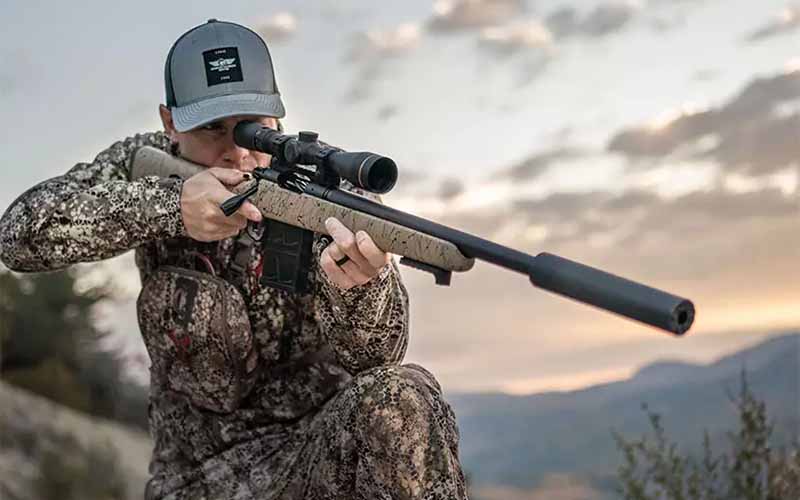
The newly released Mossberg 590S series takes a proven design and makes it even better, with four new models now capable of reliably feeding mini shells.
The Mossberg 590 was already an improvement upon the classic and well-proven Mossberg 500. With a redesigned magazine tube, the 590 was easier to maintain and modify than its predecessor, but it still typically had trouble reliably feeding 12-gauge mini shells. Now in the biggest update the 590 line has seen since the release of the Shockwave, the new Mossberg 590S will eat any flavor of 12-gauge you can feed it. Available in four configurations, the Mossberg 590S is a direct upgrade over previous generations and features a distinct new capability that opens up a lot of doors.
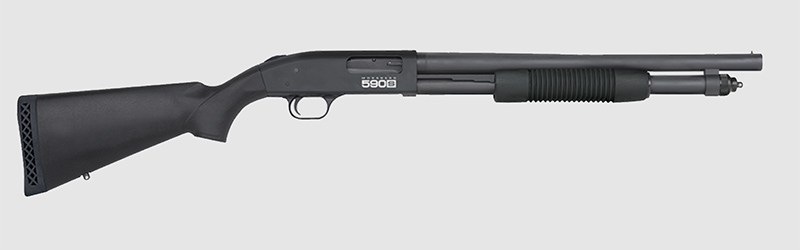
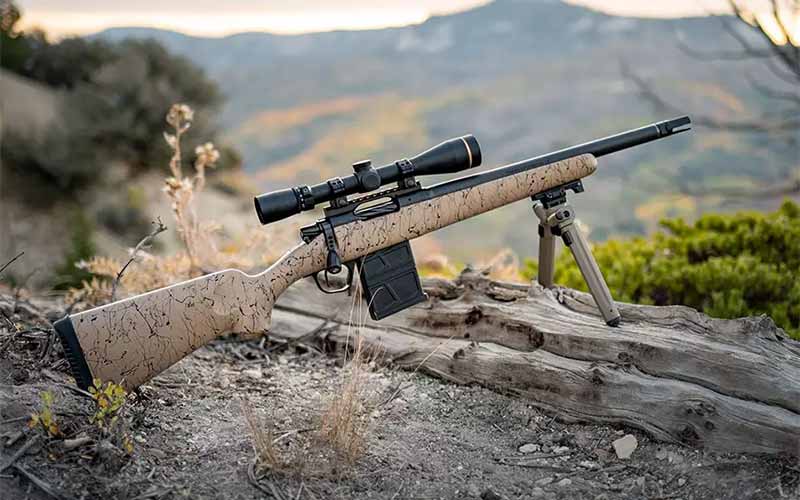
Mossberg 590S, 18.5-inch model.
The Changes
If it ain’t broke, don’t fix it. Mossberg appears to have agreed with this principle of design while reworking the 590, as most of its well-proven design remained the same in the new Mossberg 590S. The only “problem” worth addressing was the design’s inability to reliably feed mini shells—something that virtually no pump-action or automatic shotgun has been able to do consistently. To remedy this, all that needed changing on the 590S were its elevator and bolt slide. An energy-absorbing buffer was also added. The end result is a shotgun that feeds 2.75 and 3-inch shells just as reliably as before, but now with the ability to add 1.75-inch shells to the mix. Mossberg claims that the 590S will run reliably with a mix of ammo in any order, and varying load types or shell lengths will not cause problems. If it’s a 12-gauge round it can be stuffed in the tube, pumped into the chamber and fired without issue.
This added level of versatility on the Mossberg 590S may not be appreciated by everyone, but the changes bring no downsides and open the door to higher capacity pump-actions for those willing to sacrifice on power. Whether it’s just for fun at the range or serious defensive use, loading a 590S entirely with 1.75-inch shells gives roughly 40-50% more capacity than when loaded with standard length ammo.
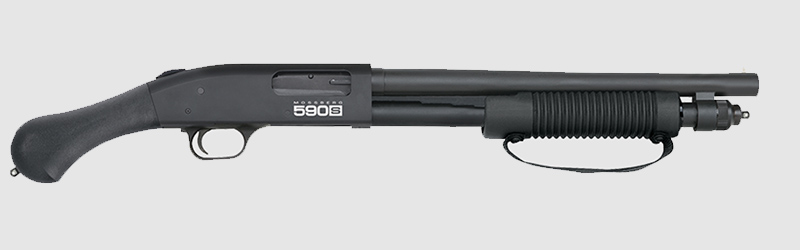
Mossberg 590S Shockwave, 14.375-inch model.
The Options
The Mossberg 590S is available in four configurations. The most standard model has an 18.5-inch barrel and its magazine tube can hold six 2.75-inch shells. The more advanced model sports a 20-inch barrel and a longer mag tube that can hold eight standard shells. It also features ghost ring sights, an AccuChoke and an M-LOK forend. All other models have simple bead sights and a plain cylinder bore choke. The final 590S variant is the Shockwave, Mossberg’s short-barreled firearm that skirts the NFA by having a long enough overall length. It’s available in either a shorter or longer configuration and can hold either five or six standard shells in its tube, respectively. All Mossberg 590S shotguns have the same matte blue finish.
Mossberg 590S, 20-inch model.
This is a solid upgrade to an already great design, and whether you plan on using many mini shells or not it doesn’t hurt to have the option. The larger of the two 590S Shockwaves can fit 9 + 1 mini shells in it, something which very well may be the next popular truck gun setup. The MSRPs for the new Mossberg 590S shotguns are $708 for the 20-inch model and $605 for all the rest.
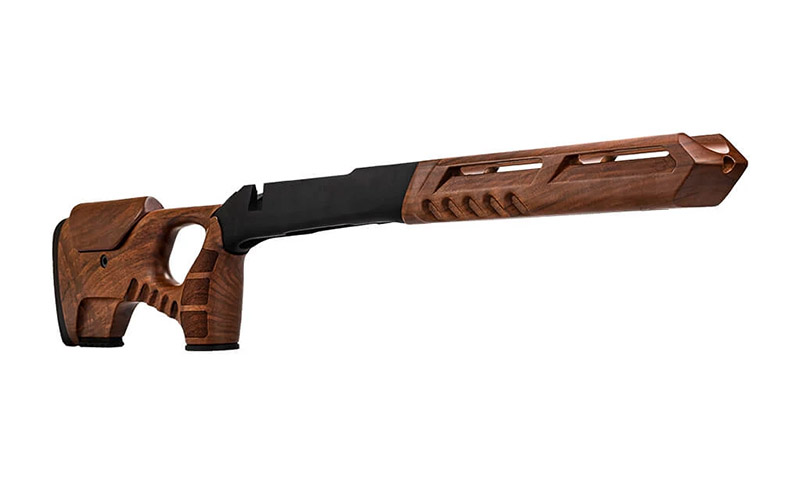
WOOX precision rifle stocks are known for combining functionality with class, and their new Cobra thumbhole stock is no different.
WOOX precision rifle stocks use a combination of premium wood and machined aluminum to improve your rifle’s ergonomics, accuracy and aesthetics with one simple upgrade. Their three previous models had varying levels of adjustability, but all used traditional profile rifle stocks. Now WOOX’s newest option, the Cobra, brings a thumbhole option to their line of precision rifle stocks that was designed specifically for precision shooters and long-range hunters. Compatible with several models of popular bolt actions plus the Ruger 10/22, the WOOX Cobra is a fine addition to their lineup of precision rifle stocks.
The WOOX Advantage
Installing a WOOX precision rifle stock is as simple as dropping in the action, as no bedding or extra pillars are required to achieve its high potential for accuracy. Once your rifle of choice has been installed into the Cobra Precision Stock, several things happen to help improve accuracy. Firstly, the Cobra enables you to adjust both the length of pull and the cheek riser height to achieve a perfect fit with the shooter. The improved ergonomics should benefit practical accuracy as well as dampen the recoil impulse. The rifle’s mechanical accuracy should also be improved by the Cobra’s ability to free float the barrel, and front and rear rail segments for monopods or bipods should help make the shot easier as well.
Cobra Options
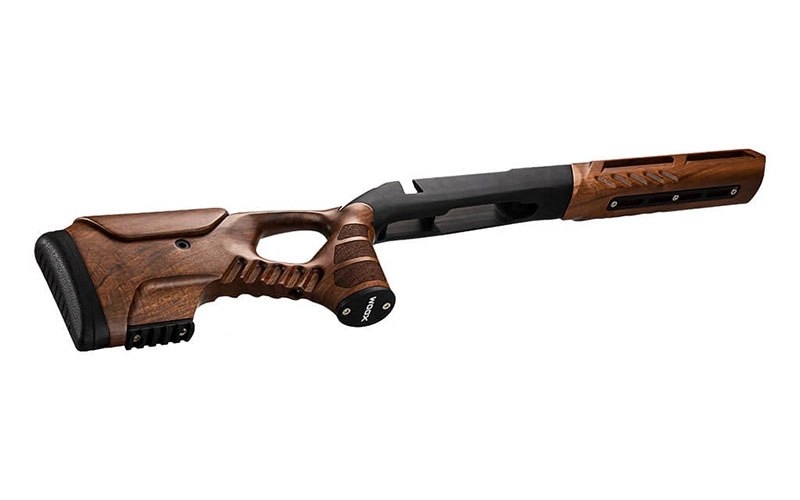
Cobra precision rifle stocks are available for several different rifle models and in two different kinds of wood. Custom made using “old world” Italian and American craftsmanship, the Cobra can be ordered for use with several kinds of Remington 700, Savage 110, Tikka T3, Sauer 100, Howa 1500 and the Ruger 10/22. The wood can either be American walnut or “Premium Tiger Wood” laminate, and the chassis can be ordered in either a left or right hand configuration.
The new WOOX Cobra precision rifle stocks have MSRPs of $699 for the American walnut version and $749 for the “Tiger Wood” model. They are available now but have an estimated lead time of two weeks due to their custom nature.
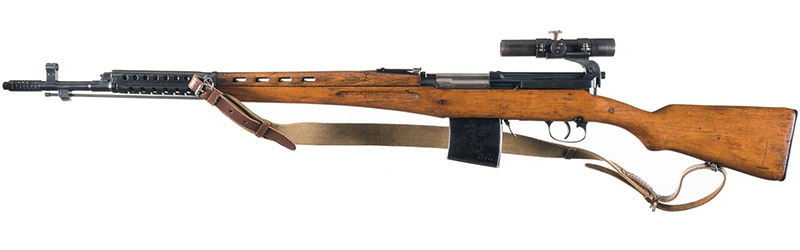
Often overlooked, the SVT-40 was one of the world’s first battle rifles and helped prove the concept of full-power self-loading rifles.
When one thinks of battle rifles, odds are that it’s the guns of NATO-aligned countries that come to mind. Whether that be the M14, the FAL or the H&K G3, full-power battle rifles have come to define the Cold War weapons used by Western powers after WWII. Considering how many of these rifles were made and proliferated, it’s understandable as to why, but it also results in some lesser-known battle rifles being criminally overlooked.
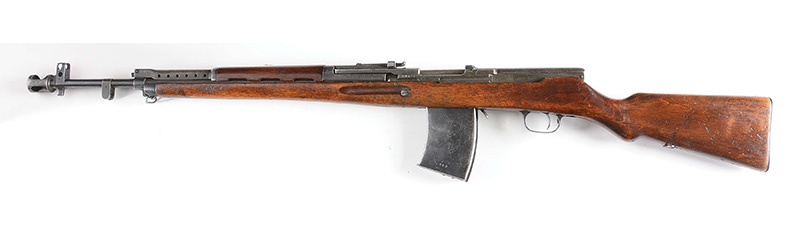
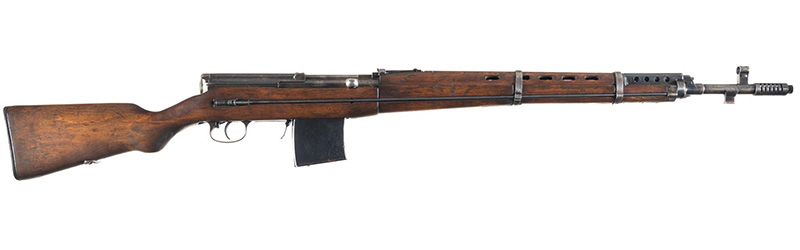
The Soviet-made Self-loading Tokarev Rifle of 1940, or SVT-40, is one such example. Despite nearly two million produced and their extensive use in the Second World War, the SVT-40 remains to most a historical oddity that’s overshadowed by both Western battle rifles as well as other Soviet-made small arms that saw higher volumes of production. None of this changes the fact that the SVT-40 was a revolutionary design at its time of inception, helping to trailblaze the battle rifle concept that would explode outside of Russia in the years to come.
The road that led to the Soviets’ adoption of the SVT-40 was long, winding and filled with characters. While the USSR is not famous in the West for its technological ingenuity, the nation still managed to innovate despite its economic handicap. This is especially true when it comes to small arms design, where ideas like the battle rifle and the intermediate caliber assault rifle were explored well before they became NATO standards.
Battle rifles are best defined as self-loading rifles chambered for full-power cartridges—a concept that was still novel in the aftermath of WWI. Several countries were interested in the concept and began working on developing their own, but only a couple were dedicated enough to see their attempts come to fruition. One was America with their adoption of the M1 Garand, and the other was the USSR when they adopted the AVS-36.
The timelines of American and Soviet attempts to create a successful self-loading rifle align closer than one might guess. Both countries began work in the early 1930s and had formally trialed and adopted a rifle by 1936. Both required further development before the designs were perfected by around 1940. The Garand’s development was much less tumultuous than the Russian’s attempt, however. The AVS-36 was designed by Sergei Simonov, and despite being very outwardly similar to the later SVT it utilized a different action and was capable of both semi and fully automatic fire. Problems experienced in the field resulted in a second round of trials, however, and this time it was the SVT-38 that was deemed the winner.
Designed by Fedor Tokarev of TT-33 fame, the SVT-38 would stay in service until the updated SVT-40 model replaced it. Between 1938 and 1940, the Soviet political elite was embroiled in a debate over whether it would be Simonov’s or Tokarev’s rifle that would enter full-scale production, a debate that was ended with politics rather than merit. While the AVS and SVT were both good rifles with room for improvement, it was ultimately Tokarev’s close personal relationship to Stalin that would result in the victory of his design. Stalin’s favor of the SVT-38 resulted in the abandonment of Simonov’s design and full-scale production of the now new and improved SVT-40. The updated design was now simpler to manufacture, lighter and featured several small quality of life improvements for its user.
The Soviets intended to equip the entirety of their armed forces with this revolutionary new rifle, but the German invasion of 1941 prevented this from happening. While the Americans were able to continue to safely produce and issue Garand rifles, the Soviets were forced to scale back SVT-40 production to produce larger numbers of cheaper guns like Mosin Nagants, PPSh-41s and DP-27s.
The SVT-40 As A Battle Rifle
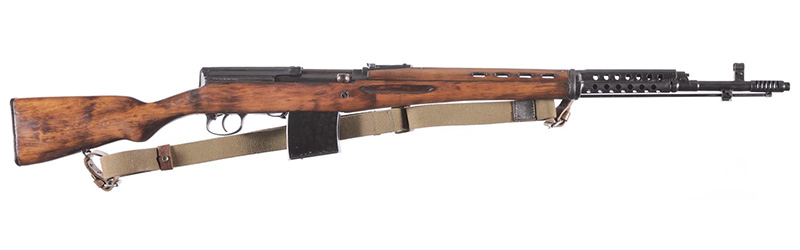
In terms of its form, the SVT-40 is most similar to the FN-49 and M14 battle rifles that would come much later. It uses a traditional wooden rifle stock without a pistol grip and is fed by 10-round detachable box magazines. Chambered for the venerable 7.62x54R cartridge that’s been used in Russia since before the Soviet Union, the SVT-40 functions using a short-stroke gas piston and a tilting bolt action. This system would go on to influence the German Gewehr 43 and likely the FN-49 as well.
Compared to its contemporary, the M1 Garand, the SVT-40 was lighter and held two more rounds of ammunition in the magazine. The Garand, however, had a potential for faster reloads with a skilled user and was chambered for a slightly more powerful cartridge. Despite the SVT having what we would think of as modern detachable magazines, spare mags were not issued like they are with modern weapons. The SVT was to typically be reloaded from the top by two Mosin Nagant 5-round stripper clips, and inserting a new magazine was reserved for emergency situations for those lucky enough to have a spare. Ultimately, both guns were excellent early battle rifles that were loved by those who used them.
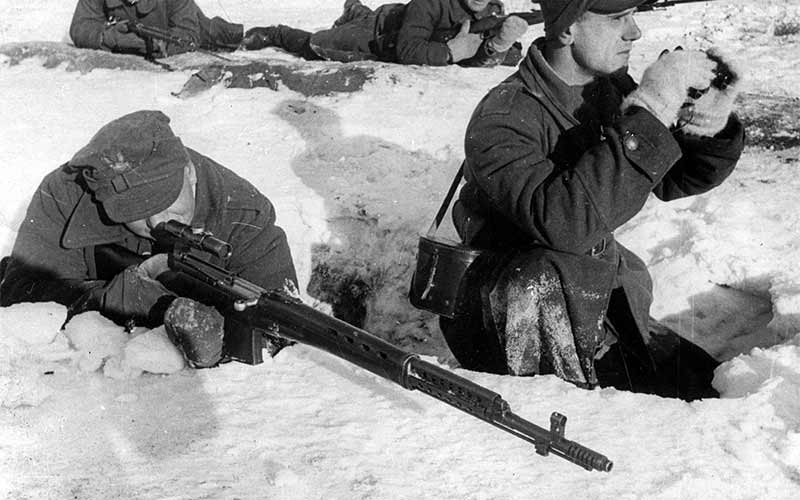
It is worth noting that the SVT-40 was more complicated to maintain and operate than the bolt-action Mosins of old, and less-trained Soviet conscripts did sometimes complain about the design, but the qualities of the rifle became apparent in the hands of better-trained troops. Whether that be Soviet marines or the Germans and Finns who captured thousands of them in the early days of the war, those who knew how to put the SVT-40 to good use appreciated them very much.
Polish Anders’ Army troops with an SVT 40 in 1942. Photo: Wikipedia
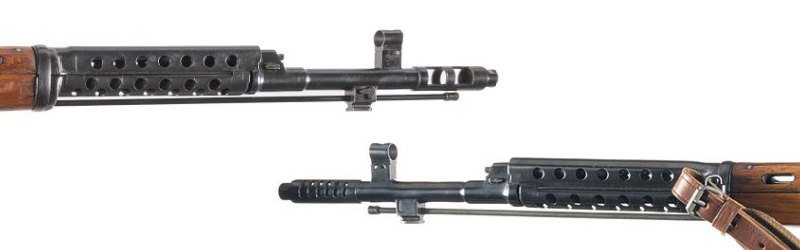
Another appreciated feature of the SVT 40 in the field was its relatively light recoil impulse for the round it was chambered for. This was mostly due to its muzzle brake which very effectively mitigated recoil despite the rifle’s light weight of 8.5 pounds unloaded. They later switched to a simpler, two vent hole muzzle brake design that was less effective but faster to produce.
The rifle’s low recoil led its designers to believe it would be an effective automatic rifle as well, leading to the development of the select-fire AVT-40. Unfortunately, the design proved to be too fragile to handle sustained fire and the project was abandoned shortly after it began. Those AVT-40s that did make it into the field were prohibited from using the automatic fire mode as testing revealed that it shortened the lifespan of the gun too significantly. There was also a short-barreled carbine version of the SVT-40 that was briefly produced as well.
A more prominent version of the SVT was its sniper variant, the failure of which was an even greater disappointment than the attempt to make an automatic rifle. Issues with the stock material, stock fitment and barrel resulted in erratic cold-bore shot placement and too much shot dispersion after sustained fire—neither of which being acceptable qualities of a scoped precision rifle, the SVT-40 sniper concept was also abandoned by 1942. Now, with its dreams of being a sniper or an automatic rifle having been thoroughly crushed, the SVT-40 had finally found its identity as an infantry battle rifle. This allowed its producers at both Tula and Izhevsk to simplify manufacturing by no longer milling its scope rails. The presence of these rails in the receiver is one way to help date an SVT.
Unfortunately, the SVT-40 is on the rarer side of WWII surplus in the States. Some Finnish-captured examples were imported in the 1950s, and more were brought in from Russia in the 90s. A mutual agreement between Russia and America prohibited the further importation of most military arms, resulting in the end of Russian SVT, SVD, SKS and other military rifle imports. The Mosin Nagant was a notable exception to this rule, partially explaining why the rifle is so much more abundant in the U.S. than other Russian small arms (besides the fact that many more Mosins were produced in total). Canada had no such agreement with Russia, resulting in many more SVTs ending up there than the U.S.
Due to their high cost, rarity and perceived fragility, most American SVT-40 owners do not shoot them as often as they deserve to be. Many who have shot one reportedly enjoy them even more than M1 Garands, so it’s a shame that these weren’t imported in greater numbers. If priced like they were in Canada, many more Americans would undoubtedly enjoy shooting these classic Soviet battle rifles. They have a lot going for them besides historical provenance and they can definitely go through a spam can of 7.62x54R faster than a Mosin.
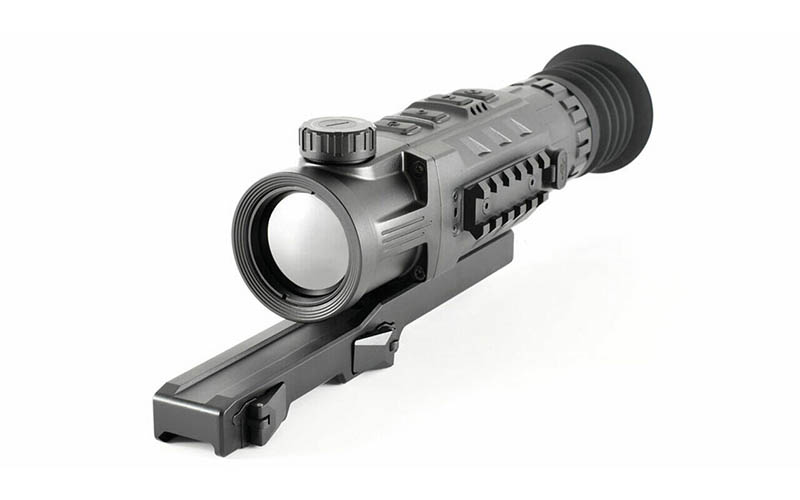
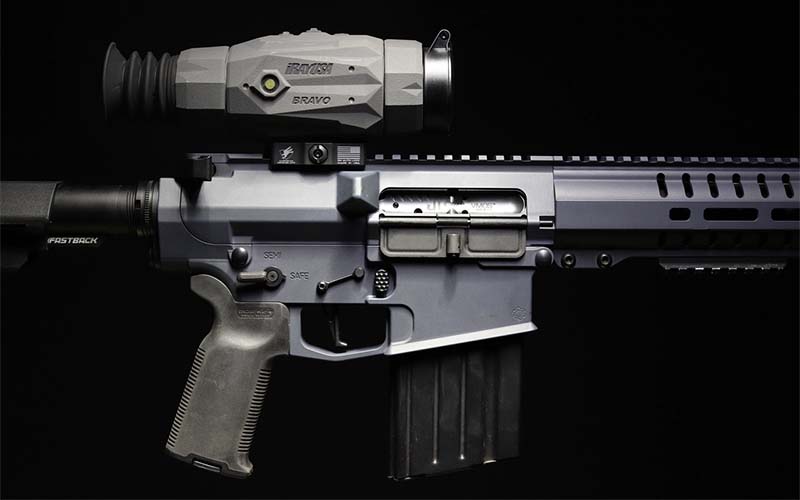
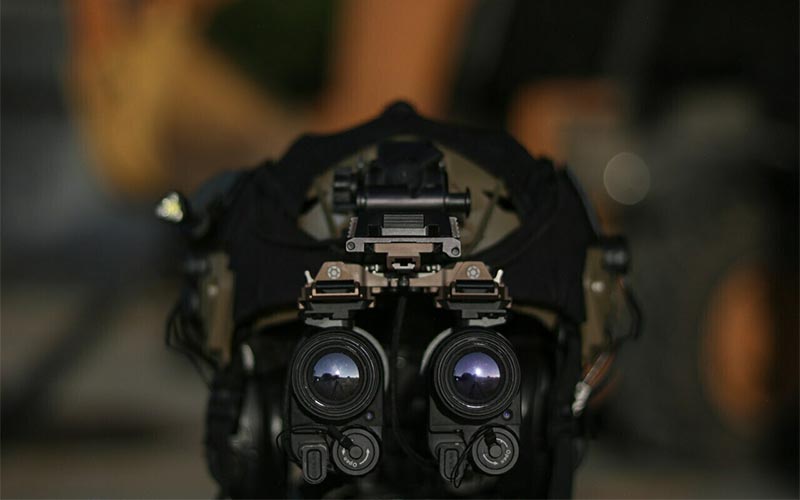
As thermal imaging devices grow in popularity and become more mainstream, iRayUSA is one of the companies working to let you own the night better than ever with their thermal weapon sights and monoculars.
Hunting hogs and tactical preparedness are both growing hobbies in the United States, and they both require one to own expensive equipment that lets you see in the dark. Whether it be night vision or thermal, weapon sights or monoculars, many Americans are currently looking to add this high-tech gear to their collection of kit. iRayUSA is a newer company in the thermal imaging device game, but they’re drawing on years of prior experience with selling, developing and using thermal weapon sights and monoculars. Currently offering four different thermal weapon sights, two thermal monoculars and a modular laser rangefinder, iRayUSA have what it takes to let you own the night.
RICO Mk1 384.
Thermal Weapon Sights
The RICO is iRayUSA’s flagship thermal weapon sight series with three different models available: the RICO Bravo, the RICO Mk1 384 and the RICO Mk1 640. The Bravo is the smallest and cheapest option, while the Mk1 640 has the largest display of the three and a proportionally larger price tag. The RICO series of thermal weapon sights aim to provide the highest resolution image possible while still being lightweight and easy to use. Between the RICO sights’ processor, AMOLED HD display and advanced image correction algorithms, they promise to provide very high-resolution images. Both still images and video can be captured and saved to the RICOs’ internal memory, and the Mk1 models can be actively used for at least 6 hours thanks to their efficient lithium-ion battery packs.
The relatively small and light Bravo model is ideal for AR-style rifles, while their BOLT TL35 thermal weapon sight was designed for use on bolt actions.
RICO BRAVO 384.
Thermal Monoculars
Both of iRayUSA’s thermal monocular options were designed to function both as handheld and helmet-mounted imaging devices. Available with either 19mm or 25mm displays, these thermal monoculars are ideal for both hunters looking for a small, pocketable tool as well as the tactically inclined in search of something to mount to their helmet. Both models feature two mounting points to provide plenty of options for compatible helmet mounts. They can be powered by either small, internally stored batteries for short-term use or wired to an external USB battery for prolonged operations up to 18 hours.
MINI MH25 thermal monocular.
Whether you’re looking to bag hogs as efficiently as possible or just want to LARP as Sam Fisher, iRayUSA is worth checking out. MSRPs of listed products range from $2,999 to $5,999 and all include a 5-year warranty with a 5-day repair guarantee.
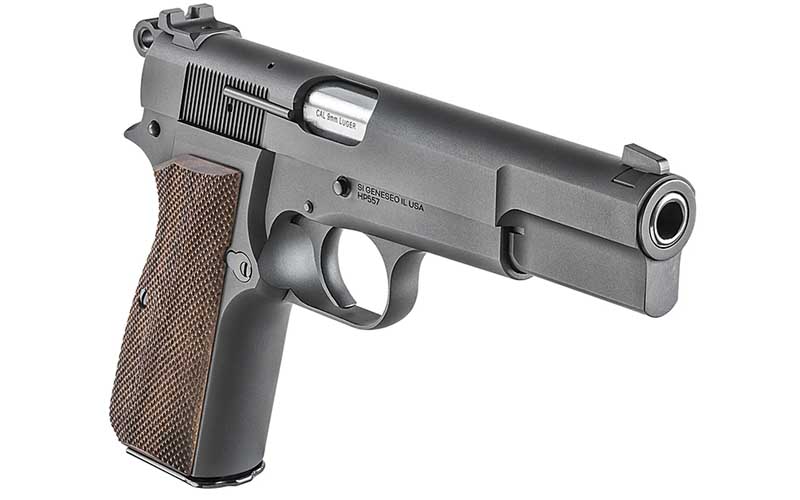
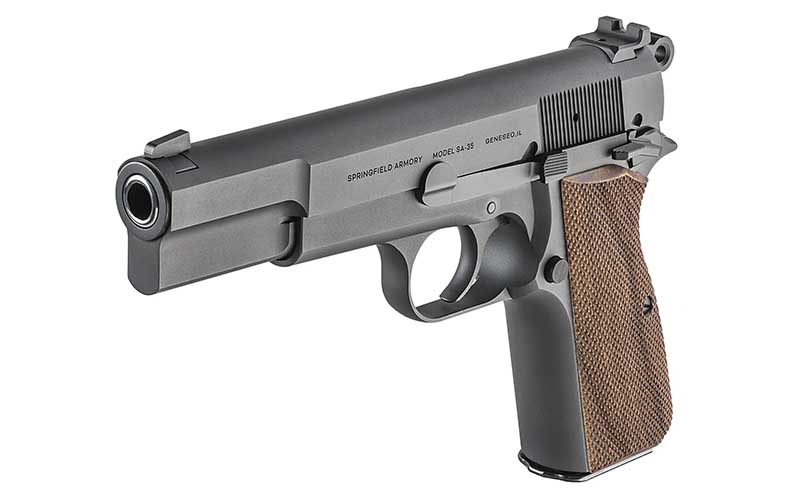
Springfield Armory has brought JMB’s iconic 9mm Hi-Power pistol back with their new SA-35, featuring some subtle improvements over the original design.
The Hi-Power, or P-35, is one of the world’s most iconic handguns. While it never achieved the popularity stateside that it did elsewhere, since its release pistol cognoscenti have recognized its qualities and the role that it played in modern handgun development. New models have unfortunately been missing from the American market for several years, and those in search of a Hi-Power have been stuck considering expensive original models, beat-up surplus or foreign-made clones of questionable quality. Now, thanks to Springfield Armory, there’s a new Hi-Power option on the table—the SA-35.
Classic Style
In a world of black plastic guns, it’s refreshing to see some new wood and steel for sale. Even most 1911s sold these days are more “tactical” than classic, but Springfield decided to stick to the BHP’s roots when they designed the SA-35. Sporting checkered walnut grips and a matte blued finish, Springfield’s new Hi-Power harkens back to the era of the man who designed it. Most of the details on the SA-35 are true to the original as well, including its single-action trigger, 9mm chambering and the “no-bite” rounded military-style hammer. While they mostly stayed true to the original, Springfield has also included some modern improvements and upgrades on the SA-35.
Better Than Ever
The SA-35 is the first American-made Hi-Power, so it’s only natural that it would be the best one. The first modern improvements found on the SA-35 start during the manufacturing process, where they are built using precision CNC machined, forged steel components. This gives the gun extremely tight tolerances and should contribute to its already excellent accuracy provided by the cold hammer-forged barrel. All parts are now also heat-treated using modern techniques, meaning the SA-35 should be more resilient than any previous iterations of the design.
Another significant departure from the original P-35 is the lack of a magazine disconnect safety, something which should be appreciated by most fans of the design. An otherwise wonderful pistol, Hi-Powers always suffered from less-than-ideal triggers and an inability to freely drop magazines, both things that are remedied by the removal of the disconnect safety. Originally included to prevent conscripts from injuring themselves while cleaning their guns, omitting this device enables the SA-35 to have a better trigger, faster reloads and a gun that can still go bang if the magazine gets lost. Speaking of the magazine, the SA-35 includes a single flush-fitting 15-round mag. That’s two more rounds of 9mm than what the original revolutionary Hi-Power mag held, but the SA-35 is still compatible with original 13-rounders too.
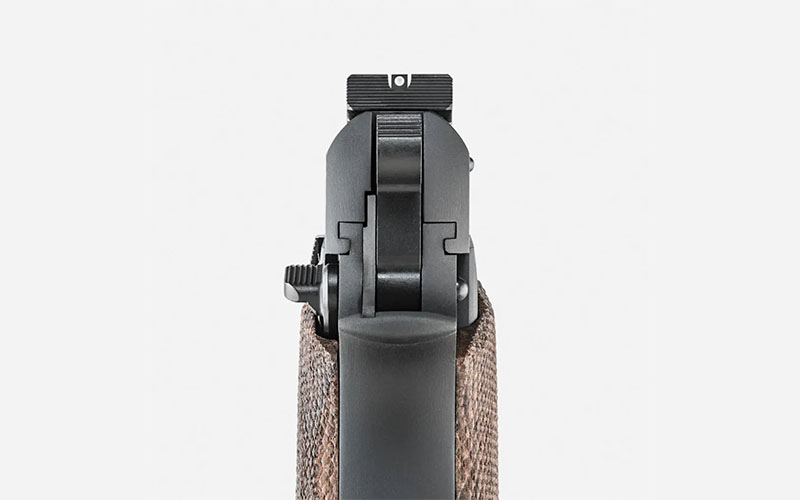
Other subtle upgrades to the design include a slightly beveled magazine well, an extended safety and new “tactical rack” sights that offer both an improved sight picture and a faster way to charge the gun. All that’s missing to make the SA-35 truly modernized is a rail segment and an optics-ready slide.
It’s nice to see such a classic gun become available once again, and it will hopefully stoke a newfound appreciation among American shooters for one of John Browning’s final and most inspirational designs. The SA-35 has an MSRP of $699 and is available now.
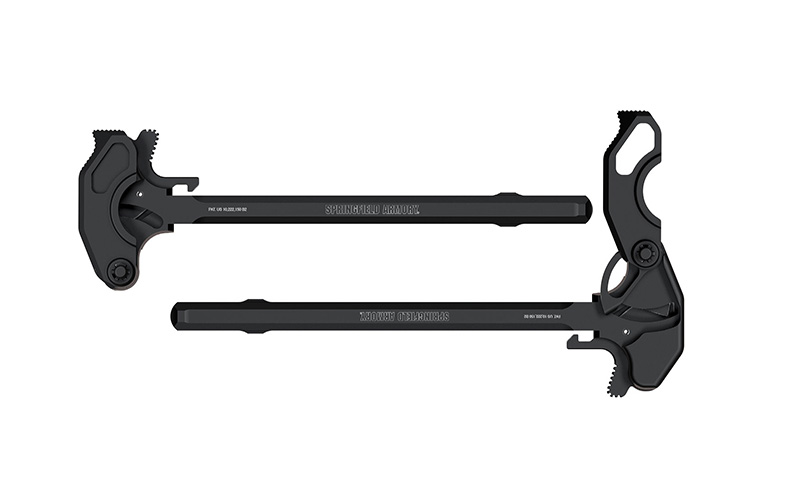
Springfield Armory’s new LevAR charging handle doubles as a stuck case extractor, keeping your gun running without any extra tools.
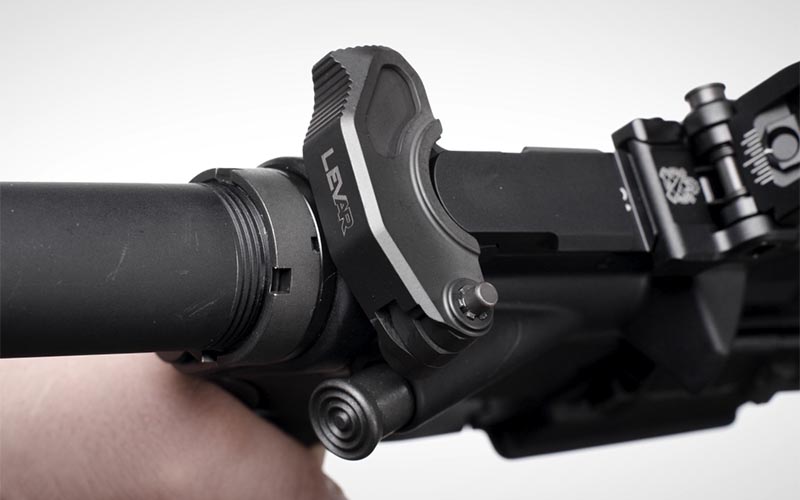
The current ammo situation in the country is no secret, and it has left many resorting to training with the cheapest ammo possible. Whether it be with the soon-to-be-extinct Russian steel-cased stuff that doesn’t agree with your rifle or ammo that’s been reloaded with poor QC, most AR users have probably encountered a higher number of stuck cases this past year than ever before. When this happens, shooters in the past have only had two ways to clear it—either by mortaring their rifle against the ground or ramming a rod down the barrel. Now, thanks to Springfield Armory, there is a third more elegant solution. The LevAR charging handle is a simple yet ingenious device that adds the functionality of a stuck case extractor to an AR-15 charging handle with minimal added mass or complexity.
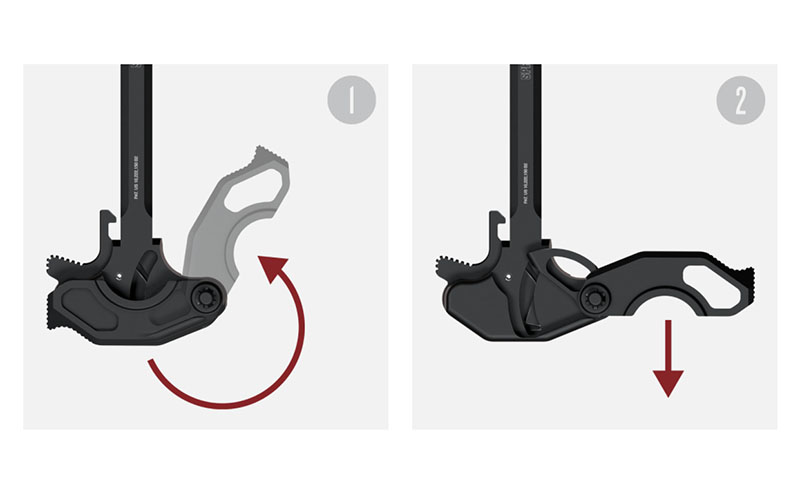
The LevAR charging handle can be dropped into any existing mil-spec AR, and installation is as simple as swapping it out for your old charging handle. Once installed, it works by giving you greater mechanical advantage than a standard charging handle, allowing you to extract a stuck shell with ease. The LevAR charging handle only differs from a mil-spec model in one major way—the lever on the right side of its handle. The lever functions as a cam once deployed by a button, bracing itself against the back of the receiver and giving you enough leverage to pull back the bolt and the stuck case with it.
Besides allowing you to quickly and easily clear jams without the aid of any extra tools or risk of damaging your rifle, the LevAR charging handle has safety benefits as well. Unlike with other malfunction-clearing methods, the LevAR allows you to keep the weapon pointed down range during the entire clearing process. Whether you’re training or using your weapon seriously, Springfield’s new contraption lets you get back on target without missing a beat.
The LevAR charging handle is available now and has an MSRP of $99.
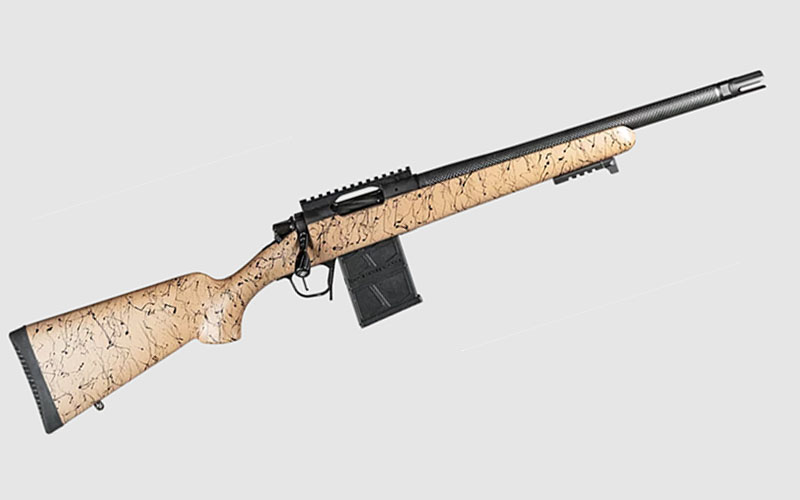
Christensen Arms has just given their Ridgeline rifle the Jeff Cooper treatment with the new Ridgeline Scout.
Christensen Arms are known for their high accuracy, low weight bolt-action rifles that are appreciated by serious hunters the world over. Taking a page out of Jeff Cooper’s playbook, the company has decided to turn their popular Ridgeline rifle into the Ridgeline Scout.
Available in four chamberings, the new Ridgeline Scout is shorter and lighter than its older brother and now feeds from AICS 10-round detachable box magazines. The Ridgeline Scout was designed to be more modular and tactical as well, now sporting a 0-MOA optics rail, a barricade stop/accessory rail and a threaded barrel with an included flash hider. This makes the Ridgeline Scout an excellent suppressor host as well, especially in its 300 BLK configuration. It’s also available in .308, .223 and 6.5 Creedmoor.
Following in its Ridgeline roots, the Ridgeline Scout is also lightweight and extremely accurate. It features a 16-inch carbon fiber wrapped free-floated barrel as well as a carbon fiber composite stock. It has a TriggerTech Flat-Shoe trigger and a Nitrided action, all housed within Christensen Arms’ precision machined receiver. All these details come together to help give the Ridgeline Scout a sub-MOA accuracy guarantee and a weight of only 5.9 pounds.
All the Ridgeline Scout is really missing to realize Jeff Cooper’s full definition of a scout rifle is the ability to easily mount a low-power long eye relief scope. Considering that this was decided mostly to retain peripheral vision while on safari, most American hunters will prefer the traditional mount location found on the Ridgeline Scout. With an MSRP of $2,199, this is a rifle for serious hunters looking for a compact, light and rugged precision instrument that’s just a bit cooler than your average hunting rifle.
Palmetto State Armory is working to begin domestic production of steel-cased Soviet calibers, set to help offset the Russian ammo ban with hopes to be fully operational by 2023.
The word is out, whether they were ready for it or not. Multiple sources in the past week shared information regarding Palmetto State Armory’s intention to begin domestically producing three popular calibers of steel-cased Russian ammo, and now PSA has confirmed it themselves.
The CEO of JJE Capital, the company which owns PSA, posted the following on AR15.com:
7.62×39, 5.45 and 54R will be manufactured in the US under our soviet arms brand. This project is a very large construction and manufacturing project that has been going on for about a year. Our current timeline has the first steel cases rounds coming off of the line in 2023. Of course any project this large can see delays. We should be able to make up for most of the missing Russian imports.
PSA has already made a substantial investment into the project, which according to Atlantic Firearms was used to purchase the tooling and know-how from an unnamed Eastern European ammunition manufacturer. It will be interesting to eventually find out the origin of Palmetto’s new machinery and knowledge.
With an undertaking this large, some are understandably skeptical of its chances of success, but it’s a noble endeavor that could help millions of Americans continue training on the cheap. The company may have lucked out by making the deal before the Russian ammo ban was announced, but they now have a prime opportunity to help offset this recent attempt at backdoor gun control.
By 2023, the full effects of the Russian ammo ban will finally have been felt by the masses, and the old supply of cheap, reliable steel-cased ammo will be sorely missed. 7.62×39 has become a very popular cartridge in the United States over the past few decades. Besides the millions of Commbloc guns that use the stuff, there are now ARs, bolt-actions and even Rugers that are chambered for it. 7.62x54r and 5.45×39 are more niche than the ubiquitous 7.62 Soviet, but there are still plenty Mosins and AK-74s out there that need love too. A steady flow of 5.45×39 is especially important for PSA, as they’ve already made substantial investments into their domestic AK-74 development, a project that began when supplies from Russia were still going strong. A 5.45 drought would certainly hurt the PSAK-74’s popularity, so it only makes sense that they would work to ensure the supply chain can never be interrupted by import restrictions ever again.
For the American shooter, this undertaking will be a success if PSA manages to deliver a high volume of ammunition at a consistent quality and competitive price. The dream scenario would be if someday the price and quality of PSA’s stuff is indistinguishable from what we used to get from Russia. Price, quality and volume are the priorities, but if they manage to achieve all three without issue there are some further interesting opportunities that they could capitalize on.
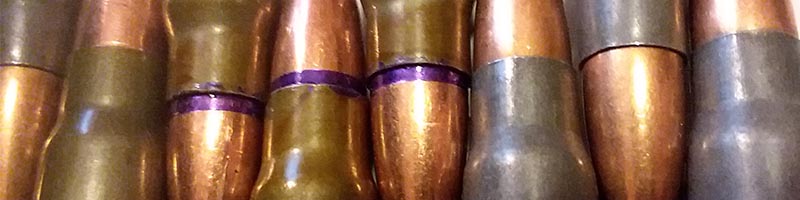
There was a period when surplus Soviet 7n6 ammo was being imported by the boatload. Genuine, Russian-made military 5.45 packed in spam cans was the norm, and it was cheap too. This was the golden era of being an American AK-74 owner, but unfortunately, the party came to an end when a company without foresight sought importation approval for a 5.45 AK pistol from the ATF. Permission was granted, but it simultaneously recategorized 7n6 as “armor-piercing pistol ammo”, instantly banning it from further importation. While imported 7n6 may never come again, nothing is stopping domestic producers from mimicking the load. It would be wonderful to see PSA produce not only cheap training ammo, but also steel-cored copies of military loadings like 7n6 and M43.
The deal between JJE/PSA and the mystery Eastern European firm is still in the works, and setting up large-scale manufacturing is difficult. There is still plenty that could go wrong before we see the first PSA steel-cased roll off their line at competitive prices, but for the sake of the American gun community at large let’s all hope that their 2023 prediction proves true.
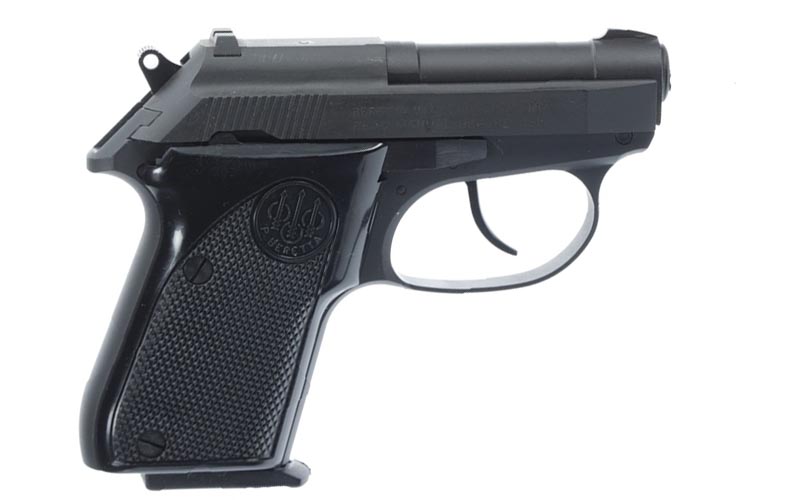
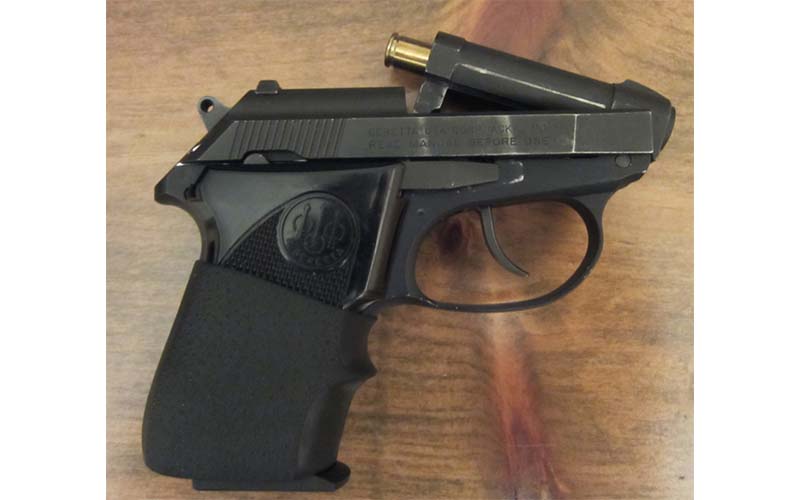
Smaller than their Cheetahs, but with more bite than a housecat, the Beretta Tomcat and Bobcat can still make for good backup guns.
Beretta’s history of making pocket pistols is longer than most know, and their current production models often seem to be overlooked. The Beretta Tomcat, Beretta Bobcat and the pistols they descended from have consistently been staples of the pocket pistol world, but they’ve never been at the top of the list either. Beretta’s original pocket pistol, the M418, never reached the popularity of guns like the Colt 1908 Vest Pocket, and their 950 series typically proved to be less popular than contemporary double-action offerings. Despite this, Beretta’s current feline family of pocket pistols are still in production and feature some interesting design choices that can still prove desirable for those in search for their perfect backup gun.
Designed around the first world war, the Beretta M418 was the company’s first major attempt at a pocket pistol. Chambered for .25 ACP and utilizing a striker-fire mechanism, the M418 only has its size and caliber in common with Beretta’s later pocket pistol designs. It was used by some Italian officers during WWII, and some know it as James Bond’s first pistol that he used in the first five books before transitioning to his famous Walther PPK. Near the end of the pistol’s production, it was sold in America under the name “Panther”, foreshadowing the company’s habit of naming their small handguns after predatory cats.
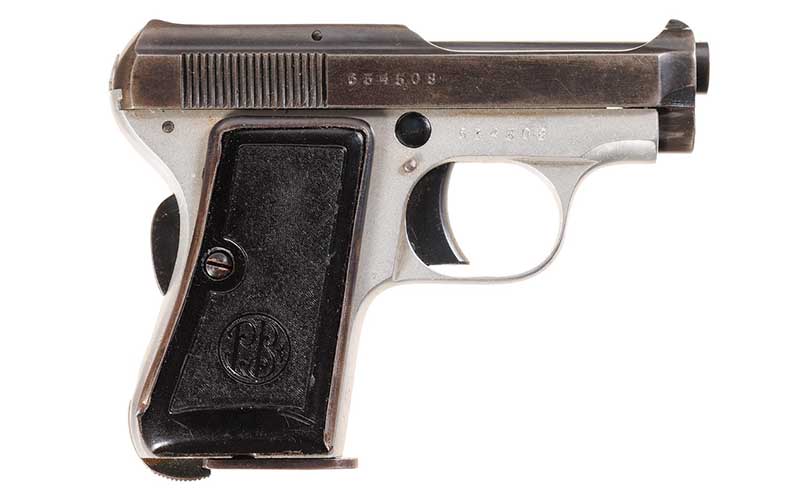
Understanding the dated nature of the M418’s design, by the 1950s Beretta had begun work on their next pocket pistol series—the Beretta 950. Now available in .22 Short as well as .25 ACP, the 950 series introduced many features that would come to define Beretta pocket pistols. Hammer-fired and now sporting a tip-up barrel, this design is the true father of the Beretta Tomcat and Bobcat pistols, with only its lack of a cat-centric naming convention distinguishing itself from its progeny. The final obsolescent feature found on the 950 (or Jetfire) series is its single-action trigger. The design stayed in production for a surprisingly long time until 2003, as Beretta had already been offering an improved DA/SA pocket pistol model since 1968 called the Model 20.
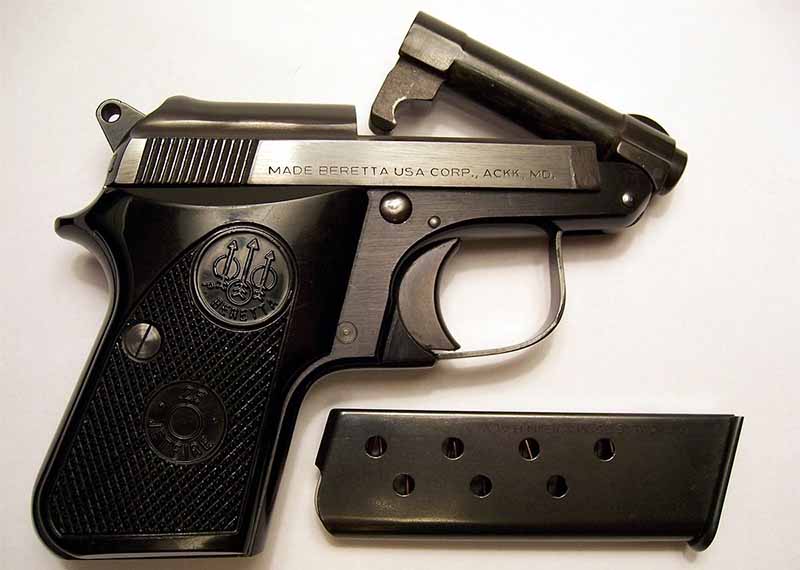
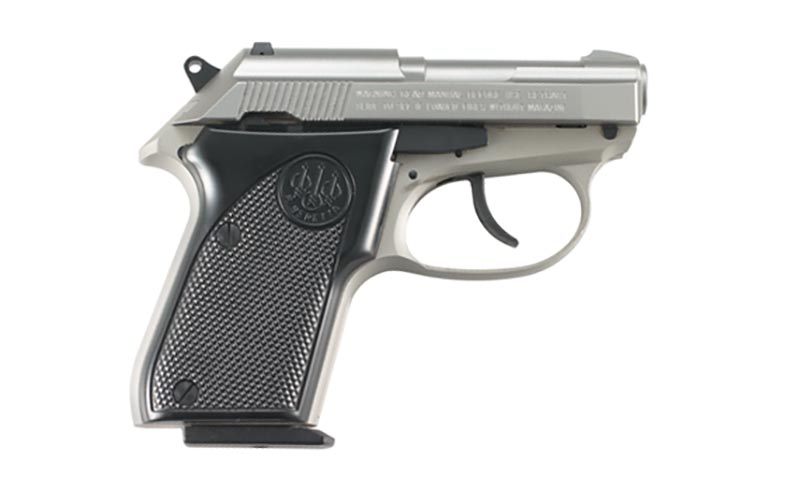
The Model 20 was produced until 1985 following the introduction of its improved model—the 21A or Beretta Bobcat. This is one of the two remaining Beretta pocket pistols that are still in production, with the other being the Beretta Tomcat 3032. The Tomcat can be thought of as just a scaled-up Bobcat, identical besides its larger .32 ACP chambering.
Modern Offerings
The Beretta Tomcat 3032 and Beretta Bobcat 21A are still in production, with a few different variants of each available. They come in black, stainless steel (Inox) and FDE finishes, and each has a “covert” model as well that features a threaded barrel. The standard 21A Bobcat is still available in .25 ACP and .22 LR, but all other Bobcat variants come in .22 LR only. The Beretta Tomcat, as always, is chambered only for .32 ACP. All of these guns are fed by 7-round magazines.
The threaded models have been poplar suppressor hosts since their release earlier this year, but they mostly have utility as range toys and weapons for wannabe wetworkers. Because we’re looking at these Berettas as pocket pistols for concealed carry, we’ll be sticking to the standard, unthreaded models.
Beretta Tomcat 3032 Inox, new production.
Carrying A Cat
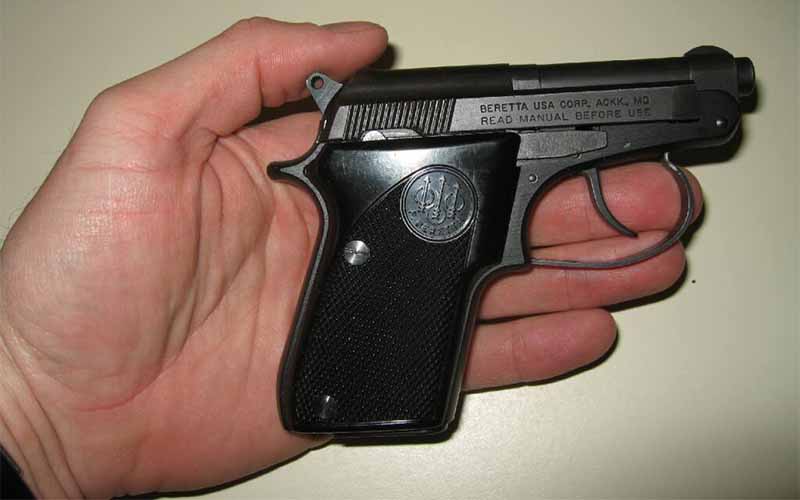
When it comes to carrying a Beretta Tomcat or Bobcat, they have pros and cons like any other pocket pistol. Slightly larger than a Colt 1908 Vest Pocket, the Beretta Bobcat is on the slightly bulkier side of the pocket pistol spectrum, but its aluminum alloy frame brings it in at about an ounce lighter than the iconic Colt. The .32 ACP Tomcat is naturally a bit larger and heavier as well. Despite these facts, both the Bobcat and the Tomcat are just as pocketable as any other pistol in their class, they just aren’t the best choice for those seeking the smallest or lightest gun possible. That being said, they are still very small and concealable.
Beretta Bobcat compared to an average hand. Photo: Wikipedia
Beretta’s pocket pistols compensate for their relative bulk in other areas—namely reliability, shootability and safety. The obvious benefit of these guns’ extra size and weight is that they positively impact ergonomics and felt recoil. The more gun you have to grip, the easier it is to shoot, and more mass results in less recoil even when discussing calibers as anemic as these. This should all contribute to a gun that’s easier to score good hits with, both on and off the range. The Beretta Tomcat is obviously the gun of choice for those willing to trade some concealability for stopping power, but when it comes to the Bobcat the choice is less clear. Between .22 LR and .25 ACP, there are pros and cons to each, and those in the market for a Beretta Bobcat will have to determine what’s best for them.
These guns’ simple blowback actions contribute to their reliability, but many pistols in small calibers operate this way as well. It’s these two cats’ simple designs that both help and hinder their potential for reliability. They feature no extractors, instead use the pressure from a fired cartridge to eject the spent shell. The catch with this system is that while not all loadings may reliably cycle through it, once you find one that does it should run like a top. When it comes to selecting a Beretta Bobcat, keep in mind that centerfire ammo will always be more reliable than rimfire.
The real stand-out feature on Beretta’s pocket pistols are their tip-up barrels that were introduced with the 950. Beretta wasn’t the first to come up with the concept, but they’re the only ones to stick with the design into modernity. A couple of very old pistols featured it as well, but otherwise, only Berettas and some Beretta clones incorporate the unique idea that has several noticeable advantages. Firstly, the tip-up barrel eliminates the need to ever manually rack the slide. This can be appreciated by those with hands too weak or large to easily manipulate one of these guns’ slides, as it allows for a round to be directly dropped into the chamber. This system also allows for the gun to quickly be made safe or opened up to clean its chamber or clear a jam. The ability to quickly disengage the barrel combined with its exposed hammer, double-action trigger and manual safety all help to make the Beretta Tomcat and Bobcat two potentially very safe pocket pistols.
Traditionally known as mouse guns, Beretta’s two currently produced pocket kittens still have plenty of desirable features for those interested in backup guns, deep concealment or comfortable pocket carry. The Beretta Bobcat and Tomcat both have high potentials for reliability, modern DA/SA triggers and an old-world style that most other contemporary pocket pistols just don’t have.
For more information on the Beretta Tomcat or Bobcat, please visit beretta.com.
While best intentions might spur an armed citizen into action, the potential legal ramifications of trying to stop a crime in progress should give the good Samaritan pause.
On January 30 of this year, 45-year-old Nya Reyes was arrested for aggravated assault when (according to news reports) she allegedly shot at a fleeing shoplifter, missing the shoplifter and hitting an innocent bystander. This occurred outside an Ace Hardware store, in Phoenix, Arizona. Fortunately, the bystander, an Ace Hardware employee who was chasing the shoplifter at the time, wasn’t seriously wounded, so instead of being arrested for murder or manslaughter, she was only arrested for aggravated assault.
While good intentions might spur an armed citizen into action, intervening in a crime in progress could very well end in legal troubles for the good Samaritan.
As the outcome of the case is still pending and we don’t know all the facts, an examination of her specific actions wouldn’t be prudent, but we should look at the legal ramifications of trying to stop a crime in progress.
Generally speaking, the use of deadly force (shooting at another) is only justified to protect innocent life. A person must possess sufficient facts that would lead a reasonable person to believe that absent the action by the shooter, an innocent life would be endangered. When I say “innocent life,” that means anyone the shooter might be protecting couldn’t have started the altercation, or otherwise participated in a criminal act.
While there’s sympathy for the person who loses a valuable object to a thief, American courts universally don’t condone stopping that theft with deadly force. The anomalous exception is the State of Texas, which allows the use of deadly force to stop property crimes under a very narrow set of circumstances. The Texas reader should get with an attorney to go through this facet of Texas law.
Otherwise, just because someone cannot use deadly force to stop an escaping thief, it doesn’t mean they have to simply say sayonara to their property.
Again, depending on the jurisdiction but much more likely justified, is the right to make a “citizens’ arrest.” And the law gives that person the ability to use “reasonable force” when making the arrest, which in practical terms means holding the person for the police. When a person confronts a burglar in their home, they can hold the suspect at gunpoint awaiting the police. In public, the person might (check your local laws) be able to draw their gun to request compliance (as cops do in many circumstances) but if the person flees, they cannot shoot.
What they could do is use non-deadly force to stop the escape, but only the amount of force a jury would conclude was reasonable? Confused yet? I know, it’s complicated.
This is why most police recommend simply allowing the individual to leave and becoming the best witness for the police.
Personal Perspective On Intervention Which brings me to an incident that happened to me a few years ago, and which was remarkably similar to the incident in question. I was leaving a large hardware/lumber store in my city, when I heard a screech of tires behind me. I turned and saw a person run from the store with a hand tool in a case, throw the tool in the back of the pickup, climb in the truck and speed off.
I assumed the store would be contacting the police concerning the crime, so I jumped in my truck to follow and track the thieves, calling into the police. As the guys quickly left me in the dust (I wasn’t going to break the law to follow), I then decided to just head to the police department and give them a good description of the truck. Upon making the report to police, I found the store didn’t even bother to report the theft! This raises the question, is it worth getting involved in a third-party theft?
One place where you might want to get involved in attempting to stop an escaping criminal, even to the possibility of using deadly force, is if that criminal killed someone in front of your eyes and, without your intervention, he would likely escape. Of course, if he were close enough for you to shoot him, you would likely be able to reasonably claim that your life was also in danger, as would be the case inside a store during an armed robbery and then witnessing the murder of the clerk.
Another scenario would be if you came upon an active shooter incident, where you see the individual killing innocents. While the shooting might be difficult for someone of basic skill using one of the small compact concealed carry guns, a person with advanced skill and a full-sized handgun would have a reasonably likely chance of stopping the escape of the mass killer and/or stopping the killing rampage.
A last incident where intervening with deadly force to protect a third party would be if you happened to come across a uniformed police officer struggling with more people assaulting that police officer. The history of police being assaulted is rife with examples of the officer being disarmed and killed with their own weapon.
When I pass a law enforcement officer on a roadside traffic stop, I routinely slow way down to get my eyes on the cop, making sure he or she is OK. Of course, if you do the same and the cop is in a life-threatening encounter, be sure to ask the police officer if he or she needs assistance before you draw your gun. Otherwise, you might just be mistaken for another armed criminal at the very moment the cop wins the fight with the first one. You can imagine what could happen.
Touchy stuff. The more skill you have with your firearm and the more training you have in the legalities of use of force, the easier these decisions would be. But in all cases, the use of deadly force to stop a shoplifting in progress wouldn’t be a wise move.
Editor’s Note: This article originally appeared in the April 2021 issue of Gun Digest the Magazine.
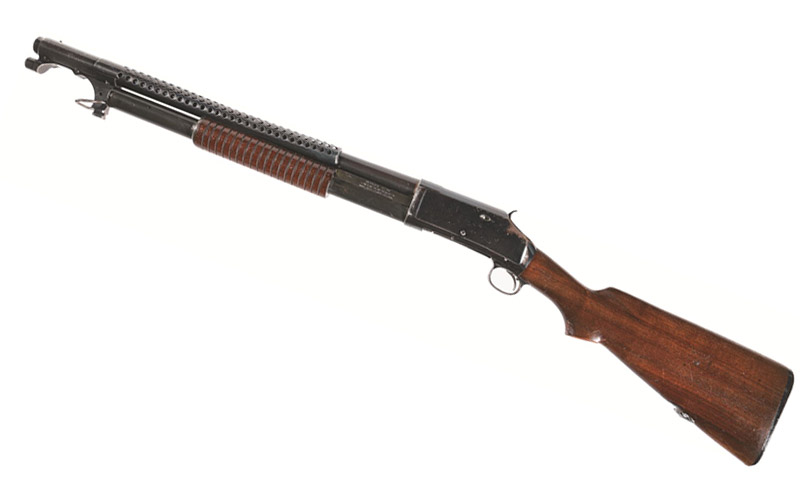
Cimarron Firearms, known for their replicas of classic American guns, have begun working on their next project: the 1897 Trench Gun.
The 1897 trench gun, a pump-action 12-gauge first designed by John Browning and manufactured by Winchester, is a true American icon. It’s been one of the most recognizable weapons from America’s arsenal since it was first fielded in the Philippines in 1899, and it’s been winning hearts and minds ever since. The design saw action in the Old West, WWI, WWII, Korea and even the early stages of Vietnam. Frequently featured in movies, television and video games, it’s no wonder why the 1897 trench gun is sought after by so many. Unfortunately for the average American gun owner, this classic shotgun has been nearly unobtainable for years. Original Winchester trench guns are collectible and expensive, and Chinese Norinco clones haven’t been brought in for years either.
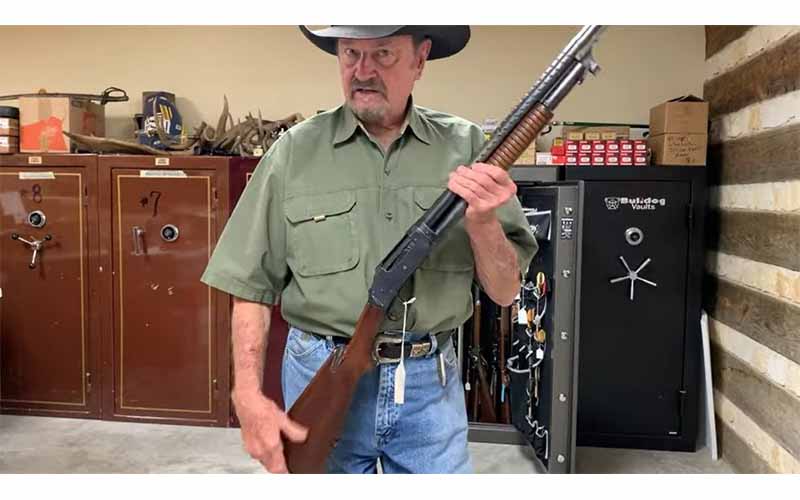
Thankfully, a glimmer of hope has just shone through for those who have been wishing to own one of these American staples themselves. In a video published in September, Cimarron Firearms CEO Mike Harvey announced that he’s chosen the 1897 trench gun as Cimarron’s latest project to bring to market. The news was delivered as he displayed his personal Winchester 1897 trench gun from WWII, a very well-maintained example featuring a U.S. property mark and flaming bomb stamp. Mike stated that this gun was going to serve as the basis for their reproduction model moving forward.
Cimarron CEO Mike Harvey with his WWII trench gun.
The project is still in such early stages that many details remain unknown. As of now, there is no announced release date or price, and Cimarron is seeking feedback from customers to help further guide the development process. Details like whether you’d prefer their 1897 trench gun to be a takedown model or capable of slam firing are still in the air, and your opinion could influence what Cimarron decides to do. With such a classic design, there will undoubtedly be many individuals waiting to hear updates on Cimarron’s progress, but in the meantime, all we can do is hope that the final product will be sturdy, reliable, historically accurate and reasonably priced.
The concept of “dressing around your gun” is disappearing as companies like Arrowhead Tactical introduce clothing that allows you to carry concealed without sacrificing comfort.
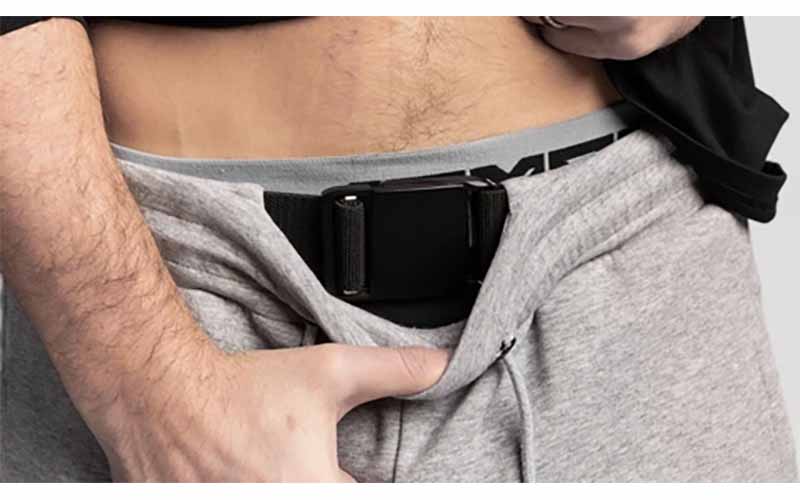
Many Americans enjoy staying armed as often as possible, some because of where they live and others simply out of principle. Regardless of your reasoning, it can sometimes be difficult to achieve. Many daily activities require clothing that isn’t conducive to carrying a firearm, and these days many people simply prioritize comfort over style when it comes to their usual wardrobe. For years, CCW experts have promoted the concept of “dressing around your gun”, the idea that your concealed weapon of choice takes priority over what you’re going to wear, and if that means wearing a jacket on a hot summer day to conceal your Desert Eagle then by golly, that’s what you’re going to do. As CCW culture explodes around the nation, however, companies like Arrowhead Tactical Apparel are finding ways for concealed carriers to have their cake and eat it too. Purveyors of “tactical apparel” geared towards concealing a firearm, Arrowhead Tactical has several comfortable, innovative and stylish options that can help to ensure you stay armed anywhere you go.
How They Do It
Whether they’re going to the gym, running around the block or just trying to stay comfortable, athletic-style clothing is what many people choose to wear on a daily basis. Unfortunately for concealed carriers, however, the elastic waistbands found on clothing of this style combined with the lack of belt loops make carrying anything heavier than a cellphone almost impossible. To solve this, Arrowhead Tactical has designed what they call the Carrier Rapid Clasp Retention Belt—an internal and removable belt system that enables traditional IWB carry with Arrowhead Tactical athletic shorts, sweatpants and joggers. The internal belt is strong enough to support the weight of full-sized handguns and is compatible with multiple styles of IWB holsters. These tactical apparel options can provide their wearer with the comfort and look of athletic-style clothing while still easily supporting a duty-sized pistol with a weapon light and spare magazines.
The Options
The three main concealed carry clothing options from Arrowhead Tactical are their carrier shorts, sweatpants and joggers. All garments are constructed from a breathable cotton and polyester fabric blend and feature a comfortable and loose athletic-style fit. Each of the different styles is available in a few color options and they feature minimal branding. They do a good job of remaining subtle yet stylish, blending in with other generic athleticwear without screaming “I am carrying a firearm.” The shorts and joggers also have internal magazine pouches in their zippered rear pockets, as well as pockets designed to carry a knife on each hip.
Arrowhead Tactical also offers what they call the standoff hoodie. The standoff hoodie’s standout CCW feature is its internal, buttonable pocket that can facilitate a concealed, preemptive draw. The pocket functions as normal when buttoned, but can quickly be bypassed to give access to one’s waistline while still appearing to have one’s hands in their pocket. This can give the edge in a defensive scenario where the element of surprise may be important.
The Arrowhead Tactical carrier joggers, sweatpants and shorts have MSRPs of $99.99, $84.99 and $64.99, respectively. The standoff hoodie has an MSRP of $64.99 as well. All of these options appear to be extremely functional and comfortable, and they enable more people to carry more often. As companies like Arrowhead Tactical bring more CCW-oriented clothing to the market, the less concealed carriers will have to dress around their gun.
It seems that ammo shortages are now the new thing. Every few years, kind of like the plagues of Egypt, we find ourselves scrambling to find ammo. (Those of you who hadn’t stocked up in one of the in-between periods, that is.)
One way to deal with this is to have backups (or main guns) chambered in calibers that aren’t so popular. I know, I know—you don’t want to be subject to the scorn of your fellow gun club members when they catch you packing something chambered in a “mouse gun” caliber, but when it’s that or harsh words, which is better?
The choice of an alternative ammo source depends on a few things. One, it has to be popular enough that gun shops and other retailers will actually stock it. An example from another shooting segment: The 7mm Remington Magnum and the .280 Ackley Improved deliver pretty much the same performance. Which do you think your local gun shop is going to have on the shelves? What, you’ve never heard of the .280 AI? I rest my case.
At the same time, it has to be a cartridge that doesn’t pop to the top of the list of “I need more … ” when people think of splurging on emergency ammo. So, that leaves out all the usual suspects: the 9mm, .38 Special. ,357 Magnum, .40 S&W and .45 ACP. It also eliminates the common backups, like 10mm, .44 Magnum and .380 Auto.
Now, in a full-blown we-need-ammo-now panic, there won’t be anything left in any caliber. But you can stretch things with some unconventional calibers, and not all of them are bad.
9mm Makarov
A Makarov is reliable, rugged, not expensive and shoots 9mm Makarov ammo. That’s not .380 Auto, although just as powerful. When the .380 has all been swept off the shelves, there’s probably still some Mak left.
The Mak is a derivative, both cartridge and pistol, of the German PPK in .380 Auto, one that was used extensively on the Eastern Front. Replacing the legions of Nagant revolvers and Tokarev pistols, there have since been shiploads of them imported after various communist countries fell or were sold by the Chinese back when we were more-or-less friendly with them. In regard to power, it’s the exact equivalent of a .380 Auto, and the Makarov pistols are traditional double-action pistols with blowback actions.
If you want inexpensive FMJ practice ammo, you can select from a slew of imported ammo, and CCI makes their aluminum-cased FMJ ammo in 9mm Makarov. Their test barrel lists velocity as 1,000 fps, but repeated range trips to chrono it has seen it deliver just over 900 fps out of various Maks.
.38 Super
Take a 1911 in 9mm or Super and fit a barrel of the other. You’ll have to swap magazines, but otherwise it’ll run just fine. A lot of .38 Super ammo is the same power as 9mm, but some loads can be better than 9m+P, or even +P+.
You’re only ever going to see pistols in .38 Super that are 1911s or clones. However, if you do pack a 1911, then this is a viable option. You could even have a two-barrel gun with magazines for each: 9mm Parabellum and .38 Super. Stash away a goodly supply of Super, which isn’t hard to do in good times, and then do all your practice with cheap (relatively speaking) 9mm ammo. Carry it as a 9mm when the ammo is available. And when ammo gets tight, you have your stash of Super to fall back on.
Some Super is hotter than 9mm, but much of it is in the same league. When a factory listing for 9mm shows a 115-grainer at 1,175 fps and the same company makes .38 Super with 115s at 1,180 fps, what’s the difference?
That said, if you want the difference, then you can always invest in ammo that’s hot, like CorBon, which carries a 115-grain JHP at 1,400 fps, or a 125-grain JHP at 1,350 fps. That’s the book spec from the old days of a .357 Magnum loading, which it rarely actually delivered.
This Springfield XD has barrels for both .40 S&W and .357 Sig. It works like a champ with either and, best of all, you don’t even have to swap magazines to go from one to the other.
Once the wunderkind that was going to be the new 9mm Magnum, the .357 Sig has fallen a bit out of favor—in part, because of the ferocious blast and recoil in compact guns. However, if you use a full-sized sidearm, the recoil and muzzle blast aren’t much more than a 9mm, on par with a 9mm +P and the velocity boost is significant.
Speer Gold Dot offers a 125-grain JHP at a listed 1,350 fps, and I can tell you that out of a 5-inch Government model it gets all of that. I’m not exactly a Glock fan, but a G31 gives up a half-inch of barrel to the 1911, while gaining a 15-round magazine.
You could, like the 9mm/.38 Super example, have a pistol with two barrels, one in .40 S&W for the easy ammo times, and a spare .357 Sig barrel to use when ammo supplies are tight. Unlike the 9mm/Super pairing, you won’t even need to have different magazines for each caliber.
.41 Magnum
OK, we’ve gone from the barking .357 Sig to the real thumper, the .41 Magnum. You can have this only in single-action or double-action revolvers; no pistols here, but if you can handle the recoil then you can get the performance.
After the shelves have been stripped bare of .44 Magnum ammo, there will still be some .41 Mag. there—just because the gunmakers sell .44 Mags. to .41 Mags. at a better than 10-to-1 ratio, but the ammo makers do better. Checking various retailers and online sites, I find that despite all the .44 being gone, there’s still .41 to be had.
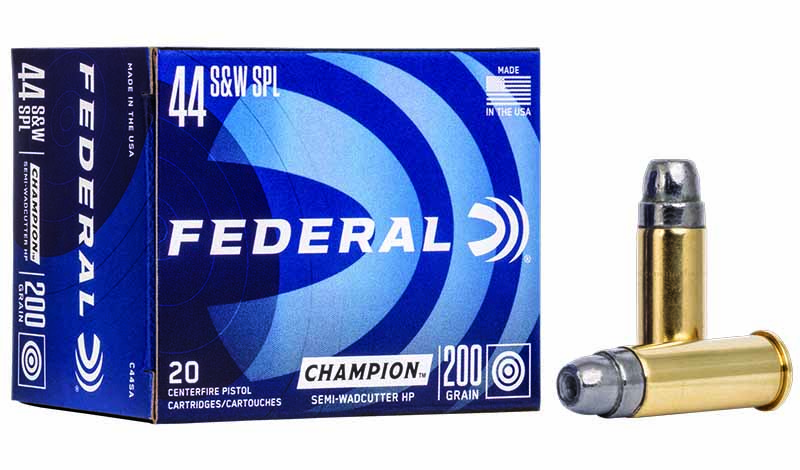
.44 Special
While a somewhat unconventional caliber nowadays, the .44 Special has ample ammunition options. Plus, it makes big holes.
Now this is a—if you’ll pardon the pun—a Special case. If your choice is a .44 Magnum revolver for defense or EDC, say an S&W M29 classic or something like that, you can always find .44 Special to feed it. And, unlike the downloaded .45 Colt ammo for cowboy-action shooting, .44 Special is readily found in loadings that are realistic defensive loadings.
A 180-grain JHP, leaving the muzzle at 900 fps, is equivalent to a .40 S&W. Or, if you want something a bit more traditional, the Federal “Training” (they call it that, but this isn’t just target ammo) load is good stuff. That one is a 200-grain lead semi-wadcutter hollow-point at a listed 870 fps, and you can expect a solid 825 fps out of a 4-inch barrel.
That’s like the old FBI .38 Special load, but with a larger-diameter bullet and 25 percent more bullet weight.
Unconventional Caliber On The Cusp
Then, there’s the .45 Colt. Yes, there are excellent EDC carry options in that cartridge. But the ammo choices? A headache. You have excellent choices, such as the Sig JHP, but you have to be careful once you start perusing the options other than JHP or JSP.
An all-lead “cowboy” load might or might not be the ticket. A lead hollow-point of 250 grains at a real-world 890 fps is an excellent thumper. But the “cowboy” load next to it on the webpage you’re perusing might be a 255 conical lead bullet with a tiny flat point and exit your immediate vicinity at the casual pace of 690 fps.
I’ll readily grant you that it’s a lot better than the 100-grain Makarov load we started with at its 900 fps, but it isn’t what you were expecting, nor what you want to be delivering, considering it comes out of a revolver that weighs close to 3 pounds.
So, if you’re going to go the cowboy route, you have best do your homework before the panic times come.
Unconventional No Longer
Some might come to mind as alternatives. The 10mm, for example … well, fuggedaboudit. The 10mm fans are so voracious that they’ll snap up all the 10mm ammo to be had even when there isn’t an ammo-buying panic.
The .45 GAP? Besides only ever being chambered in Glocks and never loaded by many ammo makers, it’s seldom seen in gun shops—either as pistols or ammo. If you do find ammo, it’s usually dust-covered and has been there since someone mistakenly ordered it years ago. And you can’t ever count on finding much. If you do ever have to use it, anyone who knows guns, who sees the caliber listed, will look at you with something between pity and disbelief.
So, there you have it: unconventional options for unconventional times. And, given the current world we live in … these are definitely unconventional times.
Editor’s Note: This article originally appeared in the 2020 Everyday Carry issue of Gun Digest the Magazine.
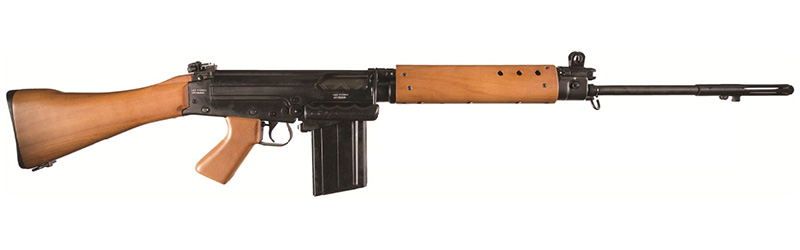
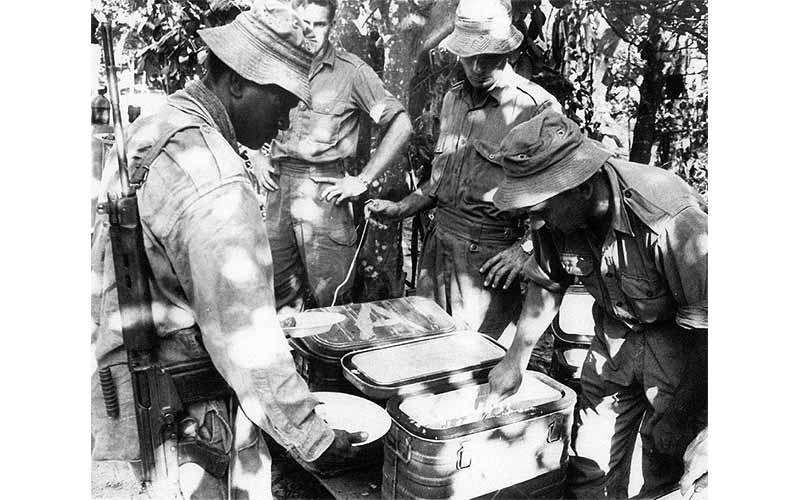
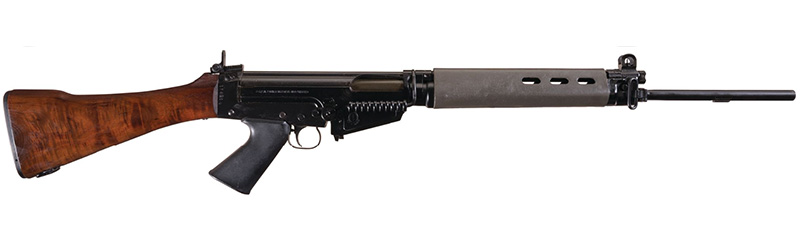
“SLR”, “L1A1”, “right arm of the free world”, the FN FAL has had many names and even more variants, but here are the five most common examples you’ll likely find spread throughout the world.
The FN FAL became known as the right arm of the free world due to its widespread adoption by NATO-aligned countries during the Cold War. While the entire goal of the FAL project was for NATO to standardize on one small arm and cartridge, the amount of variation that existed between the member states’ rifles was great enough to consider the effort a failure. That isn’t to say that the project didn’t result in a mighty fine rifle and cartridge that were used and loved by millions, but it is to say that there’s nothing standard about a British L1A1 compared to an original FN when it comes to parts interchangeability. The FAL and its variants have been produced under license by at least eleven different countries since its inception, but here are the five makes you’re most likely to still see being used in the wild around the globe.
Belgian-Made FN FAL
The original cold warrior, straight outta Liège, Belgium. As the first designers and producers of the rifle, Fabrique Nationale de Herstal has made more FAL rifles than any other single nation or factory. While official production numbers from any of the manufacturers are hard to obtain, it’s safe to say that FN-made examples were and continue to be the most abundant. This is in part due to the fact that while several other countries made the FAL, they primarily did so to supply their own armed forces. Some of these nations also sold and distributed rifles abroad, but not on the same level as FN. From 1953 until 1988, FN was churning out FAL rifles to equip armies all around the world. Even most of the countries that would go on to produce their own FAL variant got started by ordering a batch from Belgium.
Because many FN-made FALs were sold to poorer governments in less stable regions, many Belgian FALs have fallen into the hands of non-state actors over the decades. Guerrilla fighters from the Middle East to Africa to Asia who are seen using FALs more often than not have an original FN example. The only countries where an encountered FAL will most likely not be made by FN are in nations that produced their own copies or in Commonwealth member states that adopted the L1A1 pattern of FAL.
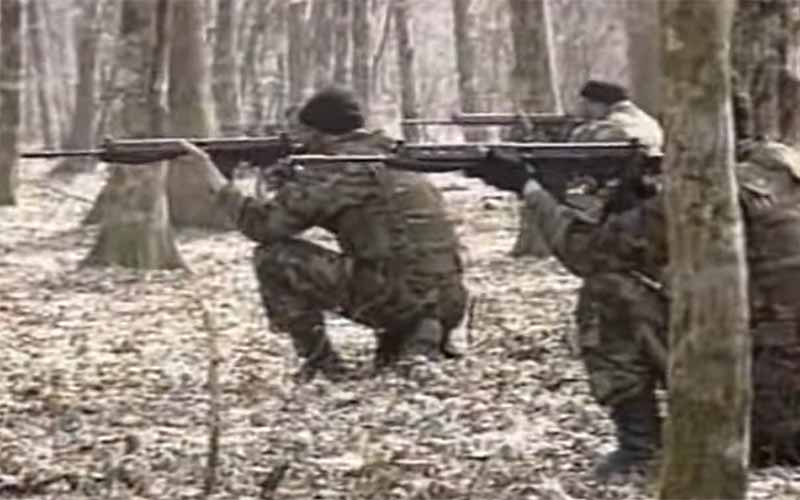
Commonwealth L1A1 SLR
There was a time when the sun never set on the British Empire, and that means there was also a time when the sun never set on an L1A1. First adapted from the FN metric-pattern rifles by Canada in the mid-1950s as the C1, this laid the foundation for the inch-pattern commonwealth FALs that would become standard in nations loyal to the British crown. From Hong Kong to Halifax, Bombay to Brisbane, it was the L1A1 that reigned supreme. L1A1 pattern rifles typically have a few distinct features that differentiate them from their metric-pattern older brothers, such as the folding charging handle and different rear sight.
Also known as the SLR or self-loading rifle, L1A1 FALs saw plenty of action before their production ended in 1999. Used by ANZAC forces in Vietnam, by the British during the Falklands War and even by some United Kingdom Special Forces in Iraq, the L1A1 has shown that it’s just as capable of a battle rifle as FN-made models are. Some minor modernization attempts integrated into the L1A1 also have led some to hold this pattern in higher regard than Metric-pattern models, regardless of their country of origin. Most L1A1 rifles were made in the UK, but some Australian, Indian and Canadian-produced models were spread around the world to some degree as well.
The proliferation of L1A1 rifles throughout the world has also resulted in their common use with non-state actors as well, especially in regions that were once under the British sphere of influence. There were also nations of “mixed influence” that at some points used both L1A1 and FN-pattern FALs such as Rhodesia.
ANZAC troops in Vietnam with L1A1 rifles. Photo: Wikipedia
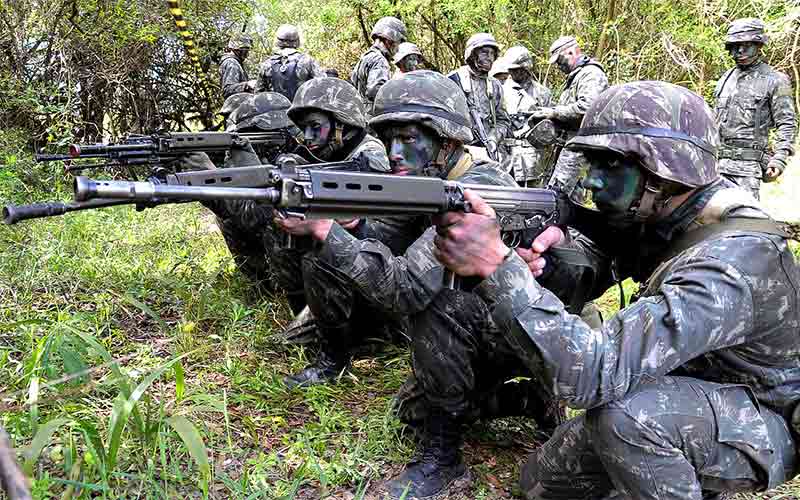
Argentine FM FAL
No, “FM FAL” is not a typo. When Argentina made the switch from purchasing FALs from FN to producing their own under license, they changed the acronym to reflect their own production facility—Fabricaciones Militares. FM FALs mostly saw action during the Falklands War where they were pitted against the Brit’s L1A1 FAL variants, but Argentina also produced them for exportation. They were mostly sold to South and Central American nations and likely comprise the majority of FALs found in that region, but some made their way overseas as well during the Balkan conflicts of the 90s when some were sold to Croatia.
The FM FAL is still Argentina’s standard service rifle today, although it is in the process of being phased out. Over the years FMAP produced most FAL variants that FN did as well, including machinegun, sniper and folding-stock variants. Some Argentine FALs were imported into the U.S. as sporting rifles for a period, and many original military examples are in British possession after being captured in the Falklands.
Like Argentina, Brazil licensed the FAL to equip their own armed forces, but unlike Argentina, they did not export them in any significant numbers. Most IMBEL FALs either remain in Brazil or were sold as parts kits, primarily to America where they were commonly used to build FAL rifles. Some were used by Century Arms in conjunction with L1A1 parts kits to make Franken-FALs, which received mixed reputations of reliability due to the crossing of metric and inch-pattern parts. The better quality IMBEL FALs in the U.S. were imported as semi-auto sporter rifles by Springfield Armory under the name SAR-48. Otherwise, the majority of IMBEL FALs remain in use by some Brazilian army and police units.
Brazilian troops training with IMBEL FALs. Photo: Wikipedia
Israeli “Romat” FAL
The Israelis initially liked the FAL well enough to purchase the licensing rights to produce it on their own, but their negative experiences with it led to the development of the Galil which replaced it in 1972 after only 17 years of service. The Israeli’s biggest issue with the FAL, and the platform’s greatest weakness in general, is sand. In the jungles of Asia where the FAL was first combat tested, this issue obviously didn’t expose itself, but once brought to the Middle Eastern desert the problem quickly became apparent. IMI, the producers of the Israeli FAL, attempted to borrow the “sand cuts” concept from the L1A1 to improve reliability but the platform was ultimately abandoned. Today, Israeli-made FALs mostly live on outside of Israel, frequently appearing in the hands of both state and non-state actors throughout the Middle East.
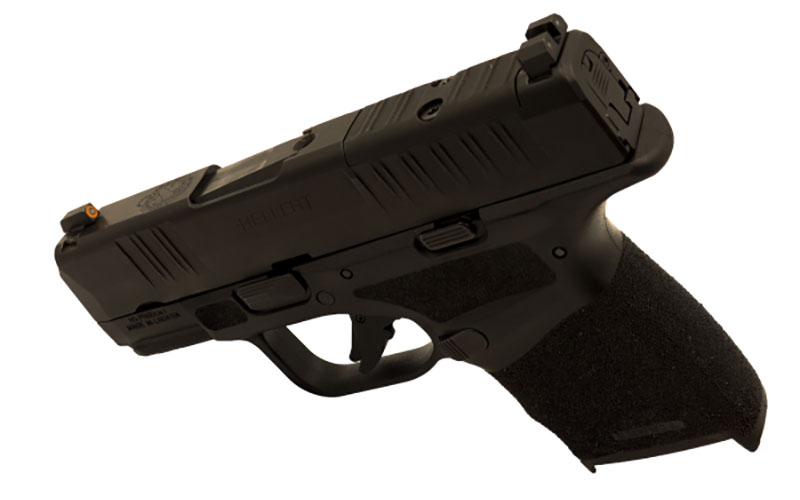
XS Sights have just expanded their popular night sight line to include the Springfield Hellcat OSP, giving you an edge in any lighting condition.
As one of the most popular new carry pistols on the market, it’s only logical that XS Sights would expand their line of night sights to include the Springfield Hellcat OSP. Despite being optics-ready, plenty of those who carry a Hellcat OSP choose to do so without a red dot sight. Whether you carry yours with an optic or not, the addition of night sights could provide a big advantage in any lighting condition.
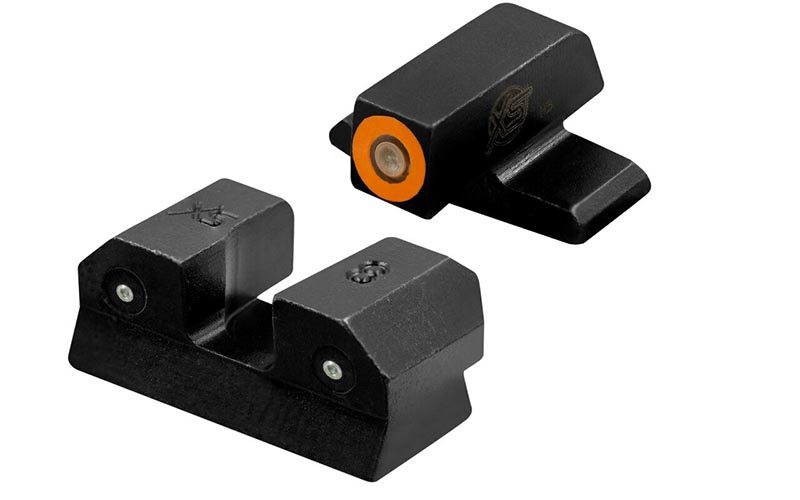
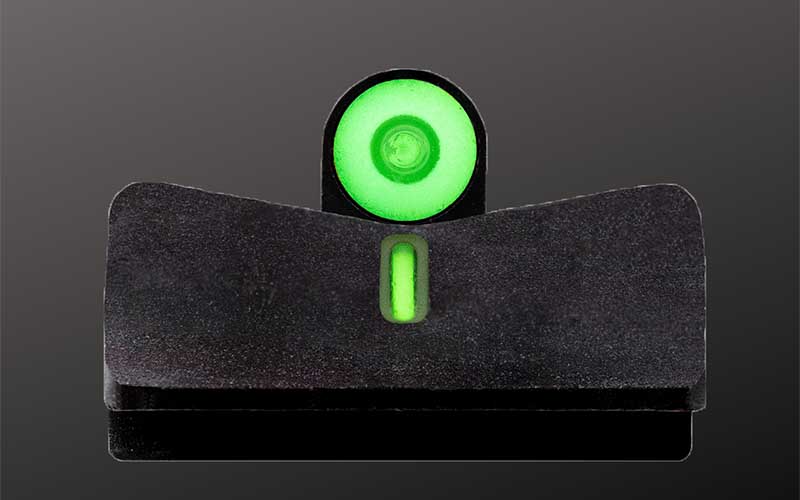
Despite what their name implies, night sights can benefit their user regardless of the time of day or ambient light level. XS Sights night sights are powered not only by tritium, but by their proprietary “glow dot” technology that further aids visibility. This feature combined with the choice of different sight styles make XS Sights a definitive upgrade over the stock irons and will result in faster target acquisition for most shooters.
Even those who carry their Hellcat OSP with a red dot could benefit from the addition of XS Sights. They are low-profile sights that provide a 1/3rd co-witness when used with the Shield SMSc optic. The addition of tritium rear sights in front of the red dot can again lead to faster target acquisition by assisting the shooter to find their red dot faster upon drawing.
The night sights available for the Hellcat OSP come in two different styles with two color options for each. Depending on your preferences, you could equip your Hellcat with either a DXT2 Big Dot in yellow or orange, or with an R3D in orange or green. The DXT2 uses a dot-the-“i” sight picture where the rear sight has a single vertical line that must be aligned with the front sight’s dot, and the R3D is a just traditional 3-dot sight.
MSRP ranges from $110 to $132 and all models include a 10-year warranty.
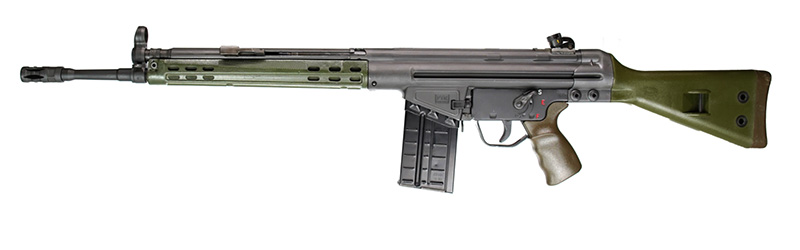
Everything you need to know about buying, modifying and owning an H&K G3 rifle in the current gun market.
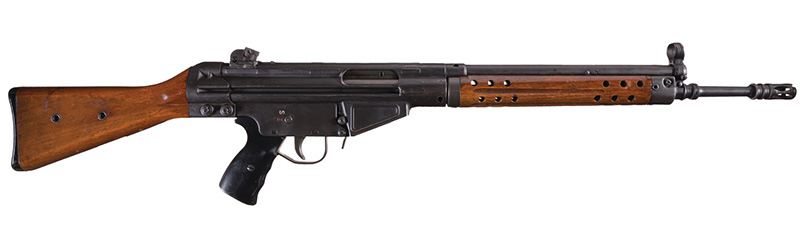
The H&K G3 and FN FAL are the two most iconic, prolific and functional battle rifles to come out of the Cold War. While the FAL managed to reach a more symbolic status, the G3 rifle managed to stay in wider service for longer, and with a higher average satisfaction level from its users. Their rugged reliability and relatively low cost have kept G3s in service with many large but less wealthy nations like Turkey and Mexico, while the platform’s inherent modularity has also prolonged its lifespan with groups like the Swedish Home Guard. Whether you’re interested in a G3 rifle as a historical novelty or as a serious shooter, there are options available, but there are some important things to know before diving headfirst into the platform.
For those looking to round off their Cold War small arms collection with a G3, there have been several enticing options imported over the years. Like with many firearms, however, their authenticity directly scales with their price. In the early 1960s, shortly after the G3 was put into military service, semi-auto H&K rifles were made for export to the United States and elsewhere. They were imported first by Golden State Arms Co., then SACO and eventually H&K themselves before the model was banned by executive order in 1989. The rifles imported during this period and by these companies were the only H&K-made G3s to enter the United States, and whether they’re marked as a G3, HK41, HK91 or SAR9, these rifles are about as authentic as they come, and they all bear price tags to match.
Collectors who appreciate authenticity but aren’t quite rich enough to afford a German-made example can turn to other licensed imports. Still expensive, but not as much as genuine H&Ks, there are Portuguese and Greek-made G3 rifle imports known as the FMP G3 and SAR-3, respectively. The largest difference between these guns and the German-made ones is the roll mark, so you decide how much that is worth to you.
When it comes to collectible G3 imports in this category, the further back you go the closer it will be to the original military pattern, with incremental changes and updates having been made along the way. The only examples in the States that are more authentic than the early 60s semi-auto HK imports are genuine military G3s registered under the NFA.
Some very dedicated H&K fans in America would cringe at the thought of shooting some of the rarer models mentioned above. With their collectability relegating most authentic G3s to safe queen status, it falls onto other G3 clones to be shooters.
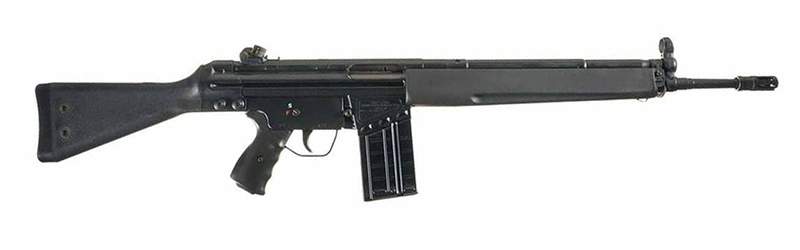
The bulk of the rifles in this category will be dedicated to PTR Industries, the company responsible for keeping the G3 platform alive in America. Built using HK-licensed tooling purchased from Portugal, the company really took off after the Assault Weapon Ban was allowed to sunset in 2004. Finally able to produce and sell clone-correct semi-auto G3s, PTR eventually transitioned from using a mix of imported surplus and new parts to their guns being 100% made in-house.
PTR makes several G3 rifle and pistol variants to suit different needs. The GI PTR 100 is their most historically accurate G3 clone, featuring no optics rail, an original “SEF” steel lower receiver and surplus green German furniture. Other variants feature a welded-on top Picatinny rail, black furniture and polymer “navy” lower. Barrels are available in either the original 18-inch configuration, 16-inch or even 8.5-inches in a pistol format. These options from PTR give the freedom to choose between a classic Cold War-style setup or a G3 rifle that’s ready to be brought into the 21st century.
The only other shooter-grade G3s in the States worth mentioning are the scantly imported Zenith clones from Turkey and the pseudo-G3 C308 builds from Century Arms that use a combination of CETME and PTR-made components.
Modifying The Rifle
The G3 rifle platform is praised for its high level of modularity despite its design dating back to the 1950s. That being said, it is still not as modular as an AR and some considerations must be made before purchasing a base rifle. Based on the direction of modification and intended use of the gun, the user will want to consider the barrel length, welded optics rail and lower receiver style before committing to a specific model. Even when only considering the options available from PTR, this can enable the user to configure their G3 into everything ranging from a CQC weapon to a designated marksman rifle.
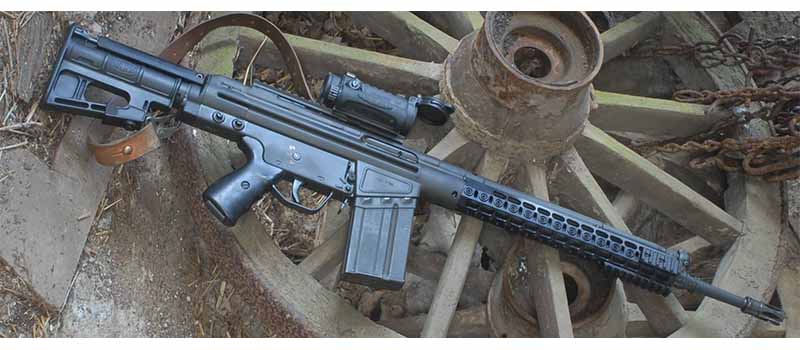
Due to its longevity of service in different armed forces across the world, the G3 has more modern upgrade options available to it than the FN FAL. There are modern free-floated handguards that enable the mounting of bipods, lights or lasers, as well as modern stocks that can majorly improve the ergonomics when the rifle is used with an optic. Some models of PTR come with modernized handguards straight from the factory, but the company leading the charge of G3 modernization is Spuhr out of Sweden. Their products have been purchased by the Swedish government on a large scale for modernizing their home guard’s issued G3s. Spuhr furniture is quite expensive, but it’s also the objectively best upgrade package for the G3 currently on the market. For those who plan on running an optic on their G3, the addition of a Spuhr stock would be enough to majorly overhaul the platform’s ergonomics and usability.
G3 rifle with optic and Spuhr stock and handguard. Photo: Spuhr.
Whether you want a classic Bundeswehr beauty to hang on your wall or a serious fighting rifle, there’s a G3 rifle out there for you. As shooters, understand that they will likely never beat a modern AR-10 in any metric besides perhaps reliability, but that doesn’t mean they aren’t worth considering. Surplus G3 magazines are still abundant and cheap and the rifles are known for eating any ammo you feed them, no matter how dirty. Whether you find yourself an original German, Greek or Portuguese example or an American-made PTR, expect it to be a very enjoyable gun that will likely stay in common use for quite some time.
Looking to go armed, but are stuck in the weeds as to what to arm yourself with? Here are 20 of the best concealed carry gun options that will keep you on the defensive.