Russian AK shotguns are banned from import and American-made clones can be pricy, so how does the Chinese JTS M12AK compare?
What Is A JTS M12AK?
Semi-Auto AK-Style Shotgun
Chambered for 2.75 And 3-Inch 12-Gauge Shells
Made In China
Adjustable Gas System
Accepts Rem Choke Tubes
Two Available Models
AK shotguns have several notable advantages over more traditional shotgun designs. They are known for being very reliable for semi-auto shotguns and have the potential for a lot of firepower in a small package. Their magazine-fed nature allows for a high ammunition capacity in conjunction with a short barrel, two things which are mutually exclusive in tube-fed designs. Their adoption by police and military both inside and outside of Russia are a testament to their usefulness in a combat role, and their popularity with sports shooters around the world suggests something similar.
In 2017 the last of the authentic Russian AK shotguns were banned from import, leaving Saigas and Veprs only available on the secondhand market for inflated prices. Kalashnikov USA attempted to capitalize on this void in the market by tooling up to produce domestically made Saiga clones. The resultant KS-12 shotguns were generally regarded as being of very high quality, but their low production numbers and relatively high price left much to be desired. Part of why Saigas originally grew so popular in the U.S. was their affordability, a trait that is now only true for the Chinese and Turkish copies. One such example is the M12AK from JTS.
While most Chinese guns have also been banned from import since 1993, their shotguns are still perfectly legal. Rumor has it that JTS is essentially a rebranding of Norinco, and while most other Chinese products are of questionable quality, Norinco’s guns acquired a positive reputation in the U.S. and are still highly desired. While you may not be able to buy a new Chinese AK rifle anymore, how does the M12AK hold up as an AK shotgun?
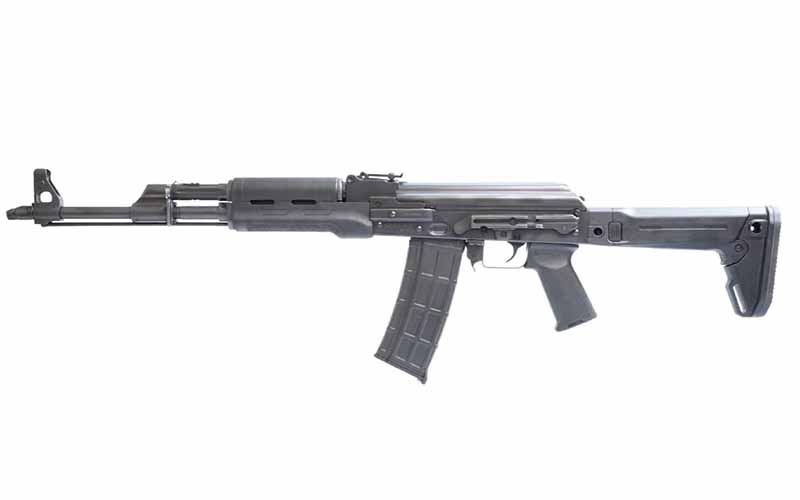
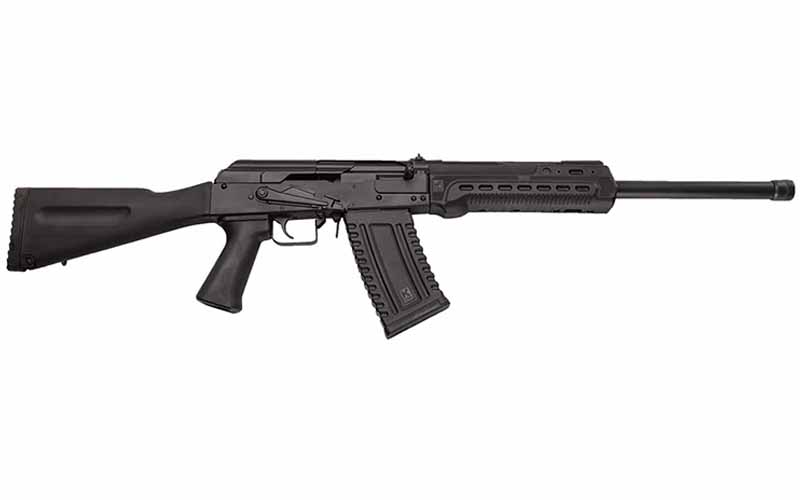
JTS M12AK
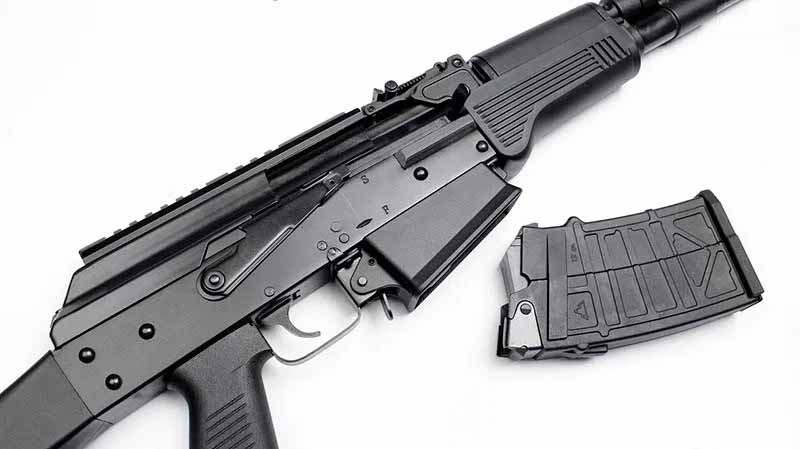
While some refer to this shotgun as a Saiga-12 clone, a copy is a more accurate descriptor. It is true that the M12AK and Saiga-12 are functionally just semi-auto AKs chambered in 12-gauge, but there are several differences between their designs. One apparent difference is the presence of a magazine well on the M12AK. While this is reminiscent of the straight-insert magwells found on Veprs, the M12AK uses rock and lock magazines like the Saiga. The magwell was added to the JTS gun to help expedite reloads. Speaking of magazines, these usually ship with 5-rounders, but they also have 10-rounders available.
All the JTS AK shotguns have a 4-position gas regulator so you can tune the gun to your ammunition type. As any semi-auto shotgun does, these prefer high brass loads, but the regulator can help to cycle lower-powered shells as well. Unlike Saigas, the M12AK’s barrel is not externally threaded for flash hiders, but it is internally threaded to accept Rem choke tubes. Also unlike the Saiga, these have no bolt hold open or bolt release button.
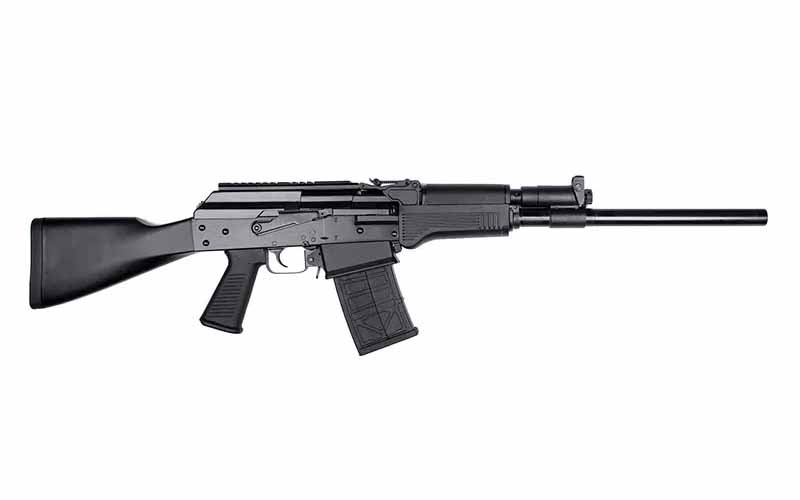
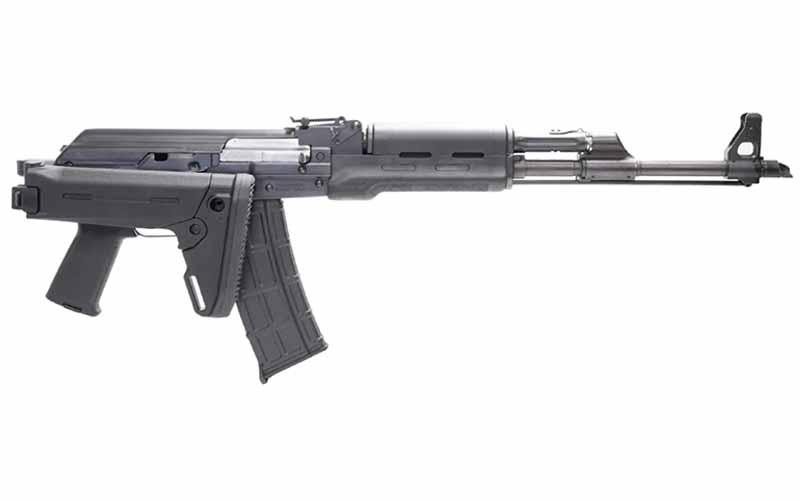
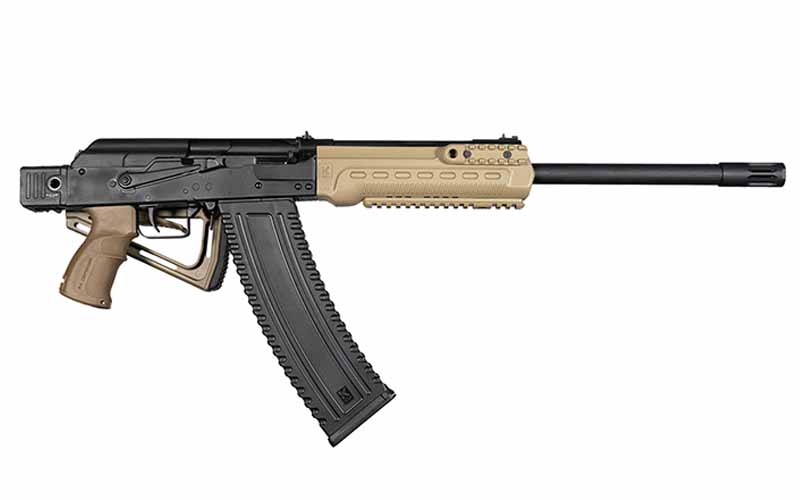
MS12AK-T1
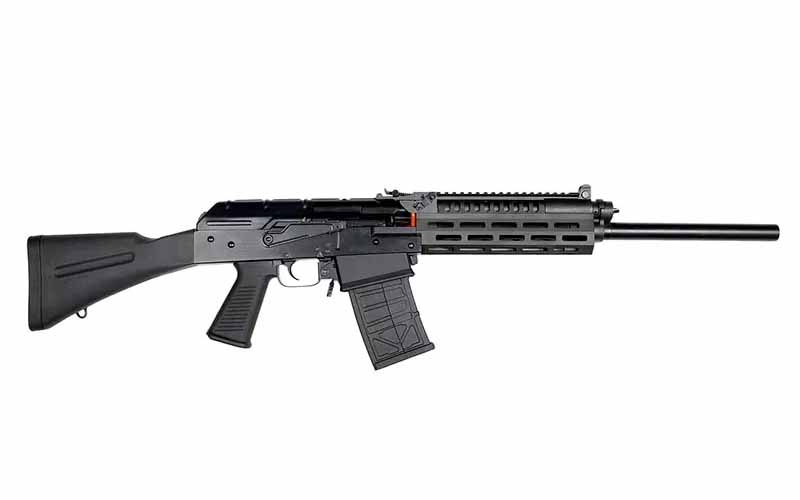
This variant is nearly identical to the standard MS12AK. While the standard model’s dust cover has a Picatinny rail on top for mounting optics, the T1 variant has a normal, ribbed AK dust cover. Instead, the T1 has an aluminum tactical handguard with M-LOK slots and rail segments, these allow for mounting optics, flashlights, foregrips, or anything else you desire.
The standard MS12AK has been selling for $400 online while the T1 variant has been going for $499. These prices are certainly attractive when most other AK shotguns have been going for significantly more. Obviously, you get what you pay for, and the general consensus surrounding JTS AK shotguns is that they are decently reliable and have an acceptable fit and finish, but they still fall short of the quality of Russian or American-built examples.
Being a budget-oriented design, it’s questionable if the tactical handguard really adds $100 of value to the T1 model. Whether you need a home defense gun or just a new range toy, if you’re in the market for a semi-auto mag-fed 12-gauge, the JTS MS12AK is a decent option. They may not be the best, but they are affordable and even more importantly they are available.
For more information on JTS, please visit jtsgroup.us.
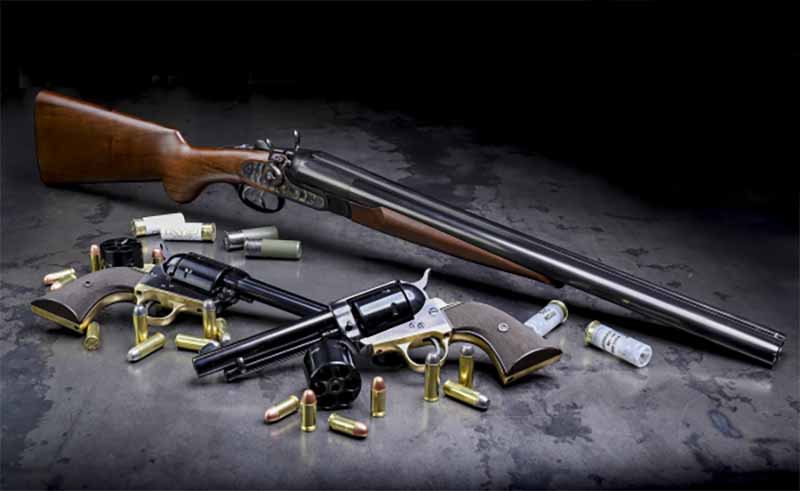
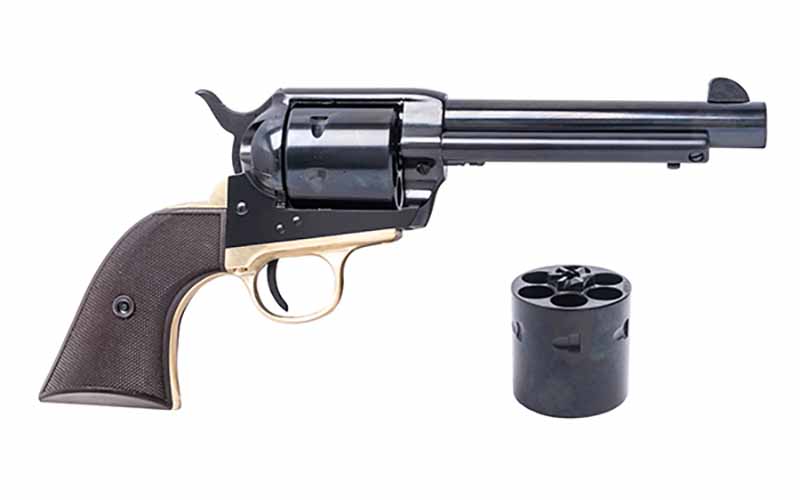
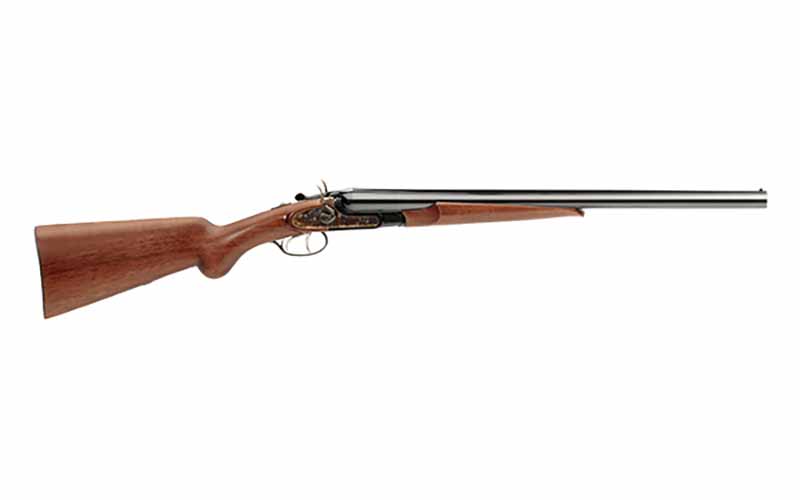
Two new Pietta single-action revolvers and a double-barrel shotgun are now available exclusively from Davidson’s.
Made By Pietta, Distributed By Davidson’s
Italian-Made
Based On Classic Colt Designs
Two New 1873 Revolver Models
One New 1878 Shotgun Model
Pietta is one of the leading manufacturers of historical American firearms. Renowned by collectors, reenactors, and cowboy-action shooters, Pietta’s guns fill a very specific niche in the American firearms market. Their catalog was already quite extensive, but they’ve just added three new models which are exclusively available through the distributor Davidson’s.
The trio includes two new variants of their 1873 single-action revolver as well as an 1878 double barrel coach gun.
Clones of the iconic Colt Single-Action Army, Pietta’s 1873 revolvers are made in a variety of calibers and configurations. The two new variants that will be available exclusively through Davidson’s are caliber-convertible models. Identical besides their barrel lengths, the new 1873s each include two cylinders which can be swapped to fire either .45 Long Colt or .45 ACP.
These caliber options add a lot of versatility to these otherwise obsolescent designs. For collectors and cowboy action shooters, the .45 Colt cartridge offers historical authenticity. For those who’d like to enjoy the Pietta 1873 at the range without breaking the bank, or carry it on a camping trip with more choices of modern defensive ammo, the option of .45 ACP is there as well.
Both models of Pietta’s new 1873 feature a blued finish, a brass trigger guard, and brown polymer grips. They are available with either 4.75- or 5.5-inch-long barrels and have an MSRP of $559.99.
The third piece in this exclusive new trio is a Double Barrel Deluxe Coach Gun. It’s a 12-gauge side-by-side shotgun with 2.75-inch chambers and 20-inch-long barrels. It has a walnut stock, blued barrels, and a case-hardened receiver to add some colorful flair. Based on the Colt 1878, this coach gun features two external hammers and two triggers, but to remain historically accurate it does not have automatic shell ejectors.
The Pietta Double Barrel Deluxe Coach Gun has an MSRP of $989.99.
These new offerings from Pietta highlight two classic American firearms designs from Colt that helped to shape the Old West. Made in Italy, this iconic trio is available now, distributed exclusively through Davidson’s.
For more on the manufacturer, please visit pietta.it.
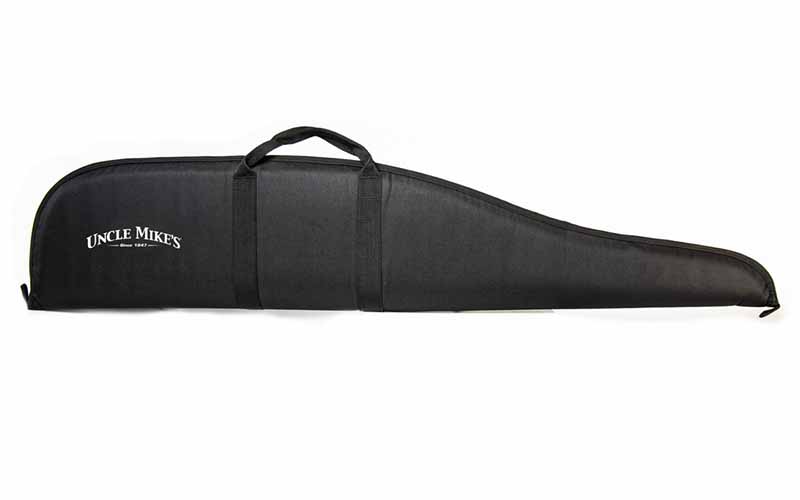
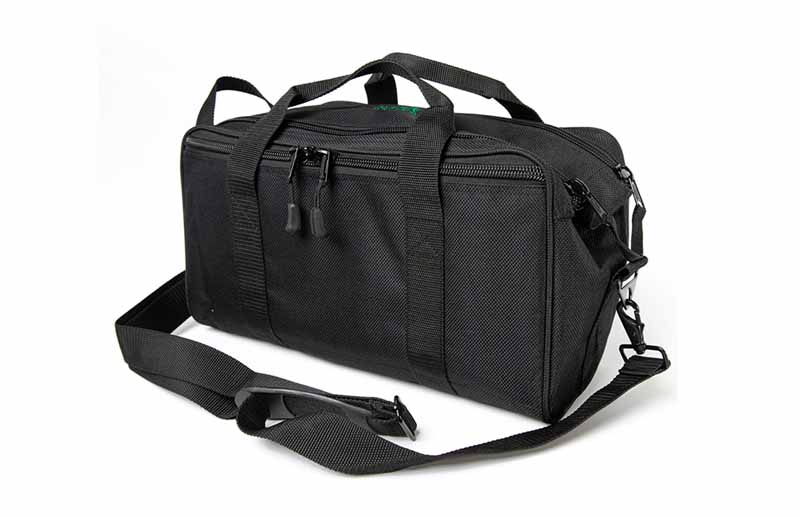
Uncle Mike’s has just released a new series of long gun cases and a handgun-specific range bag, both are affordably priced and available now.
Long Gun Case Options
Scoped Rifle Or Shotgun Profile
Three Rifle Case Sizes
Two Shotgun Case Sizes
Black Or Forest Green
Uncle Mike’s products are known for being some of the most affordable yet functional firearms accessories on the market. When simple will suit your needs, Uncle Mike’s stuff will probably get the job done for a good price. They already had some cases and bags for sale, but they’ve recently updated their catalog with a new family of long gun cases as well as a pistol-oriented range bag.
The new padded long gun cases are available for either shotguns or scoped rifles, come in black or forest green, and come in multiple sizes. The zippers run the entire length of the case to allow for them to be opened flat, and the interior lining is designed to be snag-free and protective. Simple and robust, these cases look ideal for hunters who just need to get their guns into the field scratch-free. The MSRP for all Uncle Mike’s Padded Long Gun Cases is $19.95.
The new Sportsmen’s Range Bag is designed specifically for handgunners to conveniently transport two pistols and their accouterments to and from the shooting range. Its main compartment has two removable dividers and two padded pistol rugs, and the zippers can be locked shut. It can be carried by either the removable shoulder strap or the attached nylon handles. The Uncle Mike’s range bag is only available in black and has an MSRP of $30.95.
For more information on Uncle Mike’s, please visit unclemikes.com.
Effectively shooting on the move starts at the ground up.
When bullets are flying nobody is standing still. Find that hard to believe? Dial up a video of a traffic stop gone bad and you’ll see the officer involve—and most likely the perp—don’t have their feet rooted to the ground. Which segues into the topic at hand, effectively shooting on the move.
Honestly, it’s not the easiest skill to master, not simply because you subtracted the most important asset to accuracy—stability. But shooting on the move also forces you to do two things at once, which—chewing gum and walking cracks aside—is no easy task. The reason, as Jamie Caldwell points out in the above video, is because you’re not just trotting around, pumping the trigger. Instead, you’re engaging in a controlled gate, while executing all the fundamentals that get you hits. As the instructor at 1-Minute Out and former special operator demonstrates, doing this correctly all starts from the ground up.
Your feet and legs do almost all the work in this process, not simply propelling you to the next point, but steadying the rest of your body for shooting. They absorb all the shock so your gun isn’t bouncing while you move. Conversely, your upper body remains as stable as possible, almost as if you were shooting from a stationary position. Caldwell breaks down each part in detail in the video, so it’s worth watching in its entirety. He also demonstrates a simple drill to bone up on shooting on the move. This might be the most important part of his spiel, given getting this skill down pat requires practice.
Zastava USA announced that a batch of their new 5.56 PAP M90 AKs have arrived in the U.S. and will be shipping out to retailers soon.
What’s A PAP M90?
Semi-Auto AK Derived From Yugoslavian M70
Made In Serbia By Zastava
Chambered For 5.56x45mm NATO
Ships With Polymer Furniture
Adjustable Gas System
Zastava had promised U.S. customers that they would have M90 rifles in-country before the summer of 2021, and they managed to make that deadline by a single day. The shipment arrived at JFK airport on June nineteenth and is shipping out to distributors today. Zastava says you can expect to have an M90 in your hands by next week.
American AK enthusiasts have been awaiting this news for a while, as 5.56 AK imports have been severely limited recently. The most widely available 5.56 AKs for some time now have also been from Zastava in the form of their ZPAP85 pistols, so it will be nice to finally have a rifle option on the market as well.
Zastava M90 AKs chambered in 5.56 have been imported before, but this model is an updated iteration. It shares some features with Zastava’s newest generation of ZPAPs, such as the chrome-lined barrel and bulged trunnion, but it also has some upgrades that are unique to this new model of M90.
Some unique external features are its slightly longer than standard 18.25-inch barrel and polymer furniture. The pistol grip and folding Zhukov stock are made by Magpul, and the rubber handguard is made by Hogue. The handguard can also have optional rail segments installed for mounting accessories. The furniture is still the proprietary Yugo style, so aftermarket options are more limited than for AKM-pattern guns. The polymer furniture it ships with has received praise so far for being very ergonomic and functional, but standard M70 wood furniture can be installed for those who prefer the classic look.
The M90’s barrel has been threaded for the standard AK 14×1 LH pitch and ships with a typical AKM-style slant brake. It has a Yugoslavian-pattern side scope rail like the ZPAP for mounting optics.
The M90 also has an adjustable, 3-position gas system for running a variety of ammo in any condition. With the proper gas setting, the M90 can reliably run any kind of ammo that gets fed to it. Brass or steel cased, .223 or 5.56, loaded light or loaded hot, the M90 should be able to cycle them all without issue.
Internally, the Zastava M90 also has a distinctive ported and hollow piston head. This is to increase the rifle’s accuracy according to Zastava.
With the price set at over $1,000, the Zastava PAP M90 is a more expensive AK option than either Zastava’s 5.56 pistol or their 7.62 rifle, but it comes with some unique features and upgrades that will be appealing to many shooters. Keep an eye out for these hitting store shelves and online shops sometime next week.
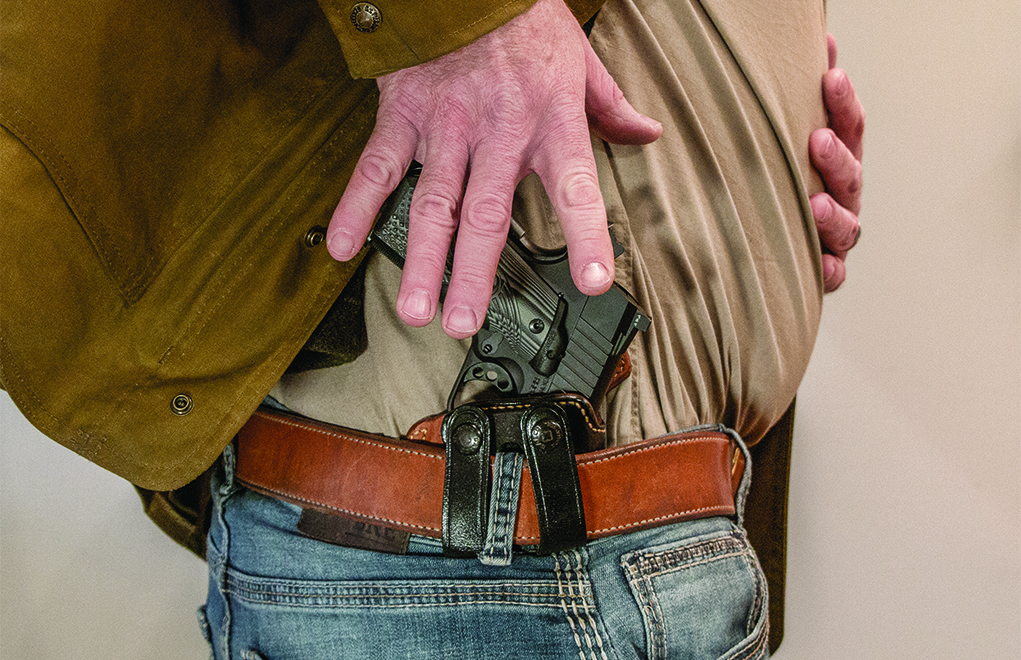
When is it brandishing and when is it a legal display of a firearm to back down an attack?
On June 28, 2020, in response to a riotous mob breaking through an iron gate into their St. Louis gated community, with a mass of approximately 300 people coming down the road toward their house, attorneys Mark and Patricia McCloskey grabbed firearms, he an AR-15 and she, a Bryco 9mm. They went outside their home to confront the riotous mob from their front porch. In doing so, they set themselves up for St. Louis Circuit Attorney Kim Gardner to charge them with “Unlawful Use of a Weapon.”
Every state has laws against brandishing a weapon in public, or “unlawfully displaying” a gun. But there are gray areas.
The legal case against the McCloskeys will take many months to resolve, and until the trial occurs, we won’t see all the evidence of the case, although YouTube videos featuring Mark McCloskey indicate that he had a fear of being attacked by the mob, which is why he used the AR-15 the way he did.
So, with this case in mind, let’s discuss the right to threaten deadly force with the use of a weapon against those who are threatening you. This analysis isn’t state-specific, but instead is intended to be considered general education. It’s up to the individual armed citizen to know what his or her state’s statutory and case laws show.
The common law of the United States ordinarily calls a criminal charge of waving a gun around in public “brandishing.” In many other states, it’s illegal to “unlawfully display” a firearm or “unlawfully exhibiting” a firearm.
Additionally, most if not all states have statutes that make it an “assault” to point or aim a weapon at someone without the justification of self-defense. And, since a firearm is used, the seriousness of that particular charge (called “aggravated assault” in states that follow the common law) elevates it to a serious felony with possible sentencing entailing years of jail time. A firearms enhancement means probably five years or more in prison.
So, when is having a gun “at the ready,” meaning in-hand and observable, not a crime? To determine that, you need to look at both your own statutory law and the case law interpreting the statutory law. Generally speaking, though, if you display a firearm (but not point it) in the face of presently threatened unlawful force, you’re likely to be in good shape.
I’d be surprised to find any state that doesn’t allow you to back down a criminal attacker by displaying a firearm and calmly telling him to stop doing what he’s doing or contemplating doing. This would apply only if the aggressor was threatening your safety. The amount of force you can use depends entirely on how much force is threatened against you.
In many states, displaying a gun, but not pointing, in the face of a threat would not be deemed brandishing. However, a keen knowledge of that state’s laws are require to make a certain determination.
If a person or persons are threatening to kill/rape/rob you, and they have the means to accomplish the threat, you’re likely going to be legally justified in pointing a gun at the aggressor(s). But, on the other hand, if someone who doesn’t obviously possess the means to carry out the threat, you had best keep your gun unseen. If there isn’t such an immediate threat, why not walk away? If doing so wouldn’t escalate the peril you’re in, then avoiding the entanglement would be the best bet.
Gray Areas
What about the gray areas, though? What about the times when you might not know what the situation really is, but you have a pretty firm belief that things are going to escalate quickly to endanger your life?
That’s when you need to invoke the reasonable person doctrine. What would a reasonable and prudent person believe, knowing what you know, and seeing what you see? Simpler put, how would this look to others?
One thing you don’t want to do when displaying a firearm or other dangerous weapon in the face of presently threatened unlawful force is make threats to kill. A new crime, which has popped up and is a favorite of prosecutors looking to be able to arrest gun owners, is the crime of “making terrorist threats.” The threat to kill, coupled with the ability to carry out the threat, fulfills the elements of this crime. Typically, the crime is a felony, with the result of conviction bringing jail or prison time, along with loss of your firearm rights. Don’t make threats to kill or even threaten to shoot.
Right about now, you might be thinking this advice seems very complicated. You may think, heck, you have trouble enough just hit the target, let alone issue verbal commands. If so, seek out competent training, which usually isn’t cheap, but well worth it when you actually have to draw that new blaster.
If this isn’t possible, may I suggest pepper spray?
Editor’s Note: This article originally appeared in the January 2021 issue of Gun Digest the Magazine.
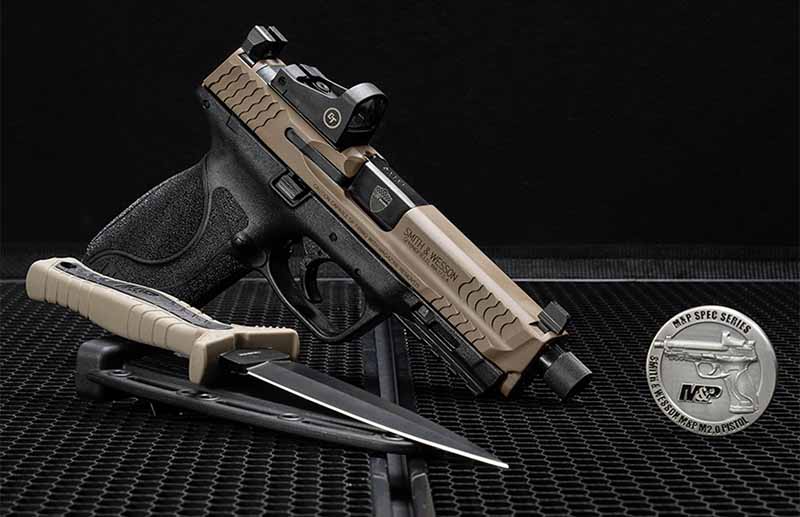
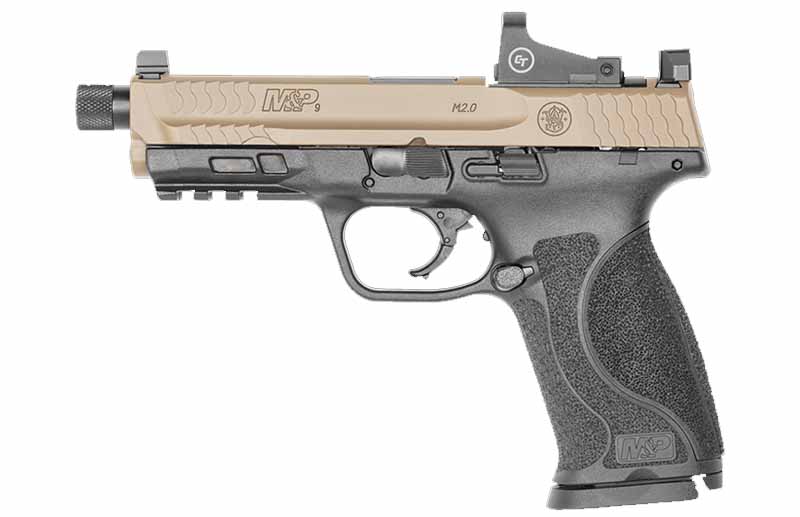
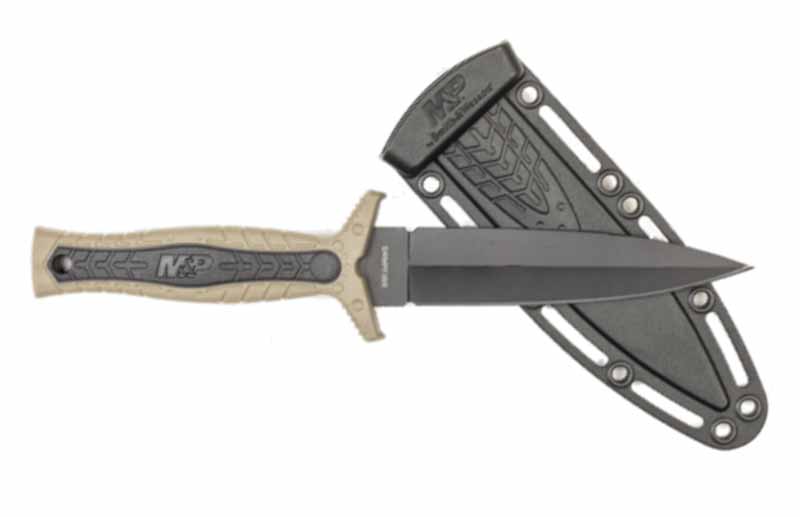
Smith & Wesson’s new Spec Series Kit includes a knife, challenge coin, and an M&P pistol chock-full of upgrades.
Features Of The M&P9 M2.0 OR Pistol:
17+1 Capacity Of 9mm
4.6-Inch Threaded Barrel
Optics Ready With Included Crimson Trace CTS-1500 Red Dot
Suppressor Height Night Sights
Two-Tone Finish
For some, half the fun of buying a new gun is tinkering with it. They enjoy installing various upgrades and accessories until they have it configured exactly how they want it. Others, however, prefer their guns to come exactly as they want them, straight out of the box. The M&P9 M2.0 OR Pistol included in Smith & Wesson’s new Spec Series Kit definitely belongs in the latter category.
Looking like something straight out of a Tom Clancy game, the M&P9 M2.0 OR Pistol was built to be suppressed. It would seem wrong to not put a can on this gun given its included upgrades. A fixed blade M&P knife, S&W Spec Series challenge coin and custom fitted carry case make this kit one very presentable package.
The Pistol
The Spec Series Kit includes an M&P9 M2.0 OR Pistol. That name is a mouthful, but it means that it’s a 9mm, second-generation Smith & Wesson M&P with an optics-ready slide. Being the newer 2.0 model, it includes an improved trigger and other upgrades over the original M&P.
The FDE slide has been cut to be optics ready, and the pistol ships with a Crimson Trace CTS-1500 red dot sight. The pistol also comes with suppressor height night sights, so it’s set up right from the box to be suppressor ready.
The Knife
The knife included with the Spec Series Kit is an M&P full tang fixed blade boot knife. It has a single-edged, spear-point blade that’s 4.5 inches long with an overall length of 9 inches. The rubber handle is marked M&P and is FDE colored, just like the included M&P pistol’s slide. A nylon sheath is also included for carrying inside one’s boot.
The Spec Series Kit obviously has some appeal for Smith & Wesson collectors and people who just appreciate fancy guns that come in fancy packages, but the included pistol has some very functional design features as well. The pistol comes from the factory set up for suppressor and optics use, making it a good choice for a home defense piece, especially if you’re already familiar with the M&P platform. The Spec Series Kit has an MSRP of $969 and is backed by Smith & Wesson’s lifetime service policy.
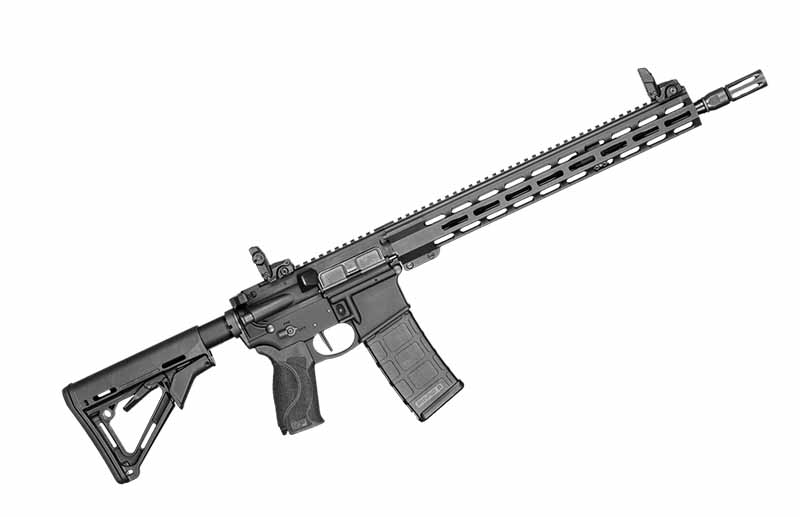
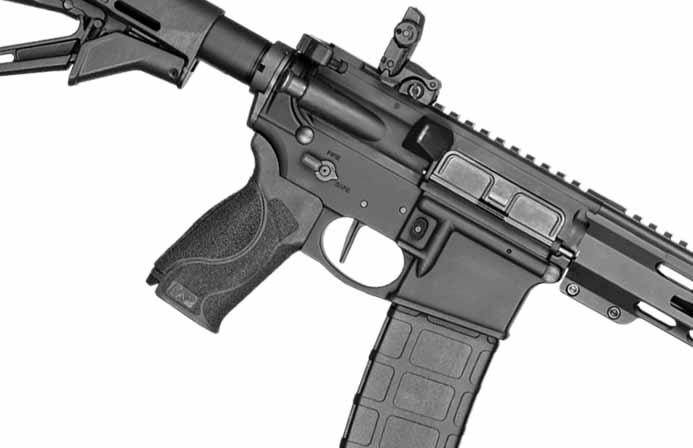
Slimmed down and dolled up, Smith & Wesson’s next-gen M&P15T II improves on an already solid model.
Where Is The M&P15T II upgraded:
Slimmed handguard for improved handling.
Grip modeled after M&P pistols with interchangeable palm swells.
Flat-faced trigger lessening the felt pull weight.
Rubber buffer system in the lower for a tighter, rattle-free fit.
Smith & Wesson, America’s foremost revolver maker? Few would argue the long-running Massachusetts concern is definitely in the race for the title, producing some outright classics over the years. But the manufacturer has proven a nimble firearms company, turning out a slew of notable non-wheelguns that have more than earned a niche in the marketplace. Perhaps one of the most underrated is the M&P15 line of AR-style rifles.
Over the years, the long guns have earned the reputation as being among the best entry-level options available, offering shooters a Spartan, but a very reliable system. The M&P15 Sport II is legendary in this regard. However, the company offers the entire gamut of AR-style rifles, at nearly every price point, and recently revamped its popular mid-line model. Meet the M&P15 Tactical II (M&P15T II). Maintaining the same solid engineering as its predecessor, the M&P15T, the new model offers a few nice upgrades that most shooters should welcome.
Among the most appreciated, a relatively sane price tag. With an MSPR of $1,372, the gun remains very competitive in its class, while bringing plenty to the table.
Slimmed Handguard
So what do you get with the next-gen M&P15T II? Most obvious is an improved handguard system, much more in line with most shooter’s expectations nowadays. Aside from boasting a full-length Picatinny rail, ample M-Lok slot real estate for accessory attachment and free-floating the barrel, its whisper-thin. Not that the version on the old model was a bear, but the new 13-inch aluminum handguard should prove much better at facilitating a forward c-clamp style grip and trimming the gun’s overall weight.
M&P15T II’s slimmed down handguard.
Getting A Grip
Typically talking pistol grips elicits yawns. However, Smith & Wesson has done something fairly intriguing in the area, incorporating a grip modeled after its M&P pistols. It’s not only a dead ringer with its fairly aggressive pebble texturing, but also that it includes four interchangeable palm swell inserts. Yeah, it’s a bit gimmicky on the surface, but does potentially have some performance-enhancing capabilities. More so than just comfort, the inserts possibly could optimize finger position relative to the trigger, cutting down on placement time.
Trigger Time
To that end, Smith & Wesson has vastly improved on the M&P15T II’s trigger, outfitting the carbine with a flat-faced switch that has a fairly nice break. Certainly better than the typical mil-spec trigger, which can even be found in this class of gun. Ergonomically, the trigger finger is easier to situate on a flat shoe, but the design also tends to make the pull weight feel less than it is.
Just link M&P pistols, the S&W AR has interchangeable palm swells on its grip.
The AR’s Odds And Ends
As to other notable upgrades, the rifle boasts a Magpul CTR stock, rubber buffers in the lower for a tighter fit and less rattle, front and read Magpul MBUS flip-up sights and Radian Raptor-LT charging handle. Smith & Wesson has made all the M&P15T II’s controls ambidextrous—save the mag release—which not only makes it lefty friendly. It also improves its handling for shooting weak side, a skill many shooters have recognized the importance of in recent times. Finally, and common in S&W rifles, the gun has 5R rifling, which theoretically reduces bullet deformation and makes the bore easier to clean.
Parting Shot
The M&P15T was a popular AR option, if for other reason than the bang shooters got for their buck. Smith & Wesson doesn’t appear to have mucked up this winning formula with the M&P15T II. Improved for modern shooter’s tastes, the rifle maintains its two most important assets—relative affordability and effectiveness.
Looking for a new iron or piece of kit to enhance the one you already own? Check out these 14 new bits of guns and gear to grow your firearms wish list.
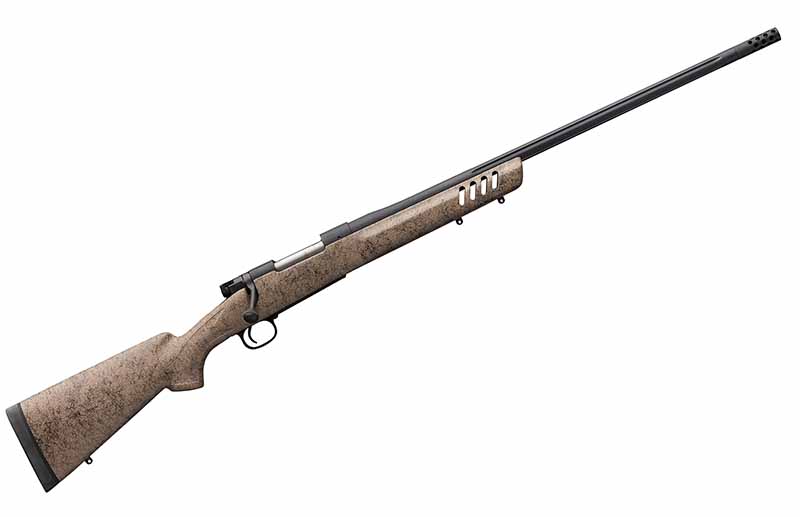
Still cherished among the all-time best rifle designs, Winchester recently aimed the classic Model 70 at precision shooters. As the Long-Range model suggests, the rifle is decked out to maximize its range. To that end, it all begins with Bell and Carlson composite stock. Boasting an internal aluminum bedding block, the stock has an air-tight mate-up with the receiver and has a few little enhancements to milk the most out of the system—including lower vents to aid barrel cooling and a wide, flat fore to stabilize on a rest. While precision is the Model 70’s focus, the rifle is still field-ready—coming in at less than 8 pounds, making it ideal for long-range hunts. Available in eight calibers, the revamped 70 hits the mark. MSRP: Starting at $1,550
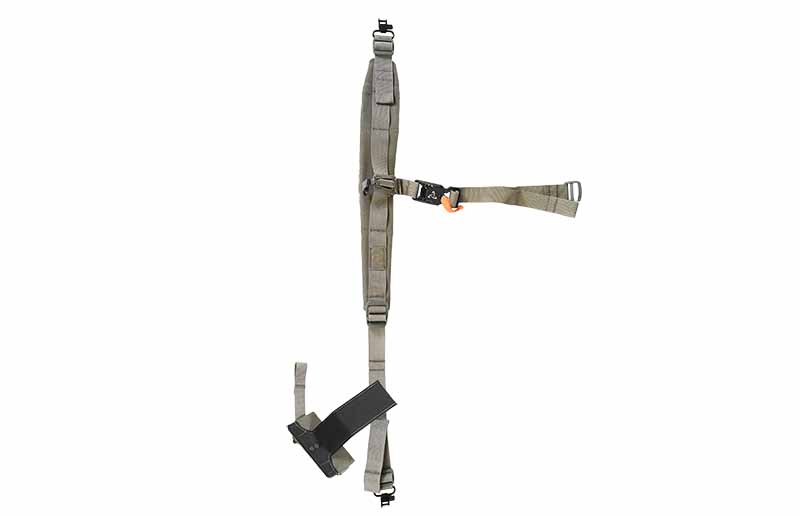
Mystery Ranch Hands-Free Rifle Sling
Refining its innovative design, Mystery Ranch has built a better mousetrap when it comes to hunting convenience. The Hands-Free Rifle Sling does what it says, giving hunters use of both hands in rugged backcountry terrain. But, through a handy system, gives up a long gun at a moment’s notice. The secret, a magnetic locking system that holds fast when on the move, but easily disengages when a target of opportunity presents itself. Also nice, it’s quiet as a mountain breeze. Comes with the sling and sternum strap proper, stock dock. Compatible with most pack systems. MSRP: $99
N8 Tactical Pro-Lock Holster
Extremely comfortable and arguably more efficient—at least on the draw—outside the waistband carry is well worth consideration. If it fits your lifestyle, N8 Tactical has the rig for you. Known as its Pro-Lock holster, the system provides enhanced passive retention not found in a typical Level I retention holster. N8 calls it their “Secure Twist Release” system, quite simply it’s a slight modification to the polycarbonate shell’s trigger pocket that requires a slight twist to release the gun. Clever. Also, comfortable. An all-leather backing keeps your iron off your side and helps your body breathe, at the same protecting your gun from body moisture. MSRP: $49.95
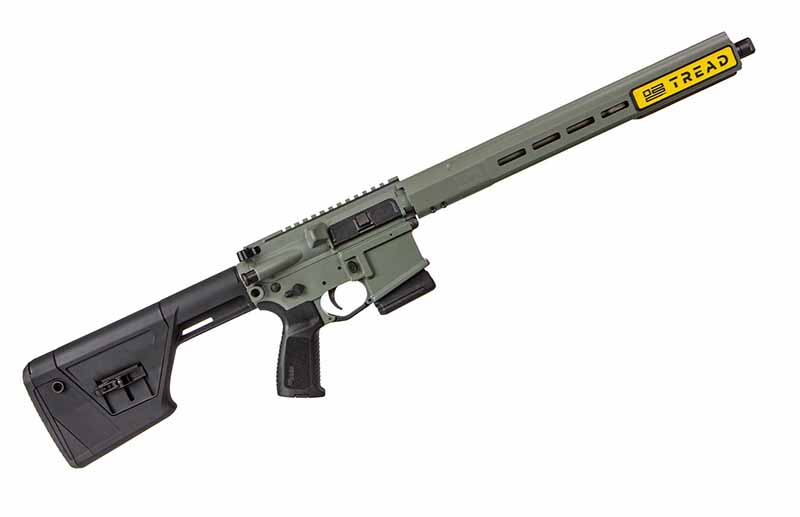
Sig Sauer M400 Tread Predator AR
When it comes to entry-level ARs, few hold a candle to Sig’s TREAD line. Now, hunters have a reason to look in Sig’s direction, with the introduction of the M400 TREAD Predator. Chambered 5.56 NATO, the rifle sticks to the line formula for success but offers a few upgrades that make it a perfect addition. In particular, the carbine boasts a fully adjustable stock, allowing users to tailor the cheek rise and length of pull at a mere twist of knobs. Additionally, the handguard—Sig’s Predator model—not only offers plenty of M-Lok real estate, but also a wide flat bottom, perfect for drawing a steady rest on a fence post or other support. Outfitted with a snappy single-stage trigger, the TREAD Predator is just the ticket to get coyotes howling. MSRP: $1,100
CCI Clean-22 Realtree Ammo
Less fouling, more stealthy … what’s not to love about CCI’s Clean-22 Realtree. The rimfire ammo has been around for a while, utilizing Federal/CCI’s polymer jacketing to keep lead from clogging up a rifle’s bore. But partnering with Realtree, the ammo-maker has upped its game in the batches you can buy. The plastic jug ships with 400 rounds of clean ammo, which should keep even the most ambitious shooters busy for a couple of hours. As to its performance, it kicks a 40-grain bullet 1,235 fps at the muzzle; that’s enough for any brushy or cottontail that crosses your path. MSRP: $43.99, jug of 400
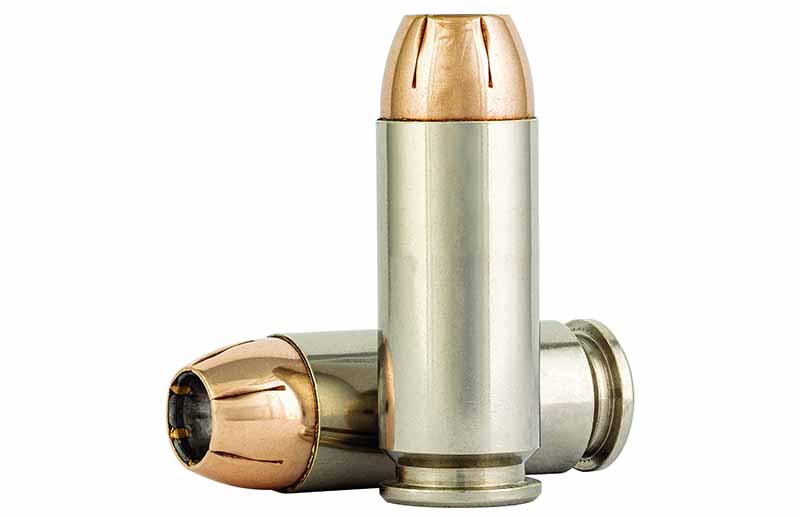
Federal Premium 10mm Punch Ammo
Federal’s first line specifically developed for civilian defensive use, PUNCH ammunition fills a unique niche in the ammo giant’s catalog. And it’s grown to fit more shooters in recent times. Federal unveiled a new 200-grain 10mm load in the PUNCH line, certain to give armed citizens an edge in life-and-death situations. Engineered to meet or exceed FBI penetration standards, leaving the muzzle at 1,100 fps, the hollow-point loads deliver the peace of mind it can get the job done. This isn’t exclusive to the terminal end of things. Utilizing nickel-plated brass and sealed primers, shooters can expect flawless function in any handgun in which it’s run. MSRP: $30.99, box of 20
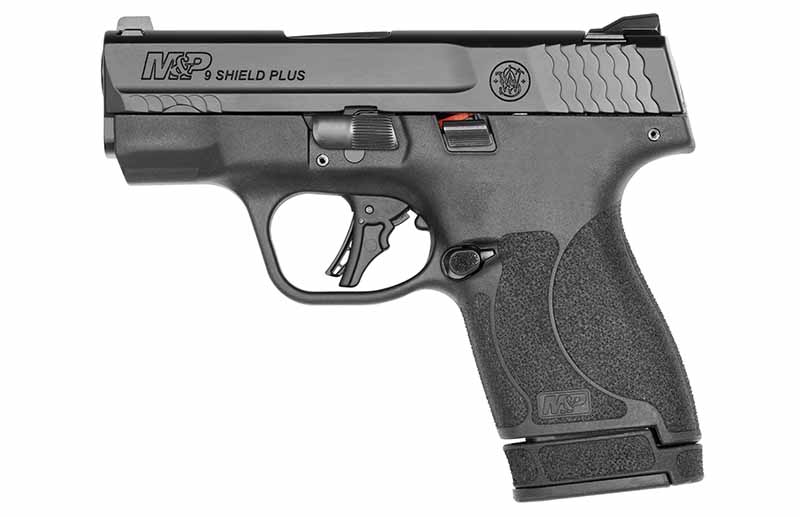
M&P Shield Plus 9mm
Little double, the M&P Shield is among the most popular concealed-carry pistols to come down the pike. Easy to keep under wraps, intuitive in control and chambered to stop threats, there were few knocks on the pistol, outside of capacity. Now, that’s a thing of the past. Upping the capacity of the demure heater, the Shield Plus brings the pistol in line with other micro-compacts currently on the market. With 13+1 on board, the 9mm has more than enough firepower to handle most lethal-force encounter—outside a full-fledged Hunnic invasion. The best part, Smith & Wesson didn’t compromise the pistol’s very manageable size to squeeze in the extra round, with the gun measuring 6.1 inches in length, 1.1 inches in width and 20 ounces in weight. MSRP: $553
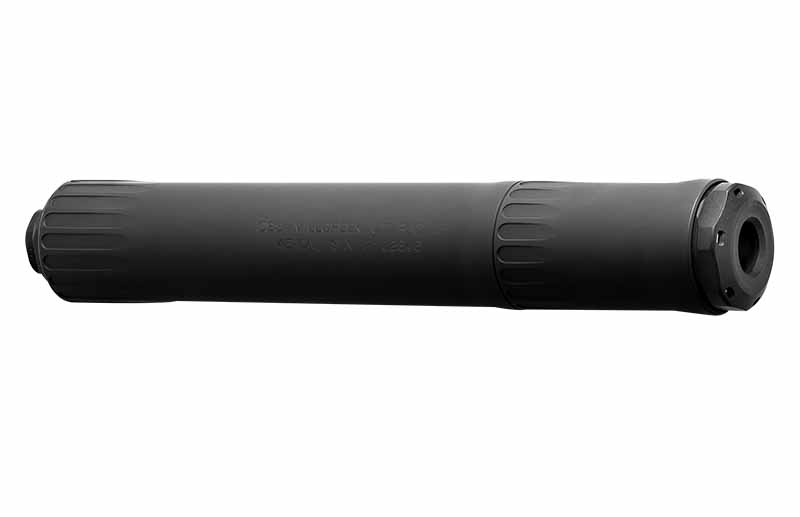
OSS RAD 9 and RAD 45 Suppressors
A significant advancement in pistol suppressors, the OSS RAD 9 and RAD 45 bring flexibility and improved shooting experience to the table. The heart of the suppressor is what OSS calls its Flow-Baffle technology, which essentially eliminates any blow-back. The secret sauce: radial baffles that route the expanding gases to the perimeter of the device, and then out the front. Modular, the suppressor also adapts to the situation with two configurations. The RAD 9 goes from 7.7 inches at full length down to 5.15 inches, while the RAD 45 is modifiable from 8.6 to 6.4 inches. In any setup, the cans make for long and very enjoyable shooting sessions. MSRP: RAD 9 $849; RAD 45 $999
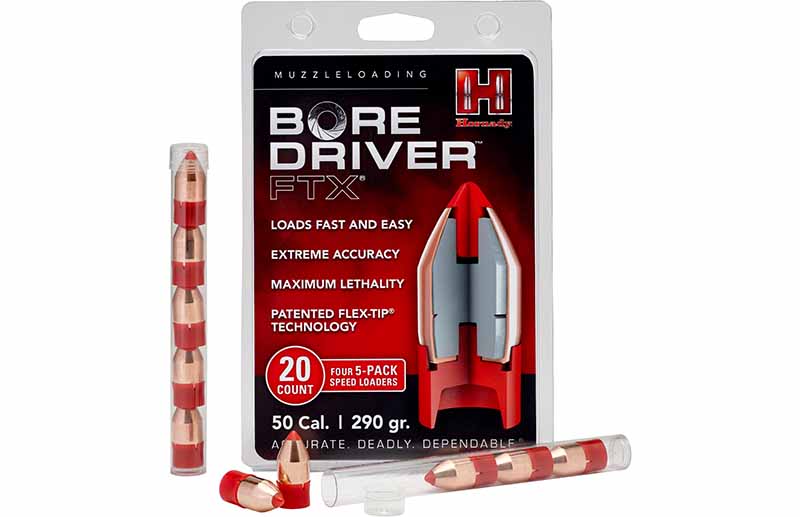
Hornady Bore Driver FTX
Hunt with sabot rounds during muzzleloader season and you know their drawback. Yeah, they’re lights-out accurate, but, boy howdy, are they a pain to wrangle down a bore. If there was only a better system. Known as the Bore Driver FTX, the system is designed for sabot-like performance, but not loading. The key here is Hornady opting for a polymer base, which provides the same sealing properties as a sabot but doesn’t require throwing your back out to ram home. Sitting atop the base is Hornady’s legendary FlexTip (FTX) bullet, which serves up class-best ballistic coefficients and downrange performance. Translated, that means the .50-calibers shoot to your muzzleloader’s limits. MSRP: $29.99 box of 20
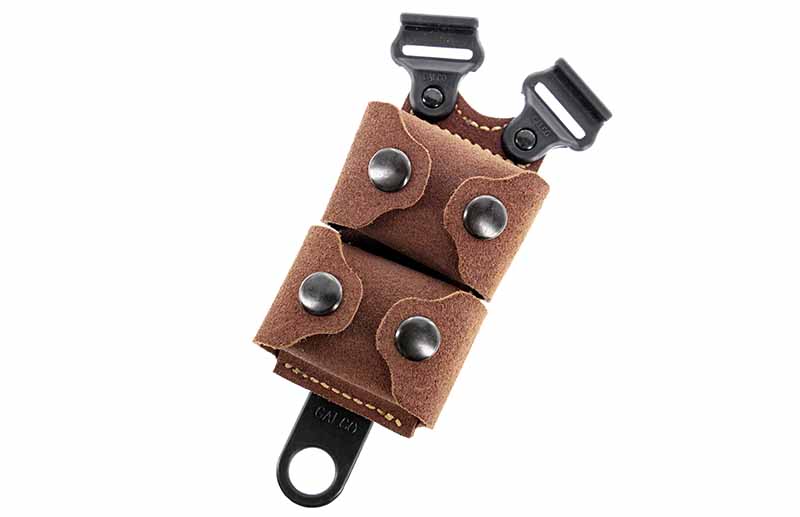
Galco Classic Lite 2.0 Speedloader Carrier
Reloading a revolver … it’s a hurdle armed citizens are well aware of. Less considered is how to keep those reloads on-hand and under wraps until they’re needed. Galco has the answer in its speedloader carrier tailored to its shoulder holster rigs. Keeping two speedloaders at hand under the support-hand armpit in a horizontal position, the system allows for fast and efficient reloads conducive to the most popular techniques taught today. And the ambidextrous system is tough as cut nails. Constructed of 100-percent premium center-cut steerhide and rugged steel snaps, the carrier is made for years of use and with any caliber. MSRP: $39
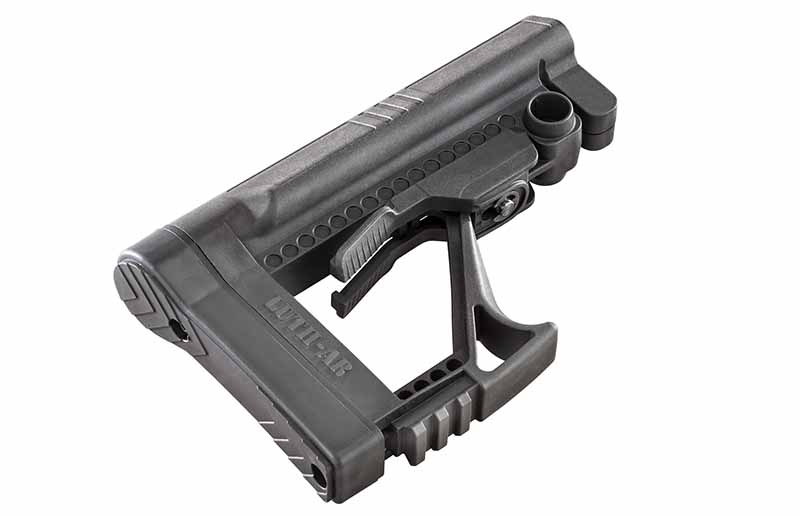
Luth-AR MBA-5 AR Upgrade Stock
Stocks usually pull up the tail end of an AR upgrade, but few enhancements—outside a snappy new trigger—do more to improve a rifle’s comfort and performance. Luth-AR is a master at tweaking this particular part of a build. Outfitted with the company’s Anti-Rattle set screw found in the MBA-3 and MBA-4, the MBA-5 stock eliminates that annoying shimmy common on lesser options. Additionally, Luth-AR includes a wide, flared cheek rest for an intuitive and comfortable weld, a convenient paddle-style adjustment lever for rapid positioning (six positions). To finish it all up, the parts maker integrates a Picatinny rail on the lower rear of the stock, perfect if you’re a precision shooter who has to have a monopod to steady everything up. Complete with QD attachment points and righty and lefty friendly, the very affordable stock brings out the best in an AR. MSRP: $49.95
Ruger MAX-9
Ruger is no stranger to carry-ready handguns, though traditionally they stuck to more non-traditional niches. Now, it’s set to tackle the fastest-growing segment of self-defense arms—the micro-compact—with the MAX-9. As to how the pistol measures out, it’s 6 inches long, 1 inch in width, boasts a 3.2-inch barrel and weighs in at 18.4 ounces unloaded. Along with its overall demure size, it offers spot-on capacity, feeding on both a 10-round flush-fit magazine and a 12-round extended capacity. Finally, it’s optic ready—yes, you heard that right. Compatible with a wide swath of red-dot optics, there are few other pistols in its class that compete with what the MAX-9 brought to the table at its price. MSRP: $499
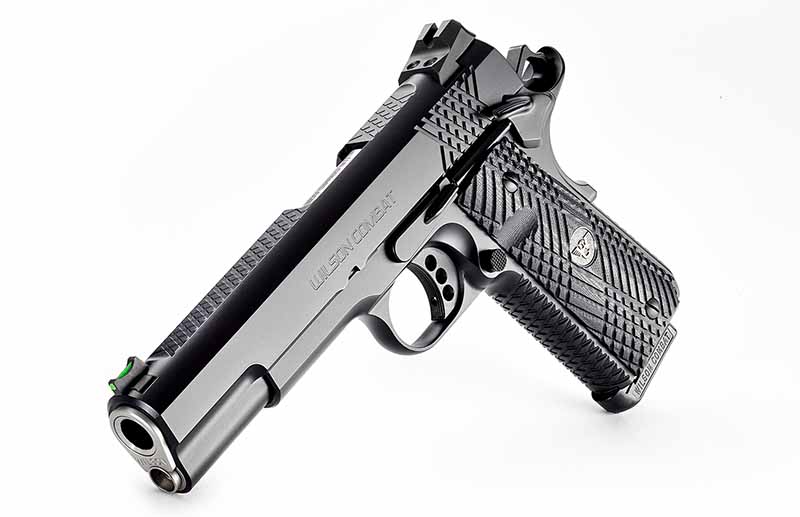
Wilson Combat X-TAC Supergrade
Arkansas is the heart of American custom gun-making, and it’s also the home of Wilson Combat. Renowned for its custom creations, the popular purveyor of top-shelf 1911s might have outdone itself in the enhancement of one of its popular lines. The X-TAC Supergrade isn’t brand-new, but its release is still worth mention, given it takes Wilson’s “one gun at a time” ethos to its maximum. The company’s most experienced gunsmiths build these John Browning classics, meaning only a few are turned out each month. Exclusivity is an asset, given the carbon-steel beast’s fit and finish are unparalleled … as is its performance. Some of the fine points include bidirectional, X-TAC frontstrap and slide treatment for enhanced grip, rear battle sight and front fiber optic, bull barrel and choice of 9mm, .38 Super and .45 ACP chamberings. MSRP: $4,795
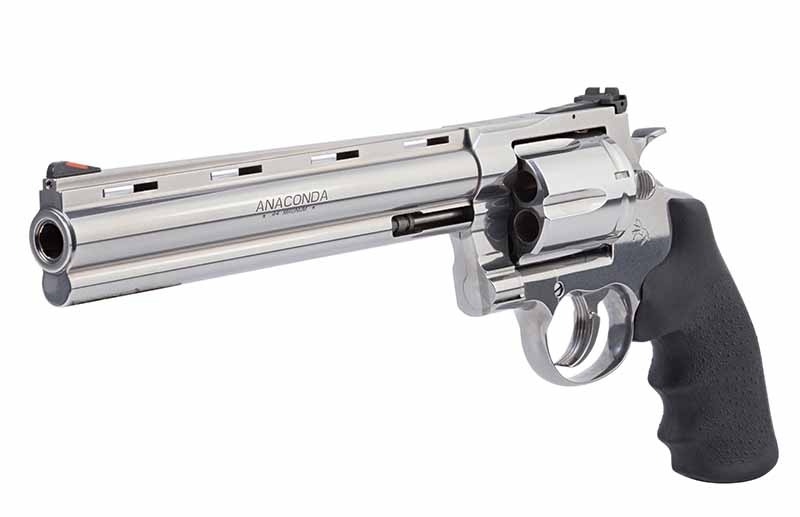
Colt Anaconda
Few things are quite as American as the .44 Magnum and Colt “Snake Guns.” Thankfully, this potent combination returns to the iconic gunmaker’s catalog in 2021 with the release of the highly anticipated Colt Anaconda. The six-round .44 Mag. isn’t a one-on-one clone of the original, instead sharing more with the recently rebooted Python. But the super-sized snake has everything to squeeze every lick of power from the cartridge, including the choice of 8- and 6-inch barrel, redesigned non-stacking double-action trigger, fully adjustable rear sight, Hogue over-molded grips and target-crowned barrel. A brilliant semi-bright finish pulls the whole stainless steel revolver together and makes the Anaconda as appealing as ever. MSRP: $1,499
Editor’s Note: This article originally appeared in the 2021 Made In The USA issue of Gun Digest the Magazine.
Can the KS-12 American Saiga clone hold a candle to the Russian original?
What’s a KS-12?
12-Gauge Semi-Auto AK-Style Shotgun
Based on Russian Saiga-12
Made in the U.S.A.
Adjustable Gas
Four Variants
AK shotguns have been popular with both civilians and law enforcement since the introduction of the Saiga-12 in 1997. But sanctions placed on Russian companies in 2014 and 2017 ended any further importation of their firearms into the U.S. Considering that 12-gauge AKs may be the best design for modern combat shotguns, it’s no surprise the demand for them didn’t disappear along with the supply. Almost immediately following the 2014 Saiga ban, Kalashnikov USA was formed to try and fill the void left by Izhmash and Molot. Their first project was the KS-12.
KS-12T, black.
KUSA Origin
Once the exclusive importer of Saiga shotguns and rifles known as RWC Group, the company reformed as Kalashnikov USA once importing Russian-made weapons ceased to be an option. They had a slow start setting up production but were finally able to get their first guns out the door in 2017.
They have no officially known relationship with the Russian company, Kalashnikov Concern, but KUSA’s guns are supposedly built using original Russian data packages. Those who have extensive hands-on experience with both Izhmash-produced and KUSA-produced AK shotguns claim that the biggest difference between them is KUSA’s generally higher quality control.
One would expect their fit and finish to be higher than on Russian guns, considering the difference in scale of production. Kalashnikov Concern is a former Soviet state-run arsenal, Izhevsk, and still produces guns for the Russian military, Russian civilian market, and export. Kalashnikov USA is a lemonade stand in comparison. There’s nothing inherently wrong with that. Being a smaller operation gives the opportunity for higher levels of quality control, and so far that seems to be true of KUSA’s guns.
Their low production numbers are also their biggest bottleneck to success, however. KUSA simply doesn’t produce enough guns to make them a serious competitor in the AK market. If they ever manage to ramp up production while retaining their excellent quality control, it would be a winning combination.
KS-12
This is the standard version of Kalashnikov USA’s Saiga-12. It is based on the later Saiga import that had a standard, fixed-stock AK configuration rather than the earlier sporter models or the later folding stock models. It is nearly identical to its Russian counterpart, with the biggest difference being the omission of the manual bolt hold open (BHO) device. This can cause problems when attempting to load a full magazine on a closed bolt, which is why the Saigas had them in the first place.
The KS-12 includes a Russian-pattern side scope rail, a threaded muzzle with thread protector, and ships with a 5-round magazine. All KS-12 variants are compatible with original Russian magazines as well, but those are rarer and more expensive than KUSA’s new production mags.
Like the Saiga-12, the KS-12 has a two-position adjustable gas regulator. The settings are designed to reliably cycle low-power practice shells as well as full-power defensive loads. They are both chambered for 2 ¾-inch and 3-inch shells.
KS-12
KS-12T & KS-12TSFS
These are the tactical configurations of the KS-12 and are almost identical besides the furniture. The KS-12T has a tri-rail handguard, an ergonomic pistol grip, and a collapsible AR-style buttstock. It also ships with a flash hider and a 10-round magazine. The KS-12TSFS is only different in price and its ability to fold the stock as well. Both the standard T and TSFS models are available with black or FDE furniture.
KS-12TSFS, FDE.
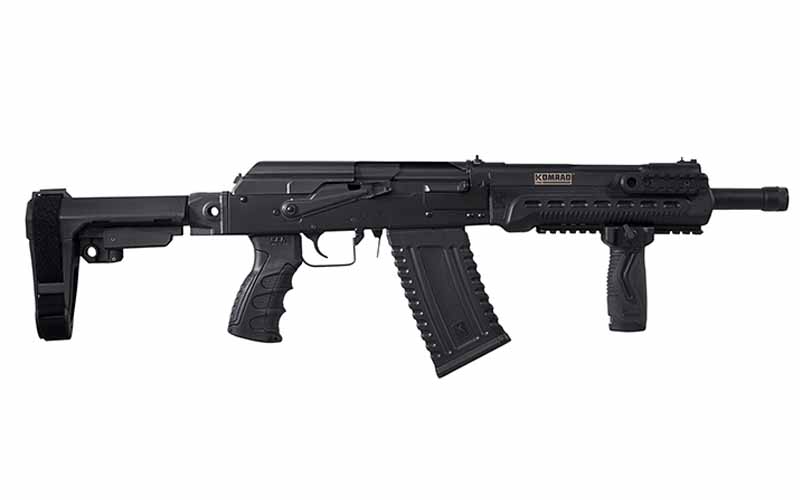
Komrad
This KS-12 variant isn’t technically a shotgun or a pistol, but a short-barreled firearm. That makes the Komrad the only way to get a factory short-barreled AK shotgun without paying for a $200 government permission slip. This version also comes with the tactical grip and handguard, as well as a vertical foregrip and SB Tactical brace.
KS-12 Komrad.
For those in the market for an AK shotgun, you will have to determine whether KUSA’s offerings satisfy your needs. On one hand, they are at least of equal build-quality as original Saigas, they don’t need to be imported, and they’re cheaper new than Saigas are used. On the other hand, KUSA guns are still sometimes hard to find, have also gone up in price, and lack a BHO device.
Both the Saiga-12 and KS-12 are good AK shotgun options, but don’t forget there are also Veprs that will be nicer, and non-Russian imports that will be cheaper. Even with sanctions on Russian arms imports, 12-gauge AKs in America continue to be a solid shotgun option.
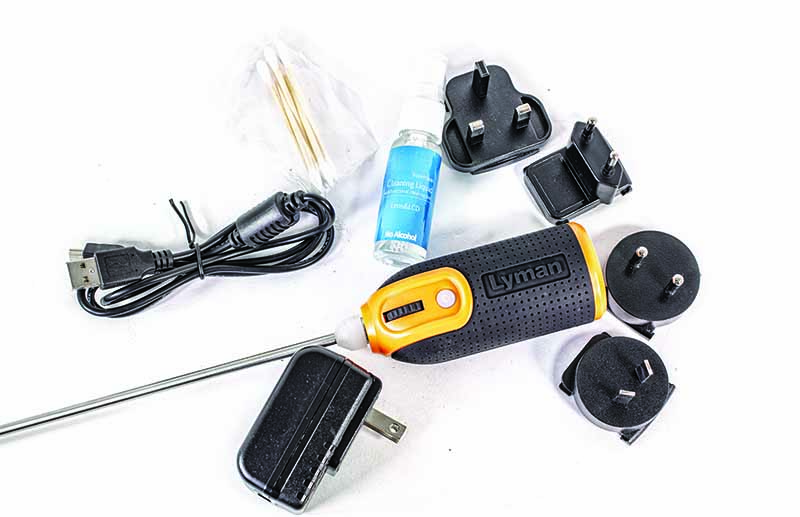
The days of peering down the muzzle to gauge the fitness of a gun bore are over. The Lyman Borecam Pro gives you an inside look at your firetube.
How the Borecam Pro Gives You The Inside Edge:
Scope tube is 24-inches long, enough to inspect most rifles.
The device is wireless, making it much more manageable.
Capable of recording video and saving still images.
Produces images at 720p in both cases.
Fits barrels .20-caliber and larger.
There’s a great scene in Major League when the team finds out their pitcher with the rocket launcher for an arm is almost blind. They fit him with a pair of glasses, and the coach comments, “Seeing’s the most important thing.” Looking at the hideous frames he’s wearing, one of the other players replies, “It’s not that important.”
The Lyman Borecam Pro comes with all the goodies: Borecam, charging cable, adapter for every electrical system known to man, cleaning gear and instructions.
We used to peer down bores and as long as we saw daylight from the other end and a shiny surface, we called it good. Little did we know. Now, perhaps, we can know too much. A rifle that otherwise shoots excellent groups might show up at the gunsmith with a request to re-barrel it, saying, “The bore is too rough.”
The important thing to remember is actual performance. If your rifle shoots good groups (however you define them) and doesn’t foul quickly, does it matter how smooth your bore’s surface is?
Not really.
But if you find that your accuracy is starting to suffer or that you once could shoot all day long with little or no accuracy loss, and now after 100 rounds, your groups open up. It’s time to investigate.
Borecam Pro Gives You A Peek
Lyman to the rescue with the Borecam Pro. Usually, a borescope means optics, lenses, mirrors and some sort of light source—all piped down a barrel. That can be tough when you’re trying to inspect an AR barrel. Lyman originally had the Borecam, which was a borescope with a digital camera built-in and wired to a monitor. It worked, but it wasn’t ideal. Keeping the wire from getting tangled, or just dragging the monitor screen around, was a hassle. The Borecam has a 20-inch reach, which was a bit limiting.
So, for the Borecam Pro, Lyman moved on up. First, they made the scope tube 24-inches long. You can now look at the throat of a barrel going down from the muzzle. That saves the work of weaseling the scope over a stock, into a receiver, and past all the internals just to get to the chamber.
You use your cellphone or tablet as a Wi-Fi receptor to see the image, photograph it or video it and save or send on.
And then, they made it wireless. You can port the image to your phone or tablet, and as a result you can easily send it on to wherever you decide. Also, without wires involved, you can mount the phone or tablet (iOS or Android) in a spot that’s easy to see, and not have to worry about the wires moving the screen all over the bench as you push, pull or rotate the scope. You can record video and save still images—all at 720p resolution. The Borecam Pro fits down barrels of 20 caliber or larger, so that leaves out the various 17s—but any .22 LR or larger bore is fair game.
The Borecam Pro has a USB charging port in the handle, so you can charge it up as your first step and have it ready once you get the firearm disassembled, the bore cleaned (or not, if you want to see the horror), and clamped in your work rack or bench vise. The charging indicator light goes on when you start charging and then turns off when it reaches full charge. The power switch also controls the power of the bore light, allowing you to adjust the light to the level you need.
I wish I had access to something like this back when I was gunsmithing, to show customers what was what. But then again, back in the 1980s, this level of technology would’ve been akin to magic. Now, it’s just a bit over $300.
Considering the cost of a new barrel—which you might avoid spending if you have a Borecam Pro—it sounds like a smart investment.
For more information on the Borecam Pro, please visit lymanproducts.com.
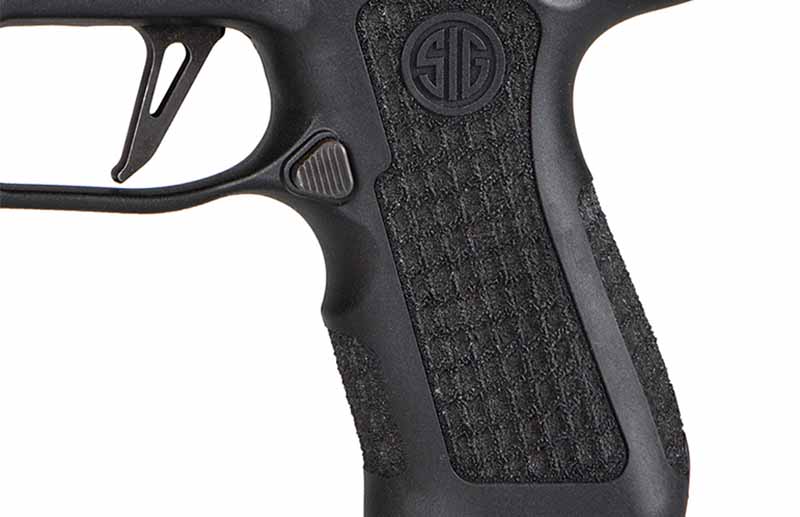
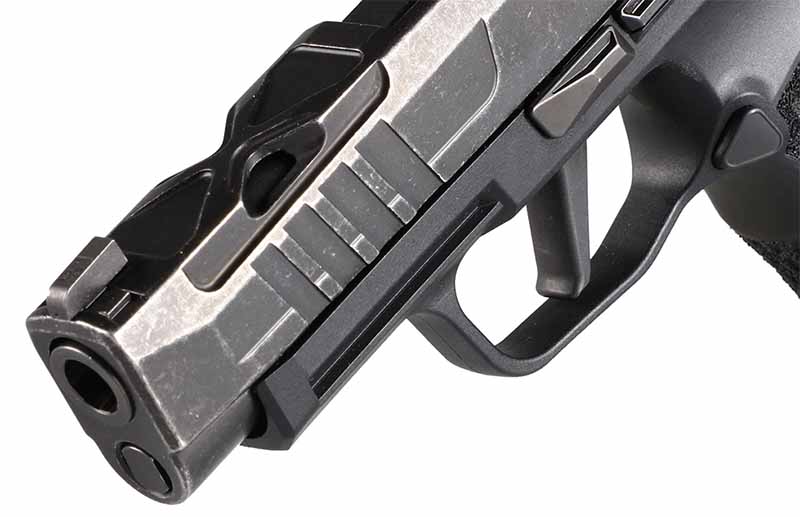
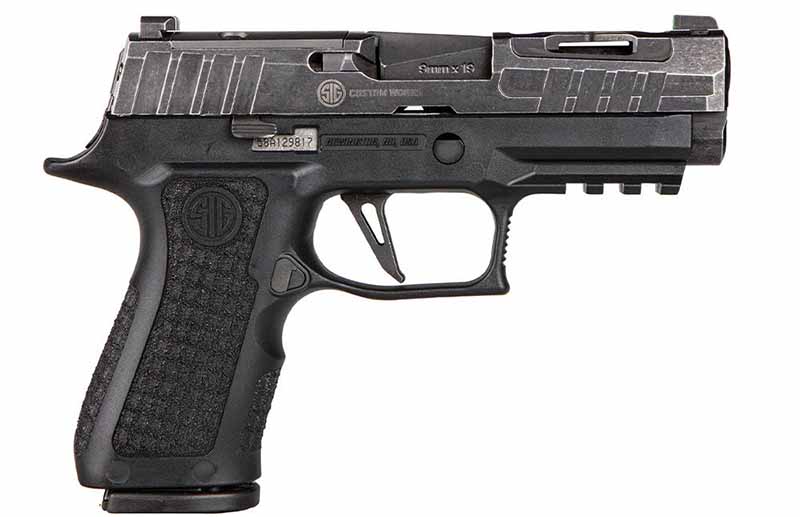
Sig Custom Works’ new Spectre pistols include Sig’s two most popular handgun models, and they’re ready to be carried right out of the box.
Spectre Series Features:
Laser Engraved LXG Grip Module
Distressed Spectre XSeries Slide
XSeries Trigger
Optics Ready
XRay3 Day/Night Iron Sights
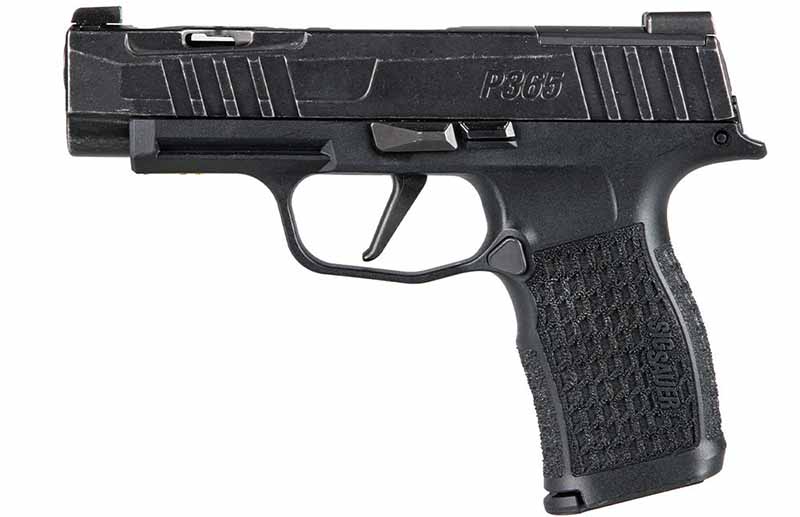
Sig handguns have been seeing greater success than usual in the U.S. market for a few years now. Their P365 XL is generally considered to be the king of micro-compact double-stack 9mm carry guns. And the army’s adoption of the P320 as the M17 service pistol helped to boost their popularity as well. Now Sig Custom Works has released the Spectre line which features the P365 XL and the P320 XCompact, both designed to be ideal concealed carry pieces without any further modification required (besides perhaps the addition of an optic).
Both Spectre pistols feature an LXG grip module which has been laser engraved with aggressive texturing to provide for a solid grip. They also include XSeries triggers, XRay3 Day/Night sights and an XSeries slide. The slides both feature Spectre X-pattern engravings and lightning cuts.
P320 XCompact LXG laser engraved grip and skeletonized XSeries trigger.
The P320 XCompact Spectre’s XSeries straight trigger has been skeletonized, something not found on the P365 version. The P320 also has more direct optics mounting options than the P365 XL, ready to accept a Sig Romeo1PRO, a Deltapoint PRO, or an RMR. The P365 Spectre is only cut for the Sig ROMEOZero.
The Spectre XSeries slides on both guns have also been intentionally distressed at the factory to give each one some unique character. It certainly looks cool, but it’s also a bit like buying pre-torn jeans. If you are training with your defensive handgun as rigorously as you should be, the finish should distress naturally.
The larger of the two Spectre pistols, the P320 XCompact is still small enough to be easily carried. It is more comfortable to shoot and has a bigger magazine capacity than the P365 XL, but comes at the cost of being less concealable.
The Spectre P365 XL
The regular P365 XL has already been lauded for how ergonomic and comfortable of a shooter it is despite its small size. This can only be more true on the custom Spectre model due to the aggressively engraved grip texture and improved XSeries straight trigger.
The Sig Spectre pistols have been listed for sale from $1099 to $1199. This may be a large sum for a carry pistol, but it has come to be expected for a custom gun of this quality. They each also ship with two magazines (15-round for the P320 XCompact and 12-round for the P365 XL), a certificate of authenticity, and a Sig Custom Works challenge coin.
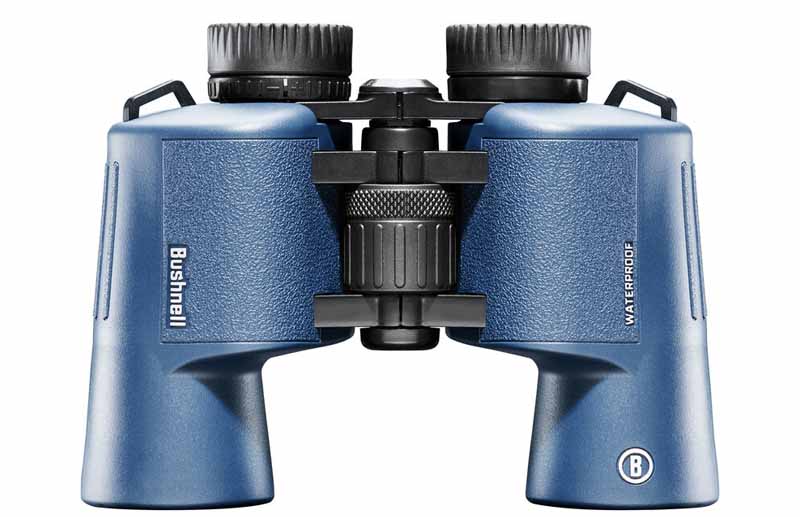
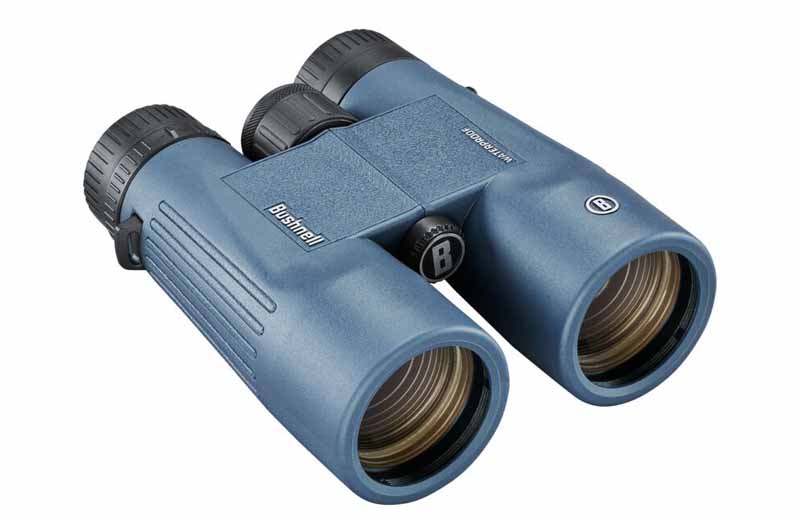
Bushnell recently released their upgraded line of H2O waterproof binoculars. Their new aluminum body makes them light-weight and tough enough to be taken anywhere.
New H20 Waterproof Binocular Models:
7×50 Porro (MSRP $99.99)
8×25 FRP (MSRP $39.99)
8×42 FRP (MSRP $89.99)
8×42 Porro (MSRP $79.99)
10×42 FRP (MSRP $99.99)
10×42 Porro (MSRP $89.99)
10×25 FRP (MSRP $44.99)
12×42 Porro (MSRP $99.99)
12×25 FRP (MSRP $49.99)
Binoculars may seem pretty simple on the surface, but like any other piece of gear once you start seriously using them you may begin to better understand the nuance involved in their design. There’s more to a good pair of binoculars than just high magnification power. Good binoculars must balance weight, durability, image quality and price, and Bushnell’s new upgraded H2O line seems to do a good job of finding a happy medium between all of those factors.
What’s New?
While Bushnell’s original line of H2O binoculars was also advertised as waterproof, no specific promises were made regarding how deep or for how long. The improvements found on this new generation of H2O binos are sure to please those who spend time around water, as they have now been officially rated for being submergible up to one meter for up to 30 minutes without any seepage. If for some reason they do leak, they also include Bushnell’s 20-year Ironclad warranty. Between the improved waterproofing and warranty, one should not be afraid of treating these binoculars the way good gear was meant to be treated—rough.
They are constructed from a new aluminum chassis that not only makes the whole package lighter, but more durable than the old generation. This is great news for those who enjoy slogging through the bush with their binos strapped around their neck, as it should take a lot longer before these start to weigh you down. Holding them to your face for a prolonged amount of time should be easier as well.
All nine models also feature a textured rubber housing to ensure a good grip even after getting wet. This is a very good idea for binoculars primarily intended for marine use. The rubber housing should also provide added protection against being dropped if the rubber texturing proves to be insufficient for your butterfingers.
The optical quality has also been improved, a nice feature whether you’re using them to track game or just enjoying nature.
Models and Variations
The nine different models come in a variety of magnification strengths, objective lens sizes, and prices, so there should be a version that suits your needs and budget. Both Porro Prism and Folding Roof Prism (FRP) designs are available.
Available now with MSRPs ranging from $39.99 to $99.99, this new generation of Bushnell H2O waterproof binoculars seems like a solid choice. Whether your hobby is tracking game through wetlands or just birdwatching at the beach, Bushnell likely has the right tool for the job.
For more information on Bushnell, please visit bushnell.com.
Given perpetrators tend to travel in packs, learning to engage multiple targets effectively and efficiently is a key self-defense skill.
Despite the fact we often train with a single target when we go to the range or run drills, most self-defense situations aren’t going to be mono y mono. If you hear footsteps approaching you in a dimly lighted parking garage, in all likelihood there’ll be two or more sets. In turn, if you value your life, you’d better get squared away effectively engaging multiple targets.
Jamey Caldwell, an instructor at 1-Minute Out and former special operator, breaks down the tactics to successfully get hits on multiple targets. It’s a challenging chore, even though Caldwell makes it appear simple. The hangup, more than anything, is transitioning smoothly between targets—not the easiest task with adrenaline pumping and only seconds to react. However, there are three points worth keeping in mind when drilling effective and efficient target transition:
Let your lower body lead the way
Keep your upper body relaxed
Keep your eyes on the target
Let’s break this down briefly.
When it comes to moving target to target, you’re legs and hips should do a majority of the work. Larger muscle groups, using these parts of the body requires less effort while providing more stability in the transitions. As for the upper body, getting tense makes for much jerkier movements. Keeping your arms and shoulders relaxed relieves the rigidity and creates a much smoother movement to the next target. Finally, getting your eyes on the target helps you move your gun in position. Certainly, you’ll still utilize your red dot or front sight, however, you’ll slow yourself down and struggle with getting on target focusing on them in transitions.
Overall, Caldwell gives very sound advice. Of course, you’ve got to do your part. Don’t just listen and nod in agreement at his instruction. Apply it to your training and push to make engaging multiple targets second nature.
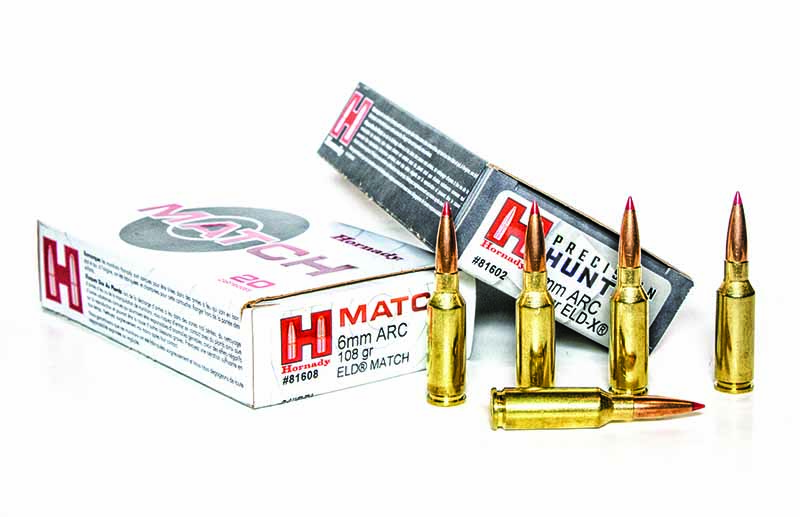
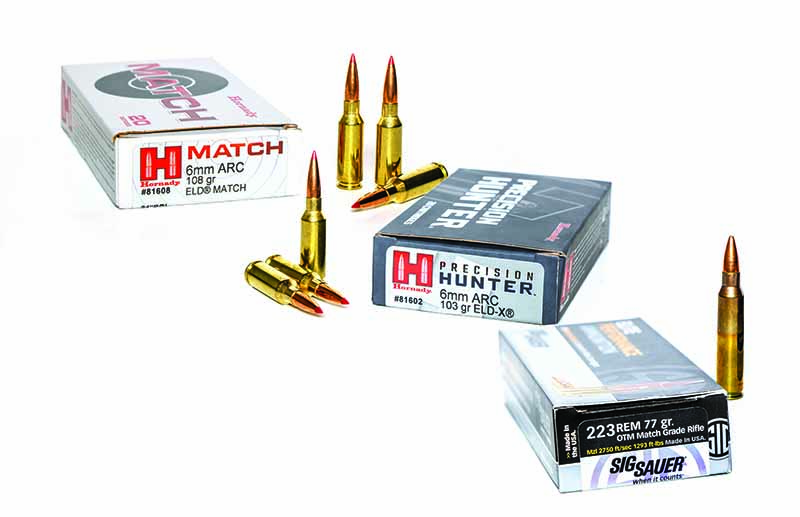
Has Hornady cooked up the ultimate long-range AR cartridge in its new sexy-six, the 6mm ARC?
What Exactly Is The 6mm ARC:
It is essentially a commercial version of the 6mm PPC.
Though, it has a slightly larger case capacity of 34 grains of water.
Given it’s designed for AR-15 platform, its maximum average pressure is 52,000.
Its forte is long-range and outperforms nearly all other popular AR-15 cartridges in this arena.
If you consider the evolution of the rifle, the goal has always been—and remains—to shoot with extreme precision, as far as possible, while experiencing the least recoil and influence from wind and gravity. Just look at the evolution of .30-caliber rifle cartridges; we went from the .30-30, to the .30-06, to the .300 Winchester Magnum and now to the .300 PRC. The desire to overcome the adverse effects of wind and gravity push the design of cartridges and bullets, and shooters relish every advancement no matter how minute. So, when someone argues that we don’t need a new rifle cartridge, what they’re essentially saying is that there’s nothing to be created that’ll be desirable or useful.
Though ringing steel at past 1,000 yards with an AR-15 might not appeal to you at all, you cannot deny the fantastic ballistic performance of the newest version of the 6mm PPC, known as the 6mm ARC.
Well, that’s clearly not true. The enhancement of external ballistics has been the driving force behind cartridge creation since Louis-Nicolas Flobert’s 6mm parlor guns of the mid-1800s. Everyone wants to shoot harder, faster and flatter, so desire and utility clearly exist. This is particularly true of devotees of the AR-15. Both amateur and professional ballisticians have been trying to develop cartridges for that platform for a long time. Some of these cartridges, like the 300 Blackout, found great appeal. Others, like the .30 Remington AR, proved to be misunderstood. The latest attempt at extending the reach of the AR-15 is from Hornady, and it’s called the 6mm ARC.
According to Hornady, they identified a need for an “unnamed” Department of Defense entity and a concept cartridge was discussed. The entity showed extreme interest, so Hornady began development. Ultimately, the result of that collaboration is what’s now known as the commercially available 6mm ARC (Advanced Rifle Cartridge), which was adopted by that undisclosed government body. For what it’s worth, I’ve been fed the “secret government agency” line so many times that it means nothing to me. And, truth be told, it should mean even less to you. I don’t care if Carlos Hathcock himself divined his dream cartridge from upon high down to some engineer in the basement of Hornady; a cartridge either fills a desire and provides utility—or it doesn’t.
But, Why The 6mm ARC?
What exactly is the 6mm ARC? It’s indeed a new SAAMI (Sporting Arms and Ammunition Manufacturer’s Institute) approved cartridge. That means there exists a set of parameters and design specifications for ammunition and firearms manufacturers to follow when building ammunition or guns for it. This is critical, because for a cartridge to have any chance for commercial success it must be SAAMI approved. Otherwise, manufacturers avoid it like a Covid-infected anti. However, the 6mm ARC isn’t really as new as it might seem.
Hornady currently offers three loads for the 6mm ARC. There’s a 105-grain boat-tail hollow-point Black load, a 108-grain ELD Match load and a 103-grain ELD-X load.
Along about 1975, Dr. Louis Palmisano and Ferris Pindell took the .220 Russian case, which was based on the 7.62x39mm Soviet cartridge and necked it up to 6mm (0.244 inch), and they also changed the shoulder angle to 30 degrees. The cartridge was explicitly created for benchrest shooting and, in fact, developed a winning reputation. Ironically, even though the 6mm PPC never gained SAAMI approval, it found great popularity in the benchrest competition circuit where most shooters made their own brass and loaded their own ammo. It should be noted, however, that there are several versions of the 6mm PPC. Though they’re minutely different, this is a result of a cartridge not having SAAMI approval.
While some believe the 6mm ARC is based on the 6.5 Grendel cartridge, it’s really nothing more than yet another variation of the 6mm PPC. No doubt, the 6.5 Grendel was some inspiration for the 6mm ARC project, and it could be argued the 6.5 Grendel is nothing more than a necked-up 6mm PPC. Of course, since bullet diameter is the primary distinguishing feature of any cartridge, this makes the 6mm ARC a closer relative to the 6mm PPC. Case capacity of the 6mm PPC is about 33 grains of water. Case capacity of the 6mm ARC is 34 grains. The most critical difference is that in bolt-action rifles, from which the 6mm PPC is typically fired, according to the Western Powders Handloading Guide, the 6mm PPC is loaded to pressures approaching 60,000 psi.
For the purposes of slowing extraction and extending bolt life, Hornady set the maximum average operating pressure (MAP) of the 6mm ARC at 52,000 psi. This is identical to the SAAMI MAP of the 6.5 Grendel, but 3,000 psi less than that of the .223 Remington and .224 Valkyrie. This makes perfect sense for Department of Defense applications, where extremely high round counts are expected. Soldiers and civilians want their guns to last as long as possible, and less pressure equals less wear and a longer life.
Of course, I’m sure some shooters couldn’t care less about where a cartridge came from or his ancestral background. Most are interested in the ballistic performance and advantages it might offer over other cartridges. After all, like has already been established, harder hitting, faster flying and more gravity-defying cartridges have forever been the focus of cartridge and ammunition development. It matters not so much where and why we now have the 6mm ARC, what does matter is what it can do.
Shooters have been begging for a cartridge that’ll deliver true long-range performance from the AR-15 for a long time. With the 6mm ARC, they now have one that delivers.
It gets tricky when you try to compare the external ballistic performance of various cartridges. This is partly because there are so many variables to consider. It’s even more complicated when the cartridges being compared are of a different caliber. So, let’s set the table for a proper comparison.
The 6mm ARC was designed for the AR-15 platform. Can it be fired in a bolt-action rifle? Sure. And, I’m sure we’ll soon see bolt-action rifles chambered for it. However, since the faster-shooting 6mm Creedmoor or .243 Winchester won’t work in an AR-15, it’d make no sense comparing the 6mm ARC to either. What’s offered here is a comparison of the 6mm ARC to other current SAAMI-approved cartridges that are AR-15 compatible.
There are a variety of ways to make this comparison. We could look at muzzle velocity and energy, and trajectories, and we could obtain this data from advertised ballistics or actual testing. Since the problem the 6mm ARC was created to solve was that of long-range performance, comparing muzzle velocities is mostly a waste of time. By the same token, comparing actual chronographed velocities is, too; it’s not unusual to see drastic velocity variations from one rifle to the next. So, we’ll compare advertised velocities in conjunction with data obtained from a ballistics program to look at a prediction of long-range performance.
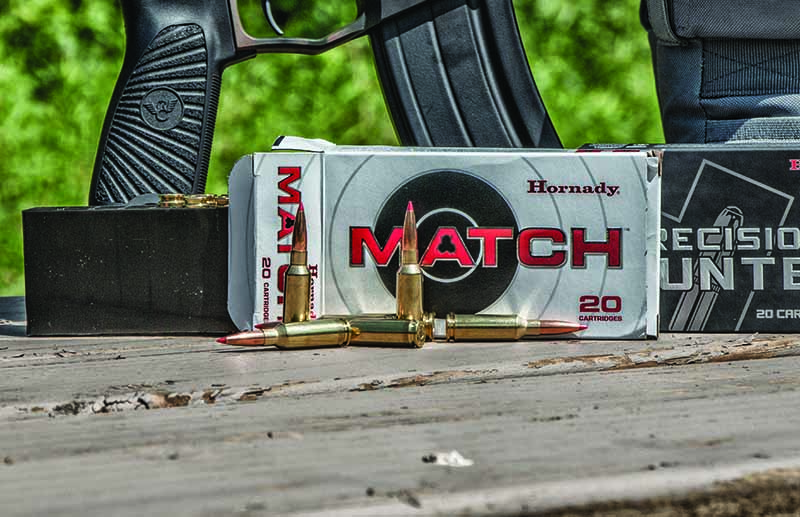
If you’re a hunter, Hornady’s Precision Hunter ELD-X load (Top) for the 6mm ARC gives the AR-15 more reach than it’s ever had before. With a muzzle velocity of 2,750 fps and a ballistic coefficient of 0.536, the 6mm ARC ELD Match (Middle) load is an outstanding long-range cartridge/load combination for the AR-15. To extend long-range performance, initially ammunition manufacturers loaded heavy and high BC bullets for the .223 Remington. This improved down-range performance, but only marginally and they required faster twist barrels.
If we do that, we see that the best performing 6mm ARC load—the Hornady ELD Match load— will take 2.04 seconds to travel 1,200 yards. The best factory 6.5 Grendel load will take 2.26 seconds to travel the same distance, and the .224 Valkyrie gets there in 2.15 seconds. The best load for the .223 Remington—the original chambering for the AR-15—takes about 2.36 seconds to travel 1,200 yards. This is what you might call definitive proof that the 6mm ARC is the best AR-15 cartridge at defying gravity and wind. This is possible due to the muzzle velocity of the cartridge and the high ballistic coefficient (BC) of the bullets Hornady loads for it. The ELD Match bullet has a BC of 0.536 and the ELD-X bullet’s BC is 0.512.
Due to these high BC bullets used by Hornady, the 6mm ARC not only retains velocity, it also retains energy. At distance, it’ll hit harder than the other three cartridges. The bullets will also remain supersonic at greater distances. If you’re a lover of the AR-15 and have been wanting to extend your effective range, this is all good news. However, keep in mind these comparisons were based on advertised velocities, which begs the question of what you can expect out of a 6mm ARC in the real world.
Testing Theory
To find out, I acquired a 6mm ARC from Wilson Combat; it was their Super Sniper model with an 18-inch barrel. The Hornady ELD-X and ELD match loads were tested form this rifle and delivered average muzzle velocities of 2,711 and 2,661 fps, respectively. Hornady advertises these loads at 2,750 fps for the ELD Match load and 2,800 fps for the ELD-X load. Out of the Wilson Combat Super Sniper, both loads clocked in at 89 fps less than advertised. If Hornady’s advertised velocities were, as most advertised velocities are, based on a 24-inch barrel, this equates to a very reasonable 14.8 fps loss in velocity for each inch of barrel loss.
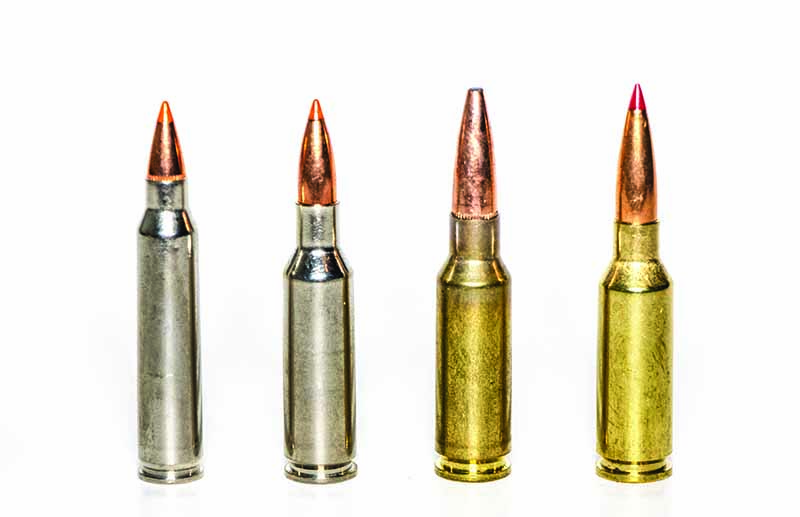
The .224 Valkyrie (second from left) and 6.5 Grendel (third from left) come close to matching the long-range performance of the 6mm ARC (right), but both fall short. All three cartridges out-class the .223 Remington (left) when the distance gets long.
For argument’s sake, let’s just assume that the actual chronographed velocities from an 18-inch barrel are all you can ever expect to get out of the 6mm ARC from any barrel length. If those velocities are plugged into the ballistics calculator and compared to the advertised—not actual—muzzle velocities for the .223 Remington, .224 Valkyrie and 6.5 Grendel, the 6mm ARC still outperforms all three cartridges at 1,200 yards. This means the 6mm ARC is indeed the flattest-shooting commercial cartridge option out of the AR-15. This places it well within the definition of need, making it both desirable and damned useful.
It should also be mentioned that the Wilson Combat Super Sniper rifle delivered, as you might very well expect, fine precision. For five, five-shot groups at 100 yards, the ELD Match load averaged 1.046 inches and the ELD-X load 0.693 inch. How does that stack up against other AR cartridges? Based on my records and all the AR-15 rifles and cartridges I’ve tested over the years, average 100-yard precision is slightly more than 1.5 inches. So, not only is the 6mm ARC flat shooting, it can also deliver precision.
What’s it good for and will it hang around very long? Distance is its forte and with its 2020 introduction and ability to flatten the trajectory curve, the 6mm ARC might ought to have been called the “Corona cartridge.” If you want to shoot at distance with your AR-15, this is the cartridge.
Long-range precision shooting is one of the fastest-growing segments of the shooting sports. Though typically dominated by bolt-action rifles, with the 6mm ARC, shooters can now contend out to 1,000 yards and beyond with an AR-15.
I also predict that it’ll indeed be with us for a while, and not just in the AR-15 platform. It’s essentially a commercial version of the 6mm PPC so look for bolt-rifles to spring up soon. Well, at least as soon as this current ammunition and firearms buying spree subsides. Until then, you can pick up an AR-15 or a new upper chambered for the 6mm ARC and have an AR that shoots flatter than you ever imagined possible.
Editor’s Note: This article originally appeared in the December 2020 issue of Gun Digest the Magazine.
The new Lo-Drag upper receiver from Luth-AR has been stripped of anything not integral to the function of the rifle to make it as lightweight and snag-free as possible.
Luth Lo-Drag Upper Features:
No Shell Deflector
No Forward Assist
No Dust Cover
Thicker Receiver Walls
When Eugene Stoner first designed the AR, it too did not have a shell deflector or forward assist, so in a way Luth’s new Lo-Drag upper is returning to its roots. Only at the insistence of the military were the forward assist and shell deflector added later on. Original ARs did have dust covers, however, so Luth’s design is taking things even a step further.
Similar low-profile uppers have been made before, but most have either been discontinued or include at least one of the three features omitted from Luth’s design. This new Lo-Drag upper will be more affordable and available than other low-profile designs on the market.
Featureless AR uppers like this are popular on varmint-gun and bench shooting builds, but there are other applications as well. If I were to build something based on the Lo-Drag upper, it would be streamlined in other areas to make it as lightweight as possible (the low weight is my favorite aspect of the AR platform in general). If you’re looking to build the lightest AR you can, try using the AR-15 parts weight database. This crowd-sourced databased is an excellent resource for finding the lightest parts possible.
That being said, it would be helpful if Luth-AR had bothered to list the Lo-Drag upper’s weight since that’s one of its main selling points. It may be a bit heavier than expected due to its thicker receiver walls which were added for extra strength, and its 6061-T6 aluminum construction is marginally heavier than MilSpec 7075-T6 alloy.
With an MSRP of $99, the Lo-Drag upper is an interesting new offering from Luth-AR. Personally though, I hope they start churning out more A1 uppers soon, there’s been a serious shortage lately.
For more information on Luth-AR, please visit luth-ar.com.
Looking to go armed, but are stuck in the weeds as to what to arm yourself with? Here are 20 of the best concealed carry gun options that will keep you on the defensive.