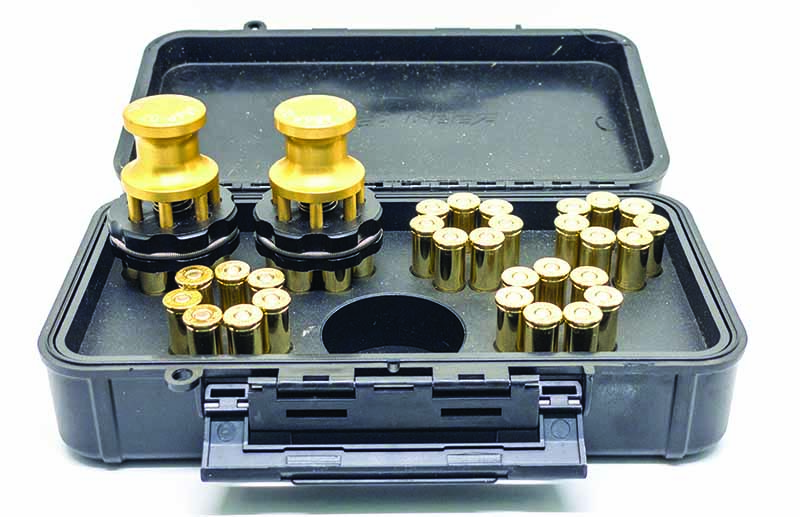
Model them at home, protect you at the range, Decibullz provides affordable custom hearing protection.
What Decibullz Offers:
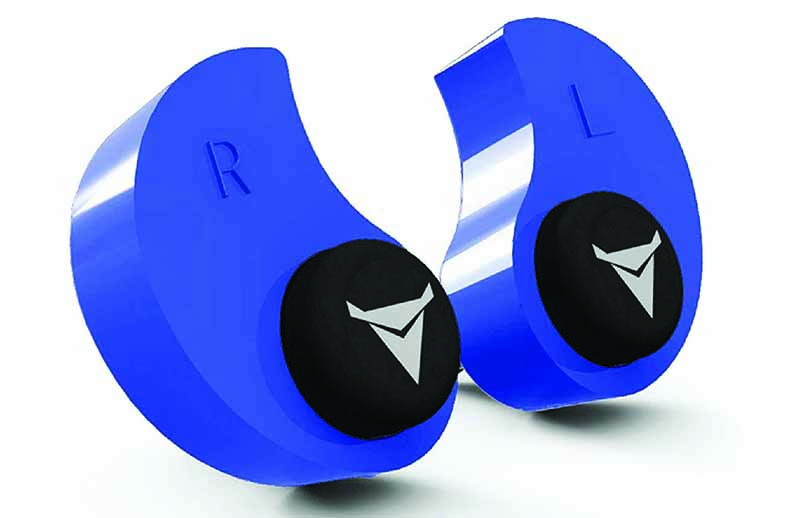
Foam exterior molds to the outer ear.
Offers complete protection, rated 31 NRR.
Remoldable, if the perfect fit isn’t accomplished the first time.
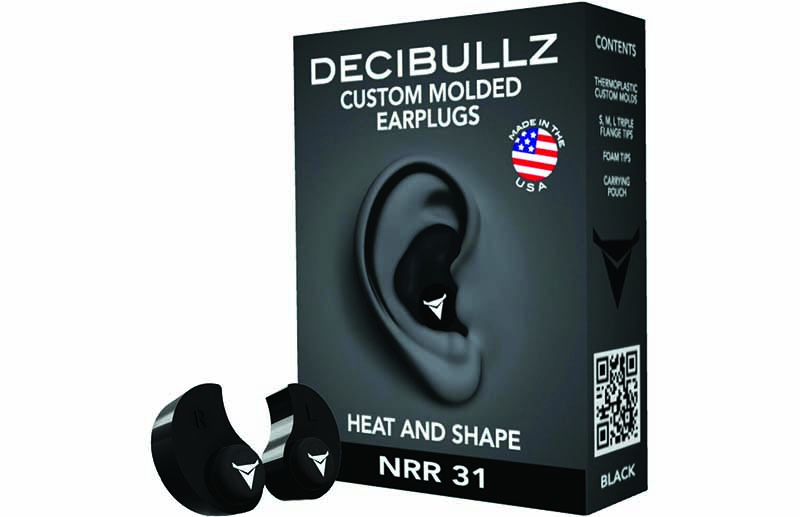
“Custom-molded earplugs, 31 NRR rated, for $30.” Standing at a booth on range day at the SHOT Show and hearing this, I was certain either my hearing was finally calling it quits after decades of shooting—or I was having a stroke. “You mean $300, right?” The answer, with a smile, was “No, $30. And you can custom fit them at home.”
OK, now I was hooked. “Tell me more.”
The custom-fitted ear protection is a clever product from Decibullz, and they’re a product of modern chemistry. The plugs start shape in a more-or-less earplug form. You drop them in boiling water and let them boil away for 5 minutes. You fish them out, let them cool and dry, and then press them into your ears. Obviously, you don’t want boiling-hot anything to be put into your ears. But when they’re cool enough to handle but not fully cooled off, they’re still pliable.
Decibullz come in various configurations: There’s the basic model, the Percussive Filter and the Professional High Fidelity plugs, each with various features and benefits.
So, you press them for a good, comfortable and secure fit and then let them finish cooling while in place. Once fully cool, they don’t change shape. You now have custom-fit hearing protection that provides up to 31 NRR protection.
Oh, and the best part? If you don’t get it right the first time, fire up the stove and boil some more water—you can repeat until you have it right. Yep, modern chemistry, a compound that can be shaped at the temperatures we can handle and does so repeatedly, not just a one-time thing.
They come in colors, so you can match your shooting protection to your shooting gear, should you wish.
Now, the basic ones for shooting protection aren’t the only option. There are upgrades: You can opt for the Percussive Filter, which dampens the peak impulse of sounds, but it permits the ambient levels to come through.
Then, there are the Professional High Fidelity plugs that use a special filter to lower all frequencies by the same amount, so you don’t have shifts in the sound itself. These are more the kind of plugs musicians would use to protect their hearing from amplifiers and such at concerts, but still permit accurate identification of sound quality.
The Percussive Filter and High Fidelity cost more, but even then they’re only $75 and $100, respectively. They are custom-moldable, just like the basic ones, and come in colors as well.
With $30, 5 minutes and a small pot of boiling water, Decibullz can be custom fit to the shape of your ear canal and offer high-dollar protection.
One of the tiring aspects of my job is lugging around a pile of gear. Each time I go to the range to test, there are guns, ammo, targets, tools, cameras, lights, chronograph, tripods … and lunch. It’s a pile of gun bags and boxes, and the only way I can be sure I have something so basic as hearing protection is to make sure there’s something in every bag I might grab.
Expensive hearing protection means a lot of cost to ensure I’m covered. With Decibullz, I can have a handful of hearing protection at a not-large outlay, and that means a set in a half-dozen different range bags, where they’re all custom-fit and deliver top protection.
Good stuff, and that’s no bullz.
For more information on Decibullz, please visit decibullz.com.
Editor’s Note: This article originally appeared in the December 2020 issue of Gun Digest the Magazine.
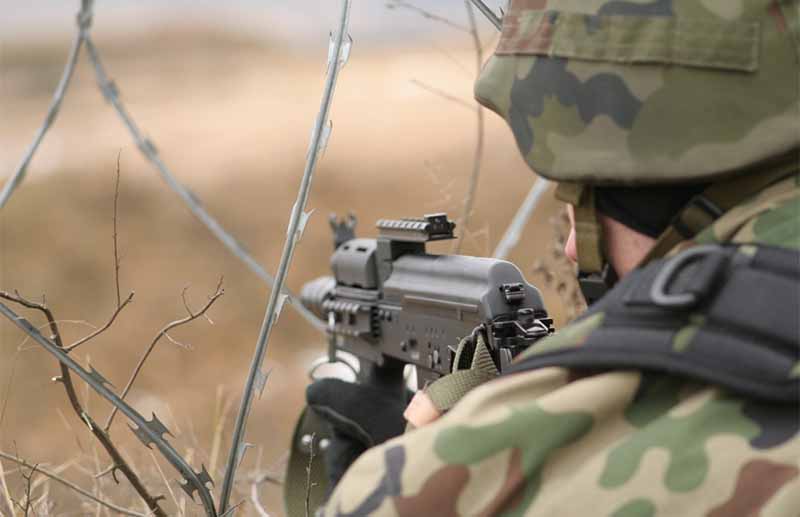
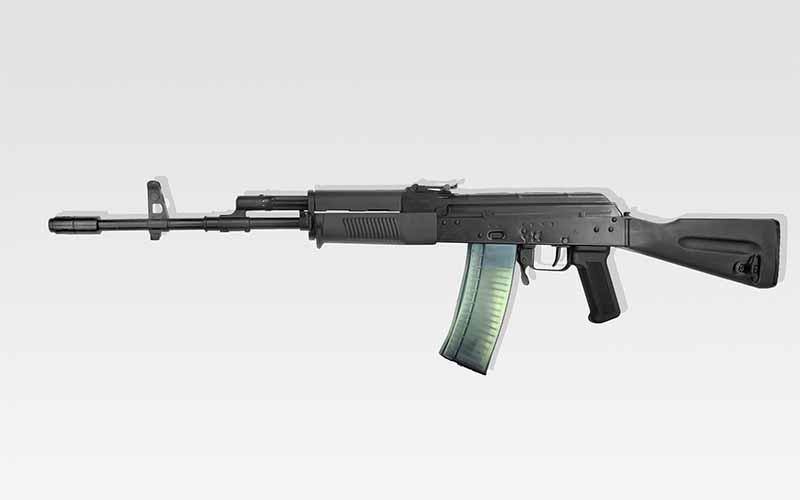
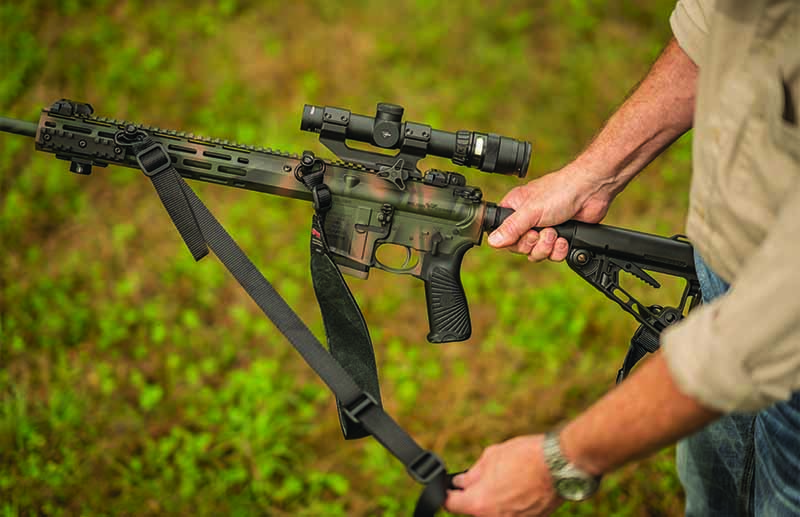
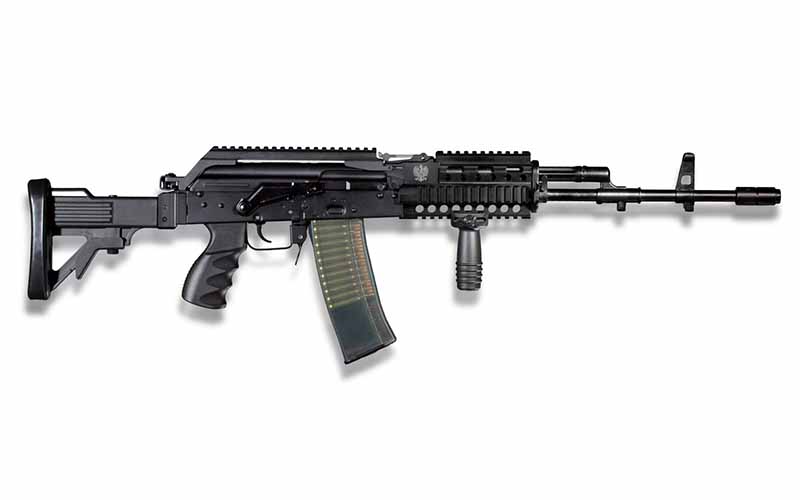
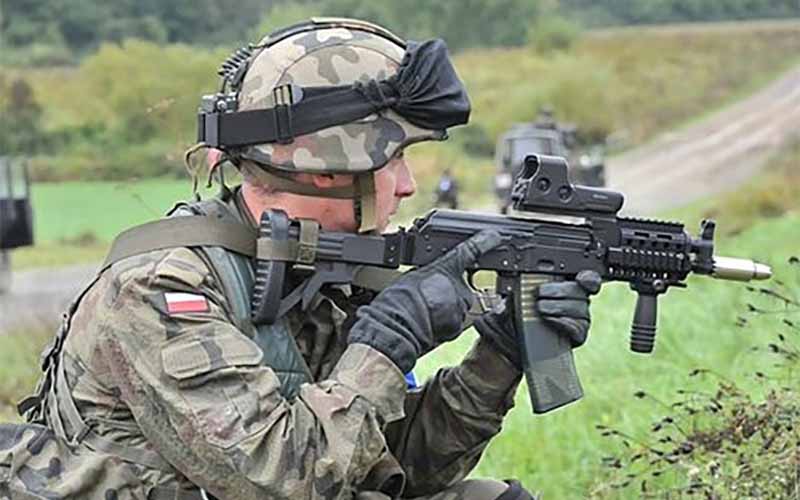
The Kbk wz. 96 Mini Beryl was adopted by Poland’s armed forces in 1997 alongside their new wz. 96 Beryl rifles. It was primarily developed to provide troops such as vehicle crews with a more substantial personal defense weapon than a pistol, similar in concept to the American M1/M2 Carbines of WWII and the Soviet AKS-74Us used in Afghanistan.
The Mini Beryl and the AKS-74U are quite similar in design, both being shortened AK carbines chambered in lightweight, velocity-dependent cartridges. The advantages of this design are mostly appreciated by those who carry their weapon more often than fight with it, with the compactness and lighter weight making them easier to transport. While it’s fun to think of these short AKs as “Spetsnaz weapons”, the reality is that those who actually fight with their guns appreciate the increased range and lethality provided by longer barrels. Whether it’s being fired from a “Krinkov”, a MK18 or a FB Mini Beryl, lightweight bullets just don’t perform very well out of short barrels. These weapons only shine in their original military configurations where they can be used as submachineguns in close quarters combat situations. The currently imported Mini Beryl pistols obviously lack select-fire capabilities, so their usefulness as a primary fighting weapon has been greatly reduced.
Despite there being several better-performing options available, the unique features and legendary quality of FB Radom AKs may still make the Mini Beryl pistol an attractive option to some shooters.
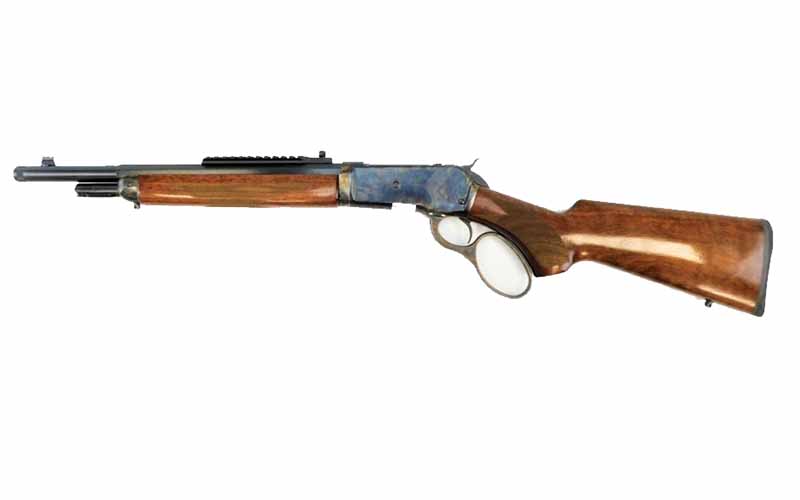
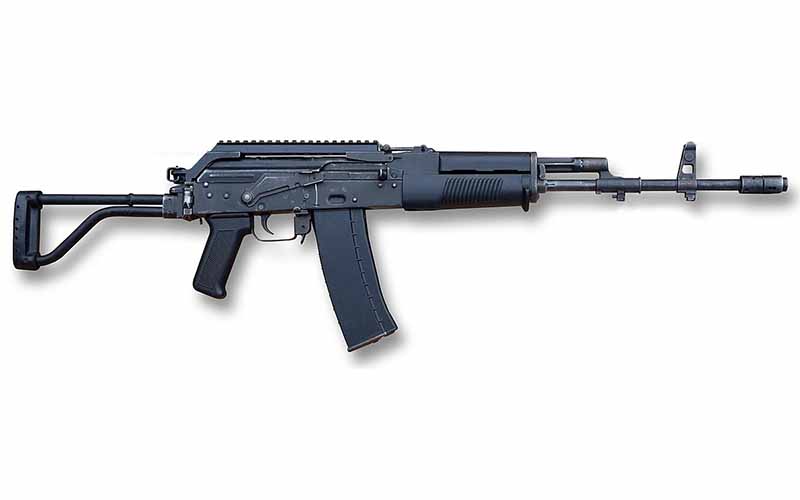
Semi-auto Mini Beryl in SBR configuration with Polish military telescopic buttstock and foregrip.
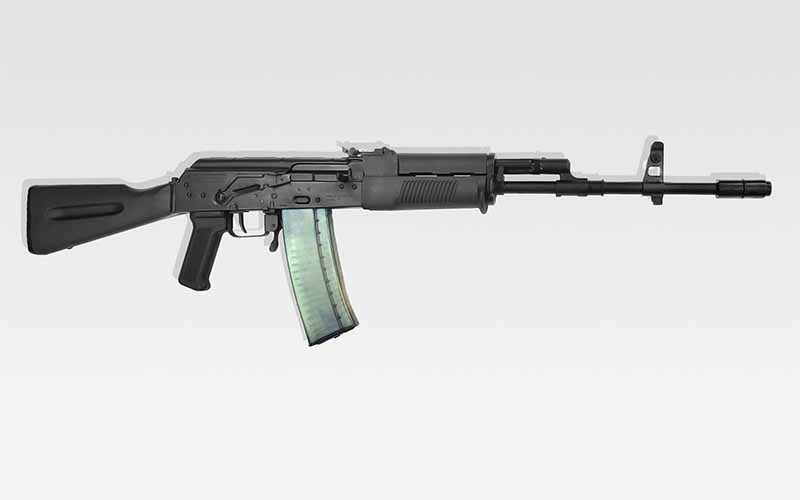
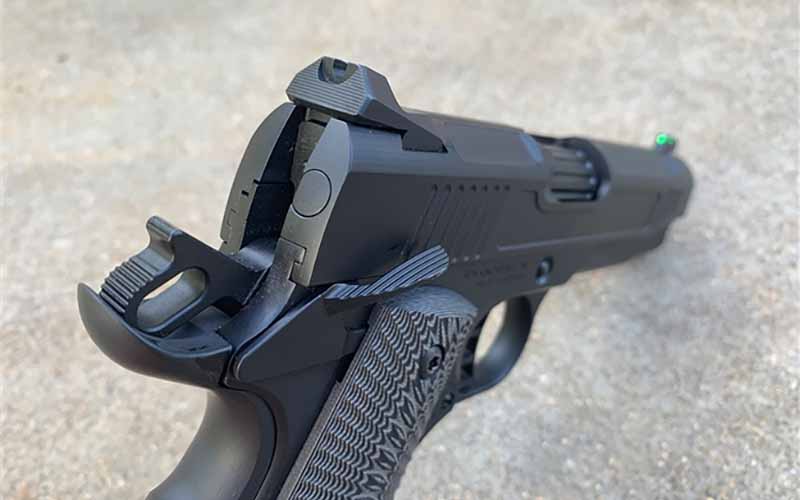
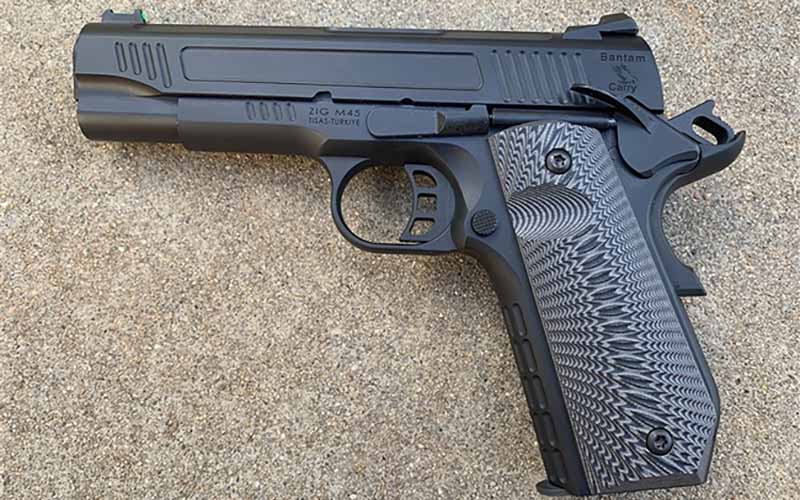
The M1 Mini Beryl Pistol
Legally classified as a pistol, the Mini Beryl is subject to different importation standards than rifles are. What this means is that, unlike the 5.56 Beryl rifles, the Mini Beryls are brought in unadulterated by U.S.-made 922 R compliance parts or conversions. Even the fire control group is the original Polish one, and it’s supposedly nicer than most stock military AK triggers. The only drawback of being a pistol import is that the muzzle device has been pinned in place, although the pins can be removed.
FB Mini Beryl Pistol, as imported.
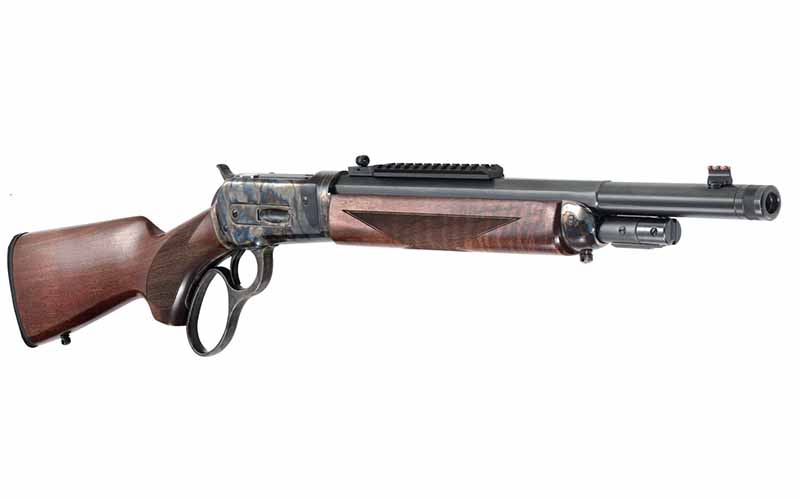
The polymer handguards on the Mini Beryl are proprietary due to the shortened gas system and unique Beryl-style handguard retainer. The pistol grip is interchangeable with any AK grip on the market, but mounting a brace or stock may present some difficulty. Mini Beryls are imported with a pistol trunnion with a bar on the rear for attaching a sling. This bar would be in the way of most pistol brace options on the market and would need to be removed before the installation of one took place. For turning the pistol into an SBR, a rear trunnion swap is also necessary in order to mount a proper stock.
Like its bigger brother, the Mini Beryl also has an enhanced safety selector and magazine release. Unlike its bigger brother, however, the Mini is optics ready right out of the box. The Beryl rifles have provisions for mounting the unique FB rail system, but this must be purchased and installed separately. The Mini Beryl instead comes with a rail section pre-installed where the rear sight would normally be, providing a solid surface for mounting an optic. A new rear sight was added inside of this rail segment as well, so the Mini Beryl is still usable without an optic installed.
Polish soldier with Mini Beryl. Notice the rear sight integrated into the optics rail. Photo: Polish Ministry of National Defense.
Performance
As previously mentioned, the Mini Beryl’s short barrel in conjunction with the 5.56 round make it susceptible to the same issues described by AKS-74U users in Afghanistan. Both 5.45 and 5.56 depend on speed for accuracy, range as well as wounding capabilities. Spetsnaz in Afghanistan preferred using standard-length AK-74 rifles, and there has been much debate surrounding the effectiveness of 5.56 since the M16’s barrel started shrinking in Vietnam. There is a good amount of data available on the speed and effectiveness of 5.56 out of different barrel lengths, but the short of it is that the Mini Beryl’s 9.25-inch barrel just doesn’t quite cut it. FB Radom claims that the Mini Beryl has a muzzle velocity of about 2,500 FPS when using M855 ball ammo. According to a study done by the Massachusetts Law Enforcement Instructors & Armorer’s Association, the magic number for 5.56 to hit in order to rapidly incapacitate a human is 2,700 FPS.
The engineers at FB Radom understood this, which is why their 5.56 Beryl rifles were given extended 18-inch barrels to achieve greater accuracy at longer ranges as well as better lethality. Like the Krinkov, the reduced performance of the Mini Beryl was considered acceptable for the jobs it was designed to do: being carried by vehicle crews and being used as an SMG by door-kickers.
Polish soldiers exit an armored vehicle with Mini Beryls during a training exercise. Photo: Polish Ministry of National Defense.
While they’re very cool and very well made, unless you are a collector or have an affinity for Polish military arms, I see no reason to get an FB Mini Beryl when other options are available. If you want an AK in 5.56, one with a longer barrel will give you much better performance. If you want a short-barreled AK pistol or SBR, one chambered in 7.62×39 or even 9mm will suffer less performance loss than small diameter rifle cartridges do. If you want a short-barreled 5.56 gun despite the poor ballistic performance, you could build an AR pistol for about $1,000 less than what the Mini Beryl goes for.
As an expensive novelty or range toy there is nothing wrong with the FB Mini Beryl AK pistol, but if you’re shopping for a gun for the end of days, I’d look elsewhere.
For more information on the importer, please visit armsofamerica.com.
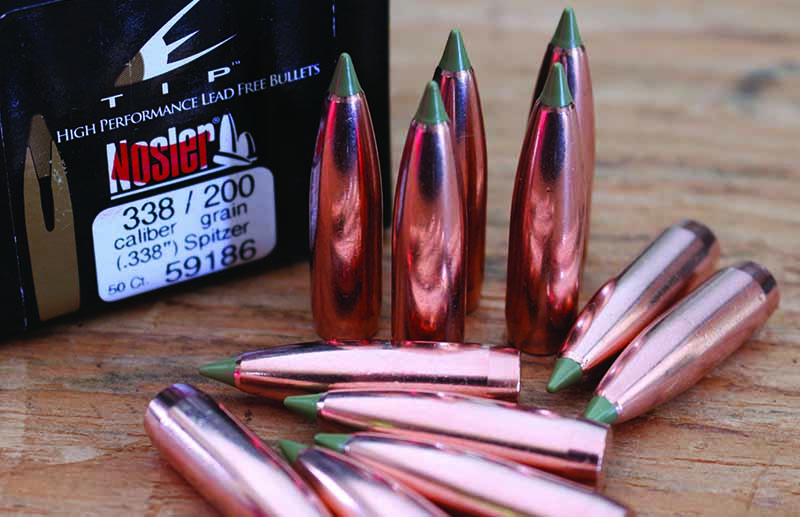
Monometal bullets are here to stay, because the technology has developed to be both reliably accurate and lethal.
“Whaddya mean there’s no lead in the bullet? That’s impossible!”
So proclaimed my father—Ol’ Grumpy Pants—when I first tried to explain the concept of the Barnes X bullet to him over two decades ago.
“Look, bullets are made either of all lead or a lead core with a copper jacket,” OGP instructed.
“No, Pop, these Barnes bullets are just copper—no lead core; they simply can’t separate, because it’s all one homogeneous piece of metal,” I retorted.
In his usual manner, he just looked at me and shook his head. In spite of his skepticism, I ordered the newfangled bullets anyway, and he thoroughly enjoyed watching me get more and more frustrated when they wouldn’t shoot from any of my rifles. Zero, zip, nada.
I ended up with a serious amount of copper in the barrels of my .308 Winchester, .300 Winchester Magnum, and .375 H&H … and also on a set of targets (which I was embarrassed about).
I abandoned the idea and went running back to my tried-and-true lead-core bullets for a couple of seasons—until I saw the Barnes XLC bullets, coated in some funky, blue powder designed to reduce both friction and copper fouling. I eagerly placed my order for these new monometal hollow-points and went to the reloading bench—at that time, located in the surveying office my father and I share.
“Now, what?!” he inquired as he looked at the quirky, blue bullets. As I began to explain, he stopped me mid-sentence. “Never mind, I don’t want to know.”
Long story short, the XLCs didn’t shoot for me either, and I gave up on monometal bullets entirely for the better part of a decade … until I saw Barnes rework the bullet into the TSX (Triple Shock X), we all know and love. “The third time’s the charm,” as the saying goes, and it proved to be true in this instance.
The Barnes TSX had three grooves cut into the shank of the bullet in order to “reduce fouling and enhance accuracy.”
So, it wasn’t me after all! It seemed as if there were two camps: those hunters whose rifles absolutely loved the original Barnes X (not me) and those who couldn’t get them to shoot at all (definitely me). But, with the release of the TSX, I found a bullet my barrels liked; the deer didn’t like them so much though.
The accuracy was certainly there, and the terminal ballistics of these bullets were a force to be reckoned with. The hollow-point opened into four petals like a copper flower (the form of which was the inspiration for the “X’” designation), and these bullets offered both high weight retention and deep penetration. Many hunters actually dropped down in bullet weight, because they were getting the performance of a heavier cup-and-core bullet with a lighter monometal bullet. (We’ll get into that a bit more in just a minute.)
Properties Of A Monometal Bullet
Our most common hunting bullets use a lead core surrounded by a jacket, or cup, of copper. That jacket is soft enough to engage the barrel’s rifling to impart a proper spin on the bullet. Nevertheless, it’s much harder than lead, so the structural integrity is preserved, and the rapid and violent expansion of a lead bullet is mitigated … to a point.
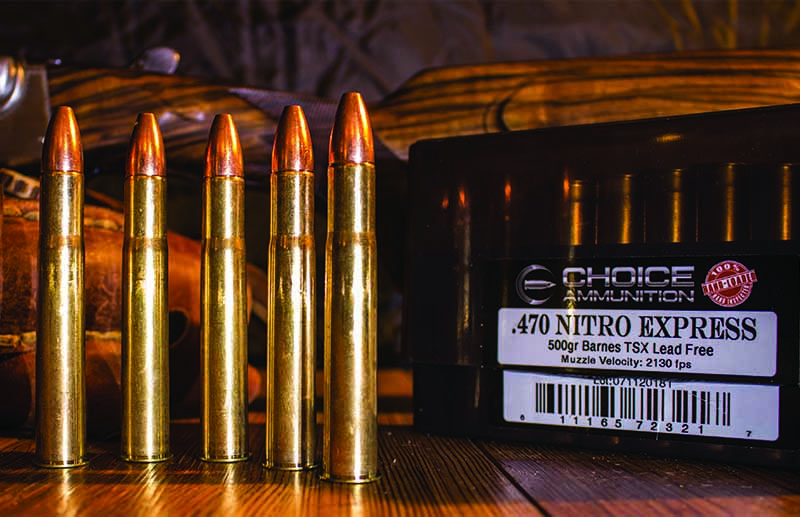
The 500-grain Barnes TSX, as loaded by Choice Ammunition in the .470 Nitro Express. African professional hunters tend to smile when they see that a client brought Barnes TSX bullets.
As cartridge and powder technology advanced throughout the 20th century, hunters found the limits of the cup-and-core design.
John Nosler saw a bull moose soak up cup-and-core bullets from his .300 H&H. This led to the design of his innovative Nosler Partition bullet—a staple in the industry to this day. But, according to Randy Brooks, who had purchased Fred Barnes’ bullet company, he (Brooks) was glassing for brown bear in Alaska when the idea to do away altogether with the lead core came to him. Brooks admitted to me that the first iterations of his bullets were “finicky,” but both he and I agree that the TSX turned the corner and that the TTSX, LRX, and other subsequent offerings are much more consistent performers.
Copper is less dense than lead, so a 180-grain copper bullet of a specific diameter will be longer than a 180-grain cup-and-core bullet of the same conformation. This has a couple of effects of which the shooter and reloader should take note: First, it tends to move the center of gravity rearward. Second, the bullet will take up additional room inside the case when the same overall length is adhered to.
Regarding the rearward shift of the center of gravity: I’ve seen more than a few monometal spitzers change direction just after impact. In fact, sometimes, the wound channel has bent at nearly right angles. Round- or flat-nosed monometal bullets haven’t exhibited this phenomenon, even on the thick-skinned dangerous-game animals.
While those early Barnes X bullets loved to foul a rifle’s bore, almost all the monometal designs in use today use a series of bands cut into the shank of the bullet to reduce both fouling and bearing surface, alike, and that’s been a major help. For the reloaders, I’ve noticed that the Barnes TSX and similar designs seem to like powders on the faster side of the burn rate chart for a particular cartridge.
Some hunters experienced a lack of reliable expansion with the early monometals, with the hollow-point plugging up and failing to give proper expansion. The bullet would just whistle through an animal, much like a full metal jacket would. This has been resolved, and reports of expansion issues are at a minimum.
Are there drawbacks, ballistically speaking, to using monometal bullets? I find no fault with their terminal ballistics, because they offer some of the most devastating designs on the market. I put them on the same plane as a bonded-core soft-points, in that the controlled expansion makes for deep penetration and massive vital tissue destruction.
Nosler’s E-Tip bullet gives premium bullet performance without the lead core.
The internal ballistics are a different story altogether and, depending on the particular application, can be eye-opening.
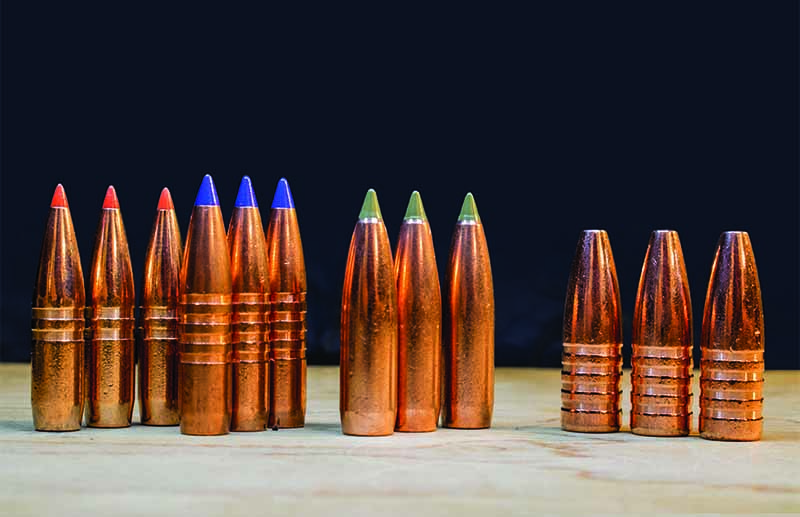
For example, the 6.5mm cartridges, which all shine with a good, 140-grain, lead-core bullet, generally struggle with a monometal bullet heavier than 130 grains, with many factory loads using monometals between 120 and 127 grains. The heavier copper bullets are just too long for stable flight, at least in the 6.5mm bore with a common twist rate. Other bore diameters are seemingly unaffected. Most of the popular .30-calibers can use 180- and 200-grain monometals, and the .375s, .416s, and .458s can also use the 300-, 400-, and 500-grain monometals, respectively.
Is it a deal breaker if your cartridge/rifle/barrel won’t stabilize the bullets you wish to use? Well, in spite of the increase in terminal performance when compared to a standard cup-and-core bullet of equal weight, the ballistic coefficient of a 120-grain, 6.5mm bullet is simply not that of a 140-grain, 6.5mm bullet; and, in today’s world, that might pose an issue.
Furthermore, although the retained weight of the monometals is often excellent (90 percent and above), there are times where the reduction in weight isn’t a great idea. Brown bears, moose, and elk often require a certain weight of bullet to ensure a quick kill, and dropping to a lighter bullet at a higher velocity isn’t always the best idea.
All Hands On Deck
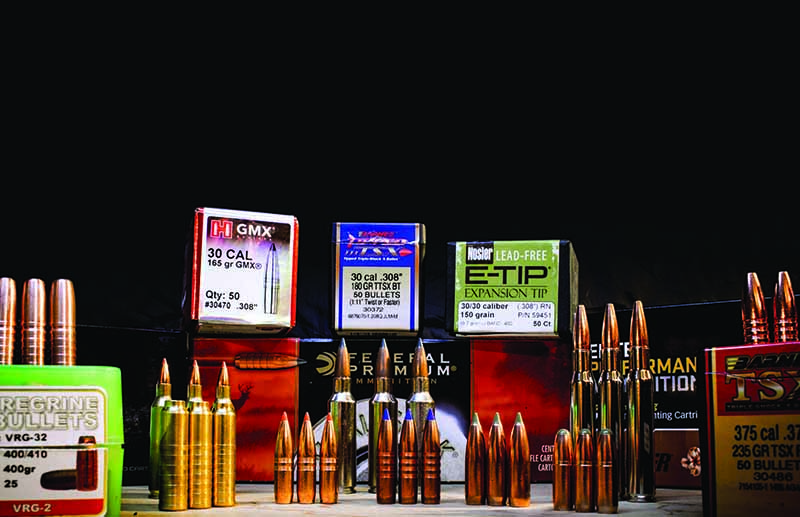
Barnes, while nearly synonymous with monometal expanding bullets, is not the only source. Many of the major manufacturers have at least one monometal offering, because the use of lead bullets has been legally prohibited in California. Besides the wide product line from Barnes, Federal’s Trophy Copper, Hornady’s GMX (Gilding Metal eXpanding), Norma’s EcoStrike, Nosler’s E-Tip, Ballistic Tip Varmint Lead Free and Solid, Lapua’s Naturalis, the Woodleigh Hydrostatically Stabilized Solid and Winchester’s Deer Season XP Copper comprise the major manufacturers. Then, there are boutique offerings such as the Lehigh bullets, the Raptor from Cutting Edge Bullets, North Fork’s Cup Solid, and, my particular favorite of the boutique companies: South Africa’s Peregrine Bullets, makers of the PlainsMaster and BushMaster bullets.
The 235-grain Cutting Edge Raptor in .375 H&H Magnum is a wonderful choice for all plains game species.
While most monometal bullets are designed to mimic the performance of their cup-and-core counterparts, some offer a unique means of getting the job done.
For example, the North Fork Cup Solid, which is once again being produced in Sweden, is designed not only for the deep, bone-crushing penetration of a solid, it’ll also give the slightest amount of expansion at the nose to increase tissue damage—and it does it well. The Cutting Edge Raptor is specifically designed to have the ogive section break apart, separating into little blades that cause a significant amount of tissue damage for the first portion of the wound channel, spinning in a star pattern, while the caliber-dimension base penetrates deeply, like a solid.
The 235-grain, .375-inch-caliber Raptor ranks among my favorite African plains game bullets. The Peregrine BushMaster bullets use a flat brass plunger over a hollow-point, and because the air in the cavity can’t be easily compressed, the sidewalls of the bullet are blown open for excellent expansion. Retained weight is well into the mid-90-percent range, and I’ve recovered a number of them against the offside skin of Cape buffalo bulls.
Woodleigh’s Hydrostatically Stabilized Solid is perhaps the most unique and revolutionary design. It uses a depression in the nose of the bullet to create a low-pressure cavitation bubble that clears the way for the bullet to penetrate. Aside from straight-line penetration, that cavitation bubble results in a cylinder of blood-shot tissue 8 to 12 inches in diameter, destroying the blood-rich vital tissue and causing a quick, humane death. They are accurate, and when they’re of suitable caliber and weight, they’re capable of taking any game animal on Earth.
Is There a Change In The Wind?
Are monometal bullets going to eventually replace the copper jacket/lead core formula? I don’t think you’ll see that happening anytime soon, although their popularity is most definitely gaining ground each year. Many African professional hunters rely on monometal soft-points and solids for their day-to-day work among the most dangerous animals on Earth and highly recommend them to their clients.
The monometals have also made their way into the target community, with both Cutting Edge Bullets and Peregrine Bullets making their presence known, especially among the extreme-long-range shooters. The Barnes XPB and Cutting Edge Handgun Raptor bring the lead-free bullets to the handgun market, and the Hornady NTX and Nosler BTLF (Ballistic Tip Lead Free) give varmint and predator hunters a lead-free option as well.
In contrast, the reduced cost of lead-core projectiles in comparison to lead-free projectiles plays a pivotal role in the choice of material, and I don’t feel the shooting public is willing to abandon such great designs as the Sierra MatchKing, Swift A-Frame, or Nosler Partition, not to mention the bulk ammunition available in .45 ACP, 9mm Luger, 5.56 NATO, and others.
Could I satisfy all my hunting needs with lead-free ammo? For big game, yes, but for small game, there’s a void, especially in the rimfire cartridges. And, although there are varmint/predator choices available, they’re lighter than I like to use for my rifles, especially on a big coyote at longer ranges.
California has mandated the use of lead-free ammunition, stating environmental reasons (such as the endangered carrion birds eating on gut piles and being poisoned by lead fragments). I can’t attest to the validity of this, nor am I willing to write off the possibility that prohibiting lead projectiles is just another means of exercising control over our firearms, but the law is in place, and hunters have to work around it.
Monometal bullets are assuredly here to stay, because the technology has developed to the point at which they’ve become both reliably accurate and lethal. Some are more finicky than others—showing sensitivity to seating depth and bullet jump—but I won’t say that there’s one design or another a hunter should avoid.
Bet on seeing more lead-free ammunition in the near future.
Editor’s Note: This article originally appeared in the November 2020 issue of Gun Digest the Magazine.
Classic aesthetics combined with modern features make the TC86 Takedown as handsome as it is handy.
TC86 Features:
Lever-Action Based On Winchester M1886
.45-70 Gov’t
4+1 Capacity
16.5-Inch Barrel
MSRP: $1,839.59
Taylor’s & Company are all about the classics. With a primary focus on Old West designs, many of their guns are imported from Italy where an entire industry has been built around reproducing historical American firearms. The TC86 is the newest to be imported by Taylor’s & Company and was made by Chiappa.
Chiappa makes beautiful historical reproductions as well as functional hunting rifles, but the TC86 Takedown was designed to do both at the same time. Based on the famous Winchester 1886 designed by John Browning, the TC86 Takedown was built using modern machining and construction techniques to ensure it performs to modern standards despite being a nearly 150-year-old design.
With a case-hardened receiver, blued-metal finish and checkered walnut hardwood stock, the TC86 takedown is pretty enough to be a safe-queen, but that’s not what it was designed for. It was designed to be carried and shot, which is why it was given several practical features that are anachronistic to the rifle’s 19th-century design. Rear peep sight and fiber-optic front post provide some of the best irons you can find on a lever-action, but if that isn’t good enough it also has a Weaver rail for mounting optics. Its muzzle has also been threaded 5/8×24 for mounting suppressors. Some old-school “tactical features” also found on the TC86 include a big loop lever and the ability to break the rifle down into two pieces for easier transport.
The Winchester 1886 was built tough from the start to accommodate the largest black powder cartridges of its day, but it was so durable that only small changes were required for it to handle the higher pressures of smokeless powder. The TC86 Takedown is similarly overbuilt, designed to handle any modern .45-70 gov’t load. With a TC86 you could be the classiest hunter on the trail, but with an MSRP of $1,839.86 hopefully, you aren’t afraid of scratching it.
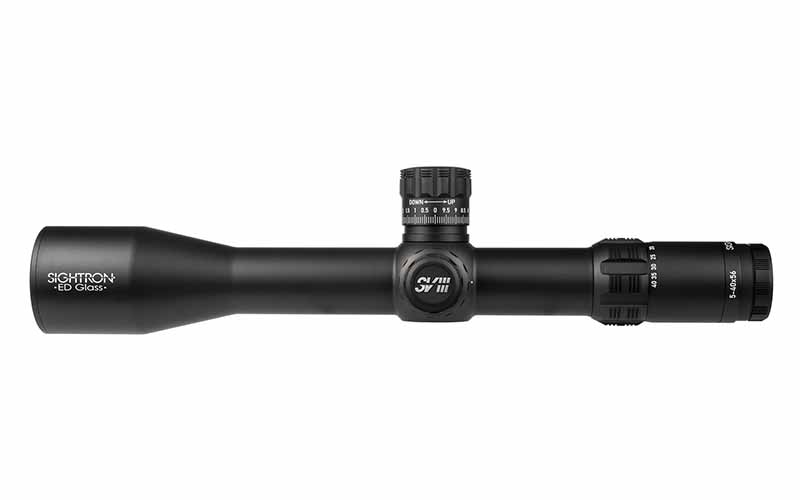
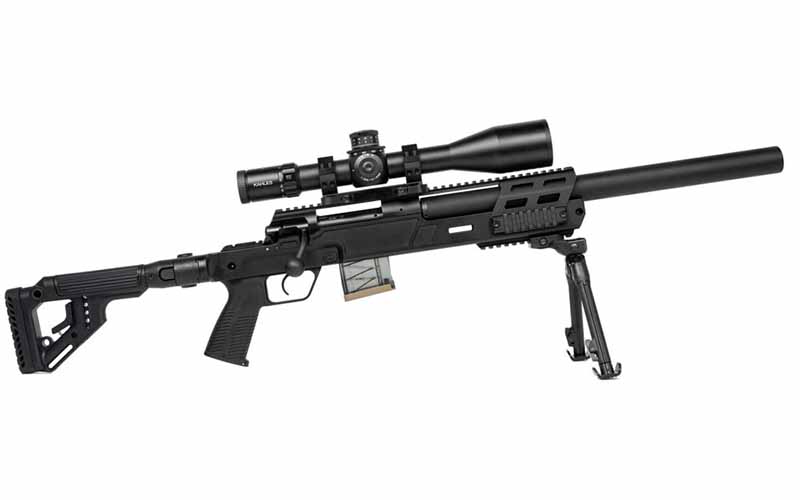
These new SVIII 5-40×56 ED riflescopes from Sightron boast improved clarity and performance to make long-range precision as easy as possible.
SVIII 5-40×56 ED Specs:
FOV @ 100 Yards: 23.7-2.9 Ft.
Range Of Adj. Windage/Elevation @100 Meters: 20/40 MRAD
Eye Relief: 3.8-3.7”
Knob Style: Precision Tactical With Internal Zero Stop
Click Value @ 100 Meters: .1 MRAD
Tube Diameter: 40mm
Minute Per Revolution: 10 MRAD
MSRP: $3,099
Sightron, an established name in the precision optics world, has just released a new line of premium riflescopes that they call the SVIII 5-40×56 ED. The new line has two different illuminated first focal plane reticles to choose from, making them ideal for low light hunting, competition, or tactical applications. The SVIII 5-40×56 ED is Sightron’s first 40mm main tube rifle scope, and like all Sightron optics, it has been designed to deliver maximum, consistent precision and unwavering durability in the most serious of environments.
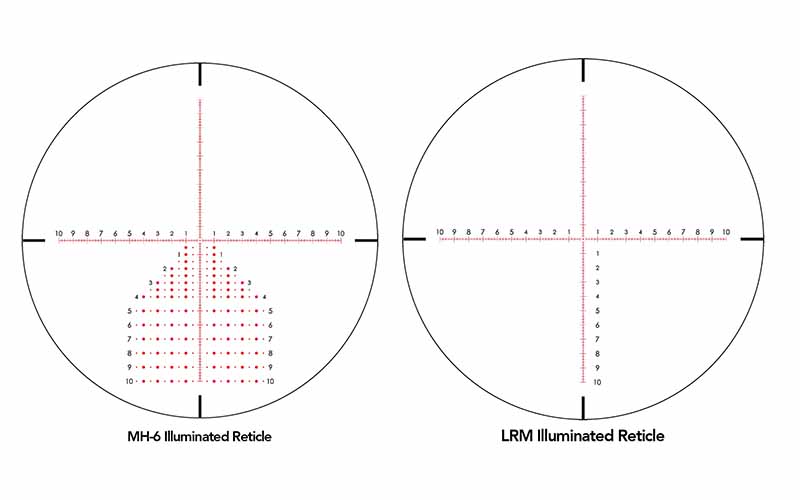
The SVIII 5-40×56 ED line features a new internal zero-stop mechanism in its turrets which provides positive, audible feedback when the zero has been reached. The tactical turrets are precision-tunable and work in conjunction with the first image focal plane (FFP) reticles to allow minute adjustments at any range. The close focus has also been improved to about 10 meters, adding to the versatility of the SVIII 5-40×56 ED scopes. Reticle options are between the LRM or MH-6. Both are illuminated and controlled by an external, 11-position dial and are powered by common CR2032 batteries.
Every air-to-glass surface within the scope has been coated with Sightron’s new MC-777 lens coating. This coating allows for more light transmission and even better clarity than what the scope’s extra-low dispersion glass already provided. The SVIII 5-40×56 ED’s 40mm tube is also waterproof and shockproof, but if the scope fails to withstand your abuse Sightron also offers a lifetime warranty.
Besides the scope itself, in the box you will also find two wrenches for installing and adjusting the SVIII 5-40×56 ED, lens covers, a sunshade and even a battery. It also includes a high-quality set of 40mm rings for mounting to a Picatinny rail.
This new Sightron scope is professional quality and comes loaded with professional-level features, so it follows that it would have a professional price tag as well. MSRP for the SVIII 5-40×56 ED is set at $3,099 for either reticle option.
For more information on Sightron, please visit sightron.com.
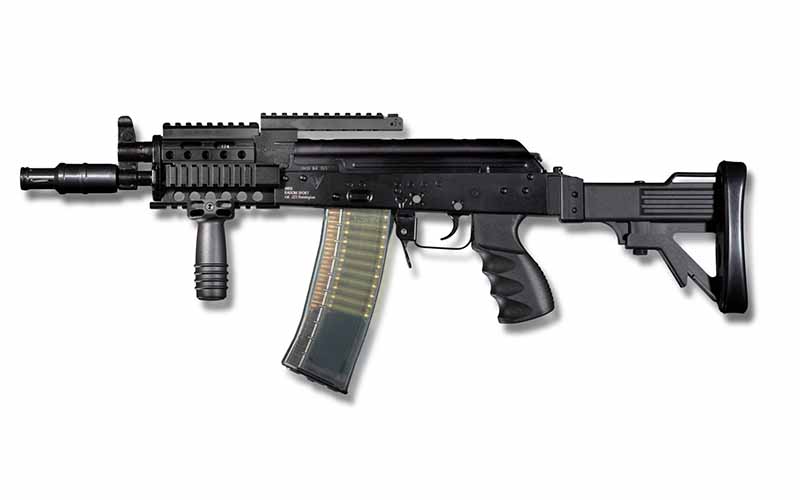
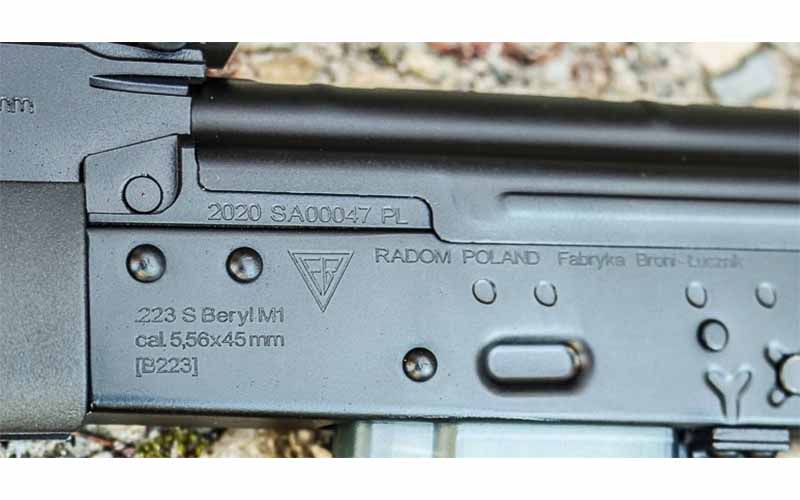
As communism collapsed around Eastern Europe in the early 1990s, Poland said goodbye to Warsaw Pact cartridges but decided to hold on to their AKs. As eager as they were to embrace the West, one might have expected the Poles to cast aside their AKs with the rest of their socialist past, but their commitment to the Kalashnikov stayed true. The eventual result of their commitment was the wz. 96 Beryl, the first standard military issue AK to be chambered in a NATO cartridge. Prior to this, AKs chambered in .223 or 5.56 were made exclusively for the commercial market and suffered from some reliability issues, mainly due to their magazines. This reputation began to change when the Poles adopted the FB Beryl in 1997, demonstrating that 5.56 AKs were a viable platform when built to military specifications.
The wz. 96 Beryl is still Poland’s service rifle as of 2021. The same factory in Radom that tooled up to produce AKs for the first time in 1957 is still making them today, and not only for the Polish armed forces but for the global commercial market as well. They are undoubtedly high-quality guns, but is the FB Beryl the right AK for you?
FB Beryl M1-223S, import model.
The wz. 96 Beryl
Named after the element beryllium, the wz. 96 Beryl was designed in 1996 following the abolishment of socialism in Poland. The fall of the USSR led the Poles to abandon their development efforts on their new 5.45 Tantal rifles, switching instead to 5.56 NATO and the creation of the Beryl.
At its heart, the Beryl may just be an AK chambered for 5.56, but what really makes this rifle unique are the many small changes made to its design. While some of these changes are considered standard for an infantry rifle today, keep in mind that many of these ideas were still novel in the 1990s. The U.S. military was only just beginning to field M16s with flat-top receivers, and Russia’s AK-74s had hardly changed since they were in Afghanistan. When the Poles went to develop the Beryl, they were really undertaking an AK modernization project before it was cool.
The most obvious design change to the Beryl is its caliber. AKs had been chambered in .223 and 5.56 before the Beryl, but they were mostly developed for commercial export by companies like Valmet and Norinco. Besides some earlier experimenting done by the Yugoslavians, the wz. 96 Beryl was the first true military AK chambered in this caliber. The new caliber resulted in lengthening the barrel about two inches beyond that of a typical AKM, done to increase the performance of the lighter projectiles.
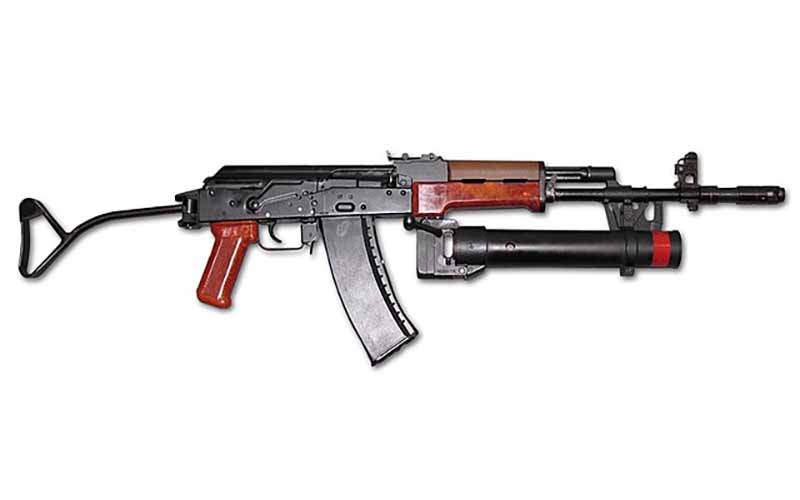
The Beryl’s gas block is angled at 90 degrees like the AK-74, and the barrel and handguards have been fitted to mount the Polish Pallad grenade launcher. The original design also had a metal, tubular folding stock which was replaced by a collapsible design in the Beryl’s 2004 update. Both stock styles attach to a standard AK fixed-stock rear trunnion, meaning Beryl stocks can be used in other fixed-stock trunnion AKs and vice versa. Some handguard styles also had Picatinny rail segments for mounting vertical foregrips as well.
The rear sight base and rear trunnion on the Beryl have also been cut to accommodate the FB Beryl rail system. This cleverly designed strut arches over the receiver and securely locks in place to provide rail segments for the mounting of optics. Many would consider this system to be an upgrade over the Russian’s AK optic solution—the side-mounted dovetail rail.
FB Beryl rail system on a 7.62 Beryl. Photo:Wikipedia
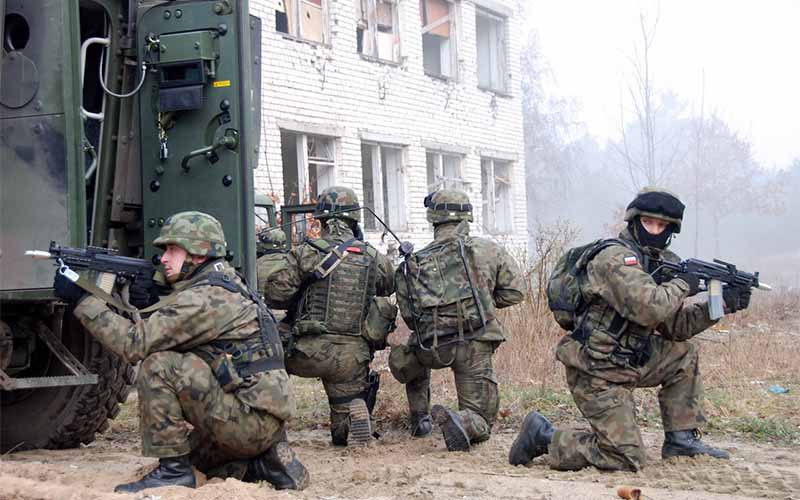
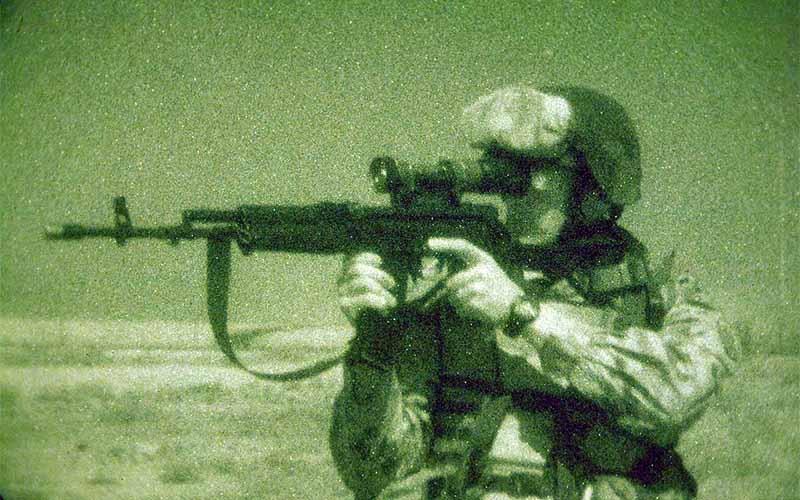
The wz. 96 Beryl in 5.56 has been used by Polish NATO coalition troops in Iraq and Afghanistan. A typical modern military configuration for the Beryl utilizes an EOTech sight mounted to the FB rail system, the new collapsible buttstock and a railed handguard with a vertical grip.
Polish Special Forces soldier with Beryl in Iraq, 2005. Photo:Wikipedia
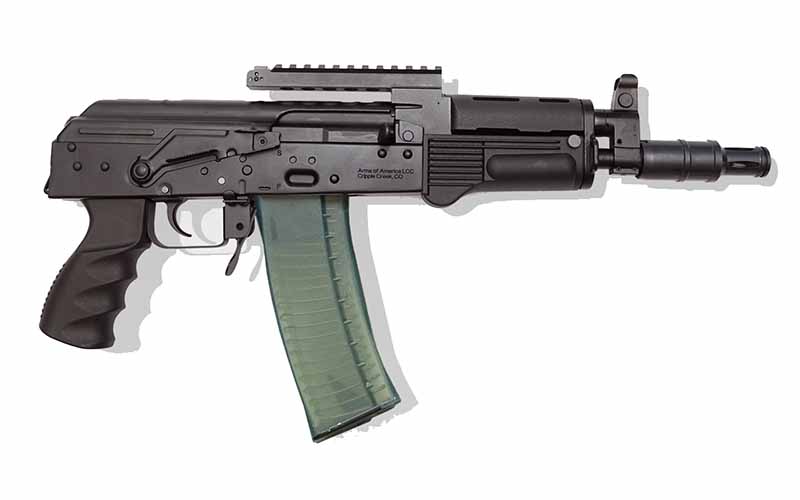
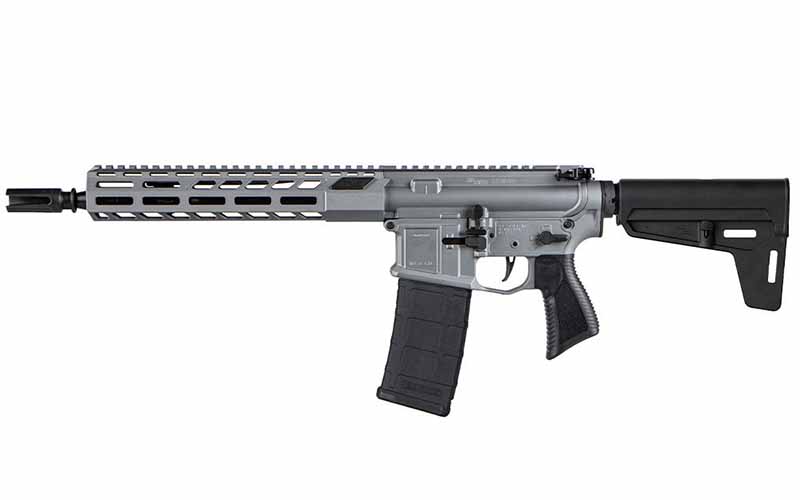
The FB Beryl M1-223S
This is Fabryka Broni’s semi-auto export version of the wz. 96 Beryl. It is imported into the U.S. in an import-compliant configuration and then converted into a traditional AK layout. To comply with 922 R regulations, the Beryls are sold with an American-made muzzle brake, pistol grip, buttstock and fire control group. Of the parts to select for compliance, these are good choices as they leave the stress-bearing guts of the rifle intact and 100% Polish in origin.
The included American-made muzzle brake looks identical to those found on Polish military Beryls, but it has been threaded on instead of pinned. This is one deviation from the military version that is beneficial, as it can now be swapped for something else by the user if so desired.
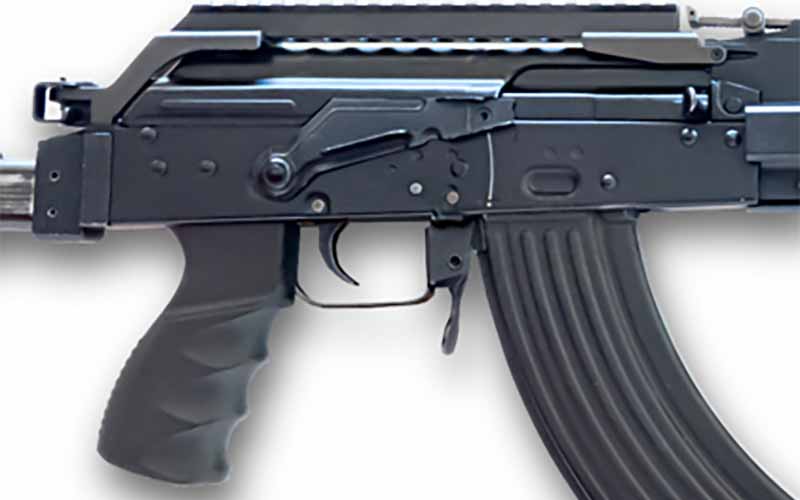
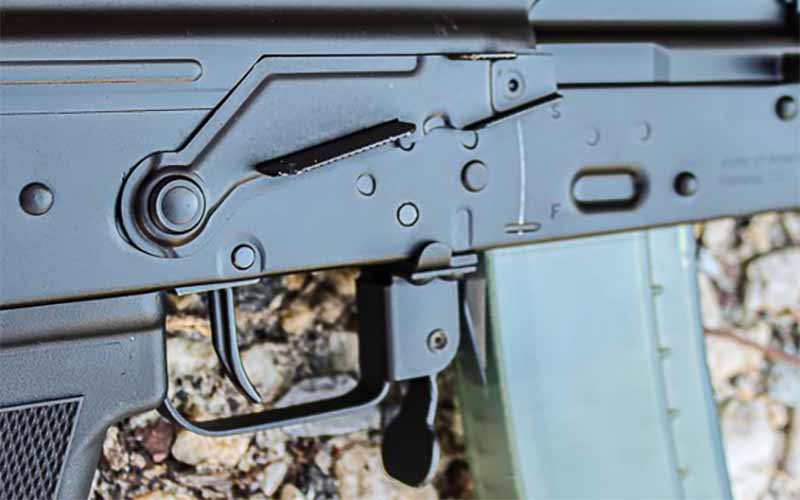
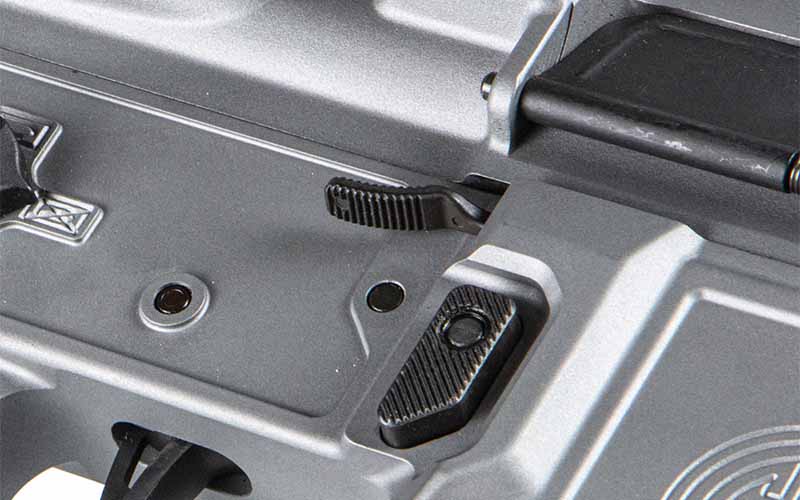
Two more small improvements on the commercial model not found on the military version are the enhanced safety selector and magazine release paddle. Both of these have been extended to make their manipulation faster and easier.
Beryl M1-223S enhanced safety selector and magazine release.
A batch of FB Beryl rifles was recently imported, but they sold out within the day despite costing $1,500. The only explanation for their popularity is that Americans like Polish guns, because other makes of 5.56 AK have had trouble selling here in the past. The next batch is expected to arrive in October (2021), so mark your calendar if you’re in the market for one.
The fit and finish on FB Beryls is excellent as well, and the iconic Fabryka Broni stamp on the receiver works as a cherry on top.
The FB Beryl is a great rifle, and the fact that it was born out of one of the original AK factories is a guarantee of quality construction. It doesn’t have the classic AK looks, but it does have classic AK roots, and those are much more important for a weapon you may someday have to rely on. Their unique Polish features and connection to modern military history make them even more interesting for practical shooters and collectors alike.
For more information on the importer, please visit armsofamerica.com.
The key points you need to know to add a quality handheld or weapon light to your arsenal.
Consideration When Buying A Handheld Or Weapon Light:
Physical Size
Lumens And Candela Rating
Power Source (Rechargable Barreries Are King)
Controls
With current events turning everyday life more unpredictable, making good decisions with your personal protection has never been more important. But how do we ensure that we make good decisions when our safety is on the line? Being an effective defender isn’t as simple as strapping a big iron on your hip and maintaining awareness.
Firearm proficiency and maintaining a high degree of vigilance is only a piece of the puzzle: You should have several options available—beyond harsh words but before switching to guns. Some of the popular less-lethal options include pepper spray, hand-to-hand training or Tasers. I’m an advocate for carrying at least a spicy treat (OC spray, such as Sabre Red), as well as getting some hand-to-hand training.
But there’s one non-lethal option that’s often overlooked: bright—really bright—flashlights.
Light Is Essential
With roughly half of every day being dark, it makes sense to practice shooting in low-light conditions as often as possible, since it presents unique challenges that are often made worse by low-output lights. Sadly, most gun owners don’t get an opportunity to hone this vital skill, leaving the importance of a good handheld or weapon light paired to a defensive firearm a mystery.
The majority of the blame for this giant gap in training lies with gun ranges that are forced to write range rules around the strict insurance policies available to them. That isn’t an excuse to not be proficient shooting your defensive firearms in the dark. There’s undoubtedly a training class in your area that should teach you some of the basics and give you some valuable time on a dark range.
Photonic Barriers
Positively identifying what someone is holding when they’re standing in front of or next to another light source at distances beyond 15 yards can be an eye- opening moment. Your 600-lumen light might be bright, but it might not mean “usable” depending on how those lumens are projected.
Even though most of my low-light students bring a light with 300 lumens or more, more than half quickly find that the light they brought to class won’t overcome the unique challenges faced when shooting in the dark. Photonic barriers like car headlights, bright windows, back lighting, side lighting and gun smoke affect a light’s effectiveness and can prevent you from getting enough information to make a good decision.
Try putting accurate shots on a target at 7 yards away in quick succession in low light and you’ll quickly realize that a 600-lumen Olight PL-MINI 2 lacks the candela needed to cut through that gun smoke.
Not All Lumens Are Equal
Comparing handheld and weapon light output is a lot easier than it used to be thanks to the ANSI FL1 standard introduced in 2009. Prior to the FL1 rating system, flashlights were marketed with claimed candlepower and LED power consumption ratings. ANSI’s FL1 rating means that when you’re shopping for a new light, you can compare apples to apples instead of trying to figure out how many watts an LED has to be rated for it to equal the candlepower rating of another flashlight.
Lumens
The number of lumens a light produces is a cumulative measure of all light being produced by your light. In the case of the ANSI FL1 standard, this is measured with an expensive testing apparatus called an integrating sphere.
Being convenient to carry, a handheld light relies on a good pocket clip.
While the quality of reflector and lens in your light has a small effect on the lumen rating, it’s almost entirely dependent on the amount of light generated by the LED emitter or bulb. Remember that lumen output is only part of the equation, it does not measure how effective the flashlight is at focusing those lumens.
Candela
In order to figure out how well those lumens are projected, you need to know what the candela rating of the light is. Candela is the measure of the amount of light at a particular point in the handheld or weapon light beam, which can be measured out to a distance rating.
Candela is most impacted by reflector shape, finish and the placement of the light source in relation to the reflector. At the risk of oversimplifying the complexities of reflector design, the larger in diameter and deeper that reflector is, the more potential it has to produce big candela numbers.
Light In The Hand
Having a weapon light on your gun is dandy, but don’t think that means a great handheld light is no longer something you should have. Not only does this mean that the temptation to use your weapon-mounted light as a task light is removed, but a high-output handheld light gives you a lot of flexibility when integrating it into your use of force continuum.
What Features Should It Have?
The single, most important aspect in selecting a handheld light is the physical size of the light. If it isn’t something you’re going to reliably put in your pocket or purse, that high-octane light saber isn’t much help.
When looking at output ratings, select a light rated to at least 500 lumens and 2,000 candela. While more candela is better, ideally the handheld will be paired with a weapon-mounted light, making its ability to cut through difficult photonic barriers less important for most cases.
Also, look for something that takes a rechargeable battery, because you’ll be using this light a lot. Some form of replaceable rechargeable like an 18350, 18650, or even some of the smaller replaceable cells are recommended. Avoid lights with an integrated battery, since rechargeable cells have a finite lifespan.
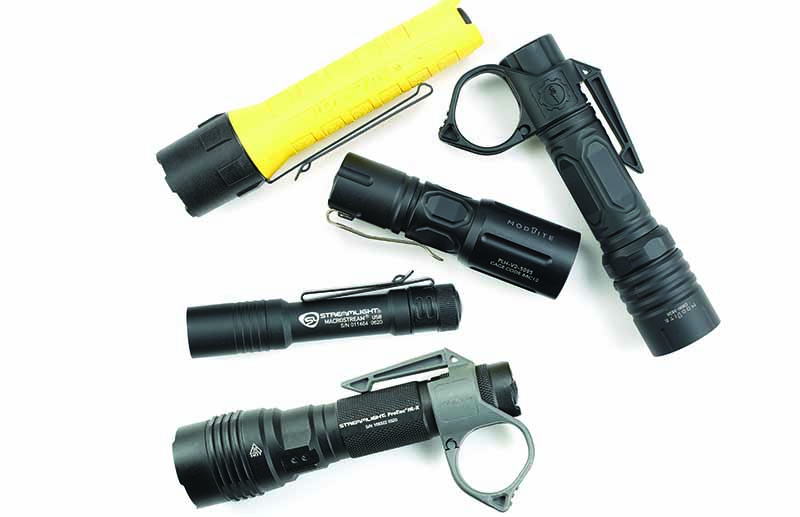
Compact Handhelds To Consider
If you prefer a more lightweight EDC, the Streamlight Macrostream USB is a fantastic light for reasonable money with few downsides. Make sure to keep the Macrostream charged; when the battery is discharged, the light shuts off entirely rather than giving you warning by stepping down brightness.
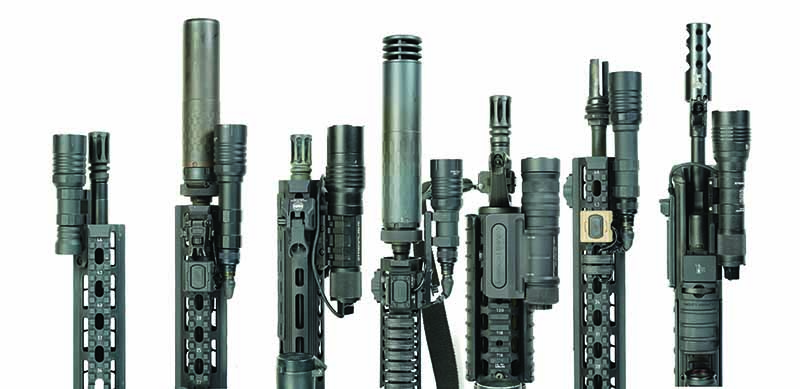
Weapon lights from left to right: Modlite Clicky Tailcap, Modlite Modbutton Lite, Streamlight Tape Switch, Modlite Modbutton, Cloud Defensive, Modlite Modbutton Lite and Streamlight Tape Switch.
Still want a small light but need more output? I’ve been most impressed with Modlite’s 18350 PLHv2 handheld. With 1,350 lumens and 54,000 candela, the Modlite handheld is a powerhouse. Make sure to have spare batteries on hand; this light has a 35-minute run time.
Full-Size Handhelds to Consider
Anything that takes a 18650 rechargeable is a good place to start when looking at a full-size tac light, since they generally have a solid runtime and output.
On the budget side, Streamlight’s PolytacX is a great light that’ll do almost anything you could ask it to do. For a bit more money, the Streamlight ProTac HL-X is a well-rounded light that accepts Thyrm’s excellent SwitchBack pocket clip.
In the over $200 category, you can get a SureFire Duel Fuel handheld or a Modlite PLHv2 handheld. Both are a good choice, but Modlite has significantly more output from the same size light.
Shooting with a light is a lot easier with both hands on the gun. You can use a handheld effectively with a pistol, but you need to practice the skill. Like the handheld light, we want at least 500 lumens and 5,000 candela for a weapon light. Ideally, you’ll buy one that’s 600 lumens or more and over 15,000 candela to help defeat those photonic barriers with greater ease.
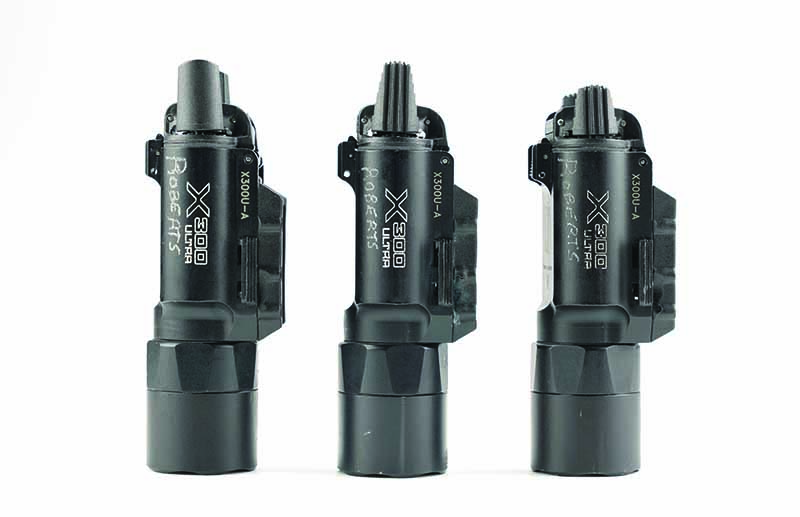
Also, take into consideration the switches on the weapon light. Rotating switches, like the ones found on the SureFire X300 Ultra or Streamlight TLR-1 HL, are a good bet. Compact lights mean that we have to use a slightly different switch—the Streamlight TLR-7A is the current king in that realm.
And remember this: You’re going to need a holster capable of accommodating the gun and the light.
Full-Size Pistol-Mounted Lights
When looking for a full-sized pistol light, there are two options you should be seriously considering at the time this is being written, SureFire’s X300 Ultra and the Streamlight TLR-1 HL. No other lights on the market have been proven to the level that these have.
Streamlight’s TLR-7 and TLR-7A are the only compact weapon lights with enough candela to defeat a rapid string of fire.
Both weapon lights have 1,000 lumens, and both have great candela ratings as well, but they run on the CR123 batteries still. Modlite will be introducing a pistol light that’s powered by an 18350 battery, uses their modular head design and will have a good switching arrangement.
Compact Lights
Not down with the idea of shoving a giant light into your pants? There’s one compact weapon light on the market worth looking at that still meets the requirements for a usable pistol light: the Streamlight TLR-7 series. There are other lights on the market that hit the mark in lumen rating but fall flat when you look at the candela rating. Only one comes close—the Olight Baldr Mini—but since it has an integrated battery with a finite lifespan it might be ideal to stick to lights that allow you to maintain the power source.
Rifle-Mounted Lights
What does a good rifle light need to do? That really depends on your application. The needs of an armed professional are very different than the needs of a suburban homeowner.
Again, look for a light that uses a 18650 or 18350 rechargeable battery, since that’ll keep you in the output range we want to see out of a rifle light. It should have at least 1,000 lumens and a candela rating of 10,000 at the minimum. Preferably, get a light with 1,300 lumens or more and north of 25,000 candela to be able to take advantage of the rifle’s longer engagement range.
There are some outliers to what I consider to be the minimum, such as the Modlite OKW with only 680 lumens. Yes, that’s less than the 1,000-lumen requirement, but the 69,000 candela pairs well with a magnified optic.
Switching
Pressure pads are the most ergonomic and useful methods of activation, but what pressure pad should you choose? If you choose a Streamlight rifle light, you’re stuck with the OEM tape switch unless you convert it to take the SureFire plug with a tailcap adapter from Arisaka.
SureFire ecosystem lights have an advantage in that there are several great switch options in addition to the choice of plug only, or a plug and button combo tailcap. Opt for switch like the brand-new Modlite ModButton Lite, the original ModButton or the Unity Hot Button and get 10 to 15 percent more light output. Choose the option that works best with your rifle and use case.
Mounting
Generally, it’s recommended to mount the weapon light on the same side as your dominant hand, as close to the rifle as you possibly can. Mounting the light like this gives you the most real estate and prevents the light from getting tangles in a sling. Arisaka’s inline scout mount is a great option; also consider mounts from Railscales, Bobro, Impact Weapon Components and Magpul.
The PHLster ARC switches for SureFire X300, and Streamlight TLR-1 HL lights make activating the light a cinch.
Cable Management
Secure the pressure pad cable with something to prevent it from being pulled out of the endcap. Low-tech solutions like rubber bands or bicycle inner tube are great, or try a purpose-built solution like LaRue index clips.
Home Defense
Nearly every rifle-specific weapon light from most of the reputable manufacturers is going to do the trick with the exception of Streamlight’s TLR RM1, the rifle adaptation of the TLR-7A. Since we’re specifically talking about a gun built around short-range defensive uses, I might select a light with more of a flood-style beam pattern rather than the pinpoint beam of a Modlite OKW.
Even though the light had some teething issues, the Streamlight ProTac HLX Rail Mount appears to be bug-free now and is a solid budget option with impressive output numbers. Just a few more dollars and you can move to the SureFire Scout Light Pro Dual Fuel with the integrated M-lok mount.
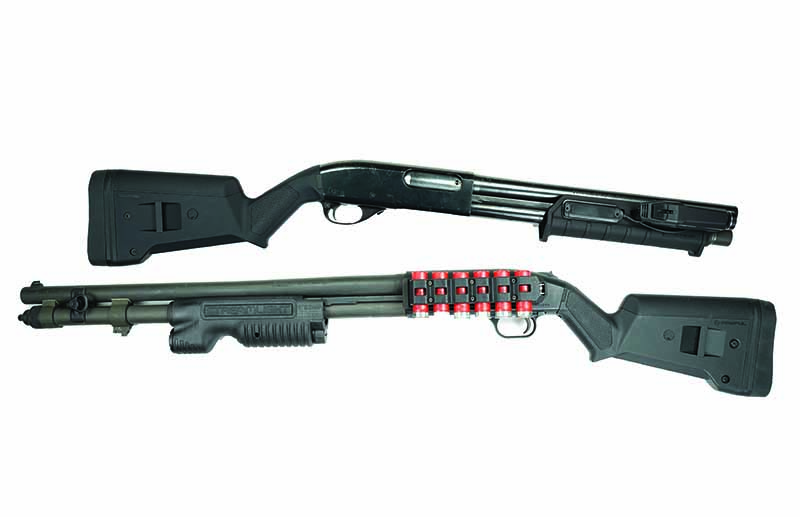
Shotgun Lights
Putting a weapon light on your shotgun is a bit more challenging than other firearms, but it’s just as advantageous. Two good dedicated options for a shotgun are the Streamlight TL-Racker or the more expensive SureFire-dedicated forend lights. There are ways to mount handheld and rifle lights to a shotgun, but they don’t work as well as a dedicated forend light.
Streamlight and SureFire dedicated forend lights are best for a shotgun, but you can make a rifle light work.
Get A Dang Light
There’s no reason that you’re carrying a gun and not at least carrying a handheld light in 2021. There are just too many reasons that a high-quality flashlight can be a defensive tool.
Give me all the lumens, but remember that candela is king.
Editor’s Note: This article originally appeared in the November 2020 issue of Gun Digest the Magazine.
The best general-purpose rifle—a rifle well adapted to just about any task—is in fact somewhat ironically, a very specialized weapon.
What Are The Traits Of A General-Purpose Rifle:
Compact
Light
Power and reach
Accurate
High volume of fire
Chambered for a cartridge easily reloaded
At one time, the .50-caliber Hawken was America’s general-purpose rifle. About 70 years later, it was replaced by the Winchester 94 in .30-30 Winchester, and after World War I, the bolt-action .30-06 became America’s one-rifle answer. It remained so until the turn of the 21st century. At that time, the AR-15—or modern sporting rifle (MSR) as it’s known among the politically correct—and the easy recoiling .223 Remington stole that title away.
Modern advancements in weaponry, ammunition and optical sights were partly responsible for these transitions. Interestingly, we passed from a single-shot, to a lever-action, to a bolt-action and to a semi-automatic. We also went from a rifle delivering about 500 ft-lb of energy at 100 yards to one with 1,400 (.30-30 Winchester), to 2,000 (.30-06 Springfield) and 900 (.223 Remington) fpe. But, in addition to technology, specialization played a large part in the evolution America’s general-purpose rifle has gone through.
With the increase in wild game populations after World War II and, with an elevated interest in sport shooting, Americans began to acquire specialized rifles designed to solve specific problems. A man might have a .22-250 for groundhog or prairie dog shooting, a .243 for whitetails or pronghorn, and a big seven or .300 magnum for elk, moose and even deer. The one-man, one-rifle concept was vanishing.
The Cooper Concept
About this time, Jeff Cooper, a Marine and founder of what’s now known as Gunsite Academy, conceived the Scout Rifle concept. It was offered as a return to the one-man, one-rifle notion and was in stark contrast to specialization. Cooper theorized in the best general-purpose rifle—a rifle well adapted to just about any task—was in fact somewhat ironically, a very specialized weapon. Among other things, he stipulated a .308 Winchester with a maximum length of one meter, a maximum weight of between 6.6 to 7.7 pounds, backup sights and forward-mounted low-power riflescope, capable of launching a 150-grain bullet at 2,700 fps. Ironically, this was the same external ballistics of the original .30-06 loading.
The Steyr Scout Rifle was the ultimate expression of Cooper’s Scout Rifle concept and is one of the best worldwide examples of a general-purpose rifle.
As the 20th century faded, sport shooting became very popular, and the latest combat veterans had established a relationship with the AR platform. It’s newfound modularity—and the ability to build your own—rocketed it to stardom. Many still had an arsenal of specialized hunting and sport rifles, but the behind the door—hell in a handbasket—rifle had become the AR-15. Cooper’s concept developed a cult-like following but never achieved universal acceptance. His ultimate goal was for a mass-produced rifle with worldwide appeal and compatibility. The Scout Rifle, as conceived by Cooper, was never intended to address specialized needs based on geography or the individual; it was to be a one-rifle answer for the world.
And, while it very might well be that, the American citizen’s ability to own many rifles, specialized to solve particular problems, detracted from the Scout Rifle’s appeal. Unless it’s an SUV or a Leatherman, most Americans want specific tools, specifically designed, for specific problems.
I have a safe full of specialized rifles, but Cooper’s enigma of the Scout Rifle had tremendous appeal and I began a deep dive into its suitability as a one-rifle answer. I’ve fired more than 10,000 rounds through Scout Rifles, used them to hunt across America and Africa, founded the annual Scout Rifle Safari, devised a Scout Rifle training program for Steyr, and even wrote a book about all that I had learned. I like Scout Rifles, own many, and find the concept a practical answer to the general-purpose rifle question. However, a Scout Rifle, as defined by Cooper, is not my general-purpose rifle.
Defining “General Purpose”
Before describing my general-purpose rifle, let’s examine what a “general-purpose rifle” really is. Cooper thought it a worldly gun—one to be used to sort problems anywhere around the globe. That’s a noble desire, but from a real-world standpoint, one few need or even want. Most Americans spend 99 percent of their time very close to home and want a rifle best suited to deal with the problems they might most likely encounter. For most, global appeal means nothing.
Bettering the ballistics of the iconic .30-30 and sized to work in the AR-15 and feed from AR-15 magazines, the .300 Hamr is arguably the best general-purpose round for that platform.
My best friend lives on Kodiak Island and had to kill a big bear that was threatening. A general-purpose rifle for him must be capable of solving that problem. I live in the forested mountains of West Virginia where the most dangerous critter I’m likely to encounter is a rabid fox, raccoon or human being with murderous intent. Our largest game animals are deer and black bear. Other hillbillies and I don’t need a grizzly gun.
The point is, the general-purpose needs of every man are different and dependent on the conditions of their life and location. Some years back, I suggested a one-rifle answer for most folks would be a CUR (Conditional Utility Rifle) as opposed to a Scout Rifle. Much like cur dogs bred for specific geographical needs, like the Rhodesian Ridgeback of Africa, the Rattlesnake Cur of the Appalachians, or Catahoula Leopard Dogs of Louisiana, CUR rifles are general-purpose rifles ideally adapted to fill the specific needs of their owners as opposed to the everyone. Though these rifles share many attributes of a Scout Rifle, such as compactness, lightness and redundant sight systems, they differ due to geographic, social and political—specialized—needs.
My background is steeped in hunting, but I also spent much of my professional life in uniform—camouflaged and blue—carrying guns in defense of country and community. I also have a respectable firearms training résumé. This isn’t meant to brag, just to illustrate that I’m not just a hillbilly who’s never gotten off the farm. When I decided I wanted a general-purpose rifle best suited to my needs, I set forth the following parameters:
Compactness: I wanted a rifle that was easy to transport in a vehicle or use from inside a blind or hide, with a maximum length of less than 36 inches.
Lightness: Rifles are carried more than shot. I wanted a rifle weighing 6.5 pounds or less before accessories.
Power and Reach: I needed a rifle with sufficient power to deal with human adversaries, black bear and deer out to around 300 yards.
Accuracy: I planned to use the rifle to for a wide range of tasks and desired 1 MOA or better precision.
Volume Fire: To fill my predator calling, sport shooting and self-defense needs, I wanted a semi-automatic.
Modularity: I wanted a rifle very adaptable to specialized tasks.
Self-Support: The rifle needed to be chambered for a cartridge for which I could create my own ammunition. I’m not a doomsday kind of guy, but ammo shortages are real.
Wilson Combat’s Protector Series Carbine is a top-of-the-line AR-15. Mated with the .300 Hamr cartridge, it’s well adapted to the general-purpose classification.
In the end, the choice made itself. The requirements of volume fire, modularity, compactness and lightness, pushed me toward the AR-15 platform. My stipulation for power and reach required the .300 Hamr cartridge. Since .30-caliber bullets are easy to find, and since brass for the .300 Hamr can be made from .223 Remington, it also filled the self-support requirement. And finally, the demand for a high level of precision meant I needed one of high-quality manufacture. The fact that AR-15 gun parts are readily available played no small part in the decision.
The One And Only
What I ended up with was a Wilson Combat Protector Series Carbine ($1,999.95) with a 16-inch barrel. I installed what I consider one of the best general-purpose optical sights for use out to about 300 yards, a Trijicon 1-4X AccuPoint ($1,099) in a Wilson Combat one-piece mount. The 1X magnification can sort out close-quarter engagements and snap shots, and 4X takes me to the limits of the cartridge.
For backup sights, I went with the Williams Gun Sight Company Tactical Folding Sight Set ($139.95,) which are very well-made fold-down sights that attach directly to the rifle’s full-length top rail. I also took a Galco Rifleman Sling ($59) and configured it for three-point attachment.
Open sights might seem dated but, as a backup, they should be considered mandatory for a general-purpose rifle. These folding sights from The Williams Gunsite Company are an excellent option.
Now, I’m not fond of screwing needless weight to my rifle, but I do appreciate a rifle allowing situational adaptation. The threaded muzzle permits the use of the fantastically light 11-ounce Sig Sauer SLX suppressor ($1,200). A Spartan Precision Equipment bipod/tripod receptor ($56.80) was attached to the underside of the M-Lok compatible handguard, and a short rail section was added to allow for the attachment of a SureFire M600DF 1,500-lumen Scout Weapon Light ($299).
The rifle, as cool and well suited to my needs as it is, is nothing without ammunition. Wilson Combat offers a dozen or so loads for the .300 Hamr, and while I use several, my default general-purpose load is the .130-grain HHC (Hamr Hot Core) load ($25.95/20 or $247/200) at about 2,500 fps. This load uses a special bullet designed for the .300 Hamr by Speer. In 10 percent ordnance gelatin, you can expect more than 16 inches of penetration and double diameter expansion. It’ll even remain terminally effective after penetrating two layers of 14-gauge steel or multiple layers of plywood and drywall.
Here, too, is another consideration. With this rifle’s compactness, moderate weight and minimal recoil, it’s easily handled by my wife and both of my teenage daughters. This is an aspect of “general purpose” that’s often overlooked. If you’re the only person in your household who can effectively wield your general-purpose rifle, then it actually becomes a rifle of limited or specialized application.
I’ll not be so bold as to claim Cooper’s Scout Rifle concept as something without merit. I have several Scout Rifles I routinely use and will always have one close. What I’ll say and stand behind is that while a true Scout Rifle might be of wondrous worldwide appeal and reasonableness, it’s something that for most people wouldn’t be the most practical one-rifle answer. A general-purpose rifle that doesn’t ideally address your general-purpose needs is, as far as you’re concerned, not a general-purpose rifle at all.
Editor’s Note: This article originally appeared in the December 2020 issue of Gun Digest the Magazine.
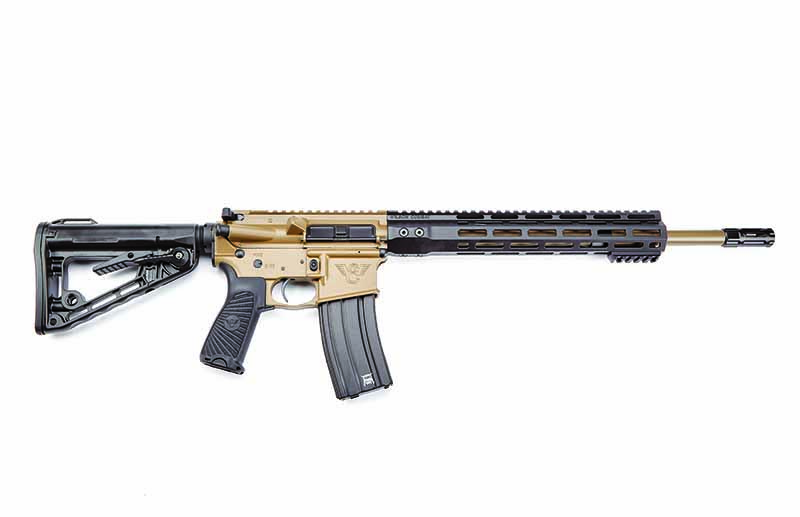
Just like its namesake, the M400 Switchblade is small, fast and versatile, squeezing competition-level performance into a small package.
Features Of The Sig M400 Switchblade:
Full Ambi Controls
2-Stage Match Trigger
Free-floated Handguards
11.5-Inch CHF Barrel
Titanium Elite Cerakote Finish
Once only renowned for their handguns, Sig Sauer has been taking the American AR market by storm. In recent years, their Tread series has been many people’s pick for the best entry-level AR-15 due to the balance between their quality and cost. The new M400 Switchblade pistol is not part of the “Tread” line, likely because some of its competition-grade features inherently raise it out of the “entry-tier” category that Tread rifles represent.
Full ambidexterity, competition-level upgrades and high-quality construction make the Sig M400 Switchblade one of the most attractive AR pistols on the market today.
Ambidextrous Controls
One of the M400 Switchblade’s most notable upgrades is its full ambidexterity. Its charging handle, bolt release, and selector switch have all been designed to be operable from either shoulder. Match environments are often filled with oddly shaped obstacles that force the shooter to utilize their non-dominant firing hand, but the Switchblade’s ambidextrous controls remove some of the difficulty associated with that. Rifle courses often emphasize the ability to shoot with either hand as well, so the M400 Switchblade is also viable in a defensive role.
Competition Features
Scoring good hits should also be easier with the M400 Switchblade’s new 2-Stage Matchlite Duo Trigger. This flat blade trigger made by Sig Sauer has a crisp break at about 5 pounds of pull, lending itself to not only more accurate shots but to faster shooting as well.
The Switchblade’s furniture has also been upgraded over the M400 Tread Pistol’s. It comes standard with a Magpul BSL Brace which is adjustable for length and designed to provide superior stabilization. The pistol grip appears to be the same as what comes on the Sig MPX Copperhead PDW. Some have praised this grip in the past for being ergonomic while others have criticized it for being too small. Regardless, it is interchangeable with any kind of AR-15 pistol grip you may prefer.
The handguard has M-LOK slots and has been free-floated to ensure there is no shift in impact when bracing the weapon against a rest. It was designed to be extra rigid, so the user doesn’t have to worry about deflection even after mounting several pounds worth of accessories and gadgets to it.
The MSRP of the Sig M400 Switchblade is yet to be released, but expect to pay more than you would for a Tread rifle or pistol due to the upgrades included right out of the box. As Sig further expands into the AR market, they continue to release new and enticing designs that bring something unique to the table. The M400 Switchblade’s competition features combined with its handsome Titanium Cerakote finish make this appear to be another winning combination.
For more information on Sig Sauer, please visit sigsauer.com.
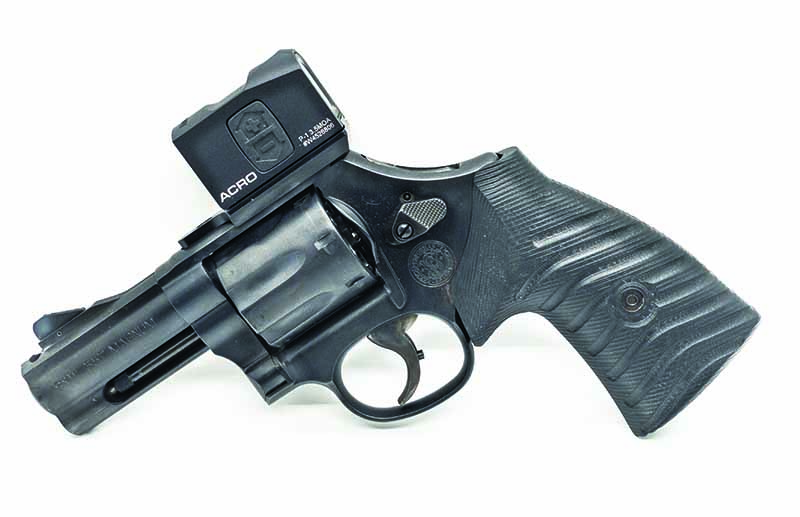
Defensively, can a gassed up Smith & Wesson Model 586 L-Comp keep up with a double-stack 9mm pistol?
How Has The Model 586 Been Modified:
Aimpoint ACRO Red Dot on Apex Tactical Specialties mount
Apex Evolution IV Hammer
VZ Grips
Minor trigger modifications
JM Custom Kydex custom holster
Is it possible to run a wheelgun heads up against a modern semi-automatic pistol? That was the question I set out to answer after building what I’ve come to call “The Modern Fighting/Defensive Revolver.”
The Modern Fighting Revolver (MFR) builds around the idea of taking a revolver and giving it all the necessary upgrades to bring it into the 21st century, while still keeping the features intact that we love about wheelguns. To that end, the build theory was designed to emulate the popular “Roland Special” modified Glock. A Roland Special is usually a Glock 19 with a slide-mounted red-dot sight, weapon-mounted light and compensator.
To get as close to that design envelope as possible, the starting platform for the 21st-century revolver was a Smith & Wesson Model 586 L-Comp. The 586 L-Comp is an L-frame revolver, S&W’s larger mid-size frame with a 3-inch barrel. Technically, only 2.5 inches of the barrel are rifled, since the last half-inch is a single chamber compensator. Plus, it’s a seven-shot, which brings the capacity in line with someone carrying a 1911.
Honing The Model 586
There’s no good solution to mount a weapon light on the Smith & Wesson Model 586 L-Comp, so that was removed from the platform. That made the next solution how to mount an optic on the gun. Previous testing indicated that closed emitter optics were a better choice for a revolver, so the Aimpoint ACRO was the obvious choice. Thankfully, Apex Tactical Specialties makes a mount for S&W revolvers that replaces the rear sight and securely mounts an ACRO to the top strap.
The addition of an Apex Evolution IV hammer and some minor trigger modifications, plus a set of VZ grips completed the “build” portion of the task. But the question remained: How to test it? How do we answer the question of whether or not you really can run a revolver heads up against a semi-automatic pistol?
The modern defensive revolver—purpose built for serious shooting.
The clear answer is to subject it to the crucible of a high-round count class, specifically a class taught by Scott Jedlinski. Scott runs Modern Samurai Project and specializes in teaching shooting classes around the application of red-dot-equipped pistols. Scott was hosting a one-day clinic on appendix carry, followed by a two-day course co-taught with Jared Reston of Reston Group. Scott would cover daylight red-dot applications, and on day three, Jared would focus on low/no light shooting. The 586 L-Comp, now dubbed The MFR (Modern Fighting Revolver), would be the only wheelgun in attendance.
Filling in the Gaps
Once the test ground was selected, the last piece of the puzzle was support gear. This is all the stuff most people who don’t take a lot of classes or shoot matches don’t think about: holsters, magazines (for semi-autos), pouches, belts, etc.
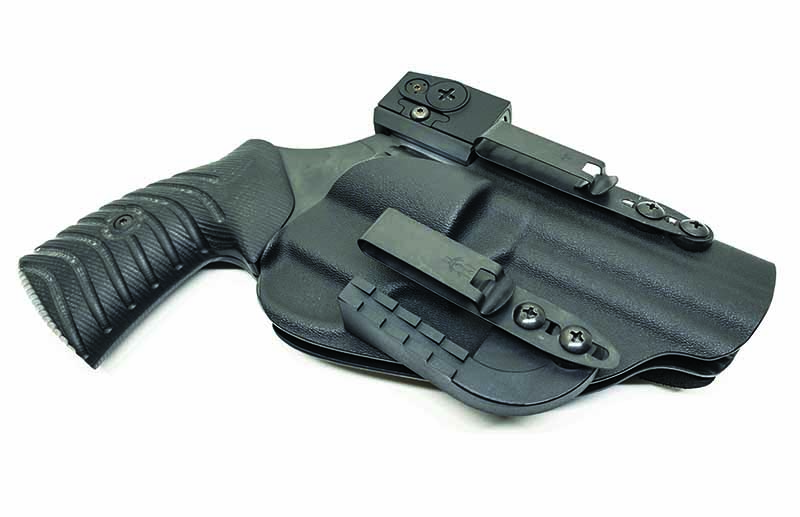
The holster for the MFR was going to be a task in and of itself, because carrying that gun at the appendix position would require some clever engineering. Luckily, JM Custom Kydex was more than willing to provide that clever engineering. Tony designed an entirely custom holster based on his Wing Claw 2.0 design.
The top of the holster has a deep scallop cut to allow the ACRO and mount sufficient clearance, there’s a custom muzzle pad for the holster to keep the grip from rotating forward on the belt line, and the whole rig is secured to the belt with Discreet Carry Concepts Clips. It’s a considerable amount of holster and occupies a lot of belt space, but then again, it’s designed to hold a lot of gun. It works as advertised, because using the JMCK holster and a Mastermind Tactics Specialist belt, the revolver conceals easily under an untucked T-shirt.
The Smith & Wesson Model 586 L-Comp is cut for moon clips from the factory; however, I opted for speed loaders instead. There were a couple of reasons behind this. The first being that moon clips and .38 Special brass don’t always get along well. Clips are great for wheelguns chambered in semi-auto cartridges like 9mm, 10mm or 45 ACP, but I’ve had some unpleasant experiences with .38 Special moon clips. Plus, the backup gun to the 586 L-Comp is a 686+ that isn’t cut for clips, so the loading devices needed to work across all platforms.
In its JM Custom Kydex holster, the 586 L-Comp can be concealed with minimal effort, despite its size.
Enter the folks at Speed Beez, who make one of the best speed loaders on the market. Their seven-shot loader is the gold standard for seven-shot speed loaders. They’re also not cheap, at nearly $40 a piece, but if you’re serious about running a wheelgun hard, they’re worth it. The speed loaders were an important component, because while the class doesn’t have any “on the clock” reloads, being able to keep pace with people shooting 15- to 20-shot 9mms means a lot of reloading. The Speed Beez are spring-loaded, so they’re a lot faster than a twist-knob-style loader. The last two bits of support gear were an OWB Blade-Tech holster for day two, and some loader pouches, also from Speed Beez.
The True Test
Gear sorted, it was time for the class. Forty-five minutes south of Miami is Homestead Training Center, the nicest outdoor training facility in South Florida: three solid days of training. Those three days of training also provided multiple opportunities to test the Modern Fighting Revolver heads up.
During the training day, Scott would have each student shoot the same scored standard, for example, a single shot from appendix, or three shots to the body and two to the head. He goes down the line and records scores, and the winner would receive a prize of some value. On top of that, at the end of days one and two, the class would have a man-on-man shoot-off. Two shooters enter the box, and the first one to hit a piece of steel at 25 yards wins. Selected shooters would also get a chance to take a crack at Scott’s challenging Black Belt standards, four strings of fire fired back-to-back for a score. Beating the time limits would earn someone a coveted Black Belt patch—as of this writing, there are only eight patch holders. Training day three also had scored standards, with the students shooting scored B8 targets at 25 yards.
The first question was whether running seven-round Smith & Wesson Model 586 L-Comp in class would cause me to lag behind the other students. That was answered quickly on day one with a resounding “no!” As long as I was aware of where I was in terms of round count, I could stage reloads between strings of fire with no issue. Keeping a Speed Beez loading block handy meant that if I needed to, I could recharge speed loaders in a hurry helped, but since training day one didn’t include any reloads “on the clock,” keeping pace was easy.
The next hurdle was a test of skill—the whole class would compete to see who could hit the A-zone of a target the fastest at seven yards. A 0.95 draw from the holster secured the win for me in this contest, and put the first tick mark in the win column for the Modern Fighting Revolver. The next win came at the end of class, where the MFR won the first head-to-head shoot-off of the weekend, defeating a student running a heavily customized Glock.
The Speed Beez loading block holds 42 rounds of ammo ready to recharge your loaders.
Day two brought more success for the upgraded defensive revolver. A win and a loss in class-wide competitions, but the gun’s record at 3 to 1 going into the final man-on-man 25-yard shoot-off. This was a battle, as the talent pool had deepened on day two, and the finale found the MFR squared off against Hilton Yam of 10-8 Performance. Hilton is a legendary 1911 gunsmith, former FBI SWAT operator and talented competition shooter. Winning against him would push the MFR to its limits of accuracy—which it did. The revolver brought home the win in the head-to-head shoot-off against a 1911 wizard.
The final training day involved scored B8s during the afternoon portions of the class. Once again, Hilton put a hard charge on, shooting all 90s or better. How did the wheelgun do? Six 10-shot strings resulted in scores of 92, 98, 95, 99, 94 and 96. Since Hilton also shot a 99, that one is a tie for the MFR. It wrapped up the scored portion of the class with four heads-up wins against semi-auto shooters, one loss and one draw. So if you want to run a wheelgun hard in a class heads-up against people with semi-autos, you absolutely can.
Defensive Revolver Shortcomings
Full disclosure: There was one area where the Smith & Wesson Model 586 L-Comp falls behind a quality semi-auto pistol, and that’s on any fast string of fire longer than three rounds. For example, the classic Bill Drill, where you draw and fire six shots as fast as possible. Because the revolver is entirely mechanically operated, the fastest split—or time in between shots—a shooter can realistically get is 0.22, maybe 0.20 on a really good day.
With a 1-second draw and five 0.22 splits, a “fast” Bill Drill is 2.10 seconds. Yes, that’s very fast, but a similarly talented shooter with a semi-auto pistol could shoot as fast as 0.18 splits and perform the same drill in 1.9 seconds. So, if pure speed is your goal, the revolver probably isn’t competitive.
The second caveat is that the revolver’s performance isn’t really about the gun at all—it’s about the shooter. If you’re a talented shooter, you’re going to be able to run a wheelgun heads up, because at the end of the day, it’s all just sights and triggers. If you’re relatively new or unskilled, it doesn’t matter what gun you buy or what doodads you hang on it—you can’t buy skill.
The MFR shows signs of use after being an EDC gun for three months and firing 1,200 rounds.
The final butcher’s bill for the Modern Fighting Revolver puts its price tag in line with other high-end defensive pistols. The Smith & Wesson Model 586 L-Comp alone starts at $1,100. Then, add in the following: $150 for the double-action-only conversion, $700 for the mount and optic and another $100 for the grips. That also assumes you’re competent enough as an armorer to install the new hammer and springs, so that you don’t have to pay a gunsmith to do it.
So, just the basic gun build costs more than $2,000, and that doesn’t include the Speed Beez speed loaders or holster. Once you add in all the accessories, you’re looking at near $2,500; and that’s a lot of money to build a revolver for a very specific purpose.
However, all that aside, the real question was whether or not a revolver can turn and burn in a class full of modified Glocks and double-stack 9mm pistols. The answer to that?
Absolutely.
For more information on the Smith & Model 586 L-Comp, please visit smith-wesson.com.
Editor’s Note: This article originally appeared in the February 2021 issue of Gun Digest the Magazine.
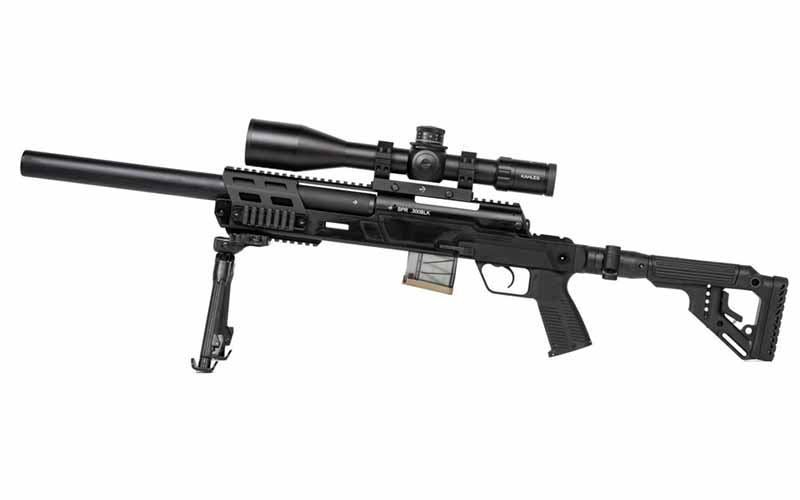
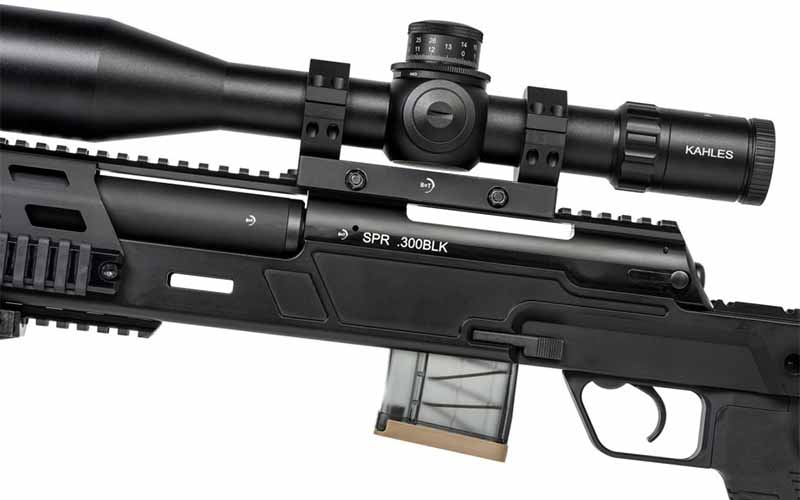
Already quiet, accurate and compact, the new SPR300 PRO model brings it to the next level.
Features Of The SPR300 PRO:
AR Magazine Compatible
AR Stock Compatible
Timney Match Trigger
M-LOK Accessory Rail
Cocked-Bolt Indicator
Earlier iterations of B&T’s SPR300 design have already made their rounds on the global firearms market and left many very impressed. Jon Scott, VP of Sales for B&T USA, claims that European police have used the SPR300 to great effect in urban environments where accuracy and discretion are vital. This integrally suppressed .300 AAC Blackout rifle has been described as being “Hollywood quiet”, producing a report comparable to that of an air rifle at less than 121 dB. When you consider the fact that the SPR300 can also be disassembled and stowed in its own briefcase-esque carrying case, it’s hard to believe that it wasn’t designed with hitmen in mind.
If this rifle wasn’t cool enough already, B&T USA’s new PRO model brings some quality-of-life features that will make using the SPR300 even more enjoyable.
One of the smallest changes on the SPR300 is also likely to be one of the most appreciated, and that’s the ability to accept standard AR-pattern magazines. The original SPR300 used proprietary mags that were rare and could sell for over $100 each, so even the wealthiest among us should appreciate that the new PRO model uses the most common rifle magazine in America. The SPR300 PRO’s folding stock assembly is now compatible with most common AR stocks as well. The addition of M-LOK slots makes this one very customizable rifle.
The original SPR300 was already plenty accurate for a bolt-action rifle, but the new PRO model is even more so. It’s been given a Timney single-stage Hunter Elite trigger which is adjustable from 1.5 to 4 pounds of pull. This should give experienced shooters the ability to reach even greater levels of precision out of their SPR300.
The new SPR300 PRO does not have an MSRP listed yet, but considering the first generation sold for over $5,000 each, one should anticipate something similar for the new model. Keep in mind that as an integrally suppressed firearm, ownership of the SPR300 PRO also requires filing NFA paperwork with the ATF as well as a $200 tax stamp.
For more information on B&T USA, please visit bt-arms.com.
Up Your Suppressor IQ
The Suppressor How They’re Made And How To Buy One
No, holstering a pistol isn’t rocket science. However, you need to know how to do it right for your own safety and those around you.
Most take it for granted if even that. Yet, holstering a pistol is an important part of the handgun firing sequence, even under the most mundane circumstances. Do it wrong, well, you and those around you could end up in a world of hurt.
While it’s not rocket science by any stretch of the imagination, Jamey Caldwell covers the basics of holstering a pistol properly. As the instructor at 1-Minute Out and former special operator points out, learning to do it right is a matter of safety. Whether you realized it or not, the simple task of holstering a pistol is often where a negligent discharge takes place. Put a little thought into it, it’s easy to see why.
Admiring the last group downrange or thinking about the next trigger pull, many shooters don’t have their complete attention on the task at hand. Additionally, shirttails and coat strings reside around this region; caught in the trigger guard they are enough to depress the trigger when holstering. Look it up on Youtube, there are plenty of videos showing this happen. Caldwell has a simple antidote, watch the pistol into the holster. Elementary to say the least, but a key safety protocol. All it takes is a second to check if everything is clear before handing your pistol back up.
Working in conjunction with rigid MOLLE fields, the Stealth 20L keeps your gear organized and at hand.
How The Stealth 20L Outdoes Other Packs:
Two RMP panels keep gear organized.
Strong 1000 Denier nylon construction stands up to any conditions.
Throw a bulletproof insert in and use it as a shield.
It’s no secret, a good pack makes life easier. This applies equally to toting around your laptop and workout clothes as it does extra mags and a medkit. Either case, you don’t want to be left rummaging for a possible and coming up with everything except what you’re after. This is why Grey Man Tactical’s new offering should prove intriguing for those who need gear at hand at a moment’s notice.
Utilizing the company’s unique Rigid MOLLE Panel (RMP), the Stealth 20L Backpack offers an unparalleled organization system and lightning-fast access. For those who’ve yet to catch wind of the RMP, it’s a slick system. Made from lightweight, high-endurance polymer, the panel is a rigid MOLLE field that won’t slump and keeps gear in place. They’re available standalone, and great for, say, an organization system on the back of a truck seat. But make an impressive enhancement in the Stealth 20L Backpack. It’s especially handy if you carry off body, creating a system where a pistol remains predictably in place.
The Stealth 20L comes with two RMPs, a 10.75×17 inch panel that fits in the main compartment and a 15.25×11 inch one in the concealed carry compartment. The latter is quick access, thanks to a right-side handle and two large YKK zippers. Built from water-resistant 1000 Denier nylon, the Stealth 20L stands up to nearly any environment. At the same tick, it won’t draw eyes. The pack is decided understated in appearance, cutting a low profile that won’t single you out from the crowd. Certainly, a plus if you happen to live in urban areas.
Internally, the pack has a padded laptop compartment to keep electronics safe from unwanted damage, supported by a high-density polyethylene (HDPE) sheet for more impact resistance. The Stealth 20L boasts quick-release sternum and shoulder straps allowing for rapid access to any of the six compartments in the blink of an eye. And two luggage straps across the back allow it to slide onto a rolling suitcase handle. Interestingly, using the straps as handles, the Stealth 20L converts into a shield with the addition of a bulletproof insert.
A nifty package, but one demanding its pound of flesh. Presently, the MSRP on Grey Man’s Tactical Stealth 20L Backpack is $294.
The first factory to make an AK outside of Russia, FB Radom is still arming soldiers and civilians in Poland and abroad nearly seventy years later.
Current FB Radom AK Imports:
Beryl M1 223 S (.223/5.56)
Beryl M1 762 S (7.62×39)
Mini Beryl Pistol (.223/5.56)
Following WWI, the freshly formed Republic of Poland needed arms. They began construction on a new factory and by the late 1920s the Fabryka Broni plant had begun production. Built in Radom, Poland, it’s commonly called FB Radom and has been producing arms ever since. Like the nation of Poland itself, FB Radom has gone through several changes in management over the years, but regardless of the flag flying outside their walls or the official name on their letterhead, the quality of their arms remained superb.
FB Radom may no longer make sewing machines or typewriters, but their AKs are as good as ever and are one of the few remaining foreign-made Kalashnikovs being imported into the United States.
History Of AK Production At FB Radom
During the Nazi occupation of Poland in WWII, FB Radom was used to produce Mauser rifles and Vis pistols for the Wehrmacht. Management changed yet again when the Soviets ousted the Germans and absorbed FB Radom into their own logistical supply train, giving the factory its other name you may have heard—”Circle 11″ (⑪). This is when FB Radom first began production of Soviet-designed arms, initially consisting of Mosin-Nagants, TTs and other Soviet WWII weaponry.
In 1957, the first AK rifles to be built outside of Russia rolled off the line at FB, marking a new era for the global proliferation of the Kalashnikov. In Polish designation these were known as the pm K and the pm KS, the fixed and folding-stock variants of the Russian milled AK-47 and AKS-47, respectively. Early FB Radom AKs are nearly indistinguishable from Russian-made ones at a glance, but as time moved forward the two nations’ AK designs grew increasingly different.
In the early 1980s, after Poland and the USSR’s relationship had continued to sour, Poland began experimenting with a new AK-based weapon system that they called the Kbk wz. 88 Tantal.
wz. 88 Tantal in 5.45 with Pallad grenade launcher. Photo:Wikipedia
Recognizing the benefits of using lighter, higher velocity cartridges, the wz. 88 Tantal was chambered in 5.45x39mm, the caliber of the Russian AK-74. Relatively few Tantals were ever built by FB Radom, but they served as the foundation for Poland’s current service rifle. When armies choose which weapons and ammo types to procure, the decision is as rooted in logistics as it is in ballistics. So, as Poland began to drift politically closer to NATO than the USSR, they switched their new AK-development efforts away from 5.45 and towards 5.56.
That new 5.56 AK was adopted as Poland’s standard service rifle in 1997 and was known as the wz. 96 Beryl. “Beryl” is pronounced the same as the first part of the word “beryllium”, as Polish military projects are typically codenamed after chemical elements.
There are several small design details that are unique to the Beryl, but at its heart, it’s just an AK chambered in 5.56 NATO.
Since their adoption in 1997, the wz. 96 Beryl has been Poland’s standard issue rifle and has seen service alongside NATO coalition forces in both Iraq and Afghanistan. They were generally well-liked by the soldiers who used them and were appreciated for combining the reliability of a Kalashnikov with more modern optics and accessory-mounting options.
The standard rifle version has a slightly longer barrel than your typical AKM at 18 inches, lengthened to improve the performance of the velocity-dependent 5.56 cartridge. While these are the most commonly issued variant, another version is made by FB Radom as well.
The Mini Beryl, also chambered in 5.56 but with a barrel length of only 9.3 inches, was developed with special forces and vehicle crews in mind. This model has also been deployed with Polish coalition forces in the Middle East.
Polish soldier with Mini Beryl during a training exercise. Notice the blank-adaptor muzzle device. Photo: Polish Ministry of National Defense.
Besides the Polish military, the other largest group to use Beryl-type AKs is Nigeria. These are nearly identical to the Polish-issued Beryls except that they are chambered for 7.62×39 due to the abundance of that round-type in Africa. The rifles were shipped with new production magazines, but they are compatible with any of the millions of surplus 7.62 AK mags that litter the continent. The Nigerian army has put their 7.62 Beryls to use in the fight against Boko Haram.
FB Radom is one of the most reputable AK-producing factories in the world, not only because of their long history of manufacturing Kalashnikovs, but also because their AKs are still trusted for military service today. Semi-auto, civilian versions of the Beryl, Mini Beryl and 7.62 Beryl are currently being imported into the United States, but are they worth looking at? FB’s reputation for quality also comes at a price, Beryl AKs are some of the most expensive AKs on the market, and they import them in relatively low quantities to boot.
FB Radom AKs offer more modern features right out of the box than most other AKs do, and their manufacturing quality is on par with any other longstanding military arsenal, but their high price and low availability turn many people away from them. They also don’t have the classic AK look that so many Americans want with their Kalashnikov. FB’s guns probably aren’t good starter AKs for people looking to get into the platform, but for those looking for a very functional, modern military rifle, any of the three available Beryls will do you right.
For more information on FB Radom, please visit fabrykabroni.pl.
Beretta’s A300 Ultima offers improved controls without upping the line’s price.
How The A300 Has Been Improved:
Bolt release and cross-bolt safety are enlarged for improved manipulation.
Loading port is bigger to make reloading easier.
Wile 7x7mm rib makes drawing a bead more intuitive and quick.
Asked to make a list, Beretta would most likely make the top five on most shotgunner’s best manufacturers list. There’s little wonder why. Aside from stunning aesthetics, the Italian-American’s smoothbores plain perform—be it at the trap range, in a tactical operation or the field. And contrary to popular opinion, you needn’t take out a second mortgage to pack one out to the duck blind.
Certainly, the Italian-American manufacture turns out its fair share of drool-inducing high-end options, but has been in the budget end of the market for some time. Granted, it’s not turning out the $300 blue-light specials (if you get that reference) available at your local mega box store. But the likes of the 3901 and A300 didn’t and don’t break the bank while offering the quality expected from a gun with the three arrows on its grip cap. And this end ofAf the company’s catalog recently grew a bit larger.
New to the game, the Beretta A300 Ultima. As its designation suggests, the shotgun is an expansion of the existing A300 line of gas-driven semi-automatic shotguns. Yet, gunmaker does a solid job of matching the original guns’ price, while enhancing the system considerably. Beretta has a $799 MSRP on the A300 Ultima black synthetic model and an $899 suggested retail price on the Mossy Oak Bottomlands and Realtree Max5 camo iterations. This track closely to the A300 Outland models, but with some nice upgrades.
A300 Ultima Enhancements
In particular, Beretta aims at hunters with the new 12- and 20-gauge shotguns, improving the controls of the guns. The bolt release is downright massive, the cross-bolt safety is ample and the charging handle enlarged and tubular. Given the launch included camo models, the gunmaker is aiming the scattergun at waterfowlers, who often have to manipulate their gun with gloves on. However, the most appreciated area Beretta super-sized was the loading port, which makes keeping the gun in the hunt much less stress-inducing. The top of the A300 Ultima’s receiver also got the once over, lowering it to make eye-to-bead alignment much quicker and intuitive. To this, Beretta marries a glare-reducing wide 7x7mm stepped rib with a mid bead and fiber optic front, which proves highly visible even in lower-light situations.
Standby Features
Beretta upgrades are welcome, but the company didn’t fix what wasn’t broken with the A300 Ultima. The gun still features the reliable gas system found in its predecessors, which is a plus. As is the inclusion of Beretta’s Kick-Off recoil reduction system, a hydraulic damping system that does a number on felt recoil. The gunmaker claims it cuts felt recoil by 44 percent, which is somewhat believable if you cracked off a shot with the system. Also, the new A300 has a 28-inch MobilChoke pattern barrel in both gauges, which fits a wide variety of choke options that suit your particular needs and hunt.
Overall, Beretta offers a tidy package in the A300 Ultima, one that’s open to a great array of shooters.
A300 Ultima Specs Gauge: 12, 20 Chamber: 3 inches Barrel Length: 28 inches Stock: Synthetic Stock Color: Black, Mossy Oak Bottomland, Realtree Max5 MSRP: $799 Black Synthetic, $899 Mossy Oak Bottomland and Realtree Max5
For more information on the A300 Ultima, please visit beretta.com.
Available in .45 or 9mm, the Bantam 1911 carry pistol brings custom features at non-custom prices.
Features of the 1911 Carry Bantam:
Chambered For Either .45 ACP Or 9mm
Front And Back Slide Serrations
Commander-Length Slide W/ Lightening Cuts
Ambidextrous Safety
Fiber Optic Front Sight
G-10 Grips
1911 pistols made by Tisas in Turkey have been some of the most popular 1911s sold in the U.S. these past few years. Their affordable cost and decent build quality have led many people to Tisas for their first 1911. While most of the Turkish-made 1911s imported by SDS are budget-oriented, basic models, their new Bantam series of carry pistols is a change of direction for the company. The Carry Bantam is twice as expensive as their next most expensive 1911, but it is still far cheaper than the true custom 1911s they’re trying to emulate.
The Bantams may not have as much love and care poured into each individual piece as something like a Nighthawk Custom does, but they do have many of the same luxury features at a third of the price.
Custom From The Factory
The features that come standard on Bantam Carry 1911 pistols help to bring them from the territory of “historical relic” and into the realm of “practical self-defense tool.” The commander-length slide has front and rear slide serrations for easy racking and press-checks. Lightning cuts have also been added to save weight and enhance the gun’s aesthetic. The Bantam’s aluminum frame has aggressive texturing on both the front and back straps which work in conjunction with the G-10 grips to provide the user with maximum control while firing. The frame has also been bobbed to improve concealability.
The Bantam’s ambidextrous safety means that this single-action gun can be easily brought into action with either hand, and its fiber-optic combat sights are ideal for a defense piece.
Reliability
The most important aspect of any carry gun is its reliability, and this is even more true when it comes to 1911s. Many people today believe that the 1911 is an antiquated design that has more place in a museum display than on your belt, but those people likely have little experience with 1911s or are only familiar with low-end models. The truth is 1911s have an excellent potential for reliability, but that reliability is usually only fully realized on high-end custom guns.
The Bantam is not a true custom gun, however, and merely has some of the features of one. Costing as much as it does, one would hope that the Bantam has been ensured to be reliable enough to be carried with confidence, but that won’t be known for sure until these have been more thoroughly tested. The inclusion of a flared and lowered ejection port should help ensure reliable ejections too.
The .45 ACP Bantam comes with two eight-round mags and the 9mm model includes 9-rounders. The package also comes with a cleaning kit, locking hard case, and owner’s manual. With an MSRP of $1,199.95, this is certainly an expensive gun, but for those who want to carry a 1911 this is a very nice option for the price. If you want a 1911 with custom features without actually paying custom shop prices, these new Bantam pistols may be worth considering.
Looking to go armed, but are stuck in the weeds as to what to arm yourself with? Here are 20 of the best concealed carry gun options that will keep you on the defensive.