Don’t rush! Taking your time to set up your shot when on the hunt will lead to more birds in the bag.
As the old saying goes, “Time is of the essence.” Nowhere is this truer than tramping grassland for birds.
Even when you have a dog working, you have precious few seconds to make the shot happen once that chukar or pheasant hits the blue. Such a narrow window, the first instinct is to get your shotgun to your shoulder and your finger on the trigger. Understandable as this urge is, you’re doing yourself a disservice. Preposterous as it might sound, taking a few extra moments before you take your shot can make your success rate skyrocket beyond expectations.
There are a couple things at play here. Initially, by taking your time you’re giving yourself a better opportunity to evaluate the direction of the bird’s flight. Often times, a bird might start off in one direction, then veer another, leaving your muzzle trailing him and you scrambling for the shot. Furthermore, putting some distance between you and the bird gives your shotgun the opportunity to do the work. Think of it this way, something pheasant sized, do you have a better chance hitting it with a golf ball or beach ball? Let your pattern optimize. Finally, taking your time you’ll inevitably relax. This can’t be stressed enough, the more comfortable you are when you shoulder your gun, the more naturally you’ll track the bird and, come the end of the day, the more you’ll find in your bag.
Slowing down your shot and milking time for all it’s worth is tough, especially with the fast action of wing shooting. But disciple yourself to do so and you’ll put a load more meat on the table.
For more information on the CZ-USA Supreme Field Over-Under, please visit: www.cz-usa.com/.
For more information Aguila Ammunition, please visit www.aguilaammo.com.
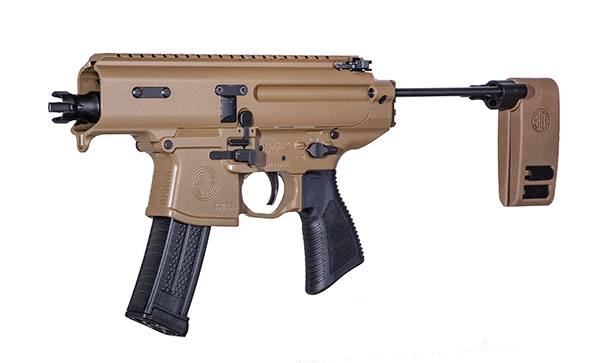
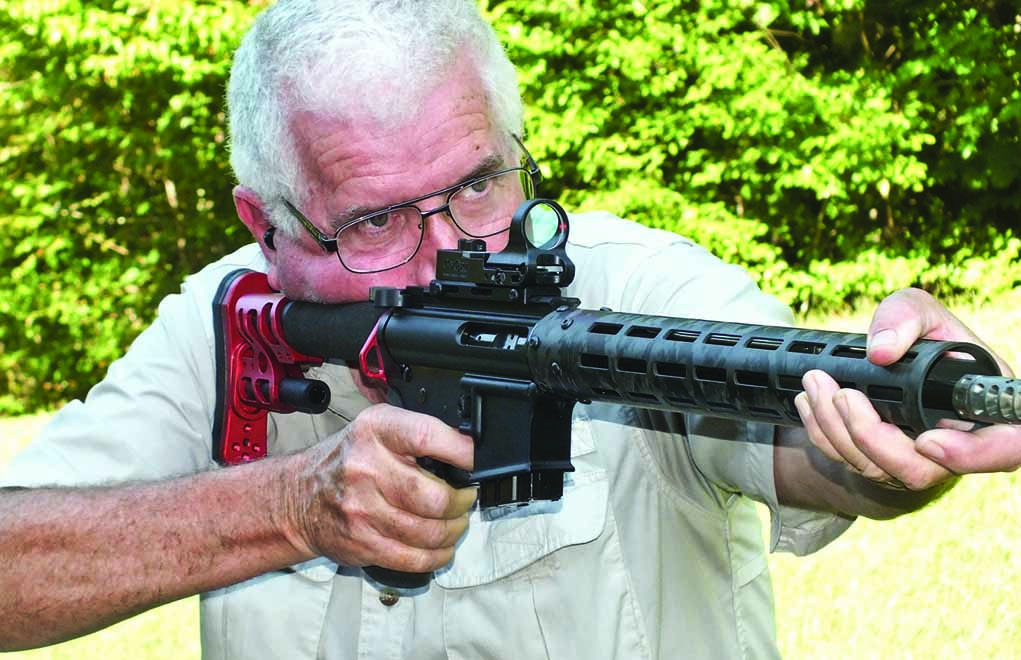
Shaved down to minuscule proportions, SIG Sauer’s MPX Copperhead cuts the AR pistol down to size.
How the MPX Copperhead shrinks the AR platform:
3.5-inch barrel
2.4-inch width and 14.5-inch overall length
4.5 pounds in weight
Slim Rattler grip
Rapid deploy Pivoting Contour Brace
Since the introduction of the AR-15 pistol, the style of firearm has tended consistently in one direction – smaller. While gunmakers have made leaps in this direction in the past, shaving an inch here and an ounce there, their efforts seem to pale with what SIG Sauer cooked up for 2019. Making a sizable jump to the petite, the MPX Copperhead shrinks the AR-15 nearly down to the magnitude of, well, a regular old pistol.
Where this is most notable is the 9mm’s barrel, which is a minuscule 3.5 inches long, the size found on many traditional pistols’ sub-compact models. In the MPX Copperhead’s case, it’s barely enough tube – even with the aid of a muzzle brake – to extend past its monolithic Elite Series upper receiver. And it’s short enough, most interested parties will mumble a word of thanks SIG had the foresight to incorporate an integral hand stop, especially since the pistol is sans a handguard. Anything less might have flirted with disaster.
SIG has seen the svelte dimensions through to all aspects of the MPX Copperhead, including a slim 2.4-inch width and 14.5-inch overall length. The gas-piston operated pistol is outfitted with SIG’s new Pivoting Contour Brace, an adaptive addition that not only swivels to match a shooter’s body position, but also rapidly deploys in a moment’s notice. If the PCB doesn’t fit the bill for you, SIG has engineered an element of flexibility into the Copperhead with a rear Picatinny rail that makes it compatible with all other MCX and MPX stocks and braces.
Other notables on the MPX Copperhead include Rattler grip, ambidextrous controls, Rem DLC trigger, upper Picatinny rail for optics, Cerakote Coyote finish and 4.5-pound weight. In line with other MPX models, the Copperhead’s $1,835 MSRP comes in on the pricey side when measured against the rest of the AR pistol market.
Marketing experts will tell you that many consumers purchase products based solely on brand recognition and loyalty. From breakfast cereal and bread to clothes and cars, we tend to gravitate toward particular companies whose products we feel are inherently superior. Gun owners are particularly loyal, and when a company provides a high-quality product at a fair price, remaining faithful and supporting your favorite brand is a wise decision.
Many gun companies now offer their loyal customers the opportunity to purchase their firearm and all accessories in one place. For concealed carry and personal defense, one of those accessories almost certainly includes an EDC knife. Carrying a sharp knife is a luxury for some, but there are plenty of real-world scenarios where having a sharp blade close at hand is a matter of life and death.
If you’re a true loyalist, here’s a look at six of the best EDC gun and knife combos from some of your favorite brands.
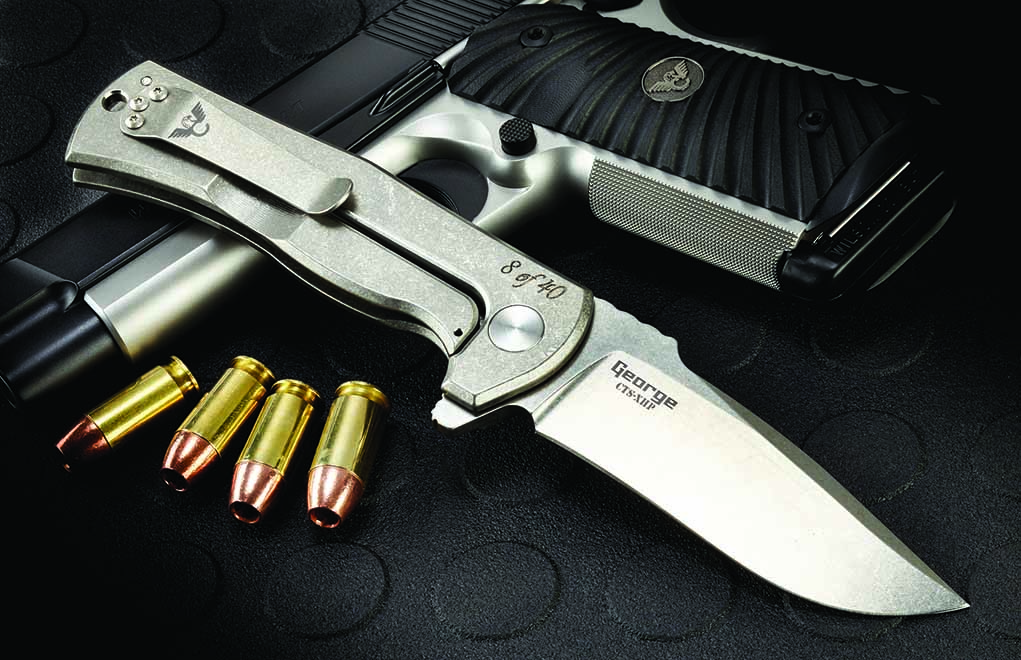
Wilson Combat
Knife: Wilson Combat Les George Eagle 40th Anniversary ($599.95) Gun: Wilson Combat CQB ($2,865) WilsonCombat.com
Wilson Combat makes world-class 1911s, and the company’s CQB is one of their most popular pistols. It isn’t cheap at $2,865, but you’re not going to find a custom 1911 of this build quality for any less. The CQB features a carbon steel slide and frame, a five-inch stainless match barrel and match bushing that are hand-fit, G10 Starburst grips, a light, crisp 3.2-4.5-pound trigger — and much, much more.
The frame-to-slide fit is seamlessly smooth with minimal tolerances, and no detail of this pistol has been overlooked. It’s among the most accurate pistols I’ve ever shot, and the gun I fired has zero issues. No, it isn’t cheap, but it’s one of the most affordable life insurance policies available. Plus, 1911s offer both a grip and manual safety, so you can feel confident carrying this gun cocked and locked. Since this is a Wilson Combat pistol, there are plenty of optional custom touches you can add to make your own gun one-of-a-kind.
A gun like the CQB demands a knife to match, and that’s what you’ll get with the 40th Anniversary Wilson Combat Eagle Framelock Titanium Flipper based in Les George’s famed Eagle model, a standard among carry knives. This knife comes with a Carpenter XHP “Super Steel” stainless 3.6-inch blade equipped with a trigger finger flipper for rapid deployment. The handle features fiber laser engraving with a special 40th anniversary motif, and the weight is minimal — just 4.8 ounces. If you want one of these knives to complement your CQB pistol, don’t wait around, though: Only 40 will ever be made and they’re selling quickly.
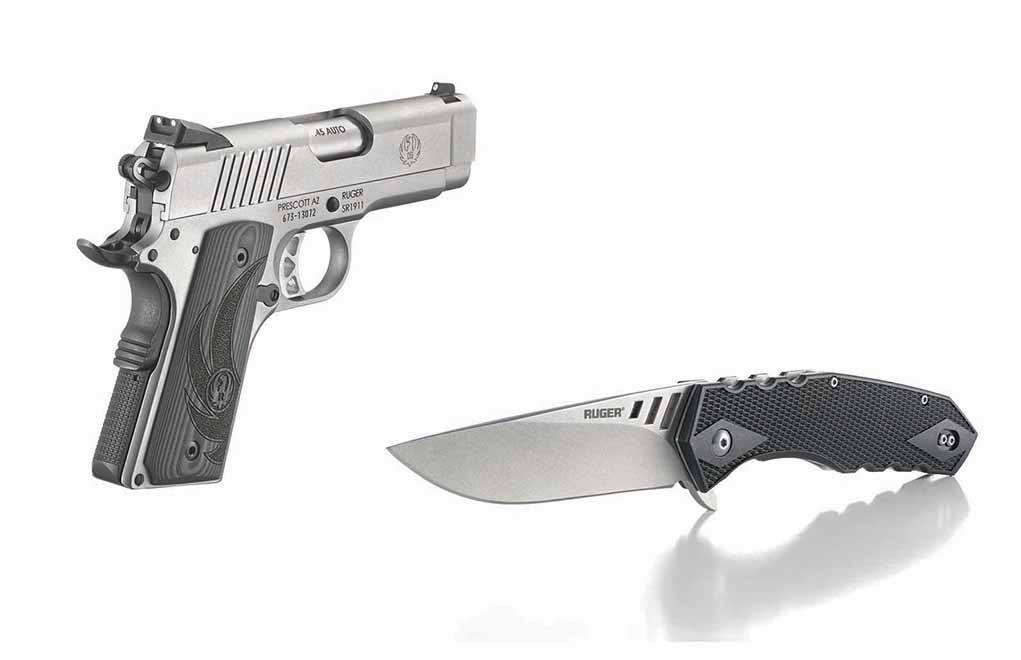
This Ruger combination isn’t in the same price class as the Wilson Combat combo, but this gun and knife combo actually offer a lot for the money. The new-for-‘18 SR1911 Officer-Style .45 is CNC machined for smooth and reliable operation — and with a 3.6-inch barrel, an overall length of 7.25-inches and a weight of just 31 ounces, this compact .45 carries seven rounds in the magazine and offers the added safety of the Model 1911 design features. The slide and frame come with a low-glare stainless finish, the sights are drift-adjustable Novaks and G10 grips are some of the most stylish and functional you’ll find on any production 1911. The SR1911 Officer-Style offers plenty of stopping power in a conveniently-sized pistol package.
Ruger’s an old name in the gun world, but the company recently began offering an expanded line of knives that includes a number of great EDC options, including the versatile and affordable Follow-Through. The 3.75-inch drop-point, flat-top blade is made from 8Cr13MoV 58-59 HRC stainless-steel, and this Matthew-Lerch designed knife also comes with a locking liner and blade flipper as well as Ruger-inspired diamond-checkering glass-reinforced nylon handles. Even if you aren’t looking for a new carry pistol, the Follow-Through is a heck of a deal with an MSRP less than $80.
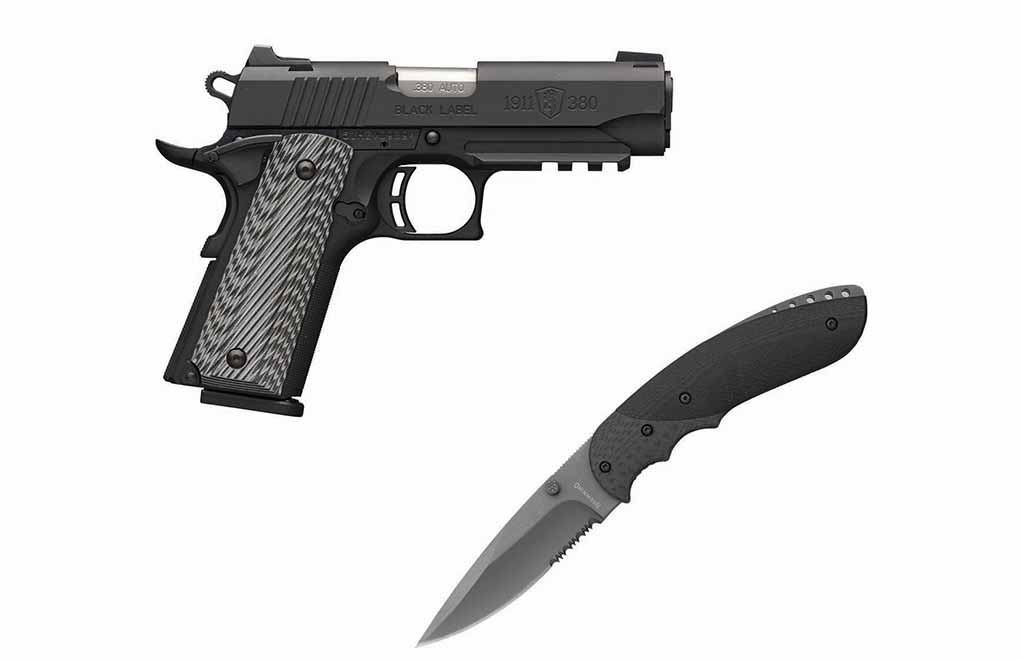
Knife: Browning Vortex Drop Point ($29.99) Gun: Browning 1911-380 Black Label Pro W/Rail ($829.99) Browning.com
If there’s a company that knows about brand loyalty, it’s Browning (have you visited their “Show Us Your Buckmark” page and seen the number of people with the brand’s logo tattooed on their body?). Indeed, Browning has developed something of a cult following, but that didn’t happen by accident. Innumerable companies have cloned the Colt 1911 pistol design over the years, but Browning did something truly bold and ingenious and created an 85 percent scaled version of the world’s most famous single-action semi-auto pistol.
Chambered in .380 ACP and dubbed the 1811-380, these guns come with composite frames with fully machined 7075 sub-frames and rails and a stainless steel slide. It’s plenty powerful to handle the mild .380 ACP round, yet it’s lighter and more compact than competing 1911s with standard-sized component parts.
How portable is it? The Black Label Pro version with a 4.25-inch barrel measures just 7.5-inches long but weighs a scant 18 ounces and holds 8 rounds in the magazine. The 1911-380 Black Label has three-dot sights that are perfect for close-range shooting — even in low light. And, there are plenty of nice additions to this pistol, like G-10 composite grips and an accessory rail for attaching add-on accessories such as lights or lasers.
The Browning Vortex Drop Point is a functional and very affordable EDC knife that features a 440 stainless-steel titanium-coated, 3.4-inch blade with partial serration and a black G-10 scaled handle. The blade has a 56-58 Rockwell rating, and when folded, the knife measures just 4.5-inches long. It’s also an extremely affordable option and remains a good value at under $30.
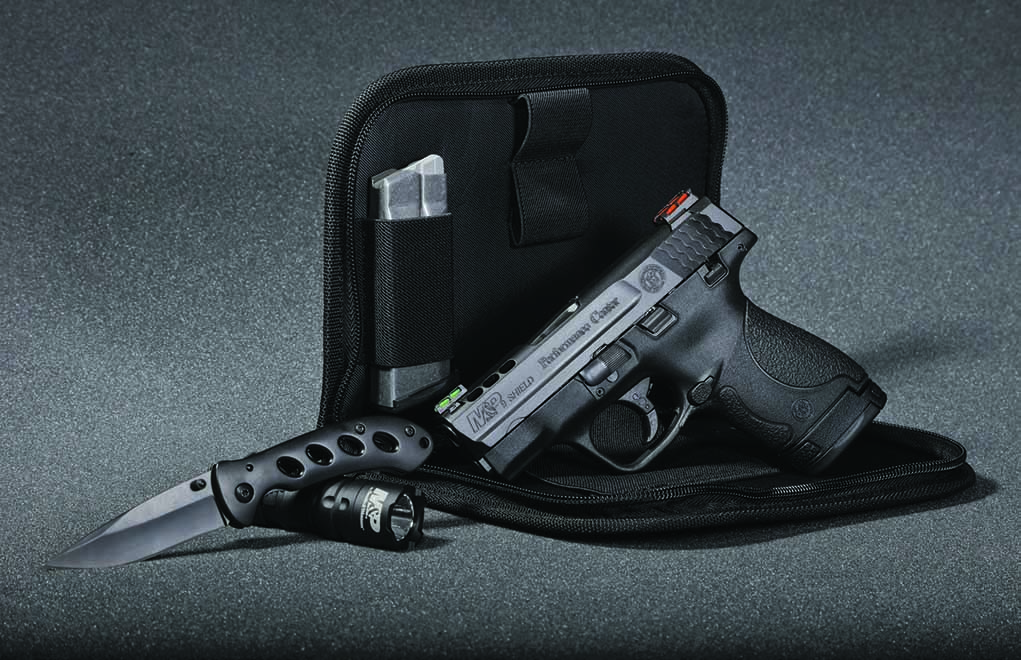
Knife: M&P Oasis Gun: Smith & Wesson Performance Center Ported M&P 9 Shield ($510 for the Combo Kit) Smith-Wesson.com
Smith & Wesson is another company with a dedicated following, and their new Performance Center Every Day Carry Kit makes buying an EDC pistol and an EDC knife as simple as possible since they both come as part of a single package. Making this offering even more appealing is that fact that Smith & Wesson also throws in a pistol portfolio and an M&P Delta LED flashlight as part of the package price. What’s all this run? Just over $500 MSRP.
The M&P 9 Shield needs no introduction. These pistols are among the most popular carry guns in the country, and more than one million of them have been sold. These striker-fired pistols come with 7- and 8-round magazines, a stainless slide and barrel and HI-VIZ fiber optic sights. The Shield has a 3.1-inch barrel and weighs just 18 ounces. Its narrow design and roughly 6-inch overall length make these guns easy to conceal, and the durable black finish stand up extremely well to the abuses of daily carry. Breakdown and maintenance of these guns is extremely simple, and the Shield has an enviable reputation for durability and reliability. The ones I’ve shot have also been accurate, and the grip design manages recoil effectively.
The Oasis folding knife features a 3.25-inch 7CR17 high-carbon stainless drop-point blade that’s titanium coated. It also features dual thumb studs, a Linerlock locking system and a skeletonized handle that minimizes weight and simplifies cleaning. At just 4.75 ounces, this lightweight knife is easy to tuck inside a pant pocket, and it’s easy to open for rapid deployment. The Performance Center EDC Kit is a superb value from a trusted brand.
Wilson Combat
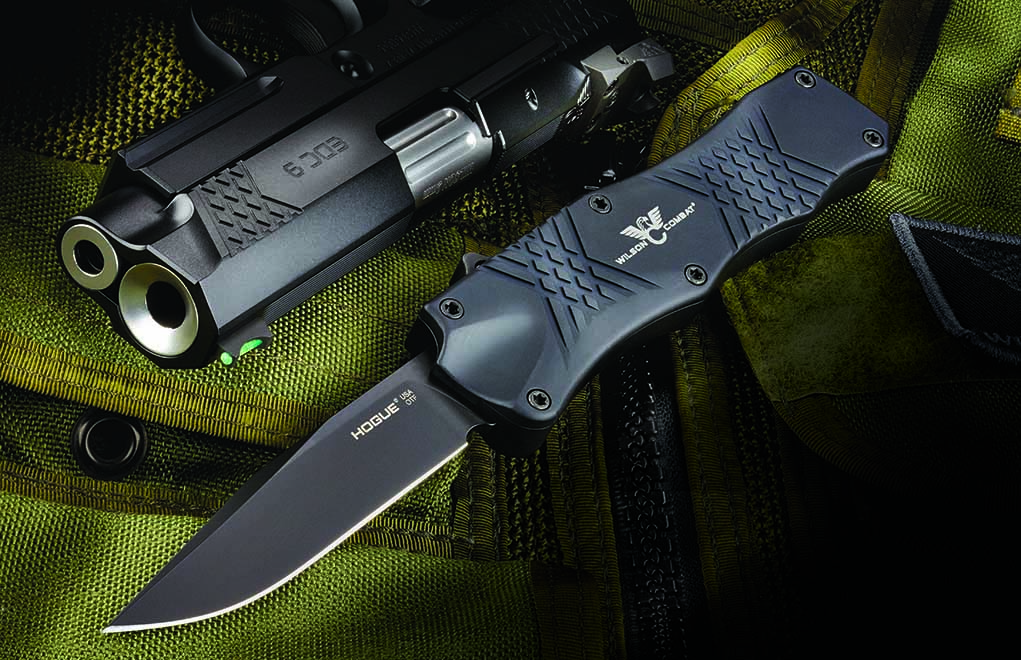
Knife: Wilson Combat X-TAC OTF Automatic ($384.95) Gun: Wilson Combat EDC X9 ($2,895) WilsonCombat.com
Wilson Combat gets another mention on this list because they offer so many great carry gun/EDC knife combinations. The EDC X9 pistol is a double-stack 9mm 1911 that offers match-grade accuracy in a portable, lightweight package. The 4-inch stainless cone barrel features a cool flush-cut reverse crown and this gun’s double-stack design holds 15 rounds of 9mm ammo on-tap. The barrel and chamber are both fluted, and carry cuts and ball endmill cuts are standard. The grips are made of G-10 with a Starburst design, and this pistol lacks the traditional grip safety found on most 1911s — but it does have a Bullet Proof thumb safety.
Despite its impressive capacity, this gun measures just 1.4-inches wide and weighs an impressive 29 ounces unloaded, making it an ideal carry pistol. Is it accurate? Very. I tested this gun recently and found that it held its own against other custom 1911s with longer barrels during 25-yard accuracy test protocols.
The EDC X9 comes with X-TAC front and rear cocking serrations that match those found on the X-TAC OTF Automatic Wilson Combat/Hogue knife. Before purchasing, it’s important to check state laws regarding auto-open knives, but this knife is perfect for EDC where legal. The 3.5-inch clip point blade is made from CPM-154 stainless-steel with a black PVD finish, so it can withstand the rigors of hard use and the total weight is just 5 ounces.
Kimber
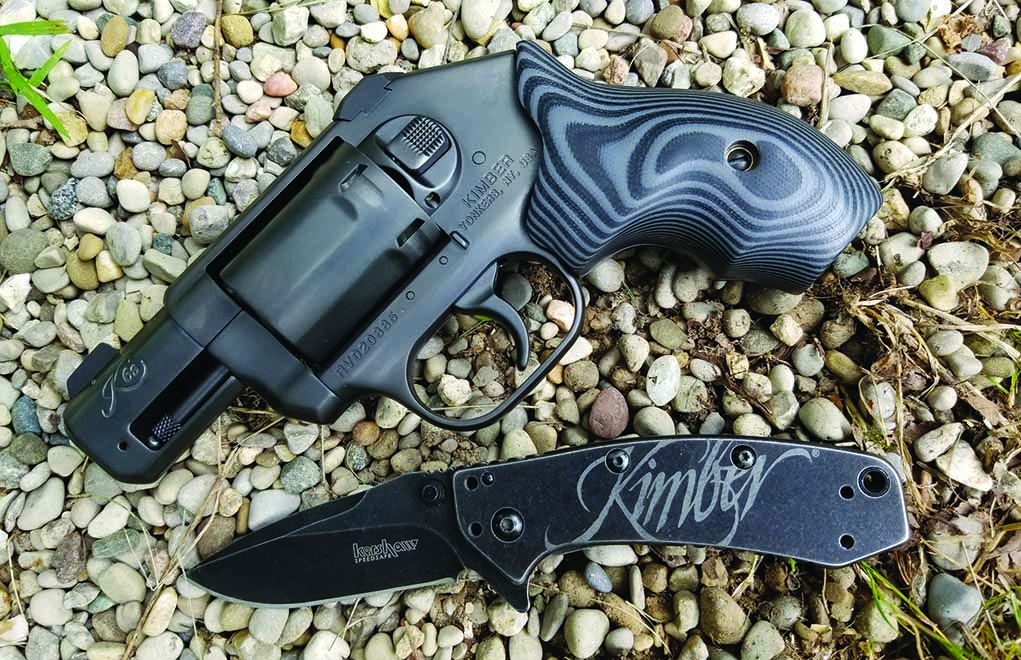
Knife: Kimber 3.25-Inch Folding Knife by Kershaw ($64.99) Gun: Kimber K6S DC Revolver ($1,155) KimberAmerica.com
Here’s one for all the revolver fans out there. Kimber is widely-regarded as one of the world’s top production 1911 manufacturers, and they offer many great semi-auto pistols that are ideal for carry. But, the K6S, introduced a few years ago, moved to the head of the class among compact carry revolvers.
The DC (Deep Cover) model features a stainless-steel frame and stainless 2-inch barrel with Black DLC overbrushed finish, which stands up well to abuse. This DAO .357 Magnum comes with a six-round cylinder and weighs just 23 ounces unloaded. Overall length is 6.62 inches, which makes this an easy gun to conceal — and the black and gray G-10 grips are well-designed and offer a secure grip on the pistol, even when firing heavy magnum loads. Night sights come standard, but the feature that really sets this gun apart from competing revolvers is the smooth trigger pull. If you’re a fan of carrying a revolver for personal protection, then the K6S is a superior choice.
The Kimber 3.25-inch Folding Knife is built by Kershaw, a name that’s familiar to even the casual knife enthusiast. The thumb stud and blade flipper make this an easy knife to open and close, and the blade and body are made from high-quality steel with a durable black finish. I’ve had a chance to carry this knife for over a year and it has become my go-to EDC carry blade, perfect for just about any task that you can imagine. It’s lightweight, robust and easy to clean — and the blade holds an edge very well.
Editor’s Note: This article originally appeared in the September 2018 issue of Gun Digest the Magazine.
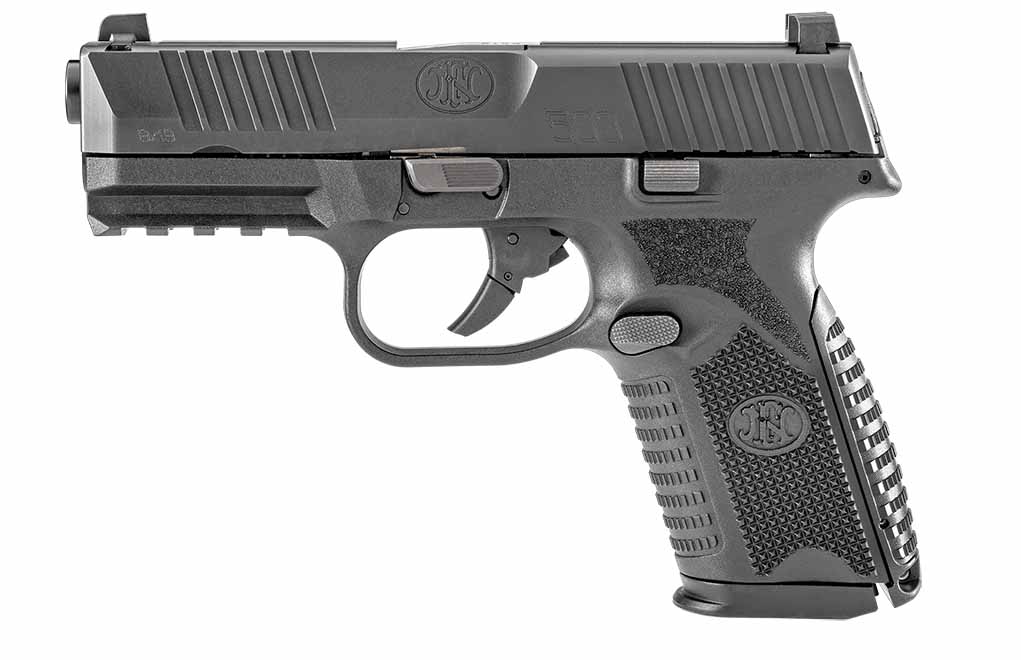
Right-sized for concealed carry, the 509 Midsize is trimmed down, yet still optimized for superior performance.
How the 509 Midsize is optimized for carry:
Grip reduced in size.
Barrel length maintained at 4 inches.
10- and 15-round magazines standard.
Compatible with standard 17- and 24-round 509 magazines.
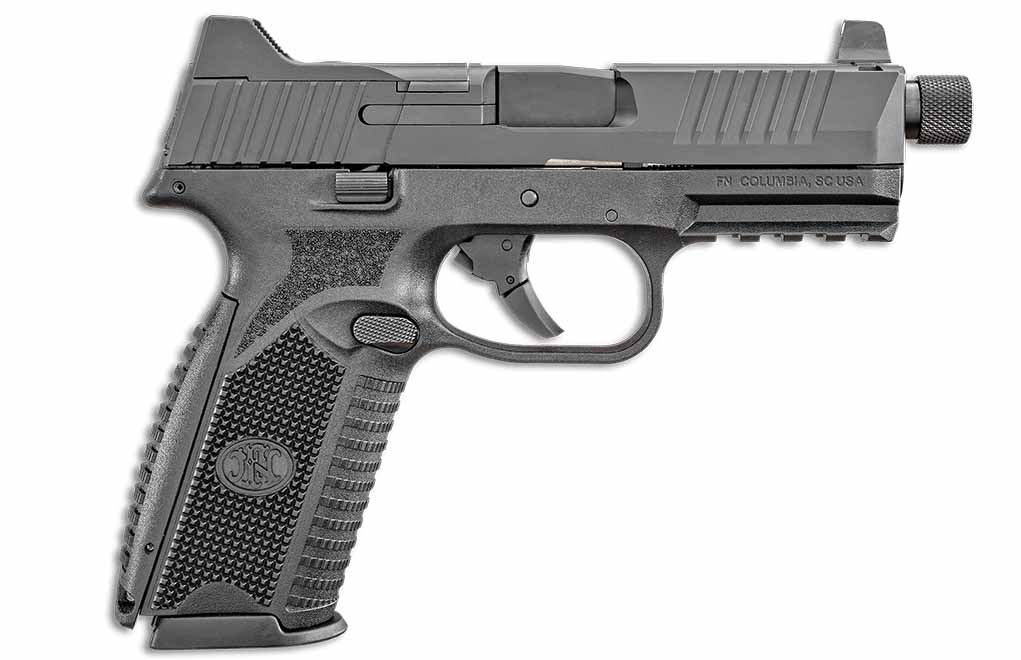
Born from the Army’s Modular Handgun System competition, the FN 509 has made quite a splash in the civilian market. And the Belgian-based gunmaker has expanded the offerings of the polymer-framed, striker-fired pistol by two for the new year.
The weightier release, the FN 509 Midsize is a trimmed down iteration of the original 9mm, aimed at making the pistol more wieldy for carry. Wisely, FN kept the barrel length the same (4-inches) and focused on shortening the grip. Overall, this should make it more concealable, yet maintain a longer sight radius. Though, the 509 Midsize may not appeal to some, given its terse grip affects one of the appealing features of the original — capacity. The Midsize version comes with 10- and 15-round magazines, a significant reduction from the 17- and 24-round mags of the earlier iteration. But if you need that sort of firepower, never fear, the Midsize 509 is compatible with the standard magazines.
Alongside the FN 509 Midsize release, the company has introduced a matte black finished model of its optics-ready 509 Tactical. Originally, the polymer-framed pistol came in Flat Dark Earth. Outside of a color upgrade, the 509 Tactical comes with everything on the original, including optics-ready mounting system with co-witnessing suppressor-height night sights, 4.5-inch threaded barrel and 24-round magazine.
From FN:
(McLean, VA – January 7, 2019) FN America, LLC is pleased to announce the release of the FN 509 Midsize, a new carry option in the FN 509 series of striker-fired pistols. Additionally, the FN 509 Tactical is now available in a matte black finish. These line extensions further FN’s commitment to offer a full line of options in the FN 509 series that meets all customer expectations.
“What truly sets FN products apart is the quality. When customers pick up the FN 509 in comparison to other striker-fired 9mm’s, they instantly notice the ergonomics, premium finishes and price point that is competitive,” noted Chris Cole, Vice President of Sales and Marketing for FN America, LLC. “With the FN 509 Midsize and FN 509 Tactical in black, customers will now have four additional FN options in the 9mm striker-fired category to choose from. We believe that options are always a good thing and we’re proud to provide them to our loyal customer base.”
The new FN 509 Midsize pistol is chambered in 9mm and features a four-inch slide and barrel, frame with shortened grip and 15- or 10-round magazine capacity, backward compatibility to higher capacity FN 509 magazines with use of a grip sleeve and fixed three-dot luminescent sights. From individuals seeking a do-it-all range, home defense and carry pistol to law enforcement use as a back-up duty pistol or carry model for plain clothes officers, the FN 509 Midsize is the ideal solution.
The pistol also features various upgrades including new sculpting around the magazine release for easier activation, a flatter-faced trigger for a more controlled trigger press and improved slide stop lever and texturing. FN 509 Midsize MSRP $649.
The FN 509 Tactical, the industry’s leading optics-ready 9mm striker-fired pistol, is now available in a matte black finish. The pistol features the company’s patent-pending Low-Profile Optics Mounting System that enables the platform to accept more than ten commercially-available miniature red dot (MRD) optics that co-witness with the suppressor-height night sights and remain adaptable to future optics releases with no requirement of direct milling of the slide.
The slide cap, for use when not shooting with an optic, has raised sight wings that protect iron sight alignment if the pistol is dropped or jostled, and provides a textured ramp for racking the slide against a belt loop, pant pocket or boot. An FN-signature 4.5-inch, cold hammer-forged, stainless-steel barrel with target crown, ½” x 28 threads that accept the bulk of 9mm suppressors available and thread cap with integrated O-ring to prevent loosening during use.
Lastly, the 24-round magazines, nearly identical in length to the pistol’s slide, maximize ammunition capacity without impacting carry convenience. FN 509 Tactical Black MSRP $1,049.
Less punishing to shoot and producing arguably superior patterns, the 28-gauge is definitely worth a bird hunter’s consideration.
One bore to rule them all. In essence, that’s the status the 12-gauge has reached for Americans, with the relatively large-bore shotgun the typical choice no matter the situation. Not that this is a bad thing, given the faithful 12 does its job superbly – be it hunting, smashing clays or defending hearth and home. However, when it comes to wingshooting, does it make the most sense? For Dave Miller, not necessarily.
When it comes to knocking birds out of the blue, the Guinness World Record holder for most clays broken in one hour swears up and down by the 28-gauge. Catch your breath for a moment and quit laughing. Miller’s dead serious about the small bore, and not just for quail and the like. It will send a pheasant or grouse into a tailspin just as quickly and just as dead as if it was popped by a 12.
The rub is, the 28-gauge is a lot less punishing. Add on its ballistics are impeccable, well you’ve got one heck of bird gun.
Certainly, you’re dealing out a smaller payload than the standby 12, which leads many to believe a crack shot is required to put a bird in the bag. Not quite. At the same distance, the 28-gauge tends to produce a superior pattern, more open than the 12, yet tight enough to ensure the half-dozen or so pellets required to down a bird reach their mark. Furthermore, the 28 produces the same velocity as the 12, in turn, hits just as hard.
It’s a difficult proposition to convince most American’s the acme of shotguns might lie outside the 12-gauge. But Dave Miller makes a solid case the 28-gauge might just have the stuff to claim the crown.
For more information on the CZ-USA shotguns, please visit: www.cz-usa.com/.
For more information Aguila Ammunition, please visit www.aguilaammo.com.
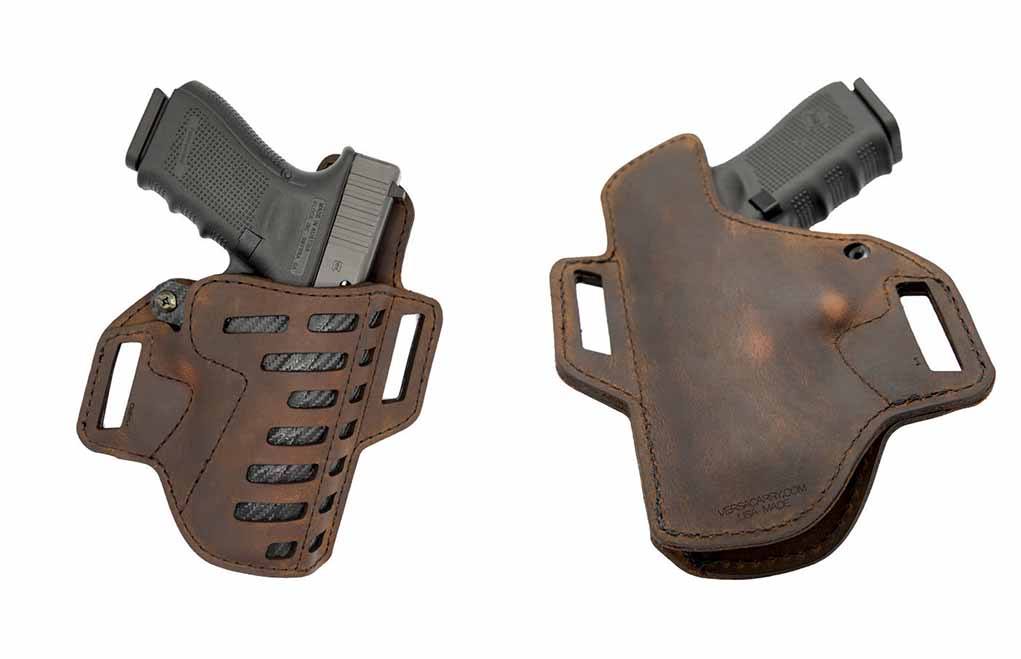
Combining Kydex and leather in a new way, the Compound Series adds a new twist to the hybrid holster concept.
How the Compound Series rethinks hybrid holsters:
Kydex is sandwiched in water-buffalo hide.
Creates rigid holster with excellent draw characteristics.
Retains classic good looks and comfort.
Reduces wear on a handgun’s finish.
Kydex and leather, the partnership has served many an armed citizen well. Configured as a hybrid holster, the materials make for one of the most comfortable and concealable carry systems out there. Though, over the years, the style has become a bit rote. Laying down the gauntlet to the traditional retention shell-paddle arrangement, Versacarry has reimagined not only the hybrid holster’s look, but also its function.
Combining the rigidity and wear resistance of Kydex with the comfort and classic good looks of leather, the Compound Series offers the best of both worlds. Ingeniously, the holster accomplishes this feat by sandwiching the plastic between two layers of water-buffalo hide, giving the softer material a superstructure … a backbone if you will. The results are a stiff holster with excellent draw characteristics that reduces wear on a gun’s finish and is soft against the carrier’s body. Furthermore, the rig is light (6.4 ounces), comes with a belt clip system for easy removal, boasts a retention screw and comes in three different frame sizes to fit most handguns.
More from Versacarry:
Bryan, TX – Versacarry, the company that created the Zerobulk Holster – one of the smallest and most comfortable handgun carry devices on the market today, is pleased to announce its Compound Series of holsters.
The Compound is a true hybrid holster unlike what is available from any other manufacturer. The unique design allows all of the comfort of a leather holster with the structural properties of a Kydex holster. The firearm itself never makes contact with the Kydex, making it as comfortable for the firearm as it is for the user. A layer of Kydex is embedded between layers of premium water buffalo leather. It is non-collapsible and features an exposed track of Kydex recessed in the leather to avoid the front sight from snagging. The merging of the two materials (water buffalo leather and Kydex) virtually eliminate unwanted stretching in the material.
The Compound Series is available in both inside the waistband (IWB) and outside the waistband (OWB) models and both feature an adjustable hardware for draw tension modification.
Compound Series Features:
Embedded Kydex frame
Rigid structure for easy re-holster
Integrated sight track
Double-ply protective backing
Non-collapsible
Product Specifications:
Left or Right Hand Available
Available in Black/ forest green Kydex or Distressed Brown Leather/black Kydex
Sizes Available for Most Handguns
Retail $68.00 (both IWB and OWB models)
For more information on the Compound Series, please visit: www.versacarry.com.
Adding a much-needed element of flexibility to the turkey gun, the Reaper Magnum has a hunter covered no matter a tom’s range.
Just out of range, it’s every turkey hunter’s nightmare. Hard work and hours of patience blown, all because Mr. Tom’s sixth sense about 2-ounces of fury waiting to hit his head like the second coming. There is little bright side to this galling conundrum, except the innovation it has spurred.
We live in the golden age of turkey loads, with high-tech shot and cutting-edge materials extending a hunter’s effective range to epic proportions. Once the stuff of tailgate tall tales, a gobbler at 50-yards today is a can of corn. As is typical, this solution has spawned other problems. Chiefly, what’s a hunter to do with his close game? Designed to shoot insanely tight patterns, modern loads make a 10-yard shot akin to hitting a baseball with another baseball.
That proposition isn’t so simple, but CZ-USA’s answer to it is – design what might be the most versatile turkey gun on the market – the Reaper Magnum. Purpose designed to take the big birds, the over-under frees a hunter to mix and match load and choke combinations so they have every range covered. Put that tailor-made turkey stuff in the top tube, maybe something for pheasants down low and your odds of an ethical shot goes through the roof. That spells success.
Furthermore, CZ-USA didn’t stop at ensuring a pattern for every range, engineering an efficient, effective and accurate delivery system. Lightning-fast barrel selector, convenient Picatinny optics rail, maneuverable 26-inch barrels and light polymer stock, the Reaper Magnum is decked to get you into the woods and a Tom out. It’s no stretch, CZ-USA’s Reaper Magnum has changed turkey hunting, most certainly for the better.
CZ-USA Reaper Magnum MSRP: $959.00 Chambering: 12 Gauge Max Shell Length: 3 1/2 in Barrel Length: 26 inches Chokes: Extended Black Stock: Realtree APG Polymer Length Of Pull: 14 1/2 inches Receiver Finish: Black Barrel Finish: Realtree APG Camo Ejector: Extractor Ejectors Rib: 8mm Flat Vent Overall Length: 44.25 inches Weight: 7 lbs Comb: 1 3/8 inches Heel: 2 1/2 inches Trigger: Mech Mechanical, Selectable For Barrel Safety: Manual Tang Safety
For more information on the CZ-USA shotguns, please visit: www.cz-usa.com/.
For more information Aguila Ammunition, please visit www.aguilaammo.com.
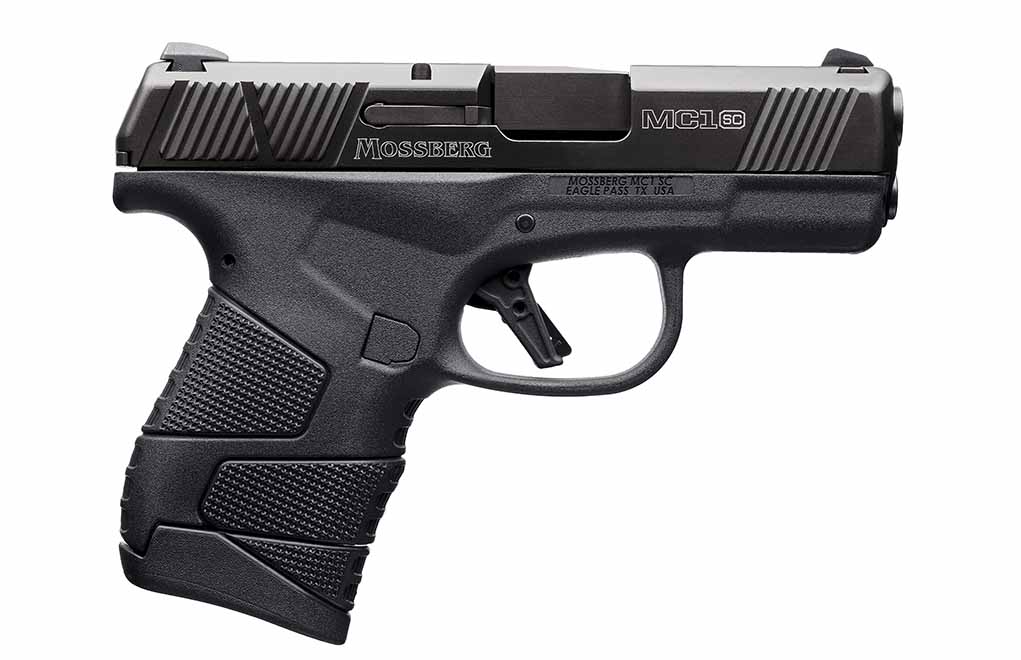
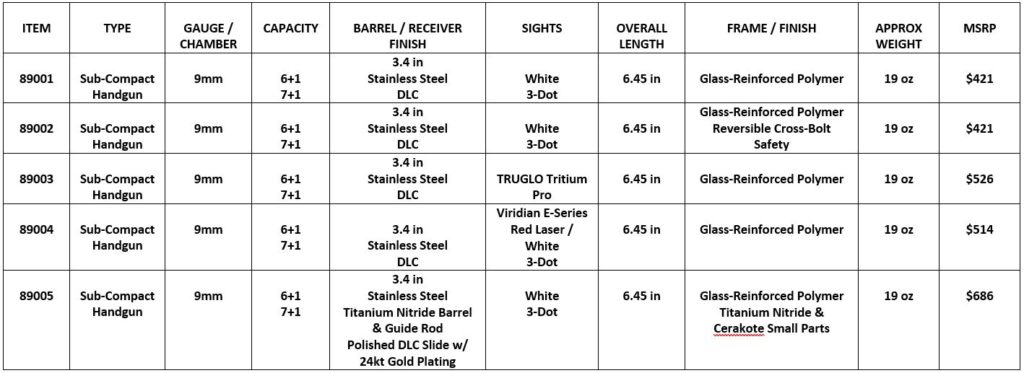
Drawing inspiration on one of its earliest firearm, Mossberg ventures back into handguns with the subcompact MC1sc.
How the MC1sc measure up against other single-stack 9mm pistols:
Polymer-framed striker-fired.
19-ounce weight.
6-round flush fit and 7-round extended magazines standard.
Mags made of transparent polymer for fast round counts.
Steel three-dot sights standard.
Takedown does not require trigger pull.
MSRP: $421 base model.
Chances are, you know Mossberg as a long-gun company. No surprise, the gunmaker has zeroed in on rifles and shotguns with a zealot’s intensity for the better part of a century, and to good effect. The Mossberg 500 alone is a legend and if the pump-action was all the manufacturer ever made, it would have still been considered among the greats. Yet, if you dig down deep, you’ll find a handgun at Mossberg’s roots. A simple .22 LR pocket pistol lovingly dubbed the “Brownie” is what started it all.
Drawing inspiration from this foundational firearm, Mossberg has jumped back into the handgun game 100-years later, though with a much different sort of pistol. While the MC1sc might mimic the Brownie’s minimal dimensions, it’s much more cutting edge than its granddaddy and packs much more punch. The single-stack subcompact also has a couple twists that potentially gives it appeal in the very swollen class of firearms in which it will compete.
To the brass tacks, the MC1sc is a polymer-framed, striker-fired 9mm, a style of pistol that has swept the concealed carry market in recent years. The 19-ounce subcompact is configured very similarly to what’s already on available and won’t throw any curve balls at those who are familiar with this type of pistol. It has a DLC finished stainless steel slide with cocking serrations fore and aft, aggressive grip texturing and the usual trigger blade safety. The trigger itself breaks around 5 to 6 pounds, which is right in the ballpark with the competition. Additionally, it comes outfitted with steel sights, white three-dot pattern, in its standard configuration. They fit the slide via SIG-pattern dovetail cuts. TruGlo Tritium Pro night sights and Viridian E-Series Red Laser sight options are available, as is a cross-bolt safety. As expected with a concealed carry pistol, Mossberg has also done its utmost to round or eliminated all potential snag points on the handgun.
You’ll notice the MC1sc’s differences when you reach its 6-round flush fit and 7-round extended magazines. In short, they’re clear, which is an interesting twist. The major advantage this affords is much faster round verification than witness holes or a sidecut. For older eyes, this might be a blessing. Though, only time will tell if these polymer mags – called Clear Count by Mossberg – have the resiliency for rugged use.
The MC1sc’s other break is less evident and involves its takedown. Unlike many striker-fired pistols, the single-stack does not require a trigger pull for disassembly. Instead, you take off the backplate and pull out the firing pin to remove the slide, virtually eliminating the chance of a negligent discharge during routine maintenance. This is an especially nice touch for those new to semi-auto pistols and the safety conscious.
The big question remains, how much will an MC1sc set you back? This is where Mossberg scores big, releasing the base pistol with a very affordable MSRP of $421. Undoubtedly, the company has a tough road ahead in one of the most competitive gun markets out there. But the MC1sc certainly appears it has what it takes to hold its ground.
For more information on the MC1sc, please visit: www.mossberg.com.
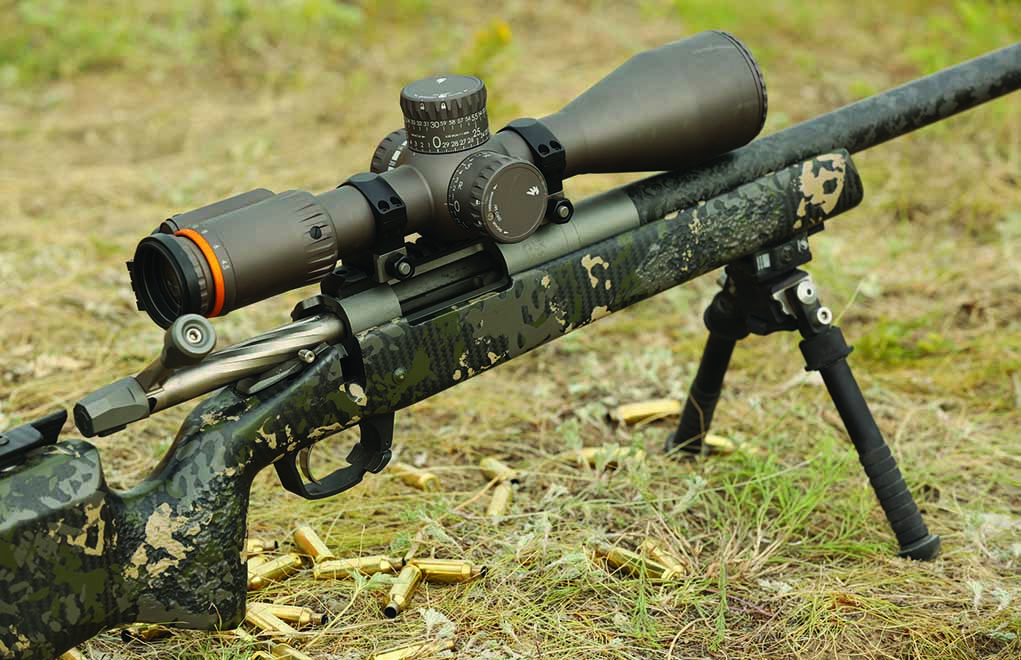
Extending your hunting range is all about “WTF”: wind, trajectory and the fundamentals of marksmanship.
How to accurately extend your hunting range:
Consider a carbon-fiber wrapped barrel or crossover rifle.
Use air-filled support bags for rests.
Invest in an optic with target turrets.
Learn to use BDC reticles.
Understand offsets.
Shoot hunting ammo that mirrors match ammo performance.
Above all TRAIN!
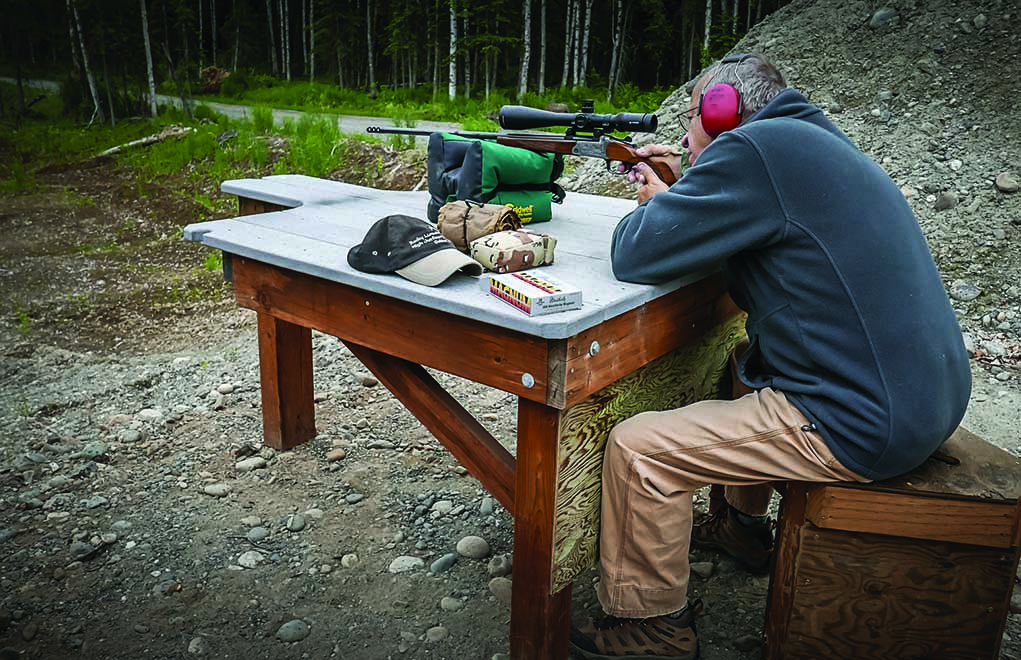
Hunters often get a terrible rap in the marksmanship department, and on behalf of the precision rifle shooting community as a whole — we’re looking to change that. The Sniper’s Hide precision rifle marksmanship classes never really appealed to the hunters out there until recently … when we started teaching in Alaska.
Crossover rifles — those meant to serve double-duty as a precision rifle and a hunter — are allowing sportsmen to extend their lethal range and expand their confidence.
Alaska is called “The Last Frontier” for a reason. When we first arrived on the scene 4 years ago, very few instructors would travel that far north. By partnering with my former Platoon Sargent, Marc Taylor, we’ve opened up a brand-new avenue for the hunter to increase their max effective range on targets — using their standard hunting rifles. Taking the Marine Corps Marksmanship principles, and applying them to our students who are focused on hunting, has been deeply rewarding for me on a personal level.
Hunters face a different set of challenges than does the average PRS shooter: Their rifles are not meant to be shot like a target rifle, their optics are limited in the amount of travel and their bullets are not match-grade quality. This is all changing, and keeping abreast of modern advances can help the “traditional” hunter evolve their skillset as well.
The Rifle
Hunting rifles have come a very long way: Their accuracy has improved as technology changes. While many of them still host very thin and light barrels, once you recognize the limitations you can adapt your training to work within those limitations.
Mils vs. MOA: Which Is The Best Long-Range Language?
During class, we manage the shots: Never shoot more than five shots in any given series. Heat is not our friend, and the more rounds you force down the barrel the worse things get for a hunting rifle. Here, it’s all about quality — not quantity. Focus on the fundamentals and take each shot individually.
We understand that “light is right” when it comes to movement and stalking, so we’re not trying to change how a hunter does business from that perspective, but we often recommend the new carbon-fiber options out there to help cross over between hunting and target. It’s very possible to keep the rifle under 10 pounds while, at the same time, affording the ability to practice and train without the negative consequences of a pencil-thin barrel.
Expenses are high for the traveling hunter. Investing in training with a hunting rifle can seriously elevate the potential for success.
Barrels from companies such as Proof Research have changed the game. Combined with carbon-fiber stocks, a hunter can easily drop the weight of a rifle and maintain precision and accuracy across far more shots downrange. Proof Research barrels are proven winners: I run three and have never been let down yet.
Also, crossover rifles are becoming increasingly popular. Gunwerks is doing outstanding work in this field by offering rifles that can be used for both competition and hunting — a concept that was unheard of just a few years ago. Nobody hunting an Alaskan Sheep wants to lug around a 15-pound tactical rifle in that type of terrain, but they will use a very similar one that tops out at 8 pounds. When considering a new hunting rifle, look at these carbon-fiber options regardless of your style of hunting.
Speaking of weight, we at Sniper’s Hide also use a host of rear and support bags that are air-filled and weigh next to nothing. These bags support the rifle and shooter very well, and they add very little to your overall load.
The Optics
Optics companies have recognized the need to increase the elevation capabilities of their hunting scopes, and that bodes very well for hunters looking to expand the reach of their hunting rifles. Optics such as the Swarovski X5 and the Nightforce SHV have bridged the gap. It’s all about target turrets and elevation.
Why hold when you can dial? Why zero at 200 or 300 yards when you can zero at 100 and dial-up to your point-blank range value? You have far more flexibility when you understand your optics, and the shooter can dial a point-of-aim that matches the point-of-impact. You can still hold the minor adjustments because the reticles have actual values of calculation as well, just like tactical riflescopes — it allows you to shoot and dope your rifle to distance.
I highly recommend a crossover optic with target turrets versus one with a single-turn, capped elevation turret. That said, BDC reticles can work if you understand how to correctly zero and use them. Use a gross zero at short ranges, and then fine-tune that zero at the midpoint of the reticle hold. Also, fine-tune the zero in the middle of the adjustment range.
Lastly, it’s important to understand the offsets. Learn how to adjust the turret elevation to account for changes in conditions when traveling. If you zeroed your BDC reticle at sea level and then traveled to 5,000 feet above sea level to score that trophy elk, it’s important to know how to dial the adjustment to the BDC value for the elevation changes using the turret. Atmospheric changes matter, and moving up and down in altitude is a climatic change that requires a scope adjustment.
Competence Breeds Confidence
Training creates competence with your equipment, and that competence breeds confidence in your shooting. Having just finished up a precision rifle class in Colorado, I want to relate the story of James.
James came to my precision rifle class with a hunting rifle chambered in .270 Win. We recognized that, although his hunting rifle was equipped with a thin barrel, it also had a Steiner tactical riflescope — so he was not limited by his scope’s adjustment range. James could keep pace with the distances shot without having to compromise; we just limited the number of rounds he shot as compared to the rest of the class.
James was a rock star on the line. He absorbed the fundamentals of marksmanship, and the result was first-round hits out to distance on sub-MOA targets. James not only scored first-round hits, but he consistently went three for three on targets, including one at a distance of 1,000 yards. Did I mention the wind averaged 12-16 mph all weekend? They had a minor effect on James’ accuracy.
Using Hornady Precision Hunter Ammunition helps a lot, too. In my opinion, this ammunition is as close to match-grade as you can get. We see solid results with this over many other factory rounds available.
Invest In Training, Not Just Gear
Many hunters need to get out of the old-school mindset and take a more modern approach to hunter training and equipment. The costs associated with hunting can be significant: The travel expenses, the time away from work and family — it makes sense to invest in your success through training. It can be the difference between a successful trip and the one that got away.
The fundamentals of marksmanship apply to all disciplines of shooting. While some disciplines host unique challenges for the shooter, I have yet to find a problem that a healthy application of the fundamentals cannot solve.
It’s all about “WTF”: wind, trajectory and the fundamentals of marksmanship.
Editor’s Note: This article originally appeared in the October 2018 issue of Gun Digest the Magazine.
It was one of those across-the-lunch-table conversations that occur often with guys who like guns. My friend and shooting companion of more than 30 years, Mike Byrd, and I were eating chips and salsa at a local Mexican restaurant and thinking about AR-15 carbines. He’d built a lightweight gun and was surprised that a light AR, which tipped the scales at just past 5 pounds, had repeatedly shot sub-MOA groups.
Light guns work really well for the fast-paced Carbine Bay matches so popular in North Carolina where ranges past 200 yards are fairly uncommon. We began thinking of how to build a light carbine that would shoot sub-MOA and also be tuned to be stable enough for double-taps that placed both bullets within 1 inch at 10 yards. By double-tap, I mean two shots with one sight picture, fired as fast as the trigger can be pulled.
In general, AR-15s in 5.56 NATO don’t have recoil, but they do have movement. Because of the reciprocating mass of the bolt and bolt carrier, standard ARs bounce about 4 inches at 10 yards in the 2 o’clock direction for right-handed shooters. That bounce can put the shooter out of the A zone on a target or slow down the shooter’s time because he must get the gun back on target for the second shot.
For several years I’ve owned a great rifle that will accomplish the task. I tested, and later purchased, a CR 18 Colt Competition Rifle — and it’s been a great gun. I’ve shot two and three gun matches, I won a local NRA High-Power match and shot a mid-master score in the NRA National Championship with it. It’s been a great rifle, but it’s a bit slow and front heavy for those fast-paced Bay Matches.
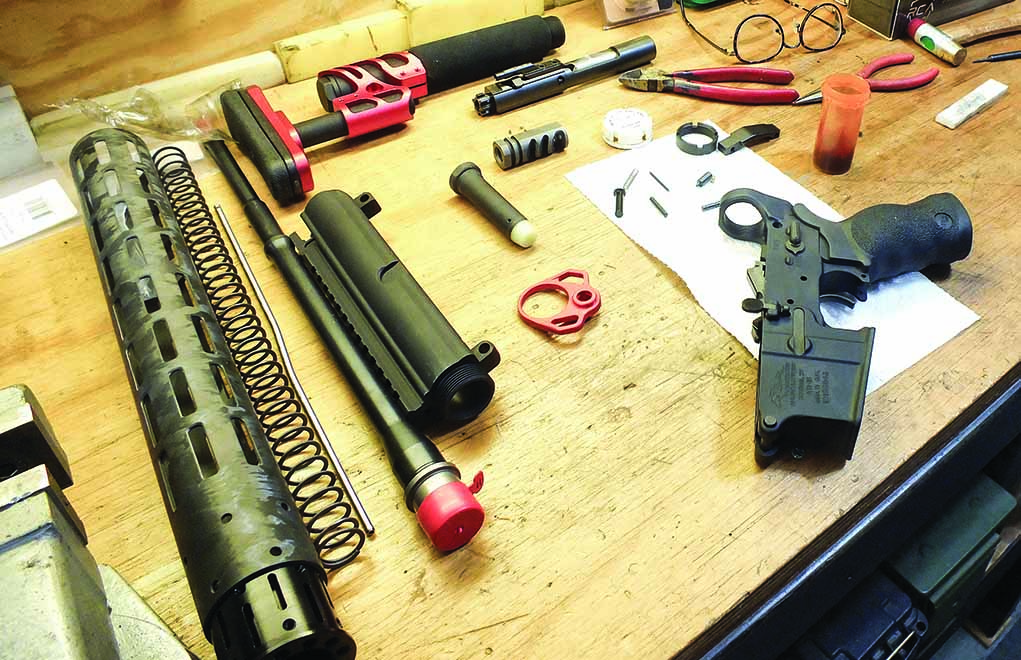
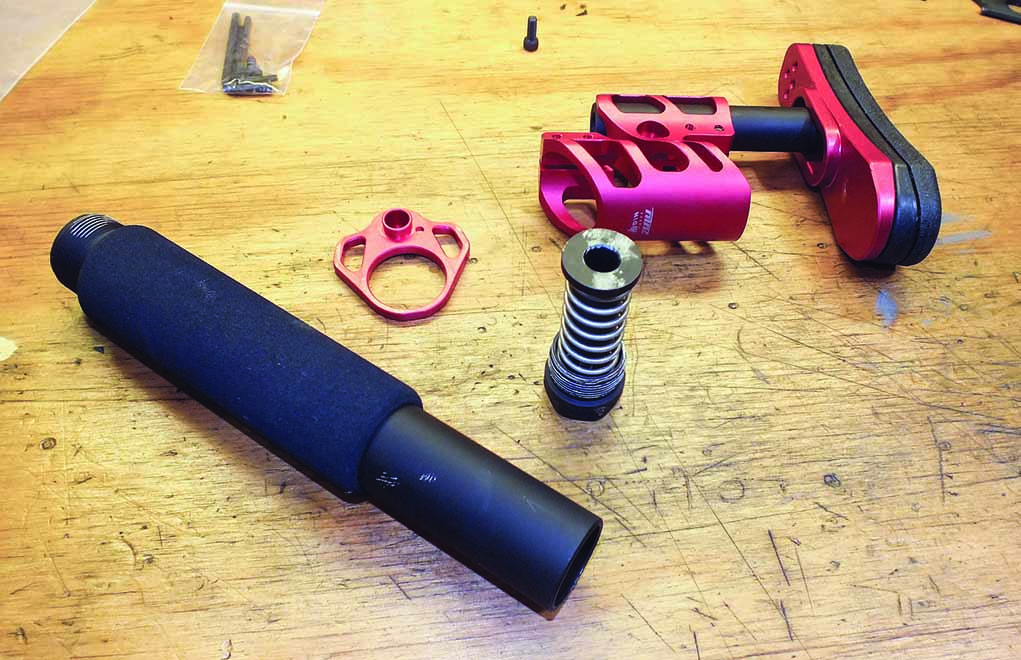
All the parts laid out before the project begins. The author chose proven and functional components, and he spent money where he felt it was most important.
The object of this project gun was not only to shoot accurately and without bounce, but the gun also had to be fast moving with the weight concentrated toward the rear, making for faster transitions. The goal weight was 6 pounds. And before my Speedy Gonzales lunch arrived, we were working out the details. By the time the tacos, enchiladas and refried beans were gone, we had a plan.
Receiver
You can spend a lot of money on upper and lower receivers, but the primary function of both is to hold the parts together. Since this project was also to build the best gun for an affordable price, we chose an economical Anderson Manufacturing lower receiver. For an upper, we chose the DPMS Low Profile Competition receiver without forward assist or a dust cover. It’s simple and smooth, has nothing superfluous, and is probably stiffer than a standard receiver. Upper and lower receivers were about $130 combined.
Barrel
Obviously, choosing the right barrel is important in a gun that’s to be judged on accuracy. Based on Mike’s past experience with them, I chose the Faxon Mid Length Match Series barrel in 16-inch Gunner. It’s a lightweight barrel with a Wylde chamber and a 1:8 twist, which will handle a wide range of bullet weights, and the mid-length gas system is proven to work with proper tuning for stability during fire. Faxon’s reputation for accurate lightweight barrels sealed the deal. MSRP is $225.
The Odin Zulu stock includes sling mount and a spring-loaded buffer to smooth out recoil. It’s adjustable in three axis directions for a comfortable fit and fast gun mount. The foam on the tube is comfortable and the pad keeps the gun firmly in place for fast follow-up shots.
The first interface between shooter and gun is the stock. I like adjustable stocks, but I don’t like wobble. I chose the Odin Gunworks Zulu 2.0 Adjustable Stock Kit. The Zulu Adjustable is a complete kit that replaces the buffer tube, buffer and stock. The buffer tube is covered with dense foam for comfort. The buffer is spring loaded to smooth out recoil (one of the objects of the project) and the stock is wildly adjustable. It adjusts in every direction I’d want adjustment except cheek placement. It’s also very reasonably priced with an MSRP of $149.
Pistol Grip
Related to the stock is the hand grip. Fast-moving guns must be held in a vise-like grip, and I’ve always been a fan of the Ergo Tactical Deluxe Grip. It’s got a tacky surface and a palm swell that fills my hand. I like the largest, but Ergo has an AR grip to fit any hand. Functional and affordable, it’s a great value at $39.
Bolt Carrier
A crucial part of a stable firing AR is the bolt carrier. After all, almost all the reciprocating weight that causes bounce comes from the bolt carrier. We chose the Rubber City Titanium carrier with their patented adjustable gas key. Titanium carriers lose weight because titanium has the highest strength-to-density ratio of any metallic element, with the bonus of being highly corrosion resistant. This carrier fills the space of an M16 profile while reducing weight substantially. There is a downside, however, because titanium is softer than steel — but RCA’s sister company, H&M Metal Processing, recently developed a new patented thermal chemical diffusion process to treat titanium and titanium alloys for high-wear applications. Another feature of the RCA carrier is the adjustable gas key that replaces an adjustable gas block. I admit I was skeptical, but the proof is in the shooting. MSRP with the adjustable gas key is $409.
There are so many triggers for ARs on the market that I knew making a decision was going to be tough. Mike and I discussed a lot of options, but since this was a test bed kind of project, I wanted to keep an open mind. Before we’d made a final decision, I got an email about Mossberg’s new Jerry Miculek Adjustable Match trigger. I took the email as a sign from above. It’s a drop-in trigger, factory-set at a pull weight of 4 pounds, and it offers a crisp, creep-free break and user-adjustable overtravel. MSRP is $161.
Lightweight, especially at the front of the gun, was an important part of this project, and Mike has been using Isler Custom Gun Works ICGW handguards on the SIG MPX PCC carbines he’s been building. He felt they were the best. They’re made from Aerospace-quality, filament-wound carbon-fiber with CNC machined M-Lok ports. Weight of the 15-inch tube is just 6.8 ounces. The handguard mount is made from 7075 aluminum and attaches to the handguard with Torx button-head screws. The system comes with shims for perfect alignment and a unique barrel nut wrench. MSRP is $299.95.
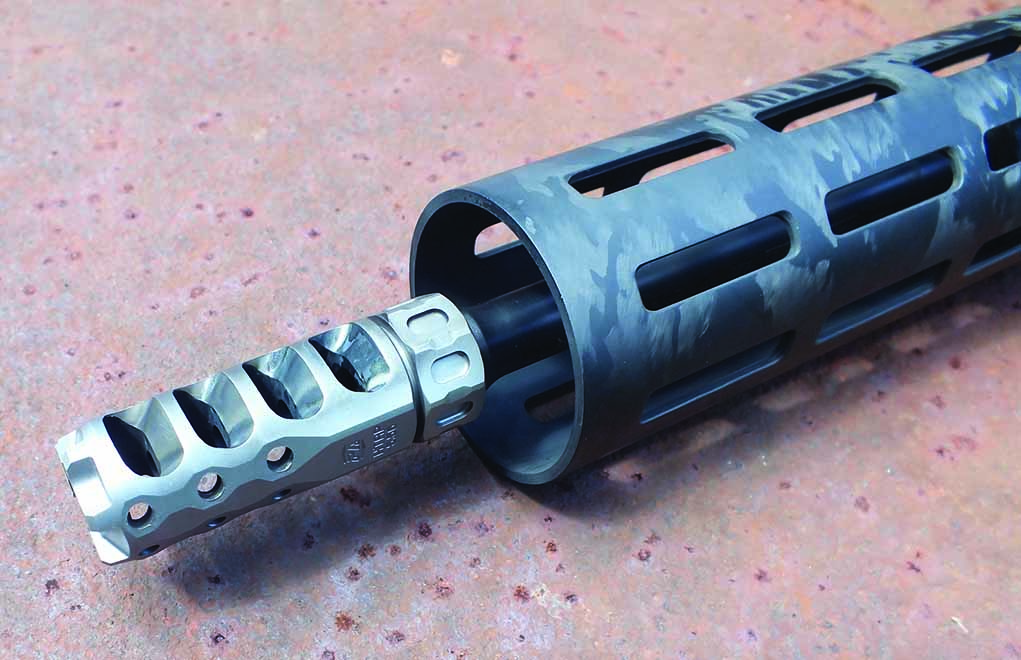
Arguably, the most important component for rifle stability is the muzzle brake. Precision Armament’s Hypertap 556 is tunable without shims because of the locking nut on the rear of the brake. Intensity of gas force is adjustable by drilling out indentions at the top and bottom of the brake.
Besides controlling reciprocating mass, the most important part of tuning an AR-15 for stability is the muzzle brake. I’ve heard more positive feedback about the Precision Armament brake than any other, and we chose their newest model, the Hypertap 556. It solves one of the most difficult issues in tuning muzzle brakes by adding a lock nut to the system. To get the desired angle for maximum stability, the tuner can rotate and lock the brake in place without using shims. There are also 12 dimples in the brake to allow fine-tuning the amount and direction of side jetting. To gain more side jetting, the tuner drills out the indentions until the desired effect is gained. On the project gun, we drilled out three holes at 2 o’clock to bring the gun to stability. MSRP is $179.95.
There were other components, but the only other notable one was the use of a Tubb flat buffer spring. Music wire and carbon steel springs are adversely affected by temperatures. Stainless-steel springs retain their values better and are less affected by temperature.
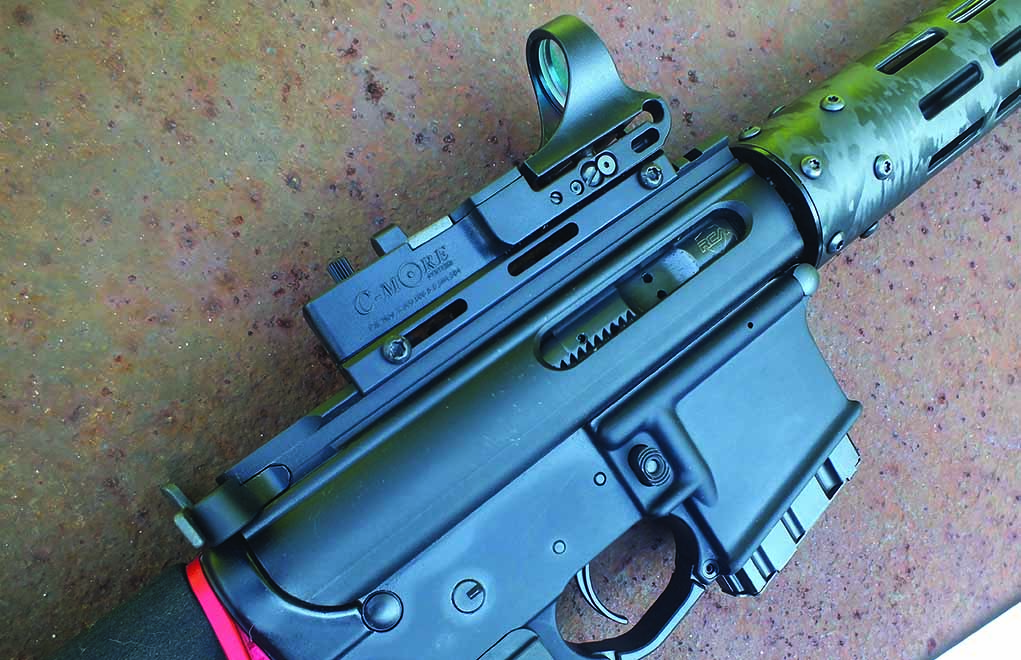
While the project gun is designed for accuracy, the primary issue is speed because it’s designed for time/score matches. Speed requires lightweight and fast target acquisition, and reflex sights excel in this area. I chose the C-More Railway red-dot with the 2-MOA dot because it affords the ability to exploit pinpoint accuracy, and the brightness level exceeds many other reflex sights. Mike was an integral part of this project and he likes the Railway because it’s so forgiving of head position, which is crucial in events where awkward positions are part of the game. It’s very reasonably priced with an MSRP of $279.
Of course, the proof is in the shooting. The goal: 1-inch double-taps at 10 yards, 1-MOA at 100 yards, weight at 6 pounds and light in the muzzle.
Weight
Our first test occurred before the carbine fired a single shot. On precise scales, we missed our target mark of 6 pounds by a bit more than 2 ounces. A lighter stock would’ve filled the bill, but I like the Odin stock much more than anything lighter. The extra weight is close to the shooter and has little effect on fast transitions.
Double-Tap Testing
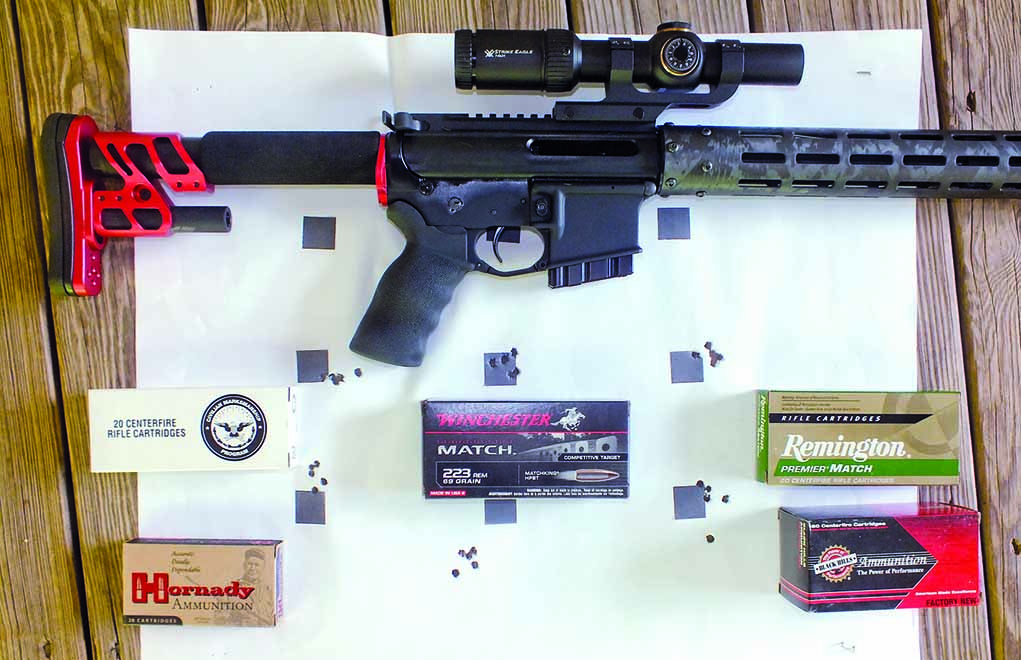
Accuracy at 100 yards was excellent for a rifle weighing just over 6 pounds. These groups were fired with less than 50 shots through the rifle. For accuracy testing, the author used the Vortex Strike Eagle 1-8x riflescope.
The next test was stability during fire. We began testing by firing single shots with an unloaded magazine to regulate the gas through the RCA adjustable gas key. We made three adjustments until the bolt failed to lock back. At that point, we were only a half turn from bottomed out. We backed out a quarter turn, achieved bolt lock and installed the locking set screw.
The next part of the tuning was to adjust the muzzle brake. Mike guessed at the first setting, and it was pretty good with a bit of push to the right. We drilled one hole at a time at 2 o’clock until we felt the gun was neutral. Now we were ready for the double-tap test.
Our first double-tap resulted in two shots almost touching — and subsequent double-taps were well within the requirement of the project and some touched. Redirecting gas at that velocity creates sound, and there’s plenty. Though sound was powerful, the rifle was as stable as a .22 rimfire AR-15. It’s almost eerie. Requirement accomplished: Everything we shot was well within the one inch at ten-yard standard.
Accuracy Testing
Real accuracy testing happens with a minimum of five-shot groups. In the real world, not many 6-pound semi-auto rifles are capable of sub-MOA accuracy. To test, I chose five loads: Remington, Winchester, Federal, Black Hills and Hornady. Results are in the included photo. Three of the five loads achieved better than 1 MOA on the first group fired. The worst group in the test was just over 1.5 MOA — all with less than 100 rounds through a new barrel.
The Package
With a firm grip far out on the handguard and the rifle pulled into the shoulder, some of the double taps touched at 10 yards, and holding groups to less than an inch was easy.
To wrap it up, the project “AR Frankenstein” turned out very well. With the C-More sight installed, the gun finished out at a svelte 6 pounds, 12 ounces. It shoots sub-MOA with readily available factory ammunition and has the recoil of a .22 rimfire. Total cost of the project, including the sight, was $1,927.
This wasn’t a project to build a gun and save money — the object was to build a purpose-built carbine for a specific goal. I doubt there’s any commercial carbine that would achieve what’s been achieved at this level of expense, and it’s a one-of-a-kind carbine that achieves the goal.
Steyr’s first new chambering for its Scout Rifle in more than a decade, the 6.5 Creedmoor variant looks ready to go the distance.
How does Steyr’s Scout Rifle compare to others in its class:
Chrome-Moly Steel Barrel
Cold-Forged Hammered
Integral Bipod
3+1 Position Safety
4 Pound 8 Ounce Single-Stage trigger
Synthetic Stock
Flip-up iron sights
39.4-inch length
6.6-pound weight
When it came to his brainchild, Col. Jeff Cooper tended toward a .30-caliber chambering. That said, he certainly wouldn’t have turned his nose up at the direction Steyr Arms recently took his versatile Scout Rifle concept.
The Austrian gunmaker with importing and, more recently, manufacturing operations in Alabama, just unveiled a 6.5 Creedmoor variation of its do-all bolt-action. The rifle’s first new chambering in more than a decade now gives shooters five calibers to choose from, along with .223 Remington, .243 Winchester, 7mm-08 Remington, .308 Winchester.
The first production Scout Rifle hasn’t changed a lick in its new chambering. The rifle still boasts a spare magazine in the stock, integral bipod, cold-hammer forged barrel (fluted) and 1/2-20 RH muzzle thread for the easy addition of a muzzle device.
The other thing that hasn’t altered, the Steyr Scout Rifle continues to run a pretty penny, even in 6.5 Creedmoor. With an MSRP of $1,735.00, in line with the rest of the series. Though, it’s hard to argue the rifle hasn’t proven value in more than 20 years of production and will continue to do so in 6.5 Creedmoor.
From Steyr:
Steyr and Col. Jeff Cooper introduced the first production Scout Rifle to the world at the 1998 SHOT Show, and for more than a decade, Steyr hasn’t introduced a new chambering in the Scout Rifle platform. That is until now. It’s official; the Steyr Scout is now available in the wildly popular performer 6.5 Creedmoor.
Throughout his decades of development of the scout-rifle concept, including the nearly decade-long collaborative design process to create the Steyr Scout, Cooper was very specific in his chambering choices for his ultimate production scout rifle. In addition to his long list of qualifications that only the Steyr Scout accomplished, he wanted the rifle to be able to knock down any North American game, and he wanted the ammunition to be readily available. While the 6.5 Creedmoor wasn’t available in his lifetime, it has become one of the top cartridge choices in the U.S., and it’s become quite plentiful.
“It can’t be said that Col. Cooper wasn’t a fan of the 6.5 mm, as he wrote about the 6.5 Mannlicher Schoenauer rather longingly,” said Scott O’Brien, Steyr Arms, USA, CEO. “But Col. Cooper never could have expected the amazing performance of the 6.5 Creedmoor, nor could he expect the widespread availability of such a round.”
Steyr and Cooper began collaborating on a production Scout Rifle around 1990, and the Steyr engineers worked within his limitations to produce a rifle that was less than a meter in length, less than about 7 pounds, and it had to be able to take anything in North America from hare to bear. Steyr engineers provided his desired backup “ghost-ring” iron sights that rest snugly within the Steyr Scout’s profile and can be deployed within seconds should the optics fail. They also provided two-stage magazines that could accomplish the same function as the 1903 Springfield’s magazine cutoff but in a much faster manner than the original.
Just like the original Steyr Scout, the 6.5 CM version incorporates a spare magazine in the stock with the ability to accept a pair of optional 10-round magazines. The stock also incorporates an integrated bipod, as well as a set of five whale-tail sling-swivel attachments to accommodate a three-point Ching Sling on either side of the stock.
“We can never know how the Colonel would have felt about chambering his rifle in the 6.5 Creedmoor, but considering its performance and after extensive testing, we think he’d wholeheartedly approve,” O’Brien said.
The Steyr Arms Scout 6.5 Creedmoor has a 19-inch cold hammer forged barrel that is fluted and threaded to accept 1/2-20 RH muzzle devices. It is now available in Black, MUD and OD Green stocks with an MSRP of $1,735.00.
Steyr Scout Rifle Specs:
Operation: Bolt-action repeating rifle Caliber: 6.5 Creedmoor, .223 Remington, 243 Winchester, 7mm-08 Remington, .308 Winchester Action material: 25CrMo4 steel Magazine type/capacity: Polymer double-stack detachable box/5 rounds (10-round kit optional) Barrel: 19-inch, fluted, cold-hammer forged Rifling: Four-groove, 1:12 twist (.308), 1:8 twist (6.5 Creedmoor) Sights: Flip-up iron sights; integral top rail Finish: Mannox Safety: 3+1 position safety Trigger type: Single-stage adjustable Pull weight: 4 pounds, 8 ounces Stock material/type: Black, OD Green, White or MUD Polymer with integrated bipod & UIT rail Recoil pad: Elastomer with spacers to adjust length of pull, sling swivels, five removable push-and-turn-style positions available. Checkering: None Weight, empty: 6.6 pounds Overall length: 39.4 inches Included accessories: Extra magazine, three sling swivels, owner’s manual
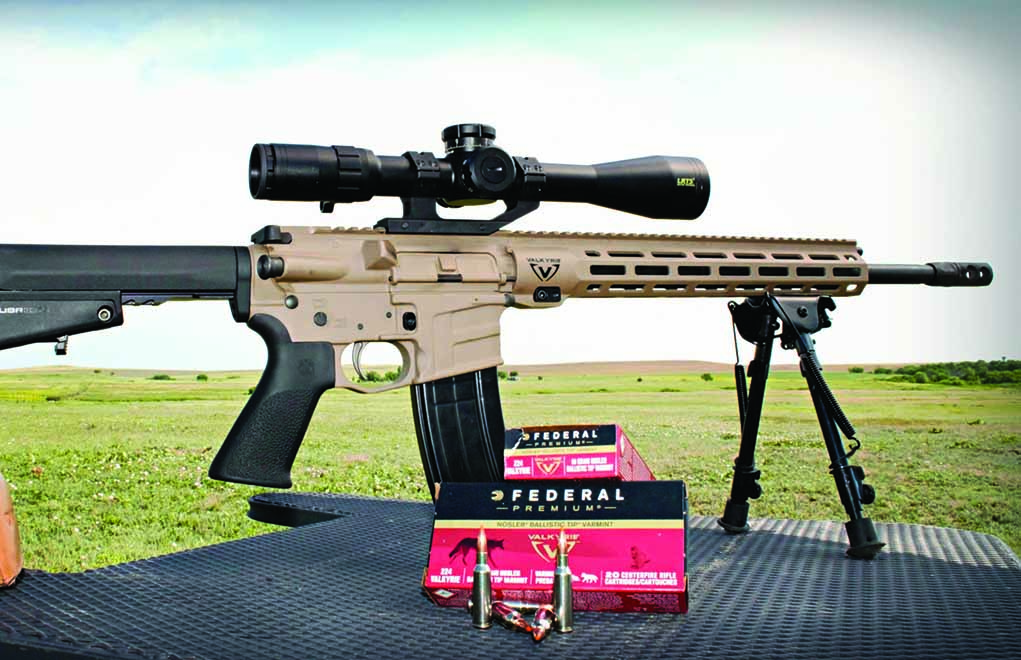
Rare is the cartridge that grabs so much attention immediately upon introduction, but the .224 Valkyrie has done so — for good reason.
Why The .224 Valkyrie Tops Other Long-Range Cartridges:
Necked down .30 Rem/6.8 SPC case.
Improved trajectories vs .22 Nosler, .223 Rem. and 6.5 Grendel.
2,700 fps muzzle velocity from a 24-inch barrel.
Vs .22 Nosler, .223 Rem. and 6.5 Grendel, 125-inches less drop at 1,000 yards.
Less recoil than 6.5 Creedmoor.
Shoots heavy-for-caliber bullets.
Existing AR can be converted with a new barrel, bolt and magazine.
In late-2017, Federal Premium Ammunition released a new cartridge that’s been getting a lot of attention. The all-new .224 Valkyrie soared into magazines, online shooting forums and, of course, social media. Touted as the first AR platform cartridge with true long-range capabilities, it had everyone in the industry on the edge of their seats.
Savage Arms has an affordable option for people looking for a great .224 Valkyrie straight off the shelves: the MSR 15 Valkyrie.
It wasn’t long before articles were flying and gun manufacturers were jumping on board. But has all the hype been warranted, now that enough time has passed for true testing by the masses? Is the .224 Valkyrie really as versatile as the marketing has painted it out to be?
Breaking It Down
The .224 Valkyrie was designed for AR platform rifles to be the new long-range dominator. Simply, the .224 Valkyrie is based on a .30 Rem./6.8 SPC case necked down to .224 caliber. It offers dramatically improved trajectories over all other AR-15 cartridges, including the .22 Nosler, .223 Rem. and 6.5 Grendel, with roughly half the recoil of larger cartridges offering comparable ballistics, such as the 6.5 Creedmoor.
Initial numbers from Federal boasted 2,700 fps at the muzzle from a 24-inch barrel, with the bullet still carrying supersonic speeds at 1,300 yards. When shot through a 20-inch match barrel, I saw 2,650 fps consistently through the chronograph. To say it’s fast would be an understatement. Even if you use the old equation of losing 25 fps per 2 inches of barrel cut-down, a 16-inch carbine will still fire the 90-grain SMK at roughly 2,600 fps. That’s what most modern sporting rifle owners can expect.
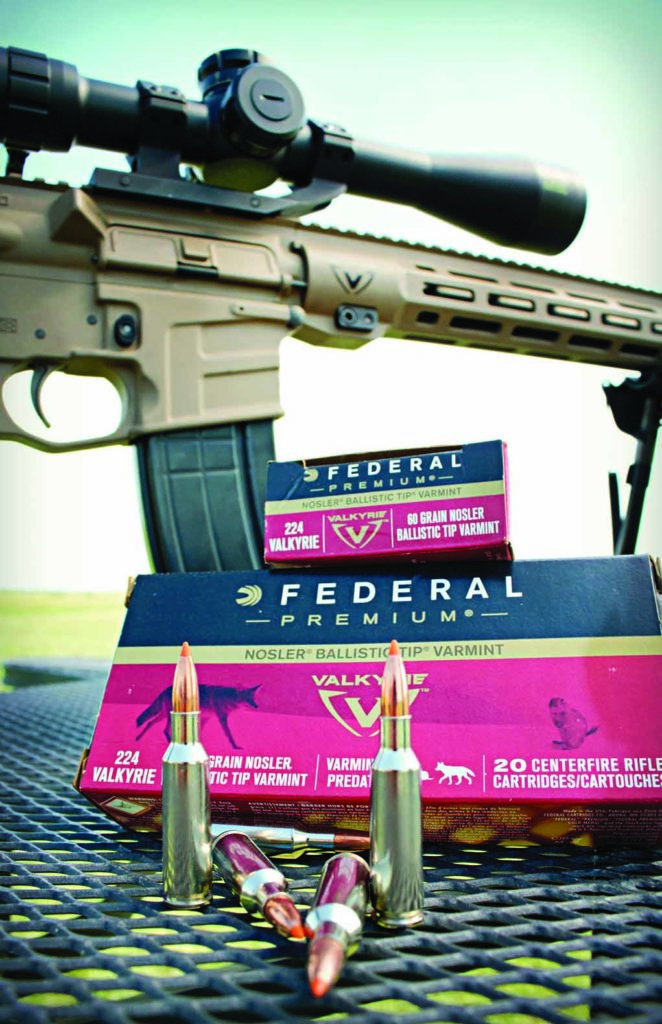
Federal’s new .224 Valkyrie in 60-grain Nosler is the perfect round for predator and varmint hunters.
The .224 Valkyrie offers 125 inches less drop and almost 70 inches less wind drift at 1,000 yards than the .223 Rem. and other short-action calibers like the .22 Nosler and 6.5 Grendel. Plus, its ballistics are comparable to much larger, harder-kicking calibers like the 6.5 Creedmoor, with as little as half the felt recoil. While I haven’t been able to stretch the cartridge past 850 yards, I trust that this truly could be the first 1,000 yard cartridge for modern sporting rifles.
Truly Diverse Options
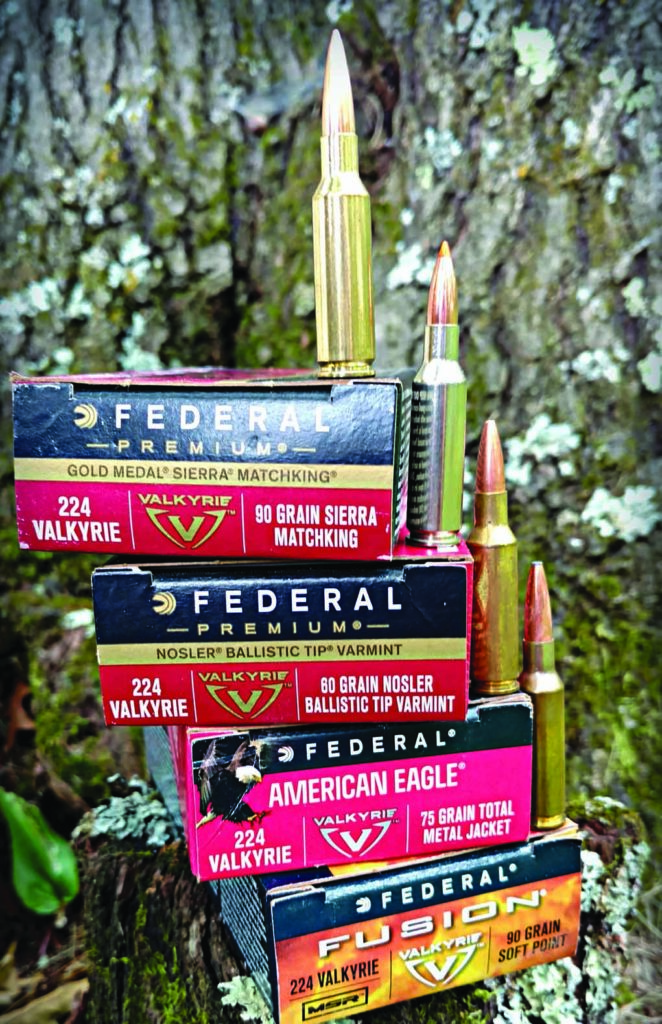
Federal currently offers the .224 Valkyrie in four options:
The 90-grain Gold Medal Sierra MatchKing will be the flagship round. The bullet design has been shot to win more matches than any other, thanks to a uniform jacket that ensures consistent, long-range accuracy, and a sleek boat-tail that maximizes ballistic coefficient. Precision and long-range shooters will love this round.
The 60-grain Nosler Ballistic Tip will be my go-to predator and varmint round. A lighter bullet with unmatched speed will be a favorite for people hunting prairie dogs and predators across the country. At 3,300 fps out of a 24-inch test barrel, this round will be blazing fast, and it holds speeds up to 934 fps at 1,000 yards.
The 90-grain Fusion will be the mid-sized game-leveling cartridge. Fusion already has a name for itself among deer and other mid-sized game hunters from coast-to-coast, and in .224 Valkyrie it’s going to be a deer hunting dream. With half the recoil of calibers with similar ballistics, this will be the perfect deer cartridge for the entire family.
The 75-grain American Eagle TMJ will be the entry-level, low-cost round in .224 Valkyrie. At just $13.95 MSRP per box, it’s selling for $10-12 on the shelves; this will take plinking to a whole new level, and it will be a favorite amongst 3-Gun shooters and casual shooters alike. With the low entry-level cost, you won’t be disappointed in its speed or accuracy. It’s still thumping close to 3,000 fps out of the muzzle.
Other manufacturers are putting out .224 Valkyrie as well. Hornady has their 88-grain ELD Match for long-range performance. Underwood Ammunition offers a 72-grain Lehigh Controlled Chaos fragmenting hollow-point, which is a 100 percent lead-free hunting round.
Savage MSR 15 Valkyrie.
The timing of this round was absolutely perfect, as the gun and ammo market is stable and prices are reasonable. The fact that you can get into a .224-chambered rifle by just purchasing a new barrel, bolt and magazine for your existing AR lower makes it an affordable setup from the get-go. If you prefer to purchase a full package, several companies offer .224 Valkyrie guns that are tack-drivers out of the box.
The Flip Side
We’ve all seen the numbers and heard the hoopla, but — what are some of the downfalls of the .224 Valkyrie?
The obvious is that it’s a new round. Look at what has happened with several new cartridges over the past century: You just don’t see guns stocked on every shelf in the sporting goods stores, and ammo is fading from shelves — not due to consume demand, but rather due to dust on the boxes. With any new round, the future is always a question mark. While things look very promising, and long-range and competitive shooters are already rocking the .224 Valkyrie with great results, word needs to spread. And, rightfully so, leery consumers need to see that it’s here to stay.
Federal Ammunition has four offerings in .224 Valkyrie. From top to bottom: 90-grain Sierra MatchKing, 60-grain Nosler Ballistic Tip, AE 75-grain TMJ, and 90-grain Fusion.
Gun availability is another issue. While the list continues to grow daily, the market isn’t flooded with manufacturers making barrels and bolts, or complete guns. JP Enterprises has several options for hunters and long-range shooters. Other players include Seekins Precision, LaRue Tactical, MasterPiece Arms, MagPul, LMT Defense, LWRC International, C&H Precision Weapons, and Savage Arms. If the round sticks, the list will continue to grow.
The .224 Valkyrie isn’t very bolt-friendly. The round was centered on AR platform guns, and it shows. While there are precision rifle makers out there putting out incredible bolt guns in .224 Valk, don’t expect to see low-cost hunter packages showing up at your local gun shop. Unless you’re set on having a bolt gun and are willing to fork out some cash for a high-end build, stick to the AR platform guns available.
The Future
Ultimately, Federal Premium’s .224 Valkyrie will unleash a new era of 1,000-yard-plus accuracy and performance for gas-driven AR-15s, without the hefty recoil and price tag of larger-caliber options. Thanks to the continuation of Federal Premium’s 95-year commitment to excellence, shooters can expect best-in-class ballistics, supersonic flight past 1,300 yards and extreme long-range accuracy from this exciting new cartridge. And with the full array of high-performance projectiles available, it’s poised to deliver on virtually every shooter’s needs.
Editor’s Note: This article originally appeared in the 2018 Long-Range Shooting issue of Gun Digest the Magazine.
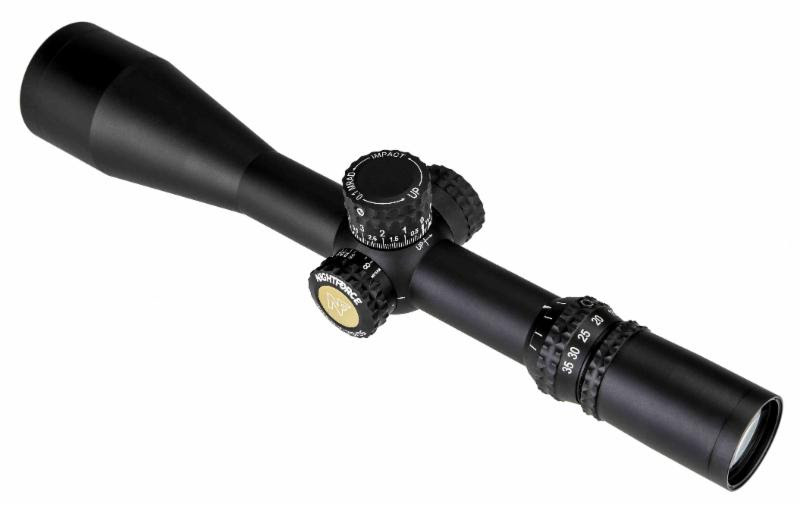
The introduction of the ATACR 7-35×56 F2 marks the third, second focal plane scope of the line.
What are the 2019 releases by Nightforce:
ATACR 7-35×56 F2
MIL-XT Reticle
Considered by many among the acme of optics, Nightforce always tends to turn heads when it releases new products. The impending year is no different, except the company might gain attention for more than simply their top-shelf scopes in 2019. Following a trend in the line, the optics manufacturer is taking another of its ATACR scopes from first-plane to second. Despite where the reticle is etched, the new ATACR 7-35x56mm F2 still offers all the goodies of the original F1, including ED glass, ample elevation and windage adjustment, ZeroStop technology and the choice of two reticles.
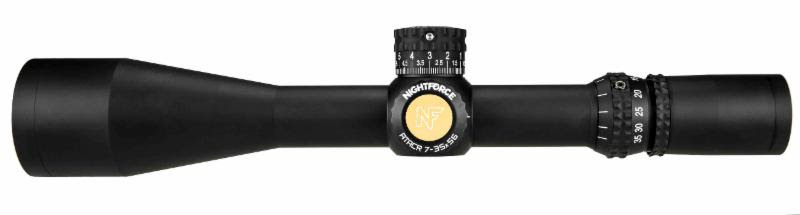
Speaking of reticles, Nightforce also unveiled its new MIL-XT Reticle, an illuminated design available in 16x, 25x and 35x ATACR F1 scopes. Configured for fast and accurate holds, the reticle has .2 Mil-Rad holds on the mainline and .2 Mil-Rad-spaced floating dots beneath for compensation.
Nightforce Optics has introduced a second focal plane version of their acclaimed ATACR 7-35×56 F1, the most powerful ATACR riflescope currently offered. “Since we introduced the first focal plane 7-35x two years ago, it has become one of our most popular models,” said Alan Stilwell, North American sales manager for Nightforce. “With its brilliant ED glass, extraordinary resolving power and the virtually indestructible construction that characterizes all of our ATACR™ riflescopes, we believe it is the most precise, powerful instrument for extended-range shooting on the market today.”
The ATACR 7-35×56 F2, built on a 34mm tube, provides 100 MOA/29 MRAD of elevation adjustment and 60 MOA/17 MRAD of windage adjustment. Unlike many high-magnification riflescopes, it delivers superb clarity at every power setting, allowing detailed rendering and identification of small targets at extreme ranges. It is offered with either the MOAR-T or MIL-C proprietary Nightforce reticles. DigIllum reticle illumination and ZeroStop elevation technology are standard.
“The F1-first focal plane-version has been so successful,” Stilwell added, “that we wanted to make the same unparalleled performance available to those who prefer a second focal plane reticle.” MSRP is $3,100.
MIL-XT Reticle
Nightforce has also announced its new illuminated MIL-XT reticle, available in 16x, 25x and 35x ATACR F1 (first focal plane) riflescopes. It is designed for precision rifle competition, being extremely fast, intuitive and providing precise hold-over and hold-off points. Main lines feature .2 Mil-Radian holds, while each whole Mil-Radian is numbered for fast reference.
Below center, there are .2 Mil-Radian-spaced floating dots at every vertical Mil-Radian. Whole Mil-Radians dots are larger in size for fast counting. Additional marks are also placed at half Mil-Radian increments. Numbers below center vary in size and are placed on each side for easy counting and verification of appropriate hold points.
The MIL-XT provides excellent range estimation, rapid target engagements and precise first-shot placement. Combined with the extreme capability of Nightforce ATACR riflescopes, it gives the serious competitive shooter every conceivable advantage.
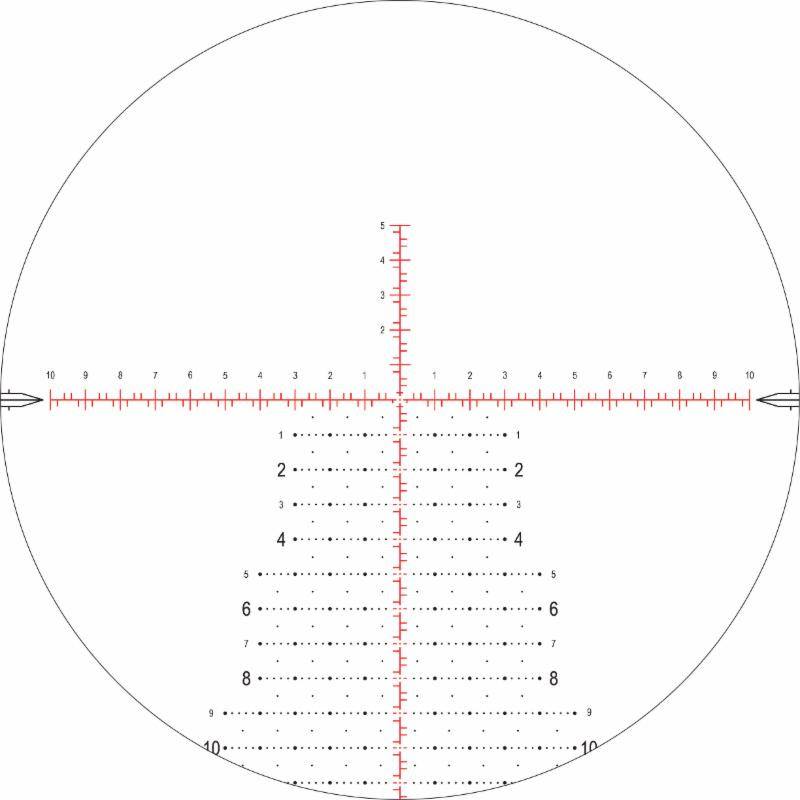
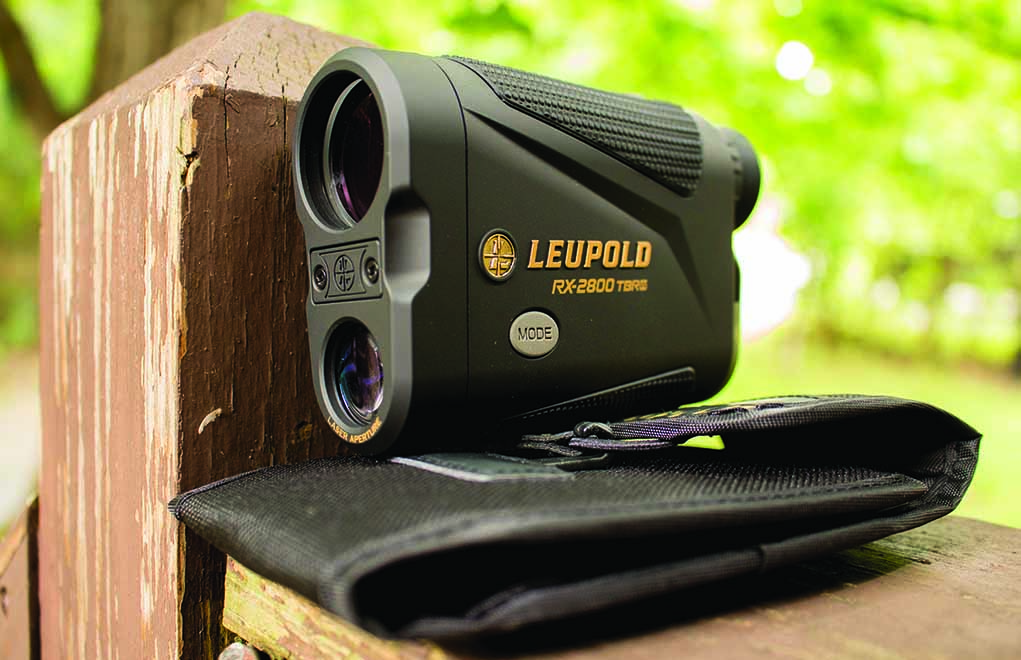
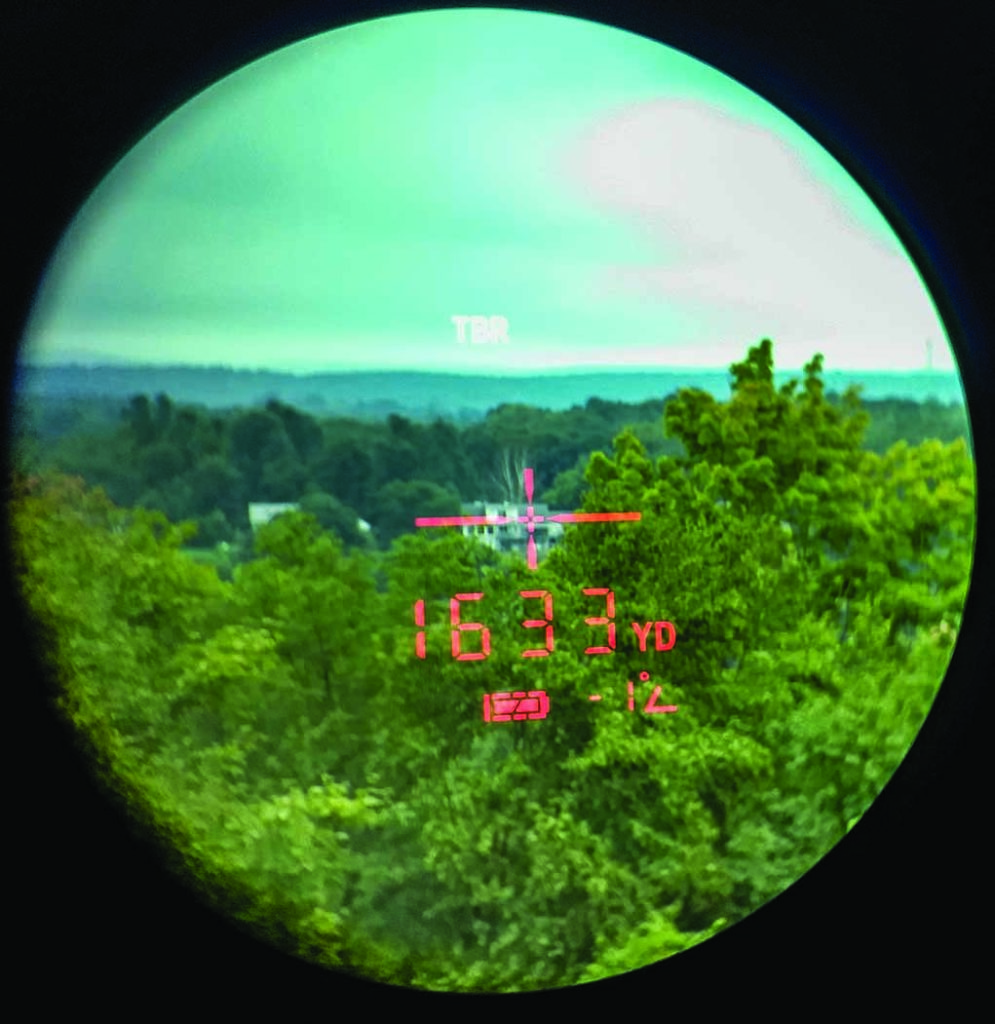
Able to account for wind and effective out past 1,600 yards, the Leupold RX-2800 TBR/W more than goes the distance.
How The Leupold RX-2800 TBR/W Gets You On Target:
OLED display delivers more light and extremely bright display.
Continuous range updates in Scan Mode.
Takes into account the angle of shot and rifle’s ballistics.
Capable of account for wind out to distances of 800 yards.
Alpha IQ ranging engine makes ranging smaller targets quicker than ever.
Leupold & Stevens has upped their game … there’s no denying that fact. A simple look at the VX-5HD and VX-6HD riflescopes will confirm that. But they aren’t just concentrating on their scopes; the new Leupold RX-2800 TBR/W rangefinder is a wonderful little tool, and their recent efforts are equally apparent here as well. It’s a rangefinder worthy of anyone’s range bag or hunting pack.
The RX-2800 TBR/W is compact, concise and packed with usable features
Many rangefinders, like our riflescopes, seem to be growing in size as the features become more complex. Not so with the RX-2800 — in fact, it’s not much bigger than a pack of cigarettes, and I appreciate good, concise, lightweight gear. It has a 7x magnification range, and that’s extremely helpful. I’ve been frustrated with low magnification rangefinders giving a reading on unintended objects because I couldn’t accurately see what I was aiming at. Not so with the RX-2800. Additionally, the unit features the OLED display, which is bright red, crisp and customizable. You can easily switch between three choices of reticle, and the Scan Mode will allow you to get updated distance readings as an animal moves, or as you move the unit along a treeline or the like.
More Long-Range Gear:
Shifting Winds: SIG BDX Changing Shooting For The Better
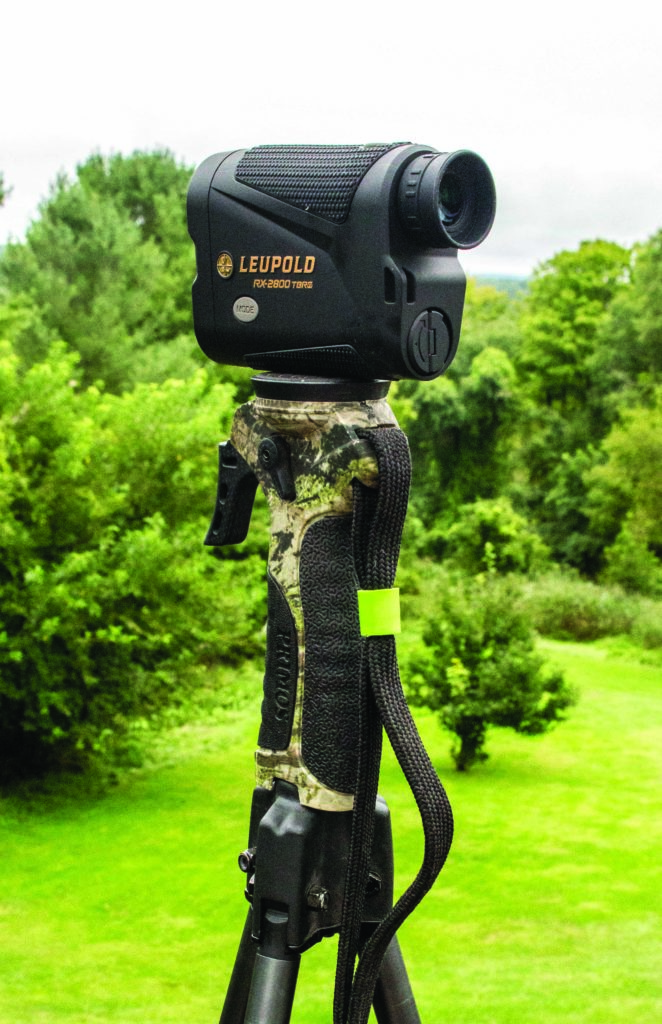
The RX-2800 is 100 percent waterproof, which I love. I use many different electronic items in the wet Northeast fields and woods, and not all stand up to the conditions. I’ve taken the RX-2800 out for a while, and even in a pouring rain, there were no issues. The aluminum housing is coated in a rubber armor, which both protects the unit and affords a solid grip, even with wet hands. Leupold has also provided a threaded insert at the base of the unit, which allows me to instantly and easily attach it to my Primos Trigger Sticks. This radically steadies the unit, and it allows for precise ranging at truly long ranges. Were I guiding hunters, I’d have an extra base attached to the RX-2800, giving me the option for a quick change from shooting sticks to rangefinder in a matter of seconds.
The RX-2800 has a threaded insert, allowing it to mate to a tripod for steady and fast ranging.
The RX-2800 comes with Leupold’s True Ballistic Range, with Wind (hence the TBR/W moniker) which takes into account the shot angle, wind deflection and comes with a multitude of presets so you can choose your trajectory — and allow the unit to display holdover and wind deflection for distant shots. All this in a package that measures 4½x3x1½ inches, which is perfect for backcountry hunts and the deerstand as well. It runs on a single CR123A battery, supplied with the unit.
I’m a land surveyor by day, so I have the ability to measure distances down to 1/16th-inch, for over a mile. I took the RX-2800 to work, as we ran some long survey baseline. At each station, I’d check the precise survey distance with the readings from the RX-2800; at distances out to 675 yards, it checked within 1 yard of the survey reading. I can live with that level of precision.
I also wanted to check the way the unit worked in varying weather conditions. I live on the west shore of the Hudson River, with a good view of the distant east shore. I could range the houses on the opposite shore — out past 1,600 yards — with no issue, no matter if it was bright sunshine, overcast or raining. In the thick woods of the Northeast, it handled the vegetation with no problem, with the precise electronics and aiming system allowing me to accurately range trees and passing deer instead of limbs and leaves. Leupold has this nailed down tight.
The RX-2800 easily handled targets out past 1,600 yards, making it perfect for nearly any shooting situation.
With an MSRP of $649.99, the Leupold RX-2800 TBR/W offers more features than any hunter will probably need, and more is better. It’s simple to use, wonderful to carry and rugged as you’d want. Our hunting/shooting technology continues to improve, and if you feel it’s time for a rangefinder upgrade, look no further than the RX-2800 TBR/W.
For more information on the Leupold RX-2800 TBR/W, please visit: www.leupold.com/.
Editor’s Note: This article originally appeared in the November 2018 issue of Gun Digest the Magazine.
Satisfying as handloading itself, passing on your passion for reloading keeps the next generation shooting straight.
How To Introduce Youths To Reloading:
Introduce them to the tools and terminology.
Explain each individual step.
Have them watch each stage of the process.
Be certain they understand the “little details.”
Give them tasks to do in the process and increase responsibilities as time wears on.
Provide guidance when they reload on their own.
Enjoy the fruits of their labor — go shooting or hunting with them.
The shooting sports are a unique situation in that we are lucky enough to participate irrespective of age; however, the number of youths participating has declined, at least in comparison to when I was young. Just as it’s highly important to mentor the youth by taking them shooting, teaching them the basics of firearm safety and introducing them to the wonderful world of hunting, I do my best to pass on the benefits of handloading.
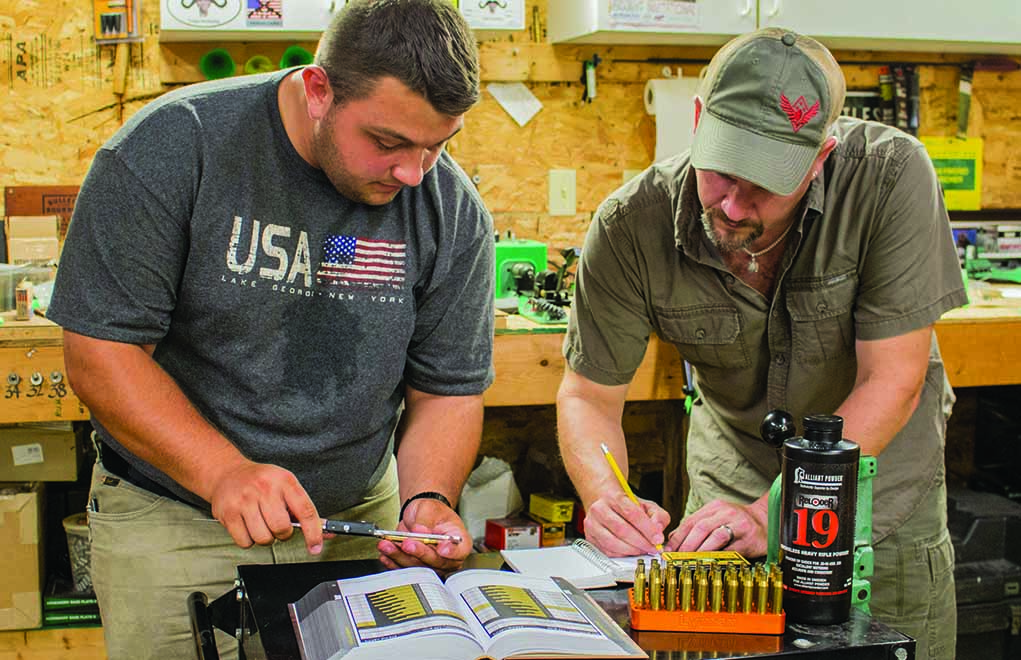
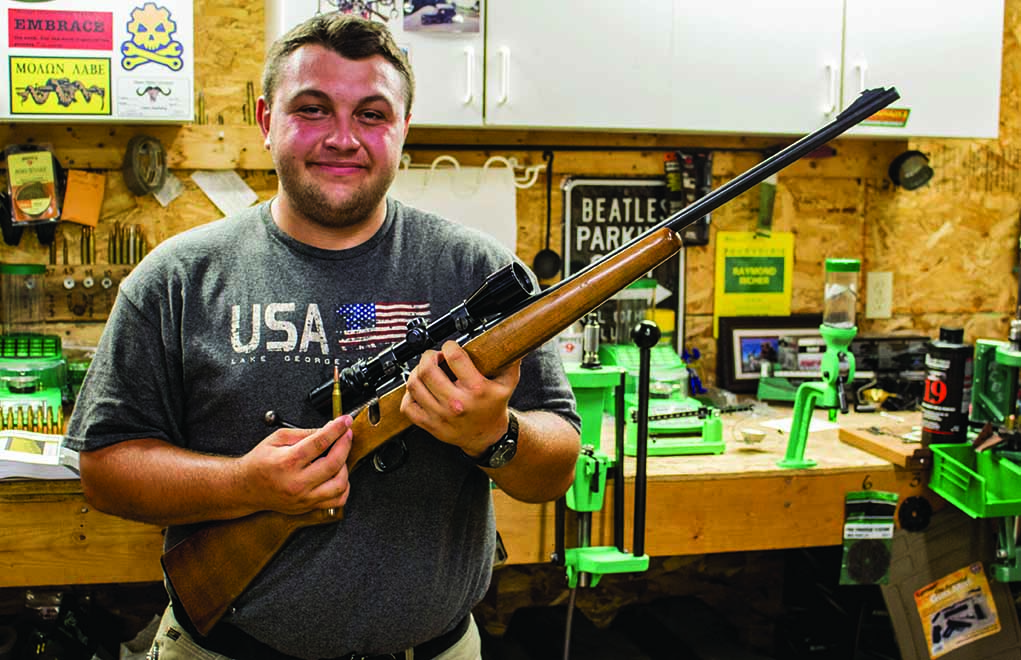
ManDrake Vermilyea (left) and the author working on a handload for the .270 Winchester. It’s great to teach a new shooter how to handload ammo.
In an age where there’s a never-ending supply of immediate electronic gratification, teaching a young person how to handload their own ammunition might not seem all that attractive. Obviously, there needs to be a certain level of maturity, but with that comes a driver’s license — and the allure of the opposite sex. Still, I have done my best to bring people into the fold, including seminars at local gun clubs and fielding hundreds of phone calls from would-be handloaders.
Yet, I found one young man who had a definite passion for the shooting sports, whether it was target shooting, hunting and, ultimately, handloading. I met ManDrake Vermilyea when he was still in high school; he had come over to my handloading pal Marty Groppi’s backyard range while we were doing some load development. He showed a level of maturity beyond his years, as well as being one of the most natural shooters I’ve ever seen. He had his uncle’s Winchester Model 70 in .270 Winchester, and he was unsatisfied with the performance. I suggested handloading for it, and he was immediately receptive.
In his words: “I was raised to believe that one ammunition company’s brand was ‘the best,’ as my uncle’s goal was to simply kill a deer in the woods, where the shots rarely exceed 75 yards. Shooting with Phil and Marty quickly taught me two things: A higher level of precision was needed for the best hunting experience, and that their handloads surpassed most of the factory ammunition we were shooting.”
Marty and I explained the process of handloading ammunition, and Manny was all ears. He watched at first, soaking it all in, and we’d let him help us during the load development process, as the young man could definitely shoot. As Manny explains, “My first time shooting handloaded ammunition, I printed a 1¾-inch group at 300 yards. I was astonished that a rifle could perform so well, and I was immediately hooked.” There’s no better way to kindle the desire in a young man.
Slow And Steady
I had him come up to my shop, at first just helping me organize things, so he could become familiar with the tools and terminologies, and then I eased him into the simpler tasks. I’d have him sit next to me during each stage of creating ammunition, from both new components as well as using fired brass, and I could see that the light had come on. “Once I saw how handloading worked, I desperately wanted to learn.” I was more than happy to teach.
Doing something is one thing. Explaining each individual step and being conscious of a diligent, repetitive pattern, is another. It was as beneficial for me as it was for him; it got me rethinking all the subtle nuances of the art, why we do what we do, and the purpose and function of all the different tools we use. The bottom line: Young “Moncrief,” as I call him, got it. Seeing him understand the process, including the little details — such as variations in seating depth, adjusting the amount of shoulder bump or setting up both brass and dies for the perfect roll crimp — just plain tickled me.
As time wore on, I allowed Manny more and more responsibility. Did he make mistakes? Of course — but so did I, and so did you. I was happy to be a source of information, and quite possibly guidance, as he would look at the performance of different cartridges, powder and bullets. A midday text regarding some aspect of handloading would assure me it is definitely on his mind; in other words, he’s got the same bug we all have.
“I wanted to produce what the factory couldn’t; I inherited a rifle which my uncle swore wouldn’t shoot well. I wanted to show him that it could. Getting my uncle’s rifle to print less than MOA was a huge source of pride. We took our time, and we found the answer,” Moncrief relates.
That statement alone made me smile, more for him than anything else. A simple blend of Reloder-19, Federal large rifle primers and Speer 150-grain Deep Curl bullets printed groups averaging 0.9-inch at 100 yards, solving an issue with a rifle that was 1¾-MOA at best.
Passing it on, and sharing the process of handloading ammunition, has been very rewarding for me. Sometimes, it’s just an extra set of eyes at the bench to pick up some little detail I may have missed, or a different perspective when actually setting up the bench and all the gear. Other times, it’s a fresh look at a problem rifle/bullet combination, or simply an idea I never may have had.
There’s an undeniable camaraderie among handloaders; we love to talk shop and support one another as much as we love to argue in defense of our favorite cartridge or pet load. We handloaders enjoy spending time together, and I’ve found it to be much more fun when there’s a buddy present than as a solitary duty. I feel the same way about hunting; the memories made doing the most mundane things can become favorites, and the score of a deer becomes irrelevant when weighed against the good time had with a friend.
I’ve seen Young Moncrief mature from high school junior to his second year of college, and yet he finds time to still join me at the both the reloading bench, as well as the shooting bench and hunting fields. We have a tight-knit group of friends who truly enjoy handloaded ammunition, and I’m glad to have had the opportunity to pass some of the hard-learned lessons onto a responsible kid — who will hopefully have the chance to do the same later in life.
Just as we all enjoy shooting and the opportunity to teach someone else how to shoot, I think those of us who are passionate about handloading need to hand the knowledge down to the next generation. The tools don’t need to be expensive, nor the accommodations perfect; what will become the true treasure is the time spent.
There will be frustrations along the way, as there will with any student/teacher relationship, but that comes with the territory. Things will be broken, and mistakes made, but the look on a new handloader’s face when those bullets are nearly touching is, to me, priceless.
By the way, Moncrief: You owe me a couple new de-capping dies.
Editor’s Note: This article originally appeared in the September 2018 issue of Gun Digest the Magazine.
Developed to handle everything from varmints to medium game, the .243 Winchester remains a flexible and accurate 6mm option.
What You Need To Know About The .243 Winchester:
The .308 Winchester provides the parent case.
Next to .30-06, probably chambered in more rifles than any other cartridge.
With mono-metal bullets, appropriate for big game.
The .243 Winchester was introduced by Winchester in 1955 for its Model 70 bolt-action and Model 88 lever-action rifles. The .243 Win. was quickly adopted by Savage for its Model 99 lever- and Model 110 bolt-action rifles. All the British and European manufacturers soon began chambering bolt-action rifles for this round. In fact, even Remington, which developed its own 6mm, had to recognize the popularity of the .243 and start chambering its rifles for it.
The .243 (6mm) Winchester is nothing more than the .308 Win. case necked down. Original development and publicity was due largely to the efforts of one gun writer, the late Warren Page, who, along with other wildcatters, worked out a similar version before Winchester. The .243 Win. is probably chambered in more different rifles than any other cartridge, except possibly the .30-06 Springfield, which is no surprise. The .243 Winchester represents a successful effort to develop a light deer rifle cartridge that could hold its own with the high-velocity .22s for long-range use on small targets — and still be adequate for larger animals. The .243 Win. does this job well. It eliminates the need to own two different rifles for anything from small game and pests up to and including deer and antelope.
The 80-grain bullet is intended primarily for varmint and small game, and the 100-grain bullet is ideal for deer-size animals. The .257 Roberts and the .250-3000 Savage are supposed to cover the same range and certainly do. All major domestic and overseas manufacturers of commercial ammunition offer this caliber. Its popularity as a deer caliber has prevailed over its varmint capabilities. (Editor’s note: The .243 Win. has garnered a reputation among ballisticians for erratic performance. Handloaders should keep this firmly in mind.) In a 2000 press release, Remington announced the availability of electronic ignition .243 Winchester ammunition for use in its new (and now defunct) EtronX rifle. The initial loading uses a 90-grain Nosler Ballistic Tip bullet. Owing to the unique primer, this ammunition will not work in a conventional rifle (just as conventional ammunition will not work in the EtronX rifle). Except for the primer, this ammunition uses conventional components.
Update: The recent introduction of all-copper, mono-metal bullets, such as the Barnes Triple-Shock and Tipped Triple-Shock, the Hornady GMX and the Lapua Naturalis, allow the .243 Winchester, as well as other 6mm cartridges that produce the same or higher velocities, to be very effective on big game while using a faster and lighter bullet. Additionally, Frank Barnes mentioned the erratic performance handloaders could expect when working with the .243 Winchester; while this has become an ever-persistent warning with this cartridge, many handloaders have been building the .243 Winchester for 20-plus years and find it as easy to work with as any other cartridge.
Editor’s Note: This article originally appeared in the October 2018 issue of Gun Digest the Magazine.
Looking to go armed, but are stuck in the weeds as to what to arm yourself with? Here are 20 of the best concealed carry gun options that will keep you on the defensive.