From WWII to the big screen, the Walther PP Series has forever been tied to history.
Why The Walther PP Series Is Collectable:
First commercially successful DA/SA pistol.
Popular police sidearm in Germany.
Later issued to Nazi officers.
Famously used by Hollywood spy James Bond.
A number of companies have manufacured PP series pistols.
Available in .22Lr, .25 ACP, .32 ACP and .380 ACP.
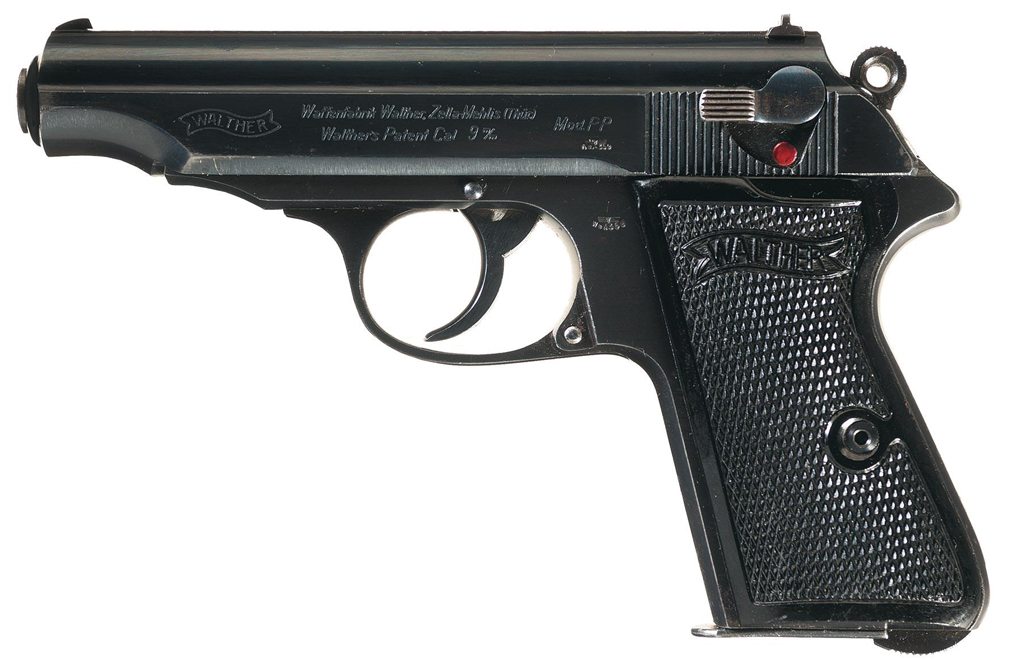
The Walther PP (Polizei Pistole) occupies a significant place in firearms history as the first commercially successful double-action semiauto pistol. It operates on a straight blowback system and a double/single action with a double-action trigger pull for the first shot and a lighter single-action pull for follow-up shots. This type of action has set the standard for double-action pistol manufacturers worldwide during the past 90 years. Features included a visible hammer, loaded-chamber indicator, hammer-block safety and a combination safety/decocking lever, all still commonly found on many DA/SA semiauto designs.
The PP model.
Introduced in 1929, the PP became a popular police sidearm in Germany and later were issued to officers in Hitler’s army. A popular variant, the PPK (Polizei Pistole Kriminalmodell, or Police Pistol Detective Model) was introduced a few months after the PP. It was designed for undercover use and had a shorter barrel, frame and grip. Both the PP and the PPK were initially chambered only for the 7.65mm (.32 ACP), but the .22 Long Rifle and .380 were soon added. (A few pre-WWII PP and PPK pistols were chambered for the .25 ACP, but these are very rare and pricey.)
The PPK became famous in the early 1960s as the main sidearm of fictional British spy James Bond. Just as Clint Eastwood’s Inspector Harry Callahan in the 1971 film “Dirty Harry” caused prices for S&W Model 29’s to soar, Bond made the PPK a big contributor to Walther’s bottom line. Serious Bond fans know the story of Geoffrey Boothroyd, a retired Army Major and gun collector, told Ian Fleming that the .25 Auto Beretta featured in his novel Casino Royale as Bond’s main gun, was not powerful enough for the job.
There are many variations of the PP series, with numerous finishes, grips, engraving patterns and special editions, making collecting the PP series somewhat of a challenge. More than 70 different listings for PP and PPK values are found in Standard Catalog of Firearms, and many are included in the sidebar on the next page.
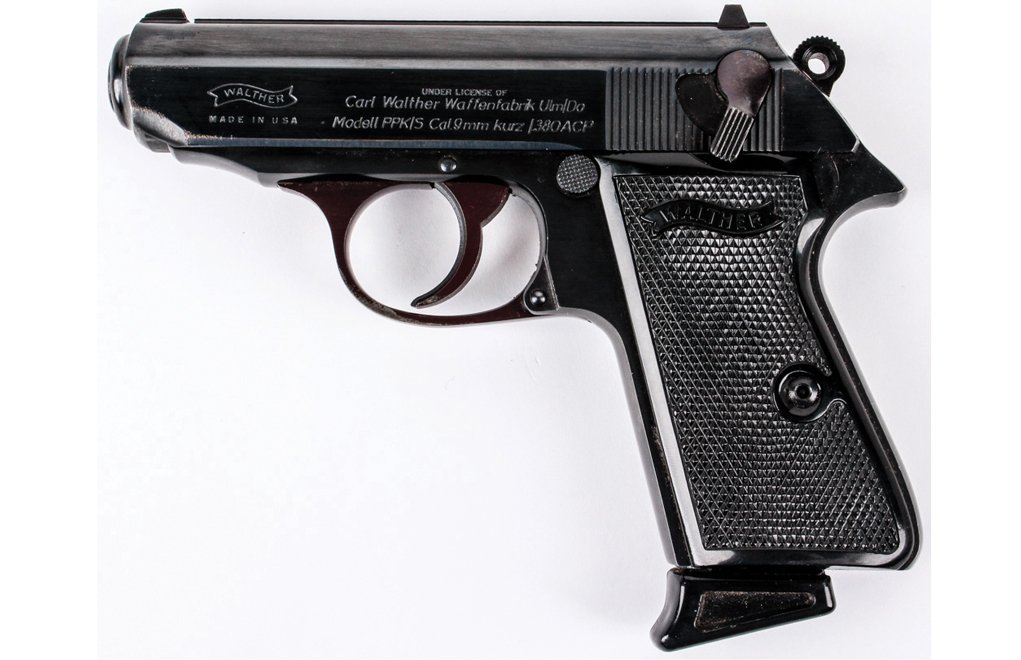
One variant was the result of the infamous Gun Control Act of 1968 that prohibited the importation of small handguns. The ATF came up with a point system that determined whether a gun could be brought into the USA, and the PPK didn’t make the cut. Walther engineers came up with a simple solution, which was simply to mount a PPK slide onto a PP frame. A new model was created that passed the point system and it was named the PPK/S. While not quite as concealable as a PPK, some shooters find the PPK/S to be more comfortable to shoot.
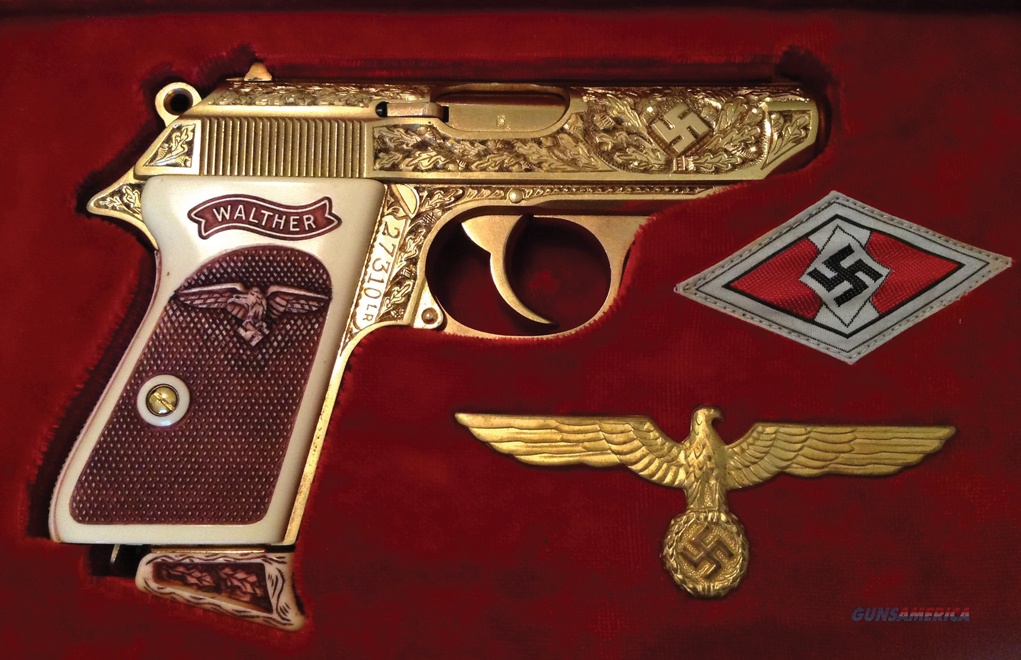
The gold engraving and Nazi markings make this PPK quite rare. It’s a .22 LR and, with the box, could be worth $7,500.
In addition to the Walther company, several other manufacturers have made the PP series of pistols. Walther produced both the PP and PPK until 1945. The factory had been destroyed in WWII, and because firearms production was prohibited in Germany after the war, Walther contracted in 1953 with the French company Manurhin to make the guns. Manurhin made all the post-war PPs and PPKs until the Gun Control Act of 1968 went into effect. Some of these models were marked with the Manurhin name.
Following the reunification of Germany in the 1980s, Walther built a new factory in Ulm, Germany, and some of the pistols were finished and proofed there after being machined in France by Manurhin. Since they were proofed in Germany, these models could be marked as German made. PP and PPK/S guns were imported by Interarms until the early 1990s.
Walther licensed Emco in Gasden, Alabama, to manufacture the PPK and PPK/S in 1983, and production continued until 1999. Smith & Wesson became the licensee to produce the guns beginning in 2001, an arrangement that continued until 2012.
The PPK/S is basically a PPK slide and barrel atop a PP frame. It came about after the Gun Control Act of 1968 forbade importation of the PPK as being “too small.
In 2013, Walther USA was established in Arkansas and is currently importing PPK and PPK/S models — along with a dozen or other Walther pistols — that are made in Germany. These current models, including those made earlier by Smith & Wesson, have an improved feature that’s appreciated by some shooters. This consists of a longer frame tang, designed to prevent injury to the web of the shooter’s hand, which can be caused by the edge of the slide breaking the skin, especially on those with larger hands.
WALTHER PP SERIES PISTOL ESTIMATED VALUES
Estimated values courtesy Standard Catalog of Firearms 28th Edition. PRE-WAR PP
It stumps some, but figuring out when to place your finger on the trigger is an important element to defensive handgun use.
Five Parts To A Draw Stroke:
Grip the handgun.
Clear the holster.
Rotate the handgun into position.
Smack the hands together for complete grip (finger should touch trigger).
Look for the front sight.
Press the trigger when you’ve aimed at the target.
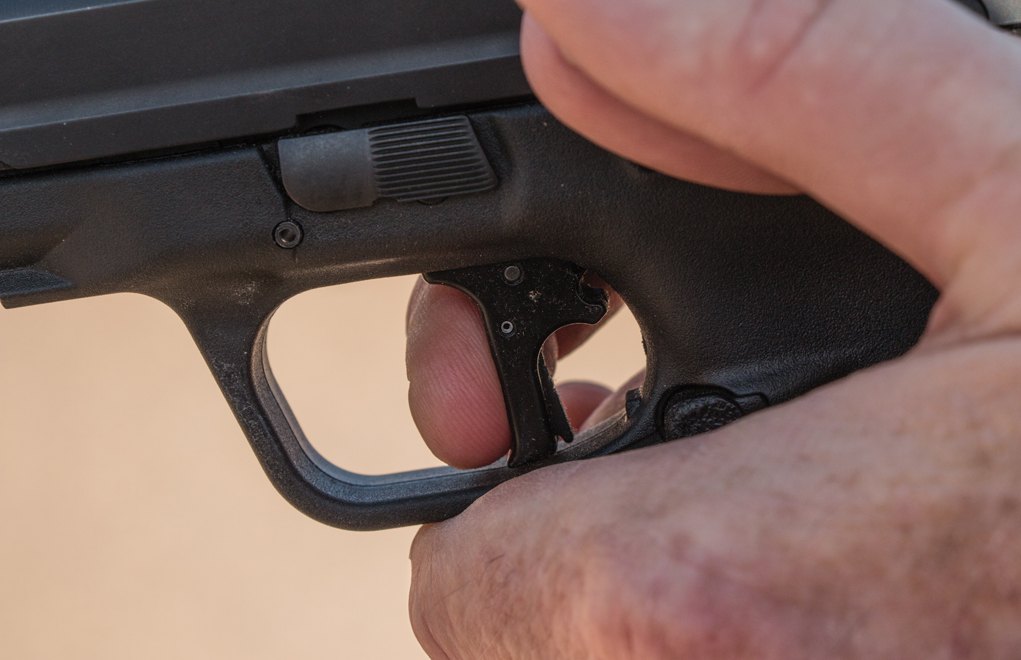
Some shooters do not know when they should place their finger on the trigger of their defensive handgun. Gunsite Instructor Cory Trapp sheds some light on this topic:
“At Gunsite, we break the draw stroke into five parts: grip, clear, rotate, smack, look and press. While the stroke is one fluid movement, breaking it down like this simplifies the teaching process. One point that often gives clients trouble is count four — smack — the point where the hands come together and start the two-handed shooting position.
“On smack, you should also be touching, or prepping, the trigger. Rule three is not being violated, the gun is aligned with the target; you just don’t yet have visual verification with the sights. You must get on the trigger now so, at the top of the draw stroke — when you see the front sight stop on the target — you’re ready to press. Many people wait until they reach full extension and have focused on the front sight. This normally results in an uncontrolled slap of the trigger and then poor shot placement.”
Mastering long-range marksmanship at H&H Precision Rifles’ shooting school.
Owning a precision rifle no more makes you a marksman than owning a guitar makes you a musician. The adage is timeworn, but as true now as when it was coined. Having a fine-tuned instrument capable of going the distance is only one, somewhat small part of the equation. The most important variable is you — your skills as a rifleman and capability to master the long-range shooting iron you’ll put to your shoulder.
When that rifle is from H&H Precision, the company more than makes certain you have the aptitude to milk every ounce of engineering it puts into one of its guns. Once a year, the custom gunmaker hosts a precision long-range shooting clinic for every person that’s bought an H&H rifle. A ballistic boot camp, top-shelf instructors break down the fine points of these custom rifles and the skills required to get one to reach out 1,000-yards or more consistently. A demanding crash course, to say the least, it puts the lucky few in attendance well on the road to mastering their H&H Precision rifle and the art of shooting a country mile.
Modern Shooter got a seat (or range lane) in this year’s class and discovered firsthand what it takes to master extreme ranges and the capability of these precision tools. The top shots who run the class make it look easy, just a few cranks of the turret and a squeeze of the trigger. But as the Modern Shooter crew quickly learned, there’s plenty of heavy lifting to own the long shot.
Catch this and more long-range shooting action 10 p.m. EST tonight on the Pursuit Channel. Episode airs again 12 p.m. EST Monday and 11:30 a.m. Tuesday.
So, you went out and bought a new precision rifle, and now you want to purchase a new optic. But there are so many choices — from Athlon to Vortex, Barska to Zeiss — where do you start? How do you wade through the hype and get down to the meat and potatoes of the questions?
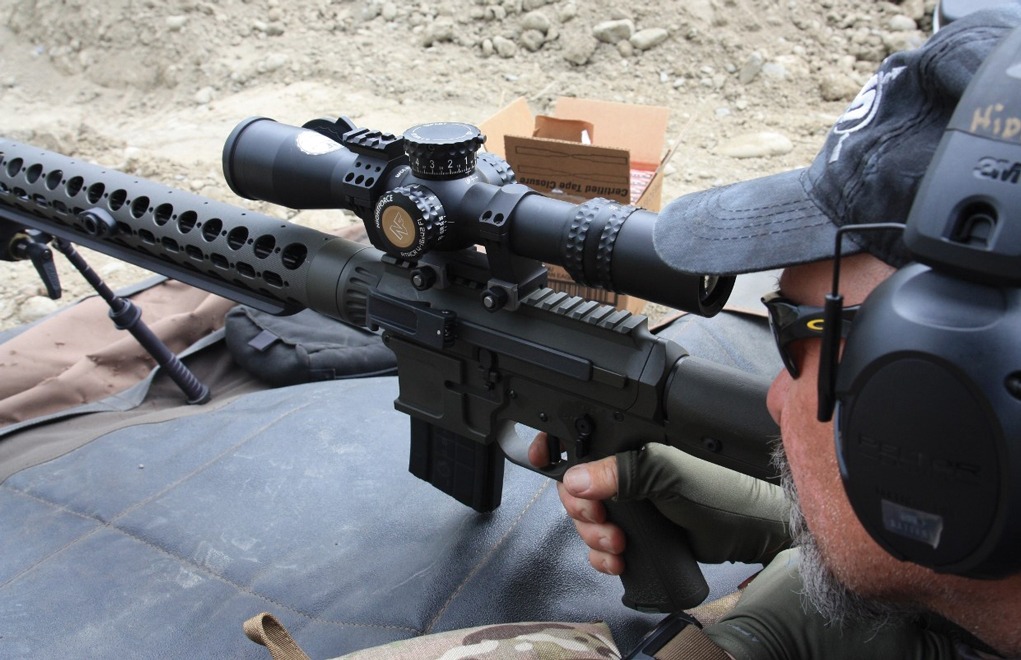
The Nightforce 4-16x ATACR mounted on a JP Rifl es .224 Valkyrie is an excellent combination for tackling a large variety of long-range work.
Let’s start with the easy ones: What’s your intended use? It’s that simple. Do you only have access to 200 yards and plan on putting the scope on your .308 Win.? Or, are you interested in shooting PRS, or F-Class or just plinking — because all these details matter. The first thing you need to do is be honest about your intended use for the scope.
To reach 1,000 yards with a .308 Win. rifle, you want at least 40 MOA of usable adjustment from a 100-yard zero. And trust me: You want a 100-yard zero on your rifle. So, if you have a scope with 60 MOA of adjustment, you’re clearly in good shape. On the contrary, you don’t need a scope with 32 mils of adjustments if you can only reach 600 yards at your local range. In short, the cartridge you’re shooting matters, too. By understanding your cartridge choice, you can determine the best scope for your given application.
Ideal Magnification
In reality, magnification has very little bearing on how far you’re shooting, but it does on what you’re shooting. If you’re shooting F-Class on paper, you want to see the X-ring, so those shooters use very high-magnification scopes — but the trade-off is less elevation adjustment. You don’t want a 55x optic for your .338 Lapua Mag. if you plan on shooting to 1 mile because you’ll run out of adjustment. Most field shooters stick to scopes that hover around 25x or less, and many are shooting them below 18x and enjoying the increased elevation adjustment. Magnification is a double-edge sword in the field.
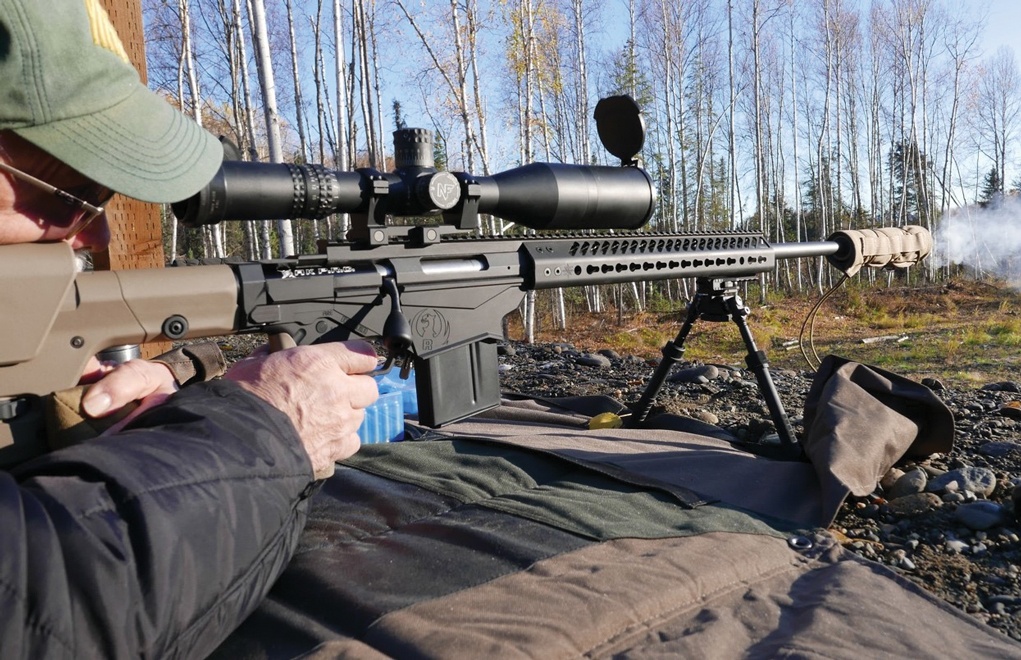
Hitting targets at 1,000 yards is very attainable with a 16x scope. Excessive magnification can cause more problems than it solves.
Magnification also magnifies problems in the air, such as mirage. Yes, you can shoot 1,000 yards with a 10x scope, but most shooters will use a scope with a 12-18x max to maintain a good field of view and a clear sight picture. Get a little bit more magnification just so you have it, but don’t overdo it — you don’t need a 32x scope to shoot 1,000 yards on steel. You want 25x or less.
Mils vs. MOA: Which Is The Best Long-Range Language?
I personally love and use a ton of 16x scopes. I shoot beyond 1,000 yards all the time, and the 16x does not hold me back. Lots of people are magnification junkies and not for a good reason — more isn’t always more. Balance the magnification and have it suit your mission.
Be Wary Of Budget
So, how much money do you plan on spending? What’s the top end of your budget and is it worth saving a bit more to take the next step up? If your budget is $2,000, you might want to wait until you have $2,500. If your budget is $1,500, you might be better served spending $1,250. Yes, you read that right.
It used to be the top-of-the-line Leupold Mk 4 was $1,250, and now that’s on the lower end of the scope spectrum regarding money spent. If that’s your budget, there’s nothing wrong with it — but accept the fact that you’re looking at an entry-level scope. When everyone was running a Leupold, I switched to Schmidt & Bender, and my budget immediately jumped to $2,000 and up.
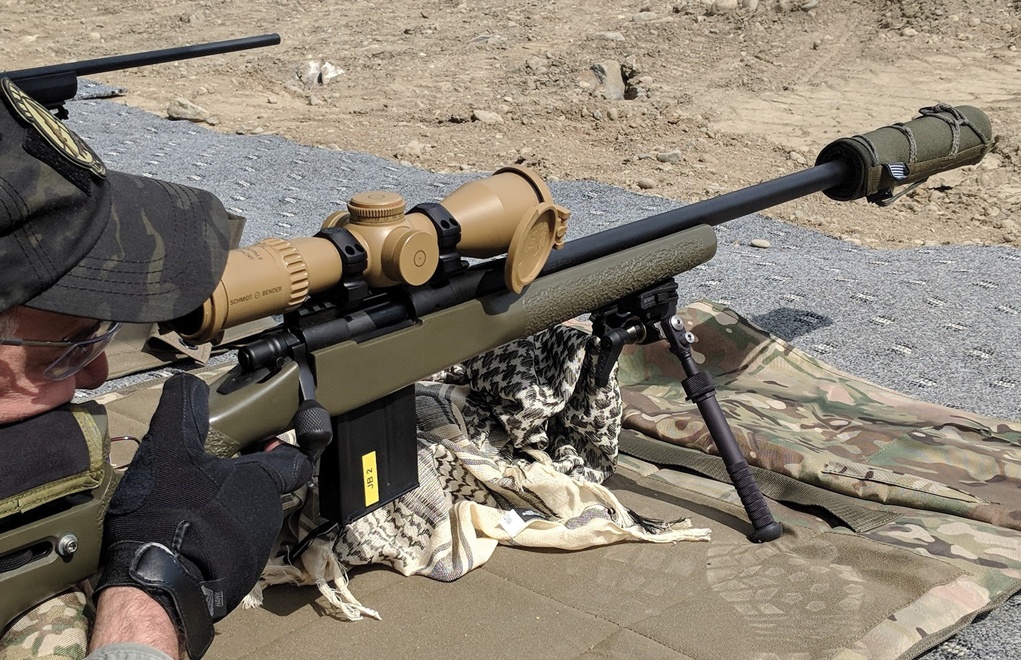
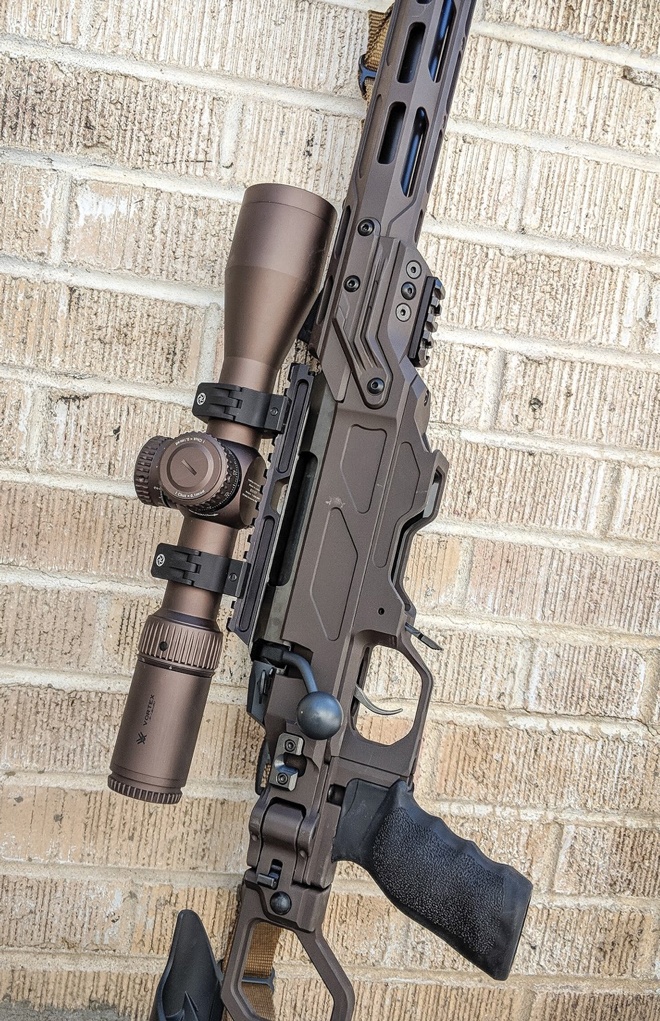
This riflescope costs more than the rifl e out of the box. When shooting long distances, a top-quality scope that fits your mission is mandatory.
Here’s a bit of history: I have one of the first S&B 5-25x PMIIs that hit U.S. shores. It cost me $2,350. Today, that same scope can retail for $3,600. A few things changed over the years with them, but its tough to see the difference. I also have a $7,000 Hensoldt 3-26x, but it doesn’t help me shoot any better than my $2,400 Vortex. In fact, if I walked down to my local mall and placed my Vortex GEN2 Razor on the table next to my $7k Hensoldt, playing the Pepsi Challenge to see who can pick out the scope that cost $7,000 — 50 percent of the people would be wrong.
Where’s The Glass Made?
Quality is not always marked by where the glass is made. Today, you’re not going to win by simply choosing a country of origin. Scopes made in Japan, where many come from these days, are mostly excellent. The majority of great cameras come from Japan. It comes down to what the vendors want to pay and how much quality control goes into the scope. In short, Europeans make some great glass, but they’re no longer the only ones doing so.
Glass And Coatings Quality
In today’s world, every scope looks good out of the box. Everyone has learned enough to make outstanding glass. The optical prescription and how they spec them is such that we, as consumers, can barely tell the difference when all else is equal.
Glass is subjective: No two users see through the scope the same way — especially if it wasn’t properly adjusted for the shooter’s eye. There’s only so many suppliers of raw glass, and the optical difference actually lies in the coatings.
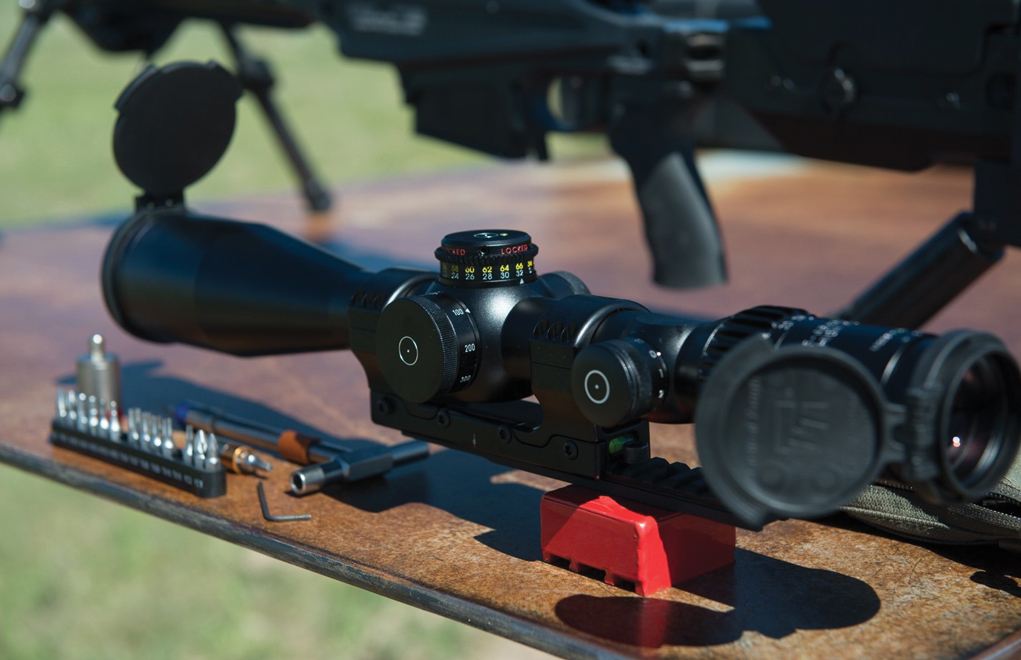
On any good riflescope, features to look for include the zero stop, locking turrets and a capped windage dial.
The problem with coatings is durability. So, while a cheap, budget-minded scope often looks just as good as an S&B, in 2 years those coatings will be worn down and not nearly as nice, and the S&B glass will be the same as the day it was bought. Things like sunlight can wear on coatings over time, so just showing up with a scope can degrade it if the coating quality is poor.
Coatings are also what gives a scope its look, and that “look” is the same as asking your friend what his favorite color is. Manufacturers design the coatings and the look for a specific set of conclusions to be made by the consumer regarding what the scope is designed for. Some scopes offer high definition and perform very well in bright light (a designated range scope). If you want low-light performance (for hunting purposes), get a large objective and reduce the power to open up the exit pupil. If you test your scope on 25x at night, you’ll be disappointed — try turning the power down.
Same goes for the elevation: If you want to see the best sight picture, the erector has to be centered. You cannot crank 50 MOA on one scope and compare it to scope that’s centered in the elevation scale.
Glass quality “measurement” is discrete and controlled by the Abbe number. Schott, Hoya and Ohara are brands, not a quality value. Each brand has their equivalent model with a matching Abbe number. In fact, there are versions of Ohara glass that out-score similar Schott models. The bird watchers and star gazers have this down to a science. They can tell what lenses are combined in their scopes to get the desired effect, and none favor one brand over another. They understand what the Abbe number means and how the design is impacted by the choices made in optical design.
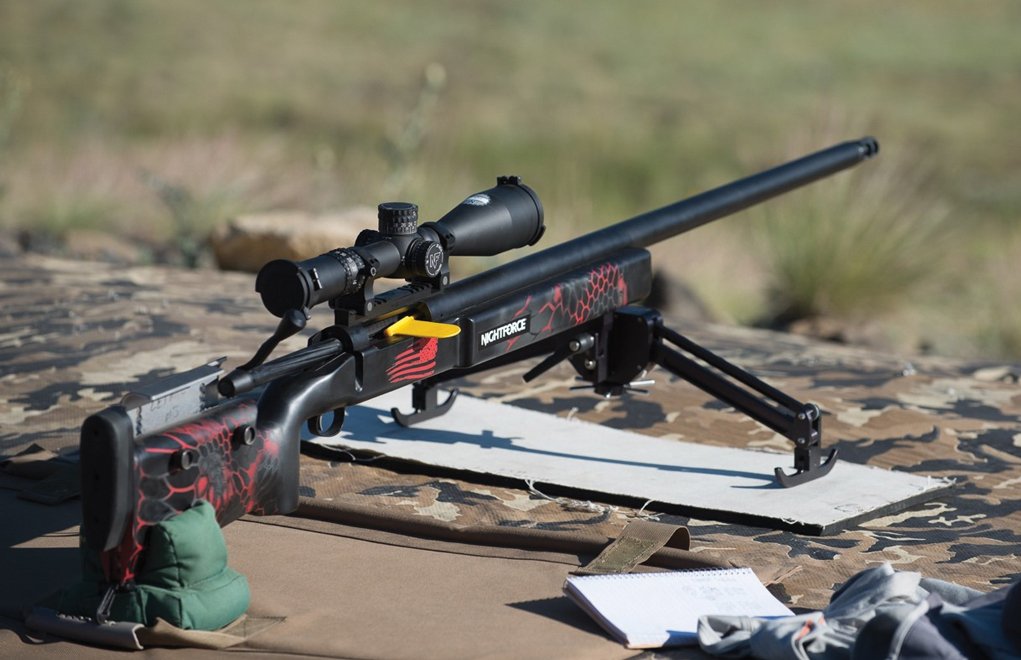
This rig is set to make a 2-mile shot — with a 25x riflescope. Too much magnification is possible
So, with all that to serve as basic information, don’t get wrapped up in the glass. The scope companies have taken care of this for you. Today, glass quality is more a byproduct of your budget than your choice in brand. In many cases, you need a machine to tell the difference.
Features To Look For
Elevation adjustment is attached to main-tube size, with the most common being 30mm to 34mm. The erector inside is the same, so you’re not getting more light out a 34mm vs. 30mm. The brightness of the scope is determined by other factors.
If you’re putting the scope on your 338 Lapua Mag., you want 100 MOA or more of elevation — which is equal to more than 26 mils of adjustment. For ELR (extreme long range) shooting, you want a scope with 28-36 mils of adjustment. Now, if you’re using your .308 Win., you can get away with 15 mils or less, which is about 60 MOA. I do recommend getting more elevation than you think you need because you might decide to swap it over or travel to a location with more distance. Also, the higher the total adjustment range, the heavier a scope will be. Keep that in mind.
Zero-stops are almost mandatory and prevent you from being off a turn when dialing distance. Some scopes allow you to set them at a specific point; other scopes are set at the factory. I always like to have a tiny bit, about 1 MOA of down, below the zero stop.
Locks, Brakes And Capped Windage
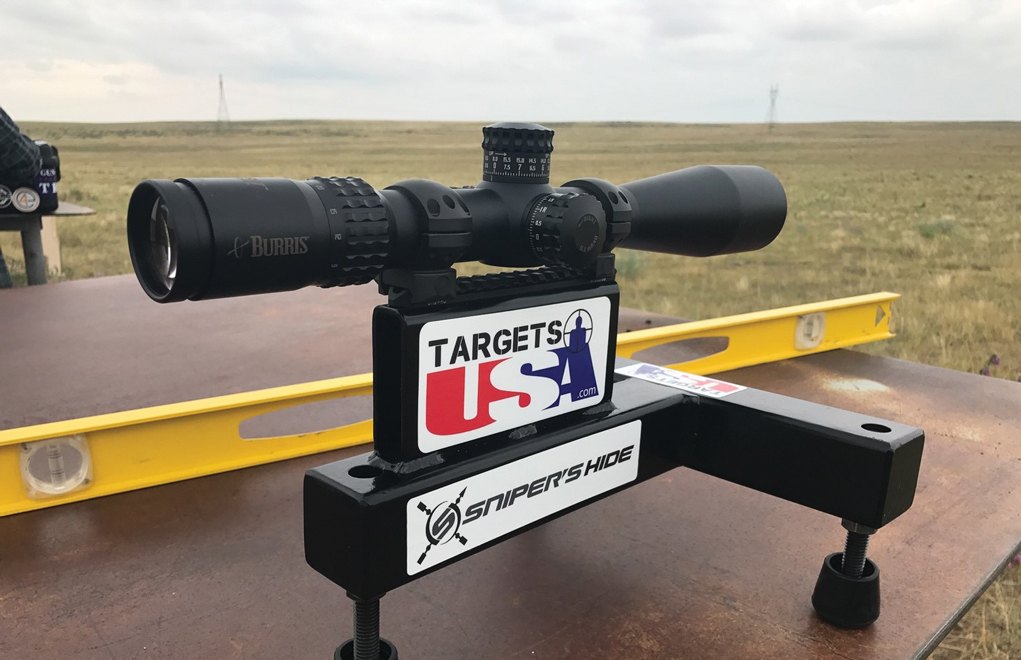
Europe isn’t the only place cranking out good glass these days. The Vortex GEN 2 Razor exceeds quality expectations, proving “Made in Japan” isn’t an issue.
Locking turrets were designed around the military using the Horus Reticle. They are unnecessary for most shooters, but they often come as a default feature. If you have a choice between an S&B Double Turn turret and a locking turret, I recommend the Double Turn. I rarely find a need to use the locks for everyday use, and if I can get a scope cheaper by skipping the locking turret, I will do that.
Front Focal Plane Vs. Second Focal Plane
If you’re a dynamic shooter, field shooter, PRS shooter or a hunter, you want a front focal plane (FFP) scope. If you plan on shooting F-Class, benchrest or if you shoot by yourself, you want to get a second focal plane (SFP) scope. An SFP scope is considered a more durable design and will be a bit cheaper compared to an FFP scope. For this reason, you see guys shooting ELR distances and heavy-recoiling rifles using an SFP scope. You can 1/2 the power on an SFP scope and double the reticle value to provide more range when holding at extended distances.
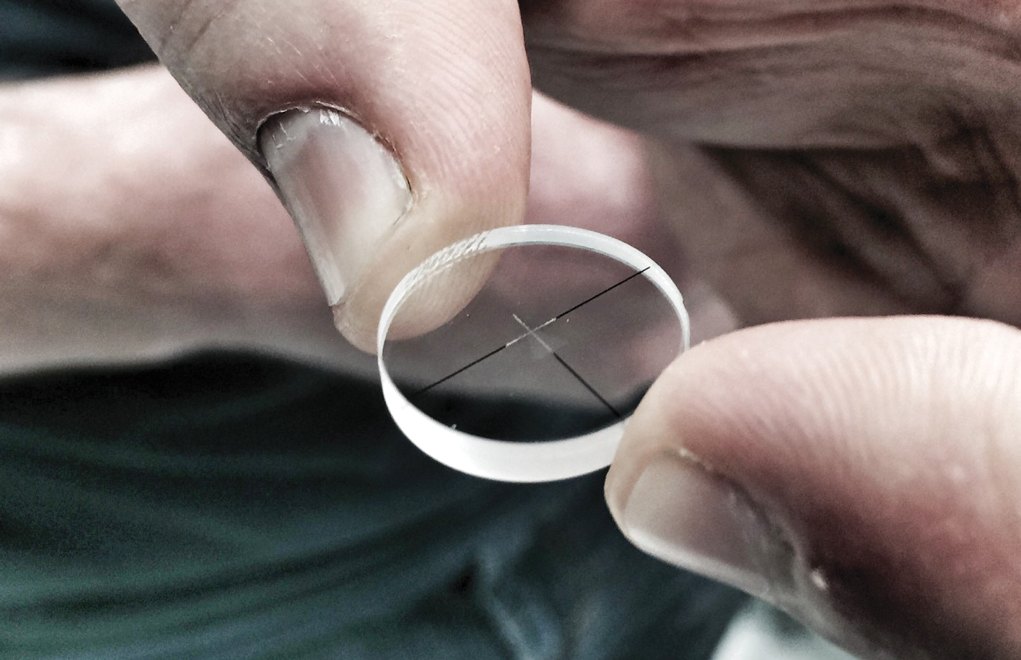
Reticles, Reticles … And More Reticles
Reticles are like shoes: You get the pair that fits and works for your desired use. You don’t buy sneakers to match your business suit. Same with reticles. Reticles take understanding and training.
We use reticles today like very few did before. The biggest consideration is to match the reticle to the turrets — mils for mils and MOA for MOA. If you don’t need all the clutter, don’t get it. Nobody I know of has won an F-Class match with a Horus reticle holding over. It’s a tool, and one that might not be necessary for your type of shooting.
High-quality scopes come in many shapes and packages, which is why recommending a long-distance rifl escope is so challenging. Every shooter has a specific set of needs and preferences.
Our brains like focus — we like a defined aiming point — and the holdover reticles are designed for speed and big targets. Sure, given time and opportunity we can get very precise with them, but they can also block bullet impact, causing us to hesitate so we have to “think” about what just happened. When you expect one outcome, and that doesn’t happen, some people lock up — and the more you can see the better off you’ll be regarding bullet impact. Also, under stress with limited training, I’ve seen people hold the wrong line, repeatedly.
Practice is important. Holdover reticles also add more money to the scope. The Horus reticle adds $400 to the cost — that’s the licensing fee, which is passed on to the end user.
Look at the schematics of the reticles you’re considering, get to know them and understand what they provide you and what they don’t. You have to wear the shoes, not me.
I trained on the Horus, I have taught others on the Horus, and I personally dislike the Horus. That doesn’t mean I can’t use it — I just don’t like it. I opt for less and do very well with less because I can use my P4F or MSR in the same manner as my Horus reticles.
Mils Vs. MOA
If you’re going to shoot F-Class, then use MOA. If you’re going to shoot PRS, use mils. And if you shoot alone it does not matter — just match the turrets to the reticle.
For the author, testing optics is a passion — and it’s a “hobby” he takes very seriously.
For the guys who say, “I think in inches, therefore, I use MOA,” you’re silly. You know 10 pennies equals a dime … and that’s a mil in a nutshell. You cannot hold the difference, and you can get 1/8th-inch clicks in mils, too. The difference between the two is half a bullet width. I promise you that dialing 7.5 MOA is the same as me using 2.2 mils. We’ll both hit center of the same target. Your DOPE is your DOPE.
The mil vs. MOA argument is tired. I personally think MOA scopes should be retired because the industry cannot decide if they want a MOA scope or IPHY (inches per hundred yards). IPHY scopes are an issue: They are the reason your ballistic computer is wrong. In some instances, you think you own a MOA-based scope, and the company rounded it to inches without saying. That mistake at 1,000 yards is at least 17 inches of difference and compounds the farther out you shoot. So, if you decide to shoot MOA, test it and make sure you have a true MOA riflescope.
So … What’s The Best Scope Out There?
Every day, I get this question: “Who makes the best scope?” Well, if there were one scope that solved it all — we’d all be using it! For a scope to be worthy, the internals need to track and repeat correctly. That’s top priority.
Like shoes, reticles are deeply personal. Find one that fits and matches the mission.
I’ve used everything from the Acme brands to Zeiss — and all scopes in between. Each one has its place, and some are more user-friendly than others. The features I like are not the same as the features someone else will like. You have to define your mission to figure out where you sit in that spectrum.
Do your homework, ask smart questions and don’t let others pick your favorite color for you. Spend your money wisely, observing the features you need against what other people are selling you. Look at the context of your shooting when making this decision. And remember, buying a scope “a level up” can be a very smart move to future-proofing your purchase.
First impressions matter because you have to live with it.
Editor’s Note: This article originally appeared in the August 2018 issue of Gun Digest the Magazine.
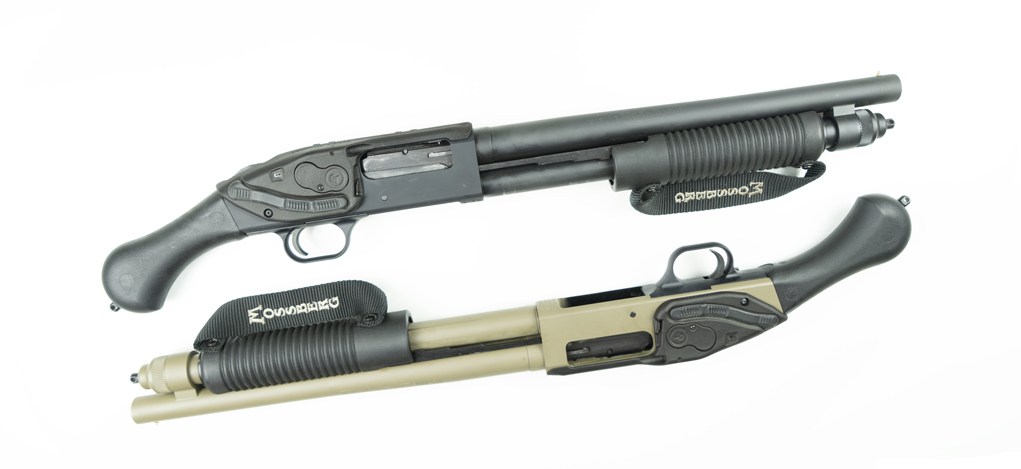
Inconspicuous and intuitive, the Lasersaddle gets Mossberg’s scatter on target quick.
Lasersaddle LS-250 & LS-250G Specs
Material: Polymer
Color: Black
Master On/Off Switch: Yes
Free Batteries For Life: Yes
Installation: User Installed
Laser Battery Life: Over Four Hours
Activation Mode: Pressure Activated
Sighting: Factory Sighted at 50′
User Adjustable: Windage and Elevation
Warranty: Three Year Full Warranty
Dot Size: Approx. 0.50″ at 50′
Thinking caps on, Crimson Trace has been churning through some intriguing additions to its catalog late this year. Breaking into red-dot sights and riflescopes qualify as a pretty big deal for a company that’s earned its tucker at a decidedly different end of the aiming solutions market. That said, the company isn’t jettisoning the niche it helped define any time soon, and has a few fascinating new laser sights it’s pulling out of its sleeve. The Lasersaddle for the Mossberg shotguns definitely qualifies as one.
Wait, what? A laser sight for a shotgun? Isn’t that akin to a laser sight for a sledgehammer? Certainly, precision isn’t exactly either blunt instrument’s forte — close range or otherwise. Yet, Crimson Trace has method well designed into its shotgun laser madness. Particularly pertaining to low light situations, the LS-250 and LS-250G could prove an indispensable asset for fast target acquisition. Especially considering the firearm it’s specifically designed for — the Mossberg’s pistol-grip, smoothbore Shockwave. An effective tool, but not one exactly know for facilitating dead-nuts holds — until Crimson Trace got ahold of it.
The Lasersaddle is compatible with most other 500 and 590s, so it’s not strictly a Shockwave affair. In any case, there’s plenty to like about the design, especially if you’re a minimalist. Installing over the receiver, the sight doesn’t junk up a gun and has three distinct activation points for convenience. Those who’ve struggled to find an unobtrusive and intuitive flashlight or laser rig for their pump-action understand the advantages Crimson Trace has engineered into the Lasersaddle sheerly off where it’s positioned.
Crimson Trace find a winner? Tell us in the comments below.
From Crimson Trace:
(Wilsonville, OR) — Crimson Trace®, recognized as America’s Top Brand of laser sights and tactical lights in a shooting sports industry survey, announces the release of the innovative Lasersaddle™ LS-250 red laser sight (and LS-250G green laser sight) for the Mossberg® Shockwave™ firearm. The simple-to-install Lasersaddle LS-250/G laser sight secures onto the firearm’s receiver side and upper area and operates with three distinct activation points, including one that can be accessed by left-handed users. The batteries for operation can also be easily changed with a rapid-change battery cap on the sight’s exterior and without the laser sight being removed from the firearm.
The Lasersaddle LS-250/G laser sight is also designed to permit installation of an accessory rail on top of the firearm after the laser sight is installed, has a master on-off switch, and incorporates integrated battery management technology for enhanced battery life protection. The Crimson Trace Lasersaddle LS-250 (red) and LS-250G (green) laser sights will also fit onto most 12-gauge Mossberg 590 and 500 shotguns. The LS-250 laser sight is covered under Crimson Trace’s Free Batteries for Life program and the company’s 3-year limited warranty. This laser sight is available nationwide and is packaged in the new distinctive CT packaging. The Manufacturer Suggested Retail Price is $169 for the red Lasersaddle LS-250 and $219 for the green Lasersaddle LS-250G laser sight.
Crimson Trace continues to expand the laser sight options for America’s firearms owners. The company offers many laser sights for use on numerous long guns, including the Rail Master® Pro™ laser sight and lights, LiNQ® wireless laser sight and light, and the workhorse MVF-515™ laser sight and light. These many innovations are all easy to install and operate and can provide up to 900 lumens of white light output.
Crimson Trace strives to make laser sights standard equipment on concealed-carry and personal-defense firearms. The Oregon-based company equips America’s firearms owners, law enforcement officers, and military units around the globe with the largest selection of award-winning laser sights, tactical lights and electro optics products along with riflescopes. Full details are at www.crimsontrace.com or are available by calling 800-442-2406.
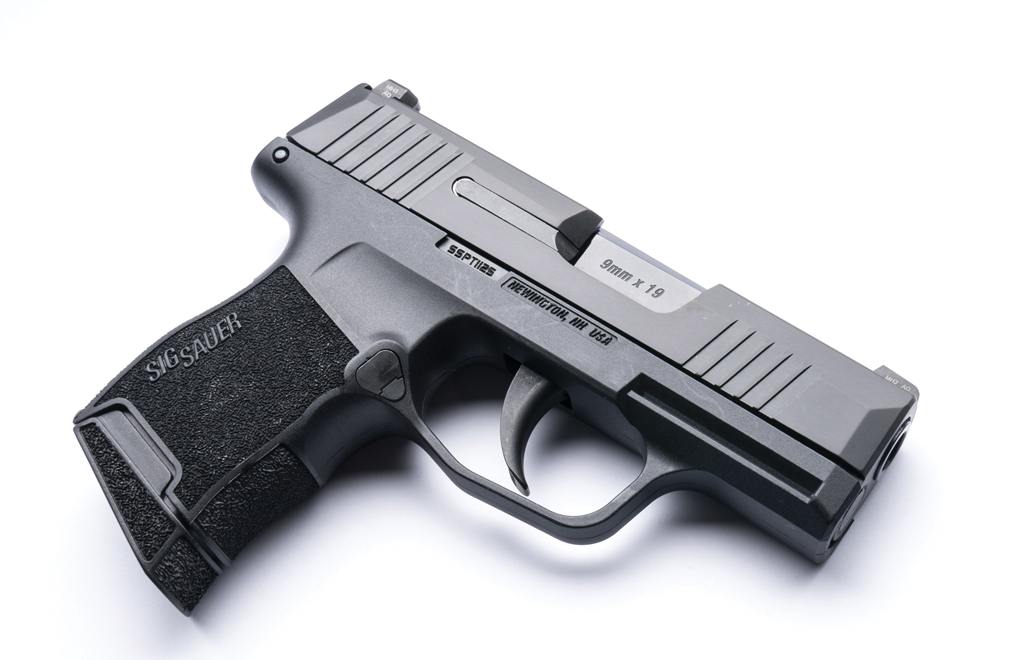
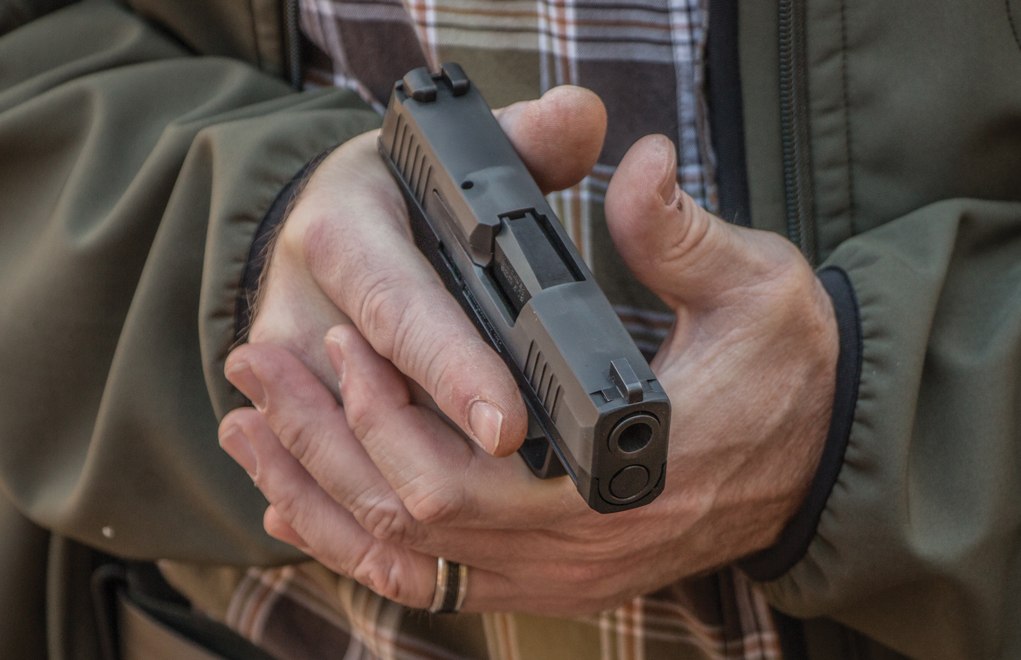
Small in stature, big on firepower, SIG hits the right notes with the P365.
The simple rule about concealed carry, you’ve got to carry. It might sound intuitive, but there are more than a few armed citizens who don’t always abide by this simple dictate. That’s playing bad odds in a game that could cash in your chips for good.
There are more than a few reasons why carry consistency is difficult to achieve. Holster comes to mind as a primary candidate, given finding the right one right away is akin to walking in a field and just picking a four-leaf clover. The other big issue is the right gun; not everyone’s lifestyle is conducive to carrying a full-sized 1911 or a traditional double-stack. At the same tick, everyone wants what those tried-and-true defensive options offer.
In recent years, the marketplace has attempted to answer these seemingly contrary desires with a new generation sub-compact pistols, particularly the micro 9 variety. Of these, SIG Sauer’s P365 has gained a healthy amount of attention as of late, given it ticks off a slew of boxes shooters have for an everyday carry option. In particular, concealability, potency and capacity.
Certainly, the striker-fired pistol catches eyes (perhaps better, avoids them) due to its extremely small size. Palm-sized and 1-inch wide, the P365 practically fits into anyone carry regime, even those dominated by shorts and T-shirts. However ample capacity – that is a full 10+1 round capacity (12+1 with the extended magazine) – is what has put the pistol on many armed citizens’ radar. Even if you’ll need that many rounds, it’s reassuring they’re there if your life is on the line.
Is the SIG Sauer’s P365 the perfect choice for every person aiming to go armed? Most likely not. But given unobtrusiveness, concealability and ample firepower, it should hit a lot the right note for a lot of armed citizens. Especially those whose aim is always to be armed.
P365 Specs Caliber: 9mm Luger Action: Semi-Auto Frame Size: Micro-Compact Grip Type: Polymer Frame Finish: Nitron Frame Material: Stainless Steel Slide Finish: Nitron Slide Material: Stainless Steel Accessory Rail: SIG Rail Trigger: Striker Trigger Type: Standard Barrel Length: 3.1 in Overall Length: 5.8 in Overall Width: 1.0 in Height: 4.3 in Weight: 17.8 oz
For more information on the P365, please visit: www.sigsauer.com.
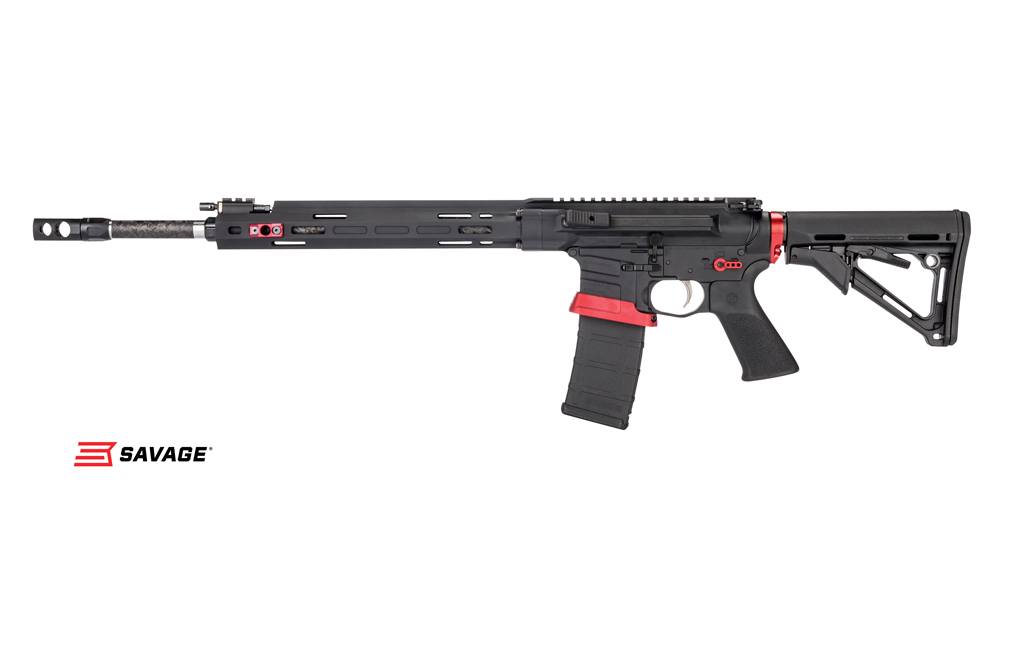
Occupying the place where accuracy meets economy, Savage Arms is renowned for being the workingman’s tack driver. Those days are far from over, but the company in recent years has turned an eye to more ritzy, purpose-built options that definitely veer from its bargain roots. The new MSR 15 Competition certainly falls into this category.
Teaming up with Proof Research, Savage’s carbon-fiber wrapped barrel hot rod is meant to stay neck in neck with top-of-the-line race guns. Of course, light, agile and strong come at a premium and the MSR 15 is among the most expensive guns the company presently offers. A whopping $2,875 MSRP, the AR isn’t going for chicken scratch. In the realm of carbon-fiber wrapped barrels, this is about par for the course. There are few examples of complete factory-build guns with the feature dipping below the $2,000 mark, including the bolt-action variety. Though, to set your mind (and wallet) at ease, when it comes to carbon-wrapped barrels it doesn’t get much better than Proof.
More from Savage:
WESTFIELD, Massachusetts – October 11, 2018 – Savage built the speed, accuracy and customization competitive shooters need to win into every aspect of its new MSR 15 Competition. Shipments of these firearms have been delivered to dealers.
The MSR 15 Competition is fitted with an advanced, 18-inch carbon fiber wrapped stainless barrel built specifically for the rifle in a collaborative effort between Savage and PROOF Research. Its unique ported muzzle brake allows the shooter to tune recoil impulse to stabilize the muzzle for faster, more accurate follow-up shots.
The custom-length gas block can be adjusted for optimal cycling of the full range of bullet weights, as well as for use with a suppressor. The gas block has also been upgraded with an integral Picatinny rail and a custom handguard.
Features & Benefits:
Savage by PROOF Research 18-inch carbon fiber wrapped stainless barrel
Nickel-boron bolt carrier
Custom-forged upper and lower receivers
Non-reciprocating side charging handle
Savage tunable muzzle brake
Magpul CTR buttstock
Two-stage trigger
Custom-length adjustable gas system
Rigid free-float handguard with M-LOK, anti-flare grooves and red QD sling mount
Red ambidextrous selector, receiver end plate with QD mount, and removable custom mag well flare
Ambidextrous magazine release
Hogue pistol grip
For more information on the MSR 15 Competition, please visit: www.savagearms.com.
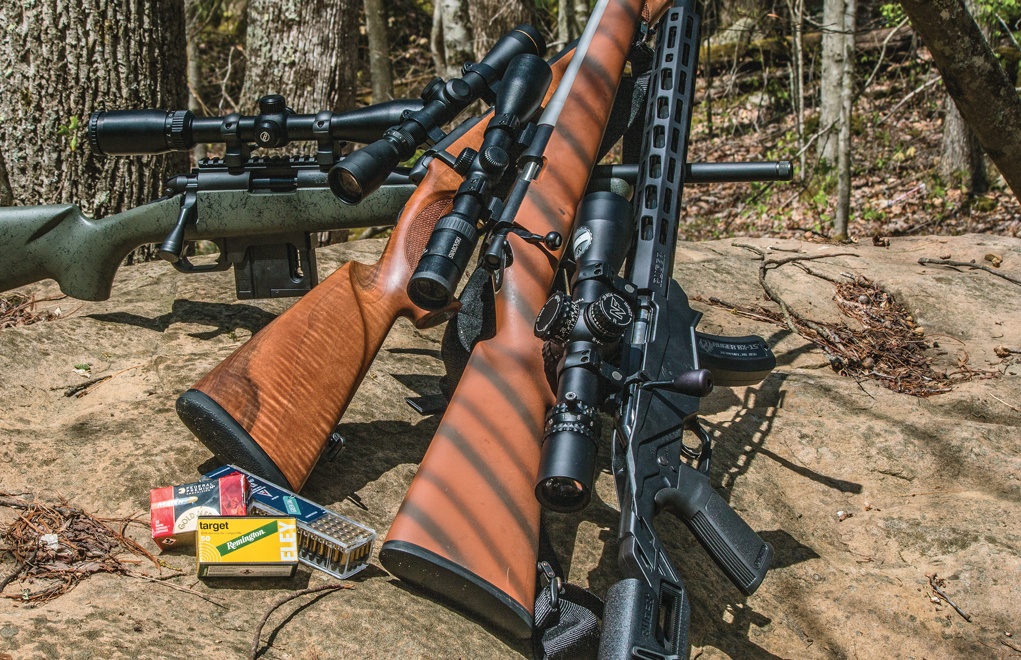
Shooters tend to overlook rimfire rifles. They don’t fit the tactical mantra and they’re not suited for worldwide big game hunting. But, they are the most fun and most affordable firearms to shoot: You don’t need a fancy range or high-tech targets — a backyard and everything from pop cans to Skittles will do.
Modern rimfire rifles can be astoundingly accurate. I tested four, priced from $500 to $2500. They varied just as much in style and substance. Depending on whether you want to consistently hit a golf ball, M&M or an Aspirin at 50 yards, you’ll need a different level of precision. I fired a bunch of ammo through each of these rifles to get a feel for them, and to see which ones were Aspirin capable.
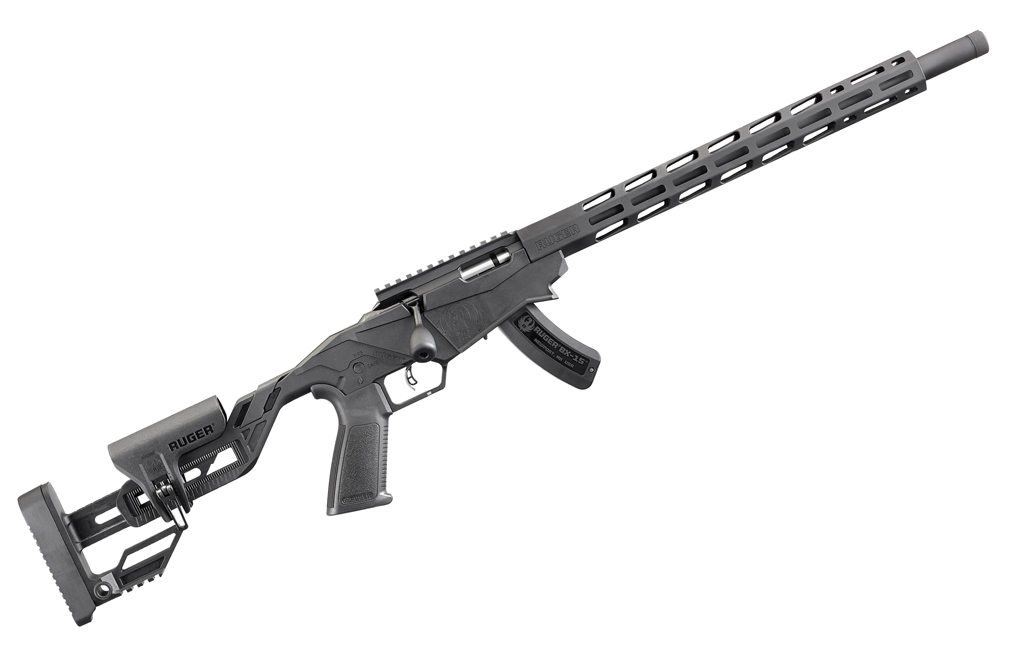
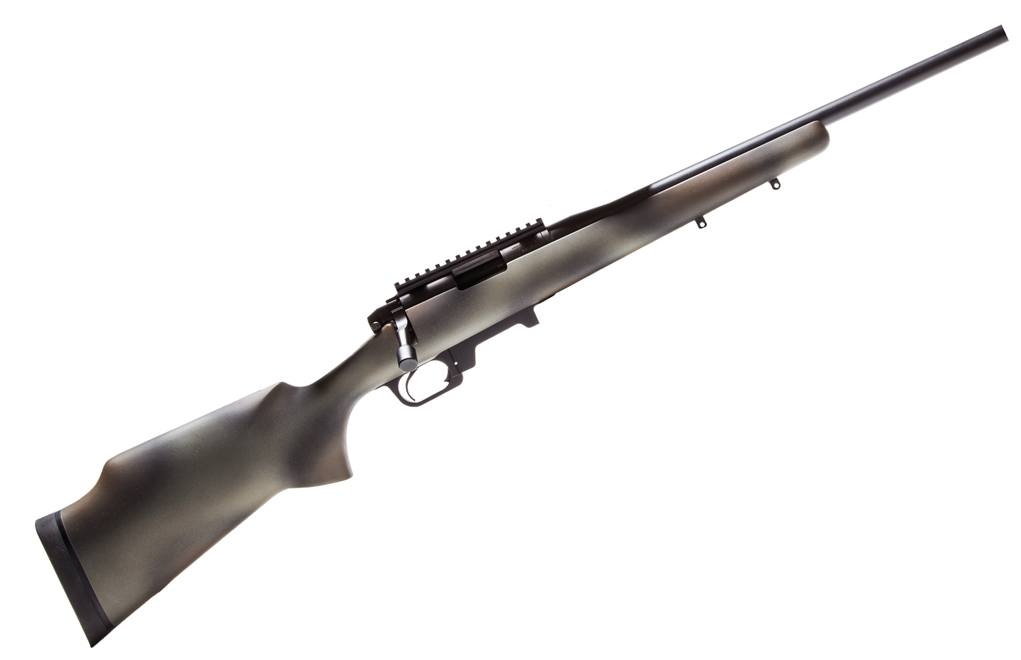
Ruger’s Precision Rimfire Rifle
Ruger Precision Rimfire Rifle: $529
Introduced in late 2017, the Ruger Precision Rimfire Rifle is really a sub-caliber rendition of a centerfire bolt-action rifle, housed in a highly adjustable chassis stock. In fact, centerfire rifles of this type have become one of the hottest selling firearms in America. Right now, precision long range shooting is as hot as Britney Spears in a string bikini.
The Ruger Precision Rimfire has a molded, one-piece chassis, with a buttstock that’s fully adjustable. It allows optimum tuning for shooter interface; you can adjust the length of pull and comb to perfectly suit you. The handguard is aluminum with a black anodized finish and it features Magpul M-Lok slots on four sides. It surrounds an 18-inch, cold-hammer-forged barrel, made from 1137 alloy steel.
Precision Rimfire Results
LOAD
VEL
SD
MD
Best
Worst
AVG
Remington ELEY Target
1,029
20.4
50
0.556
1.114
0.934
CCI Green Tag
1,052
16.4
59
0.705
0.834
0.778
Federal Gold Medal Match
977
20.9
75
0.716
1.418
1.053
AVERAGE:
0.921
Prime (Bolt)
1,004
27.2
104
0.611
1.872
1.188
Aguila Match
1,051
10.3
33
0.587
1.362
1.052
Aguila Super Extra
1,155
13.2
44
0.564
1.218
0.835
Winchester Power Point
1,366
37.8
121
0.987
1.767
1.369
OVERALL AVERAGE:
1.030
Ruger also fitted their AR-pattern pistol grip, 45-degree safety selector, threaded muzzle, oversized bolt knob, 12-slot Picatinny/30 MOA rail that’s integral to the receiver, and a Ruger Marksman Adjustable trigger with a pull weight range of 2.25 to 5 pounds. It will also accept all 10/22 magazines, giving you a wide choice in capacity. Out of the box, without the magazine or a riflescope in place, it weighs 7 pounds.
Forget the Ruger’s futuristic looks: This rifle is just as adapt for small game hunting in the timber as it is for shooting prairie rats off a portable shooting bench in the wide-open spaces. At about half the price of the next most expansive rifle tested, the Ruger Precision Rimfire Rifle has a lot going for it, and its modular-like platform makes it the most versatile of the bunch. It also delivered the least precise performance on target, at just under two MOA — an inch at 50 yards. This is, of course still, squirrel-head accuracy.
After seeing how well the other three rifles shot, I gave the Ruger a chance for redemption by testing four additional loads. There wasn’t much difference with the exception of the Aguila Super Extra load, which the rifle seemed to really like. Aside from a feeding hiccup here and there, the rifle performed well, especially given its price point.
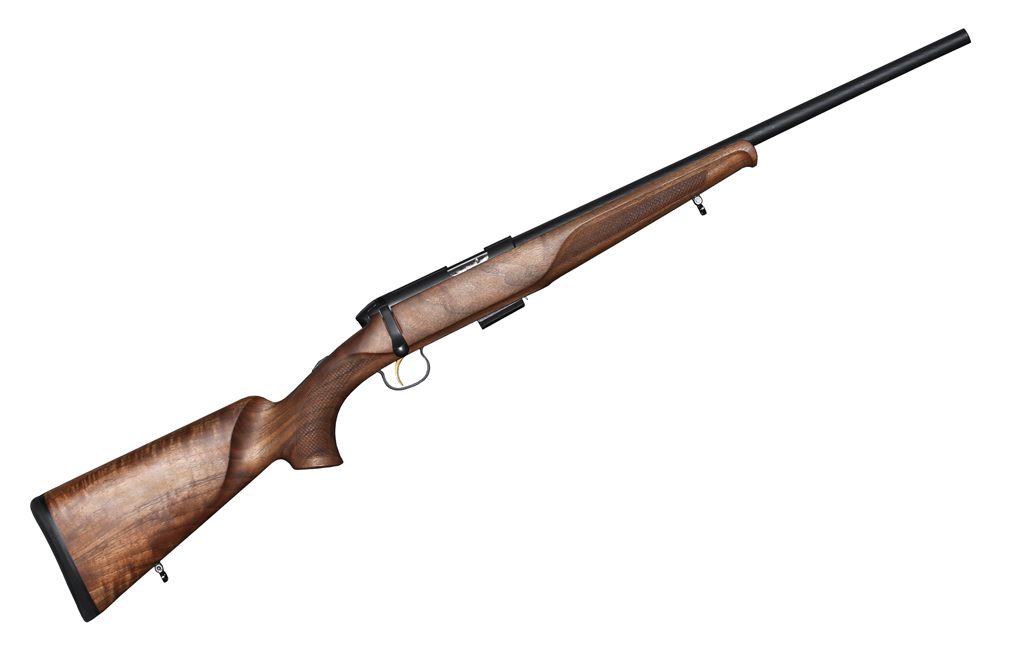
When I was a boy, my life revolved around a rimfire rifle. It was my ticket to every imaginary world I went to. My rimfires were hillbilly-basic and affordable, and I dreamed of a rimfire made for a man. Admittedly, there’s no way I could have afforded a rifle like that, but that didn’t stop me from dreaming.
For 2018 Steyr Arms introduced the Zephyr II. This is a full-size rimfire, with an overall length of almost 40 inches and a 14.5-inch length of pull. As full size as this rifle is, it’s not heavy; without the scope and rings it weighs only 5 pounds, 15 ounces. The elegant European walnut stock is configured to fit a grown man, and its elegant lines, Schnabel forend, slight palm swell, Bavarian cheekpiece, fish-scale checkering and integral sling swivel mounts all add to its majesty and appeal.
Zepher II Results
LOAD
VEL
SD
MD
Best
Worst
AVG
Remington ELEY Target
1,04
23
69
0.343
0.965
0.652
CCI Green Tag
1,068
15
51
0.249
0.696
0.464
Federal Gold Medal Match
1,011
15.5
55
0.269
0.599
0.424
OVERALL AVERAGE:
0.513
If that was not enough, the Zephyr II has the old-style, traditional butter knife, Steyr Mannlicher bolt handle, spiraled texture of the cold-hammer-forged barrel, scope mounts that are integral to the receiver, and a two-position tang safety. Though Steyr lists the trigger as being single stage, it has a good bit of near-effortless take-up, allowing you to stage the brake, which comes with only 2 pounds of pressure.
This is a fabulous rifle. It shot incredibly well from the bench and just as wonderful off-hand. The bolt requires a bit of effort to close and the rifle does not come with scope rings. (I’d suggest you get a set of Talley steel rings — they’re the best money can buy and are fitting for a rifle this fine.) I’ll be buying this rifle … it’ll not go back to Steyr. In fact, it has inspired me. I can’t wait for a cool morning after a fall rain, to sneak into a hickory patch and use it to wreak havoc on the fox squirrels.
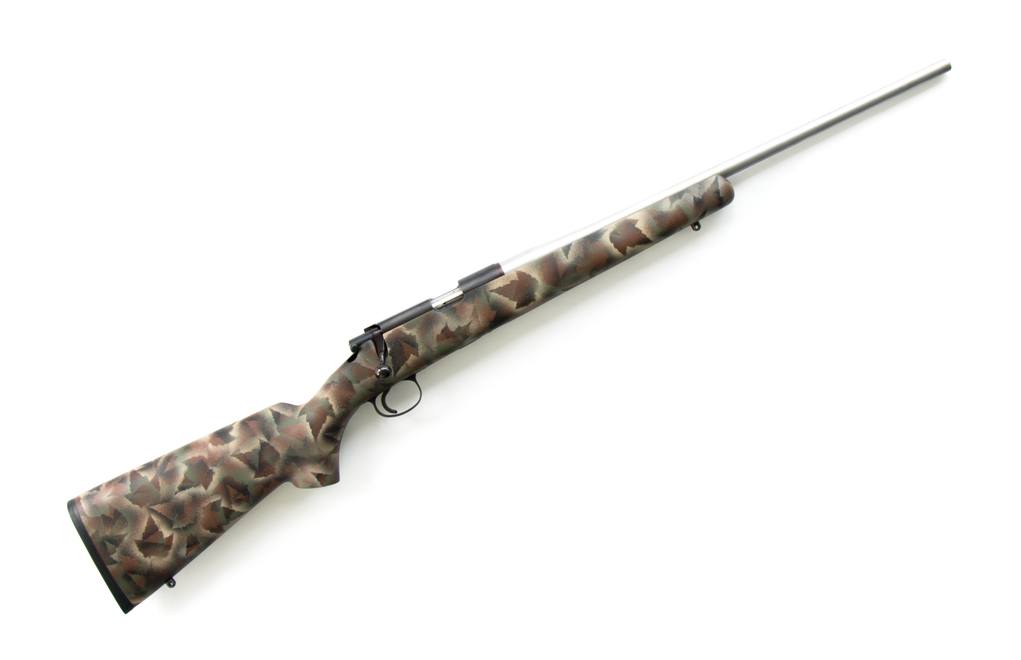
The Melvin Forbes rifles of New Ultra Light Arms have long been regarded as the finest bolt-action hunting rifles on the planet. They earned their reputation partly because of their proprietary, stiffer than steel, carbon-fiber and Kevlar stock, and partly because Melvin Forbes may know how to assemble a rifle better than anyone else. Forbes did not intend to build rimfire rifles, but he finally gave in to the pleading of his customers.
Built with the same type stock as his centerfire bolt-action rifles, when it comes out of the mold it nearly floats because it only weighs 8 ounces. Forbes then beds these stocks to the action, from the tang to the tip of the forend. Though this may seem to go against everything you know about rifle accuracy, the rifle stock is so rigid it makes the barrel think it’s much stiffer than it really is.
Model 20 RF Results
LOAD
VEL
SD
MD
Best
Worst
AVG
Remington ELEY Target
1,076
11.0
37
0.224
0.540
0.411
CCI Green Tag
1,087
14.8
41
0.309
0.983
0.559
Federal Gold Medal Match
1,065
8.4
29
0.125
0.583
0.442
OVERALL AVERAGE:
0.470
New Ultra Light Arms offers two rimfire rifles: one is a single-shot, the other a repeater. Both come standard with an excellent Timney trigger and Douglas barrel. Since this is a full custom rifle, you can specify any legal barrel length you like. (For what it’s worth, with the 22 Long Rifle, barrels longer than 16 inches generally reduce velocity.) You can also specify whatever color scheme you’d like on the stock, and there are two stock options. If you prefer one configured in more of a bench rest pattern, it’ll cost you an additional $58. The magazine fed option is an additional $50.
Short of the near $2,000 price tag, it’s hard to say anything bad about this rifle. The one evaluated is mine. It weighs only 5.68 pounds with the Talley lightweight rings attached. (The Talley rings come with the rifle.) This rifle is more than 10 years old, has been shot thousands of times, and has very likely killed 20 times its weight in squirrels and other small game.
Model 20 RF Specs Chambering: 22 LR Length: 40 inches Weight: 5.68 pounds (With scope rings) Barrel: 22 inches, Douglas Stock: Kevlar/carbon fi ber Trigger: Timney Capacity: Single shot (tested); repeater with detachable magazine is an option MSRP: $1,800
Vudoo Gun Works Raven
Vudoo Gun Works Raven MSRP: $2,395
Vudoo Gun Works out of Saint George, Utah, offers six rifle variants, all built on their V-22 action. At $2,395, the Raven is their least expensive. (The Crow — which is essentially a Raven — retails for the same price, but it’s sized for smaller shooters.) Any way you look at it, that’s a lot of money to spend on a rimfire rifle. Or is it? I know shooters who spend twice that much on centerfire rifles they’ll never shoot near as much as a 22. Thing is, if we’re talking Aspirin accuracy at 50 yards, you’re either going to have to pay for it — or pray for it.
The V-22 action used by Vudoo Gun works is proprietary but it has a Remington 700 footprint, meaning it can be fitted to rifle stocks cut for the Remington 700. The V-22 action also works with the Vudoo V-2210 magazine, a magazine that’s patterned in the AICS form, so it will slip right in to any chassis or detachable box magazine housing AICS magazines work in. The action is an engineering masterpiece, and it’s fitted with a precision manufactured, hand-lapped, single-point-cut rifle barrel. It’s also available in left- and right-hand variations.
Raven Results
LOAD
VEL
SD
MD
Best
Worst
AVG
Remington ELEY Target
1,071
15.1
40
0.143
0.644
0.387
CCI Green Tag
1,088
14.9
40
0.087
0.899
0.497
Federal Gold Medal Match
1,058
16.2
63
0.205
0.417
0.292
OVERALL AVERAGE:
0.392
The Raven’s stock is manufactured by Grayboe. It’s called the Outlander and it was custom designed for Vudoo — just for the Raven. It comes standard with a soft, 1-inch, Decelerator butt pad. Why? I don’t know; there’s no recoil with a 22 LR. The Raven is not what I’d call a light rifle; without a riflescope or rings — but with the 10-shot magazine in place — it weighs 7 pounds, 13 ounces.
The Vudoo Raven is undoubtedly the most precise shooting rimfire rifle I’ve ever fired, and it delivered the smallest group out of the 80 groups fired from all four rifles. That group measured 0.087 inch! With precision like that, the Raven is begging to go to the woods or field, for tree or ground squirrels. But, it might be more fun to use the Raven to win cash from your friends; I doubt they’ll have anything that’ll shoot like a Raven. And, you can use the money to pay off your credit card.
Obviously, money buys precision. The more money you spend, the better shooting rifle you’ll end up with. Of course, when we’re talking rifles that shoot this well, there are other things to consider. What you intend to do with the rifle might matter more than the advantage 1/10th-inch or so in accuracy offers.
If I wanted a cool-looking, egg-accurate rifle — and my wallet was thin — the Ruger Precision Rimfire would be the obvious choice. If a traditional hunting rifle was where my dreams took me, I know of nothing better than the Steyr Zephyr II. If your weakness is M&M accuracy and unmatched ruggedness, there’s the Model 20 RF from New Ultra Light Arms. And finally, if you just want the best shooting rimfire rifle money can buy, the Vudoo Raven is probably the one. You can use it to shoot the left over Aspirins, when your head recovers from sticker shock.
If I could only have one of these rifles, it would be the Steyr Zephyr II. It shoots better than I can, and with the $1,000 I saved, I could buy a lot of 22 LR ammo. In fact, $1,000 will buy more than 10,000 rounds of the good stuff. Fortunately, here in America, we can have as many rimfire rifles as we want, so why not get more than one?
NOTES: The average muzzle velocity (VEL) standard velocity deviation (SD) and maximum velocity deviation were established by firing 10 shots with each load over a Caldwell G2 chronograph, with the screens positioned 10-feet in front of the muzzle. Note: Average accuracy/precision was established by firing of five, five-shot groups, from a sandbag rest, at a distance of 50 yards. Temperature: 66-74° / Humidity: 42-69% / Pressure: 30.00-30.20 / Elevation: 2,200 feet.
More Rimfire Information
10 Great New .22 Rimfire Guns To Satisfy Any Shooter
7 Great Rimfire Handguns For Pure Plinking Pleasure
Check Out these top AR-15 optics, certain to get you on target no matter your range or application.
An AR-15 on its own, pretty dang good. With the right optic, incredible.
Thanks to the advances in aiming solutions, there is an option for nearly every conceivable application today. Given its versatility, no single firearm has reaped a greater benefit from these breakthroughs than America’s favorite rifle — the AR-15. Yet, this incredible diversity of optics has put shooters in a switch. More than ever, scopes and red-dot sights are specialized, engineered to excel at a few purposes or single specific one. Yes, yes … all of them are meant to get you on target, but different options shine at different ranges and under different circumstances.
Take the Aimpoint Compc3 red dot, Modern Sportsman’s John Tupy highlights in the video. If you were searching for a fast acquisition optic, ideal for a defensive AR or one used in up-close hunting, say in thick timber, you’d be spot on with this 1x choice. However, if your effective range went out to 100-yard and beyond, then it begins to struggle. It’s not Aim Point fault — they’re as good a name as you can get. Simply, you’re pushing that particular optic past its parameters.
So before going out and spend your hard-earned money on an optic that may or may not suit your needs, consider:
Range: How far you’ll shoot a majority of the time dictates the magnification you’ll need.
Application: How you plan to use your firearm – hunting, competition, defense – gives you a solid clue on the best type.
Compatibility: How well it fits into your overall system gives you an idea of the size and weight of the optic that might best suit your gun.
Cost: Self-explanatory, but make sure you can afford the dang thing.
Like everything in firearms, forethought goes a long way in making the proper choice and getting the most out of your gun. If you know what you’re setting your sights on, you’re more likely to hit the mark with a quality optic.
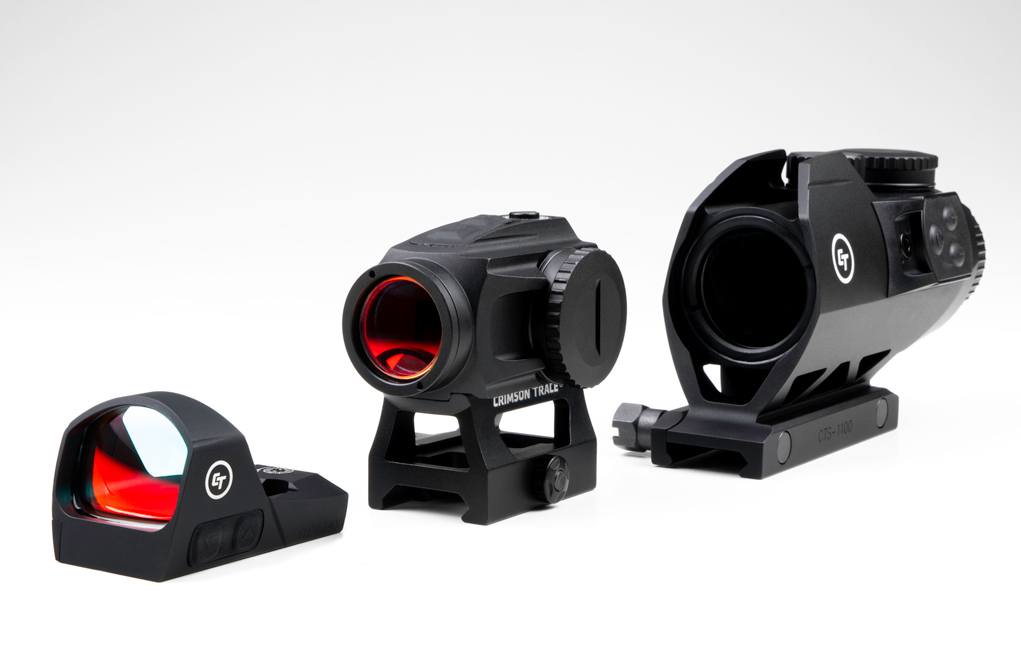
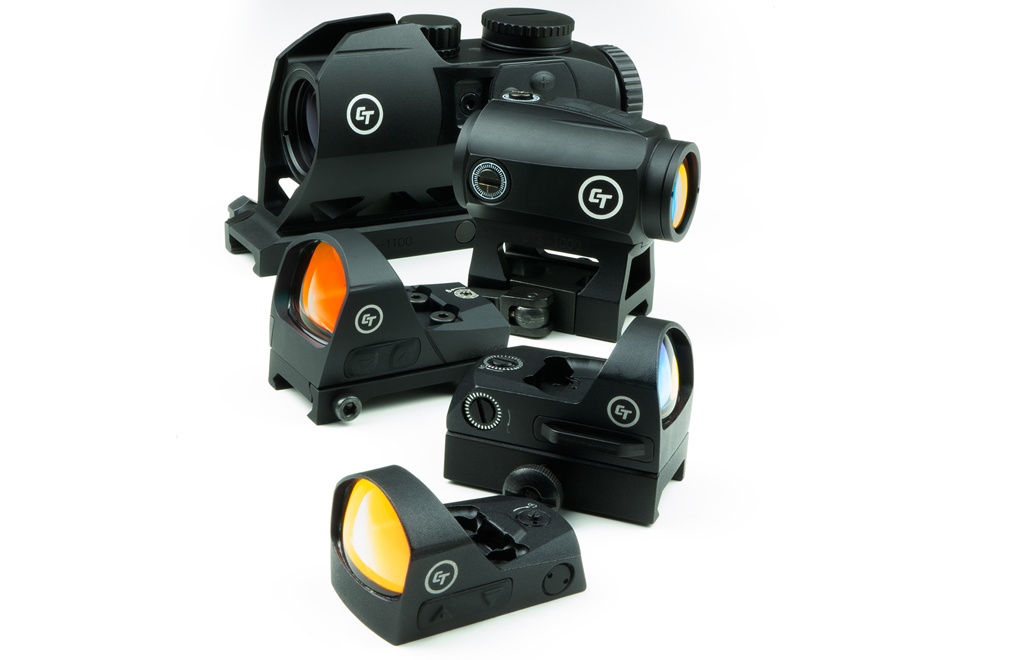
Crimson Trace takes its first foray into optics with five red dot options.
Crimson Trace Red-Dot Optics Options:
CTS-1000 – 1x, 2 MOA reticle
CTS-1100 – 3.5x battlesight
CTS-1200 – 1x reflex, 3.25 MOA reticle
CTS-1300 – 1x reflex, 3.5 MOA reticle
CTS-1400 – 1x reflex, 3.25 MOA reticle
Laser sights, it’s Crimson Trace’s brand. Every color, configuration and application – the company has made a diode to get you on target. Given their track record in the niche, you’d figure they’d be pretty happy with their position lighting up the rails of American handguns and rifles. But apparently, the laser-sight manufacturer got an itch.
The company recently released its first-ever line of red-dot sights, five in all, drastically expanding their focus on getting shooters on target. Not a bad looking lot with plenty of what you’d expect from reflex and red-dot systems.
While a break from tradition, the move to optics is a logical one for Crimson Trace. Laser-sights aren’t obsolete by a long shot — not as long as there are low-light situations that demand fast target acquisition. Yet, in recent years, the optics end of the market had caught fire, whether you’re talking hand or long gun. Crimson Trace’s first venture into this area should prove interesting, especially given their optic’s price point, which starts at a $199 MSRP.
From the company:
(Wilsonville, OR) — America’s Top Brand of laser sights, Crimson Trace®, today introduced a new line red dot sights for pistols and long guns. These five new products are designed to meet the needs of 3-gun competitors, home defenders, hunters and recreational firearms enthusiasts. They include several field of view and reticle choices, and they utilize existing industry standards and installation features that ensure after-market compatibility with a vast range of firearms and mounting systems. Availability of all five new red dot sights is slated for November 2018.
“This new line of red dot sights offers consumers high-quality optics products from a name they trust,” said Lane Tobiassen, President of Crimson Trace and American Outdoor Brands Corporation’s Electro-Optics Division. “We are very excited to introduce this new product line which has been carefully engineered and designed to meet the needs of consumers seeking quality and performance.”
The new Crimson Trace red dot sights are:
*CTS-1000—a closed red dot sight with a 2 MOA aiming reticle. This sight is designed for use on a rifle and offers adjustable brightness settings, utilizes fully multi-coated lenses with an advanced notch filter to maximum clarity and it has a sturdy aluminum chassis. This sight is easy to adjust for windage and elevation, can also be adjusted for intensity, has a quick-release mount, is waterproof, and the sight will provide years of uninterrupted service with the provided battery. *CTS-1100—a 3.5X battlesight with a custom and fully-illuminated Crimson Trace advanced hybrid BDC reticle. This sight is designed primarily for use on a long gun and features a wide field of view. The CTS-1100 is easy to install with an M1913 mount, is waterproof, and provides long-term operation on the provided CR2032 battery. *CTS-1200—a red dot reflex sight that is compact, utilizes a 3.25 MOA aiming reticle and is designed for mounting on a pistol. Users can easily change the battery via a unique side-opening access slot without removing the sight from the firearm. Easy-to-reach controls help with adjusting the sight intensity and settings for light conditions and user preferences. *CTS-1300—a compact open red dot sight providing 3.5 MOA aiming reticle. This sight is designed for use on a long gun and delivers a wide field of view, provides easy windage and elevation adjustments and is water resistant. It features fully multi-coated optics and an advanced notch filter to improve clarity. The sight also has a removable Picatinny rail mounting system so it can be adapted to other mounting systems. *CTS-1400—is an open red dot sight with 3.25 MOA aiming reticle and a large field of view. The sight is designed for use on long guns and incorporates an advanced motion detection system to note inactivity resulting in auto-shut-off to save battery life.
These new Crimson Trace red dot sights are night vision compatible, provide excellent light transmission, and are waterproof. MSRPs begin at $199. Users will find the complete sight line offers many advantages, including: helping to rapidly acquire close-range targets when aiming; secured in a machined aluminum housing; utilizes clear-coated optics to provide a vivid edge-to-edge view; are shock-resistant, dust-proof, and fog-proof. All sights permit the user to adjust brightness levels to meet individual preferences and changing light conditions. Each open red dot sight comes equipped with a cover to protect the sight and keep it clean. All of the new innovative red dot sights are packed with features and user-benefits that firearms owners will appreciate, and a high level of quality that fans have come to expect from Crimson Trace. All Crimson Trace red dot sights are covered under the company’s Free Batteries for Life program.
Full details on these new sights, and the 350-plus laser sights the company manufactures, can be reviewed at www.crimsontrace.com. Crimson Trace strives to meet consumer demands for innovative laser sights, lights and optics. The US-based company has equipped America’s gun owners, law enforcement officers, and military units around the globe with the largest selection of award-winning products. Full details are at www.crimsontrace.com or are available by calling 800-442-2406.
For more information on Crimson Trace Optics, please visit: www.crimsontrace.com.
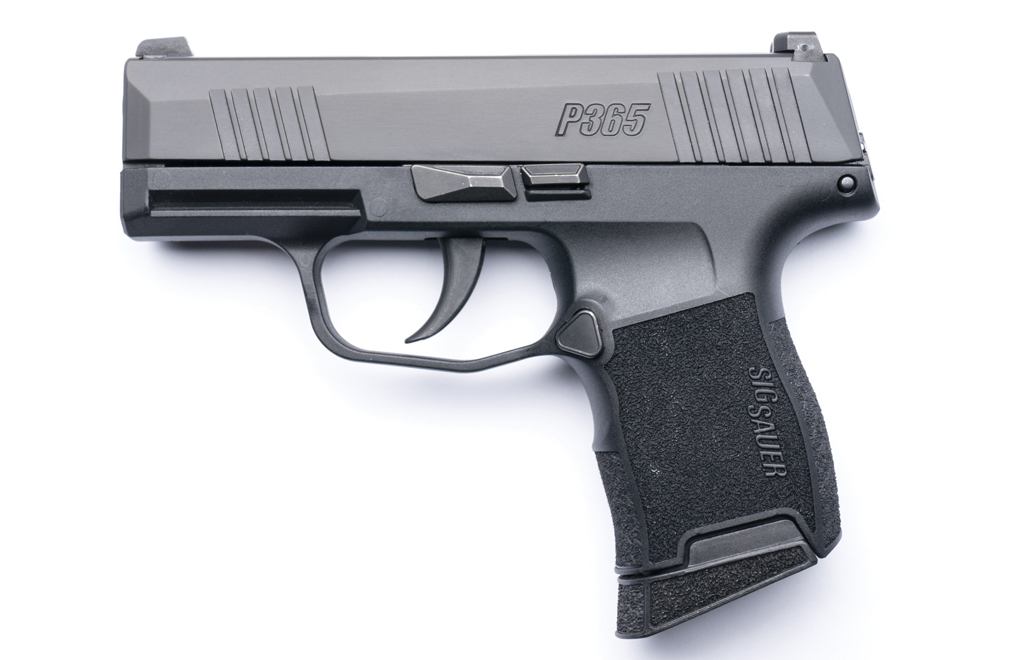
For everyday carry, SIG Sauer’s micro nine P365 is a small miracle.
How compact is the SIG P365:
3.1-inch barrel
5.8-inch length
1-inch width
17.4 ounces
10+1 capacity
Just to be clear, I believe you are responsible for your own safety. I also believe in an individual’s right to own firearms. It’s damn hard to believe in the first, and not the second. As the famous quote goes, “They say God made man, but Sam Colt made them equal.” If you’re going to be equal, you gotta have a gun and you gotta have it with you. Sig Sauer just made the having it with you part easier with their P365.
Though I suggest you carry with religious-like commitment, I’m not a tactard practitioner who subscribes to the carrying of spare ammo, pepper spray, an impact weapon, a switchblade, and the wearing of body armor every were you go. There’s no denying those things can make you safer, there’s also no denying that if you carry all those things, all the time, you’re probably not going to do much going. You don’t have to be a covert operative to live a safe, normal life.
I consider a defensive firearm a tool you should always have with you, but I also recognize the real-world reality of carrying that tool. It’s an exercise in finding a comfortable balance between size, capacity and power. As an analogy, you carry a lug wrench and compact jack in your car. You don’t carry an air-driven impact wrench and a hydraulic floor jack.
If you’re going to use a gun to save your life, the first rule is simple: have it with you. The second rule is it must work — every time — all the time. The third rule dictates you must be able to run it proficiently. Spare ammunition, speed reloads, the lethality of your ammunition, ancillary weapons and tactics are way down the list of what matters. Ease of carry, reliability and proficiency are the primary considerations.
Redrawing The Lines
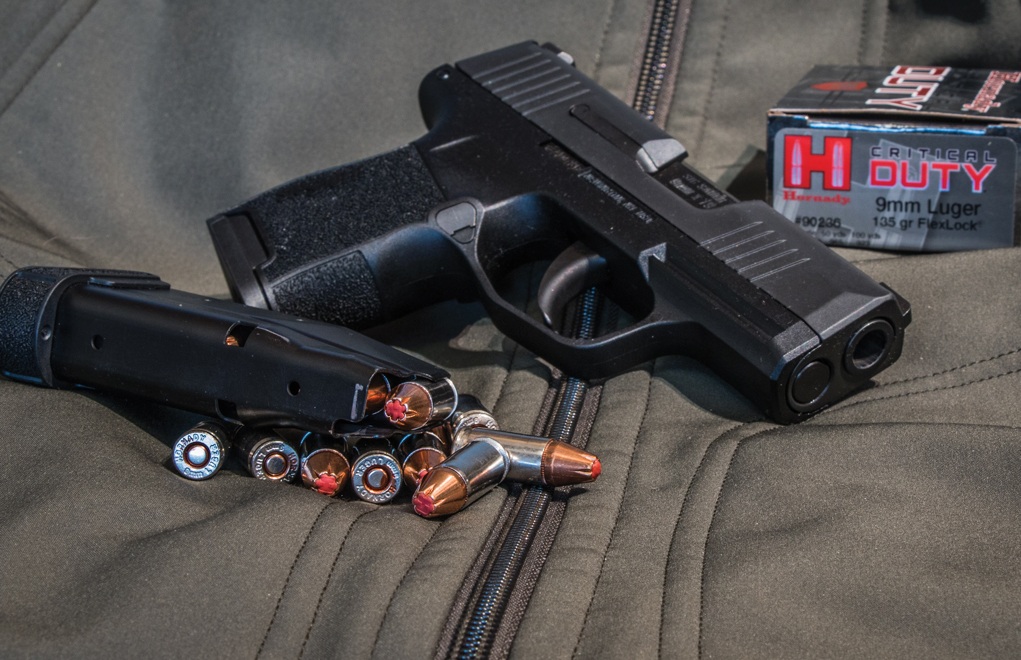
This new P365, ultra-compact, polymer-framed, striker-fired, semi-automatic pistol from Sig Sauer is intended to be a handgun you carry every day, trust all the time and run with ease. The pistol is devoid of complication — it has four controls: trigger, magazine release, slide-lock and takedown lever. It’s only an inch wide, 5.8 inches long and, unloaded, it weighs 17.4 ounces. Add a full 10-round magazine and its ready to go to town at 23.9 ounces.
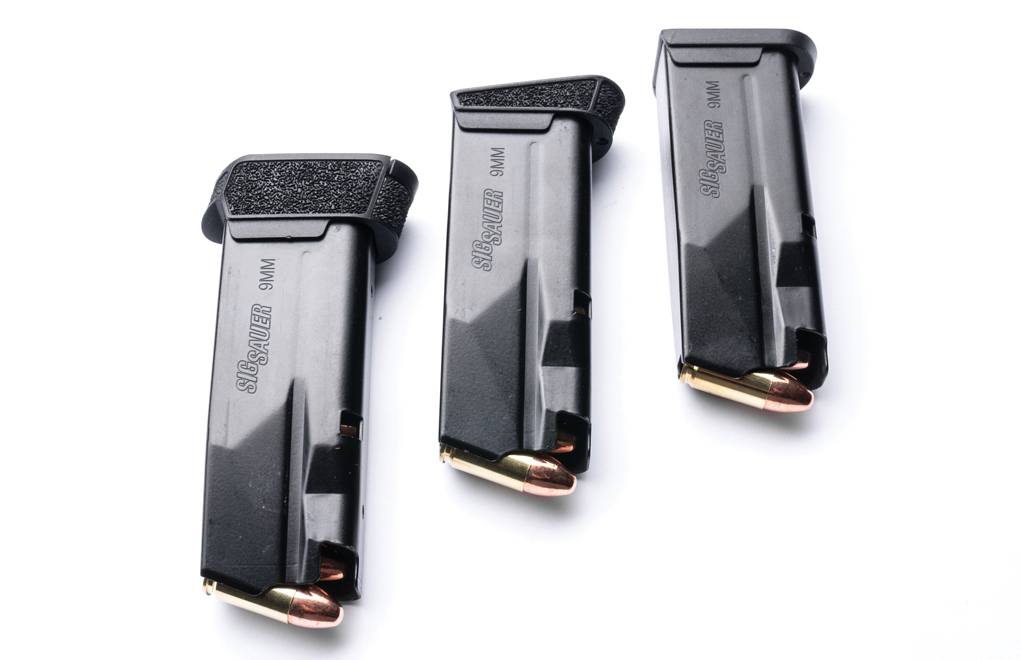
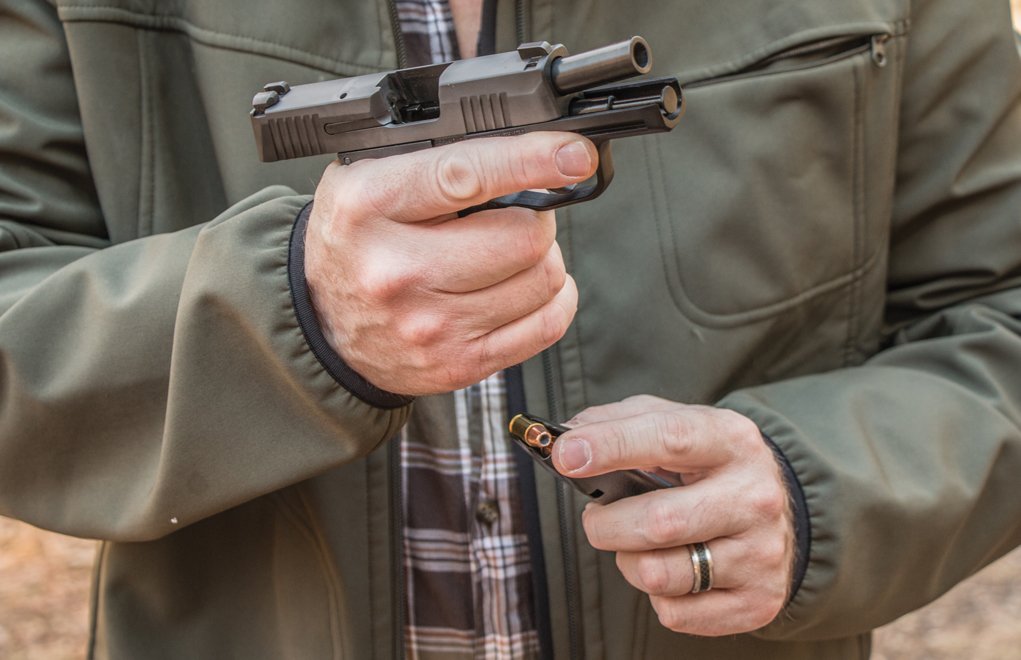
The P365 comes standard with Sig XRAY3 day/night sights and an under-barrel accessory rail. It’s shipped with two 10-round magazines; one has a flat baseplate and the other is fitted with a slight extension to increase grip size. An optional 12-round extended magazine brings the payload to 13. With front and rear serrations on the slide, it’s easy to grasp for manipulation, and the gun was surprisingly easy to cycle — my 10-year old daughter could do it. Don’t overlook the importance of manipulation ease: Many shooters don’t have the hand strength to rack the slides on a lot of micro 9mm pistols.
What I’d call semi-aggressive stippling on the sides, front and rear of the grip help keep the little gun in hand. You should have no trouble maintaining a purchase during athletic activity or while dumping a full magazine in a hurry. Additionally, the magazine release — which can be switched from side to side — can be depressed without altering the grip, and the magazines are drop-free. For those who like to use a slide lock as a slide release, I could easily reach and depress it with the thumb of my shooting hand.
Finally, the P365 has a Nitron finish on the slide to help fight corrosion, and a 3.1-inch barrel to help deliver all the velocity possible from a micro-pistol. The P365 is also rated for +P ammunition. I found the trigger to be very impressive. Its surface is smooth, has a positive tactile and audible reset and it broke slickly at about 5 pounds. Of course the best way to evaluate a handgun designed for constant carry is to look at it from the standpoint of what matters, and that’s carry comfort, reliability and the proficiency with which it can be operated.
Concealability To get an idea of how compatible the P365 was with everyday carry, I carried it every day for 30 days. I carried it in a Galco Stow-N-Go IWB holster, a Versacarry IWB holster, tucked in my back pocket, crammed in a coat pocket and Mexican style — shoved in my waistband. I’ll not say it’s the easiest to carry handgun I’ve ever handled, but I will say it is the easiest to carry 10-shot 9mm I’ve yet to come across.
Reliability I ran 100 rounds each, of the five chronographed loads, along with some other assorted munitions, through the P365. There was one stoppage during the more than 600 rounds fired. While chronographing the Wilson Combat 147-grain Subsonic load, the last round stove-piped. For what it’s worth, when I chronograph ammo I shoot from a bench and have a sometimes tendency to relax my wrist. I suspect this was the culprit, but I still fired an additional 25 rounds and could not duplicate the problem.
Sig Sauer P365 Velocity Tests
LOAD
MV (fps)
ENG (fpe)
SD
Federal Syntech 115-grain TSJ
971
241
17
Wilson Combat 124-grain XTP HP+P
1056
307
9
Browning BPT 147-grain FMJ
925
279
8
Winchester Defend 147-grain HP
893
260
16
Wilson Combat 147-grain XTP HP Sub-Sonic
971
308
17
Proficiency My standard defensive handgun proficiency test is the Forty Five Drill. Fired from concealment, the goal is to deliver five shots, inside a 5-inch circle, at 5 yards, in less than 5 seconds. With my Wilson Combat EDC X9 and custom Robar Browning HiPower, I can comfortably run this drill — miss free — in less than 3.5 seconds. With the P365 I had to concentrate a bit more, but I still managed an average of 3.86 seconds. The only shot missed was the very first, of the very first run.
Glock Killer? All polymer-framed handguns are compared to the Glock. With regard to the P365, the question is: Which Glock should we compare it to? If we go by weight, the obvious choice is the G43; it weighs 17.95 ounces unloaded. That’s 0.15-ounce more than the P365. The G43 is also about a half-inch longer. But most importantly, the G43’s capacity is only 6+1. Smaller, the P365 holds 57 percent more ammo.
If we’re going to talk capacity, the G19X holds 17+1. That’s a 63 percent capacity boost over the P365. But, the G19X costs $150 more, and it’s substantially larger. Measured in square inches, a box to fully contain a G19X would be twice as large as one sized to fit a P365. Fully loaded, the Glock 19X weighs almost 33 ounces, as compared to 24.5 for the P365.
The Glock that best compares is the G26. It, too, retails for $150 more, but it has the same capacity as the P365. It’s also 4 ounces heavier, more than a half-inch longer and slightly wider. If you want to maximize your survivability with a micro-sized 9mm, the P365 seems better than anything Glock has to offer. The comparisons are not offered to bash Glocks, hell; I carried G22 and G23 for almost 13 years as a cop — and I trusted them. The comparison is made to demonstrate that when it comes to compact polymer pistols, Glock no longer rules the roost.
To put it bluntly, the P365 changed my life. When weather, clothing and circumstances permit, I’m carrying my Wilson Combat EDC X9 or my custom Browning HiPower. However, just as often — especially with warmer weather coming on — I’m carrying the Sig Sauer P365. The word from Sig is that they’re working on a compact light/laser unit that’ll attach to the P365’s accessory rail. When that happens, it will only make what might already be the best ultra-compact defensive handgun even better.
Want to shoot fast and accurately? Work on your follow through.
As in life, the little things in shooting make a big difference. How you grip the gun, where you focus when aiming and how you follow through to the next shot. That last point, it gets glazed over a lot. But if speed and accuracy with a handgun are your goals, then it may be one of the most important factors.
Bantered about plenty, follow through ends up a vague term for many. Essentially, it’s the final step in a shot, where you maintain fundamental controls — breath, trigger, hold — through breaking the shot. On multiple-shot strings, it also includes resetting the trigger so the next shot is ready to go. It sounds logical enough, yet it’s a devil. Add a cubic centimeter or two of adrenaline to the bloodstream and even the most seasoned shooter can rush and fudge the process.
Patients … steady-nerved, rock-ribbed patients are the key to mastering follow through. That, and of course, means practice. There’s no getting past putting in the work to become a better shooter.
Luckily, follow through is among the easiest skills to practice, given it lends itself to dryfire well. Obviously, live fire is also essential to really hone in, but going ammo free gives you the opportunity to concentrate on executing each stage without the pressure of hitting the target and in the comfort of your own home. That said, a training partner is indispensable in practicing follow through — live or dry. Mistakes are often imperceivable to the person behind the trigger. A fresh set of eyes can catch those minor sticky points and help you correct them.
Adaptable for specific applications, the Revolution 9 is like having multiple suppressors in one package.
Modularity is the hot concept in firearms today. Makes sense, given the ability to jump between calibers and configurations adds desirable flexibility, whether you’re talking about the good old AR-15 or the cutting-edge modular pistols. Honestly, who doesn’t want a gun that does more?
Intriguingly, the idea of a single device that transforms for multiple applications has infected more than just the gun world. Suppressors have also embraced the adaptability of modularity, offering multipurpose noise-reduction options all that operate off one platform. Among these jewels, none shine more brightly than Griffin Armament’s 9mm can.
The company’s Revolution 9 has the mild-mannered appearance of an everyday suppressor, but a few twists here and there proves it handles more than one job with ease. Target practice or plinking for the day, the suppressor’s full-sized eight baffle configuration is the ticket. Need a practical noise-reduction device for home defense, the “K” configuration — three baffles shorter — has you covered.
Designed with ease of use in mind, it only takes minutes to go from one to the other. Griffin pulls off this ingenious feat elegantly, with a removable booster housing, which comes off with the aid of the included armor’s wrench. It goes long or short in a matter of minutes. In either case, it does its job exceptionally, reducing a 9mm’s report a full 34dB when full length and 32dB when in the “K” configuration.
Nowadays, shooters expect more out of their guns. More uses. More calibers. More customization. The same should hold true for firearms accessories. Griffin Armament’s Revolution 9 makes it a reality, at least where it concerns suppression.
Tips and tricks for using and adjusting open sights.
What are the advantages of open sights:
Precise in medium to close range.
Fast target acquisition.
Many offer easy adjustment for zero.
Lighter rifle.
Back when my eyes were crisp, I could shoot the ear off a squirrel with open sights. In the ‘70s, riflescopes were just starting to be trusted and they failed about as frequently as they didn’t. At that time, only one hunter frequenting our deer camp had a rifle with an optical sight — most of the other hunters thought he was weird. (He was weird, but for other reasons.) Open sights have now fallen out of favor because most shooters don’t know how to use them, or just as importantly, they don’t know how to adjust them.
Open sights are easiest to see in good light. In early morning and late evening, not so much.
The key to using open sights is to focus on the front one, trust the sight picture, and like with any other sight, follow through. With but little practice you can trust open sights more than you trusted your high school girlfriend. In fact, you might be surprised how well you can actually shoot with them.
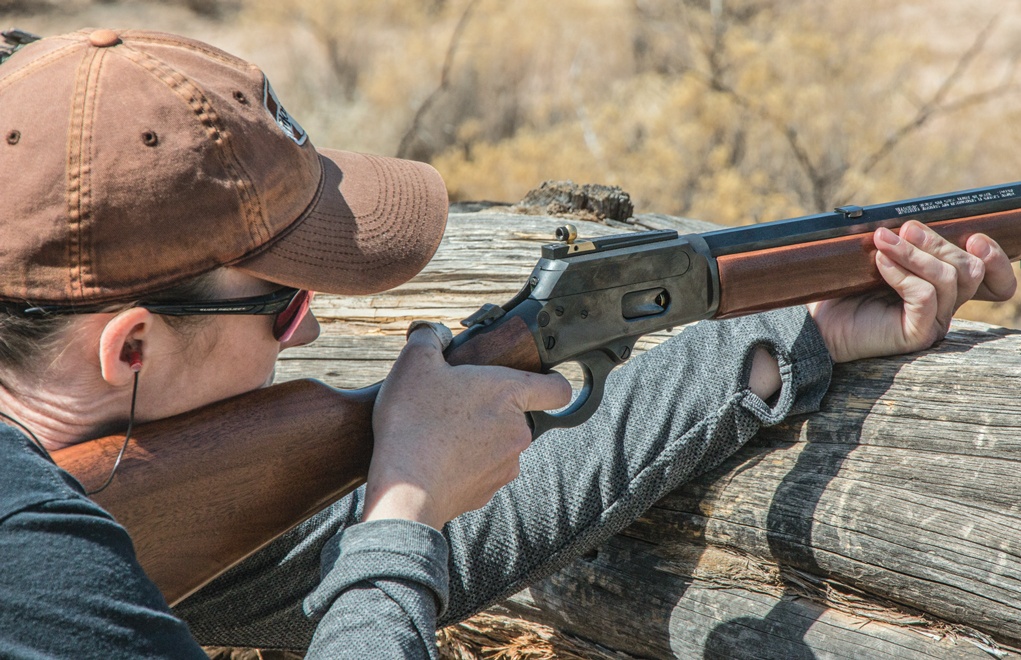
Not too long ago I was testing Ruger’s new Single Seven Bisley from Lipsey’s. I managed seven out of seven hits on an 8-inch plate, at 50 yards, while shooting off-hand. Similarly, during a recent lever-gun class at Gunsite Academy, I took a Marlin .45-70 Govt. from the Remington Custom Shop and hit a 12-inch target five out of five times at 200 yards. Granted, these feats pale in comparison to what others can do — or I used to be able to do — with open sights, but they stand as evidence that they’re not as antiquated as some might think.
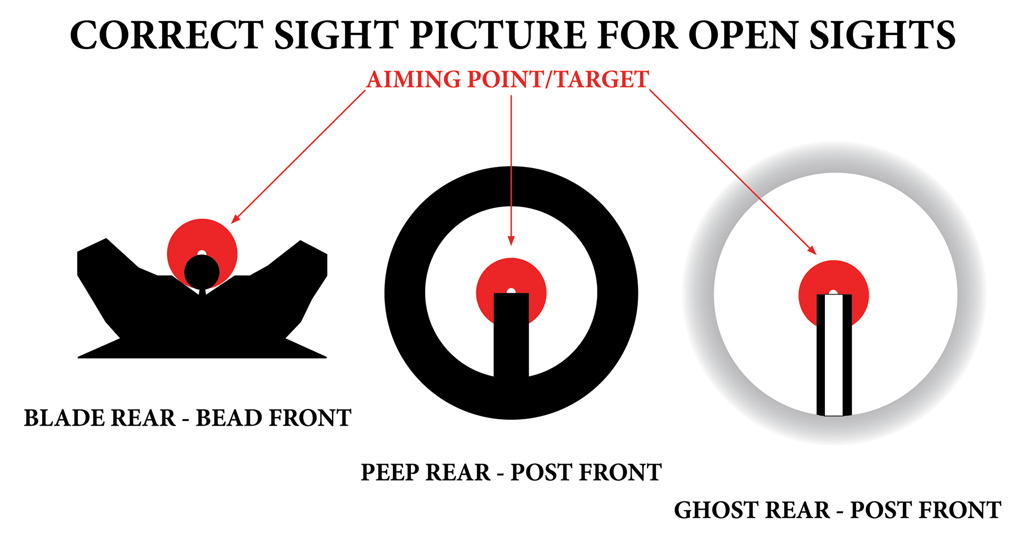
Open Sight Application
Many who try to shoot open sights fail to utilize the correct sight picture. Here is the proper sight picture for blade rear and bead front, and ghost-ring or peep rear and post front.
Part of the trick with open sights is to make sure you’re using the correct sight picture, and some folks — particularly those raised on optics — don’t know what a proper sight picture is. Excluding target-styled sights, with open rifle sights there are two basic versions. The most common is the blade rear and bead front, the other is the peep or ghost-ring rear and post front. Sometimes a bead front is used in conjunction with a peep or ghost ring, but a post generally provides a better sight picture for the most precision.
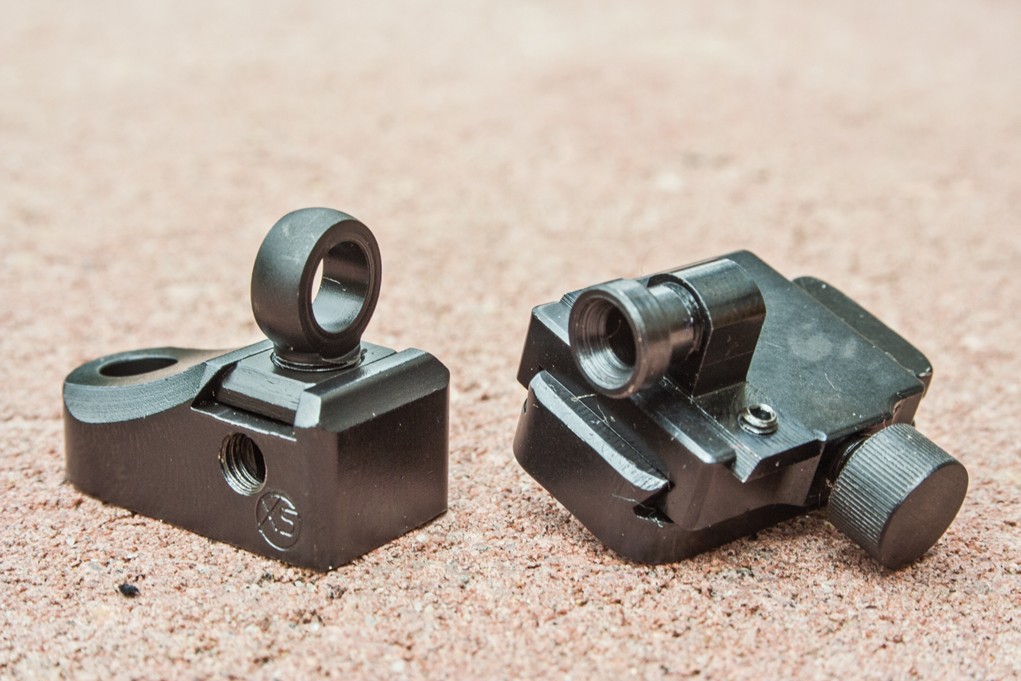
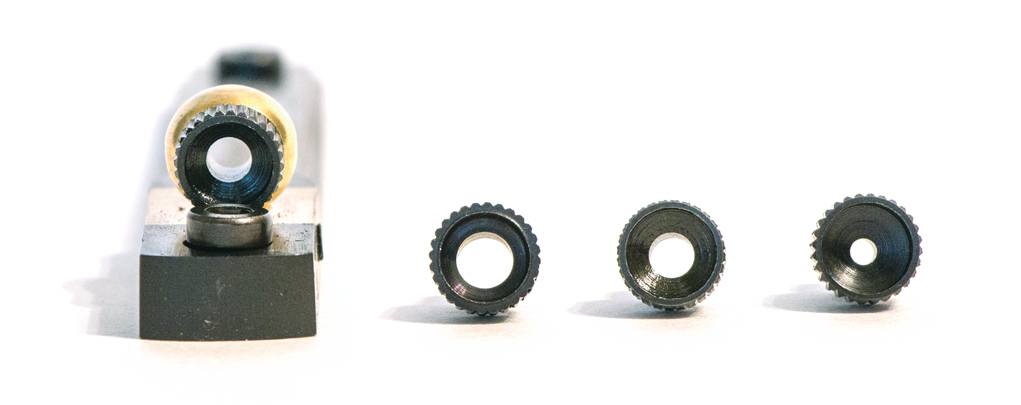
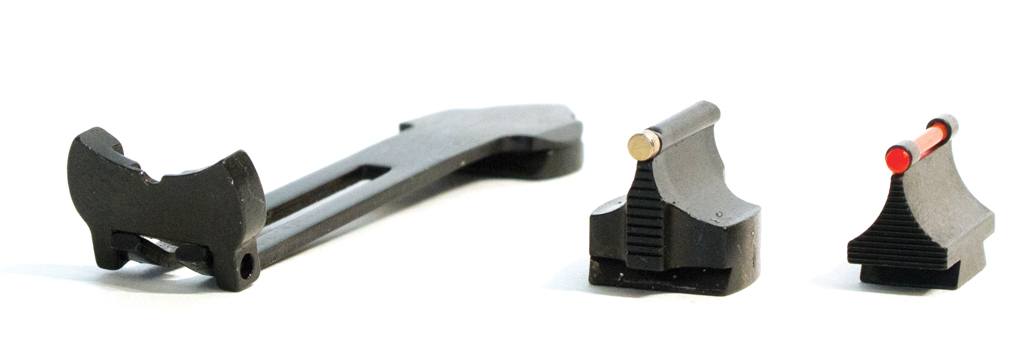
Most factory rifles that come with open sights have the traditional blade rear and bead front. XS Sights makes a wide variety of ghost ring sights for many rifles. They’re of excellent quality and offer full adjustment of the rear sight. They also come standard with a white-striped front post, which is the best front sight for the ghost ring. Skinner Sights also makes a wide selection of ghost-ring sights, but with optional screw-in apertures that can make them more of a peep sight. Skinner also has a wide variety of front sights, including fiber-optic versions.
A Talley peep sight that will fi t Talley scope bases (right) is shown next to an XS Sights ghost-ring sight. Both are reliable and rugged open sight options.
A tremendous advantage of peep or ghost-ring sights that’s often overlooked is the sight radius — actually it’s not a radius, it’s a separation. For example, with a barrel-mounted blade sight on a lever-action rifle with a 20-inch barrel, sight separation can be as short as 16 inches. Install a receiver-mounted peep or ghost-ring sight and the distance between the sights can increase to about 25 inches.
This matters because with a 16-inch sight radius, if you have 1/10-inch deviation in sight picture, it will change point of impact as much as a foot at 50 yards. With the longer sight radius, that same sight 1/10-inch deviation in sight picture would only alter your point of impact by about half as much. That’s a big difference.
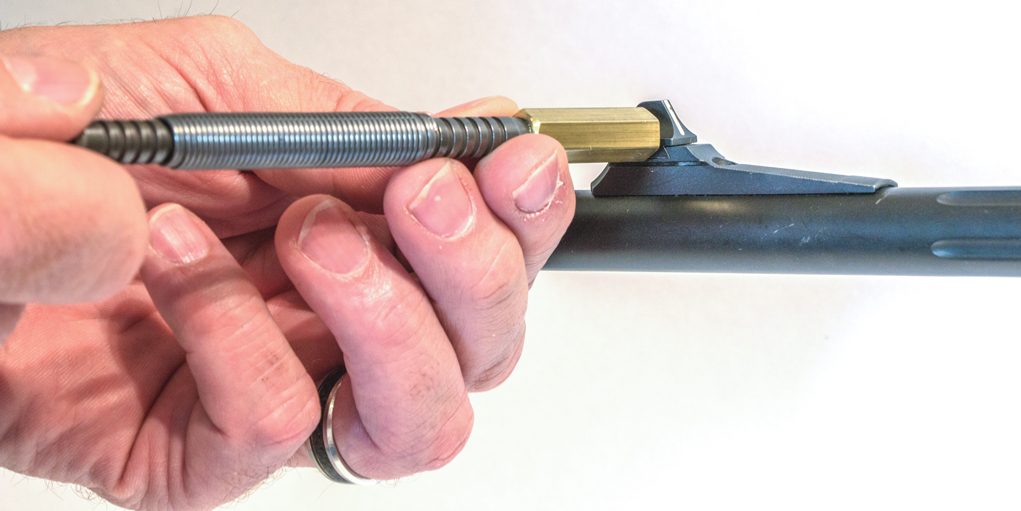
The Wyoming Sight Drifter adjustment tool from Skinner Sights is a must for anyone serious about shooting with open sights on a handgun or rifl e. It will take the work and the cussing out of sight adjustment.
With the blade rear and bead front, you position the bead in the notch in the rear sight, with an even amount of space — or no space — on the bottom and three sides, and focus on the front sight — not the target. With the peep or ghost-ring rear and post front, you focus on the top of the front blade and let your eye naturally center that focus point in the circle of the peep or ghost ring. Again, your focus is always on the front sight, not the target.
Calculating Corrections
Some folks get all flustered when they try to adjust open sights because they confuse themselves with the correction needed. So, here’s your rule of thumb for open-sight adjustment: Move the rear sight in the direction you want the bullet to move on the target, and move the front sight in the opposite direction you want the bullet to move on the target.
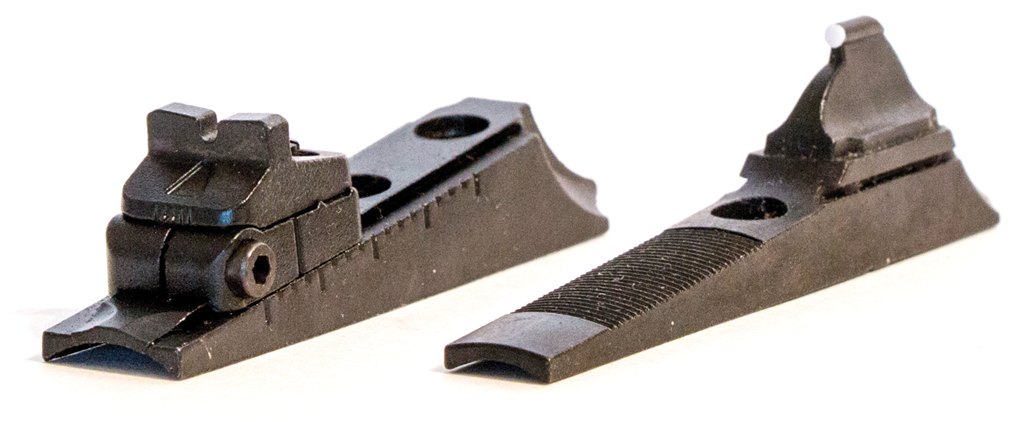
For many years, most new rifl es came with open sights like these. The blade rear and bead front sight were the standard for a long time. Now, lever-action rifl es are about the only rifl es that come with open sights.
For example, let’s say you shoot a three-shot group at 50 yards with your open-sighted Marlin 336, and the center of that group is 4 inches to the right of center, and 2 inches high. This means you need to move the rear sight to the left for the windage correction. For the elevation correction you can raise or get a taller front sight, or adjust the rear sight down.
Simple enough, right? The other confusion that complicates the adjustment of open sights is how far to move them to achieve the correction you want. Unlike optical sights, most practical non-target open sights don’t come with a click adjustment feature. This means you will have to do some math.
The author has used open sights across North America and in Africa with success. Practice makes perfect, and so does knowing the proper sight picture as well as how to calculate and make corrections.
Some manufacturers will give you an indication of the adjustment you can expect with one turn of a sight screw, and they’re generally very close. However, the problem is, manufactures don’t know the length of the rifle’s barrel that you might install their sights on. This is critical because the sight radius — separation — determines how much each movement of the front or rear sight will affect the point of impact at a specific distance.
One way to sort all this out is to use the Sight Correction Calculator at Brownells.com (Google is your friend.) This handy-dandy online calculator will tell you exactly how much correction you need. All you have to do is input the amount of error on the target, the sight radius and the distance to target — all in inches — and push the “calculate” button. The result will tell you how much of an inch of correction you need. Since almost all of us have a smartphone, you can even do this at the range.
An advantage of Skinner sights is their compatibility with various apertures. The smaller the aperture — like the one on the right — the more precise the shooting can be. Also, the smaller the aperture the better it helps to combat the negative effects of presbyopia.
If you’re living in the dark ages or just feel like math is something you do on paper instead of on the internet, you can work out the correction (C) yourself. Just multiply the amount of error (E) in inches, by the sight radius (SR) in inches, and then divide the product by the distance (D) to the target in inches. Regardless, you get the same number — a fraction of an inch — as the answer. The formula looks like this:
(E x SR ) / D = C
In the previous example mentioned, where we needed a 4-inch adjustment to the left, the calculation would look like this:
(4×16) / 1800 = C or 64 / 1800 = 0.036
In other words, you would need to move the rear sight 0.036 of an inch to the left to obtain a proper zero.
Making Corrections
The next place shooters screw up is when they’re making corrections. Most open sights on rifles fit into a dovetail cut into the rifle’s barrel. The front and rear sights are driven or pushed into the dovetail and held in place by friction. You can move — drift — or replace these sights by tapping them lightly with a small hammer and a nylon or brass punch. Don’t use a steel punch! You’ll mar the sight and your firearm. In most cases, this drifting occurs rather easily. In some cases, it must be accompanied by some hard pounding and even cussing. It’s always wise to put the rifle/barrel in a vice first.
Andy Larsson of Skinner Sights showed me one of the coolest gun tools that’s specifically made for adjusting open sights. It’s called the Wyoming Sight Drifter — it’s spring-loaded and sells for $32. You place the brass end against the sight and pull and release the spring-loaded plunger. It impacts the brass push, and very much like the Newton’s Cradle balls you find on office desks, it drives the force from the impact through to the sight. This tool will eliminate time, scarred guns and a good deal of profanity from your sight adjustment sessions. Skinner Sights has them in stock.
Open Sights And Old Eyes
Blade-type rear sights are now most often matched with a brass-bead front sight or a fi ber-optic sight, so they will be easier to see in low light or dark timber.
An optical sight does not make your rifle deliver more precision … it only helps you see better. Yes, because you see better, you can often shoot more accurately, and this is why young eyes often perform better with open sights. As you get older — around age 40 — presbyopia sets in. Presbyopia is a condition that comes with age and limits your ability to focus on objects up close. With minor cases of presbyopia, peep and ghost ring sights help you better focus on the front sight. However, when you get to the point you need reading glasses with a +2 magnification, you’re going to have to seek the help of an optometrist.
That’s what I did. I explained to my eye doctor what I wanted to see, and what needed to be in focus. He altered my prescription and ordered me a pair of Oakley shooting glasses. It didn’t take my eyes back to when they were only 20 years old, but I think I might once again be able to shoot the ear off a squirrel, or at least, the cents off a nickel … even with open sights!
Editor’s Note: This article originally appeared in the June issue of Gun Digest the Magazine.
The defensive AR-15 affords many advantages if you employ the right tactics.
A popular home-defense option, the AR-15 combines ease of use with overwhelming firepower. Despite these assets, getting the most out of the carbine in a lethal-force event takes consideration – perhaps more so than with a handgun.
Some of this is due to the immobility of the AR compared to a pistol or a revolver. While certainly doable, maneuvering a long-gun through the rooms and corridors of a house or business tends to be a tricky proposition, one that requires training above and beyond simple marksmanship. Though, much of this is simplified by turning the carbine into a defensive option in the purest form. Waiting, well concealed for the threat, unleashes the full potential of the gun, one few assailants can trump.
Wielding a Colt 6720, renowned firearms instructor Massad Ayoob runs down the proper form and tactics to use an AR-15 in the defensive situation. Key among these, minizine exposure through cover. Narrowing the possibility of being hit by opposing fire, it also affords the armed citizen a position where he is ready to engage a threat at a moment’s notice.
Care is essential. As Ayoob demonstrates, the typical off-hand position you’d use off the firing line just doesn’t cut it behind cover. A shooter must shift his or her off-hand leg back behind them, or run the risk of exposing nearly 18-percent of their body mass. The same holds true in a kneeling position, where carelessness can expose nearly as much of the body. The carotid artery among the tender points that have the potential to stick out, it’s well worth thinking and practicing proper positioning.
If you do, you’ll rarely find yourself outgunned with an AR-15 in hand.
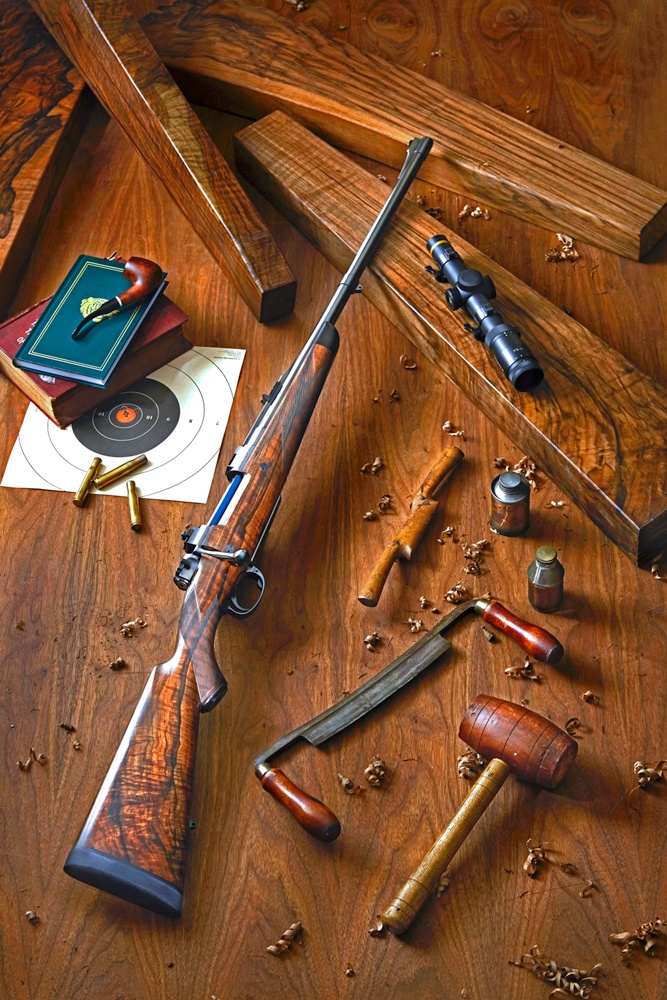
Swiss-born and educated, Reto Buehler is one of the new breed of custom gunmakers turning out very high-quality firearms. He and his contemporaries are the future of the custom gun trade. His work is impeccable and his talents seemingly endless, with many years left to further his chosen craft. Except for engraving, he is a one-man, one-stop shop in that he is equally adept at stockmaking and metalwork.
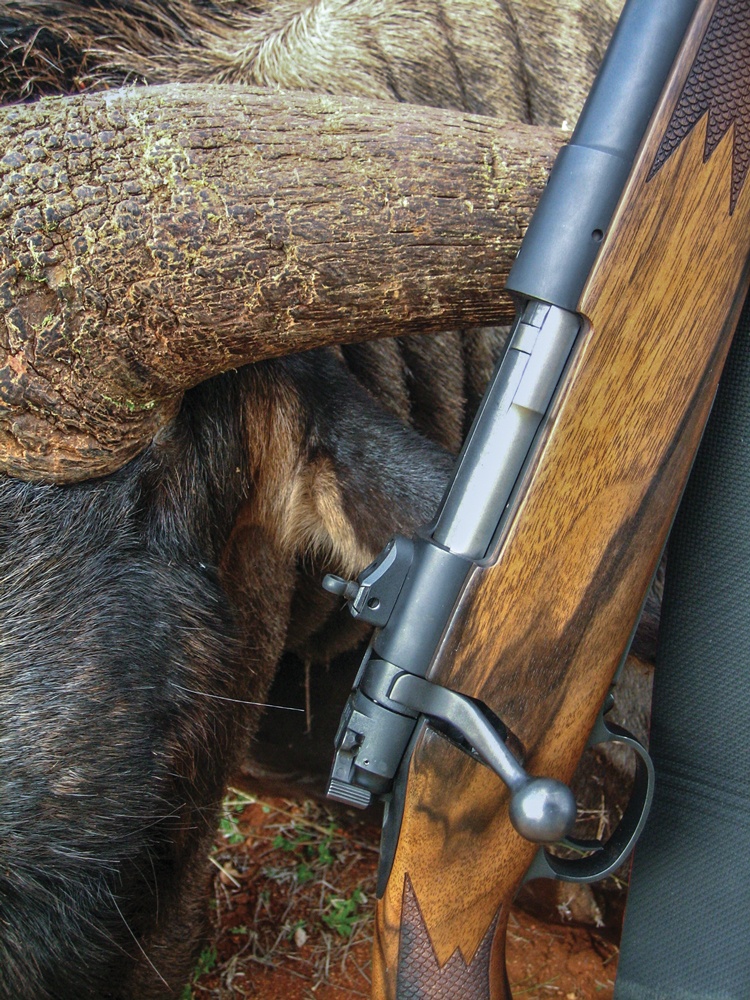
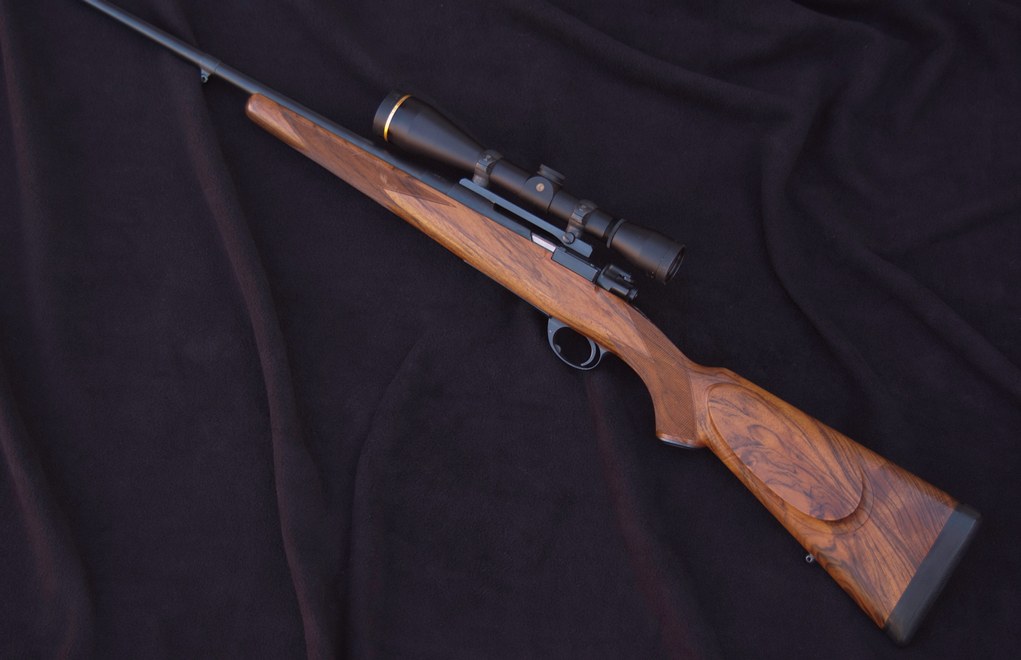
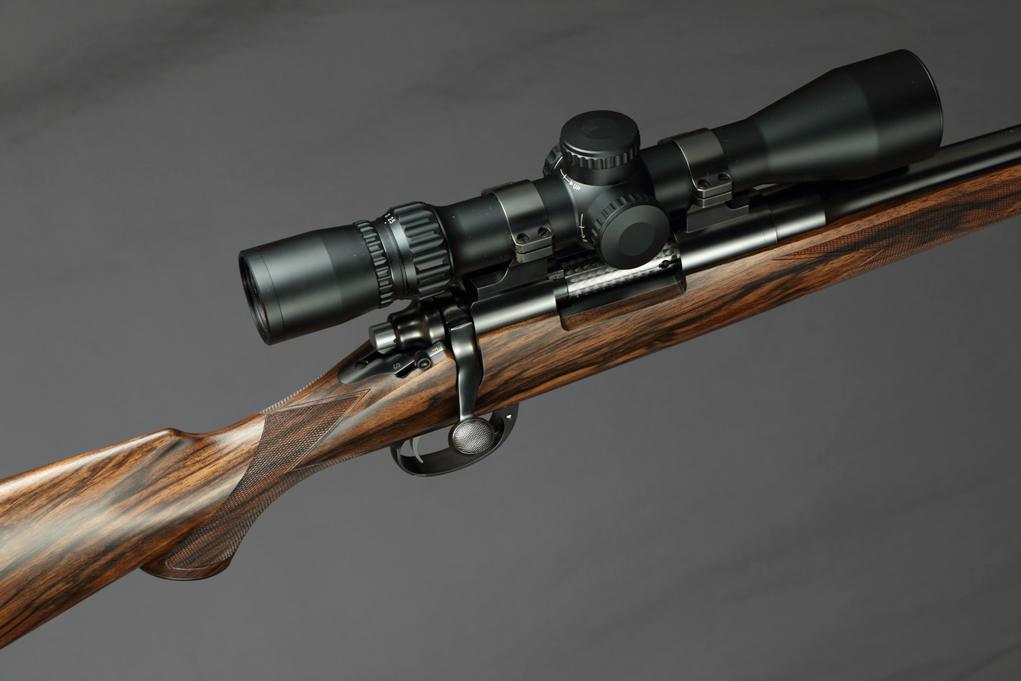
Reto Buehler Custom .404 Jeffery
This lovely rifle is built on a Granite Mountain Arms action and is typical of a Buehler Custom Sporting Arms “English Express” model. Chambered for the old but excellent .404 Jeffery cartridge, it features most all the “bells and whistles” one expects to see on such a rifle. Buehler used a PacNor 24-inch barrel, fitting it with a quarter rib, front sight ramp and sling swivel band. He mounted the Leupold straight tube scope in his own quick detachable cam-lever mount. He also installed a trap grip cap, which holds a peep sight that can be installed on the rear bridge when the scope is detached. Buehler crafted the stock from a spectacular stick of Turkish walnut, finishing it with many coats of hand-rubbed oil, and used a flat-topped checkering pattern with 20 LPI.
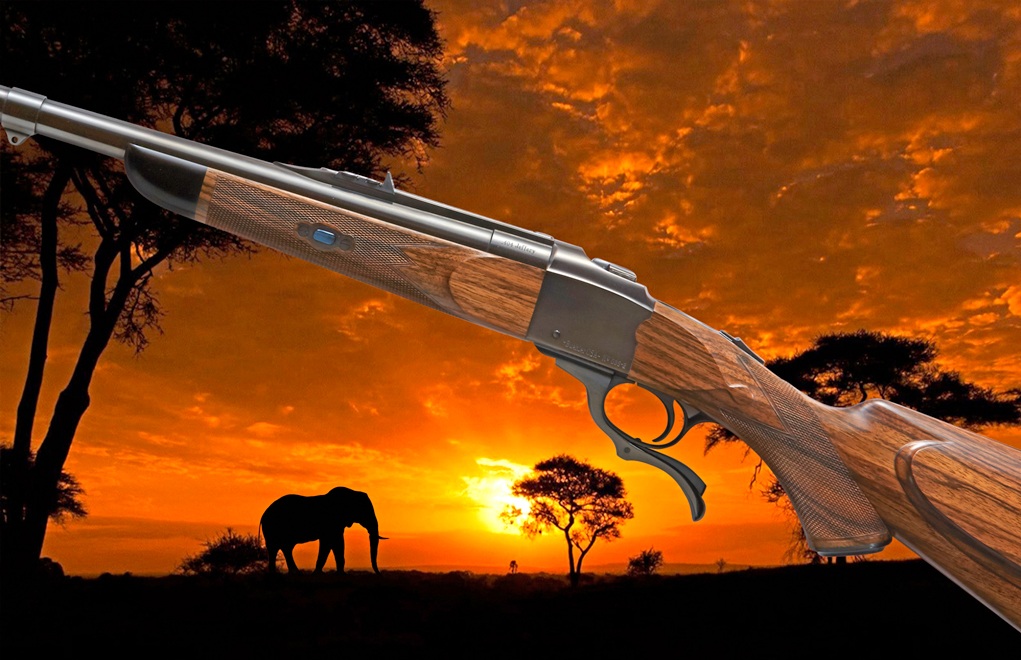
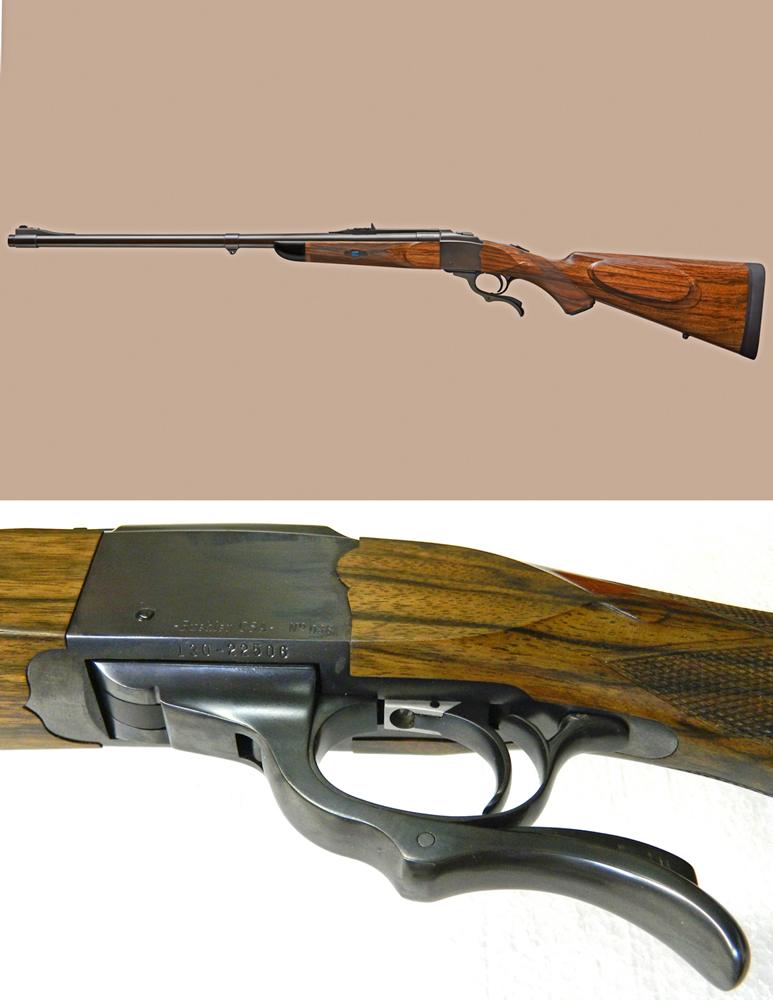
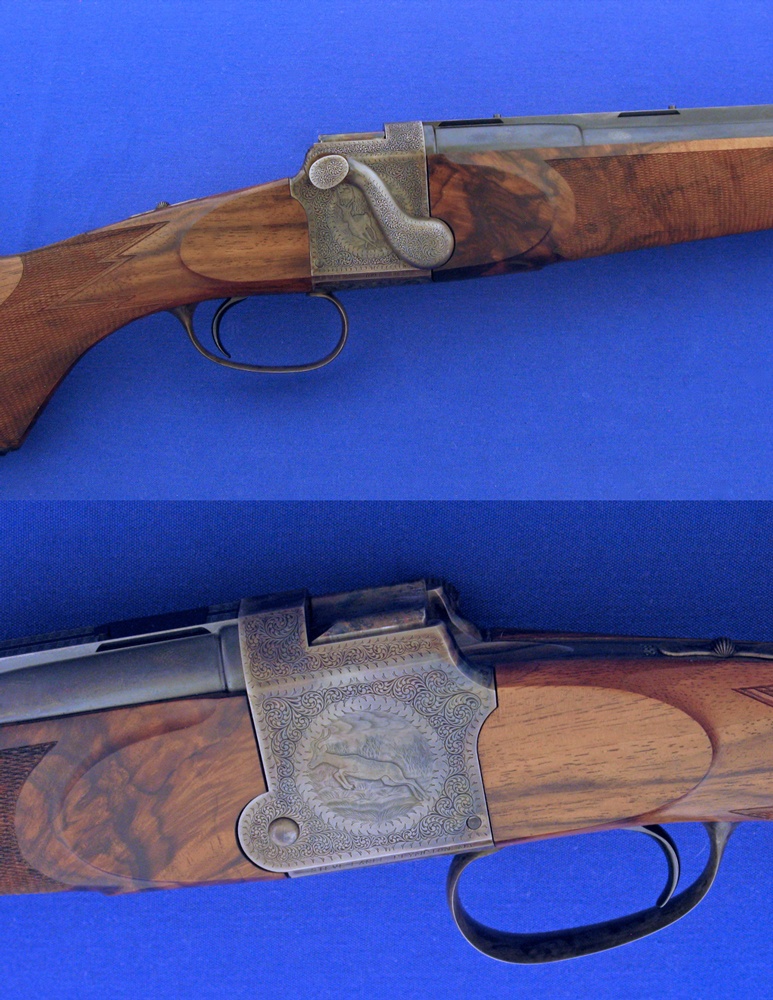
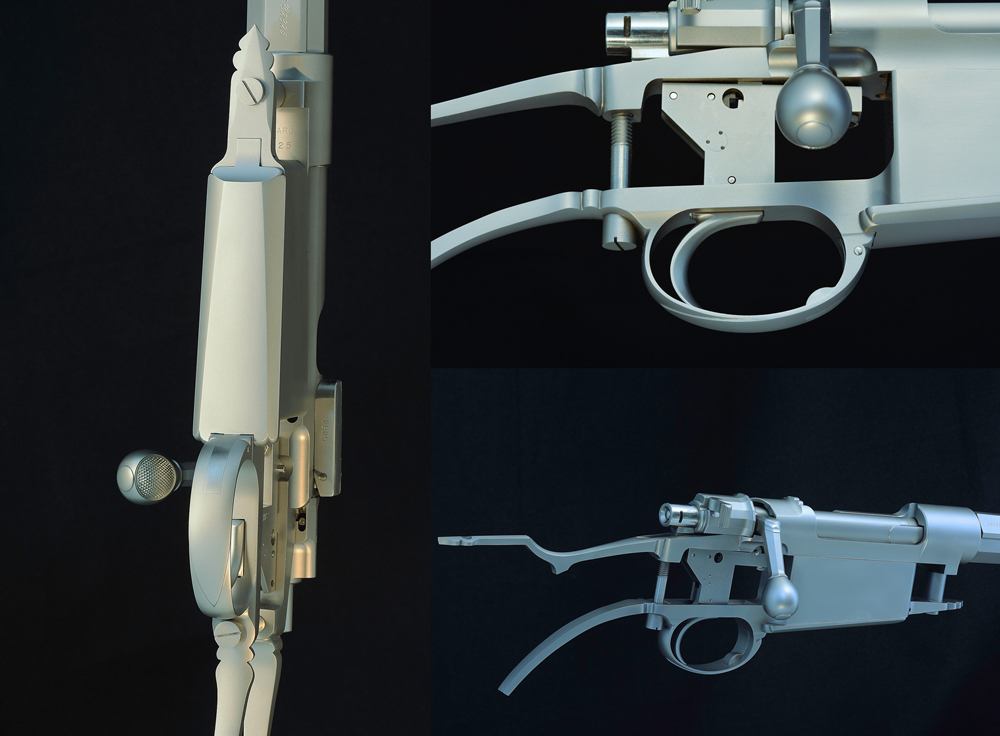
Reto Buehler Custom Ruger No.1s
A superb pair of No.1 Rugers crafted by Buehler in an unusual chambering combination. The full-length photo shows a No.1 chambered for the .404 Jeffery cartridge. The second rifle is chambered for the .303 cartridge. The factory Ruger actions were heavily modified, including removing the slotted screw in the action, adding new sliding safeties and a steel trigger and other cosmetic touches. He also fitted a set trigger to the smaller-caliber rifle. Both rifles feature PacNor barrels and are stocked in English walnut checkered with “flat-topped” patterns. The fore-ends are attached using the traditional wedge and escutcheons. Buehler installed a recoil reducer in the .404 buttstock, primarily to achieve a better balance due to the heavy .404 barrel. Photos by Brian Dierks
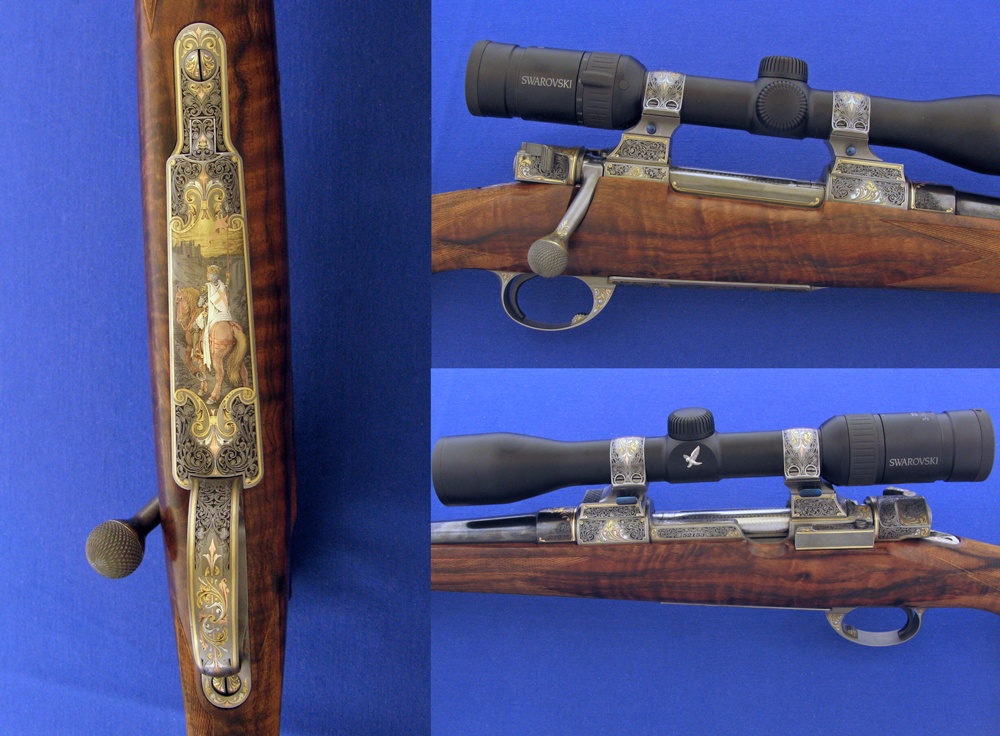
Brian Hochstrat is one of the younger master engravers to have reached this level of artistic creative ability. His skills take a back seat to no one. The rifle shown here took the Best Engraved Rifle Award, and the Firearms Engravers Guild of America (FEGA) equivalent to Hollywood’s best picture Oscar, the Engravers Choice Award. Photos by Sam Welch
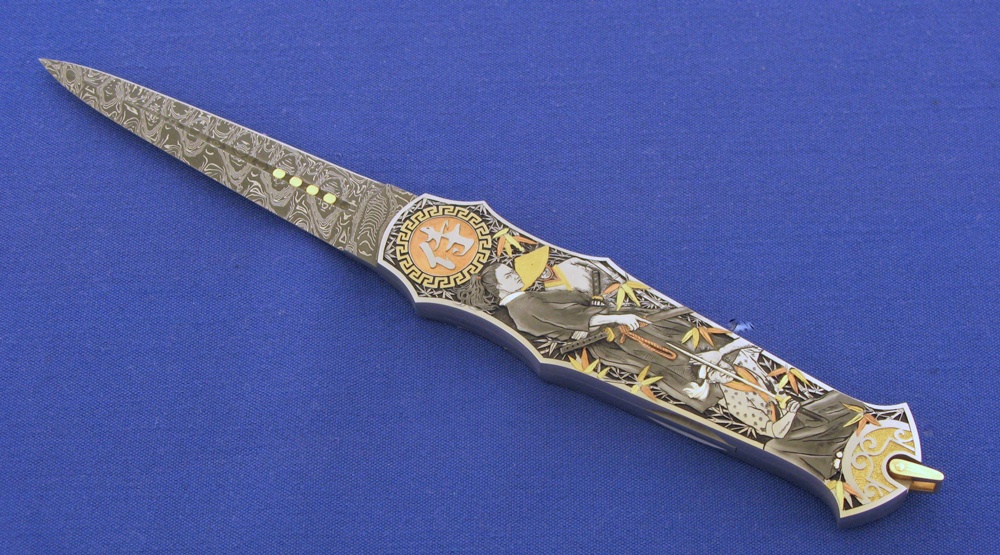
C.J. Cai Engraved Custom Knife
C.J. Cai is one of those master engravers whose style is so distinctive that anyone the least bit knowledgeable about his artistry can recognize his work from across a large room. His talents showcased on this Warren Osborn knife won him two awards at the FEGA Exhibition — Best Engraved Knife and the Best Metal on Metal Inlay. Photos by Sam Welch
Dave Talley: Custom Rifle from the Past
This rifle is not one that was made for me, but was crafted by a good friend of mine, Mr. Dave Talley, many years ago. He used a Mauser action, most likely of WWII Czech manufacture, and the .308-chambered barrel is probably from Douglas. I say probably, as I can’t be certain, but I do know he used a lot of Czech actions and Douglas barrels in his work. The action is clearly marked as Talley’s work on the recoil lug of the action. The stock is unmarked as to the maker. I suspect that it was crafted by Jere Eggleston, primarily due to the fact that they were both in South Carolina and used each other’s talents frequently. I also showed the stock to a colleague and dear friend of Eggleston, Mr. Gary Goudy. He has seen a lot of Eggleston’s work and told me that he thought it was an Eggleston stock, but couldn’t be certain.
I came across an ad on a website listing the rifle for sale at a very attractive price. Further investigation revealed that the seller was also an Arizonan, living in the Phoenix area, making it an easy acquisition. The photo was taken of the rifle exactly as I bought it. I’ve since had it professionally cleaned up, swapped out the scope mounts for Talleys (what else!), had the recoil pad exchanged with a red Old English pad from Pachmayr, and had the checkering dressed up by Kathy Forster. Some work at the range revealed that the rifle loved Varget powder and, with its preferred load, gives sub-MOA groups with regularity. It’s a neat little rifle that I’m proud to own and use. Photo by Tom Turpin
Hanns Doesel Engraved Floorplate and Grip Cap
Hanns Doesel studied engraving under my old and dear friend, the late Erich Boessler. Boessler, in addition to being a great master engraver, was an outstanding teacher of this fine art. He passed away in 1997, but his many students are still at the bench all over Germany. A good friend of Doesel’s and a fine engraver in his own right, Terry Wilcox, has several examples of Doesel’s work and I persuaded him to photograph a couple for use in Gun Digest. Photos by Terry Wilcox
James Anderson Custom .22
One of our best custom gunmakers can be found most anytime in his South Dakota shop turning out exquisite custom rifles. In addition to being exceptionally talented, James Anderson is also one of our younger generation gunmakers in a craft whose superstars are mostly dominated by “mature” craftsmen.
One of his latest creations is this custom .22 rimfire, something not often seen in custom rifles. He started with a factory Remington 40X action, which he modified substantially. In addition to the normal honing and general cleanup, he made a new mag housing to accept Kimber magazines. He also made the floor metal unit and replaced the factory trigger with one made by Jewel.
He fit and match-chambered a Shilen hand-lapped barrel and crafted a set of custom scope mounts for a March 2.5-25X scope to the rifle. He then whittled out the stock from a nice stick of California English walnut and fitted an old Niedner-checkered steel buttplate. He then checkered the stock in a pleasing point pattern. To add a final touch, he took the rifle to his South Dakota neighbor, engraver Jesse Kaufman, who embellished the original factory markings.
To sum up the project in one sentence, it just doesn’t get any better than this. Photos by James Anderson
Joint Project Single-Shot Falling Block
Members of both the FEGA and the American Custom Gunmakers Guild (ACGG) joined together to craft this lovely single-shot falling block rifle. The metalwork was executed by Glenn Fewless, the stock by Doug Mann, and the outstanding engraving was by Bob Strosin. The modern version of a Daniel Fraser falling block action used in this project was machined by Steve Earl. Photo by Sam Welch
Steve Heilmann Custom .500 Jeffery
Steve is one of the very best custom gunmakers in the USA today. I would go so far as to expand that statement to encompass the globe. Some of the finest custom guns that I’ve ever had the pleasure of seeing and handling have come from his Grass Valley, California, shop. Like most superb craftsmen, his creations are always for his clientele and never for himself.
The old saw that the cobbler never makes new shoes for himself notwithstanding, pictured here is a creation that he’s been working on for a while now, and believe it or not, it is for himself. He only works on it when he has a few spare hours, which isn’t often, but he intends to finish this one as he wants it. So far, the metalwork is nearing completion.
Starting with a military ‘98 Mauser action, a Ted Blackburn bottom metal set and trigger, Model 70-type safety and shroud, and a .50-caliber 2-inch diameter Krieger barrel blank as raw material, Steve added over 350 hours of his precise metalsmithing. It is now as you see it in these photos.
The barrel has been chambered for the .500 Jeffery cartridge and milled octagonal in shape. The full-length rib, quarter-rib, front sight ramp, extra recoil lug and front sling swivel base are all milled integral with the barrel steel. The Mauser action has been extensively machined and has all the bells and whistles usually found and substantially more. Extended top and bottom tangs are but one example. The sculpted bolt has required more of Heilmann’s time than some ‘smiths devote to an entire action.
Heilmann says he has set aside a spectacular Turkish walnut blank for this rifle from his substantial stash of impressive walnut blanks. Eventually, he will inlet, shape and mate the blank to the metal. Hopefully, I will remain above ground long enough to see its completion. If I don’t, my successor for these pages will surely do so. It will be a sight to behold. All photos by Steve Heilmann
Lee Griffiths Hagn Single Shot and Custom 1911
Master Engraver Lee Griffiths is a fantastic engraver and is normally the recipient of several awards at the annual FEGA bash in Las Vegas. The 2018 show was no exception. His artistry on this Hagn-action single shot won him the Best Modern Firearm Award and the Model 1911 pistol won the Best Engraved Handgun Award. Photos by Sam Welch
Marty Rabeno Winchester Model 1876
Master engraver Marty Rabeno engraved this Winchester Model 1876 rifle. Rabeno excels at all styles of engraving, but he is at his absolute best when doing western motif scenes on period firearms. This Model 76 won runner-up Engravers Choice Award at the annual FEGA Exhibition this year. Photo by Mary Rabeno
Looking to go armed, but are stuck in the weeds as to what to arm yourself with? Here are 20 of the best concealed carry gun options that will keep you on the defensive.