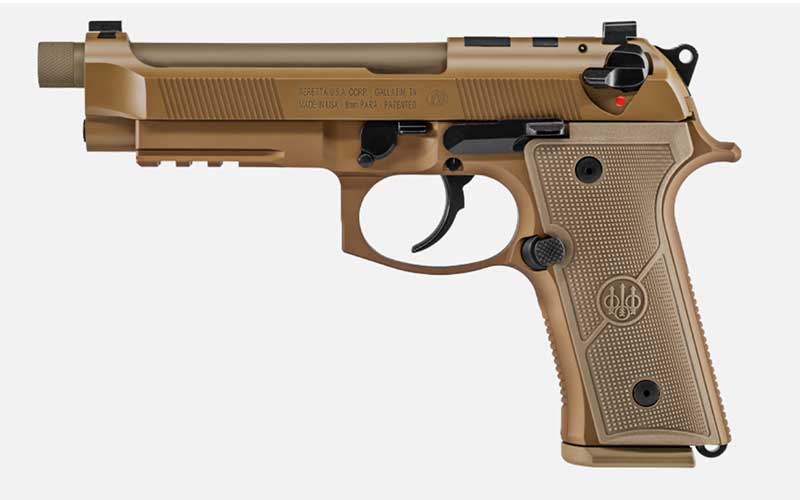
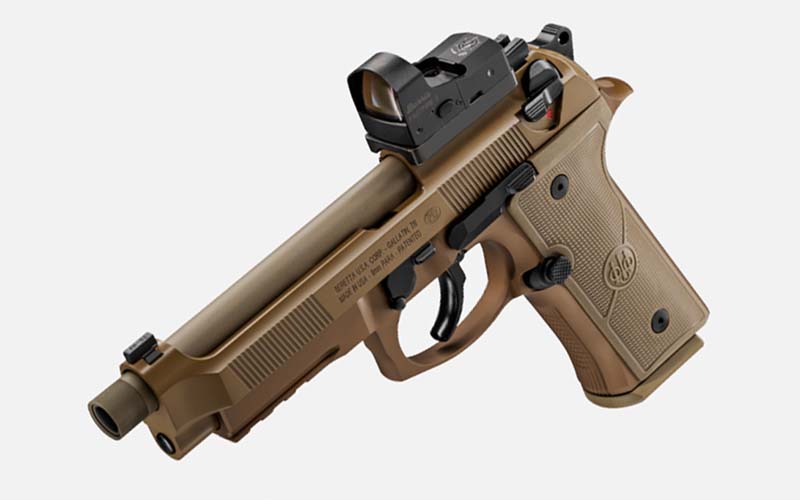
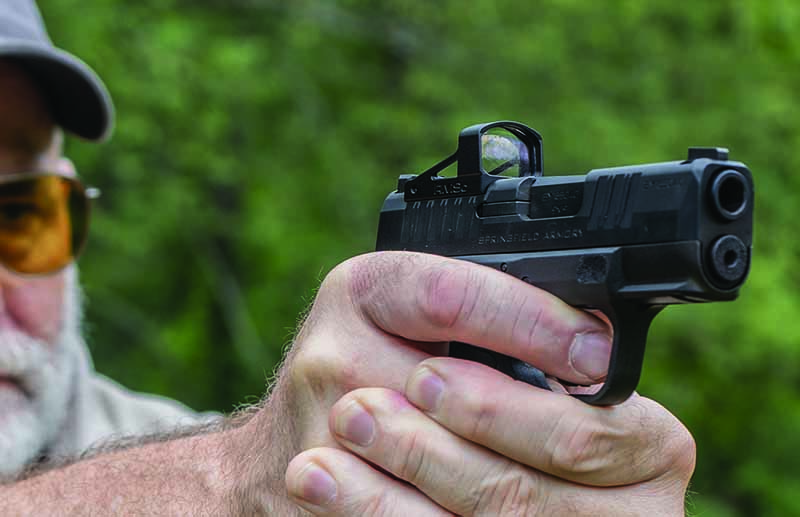
The newest iteration of the iconic M9 service pistol, the Beretta M9A4 now comes optics-ready and even more combat-oriented.
Beretta M9A4 Features:
9mm, 18+1 Capacity
Tritium Night Sights
Optics-Ready
Threaded Barrel
Xtreme Short Reset Trigger
MSRP: $1,099
The newest member of the Beretta 92 family is here, a bit late to continue the tradition of military service, but just in time for the civilian red dot sighted pistol craze. The Beretta 92 has been in a constant state of development since it was first adopted as the M9 in 1985, and all the upgrades it received along the way have come together to make the new Beretta M9A4 a truly modern pistol.
What’s New?
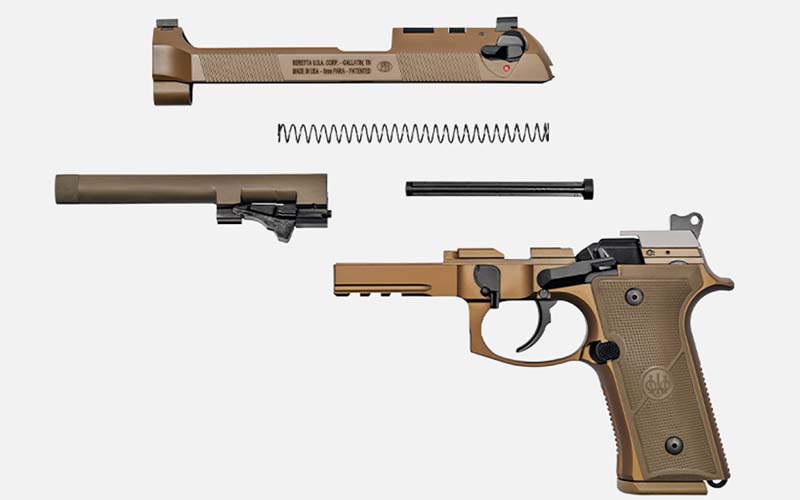
As is true with anything that receives generational updates, the M9A4 is essentially just an improved Beretta M9A3. It still has the ergonomic improvements of the aggressively textured Vertec-style grip, a threaded barrel for mounting suppressors or compensators and a beveled magazine well. It also still comes with tritium night sights, a segment of Picatinny rail and oversized controls. The substantial upgrades that set the M9A4 apart and allow it to sit at the table with other contemporary tactical pistols are found on the slide, in the trigger and in the magazine.
By far the most significant and apparent upgrade found on the M9A4 is its ability to accept a pistol red dot. The slide is cut to accept a variety of mounting plates available from Beretta, enabling you to mount virtually any model of modern pistol red dot sight. The trigger has also been improved over the stock variety that was found in the A3 series, with the M9A4 now featuring an Xtreme short reset trigger for faster follow up shots.
The M9A4 can now also fit one additional round in its magazine and has a decocker only slide.
Does It Come In Black?
No, it does not. While the A3 variant was available in either classic black or with an FDE wear-resistant finish, the M9A4 only comes in FDE. While wear resistance is nice, FDE sticks out like a sore thumb outside of the desert. I’m sure that a black M9A4 option would have been appreciated by shooters who don’t live in arid environments as well as by law enforcement.
The new M9A4 would make for a top-tier home defense or duty pistol after being outfitted with the proper accoutrements. It comes with a hefty price tag, but if you’re looking for a reliable, high-capacity and controllable pistol that can mount optics, suppressors and lights, the M9A4 is worth considering.
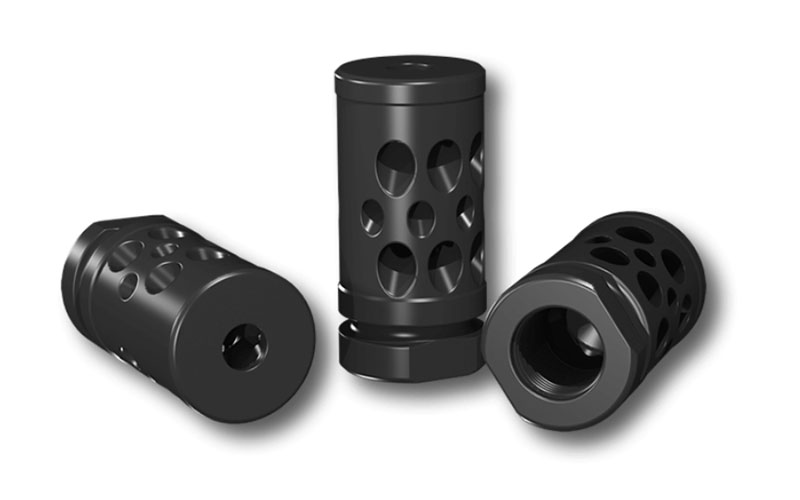
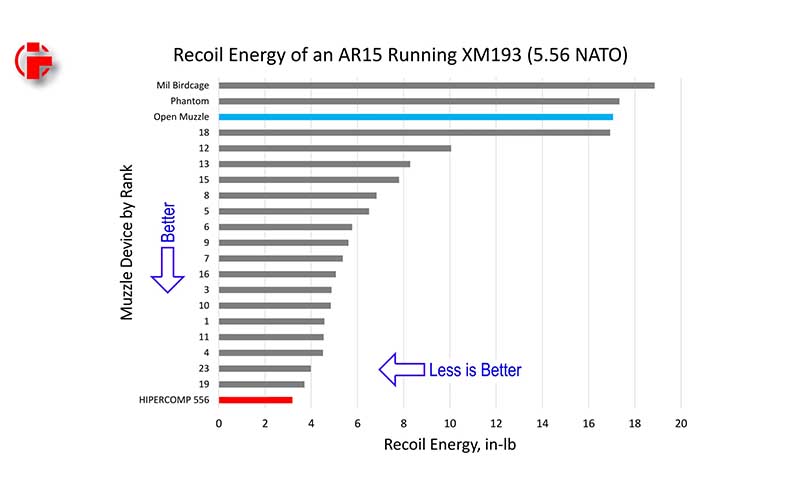
HIPERFIRE’s newest generation of HIPERCOMP compensators are now more effective, cheaper and now come in two flavors of 7.62.
Next Gen HIPERCOMP Options:
Caliber
MSRP
5.56/.223
$69
9mm
$69
7.62 NATO
$79
7.62 Russian
$79
While they’re better known for their upgraded AR-15 triggers, when HIPERFIRE began making compensators as well their efforts were met with positive feedback. While excellent at mitigating recoil, customers thought that the first-generation HIPERCOMPs were too expensive and unnecessarily bulky. In response, HIPERFIRE has just released the next generation of HIPERCOMP, and they’re better in every possible way.
HIPERCOMP 556 Next Gen
Made In The Matrix
HIPERFIRE claims that the primary reason for the lower price on the next-gen HIPERCOMPs comes from their innovative development process. Rather than using the traditional trial-and-error testing method, they used “Fluent computational fluid dynamics software” to virtually test their compensator designs within a simulated computer environment. The efficiency of this allowed HIPERFIRE to shed less sweat and waste less time and resources on the development process, passing the savings on to the customer.
The first generation of HIPERCOMP was only available for 5.56 and 9mm, but this next-gen update has added 7.62×51 NATO and 7.62×39 to the lineup as well.
HIPERCOMP 762 Next Gen AK
Universal Improvement
Using the advanced methods described above, HIPERFIRE was able to improve every iteration of the HIPERCOMP across every metric while also adding two new models. Not only does the next-gen HIPERCOMP do a better job of reducing recoil than the original version, but HIPERFIRE claims that they are better than anything else on the market, too. While many competing muzzle devices seem to get larger to become more effective, the HIPERCOMP managed to get smaller during its upgrade process. Not only has it become lighter, dimensionally smaller and more aesthetically pleasing, but the 5.56 and 9mm versions are now also compatible with standard M-16 bayonets and armorer’s wrenches.
These next-gen HIPERCOMPs may become a new industry standard if they perform as well as advertised. They’re light, efficient and roughly the same size as a MILSPEC birdcage, all while remaining decently priced. All models include a crush washer and are threaded for the most common pitch for their respective caliber.
Trigger Control is the foundation upon which all other skills are built. Is there a way to ensure a precision press each and every time?
What Are The Difficulties In Learning Trigger Control:
The skill is difficult to grasp, given there is no simple way to explain the process.
Practic, and plenty of it, is the only way to hone a proper trigger press.
Even then, it’s impossible to expect a perfect press each and every time.
Instructors have been preaching it for years, and in my 2013 book, Handgun Training for Personal Protection, I called it “the secret.” The single, most important skill you must master with a handgun is the ability to operate the trigger—make the handgun fire—without disturbing the sight picture.
Many would consider this an excellent example of aligning the sights and pulling the trigger. However, for defensive purposes, this is mostly an example of shooting too slow.
As simple as it sounds, this single task is the most difficult part of becoming proficient with a defensive handgun. It’s the foundation that must be laid before any other skills can be built. Anything you build on a foundation that’s not up to par is doomed; at some point, you’ll add something to this—less-than-ideal—foundation, which will cause it to collapse. It might be stress, unique positions, low light or a host of other circumstances through which you must perform.
Sight alignment and trigger control are indeed the secrets to shooting. Of course, there are other things like stance, grip and breathing that influence marksmanship, but in the end, it all comes back to your ability to press the trigger without disturbing the alignment of the sights.
The Simplicity Of Sight Alignment
However, the problem is that many instructors and most shooters believe that this is a 50/50 function; they think you must concentrate equally on the sights and the trigger in order to get your hits. This notion of equality is the primary reason so many defensive handgun shooters have trouble becoming proficient. Sure, in the beginning when you’re just learning to shoot a defensive handgun you must balance the concentration you devote to these two physical activities. Typically, it takes only a little bit of time on the range until you understand the concept; after that, the trigger is what should be getting damn near all of your attention.
Consider this: I, or any other reasonably qualified instructor, can teach you what proper sight alignment is in less than five minutes. In fact, if you can read, you can learn it yourself. Hell, easier than reading, all you really need to do is look at a picture to understand what proper sight alignment looks like. Then, for the rest of your life you should easily be able to demonstrate proper sight alignment on demand and without fail.
The Complexity Of Trigger Control
Teaching someone how to pull a trigger isn’t as simple. Considering that I’ve been pulling handgun triggers for half a century and still mess it up should be evidence enough to prove that you can never really learn to pull a trigger as well as you can learn to line up sights. In 1999, I won the West Virginia National Guard State Pistol Match. That would seem to suggest that I know how to pull a trigger. The problem is that knowing how to pull a trigger and pulling a trigger correctly every time is not the same thing. In fact, during that match, I made numerous trigger-pulling mistakes, which is why my score wasn’t perfect.
It’s all about pulling the trigger, because when it comes to shooting a defensive handgun, pulling a trigger correctly is the hardest thing to learn.
Here’s the thing, in only a few words or with a simple diagram, sight alignment is simplified. You cannot do the same when it comes to pulling a trigger. The words to perfectly describe it have never been assembled, and no diagram can effectively convey the lesson. Pulling a trigger correctly is something learned by feel, and the only way to learn to feel it is to do a hell of a lot of it. Pull? Press? Neither.
Some instructors will chastise others for using the term “pull” when it comes to describing the action of manipulating a trigger to make a handgun go bang. They’ll insist the word “press” is the proper term. Do you really think that either of these words simplifies the description of the action to the point it makes the stroke easier to learn? No. Maybe “manipulate” is a better word than pull or press, because manipulate doesn’t seem to describe a physical action that might be strong enough to negatively impact sight alignment.
I really don’t think the word that’s used matters; it’s pretty obvious what needs to happen. The trigger must be moved far enough to the rear, to make the pistol fire fast enough, to solve the problem, without disturbing the sight picture. There are all sorts of reasons this is difficult. Recoil anticipation, target panic, grip intensification, improper finger positioning and available time are just a few of the things that result in bad trigger pulls. I’ve been pulling handgun triggers for a long time, and, on occasion, all of these things cause me problems.
Why? Because I don’t practice pulling triggers enough. Let’s use a free throw in basketball as an analogy. If you practice it enough, you can become very good at it, but no matter how much you practice it you’ll never become perfect. Just consider professional basketball players, the best in the business are only 90 percent successful. The late Tom Amberry holds the Guinness world record; he made 2,750 free throws in a row. He was 71 when he did it so we must assume he practiced a lot. However, he didn’t practice enough to make number 2,571!
The Secret To Trigger Control
So, if the secret to shooting is sight alignment and trigger control, what’s the secret to the secret? It’s learning to pull the trigger, and the only way you can learn to pull a trigger is to pull a trigger. It cannot be learned by reading, watching or osmosis.
This target is an almost ideal representation of what good sight alignment and trigger pulling looks like with regard to defensive shooting; it exemplifies a good balance of speed and accuracy.
Dry practice or dry-fire is a fantastic way to do this, because it costs a lot less than actual shooting. But you don’t have to practice pulling the trigger while the sights are on the target to get better at pulling the trigger; you can improve your ability to pull a trigger correctly by pulling the trigger lots of times. The more you do it, the better you’ll get.
However, you must be prepared for failure; no matter how good you get a pulling a trigger you will at some point pull one incorrectly. Practice is how you get to the point where the good pulls far outweigh the bad ones.
Editor’s Note: This article originally appeared in the January 2021 issue of Gun Digest the Magazine.
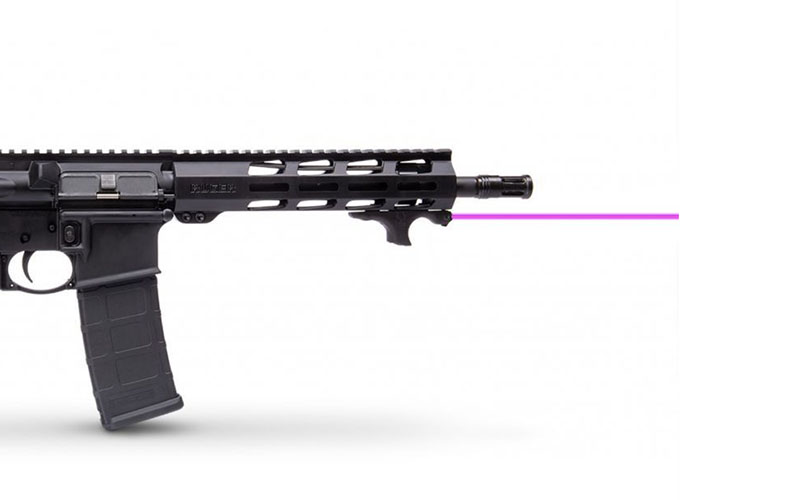
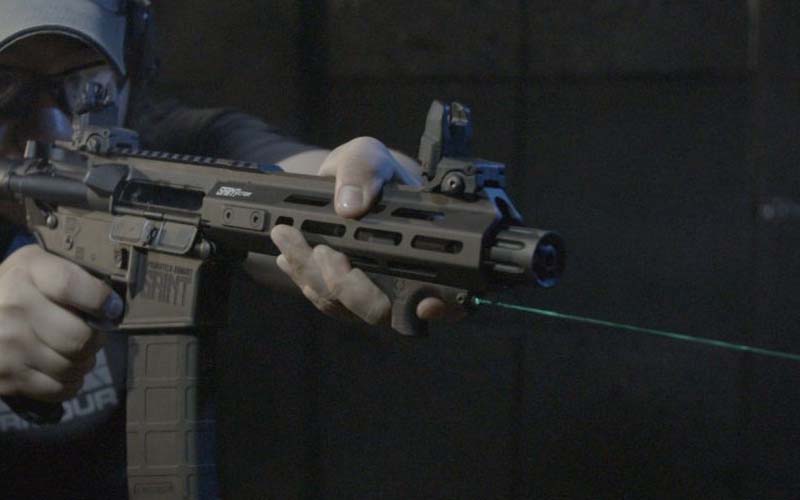
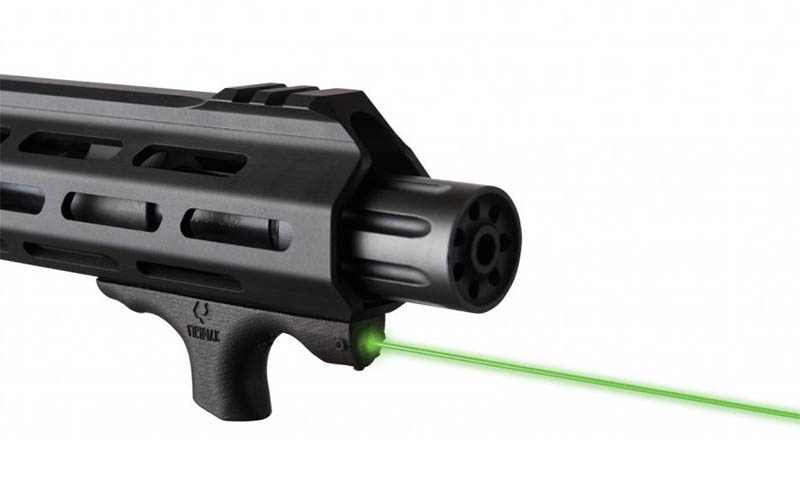
Hand stops are a popular ergonomic accessory that can help the shooter maintain control of their rifle while firing. Viridian Weapon Technologies asked themselves, why waste room inside the hand stop when it could be pulling double duty? This is what led to the development of the original HS1, a combination hand stop and laser aiming unit that was available with either a red or green visible laser. While the tactical world has been hesitant to seriously use laser aiming devices of any kind during daylight operations, their usefulness at nighttime is a different story. Those familiar with night vision know that infrared lasers have proven to be invaluable force multipliers on the battlefield, allowing a soldier equipped with night vision to deliver accurate fire without the use of an optic, cheek weld or any kind of proper sight picture. As the use of night vision grows in popularity and accessibility within the civilian world as well, Viridian has decided to begin offering the HS1 IR.
HS1 IR device mounted to rifle. Purple laser is representative of invisible IR beam.
Own The Night
Now available with an infrared laser, the HS1 IR was designed to simultaneously improve the shooter’s control of their weapon while also providing a clear indication of the weapon’s point of aim. Unlike visible lasers which can only effectively place a dot on their target during daylight conditions, IR laser aimers used in conjunction with night vision can show a clear beam extending from the end of their emitter to where it is being aimed, up to two miles away in the case of the HS1 IR. Whether you enjoy hunting hogs in complete darkness or just want to be ready to go bump in the night if the need ever arose, the Viridian HS1 IR seems ready for serious use.
HS1 green laser version, HS1 IR laser is invisible to naked eye.
The HS1 IR is activated automatically when the hand stop is gripped in a shooting position, instantly assisting with target acquisition as well as recoil control. This combo unit is also lighter, more compact and less expensive than many similar devices in its class, and it’s the only one that doubles as a hand stop. It mounts using two slots of M-LOK, but a Picatinny rail adaptor is available as well. The HS1 IR can operate for 1.5 hours while turned on, but the automatic activation and deactivation should preserve the battery for a longer amount of time of real use. It is powered by a single 1/3 n battery.
The hand stop housing is available in either black or FDE, and the IR beam is adjustable for both windage and elevation. The HS1 IR has an MSRP of $249 and includes a 7-year warranty. While the visible laser variants of the HS1 may be more tacticool than genuinely useful, the new HS1 IR has the potential to become a serious piece of night vision kit for users to consider.
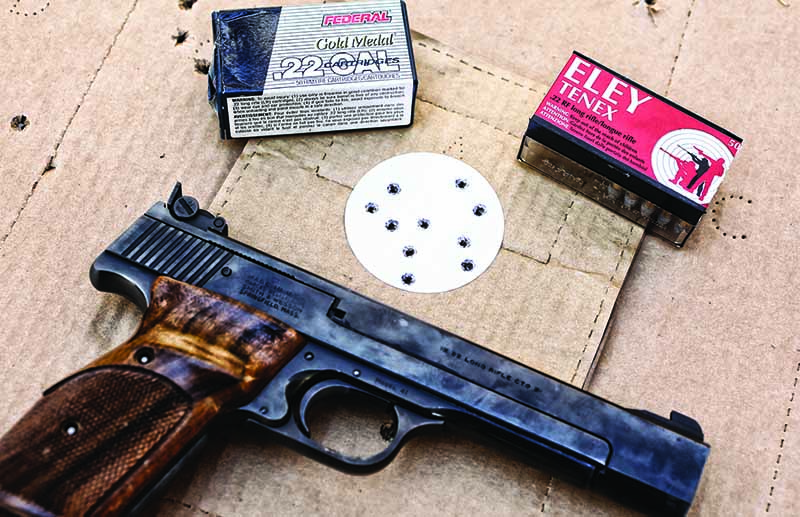
Conditioning a rimfire barrel? Pish if your aim is perforating tin cans. But if maximum accuracy is your goal you’d better listen up.
What You Need To Know About Conditioning a Rimfire Barrel:
Lubricant on the outside of .22 LR is what causes accuracy issues between loads.
In most cases, this is overcome by shooting a number of rounds to condition the barrel to the particular load.
It can take as many as 40 rounds before the ammo/gun finds its groove.
Many veteran shooters won’t clean the bores of their rimfire in fear of upsetting its conditioning.
I shot my first IPSC match in the fall of 1977. I won it, and that was that; I was hooked.
Aiming for maximum accuracy, ensuring your conditioning your rimfire’s barrel for specific loads Is a must.
By 1986, I had been on a roll for a few years. I attended three U.S. IPSC Nationals and had a slot for a fourth. I shot in local matches in two states and the Second Chance Combat Match. I suddenly had an invitation to the inaugural Masters in my mailbox. Woo-hoo!
But I needed a rimfire pistol.
As luck would have it, I had just acquired an S&W M-41. I proceeded to the gun club with my also-new Ransom rest and proceeded to make myself crazy. Nothing would shoot well enough for the match, and nothing shot as well as the pistol or the ammo makers promised. Even the good stuff printed groups on the lines of 3 inches at 50 yards.
I was about to give up when I remembered reading about small-bore rifle competitors. They’d test various batches of ammo for accuracy, and when they found the best available for their rifle (this was in the early Paleolithic era for ammunition accuracy), they’d buy a metric truckload of it.
And not just that load but that production lot.
The important thing was this: They had learned the necessity to “condition” a rimfire barrel for each ammo tested. That is, they’d either run a patch down the bore and then shoot the next load (rare in small-bore circles) or just start shooting the next load. But they wouldn’t measure groups with the next load until the load had time to deposit its own mixture of lube and residue in the bore—its own mojo, if you will.
That was the step I was missing.
By shooting two, three or four groups with a given load, and then switching to the next, I wasn’t giving my M-41 time to settle down with a particular batch of rimfire and get into the mood. It was always just about set, and then I’d go and change things.
You have to get to know your rimfire firearm in order to extract maximum accuracy out of it. Some are easy-going, and some will sulk.
Oh, the impatience of youth.
Rimfire Barrel Conditioning
Why do firearms do this, and in particular, rimfire firearms?
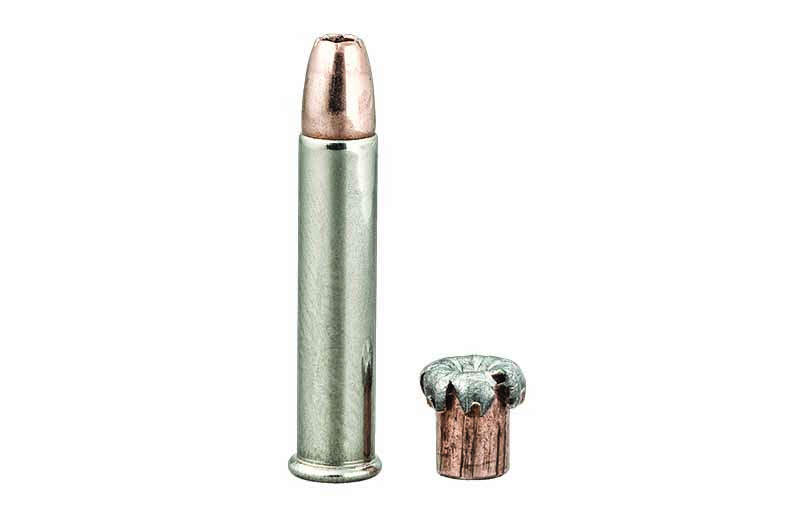
Simple: .22 Long Rifle ammunition is, as we all know, outside-lubed. Unlike centerfire ammunition, where the case encloses the lubricant, on a rimfire, it’s right out there, in front of God and everybody else.
Every maker has their own “secret sauce” of lube—what works, what’s cheap and what stays in place during manufacture, shipment, storage … who knows? They make their own, and if there are still traces (or more than traces) of lube or something else from the previous load tested, the bullet can’t really do its job.
The lubrication issue is exacerbated by the pretty much pure lead composition of the bullet. They’re made soft because it’s cheap, and soft bullets are easier to swage into shape. But they’re also made soft so they’ll upset, or obdurate, in ballisticians parlance, to fit the bore.
Having some other lubricant interferes with the smooth progression of this part of the bullet’s travel. We are, after all, talking about the last bits of accuracy, so anything that interferes with the process makes a difference on the last few percentage points of performance.
Sweat The Small Stuff
This means that, in order to wring the most accuracy out of a given load, you have to shoot enough of it so that the lube-size-bore-fit-travel equation is to the satisfaction of the firearm in question.
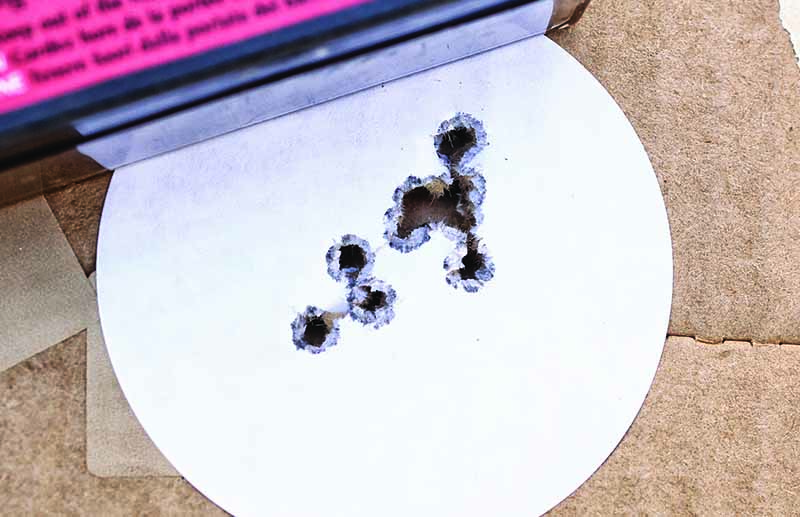
The author is a big fan of Eley Tenex because they often deliver groups like this at 50 yards. However, when switching to another batch of Tenex, he’ll recondition the bore again.
What about cleaning the bore? First of all, at that time (I don’t know about now) most small-bore shooters would look at you with a mixture of horror and pity were you to broach the subject of cleaning rods, solvents and patches. Brushes down the bore was simply a taboo subject. The risk of wear to the throat or muzzle of their rifle was too great, in their opinion—better to simply shoot more ammo.
As far as cleaning the rest of the rifle or pistol was concerned, that wasn’t a problem. And if any cleaning solvent or oil found its way into the chamber or down the bore, well, the solution to every problem was to shoot enough rounds to “clean it up” and “recondition” the bore. Back when “expensive” rimfire ammo might cost you a nickel a shot, “shooting more” was inexpensive advice.
Defining Accuracy
As I told you, this was the early Paleolithic as far as bores, lube, cleaning and accuracy were concerned. Today, things may or may not have changed; it depends on what you think “accuracy” is and who you’re shooting with. The last time I was shooting accurate rimfire rifles (scarily accurate, at that) we were connecting on plates out to 400 yards, as long as the wind cooperated. We didn’t change ammunition, however, and we didn’t put anything down the bore but more ammo.
Now, does this matter today? That depends. If you’re out for an afternoon of plinking or teaching a new shooter how things work, no. Minute-of-tin-can is going to be plenty accurate, and using whatever ammo is available, inexpensive or reliable is what’ll get the job done.
However, if you’re trying to improve your skills in the form of using a duplicate rimfire to your centerfire pistol or rifle, then maybe. If the accuracy level of the mismatch ammo to bore is still smaller than your aiming error, you’re in the same boat as the plinker or new shooter—you won’t notice a thing.
However, if you’re shooting in competition or you’re trying to find what an otherwise accurate pistol or rifle will do at its best, then, yes, you have to condition the bore. And recondition with the next load.
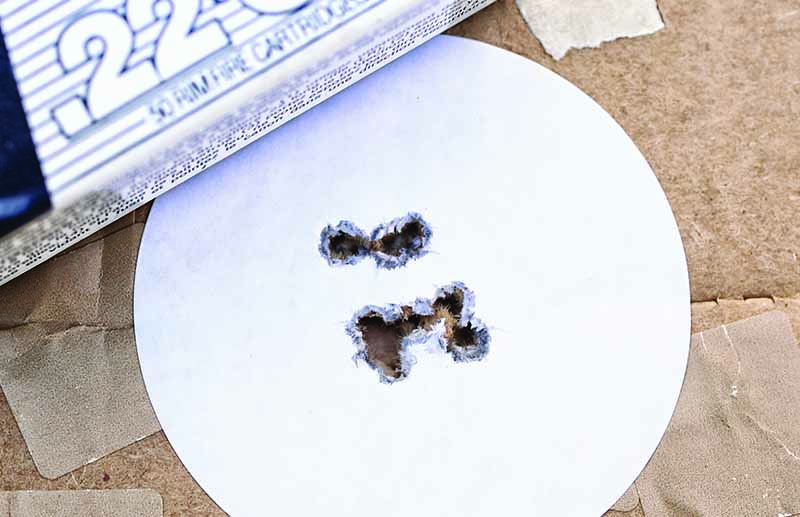
Once the author has conditioned the bore of his M-41 to Federal Gold Medal, it’ll deliver groups like this at 50 yards from the Ransom rest.
What I found was that my M-41 was the equivalent of a redheaded supermodel when it came to rimfire ammunition and accuracy. It’d take me 20 to 30 rounds of the next load before it’d settle down, and then it might or might not like what I was feeding it. I finally found that there was a correlation: The more expensive the ammunition, the better the chances it would deign to shoot it well.
Sigh.
I used the cheap-but-accurate-enough ammo for practice, and then I made sure I reconditioned the rimfire’s barrel thoroughly with the expensive stuff before loading up the car and driving to Quincy, Illinois. I did well enough that, after three years, they bumped me up from amateur to professional. I couldn’t be both a full-time gunsmith and a professional shooter, so I had pick one and bowed out of the pro division.
Oh, and the redhead comparison? I had by then been living in a university town for a number of years. While my sample size wasn’t statistically significant, there were some correlations. And yes, there were levelheaded redheads and crazy brunettes (we won’t speak of blondes at this time), but the odds were, well … with the stereotype.
Editor’s Note: This article originally appeared in the January 2021 issue of Gun Digest the Magazine.
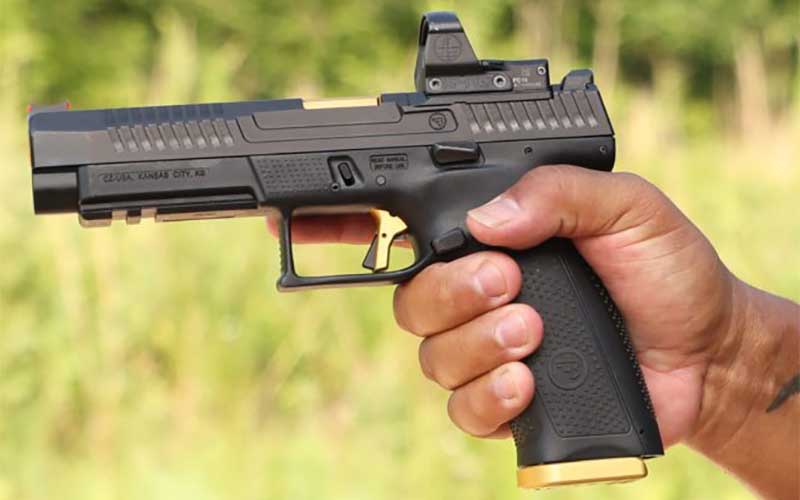
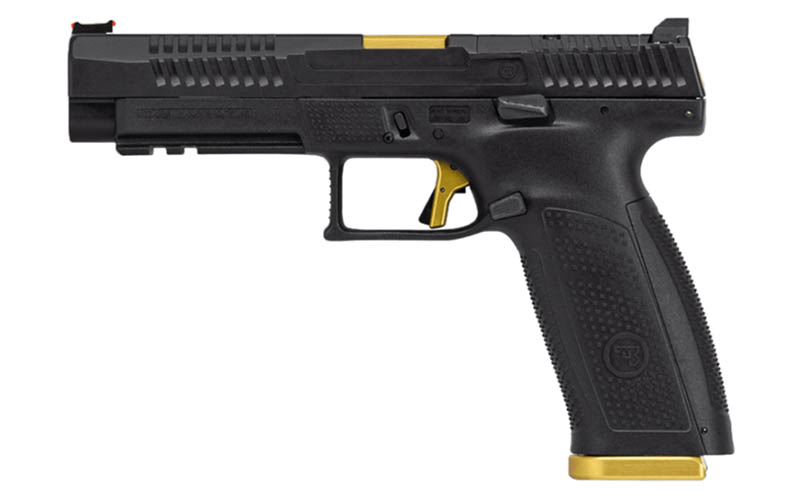
Originally designed for self-defense, the CZ P-10 series is now competition-ready with the new P-10 F.
CZ P-10 F Features:
9mm, 19+1 Capacity
Striker-Fired
5-Inch Barrel
Fiber Optic Front Sight, Optics-Cut Slide
MSRP: $999
CZ’s flagship pistol, the CZ-75, began its life as a military and defensive handgun only for it to eventually evolve into the slew of competition-oriented variants that exist today. Now, their P-10 striker-fired series has begun the same process. The CZ P-10 F is their first competition-ready striker-fired pistol to come to market, and time will tell if it proves to be as popular as the Shadow or Tactical Sport series.
Improved Accuracy
Both the mechanical and practical accuracies of the CZ P-10 F have been improved over the standard model, primarily due to its longer barrel and sight radius. The new cold hammer-forged 5-inch barrel also features a 9mm match chamber for increased consistency and improved feed ramp geometry for more reliability.
Practical accuracy was further improved by the P-10 F’s standard fiber-optic front sight and flat HB Industries trigger. The slide has also been cut to accept a variety of pistol red dot sights.
Upgraded Ergos
Like the original P-10, the P-10 F has a polymer frame and comes with three interchangeable backstraps. It also still has a reversible magazine release and an ambidextrous slide release lever, except they are now made by Apex Tactical and feature enlarged, easier to access controls. Like the original iteration, the P-10 F also still has forward and rear slide serrations, but they appear to be more aggressive on the new competition model.
If you participate in any kind of pistol shooting competitions and enjoy the CZ P-10 platform, the P-10 F is for you. It offers familiar ergonomics and controls to the standard defensive model but has been improved for competition use. Its gold accents and MSRP of $999 ensure that you won’t forget that fact. Ten-round magazines are also available for ban-state residents. If the new CZ P-10 F proves a popular piece for competitors, it will be interesting to see how CZ’s competition striker-fired line expands and develops.
Rimfires for self-defense might be met by a chorus of clucking tongues, but when lives are on the line, ‘small’ is better than nothing at all.
Scott Reidy, director of training at Sig Sauer Academy, spent 21 years as a police officer in Nashua, New Hampshire, where winters are cold and clothing is heavy. He’s spent most of the last 10 years as a full-time firearms instructor.
“Last year, we had 14,000 students through our concealed carry program,” he said. “We teach heavily on acceptable caliber and recommend no lower than a .380, but there are some big caveats there. Can you safely manipulate the gun? Manage the recoil? How small does the gun need to be to conceal?”
In other words, there are scenarios where rimfires for self-defense make sense, rare as they might be. Older arthritic hands that can’t handle the snap of a micro .380 or 9mm might be OK with a low-recoil .22 WMR or .22 LR. Disabled or injured shooters with limited hand mobility may be able to safely manipulate a small and light pistol, with limited recoil.
Then, there are deep concealment scenarios that call for a positively tiny piece—a boot or even a belt-buckle gun. This all boils down to the idea that a small gun a shooter can shoot accurately, reliably and quickly is better than a larger caliber they can’t shoot well at all. Hitting is better than missing. One gun is better than no gun.
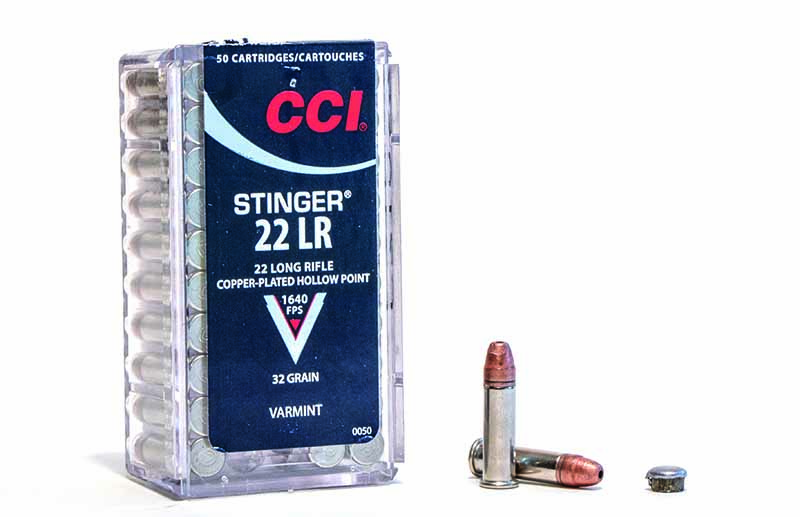
When looking for penetration from a .22-caliber bullet, think speed. CCI’s Stinger and Velocitor rounds are designed with velocity in mind.
And, two guns are better than one gun. A friend of mine in Georgia does just this, carrying a concealed Sig P365 on his hip every time he steps out of the house, along with a Ruger LCR in .22 WMR in an ankle holster when about town with his wife, who knows how to shoot but doesn’t like to carry.
“If something terrible happens, and we’re in a shopping mall, say, I can get her to a safe place, arm her with that little gun she likes to shoot at the range, and situationally we’re better off,” he said. “Two guns are better than one.”
Limited as it might be, rimfires have a particular use case in the self-defense world.
.22 Magnum For Self-Defense
Considering rimfires for self-defense, we’re really lumping together the two .22s—the .22 WMR and the .22 LR. This is largely unfair because as all Gun Digest readers know, ballistically they’re very different. Most won’t argue the adequacies of .22 WMR for self-defense, and some will say its power versus cost versus weight make it the ideal SHTF survival round.
Consider how the .22 WMR holds up to the old-school pocket gun rounds like the .25 Auto and .32 Auto, as tested by engineers at Federal Ammunition at the Federal Factory in Anoka, Minnesota.
“Our Gold Dot .22 Magnum load, which we’ve had in the lineup for years, will go toe-to-toe with any .32 Auto or .25 Auto any day of the week,” said Dan Compton, product manager for rimfire and shotshell with Federal. “Our main goal was penetration, even at the sacrifice of expansion. The light bullet with flat profile really gave us that penetration.”
Federal found that the 40-grain .22 WMR running 1,500 fps penetrated 2.5 inches more than the heavier, slower 60-grain .32 Auto load running just 725 fps. Talented gun writers like our own Richard Mann have corroborated these findings from as early as 2013, how the .22 WMR with loads like Gold Dot and Hornady Critical Defense have killing penetration when placed correctly, with adequate expansion from handgun-length barrels.
.22 LR For Self-Defense
A more debated topic is the viability of .22 LR for self-defense applications. While no dedicated .22 LR self-defense loads are currently on the market, it wouldn’t surprise me if we see them trickle out in the new year.
If the main goal remains penetration, as it was for Federal on .22 WMR project, it’s likely a self-defense .22 LR will be a fast, light load—something hyper-velocity like a CCI Stinger or Velocitor. Both loads have been widely tested by engineers and gun writers alike for self-defense applications, and, in the best cases, penetrate ballistic gel just 6 inches.
To this point, Reidy has seen cases on the street where .22 LR rounds have failed to penetrate heavy leather jackets. One of my most memorable police stories as a daily newspaper reporter was a guy shot randomly in the back of the head with a .22 LR while running down the street. The shooter was an estimated 50 to 100 yards away when his 40-grain soft point connected dead center in the back of the runner’s head. The bullet broke the skin, but not the skull, and stuck there like bent tin can. The cell phone photo his girlfriend had taken of the bullet lodged in his head was graphic, and the newspaper declined to run it. The runner, for what it’s worth, thought he was stung by some giant hornet and was seen, patched up and pushed out of the emergency room in a few hours.
Not all .22 LR loads are equal, of course. Damage from a bulk-pack load at 100 yards is nothing like that from a hyper-velocity round at 10 steps. At bad-breath distances, the right .22 LR could be potent. As David Petzal has written, “They’ve killed African lions and Alaskan grizzlies and who knows how many unfortunate human beings.”
With a big trend in the firearm industry currently being all things .22 LR, and the release over the past year or so of new .22 LR pistols from Glock, Ruger, Taurus, Kel-Tec and others, rest assured the discussion of .22 LR as a viable and deadly self-defense round is only just beginning.
Editor’s Note: This article originally appeared in the 2020 EDC issue of Gun Digest the Magazine.
While it may seem like good news rabid anti-gunner David Chipman’s nomination for ATF head was dropped, the battle may have only just gotten harder.
Leaked information from the Biden administration has revealed the White House’s intention to withdraw David Chipman’s nomination for bureau director. Chipman’s blatant and aggressive anti-gun rhetoric, and work as a lobbyist for gun-control groups should have been enough to disqualify him from the position from the start. But it was likely accusations of past racist comments that put the final nails in his nomination. Whatever the reason for Chipman’s demise, it is clear the Biden administration is not done pursuing its gun-control agenda. And without a clear boogeyman such as Chipman to unite the gun community, fighting future attacks against the constitution becomes harder.
There may not have been a more perfect candidate to incite passionate resistance to gun control than Chipman. Without his almost cartoonish media presence, it’s a fair bet there would have been far fewer comments submitted to the two ongoing proposed ATF rule changes regarding home-built firearms and braced pistols. His donkey-like visage acted as the perfect talisman to concentrate pro-2A support around the country. While I’m happy to see him go, I’m worried it will only inspire sneakier tactics in the future.
President Biden has already enacted backdoor gun control by sanctioning Russian ammunition imports, and there’s nothing stopping him from continuing down this path. Imported arms and ammo are a major backbone to the American gun industry, and future sanctions on other ammo-producing nations are not off the table. The current administration seems to also hold the governments of Turkey, Hungary and the Philippines in a less than positive light. All three countries are major arms and ammunition exporters as well. With Chipman out of the picture to do the White House’s dirty work, it may come down to more sanctions and other unilateral executive branch actions to achieve their unconstitutional goals.
Feel free to celebrate that Chipman was denied a job, but remain vigilant. Gun control attempts won’t be stopping any time soon. Chances are the next nominee for director of the ATF will be as rabidly anti-gun as Chipman, but without the baggage. If he or she lacks a history of racist comments, odds are the nominee will be confirmed. In the meantime, the ATF remains a headless snake, but one that can still bite gun owners.
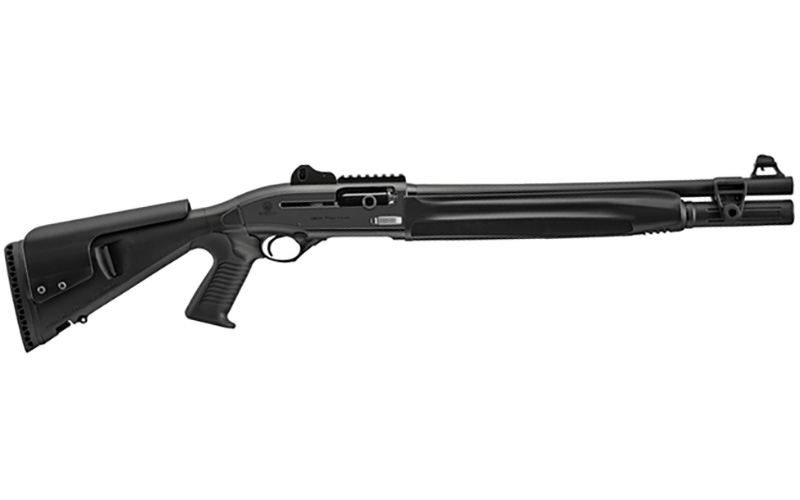
Reliable, fast and high-capacity, the new enhanced 1301 Tactical 12-gauge from Beretta USA is loaded with features that make operating easy.
Enhanced 1301 Tactical Features:
12-Gauge, 7+1 Capacity
Semi-Auto, Beretta BLINK Gas System
18.5-Inch Barrel
3-Inch Chamber
Ghost Ring Sights/Picatinny Top Rail
MSRP: $1,429-$1,449
People can’t help but compare the Beretta 1301 to its iconic older cousin—the Benelli M4. While they are certainly similar in many ways, and both shotgun brands are owned by the same parent company, there are plenty of design differences between the two guns. The legendary Benelli M4 has a lot going for it, but many who have had extensive trigger time on both models have claimed that the 1301 is better in many ways. Now, following several upgrades and refinements, the enhanced 1301 Tactical is in an even better position to give the M4 a run for its money.
Enhanced
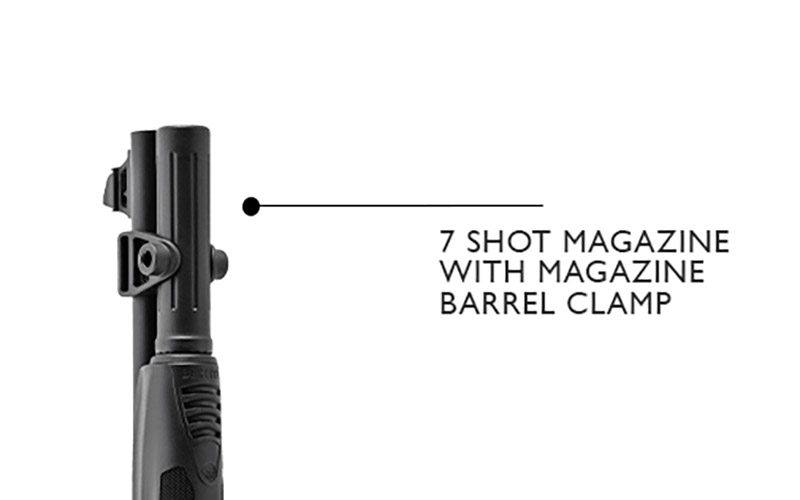
While the original 1301 Tactical was appreciated by many, it did have some shortcomings. Its BLINK gas system is ultra-fast and reliable, but that only means that it takes even less time to empty the gun’s tube. Because the original 1301 only had a five-shell capacity, the enhanced 1301 Tactical now comes from the factory with a 7-shot tube. The new barrel clamp also has MLok slots and QD sling cups, similar to the aftermarket accessory that was the go-to option for the original 1301.
The bolt release, safety and charging handle are also all enlarged and aggressively textured for easier operation.
1301 Tactical Options
The stock choices for the enhanced 1301 Tactical have been increased while the finish choices have been reduced. The first generation 1301s were available with either black, FDE or OD green Cerakote finishes, but the new enhanced model is so far only available in black. For a $20 higher MSRP, however, the enhanced 1301 Tactical is now also available with a Mesa Tactical Urbino pistol grip stock. This gives the shotgun an even more tactical appearance reminiscent of a Benelli M4 while also improving ergonomics and control. The Mesa Tactical Urbino stock is also adjustable for length of pull, drop and cast.
The enhanced 1301 Tactical also has a cold hammer-forged, back-bored barrel that greatly reduces recoil and muzzle flip.
This sleek 12-gauge just got sleeker, and it’s packed with features and upgrades that make it a contender for one of the world’s top combat shotguns. Like the original 1301, the enhanced 1301 Tactical is extremely reliable, very fast cycling and simple to operate. Its ability to accept modern optics, accessories and slings combined with its now upgraded magazine capacity make the enhanced 1301 Tactical one formidable shotgun.
For more information on the new enhanced 1301 Tactical, please visit beretta.com.
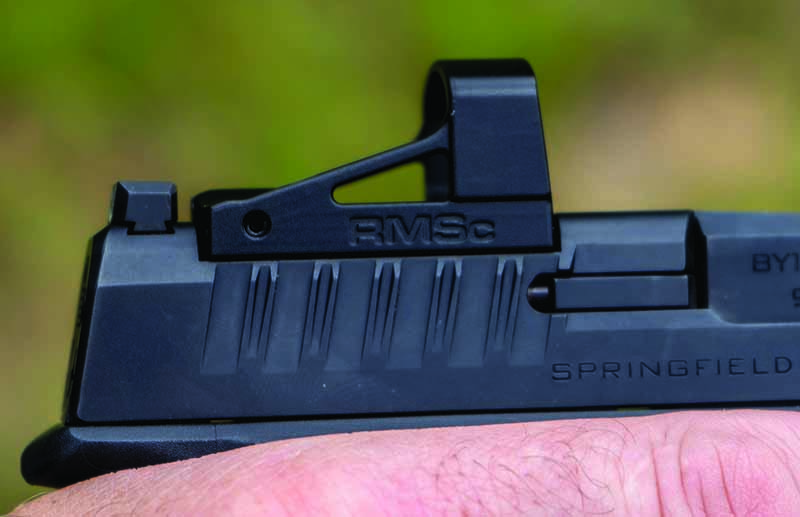
Light, small and affordable, the Shield SMSc might be the ideal red dot for compact pistols.
What Makes The SMSc Ideal For Compact Defensive Pistols:
Weighs less than a half-ounce
Doesn’t have a base plate, thus mounts lower on the slide
Co-witnesses with most compact pistol’s sights
Battery life is three to four years
No doubt you’ve seen articles or videos, or at least heard conversations at your local firearms emporium, about the Springfield Hellcat. If, by some inexplicable reason, this is your first-ever gun magazine, or if you’ve been living the bunker life trying to hide from the election flu or rioters, here’s a brief recap.
The Springfield Hellcat is an ultra-compact, polymer-framed, semi-automatic pistol that’s only 6 inches long and weighs only 18 ounces. It comes with one 11-round magazine and one extended 13-round magazine. It also has a Tritium front sight and a tactical Rack U-Notch rear sight. Depending on the variation, the suggested retail price ranges from $569 to $643.
I’ve spent a couple months working with this pistol and, after more than 500 rounds, I’m impressed. For an ultra-compact 9mm, it’s reasonably comfortable to shoot, plenty accurate for any type of problem you’d ever need to solve with a defensive handgun, and it has proven very reliable. One of the pistol’s most notable features is that it can be had as an optics-ready version, where the rear slide is precut to accept a micro reflex sight.
So there, I’ve given my thumbs up to the Hellcat. In fact, a friend of mine was looking for a compact defensive handgun, and, after some discussion and range time with the Hellcat, it’s the handgun I recommended he purchase. However, as much as I like the Hellcat, it was during my time working with that pistol that I found something I liked even better: the Shield SMSc Micro Red Dot 4 MOA sight.
SMSc Advantage
You can purchase this sight, which attaches directly to the slide of the Hellcat after the plate has been removed, from Springfield for $299. It’s unbelievably small and weighs less than a half-ounce with the battery installed. And, unlike some of the mini-reflex sights, the Sheild SMSc doesn’t have a base plate to hold the battery in place.
A compact handgun like the Hellcat deserves a compact reflex sight, and you won’t find one smaller or lighter than the Shield SMSc.
The top of the slide serves as the base for the sight. This allows the sight to be mounted very low—low enough that you can still see the pistol’s sights through the sight window. This is an exceptional idea: In case the battery is dead or the electronics fail, you can still effectively engage targets. But get this: This sight has a battery life of between three and four years!
We’ve come a tremendously long way from when the first red-dot sights were used on handguns for competition. In fact, while some thought that one day red-dot or reflex sights would be common on defensive handguns, I seriously doubt anyone imagined they’d be this compact. With an IWB holster like the Crucial Concealment Covert IWB ($59.99), you can very comfortably carry the Hellcat with the Sheild SMSc installed, even in the appendix location.
Reflex sights are becoming popular on defensive handguns. They’re also getting lighter and more trustworthy all the time.
In my 2013 book Handgun Training for Personal Protection, I dedicated a chapter to red-dot-style sights. There, I described their primary advantage—you can engage targets with a target/threat focus. What’s meant by that is that you never have to shift your focus from the threat to your sights; you simply put the dot on the target and pull the trigger, just as you would with a red-dot sight on a carbine. It’s the most intuitive sight system available. With not a tremendous amount of practice, I’ve seen shooters reduce engagement times by as much as 10 percent compared to conventional sights. That is, indeed, something of value.
Like laser sights, reflex sights also allow you to keep both eyes open when you shoot. This helps your peripheral vision keep track of things going on around you. However, unlike a laser sight, to accurately shoot a reflex sight you must still bring the pistol—and the sight—up in front of your eyes. The downside of reflex sight systems is that they’re an electrical system that might fail. At least with the Shield SMSc on the Hellcat, if it does fail you can still see your pistol sights.
This Crucible Concealment holster for the Springfield Hellcat fits the pistol even with the Shield SMSc reflex sight installed. Paired together, the three make a great IWB concealed carry package.
Obviously, there are some other considerations with a reflex sight. Light directed at the sight from the front or rear can inhibit your ability to see through the sight window clearly. Your own blood, dirt, or other debris can also get on the lens and do the same thing. Still, like I said in my book, “The future is coming. When it gets here, we will all shoot better and faster.” With advancements in engineering, we’re getting closer to that—reflex sights on handguns—future every day.
Shield SMSc Specs Light Source: Red light-emitting diode (LED) No laser; completely eye-safe No radioactive materials Red Dot Size Options: 1MOA, 1/65RING MOA, 4 MOA dot 8 MOA dot Lens: Reflex x1 (no magnification) Low Parallax Lens Coating Si02 Quartz and Anti-reflection No colored coating, minimizes visible signature Electronics: Battery One 3V lithium battery, CR2032 Battery Life 1 to 3 years – average use >4 years – dark storage Brightness Adjustment: Fast Automatic Brightness Range Lowest – Compatible with Night Vision Highest – Visible against the sky in bright daylight Exterior Housing Material: Glass-filled nylon polymer. Colour: Matte black Dimensions (Sight only): (Length x width height) 42x25x23 mm 1.7×1.0x0.9 inches Weight: 9.68 grams / 0.34 ounces – 12.53 grams / 0.44 ounces with battery Mount: A wide range of mounts are available. MSRP: $304.64
For more information on the Shield SMSc, please visit shieldpsd.com.
Editor’s Note: This article originally appeared in the November 2020 issue of Gun Digest the Magazine.
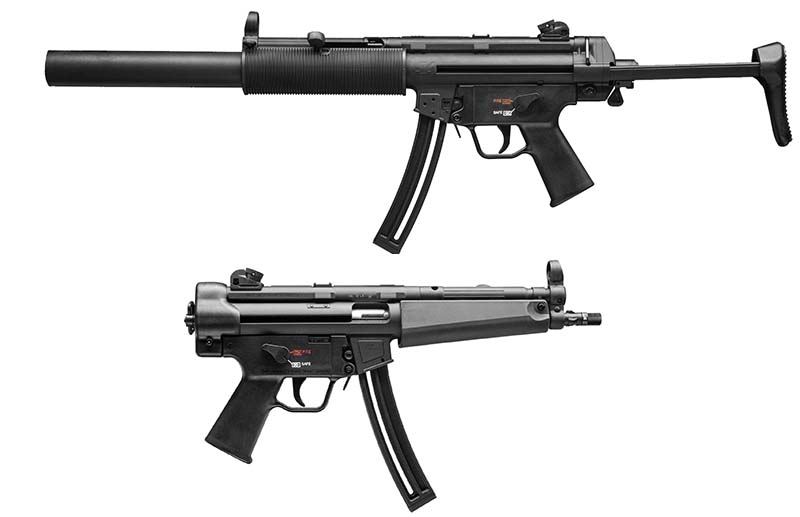
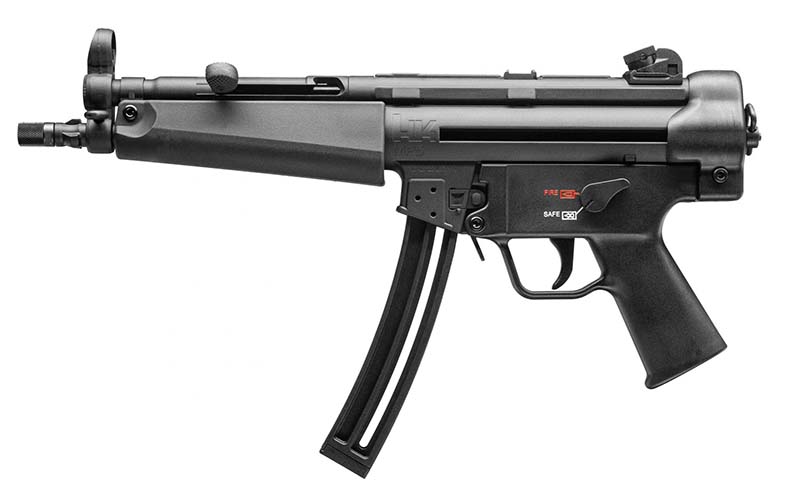
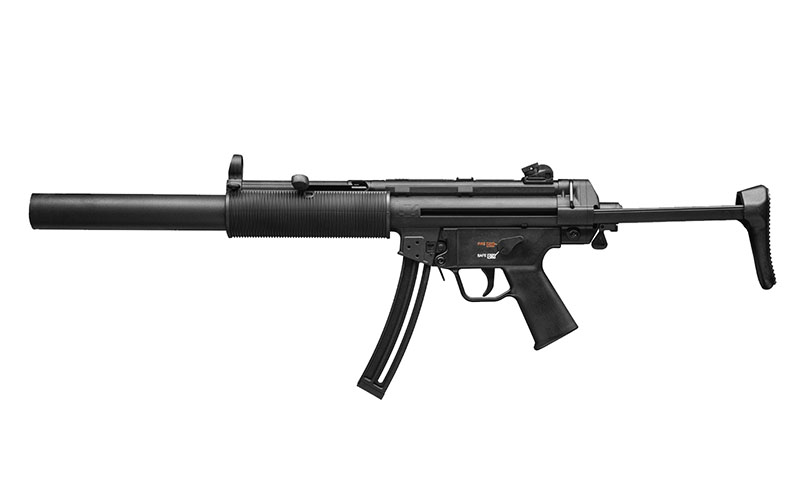
Officially licensed by H&K and made in Germany, the new MP5 .22 LR rifle and pistol are as close as you can get to the real deal for only a fraction of the price.
H&K MP5 .22 LR Rifle And Pistol Features:
.22 LR, 25-Round Magazines
Rifle Has Faux Suppressor And Telescoping Stock
Pistol Has End Cap Sling Swivel
Both Barrels Threaded
MSRP: $479
When H&K began importing their SP5 9mm semi-auto MP5 clone in 2019, many people were very excited. Fewer were excited after seeing the price tag. For those who grew up watching the MP5 being wielded by heroes on the silver screen but could never afford to own one yourself, the new MP5 .22 LR rifle and pistol are probably as close as you can get. They share the iconic look of the original sub gun while costing over $2,000 less than their 9mm semi-auto counterpart, and unlike the SP5 the new rimfire version is available as either a rifle or a pistol.
Made by Umarex in Germany, the H&K-authorized MP5 .22 LR rifle and pistol are semi-auto, direct-blowback firearms. Umarex and H&K have partnered before to produce rifles like their .22 LR HK416. The rifle .22 LR MP5 has a barrel length of 16.1 inches while the pistol’s is 8.5 inches. The rifle version weighs seven pounds, about a pound heavier than a real MP5A3 likely due to its longer barrel and heavier bolt. They come with no provisions for mounting optics, but because the rimfire versions appear to be exact replicas of the real MP5 one can presume that they are compatible with claw mounts.
H&K specifies in the owner’s manual that the .22 LR MP5 rifle and pistol were designed to work with high-quality standard ammunition and high-velocity ammunition, meaning that cheap bucket .22 LR ammo should probably be avoided to achieve maximum reliability.
Pistol Or Rifle?
With a shared MSRP of $479, it comes down to personal preference whether you want the rifle or pistol version of the .22 LR MP5. Because these guns are really only useful as range toys and trainers, even the different ballistics resultant from their different barrel lengths won’t affect most people’s decision. What it really boils down to is whether you plan on suppressing it, SBRing it, or both.
The .22 LR MP5 rifle version comes with a 16-inch barrel in order to legally have its MP5 A3-style retractable stock. The extra barrel length is then shrouded by a faux suppressor, giving the rifle the appearance of the iconic integrally suppressed MP5SD. While the rifle version’s barrel is also threaded, the extra length will make it awkward to suppress, making the pistol version the better choice for a suppressor host.
Both the H&K MP5 .22 LR rifle and pistol have an MSRP of $479 and feed from 25-round magazines with 10-round mags also available for ban states. Both magazine sizes have an MSRP of $35 and the guns are planned to begin shipping to dealers on October 1st.
For more information on the new .22 LR MP5s, please visit hk-usa.com.
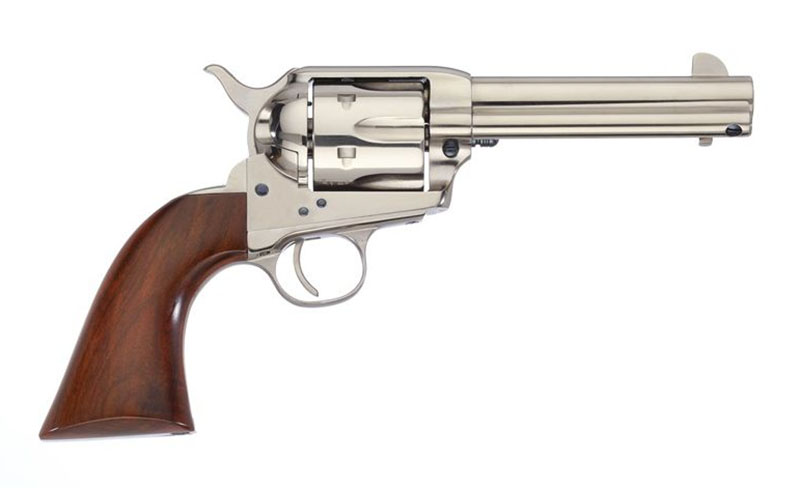
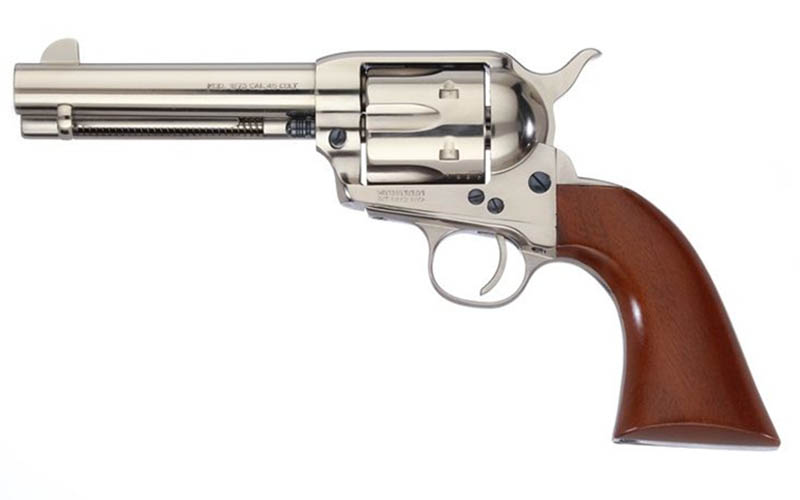
Ergonomics and style come together in the new Taylor’s & Company Gunfighter Nickel revolver series.
Gunfighter Nickel Available Models:
.357 MAG | 4.75-Inch
.45 LC | 4.75-Inch
.357 MAG | 5.5-Inch
.45 LC | 5.5-Inch
Pretty enough to be a hung on a wall, Taylor’s & Company’s new Gunfighter Nickel revolver wasn’t made to be a safe queen. Designed with features intended to improve its shootability, the Gunfighter Nickel revolver is also available with Taylor’s tuned action for an even smoother shooting experience. With a choice of two barrel lengths and two calibers, the Gunfighter Nickel revolver should suit your needs whether you’re looking to take it to cowboy action matches or just use it for some classy, old-school home defense.
The heart of the Gunfighter Nickel revolver is in its grip, which is an 1860 Army style grip attached to the revolver’s otherwise 1873 SAA style frame. This is especially ideal for shooters with larger hands, but even those with more average-sized mitts will likely find the Gunfighter Nickel revolver more ergonomic.
Rob Girard, Vice President of Sales and Marketing, had this to say about Taylor’s & Company’s newest revolver:
“The Gunfighter Nickel is a cool addition to our very popular Gunfighter Series. The nickel-plated revolver has a flashy look with its charcoal blue screws and hand polished action not to mention its available with the unique Taylor Tuned action.”
Besides looking handsome, the new Gunfighter’s nickel finish should be more corrosion resistant than the blued model as well. Whether you’re interested in the .357 Magnum or the .45 Long Colt variant with either the short or long barrel, the MSRP is $704.46. Any of the models ordered with a custom-tuned action will have an MSRP of $850.71.
For more information on Taylor’s & Company, please visit taylorsfirearms.com.
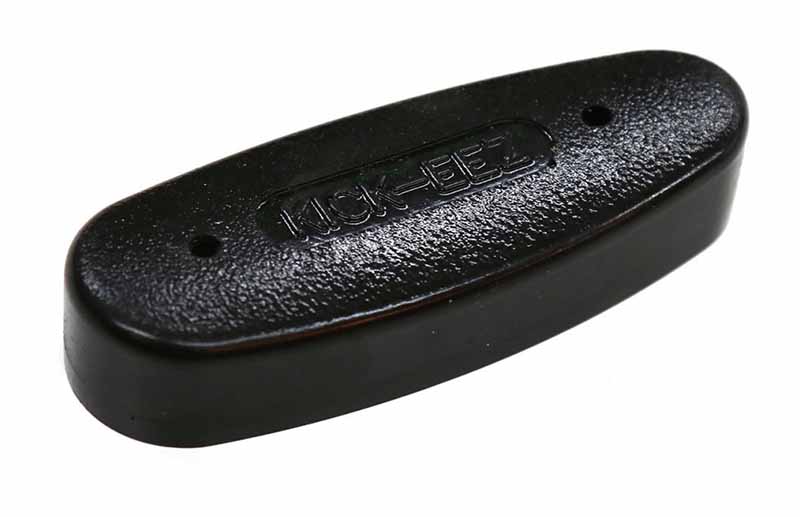
Whether you’re looking to start an aspiring hunter on a full-power shotgun or just a sportsman looking to cut down on shoulder pain, Kick-Eez Junior and Slip-On recoil pads have something to suit your needs.
Kick-Eez Recoil Pad Styles:
Grind-To-Fit
Pre-Fit
Slip-On
Whether it’s hit your radar or not, youth shooting is on the rise. This especially goes for competitive shotgun numbers.
According to data from The National Shooting Sports Foundation and the USA Clay Target League, youth participation rates in hunting and shooting sports improved drastically in 2020 and the trend is projected to continue. Schools and private programs like 4-H have all seen a rising interest in shooting sports over the past few years, and for the sake of the future of American gun culture, this trend should get encouraged as much as possible.
Kick-Eez Junior is sized right to fit on youth shotguns.
One way, especially for youth just cutting their teeth on shooting, is to make it more accessible. And when it comes to smoothbores, there’s no easier—and inexpensive way to do this—than a recoil pad.
Face it, shotguns have a kick to them, one even big guys notice—not to mention a light-framed youngster. But with the addition of a Kick-Eez Junior Recoil Pad or the company’s Slip-on model, nearly any scattergun is accessible.
Kick-Eez Starting Them Off Right
If starting your kid off with a .410 is the equivalent of signing them up for swimming lessons and handing them a 12-gauge is the equivalent of throwing them in the pool, then giving them a 12-gauge equipped with a Kick-Eez recoil pad is equivalent to throwing them in with floaties on. The latter set of examples both provide the novice with a taste of the real experience, but with an added measure of safety or comfort to make it more palatable.
The Slip-On model easily goes on and off any shotgun.
That, essentially is what Kick-Eez Junior and Slip-On recoil pads do. The Junior is a full-time enhancement to a youth shotgun, tailored to and attaching directly to the buttstock of a gun. The nice aspect of this model is that, with Kick-Eez’s spacer system, it also helps modify the length of pull for the perfect fit. While the Slip-On, much as its name suggests, comes on and off at a moment’s notice. A bit more convenient, especially if a youth barrows mom’s or dad’s gun.
Despite their differences, the pads do the same thing—eats recoil. Namely, that’s because both are made from the same material—Sorbothane.
Sorbothane Advantage
Most are saying, what the heck is that? Well, more than a strange name.
Sorbothane is meat-like polymer material developed in the early 1980s that shares some properties with both solids and liquids. It’s like a solid in it maintains its form over time, thus can be made into different products. However, it’s like a liquid when a force acts upon it. Namely, it dissipates energy in all directions, instead of just one.
Kick-Eez sparcers allows you to tailor length of pull for any shooter.
Guess what … that’s the perfect stuff to make recoil pads out of. It’s so effective, in fact, Kick-Eez recoil pads absorb about half the felt recoil from a shot, making the use of a full-power shotgun by a smaller person much more feasible and effective. In the guise of the Junior and Slip-On recoil pads, this can provide the difference between a memorable time behind the trigger or a horrible experience that turns a kid off shooting sports.
It also, potential, offers the youth shooter the chance to begin honing their skills earlier with gauges they’ll most likely use as adults. This is important. After safety, success is the name of the game when it comes to introducing youths to shooting. Nothing is more frustrating to a new shooter than walking away from the range without breaking a clay or a hunt without a bird in hand. If a 12- or 20-gauge is tamed so a novice can use and succeed with it, then all the better in endearing them to the sport.
Kick-Eez Options
In addition to the Kick-Eez Junior and Slip-On recoil pads, the company offers a variety of styles and fits that should suit just about anyone’s needs. Between their grind-to-fit, pre-fit and slip-on styles of pads, they should have a Sorbothane solution that’s compatible with your gun. They come in different shapes and thicknesses too depending on what your intended use. Whether you intend to go hunting with magnum slugs or just bust clays all day long, they have a pad for that.
Kick-Eez offers options for any shooter, from new youth to seasoned hunter.
While the primary demographics likely to benefit from Kick-Eez recoil pads are novices and youths, a 50 percent decrease in felt recoil is something that all of us could appreciate.
Even when shooting light loads out of a heavy gun, after doing it for hours on end one’s shoulder is prone to get sore. That’s why Kick-Eez recoil pads make for an excellent addition to almost any shotgun. They are affordable and don’t modify your gun in any permanent or negative way. A shotgun with a Kick-Eez pad installed will provide a better shooting experience while hunting with hot loads, blasting clays all day or even when helping to encourage youth in your life to take up shooting sports.
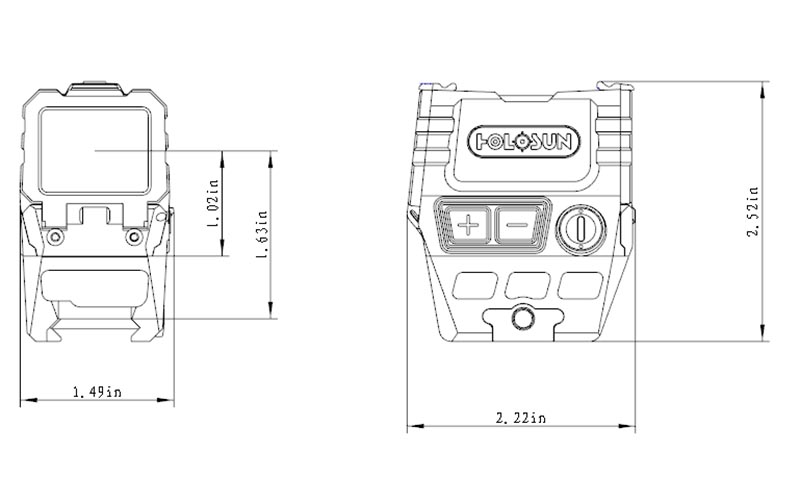
Lightweight, rugged and affordable, the new Holosun AEMS optic has innovative features that are sure to appeal to a wide variety of shooters.
Holosun AEMS Features:
Large FOV, Compact And Lightweight Body
Shake Awake System
~50K Hour Battery Life
Dot, Circle Or Circle-Dot Reticle
Available With Red Or Green Reticle
MSRP: $470.58 (Red Reticle)
Most red dot sights on the market today were designed either to be as lightweight and compact as possible or to be durable and provide a better field of view. These qualities are often mutually exclusive, forcing consumers to choose one style over the other depending on their needs. Now, the new Holosun AEMS is attempting to combine these features into a single, do-it-all optic.
Lightweight Yet Rugged
Constructed from 7075 T6 aluminum, the Holosun AEMS manages to weigh only 3.9 ounces without its mounting hardware. That’s less than half as much as what an Eotech XPS3 weighs, but it’s been tested against recoil vibration and other environmental factors to ensure that it can still withstand plenty of abuse in the field. The Holosun AEMS has also been tested against submersion and extreme temperatures and includes a built-in set of plastic lens covers for further protecting the glass viewfinder. The enclosed nature of the AEMS also means that it’s impervious to snow or mud blocking the sight’s emitter.
Compact Yet Usable
The Holosun AEMS has a similar-sized viewing window to an Eotech XPS3, but still manages to come out dimensionally smaller overall. This provides the shooter with the least obstructive field of view possible, enabling quick target acquisition while keeping the weapon compact and maneuverable. While most red dots of a comparable size and weight have much smaller viewing windows, making them more difficult to use, the Holosun AEMS manages to squeeze the FOV of an almost full-sized optic into a compact housing.
Holosun AEMS Options
The new Holosun AEMS is configurable to work with a variety of different setups, platforms and uses. When purchasing an AEMS, the first option one is presented with is the choice between a red or a green reticle. There are pros and cons to each color, and it mostly depends on personal preference, but the green version does have an MSRP of about $35 more. Both versions of the AEMS can switch between three different reticle modes and 12 different brightness settings. The reticle can either be set to a 2-MOA dot, a 65-MOA circle, or both. The optic is powered by a CR2032 battery but also draws ancillary power from the top-mounted solar panel which doubles as a light sensor for automatic brightness adjustment. The auto-adjust and shake-awake features can also be tuned to fit your preferences or disabled completely. With just the dot set to an average brightness setting under normal conditions, the Holosun AEMS can last up to 50,000 hours before needing a new battery.
The AEMS can also be either directly mounted to the weapon or attached by using the included lower 1/3 co-witness mount. An absolute co-witness mount is sold separately. These mounts enable the Holosun AEMS to be right at home on an AR, HK or just about any other long gun.
With a projected release date of early October, the Holosun AEMS is sure to make waves in the red dot world. Innovative due to its large lens size fit inside a compact housing, the AEMS still manages to be durable and affordable. It will enable shooters to reduce their rifle’s weight and clear up rail space while retaining an optic that looks more usable compared to other micro red dots. The Holosun AEMS is undoubtedly about to become one of the most popular optics in its class.
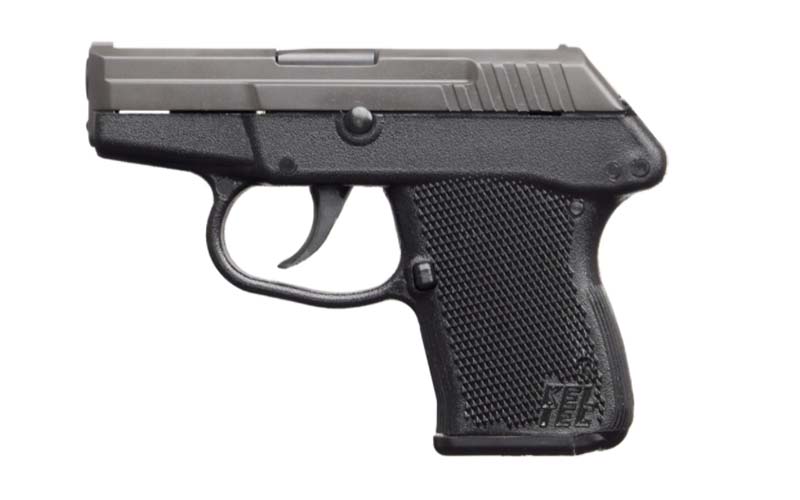
From police ankles to grandma’s purse, the KelTec P32 has been the preferred pocket pistol of many since it was first released.
KelTec P32 Features:
.32 ACP
7-Round Magazine
Double-Action Only
Ultra-High-Impact Polymer Frame
7-Ounces Unloaded
Molded out of what appears to be the same plastic used to make action figures, the KelTec P32 emanates a certain 1990s charm that brings to mind neon-splattered movie theater carpet and paper cups with a wavy blue line across the center. Despite how it looks, the KelTec P32 was an instant classic for the role it was designed for. While the polymer used doesn’t look as sleek as what we’re used to today, it’s high quality, durable and accomplishes one of this pistol’s main goals—being lightweight. Old, all-steel pocket pistols may be compact and work fine when actually being carried in a pocket, but another common carry method used is ankle holster carry. Any cop who used to chase down suspects with a Colt .38 snubby strapped to his ankle will tell you that ounces matter, and that’s where the KelTec P32 shines.
Many Ways To Carry
Many of the KelTec P32’s features make it ideal for deep concealment, especially when weight is a factor. The gun operates by using a short-recoil, locked breach system despite only being chambered for .32 ACP. By choosing this system over direct blowback, the P32 can use lighter recoil springs, resulting in a smoother action. It has an internal hammer and a double-action-only trigger with about a five-pound pull, but KelTec claims that it should be smooth and consistent all the way through. The double-action trigger acts as this gun’s only safety (besides an internal hammer block to make it drop-safe). The lack of a manual safety, external hammer or other controls help keep the KelTec P32 snag-free and extremely simple to operate—all qualities of a good backup piece.
Weighing less than seven ounces unloaded, it’s no wonder why the P32 became so popular for those who carry with an ankle holster, but the gun’s light weight enables more carry methods than just ankle alone. Belly bands, neck-lanyards and other unorthodox techniques that are often thwarted by a gun’s heft suddenly become accessible when the piece only weighs as much as a roll of nickels.
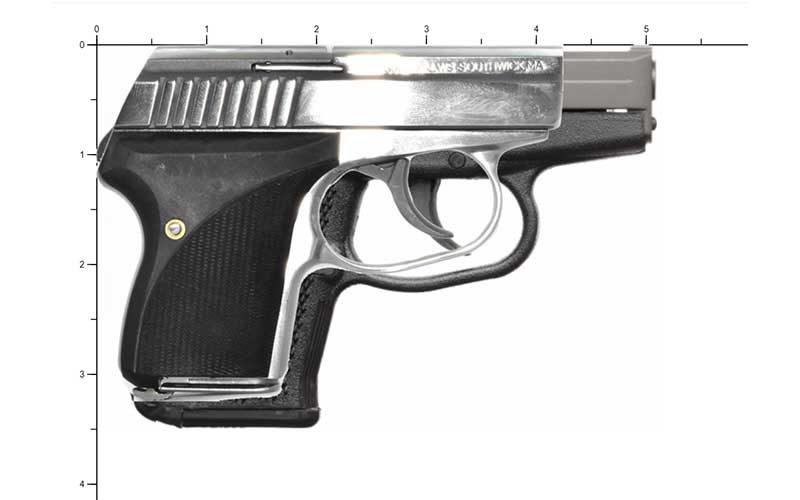
Best In Its Class
As far as polymer-framed .32 ACP pocket pistols go, the KelTec P32 is undoubtedly the best in its class, and not just because it’s the only one in it. Since it was released in 1999 there hasn’t been another pistol quite like the KelTec P32. There are other, metal-framed .32 ACP pocket pistols such as the Seecamp that outclass it in terms of compactness, but there are none that I know of that outclass it in weight. The extra grip size also contributes to better ergonomics and a higher capacity.
KelTec P32 Vs. Seecamp Model 32. Photo: HandgunHero
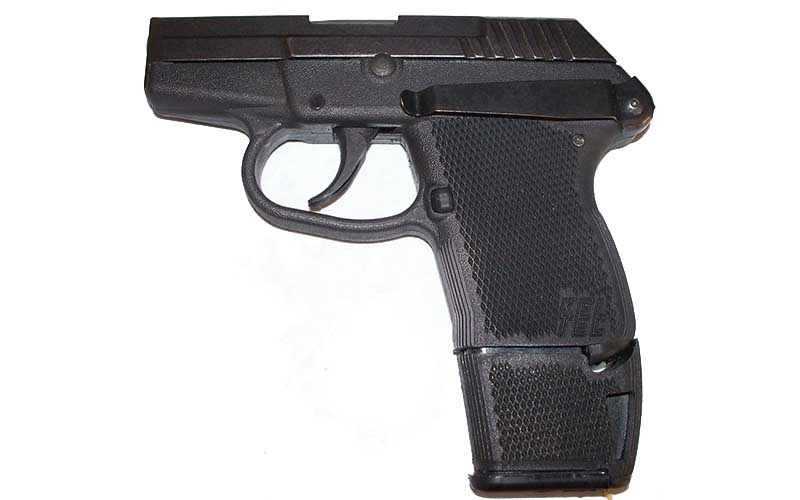
On one hand, the DAO trigger and tiny sights make the P32 difficult for inexperienced shooters to make hits with, but the low-power round being fired should help compensate. An eight-round capacity also isn’t bad for a pocket pistol with flush-fitting mags, but they even have extended magazines available for sale as spares.
KelTec P32 with extended 10-round magazine and a pocket clip. Photo: Wikipedia
The KelTec P32 may still be the number one choice for a police backup gun more than twenty years after the gun’s release. Its uniquely lightweight and simple operation makes it particularly suited for the role in ways that not every pocket pistol can be. It has a slew of aftermarket accessories available for it and still has a reasonable MSRP of $360, making it an attractive option for anyone looking for a deep concealment piece. The KelTec P32 fills a niche that no other pistol does quite as well, and for that reason this retro-looking chunk of plastic will likely be remembered as a classic for years to come.
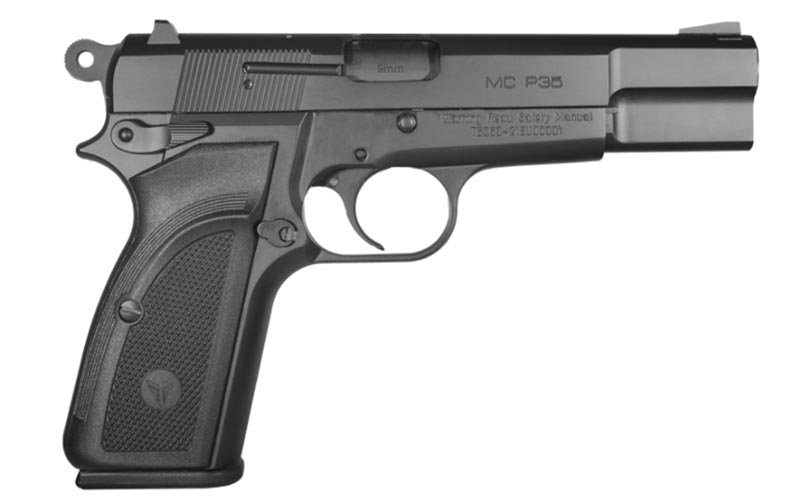
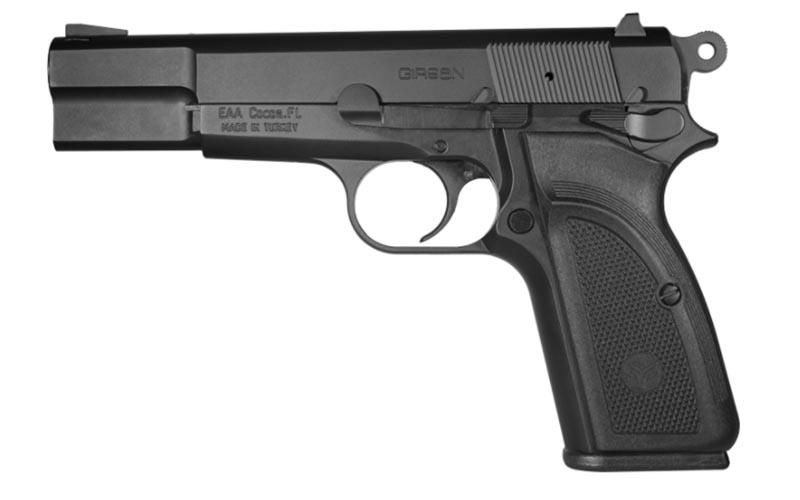
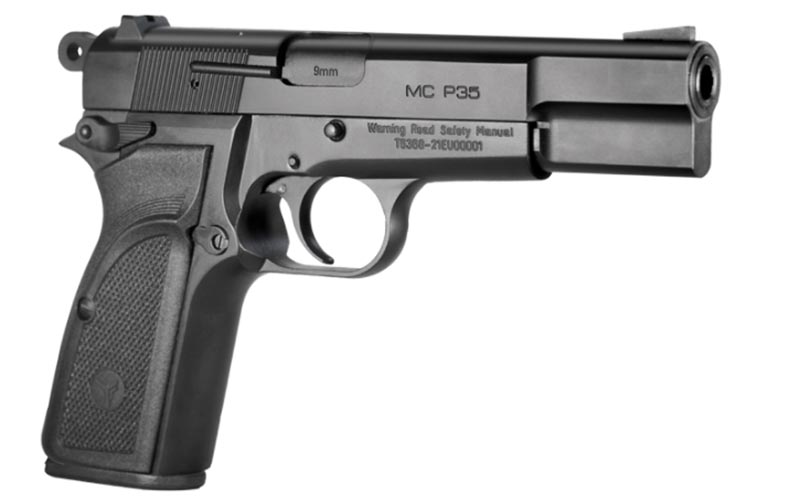
New production Hi-Powers are once again available as EAA begins importing the Girsan MC P35.
Girsan MC P35 Features:
9mm, 15+1 Capacity
Single-Action
Ambidextrous Safety
Matte Black Finish
Checkered Synthetic Grips
Ever since Browning discontinued production in 2018, your choices for a Hi-Power have been limited to the secondhand market. Another Turkish-made clone, the Tisas BR9, was available briefly as well but was apparently discontinued due to quality issues. EAA is now attempting to revive this classic John Browning design with a new Turkish clone we’re seeing stateside for the first time—the Girsan MC P35.
Classic Design
Development of the Hi-Power started under John Browning and was finished by his assistant at the time, Dieudonné Saive. Browning’s achievements need not be repeated, but Saive was responsible for pioneering the double-stack pistol magazine which would prove to be the heart of the Hi-Power design. He would also go on to design the iconic FAL. The Hi-Power was instantly well-received by its users and its popularity around the globe would only grow in the decades to come.
Many people claim that the Hi-Power is the most ergonomic pistol they’ve ever shot, and many of those who disagree only do so because they prefer pistols that were derived from the Hi-Power like the CZ-75. The requirements driving the Hi Power’s development necessitated that it be accurate, powerful, durable and have a high capacity (for the time). Assuming that the Girsan MC P35 is a decently manufactured reproduction, it should have similar accuracy and reliability as the original. Its capacity has already been improved upon by shipping with modern, flush-fitting 15-round magazines rather than the initial 13-round design. The Girsan MC P35 also includes an ambidextrous safety right out of the box, as well as an improved external extractor and a rounded, no-bite hammer.
One original feature that the Girsan MC P35 retained that could have been left off is the magazine disconnect safety. This was one of the original military requirements for the Hi-Power and was included solely to prevent poorly trained troops from accidentally shooting themselves while cleaning the gun. The inclusion of this device unfortunately means that the trigger is not as good as it could have been without it, and in my opinion, it makes operating the gun more tedious with no real benefit.
Here To Stay
While its popularity may have declined some in recent years, the Hi-Power was one of the most prolific sidearms in the world for several decades. It was the go-to pistol for many American special forces soldiers when working abroad in this time period due to how commonplace the spare parts and magazines were. With the millions of Hi-Powers built and distributed over the decades, it’s safe to say that this iconic design isn’t going anywhere. So if you’re considering the Girsan MC P35, parts availability shouldn’t be a concern. Magazines, aftermarket upgrades and accessories like holsters can all still easily be found.
Bigger, heavier and more primitive than most handguns on the market today, the Hi-Power is still an excellent design that one could feel confident trusting their life to. If the Girsan MC P35 proves to be a well-made clone, a pair of wooden grips and a leather shoulder holster would make for one classy CCW setup.
With an MSRP of $528, the Girsan MC P35 looks like a very promising pistol. It’s always nice to see the classics being kept alive. Hopefully this Turkish clone proves to be a faithful reproduction of John Browning’s work and continues to be imported for years to come.
For more on the Girsan MC P35, please visit eaacorp.com.
Looking to go armed, but are stuck in the weeds as to what to arm yourself with? Here are 20 of the best concealed carry gun options that will keep you on the defensive.