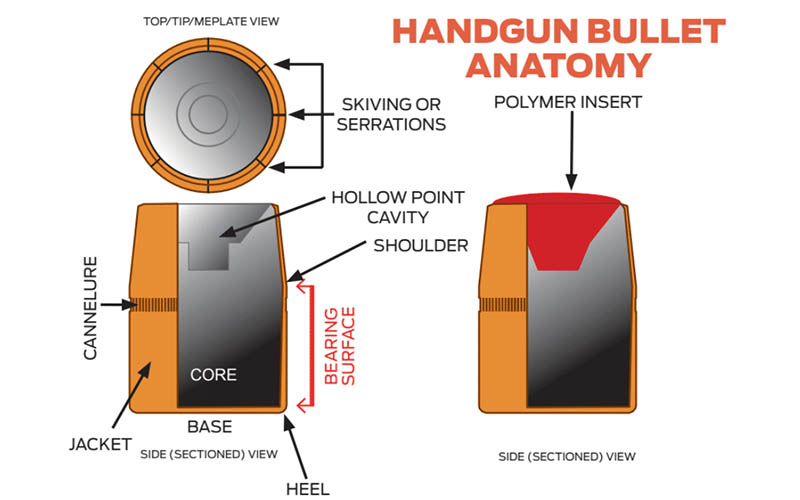
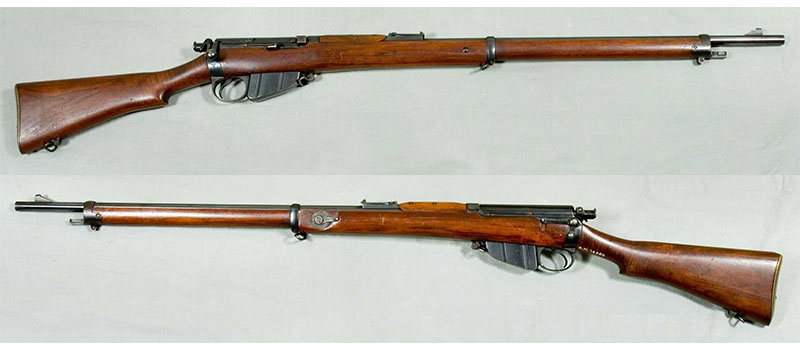
An in-depth look at the Lee-Enfield, one of the most successful military bolt-action rifles ever produced.
The Lee–Enfield rifle was a cutting-edge design when it was adopted by the British military in 1895. It was issued throughout the British Empire and became one of the most recognized bolt-action rifles ever deployed. While overshadowed by the Mauser and the Mosin-Nagant, the Lee-Enfield is still the third most-produced bolt-action in history with an estimated 17 million units made.
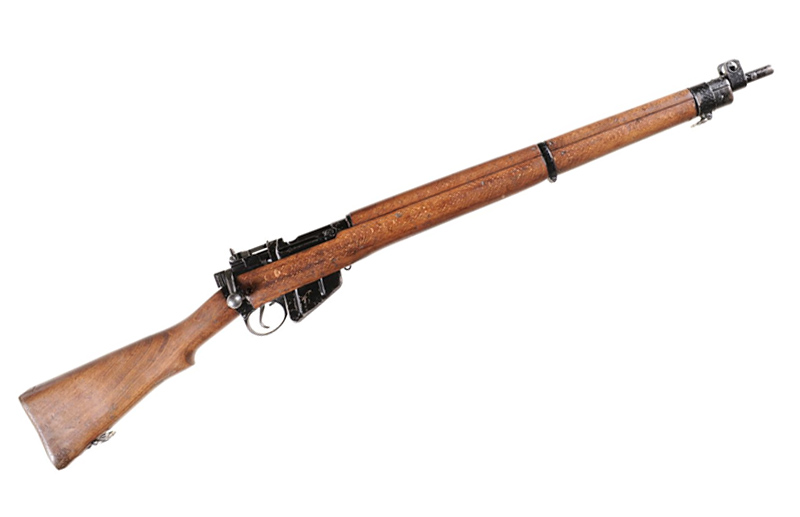
Not many rifles can claim to have spanned centuries of active use like the Lee-Enfield can. It transformed into new variants as warfare changed in the late 19th and 20th centuries, but the Lee-Enfield was first fielded in 1899 during the Second Boer War and it has seen much action since then, including contemporary conflicts in the Middle East.
The story of the Lee-Enfield starts with the Lee-Metford rifle, which was adopted by the British Army in 1888. The Lee-Metford rifle takes its name from Jame Paris Lee, who designed the action, and William Ellis Metford who designed the rifling. Developed in the time of black powder cartridges, the Lee-Metford was a high-tech rifle design that offered rapid-fire compared to the slow-to-reload single-shot Martini-Enfield rifles it replaced. The military liked the Lee-Metford, but the conversion to smokeless powder cartridges forced the Lee-Metford to evolve into the Lee-Enfield we know today.
Rear-Locking Lug Action
As you may already know, the Mauser 98 locks into its action using two primary lugs at the front of the bolt. A result of this is that the Mauser requires a 90-degree bolt lift to cycle and that action blocks the user’s sight picture. Despite this, the Mauser 98 was still an excellent gun that had the most lasting impact on bolt-action rifle design in the years that followed. While the Lee-Enfield action may have never become as ubiquitous as the Mauser’s, its different design resulted in some distinct advantages as well.
This is mainly because the locking lugs on the Lee-Enfield are found closer to the rear of the bolt, and they lock into the receiver bridge instead of the receiver ring like on Mauser rifles. This difference not only makes it potentially faster to cycle the bolt than on a Mauser-style action, but it also doesn’t block the shooter’s vision since it only requires a 60-degree bolt lift. The Lee-Enfield has a shorter bolt travel distance because of this as well. These details came together to make the Lee-Enfield the fastest cycling bolt-action rifle of its day.

If there is a negative aspect to the rear lug action, it is accuracy. Since the front of the bolt does not lock into the receiver, it has more play than a Mauser-style action does. While this gave Mausers the edge in accuracy, the speed advantage of Enfields was arguably more useful for a military rifle.
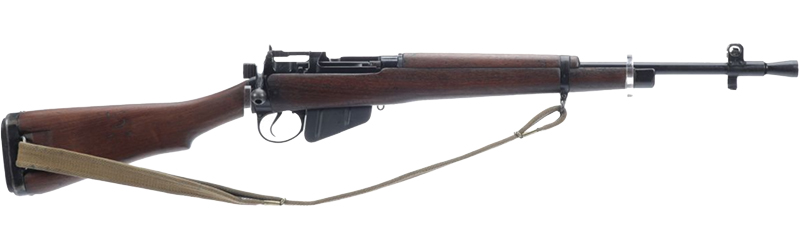
The Lee-Enfield also used a detachable 10-round box magazine. This was a unique feature at the time, but old-school army leadership assumed that soldiers would lose the magazine. Today, our soldiers are equipped with multiple magazines and don’t think twice about dropping them during a reload. This philosophy wasn’t feasible back then, however, so despite having detachable magazines the soldiers were expected to recharge them with stripper clips while they were still loaded into the rifle.
Mad Minute
The potential speed and firepower of the Lee-Enfield were demonstrated in a shooting exercise developed before WWI called the “Mad Minute”. A rifleman, in the prone position, shoots at a 48-inch target at 300 yards and tries to hit the target as many times as they can in one minute. A trained rifleman could easily get 20 to 30 hits in 60 seconds. Compared to the Mauser 98’s accepted rate of fire of 15 rounds per minute, you see that the Enfield could potentially make aimed shots twice as fast.
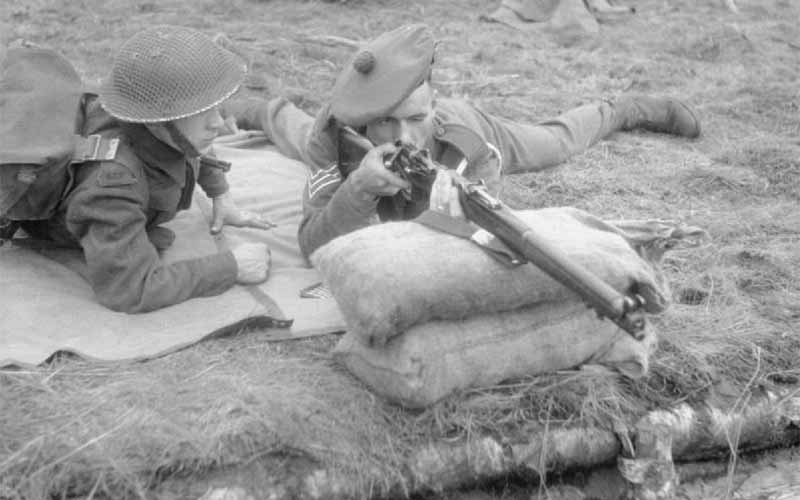
While the rear lug action of the Lee-Enfield was novel, the barrel length of 25.2 inches was controversial. The established shooting community thought a rifle needed a long barrel for better accuracy, which turned out to be untrue. The Lee-Enfield used a barrel length between a rifle and carbine, and it provided a good balance between maneuverability and ballistic efficacy.
There are several Lee-Enfield variants, which we’ll get into later, but suffice to say the Rifle, Short, Magazine, Lee–Enfield Mk III, or SMLE Mk III, was the model that started the rifle’s excellent reputation when it was adopted in 1907 in time for WWI. By WWII, the Lee-Enfield had morphed into the No. 4 which canonized the rifle’s reputation as one of the best military rifles the world has ever known.
Arming The British Empire
In the late 1890s, England was the predominant military power in the world and ruled over the British Empire which was made up of dominions, colonies and territories around the globe. The expression used at the time was “the empire on which the sun never sets”, referring to how the sun was always shining on at least one of its overseas possessions.
The British Commonwealth Nations are former territories of the British Empire such as Canada, New Zealand, Australia, India, South Africa, Jamaica and many others. Not only was the British military armed with Lee-Enfields, but so too were the nations of the Commonwealth. All the territories were outfitted with Lee-Enfields, and they have seen action from deserts to jungles and everything in between. The rifles were about as prolific as Kalashnikovs are today.
.303 British Ballistics
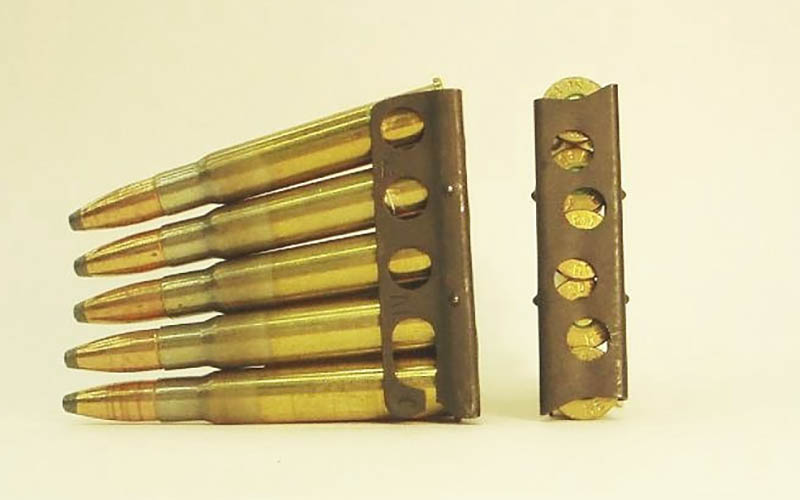
The .303 British was designed in 1887 for the Lee-Metford rifle and adopted by the British military in 1888, making it one of the most successful and lasting military cartridges ever developed. In fact, it was still used by the British until 1957 when it was replaced by the 7.62x51mm NATO. The original load of .303 British used a 215-grain round nose bullet with a copper-nickel jacket over about 70 grains of compressed black powder, although the black powder was quickly replaced with cordite once it was available in 1891. This cordite load used the same 215-grain projectile and produced velocities of about 1,970 fps.
The round-nose bullet design proved unimpressive in combat, so the British experimented with several expanding projectile designs until they were banned by the Hague Convention of 1899.
The next notable iteration of .303 British came in the form of the MK VII cartridge due to its use of the then-new spitzer bullet design. Spitzer bullets are pointed rather than rounded, and it results in a significantly higher velocity. Most modern rifle cartridges today are still loaded using spitzer bullets.
Loaded with a 174-grain full metal jacket bullet, the MK VII cartridge was capable of producing a muzzle velocity of 2,440 fps and about 2,300 foot-pounds of muzzle energy. What is unique about the MK VII round is that although it has a solid jacket, the front portion of the bullet core was made of aluminum, wood pulp or other materials. This brought the bullet’s center of gravity rearward, meaning that it would tumble upon contact and cause more severe wounds.
Most current commercial .303 British ammo is loaded with 180-grain soft point bullets for hunting and 174-grain FMJ bullets for target shooting.
Lee-Enfield Variants: From “Smelly” To Sniper
There were many variants of the Lee-Enfield made over its lifetime (more than we have the space to discuss here), each enhancing the model that preceded it. In many instances, the older variants were updated to the latest design specifications and given a new model name. To the uninitiated, Lee-Enfield model names can get confusing and read like footnotes with symbols like “*” in their designations, but we’ll get that sorted out.
MLE
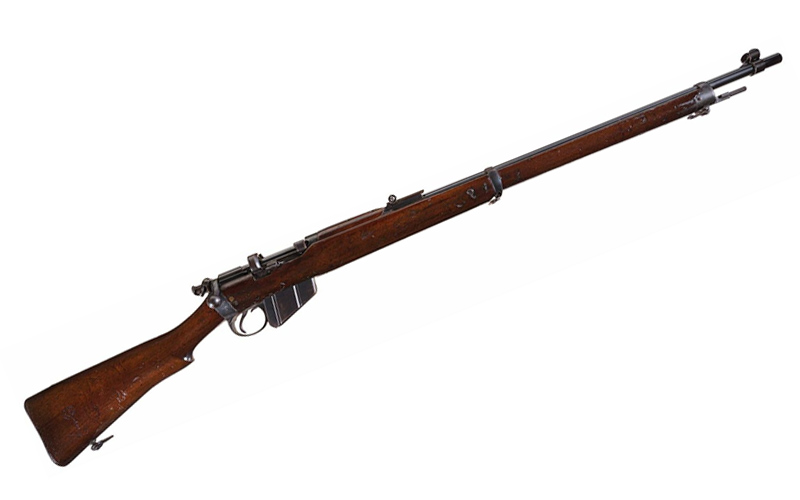
The first Lee-Enfield variant was the Magazine, Lee-Enfield or MLE for short. It is sometimes referred to as “Emily” instead of pronouncing each letter “M-L-E”. These rifles were adopted in 1895 and were chambered for a .303-caliber cartridge and featured a long, 30.2-inch barrel.
A shorter version of this was called the Lee–Enfield cavalry carbine Mk I, and it was outfitted with a 21.2-inch barrel instead. The Lee-Enfield continued to evolve over the years with some being converted to load from stripper clips. These were called Charger Loading Lee–Enfields or CLLEs and first saw use in the Second Boer War (1899-1902). This war pitted Mausers against the MLE, and where the MLE fell short in comparison was its reloading speed. The Mauser could be reloaded relatively quickly by using a stripper clip to reload the internal magazine, whereas rounds needed to be inserted individually with the MLE.
SMLE
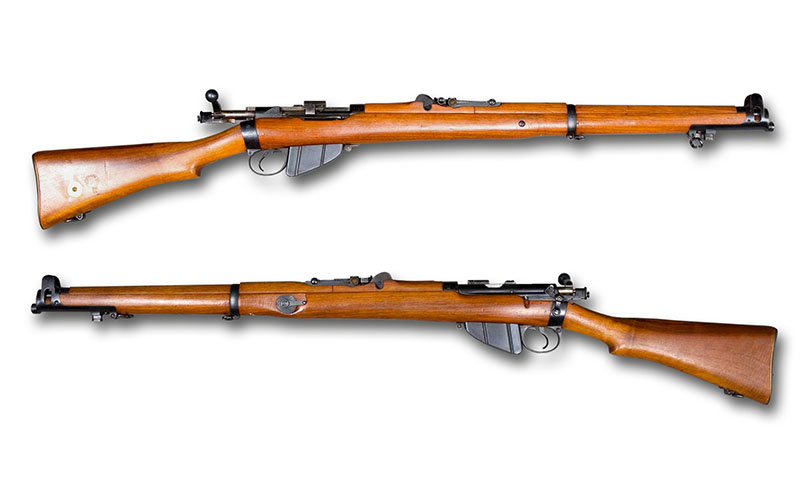
This discovery resulted in the addition of stripper clip capabilities to the MLE, and this new design was designated as the Short Magazine Lee-Enfield or SMLE Mk I and adopted by the British military in 1904. “Short” was added to the name because its 25.1-inch barrel isn’t as long as the original MLE, but it wasn’t as short as the cavalry carbine variant either. The new SMLE designation also caused many to lovingly refer to the rifle as “Smelly.”
SMLE Mk III
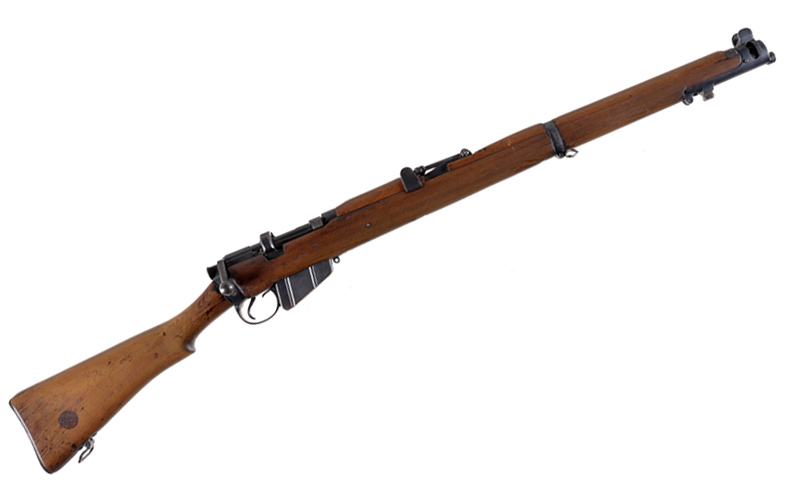
The next major variant is perhaps the best known—the Short Magazine Lee-Enfield Mk III introduced in 1907. This model featured an improved stripper guide, a simplified rear ladder sight and a front sight protected by massive wings on both sides. The chamber was also altered so it could handle the Mk VII .303 British cartridge that was introduced alongside it. It was produced during WWI and found to be costly to manufacture, so a revised version—read cheaper and faster to make—was introduced in 1915 called the Mk III*. Notable changes included removing the magazine cut-off feature and changing the cocking piece from a knob to a serrated flat piece.
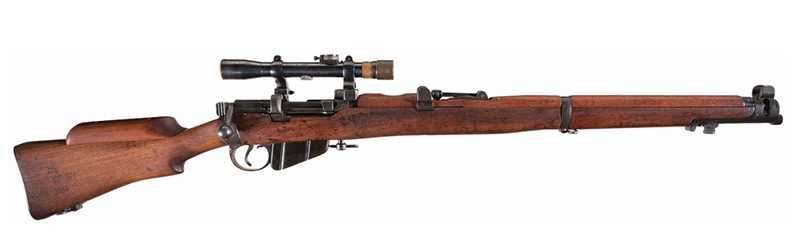
A sniper variant called the SMLE No. 1 Mk III* (HT) was also developed, and it featured a heavy barrel and an optic.
The Mk III and Mk III* were used by British forces in World War I and found them to be tough, reliable and effective. When the war was being fought over long distances, it was common for British troops to hit German soldiers out to 600 yards. The First Battle of Ypres was fought between Allied troops, including the British, against German forces.
The Brits were so lethal with fire from the Lee-Enfields that the German Army called the battle the “Massacre of the Innocents” because of the 25,000 student volunteers who fell to British marksmanship. Plus, the speed at which the rifles could be fired caused the Germans to think the Brits were armed with machine guns at times. In the trench warfare that followed, guns were subjected to mud that could jam up the action. Another benefit of the rear lug Lee-Enfield bolt was that the front of the bolt and breech were easier to clean than Mauser actions.
The MLE, CLLE and SMLE Mk I through the Mk III* were produced by manufacturers in England, including the Birmingham Small Arms Company Limited, London Small Arms Co. Ltd. and the Royal Small Arms Factory of Enfield. Commonwealth manufacturers included Lithgow Small Arms Factory in Australia and Rifle Factory Ishapore in India.
World War II Lee-Enfield Variants
No. 4 Mk I
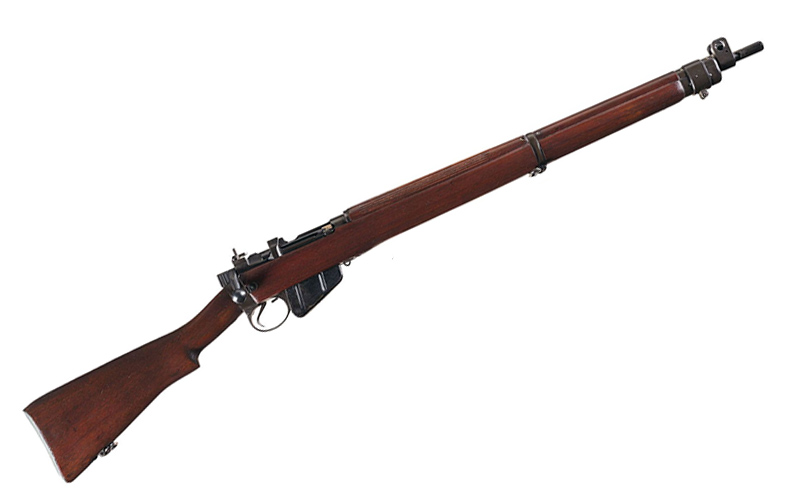
The next major variant was the No. 4 Mk I. This model was first produced in 1931, but it didn’t enter mass production or become officially adopted until after WWII was already underway in 1941. The primary advantage of the changes made to the No. 4 was that it was easier to manufacture. Different from the SMLE rifles used in WWI, the barrel of the No. 4 protruded from the nose cap. The sights were also changed to a rear aperture style rear sight with an aperture for 300 yards and 600 yards. The No. 4 also had a heavier barrel and a new spike-style bayonet instead of a blade bayonet. To meet wartime production and simplify machining and assembly in 1942, modifications were made including going from five- or six-groove rifling to two-groove rifling, and the revised rifle was named the No. 4 Mk I*.
The No. 4 rifles were built in England as well as at the Small Arms Limited company in Canada, Savage Arms in the U.S. and Pakistan Ordnance Factories in Pakistan.
No. 4 Mk I (T)
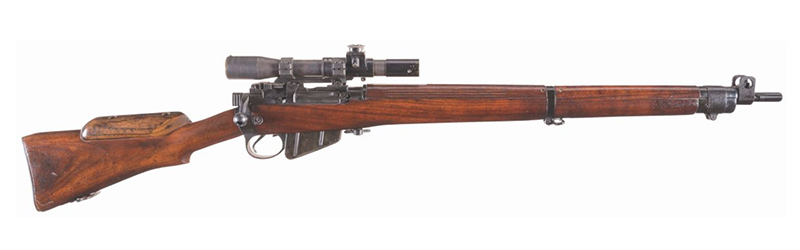
The No. 4 was also developed into a sniper rifle. These rifles were hand-selected at the factory for their accuracy. The rifle needed to place seven shots in a five-inch circle at 200 yards and six shots in a 10-inch circle at 400 yards. These rifles were then outfitted with a wooden cheekpiece and scope and designated as the No. 4 Mk I (T) or No. 4 Mk I* (T).
Rifle No. 5 Mk I
Late in WWII, a carbine version of No. 4 was created with a shorter barrel that lightened the rifle by two pounds. The barrel was fitted with a cone-shaped flash hider and a rubber butt pad was used in place of a metal butt plate. This rifle was named Rifle No. 5 Mk I. Unofficially it is called the “Jungle Carbine,” a name coined by British and Commonwealth troops in the Pacific Theater.
WWII saw massive changes in warfare and weapons. While a rifle with good accuracy was suited to much of the long-range fighting of WWI, the No. 4 began to show its age in WWII. Bolt-action rifles were slow and heavy compared to many of the newer self-loading weapons being used by Germany. While the No. 4 did perform well, like the other bolt-actions of WWII, its days of frontline service were numbered. Despite this, the No. 4 is still used in limited capacities by some Commonwealth countries today and has the distinction of being the second oldest bolt-action still in official use, with the oldest being the Mosin-Nagant.
When Britain adopted the 7.62x51mm NATO cartridge, the No. 4 Mk I (T) and No. 4 Mk I* (T) sniper rifles were rechambered for it and designated as the L42A1. These remained in service until the 1990s.
From Battlefields to Hunting Camps
Surplus Lee-Enfield rifles, like many military rifles, have found their way into many hunting camps over the years. While not as popular in the U.S., hunters in Australia, Canada, New Zealand, and South Africa still commonly use the rifle. Sporterized Enfield rifles typically have cut-down stocks and are equipped with a scope.
Collecting Lee-Enfield Rifles
Due to the sheer number of rifles built, there are plenty of Lee-Enfields on the commercial market. The most common variants are the SMLE No. 1 Mk III and the No. 4 Mk I, and they can be found in a wide range of conditions. They can be easily found for sale by various online retailers and auction sites, but if you care about the rifle’s history, the key thing is to stay away from sporterized guns that were bubba-fied by amateur gunsmiths into hunting rifles. Also, many of the cooler variants such as Jungle Carbines are often fakes or reproductions, so keep an eye out for details if you want an authentic one.
Nicer condition rifles and more rare variants such as sniper models will obviously command a much higher price, but you can still find a decent shooter-grade Lee-Enfield for less than $600 if you shop around.
The Lee-Enfield’s Legacy
Considering just how many times the Lee-Enfield was redesigned, updated and modified over the years, it’s no surprise that it remained in service for as long as it did. Early in its life, it was a close competitor to arguably more successful rifles like the Mauser 98. Later on, when WWII came, the rifle may have been a bit outdated by contemporary standards, but it still served the British well. Perhaps a completely new, auto-loading design would have been preferable, but with time and money in short supply, the No. 4 proved good enough to see Britain to victory.
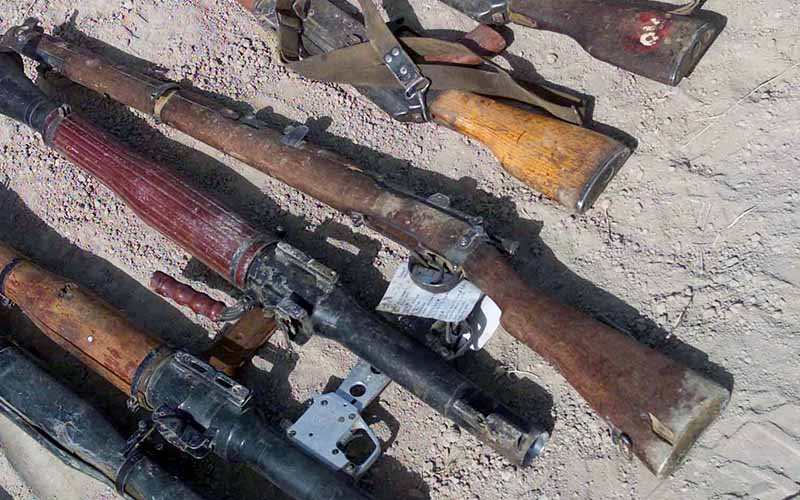
The Lee-Enfield has been used in most of the world’s significant conflicts since it was invented, and it’s still used today the world over by everyone from sportsmen to police to guerilla forces. Odds are, that will never change.
More Historical Military Rifles:
- The StG 44: Father Of The Modern Combat Rifle
- The Karabiner 98k: The Best Combat Bolt-Action Rifle Ever Made
- SKS: Collecting & Identifying The Simonov
- All About The Mosin Nagant
- The Gewehr 43: The Road To Germany’s Garand
- Fusil Automatique Leger: Everything You Want To Know About The FN FAL
- The Rise And Fall Of The AR-10
- The M1 Garand: America’s Original Battle Rifle