The iconic R. Lee “Gunny” Ermey passed on Sunday. Modern Shooter looks back on the affable and down-to-earth Marine, actor and gun-rights advocate.
The Marine Corps, gun world and movies lost a good friend in the passing of R. Lee Ermey Sunday morning. The Vietnam Veteran, former Marine Drill Instructor and actor died at the age of 74 from complications due to pneumonia.
Ermey is perhaps best known for portraying Gunnery Sergeant Hartman in Stanley Kubrick’s “Full Metal Jacket,” a role that earned him a Golden Globe nomination. Ermey’s personal background brought a level of authenticity and intensity to the Hartman character and helped catapult the movie to icon status. Ermey’s lines from the first half of the movie might very well be the most quoted from any war flick.
An honorary Gunnery Sergeant in real life, Ermey had a thriving acting career outside of “Full Metal Jacket,” playing parts in more than 70 films. Additionally, he was a mainstay on T.V., making more than 200 episodes of ‘GunnyTime’ for the Outdoor Channel, as well as a number of other programs and commercials over the years.
Ermey was also a plain and outspoken advocate for the U.S. Military, firearms and the Second Amendment, and he was a regular superstar as such venues as the SHOT Show. He rarely diced words when speaking about America’s right to keep and bare arms, and actively worked as an NRA board member to protect and advance these civil liberties.
While Ermey’s characters oftentimes came off as gruff even borderline hair-curling, the man himself was down-to-earth and downright affable in person. Modern Shooter was lucky enough to shoot the breeze with the Gunny about 3 years back and got a first-hand taste his friendliness, not to mention straight shooting on any topic that came up — getting into movies, hunting deer as a boy in Kansas, our American freedoms and his beloved (and never cleaned) .45 GAP.
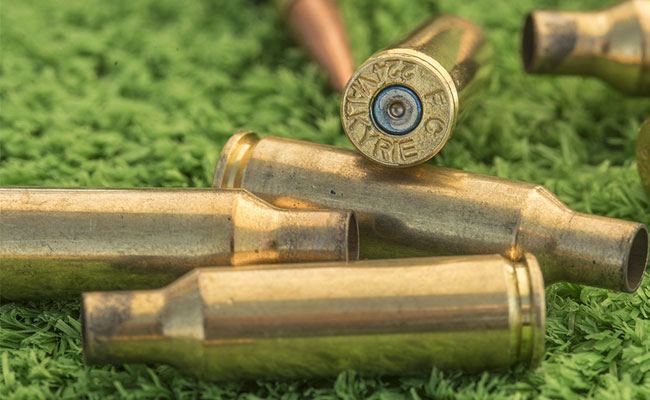
Federal Premium’s new small-bore, long-range cartridge, the .224 Valkyrie, has received final approval by SAAMI and its specifications have been published.
The .224 Valkyrie received final approval by SAAMI as a standardize cartridge.
It is one of five new cartridges approved in the past year, all long-range specialists.
The others include: 6mm Creedmoor, 20 Nosler, 22 Nosler and 24 Nosler.
From SAAMI specs, the .224 Valkyrie can push a 60-gr bullet 3,300 fps.
It is official! Federal Premium’s hot-rock .224 Valkyrie is a cartridge. Or more precisely, it is a recognized cartridge by the powers that be within the Sporting Arms and Ammunition Manufacturer’s Institute.
SAAMI, as it is better known, published the approved .224 Valkyrie specifications on its website at the end of March making it freely available to shooters and manufacturers alike. The small-bore cartridge designed for long-range work and optimized for use out of AR-style rifles was initially approved in January at the 2018 SHOT Show in Las Vegas.
“It’s thrilling to have brought the world’s best MSR 15 cartridge to market. We’re proud and excited about our new cartridge, and we deeply appreciate SAAMI’s support with this launch,” said Federal Premium Ammunition President Jason Vanderbrink in a press release. “SAAMI’s approval of the cartridge was a crucial step in legitimizing it within the industry. Their work creates standards for the cartridge, increasing safety, interchangeability, reliability and quality for the dozens of firearm manufacturers currently building rifles in our 224 Valkyrie.”
The .224 Valkyrie headlines five new SAAMI approved cartridges in a little over a year, each a riff off a common theme — long-range shooting. In addition to Federal’s offering, newcomers to standardization include the 6mm Creedmoor, 20 Nosler, 22 Nosler and 24 Nosler. Each of these received approval in 2017, though in the case of the 20 and 24 Nosler cartridges do not yet exist — at least for public consumption.
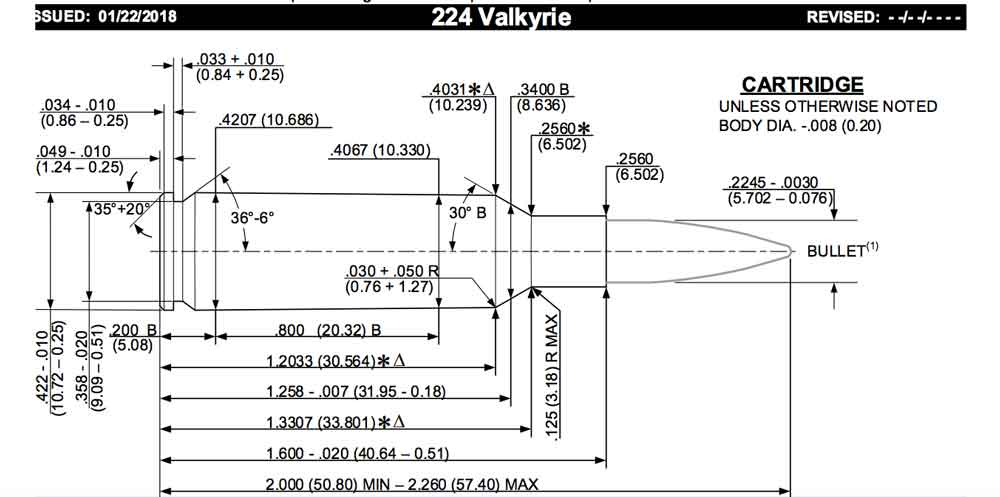
For those curious about the .224 Valkyrie or any other standardized cartridge for that matter, SAAMI allows free access to its technical data and drawings. The .224 Valkyrie itself is listed with a Maximum Average Pressure (MAP) of 55,000 psi on the spec sheet (available here) and produced the following muzzle velocities during testing:
60-gr @ 3,300 fps
75-gr @ 3,000 fps
90-gr @ 2,700 fps
SAAMI was founded in 1926 at the request of the federal government and is tasked with creating and publishing industry standards for safety, interchangeability, reliability and quality, as well as coordinating technical data.
Federal Premium’s .224 Valkyrie is a based on the 6.8 SPC case necked down to 22 caliber. From the company’s literature, which has been free-flowing since fall 2017, the cartridge is capable of impressive performance, including maintaining supersonic flight past 1,300 yards. Federal touts it as being equal to the vaunted 6.5 Creedmoor, only with less recoil and more economical to shoot. Already, there are a number of gunmakers offering .224 Valkyrie rifles, including Savage and CMMG.
Presently, Federal offers four .224 Valkyrie loads: 90-grain Gold Medal Sierra MatchKing, 60-grain Nosler Ballistic Tip Varmint, 90-grain Fusion MSR and 75-grain American Eagle TMJ.
There’s something special about shooting recreations of classic AR designs, and acquiring one or devising your own isn’t as hard as it might seem.
How to get a classic AR in your hands:
Having been around now for over 50 years, shooters are becoming more interested in classic AR designs.
Counterintuitively, in the AR world, Reto means original, vintage means reproduction.
There are three routes into classic ARs: buying an original, buying a reproduction or building your own.
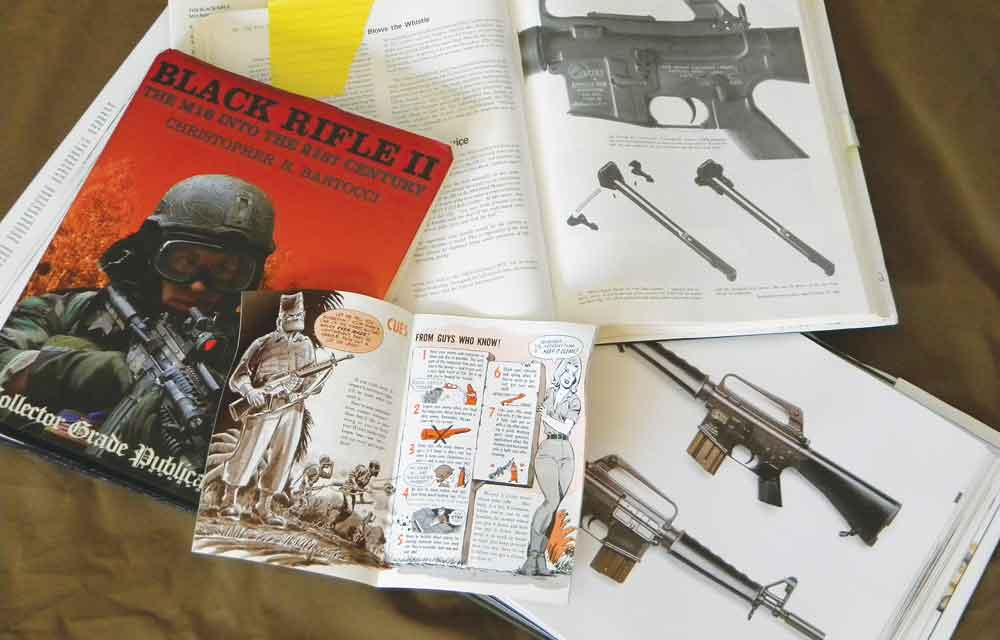
A number of online forums and books document AR developments and prove vital resources in a build.
It’s important not to get caught up in recreating every detail in a build.
First off it’s a semi-auto version of the original; secondly, original parts cost a pretty penny.
The proper balance is somewhere between authenticity and money spent.
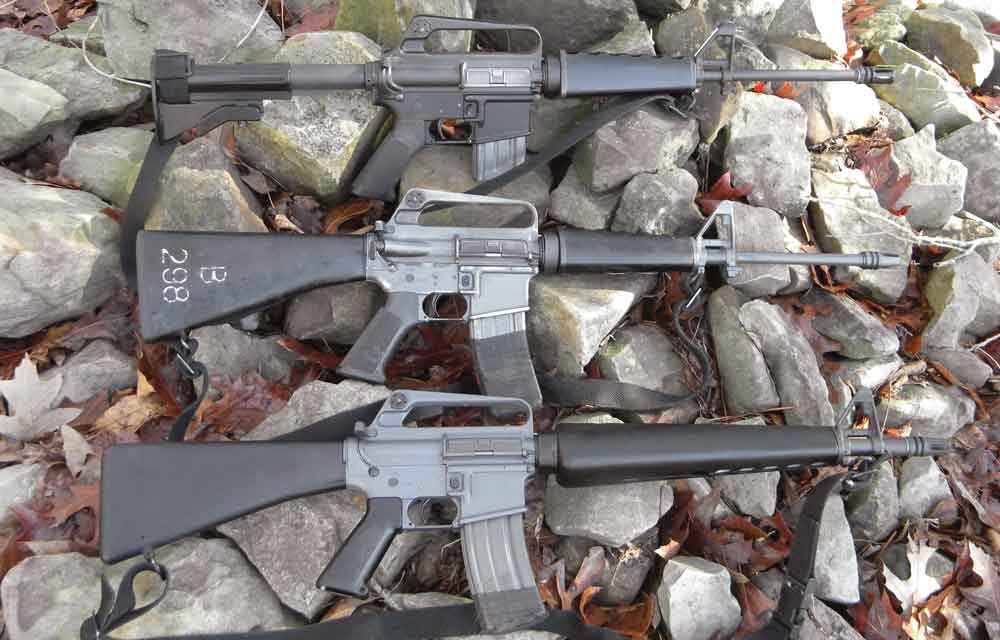
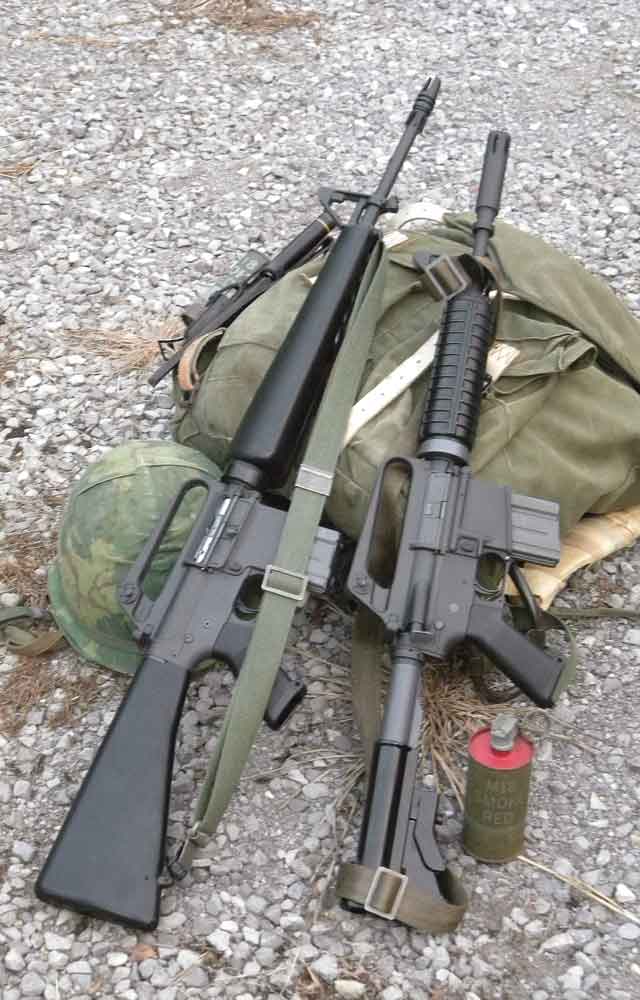
It’s hard to believe the AR-15 has been around for over 50 years. Colt began selling the AR-15 — a semi auto version of the M16 was created for the civilian and law enforcement markets — in the mid sixties. Since that time, the AR has evolved, following suit with the different versions of the M16. The “Black Rifle” is now old enough that it qualifies for the terms vintage and retro, and these older versions of the AR have developed a large following.
These are three of my builds. They look like the originals, but are nowhere near exact. I put them together how I wanted, and I love to shoot them. They are lightweight, reliable and fun on the range.
In the art and design world, vintage means an original; retro means a reproduction made to resemble the original. In the AR world, these terms are flipped. This is due to forum listings on the website AR15.com. The forum had a “Retro” category, which mainly focused on Colt’s 600 series rifles and carbines — think Vietnam. For discussion on the 700 Colts — the type weapons fielded in Desert Storm — they formed a “Vintage” category to separate the two styles.
Then you have “Fantasy” rifles/carbines, which use military-type parts but are configured in a way that never came from the factory. But, this doesn’t mean these weren’t used in the field. My go-to AR guy is Matt Weathers, a law enforcement officer and instructor for Shootrite. His dad was 5th SFG (Special Forces Group) and a member of SOG, a special operations unit that served in Vietnam. They carried Colt XM177E2s, an issued carbine with an 11½-inch barrel and collapsible stock. In order to make the carbines more reliable, troops put their upper assembly on a “rifle” lower, which has a fixed stock and a rifle-length buffer and spring. This configuration was never produced by Colt or officially issued, and yet there’s Matt’s dad in the pictures carrying it in the field. (He also used det cord for a sling.)
Getting Into A Classic
There are three options to go old school with an AR. You can buy an original. The problem with this is that a lot of the ARs we want to have and shoot were never produced in semi-auto versions, so the offerings are a little slim. You can buy new ARs that look like originals. Colt, Troy and Brownells build great rifles and carbines based on the earlier models and at affordable prices. Or, you can build your own, using old and/or new parts. Today, if you want an older model AR, there’s no reason not to have one.
I’ve put together several ARs to mimic the old versions. Early on I learned that assembling the “perfect” reproduction is almost impossible, a matter of luck or just too expensive. In the early days, Colt was building a lot of weapons. Colt was improving the designs as they went; changes were being made rapidly and they were using a lot of different contractors to produce parts. Take the grip as an example. For early model Colts, there are dozens of different grips that vary in exact size, shape and markings. Knowing exactly what part goes with what AR can sometimes be difficult.
Luckily, you don’t have to be an expert. Trying to figure out what type part you need for a build, or have questions about parts you have? Forums like AR15.com and RetroBlackRifle.com are full of people who have spent years researching and documenting the AR’s history and the various parts used. The AR community is full of good people who will be willing and eager to help in your quest.
Another great source of info are the Black Rifle series of books published by Collector Grade Publications. These two volumes get into the gritty details of the rifle’s history and development. Volume I, by Stevens and Ezell, was published in 1987 and covers the beginning and early years of development. Black Rifle II, by Bartocci, picks up there, covering later versions of the weapon like the M-4. The Vickers Guide: AR-15 Volume I is another good read. While it’s not as technical as the Black Rifle books, it’s just as interesting, and contains outstanding photographs. There’s even one section entirely devoted to reproductions, with clones of significant and historical rifles and carbines.
Cost vs. Authenticity
Searching for parts is part of the fun of a build, especially with vintage/retro projects. Both of these reproductions — a rifle and carbine — are built exactly as the real ones would have been. With a mix of original parts and new parts machined to the old specs, you can assemble any type AR.
One word of caution on starting a build: Don’t get too caught up in all the details. Yes, I want an authentic AR, but it ain’t gonna be perfect. First off, it’s a semi-auto version of the real thing. Next, I’m not paying some of the prices that original parts are bringing. A pristine set of factory, original green furniture for an AR is going to cost you a few thousand dollars. Reproductions from Brownells will only be about eighty dollars. There are also outstanding shops like Retro Arms Works and NoDak Spud that recreate hard-to-find parts that match the factory, original specs.
With hot rods, speed is a question of money. How fast you go depends on how much you spend. The same can be said of authenticity and ARs. I’m all for authentic, but I’m not going to let that stand in the way of me having the type of AR I want. The retro/vintage thing is learning about the older weapons and having fun. You’re looking for the proper balance between “authentic” and the money you spend. It’s hard to have fun if you have to break the bank. Plus, all of my ARs end up seeing hard use. I don’t want to worry about scratching or breaking something costly and collectible.
Modern Sporting Rifles are cool. They are the pinnacle of design and function. But — given the choice — when it comes time to head to the range, I’m going to take one of my old school reproduction ARs. These are lightweight, simple and reliable weapons, the same type used in Vietnam, Desert Storm and Mogadishu. They feel good in the hand, are fun to shoot and help me connect to an earlier time and the heroic deeds of the brave soldiers who carried them.
Editor’s Note: This article originally appeared in the April 2018 issue of Gun Digest the Magazine.
With all the modern handgun choices available today it might seem counterintuitive, but single-action revolvers are still a viable concealed carry option.
For those competent with one, a single-action revolver can be a legitimate carry option.
Barranti Leather offers an IWB option for single-action revolvers.
For short-term carry, you can open the loading gate of the revolver and secure it IWB.
It can be quickly closed, with a little practice, when the gun is drawn.
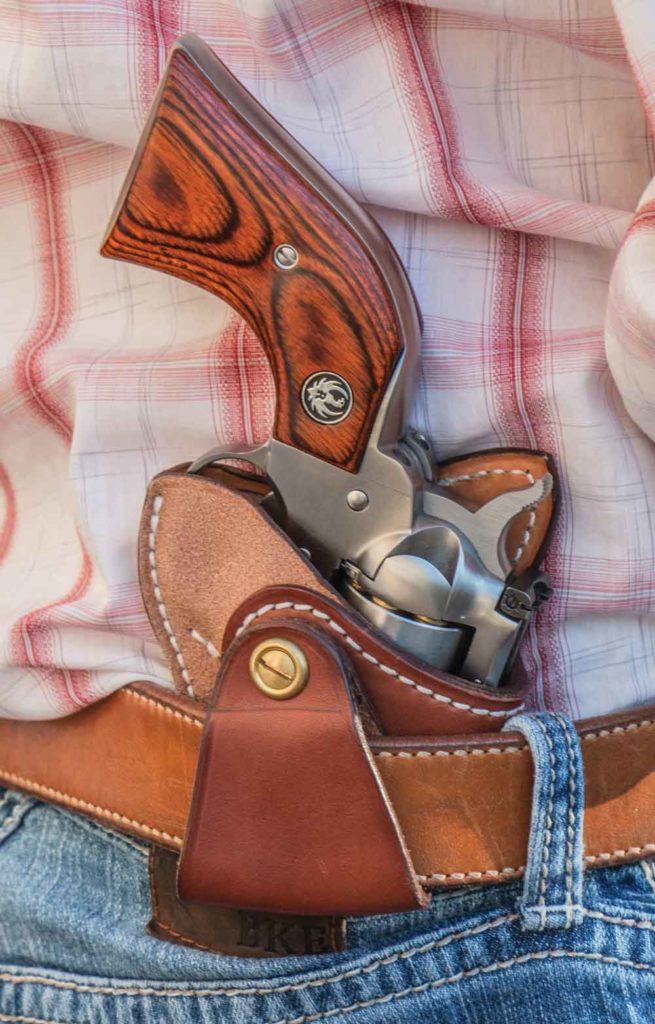
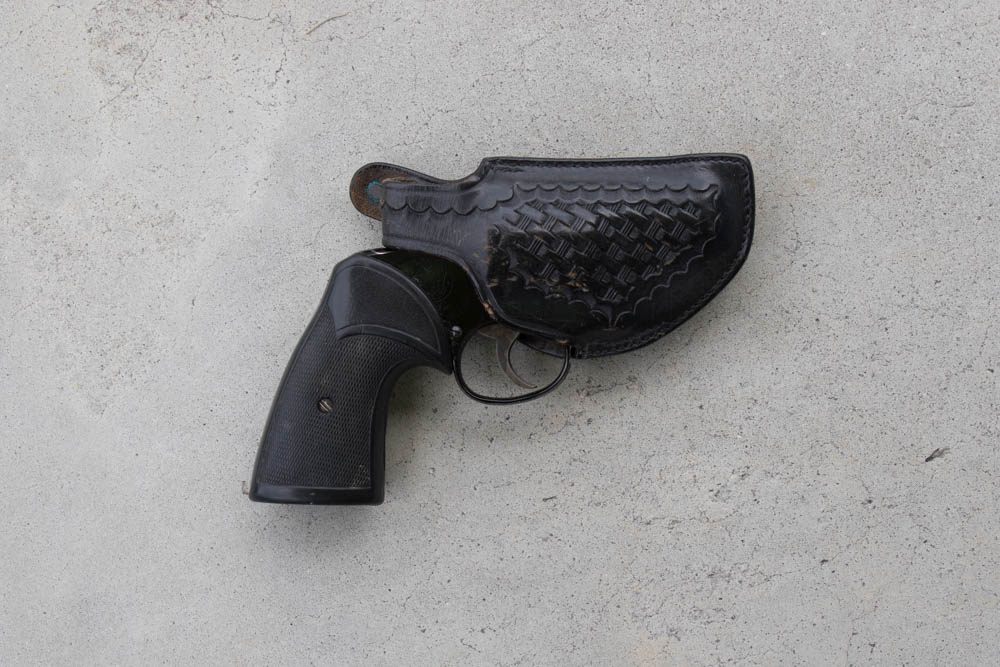
The Barranti Leather Summer Classic is an ideal way to carry a single-action revolver concealed.
Though few modern trainers will admit it, a single-action revolver can be suitable for personal protection. But, this is only true if you’re competent with that revolver and if you have it with you when you need it. (Incidentally, this applies to any handgun you might carry for protection.) Historically, single-action revolvers are carried outside the belt in some sort of cowboy-like holster. While this might make access fast and easy, it is almost impossible to cover up.
On occasion, I’ll carry a single-action revolver for personal protection, particularly when I’ve been in the field hunting and carrying it for another purpose. I stumbled upon a very unique holster to help me do this called the Summer Classic; it’s hand made by Mike Barranti of Barranti Leather.
This holster resembles several frequently used for the inside-the-waist-band (IWB) carry of semi-autos or double-action revolvers. It’s also magically comfortable and as secure and easy to access as any IWB-style holster I’ve worn. For those of you who can handle a single-action Colt or Ruger, I’d suggest you try one out. Additionally, Barranti will custom make just about any gun-leather product you can imagine, and his work is magnificently extraordinary.
Oh, and by the way, for the incidental short-term and secure concealed carry of a single-action revolver, you can always open the loading gate and it will catch on your belt when you shove the revolver in your waistband. I’d not carry a revolver like this long term, but in a pinch, it’ll do just fine. When you draw the revolver, just click the loading gate closed with your trigger finger. I learned this carry technique from a real cowboy.
Editor’s Note: This article originally appeared in the January 2018 issue of Gun Digest the Magazine.
Some might have reservations about carrying a gun to church. But a self-defense scenario can play out anywhere, even a house of worship.
Going armed should mean going armed, even at Sunday services.
As to what sort of gun to carry it’s simple, the one you carry everyday.
Churches, like any other venue open to the public, should have a security policy in place.
Church Security
As of late, there’s been a lot of talk about whether someone should go to church armed. The question perplexes me a bit because I’m thinking, “Why would you go anywhere unarmed?” Regardless, there now seems to be a rush to establish church security policies and training for church security teams. For what it’s worth, Gunsite Academy was doing this before that cretin in Texas had his temper tantrum. Folks are also wondering what gun they should carry to church.
Taking responsibility for your own safety means accepting that responsibility everywhere, even at church, where the focus should be on saving souls and lives.
Let me see if I can sort this out, simple like. The last question is the easiest to answer: You carry the same gun to church you carry anywhere else. Now, for the more complex problem: Yes, a church absolutely needs a security policy. So does a convenience store, lumberyard or sporting event. And, yes, when devising this policy or training a team, an expert should be consulted.
But here’s another solution that might seem over simplified. Let me first explain the answer with a story. I was on a recent hunt and a guide was in the back seat of the truck when we spotted animals 1,000 yards away. He wanted to put the spotting scope on them, but he was seated on the wrong side of the truck to mount the scope on the window. His solution was to throw all the gear piled beside him up front with the other guide and me. This was a cluster because hunters take way too much gear with them; it took almost 5 minutes to sort it all out. About midway through the process, I suggested it might have been easier if we’d just turned the truck around.
The same logic applies to church security and, unsurprisingly, some churches have already figured it out. Just post a sign out front that clearly states the church supports concealed carry. Or, if you like a little alliteration in your announcement it could read, “This Christian congregation carries concealed.” Regardless of how it’s handled, churches need to be just as concerned with saving lives as they are with saving souls.
Editor’s Note: This article originally appeared in the January 2018 issue of Gun Digest the Magazine.
In addition to being a capable cartridge in its own right, the .30-06 Springfield has spawned a talented brood of offspring.
Perhaps only the .375 H&H Magnum is the parent case of more cartridges than the .30-06 Springfield.
The .30-06 has been modified to pitch everything from .25-caliber bullets all the way to .358 caliber.
Add in the .308 to the .30-06 family tree and really there’s something for everyone.
All parents are proud of their children — with good cause — but few cartridges have the brood of offspring that the .30-06 does, save perhaps the .375 H&H Magnum. Just think about the immediate children of the Springfield: the .270 Winchester, the .25-06 Remington, the .280 Remington, the .35 Whelen and the .338-06 A-Square, just to mention the commercially produced lineup.
There are those other children who’ve stayed out of the limelight (commercially, that is), which include the 6.5-06 and the twins, the .375 and .400 Whelen. I’ve read of wildcats as small as .22 caliber based on the ’06 case; well, I believe you get the point. Hell, even the .308 Winchester can trace its lineage back to the .30-06, so you’d call them cousins, but the .243 Winchester, .260 Remington, 7mm-08, .338 Federal and .358 Winchester all get the invite to the family reunion.
Like the .375 H&H, the .404 Jeffery, the 8mm Mauser and the .308 Winchester, you can see that the ’06 case is an excellent platform to begin with; can we deny the successes of the .25-06, .270 and .280? And if you truly believe that more bullet weight or frontal diameter than .30 caliber has to offer is warranted, the .338-06 might be one of the sweetest shooting means of delivering a 250-grain bullet I’ve ever fired, save my pet .318 Westley Richards of course.
If that 61mm case length appeals to you more than the short-action .308 family, or the belted magnum of H&H lineage, there really is something for everyone within the .30-06 family tree.
Editor’s Note: This article originally appeared in the October 2017 issue of Gun Digest the Magazine.
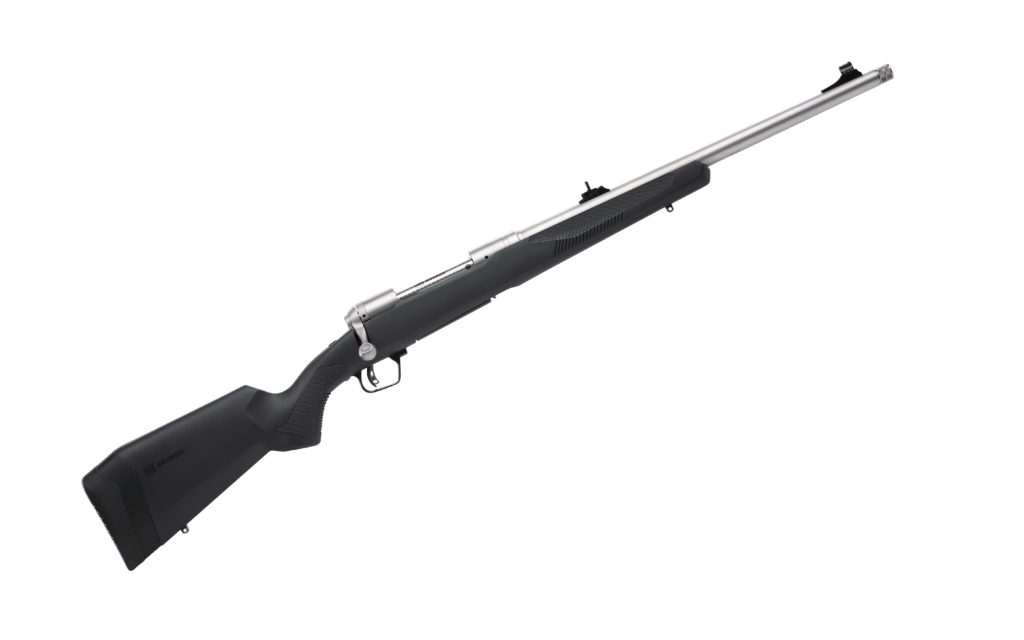
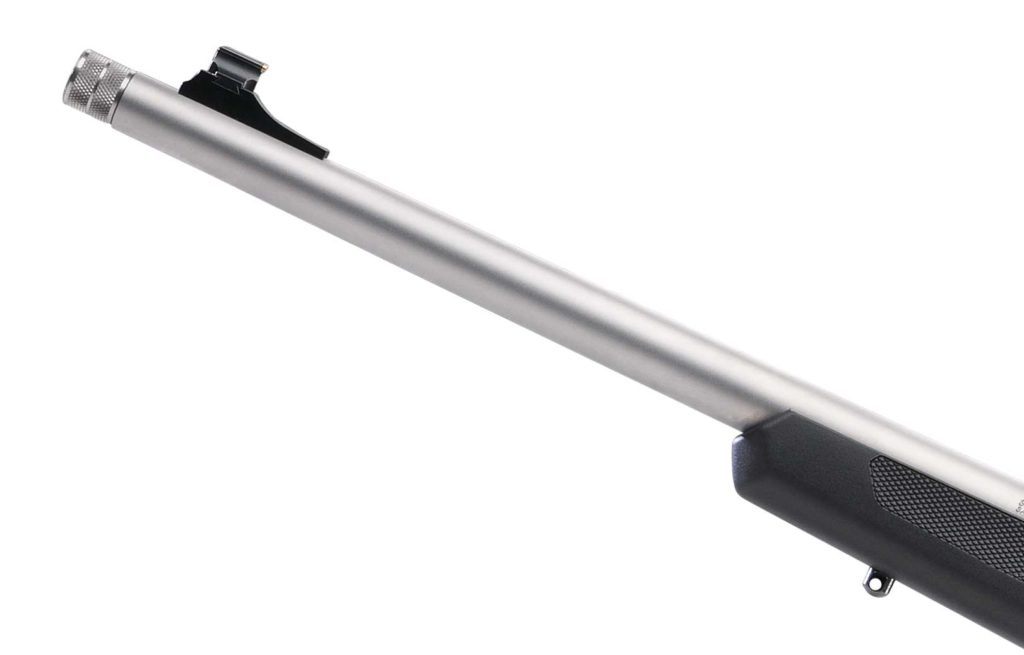
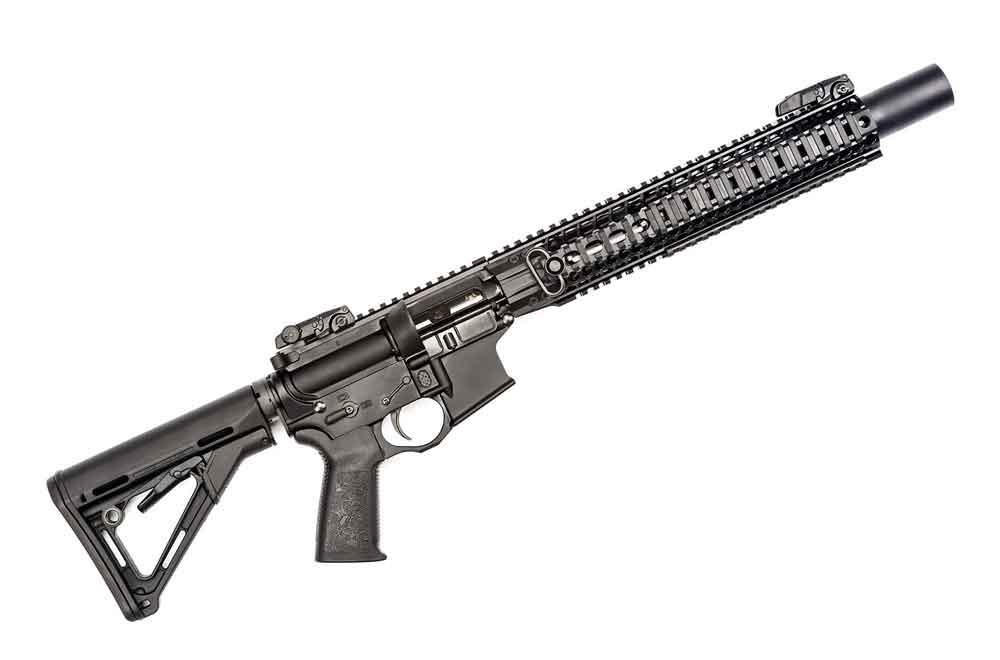
Chambered in potent .375 Ruger and .338 Win. Mag., Savage Arms’ Brush Hunter takes aim at the world’s biggest game.
What the Brush Hunter brings to the table:
The Brush Hunter has a fast-handling 20-inch medium contour barrel.
Its oversized bolt handle helps operation of the Model 110 action.
The rifle is light, at just over 7 pounds.
And at $784, the Brush Hunter is highly affordable.
Savage Arms in its present form has come to mean bolt-actions.
Few other American gunmakers have been more dedicated to the age-old and highly accurate style of rifle than the Massachusetts manufacturer. Even fewer gun companies win the kudos Savage does for balancing price and performance in nearly everything it rolls off the factory floor. While it has recently expanded into producing more contemporary semi-automatic rifles, its bolt-actions still, by and large, take center stage. And Savage continues expanding and evolving to fill every niche in the turn-bolt world.
Recently, Savage addressed one of the gaping holes in the modern iteration of its catalog with the introduction of the Model 110 Brush Hunter. With one of the chambering options .375 Ruger (the other is .338 Win. Mag.), the company now offers a legitimate dangerous game rifle and in a package well suited to excel in the heat of the most testing hunts.
The barrel, all 20-inches of it, is perhaps the most eye-catching aspect of Savage’s stainless steel beauty. In addition to making for an overall lighter rifle, a hair over 7 pounds, the medium contour barrel also endows the Brush Hunter with another highly desirable quality — fast handling. With more weight situated around its time-tested 110 action, the rifle has the ability to transition targets quickly and stop on a dime. For good measure, Savage has also included an oversized bolt handle, ensuring hunters can run the action even when drunk on adrenaline. These attributes are desirable for any hunter potentially facing down critters armed with deadly teeth, claws or horns.
The Brush Hunter comes outfitted with adjustable iron sights, commonplace in safari rifles and aiding in the rifle’s fast handling. Savage’s heavyweight also boasts the company’s vaunted AccuTrigger, which can be tuned between 1.5 and 6 pounds, and a synthetic stock with 1 inch of play in length of pull.
The Brush Hunter utilizes a detachable box magazine with a 3-round capacity in .375 Ruger and 4 rounds in .338 Win. Mag. Additionally, it has a threaded muzzle for the easy addition of a muzzle device for hunters further looking to tame the rifle’s recoil. But of all the features the Brush Hunter touts, it’s its price tag that may be the most appealing. At $784 for both calibers, Savage makes available to nearly every shooter a rifle that literally can tackle any game on the face of the planet.
For more information on the Brush Hunter please check out: www.savagearms.com
Decked out to perform, CMMG’s new MkW ANVIL XLR2 looks to milk the most out of the 6.5 Grendel.
How the new MkW ANVIL XLR2 is decked out:
The MkW ANVIL XLR2 comes outfitted with a 22-inch barrel with a rifle-length gas system.
It has a 1:8 twist to stabilize bullets between 90 and 130 grains.
A Geissele Automatics SSA 2-stage trigger comes standard in the 6.5 Grendel.
The MkW ANVIL XLR2 also boasts a fully adjustable Magpul PRS stock.
Currently, CMMG lists the MkW ANVIL XLR2 at $3,000.
As has happened to everything with a trigger and a rifled bore in recent years, the 6.5 Creedmoor craze has swept the AR world. But for a knowledgeable subsection of black rifle shooters, the 6.5 is nothing new to the platform. The 6.5 Grendel predates the Creedmoor by three years and unlike the newer cartridge, it was designed with the semi-automatic rifle in mind.
Pickings for the Bill Alexander and Janne Pohjoispää designe have been slim in recent years, a maker here and there, But CMMG changed this in a big way in recent months. The Missouri gunmaker unleashed a slew of 6.5 options in its beefy ANVIL line of rifles near the end of 2017. And it has continued to fill the Grendel niche, recently releasing a top-shelf model — the MkW ANVIL XLR2.
Designed to milk the most out of the ballistically-talented intermediate cartridge, the rifle is configured to help the 6.5 reach is full potential. In addition to a 22-inch medium taper barrel with a rifle-length gas system and 1:8 twist (ideal for bullets 90 to 130 grains), the MkW ANVIL XLR2 boasts the features that should get precision shooters looking semi-auto’s direction. In particular, with a Geissele Automatics SSA 2-stage Trigger and a fully adjustable Magpul PRS stock, the rifle should provide plenty of punch, perhaps even beyond 800 yards.
“The 6.5 Grendel is a great round. It has very minimal recoil. It is also flat shooting out to 500 yards and beyond,” said Chris Reinkemeyer, CEO of CMMG. “It’s great for hunting medium-sized game such as deer and pigs, and best of all, you can find ammo for it that is relatively inexpensive. In building the ANVIL XLR2 with a 22-inch barrel, along with some of our other finest components, we designed this rifle to help shooters achieve the best possible results with this caliber.”
The ANVIL system itself should help the 6.5 Grendel excel. Originally chambered for the mammoth .458 SOCOM, the midsized AR platform is built around a modified AR-10-sized frame with a shortened upper receiver. Additionally, ANVILs have a much sturdier bolt design, what CMMG calls a Powerbolt, which negates the need to mill out, thus weaken a standard AR-15 bolt.
Some other notables of the MkW ANVIL XLR2 include a Magpul Moe Pistol grip, ambidextrous CMMG charging handle and safety selector, CMMG’s SV Muzzle Brake and the company’s KeyMod RKM15 hand guard. CMMG currently has the MkW ANVIL XLR2 listed at $3,000.
For more information on the MkW ANVIL XLR2 please visit: www.cmmginc.com
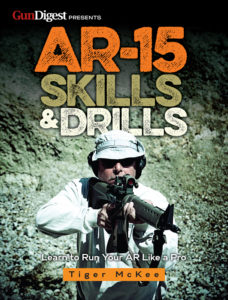
Run Your Are Like A Pro Master the versatile and potent AR-15 under the tutelage of one of the nation’s foremost tactical trainers with the help of AR-15 Skills & Drills. The 272-page guide introduces shooters to Tiger McKee’s methods for developing and honing the skills necessary to manipulate the AR efficiently and shoot it accurately. This unique and fully illustrated reference details the essential physical and mental skills needed to effectively operate the tactical rifle and provides specific drills to cultivate and master those skills. Get Your Copy Now
It is imperative that a firearm be safe to carry and use, and the same is true of a concealed carry system, i.e., the holster. Check out this list of gear to avoid.
If you are criminally charged or civilly sued over something involving your use of a firearm, you may find that your gun becomes a focal point of the opposing side’s case against you. Unscrupulous lawyers with a case to make are very likely to take advantage of the fact that the media and certain politicians and activists have for generations demonized firearms and the people who own them.
This trick sun visor holster has Velcro straps over back of grip, blocking effective draw of the J-frame it holds, and in practice, holster separated from visor strap without yielding the gun. Not on the author’s recommended list.
Some guns are more easily demonized than others. I’ve never seen it become a cornerstone issue in a case that the Colt revolver in question was a Cobra instead of the virtually identical Agent, or that the small 1911-style .45 caliber semiautomatic involved was an Auto Ordnance Pit Bull instead of a Colt Defender. What I have seen is attorneys who use that sort of thing to become a red herring that they stick up the jury’s nose to get that pack of twelve bloodhounds off the trail of the truth. Enough of those red herrings, and the jury just might lose the scent of the real issues. Thus, the more of these trivial issues that can be kept out of the case, the better off the honest defendant will be.
We’ll go into more detail on that sort of thing momentarily.
Before anything gets to court, the defendant has to survive things on the street. It is imperative that the firearm be safe to carry and use, and that the same be true of the concealed carry system, i.e., the holster. That needs to be examined as well.
Carry Gear to Avoid
I would strongly urge you to avoid the following:
Holsters which fit the gun poorly. If the gun is in too tight, the user may not be able to draw swiftly enough to win a fast-breaking life-or-death encounter. If it is too loose, the gun may fall out during fights, falls, other stressful activities, or something as simple as lying down on a couch.
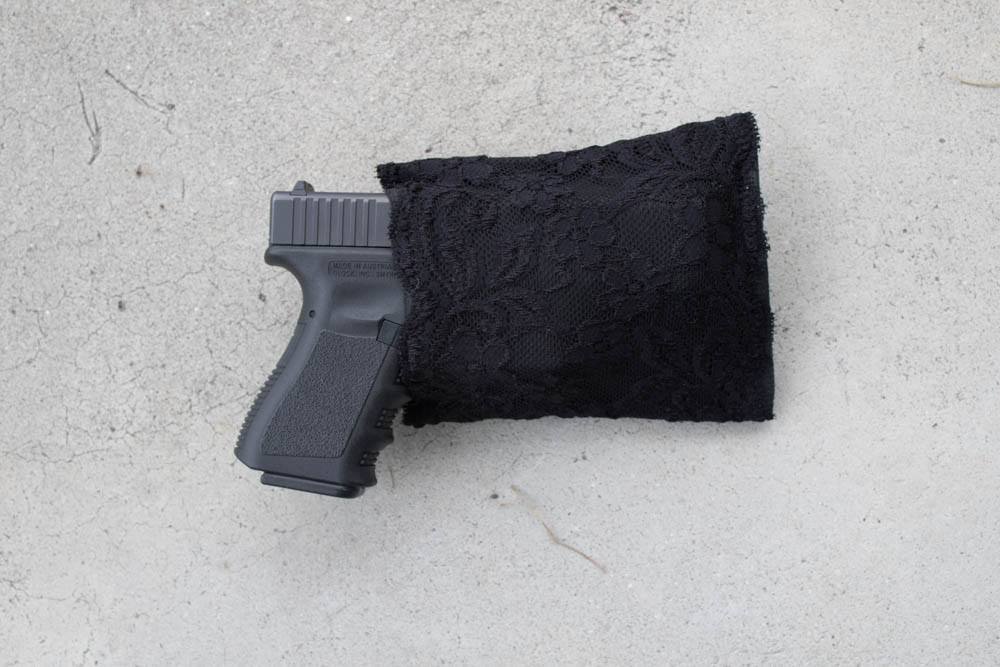
Holsters that do not protectively cover the trigger guard. Why that Italicized word? There are some holsters made of thin fabric that cover the trigger guard, but do not protect it. I recently bought a $40 ankle holster my significant other thought she’d like for her new LCP-II. Trying it on with the unloaded .380, she discovered that the elastic fabric was too tight and too deep, preventing a good drawing grasp, and was so shaped that the finger “wanted to slip into the trigger guard” prematurely. That one quickly went into the reject bin. Another that didn’t make it even that far was a frilly lace concoction that resembled an Ace bandage with a gun in it, made of material so thin and sheer it was almost translucent. Trying it just on the display mannequin, she realized it could be fired while still in the holster.
Once the national standard, holsters with exposed trigger guards are now banned from many ranges for safety reasons. This is S&W Model 12 Airweight .38 in Safariland thumb-break.
Bear in mind that if you are ever in a struggle for your holstered gun, you don’t want the person attempting to disarm and shoot you to be able to do it while the gun is in your holster, its muzzle perhaps in line with some part of your own body.
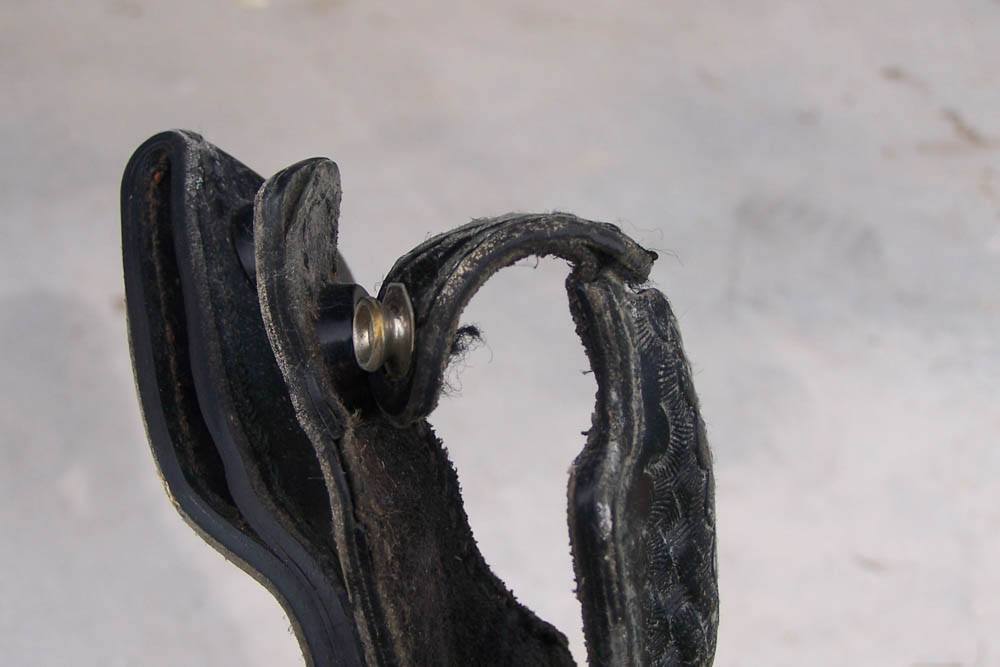
Holsters with safety straps that pass over the back of the grip. It is highly likely that when you attempt to make an emergency draw under desperate circumstances, your own hand will trap the strap against the grip, thus trapping the gun in the holster.
Holsters with safety straps that go over the back of the trigger guard. This design, found primarily on revolver holsters, can have the same “trap your own gun in the holster” effect, this time with the middle finger of the drawing hand creating the trapping effect instead of the palm or web of hand.
Worn, cracked safety strap is a sign the holster is ready to be discarded from use.
Holsters which cover part of the grip. These will prevent you from getting a proper drawing grasp. The draw itself will be slowed, perhaps fatally, and when the gun does come up you will have a less than optimal firing grasp.
It gets worse. There are a handful of concealed carry holsters out there that cover the entire grip. This may be the very definition of “designers unclear on the concept.”
Holsters with safety straps narrow enough to get caught in the trigger guard. As the gun is inserted into the scabbard, the strap gets in front of the trigger. The trigger stops there. The rest of the gun keeps going. BANG!
Holsters with thin, floppy bodies. Leather worn down enough to become too pliable, or cheap fabric holsters, can fold. In the same sense that a rolled-up magazine can jab as hard as a club, the fold of leather or fabric can work its way into the trigger guard with enough rigidity to hold the trigger while the rest of the gun completes its insertion, and we have another BANG!
Velcro notwithstanding, thin and floppy fabric does not a good holster make, in author’s opinion.
Holsters whose belt slots don’t fit the belt they ride upon. If the slots were too small, obviously you wouldn’t have gotten it onto the belt at all. If they’re too large, however, the whole holster starts moving up with the gun before it can come to a halt and allow the sidearm to clear. This can make the draw slow and awkward. Often, a holster that doesn’t fit the belt will also tend to tilt outward. This compromises concealment, and keeps the gun from being exactly where the hand is reaching for it. Poor holster-to-belt fit can also allow the holster to slip forward or back on the belt, again moving it away from the reaching hand.
Belts without backbone. Any of us who teach the gun can tell you stories about crappy holsters students bring to class. It’s never a surprise to see a cheap junk gun in a cheap junk holster. What does surprise you, at least the first few times, is the top-quality gun carried in a cheap, unsuitable holster. And then you get the student who brings a fine gun and a top-quality holster on a belt made out of soft fabric, or leather so thin and pliable that you wonder whether its manufacturer managed to peel a chicken, tan its skin, and somehow make a belt out of it.
The gun, holster, and belt are symbiotic. They’re part of a system. I’d rather have a good, economy-priced handgun in a good holster on a good belt than quality in one or two of those components but not all three.
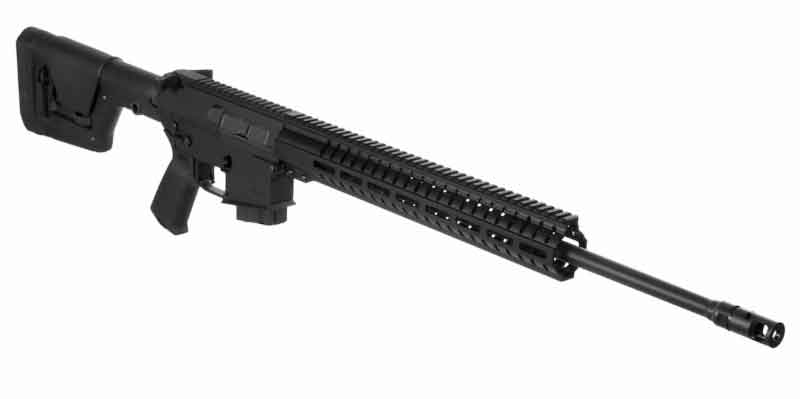
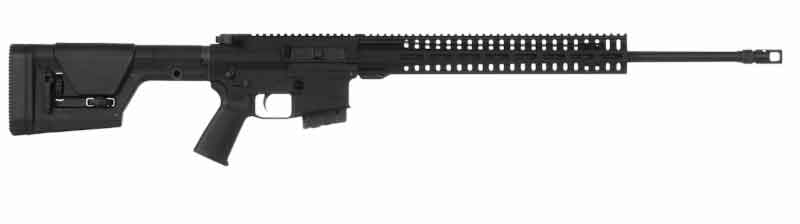
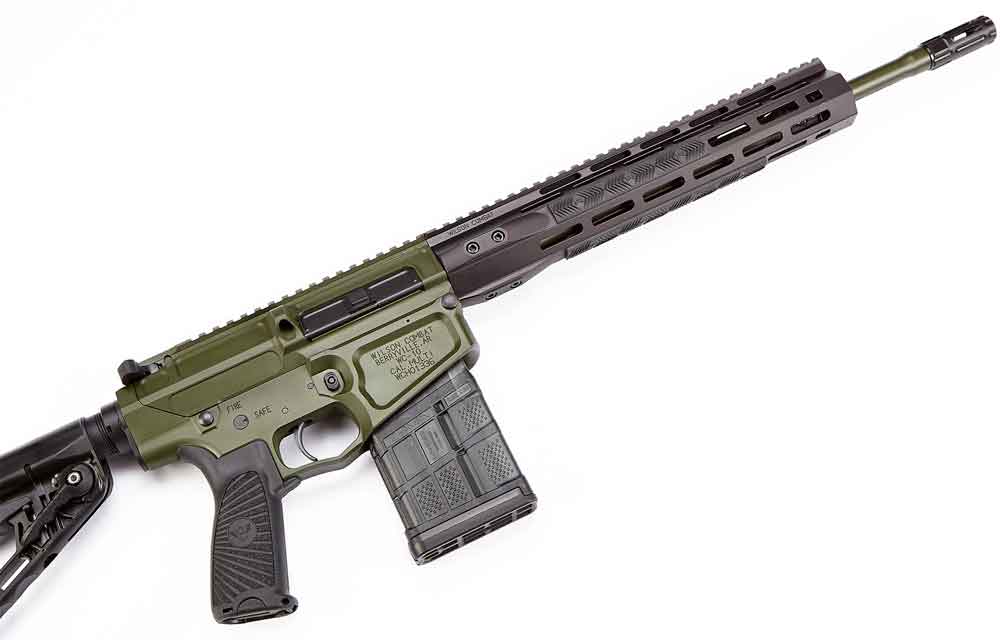
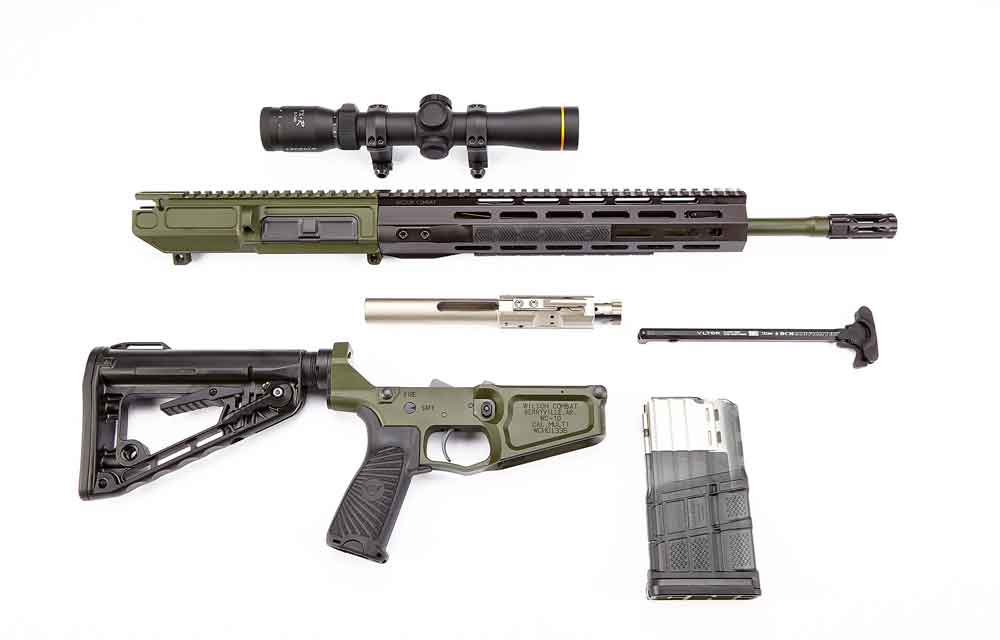
Lightweight and accurate, Wilson Combat’s Ranger line is configured to bring precision shooting to the field.
The new line marries a lightweight billet receiver with Wilson’s match-grade Ranger Barrel.
The Standard Ranger weighs 8 pounds, while the ultralight model comes in a tick above 7.5.
The carbines are available in eight calibers and come in AR-15 and AR-10 configurations.
The Ranger line demands a premium, running from $2,350 to $3,195.
For shooters hunting for more than a bench-anchored tack driver, weight is the important consideration in a carbine. The lighter a rifle the less trouble it is to hump into the backcountry or operate on the fly.
In the past, this has meant material removal, shaving ounces to save pounds. And being one of the largest parts of a gun, the barrel has always been a prime location to cut away at in efforts to make a firearm featherweight. As any precision shooter knows, this is a deal with the devil. Sure, it reduces weight, but at the cost of barrel rigidity and in turn accuracy.
The new Wilson Combat Ranger line of ARs goes a long way in finding a happy medium between ballistic performance and manageability. Designed for tactical, defensive and hunting applications, the line combines a lightweight billet receiver with Wilson’s Ranger match-grade, tapered barrel for some impressive results. The standard model Ranger tips the scales at 8 pounds, while the ultralight comes in at a hair over 7.5 pounds. Either configuration should prove to be fast handling and on target.
Both Ranger models come outfitted with a SLR Rifleworks adjustable gas block, Wilson’s Tactical Trigger Unit, a 10-inch M-LOK rail, the company’s Q-Comp muzzle break and a Mil-Spec NP3-coated bolt and carrier.
Where the models differ is furniture. The Ranger standard has a Rogers/Wilson Super-Stoc buttstock and Wilson/BCM Starburst Gunfighter grip. The ultralight, on the other hand, has a Smoke Composite carbon fiber buttstock and Mission First pistol grip. The variation also leads to slightly different overall dimensions, given the standard’s buttstock is adjustable, with 3 inches of play, while the ultralight’s is fixed.
Wilson offers a bevy of caliber choices for both Ranger models, including: 5.56 NATO, 6.8 SPC, .300 Blackout, .243 Win., 6.5 Creedmoor, .308 Win., .338 Win., and 7.62×40 WT. Depending on caliber choice the carbine boasts either a 14.7 or 16-inch barrel.
Wilson Combat firearms tend to demand a premium and the Ranger line is no different. The base price of the standard, which is an AR-15 configuration, is $2,350; it jumps to $3,095 for an AR-10. The ultralight Ranger is base is $2,450 as an AR-15 and $3,195 as an AR-10.
For more information on Wilson Combat’s Ranger line, please check out: www.wilsoncombat.com.
Richard Mann gets you on target with these shooting drills tailored for concealed carry.
The old saying goes, “A pint of sweat, saves a gallon of blood.” Nowhere is this truer than pertaining to training with a defensive firearm.
The hours of trigger time with a self-defense pistol, rifle or shotgun might never be called into play — if lucky. But it’s far from a waste. Because with it, if lethal force is ever required, as armed citizens we can be certain we’ll respond precisely and effectively.
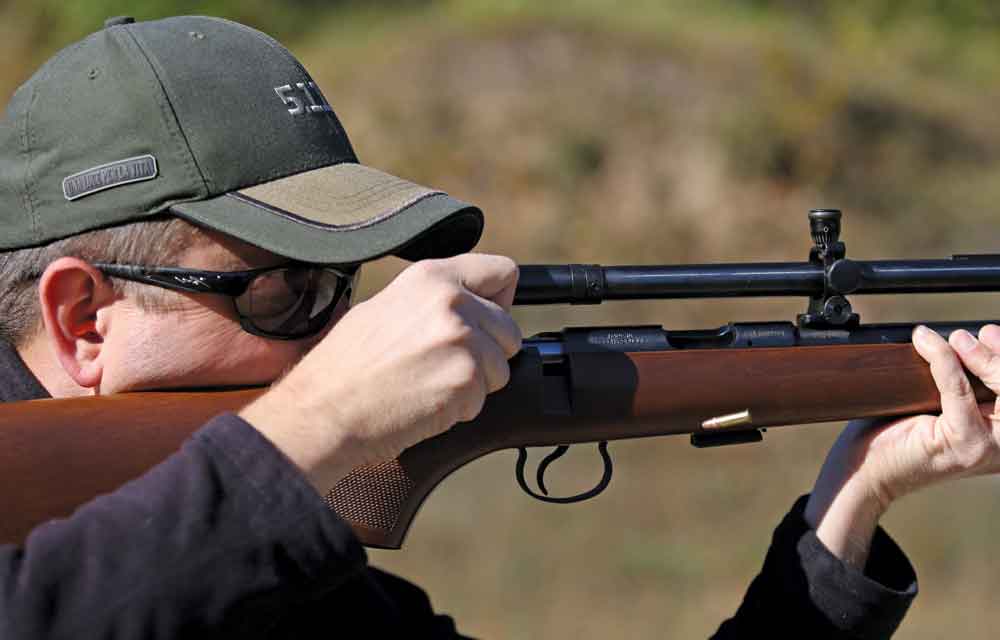
Richard Mann dusts off his SIG Sauer P226 RX Compact, complete with ROMEO1 Red Dog sight, and runs over five popular gun drills for self-defense shooting. The Gun Digest writer’s drills move from breaking a single precise head shot, all the way through a 15-shot, three target series, complete with reload. To say the least, there is something for everyone in this video, even the most seasoned armed citizen.
It’s also important to note, the former law enforcement officer and military man does not begin each drill with the handgun at the ready. Mann draws his P226 from concealment, under relatively bulky clothing. This aspect is imperative to competent concealed carry. Not only does it build vital muscle memory, it also gives a feel for how a particular pistol draws.
The P226 provides a good example why this should be a consideration. The double-action/single-action pistol is hammer fired, which presents the challenge of a spur. While SIG has done its utmost to eliminate any potential snag points, rounding it completely, it might require an adjustment for a shooter more familiar with a striker-fired. Realizing this may come too late without incorporating every potential movement into a gun drill.
With this in mind, it is advisable to find facilities that allow you to train the way you’ll fight. Otherwise, you’ll just be going through the motions.
The new technology going into mass-produced ammunition is making factory ammo as good — or better — than handloads.
How has factory-loaded ammunition improved over the years:
The quality of today’s factory ammunition, in general, is on par or better than handloads.
Even cost wise, factory loaded ammo doesn’t run much more than reloads.
Much of the improvement in quality is do to better tooling and manufacturing practices.
Many manufactures also engage in cutting-edged ballistic research and development.
And they are able to make significant quality jumps through testing at state-of-the-art facilities.
They also have raised standards to the point a dud is are a rarity.
A pal of mine, who knows his way around a rifle and reloading press, spent hours assembling handloads for the 6.5 Creedmoor. He was trying to wring out the best accuracy, the best consistency. He tried all bullet weights and styles, different powders and primers, and cases from a variety of manufacturers. I listened about the detailed data he collected — temperature, humidity levels, wind speed, the trigger time, the time handloading hundreds of rounds.
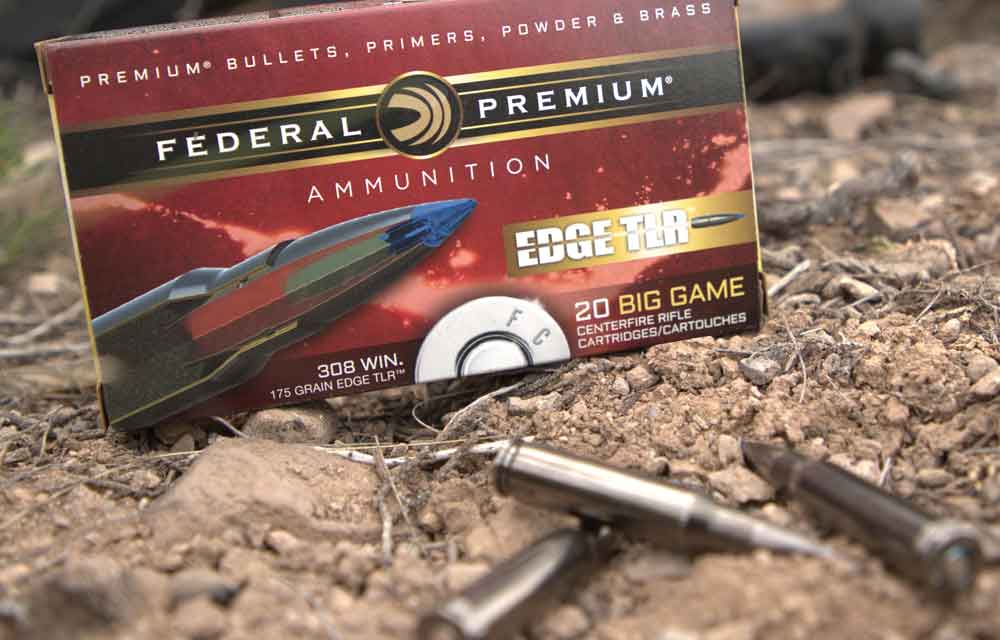
Federal’s new Edge TLR is built with the manufacturer’s new Slipstream tip and is designed to offer consistent expansion and penetration at both close and long ranges.
“Have you tried Hornady’s 140s?” I asked. “They shoot sub-½-inch out of my Savage all day long.” He looked at me and conceded that he couldn’t reload better ammo despite his best efforts.
That’s the situation today. Call it an embarrassment of riches. Today’s factory ammo is good. Really good.
If you reload today, it’s not because you want stellar accuracy and consistency from your ammo. Sure, there are benchrest shooters who weigh and measure exactly to achieve phenomenal results, but for the most of us, reloading is an excuse to get away from the significant other and spend alone time in the man cave. Face it: You won’t be saving a wad of money by reloading if that’s your motivation. I’ve only seen a decrease in per-round cost when I purchased in bulk, and then I never did figure in my time pulling the press handle.
But I completely understand the desire to reload. I’ll still reload for the enjoyment of the process, but I have confidence that the ammo sitting on my dealer’s shelf will consistently group at distance and go bang every time I pull the trigger. And here’s the kicker: Good factory ammo isn’t just coming out of small boutique ammo factories. The big companies are producing jaw-dropping results, too.
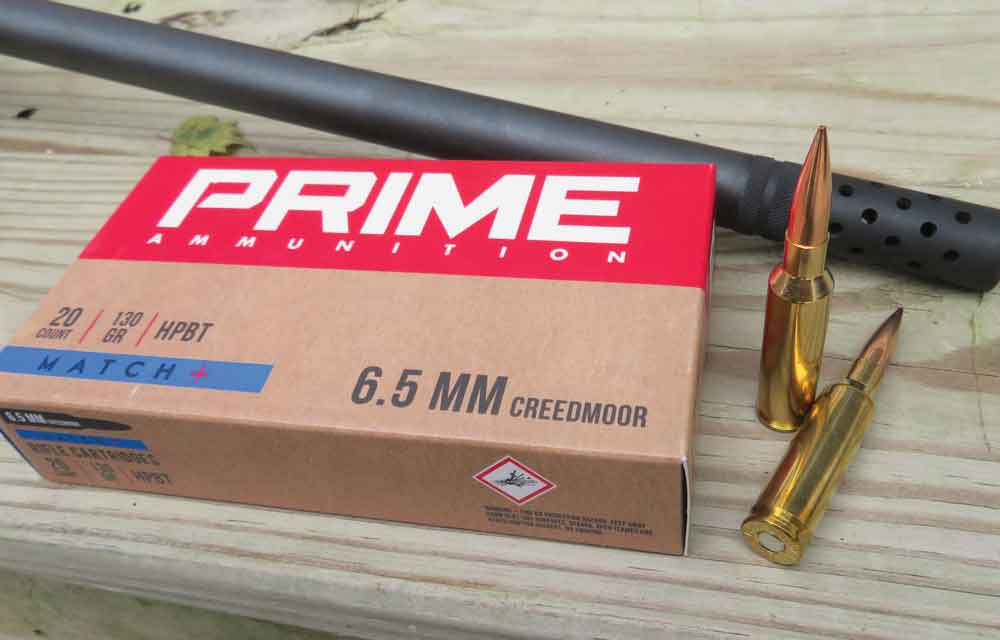
Prime’s ammunition is manufactured by the excellent Swiss RUAG Ammotec, which operates a high-tech facility that produces stunningly accurate loads. Prime also offers its unique Shootscription Service, which allows shooters to schedule out regular orders of the ammunition they use most often at specified intervals, with guaranteed automatic delivery and a stable price point.
From factory rimfire and shotshells to centerfire pistol and rifle ammo — all of it is good — or at least better than it was in the past. Today’s shooters are typical of shooters of yore in that they don’t want to pay a lot for their ammo, and they want it to go bang every time they press the trigger. What is different about today’s shooters is they also want to order ammo online and expect free shipping, too.
Ammunition At Your Doorstep
Prime Ammunition is an excellent example of innovation in not only the quality of ammo being produced, but also in distribution methods. Prime is a new player in the ammo market and has been selling ammo for the past 4 years, mostly online. It doesn’t actually manufacture its ammo but rather specs it out and has it manufactured by RUAG, which is a large Swiss ammunition manufacturer.
RUAG has a state of the art ammunition factory, which is one reason why factory ammo is so much better these days, and Prime’s reputation is building rapidly because of it. Better tooling and manufacturing equipment means the final product can be held to tighter specifications, and ammo that might have passed muster in older facilities might not pass in these newer ammo factories.
The newer factories churning out round after consistent round is part of the reason. The other elements that separate your ammunition from your granddad’s ammo are the proprietary bullet designs and powders tailored to the requirements of the shot, and all these elements offer cartridges that are consistent round after round, across every single lot. This is a consistency that is found year after year.
At one time in the not too distant past, ammunition was part of the accuracy equation. What ammo manufacturers are trying to do is eliminate ammunition from the accuracy equation. In short: If you have an accuracy problem, it likely isn’t because of your factory ammo.
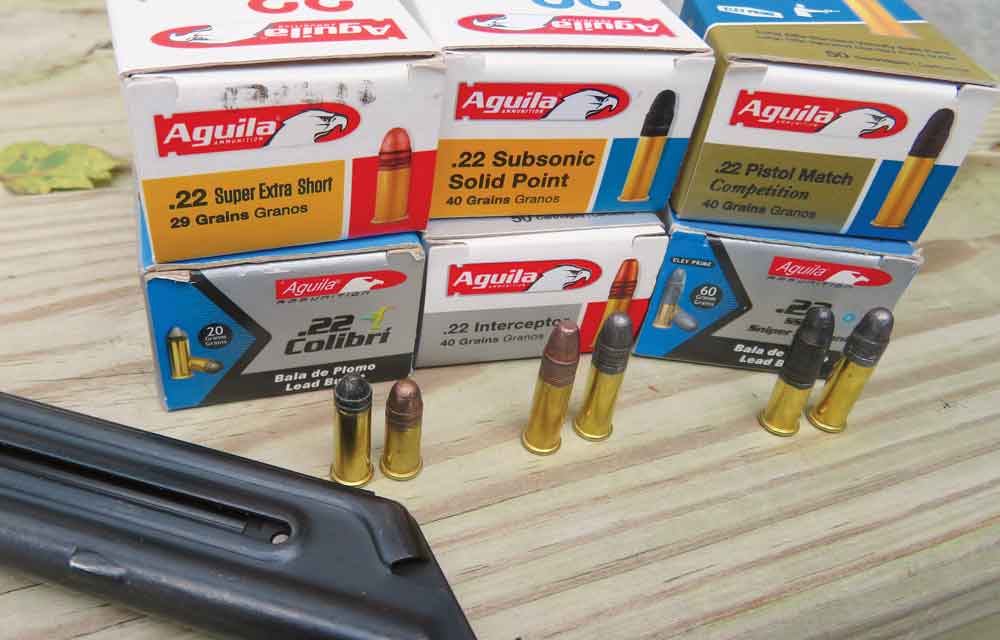
Aguila Ammunition is another company that’s been updating its manufacturing process to produce improved ammo. The manufacturer is most known for its rimfire production, which includes a number of specialty rounds.
Prime’s specifications are not the vanilla offerings that you might expect. You know — same bullet weights and basically the same cartridge but packaged in a different brand’s box. What Prime does and what other ammo makers are doing is listening to shooters’ needs and requirements.
Specifically, Prime listened to long-range shooters, and the testimonials on Prime’s website tell the story. Long-range competition shooters use Prime ammo because it’s so consistent that there’s no need to spend time reloading. Is Prime ammo more expensive? Yes, it’s slightly more than you could pay elsewhere, but those few extra dollars buy incredible peace of mind.
Learning New Tricks
When I contacted one of the “pillar” ammo manufacturers, Federal Premium, I asked them this: What has Federal Ammunition done to push the envelope on ammo design and production to get it to today’s top-notch performance levels?
Federal’s response was that ongoing testing and development is the key to continuous ammo improvement. While some developments are breakthroughs, the vast majority of ammo improvements are subtle in nature — a tweak to powder type, a tweak to bullet weight and/or bullet ogive. Engineers are creative people, and oftentimes small adjustments to production tolerances and testing practices yield very tangible results in the final product. Federal’s engineering teams, like teams at other cutting-edge ammo factories, strive to improve every step of the process, from the intake of raw materials to the final testing in test alleys. What’s the expression? The devil is in the details.
Concerned About Cleanliness
Not all ammunition is used for the same purpose — meaning that rimfire, handgun, rifle and shotgun shooters have different needs — which pose a different set of challenges for ammo manufacturers to overcome. For a high-volume action pistol shooter, reliability and cleanliness might be the biggest concerns. In its American Eagle Syntech line, Federal uses Syntech polymer coatings on bullets and Catalyst Primers, which allow shooters to go longer between cleanings without sacrificing reliability. The Syntech Total Synthetic Jacket is a polymer coating that takes the place of the copper jacket in conventional FMJ target ammunition.
Federal Premium’s innovative Syntech line is designed to run cleaner and be more reliable over extended use. It achieves this with a polymer coating on bullets and Catalyst lead-free primers. This is also good for folks who shoot at indoor ranges.
Promoting Long-Range Expansion
In the old days, some hunting rounds performed flawlessly, expanding as advertised. However, push the distance on those bullets and the performance dropped like a rock with minimal expansion at best because the bullet was designed to expand at a certain muzzle velocity. Newer bullet designs offer match-grade long-range accuracy and reliable expansion at low velocities. The quest is for more uniformity and to have an ever-increasing ballistic coefficient while balancing stability in conventional rifle configurations. Sounds like a lot to ask? Maybe … but it’s been done.
The new Federal Edge TLR bullet features a Slipstream Tip, which has a small cavity that runs the length of the shank all the way up to just below the point itself. That point breaks free upon impact, allowing fluid to enter the hollow core, where it generates pressure and easy expansion, even at low velocities. The large hollow cavity in the bullet nose, combined with exterior jacket skiving, further aid expansion and penetration. Serrations allow the petals to peel back on contact at velocities as low as 1,350 fps — speeds typically seen 1,200 yards downrange in the 200-grain .30-caliber loads.
Redefining Reliability
There was a time when I competed in small-bore pistol bulls-eye matches, and I was on a quest for the best ammo to run through my S&W Model 41. I was angry when I’d get a dud round in a case. Back then, it was almost a guarantee to have a dud in a case. I had three duds in one case and changed from that old-school rimfire ammo brand to another. With the new brand there were no duds, but the dry lubricant on the bullets bogged down my pistol fast, requiring me to clean it after each match or else run the chance of it jamming during a match, requiring me to shoot an alibi.
Aguila is an example of an ammunition company that makes us rethink the 40-grain .22 LR round. Aguila has totally rebuilt its rimfire manufacturing capabilities. Previously, the company’s manufacturing equipment was like that of most rimfire manufacturers: They used equipment dating back to World War II. The investment in new equipment means that Aguila produces reliable, consistent rimfire ammunition, and not just typical rimfire rounds that we buy by the brick: Subsonic, high velocity and other specialty rounds make Aguila one of the most impressive suppliers of rimfire ammunition in the world.
Superb Shot Strings
I once bought shotgun shell wads by the 500-count bag. Who would think that such an insignificant component could play such a critical role in shot density? Now that ducks are consistently on my end-of-the-year hunt list, I’m paying more attention to factory loads like Federal’s Black Cloud. The FliteControl Flex wad in Black Cloud shotshells features rear-deploying brake fins and side-mounted vents that prompt the shot payload to separate from the wad at precisely the right moment. Dense and consistent shot patterns are the result.
Rejuvenating Old Cartridges
The resurgence of the 9mm pistol cartridge in law enforcement is a perfect example of factory ammo stepping up its game. In the early 1980s, law enforcement geared up with the 9mm cartridge, then, due to the round’s lackluster performance, it was bumped by the .40 S&W. More power equals better was the thought, but now, in the past 10 years, ammunition manufacturers have developed better bullets and use better powder, and the pendulum has swung back. Most law enforcement agencies, including the FBI, have reverted back to the 9mm. The Speer Gold Dot G2 with elastomer filler in the shallow hollow point ensures the bullet expands.
Factory ammo these days is good. Real good. And there are more choices than ever from new and established manufacturers. Hornady has even tweaked the bullet weight in my favorite 6.5 Creedmoor load and now offers a 147-grain ELD bullet, which uses a heat shield tip. There’s so much great new factory ammo, I’m going to need more range time. Don’t you just love the science being infused in new ammunition?
Editor’s Note: This article originally appeared in the Winter 2017 issue ofGun Digest the Magazine.
Optimized to break clays without mercy, the A300 Outlander Sporting has the stuff to own the range.
Where’s the new shotgun’s competitive edge?
A gas valve system reduces even the hottest loads pressure for manageable recoil.
Shim system ensures the A300 Outlander Sporting always has a proper fit.
Its heavier stock reduces kick and helps it swing more intuitively.
Wider rib and two beads help the shotgun get on target.
The gun’s MSRP is $1,100.
If you generally dress in tweed when you shoot and rarely touch your fowling piece before the Glorious Twelfth, then versatility in a shotgun isn’t likely a concern. For the rest of the shotgun world it’s a different story. For most, a scattergun is a workhorse, ready teakettle a Canada honker on the pass, knock a pheasant head over spurs and vaporize clays the instant “PULL” is uttered.
Beretta succeeded in ticking these boxes a few years back with the introduction of its yeoman semi-automatic the A300 Outlander. The American-made replacement of the 3901, the 12-gauge offers reliability and performance in a relatively affordable package. And now the Italian-based company looks offer the same for those who live and die at the trap range.
Introduced at the SHOT Show 2018, Beretta has tailored the line’s newest addition — the A300 Outlander Sport — to the clays game. And while the new semi-auto runs at a premium compared to the original, at $1,100 it’s not so prohibitive as to knock it out of the running as an entry-level gun for the budding clays enthusiast.
Among the more attractive aspects, particularly for those newer to the marathon shooting discipline, is a feature common to most Berettas — forgiving recoil. The company’s autoloaders have typically won praise for their mildness, and the A300 Outlander Sporting’s self-cleaning cylinder and piston design go a ways to enhancing this facet. Optimized to run lighter loads, the gas system also includes a valve system that decreases the pressure of more powerful shells, thus doles out less punishment. Additionally, the A300 Sporting’s larger, heavier stock plays its part in dampening kick, as do shims to adjust the length of pull, ensuring proper fit.
For the money, Beretta makes certain the A300 Outlander Sporting comes with the little extras clay shooters look for on their guns. These include a 30-inch barrel, widened rib, front and mid beads, a palm swell on the grip and extended chokes. The 12-gauge comes with three MobilChoke Victory tubes (IC, M and F).
While not performance enhancing, the gun also comes in a stick of attractive walnut. And who can complain about wood on a shotgun?
For more information on the Beretta A300 Outlander Sporting please visit: www.beretta.com
A300 Outlander Sporting Specs: Barrel length (in): 30 Chamber (in): 3” Choke: MC Gauge: 12 Lylium: Y Rib: 6×6
The Recluse earned a patent for more than its sound-suppression capabilities; it also has the ability to make any round sub-sonic.
How the Spike’s Tactical Recluse is making noise:
The Recluse not only suppresses a round’s report, but also slows any bullet’s velocity to sub-sonic speeds.
It accomplishes this through barrel porting, siphoning off some of the gases.
The design recently was issued a patent.
The Recluse is also a single NFA stamp gun, given the suppressor lengthens the barrel over 16-inches.
Typically, when talking suppressors one style comes to mind — the removable variety. By far the most common, if a shooter owns one or has seen one at their local range it is most likely one of the many threaded units that have flooded the market in recent years.
Even with their abundance and relatively affordable price points, the traditional style of suppressor is giving way to more holistic systems. Integrally suppressed rifles and pistols have gained a toehold and, given the innovations incorporated into a number of the designs, they don’t look hit the skids anytime soon. A good example is Spike’s Tactical’s Recluse Rifle.
Unleashed upon the greater shooting world in 2016 as the Brown Recluse, the pistol caliber carbine’s built-in sound-suppression system does more than muffle its report. It does so literally for any 9mm round — sub- or super-sonic — run through its blowback action. No small feat, given it typically takes some pretty toned down ammo to get the most out of a can.
The Recluse pulls off this coup with a rather ingenious bit of engineering buried under its suppressor tube — a ported barrel. Situated behind the baffles, the ports allow some of a round’s gases to escape, slowing a bullet’s velocity and thus eliminating the crack of the projectile breaking the sound barrier. This was one part of the equation that, in late March, earned Spike’s a patent on the upper assembly of the Recluse.
The other, given the abbreviated barrel (1:10 twist), is the pistol caliber carbine only requires one NFA tax stamp. Spike’s accomplished this by permanently affixing the forward tube to the barrel nut to create an extension greater than 16-inches. This gives the weekend 3-Gun warrior as much chance of owning the 7.5-pound Recluse without taking a second mortgage as a local law-enforcement agency.
To the surprise of no one, given the technology, Spike’s Recluse still runs a pretty penny, even with one stamp. The carbine’s MSRP is $2,230 before paying Uncle Sam’s share. But, aside from the advance suppression system, shooters get a ton of top-end features.
Among some of the more notable are a 12-inch BAR2 rail, dedicated lower receivers for Colt and Glock magazine compatibility, jeweled mil-spec trigger and cut down ejection port. The Recluse comes decked out with a Magpul CTR Stock and MBUS front and rear sights.
‘Running the gun’ is not exclusive to carbines and handguns. The same principle of staying topped-off and ready should apply to bolt-action precision rifles as well.
What does it mean to “run” a bolt-action rifle?
Running the gun means manipulating the firearm with authority and ensuring it’s ready to go.
It’s a concept well embraced by pistol and tactical rifle shooters, but is sometimes lost on those wielding bolt-actions.
Reloading immediately after a shot and preparing to take another is a simple method to build the proper mindset.
Learning to look through your scope while reloading, running the bolt with authority and calling your shots also make for a more prepared marksman.
The challenge is treating your bolt gun like you would a pistol or carbine.
I just spoke with a Deputy Chief of Police for a major metropolitan police department who’s responsible for overseeing the “special” divisions, which includes SWAT. We were talking about firearms training, and I brought up some typical issues that I’ve noticed over the years while training military and police snipers.
Just as with carbines and handguns, always ensure your bolt-action rifle has a fresh round chambered after each shot. Teaching yourself to cycle the bolt without losing your sight picture is ideal.
He asked me an easy question that one would expect I would be asked all the time of my courses: “What’s the biggest error I see with new students?” Interestingly, to me anyway, I cannot remember ever being asked that question before.
It sure seemed like a question for which I’d have a canned answer ready. But I didn’t. So, I did the next best thing — I just rambled about common issues I correct on the first day of a training course. Somewhere between adjusting ocular focus, setting the rifle up for the shooter and proper trigger control, I stumbled upon the answer that I knew I had to share with you: “Failure to run the gun.”
Making The Mental Shift
To me, “running the gun” means manipulating the firearm with authority, and ensuring that it’s ready to go and topped off with ammunition.
Here’s what practically every new student does: They shoot a series of shots at a target and then sit there with the bolt to the rear as they stare at their target and either make excuses for their poor performance or high-five their buddy for their good group.
I do have a canned response for this situation: “Shooter, if you were running a pistol drill and just fired the last round of ammunition in your pistol at the end of the drill, would you stand there with your slide locked to the rear and discuss your performance, or would you immediately reload the pistol and get the gun ready to shoot again?”
Of course, they’d get the gun ready to fire again every time.
Too many precision shooters analyze — or, sometimes, admire — their shot after pulling the trigger. Exhibit proper follow-through, and then work that bolt quickly and efficiently to ready yourself and your rifle for the next shot.
So, why don’t they do it when they’re lying behind a bolt-action rifle? For some reason, a bolt-action rifle causes new shooters to forget to run their gun as they would any other firearm.
When my students shoot a group on paper, even if it’s just to confirm their established zero, I always have them reload their rifle and prepare to take another shot. Only then are they permitted to unload. It might seem like wasted energy, but trust me — it instills important habits for tactical shooters and hunters alike.
Bad guys have friends. Don’t sit there on an empty rifle … load it! Deer are sometimes missed. Don’t stare through the scope of an empty rifle … get it up and running again!
Mastering The Mechanics
There’s a right way to do this, and it involves looking through your scope at your target while you load your rifle. After all, the easiest way to find a target again is to not lose it in the first place. Also, if the bad guy or the deer moves, wouldn’t it be nice to know where?
If you can’t load your rifle without looking, you need to learn how. You should store your ammo in a consistent location that you can access while you’re behind your rifle. This is one of the many reasons I prefer shooting off of a pack — my ammo is right there in front of me, ready for flight.
When it comes to following up with another shot while you’re reloading, an internal magazine — instead of a detachable magazine — can be faster. This might be counter-intuitive, but detachable magazines are only faster for as long as you have full magazines. If you must reload a magazine with fresh rounds, then both hands need to come off the gun and you need to load one at a time. If you need to shoot, the magazine must be re-inserted into the rifle and the bolt closed before you can send another round down range.
On the other hand, if you’re loading an internal magazine, you can press each round into the magazine one at a time, and if you need to shoot, you can simply push the bolt forward and shoot. You can leverage this technique with magazines by throwing a loose round into the action on top of an empty magazine and closing the bolt before removing the empty magazine and refilling it. This way, you’ve got a round in the chamber ready to go.
“Running the gun” also applies to operating the bolt between shots. Sitting on an empty rifle is pretty bad, but so is sitting on an empty chamber. Not only does it take longer to take a second shot if needed, but it’s really easy to forget to cycle the bolt again for the next shot. Trust me, I’m guilty of being lazy on the bolt before and pulling on the trigger for the next shot only to realize that I forgot to get a fresh round in the chamber. It’s embarrassing on the range. It can be deadly in a tactical situation, and it can lead to a missed deer while in a hunting situation.
When you shoot, you should apply a small amount of follow-through to the trigger, “call your shot,” and then run the bolt! Especially when I’m shooting at 500 yards or farther, I can run the bolt and be back on the target taking the next shot right as I hear the impact from the previous shot.
And, when you run the bolt, run it with authority! Most malfunctions I see with bolt-action rifles are due to being too gentle — either not pulling the bolt all the way to the rear to catch the next round or failing to eject the previous case by pulling the bolt back too slowly.
Here’s your challenge — treat your bolt gun like you would your pistol or carbine. Keep it topped off, and run it with authority. You’ll have fewer malfunctions, and you’ll be a more effective shooter.
The gun world is full of personalities, both the genuine and the two-bit knockoff. Elmer Keith most certainly fell into the former and probably made the latter as jittery as lambs during docking season.
Typically pictured with six-shooters in his hands, a large Stetson on his head and a well-chewed cigar between his teeth, Keith seemed like the American Spirit come to life. But under his homespun exterior ticked a thinking man, particularly on the subject of guns. A fella doesn’t produce more than a half-century of articles for the top gun publications in the country and a mountain of books purely off of Western charm. At least they didn’t in Keith’s day.
The rancher and big game guide knew his stuff, even if he had to learn it first hand and blow the loading gate off a single-action Colt .45 in the process. And Keith innovated from this hard-won, sometimes dangerous knowledge. From the efficient Keith style bullet to a handsome and quick-drawing six-gun holster to advancing the sport of handgun hunting, modern shooters still owe this firearms wildcatter a debt of gratitude.
There was, however, one area where he perhaps exerted more influence than any other — cartridge development. A lover of big-bore firearms that slung big lead, fueled by big loads, Keith’s work revolutionized what we shoot today. And nowhere was his impact greater than on the handgun, magnum handguns. Would they exist today without him? Probably, but sans his hot loading and constant hounding of gun and ammunition companies they might have taken a spell longer to come to fruition and gain popularity.
So without further ado, here are the three handgun cartridges Elmer Keith helped innovate you need to know. Without out them and the Ol’ Cuss modern shooting wouldn’t have been the same.
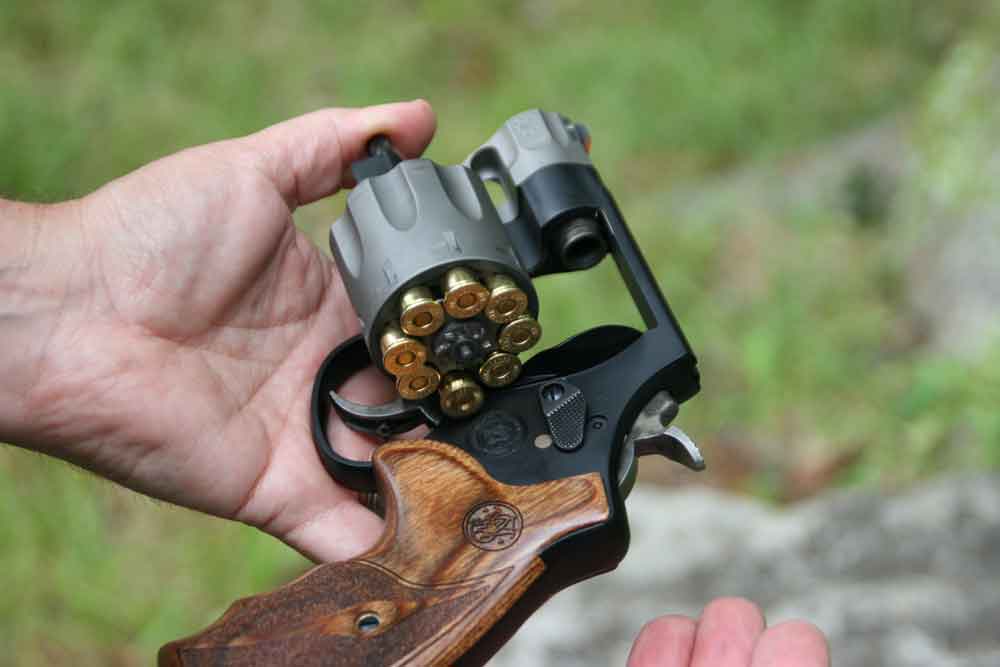
.357 Magnum
Possibly the most popular high-velocity handgun cartridge to come down the pike was born, in part, from Elmer Keith’s pushing lead to its limits. The Ol’ Cuss didn’t bring the first magnum handgun cartridge to market in 1935; Major Douglas B. Wesson and Philip B. Sharpe get that credit. But Keith did plenty of hot-rodding the .357’s forerunner — the .38 Special — to help lay the groundwork.
Actually, he and Sharpe both pushed the Special to its redline separately with heavier bullets and bigger charges. And the time was ripe to take the cartridge to its ballistic limits. Smith & Wesson released its N-frame .38/44 revolvers in the early 1930s, engineered to weather the high pressure of hot .38 loads. For a short time there was a .38/44 cartridge, simply a .38 Special loaded to produce around 1,150 fps muzzle velocity. Sharpe and Keith took advantage of the beefed-up revolvers, cooking up rounds approaching 1,400 fps at the muzzle with a 158-grain bullet.
Keith’s interest in the souped-up .38 eventually waned when he became enamored with developing what became his baby — the .44 Magnum. But Sharpe and Wesson both drew upon his work to finalizing the legendary .357 Magnum.
Slightly longer than the .38 Special, so it’s not accidentally loaded the lighter-framed revolver, the magnum today is capable of pushing a 180-grain jacketed hollow point 1,550 fps. The S&W Model 27 was the first gun chambered for the hard-hitting .357, but it made its way into some all-time classics, including the coveted Colt Python.
.44 Remington Magnum
The big .44 was Elmer Keith’s magnum opus. Able to kill truck engines at close range and deer at 600 yards graveyard dead, the .44 Magnum is the hallmark of handgun power. Only in the last quarter century or so has it been dethroned as the world’s most powerful handgun cartridge.
Keith had to preach like a minister before end days to convince gun and ammunition companies his hot .44 Special was viable, not just a blown off hand waiting to happen. What had the manufacturers edgy was Keith’s test revolver. For around 15 years, he sent his heavy .44 bullets with ample loads screaming to the tune of 1,200 fps out of a Smith & Wesson Triple Lock. Despite Keith never running into a hitch, S&W was nervy about the hot load-revolver combination. In their eyes, it was an accident waiting to happen. After all, it was designed and manufactured before some key metallurgical advancements.
Ever the innovator, the cowboy had a simple solution — build a modern gun to wrap around his cartridge. Smith & Wesson relented and in 1955 and whipped up the first of what would become a jewel of the revolver world — the Model 29. Remington supplied the factory ammo for Keith’s cannon — a hair longer than the .44 Special ensuring it didn’t make its way into a lighter-framed revolver.
The .44 Magnum and Model 29 were an instant sensation, though many made their way back to gun stores when their owners discovered they kicked like a maladjusted mule. This facet of the magnum also smashes popular Hollywood hoopla — the cartridge was never big with law enforcement, outside of “Dirty” Harry Callahan. The 29 is a lot of gun to strap to a duty belt, and the .44 bucks like rough stock; not the stuff that keeps you in the black when qualifying.
But with the ability to punt a factory-loaded, 210-grain jacketed hollow point 1,494 fps at the muzzle, it’s still a cherished. Even with more powerful options available, the .44 Magnum remains a top choice of handgun hunters the world around.
.41 Remington Magnum
41 Magnum
The .41 Magnum’s pedigree should have gotten it into the finest chambers around. But it never really got out of the shadows of Elmer Keith’s other projects.
Developed by Keith, with input from marine, lawman and gun writer Bill Jordan, the .41 was supposed to be a ‘Mama Bear’ cartridge tailored for law enforcement. More stopping power than a .357 Magnum, easier to shoot than the .44 Magnum. Trends of the days, however, sent the .41 into semi-obscurity.
Early on, Keith advocated a milder .41 Special to fill the .357’s terminal ballistics cracks, while still keeping the gun manageable, particularly during rapid fire. The issue was, by the time Smith & Wesson and Remington listened to Keith and Jordan it was the early 1960s and the era of hard-hitting, wrist-snapping magnums was in full swing.
In turn, the market morphed Keith’s .41 Special concept into the .41 Magnum reality. When S&W’s .41 Magnum Model 58 was released in 1964, its ‘light’ police load was a 210-grain semi-wadcutter that escaped the muzzle at 1,150 fps. Overkill, plain and simple, and most law enforcement agencies saw it that way too. That’s quite a bit of big iron in the hand of an officer used to a pussycat like the .38 Special.
All was not lost for the .41 Magnum, however. While it never earned anything like the .44 Magnum’s ticker-tape parade, it proved itself a competent hunting round. It is big medicine on the likes of deer, bear and other medium-sized game, and it offers some advantages over its bigger brother, namely a flatter trajectory and less recoil.
Even with a dedicated following today, Keith’s black sheep magnum still faces hurdles. Factory loads are as scarce as July snowflakes, which makes the round fitter for handloader types. But depending on whom you ask that’s not necessarily a bad thing.
Looking to go armed, but are stuck in the weeds as to what to arm yourself with? Here are 20 of the best concealed carry gun options that will keep you on the defensive.