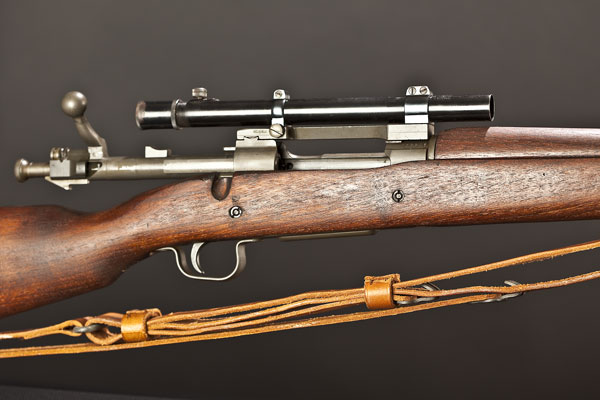
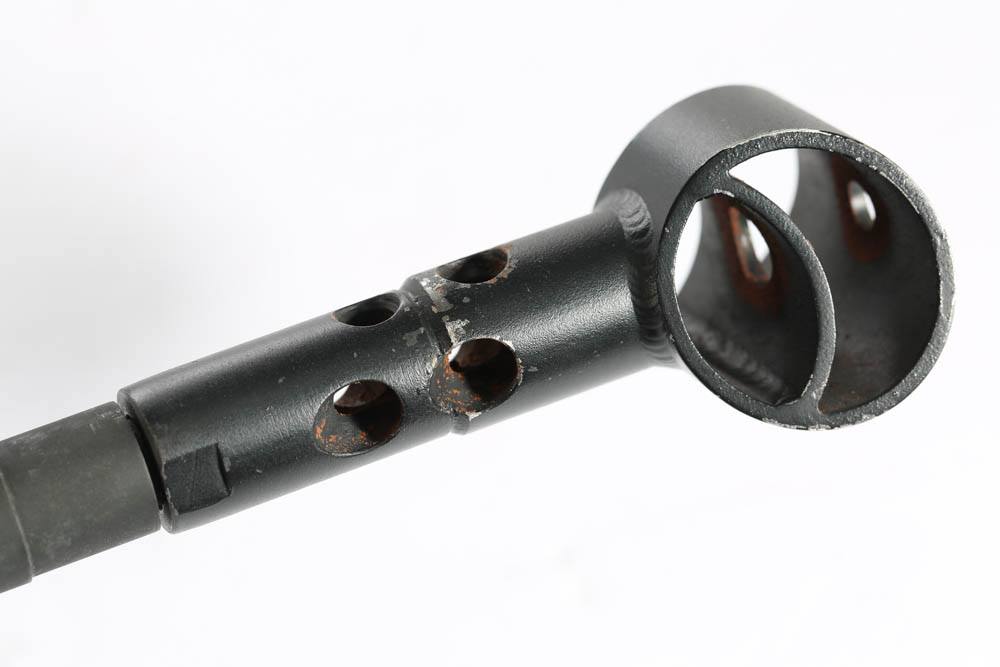
Hanging a big hunk of metal off the muzzle of your gun is going to have an effect on accuracy, but exactly how much … and why?
Barrel harmonics will change with a suppressor.
A suppressor will shift the point of impact consistently with each mounting.
This shift will be different for each firearm it’s mounted on.
Suppressors generally improve a firearm’s accuracy.
When it comes to accuracy while shooting with a suppressor, we have competing dynamics at play. On one hand, the suppressor should cause a shift in point of impact, and perhaps even accuracy, because we’ve just attached a half-pound, up to a pound and a half, of metal on the end of the barrel. When you fire a rifle, the barrel hums like a tuning fork. The muzzle whips around like crazy. The point of impact depends largely on where in the “cycle of whipping around” the muzzle is pointed when the bullet pops out of the crown.
An inaccurate barrel has inconsistent harmonics, and the bullet leaves when the muzzle is basically in a random location at each shot. An accurate barrel is one that either has little or no movement, or the bullet leaves at the same location in space of the muzzle’s movement.
The Browning BOSS system was an attempt to tune the barrel harmonics so that you have a consistent release. The BOSS has an adjustable weight, one that moves back or forth and changes the harmonics, and you do a trial-and-error test to see which position is best. (I can’t help but wonder just how much of the improvement in accuracy is created simply by the shooter getting more practice.) So, hanging a chunk of metal on the muzzle should change accuracy.
On the other hand, the suppressor can improve accuracy by stripping away the turbulent gases from the muzzle, the location where the bullet is at its most unstable and most suggestible to change. Which one wins?
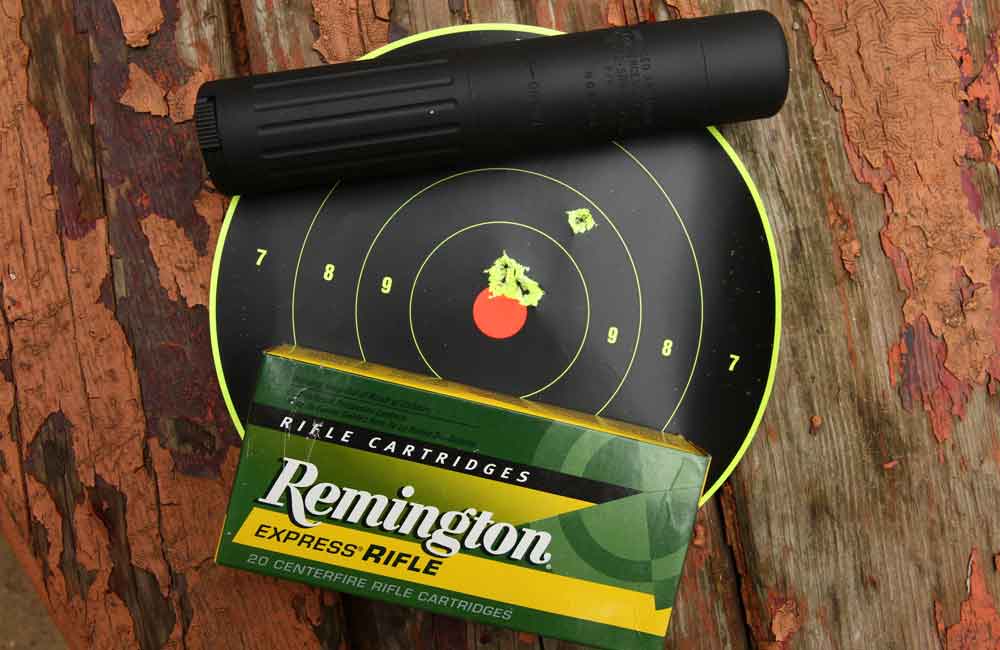
It turns out that the gas-stripping variable is larger than the random harmonic change variable. (Maybe that’s why Browning let the BOSS fade; the improvement wasn’t worth the effort?) Most suppressors actually increase accuracy. Few change the point of impact, and when they do, it’s by a minimal amount. While the direction and distance of the change is random on each pairing, it is consistent with the pair. That is, if you slap a suppressor on your rifle, and find it shifts the group half an inch low-left, the shift will go away when you take the suppressor off. And, it will return, in the same direction and amount, when you put it back on. But, it will not necessarily have the same change on the next rifle in your rack.
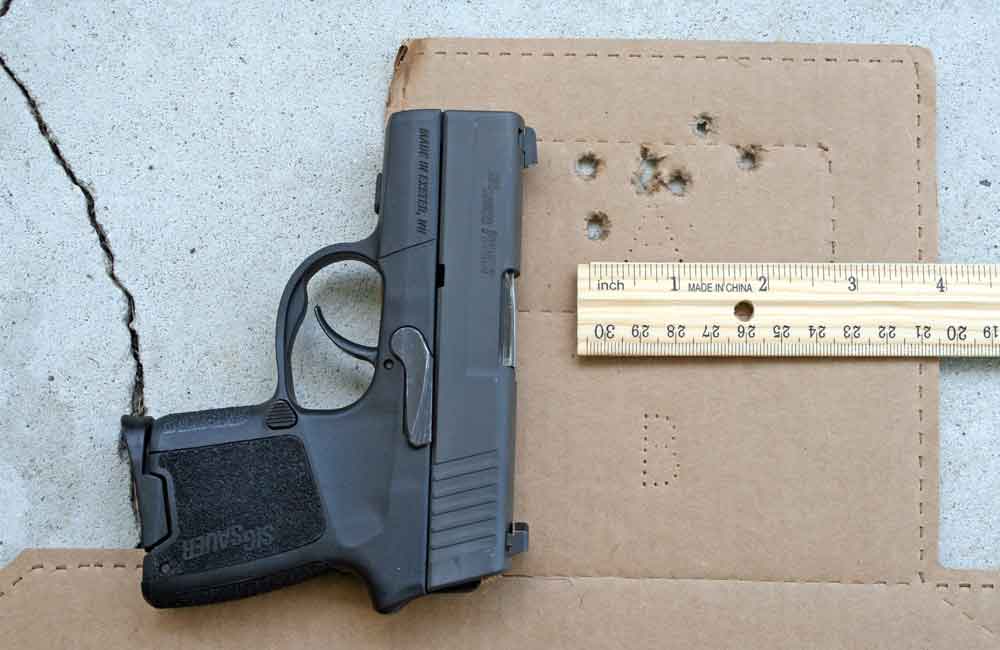
Now, there is accuracy, and then there is accuracy. For most shooters (and I don’t mean to be insulting here), the accuracy shift is one they will not notice. For example, I tested a 9mm suppressor on a high-end 1911, a pistol built with a bank-vault-like fit. Over sandbags, the pistol was capable of less than 2-inch groups at 25 yards. If I knocked off my usual and excessive coffee consumption, I could get groups down to close to an inch, center to center. That’s basically five shots touching at 25 yards … from a pistol.
The suppressor I tested shifted the group center maybe an inch. So, a shift at 25 yards that isn’t even half the apparent width of the front sight blade, this when shot over sandbags? Admit it, how many of you can shoot a sub-2-inch group, even off of a rest, with your current pistol, ammo and practice level? On demand? If I had handed the pistol to someone who could shoot a 3-inch group at best (which is still pretty darned good) the change in point of impact would not be as great as the group itself. The overlap of the groups would mean no change was apparent, and it would take some very careful measuring to even indicate there had been a shift.
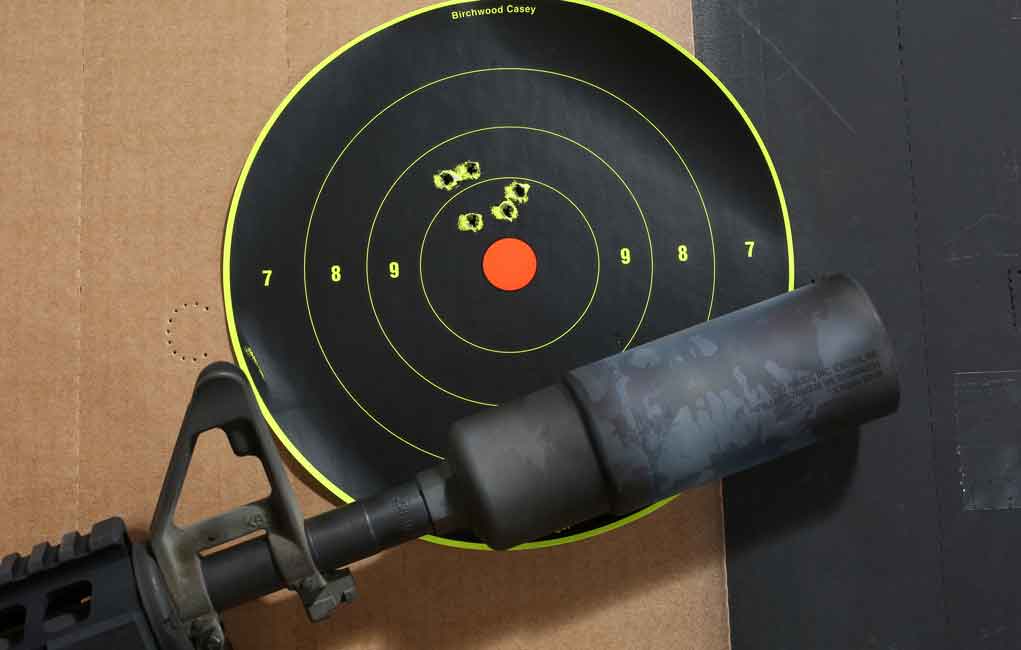
I did the same thing with a top-flight AR, using match ammo. And the numbers were pretty much the same. If I changed my regular scope to a high-X one (Leupold 6.5-20) I could shoot sub-MOA groups, and the suppressor caused a change of almost an inch at 100 yards. If you could not shoot sub-MOA groups, you would not be able to determine if any change at all had occurred.
Editor’s Note: This article is an excerpt from Gun Digest Book of Suppressors.
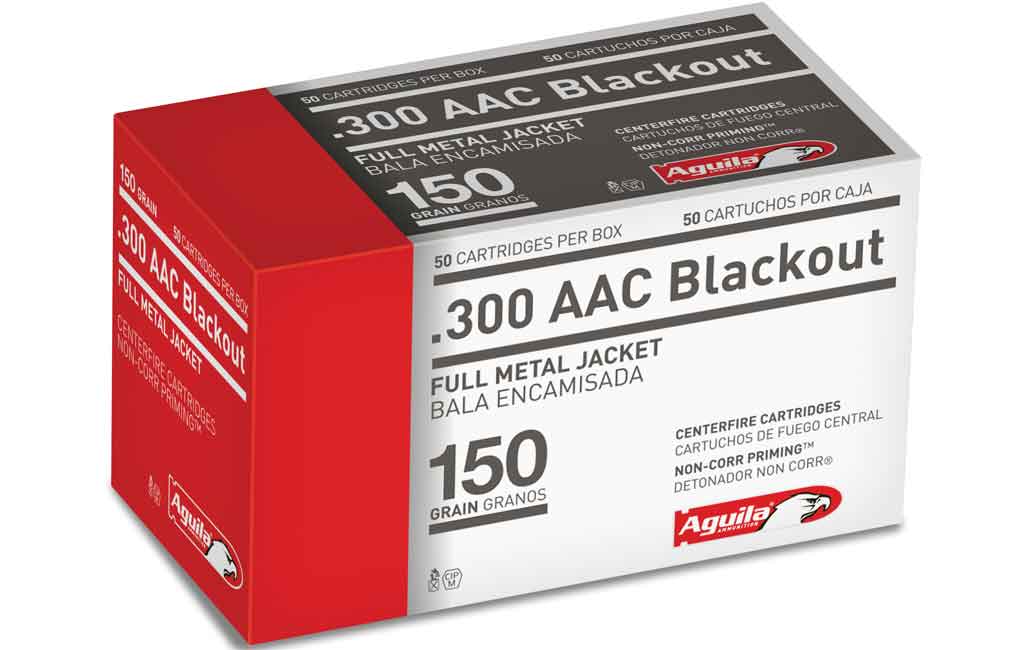
Aguila Ammunition has released its first 300 Blackout round, tailored to excel downrange.
Aguila’s .300 Blackout is loaded to perform downrange and produce mild recoil.
The cartridge features a 150-grain FMJ bullet with a muzzle velocity of 1,900 fps.
The cartridge is supersonic, not optimized for shooting suppressed.
The roots of the .300 BLK, or .300 AAC Blackout, are purely tactical, but in a relatively short period of time the cartridge has blossomed into a favorite among everyday AR shooters.
The appeal of the .300 Blackout is obvious, with the less than 10-year-old cartridge not only offering shooters a .30-caliber option for their black rifles, but doing so with little hassle. The .300 BLK is completely compatible with the AR-15 platform, utilizing the same bolt and magazine as the 5.56 NATO without reduced capacity. A shooter need only have the appropriate barrel to harness everything the cartridge brings to the table.
The market has been quick to hitch its star to the meteoric rise of the cartridge, with gun and outdoor stores’ racks bursting with a full selection of rifles chambered for the round, and its shelves brimming with .300 Blackout ammo. Aguila Ammunition is among the most recent to “blackout,” offering what appears to be a snappy round, perfect for the range or competition.
Topped with a 150-grain full metal jacket bullet, the new round is designed to outperform the 5.56 NATO in every barrel length, particularly in pistol-length guns. At the same time, it’s not so hot as to make the recoil unmanageable.
“Our new .300 AAC Blackout design delivers impact and accuracy, with low recoil much like other Aguila rounds,” said John Domolky, Director of Sales for TxAT/Aguila Ammunition.
Aguila lists the muzzle velocity of its .300 BLK ammo at 1,900 fps, which is a good clip for the round. And while there was no ballistic coefficient listed for the bullet, if the company’s numbers prove true, it’s a decent downrange performer. The bullet looses just over 150 fps at 100 yards, and it delivers 1,004 ft-lbs. of energy at that range.
One thing to keep in mind about the new .300 Blackout round from Aguila, which is certainly not lost on those who shoot suppressed, is that it’s supersonic. In turn, this .300 BLK ammo is not optimized for a reduced sound signature. But there’s always a trade-off in how ammunition is loaded, and Aguila is shooting for downrange performance. It will be interesting to see if the company also has a heavier, subsonic .300 BLK round in the works.
Aguila is offering both 50- and 20-round boxes of its new .300 BLK ammo, and at the present time has not released an MSRP for either.
Gun Digest contributor Phil Massaro explains the ins and outs of the ballistic coefficient and what it means when selecting the right bullet for the task at hand.
What is ballistic coefficient and why does it matter?
Ballistic coefficient (BC) measures a bullet’s ability to slice through the atmosphere.
There are two standard models for calculating ballistic coefficient: G1 and G7.
The ballistic coefficient figure is represented by a decimal less than 1.
The higher the ballistic coefficient number, the better the bullet will fly.
A high ballistic coefficient offers a flatter trajectory and less wind drift.
The term ballistic coefficient (BC) gets thrown around a lot in the shooting world, particularly with the long-range shooting crowd. And this talk is routine for those who are familiar with its meaning. But for the uninitiated, it might sound like the beginning of a complex algebraic equation.
Make no mistake, math is involved is formulating ballistic coefficient figures. But it’s not a formula the average shooter needs to know, as most ammunition manufacturers offer those figures on their bullets freely.
Ballistic coefficient measures a bullet’s ability to overcome air resistance in flight — basically, how well it cuts through the atmosphere. A high BC translates to a more aerodynamic bullet that is able to better resist the effects of wind and gravity. This is important information with regard to bullet selection and a shooter’s intended purpose, especially as range increases.
If you’re hunting deer in thick timber in the Midwest or the East and shots are generally within 200 yards, your chosen projectile’s ballistic coefficient doesn’t matter as much. At those distances, your bullet is traveling fast enough and for a short enough time before impact that wind and gravity won’t have as huge of an impact on your bullet’s trajectory.
If you’re hunting in the plains or out West, where the open terrain often mandates longer shots, then ballistic coefficient is a much larger factor and one that should be taken into consideration when selecting your bullet. If you’re a dedicated long-range shooter, BC is never far from your mind. In both of these applications, because of the distance, wind and gravity have a longer time to affect your bullet’s trajectory, which is why a projectile with a high ballistic coefficient that slices efficiently through the air is so beneficial.
To learn the basics of ballistic coefficient, check out the video above, which features Gun Digest contributor Phil Massaro. Massaro is an expert on reloading and ballistics and has written extensively on those subjects.
While it might sound like a simple step on the road to competitive shooting, there’s more to a proper grip than just picking up a pistol.
Two of the keys to a proper grip in competitive shooting are consistency and tension, which allows shooters to reputably present their pistol in an instinctive fashion.
Walking hand in hand with a consistent grip is trigger-finger placement, which can be honed with plenty of dry-fire practice.
Developing a consistent grip also ensures a shooter will allow for a natural point of aim, thus making their shots more intuitive and natural.
There are also a slew of grip don’ts shooters need to avoid, from employing the “tea cup” method to limp wristing their pistol.
The grip part sounds easy; simply pick the pistol up and you are gripping it, right?
Not so fast. There are several do’s and don’ts when establishing the proper firing grip. Two of the main aspects of establishing a proper grip are consistency and tension. For a bullseye shooter, it becomes even more critical since we are only using one hand to shoot.
Also, the firing hand and arm need to absorb the recoil and be an aid to a quick recovery, especially when firing the timed and rapid fire stages. This is even more true with the hardball gun, where the recoil is the most extreme since we are using full power .45 ACP loads and not the lighter recoiling loads of the centerfire or .45 match Wadcutter guns.
As I mentioned, one of the key aspects of the grip is consistency, not only in the application of the grip but also in the tension applied. Too loose of a grip, and the pistol will shift in the hand during firing. Too tight, and two things happen: the hand will tremble, and the trigger finger is partly immobilized. One way I’ve found to get the proper grip is to pick up the gun with one hand, and squeeze the pistol until the hand starts to shake, then slowly back off the tension until the pistol stops shaking.
This is a good starting point in applying the proper grip, and you may need to adjust this amount of tension up or down based on the gun and caliber of the pistol and the type of shooting you are doing. One aspect not talked about enough is that the grip should allow the recoil of the pistol, any pistol, to travel straight up the arm and not rotate around the wrist. This is especially important with heavy recoiling pistols. When firing with one hand, a la bullseye, the shooter should be able to draw a line from the front sight through the pistol straight up the arm.
The grip on a bullseye gun, being a one-handed grip, needs to make sure the recoil goes straight up the arm, helping to control recoil.
With a two-hand hold in an Isosceles stance this isn’t possible, but the recoil still needs to come up the arm as much as possible. Another aspect of the grip, especially with the two-hand hold, is the shooter needs to “choke up” on the pistol. In other words, the shooter needs to get the firing hand as high up on the pistol as possible. This helps direct the recoil to travel up the arms, and also keeps the pistol from rotating around the central point of the wrist. This “torque” makes the pistol twist up and over, making follow up shots much more difficult.
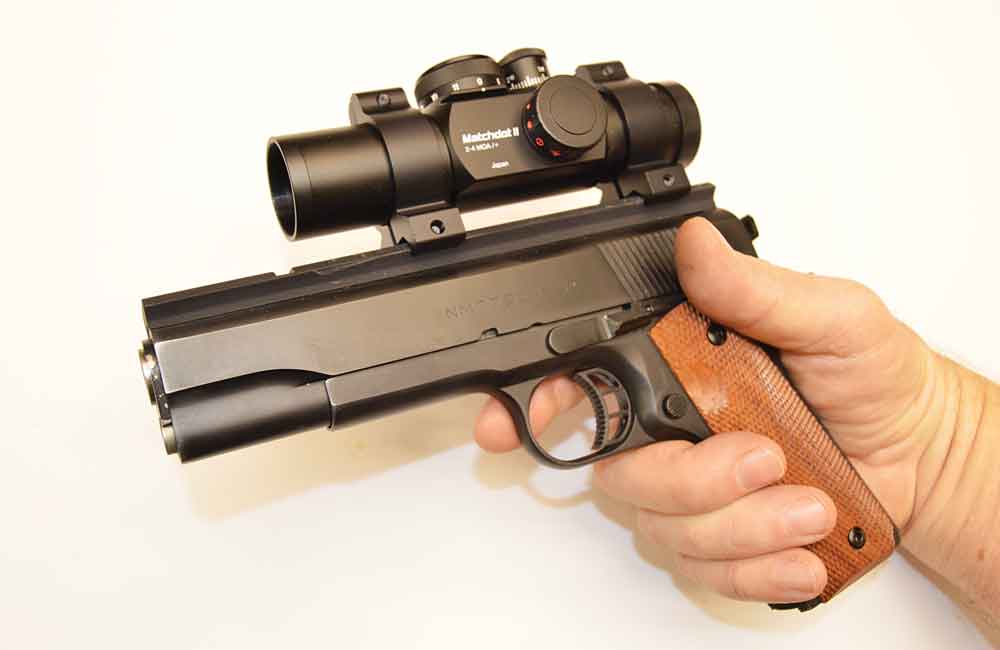
This is why handguns with a high grip, like the 1911 with the aftermarket upswept beavertail grip safeties, are so effective. They don’t just look cool, it gets the hand high up on the gun to better manage the recoil. The general rule of thumb is the lower the axis of the bore is, relative to the hand and forearm, the more manageable the recoil will be.
Another aspect of the grip that many shooters discuss is placement of the trigger finger. Like many aspects of shooting, there’s really no right or wrong way to place the trigger finger on the trigger. The two most common ways are the pad of the finger and the first joint. Both are used by many champion shooters, so decide which one is more comfortable and go with it.
One of the best ways to see if the placement of the trigger finger is correct for you is to dry fire. If, during a dry fire session, the pistol’s sights move to the left when the hammer or striker falls, then there is too little trigger finger applying pressure and the trigger finger is moving the gun to the left, assuming a right handed shooter. If the sights move to the right, there is too much trigger finger, most likely the shooter is placing the trigger finger on the joint of the finger and it’s pulling the sights to the right.
This brings up another point: dry fire. Dry firing is one of the single biggest methods a new shooter can use to improve their skills. It doesn’t matter if the new shooter is a bullseye shooter, IPSC, IDPA, silhouette or whatever, dry firing is the single best and fastest way to improve your shooting. If the shooter is an action-type shooter, IPSC, or IDPA for example, incorporating drawing from a holster into the dry firing routine will also pay huge dividends.
With dry firing, the shooter can practice almost all of the basic fundamentals of shooting − stance, position, grip, sight alignment, trigger control, breathing, and mental discipline − and can include loading and unloading safely (with dummy rounds) as well as drawing from a holster. The problem with dry firing is that dry firing to a shooter is like practicing scales to a musician. It’s not a lot of fun, it’s repetitious and it’s a little boring. But dry firing is probably the easiest, most cost-effective method there is to improve a shooter’s marksmanship.
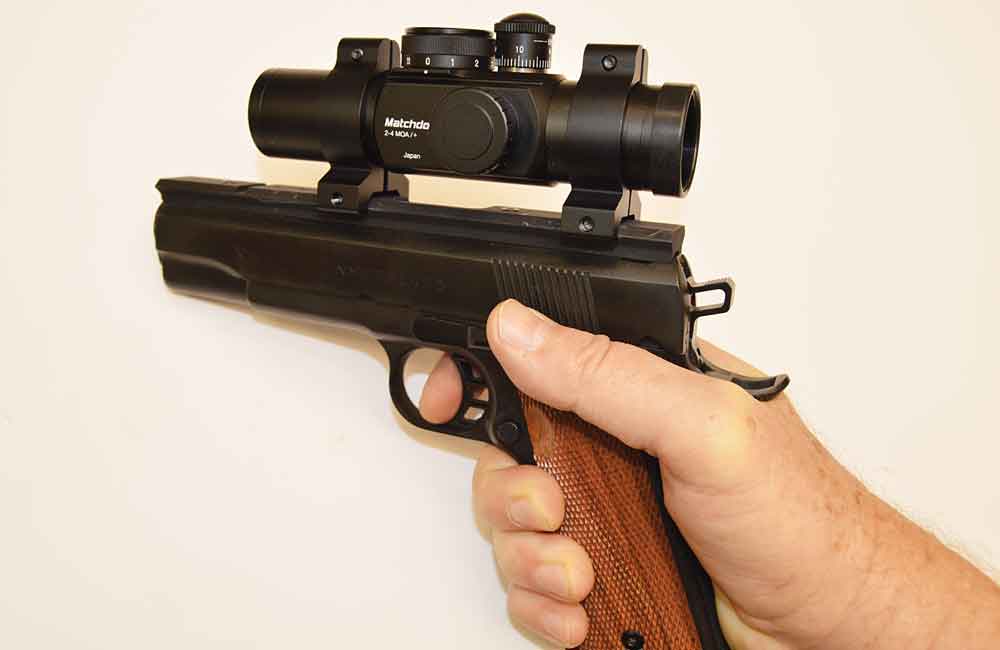
The UltraDot Matchdot II is a popular pistol for bullseye competition. Note the high grip on the gun, letting the shooter control the recoil and recovery during timed and rapid fire.
One aspect about the grip that a new shooter wants to avoid is known as “milking the grip.” This is where the shooter begins to grip the pistol, then shifts the position of the hand, the tension of the grip, or both either during or just prior to the act of firing.
The next feature about the grip is that it needs to allow a natural point of aim. This means that when the pistol is brought up to the target, the front and rear sights should be in natural alignment, and there should not be any need to shift the pistol in the hand in order to get proper sight alignment. If you are a bullseye shooter, you can get a good natural grip before the load command is given. If you are an action-type shooter and are drawing from the holster, the grip you get out of the holster is the grip you will have when the shooting starts.
This is why a good shooter will dryfire for hundreds of hours in order to develop that muscle memory. To get that natural grip and natural point of aim, a good drill to employ is similar to the drill outlined in developing a good stance and position. Get a good grip on the pistol, either coming out of the holster or, if a Bullseye shooter, by holding the pistol at a low ready position.
Close the eyes, and raise the pistol. Open the eyes and the sights should be mostly centered on the target, but also the sights should be MOSTLY in alignment. If the front sight is left or right, relative to the rear sight, then the grip should be adjusted until they are lined up.
We are striving to place the body into the center of the target with the stance and position that get us in the general area of the center of the target. Then, by establishing the proper grip and natural sight alignment, we can complete a rapid fire string with good recovery and the front and rear sights will return to a natural state of alignment out of recoil.
If the grip has shifted or was not good to begin with, when the pistol comes out of recoil the sights will not be in natural alignment. At least with a proper grip, the sights will bounce back to the position they were in prior to the shot.
The grip is one of the most important physical aspects of bullseye. Every person’s grip is different, and each shooter needs to develop a grip that is comfortable and repeatable.
When using a two-handed grip, I mentioned that the shooter should “choke up” on the pistol, or get as high on the gun as possible. The shooter also needs to push slightly with the firing arm, and pull back slightly with the non-firing arm. This will create a good amount of isometric tension that will help overcome the effects of recoil.
Another aspect of the grip is the thumb of the firing hand. Make sure that the thumb does not drag on the slide, as this can strip energy from the recoiling slide and cause failures to feed and eject.
I’ve talked about aspects of the grip that the shooter wants to do, now here are a couple of don’ts.
Don’t use what’s called a “teacup” grip. You will see this type of grip in the movies from time to time, and is where the non-firing hand acts as a “saucer” to the pistol’s “teacup.” This type of grip offers little countering to the effects of recoil. The pistol will twist right out of the non-firing hand with this grip, although it does look cool in the movies.
Also, don’t fail to use the proper amount of tension in the wrist and forearm. This is really important, especially with semi-auto handguns. The reason for this is that semi-auto pistols need to have a solid platform for the gun to properly feed, chamber extract and eject. There’s a condition called “limp wristing,” where the shooter fails to provide enough tension in the wrist and arm and, in effect, takes away energy from the recoil spring as the slide is moving rearward, sometimes failing to fully eject the round.
The pistol will also not then have enough energy going forward to feed the next round fully. The classic “stovepipe” jam, where the spent round is caught by the slide that’s moving forward, and is sticking out of the ejection port, is usually caused by either too weak of the powder charge, or limp wristing the pistol. Many new shooters can’t visualize how this phenomenon can happen, and while it’s more prevalent with bullseye shooters since they are only using one hand and arm, it happens with action-type shooters as well.
Think of it like this, if I’m firing a semi-auto pistol and if I were able to move the pistol to the rear as fast as the slide was moving at the moment the gun went off, the slide would never unlock to extract or eject the fired case. If I were able to move the pistol to the rear at the moment of firing, half as fast as the slide was moving, the slide would only unlock and move to the rear halfway, and would only have the energy to move forward to feed and chamber the next round.
So, in effect, if you don’t provide a firm platform for the handgun to cycle, you are taking away energy from the recoil spring and can induce all manner of malfunctions. How much tension is enough? Remember, apply tension to the hands and forward to the point of inducing a tremble, then back off slightly to where the tremors stop, this is about the proper level of tension for your frame. Each individual shooter needs to experiment in order to fine the amount that is comfortable and provides consistent results with the pistol.
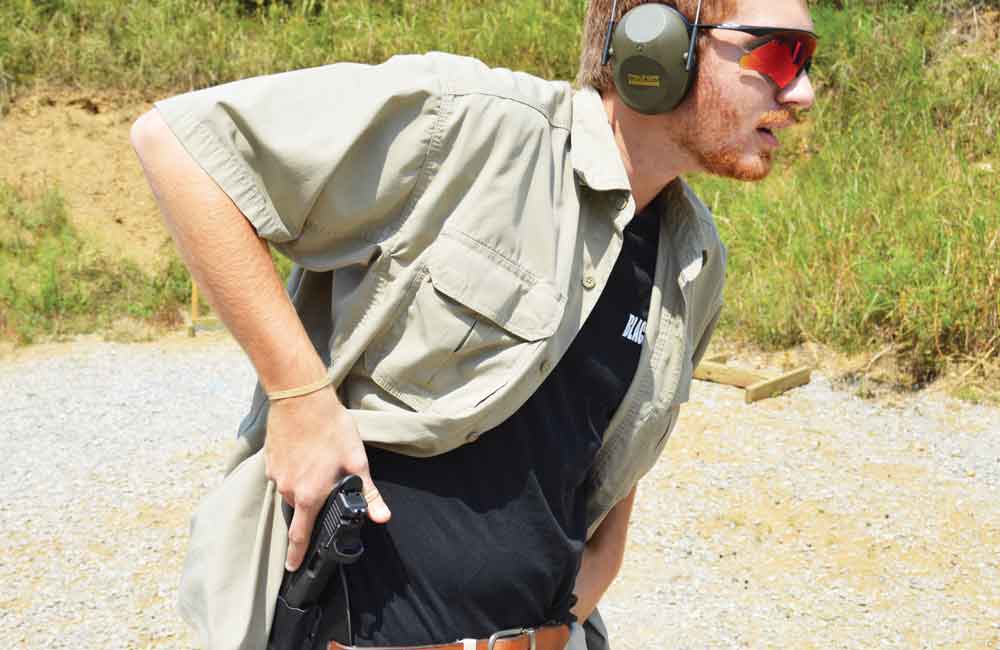
The shooter is keeping the eyes forward toward the target while drawing the pistol from the holster, knowing his natural point of aim.
Although the shooter doesn’t want to fire a string with a grip that’s too loose, having a grip that’s too tight has its own issues. If the grip is too tight and there’s too much tension in the firing hand, it has a tendency to cause the trigger finger to freeze up, and not be as nimble and quick. This can cause all sorts of trouble when trying to fire off a quick string of shots.
You can take your shot timer and prove this. Fire a series of five or six shots with your normal grip, and then fire the same five or six, with the same accuracy, with a grip that is twice as firm. I guarantee the split times will be slower. It may not be much, but it will be measureable. The trigger finger just is not as responsive if the tension in the hand is excessive, because the muscles in the back of the hand are too tight. Excessive tension in the hand makes the muscles in the trigger finger more difficult to move independently. It also makes the trigger pull feel much heavier than it actually is.
Another tip for obtaining a proper grip is for the revolver shooters. Revolver shooters need to employ most of the aspects of obtaining the proper grip that the semi-auto shooters need, but with the awareness that the exposed hammer of the gun needs to be taken into account. I’ve taught many new shooters who started out with the revolver and one of the biggest mistakes they make is to wrap the non-firing thumb over the back of the firing hand. Both thumbs need to be on the same side of the gun, just like with the semi-auto shooters.
The reason for this is obvious the first time that the hammer comes back and pinches the thumb during a string of rapid fire when the thumb on the non-firing hand is wrapped over the top of the firing hand. This is also a bad idea with semi-auto handgun shooters. If the thumb is wrapped over the top, the slide can scrape and cut the top of the thumb during recoil.
Montana Rifle Company’s MTR, built on the manufacturer’s Model 1999 Professional Hunter action and chambered in the potent .338 Lapua, certainly goes the distance.
What makes the Montana Rifle Company MTR an exceptional option for long-range shooting?
The MTR is built on Montana Rifle Company’s excellent Model 1999 Professional Hunter action, the manufacturer’s largest, which is designed for big-bore cartridges like the .338 Lapua Magnum and .338 Norma Magnum in which the MTR comes chambered.
The Model 1999 action combines some of the best attributes of the famed Mauser and Winchester Model 70 actions for supreme accuracy and reliability.
The gun boasts a host of precision features such as a custom-built fully adjustable stock, a 26-inch hand-lapped button-rifled stainless steel barrel, and a quality Timney trigger.
Montana Rifle Company states it to be a sub-1/2-MOA shooter out of the box, incredible accuracy for any rifle but especially useful as distances stretch.
My first contact with the Montana Firearms group, the builders of Montana Rifles, took place this past fall near Brady, Texas, and the Champion ranch while hunting whitetail deer. At the time, I was testing a new Norma poly-tip bullet loaded in the .300 Win. Mag., and chambered in a sporter Model 1999. The rifle had been selected as the NRA gun of the year in 2016, and as it carried a set of controls exactly like those of my tried-and-true pre-1964 Winchester Model 70 Feather Weight in .30-06, I felt right at home with the near-custom-built rifle.
The details don’t take long to unveil here. Two days on tower stands, and two fine bucks dropped cleanly inside 200 yards with one well-placed shot on each. A previous field range day had yielded two shots touching at 100 yards, which ended my test phase and zeroing time in terms of hunting the Champion for trophy Texas whitetails. The bottom line is that I was very impressed by the sheer quality and performance of the Montana Rifle product, and when I found out they offered an advanced, heavy rifle design in a long-range .338 Lapua in the form of its MTR (Montana Tactical Rifle), the company had my full attention.
Following a short note to the folks at Montana Rifles, I was told the company had a sample of its MTR tactical .338 Lapua Model 1999 available for testing that could be sent my way. The Model 1999 Professional Hunter rifle was a heavy, full-scale sniper rifle and designed as a counter operations sniper system tailored to the kind of military or special operations work encountered in the Middle East. Given my background and having written three books on long-range shooting, as well as my numerous interviews with real-time, active, long-range snipers, I realized the possibilities associated with this rifle from the start.
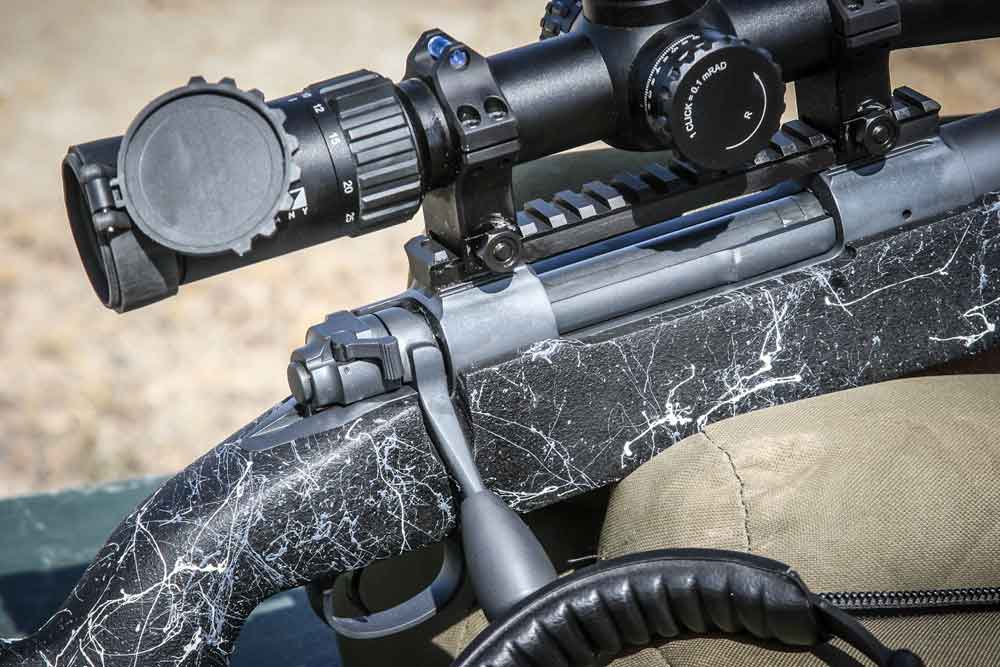
The MTR, as we will call this death-at-a-distance shooting machine, is made up of a T-3 custom-built glass stock with full cheek adjustments, and length of pull (LOP) adjustments are built directly into its furniture. The exact LOP is 13 1/4 to 15 inches, and, as dressed in sniper gray, the rifle stock is quite handsome and retains a heavy-target contour look and basic design.
The metal work in the bottom metal is crafted like a fine piece of sculpture — smooth and snag-free edges, with a watchmaker’s fit. The barreled action retains a 26-inch button hand-lapped 1:10-in. twist barrel. The action on the MTR consists of the Model 1999 Montana PH model, which, for the most part, is almost a remake of an oversized Winchester Model 70, as previously noted. Making use of a Mauser-style ejector, this stainless steel receiver, which uses a controlled round feed, is built for accuracy at its core. Even just loading a round into the chamber, the shooter can “feel” the final, snug fit that requires a feather-light extra push into the hand-lapped breech face. After test shooting four additional .338 Lapua rifles back to back over the course of a year, I am now considering the MTR as a lead contender in terms of primary long-range shooting systems.
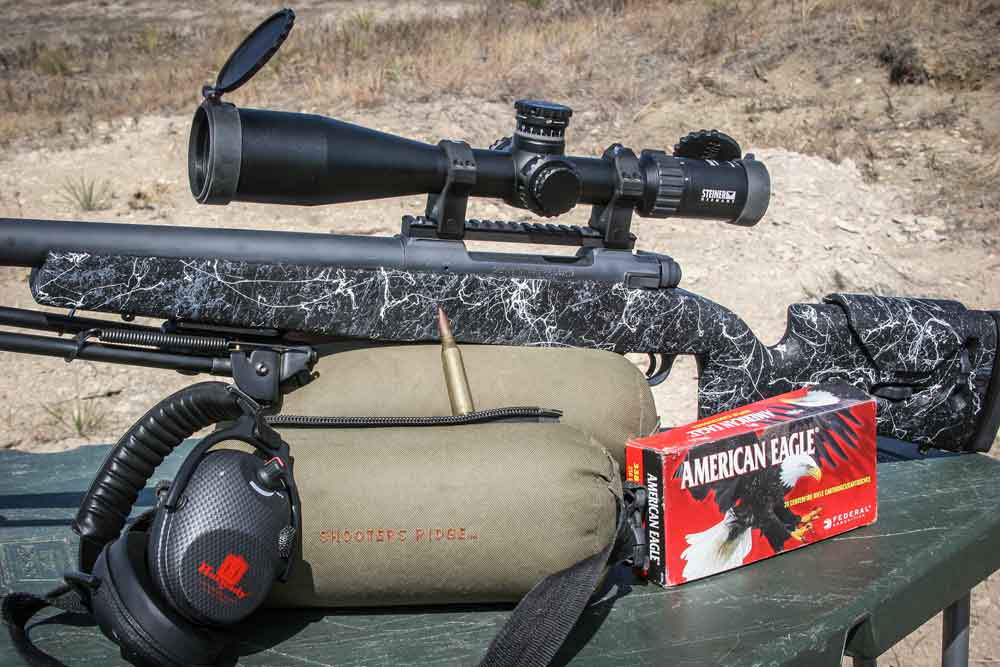
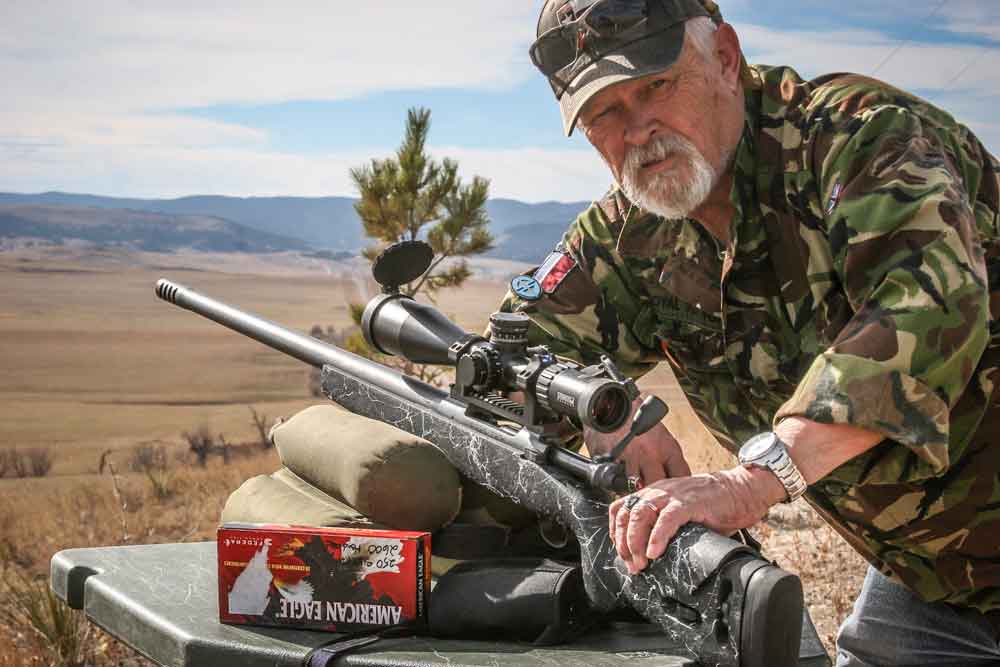
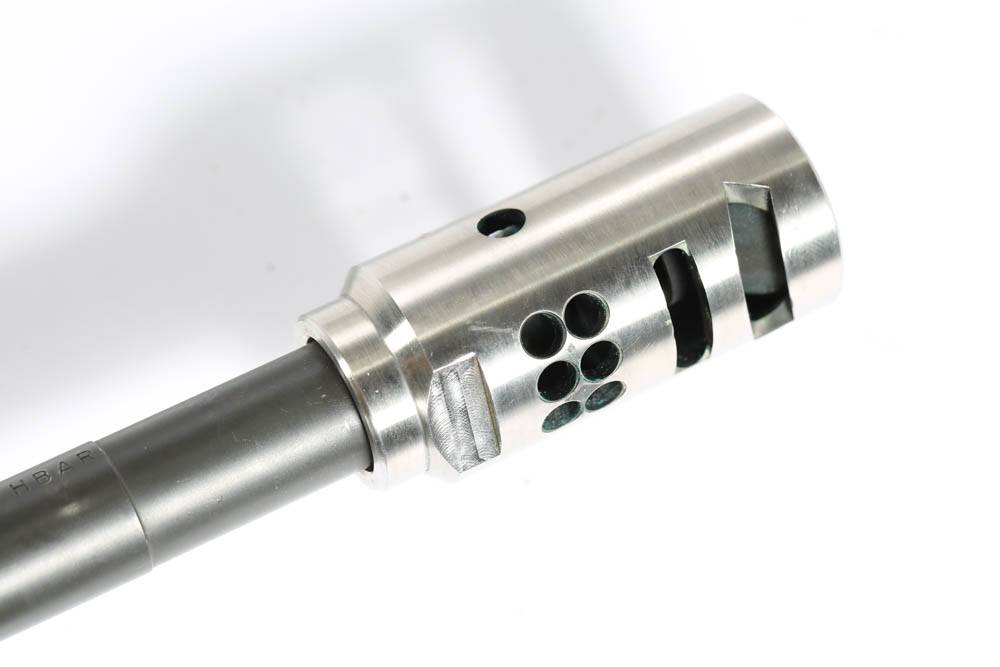
Downrange Taking the rifle out for the customary “zero” run to 100 yards was eye opening. I fired a total of two rounds before getting a dead-on-the-target-center zero. Electing to use a military (Mil-Spec) German Steiner optic in Milrads proved to be a very good choice, in that its adjustments from the first focal plane as set at 10x were right on the money. The MTC muzzle break reacted to my handload, which consisted of a charge of RL 19 and a Sierra 250-grain MK bullet, with a sharp but almost gentle nudge.
The 18¾-pound rifle with optics rested in sandbags like an oversized sporter, and as such, illustrated its solid, flat base-stocked forend design similar to that used in a bench rest-style rifle, or, in my case, an ultra-long-range target/game hunting system. When firing, about the only reason I held on to the rifle much at all was to be sure and spot my exact bullet splash downrange for target correction in the event I missed my mark. Recoil is about the same as a medium-weight sporter chambered in .308 Winchester.
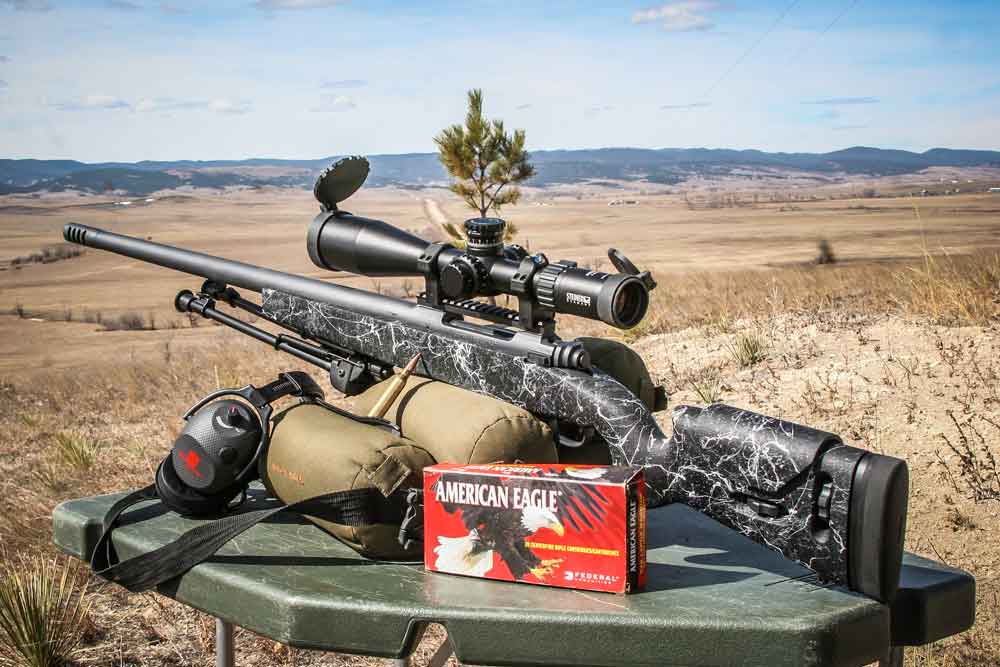
Shooting for groups, the handload previously indicated drilled a 0.671-inch group at 100 yards. Montana Rifles states that this rifle out of the box is a sub-1/2 MOA shooter with the PH #7 barrel and Timney trigger. I was shooting in light wind conditions in spring weather at about 3,000 feet above sea level, so I was fairly certain there’d be at least a small amount of deviation from the advertised ½ MOA figure. This rifle is a dead-on shooting system to be sure, and with the correct loads, it can push accurate bullets to distances as great as one mile or more. When I did start pushing bullets over some long-range real estate with the MTR, the rifle’s accuracy shined.
I must admit that I didn’t spend a lot of time with this review on 100-yard groups. When a pound of powder will yield about 50 rounds of ammunition, and even budget factory loads by Federal (American Eagle) cost upwards of $65.00 for a box of 20, things get costly pretty quick. Therefore, most of my attention was directed toward practical long-range steel targets after doing just a bit of work at the closer ranges. If a rifle like this can’t shoot long with solid accuracy, it is not worth the price of a custom-based system.
On Steel I set up my bench rest table with some of my Sierra MTK 250-grain handloads (Federal brass and RL 19 powder) on a 100-foot bluff (Dead Horse Ridge) above the valley where my Action Target (AT) E-50 silhouette target, designed to take on rounds up to .50 BMG at range, was set up. With dry ground, which in the open range is nothing but dust, I would be able to pick up trace hits in the form of bullet splash with ease. As previously indicated, the Model 1999 in its heavy-tactical variant is an outstanding ultra-long-range rifle when you’re shooting alone, and that was the case on this day, as I was lacking a spotter.
With a loaded chamber, I checked the wind that I had previously measured at 10 to 15 mph, gusting. It was almost full value left to right, and by pushing two Milrads into it, then making an elevation adjustment of 7 Mils, I sent round number one through this handcrafted masterpiece. In a period of time that seemed like forever, I waited with my crosshairs dead center on the E-50 steel target. Almost three second went by when I was greeted by a bullet splash, which indicated I had shot just off the very right edge of the upper torso-size steel target. The elevation was good, but the stiff crosswind required a bit more correction.
Sighting for a second time, I now advanced to an additional 3/10 of a Mil but maintained the very same elevation of 7 mils. When the Timney trigger cut the sear and lifted off its 3 pounds of trigger weight, the second bullet was on its way to the 1,000-yard steel. Wait and hold was the order, and after a bit of time, the earth erupted all across the big steel plate angled toward the ground to prevent any bullet deflection. The bullet had hit a bit low, but well centered on the target. The dust and splash had been the big 250-grain Match King bullet coming apart all across the ground at the face of the target. With this system on dry ground, hits are easy to spot; although, I also have an outstanding Vortex spotting scope at hand for a detailed look at the freshly painted target surface when required.
Seven more rounds and three additional hits confirmed that the Montana MTR .338 Lapua was right at home to over one-half mile down range. Day number two, however, brought forth another set of obstacles that were somewhat of a challenge for the Montana super rifle. The winds at 100 feet above the valley floor were gusting to 25 mph when I arrived on site for the day’s test shooting. I was strongly thinking of packing the whole thing up for the day, as I noticed that, not only were winds crazy bad at the muzzle, but there was an obvious direction switch of 90 degrees at about 800 yards out. Two wind flags in the area put the wind at around 20 mph, so this was going to be tricky shooting at the least.
I had handloaded a new load that I intended to run downrange that morning, so I decided to set up if for nothing less than to get a feel for a new IMR 7977 load of 94.6 grains behind the 250-grain Sierra MK bullet. This recommended load by my friend Kris Hodgdon, of the Hodgdon Powder Company, was right off the drawing board in terms of driving big bullets in the .338 Lapua. The new load picked up a full 200 fps increase downrange from the previous RL 19, and with these conditions cutting hang time (time of bullet flight from muzzle to the target), they would aid in the fight with the crazy crossing winds I was now about to face.
I want to be clear in this case, the RL 19 was a downloaded round designed expressly for long-range whitetail deer hunting during the coming fall. It could have been moved up in grain weight, but as usual I was in the testing mode, and with the hotter loads in hand, the IMR 7977 propellant got the call.
Even though long range and wind don’t mix well, if more bullet and more powder can come to the rescue, so much the better. Now on hold and waiting for the gusting 25-mph winds to ease up, I was locked down on the bags with my safety off and eyes in the glass. At a reduced wind velocity of about 18 mph, I ran the same sight picture as the prior RL 19 load, then touched off the Montana MTR.
After a several-second time delay, the bullet erupted into a cloud of dust about 5 yards beyond the steel target, indicating a steep drift of a solid 2 yards to the right. My theory was that the bullet had traveled farther, and as such was being pushed by wind for a longer period of time, which translated to more bullet drifting. I could have been all wrong with that theory, but it felt right at the time, so I then pushed for another two mils into the variable, full-value wind, and also dropped a full mil off my elevation.
With the second round sent downrange, the dust exploded across the face of the big E-50 target plate, indicating a solid hit on steel. Even when shooting a rifle like the Montana MTR, there is an element of gut-level feeling that tends to come into play quite often when sending bullets through a wind storm at very long range. That stated, the sheer fact that the rifle was a very stable platform with solid accuracy to match, allowed me to make corrections and find success in getting my bullets on steel with a minimum amount of spent ammunition.
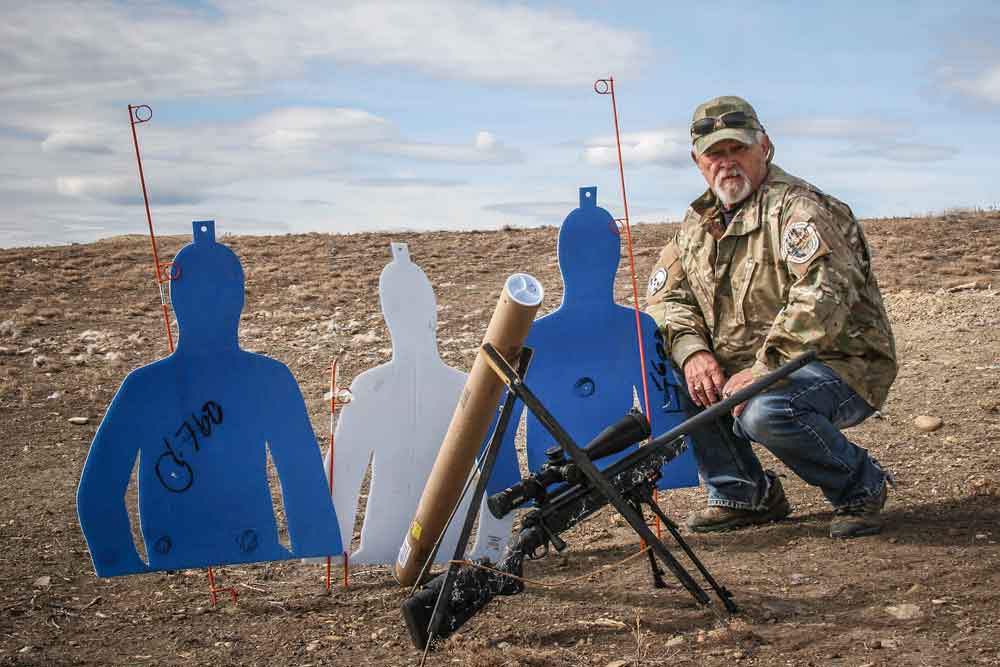
Going Long Up to now I had been shooting the Montana MTR at close range. Well, not exactly close range, but not even close to what this rifle will deliver when checking into the next zip code. Just to make things interesting, I elected to turn to my Birchwood Casey “blue man” half-torso targets and a mock trench mortar set up as if being advanced on by an ISIS fire team. While I don’t play video games, I do like some element of realism when applying a rifle/cartridge like the .338 Lapua at a distant target. With three torso targets down behind a handmade cardboard mortar, I set up the whole deal at 1,400 yards, which was confirmed by my Leica 2000 rangefinder.
First off, the developing DOPE (Data on Previous Engagement) rolled out of my handheld smartphone ballistics app in seconds. While I didn’t expect the bullet impact figures to be exact, since everything is in constant change on the prairie minute by minute, I did figure that I would be able to hit close enough to pick up my bullet’s splash, then adjust my exact hold from that point on. With my “blue man” targets set in a pocket that consisted of prairie dog mounds and almost no vegetation at all, a dust cloud should have been somewhat easy to pick out.
The firing solution (DOPE) indicated that I should maintain a 16.5 mil holdover. With an angling wind of about 30 degrees right to left, I pulled for two mils, which took my cross hairs to the far right side of the cluster of cardboard bad guys. Now disengaging the Model 70-style safety and pulling the MTR’s butt stock into my shoulder solid, but not tight, I maintained my sight picture and sent round one downrange. Three plus seconds went by before the splash of the bullet turned up dirt directly over the far left cardboard member of the bad guy mortar team. I was about 3/10 of a mil high, and that was about normal for the 4-percent downward angle I was shooting from on the 100-foot elevated bluff, and I had failed to take that into consideration.
I dropped my elevation less than half the measurement of a single mil and maintained the same wind hold, and as the Timney trigger cracked once again, the mortar tube came apart, and the targeted Blue Man in the center of the group took the round almost dead center. When I make shots like that, it is like dusting a bull elk in my mind. Over the next 10 rounds, four bullets found their mark, and with the mortar tube eliminated and two targets hit, I felt that the MTR had done its job well, particularly given the wind conditions.
Parting Shots During my interviews and real-time e-calls with on-location snipers over in the sand box, I have come to understand that many of them believe in the basic turn-bolt rifle with a very big cartridge in its chamber far and above some others. Harsh conditions shut down some systems, and the more complicated they are, the greater the risk of failure.
As I have illustrated here, the Montana Rifles MTR is, in my opinion, one of those systems that won’t quit when the conditions get rough. Quality design, construction, materials and cartridge choice make this a true custom rifle for next-zip-code-type applications. I fully realize that the .338 Lapua, or even the equally effective Norma .338 Magnum, are not every shooter’s choice. These big cartridges cost a whole lot of money to buy or even handload, and the paired rifles are not to be found on any bargain basement store shelves either.
What I do know is that rifles like this Montana Rifles creation are a specialized class of thunder stick. These types of rifles were born out of a need to hold off at a distance some very nasty people from doing their bad deeds. To that end, I feel the Montana MTR is extremely well suited. The MTR is available in .338 Lapua & .338 Norma Magnum.
Specifications:
Montana Rifle Company MTR (Montana Tactical Rifle) Caliber: .338 Lapua Magnum, .338 Norma Magnum Type: Bolt-action rifle Barrel: 26 in., stainless steel, heavy target countour, hand lapped, button rifled, free floated Barrel Finish: Sniper grey Cerakote Overall Length: 48 in. Stock: Custom T-11 stock, adjustable for cheek height and length of pull Action: Montana Rifle Company (MRC) Model PH 1999 Trigger: Timney Trigger MSRP: $3,625
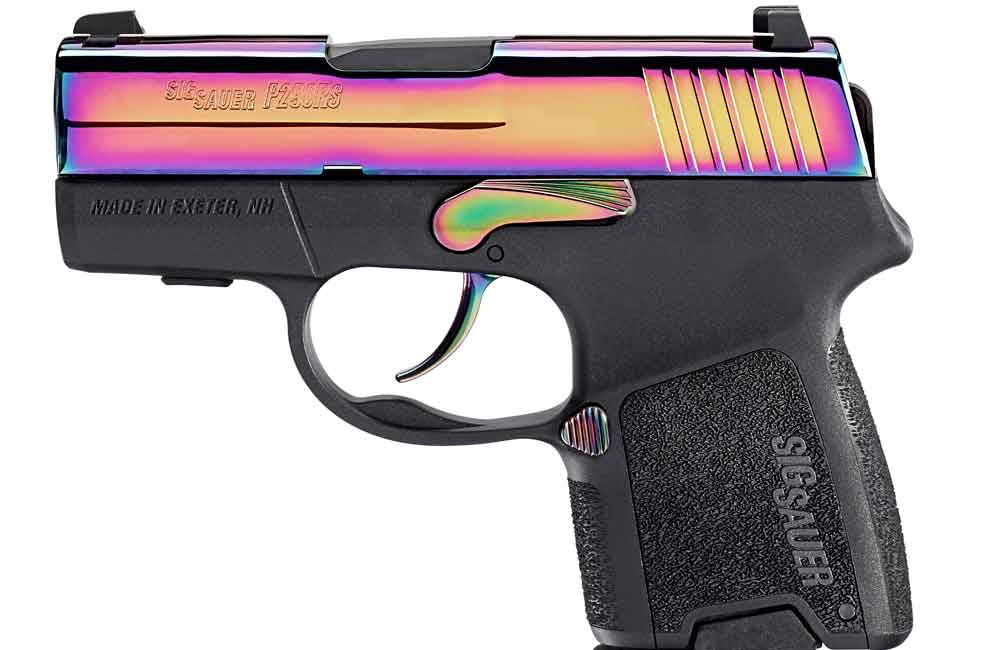
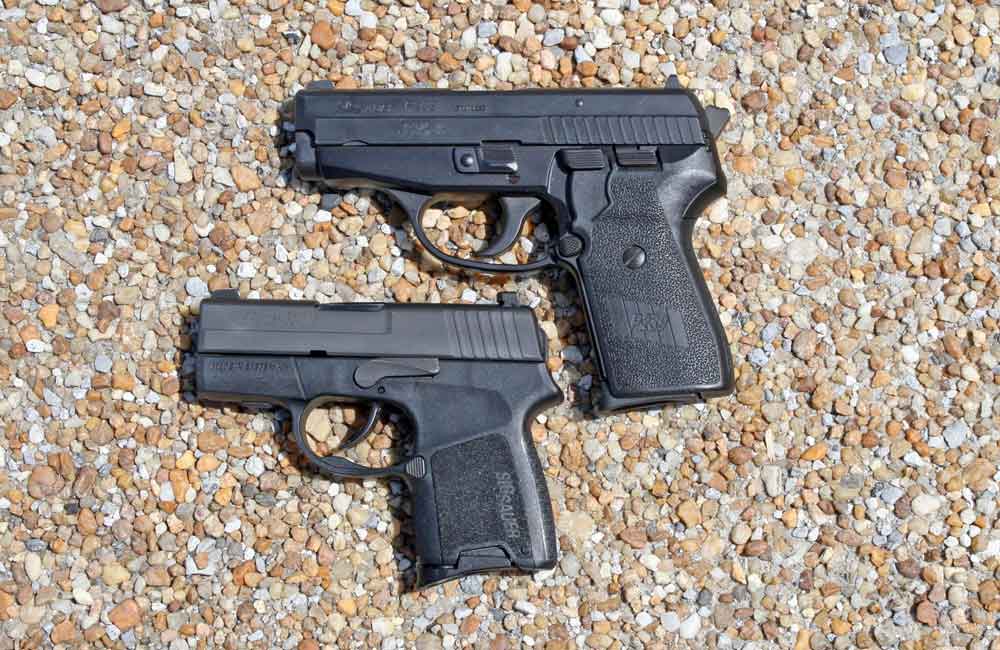
A double-action-only variation of the original P290, the SIG P290RS offers shooters a reliable and compact pistol, with the peace of mind of re-strike capabilities.
The SIG P290RS was released in 2012, a double-action only variant of the original P290, produced to meet users’ demands for re-strike capabilities.
There are four other major redesign points on the P290RS from the original: an added beavertail, rounded slide-lock lever, trimmed down magazine release button and a lengthened lip on the magazine.
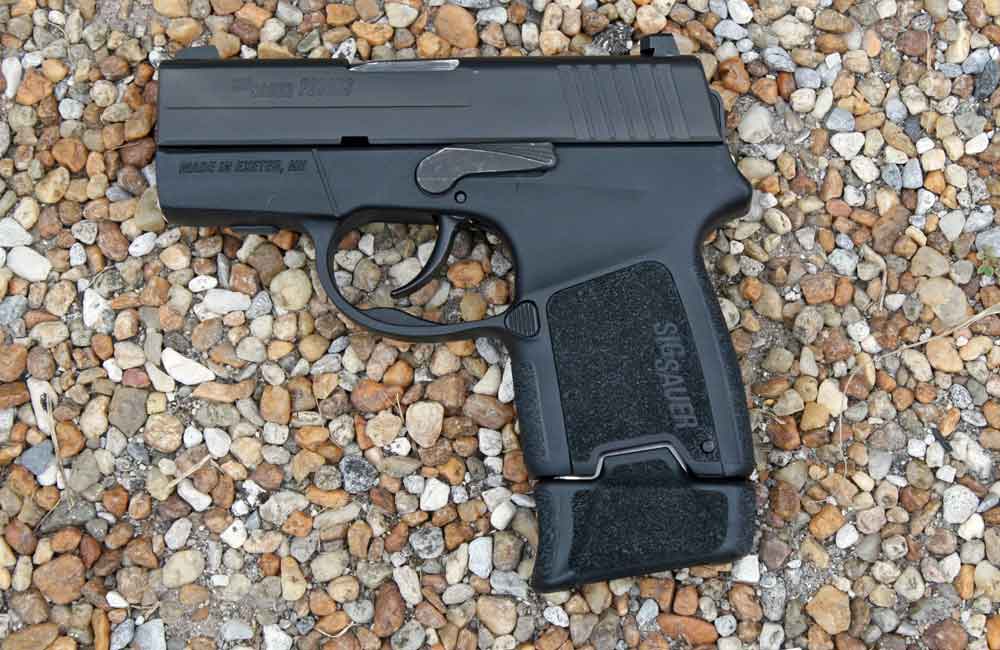
The trigger pull is consistent on the P290RS, breaking at a predictable 9 pounds each time; however, being DAO, it is an extremely long trigger pull.
The P290RS proved reliable in the author’s testing, though due to its extremely small size, it does take time to grow accustomed to shooting the handgun.
A year after its introduction, SIG’s smallest 9mm gets some meaningful design changes.
The guns I call “slim-nines,” 9mm carry pistols made thin and ultra-compact, are a hot item today. SIG’s entry is the P290. I first saw it in the fall of 2010 at the IACP (International Association of Chiefs of Police) conference. It was introduced in January 2011 at the SHOT Show.
Some concerns showed up in its first year in the field. There were reports of occasional misfires. Because a lot of buyers were fans of traditional double-action SIG Sauer pistols, they didn’t appreciate the fact that, like so many striker-fired autos, these new guns wouldn’t let you just pull the trigger again if you got a misfire, one SIG exec later informed me. The folks at SIG Sauer in Exeter, N.H., came up with a few other tweaks that could be wrought on the P290, too.
As a result, the redesigned P290RS was introduced right at a year after the original P290, at the 2012 SHOT Show. It’s not another option, it’s a total replacement of the older gun.
Key Features The trigger mechanism is the defining new feature — but not the only one — on the P290 RS. The suffix in its designation stands for Re-Strike. SIG Sauer’s product manager at the Exeter plant, Tim Butler, tells me that the change involved a redesign of trigger bar, sear, and hammer. The result is a long, conventional double-action-only trigger stroke. The trigger goes much farther back before sear release than on the first iteration, but has proportionally less backlash.
The obvious advantage is that it gives an immediate second “shot” at a recalcitrant primer in the event of a misfire. Some don’t see this as a big deal, because they follow the doctrine that a bad round that’s failed them once doesn’t get a second chance, and their preferred response to a “click” instead of a “bang” is a fast “tap-rack-assess the situation in front of you.”
An absolutely undeniable advantage of the P290RS over its predecessor, however, is that it’s much more friendly for dry fire. Instead of having to interrupt your trigger pulling practice by breaking your hold and retracting the slide between dry “shots,” the P290RS owner can roll the trigger continuously.
There have been four other changes. Apparently some folks had hands beefy enough that the web of their palm could ride up and get pinched by the bottom of the external hammer during the slide cycle. (That never happened to this writer with the P290, but this writer doesn’t have the world’s biggest hands, either.) In any case, a subtle, rounded beavertail has been added at the rear of the grip tang. For smaller-handed shooters, it won’t hurt anything; for those with meatier paws, it could be a deal-sealer for this little 9mm.
The lower rear edge on the slide-lock lever of the earlier P290 had a rather sharp corner, and I can see where that would have been a problem for those who shoot with straight thumbs. That corner has been very nicely rounded. Good for you, SIG! There’s another manufacturer of powerful subcompact pistols which has long ignored a similar well-founded criticism.
On the first variation, the magazine release button stood up “loud and proud.” The good news was, when you were doing a speed reload, that big button was easy to hit. The bad news was, when you weren’t trying to dump the mag, it was still easy to hit. There were reports of some buyers carrying it inside their waistband, along with a personal “spare tire,” whose excess flesh accidentally popped the magazines. For the P290RS, the mag release button was trimmed down some in hopes of curing that problem.
Finally, for some users, the super-small profile that was the P290’s raison d’etre proved to be too small. Those consumers felt they couldn’t get enough hand on the gun when shooting. A lengthened lip on the P290RS magazine created enough additional frontal length for both middle finger and ring finger to gain a secure purchase. (For those who want minimum butt size in every dimension, the P290RS comes with a flush-bottom floorplate that can be installed on the new magazine which, like the old, holds six rounds. Older mags will work in the new version of the P290, and vice versa.)
Moreover, the P290RS comes with an additional eight-round magazine featuring a grip extension. The thing was a test of strength insofar as getting the eighth round in, but it worked fine, and didn’t bind upon insertion, even with the slide closed.
The slide stop on the first P290 had a sharp edge at the lower rear. It is rounded on the P290RS.
Trigger pull P290s in their first generation had a trigger pull somewhere between 9 pounds and off-the-chart, the latter referring to the fact that the most popular pull gauge hits its limit at about 12 pounds. The test P290RS when tested on a Lyman digital trigger pull gauge from Brownells averaged 9.23 pounds of pull weight, when leaving the slide forward throughout and just pulling the gauge on the trigger. However, when cocking the slide to duplicate live fire cycling between each test trigger pull, the average weight went up to 9.60 pounds of average pull.
Accuracy Strangely enough, over the years it has become common to test short-barrel handguns at short ranges — 5, 7, 10, or 15 yards — instead of at the 25-yard line, which is where fighting handgun accuracy has been judged ever since this old man came on the scene. Not yet having “gotten the memo” that people with short-barrel hand guns will be “given a handicap” in a gunfight across a parking lot, this writer continues to test short barrel and longer-barrel defensive handguns alike at the traditional distance of 25 yards.
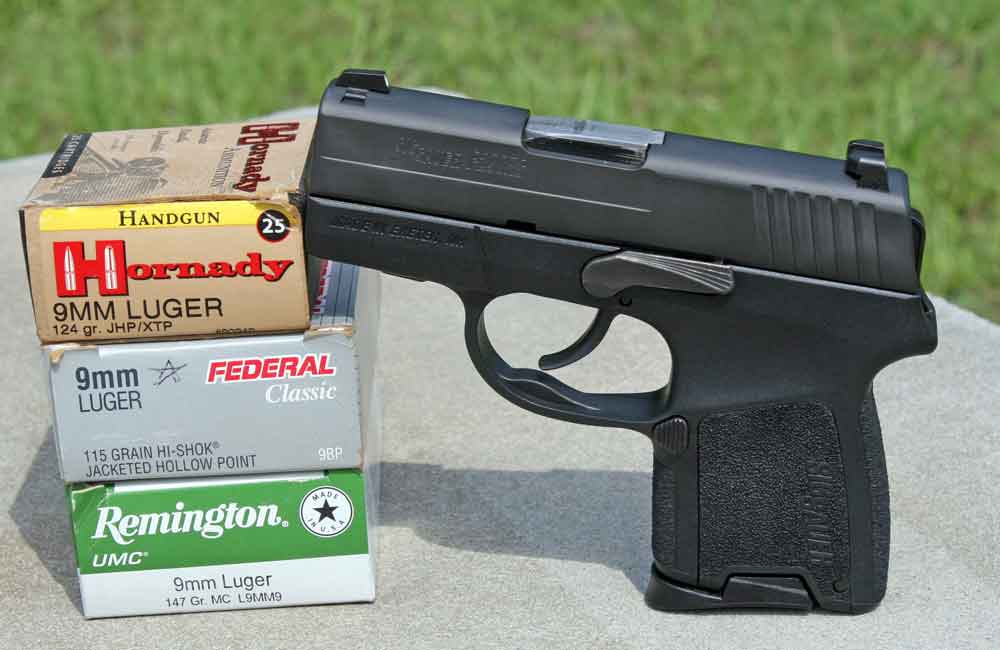
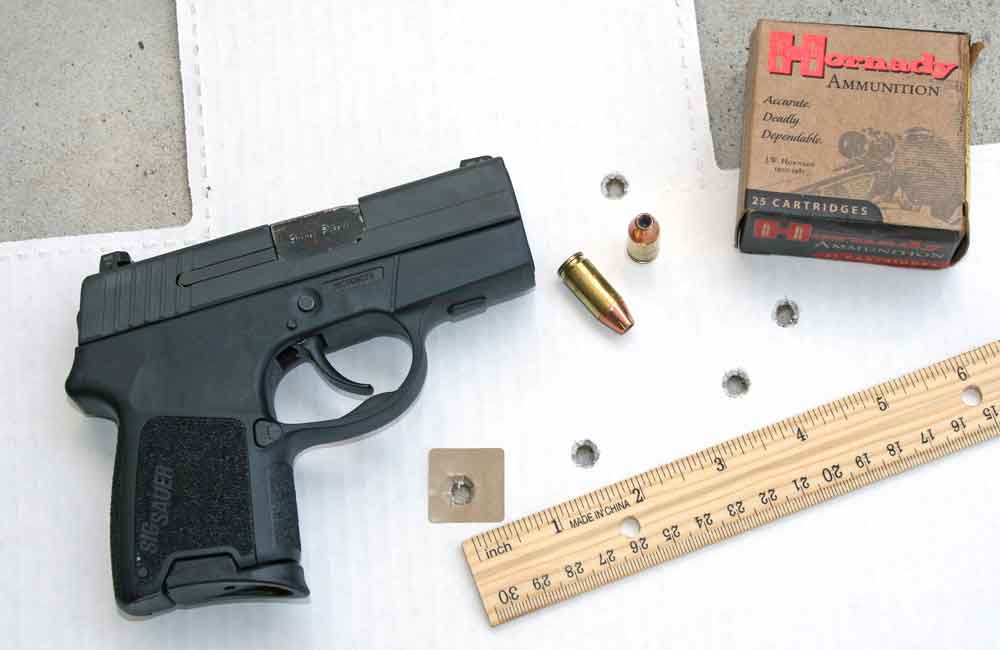
Working hand-held off a Matrix rest on a concrete bench at a measured 75 feet, I tried out the P290RS with the three most popular bullet weights in 9mm Luger/9mm Parabellum/9×19. (You know the cartridge has been around for a while when there are at least three different designations for the same darn thing.) I used my standard protocol: measuring each five-shot group center to center between the farthest hits, and then taking a second measurement of the best three hits. A test done for American Handgunner a decade ago, with me and Charles Petty, confirmed that the “best three” measurement under these circumstances would come remarkably close to what the same gun and cartridge would do from a properly adjusted Ransom machine rest. It’s a useful tool, because most folks don’t have access to a machine rest, but most of them can test their hardware from a solid bench rest, to compare their results with what the gun writer might be getting.
147-grain subsonic 9mm rounds became trendy in the late 1980s. Winchester developed the concept with their original OSM (Olin Super Match), created at the behest of Special Forces personnel who wanted super-accurate 9mm rounds that could center an enemy sentry’s head from a suppressed MP5 submachine gun. The exemplar of the concept for this test was the inexpensive Remington-UMC 147-grain full metal jacket round, which this writer has seen win many a pistol match. From the SIG Sauer P290RS, it put five shots into 4.25 inches from 25 yards. It must be noted that four of those five shots were in 2.45 inches, and the significant “best three” shots created a tight group of 1.10 inches. (Measurements were to the nearest 0.05 inch.)
For most of the epoch of the 9mm Luger cartridge, the 124-grain bullet was the heaviest load available. For this test, our 124-grain exemplar was the Hornady XTP load, using a deep-penetrating jacketed hollow point projectile. The five shots went into 4.35 inches, and the best three of those formed a 2.80-inch group.
When this writer was a young puppy cop, if you wanted a hollow point 9mm round, it was going to weigh 115 grains. Our test load in that bullet weight was the Federal Classic, coded by its manufacturer as “9BP,” which over the decades proved itself to be one of the most accurate loads ever produced in its caliber. It re-proved that in this test, with a five-shot group measuring 4.05 inches. Four of those shots were a mere two and a quarter inches apart, and the “best three hits” measurement was “the best of the test,” 65/100ths of one inch center to center. That is simply amazing performance from a short barrel pocket pistol with a heavy trigger pull at, remember, 25 yards, not 25 feet.
For a very long time now, “conventional gun wisdom” has held that a 4-inch group at 25 yards was “acceptable combat accuracy” from a full-size 9mm service pistol. The P290RS, an itty bitty pocket pistol, came achingly close to that: 4.15 inches with 147 grain, 4.35 inches with 124 grain, and 4.05 inches with 115 grain averages under four and a quarter inches. By that standard, we have in the SIG P290RS a pocket-size 9mm that needs to make no apologies at all in terms of accuracy. This was, after all, a small, light gun with a long trigger pull much heavier than the gun’s own weight. I have no doubt that its intrinsic accuracy is much greater than what I was able to wring out of it in five-shot groups.
Shooting and carrying the P290RS I wore the little SIG 9mm for a while on my non-dominant-side hip as a backup, in the useful new Remora holster. Comfort was exquisite: no sharp edges anywhere.
Because of the long trigger pull and concomitantly long trigger return, I wasn’t able to get the speed in rapid fire that I’d expect from some other fire control mechanisms. Recoil had a bit of a snap for 9mm Parabellum, but nothing I could call uncomfortable. The shape of the P290RS causes it to point low for me, but that’s subjective: dry handling in the gun shop will quickly show whether it’ll be a problem for you, before you put your money on the counter.
This little pistol passed through a lot of hands among my test group. Only one shooter had a problem: A man with very long fingers found his middle finger (and particularly his thumb, in the thumb-down grasp he prefers) rode the magazine release and three times caused the mag to drop when he didn’t want it to. The long, heavy trigger pull didn’t make a lot of friends, but the little SIG’s comfortable size and rounded edges were both unanimously appreciated. Several also liked the fact that by putting their thumb on its flat hammer, they could holster the P290RS without fear of an unintended discharge if a drawstring from a warm-up jacket or something like that got fouled in the trigger area.
Throughout the whole test, there were only two malfunctions. One was a 12 o’clock misfeed with a 147-grain load, quickly rectified with a tug on the slide. The other was a misfire (on a Federal round, of all things, famous for sensitive primers). As per the “RS” design, I just pulled the trigger again, and the shot went downrange. Both malfs occurred early in the first 50 shots during “break-in.” There were no further mechanical malfunctions.
All in all, despite a manufacturer’s suggested retail price of $758, this handy little 20.5-ounce seven-shooter is a definite contender in the currently hot niche of subcompact 9mm carry pistols.
Getting a custom paint job on your AR doesn’t have to come with a custom price.
What are some simple tips for getting a great paint job on your own?
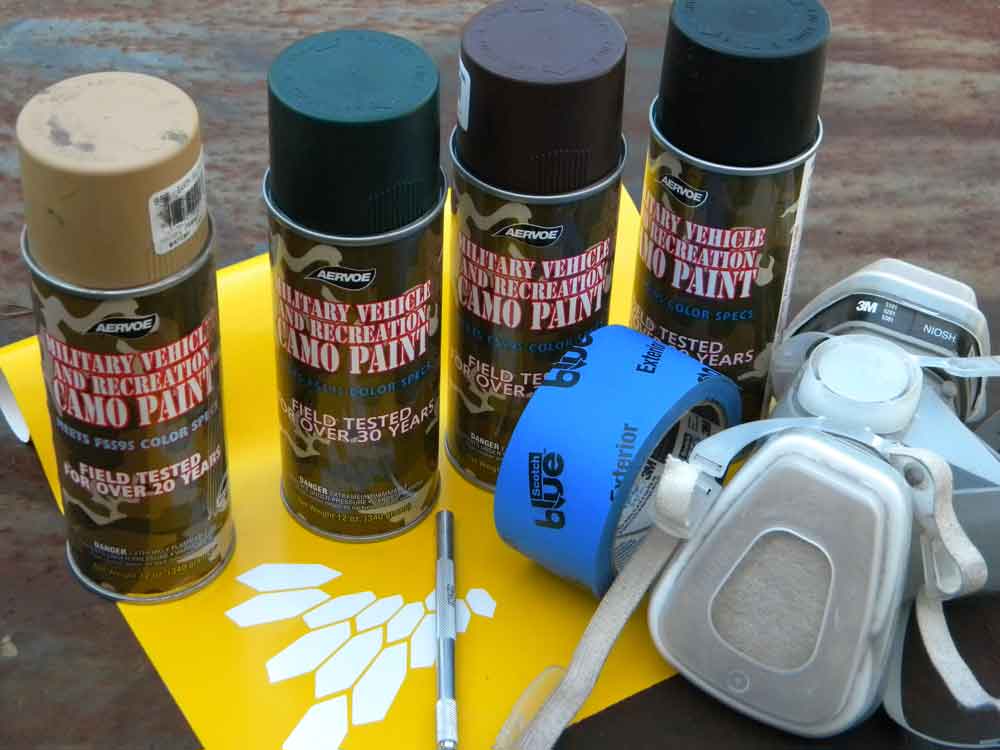
Gather the necessary supplies: the paint you intend to use, a mask, gloves, a degreaser (acetone or Brownells’ TCE cleaner), scuff pads or sandpaper and masking tape (the good, blue type).
Decide which method you intend to use for your paint job: “Sponging,” “Stenciling” or “Masking.”
If your goal is a good camouflage, strive for “depth.” You want areas that are sharply defined that contrast with areas that blend together more easily. Above all, you’re looking for it to appear to be a different shape.
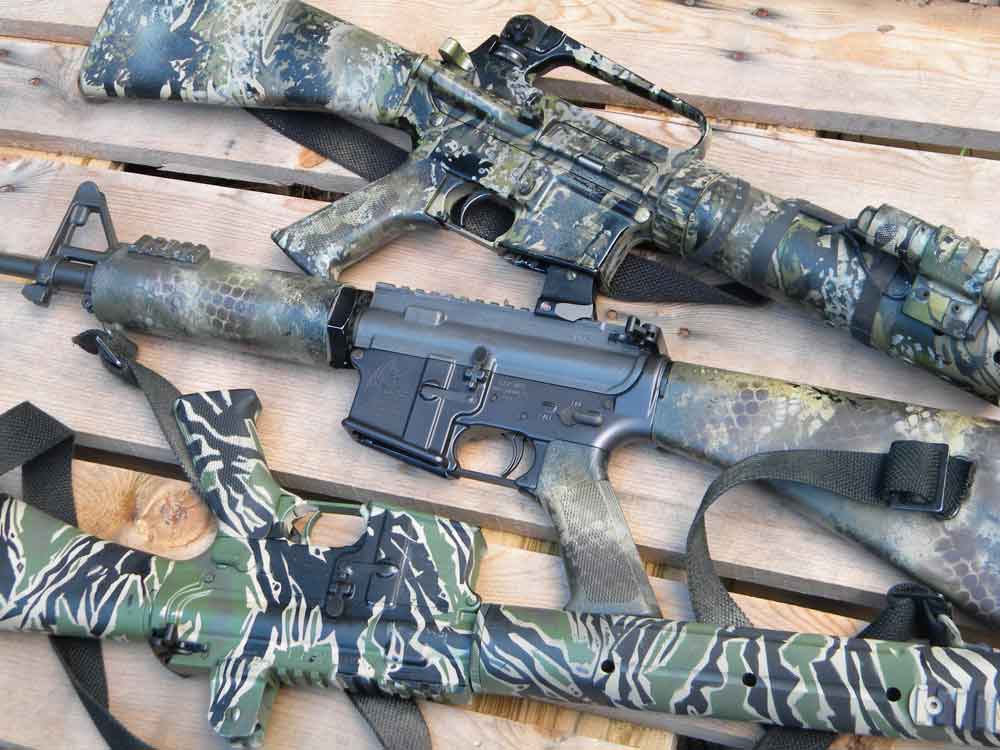
The thing about ARs is they pretty much all look alike. If you want to stand out, or blend in, a paint job is the way to go. You can get a professional to do it, but using spray paints is also an easy D.I.Y. project. With a little time, effort and creativity, you can create a professional-looking paint job. And, the same techniques can be used with any of your gear.
The materials you need are simple. (This varies some depending on what method you’re using.) For a camo job, use “flat” paint that doesn’t have a shiny finish. I use Aervoe-Pacific camo paint from Brownells. It comes in a variety of colors, covers extremely well and dries quickly.
You’ll want a mask, to prevent inhaling fumes and overspray, and a set of safety glasses. Wear gloves to protect your hands and prevent oil on them from transferring to the gear. Use a degreaser — acetone or Brownells’ TCE cleaner — to remove oil from the weapon and scuff pads or sandpaper to prep the surfaces. You’ll need masking tape — the good blue type made for painting — to cover areas you don’t want painted. I use a sharp X-ACTO knife to trim tape and cut stencils. Having a way to hang your gear allows you to work it from all angles.
Sponging There are a variety of different methods you can use for a paint job. “Sponging” is one of the simplest and produces good, random patterns. Tape off any areas you don’t want painted — optic lens/dials, other sights and areas like the muzzle crown and other controls. Use a degreaser to clean everything, and lightly scuff everything to give it some “tooth.” Clean everything again to remove any contaminants.
Start with a base coat of two or three colors. Then use a course painting sponge to apply other colors in a variety of patterns. Cut the sponge into different sizes and shapes and spray it until it’s wet. Start dabbing. Repeat with other colors, and if needed spray some more paint over this to break up some of the sharp edges.
Stenciling Probably the most common method is “stenciling.” Prep everything as mentioned above. Apply a base coat with one or multiple colors. Now you’re ready to attach your stencil. Almost anything can be used as a stencil. You can make your own, cutting out shapes or designs using cardboard or masking tape. Brownells offers pre-cut stencils, such as the “Peel ‘n Spray” series from Lauer Custom Weaponry, the same people who make Duracoat finishes. You can also use materials like mesh laundry bags, which create good random patterns. Also, try combining different stencils to discover what works best. Don’t be afraid to experiment using pieces of wood, laundry bottles or anything else you can paint.
Attach the stencil by taping it to the rifle. Don’t worry if it doesn’t fit perfectly. You’re not looking for perfect; remember, in nature things are random and chaotic. Having sharp and blurred edges looks natural. Spray your next color or two over the stencil, and then move the stencil to another location, or attach another stencil, and repeat the process.
Masking “Masking” is a simple process that produces great results. You spray one color or two base colors, and then mask off the areas you want to remain that color. Remember, any areas left uncovered will be painted over, so you have to do a little planning in advance, especially if you are trying to reproduce or match an existing camo pattern. Spray your next color, put down more masks and repeat. I start with my darkest color and work through to the lightest color. You can also blend one color into another for smooth transitions. After completing all the masks and painting, remove the tape to reveal the finished paint job.
As mentioned, you can combine the different techniques — sponging, stenciling and masking — to create unique and individual patterns.
Camouflaging is all about blending into the surrounding terrain and trying to deceive the eye. The colors and patterns you use will depend on the environment. Our eyes will quickly pickup on anything “abnormal.” For example, pure black does not exist in nature or man-made environments, so avoid that color.
You want to create “depth.” This is accomplished by having both sharply defined areas that contrast with areas that gradually blend from one color to another. Camo should make the object appear to be a different shape. An object that is one color is usually light on top, where the light is hitting, and dark on the bottom, where there are shadows. Nature reverses this out; animals are usually a dark color on top and light colored on the bottom. This makes them appear to be upside down. Use this same principle to break up the shape of your equipment, almost bending the “light.”
Or, you want your rifle to stand out from the crowd. So, it’s bright colors and black for contrast for a “race car” look. It all depends on the look you are going for with your paint job.
Once you’ve got everything painted, it’s time for testing. Put your gear into the field – urban or rural – and have someone try to spot it. Does it blend in, successfully deceiving the eyes? Or, does your rifle stand out in a crowd of others that all look the same? The cool thing about doing this yourself is that if you don’t like the results, it can be redone. With a little practice, time and inexpensive materials, you too can create works of art.
Editor’s Note: This article is an excerpt from the August 2017 issue of Gun Digest the Magazine.
Bolt-action rifles have been with us for going on two centuries and are sure to be pounding the bullseye for years to come. That’s because few other firearms match what this classic design brings to the table — capacity, relatively quick rate of fire and above all accuracy.
Whether as a military sniper implement, a dead-on hunting tool or a gold-medal match gun, the bolt-action rifle gets a rounds where they needs to be, again and again. Truly, if you don’t at least have one bolt-action rifle in your collection there is something awfully wrong with you. You’re not necessarily a bad person, but you’re a little off.
Thankfully, the situation is more than rectifiable, and you needn’t scour the globe to find the right rifle. The good old U.S.A. has produced some truly great and deadly-accurate bolt-actions over the years. So with that in mind, here are Six All-American Bolt-Action Rifles You Need to Own and that will definitely get you on target.
Springfield 1903
It could be said America’s love affair with the bolt-action rifle started with the M1903. Deadly accurate and rugged, the Springfield was among the preeminent U.S. service rifles of the 20th Century, serving all the way up to the Vietnam War. With a scope affixed to its receiver, there were few firearms that could hold a candle to a M1903 as a sniper rifle. But the Mauser 98 clone earned its stripes away from the battlefield, as well.
The .30-06 Springfield has proven itself among the best game cartridges of all time, able to handle the meekest to most dangerous game on the planet. Cheap surplus Springfield rifles only helped to fuel the cartridge’s popularity, as former soldiers, and civilians for that matter, sporterized the venerable M1903. Unfortunately, the days of cheap Springfields in good condition are drawing to a close. Now the venerable old warhorse — and hunting rifle — is becoming more and more expensive, relegating them to collector status.
Remington Model 700
Since its introduction in 1962, the Model 700 has become one of the most popular and prolific bolt-action rifles of all time. Being designed for mass production, and thus economical from the get-go, didn’t hurt the rifle’s chances at being a hit. But there was a much more important facet to the Model 700 that sent the push-feed dandy into the stratosphere — accuracy.
Many consider the rifle the most accurate factory bolt action ever produced, and its professional use does a great deal to lend credence to this assertion. The Model 700 has served as both the U.S. Marine Corps’ sniper rifle (the M40) and the U.S. Army’s (M24 SWS). To boot, it’s a gem on the hunt. The Model 700 can fill nearly any role afield, be it mystifying varmints at a couple hundred yards, tagging deer with ease, or even tackling dangerous critters. Chambered for more than 35 cartridges, really the Remington can do dang near anything demanded of a bolt-action rifle.
Winchester Model 70
Dubbed the “Rifleman’s Rifle,” American shooters and hunters fell head over heels for this Winchester — for good reason. The Model 70 plain brought the goods, as it pertains to bolt-action rifles. The rifle was light, with a quick action and a slew of chamberings. But the little things that Winchester paid attention to is what made the rifle stand out from the crowd since its introduction in 1936: cut checkering, drilled and tapped for a scope, bolt throw that didn’t come in conflict with an optic.
There was, however, one feature that really caught shooters’ eyes — a big and beautiful Mauser-style extractor claw. The Model 70’s controlled feed was among the rifle’s most desirable assets and would eventually become a point of contention. Winchester did away with the feature in 1964, opting for a push feed. This did not go over well with sportsmen, especially those with a traditional bent who had spent most of their lives working bolts with huge claw extractors. Winchester eventually sobered up and returned to a controlled feed in 2008. But for more than one shooter, the company’s break from tradition was an unforgivable sin.
Weatherby Mark V
Considered one of the finest production bolt-action rifles to come down the pike, the Mark V has turned heads since its introduction in 1958. But it’s not just the rifle itself and its rock solid action that has kept the attention of shooters for more than 50 years. The red-hot Weatherby rounds the Mark V digested also had a way of captivating marksmen. Roy Weatherby built a name for himself and his company with zippy, round-shouldered cartridges that left their competition in the dust.
Designed to safely contain these cartridges’ high pressures, the Mark V is outfitted with arguably one of the soundest rifle actions ever conceived. Based on the screw breech common to artillery pieces, the rifle’s nine lugs (six on lighter cartridges) locked tight as a safe. On top of that, the bolt’s recessed face completely enclosed the base of the cartridge, and there are vents to allow gas to escape away from a shooter’s face if there were ever a case breach.
While nice, the safety features were icing on the cake. The Weatherby Mark V’s smooth operation and ability to shoot cartridges of near unparalleled power was and still is what makes it a great.
Savage Model 110
Simple, affordable and above all accurate! Savage proved a tack-driving rifle was within reach of every shooter with the slick Model 110. Heck, Savage was so enamored with the value it provided in the rifle that its original pricing in 1958— $109.95 — influenced the firearm’s model number.
Savage kept the price down through extensive use of investment casting for many of the Model 110’s components. But the company turned to tried-and-true forged bar stock where it counted — the barrel and action. On top of that, Savage added to a couple design points to milk as much potential precision out of the rifle as possible. The barrel nut is one such example, allowing for precise and easy headspacing adjustments. The other is the bore’s button rifling, which has proven to produce tight groups time and again over the decades.
The modern iterations of the Model 110 go even further in facilitating one of the most accurate rifles for the money with its AccuStock aluminum chassis and AccuTrigger adjustable trigger. This Savage might be well over 50 years old, but it’s offering more bang for the buck than ever before.
Ruger M77
Around the era economics and design trends were pulling gunmakers away from Mauser actions, Ruger went running to them. What resulted was an epic and reliable little number known as the M77.
Ruger was able to offer a controlled-feed bolt-action rifle at a reasonable price, due in part to the company’s manufacturing processes. Replacing a forged receiver with one made by investment casting allowed Ruger to keep other design points, then considered too costly by some companies. But the receiver wasn’t the only break the M77 made from a classic Mauser design. The rifle also has a plunger style ejector, two-position tang safety and a trigger designed from the ground up.
The action screw was a stroke of genius as well, angled to tightly bed the action down and back into the stock. In classic Ruger fashion, the M77 is available in a panoply of configurations and chamberings, fit to tackle absolutely any task imaginable for a bolt action.
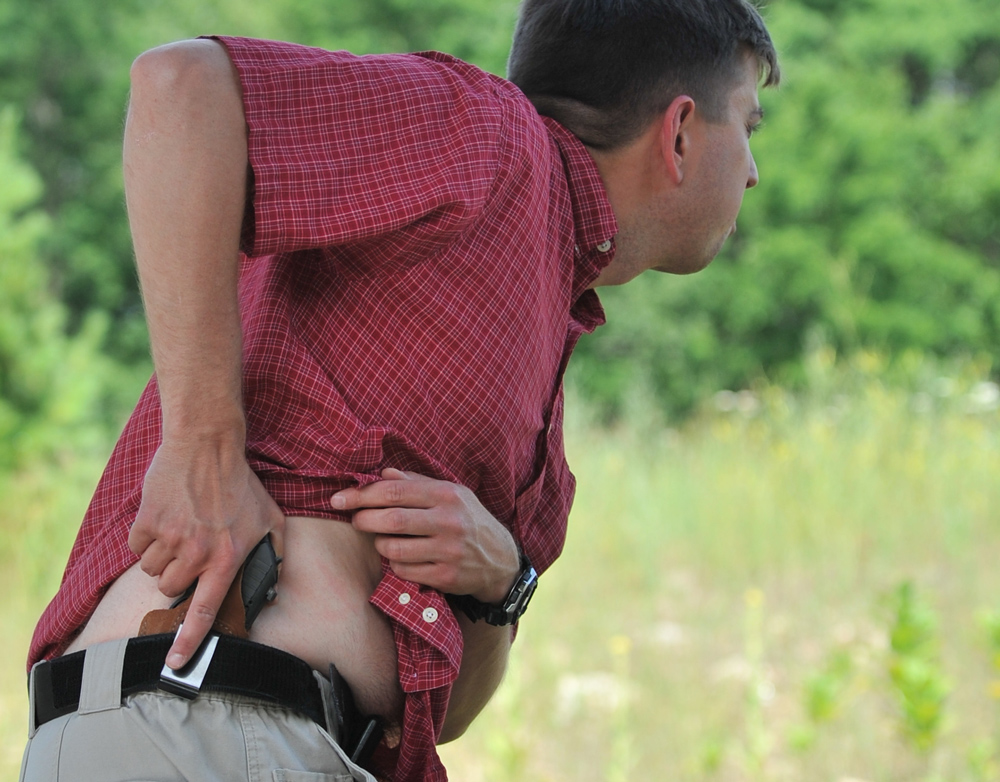
Sadly, there just aren’t a lot of shooting ranges that are conducive to good defensive shooting practice. If you have a range nearby that meets the following criteria, you’re in luck — and also in the minority.
An ideal shooting range would allow you:
free movement relative to the target;
to set up targets in at least a 270-degree spread;
to shoot those targets on angles;
to draw from your holster;
to fire as many shots as you deemed necessary;
to fire those shots at the fastest speed you could muster while still getting the hits;
to look behind you while safely holding a loaded gun; and
to shoot past dusk, or to turn off the lights to simulate low-light conditions.
As I said, that describes precious few shooting ranges. Most ranges restrict your activities in some way: don’t allow you to use “humanoid” targets; require you to set up targets in front of one specific berm; require you to always be at right angles to the targets, never shooting ‘cross lane’; don’t allow drawing from a holster; restrict the number of rounds per string; specify a specific shooting speed; don’t allow you to do anything other than look downrange when holding a firearm; and don’t allow shooting past a certain time or with the lights turned low. Indoor ranges are the most likely to have these kinds of limitations.
The reason for these kinds of restrictions comes down to either liability concerns or shooting prejudice. The liability part is somewhat understandable: The range can’t verify the training level of everyone present, and since most shooters are, in fact, untrained (or under-trained), they enact and enforce strict range rules to prevent accidents. While I don’t like those kinds of places, I do understand their concerns.
It’s the ranges with shooting prejudices I dislike. What do I mean by this? Those ranges, usually run by gun clubs, restrict certain activities because they’re not somehow proper or polite. I once knew a board member of a gun club who didn’t want anyone to use even a vaguely human silhouette because he thought guns were to be used strictly for hunting game animals. Some don’t like rapid fire because it’s not done in Olympic bullseye or trap shooting. If a certain interest in the shooting community doesn’t happen to be their interest, they’ll use their power of regulation to prevent it from happening on their turf.
Either way, any restriction is going to affect how and what you’re able to train. For those people whose only choice is an extremely restricted range (no drawing, no rapid fire, no more than a fixed number of rounds in the magazine), here are some ideas to spur further creativity on your part:
On ranges where drawing from a holster isn’t allowed, very often you can substitute getting the gun out of a case, loading it rapidly, and shooting. This can simulate a home defense scenario where you’re retrieving your gun from a quick access safe.
For those where ‘rapid fire’ isn’t allowed (usually defined as more than one round per second), you can work on a rapid first shot response. Since these ranges usually don’t allow drawing from a holster, either, start with the gun in a high ready position (gun pointed downrange, close to your body at roughly the base of the sternum, elbows tight in to your sides) and quickly extend out as you trigger a shot when you reach extension.
For those that allow only a small number of rounds in a magazine, load them randomly so that you never know how many rounds you’ll be able to fire before being forced to reload. This will give you practice in recognizing the need to reload.
The best solution, of course, is to find a range that will allow you to do the things you need in order to practice realistically. If that means a drive you can only make every few months, make that drive rather than handicap yourself so badly. I’m not of the opinion that ‘any trigger time is good’; under severe restrictions, it may amount to little more than turning money into loud noises.
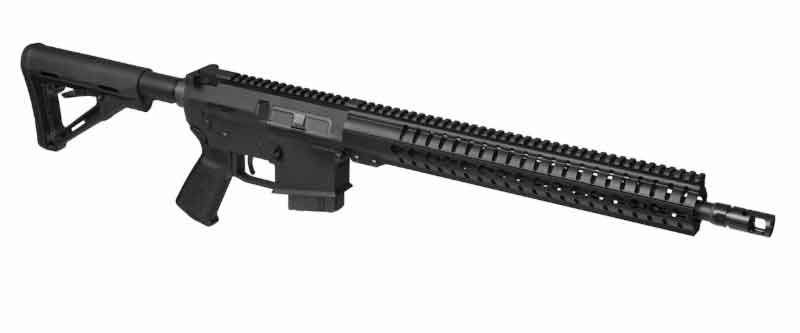
CMMG is gunning for long-range shooters with its new MkW ANVIL, chambering the robust rifle in the flat-shooting 6.5 Grendel.
What the MkW ANVIL in 6.5 Grendel brings to the table:
The MkW ANVIL is the second extension to the line, following up on the company’s .458 SOCOM released a little less than a year ago.
Given the ANVIL’s beefed up bolt and frame, the 6.5 Grendel is smooth shooting and a rugged performer in the rifle.
CMMG has configured the rifle to milk the most out of the round, giving the rifle an 1:8 twist rate, making it capable of stabilizing the heavier bullets.
CMMG doesn’t shy away from putting a different spin on one of the modern era’s most ubiquitous firearms — the AR-15. The Missouri gun manufacturer has gone way beyond the typical 5.56 NATO/.223 Rem., offering configurations and chamberings for nearly any conceivable situation or shooter. And the company continues down the road less traveled by tactical rifle makers.
Most recently, CMMG has set its sights on long-distance shooters with the introduction of a 6.5 Grendel option. But it’s rather interesting where this expansion comes — CMMG’s 1-year-old MkW ANVIL line.
The new chambering, available in five different configurations, is a turn from how the line launched, with the rifle originally feeding on the behemoth .458 SOCOM. The round was originally designed for Special Forces operators who wanted more power in a M4, while still utilizing a standard 5.56 NATO, i.e., bolt, magazines, etc. While the inspiration of the Grendel as a means of improving the AR platform mirrors that of SOCOM, the slick little 6.5mm has much different ends.
The new chambering should agree with the ANVIL’S engineering, which features a beefed up design meant to handle large-diameter cartridges. Central to this is the rifle’s POWERBOLT, a modified AR-10-sized bolt that improves the system’s function and durability. Also aiding in the rifle’s overall resiliency is its modified AR-10 frame, shortened by .75 inch to keep the ANVIL lightweight.
The new rifle (outside the pistol variants) comes with a 16-inch medium taper barrel, with a 1:8 twist rate. This definitely sets the rifle up for long-range work, allowing it to stabilize the heaviest bullets available today. The rifles also come with a threaded barrel, 5/8-24 pattern, making it compatible with almost all muzzle devices on the market.
As is typical with a CMMG firearm, the new ANVIL comes with a range of mounting options. In addition to a full-length Picatinny rail along the top for optics, the rifle also has KeyMod slots at the 3,6 and 9 o’clock positions. On top of that, the rifle’s RKM15 handguard also has five-slot accessory rails available for accessories that aren’t KeyMod compatible.
The new MkW Anvil in 6.5 Grendel will cost you a bit more than your run-of-the-mill sporter AR, with an MSRP ranging from $1,700 to nearly $2,000. But that could prove a pittance for long-range shooters aiming to go semi-automatic.
You shoot. Therefore, you need stuff. Lots of stuff. Make that, lots of new stuff. Don’t fret. Each year brings a slew of new shooting products and gadgets. Some are vital tools that help us stay on the range or in the woods longer. Others are nothing more than convenient little accessories that just make our lives as shooters a little easier.
This year is no different. Once again, your favorite gun store or shooting catalog is filled with a host of new items that you need to add to the shelf in your garage, basement or man cave.
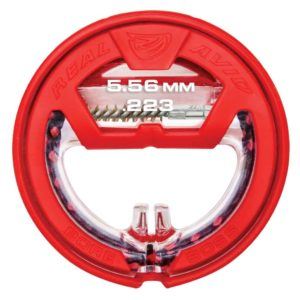
Real Avid Bore Boss Need a fast, compact and effective bore cleaner? Real Avid’s got you covered. The new Bore Boss incorporates a single-pass design that includes a 32-inch dual-action wire cable, a bronze bore brush and an 8 ½-inch braided mop. Simply attach the brush to the cable and the mop to the brush; douse with your favorite bore solvent; and pull. It feeds easy, pulls easy and cleans thoroughly. Even better, all of the components store in a durable, compact case that serves as a pulling handle. It’s just 3.25 inches in diameter and 1-inch thick. It’s available in .22-caliber up to .45-caliber and 12 and 20 gauges. ($9.99; RealAvid.com)
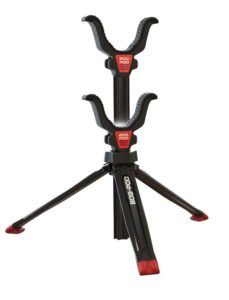
Bog Pod Rapid Shooting Rest A steady rest can mean the difference between a hit and a miss. You’ll never scramble to find a solid rest if you take Bog Pod’s Rapid Shooting Rest every time you hunt or head to the range. It’s light, compact and portable and is easy to store in a range bag, a backpack or behind the seat of your truck. It’s made of durable polymers and cast aluminum and is adjustable from 7 to 11 inches. It weighs just 21.6 ounces and has fast tripod legs and twist-lock elevation adjustment. ($44.99; BTIBrands.com)
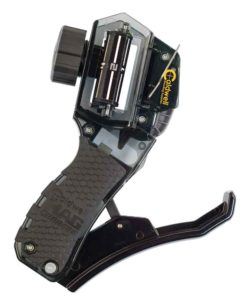
Caldwell Mag Charger Universal Pistol Loader It’s all fun and games until your magazine runs dry. Thanks to Caldwell’s new Mag Charger, you can spend less time stuffing ammo into your magazine and more time actually having fun at the range. It works on 9mm, 10mm, .40, .45 and most .380 magazines. Simply lock a magazine into the charger and feed rounds into the groove. A simple squeeze pushes each round into the magazine. Works with both single- and double-stack magazines. It’s made with durable polycarbonate material. ($47.99; BTIBrands.com)
Caldwell Stinger It’s not just light, Caldwell’s new Stinger gun rest is simple to use, too. The innovative spring-loaded elevation system allows for fast, one-hand adjustment for a wobble-free rest. The front and rear molded rests prevent guns from getting marred while providing the perfect grip for maximum accuracy. Adjustments include 3 inches of front elevation, 1 inch of rear elevation and 3.5 inches of lateral gun fit. The Stinger is built with steel tubing for maximum durability. ($119.99; BTIBrands.com)
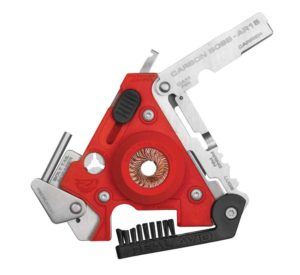
Real Avid Carbon Boss AR15 Tool It’s designed to remove carbon build-up from every nook and cranny of your favorite AR, but Real Avid’s Carbon Boss is much, much more. It comes with a bolt carrier carbon scraper, a bolt lug scraper, a firing pin scraper and a number of other tools designed to remove carbon and other fouling build-up. It even comes with a pin punch to help make takedown that much easier. Each tool locks into place, and most are labeled to help you find the right tool in a hurry. The Carbon Boss AR15 comes with its own carrying pouch, too. ($29.99; RealAvid.com)
Champion Workhorse Trap Shooting clay targets is always fun, but it’s a lot more fun when you don’t have to throw them manually. The new Workhorse electronic trap from Champion is not only compact, it’s affordable and allows you to throw clays until you run out of ammo, clay pigeons or daylight. It’s small enough to fit in the trunk of most cars and sets up in minutes. It has a removable 50-clay magazine and throws targets up to 75 yards at three different launch angles. The Workhorse has a 2.5-second reset, allowing you to challenge even the most skilled clay target shooters. ($359.95; ChampionTarget.com)
Real Avid GT Max You don’t need to take a toolbox to the range when you have a Gun Tool Max in your range bag. It’s got everything you need to work on your favorite firearm. Tools include needle nose pliers, a carbide cutter, a universal choke tube wrench, an 8/32-threaded receiver that fits standard gun cleaning tools and a round and flat carbon scraper. The Gun Tool Max also comes with a bit driver and 12 bits. It’s even got a bottle-opener for those after-shoot celebrations. ($59.99; RealAvid.com)
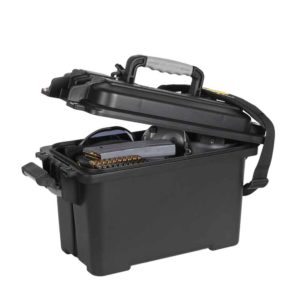
Plano Field Locker You’ve got lots of stuff, but is it all organized? With Plano’s new Field Locker, you can keep your tools, ammo, gear and gadgets in one convenient location. It is built of thick, durable, solid plastic and won’t rust or dent. Even better, it is guaranteed waterproof and dustproof. It also has an automatic pressure valve for air travel. The heavy-duty handle, hinge and clamp are built to withstand a lifetime of use. Inside dimensions are 12.8”x6.55”x9.175”. ($74.99; PlanoMolding.com)
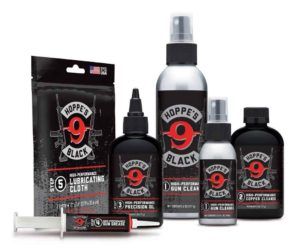
Hoppe’s Black High-performance firearms need a high-performance cleaning solution. Hoppe’s Black is designed just for those high-performing gas-operated ARs and other “black” rifle platforms. The five-step cleaning products include everything from a powder solvent and copper cleaner to a precision oil and gun grease. It even comes with a lubricating cloth to keep your stored firearms in top working order. Even better, the various products work on any type of firearm, giving you maximum cleaning and protection, no matter what you shoot. (Starts at $6.45; Hoppes.com)
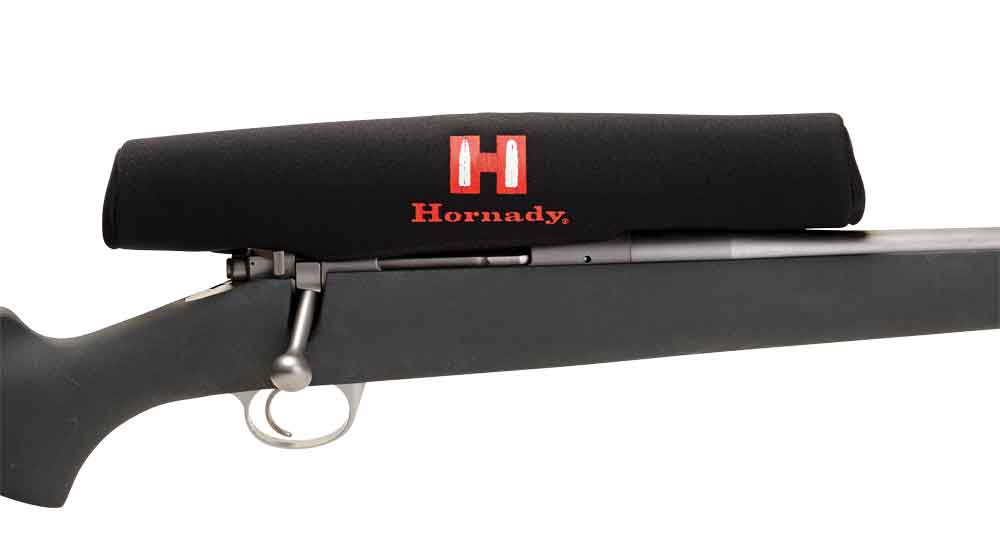
Hornady Scope Cover How can such a simple, unassuming product like a scope cover save your bacon? Hunt in the rain without a scope cover and you’ll find out. Hornady’s new cover is made of durable, waterproof neoprene rubber that protects your scope from dings, dirt and moisture. Most important, it will keep rain off your eyepiece until it’s time to take the shot. Simply pull the stretchy material and lift. It also keeps dust from settling on the glass when you aren’t using your rifle. ($15.99; Hornady.com)
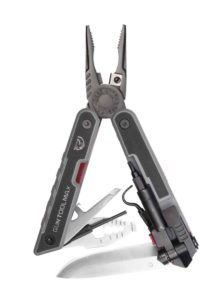
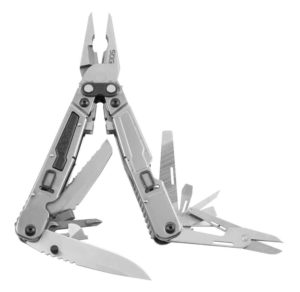
SOG Power Grab Where’s that “fill-in-the-blank” when you need it? With SOG’s new Power Grab multi-tool in your truck, range bag or backpack, you’ll never have to ask that question again. The high-quality device is loaded with tools that you need and that you’ll be glad you have. The Power Grab has 19 tools, including a flat and Phillips screwdriver, pliers, an awl, a serrated blade, a wire cutter and a bolt grip channel. It’s less than 5 inches when closed and weighs about 10 ounces. ($134; SOGKnives.com)
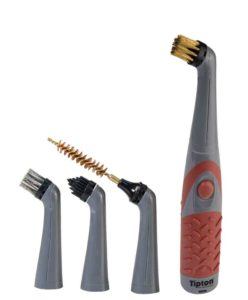
Tipton Electric Cleaning Brush Cleaning guns shouldn’t be a workout. Tipton’s Electric Brush Kit not only takes the work out of cleaning, it cleans where normal cleaning tools can’t. The revolving head scrubs at 3,600 oscillations per minute and uses interchangeable plastic, nylon and stainless steel cleaning brushes that scrub out dirt, fouling and residue in places other tools can’t reach. It has a soft-touch handle and power switch and runs on 4 AA batteries for portability and convenience. The handle is solvent resistant and sealed. ($47.99; BTIBrands.com)
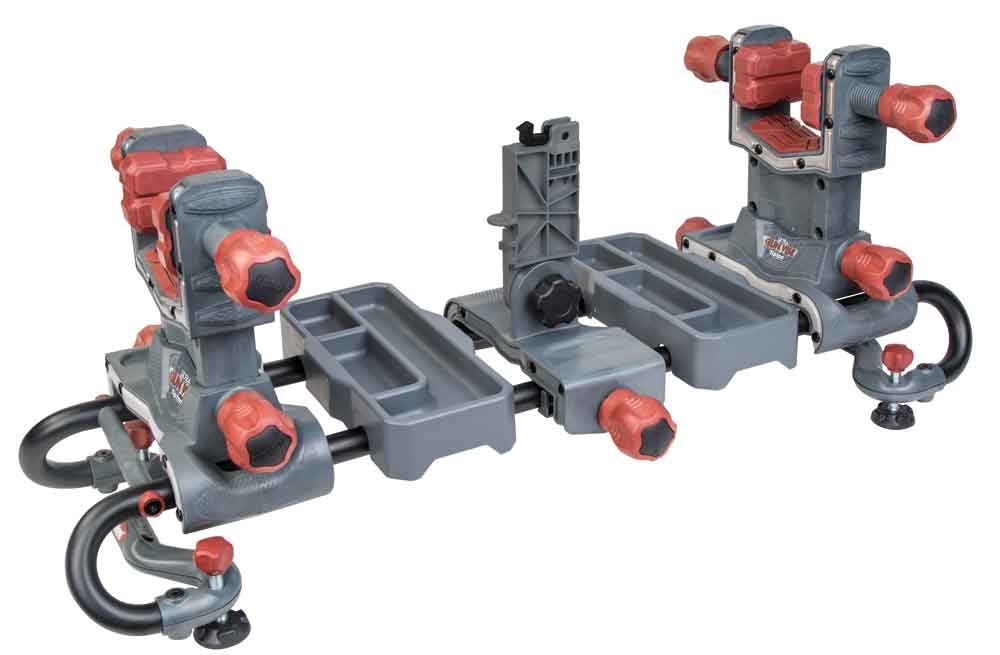
Tipton Ultra Gun Vise Every gun owner needs a solid vise for cleaning, mounting scopes and doing other work to your firearms. Tipton’s new Gun Vise is the only vise you will ever need. It’s built with a steel frame and solvent-resistant materials, giving you a lifetime of use. Front and rear fast-turn clamps are height and length adjustable. The bottom consists of compartmented trays to help you keep track of small and large parts. It even has leveling feet to help make scope leveling easier. Modules can be moved to accommodate a wide variety of guns and even bows. ($179.99; BTIBrands.com)
Yankee Hill Machine Turbo Suppressors have been continuing to grow in popularity, and the Turbo is an exciting new offering from Yankee Hill that’s attractively priced. Built to be a high-tech, cost-effective suppressor, the Turbo utilizes a tubeless design constructed using heat-treated 17-4 stainless steel and a heat-treated 718 Inconel blast baffle. Because of this combo, the Turbo is capable of sustained full-auto fire and can handle a fair bit of abuse. Overall length is 6.5 inches, and weight is fairly light at 13.5 ounces. The sound pressure level of the Turbo on a 14.5-inch AR with 55-grain ammo is around 134dB, falling within the hearing-safe range of under 140dbB. ($489; YHM.net)
Yankee Hill Machine Nitro 30 The Nitro 30 suppressor from Yankee Hill is designed to meet the varied needs of today’s suppressor community. As such, it features a modular design – offering muzzle cap and rear cap options – is full-auto rated and accommodates calibers ranging from .17 HMR to .300 Remington Ultra Mag. It comes with two .30-caliber muzzle caps; the flat cap is built for the tactical crowd, while the muzzle brake cap leans toward target shooters. The Nitro 30 also comes equipped with two different rear caps – a quick-detach cap for easily switching between platforms and a 5/8-24 direct thread cap for more dedicated setups. Weight is 18.2 or 20.2 ounces, depending on configuration; length is either 6.93 or 7.75 inches. ($890; YHM.net)
Editor’s Note: This article is an excerpt from the Shooter’s Guide 2017 issue of Gun Digest the Magazine.
With an eye toward creating a jack-of-all-trades, Ruger recently released its American Ranch Rifle chambered in the potent and prolific 7.62x39mm.
Is Ruger’s new American Ranch Rifle the perfect utility firearm?
The new 7.62x39mm American Ranch Rifle should be a solid utility rifle, perfect for throwing in the back of a truck and taking shots at coyotes and pigs.
Ruger has given shooters the ability to quickly increase the rifle’s capacity, making it compatible with Mini Thirty box magazines.
The American Ranch Rifle comes with all the features standard to the American line and is highly manageable; with the 16-inch barrel, the gun tips the scales at less than 6 pounds.
If bolt-action rifles are your thing, it’s a great time to be alive. Almost weekly, new variations and chamberings of venerable designs sprout up, opening the platform to yet another segment of the shooting world. Best of all, given the leaps forward in manufacturing processes, bolt actions are both affordable and honest-to-goodness accurate in nearly all their iterations.
One of the major players in the production of this style of rifle has been Ruger, which has come up with some of the most popular economy bolt actions around. The company’s American Rifle line has become a veritable playground for shooters avoiding the poorhouse while getting behind the trigger of a slew of different chamberings.
The line has allowed the New Hampshire company to really tinker around with the bolt-action concept and has given it a chance to venture into some rarely trod territory. Ruger’s newest chambering for its America Rifle Ranch Model is one such example.
The compact, lightweight utility rifle has recently been married to one of the most prolific intermediate rounds in the history of firearms — the 7.62x39mm. This is an intriguing development, to say the least, and one that is certain to pique the interest of any shooter with the yen for a true jack-of-all-trades rifle.
The 7.62x39mm Ruger American Ranch Rifle should be the ticket for a number of tasks: putting coyotes on heel, thinning the ranks of pesky pigs, or even as a survival gun option. Heck, few could argue, with abundant and cheap ammo, that it wouldn’t make a dandy plinker.
While the rifle ships with a five-round, flush-fit magazine, it is compatible with Ruger’s other famous 7.62x39mm rifle’s magazines — the Mini Thirty. This compatibility gives shooters the ability to increase the rifle’s capacity to 10 and 20 rounds. While many will welcome this adaptability, a number of shooters are certain to have their noses bent out-of-place with Ruger opting for proprietary magazines.
The Ruger American Ranch Rifle comes with a number of features common to the line, including: cold hammer-forged barrel, adjustable trigger, integral bedding block system, lightweight synthetic stock and threaded muzzle. The last feature is particularly useful, especially when it comes to using the rifle for nuisance animal management, with the 5/8-24 thread pattern compatible with any .30-caliber muzzle device (think suppressors).
The rifle boasts a 16-inch medium-contour barrel, keeping it at a manageable 36 inches in overall length. And at 5.9 pounds unloaded, few rifles are less of a burden, even on long humps. To boot, given the 7.62×39’s relatively mild recoil, the rifle’s light weight shouldn’t turn it into a painful thumper.
As mentioned before, the American Rifle line is the definition of affordable, and the new Ranch model is no exception. With an MSRP of $599, there are few excuses not to add a 7.62x39mm bolt action to your collection.
Specifications:
Ruger American Ranch Rifle Caliber: 7.62x39mm Stock: Flat Dark Earth Synthetic Sights: None-Scope Rail Installed Barrel Length: 16.12 in. Material: Alloy Steel Capacity: 5 Thread Pattern: 5/8-24 Twist: 1:10 RH Finish: Matte Black Weight: 5.9 lb. Overall Length: 36 in. Length of Pull: 13.75 in. Grooves: 6 Suggested Retail: $599.00
Learn how to check headspace and adjust headspace on your AR-15 with this guide from master gunsmith Patrick Sweeney.
What is headspace? In simple terms, it is the amount of room in the chamber for the cartridge to rest before it is discharged. The measurement is defined as the distance from the face of the bolt to what is called the “datum line,” which is a particular location on the shoulder of the chamber of a given diameter, and a stated distance from the face of the bolt. The idea is to provide enough room for the loaded round to fit, even when the rifle is dirty, choked with carbon or just not squeaky clean.
Similarly, ammunition is manufactured so the distance from the base of the cartridge to the shoulder will always fit into a chamber. The tolerances of the loaded round and the chamber into which it fits are not allowed to overlap — the largest cartridge made must fit into the smallest chamber made.
Alas, not everything can be made to exact dimensions. So, the chamber is allowed to vary slightly. Generally speaking, the allowable “drift” of the headspace dimension is 0.006, or six-thousandths of an inch. If headspace is within that spread, it is deemed to be correct.
How is headspace measured?
When it comes to the AR-15 , almost nothing exceeds the volume of misinformation as does headspace.
If someone tells you that all you need is a USGI Field gauge, stop talking to that person right now. Stop listening to anything they have to say. Just walk away. Oh, there might be useful information there. After all, you have to paw through a lot of gravel to find a nugget of gold. And telling you that a Field gauge is the only tool you need is definitely gravel.
To measure headspace, there are three kinds of instruments. One is called a “Go/No-Go” gauge. Another is a set of precisely ground and measured gauges, each .001 inch difference in size. And finally, a micrometer that looks like a headspace gauge. Each works differently.
The Go/No-Go gauge is simple. The Go gauge is manufactured to the largest size of a cartridge. If you can close the bolt on a Go gauge, things are good, as the chamber is not below minimum.
The No-Go gauge is made to be a small amount larger than the largest allowable dimension of the chamber. If a bolt closes on a No-Go gauge, the chamber is too big. But, what does that really mean? When you fire a round, the case expands to fill the chamber. If the shoulder of the chamber is forward of the shoulder of the case, the case expands to fill the chamber. The shoulder must then blow forward to fill the gap. The rear goes back to the bolt face. In the middle, brass gets stretched.
Now, in the microsecond in which this happens, it can proceed in several different ways, but the end result is the same: the case gets stretched in the middle, weakening it. This matters only to reloaders.
Re-sizing brass pushes the shoulder back to minimum (this is called the “shoulder bump” and it ensures your loaded ammo will fit your rifles) and the next time you shoot, the brass will be stretched again. The effective service life of your brass depends on how much stretching, and how much bumping you subject it to. If your headspace headspace is within accepted limits, you can get 10 or more loadings out of your brass before you start seeing neck cracks from work-hardening. If the headspace is excessive, you may only get two or three.
Manufacturers have to make bolts within very strict tolerances. But they still have small variances in dimension and that’s where headspace tolerances come in.
An example of this is the SMLE in .303 British. The .303 headspaces on the rim, not the case shoulder. The British Army cared not a whit about reloadability, only for reliability. I gave up reloading ammo for my various SMLEs because I could not get cases to last more than three loadings in any of them.
The U.S. Army, Marines, Air Force, and let’s not forget the Coasties, do not care about reloadability of brass. As long as the brass holds together and is ejected in a single piece, they are happy. And that is where the Field gauge comes into play. The Field gauge has been developed with one thing in mind — how large can the chamber be and still have a rifle that can be used in a wartime situation? And that is why military armorers have a Field gauge that they use commonly, rarely reaching for their Go and No-Go gauges . An armorer may have a rack filled with rifles and carbines that would easily gobble up a No-Go gauge.
Use of the Field gauge only applied to used rifles and carbines. If a brand new, fresh out of the box unfired rifle is tested, and the bolt partially closes or locks on a Field gauge, it should be sent back, even in military use.
Why then is a Field gauge not a good choice for you? In short, you aren’t going to war. You will likely be using reloaded ammo. You have an interest in making that brass last as long as possible. If you need headspace gauges, get a Go/No-Go set.
What of the others? The “thousandths” set is used to determine not just that the headspace is within tolerance, but precisely what it measures. The micrometer gauge does the same thing, but instead of having to check the fit of the gauge set, you install/assemble the micrometer set, adjust, and then read the measurement.
The cognoscenti argue over the commercial .223 versus the mil-spec 5.56 headspace gauges. I talked to Dave Manson, a maker of headspace gauges about this. His quick reply was, “Which 5.56 set?” It seems there are a whole raft of gauges and specifications out there. And that is just in the shoulder location, not including the leade, which we’ll get into in a short bit.
How much can these vary? Let’s look at a few dimensions, hunted down and laid out for your curious gaze.
Source Go No-go Field Colt factory reject/aka Field II
So, if you have a rifle chamber just over the max size, call it 1.470 inches, and your sizing die is set to bump the shoulder back to fit under the minimum chamber size, let’s call that 1.460 inches, you are working your brass .010 inches on each shot. It isn’t going to last long.
How to check headspace on your AR-15
To measure headspace you’ll need a chamber brush, cleaning rod, bolt disassembly tool and a set of headspace gauges.
Unload your rifle and separate the upper from the lower. Use the chamber brush to scrub the chamber. Clean the bore with a patch to extricate any crud you scoured out of the chamber. Remove the extractor from the bolt. Use the bolt fixture to remove the ejector. Scrub the bolt and dry it.
At this point, don’t be tempted to just drop the gauge in, close the bolt and see what happens. The closing bolt has enough mass and leverage to close the bolt on even a No-Go gauge if you are forceful enough or let it crash forward under full spring force.That is the wrong way to be doing it. The right way is as follows.
Manufacturers have lots of parts on hand, and can mix-and-match a bolt to a barrel for correct headspace. If you are replacing a barrel, it would be clever to order a new, headspaced bolt with it.
If you have the barrel out of the receiver, life is easy. Drop the Go gauge into the chamber. Hold the bolt by the tail, and see if you can insert it into the barrel extension, rotating it in front of the locking lugs. You should be able to do this. If not, that particular bolt/barrel combo is out of tolerance, under-minimum headspace and should not be used. Which is at fault? There is no way of telling with the tools at hand. To find out, you need at a bare minimum a surface plate, standing calipers and a bolt face cylinder. The cylinder is simply smaller in diameter than the bolt face opening, and a known thickness.
Put the cylinder on the surface plate. Stand the bolt on the cylinder, and measure the distance from the surface plate (which is flat to a millionth of an inch, if you bought the good one) and then consult the bolt drawing to see what that measurement should be. Without a bolt drawing there’s no real way to know.
If the bolt and chamber accepted the Go gauge, then remove the bolt and gauge, and replace the Go with the No-Go. Try again. The bolt should not, must not, rotate to the closed position. If it does, you have excessive headspace, and as before, you don’t really know which of the two is at fault.
A quick answer, in both instances is, both of them. What if you have the barrel already installed in an upper receiver? Go to the store and buy yourself a foot of PVC tubing. You want a piece that has a quarter-inch inside diameter, or ID. The outside diameter, or OD doesn’t really matter since you can’t buy it with walls thick enough to not fit into the upper receiver.
Stuff the tail of the bolt into the PVC tube and use the tube as a handle to hold the bolt, as you insert it into the chamber while doing the Go/No-Go test.
How to adjust headspace on your AR-15
The first thing to do, if you have the gear and parts, is check the headspace on a rifle that has worked. If you are building a rifle from parts and do not have a working rifle to check, then you need to borrow one. Or go to the gun club with your parts and tools, and ask someone if you can measure theirs.
If the other rifle checks out, then send the parts back. If the other rifle doesn’t pass muster, then check your technique. The odds of two rifles from different sources both having incorrect headspace is exceedingly low.
Back in the early days, we ran into incorrect headspace frequently, as many people who were making parts were either new or not very good at it. I also suspect that a lot of the bad parts we found at sale prices in gun shows back then were production rejects, out of spec and should never have been sold. The bad parts makers got their names bandied about enough that they either improved or quit. Now, everyone who is still in the business knows the proper bolt or barrel extension dimensions. However, you may still find some parts that do not agree.
Brand new parts should fit. If you got the bolt and barrel from the same source, contact them and arrange an exchange. They should be happy to do so. If you got them from two sources, contact each and explain the situation. See which, if either of them, will help you. Accept their help and strike the other company from your list of “doing business with” for the future.
Only in extreme circumstances should you even think about chamber reaming to adjust headspace. And then only if the barrel is stainless or un-plated carbon steel and un-returnable. You can only correct insufficient headspace by reaming. If you have excess headspace, and you cannot return the barrel, then your only other option is a session with spare bolts and your headspace gauges. Maybe you’ll find a bolt that would otherwise be too big, but will solve your excess headspace problem.
Reaming headspace
I have reamed chambers and adjusted headspace in rifles without removing the barrel from the receiver, so it can be done. Having done it, I have to tell you this: remove the barrel. The hassle of reaming the chamber with the barrel in the receiver is greater than the hassle of removing the barrel and then reaming. Plus, you can do a better job with the barrel out. So, you’ll need the barrel and bolt, the finish reamer for 5.56 (not .223 Remington) with handle, cutting lube, chamber brush and a cleaning rod and patches for the bore once you are done.
Clamp the barrel, padded, upright in your bench vise. Scrub the chamber. Strip the bolt and scrub it clean. Check the headspace, just to remind yourself what under-minimum headspace feels like. (The bolt won’t rotate closed with the Go gauge in the chamber.)
Insert the reamer in your tap handle or reamer holder. Gently lower the reamer into the chamber, and begin rotating before it contacts the shoulder. Only turn in the direction of cutting, never reverse rotation. Give the reamer two full turns once you feel contact, pull it out while still rotating, and inspect the reamer. You should see metal chips on the shoulder of the reamer. If you also see chips on the body, you’re getting a bonus in the headspace adjustment; you’ve got a narrow chamber and the reamer is correcting that. You won’t have to mess around with small-base dies when you go to learn reloading.
Swab out the chamber and recheck headspace. With a few iterations you will get to the point where you can feel the bolt lugs start to cam underneath the lugs of the barrel extension.
Repeat the two-turn cutting procedure until the bolt will just rotate closed on the Go gauge. You have minimum headspace at this point.
You now have a decision to make. You can leave it at minimum, reassemble the barrel into a rifle again, and test fire it. You’ll probably find that it is plenty reliable, and unless you insist on shooting it in miserable environmental conditions it will serve you well.
If you want it to be a little more forgiving of neglect, you have to increase headspace past minimum, but not too much. Remember, the .006 inches of gap is all you have to work with.
Measure the overall length of your Go gauge. This is not the headspace, just the length of the gauge. Now carefully apply a small piece of tape to the base of the gauge and measure again.
You have just added a few thousandths to the Go headspace, by the thickness of the tape. Do the two-turn ream again, install the taped gauge and measure.
You can, if you are careful and diligent, add a controlled number of thousandths (adding .002, .003, or .004) to the minimum headspace, and not exceed the maximum.
Once you are done, scrub the chamber. Push a clean, dry patch down the bore to get lube and metal chips out of the bore, reassemble the rifle, and go to the range to test-fire and re-zero. Why a 5.56 reamer, and not a .223? Because you want the leade to be 5.56. If your chamber is not only under minimum, but has a .223 leade, then the headspace reaming operation will take care of both.
Excessive headspace
If you have too much headspace, and your brass stretches, then what? Basically, subjecting the same brass to excessive headspace too many times will cause it to break in the middle. You probably won’t know it, because the broken rear half will be extracted and ejected. But the next round will find the front half crammed in the chamber. The fresh round will wedge hard into the remaining piece, locking the rifle up. You’ll have a heck of a time clearing the jam.
If you are using commercially reloaded ammo , it is possible for the brass to have been abused before it got to you. If it had been fired in something with grotesquely excessive headspace, like an M249 SAW, then it would have been stretched at that time.
So, a singular event, in reloaded ammo, may not be your rifle’s fault.But check anyway.
One of the most common questions that comes up in an AR armorer’s class is, “In what order do you assemble a box of parts?” No, really. I get questions like this all the time.Let’s take a look at how to assemble an AR from a box o’ parts.
In what order do you assemble a box of AR-15 parts?
Inventory the parts.
Inspect the parts.
Start by checking the fit of the upper and lower.
Check the fit of the other major parts.
Assemble the upper and the lower according to the sequence below.
Connect the assembled upper and lower.
Inventory and inspection
First pull everything out of your box o’ parts and do an inventory. Some parts may be missing, duplicated, wrong or even unidentifiable. You want to make sure everything you need is at the ready before you start.
Next, do a preliminary inspection of the parts, making sure they are the correct ones. For instance, if you ordered a barrel with a 1/7 twist, is it marked to reflect that? If not, you have a return or exchange to make. Similarly, if you ordered a barrel with a mid-length gas system, and the gas tube that arrived with it is a carbine or rifle tube, you need to make a swap. Do you have the correct buffer for the stock? Is it the correct stock?
Once you’ve made sure that all the parts are there, and they are the ones you asked for, you’re ready to check fit.
Dabs of paint, at strategic locations, can tell you if the fasteners on your rifle have come loose.
Checking the fit of the parts
Start with the upper, lower and the two takedown pins. Press the upper and lower together, passing the front pin through. Don’t worry about the retainer or spring, just fit the pin. Check that the upper hinges smoothly on the lower. If not, you’ll need to swap parts until you find ones that do. Close the upper and lower, pressing the rear pin through. It should slide in smoothly. The upper and lower should have little or no wobble.
If you can’t fit the pin in, or it needs to be pressed or hammered, pass on this set and have the place you got it from replace one or both.
Here’s a pro tip. If you have other rifles, go on a fit-check mission to see if your other uppers and lowers will match the new ones. If you’re willing to do some swapping, you can often find a set that will work.
If all of your parts came from a genuine mil-spec shop and they don’t fit, you have cause to complain. But the volume of good non-mil-spec products is large. The number of real-deal mil-spec parts is a small subset. You can build a perfectly good AR and not have a single mil-spec part in it. That’s your choice.
Check how well the other major parts match. Does the barrel extension slide smoothly into the upper receiver? Is it excessively loose, or does it fit so darn tight you’ll need a mallet?
Does the buffer tube screw into its hoop on the lower, or not?
Is the handguard the one you asked for, and will it fit the barrel length? If it is supposed to come with a replacement barrel nut, does it?
Upper and lower assembly
It doesn’t matter if you start assembling the upper or lower. I tossed a coin, and tails came up. So I took that as a sign that I should describe the sequence of assembling a lower first.
Assemble an AR-15 lower
Check the fit of the fire control parts in the lower. Do they fit? Do the pins go through? Is the trigger pull something approaching normal? If so, pull them out. Check the fit of a magazine to the lower. Does it slide in normally and fall out of its own weight? Good, then we can go on.
Assemble the lower in this sequence:
Install the bolt hold-open, trigger guard, front takedown pin, fire control parts, pistol grip and then the stock.
Since it doesn’t have to depend on anything else, you can install the magazine catch any time that suits you.
If there are any extra parts or accessories you want to put on the lower, add them last, unless they have a reason otherwise. One example would be the single-point sling plates on buffer tubes. If you are going to use one, install it as part of your stock assembly. Don’t install a plain one only to remove it and replace with a single-point.
Assemble an AR-15 upper
Assemble the upper in this sequence:
Begin with the bolt and carrier. Check the carrier for a properly staked key. If wrong, get it staked.
Assemble the bolt, with all of its upgrades and do the function checks.
Install the forward assist, if any, and the ejection port cover.
Install the barrel, gas or piston system, flash hider or muzzle device, handguards, sights and optics, and then put the upper and lower together.
There, that wasn’t so hard, was it?
Once parts are tight, and have stayed tight after testing, they get painted in.
Truth is, I had to figure this out from scratch back when Reagan was President. I made mistakes, but then I moved on, and here I am. So, if you make minor mistakes non-essential to function, while assembling your rifle, it isn’t the end of the world. Look on it as a learning experience, and make the next one better.
Flash hiders and muzzle brakes (or compensators) are two types of muzzle devices, and they use gas created from firing a cartridge differently:
– Hot gases from the muzzle flash expand into the cool air, emitting photons from heat(not from burning powder). A flash hider hides most of this by creating turbulence. By mixing the cooler ambient air with the expanding bubble in a random pattern, there is no longer a large flat surface, or bubble, to glow.
– A muzzle brake jets the gases out to the sides or top, or causes them to slam into a fixed barrier, decelerating them. You can use the leverage the barrel provides, and not just negate the added gas component to recoil, but pretty much negate all the recoil. That’s what a muzzle brake does.A good muzzle brake is loud, as the gases are re-directed back at you or the guy next to you.
The JP Enterprise “Tank” brake. For when you absolutely, positively, have to clear off the benches on either side of you.
What does a flash hider do, and what exactly is flash?
Flash hiders keep muzzle flash down in the visible spectrum. In the infrared, they don’t do squat. In fact, a rifle may produce a visible muzzle flash only part of the time, but through a thermal scope it will flash every time. Hot gas is hot gas, even if it isn’t incandescent in the visible spectrum. A thermal scope will see it every single time.
Disregard the notion that flash is unburnt powder. If you have not combusted all the powder the case contained in its travel through 16 inches of bore, you’re using the wrong powder. In some handgun cartridges, the powder has been fully combusted before the bullet leaves the case. In rifles, the powder has all been burned by the time the bullet is 3 or 4 inches down the bore. Actually, the bright flash we see is incandescence.
The powder burns at a high pressure and temperature. The confined combustion temperature of your average rifle powder is on the order of 3,500 to 3,700 degrees, Fahrenheit. That gas leaves the muzzle in an expanding bubble. At that temperature, the gas is incandescent and the glow happens to be in a part of the spectrum we can see.
Also, the uncorking pressure of rifle ammo, typically 10,000 PSI or higher, produces a smooth-surfaced gas bubble. It expands too quickly to mix until it has sufficiently cooled.
An example of incandescence is your common light bulb. The electricity flows through the filament, and the filament glows due to the electrical resistance of the material involved. The filament, due to electrical resistance, is heated up until it is hot enough to be incandescent, and the glow is in the visible spectrum, which throws off … light. The filament is not consumed, it is not burning, it simply ejects photons due to the heat. Turn the light off, electrical flow stops, and the filament cools and stops emitting photons.
The muzzle flash of your rifle is the same principle. The hot gases, expanding into the cool air, emit photons from heat, not from burning powder. A flash hider hides most of this by creating turbulence. By mixing the cooler ambient air with the expanding bubble in a random pattern, there is no longer a large flat surface, or bubble, to glow.
The flash hider on your AR-15
An AR barrel with no flash hider is problematic. In a rifle-length 20-inch barrel it isn’t too bad, as there is enough length and time for cooling and pressure loss to keep flash manageable. Also, there are a lot of uses where the shooter doesn’t really care if there is a visible flash or not. A deer hunter, for instance, cares not one whit about muzzle flash. Target shooters are not bothered by it. Most matches are held in broad daylight, and cardboard targets aren’t going to notice muzzle flash. But the rest of us want a flash hider.
The only real difference between the A1 and the A2 is that the A2 lacks the three bottom slots.
The basic A1 and A2 flash hiders do a very good job. The A2 differs only in that it has three of the slots closed, so that when you are firing prone, in a dusty environment, you will not be kicking up so much dust that everyone will be able to point and say, “Over there!” The closed bottom allows you to perform some tuning later on.
The next flash hider to consider is known as the Vortex. The real-deal, actual Vortex is made by Smith Enterprise. It’s longer than the A1/A2, and has only three or four (depends on the caliber) open-ended slots. The tines of the Vortex are thicker than the slot walls of the A1/A2, and its slot is machined along a slight spiral, angled path. As a result, the Vortex does a much better job of turbulating the gas flow of the muzzle blast, thus hiding the flash. (Yes, turbulating. It’s my book, I get to invent words now and then.)
The one drawback is that the open ends of the tines can catch on stuff like vines, branches or gear.
Everyone from the smallest machine shop to massive offshore manufacturers has made copies of the Vortex design. I’m as much in favor as saving money as the next guy, but when it comes to intellectual property, I’m also interested in protecting it. So buy original if you can.
There are more kinds of flash hiders: ones with slots, drilled holes, ports, vanes, grooves, you name it. All of these are marketed as improvements, but between the A1/A2 and the Vortex, there isn’t a whole lot of improvement to be gained.
How does a muzzle brake work?
A muzzle brake is a simple thing in theory, and a difficult thing in the real world. A brake directs hot, high-pressure gases, turning the gas flow into something we can use.
Newton’s Third Law tells us that for every action there is an opposite and equal reaction. When the bullet begins to move, the rifle begins to recoil. We can calculate the movement force precisely because we know the bullet’s mass and velocity, and we know the rifle’s mass and velocity. The first approximation is muzzle velocity multiplied by mass. For a .223/5.56 with a 55-grain bullet leaving at 3,000 fps, that comes to 165,000 gr. fps. The rifle weighs 7.5 pounds. There are 7,000 grains to a pound. So, our first estimate will be that the rifle will recoil at a velocity of 3.142 fps. (The actual total recoil is derived via calculus, as the bullet does not spend the entire bore time at 3,000 fps. I’ll leave that as an exercise for the really math-happy reader to solve.)
The baffles and exhaust ports on a muzzle brake are meant to change the direction of gas flow to the benefit of the shooter.
The same estimate, using a hunting rifle in .30-06 with a 180-grain bullet at 2,500 fps out of an 8-pound rifle, gives us 8.035 fps as the recoil velocity. Even if you’ve never fired an AR before, you can clearly see that the recoil it generates isn’t all that onerous.
The muzzle blast is basically a jet nozzle, and we can also calculate that. If we take a basic .223/5.56 load, with 25 grains of powder, and we burn and eject it, we have extra recoil. The hot gases jet out at over 4,000 fps, in some loads as high as 5,000 fps. We’ll use the lower figure. 25 grains (we’ll assume it all ejects at full velocity) at 4,000 fps is an additional 100,000 gr. fps in recoil. That adds 1.90 fps to the recoil velocity of the AR. (The .30-06? It adds 50 grains of powder at 4,000 fps, for an extra 3.57 fps. Ouch.)
But, what if we redirect those gases? A brake can jet them out to the sides or top, or cause them to slam into a fixed barrier, decelerating them. You can use the leverage the barrel provides, and not just negate the added gas component to recoil, but pretty much negate all the recoil. And that’s what a muzzle brake does.
The Colt Competition muzzle brake has more top slots on the right than the left. That design keeps a right-handed shooter on center.
You will notice that there is no mention of turbulence or of reducing flash. That’s because most muzzle brakes are actually flash enhancers. They redirect gases as smoothly and cleanly as possible. A good muzzle brake is loud, as the gases are re-directed back at you, or the guy next to you. They are dangerous, as the 4,000+ fps gases have been smoothly (smooth means efficient, and efficient means no loss of momentum) squirted up or to the sides — or both. You do not want to be standing next to someone shooting a braked rifle in any caliber.
The most effective muzzle brake to be had, the McArthur PRGS-1.
Despite the assurances of manufacturers, there is no such thing as a device that is an effective muzzle brake and flash hider. You have to pick one.
There are times, under the principle of disparity of force, that deadly force can be used against unarmed assailants. One of the prime examples is when facing multiple attackers.
It’s been long recognized that when faced with two or more criminals, their tactical advantage is so great the victim is likely to be killed or sustain grave bodily harm.
Michigan v. Ossian Sweet is one such example, where a jury found Dr. Sweet not guilty after killing a member of an angry mob that looked to do grave harm.
Still, even today, it can take a full-blown trial for the truth to come out when a victim defends themselves against multiple unarmed attackers.
The law has long since recognized that when two or more criminals attack a lone victim, their physical and tactical advantage is so great their single victim is likely to suffer death or grave bodily harm if the attack is not stopped immediately. (And, of course, the innocent victim has no prudent reason to believe that the attack will be stopped before that point by his or her violent assailants.)
A classic case in this vein was Michigan versus Ossian Sweet, in 1925. Dr. Sweet was a black physician in Michigan, in a time when segregation was law in the South, and “practice if not law” even in the North. He and his wife Gladys purchased a home in a Detroit neighborhood that was “all-white.” Hellish racial animosity ensued, and rose to the level of deadly threat. On the day in question, Dr. Sweet had been so alarmed he had bought guns for the friends and relatives who came to his home to protect him. Hostile crowds formed, at first held back by local police. When the mob began to storm the house, first throwing rocks through the windows, the defenders inside opened fire. One white man was killed, and another wounded.
Murder charges resulted. Legendary attorney Clarence Darrow took the case for the defense. In the chain of trials that followed, all of the defenders were ultimately exonerated, either by verdicts of not guilty or by prosecutorial dismissal of charges.
Not long after this trial, the classic legal text Warren on Homicide appeared, in 1938. This was the authoritative text destined to become known as “The Bible of Homicide Law” among lawyers and judges. The author(s) made it clear that when an individual faced a mob bent on doing violence to him or his compatriots, each member of that mob shared the culpability of the entire organism of the mob…and, therefore, was equally and individually fair game for the defensive violence suffered at the hands of the lawful defender(s).
One would have thought that would have decided the issue…and one would be wrong. It has long been a societal norm in the entertainment media, from books to “moving pictures” to the entertainment and even news media of today that “only a cowardly murderer would shoot/stab/kill” an “unarmed man.” We live in a society where media memes have so overpowered collective logic, and even long-established law and case law precedent, that it takes a full-blown trial for the truth to come out, and for law and justice to prevail.
Editor’s Note: This article is an excerpt from Deadly Force.
Looking to go armed, but are stuck in the weeds as to what to arm yourself with? Here are 20 of the best concealed carry gun options that will keep you on the defensive.