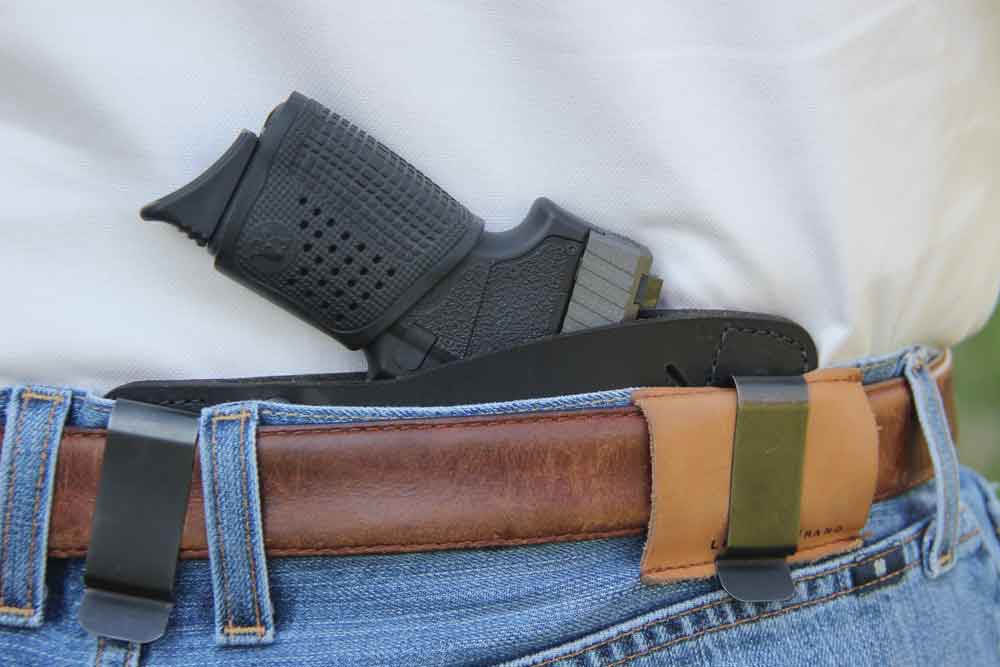
Given the lack of national reciprocity, armed citizens must be aware of other states’ concealed carry laws if they travel. Ignorance to other states’ firearms laws when traveling armed can set you on a course for serious trouble.
What you need to know about traveling with a concealed carry handgun:
Each state has different gun laws pertaining to concealed carry.
Some may not recognize your state’s CCW permit.
Handgunlaw.us is a great, up-to-date resource for individual state gun laws.
It’s unwise to trust printed resources on concealed carry law.
This is because laws are often changed with little or no public notice.
It is imperative that the lawfully armed citizen know the laws of the given jurisdiction. Let’s say that you are a resident of New Hampshire, the “Live Free or Die” state. If while carrying a gun you cross the southern border into Massachusetts, which does not have carry permit reciprocity with any other state at this writing, you will be committing a felony the moment you cross the state line. However, if you have obtained the difficult-but-not-impossible-to-acquire Massachusetts non-resident carry permit, you will be fine.
And if you instead drive west into neighboring Vermont, you will also be fine because for longer than anyone reading this has been alive, the Green Mountain state has allowed any law-abiding citizen regardless of their state of residence to carry without a permit, and merely forbidden anyone to do so if they have been convicted of a felony or adjudicated mentally incompetent. Indeed, for many decades Vermont was the ONLY state that allowed permitless carry, which some prefer to call Constitutional carry, though it has now been joined in that by several other states.
“We don’t have to like reality. We do have to face it.” ~ Jim Fleming
But if you continue your journey through Vermont and cross that state’s border with New York, things change. New York offers neither any reciprocity with any state, nor any option for a non-resident to be permitted to carry a gun. First offense illegal concealed carry is a serious felony there, with mandatory prison time.
It’s a classic example of what lawyers call malum prohibitum, which means in essence “it’s bad because we passed a law against it.” This stands in contrast to malum in se, which translates to evil in and of itself: “we passed a law against it because it’s bad.” Much gun law follows this pattern. As famed defense attorney and firearms instructor Jim Fleming likes to say, “We don’t have to like reality. We do have to face it.”
At this writing, the best resource by far on the topic of gun laws is the website handgunlaw.us. It is unwise to trust anything in print on the topic, because the reciprocity agreements between state Attorneys General change regularly, often without widespread public announcement.
For example, the state of Nevada for many years recognized the home-state carry permits of Florida residents. However, when Florida for administrative reasons extended the longevity of their carry permits, Nevada authorities decided that was a longer period than they liked and ended their reciprocity with Florida. This was not widely announced, and visitors from the Sunshine State who routinely visited Las Vegas every year and carried their guns where legal there did not realize that doing as they had always done had now criminalized them. When Nevada subsequently chose to recognize Florida again, that wasn’t widely publicized either.
Handgunlaw.us maintains constant contact with all the states’ AG’s offices (and with gun owners’ civil rights groups in the various states) and thus stays current with things. It is strongly recommended that the armed citizen do a here-and-now check at handgunlaw.us before crossing state lines. For a smartphone app in the same vein, consider Legal Heat.
A beautiful day or even a crappy one, the conditions are always ideal to head to the shooting range. All you need is your guns and ammo and you’re ready to roll, right?
Well, almost.
If you’ve spent any time around firearms, you know a day plinking away at paper, poppers or tin cans requires quite a bit more gear than just the bare necessities. There’s safety, maintenance and even a shooting setup to consider.
That’s where the tried and true range bag comes into play. These all-purpose marksmen satchels are the ticket to make a day behind the trigger enjoyable, safe and right on target. As an added benefit, it gives you the appearance of actually knowing what you’re doing.
With that in mind, here are 8 Pieces of Gear To Build Your Own Top-Notch Range Bag. This, by no means, is an exhaustive list, but it should get you on solid footing to make the most of your shooting time.
We know we’re not infallible, tell us in the comments what you think are the foundational pieces of gear in a range bag.
Yeah, when you’re putting together a range bag, it’s pretty obvious you need a bag. And for all intents and purposes, anything short of a plastic grocery bag will tote your gear (if you don’t mind being pointed at and mocked). But if you’re serious about shooting, you should spend a bit of coin on your range bag and get something that suits your needs and will last you a few trips.
A couple considerations when you shop for a range bag are space and durability; you definitely want both in spades. And there are many fine brand-spanking-new examples tailored just for the range from BlackHawk, VooDoo Tactical and G Outdoors.
But don’t think you’re hemmed into a piece of gun luggage specifically engineered for that job. If you’re willing to hunt around a bit at the military surplus stores or sites, you can typically scratch up a first-rate range bag, even if that wasn’t its original purpose. For 20 years or so, an old gas mask bag has toted my cartridges, tools and what have you fairly nicely and on the cheap.
Unless you hate yourself or your head holes, you’ll need to kit up with some shooting glasses and ear protection. Besides, any self-respecting shooting range west of Uzbekistan isn’t going to let you within a country mile of its firing line without this essential safety gear.
As for the hearing protection, earplugs and earmuffs are both viable options and, like concealed carry holsters, you’ll have to experiment to find out what’s right for you. With either option, what you’re concerned about is their NRR rating. By law, all hearing protection equipment must have this rating, which is typically printed on the package. The highest you can purchase is 33 NRR. The CDC recommends using earplugs and muffs in conjunction, which can increase the effectiveness of hearing protection an additional 5 to 20 dB of peak protection.
Concerning eye protection, there are plenty of ranges that will let shooters get away with just sunglasses. But that probably shouldn’t be your standard. A good set of shooting glasses that meets or exceeds the ANSI z87 + standard is your aim.
Tested for impact resistance, these will take the worry out of having to invest in eye patches in the future. Besides, you can literally purchase glasses that are up to that level of protection for less than a dollar. Wrap around frames or lenses are also a good idea — you know what I mean, if you’ve ever had a Mini-14 shooter a lane over.
From there it’s all about comfort and what will suit your needs. That said, if you plan on doing a lot of indoor shooting, perhaps smoked lenses shouldn’t be your top choice.
In our imperfect world, stuck brass happens. And few things can bring an enjoyable day behind the trigger to a screeching halt quicker if you don’t have the right tools.
A good old cleaning rod is just the medicine to remedy the situation and, no matter if you’re shooting pistols, revolvers or rifles, you should definitely have one in your range bag.
A single-piece rod is the best for cleaning, but not for range work. A solid takedown cleaning rod is just the ticket for stubborn brass and convenience. But shoot small when outfitting your kit — .22 caliber is always a safe bet. This ensures the rod is universal, an especially important factor if you plan on taking multiple guns to the range.
Though if you’re a precision shooter and have a slew of perfectly tailored handloads begging to rip apart the 10-ring, then something caliber specific to swab your bore is perfectly acceptable. Of course, if that describes you, you already knew that and probably have one in the metric ton of gear you drag to the range.
Shooting Rests
I am a strong advocate of getting off the bench to shoot. Deer and bad guys rarely set themselves up for a precision shot off a benchrest, so you might as well get use to shooting (if your range allows it) in different positions.
Even with this in mind, there are times you require the bench — sighting in a scope, working on trigger control, lethargy. For these situations, you should have some sort of rest to help you get into the most stable position possible. Many ranges provide something, but being prepared is better than discovering they have nothing.
Of course a HySkore Dual Damper Machine Shooting Rest isn’t practical for a range bag. Instead, something simple such as a fabric or leather front and rear rest will do the job nicely. Caldwell, Protktor, Champion and many others make a full range of portable shooting rests that are far from a burden to load up into your bag.
Pro tip (if there was actually anything remotely close to that anywhere near where I’m writing): Make friends with someone who reloads for their shotgun. They’ll have a ton of canvas bags their shot came in. Add a bit of sand to an empty one and you’ll have a dandy rest that costs next to nothing.
Spotting Scope
Honestly, you needn’t go SEAL Team Six on this bit of gear. You aren’t ranging for a sniper team.
Your aim is to save yourself time and energy, not to mention giving yourself instant feedback on the shot you just took. Otherwise you’re looking at a lot of waiting and walking just to find out how you’re grouping. Even if your range has spotting scopes, owning your own is a heck of a lot more convenient.
The best news, there are plenty of decent offerings in the spotting scope market that fall under the $100 price. Barska, Konus and Simmons (there are others) all have great entry-level models at entry-level prices
If you can’t live without top of the line, you can always upgrade to $1,000-plus glass later.
Ever seen a scope come out of its rings? Not a pretty sight and one heck of a way to ruin a day. How about being around a rifle that has an action screw come lose to open its groups as wide as a canyon? That happened to a buddy of mine on a brand new, out-of-the-box rifle. It goes without saying, he was not too pleased about the situation, but didn’t stay steamed long since he had the tools for the job.
You should, at the bare minimum, have a scope mounting tool (Leupold and Real Avid make slick ones) and a set of screwdrivers made for working on guns (Wheeler’s one of the tops).
Yeah, these screws should be checked before heading to the range. Again, this is an imperfect world and screws come loose. Better a boy scout and prepared, than sulk home two rounds into a session because your scope is rattling like a diamondback.
Duct Tape
Hanging targets. Fixing recoil pads on the fly. Remounting your tailpipe savaged from the parking lot’s speed bump.
Honestly, you never know what life will throw at you — even at the shooting range. But if Duct Tape can’t fix it, well you’re in real trouble. I’d throw in baling wire as a necessity, but that’s harder to obtain in some of the more tony corners of the country.
Pen & Note Pad
If you’re serious about shooting and shooting well, you should be serious about note taking. Accuracy and precision is about controlling variables, and you’ll never remember them all without spilling a little ink.
I prefer steno pads and mechanical pencils for convince, but whatever works for you works for you. Knock yourself out. Just get into the habit of recording the factors (conditions, ammunition, etc.) to figure out what’s going right and wrong. You’ll thank yourself later when the former outweighs the latter.
Shooting downhill or on an incline requires an adjustment in trajectory. Here’s what you need to know to connect on those tricky angled shots.
What do you need to know to adjust trajectory on angled shots?
The longer the range to target, the more critical incline and decline become.
Today’s shooters have many ballistic apps and BDC calculators for angled shooting.
Know field calculations you can use on the fly when faced with high- or low-angle shots.
Develop a system with your BDC reticle for angled shooting and practice, a lot!
Shooting Downhill, Shooting Uphill
If you raise or lower the target, the amount of drop necessary will appear to change.
Let’s say I’m using my .300 Winchester to shoot at a target 400 yards away, but at a downhill angle of 20 degrees. The above information will indicate that I need to hold 19.1 inches above the bullseye, in order to allow for the drop in trajectory over that distance.
However, I’d hit the target about 4 inches higher than I aimed. Now, perhaps that would still be a lung hit, or maybe it would not be a vital hit at all. Why?
The Bushnell 1 Mile rangefinder helps establish the shooting angle.
When measuring the effect of gravity on a bullet’s trajectory, it needs to be done on a level line, perpendicular to the line of gravity. When shooting uphill or down, you need to know the level distance.
It’s not hard to calculate this difference; simply observe the angle of deviation from level (in our instance, 20 degrees), and take the cosine of that angle. Multiply those results by the slope distance (like you’d observe on some laser range finders) and you’ll have the level distance.
In the case above, where my .300 Winchester was 19.1 inches low at 400 yards, I should’ve held for 375 yards — the level distance — where the bullet will strike 15.5 inches low. Here’s the math:
Cos (20 deg.) = 0.939 0.939 x 400 yards = 375.8 yards.
As the shooter, you need to know both the distance (again the range finder is your friend), and angle, either up or down to adjust the trajectory.
Laser Rangefinders And Ballistic Apps
There are a couple of methods I recommend. Many of today’s smartphones provide an app that will act as a level, providing a measurement of the angle up or down from level; I use one that acts as a clinometer (I’m a mild-mannered land surveyor by day) and is rather accurate.
If I have a severe uphill or downhill shot, especially at the distances where the reduction in range becomes significant, I should have time to use my phone to observe the angle and make the necessary adjustment to the trajectory.
A good laser rangefinder is an invaluable tool for shots that require a specific amount of holdover.
Many of today’s laser rangefinders, such as the Bushnell Elite 1 Mile, also provide either a level distance to the target, doing the mathematics for you, or will provide the angle from the shooter to the target.
If you don’t like the electronic gizmos, you can spend some time in the field judging some severe slopes where the level distance to the target will be affected most, and develop a good idea of what a 10-degree slope looks like in comparison to a 20- or even 30-degree slope.
When things get to 30 degrees and more, you’ll usually find climbing requires a hands and knees position. It’s very common for most folks to judge a slope as more severe than it truly is, so some practice will come in handy for reducing those distances to level.
Many smartphones offer an app for measuring slope angle.
While few of us carry a cosine chart around in our heads, here’s a good reference piece to give you the amount of reduction necessary, in percentages.
5-10 degree slope = 98% of slope distance 15-20 degree slope = 95% of slope distance 25-30 degree slope = 90% of slope distance 35-40 degree slope = 80% of slope distance 45 degree slope = 70% of slope distance
For the rifle, where we have the benefit of using sleek, sharp bullets that resist gravity’s effects efficiently, the gravitational drop in the trajectory is a manageable figure, especially within common hunting distances.
For the handgun hunter, where velocities are significantly lower — coupled with using projectiles that traditionally have a much lower BC — knowing the distances even within 150 yards becomes paramount.
For personal defense guns, the distances at which you are likely to shoot are close enough to negate the major effects of gravitational pull. That said, I like to take my carry guns out to distances where I see a definite drop in the trajectory of my group, so I know what’s going on. The same principals we discussed for rifle bullets apply to handgun bullets, except the scale shrinks a bit.
Long-Range Shooting
As a side note, while all of this mathematical wizardry probably won’t make much of a difference to the hunter whose shots are taken within 200 yards (which I feel represents a great deal of the shots taken at game annually), there is a movement in the hunting world to take shots at game at distances that seem to increase with every television season.
While I realize that shots out past 500 yards can certainly be executed by a shooter who is highly experienced and knows his or her gear inside and out, the portrayal of routine shots taken out past 700 yards, at unwounded game, is not only unethical, but will result in a multitude of wounded game.
As I demonstrated with the drop figures alone — saying nothing of the effects of wind deflection — a misjudgment in distance of as little as 25 yards can result in a wounded and/or lost animal.
I highly suggest you find your own personal limits with respect to distance, based upon your own shooting abilities, and stay true to that figure. It’s one of the instances where you’ll have to police yourself. Should you realize that the distance is too great to make a confident hit, simply say no to the shot and get closer.
Purchasing the best long-range optics, and a cartridge/rifle combination that is theoretically capable of connecting, does not make it a wise decision to take the shot. I don’t want to sound like I’m preaching, but I’m not comfortable with the way some outdoor personalities act blasé about shots past 500 yards at game; there’s an awful lot that can go wrong.
So, with an accurate drop chart available, how can you make those shots that require a certain amount of holdover? Gravity is relentless, and you need to fight that effect, even at 250 or 300 yards.
Ballistic Drop Compensated (BDC) Reticles
In this great technological age you’d be foolish not to take advantage of electronic calculators. However, a ballistic drop compensated (BDC) reticle in a riflescope is another means.
This is a reticle with more than just crosshairs, but a series of smaller horizontal lines on the lower vertical wire at a predetermined interval, providing a specific aiming point out at certain distances.
For example, my 6.5-284 Norma wears a Swarovski Z5 3.5-18x44mm riflescope, with the BRH reticle. This optic features a duplex reticle on three of the four wires (up, left and right) and a ballistic compensated reticle on the lower vertical wire.
In addition to the crosshair point, which I use for a 200-yard zero, there are five additional, smaller crosswires, and four small dots on that lower wire, as well as a point where the thin wire thickens.
In that rifle with 140-grain handloads, it works like this: my traditional crosshair is set to hit at 200 yards (and at any range shorter than that I’ll confidently hit an animal’s vitals), using the next lower crosswire it will hit at 270 yards, and the dot below that will impact at 330 yards. Should an even 300-yard shot present itself, I simply hold between the first crosswire and first dot.
Holding at the next crosswire down causes the rifle to hit at 390 yards (I use this for 400, calling it close enough) while the next dot lower is for 450 yards.
Continuing down the line, the next line is an even 500 yards, and the dot below that will strike at 550 yards. The fourth wire down strikes at 590 yards (so close to 600 it’ll scare you) and the dot below impacts at 640 yards. The lowest crosswire is designed to hit at 680 yards, but we’re already considerably past my hunting ranges.
I much prefer to stay within 400 yards, but certain hunts may require a longer shot. However, it sure is fun to play with steel plates and paper targets at those distances.
Now, I’ve found this reticle works within reason at these distances, and Swarovski has put a considerable amount of research into it.
And while this is only one of their available options, I think it makes a good choice for a hunter whose ranges concur with my own, or don’t plan to take shots much past 600 yards (where things can get tricky due to the winds, but that’s for later).
The new versatile and affordable Stoeger P3500 pump gun chambered for 3½-inch shotshells proves you don’t need a fancy gun to get the job done.
What makes the Stoeger P3500 a good choice?
The Stoeger P3500 is simple yet versatile and can handle any intended job.
This ranges from putting meat on the table to defending your home.
At $399, the Stoeger P3500 is highly affordable, but performs way above its price range.
It chambers 3 1/2-inch shells and comes with a black synthetic or Realtree camo stock.
Pulling up to the hunting lodge at the Diamond K Ranch in central Texas, the first thing I saw was guide Thomas Neuberger and his son, Reed, skinning a 5-foot rattlesnake. I looked down at the Irish Setter snake boots on my feet and fervently hoped I wouldn’t have to test them against a live specimen during my hunt for Rio Grande turkeys. Rattlesnakes and I have a long history of mutual hostility, and I was not eager to renew the feud.
The author had to make a long shot with the P3500 to bag this Rio Grande gobbler.
Forty-eight hours later, I was feeling snake-bit, but not in the traditional sense. Hunting hard, I’d had plenty of close encounters with turkeys. They just weren’t the right kind of turkeys. Twice, Reed and I were practically run over by pairs of jakes. On one occasion, a hen camped out so close to us that we could have poked her with the barrel of the new Stoeger P3500 12-gauge pump shotgun I was holding.
By late afternoon of the final day of the hunt, everyone else in the hunting party had tagged a nice turkey. Three fell to hunters using Stoeger’s new M3500 semi-auto shotgun and Burris FastFire II sights. Keith Heinlein, Stoeger product manager, stunned everyone when he took a once-in-a-lifetime bird that required an hour and a half of coaxing to come into range. Remarkably, Keith’s bird had — count ‘em — five beards, and Keith took him the old-school way, using the same basic, black P3500 pump gun that I was using, equipped with only a single red fiber-optic front sight.
For the last setup of my hunt, Thomas and I headed to the edge of a large field we hoped birds would work through to go to roost, and they did. About 20 hens flew in from the ridge behind us or filtered in far to our right, but only one visited our decoy hen. We counted five toms strutting on the far side of the field, but none could be persuaded to leave their hens and cross the big field.
With hope and time running out, my last chance rested with a bird we’d heard gobble a couple of times far down the ridge on our side of the field. We heard him drumming close behind us, at one point late in the day, but 30 more minutes ticked by until he finally emerged from cover and started working his way slowly toward our decoy.
He advanced and started to strut, but he changed his mind at the last minute and began to angle toward the birds on the far side of the field. I had to wait for the big gobbler to clear a tree to my right, and I watched as he gained distance with each step. I knew it was going to be a very long poke, but it was now or never.
Affordable Reliability
In the minds of most Americans, a 12-gauge pump shotgun will handle just about any chore, from putting meat on the table to defending the homestead. It will do both jobs admirably when deployed at an appropriate range and when loaded with appropriate ammunition. Pumps don’t have quite the allure of semi-autos or double guns, but they’ve always won the hearts and minds of Americans because they are both reliable and affordable.
The new P3500 is the big brother to Stoeger’s popular P3000 pump-action 12-gauge, but in a 3½-inch chambering.
The new Stoeger P3500 meets both of those criteria in spades. With a MSRP of $399 for the basic black synthetic-stocked gun — and a common retail price well below that — it’s a working man’s gun sold at a working man’s price, and Stoeger makes no apologies for that.
“We are targeting consumers who are looking for a value but will not sacrifice quality,” says Keith Heinlein. “These guns work, and work well, and will not break the bank. With the price point, quality and a 5-year warranty, there’s not a better-valued shotgun on the market.”
If you’re unfamiliar with the Stoeger brand, it might help to know that Stoeger Industries is a member of the Benelli USA family of companies, which also falls under the ownership umbrella of Beretta. Stoeger Industries has more than a million firearms in the market consisting mainly of shotguns in pump, semi-auto, over/under and side-by-side configurations.
The P3500 is actually manufactured by a company in Turkey named Stoeger Silah Sanayi A.S., which was formerly known as Vursan. Beretta Holding purchased the company in 2002, and the operation was modernized with CNC-controlled machinery and formal quality process controls. The resulting quality of guns manufactured there allows Stoeger to back them up with a 5-year warranty, including round-trip shipping if the gun ever needs repair.
Synthetic Simplicity
The P3500 shotgun is initially available with a synthetic black stock and forearm or a Realtree MAX-5 camo finish with 26- or 28-inch chrome-lined barrels. Barrels have a full-length, stepped vent rib and are adorned with a highly visible red fiber-optic front sight. The gun is quite similar to Stoeger’s prior P3000 pump-action model. It’s still a versatile, do-it-all shotgun, but it delivers more power by virtue of the fact that it’s chambered for 3½-inch shells.
The Stoeger’s trigger broke crisply, if a bit heavily, at a pull weight of slightly more than 8 pounds. The shotgun employs a standard crossbolt safety located at the upper rear of the trigger guard, and it can be broken down within seconds for cleaning.
Ergonomically, the gun worked fine for me and handled nicely thanks to its trim lines and a slimmed-down forend. This gun is neither elegant nor clunky. It’s just what you would want and expect in an everyday shooter that’s equally at home in a muddy boat bottom or a turkey blind. Happily, the gun has sling swivel-stud attachment points fore and aft, and it carries well on a sling. The gun weighs 7 pounds, but it feels lighter than that to me. Recoil is moderated with a rubber butt pad, but it was significant enough during pattern testing that I was content to stick with 3-inch shells.
The gun comes with one modified choke tube, but it will accept a variety of non-Crio Beretta and Benelli choke tubes. Use of steel shot is fine with the modified choke tube, but it should not be used with any tighter chokes, according to Stoeger. For our hunt, we used Stoeger’s extended extra-full turkey choke, which patterned beautifully and helped account for a half-dozen turkeys, with as many shots fired, on our hunt.
The P3500 has a black anodized aluminum receiver and steel magazine tube that comes with a plug to limit magazine capacity for hunting, when required. Dual action bars promote reliable, non-binding cycling of the action. The bolt assembly rides between the rails, and the action utilizes a Benelli-style rotating bolt head. I found cycling to be smooth, requiring little effort, but you need to make sure you push the forearm all the way forward when closing the action so that the rotary bolt fully engages. The safety is a standard crossbolt design, and the shotgun breaks down easily and quickly for cleaning and transport.
Given its real-world price, it’s hard to find anything to dislike about the P3500. My chief complaint was the somewhat heavy trigger pull, which I measured at slightly over 8 pounds with a Lyman trigger gauge. That’s a bit heavier than I prefer, but the trigger broke in sufficiently crisp fashion that I really didn’t notice it in the field.
Last-Chance Gobbler
Stoeger’s Keith Heinlein had already used the P3500 to demonstrate, in admirable fashion, that you don’t need a tricked-out, camo’d-out shotgun to kill a turkey. It was now my turn to do the same, but the bird in my sight picture was rapidly opening the distance between us with each step.
I had confidence in the P3500 and Stoeger’s extra full turkey choke. It had produced very impressive patterns in testing at 25 yards shooting Federal’s 3rd Degree 3-inch turkey load with 1 ¾ ounces of shot, which distributed pellets in a fashion that make it well-suited to both close- and long-range shots. This unique load contains 40 percent No. 7 Heavyweight (tungsten-based) shot, 40 percent No. 5 copper-plated premium lead and 20 percent No. 6 Flitestopper lead.
The second the bird stepped clear of a tree that was blocking my shot, Thomas used a diaphragm call to cutt at the tom, making him stop and raise his head. I fired instantly, and the bird folded on the spot. Of course, I never noticed the recoil. Later, when we checked the distance from where I fired to where the bird dropped at the shot, you could have knocked me over with a feather. It was exactly 70 yards — and it wasn’t a fluke shot with a lucky couple of pellets. Upon close examination, we found the gobbler’s neck and wattles to be riddled with shot.
It was a dramatic ending to my first hunt for a Rio Grande turkey, and the credit goes exclusively to the P3500 shotgun with Stoeger’s extra full turkey choke and Federal Premium’s 3rd Degree shotshell. This was my first time using both, but it’s a pretty safe bet it won’t be my last time shouldering a P3500 and heading afield. You’d be hard-pressed to find a more effective combination for turkeys at any price — or a shotgun that’s more willing to do whatever you ask of it.
Locked, Loaded, and Ready: Dive Into Shotgun Basics
Practice doesn’t have to stop when you leave the range with the aid of laser training devices.
Why are laser training devices good options for non-live-fire training?
Laser training devices allow shooters to stage drills that simulate specific situations.
They’re excellent for new shooters, teaching safety basics before welding a live firearm.
There are many brands — LaserLyte, Laser Ammo and Next Level Training, etc.
These include systems that utilize faux firearms or actual weapons systems.
Paired with regular live-fire training, laser devices can have a big impact on shooters.
It doesn’t matter if it’s your life, your pride or a championship on the line. Nothing is more important than hitting your target when it matters most. That’s why the best shooters train, and they train often. They spend countless hours on the range shooting live ammo and going through all the motions they expect to use on the range or on the street.
Setting out several targets is a great way to work on your speed in transitioning between targets, as can be seen in this setup from Laser Ammo. It’s also loads of fun.
That’s because there is no better practice than live-fire drills that simulate specific situations. Sometimes, though, live-fire training just isn’t an option. Life has a way of interrupting time at the range, and for many of us, the cost of live ammo is enough to keep us from shooting as often as we should. It’s easy to burn through $100 or more in just a few hours.
“Many ranges do not allow you to practice drawing, either, so if you don’t have access to a range that does, your next best option is to use a laser training device,” says Laser Ammo spokesman Colin Gallagher, a retired police officer and former contestant on Top Shot. “Other than the initial cost of the equipment, there are no expenses associated with using a laser training device, either. You can shoot thousands of times, and it won’t cost you anything other than maybe some batteries.”
That’s why serious shooters don’t just rely on live-fire practice: They use laser training tools at every opportunity.
“It doesn’t replace live fire. You must practice with live ammo as often as possible, but a laser trainer lets you practice things like drawing, trigger control and target acquisition virtually anywhere. You can set up several reactive targets and practice moving just like in a competition or even a personal defense situation,” adds Gallagher. “They are also great safety training tools for beginning shooters and even advanced shooters. We have a training pistol that emits a warning sound any time the finger enters the trigger guard before the gun is raised. That can help reduce negligent discharges.”
How They Work
The mechanics of laser training devices are pretty simple, at least from a technological perspective. They use a laser beam emitted from a device, either a bullet-shaped laser that actually fits into a gun’s chamber, a rod that is inserted into the barrel, or a stand-alone dummy gun that has a built-in laser device. Squeezing the trigger results in an instantaneous beam that takes the place of an actual bullet. Unlike a laser sight, the beam cuts off after a fraction of a second. That’s all that is needed to send a beam to a reactive target that responds to the light.
This LaserLyte .223 Rem. laser trainer fits inside the AR’s chamber. Firing activates the laser, and a built-in snap cap protects the firing pin.
If you shoot at a reactive target, you’ll get instant feedback in the form of a sound, a light on the target at the point of impact, or both. That is, assuming you actually hit the target. A miss won’t register.
So Many Choices
LaserLyte and Laser Ammo, for example, have a variety of reactive targets that are designed to increase your draw and shot speed thanks to a timer, as well as some that are meant mostly as a fun way to improve your skills. They include everything from electronic cans that vibrate and spin when you make an accurate shot to targets that imitate the ding of a bullet striking a steel plate. Some even use changing colors to simulate a “shoot, don’t shoot” situation. Gallagher says Laser Ammo’s products are accurate to about 130 yards.
“They can be good training devices for snipers, too,” he adds.
Even better? Training simulators use everything from shooting games to real-life situations played through a gaming console or laptop. The scene can be projected on a wall or other large canvas for more life-like simulation. It also uses laser technology to register hits, even when you are shooting at targets projected on a wall.
“That’s a really good training device for personal defense situations,” says Gallagher.
What’s Best For You?
They all help you shoot live ammo better, and virtually any laser training device will help you develop a faster, more efficient draw and target acquisition. The best one for you depends on what you hope to accomplish.
Some manufacturers of laser training devices offer non-functioning gun replicas that mirror the weight and profile of common defensive guns. This trainer, from Laser Ammo, replicates the S&W M&P series of pistols.
The simulated guns with built-in laser devices are great for rapid sighting and reflex development. You can practice multiple shots at the same or at different targets and at different distances. If nothing else, they are great fun.
The in-chamber, cartridge-shaped laser devices allow you to practice with your actual gun, eliminating weight, trigger pull and other variations between your gun and a practice model. Both LaserLyte and Laser Ammo, along with a number of other companies, sell in-chamber lasers in popular calibers, including .223 and .308. However, they work best with double-action guns so you can take as many “shots” as you like without working the slide and reloading the device. Gallagher says Laser Ammo also sells drop-in triggers that allow you to pull the trigger on single-action guns to avoid manually working the action after each shot.
Some companies, like LaserLyte and Next Level Training/SIRT, make training guns that aren’t actually working firearms, but they mimic the weight and feel of exact models. Next Level Training, for instance, offers guns that are similar to a Glock 17/22 and a Smith & Wesson M&P. Some trainers even have a working slide, a training magazine and adjustable triggers. The laser sight also has elevation and windage adjustments.
Laser Ammo also sells an infrared system that works much the same way as a laser-training device. The only difference is that you can’t see the beam emitted from the gun, but the reactive target can sense it.
“That’s a good tool because you are focused on the sights instead of the beam of light on the target,” says Gallagher.
No matter what training device you use, there’s no doubt you’ll be a better shooter when you use one regularly.
Editor’s Notes: This article originally appeared in the Fall 2017 issue of Gun Digest the Magazine.
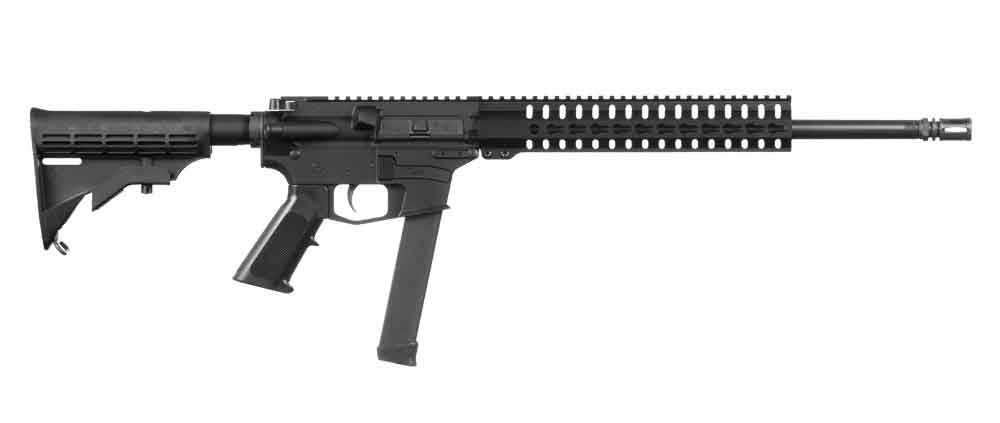
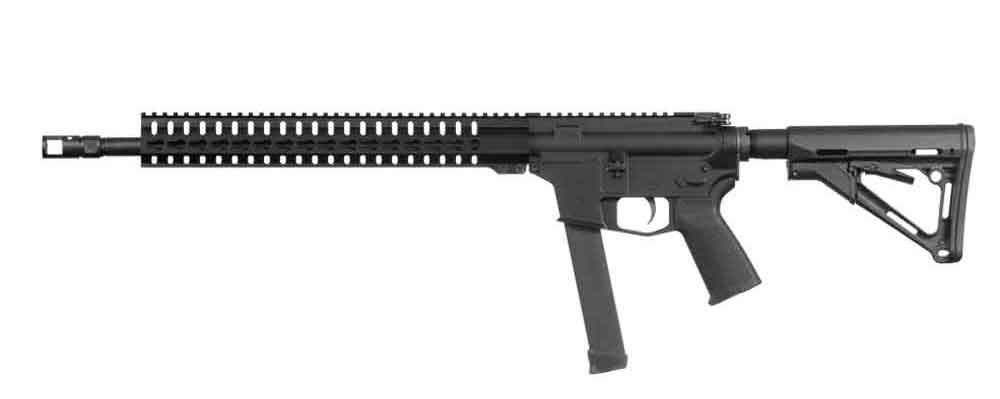
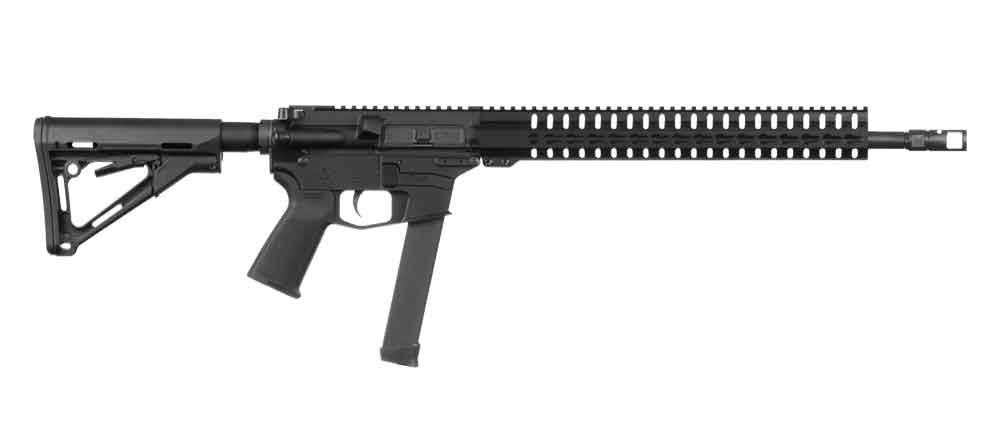
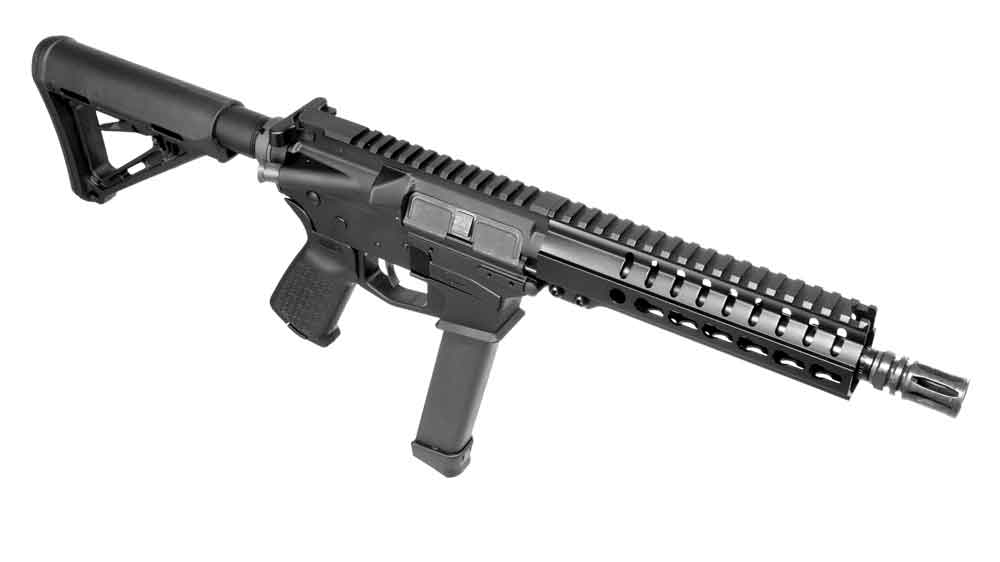
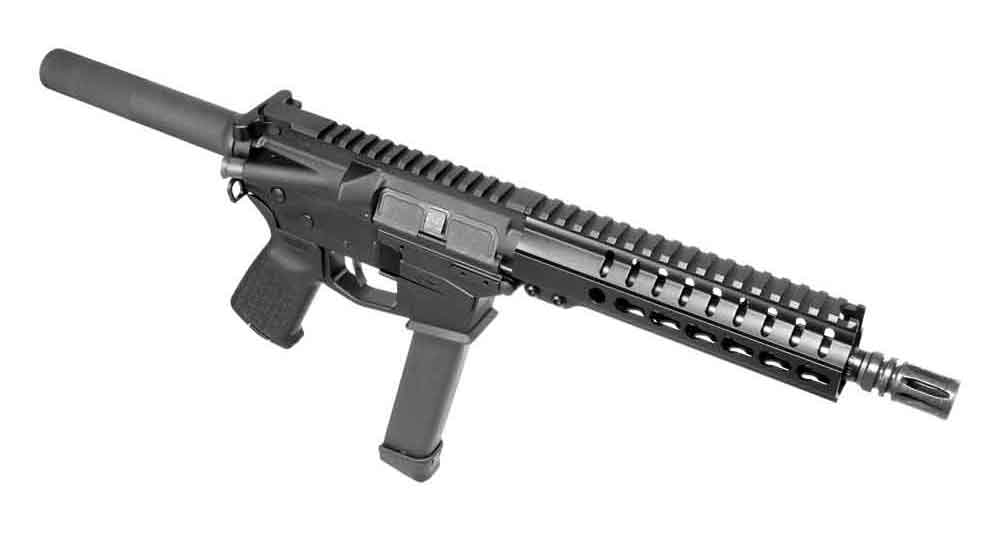
CMMG has upped its game when it comes to pistol-caliber ARs with the introduction of the MkGs Guard, a platform chambered for one of the most popular rounds of all time, featuring the company’s innovative delayed blowback operation.
What makes the new MkGs Guard exciting?
The MkGs Guard is the newest addition to the line introduced earlier this year.
This version is chambered in the ever-popular 9mm.
Like the .45 ACP iteration, this features CMMG’s Radial Delayed Blowback system.
This ensures smooth, reliable cycling, and can reduce weight by as much as 6.5 ounces.
There are two pistol and four rifle models of the new MkGs GUARD. The Missouri AR manufacturer is downright innovative in its approach to black rifles. Whether you’re talking its monstrous AR-AK hybrid MK47 Mutant or its deadly accurate Mk3 in 6.5 Creedmoor, the company most definitely isn’t a spitting out your run-of-the-mill tactical arms.This is no more apparent than in CMMG’s vast selection of pistol-caliber ARs, which come in nearly every conceivable size and configuration. And the gunmaker has slapped another potential gem in its catalog, chambering one of its newest designs in one of the most popular pistol calibers out there.Freshly released, the MkGs Guard in 9mm is decked out with one of CMMG’s newest pieces of technology — its Radial Delayed Blowback operating system. Released earlier this year in the form of the MkG-45 Guard, and originally invented to provide a nimbler operating system that reliably cycled the .45 ACP, the design is elegant in its simplicity.The Guard’s Radial Delayed Blowback system uses a bolt carrier group (BCG) similar to those on a standard, direct impingement AR. Except, the system has been tweaked so the bolt is forced to rotate after the shot to unlock, in turn slowing down the BCG. This simple design modification allows the system to cycle smoothly and reliably, even larger-caliber pistol rounds, without turning to the bulky material required to make a traditional blowback system functional.Shooters reap the benefits in the form of a lighter overall platform — as much as 6.5 ounces vs. a straight blowback pistol-caliber AR. On top that, it makes for a firearm with a lighter recoil and overall more controllability. Given the system was originally conceived for the .45 ACP, it’s a sure bet the MkGs GUARD will be a pussy cat shooting the smaller 9mm, whether for self-defense, competition or just plinking around.Getting up to speed on the 9mm MkGs Guard is a snap, as CMMG has ensured the six pistol and rifle configurations all have fully functional AR-15 controls. This includes last-round hold open, as well as the magazine release and safety both being where you’d expect.The MkGs Guard also features newly designed dual-pinned, fully machined bolt catch linkages that ensure reliable operations straight out of the box, with no adjustments required. The pistols and rifles are both compatible with Glock magazines, with each model shipping with a 33-round magazine. Additionally, the muzzle of each model has a ½-36 pattern for the addition of a suppressor or other muzzle device. And CMMG offers bolt weight kits separately for those shooting to fine-tune their Guard for use with a suppressor.Presently, CMMG’s MkGs Guards have MSRPs running from $1,299 to $1,599. But for those aiming to rock one of the smoothest shooting pistol-caliber ARs out there, the price might just be right.
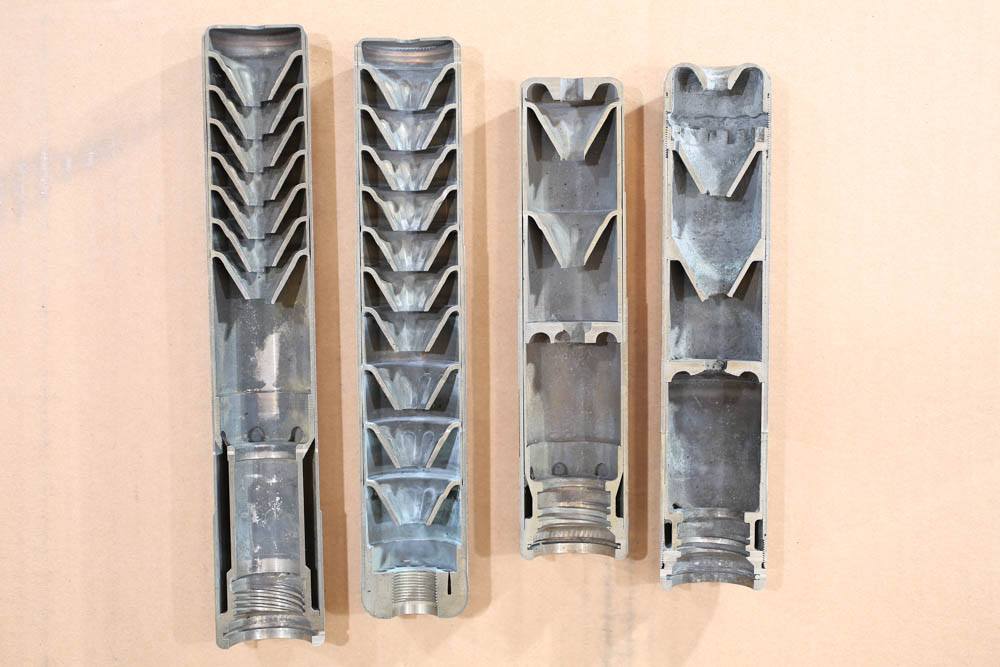
Five types of sealed: Cap-welded, Tack-welded, Fully Welded Stack, Fully Welded with no tube, monocore.
Federally legal they suppressors are not legal in some state and municipalities.
Background check is necessary.
Form 4 transfer approval application must be filled out.
FBI fingerprint cards and photo are also required.
$200 tax payment.
Form 4473 is final form, fill out upon receiving the suppressor.
Trusts are used to allow multiple people possession of a suppressor.
Simply put, a suppressor is a tube with a series of partitions inside that trap the expanding gases and slow their release into the air. This reduces the pressure wave, and thus the noise, the firearm creates.
The full technical explanation involves physics, metallurgy, heat transfer, the chaotic movement of gases under pressure, and we’ll skip that.
Some suppressors are quieter than others. This is due to design, materials, barrel length and powder used in the ammo.
Suppressor Design And Construction
Making a suppressor is both easy and difficult. It is easy, in that pretty much anything you put over the end of the muzzle will dampen noise. (Which can, in some instances and designs, be against the law without proper paperwork.) It is difficult in that what you use to dampen noise can degrade accuracy, cause difficulties aiming, and can be inconvenient, messy and just plain ugly.
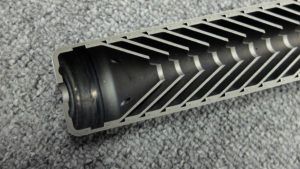
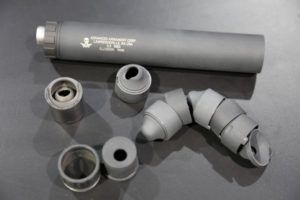
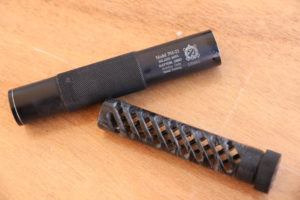
Here’s a look inside a silencer. The design and construction of a suppressor involves baffles welded inside of a tube.
Suppressor designers and manufacturers work hard to make suppressors easy, convenient, good-looking, not harmful to (actually increasing) accuracy, and all this while significantly reducing noise.
The basic designs of suppressors fall into two camps, and each is either sealed or user-serviceable. User-serviceable is the technical term for “take it apart and clean it.” The two camps are baffle stack and monocore.
Baffle Stack
The baffle stack design entails a tube, and inside the tube the manufacturer places a stack of relatively cone-shaped baffles. Back in the early days, there were two versions, the “K” baffle and the “M” baffle. Today, we have more than two, they all work, and the details matter only to those who obsess over fractions of a dB in on-the-range testing. The baffles are machined to have space between them. The spaces they create are the volume into which the gases will expand. The first of these is called the “expansion chamber.”
The baffles can have various shapes, as seen in cross-section, and they can also have holes drilled through them to create turbulence in the gas flow. Turbulence increases efficiency and makes a suppressor quieter, although some argue just how much it matters.
This bin of machined baffles is ready for the next step in the manufacturing process.
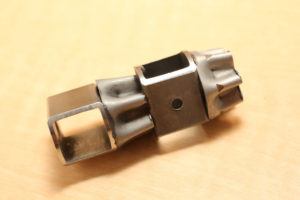
The baffles must be kept in place, so they are machined for a snug or tight fit in the tube. The tube is sealed with front and rear caps, trapping the baffle stack inside. The rear cap also contains the mount design, either direct-thread or QD.
On a rimfire or pistol-caliber suppressor, the front and rear caps are threaded so you can take the suppressor apart and clean it. If you do not, it will collect powder residue, lube and bullet material, which hardens into an impressive layer. This can build up until the suppressor is only a heavy tube with minimal clearance for the bullet, and no effective baffles left, the baffles now buried under the gunk.
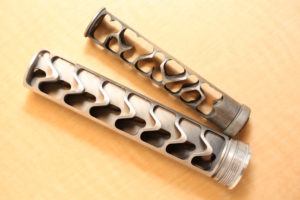
Rifle-caliber suppressors are self-cleaning, and as a result they are not often user-serviceable. They do not need to be, unless the centerfire rifle you shoot uses cast lead bullets. Then, you’d better have a cleanable suppressor on it.
Once cast or machined and then surface-treated, a baffle stack can be assembled into its tube, ready to be a suppressor.
Sealed Suppressor Welding
A sealed unit will have, at the very least, the front and end caps welded to the tube. Generally speaking, more welding creates a more durable a suppressor. There are five levels.
Cap-welded
Here, the front and rear caps are welded on and the baffles are simply pressed into the tube and trapped in place. While the baffles are tightly packed, they are not attached to the tube.
Tack-welded
On these (usually older designs), the baffles are stacked outside of the tube, and the edges welded at two or three points on their perimeters, creating a rigid assembly. The welds are then filed/ground flush, and the baffle stack is pressed into the tube, where the caps then are welded on.
Alternately, the tube can be drilled at spots along its length where the flanges of the baffles would rest, the baffles inserted, and each hole weld-filled with the baffles in place. As a result, each baffle has two or three welded attachments to the tube, through where the holes had been.
Baffles can be simple or complex. If your suppressor can be taken apart, don’t be surprised at what you see when you slide out the baffle stack.
Fully Welded Stack
Here, the rim of each baffle is welded its full circumference to the next baffle in the stack. The assembly is then ground or lathe-turned to be round again, and then pressed into the tube, where it can be welded in place or the caps welded on, or both. Also, each can be welded in turn into the tube, but this is a lot more difficult.
Fully Welded, No Tube
This is the process used by Sig. They fabricate the baffles such that they have external, cylindrical skirts. The baffles are then fully welded into a stack, and the skirts form the tube that the baffle stack would otherwise be shoved into. This is a process that requires a great deal of precise equipment, but the end result is a suppressor with greater internal volume and less weight, since it does not use both a baffle stack and an external tube.
Monocore
Here, instead of the baffle stack being composed of a series of cone-shaped parts, it starts as a solid cylinder of the baffle material. Then, through the magic of multi-axis CNC machining, the cylinder has gaps, holes, and baffles machined out of the bar stock of metal. This is then inserted into a tube. The big advantage here is that the monocore can be created in shapes that no baffle stack of cones could ever duplicate.
The monocore tends to be a bit heavier than an equal diameter and length baffle stack, but that can be offset by the choice of tube materials and thickness.
One place synthetics can work is as the monocore of a rimfire suppressor. And if the monocore finally wears out? A replacement is not a controlled part, and will cost $20-30.
The big advantages are that the extra contours of the monocore can make for a quieter suppressor, and it is easier to make a rifle-caliber suppressor that can be disassembled and cleaned. As a result you can use a monocore suppressor as a multi-caliber compromise, since it is a lot easier to take apart and clean.
There is one other design detail of the monocore that can matter, or not. It is relatively easy to not only make a monocore suppressor that can be taken apart, but also incorporate into the design an external tube that does not have threads on it. The plain tube is the part that has the manufactures name, model number and serial number on it. If, in disassembly or cleaning, you were to damage the threads (easy to do if you have neglected it, and it is carbon-welded into a single part), the threaded parts, the front cap, rear cap or monocore can easily be replaced. The tube, lacking threads, is extremely unlikely to be damaged by such heavy-handed treatment, and thus you do not have the headache of having it repaired.
These monocore designs allow the maker to place the tube threads in different, and often useful, locations. They can even make the tube a threadless sleeve.This modern design uses a monocore, and the tube is a sleeve without any threads on it.
What’s The Most Effective Suppressor Baffle Design?
Which method a manufacturer uses depends in part on when they began making suppressors, how much they are willing to invest in capital equipment, and what the caliber and use demands. A maker that has been in business for a number of years, with familiar equipment capable of making solid, dependable old-style suppressors, may be reluctant (and understandably so) to invest in a lot of new equipment that will make suppressors only a little bit better than what they make already.
As the buyer, you can decide what type you want, with the understanding that the more welding there is, the more it will cost. If you do not need a fully-welded suppressor, then don’t buy one. A hunter, for example, really doesn’t have a pressing need for a full-auto-rated suppressor. Buying one will entail higher cost and greater weight.
You will be advised by those who claim to be experts that money spent on any suppressor that isn’t full-auto-rated, or adopted by SoCom or SEALs or some other black-bag group, is money wasted. You must, simply must, buy the most rugged, extreme-use, manliest suppressor, or you are a poseur, dilettante, or not serious. Ignore them.
This is your decision, your purchase, and you will be the one using it in the future. Buy what fits your needs, your wallet, and your self-image. If that requires weight, exotic materials and a military provenance, go for it. If not, go for it anyway, and have fun.
How To Buy One
The popularity of suppressors has caused a growth in the number of outlets where you can buy them. Gun shops that were “01 dealers” only had to add an SOT to their license wall, and then they could begin selling suppressors. As a measure of their popularity, you can now find suppressors in the Brownells catalog.
Yes, it is a four-page government document. Yes, if you get any part wrong they will bounce your application back. But the dealer has done this before, many times, so work with the dealer when you fill out your form 4.
Buying is easy. Frustrating because of the wait and the paperwork, but easy.
First, do you have the money? Suppressors aren’t cheap, even an “inexpensive” .22LR suppressor can cost more than the rifle or handgun you are putting it on. And, you have to have a suppressor-ready firearm. Do you have one of those? No? Then can you afford to also buy a gun onto which you can put the suppressor?
Second, do you live in a state that allows them? In a lot of areas of the legal landscape, the federal government has been more than happy to trump state law. There was that whole 55 mph on the freeways thing, a while ago. Oh, a state could tell the federal government, “We don’t think 55 is right, we’re going to post a higher limit.” The federal response was simple, “OK, but you aren’t getting a dime of federal money for road building, maintenance, and anything else we can think of, relating to roads, while you are over 55.”
Federal law has a path to buying a suppressor, but they won’t insist on it over the objections of a given state or local jurisdiction. So, if your state doesn’t permit it, the Feds won’t help you. “Application denied, money refunded.”
So, the first two hurdles? Money and state.
Next is your own background. Have you bought a gun recently from an FFL holder? Or do you hold a CPL? If so, cool, you have already gone through the kind of background check the ATF will do on you for your suppressor application. If you passed those, you’ll pass the next. If you haven’t, then you have to do some deep thinking about your past behavior. Be honest with yourself. Ever been arrested? Ever skipped on child support payments? DUI? Have you ever had any kind of a run-in with the law? Do you have an ex who bears you no good will? Because the ATF will check, and if they find you have some sort of disqualifying problem, and you haven’t gotten the situation cleared up, then your application will be cheerfully denied.
So, have a clean record and you’re good. If you don’t have a clean record, your problems need to be resolved before you apply.
Next, find a dealer. This isn’t as hard as it used to be, as the manufacturer of the suppressor you are interested in will be more than happy to tell you the dealers in your area, and which of them might even carry their product in inventory.
With a dealer or dealers in mind, go there and see what they have, or what they can order. You have this book, you have magazine articles, hopefully you’ve done your research.
Shop, discuss, work out a price, and pay for it. Once paid for, it is yours, but you don’t get to take it home. It may not even be there in the store. This is where the patience comes in. You and your dealer will fill out the form, in this instance a Form 4, a transfer approval application.
This is different from the Brady check you went through when you bought a gun last year. There, they were simply verifying that you weren’t a prohibited person. Once that was established, the dealer could sell you whatever gun he had on hand, or order one.
The Form 4 is an application to transfer a particular item to you, at this time. That’s why the form has your name, the dealer’s name, the model and serial number, and manufacturer’s name of the suppressor on the form. The form approves the transfer of this suppressor, from this dealer, to this person, on the date approved, and not a minute before. And it is what you will have to go through each time you buy another suppressor.
Once the Form 4 is filled out, in duplicate, take it to your CLEO along with the FBI fingerprint cards. And again, they want specific cards. The ATF does not want to see your local police department’s fingerprint cards, or the state police, or anyone else’s. They want the FBI cards they specify. Get fingerprinted, get the CLEO sign-off, wash your hands, write a check for $200 and, wait, there’s one more step – get photographed. You’ll need a pair of passport-quality photos, so comb your hair, put on a smile and get your pics. Then you can send it all, in one envelope, to the address on the form.
Oh, and be a smart guy and make sure the check will clear the bank. If the check does not clear, your transfer is denied, and you won’t find out until the paperwork is returned. Don’t send cash, don’t send anything but approved funds. Now, if you want to make sure that there is no question, sending the ATF a U.S. Postal Service money order will likely work. I mean, a USPS MO is as good as cash. But they do accept personal checks, and that is easy.
Then you wait. And wait. It takes as long as it takes, and phoning to “see how things are going” simply delays the process.
Now, there was an electronic form that was used for a while, and may well be back by the time this hits print. This sped things up quite a bit, as the examiner didn’t have to wade through piles of forms, all arriving in the mail in one big bag, to do the work. However, as with so many things, some smart-alec (stronger words were used at the time) screwed it up for everyone else. What I have heard from those on the inside was this: some too-clever outside programmer figured out how to “jump the line” and get their own electronic transfer applications moved up to the head of the line.
Once this was discovered, the ATF figured, and rightly, that if the system could be “gamed” that way then they had to close it down until it could be made secure. So, we went back to the paper system. I had a bunch of electronic transfers in-process at the time, and when the ATF decided they couldn’t continue, they voided all of them (mine and everyone else’s) and told us to go back to paper.
Thanks to whoever was responsible for that.
OK, you’ve been patient, you’ve been approved, and your form has come back stamped and ready to be used. There’s still one more form you have to fill out, the 4473.
You see, as defined by law, a suppressor is a firearm, which means it requires the 4473. Your dealer is familiar with this, and will mark it as “other” when you get to the box on the form. (Hey, it isn’t a rifle or shotgun, it isn’t a pistol or revolver, what else can you call it?) You finally get to take your new toy home. Make sure you take care of it, keep it locked up and know where it is. It would be bad enough to explain to the local police and insurance company that you “don’t know where” your deer rifle is, but a suppressor? That one brings in the Feds.
Trust
No, not the feeling you get when you see your grandmother (I hope you can trust granny), but a legal trust. A legal trust can take a number of different forms, and these forms have variations from state to state. But the essence of a trust is that it is a legal entity that can possess property or items of value, and those items are not considered to be possessed by the individuals who hold the trust.
The whole idea of a trust, and why it even exists, is a matter of historical and philosophical legal arcana. But they exist, and for our situation they can be very useful tools.
You see, your Form 4 must have a signature from the “Chief Law Enforcement Officer” of your area. We’ve covered this in chapter three, Myths, but it bears repeating: you form a trust because the CLEO won’t sign. If you do form a trust, it would be prudent for you (and a good idea for the rest of us) to make sure no one who has access to your suppressors might be in a prohibited category. Prudent for you because handing a suppressor to a prohibited person is a crime, and good for us because if the trusts are abused, they will go away.
It is one thing to be at the range on a beautiful day and, after handing your daughter’s boyfriend your suppressor-equipped firearm to plink with, find out later he is considered under the law a “prohibited person.” It is something else to have had him named on the trust papers as having access to the suppressor, and all the other toys, for who knows how long. The first can be laid at the feet of inadvertence, and “I didn’t’ know at the time.” But to put someone on the trust, you’d be smart to make sure you know what you need to know.
There’s also the matter of taxes. A trust pays a tax on the transfer, just like a person does. If the trust has to be dissolved, then the transfers out of the trust will also be taxed to the new owner or owners of the suppressors. If, on the other hand you own them personally, your inheritor may not have to pay the transfer tax. As with so many things, it depends.
And, in a curious twist, it wasn’t that long ago that the ATF themselves suggested that the CLEO requirement be done away with. After all, with instant, digital background checks now the norm, and readily available to any law enforcement agency, and since the ATF was doing it themselves, what did they need the local LE to be doing it for?
That was entirely too rational a suggestion for the administration in place at the time, and it wasn’t but a couple of years after that the “suggestion” came floating down from the administration that the CLEO sign-off be added to trusts.
When someone tells you that voting for the “lesser of two evils” is still voting for evil, remind them that we probably wouldn’t be dealing with nonsense like this, were it a Republican administration. Sure, we’d be dealing with different bone-headed ideas, but they’d be less hazardous, and easier to quash.
Trust extras
Let’s assume you own a suppressor or a bunch of them and you finally run out of luck. What happens to your suppressors? Well, if you have them covered in your will, your executor can handle things, but they won’t like you for it. You see, while the inheritor of your suppressors waits on their paperwork, the items in question are in legal limbo. You own them, but you are dead. The new owner doesn’t have approval to own them. Where do they stay? In the bank safe deposit box? In the desk drawer of your attorney who is handling the will? It is entirely possible that your state law will require them to be handed over to the custody of the local police until the new paperwork is approved.
And there is also the matter of publicity. You see, a will is good, but it will not prevent you from going through probate. And when the court gets involved, and your will goes through probate, it all becomes a matter of public record. As a friend of mine pointed out, when Bob Hope died, and his property was disposed of according to his will, it all became a matter of public record. But, when Bing Crosby died, he had formed a trust (no idea if there were suppressors involved) and no one outside of the inheritors know what was involved.
A trust solves all that uncertainty. You die, and the other named trust officers still have access, and the trust still owns the items.
And if you have set up a trust to cover the disposition of your property, there is no probate, there is no public record, and no one with the search software can simply troll court records and find out what you owned and to whom you left it.
Even if don’t form a trust to transfer suppressors, get yourself a trust to cover your property disposition instead of just a will.
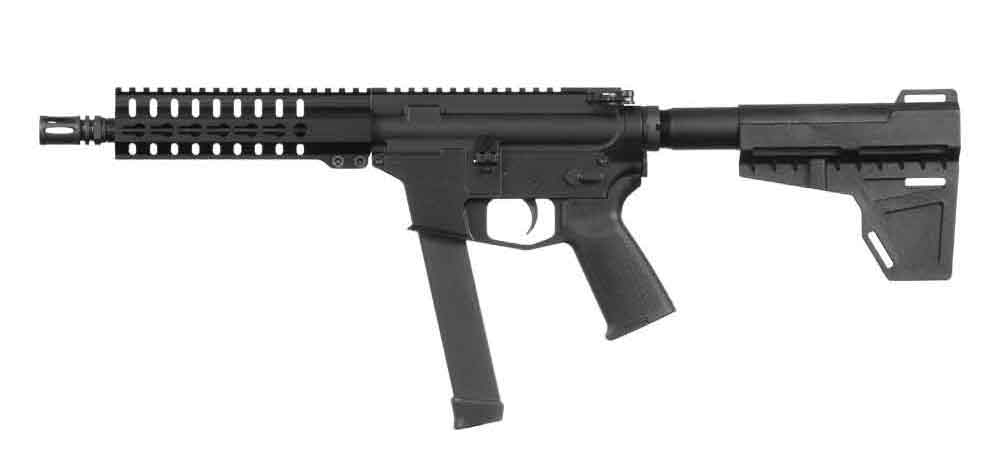
Engineered not to run afoul of Draconian gun laws, the DS-10 Typhoon in 6.5 Creedmoor gives shooters an AR-style rifle that can reach out.
How the DS-10 keeps people shooting, despite restrictive state gun laws:
The DS-10 Typhoon is now available in 6.5 Creedmoor — a perfect long-range option.
The DS-10 Typhoon Featureless comes with a fixed stock.
It also removes a number of restricted features making it legal, even in NY and CA.
The rifle does unfortunately have a higher MSRP: $1,445.
It’s been a tough go for AR fans in such far-flung locales as New York, New Jersey, Maryland, Washington D.C. and California. Over the past couple of decades, the state and city governments have passed a bevy of gun laws in a thinly veiled attempt to red-tape America’s most popular rifle out of existence. While the politicians sure have made it a royal pain in the neck to bring the wiz-bang semi-auto into compliance, they have not ceased the sale of the firearms.
Enterprising firearms manufactures were quick to answer the call to produce AR-style rifles legal for sale, purchase and ownership in the less enlightened corners of the country. Dark Storm Industries was at the vanguard of this niche, churning out compliant versions of Eugene Stoner’s brainchild. And it has continued to advance their platform to meet shooters’ needs across all 50 states.
Most recently, the New York-based manufacturer gave long-range shooters a reason to look in their direction, releasing its DS-10 Typhoon in 6.5 Creedmoor. The rifle comes in the company’s three configurations tailored to different gun laws around the country — Standard, Featureless and Fixed Magazine.
The Standard model DS-10 Typhoon, as its name suggests, is a standard AR configuration, familiar to shooters in the civilized world. And the Fixed Magazine is, essentially, the same as the standard, only with a non-removable 10-round box magazine. The Featureless, on the other hand, is a complete break from what most imagine when they think of an AR.
Outfitted with the Thordsen FRS-15 rifle stock, a fixed model that does not attach to the buffer assembly, and sans a number of common features, the rifle is compliant coast to coast. Other notable departures from a common AR configuration include a grip integral with the stock, Thordsen buffer tube cover (QD sling sockets on each side) and no muzzle device. As a side note, despite being fixed, the stock is still adjustable for length of pull through a spacer system.
In all cases, the 6.5 Creedmoor models have 18-inch barrels with a 1:10 twists. Each is outfitted with a 15-inch narrow profile handguard, with M-LOK slots at the 3, 6 and 9 o’clock positions and a full-length Picattiny rail on top. They have mid-length gas systems, with steel micro gas blocks. And all boast Spec Ops Gen 2 Charging handles.
The DS-10 Typhoons are available in black, flat dark earth and OD green Cerakote. The Fixed Magazine and Featureless models come with 10-round Magpul PMAGS, the standard a 20-round PMAG. The MSRP on the DS-10 Typhoon 6.5 Creedmoore is $1,545, while the Fixed Magazine and Featureless both run $1,445.
In this day and age, it’s a bit steep for an AR-style rifle; however, if you reside in coarser regions of America, the price could be just right to keep on shooting.
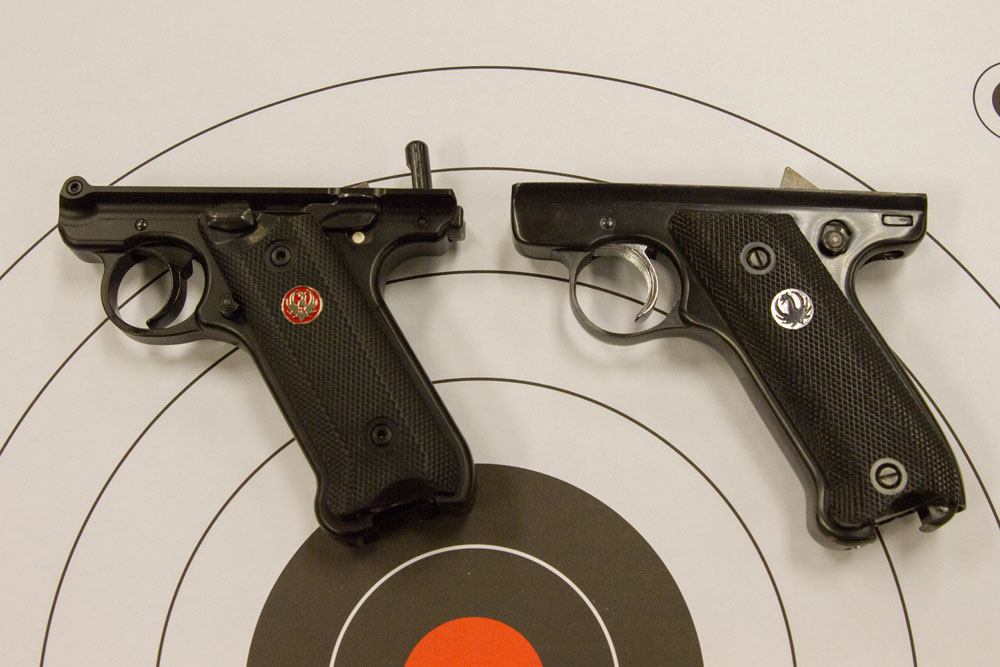
Older shooters remember when Sturm, Ruger & Company appeared, and how its reputation grew as a maker of some of the most robust, yet reasonably priced, firearms available. The first offering was a .22 Long Rifle semi-automatic handgun, which has evolved from the Standard model to the newly introduced Ruger Mark IV Target.
After WWII, Bill Ruger decided he wanted to build a .22 Long Rifle semi-automatic pistol of his own design, and about that time he met Alexander Sturm, a young man who had access to the capital needed.
Ruger told Sturm about his pistol idea, and in 1949, with Sturm’s money, created Sturm, Ruger & Company. In a small building they called the “red barn” in Southport, Connecticut, they produced 2,500 Standard model pistols during their first year in business.
The Standard had a Japanese Nambu pistol-inspired bolt that was housed inside a tubular receiver, which was permanently attached to the rear of a 4.75-inch barrel.
The finished gun looked a little bit like the P08 Luger, which at that time was highly sought after, especially as a war souvenir. That resemblance probably helped spur the popularity of the new gun, especially considering that the list price in 1949 was about $38 – less than the list price of its major competitors.
Two major features of the barrel/receiver assembly on the Mark IV (top) are the bull barrel and adjustable rear sight. The Standard model is shown for comparison.
Then in 1950, Ruger released a newer model called the Mark I Target featuring a 6-inch barrel and adjustable sights, while production of the Standard with its fixed sights continued. Manufacture of the Standard and Mark I ended in 1981 when they were replaced by the Mark II Standard and Mark II Target.
Both featured a bolt hold-open lock, loaded chamber indicator and magazine disconnect.
The Mark III was introduced in 2004 and had a magazine release button on the left side of the frame instead of the heel clip used on previous models.
Then a stainless steel hunter model appeared that had a fluted bull barrel, fiber optic front sight and adjustable rear sight. A stainless steel Competition model was then introduced with an adjustable rear sight and slab sided bull barrel.
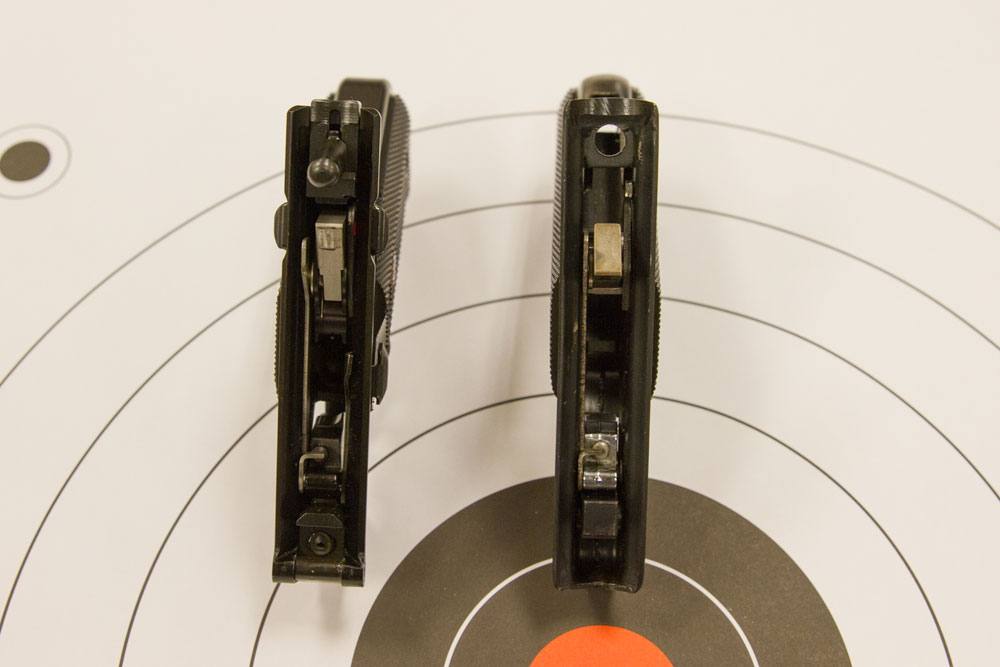
A Closer Look At The Ruger Mark IV Target
Most recently we have the introduction of the Mark IV models. Prior to the Mark IV, a latch located on the mainspring housing had to be pulled down in order to disassemble the gun. It was an awkward operation.
Then, when assembling the gun, care had to be taken to get the hammer strut properly aligned with the mainspring plunger in the mainspring housing. This takedown and assembly design caused criticism and more than a few trips to the gunsmith to find out why the gun did not work properly once the owner had tried to assemble it.
In its September 22, 2016, press release introducing the Mark IV, Ruger leads off by announcing a new, much simpler method of disassembling the gun. Instead of the latch, a takedown button located at the rear of the grip frame just below the receiver is pressed and the barrel/receiver assembly tilted down at the muzzle until the bolt stop pin is cleared.
The barrel/receiver assembly can then be lifted away from the grip frame. At that point, the bolt can be removed from the receiver. Assembly is in reverse order.
For comparison purposes, a vintage Ruger Standard model originally purchased new in 1971 for a retail price the owner recalls as being less than $50 was located. Thousands of rounds have been fired through the gun, but it still functions well, just as it did when first purchased.
A close examination shows evidence of marring on the mainspring housing where on more than one occasion the owner had difficulty lowering the takedown latch during disassembly. The bore is still bright and the rifling sharp, while the original blue is slightly worn in a few places.
Except for the controls and takedown method, the grip frame of the Standard model from 1971 is nearly the same as that of the new Mark IV.
The original owners manual still accompanies the gun and reflects the times during which the gun was made. Six pages long, with only three pages of instructions, a title page and two pages devoted to a parts diagram and parts list; there are no long warning paragraphs. Instructions are short.
Even new gun owners at the time were rightfully expected to have some basic knowledge of firearms and how to handle them, so that long, detailed descriptions and warnings were not characteristic of most owner manuals. And because most people had common sense and took responsibility for their own actions, a person being injured with a firearm did not necessarily spur a lawsuit against the manufacturer.
Looking inside the frame on the older gun reveals that it was built by forming two sheets of steel and then welding them together. In comparison, the new Mark IV frame is CNC machined from solid metal to improve strength and precision.
Other features of the Mark IV not found on the older Standard model include an ambidextrous safety located above and to the rear of the grip panels. There is also a bolt catch located on the left side of the frame above the grip panel, which is activated after the last round is fired, holding the bolt to the rear.
On the old Standard model, the bolt does not lock back after the last round is fired, and the safety doubles as the bolt catch only when the bolt is manually held to the rear and the safety selector pushed up.
The Mark IV has a magazine release located on the left side just to the rear of the junction of the trigger guard and front strap. This is in contrast to the magazine release on the original Standard model, which is a heel clip.
Additionally, the Mark IV is equipped with a magazine disconnector that prevents firing unless the magazine is in place. The older Standard model does not have this controversial feature.
The Mark IV rear sight is adjustable for windage and elevation by turning adjustment screws, while the rear sight on the old Standard model is fixed. The front sight on both guns is a fixed blade, although a Hunter model Mark IV is offered with a fiber optic. Mark IV receivers are drilled and tapped for the installation of an optic, except for the 22/45 Lite that has a factory-installed Picatinny rail in addition to iron sights.
In addition to the takedown method, the Mark IV grip frame (left) shows some subtle changes compared to the vintage Standard model.
Although it was not possible to obtain a sample Mark IV for accuracy testing because of deadlines, the accuracy potential of the gun is high due to the fact that the sights are firmly mounted to the barrel/receiver assembly rather than on a reciprocating slide. This means that the barrel and sights are permanently aligned during firing and disassembly/assembly, eliminating any movement that could reduce accuracy.
Ruger offers several models within the Mark IV series, including the blued Target with an aluminum grip frame, as well as a model with a bright finish stainless steel grip frame and barrel/receiver assembly.
Then there are the Hunter in stainless steel and the 22/45 Lite that features a grip frame with a grip angle similar to that of the 1911 pistol. Within the various models, the company offers a variety of features. More information about the Mark IV and features available can be found at www.ruger.com.
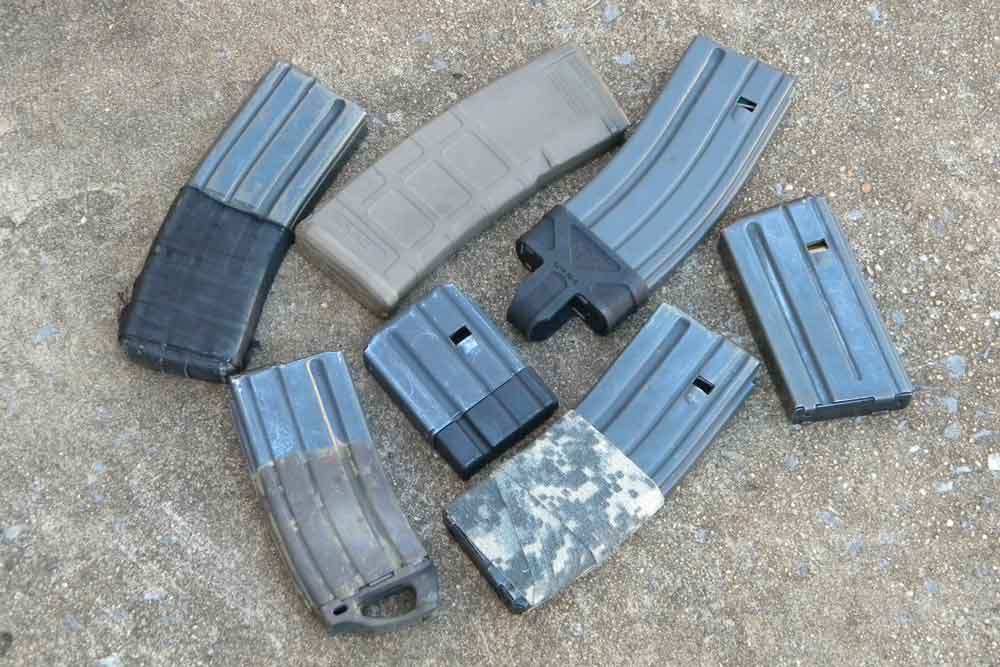
There are a few things you need to understand when it comes to AR magazines and keeping your rifle running smoothly.
The skinny on AR mags:
Magazines have four parts: body, spring, follow and floor plate.
All mags require regular inspection and maintenance.
If not maintained, carbon and grime will start to build up.
The author recommends two sets of magazines.
One set is for practice and training magazines, the other for operational or serious work.
Magazines are an essential component to the properly functioning semi-auto firearm. You have to feed the “machine,” otherwise it won’t run reliably. Although AR magazines haven’t evolved a lot, especially compared to the rest of the AR platform, there are some tips and upgrades that make them more reliable.
This is especially true of the GI aluminum M-16/AR mags, which were originally considered disposable. We now know that with proper care these mags will last a long time.
The Making Of A Magazine
The author recommends having two sets of magazines: one designated for range use and practice — where abuse is more likely to occur — and another set aside for “operational use” in hunting or defensive scenarios where reliability is critical.
The magazine has four parts — the magazine body itself, the spring, the follower and the floor plate, which holds everything together. Mags are made from aluminum, steel and polymers … and not all are the same.
During Vietnam, a long list of companies made mags on government contracts, now referred to as “GI mags.” Some were complete rejects, and you’ll still find them in bargain bins of used mags. From this generation of GI mags, I prefer the aluminum ones and Magpul’s newest generation mags. Keep in mind that a “functioning” mag should lock in easily and drop free when you press the mag release.
The most common magazines are 20- and 30-rounders. You can also find five-, 10- and 40-round mags. Surefire offers 60- and 100-round magazines. The Beta C-Mag, a dual drum, holds 100 rounds.
Even with all that, I still use 20-round mags a lot, especially for my home defense AR. The 20s are lightweight and short. A 20-round mag creates a more compact package, but it still offers plenty of rounds. If I do need more, there are 30-rounders waiting and ready. Thirty-round mags are the “standard.” I have many that have worked well for over 3 decades and tens of thousands of rounds.
Prolonging Mag Life
McKee adds Magpul’s Enhanced Self-Leveling Follower to all his 30-round GI AR mags to improve reliability. Of course, he also recommends regularly cleaning to help in that regard.
I install Magpul’s “Enhanced Self-Leveling Follower” in all my 30-round GI mags. The original followers, which are usually green, will “tilt” in the mag. The front of the follower will end up lower than the rear, locking up the spring. Magpul’s follower has longer legs and is shaped, so it fits the body of the mag tighter. If you have GI 30-rounders, buy these and install them now — it’s a simple process. You can also buy magazines with Magpul followers already installed.
The other thing you need to do — regardless of what type of mag you use — is regular inspection and cleaning. The gas system of the AR will eventually create a buildup of carbon and grime inside the mag body. It can build up enough to cause feeding problems. Kleen Bore has a brush — M 206 — made specifically for scrubbing life back into AR mags.
Disassembling the mag is easy. Take a flat-blade screwdriver and insert it between the body and floor plate in the back. Gently pry the tab on the rear of the base plate so it slides out to the rear. Pull the spring out. The follower is attached to the spring, so it will come out with the spring. Once the follower reaches the bottom of the mag, you’ll have to work it out, rotating and twisting slightly to clear the shoulders that hold the base plate in position.
Clean well, and then reassemble in the reverse order. Do not use any lubricant inside the magazine. Lubricant will just attract more carbon and grime, leading to problems. Plus, the followers are made from self-lubricating material. Assemble them dry, and they’ll work fine.
If your mag is having troubles, you can “rebuild” it. There are tools to reshape the feed lips, and you can get new springs, followers and base plates. The aluminum bodies can be sanded or blasted and refinished. You can even buy new mag bodies. During the Clinton “assault” ban from 1994 to 2004, it was cheaper to rebuild mags. As I write this, mags are plentiful and affordable, so there’s not a real reason to rebuild, unless you just want a project.
How Many Mags Do You Need?
The question of how many mags you need comes up often. First of all, you need two sets of magazines. Mark them so you can tell one set from another, with the ability to identify individual magazines.
Use one set of mags for training and practice. They get abused, dropped, stepped on and all the other tortures associated with range work. Consider the other set “operational” mags, used for serious purposes like hunting, self-defense or patrol work — situations when you cannot afford a problem. Test them to ensure they function properly, but use your training mags for all of your range work.
Clint Smith always said you need one magazine for every minute it will take help to arrive. If you live in an urban area, it will take officers several minutes to arrive. Where I live, in Nowhere Alafrickingbama, it’s going to be about 20 minutes before law enforcement arrives. Will we shoot that many rounds? Not likely, but it doesn’t hurt to be prepared for the worst-case scenario.
When it comes to loading your mags, it’s always a good idea to download them less than “full.” To seat the magazine into the receiver when the bolt is closed, the bolt carrier has to press the top round down into the magazine. If there are too many rounds in the mag, it won’t lock into the receiver. With a few too many, you’ll have to bang on it to lock it in. With 25 rounds in a 30-round mag, it should lock in easily. For 20-round mags, I load 18 rounds.
How long can you leave the mag loaded without it affecting the spring? Turns out a long time — probably the rest of your life! What fatigues a spring is the constant action of being compressed and released. With today’s technology and metallurgy, a spring can be compressed a long time before taking a “set.”
So load up your magazines, put them where you can get to them, and you’ll be ready. Buy good ones, and plenty of them. Take care of them, inspecting and cleaning them regularly. With proper care, your mags will provide reliable service, and they’ll be something you can pass on to future shooters.
Editor’s Note: This article originally appeared in the November 2017 issue of Gun Digest the Magazine.
If you carry a gun for protection, chances are good you want a knife to go with it. While your everyday carry piece serves to protect you and your loved ones from a potentially lethal threat, a knife is there to handle an assortment of other tasks, and it can also be used defensively if circumstances require.
I recently traveled to Atlanta to attend the 2017 Blade Show, an event that’s billed as the largest knife show in the World. Among the vast array of blades, I found eight new knives by some of the top knife manufacturers designed for everyday carry.
Some of these blades represent the cutting edge in blade tech. Others are the newest great buys for the money, and good American manufacturing made the rest.
Whether tucked into your jeans pocket, tossed into your car’s glove box or tucked in your briefcase, here’s what these knives have to offer.
Bear and Son Cutlery Inc. Bold Action V
Automatic knives will only become more popular thanks to the recent trend of states legalizing the carry of switchblade knives within their borders. Bear and Son’s automatic Bold Action V is the kind of knife that invites everyday use thanks to its subtle tactical features with a price that won’t break the bank. With an MSRP of $149.99 to $154.99, the Alabama-made knife is an inexpensive buy for an automatic, which requires tighter manufacturing to create a mechanism that will fire again and again.
It’s easy to find the button that fires this side-opening auto, and the lock to prevent the accidental discharge of the knife in, say, a pocket, lies millimeters away. With the dual-colored G10, the Bold Action V doesn’t have the full-on tactical look. The one-hand opening knife with tanto blade means that it’s a knife comfortable at home, on the gun range or for a nice night out on the town.
The Bold Action V comes in two sizes: a 3.125-inch blade with a 4.5-inch handle, and a 3.625-inch blade with a 5-inch handle. The smaller model is perfect as a modest tactical folder that chews through everyday tasks and then some, and the larger knife is suited for overtly tactical situations, such as when you’re wearing gloves.
Benchmade Freek
Over the years, Benchmade has developed a reputation for crafting high-quality, American-made blades, although some of the manufacturer’s pieces do cost a few Benjamins. But one of the newest knives the company brought to the Blade Show was the Freek, a utilitarian knife with an MSRP of $130 — and a notable handle.
To create the grey Grivory and black Versaflex over-molded handle, Benchmade looked to grease monkeys and their high-end hand tools, nothing that mechanics use those tools for long periods of time in environments that don’t exactly contribute to secure grips.
“We worked with hydraulic mechanics on their preferred ergonomics and materials for tools that are easy and comfortable to use, as well as more durable than the competition,” said Madelyn McGill, marketing coordinator at Benchmade.
Additionally, the 3.6-inch blade on the knife is made from S30V stainless-steel, a metal designed for high-performance knives. Finally, the knife locks up with Benchmade’s proprietary Axis lock, which is as easy for a southpaw as it is for a righty to use.
As a result, “The Freek is 100 percent EDC [everyday carry],” McGill said. “It was designed for someone who regularly uses their blade, looking for comfortable, lightweight performance and a good value.”
Columbia River Knife and Tool Septimo
The helicopter crash broke Green Beret Jeremy Valdez’s shoulder and injured his head. It was 2009, Western Afghanistan. Crew and soldiers were still in the burning wreckage when Valdez climbed back in to save as many as he could, according to his bio on the Green Beret Foundation website.
Ten people died in the crash. Although Valdez rescued five lives, the small folder the Green Beret carried didn’t meet the demands of the situation. It failed, according to CRKT. Afterward, Valdez designed the Septimo to create a better soldier’s backup blade, and it’s named Septimo as a tribute to the Seventh Special Forces Group.
The lone serration at the base of the blade is designed to rip through seatbelt webbing. The flipper opening mechanism on the knife allows the 3.622-inch blade to come into quick play and gives a hefty finger guard while in use. An aluminum handle, with an inlay to provide grip combined with a black oxide finish, gives the Septimo a get-it-done attitude. And, the tanto-style blade made from 8Cr14MoV stainless-steel brings a tactical sensibility.
Hogue Inc. EX-A05
Hogue is already a well-known name in the gun world thanks to its accessories such as pistol grips and stocks. When it rode into the Blade Show, it wasn’t hawking its lineup of great boom-stick products, though. Instead, the company was introducing the world to some of its latest and greatest knives, including the automatic Hogue EX-A05.
The EX-A05 has the feel of some tight designing and even tighter manufacturing behind it. It’s a blade designed by custom knifemaker Alan Elishewitz, and the spear-point blade features the lines of a futuristic shark while the crisp curves of the handle are constructed from 6061-T6 aluminum. Press the large button to the side of the pivot pin and then the blade — either 3.5 or 4 inches, depending on the type of EX-A05 — snaps to attention. Closing the knife is equally as intuitive: Unlock the knife by pressing the push-button lock and fold the blade under spring pressure back into the handle.
Hogue grinds its blades from CPM154 stainless-steel, which is part of the reason why the MSRP on this American-made blade ranges from $229.95 to $279.95. Price all depends on whether consumers want a spear-point or Wharncliffe blade, an insert in the handle or a different color of aluminum.
Kershaw Knives Dividend
For people who only want to pay a few dozen dollars when purchasing their knives and still buy products made in the good ol’ United States, knives that fit their criteria are few and far between. It’s no secret that China and Taiwan have most of that market all locked up.
This year, however, Kershaw Knives won 2017 “Best Buy of the Year” award at Blade Show for its American-made Dividend.
“In 2016, we challenged our Kershaw designers and engineers to come up with a knife that we could produce in our Tualatin, Oregon, manufacturing facility — and that could also be built at an affordable price,” said Thomas Welk, director of sales and marketing for Kershaw and ZT Knives.
The result is an aluminum-handled knife with a 420HC blade with a stonewashed finish. Kershaw designed the new Dividend to be light and easy to carry with its 2.8-ounce weight. MSRP for the Dividend is about $70, but it will have “a street price of about $39.99,” Welk said. To open the knife, simply press the flipper opening mechanism. Once the arc begins to spin, Kershaw’s assisted opening takes over and the 3-inch blade snaps straight.
LionSteel SR-11
The SR-11 is a Ferrari of a knife. The blade created by Italian manufacturer LionSteel earned the 2017 “Overall Knife of the Year” award at the Blade Show.
The SR-11 is an update to a design that LionSteel took to the 2010 Blade Show. That design won the best overall award then because LionSteel machined the handle from a single piece of metal — one of the first production knives to do so. The SR-11’s lines flow more aggressively than the SR-1, though, and it has a different design machined into the surface of the handle. It also opens with a flipper mechanism.
“Beyond the expensive materials used, the time, precision mechanics and technology needed to work on the solid pieces, what makes a knife high-quality is the attention for the details during every step in the manufacturing process,” said Andrea Mazzoli, who works with the Consorzio Coltellinai Maniago Srl (Maniago Knife Makers Association), which helps represent LionSteel.
The 3.7-inch blade of Sleipner tool steel flies open on a set of IKBS ball bearings, and a tungsten carbide glass breaker sits in the pommel. To make it your constant companion, buying a titanium-handled SR-11 will cost you 330 Euros … or about $370.
Ontario Knife Company Dozier Arrow
My first impression holding the Ontario Knife Company’s Dozier Arrow was the lightness of the knife. It’s got a slender blade and G10 handles that are not weighed down with metal liners. The result is one of those knives that melt away in your pocket only to reappear when you need something cut.
With its symmetry like a dagger, the Dozier Arrow stands out in a world proliferated with asymmetric knives. Yet this knife designed by famed knifemaker Bob Dozier isn’t double edged — which keeps you on the right side of the law in many locales.
Buying this knife from Dozier’s shop costs more than four times Ontario Knife’s MSRP of $79 for the design. To make it, Ontario Knife grinds the 3.63-inch blade from D2 tool steel, the same steel that Dozier uses because it’s proven to hold an edge. The Taiwan-built knife opens with a thumb stud on the blade, but the stud sits nestled in the handle — almost flush with it — until a push with your thumb guides the blade along its arc.
Spyderco Inc. Police 4
Sometimes, a small knife just won’t do. Most people carry something with a 3- to 3.5-inch blade, and they do so for good reason: Lots of states and cities restrict blade length. But in places where the law allows larger blades, you might prefer to carry something bigger. After all, the Bowie knife was an everyday carry knife in its time. And as the character Crocodile Dundee said in the 1986 movie, “That’s not a knife … this is a knife.”
The first model of the Spyderco Police, issued in the 1980s, was one of the first knives to feature a pocket clip and a hole in the blade so that users could open it one handed. As the name implies, Spyderco designed it for those who walk the thin blue line.
In the updated design, the blade comes in K390 steel. Gone is the stainless-steel handle; instead, the Police 4 comes in a black G10. And although the Police 4 is slightly larger than its predecessor, it loses more than an ounce and a half of weight, coming in at 4.3 ounces. Open, the Police 4 features a 4.4-inch blade and a knife that stretches 9.95 inches overall, which is enough to make Crocodile Dundee proud.
Editor’s Note: This article originally appeared in the Concealed Carry 2017 issue of Gun Digest the Magazine.
The .380 ACP is little in a lot of ways. But is it big enough where it counts?
Does the .380 ACP stack up?
There are plenty of fans and detractors of the .380 ACP as a defensive caliber.
Its capabilities lie somewhere in the middle of these two opinions.
Much of getting the most out of the .380 depends on finding the right pistol.
Optimal barrel length, weight, capacity, price and fit and feel should be considered.
Ease of carry make the .380 pistol appeal to many who carry concealed.
Roughly 16 million Americans have obtained permits to carry concealed firearms, and each year more criminals end up on the wrong side of a law-abiding citizen with a personal defense weapon. With the rising tide of CCW permit holders has come a wave of new products to suit their needs, everything from holsters to cleaning kits to sights, to lasers and ammunition. And, of course, there is a whole new crop of defensive auto-loading pistols, too.
One caliber that has gotten a lot of attention in recent years is the .380 ACP. Designed by John Moses Browning and first chambered in the 1908 Colt semi-automatic pocket pistol, the .380 has been cussed and discussed more than just about any other defensive caliber on the market. Fans of the caliber believe that it’s the ultimate concealed carry caliber because it’s small enough to be chambered in ultra-compact pistols and generates moderate recoil while offering plenty of energy to drop an attacker at close range. There’s another camp, though, that believes the .380 is underpowered and overrated.
So, where does the truth lie?
Probably somewhere in the middle, and that’s due to a number of factors. First, not all .380 pistol options are created equal. Some have better triggers than others. Some are striker-fired, while others are double-actions … and barrel lengths vary. Likewise, not all ammo is created equal. The shooting public is learning that bullet performance (or lack thereof) is critical in a personal defense situation. Lastly, many shooters simply decide on whether a cartridge is effective or not based on personal tastes, and they don’t have any real evidence to back their claims.
The Right .380 For You
With the right ammunition, a .380 can produce effective results based on objective test data. Is it as versatile as a double-stack 9mm? No, but it’s also easier to carry, and that’s the limiting factor for many shooters.
So, how do you choose the right .380 for you and your needs?
Who says compact .380s aren’t accurate? This is a 25-yard group fired through Browning’s 1911-380 using Federal HST ammo. This level of accuracy isn’t absolutely necessary for personal defense, but it definitely offers peace of mind.
There are a number of different .380 semi-autos available today, including Kahr’s CT380, Ruger’s LCP, Remington’s RM380, Glock’s 42, Smith & Wesson’s Bodyguard 380, SCCY’s CPX-3, Colt’s Mustang, Kimber’s Micro, SIG’s P238, Browning’s 1911-380, Walther’s PK380 and several others. The rise in CCW permits has created a great demand for small .380s, and gun manufacturers roll out new .380 models each year.
Barrel Length
Choosing the one that works for you is largely a matter of personal taste, but there are some important differences among the guns listed above. Barrel length was already mentioned; the LCP, RM380 and Bodyguard all have barrels that are relatively short and make them easy to conceal. At 4.25 and 3.66 inches respectively, the barrels of the Browning (full-size version) and Walther guns offer a longer sight radius. I’ve never found that an extra half-inch of barrel length negatively affects concealability (grip design is more important when choosing a gun that won’t print), but it does help with accuracy.
The Angle On Actions
Gun design and action operation are also important considerations. The guns listed above are double-action, double-action-only (DAO), single-action and striker-fired pistols. And while all of these will work, you’ll need to examine the pros and cons of each when selecting the gun for you.
Striker-fired guns, for instance, offer a consistent trigger pull. Double-actions, though, offer more assurance against hard primers; if a round fails to fire because of a hard primer, you can simply pull the trigger once more, and the hammer will strike again. That’s not an option with striker-fired guns, but, thankfully, hard primers are quite rare. Single-action guns require the shooter to operate the safety before firing, but with some practice that becomes intuitive, especially if you only carry one firearm.
Packing Extra Pounds
No .380 semi-auto is heavy by pistol standards, but there are some real lightweights in this group. Ruger’s diminutive LCP weighs in at a scant 9.6 ounces without an empty mag, and the Remington, Smith & Wesson and Kahr all weigh around 12 ounces. The “heaviest” guns mentioned are the Walther PK380 and Browning 1911-380 (full size), both of which tip the scales at just 18 ounces.
Kimber’s Micro CDP is a lightweight single-action .380 that’s very light and is tough enough to withstand the rigors of daily carry. It isn’t the cheapest gun on the list, but it’s built to Kimber’s high standards.
In short, you can rest assured that none of the guns listed here will be too heavy for daily carry. But a little extra heft isn’t always a bad thing; some people, especially new shooters, are recoil sensitive and don’t like the muzzle flip inherent with short-barreled lightweight guns. The .380 doesn’t produce the kick of larger calibers, but in general terms, the lighter the gun, the less effective it is at handling recoil. The guns on the list measure from 5.1 inches to 7.5 inches long and vary from just under to just over an inch wide. Concealment with any of these firearms is only an issue under the lightest, tightest clothing.
Of the many .380 fans I’ve met, only one said they carry a spare magazine, so those two extra shots suddenly become even more significant. One great feature of most .380s is easy slide operation, something not always true of larger-caliber firearms. In fact, I know of at least one individual who has suffered nerve damage, resulting in limited hand strength, and the only semi-auto he can comfortably manipulate is a .380.
The Fit, Feel And Finances
It’s no secret many new CCW permit holders select their new carry gun based on two factors: how the gun feels and the price. You can discuss nuanced features separating one pistol from another, but ultimately a gun that sits well in the buyer’s hand is the one they’ll choose — so long as it is in their budget.
In terms of cost, the guns listed here have MSRPs that range from $229 to $800. Street prices are likely a bit lower, so odds are there’s a pistol in your price range.
The great advantage of carrying a .380 is that these guns are so light and so compact that you can hide them under virtually any clothing. Many .380s weigh 12 ounces or less and are under an inch wide, meaning you can conceal them under the lightest warm-weather shirt and pants.
Deciding which of these is comfortable is largely personal, but because most of the guns listed include a magazine with a finger extension (or offer these mags as an optional accessory), then only shooters with the largest hands will find they don’t have enough grip space. Shooters with really long hands and fingers might find that it’s difficult to keep from “wrapping” the trigger, so it’s best to spend time at the local gun shop handling each of these guns. Better yet, head to an event like the NRA Annual Meetings where you can examine every gun and get expert advice without the pressure to buy.
Is the .380 an effective self-defense cartridge? Evidence says it can be if the distance is close and you choose the right bullet. Compact, lightweight .380s have the advantage of portability and convenience … and any gun that you have with you in a deadly encounter is far better than one that you’ve left at home.
A Laser sight is a powerful aiming tool in low-light defensive scenarios for those trained in their use.
What a laser sight brings to the table:
Under perfect conditions, conventional pistol sights are the fastest option.
However, in low light, lasers shine, making them great for carry or home defense guns.
Lasers shouldn’t be considered for just close-quarters encounters, though.
Paired with a scope, a laser sight can paint a target more than 200 yards out.
Several years ago at SHOT Show, at an indoor range on Media Day, I shot an S&W Bodyguard equipped with a laser sight. Out of curiosity, I held the gun at waist level and fired five shots at 10 yards. I put the laser sight on the X in the center of the target and all five rounds went into a ragged hole. I was impressed and decided then and there that any defensive gun I carried would be laser sight equipped. In our house, there are four personal defense/carry guns. All have lasers.
When The Lights Are Down
Viridian offers green laser sighting options for most pistol systems, along with holsters that activate the laser/light when the gun is drawn.
Under perfect conditions, I can shoot faster with conventional sights. The problem is, most life or death defensive situations don’t happen under perfect conditions. In fact, most personal defense situations occur under poor light conditions, just the time when a laser shines, literally. Under low-light conditions, when conventional sights, or even Tritium sights, are difficult to see, a laser is highly visible and allows faster shooting. In home defense situations that might occur in the middle of the night, your eyes require time to adjust. A laser-equipped firearm aids in visibility and allows you to shoot more accurately and much quicker.
You can now get a laser sight for almost any defensive handgun you can imagine, and while a good laser sight isn’t cheap, it has the potential to be an invaluable aid when you most need one. I prefer the models that activate when the gun is gripped, and for this to work for me, the button must be under my middle finger just under the trigger guard.
Passive Activation
Laser systems for firearms are activated either manually — with a switch or button mounted on the unit — or passively, with switches activated when the gun is gripped or removed from the holster. For defensive use, passive activation is a good idea because concealed carry citizens aren’t accustomed to deadly force events … and the simpler the defense system, the better. If you choose a manually activated laser system, make sure you practice finding and activating it to the point it becomes a conditioned response.
Laser Carry
The Crimson Trace Laserguard Pro is a passively activated system that comes complete with a modular holster.
When possible, I prefer grip-mount lasers because they allow use with standard holsters. Some of the front-mount units will work in some holsters, but grip-mounted units work with almost any holster designed for that gun. Grip-mount lasers add little or no weight, they’re virtually maintenance-free, and they’re easy for even a novice to install. Normally, one or two screws have to be removed and replaced, just as one would when changing grip panels.
For front-rail-mount lasers, Crimson Trace has resolved the holster situation with the excellent Laserguard Pro system that’s currently available for M&P Shield, Glock 42 and 43, and XD-S semi-autos. The system combines the manufacturer’s laser/light unit, passively activated with the middle finger on the grip, with a Bladetech holster that’s convertible for inside or outside the waistband, and for right- or left-hand use.
This rail-mounted system not only offers a laser, but also a powerful 150-lumen white light and can be programmed for combinations of laser, light, both and flashing operations. It’s available in both green and red laser variants. The standard Crimson Trace Laserguard is less expensive and doesn’t have the light, but it’s also available in green and red.
On a purely defensive carbine, the Crimson Trace LiNQ system provides both light and laser as a wireless passive activation system.
Viridian has solved the holster and activation problem by creating a holster system that activates the laser sight when the gun is drawn. The Reactor system is offered for most defensive pistols, and different holster styles are available. The instant-on holster is included with the unit, and the Reactor system is available in both green and red lasers.
The Lasermax solution to the holster problem is to install the laser sight in the guide rod of the pistol. This system replaces the existing guide rod with one with a tiny laser inside the guide rod that’s activated by a switch within the replacement takedown lever. Installation is fairly simple, and it involves only a bit more difficulty than field stripping. The activation switch is ambidextrous, and the one I tested was certainly aligned well enough for defensive use.
Choose Your Color
While red lasers work wonderfully in low-light conditions, green lasers have the advantage of working as well in normal light conditions and might be the perfect solution to shooters with handicaps that prevent getting the sights into alignment with the eyes. Green lasers cost more and have shorter battery life, but the utility of daylight use might make them worth the difference.
Not Just For Short Range
Under low-light conditions, lasers are completely effective at ranges past 200 yards. I learned this several years ago at the Midnight Three Gun Invitational shoot in Bend, Oregon. At longer ranges, with a laser in conjunction with a variable power scope, it was easy to see and hit targets that would have been difficult to define otherwise. Unless there’s dust, fog or smoke, the laser beam is invisible and it paints the target, allowing a shot even when you’re not looking through the scope.
Simple Setup
The Lasermax system solves the holster problem by putting the laser inside the pistol’s recoil spring guide rod. The manual activation switch is in the takedown lever.
Once a laser sight is installed, it must be calibrated, and this is accomplished with the hollow head adjustment screws and the provided wrench. Adjustment requires no actual shooting if the sights are properly zeroed because you simply move the laser dot to show just under the front sight when the sights are properly aligned. Adjustments require little movement, and it might take a few tries to get it right, but once you’ve done it once or twice, it’s a 2-minute job.
When aligning a laser, it’s best to align it for a longer distance than normal personal defense distances of less than 7 yards. Like any sighting system, the sight is on a different axis than the bore of the gun, and with lasers, there’s more offset than there is with the sights on top of the barrel.
At short distances with the laser aligned at 25 yards, the offset is of little consequence. An inch or two normally isn’t an issue in a defensive situation. If the laser is aligned at 3 or 5 yards, the offset is exaggerated and can mean a meaningful change of zero at longer range. With the laser aligned at 25 yards, point of impact will be within 2 inches for the first 40 yards or so, providing more accuracy than most people are capable of producing.
This Crimson Trace CMR 206 laser, mounted on the top rail of this Colt CRP 18, offers a closer bore to laser alignment than traditional bottom rail mounting and allows for cowitness with the scope.
I align my lasers to be just below the level of the front sight when the sights are properly aligned. This allows the shooter to train with the normal sight picture and have the laser available for instant use should the light be too low for effective sight alignment. As an instructor, I’ve learned some shooters begin to rely on the laser instead of the sights, and I believe everyone should have the capability to shoot well with the iron sights in case the ambient light is too bright for easy laser acquisition.
Narrow Beam, Broad Applications
One of the great things about a laser-equipped defense gun is the ability to utilize the gun in almost any position. At a nighttime, laser-only competition I realized the value of this. Laser-equipped rifles, shotguns and handguns don’t have to be held in a position to see the sights. This can be a huge issue in a defensive situation under low-light conditions. Rather than extending the gun at eye level, you can keep the gun closer and lower, allowing totally unobscured vision of the threat in front of you and keeping the gun close to you when the threat’s in close proximity.
I believe every citizen should be capable of defending themselves, and I believe we all have a moral obligation to those who care about us to do so. I carry every day and in every location I can. I carry a firearm that’s capable of doing the job, and I want every advantage available to me. I know bad things don’t always happen under good conditions … and that’s why my daily carry gun will always have a laser.
Editor’s Notes: This article originally appeared in the August 2017 issue of Gun Digest the Magazine.
As a popularity leader in both the law enforcement and civilian circles, the Model 1903 dominated the early 20th century.
What makes the Colt Model 1903 special and collectible?
The Colt Model 1903 and later 1908 were quite popular in the early 20th century.
More than 572,000 Model 1903 Pocket Hammerless pistols were produced for civilians.
An additional 134,500 Model 1908s were produced for the civilian market.
The pistols were popular among police, civilians and criminal elements.
There are four different variants for both the Model 1903 and 1908.
Pistols marked “U.S. Property” are especially popular and valuable with collectors.
In the waning years of the 19th century, Colt was the first American gun manufacturer to take the semi-auto pistol seriously. The revolver was king — both single- and double-action variants — and civilian, law enforcement and military shooters of the day had not yet accepted the concept of the new “automatics.” Colt’s management believed that when the designs of semi-autos were perfected and could be counted on to function reliably, the world of handgunning would be changed forever.
Image courtesy Steve Gash.
The legendary gunsmith and inventor John M. Browning had designed several single-shot and repeating rifles in the 1880s and 1890s, some for his own company and some for Winchester, including several of that company’s most famous lever actions. Browning was also interested in the idea of self-loading firearms and, as early as 1889, was working on several designs, both full-auto and semi-auto models. In fact, the first firearm he created for Colt was the Model 1895 Automatic Machine Gun, a full-auto that was known as the “Potato Digger” in the Spanish-American War.
Browning shifted his focus to handguns, and the next design he did for Colt was a semi-auto pistol, the Model 1900, named for the year that Colt put the gun on the market. It was chambered for the .38 Auto, a cartridge developed by Browning. It had a 6-inch barrel, wasn’t very well balanced and not a success on the market. Only about 3,500 were manufactured, including a few hundred for the U.S. Army and Navy. The Model 1900 was replaced by the Model 1902, which had a few improvements, including a rounded butt and a round hammer spur. Next came the Model 1903 Pocket Hammer Pistol. It was essentially identical to the 1902 except for its 4 ½-inch barrel, which led to the “pocket pistol” concept.
Image courtesy Steve Gash.
Going Hammerless … Almost The next Browning-designed model was the Model 1903 Hammerless Pocket Pistol, which became one of Colt’s most successful handguns of the 20th century. The “hammerless” reference was not accurate of course, but rather it was a marketing term to call attention to the pistol’s streamlined profile. The hammer was enclosed by the rear of the slide. Browning also designed a new cartridge for this model, the .32 Automatic Colt Pistol (ACP) round, which became one of the most popular handgun calibers in the world.
The Model 1903 Hammerless was on the market for more than 40 years, from the year of its introduction until the end of World War II. More than 572,000 were made for the civilian market and another 200,000 or so for military contracts, including several thousand for England, Belgium and the Philippines. An additional 134,500 Model 1908s in .380 ACP were manufactured, plus several thousand for military contracts at home and abroad.
John Browning gave the 1903 and 1908 design a smooth, graceful silhouette that epitomized what was called a “pocket pistol” at the time — today we’d call it a concealed carry gun. It’s a handsome pistol, and I know several writers who have referred to it as one of the best-looking handguns ever. Thanks to the film industry, the 1903 and 1908 Colt is one of our most recognizable pistols. In almost any black-and-white movie from the ‘30s and ‘40s that has a crime/drama theme, sooner or later one of the good guys or the bad guys pulls out one of these pistols.
Colt 1903 and 1908 pistols marked “U.S. Property” are popular with collectors. Expect to pay a premium for one of these pieces of history. Image courtesy Rock Island Auction Co.
The Pocket Hammerless was also known as the Model M, the official factory designation. It’s a straight blowback single-action design with a fixed barrel. When the gun is fired, the slide moves back, the empty case is ejected and the spring beneath the barrel returns the slide forward and the next cartridge is stripped off the top of the eight-round magazine, seven for the 1908 .380 ACP. There’s a thumb safety on the left side of the frame and a grip safety much like the one found on the Model 1911 series of pistols. The overall weight is a handy 24 ounces, and dimensions are 6.75 inches long, 4.5 inches high and 1.16 inches wide.
In both .32 ACP and .380 ACP versions, these pistols became very popular in police and civilian circles, including the criminal element. Al Capone was known to have carried a Model 1903 and John Dillinger was said to have had a Model 1908 on him when he was gunned down in July of 1934 as he came out of a movie theater in Chicago. It was reported that Bonnie Parker and Clyde Barrow had two Colt Pocket Models in their car when they met their demise a couple of months earlier in Louisiana.
After more than 70 years, the 1903 is back. Colt licensed this series to U.S. Armament Corporation. Image courtesy U.S. Armament Corp.
Variations Of Success Over its 40-plus-year run, there have been four variants of the 1903 and 1908 pistols with features mostly relating to barrel length and the presence — or lack of — a barrel bushing in the design.
Type I models, made from 1903-1910, have a 4-inch barrel and a barrel bushing. Type II models (1908-1910) have a 3.75-inch barrel with bushing, Type III models (1910-1926) have no barrel bushing and retain the 3.75-inch barrel length, and Type IV models (1926-1945) have the addition of a magazine disconnect safety, meaning the gun will not fire unless the magazine is in place.
For those who have always wanted a brand new Colt Pocket Hammerless, there’s good news: Colt has licensed U.S. Armament Corporation to produce a limited run of Model 1903 General Officer’s Pistols. The project will be limited to 3,500 guns. It’s a well-crafted and faithful replica of a WWII-era Parkerized model. Grips are checkered walnut and wear gold Colt escutcheons instead of the original silver ones. The suggested retail price is $1,395. For more information contact USArmamentCorp.com.
This “Collector’s Corner” column is an excerpt from the October 2017 issue of Gun Digest the Magazine.
You will not achieve the best accuracy with a second- or third-rate handgun. Thankfully, there are a number of affordable handguns that still exhibit excellent accuracy.
There are plenty of affordable handguns that are also quite accurate:
Handgunners have lots of options when it comes to sidearms.
All are not equal, but many will shoot 2 inches at 25 yards for under $1,000.
Many accurate and affordable 1911s are being made by popular manufacturers.
In terms of hard-hitting, accurate revolvers, don’t overlook some of Ruger’s offerings.
The Browning Hi Power 9mm was the first “wonder nine” and is a very reliable handgun.
The Most Accurate Handguns
When you consider accuracy you must determine first the use to which the handgun will be put.
A few years ago, I read an article describing how a shooter had a custom-grade Browning Hi Power put together with Novak sights and a Bar-Sto barrel — all great additions. Then the writer, obviously given the wrong assignment to cover, fired the piece at 7 yards and voiced the opinion that a defensive handgun would never be used past that distance!
There are competing demands on the handgun, but the worst case scenario is the one that I consider. I may limit my sure kill range when deer hunting to 35 yards with the .45 ACP, but would 50 yards be too much?
The Ruger Blackhawk .44 Magnum will stretch that range to all of 100 yards if I do my part. On the other hand, if you are going to shoot at Camp Perry, the emphasis will be on accuracy and the piece must be more accurate than most any off-the-shelf handgun.
The Ruger SP101 .357 Magnum, top, is a handy, lightweight defensive handgun, while the GP100, lower, is a dandy all-around packing and hunting gun.
There must also be a balance of power and accuracy. The defensive handgun that isn’t going to be called upon past 7 yards may be the pistol on hand when you have the opportunity to stop an active shooter. It should be accurate enough for the chore and it should fire a powerful cartridge.
A target gun need only cut a hole in paper, but it may have to do so at long range. In a defensive handgun, reliability is a million times more important than anything else. In a competition gun, reliability is less important. The occasional malfunction with a .22 is par for the course.
Modern, affordable handguns have stronger, better steel than ever before and tighter tolerances. Modern Smith and Wesson revolvers have tighter throats than ever, resulting in a reduction of the accuracy problems that once dogged the .45 Auto Rim.
Modern Smith and Wesson revolvers in all calibers are more accurate than any previous revolver from this company. Ergonomics and sights are much better than ever before in all quality handguns. Handguns with tighter tolerances simply last longer.
There isn’t much slip or banging of misfit parts when the pistol fires, resulting in less wear. Accuracy and reliability are better, too.
The author’s go-to 1911 .45 is the Springfield Range Officer Operator. While an affordable handgun, it is also incredibly capable.
Today, we have off-the-shelf 1911 handguns that will deliver accuracy of 2 inches at 25 yards with good loads.
Colt, SIG and Springfield 1911s with adjustable sights are available for the serious handgunner. While some experimentation with ammunition is necessary, these handguns are often surprisingly accurate. A modern magnum revolver may be even more accurate.
My personal Ruger GP100 .357 Magnum revolver is the single most accurate handgun I have owned, and I am not alone in this sentiment. The GP 100 has cut a 25-yard group on several occasions of 1 inch or less.
That is an incredible standard and I am certain I cannot shoot up to the capabilities of the handgun on most days, although it appears I have done so on a few occasions.
The better-quality 1911 handguns are among our most accurate pistols, while Magnum revolvers are often very accurate and more accurate, in my experience, than all but the finest self-loading pistols.
SIG’s P210 offers legendary performance. Many regard it as the finest-made 9mm handgun of all time. It is difficult to make an argument against that.
As for my personal testing, I could not fire every handgun and type of ammunition on the market. But chances are, the more quality guns will yield similar performance, as a Springfield Range Officer Target model and a SIG target-sighted 1911 tend to perform similarly. These are among the most useful of all handguns. Reliable, accurate and powerful they convey more than a little emotional attachment.
There are other affordable handguns that I find exceptionally pleasing to shoot and very accurate. The aforementioned classic Browning Hi Power is such a timeless design with many good features. I would not be hesitant to stake my life or a contest on a good specimen of one.
My own Hi Power has been fitted with a Bar-Sto Precision barrel, which made a considerable difference in accuracy. The average Hi Power can be expected to group five rounds of quality ammunition such as the Federal HST into 2.5 inches at 25 yards.
The trigger on the Hi Power is notoriously heavy, although later models are better and early handguns sometimes become much smoother with age.
The Bar-Sto fitted Hi Power will shave an inch off that group given proper fitting and carefully chosen ammunition. The SIG P210 is even more accurate straight from the factory, but very expensive and leaving something to be desired as for the location of its safety and general handling.
The new Match Target version of the GP100 has features that make it more ergonomic than the standard model. Accuracy is easier to come by with this handgun.
The CZ 75 is respected for ruggedness and reliability. And it has a good reputation for accuracy. Although the contest is a tight one, in general the CZ 75 will outshoot the Browning Hi Power. It takes a fine shot to demonstrate this — and benchrest accuracy is theoretical when comparing combat guns — but I had rather have the CZ 75 in a fight than any other 9mm handgun. It is that good and the combination of features is excellent.
If you desire an accurate belt gun that is capable of personal defense at long range in the most demanding circumstances, of taking game and engaging in IDPA and ISPSC matches, the list of suitable, affordable handguns gets pretty short.
I have shot most of the available handguns and find that some are more accurate than others. The accurate handgun should also be capable of using a target load with less recoil than the full power service loads. This is very important in bettering your marksmanship skill.
After a long session with the .45 ACP, recoil sneaks up, giving you sore wrists. A good supply of medium-velocity handloads or target loads makes life easier.
In the revolver, target wadcutters or lead semi-wadcutters (SWC) loads are great practice loads. I recommend a diet of ten practice loads for every one full power service load. Both you and the handgun will last longer with this type of ammunition.
I recommend purchasing quality, yet affordable handguns and spending much more on ammunition. In addition, handloading is mandatory for marksmanship growth.
Editor’s Note: This article is an excerpt from The Accurate Handgun, available now at GunDigestStore.com
What exactly is headspace, and how is it applied to different cases?
Headspace is distance from a case’s base to the point that prevents its forward movement.
Different cartridge types use different points on the cartridge case for headspacing.
Rimmed cartridges use the thickness of the cartridge rim for headspacing.
Rimless bottleneck cartridges headspace off the shoulder.
Rimless straight-walled cartridges (most pistol rounds) headsapce off the case mouth.
Some belted cases headspace off the belt, while others headspace off the shoulder.
What is headspacing?
Headspace is the distance from the base of the cartridge case to the point on the cartridge case that prevents the cartridge from moving any farther forward in the chamber.
A rimmed cartridge, whether straight-walled, tapered, or bottlenecked, uses the thickness of the cartridge rim for its headspacing. It is a positive method of headspacing, resulting in very uniform results, yet these cartridges don’t often feed well in bolt- or pump-action magazine rifles.
They do very well in lever-action rifles and revolvers, as well as single-shot and double rifles. Examples include the .30-30 Winchester, .45-70 Government, .22 Long Rifle, .38 Special and .357 Magnum.
Rimless pistol cartridges.
The rimless bottleneck cartridges, like the .223 Remington, .308 Winchester, .30-06 Springfield and .270 Winchester, have an extractor groove cut into the base of the case, just north of the case head. As a result, these cartridges use the shoulder of the bottleneck for headspacing.
The shoulder is typically quite steep, upwards of 15 degrees (though there are exceptions like the .404 Jeffery) to prevent the cartridge from moving any farther forward in the chamber.
The rimless bottleneck design works perfectly in almost all repeating rifles, from lever to bolt to semi-automatic, to the military’s fully-automatic, belt-fed machine guns. So long as the firearm is properly headspaced, this bottlenecked rimless design will work as intended. The groove allows for excellent extraction, too; it’s a design common among many of our most famous cartridges.
The rimless, straight-walled cartridges comprise the most common choices for the modern, semi-automatic pistols. This style of cartridge uses the same extractor groove as its bottlenecked cousins, but since there is neither rim nor shoulder, it headspaces off the case mouth.
Note that this feature is especially important to those who handload this style of cartridge, as the projectiles cannot be ‘roll-crimped’ into the case; they must be taper crimped, or held in place by the use of a special die which squeezes the side wall of the cartridge around the shank of the bullet.
In this type of cartridge, the case length is of utmost importance as that distance is the sole dimension responsible for setting the headspacing. If you’ve ever picked up a 9mm Luger or .45 ACP that has a rather ‘sooty’ look around the mouth of the case, it is an example of poor (excessive) headspacing, either from the firearm’s chamber being too long, or the ammunition being too short. The .40 Smith & Wesson, as well as the 9mm Luger and .45 ACP, are all examples of pistol cartridges that headspace off of the case mouth.
How Belted Cases Headspace
The belted cartridges, based on the famous Holland & Holland design of the early 1900s, are a hybrid of the rimmed and rimless design. Because the rimmed design gave such fantastic headspacing, but didn’t feed very well from a box magazine, and the London firm didn’t want to rely on a steep shoulder for headspacing (both the .375 H&H and .300 H&H have gentle, sloping shoulders), they built a small shelf, or belt of brass into the case wall, just above the extractor groove.
So, in essence, the H&H belted cartridges use a “rimmed-rimless” case, which feed perfectly in repeating rifles, yet headspace off of the rim. Thus, the shoulder dimension is irrelevant.
While it is commonly thought that the .375 H&H Rimless Belted Magnum — the .375 H&H we all know and love — was the first cartridge released that featured the now-famous belt, that isn’t true.
Holland & Holland’s .375 rimless belted magnum.
In 1905, Holland & Holland released the .400/.375 Belted Nitro Express, also known as the .375 Velopex, but its performance was poor in comparison to other Nitro Express cartridges of the era, so it didn’t last long.
Additionally, when the .375 H&H was released in 1912 it wasn’t alone. The .275 Holland & Holland Magnum, with a 2.500-inch case length and the same belt was released simultaneously.
Firing a 7mm projectile at some very familiar velocities, the .275 H&H Magnum is, in theory, the 7mm Remington Magnum. It just took 50 years for the shooting world to realize they wanted it!
Since the belt on any belted cartridge is there for headspacing, and has nothing to do with case strength, it’s rather ironic that there are so few belted cases that actually headspace off of that belt. Certainly the .375 H&H and .300 H&H, and I’d definitely include the .458 Winchester Magnum, .458 Lott, and the .450 Marlin, but the plethora of belted magnums (including the .300 Winchester and 7mm Remington Magnum, as well as the entire Weatherby family of cartridges) all headspace off of the shoulder.
Now, I know what you’re thinking: in the last half of the 20th century, no self-respecting “magnum” cartridge would be caught dead without its belt. It’s a very good point, but I think that the .375 H&H case was used as the basis for the brood of offspring ranging from the .257 Weatherby up to the .458 Lott — not for the ‘strength’ of the belt or for headspacing issues, but for the case capacity of the parent cartridge.
Looking to go armed, but are stuck in the weeds as to what to arm yourself with? Here are 20 of the best concealed carry gun options that will keep you on the defensive.
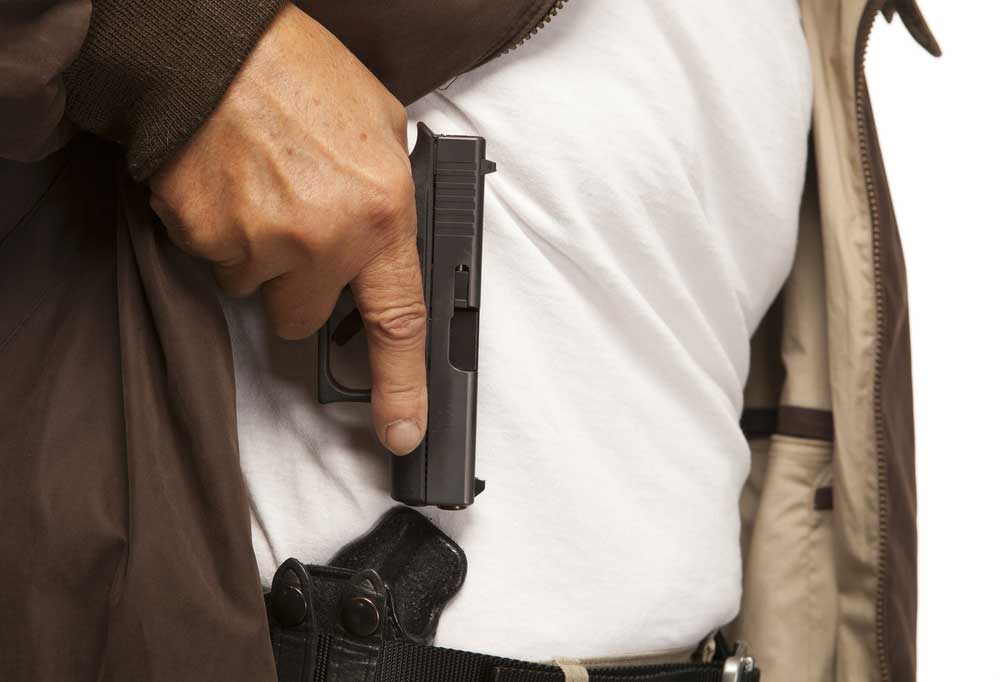
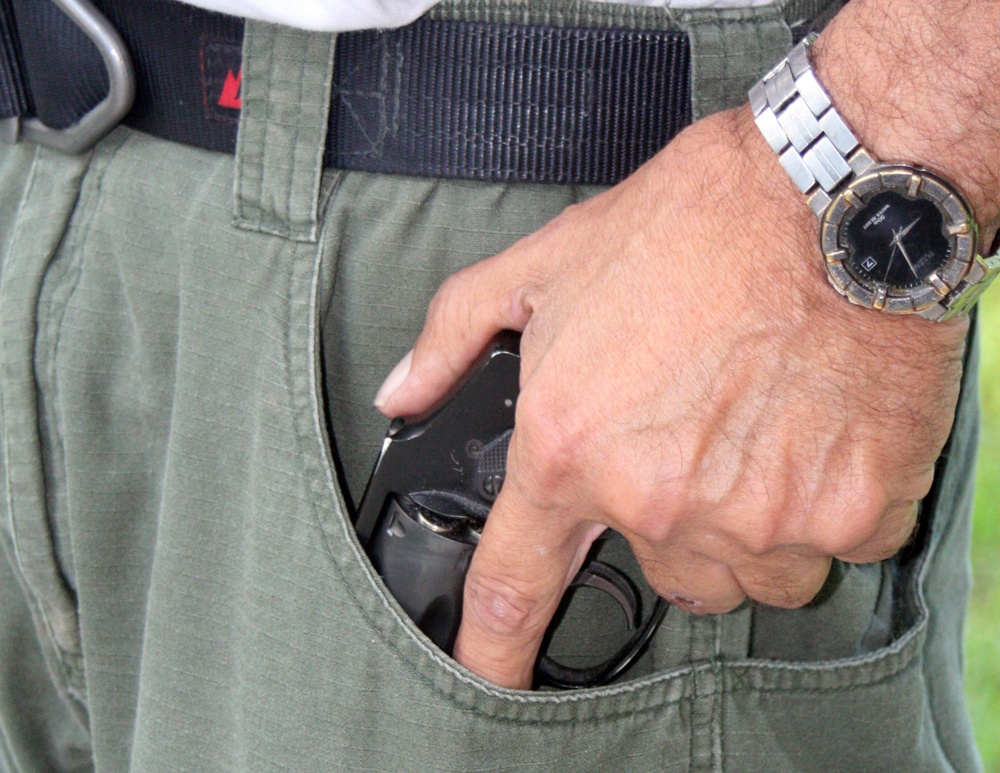

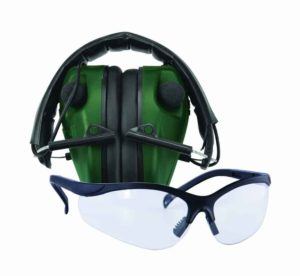
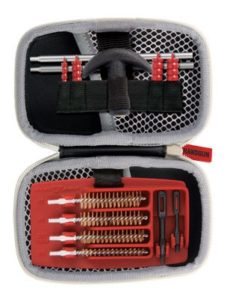


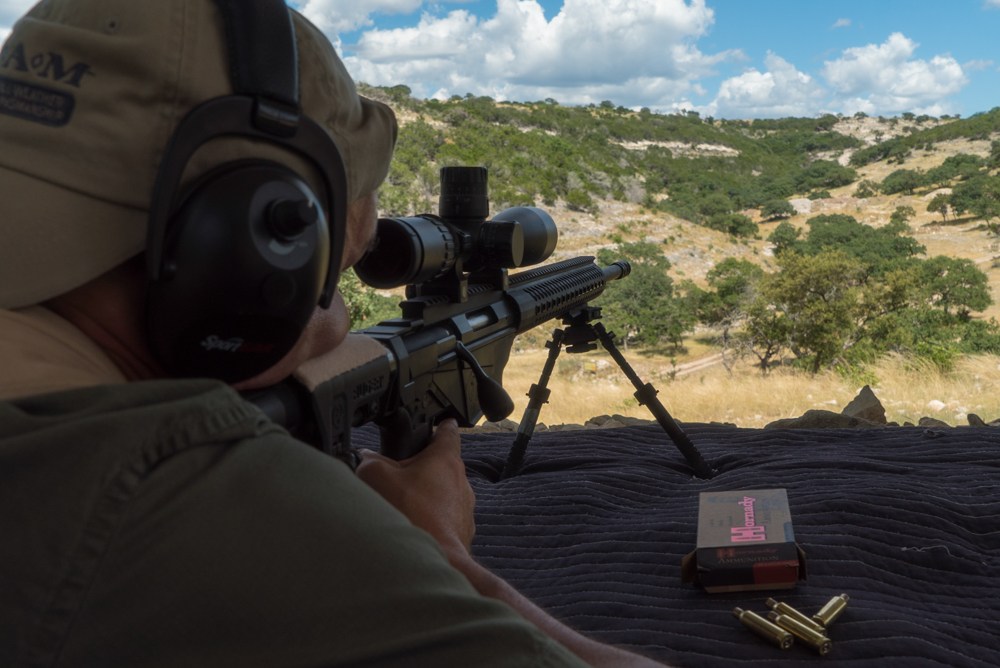
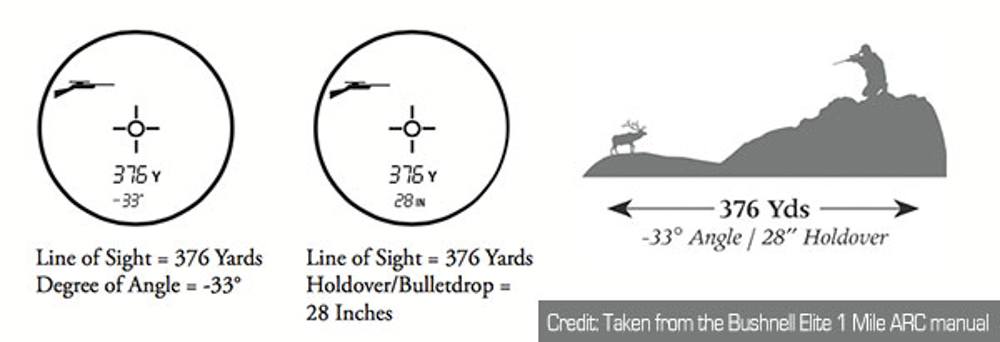
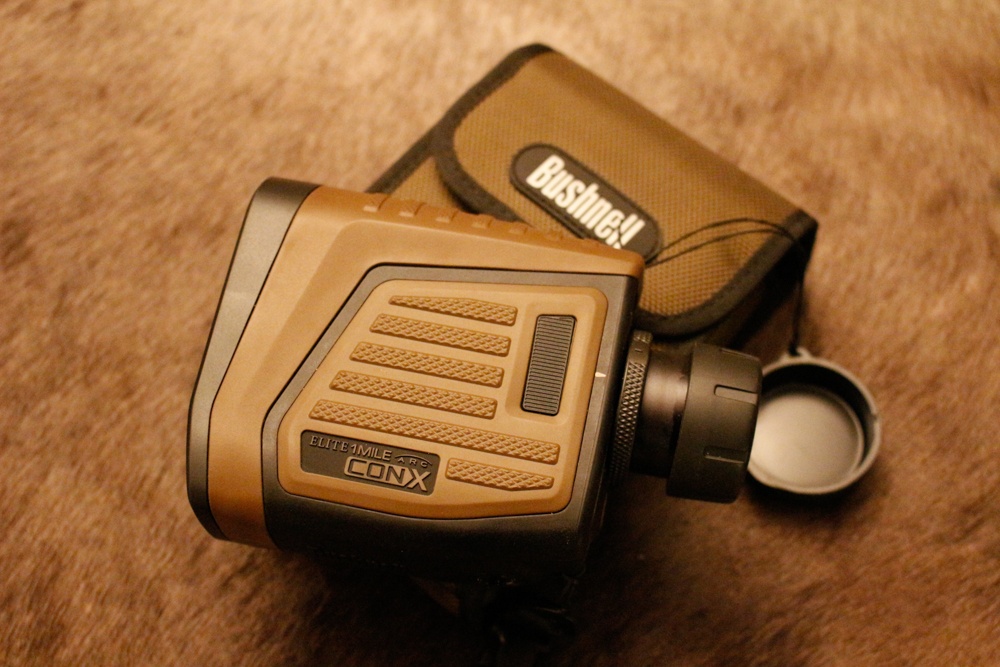
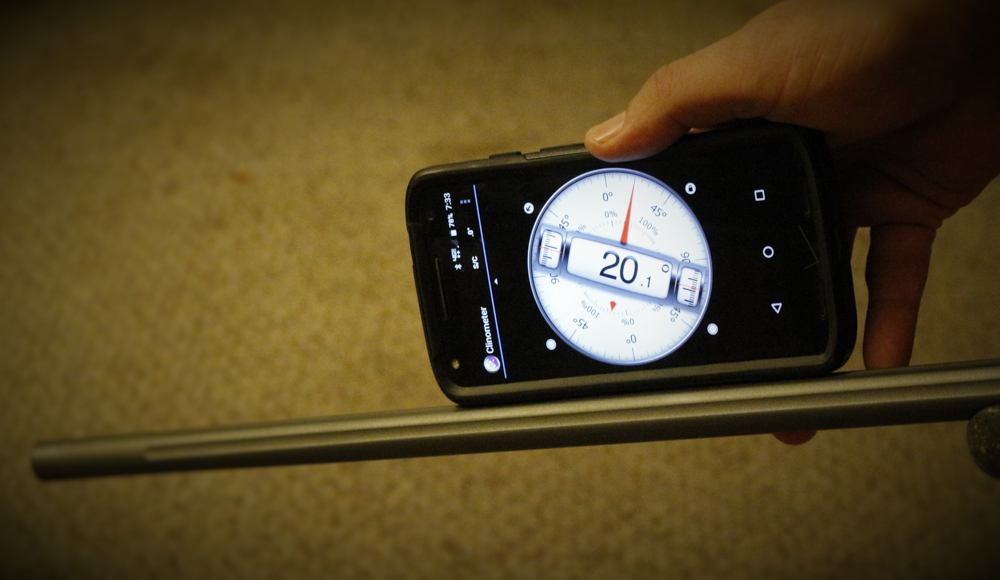
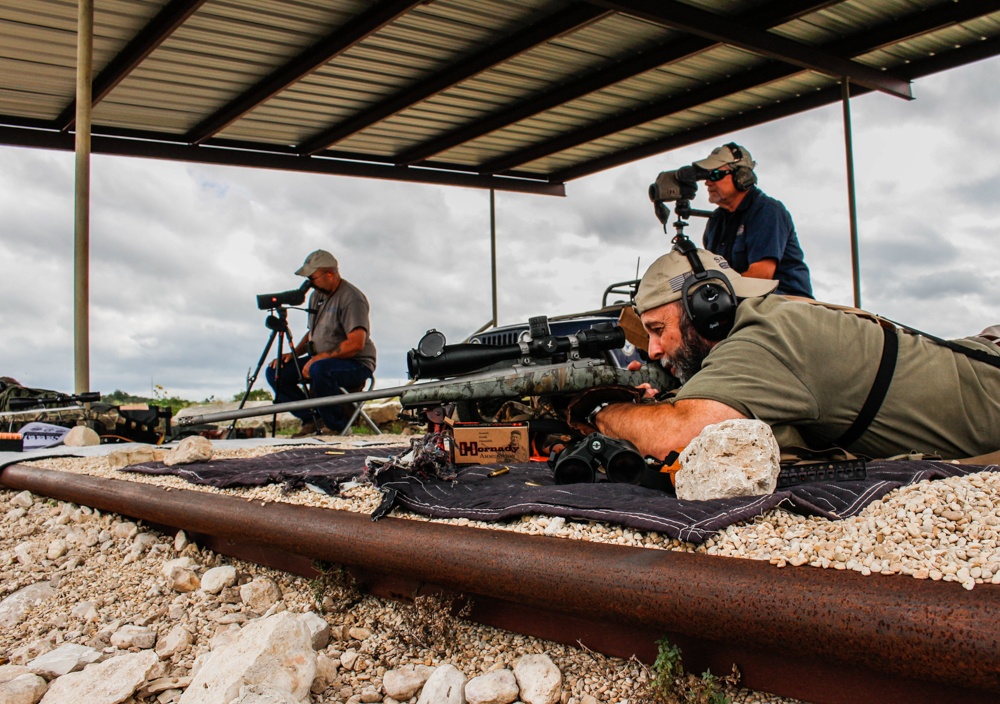
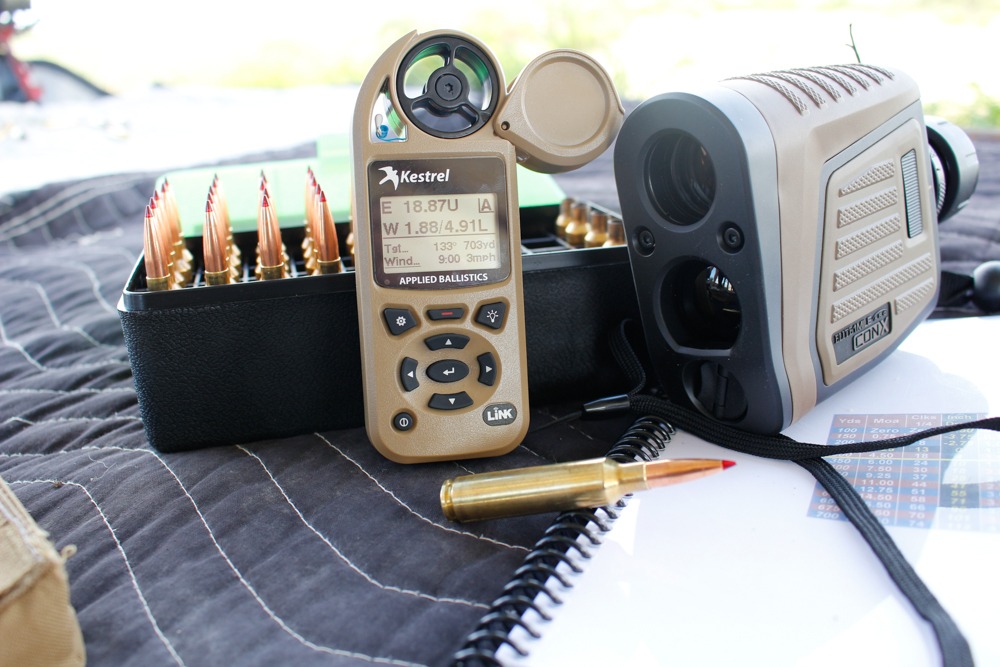
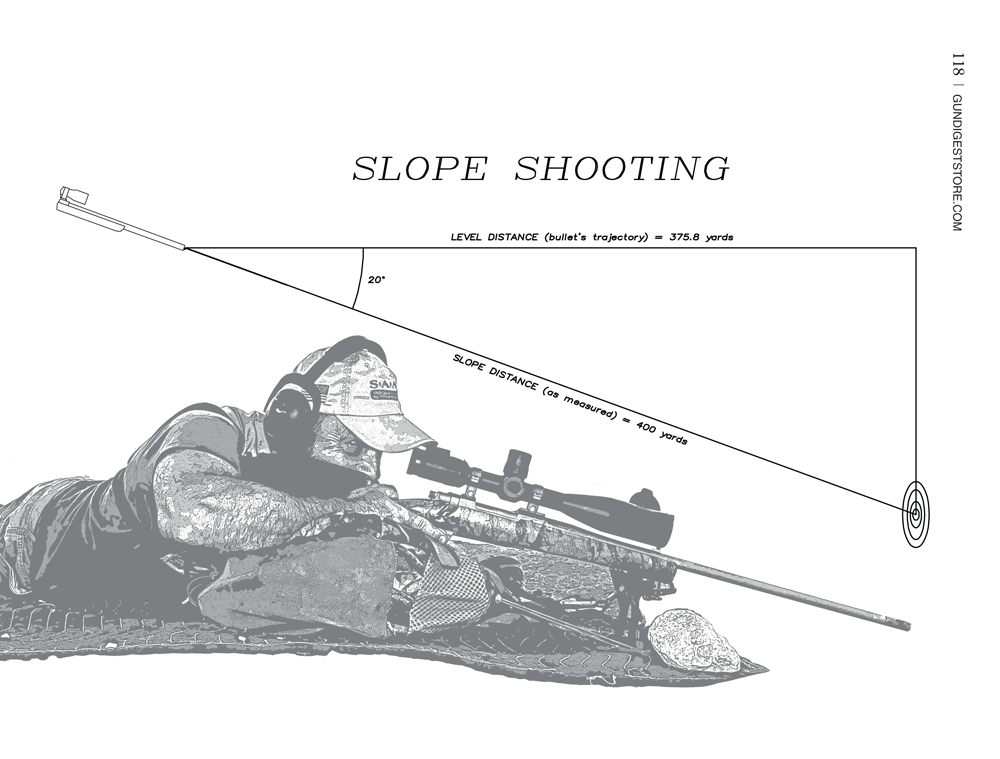

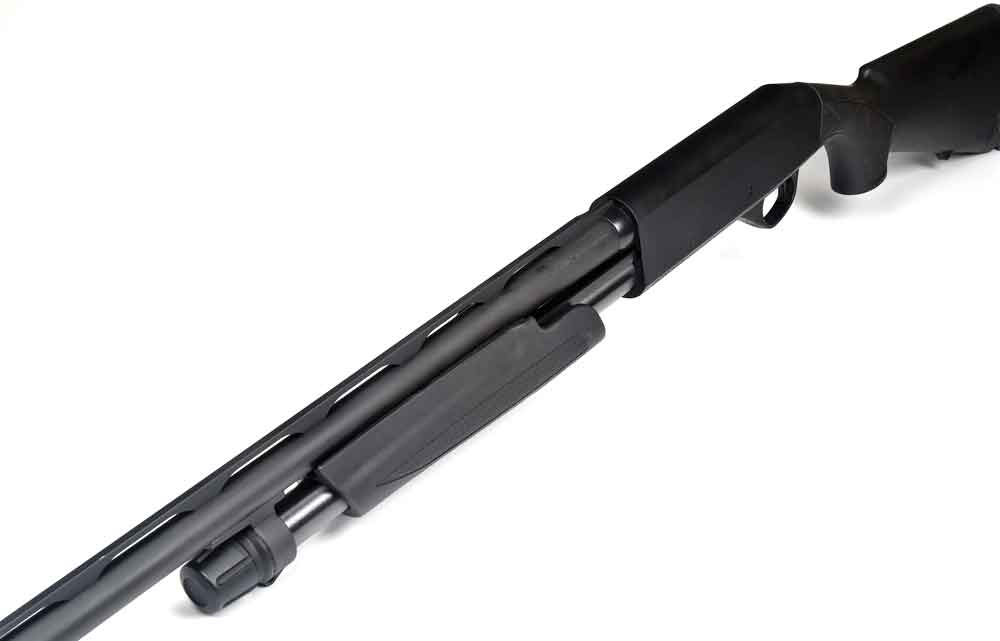
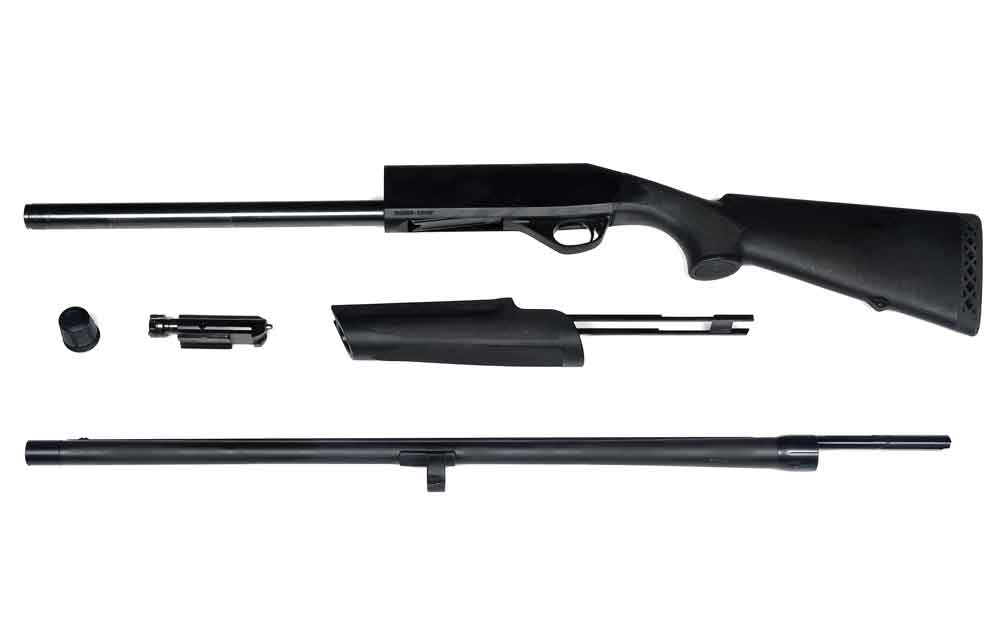
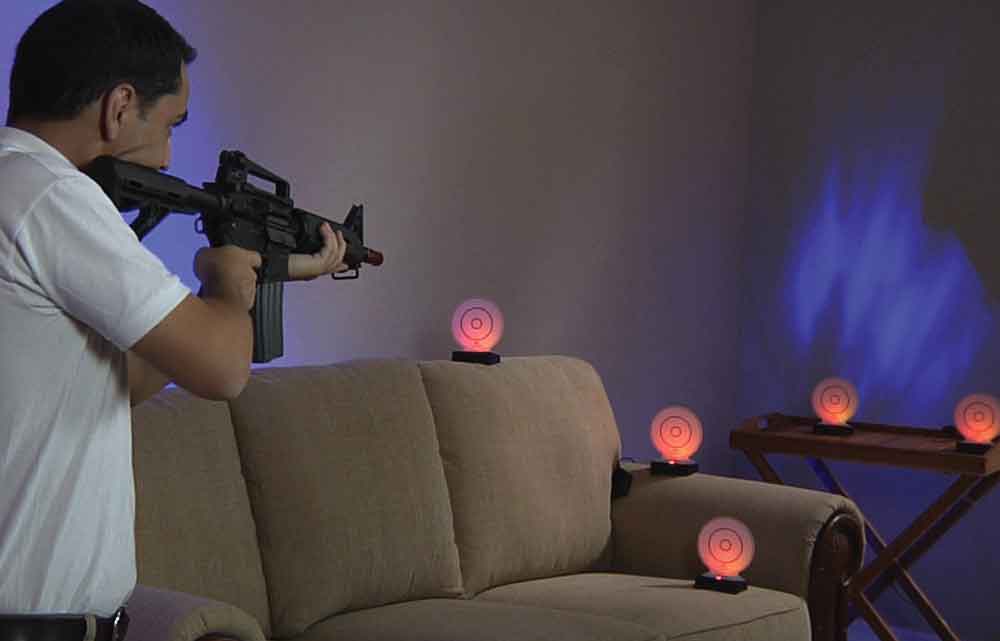
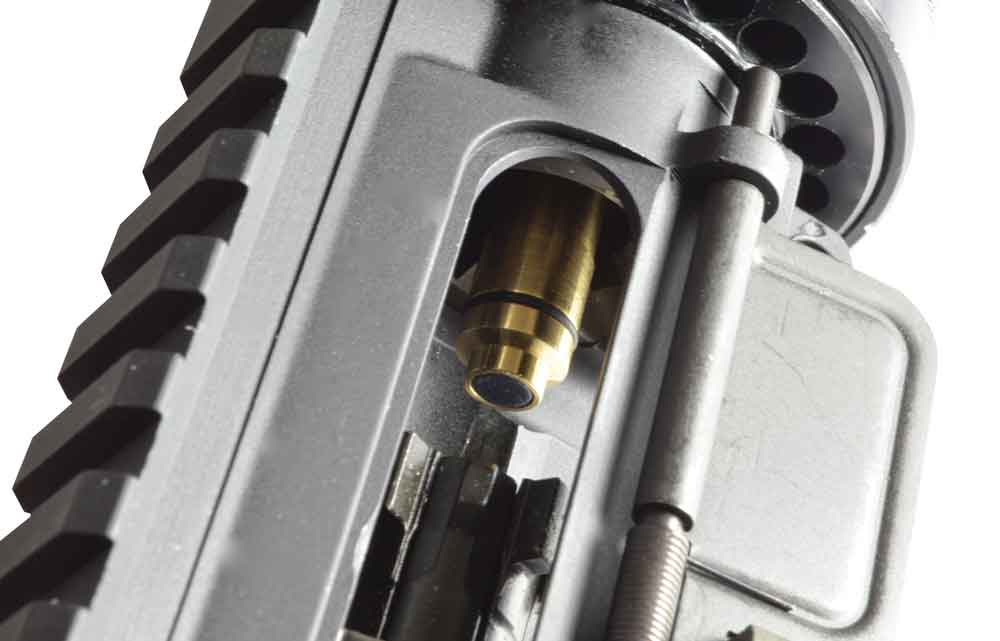
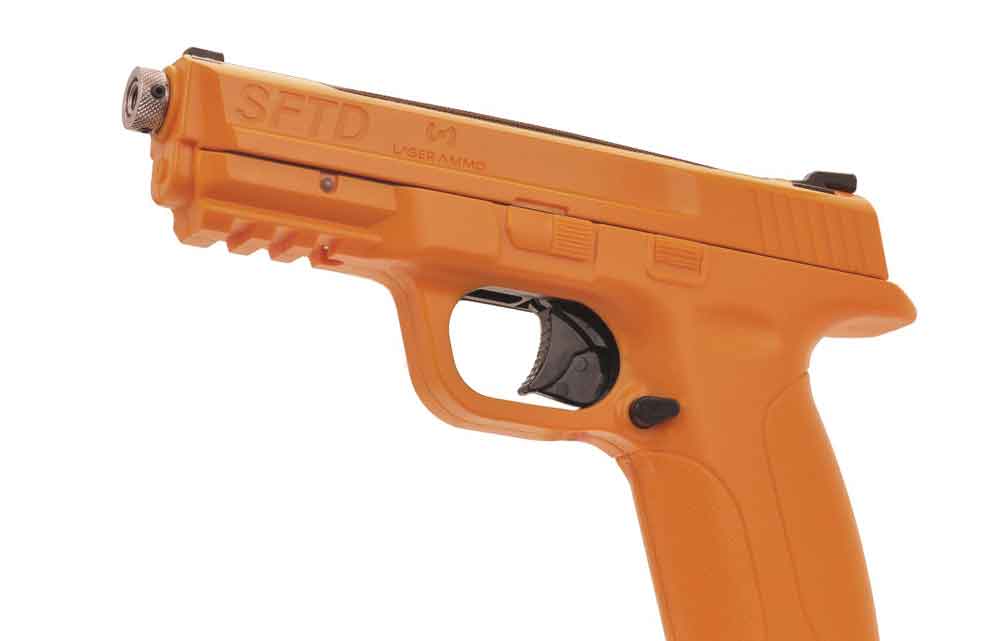
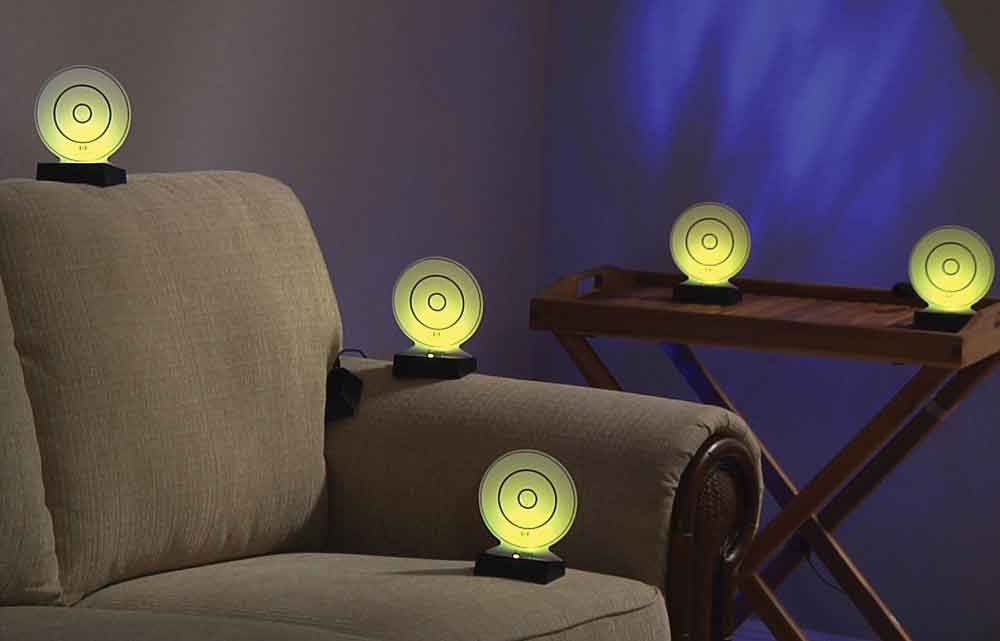
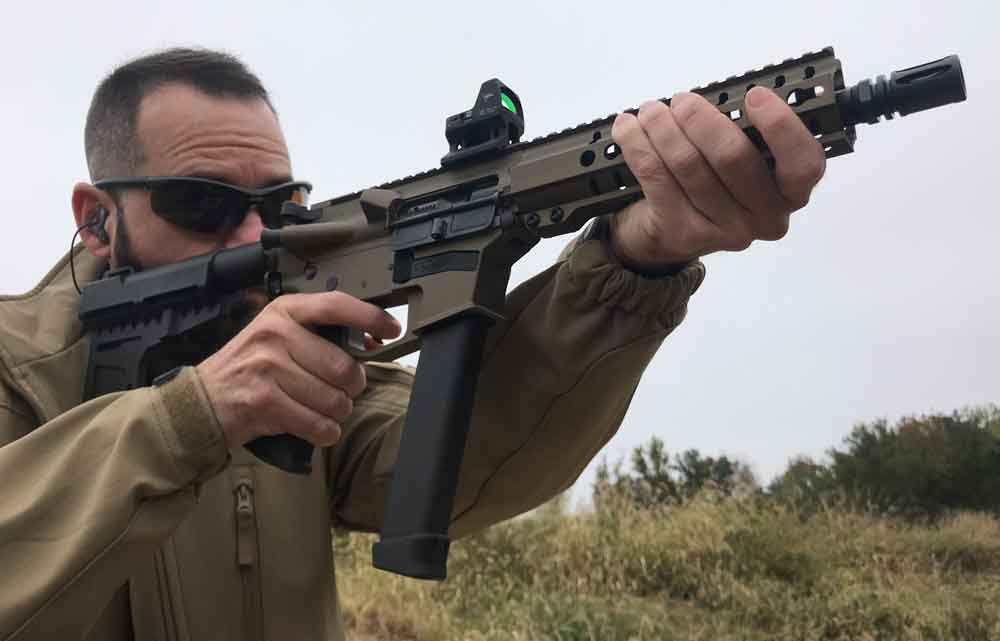
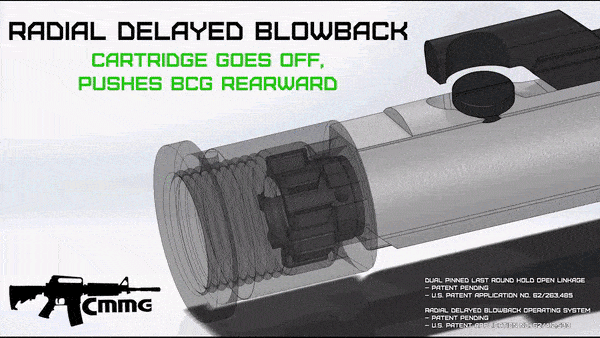
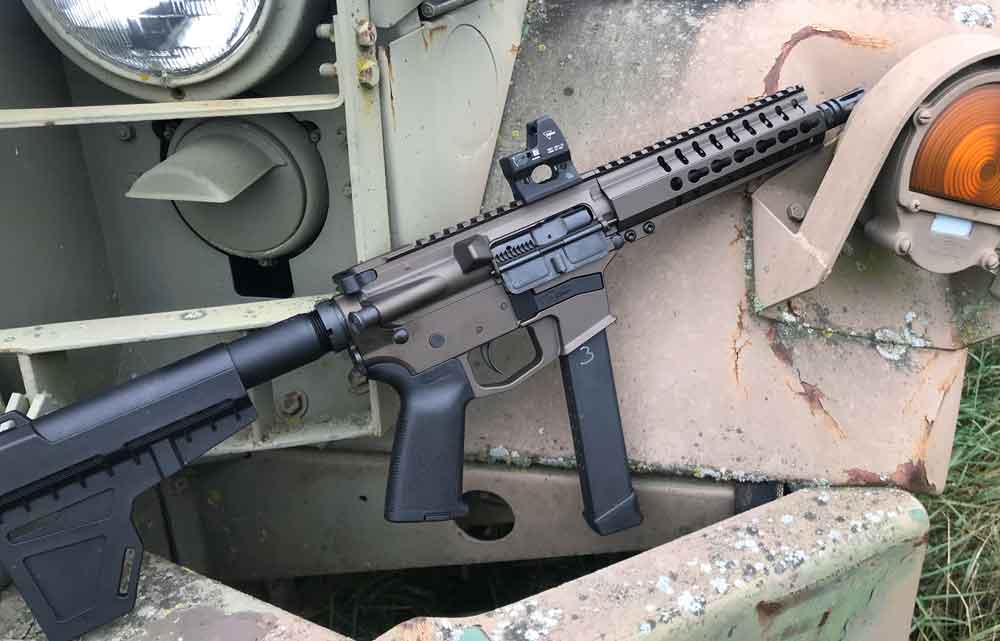 Getting up to speed on the 9mm MkGs Guard is a snap, as CMMG has ensured the six pistol and rifle configurations all have fully functional AR-15 controls. This includes last-round hold open, as well as the magazine release and safety both being where you’d expect.The MkGs Guard also features newly designed dual-pinned, fully machined bolt catch linkages that ensure reliable operations straight out of the box, with no adjustments required. The pistols and rifles are both compatible with Glock magazines, with each model shipping with a 33-round magazine. Additionally, the muzzle of each model has a ½-36 pattern for the