Deciding to concealed carry takes plenty of consideration, particularly determining which is the right gun for you.
How should you go about choosing a concealed carry gun?
Concealed carry gives armed citizens the advantage.
Potential attackers do not know who’s armed and who’s not.
The author will not disclose whether he carries, and suggests others don’t either.
There are some basic considerations for carry: climate, training level, concealablity.
A sub-compact, single-stack 9mm, for many circumstances, is adequate protection.
Where I live, a lot of people carry discreetly. As such, the bad guy doesn’t know who is armed and might shoot him. That makes every type of attack less likely, which makes everyone much safer. And that’s exactly how it should be.
So, I’m not going to tell you — or anybody — if I carry a gun or not and what that gun might be. And you shouldn’t — unless required by law — let other people know whether or not you are carrying. But I can give you the reasoning I would use if I had to choose a gun for concealed carry in public.
Why should you care what I think? I’m just like many of you, except I’ve had hundreds of hours of training in the use of handguns, rifles and shotguns from some of the best trainers and gun fighting schools in the world. And I’ve done a lot of research on the subject and learned directly from real gun fighters.
All of them have an opinion about what gun or caliber is best, and it’s reflected in what they carry when they have a choice. And the choice each person makes is right for them. So learn, get training and weigh the options. Then make your choice, but obey the law.
It’s hot where I live, so if I had to select a gun for concealed carry, it would have to be easy to carry discreetly in hot weather where a coat looks out of place. So small is better. But with more terrorist activity, the rise in attacks by multiple assailants is increasing, so it would be a good idea to have as much ammo on board as possible. While a double-stack 9mm pistol sounds good, it might not be as easy to hide as a single stack. And the same pistol in .45 ACP won’t hold as many rounds as a 9mm.
I’m getting older, and my bones and joints don’t work as well as they used to. After years of aggressive shooting, especially after shooting a lot of very high-powered handgun cartridges, I find that a gun in 9mm is much easier to control and more comfortable to shoot during long periods of training.
So, if I had to choose, I would not feel under protected by a sub-compact single-stack 9mm semi-automatic. But this is just my opinion, and it’s all hypothetical anyway. You should do what makes sense for you.
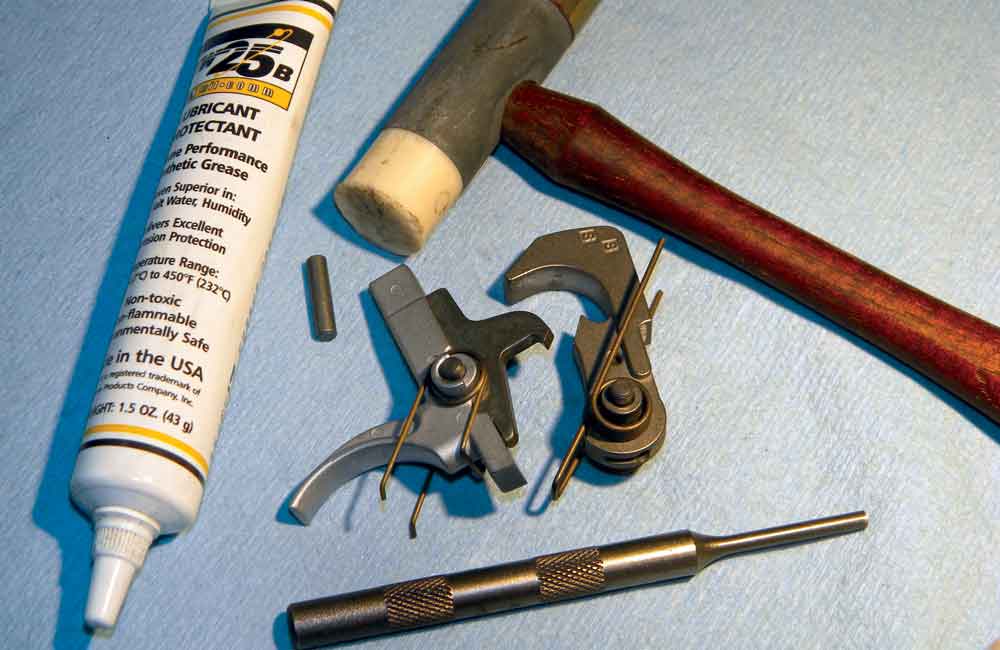
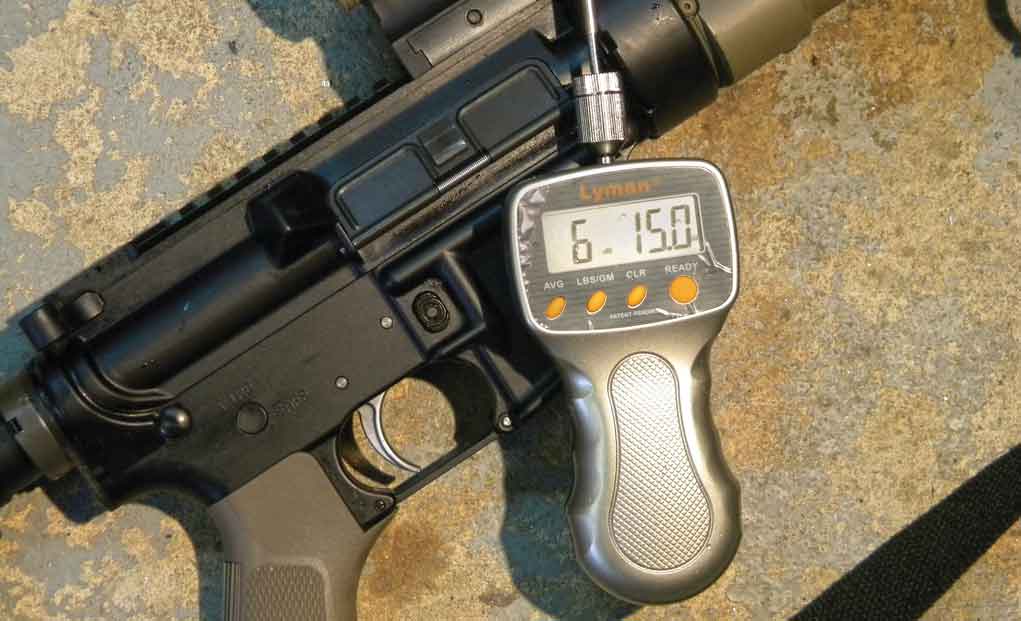
The AR is a great firearm. It can be used for almost anything. There are plenty of aftermarket parts to work with, so you can custom configure it to fit any particular application. One of the first areas you should address is the AR trigger group. Regardless of the application of your gun, a good trigger will make getting accurate hits easier.
The typical Mil-Spec AR trigger is pretty rough. It feels gritty. As you press it, it catches and grabs on the rough areas. However, one of the coolest features of the AR is its modular design. It’s simple to swap out various components, often without any special tools. There is no “fitting” required to swap out the AR trigger. As long as your receiver is within spec — which most are — all that’s required is to remove the old parts and install the new. And if you’re not sure about what you’re doing, have a qualified gunsmith address this for you.
Do not, under any conditions, modify the stock AR trigger components. These parts are heat treated, but only on their very surface. Polishing/grinding or removing material will take off the hard surface, leading to rapid wear on these areas. It might work great initially, but you’ll soon experience double-taps, which are shots fired as you reset or release. Sometimes, the result is full-auto fire. Modifying the factory components is dangerous.
Luckily, you don’t have to rework anything. There is a host of aftermarket companies offering great triggers for the AR. Once you decide what you’re going to do with the AR, you can then select the appropriate one.
Match vs. Defensive AR Triggers
The first decision to make is between a competition trigger for matches or a one for defensive and patrol use. Match or competition triggers are usually highly modified, varying in shape and weight significantly from the original designs. Some are adjustable. They have a very smooth action, and normally a greatly reduced pull — the amount of pressure required to drop the hammer. A lightweight AR trigger is fine on the range, or for a rifle set up for specific applications, such as a “special purpose rifle” for hunting or sniping. They are not for defensive or patrol use.
A match or competition trigger should not be used for defensive or patrol work. Under stress you lose dexterity in the fingers. During a violent confrontation, you’ll be moving, using different firing positions and fighting. An AR trigger that’s too light leads to negligent or unintentional shots fired. We see this occur during drills on the range, which means it will definitely be a problem under stress when lives are on the line.
A light trigger can be a legal liability. “Common custom and practice” is the key phrase. For the AR, this means a trigger of at least 4.5 pounds or more. Going with one that’s lighter than what is accepted for the purpose has been a major factor in court cases. Mas Ayoob discusses this in his classes, citing a few court cases where “hair” triggers were major factors.
In Ayoob’s first case as an expert witness, Florida v. Luis, the light trigger was critical to the manslaughter charge against Alvarez, a police officer. In Santibanes v. Tomball, the lawsuit “alleged negligence because the officer had created, ‘with the best of intentions,’ a trigger pull lighter than the gun’s manufacturer specs for ‘duty/self-defense use.’” Although these cases involved handguns, the same can be applied to the AR.
If you’ve been following along with this column, or if you’ve been around ARs for a while, you know gear selection is dictated by the anticipated use of your rifle or carbine. This consideration is also mandatory when selecting an AR trigger. The wrong trigger can lead to embarrassing or tragic results. With the right one, however, the AR will do anything you need.
Single- vs. Two-Stage AR Trigger
You’ll also need to decide between a single- or two-stage trigger. The single-stage trigger requires one smooth press, from beginning to end, to fire the shot. You start pressing and, at some point, the shot fires.
A two-stage trigger has two phases. As you press and take out the first stage, you hit a “wall,” which is a distinct point where you start to feel increased resistance. This is where the second stage starts. Apply a little more pressure, and the shot fires. This provides a break point you can feel; you know when the shot is about to fire. For newer shooters, this can cause a flinch, tensing up in anticipation of the shot that’s coming. For an accomplished shooter, this can be an advantage: You’re able to fire the shot exactly when you want.
Drop-In vs. Standard Configuration
Today you have the choice between a drop-in AR trigger group and a “standard” group. Drop-in trigger groups are self-contained units pre-assembled within a housing. You remove the old parts, slip in the new group and install the pins to retain it.
The standard parts are just like the Mil-Spec originals. There are separate components that you assemble inside the receiver. Both types work very well, although the drop-in variety have started to gain popularity, especially with competitive shooters.
For competition triggers, or a “special purpose rifle” for surgical shooting, I recommend Geissele or Timney. Geissele offers several designs for the AR, featuring standard-type components to install. Timney specializes in drop-in units.
For general-purpose or defensive AR trigger assemblies, I highly recommend ALG’s ACT trigger group. This group comes with all the parts needed — trigger, hammer, disconnector, springs and pins — to install in the AR. The ALG parts are Mil-Spec in size and shape, but they have polished and coated surfaces that provide a smooth action and crisp break. The group comes with two hammer springs: One provides a 4.5-pound trigger pull, and the other a 6-pound pull. This is a great trigger, especially considering the price, which is about $70.
Before you go out and spend a lot of money on a trigger for your AR, research and study not only what’s available, but also determine how you will use your gun. Go to the range and ask other shooters what they use. Whenever possible, test fire them. Eventually, you’ll discover what one best suits your purposes. Once you’ve got it installed, then work dry fire to learn the trigger, and live fire to check your results. While a good trigger won’t make up for insufficient skills, it will make it easier to get consistently accurate hits.
Editor’s Note: The article is from the September 2017 Gun Digest the Magazine.
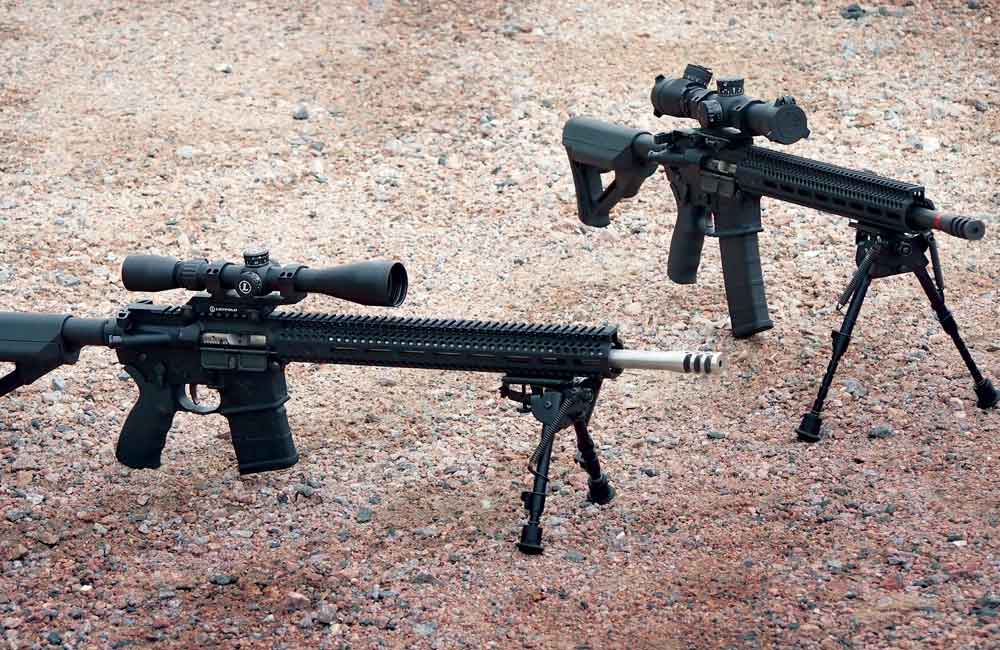
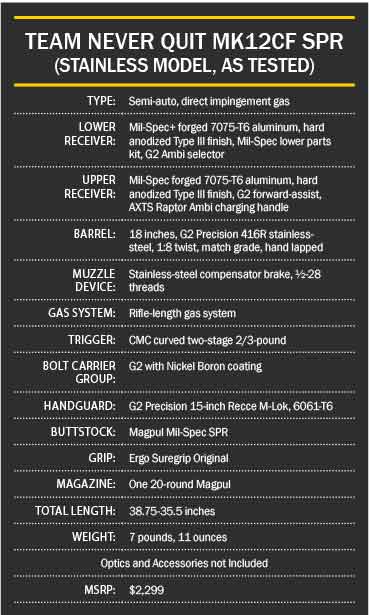
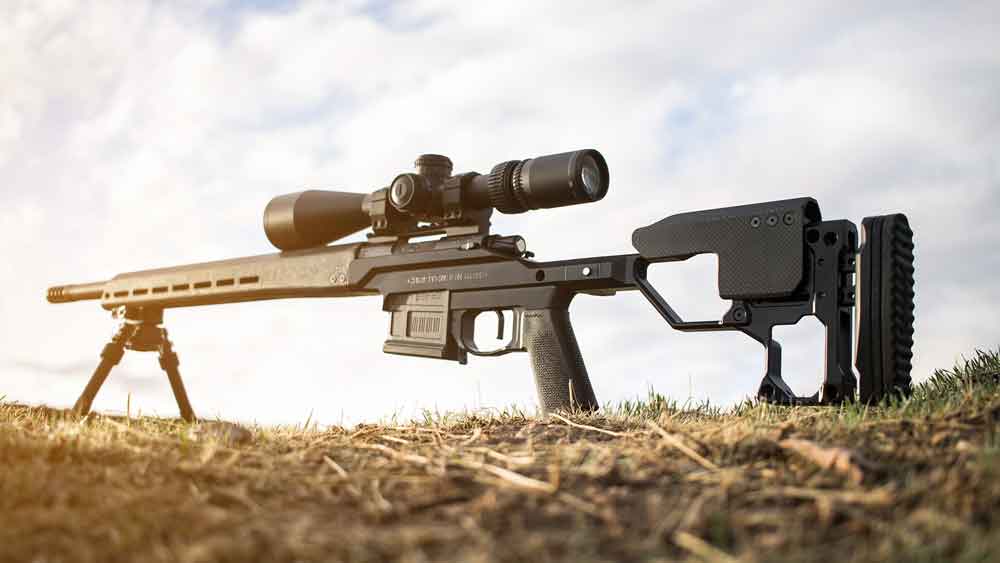
The new Team Never Quit Mk12CF Special Purpose Rifle is a rugged tack driver fit for a number of purposes.
What to know about the new Mk12CF Special Purpose Rifle:
The Team Never Quit (TNQ) MK12CF SPR is a nimbler version of the MK12 Mod-1 SPR.
It retains all the excellent accuracy of the prior model.
A best group of .431 inch was achieved at 100 yards.
The Mk12CF SPR comes in two models, one with a Proof Research carbon-fiber barrel.
The other features a more traditional stainless-steel barrel.
Most Americans know Marcus Luttrell through Lone Survivor, Luttrell’s autobiographical book about his time as a Navy SEAL, and which was later made into the movie of the same name starring Mark Wahlberg. The central action of the book and the movie concerns Operation Red Wings, a mission by Luttrell and three other SEALS to find a top Taliban leader in Afghanistan’s Hindu Kush in June of 2005.
Unfortunately, Red Wings did not go as planned, with Luttrell and his compatriots fighting a running battle against Taliban guerillas well before they found their intended target. Greatly outnumbered, the SEALS were killed one by one, except for Luttrell, who escaped by falling down the side of a mountain, literally, and was found and given sanctuary by a local Afghan villager.
When Luttrell retired from the Navy, he returned to his home in Texas and, among other things, continued to participate in three of his life’s passions: firearms, shooting and hunting. This led Luttrell to team up with friend and ex-SEAL Team member Garrett Golden. Golden is co-owner of the gun-making concern G2 Precision of Porter, Texas, and the two went to work on re-designing their duty rifle, the Mk12 Mod-1 SPR rifle. It was a fine rifle — very accurate and reliable — yet it weighed more than 10 pounds.
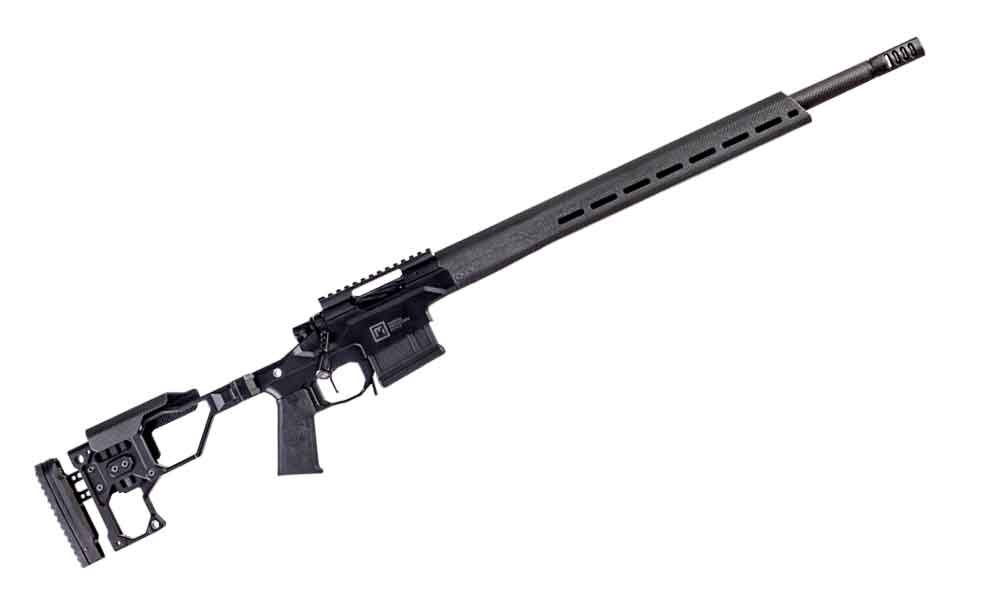
What they created is the Team Never Quit Mk12CF Special Purpose Rifle (SPR), built by G2 Precision. The Mk12CF SPR concept was to keep all the original rifle’s accuracy, precision and reliability, but with considerably less weight. Plus, Luttrell and Golden added a number of enhancements to increase the original’s functionality.
Recently debuted to the shooting public, the Mk12CF SPR comes in two models: a Proof Research carbon fiber-barreled Mk12CF SPR that weighs just 6 pounds, 11 ounces; and an Mk12CF SPR with a stainless-steel barrel that’s exactly 1 pound heavier.
As Luttrell said when the rifle was introduced, “This is the rifle I would want to take with me into battle.”
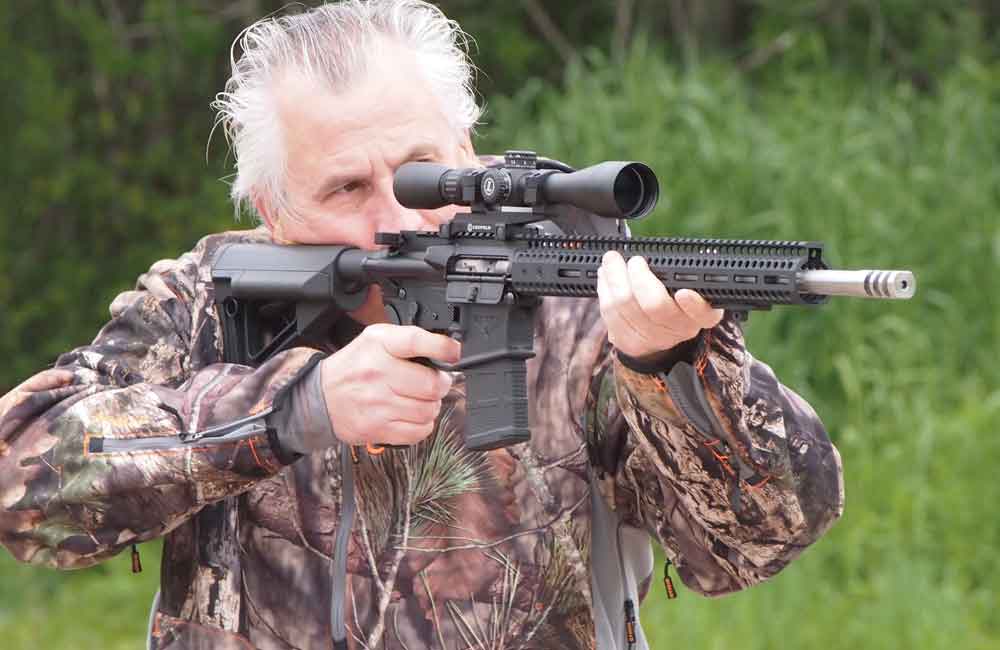
Less Beef, More Bite I was fortunate enough to have access to both models of the Mk12CF SPR, among the very first production rifles, and spend a good deal of time with them at the range.
The Mk12CF SPR is chambered in .223 Wylde, so it can fire both .223 Rem. and 5.56x45mm rounds, and it operates on a rifle-length direct impingement gas system. Both models sport 18-inch barrels and feature the same set of controls.
Before the end of my first magazine, my initial impression of the rifle was that the Mk12CF SPR just feels right. In hand. On the shoulder. Over a rest. Part of that good feeling has to do with the relative lightness of these ARs, and it’s easy to forget this about the AR-15 rifle as it was imagined and created: It’s supposed to be fairly light.
Somewhere along its evolutionary path, the AR-15 got heavier and heavier, even as it became more and more popular. More metal. Longer barrels. Full-length handguards. Stouter receivers. What had been a standard 6.5- to 7-pound rifle quickly became an 8-pounder. And then a 9-pounder. Today, you can still pick from a rather large selection of 10-pound AR-15s. Often very accurate and fine shooting rifles, these ARs are still a far cry from what Eugene Stoner’s original design sought to accomplish: a reliable combat rifle that was nimble and rugged.
The Mk12CF SPR feels like the rifle Stoner created — with numerous upgrades of course.
For example, the mag release, bolt catch and fire selector on the Mk12CF SPR models each have a dimpled texture on the contact surfaces that makes them easier to use and manipulate than standard Mil-Spec options.
The full-sized Raptor Ambi charging handle lets you pull back the bolt smoothly and without the need for much force. The handle is easily reached, too, even with an optic mounted atop the rifles. The ERGO Pistol Grip molds to your hand, even when that hand is wet, sweaty and dirty, and the CMC Curved Two-Stage trigger snaps off cleanly and easily, and resets very fast.
The Mk12CF SPR also has a forward assist. Many AR makers are foregoing this, but I’m always glad when an AR I’m using has the assist. Shoot any AR long enough and hard enough, and you will find times where you want and need a forward assist. What if you don’t have one and are in a situation where pulling back at the charging handle isn’t an option? Then you invariably find yourself trying to push the bolt forward with all sorts of things definitely not made for the job, including car keys, screw drivers or empty brass cases. Your scratched up bolt will bear witness to what you really needed: a forward assist!
Accuracy In Spades While in no way qualifying as a torture test, I did run more than 300 rounds through the two rifles without a single failure to feed or eject. I would also note that I used seven different types of .223 Rem. and 5.56x45mm ammunition, some of it made with high quality components, some of it not so much. The rifles handled all of it without a hiccup, and the bolt stayed open at the end of every magazine.
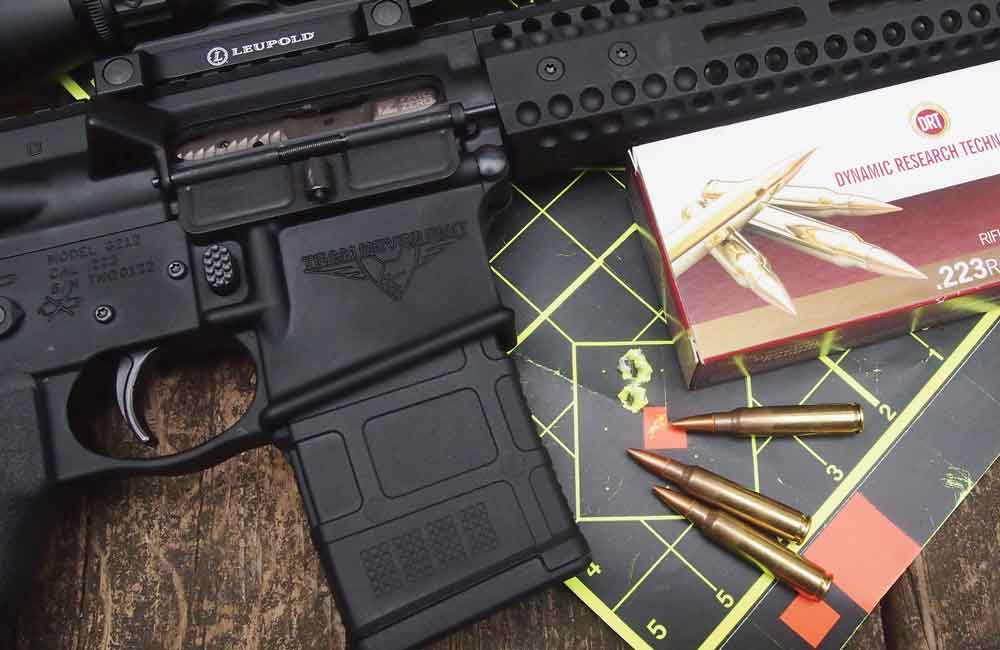
I shot approximately 150 rounds with each rifle, starting with the carbon fiber barreled model. Then, for my accuracy and ballistics testing, I switched to the stainless-steel barrel model and shot another 150 rounds. For an optic, I mounted a Leupold 3-9x40mm Mark AR scope on it, securing it with a one-piece Leupold Integral Mounting System mount.
I used three types of ammunition, all in .223 Rem., for my accuracy testing with the Mk12CF SPR stainless rifle: Browning BXV Predator and Varmint with a 50-grain poly-tipped bullet, Dynamic Research Technologies (DRT) Terminal Shock and a 55-grain HP frangible bullet, and Hornady’s 55-grain FMJ/BT load. All groups were fired at 100 yards from a sandbagged rest. The range was located outdoors; the day was sunny, with temperatures in the low 70s, with a light breeze quartering from left to right through the shooting.
For the five-shot and three-shot groups, the DRT ammunition took top honors. My best three-shot DRT group came in at .431 inch, and .866 inch for my top five-shot spread. The other two ammunition brands also posted numerous sub-MOA groupings, including the Browning load that drilled four shots into a group of just .463 inch.
Once the accuracy evaluation was done, I set up my PACT Professional XP Chronograph from Brownells, and fired 10 rounds of each ammo brand through the device. All three brands of ammunition came in right where you’d expect them to be, taking the SAMMI-rated fps velocities recorded with a 24-inch barrel, and adjusting for the somewhat diminished velocities you achieve with the Mk12CF SPR’s 18-inch barrels (see chart). What’s the only thing I wish were different about the rifle? The compensator brakes. While they certainly work to lessen recoil and do direct the muzzle blast away from the front of the rifles, they also tend to direct that blast back toward the shooter. A couple of shots on a hunt won’t be a big deal for the shooter. But when you’re firing dozens of rounds at a time, the smoke and debris coming back into your face — and going into your nose and lungs — becomes quite uncomfortable and distracting.
And what about uses for the Mk12CF SPR rifle? Given its lighter weight and long-range potential, the rifle will be a first-rate predator and varmint rifle, especially for the hunter walking a good number of miles during a day. Those same features make the rifle a good fit for various competitive shooting events, too, and an AR platform is usually a solid all-around choice for home defense.
The Team Never Quit Mk12CF SPR rifles can be ordered from the G2 website at G2Precision.com or through select authorized dealers.
Editor’s Note: This article originally appeared in the October 2017 Gun Digest the Magazine.
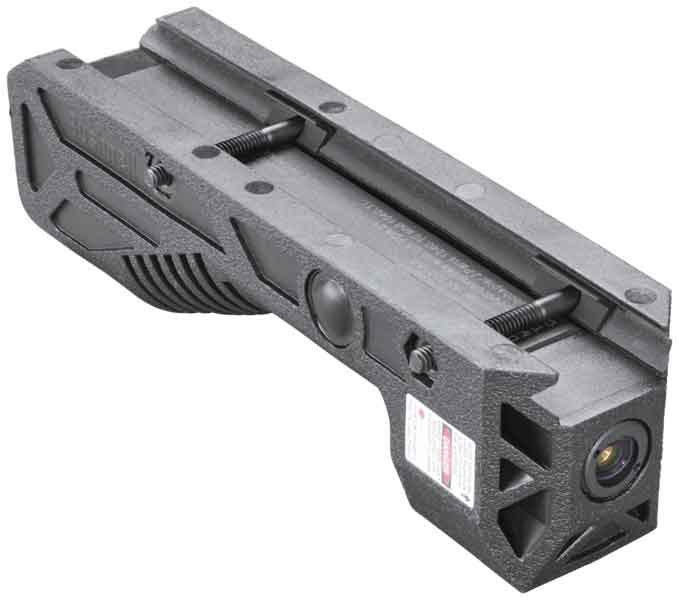
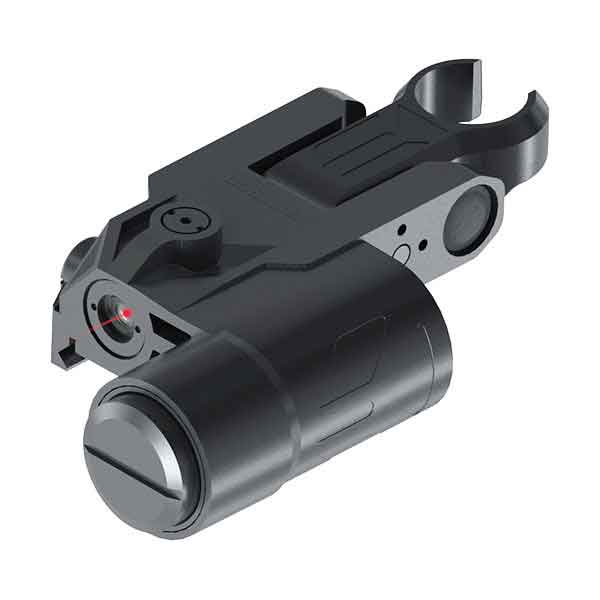
Bushnell has taken a different tact in its tactical aiming solutions, releasing three new laser sight options for AR-15s, perfect for close-quarters action.
Typically when shooters shop for sighting systems for an AR-15, optics are the first thing to pop into mind. But are scopes and red dots always the right answer for every application? Bushnell is betting they aren’t.
The Kansas-based company recently moved a different direction with its tactical aiming solutions, releasing three laser sight systems. Purpose-built and adaptable to a variety of shooting styles and missions, Bushnell’s AR Optics Haste, AR Optics Chase and AR Optics Rush appear to arm shooters with systems dynamite for drawing a bead at close quarters.
“More and more MSR users are finding the benefits of laser sight systems impossible to ignore,” said AR Optics line manager Bryan Parrish. “Our engineers worked tirelessly to advance these systems, with innovative designs purpose-built for the rifle platform. With high-output lasers and easy, one-button, constant-on operation, the Haste, Chase and Rush outperform the competition and offer users a better way to make the shot.”
AR Optics Haste Laser Sight
The Haste’s unique design not only provides shooters with a class-III laser sight, but also a way to get a better handle on their rifle. The aiming device’s unique housing provides users with an angled foregrip, giving them better overall control over an AR.
The model attaches to any standard Picatinny rail and is engineered to work with both a standard 16-inch AR-15 carbine and AR pistol. As an added benefit, and headache reducer, the Haste will not run afoul of NFA regulations pertaining to the attachment of a vertical foregrip on pistol configurations.
Operated through ambidextrous push-button controls, the unit is an option for both lefties and righties. And its polymer housing is waterproof, making the Haste ideal for shooters who don’t allow inclement conditions to get in the way.
Other features of the Bushnell Haste include a battery charging system that doesn’t require removal from the rail, full adjustment for windage and elevation and red and green laser sight options. The MSRP for the Haste is $248.95 for the red laser and $348.95 for the green, which will be available in January 2018.
AR Optics Chase Laser Sight
The Chase is two sighting systems in one package. At the push of a button, the sight emits a continuous laser, but in a pinch, it also includes a flip-up post for a physical iron sight. The over-the-bore, forward mounting unit is just the ticket for those who need to transition from close range, to medium or long at a moment’s notice.
Designed for the most rugged usage, the Bushnell Chase is completely waterproof and features a strong exterior housing. The unit comes in red and green class-III laser options, both fully adjustable for windage and elevation, and features push-button controls for both sighting systems. The MSRP of the Bushnell Chase is $301.45 for the red laser sight and $401.45 for the green, available in January 2018.
AR Optics Rush Laser Sight
Designed to integrate into an AR’s existing configuration, while providing a laser sight function, the Rush is versatile. The sight is actually a hi-rise mount with an integrated offset laser that saves space on the platform. This gives shooters the ability to seamlessly transition between any Picattinny rail compatible optic and the laser. The push-button control activates the fully adjustable sighting system, which emits a continuous class-III red or green laser. The MSRP on the Bushnell Rush is $275.95 for the red laser and $375.95 for the green version, which is available in January 2018.
If you’re a gun owner, the Internet is your playground. From solid data for your next loading project to ballistics resources that help you understand a bullet’s flight from ignition to target when shooting, there is a wealth of information. Honestly, it would be fair to say that the everyday average shooter has more resources at his disposal now than perhaps any other time in the history of marksmanship. But the right data is as elusive as the X-ring on a MR-31 target.
Luckily, we’re here to help you find the vital info sure to have you shooting as sharp as ever. With that in mind, here are 5 Great Online Shooting Data Resources that will get and keep you on target.
This is by no means an exhaustive list and there are plenty of other shooting-related sites out there. So, tell us in the comments below where you like to go to crunch your ballistic numbers or research shooting data.
Reloading Data Nothing can replace a reloading manual when it comes to cooking up a load. And when you take to producing your own ammo, in time you will accumulate a library of these valuable volumes. But for tinkering with new handloading ideas, the Hogdgon Reloading Data center is an invaluable tool.
The website gives you the ability to play around with a number of variables — cartridge, bullet weight, powder — for a potential load and then spits out the reloading data on the other end. Perhaps the best aspect is the side-by-side comparisons of powder performance for each bullet weight, giving a solid handle on what you can expect in the velocity and pressure departments for each propellant.
Of course, there are limitations on what the data center offers. You are strictly limited to Hogdgon’s universe (luckily a large one) of powders — Hogdgon, IMR and Winchester. And, for each weight, there is only a sampling of projectiles. But even with these limitations, the Hogdgon Reloading Data center is a top-notch way to play with new ammo ideas, before you take to the bench.
Ballistics Calculators Aside from your mechanics in making a shot, practical marksmanship is a matter of mastering variables. Gravity, wind, on particularly long shots the coriolis effect all must be accounted for to get that tiny piece of copper-jacketed lead to land where you want it. In the simplest terms, conquering these is an exercise in math.
Far be it from me to disparage the pen-and-paper method of crunching numbers, but there are plenty of solid — and free — ballistics calculators online and at your disposal to simplify the process. Perhaps the most extensive is JBM Ballistics, which offers one of the widest selections of calculators on the Internet.
If you’re looking for a bare-bones calculator to get a handle on how your bullet drops for your particular location or if you want one that will account for minutia such as spin drift, this online tool has it.
It comes with a library of pre-loaded ammunition to choose from, but you’re also free to tinker with each variable all the way down to the length of the polymer tip of your bullet. For me, the handiest aspect of JBM Ballistics is its range card calculators, which do exactly what you’d expect — outputs a handy ballistic table perfect for taking into the field.
The site also offers a number of other calculators — recoil, power factor, maximum distance. It is the perfect way to lose hours online, but honestly, you’ll find that at JBM Ballistic it ends up being anything but wasted time.
Internal Ballistics If you’re in the market to buy an AR-15 for varminting, will a .223 Rem. reach out from a carbine-length barrel? Ballistically speaking, does polygonal rifling have any advantage over lands and grooves? There’s an easy what to find out — Ballistics by the Inch.
Originally, the site tested and published the relationship between barrel length and velocity for a number of handguns. Since then, it’s grown into a gold mine of internal-ballistic related data (and perhaps the best FAQ page on the web). And when you dig into the data — a labor of love of the four guys who run the experiments and site — it will smash preconceived notions and truisms you’ve heard about internal ballistics.
Here’s the draw back to Ballistics by the Inch — it’s limited almost exclusively to handgun cartridges. The exception is the .223 Rem. Nevertheless, the site does provide plenty of food for thought and could prove useful in fine tuning your next gun purchase.
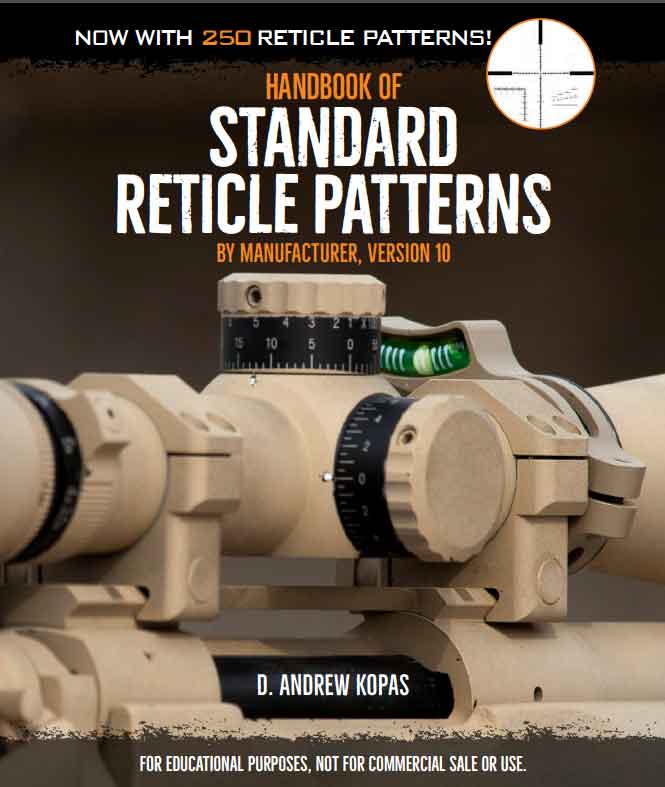
Optics Selection OK, you caught me — this is a blatant shill for a Gun Digest resource. But it’s free and extremely useful. The Handbook of Standard Reticle Patterns is perhaps one of the best resources for researching one of the more overlooked aspects of an optic.
You’re probably thinking — “Reticles? Really?” You bet, since you’re about to shell out your hard-earned money on a piece of equipment that costs as much, or exceeds that of your rifle. You’d better make certain you receive what you paid for and it better be capable of the mission in which it will be applied.
Col. D. Andrew Kopas helps you make certain you will with this 126-page handbook that compiles 250 tactical-style reticle patterns from the most popular optics companies. In many cases, you can drill down on what you’re looking for with the guide, and its ample subtension measurements and other explanatory data.
This is a great resource if you’re in the market for a high-end piece of glass and want to shop for your exact needs. And if you’ll allow me to shill just a bit more, checkout Gun Digest’s entire free resources page — there’s plenty of great info to load up on.
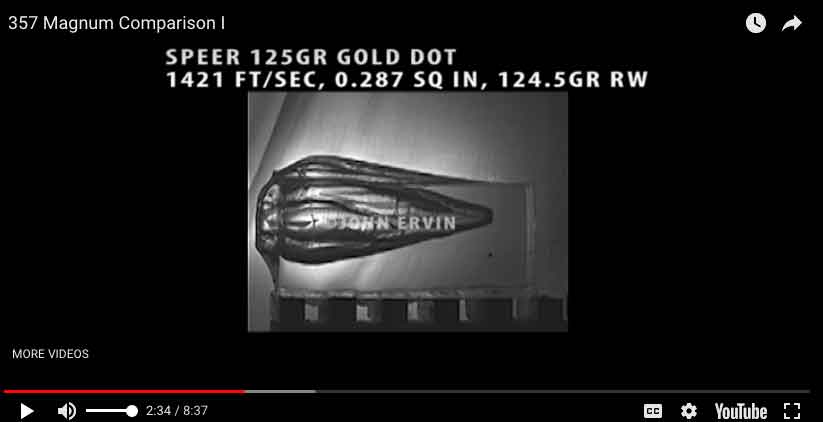
Terminal Ballistics If you are interested in understanding what happens once a bullet reaches its target, then Brass Fetcher Ballistics Testing is for you.
Run by mechanical engineer John Ervin, the site documents the terminal ballistics tests he runs for ammunition developers. It also has some of the best ballistics gel testing footage available on the Internet. From the mild-mannered .22 LR to the behemoth .50 BMG, there are hours of slow-motion footage of Ervin’s experiments. On top of that he supplies plenty of supporting data on each test’s terminal ballistics, at the bare minimum the kinetic energy transfer.
Do you need to see hours of ballistics gel abuse to make you a better marksman or choose the right caliber and ammo? Probably not. But at the same time, it’s a great aid in visualizing what happens when a bullet reaches its target. And a better understanding of what you’re doing when you’re behind the trigger is never a bad thing.
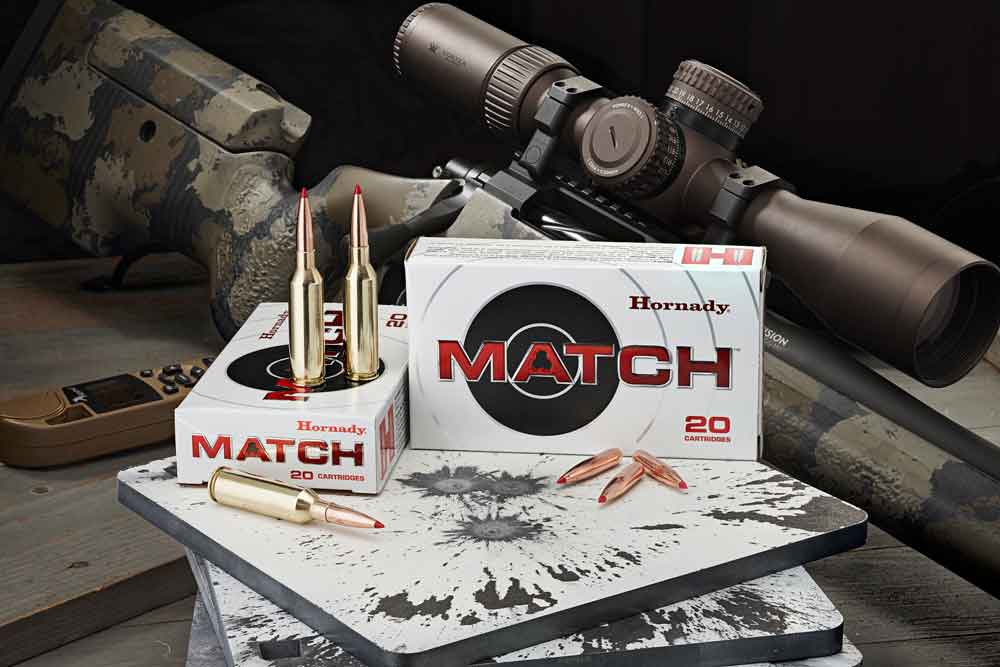
As always, when it comes to ammunition, there’s plenty cooking in Grand Island, Nebraska. Home of Hornady Manufacturing, the corn-swept plains is an epicenter of ammo, reloading and security innovation each year. And 2018 is shaping up no different.
Hornady recently released a sneak peek at its new product lineup for the impending year. And there is enough rolling off the company’s manufacturing floor to foul an entire brigade’s rifles.
So, as to keep everything straight, we’ll give a look at each of Hornady’s new categories in turn. Of course, we’ll save the best for first and jump headlong into the company’s mountain of new ammunition.
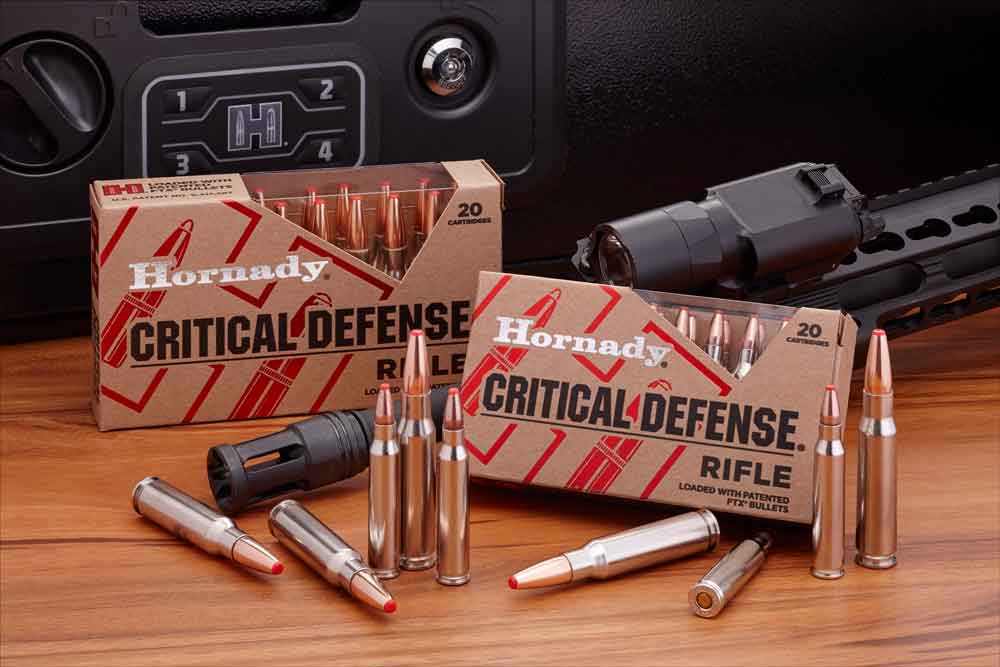
Critical Defense Rifle
Up to now, Hornady’s Critical Defense line of ammunition has been strictly a handgun affair (with the exception of a .30 Carbine load that has been around for a while). But with more shooters turning to tactical rifles for personal and home defense, Hornady saw the opportunity to arm long gun shooters with premium ammunition.
The heart of the round is the Critical Defense FTX bullet that boasts Hornady’s patented Flex Tip. The polymer tip not only helps the bullet expand quickly even at low velocity, but it also keeps the cavity free from clogging.
The bullet’s quick expansion makes the round ideal for short-range engagements, reducing the potential of over-penetration. Hornady has even turned an eye to modern gun designs, with the Critical Defense Rifle line engineered to deliver top performance even out of shorter barrels, which are becoming more and more common.
Available Loads:
.223 Rem. 55-gr. FTX
.223 Rem. 73-gr. FTX
.308 Win. 155-gr. FTX
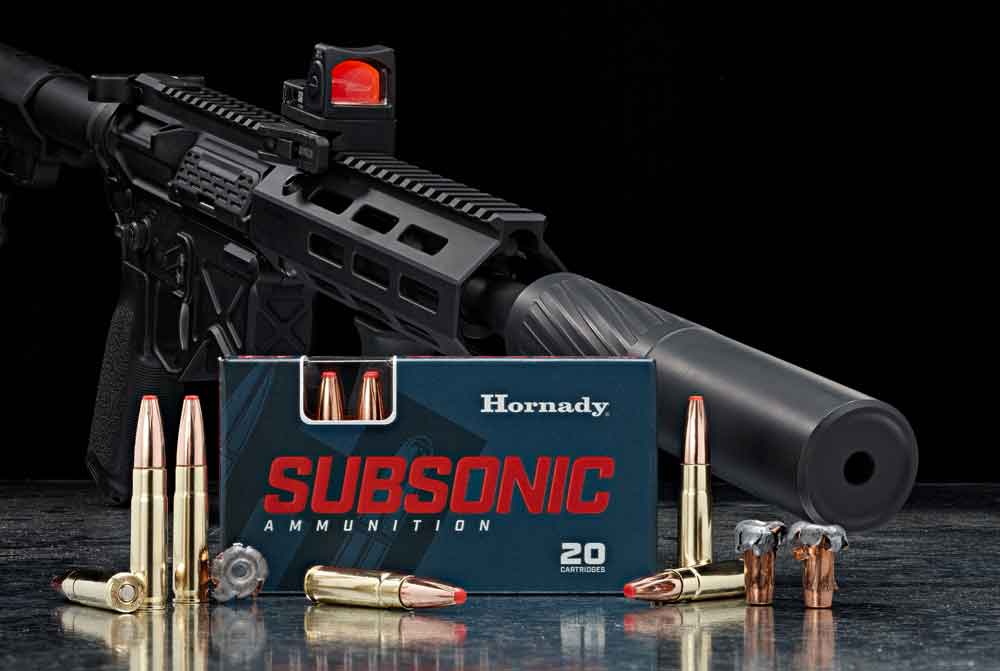
Hornady Subsonic Ammunition
The .300 Blackout has become one of the most popular chamberings for the AR-15, due to, among other things, the fact that the round is eminently capable of being suppressed. With its Subsonic Ammunition, Hornady has attempted to arm Blackout shooters with a stealthy round that still provides accuracy and power.
Hornady has loaded these rounds hot for subsonic, with its data listing the muzzle velocity out of a 16-inch barrel at 1,050 fps. But this allows top performance from the 190-grain Sub-X bullet, especially at close range.
At 1,020 fps, the Flex Tip round meets or exceeds FBI Protocol terminal ballistics test requirements. Optimized for subsonic performance, the Sub-X’s flat polymer Flex Tip and serrated jacket ensure the hollow point expands quickly and violently.
Hornady even went as far as to enhance the powder in its Subsonic Ammunition. The propellant is not only engineered for optimal performance below the speed of sound, it also reduces the flash signature.
6.5 PRC
Hornady is, in part, responsible for the surge in popularity of 6.5mm chamberings. The company did, after all, cook up the 6.5 Creedmoor. Now it’s shooting to push the ballistically gifted caliber even further.
The 6.5 PRC (Precision Rifle Cartridge) offers shooters a stepped-up option for long-range hunting or precision shooting. Designed to operate in short or medium actions with standard magnum bolt faces, the cartridge offers a flat trajectory and minimal recoil. Its case has been tweaked for maximum performance as well, with a long neck and 30-degree shoulders. Hornady has initially offered a Precision Hunter load tipped with a 143-grain ELD-X bullet and a Match offering with a 147-grain ELD Match bullet.
At this point, there are just a handful of rifle makers offering 6.5 PRC chamberings: GA Precision, Gunwerks, Horizon Firearms, PROOF Research, Stuteville Precision and Seekins Precision. But if it follows its little brother’s footsteps, expect many more to come out of the woodwork as time wears on.
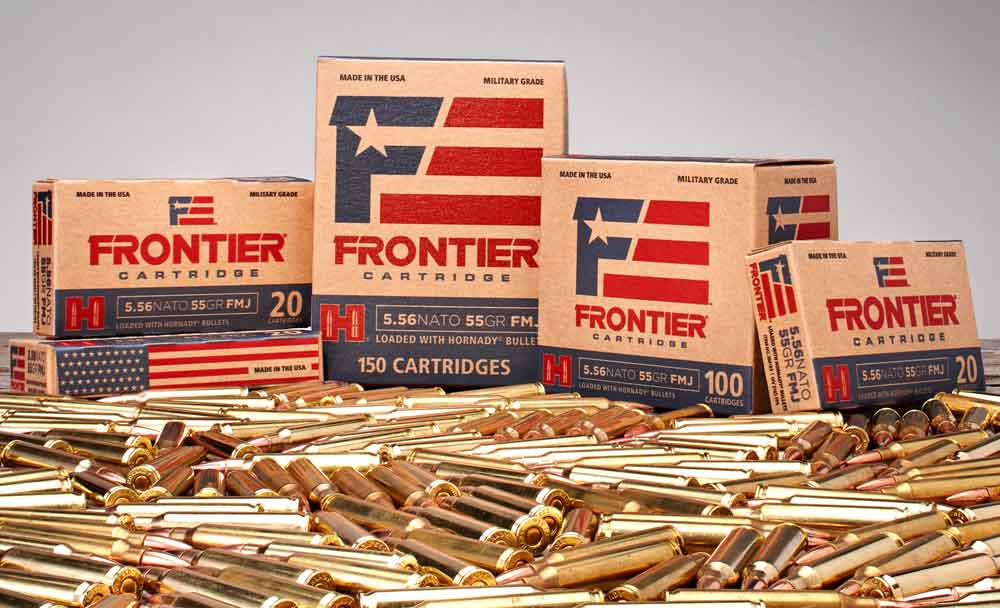
Frontier Cartridge
Hornady has teamed up with the manufacturing prowess of the Lake City Army Ammunition plant to offer military-grade ammunition at an economical price. Frontier Cartridges are manufactured at the Missouri facility and are tipped with Hornady bullets.
This is not the first time Lake City and the Nebraska manufacture have come together to produce ammunition. The original Frontier Ammuntion, launched by Hornady in 1964, utilized Lake City brass.
Hornady is offering 11 different rounds in its launch of Frontier Cartridges, all in .223 Rem., and 5.56 NATO. The company touts the line as ideal for everything from plinking to target shooting to hunting to law enforcement training.
Available Loads:
.223 Rem 55-gr. FMJ
.223 Rem 55-gr. Spire Point
.223 Rem 55-gr. Hollow Point Match
.223 Rem 68-gr. BTHP Match
5.56 NATO 55-gr. FMJ M193
5.56 NATO 55-gr. Hollow Point Match
5.56 NATO 62-gr. FMJ
5.56 NATO 62-gr. Spire Point
5.56 NATO 62-gr. BTHP Match
5.56 NATO 68-gr. BTHP Match
5.56 NATO 75-gr. BTHP Match
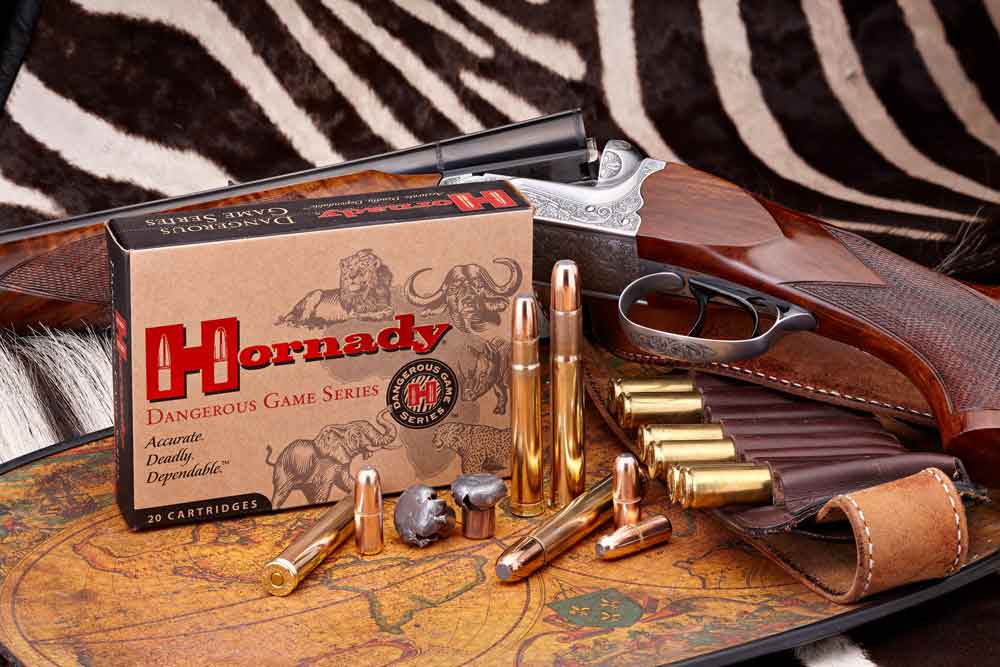
Dangerous Game Series
Hornady has deep roots in big and dangerous game hunting. And it has tweaked its renowned Dangerous Game Series to be all the more potent.
The premium hunting ammunition is now being loaded with either DGS (Dangerous Game Solid) or DGX Bonded bullets, providing utterly devastating terminal ballistics. The lead cores of the DGX Bonded bullets, boned to the jackets, expand predictably, while retaining a high amount of mass once traveling through the target.
You need to give your own handgun skills an honest appraisal. From novice to expert, these standards will encourage the average shooter to excel and present a basis for procedure.
Handgun shooters can be classified by novice, beginner, specialist and expert.
An honest evaluation of your handgun skill level is necessary to advance.
A novice may not win a fight, while a professional should be decisive in a battle.
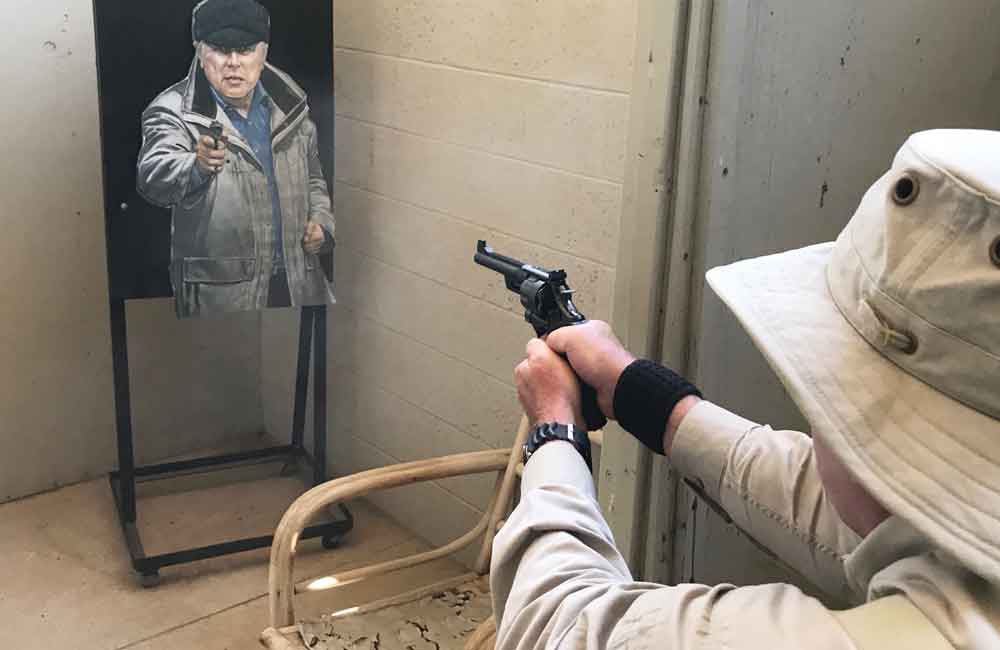
Note Jessie Duff’s grip and trigger finger position — she gets it right and wins the big money!
Novice The novice may be able to safely load, unload and handle his or her personal sidearm with a minimal amount of fumbling. Their level of competence is more broad than deep. This is the beginning level for each of us.
While indeed minimal, it is the common skill level of quite a few non-dedicated service personnel. Shooters at this level may not survive gunfights. It really depends upon their mindset.
At short range, marksmanship problems are not severe, but the combat mindset is questionable. Shooters in this class are likely recreational shooters on the civilian side. Peace officers at this level maintain their marginal skill by yearly qualification.
Many look forward to these qualifications as much as they looked forward to high school fire drills. Their tactical mindset is influenced more by the media than reality. Among this group you will find many that rely upon skills they cannot demonstrate. The single greatest shortcoming among this group is a lack of complete familiarity with their sidearm.
The author demonstrating a good, solid grip with the thumbs forward and proper trigger finger placement.
Beginner/Proficient The beginner may be a product of a personal training program or an agency with quarterly qualifications. Their training is likely to be relatively narrow but perceived as adequate.
Some within this group realize there is room for improvement. It is important to note that this is the highest level of skill sustainable by many with job and family demands. A homeowner who keeps a firearm primarily for home defense has done well to reach this level. A peace officer trained to this level who combines his skill with streetwise tactics will be a formidable shooter.
This is the highest level of skill to which administrative qualifications will lead. While common street thug adversaries are often at the duffer level, some criminals reach the beginner-proficient level.
In my experience, very few of our protein-fed, ex-con criminal class rise past the novice level. The proficient class of shooters is common among those who shoot in IDPA matches. The proficient level of skill is sustainable with monthly practice and not out of the reach of anyone of normal strength and dexterity.
Specialist This level isn’t one that you arrive at by accident. Hard work is needed.
The specialist is good at a number of skills. He or she will deploy a top-grade handgun and be able to use it well. This person knows the likely threat profile and practices diligently to address this threat.
Well-versed in the tactics and skills likely to be needed in a personal protection scenario, they are able to handle unexpected problems. The specialist is often deeply opinionated, has formal training and often gravitates to training others.
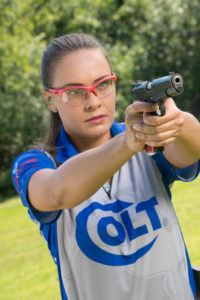
Colt’s Maggie Reese demonstrates an excellent all-around firing grip and trigger finger placement.
The Professional The professional has a lot of answers dependent upon the situation. He is conversant in marksmanship and gun handling as well as advanced tactics. He is familiar with a number of firearms.
While he has opinions concerning firearms, he regards each as a tool. The professional does not consider training the goal but a means to an end. His marksmanship skills are well-honed and consistent.
He has fewer bad days and brilliant moments than the rest of us, but rather his skill is consistent. He is responsible for his actions and strives to learn new tactics while respecting the tactics and skills that saved his life in the past. His skills are demonstrably superior to most of those he trains but they are hard-won.
While the specialist is a product of official training, the professional may only be produced by diligent effort on his own time — and his own dime. His training time is measured in thousands of hours. I know such men. Three have run my training classes and two were United States Marines. I also attended a class as a student with such a marksman (the only one in his class at the course), and he too was a Marine. I have no military experience and I can only state that the Marines are doing something right.
As for the third I met, he was a U.S. Army veteran that had been injured overseas. Despite muscle tremors that challenged his considerable skill he aced the course and demonstrated extraordinary ability. Very few instructors have the privilege of training such men.
The .45 ACP has long been one of the most popular for personal defense among those who carry, but is the 9mm starting to edge it out?
In .45 ACP vs 9mm, is the .45 still the top self-defense choice?
A key point in choosing self-defense ammo is its ability to quickly neutralize a threat.
The .45 ACP, .40 S&W or 9mm are the most commonly argued for calibers.
Hornady’s chief ballistician Dave Emery says there’s little difference between them.
Terminal performance of modern defensive rounds is relatively similar in ballistics gel.
Some stick to the .45 ACP — if technology fails, the round still makes a bigger hole.
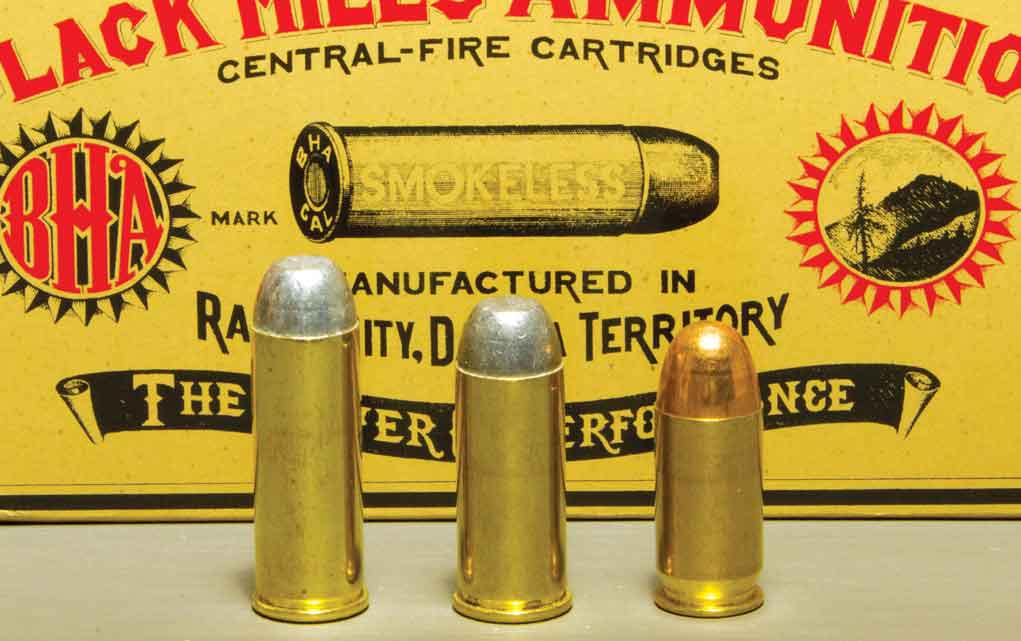
While attending a recent event where .45-caliber semi-automatic handguns, double-action revolvers and single-action revolvers were shot at contact to long-range targets in simulated self-defense situations, it brought to mind the United States’ long-standing love affair with the .45-caliber handgun round. Yet, many who carry a handgun as part of their job choose to use other handgun cartridges, such as the .40 S&W and 9mm Parabellum.
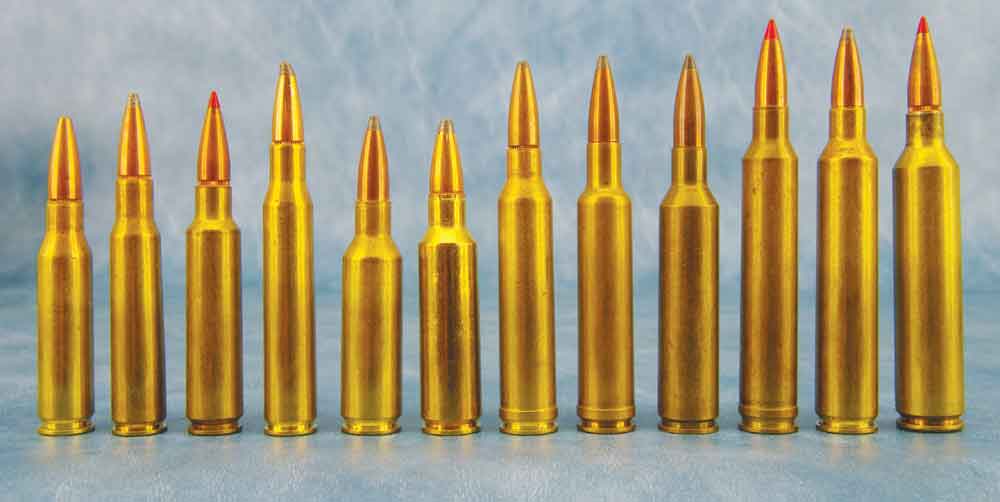
The .45-caliber handgun round in America has evolved from the .45 Colt introduced in 1873 (left), followed shortly after by the .45 Schofield (center) to the .45 ACP used in John Browning’s 1911 semi-automatic handgun.
The disagreement about what’s the best handgun cartridge for self-defense never seems to end, and it probably never will until someone invents a handgun that will always stop a felonious assault immediately.
You see, handguns just aren’t very effective fight stoppers. The reason people carry them is because they are easy to keep out of sight and they’re readily available in an emergency. Rifles in almost any caliber and shotguns are much better at stopping an aggressor, but they’re not easy to carry — and, incidentally, they too are not perfect at immediately stopping an attack. So, for the time being, handguns are the method of protection that most people rely on.
But, you say, on TV and in the movies, if a guy gets shot with a handgun, he goes down right away. That’s the movies, and it’s Hollywood, where fantasy reigns. It’s not real life.
In his book, Guns, Bullets, and Gunfights, Jim Cirillo, a real gunfighter and member of the New York Police Department Stakeout Unit, states, “I have seen felons get shot with 158-grain .38 Special, 200- and 230-grain .45 ACP, 115-grain 9mm hollow points, 110-grain .30 Carbine and 12-gauge 1-ounce slugs, and only two of those [many] incidents were one-shot stops.”
Keep in mind that human spirit and determination varies. Some people intent on doing injury to others will be stopped and scared off at the mere sight of a gun. Others will be stopped by a minor injury or thumping them with a fist. But a small number will not stop unless they’re physically unable to continue.
The double-action revolver is not obsolete and is still a viable choice for self-defense if its limitations are realized and the user has the proper training.
For the last group, they must no longer be able to breathe, the blood supply must be interrupted so that muscles and organs can no longer function, a bone must be broken so that the person can no longer control the body, or the nervous system must be disrupted so that the brain can no longer send signals to the muscles.
And even if the air or blood supply is cut off, a person can still function for long enough to continue an attack and kill a victim. So, the goal for a law-abiding citizen, who has no other choice to save his life or prevent serious bodily harm from a felonious attack, is to do as much damage as necessary to quickly stop the attacker. Notice that the goal is not to kill the attacker, but to stop the attack. If the attacker turns and runs, that’s a good outcome, but if the attacker is killed in lawful self-defense, that’s a consequence the attacker assumed when starting the aggressive behavior.
Given these realities of life, it makes sense to carry a handgun chambered in the most effective cartridge available that the shooter can shoot accurately, quickly and can carry discreetly. This is where the argument begins. And the argument has been raging for decades with no clear winner.
It’s All In The Ammo: .45 ACP vs 9mm, .40 S&W
The FBI and other law enforcement organizations are switching to the 9mm Parabellum. Reasons include lower recoil generated by the 9mm round, which makes it easier for many people to shoot accurately and get back on target quickly for follow-up shots. And a 9mm handgun can carry more rounds than the same-sized handgun chambered in .40 S&W or .45 ACP. That’s an important consideration given the rising frequency of group attacks by terrorists or gang members.
When fired into ballistic gelatin to test the relative effectiveness of handgun rounds, the Black Hills 9mm (top) has about the same penetration as the Black Hills .45 ACP +P round (bottom). The temporary wound cavities are very similar, with the .45 only slightly wider, but not as long.
But probably the biggest reason for the switch is the recent improvement in handgun round terminal ballistics. According to Dave Emery, wizard and senior ballistician at Hornady Manufacturing, an innovative maker of a variety of ammunition, there’s now very little difference in the actual terminal performance in ordnance gelatin between premium self-defense .40, .45 and 9mm projectiles.
Yet the disagreement continues. While some excellent firearms trainers and experts, many who have carried a gun for a living and participated in real gunfights, have switched from .45 ACP to 9mm, others still carry the .45 ACP.
No less than the late Pat Rogers, who I have trained under and who has used a gun while in the U.S. Marines and as an officer with the New York Police Department, switched from a 1911 chambered in .45 ACP to a double-stack, striker-fired 9mm polymer-framed pistol. And many experienced gunfighters have done the same. But others, like retired Sheriff Ken Campbell, who is the Chief Operations Officer at Gunsite Academy, still favor the .45 ACP.
Campbell points out that gelatin blocks are not human and that humans are much more complex and react differently than an inanimate, unmotivated blob of jelly. He recognizes the improvement in self-defense bullet technology that has resulted in better terminal ballistics for the 9mm round, but the .45 ACP bullet has also improved.
“I’ll stick with the bigger bullet,” Campbell says. “Again, when technology fails, the .45 ACP makes a bigger hole. Also, it has a greater chance of hitting something vital since it is wider.”
But Campbell is rational and not married to the .45 ACP just because of tradition. He recognizes that getting multiple, fast and accurate hits in vital locations is more important than bullet performance, and if he ever gets to the point that he physically cannot control the .45 ACP adequately, he will consider switching to smaller bullets. In fact, despite the 1911 .45 ACP heritage associated with Gunsite, the school regularly teaches students how to effectively use other guns in other calibers.
For some, the .45 ACP works best, but for others, the .380 ACP or an even smaller round is the right choice. There is no way everyone is going to agree on this, so the debate continues.
Editor’s Notes: The article originally appeared in the September 17 issue of Gun Digest the Magazine.
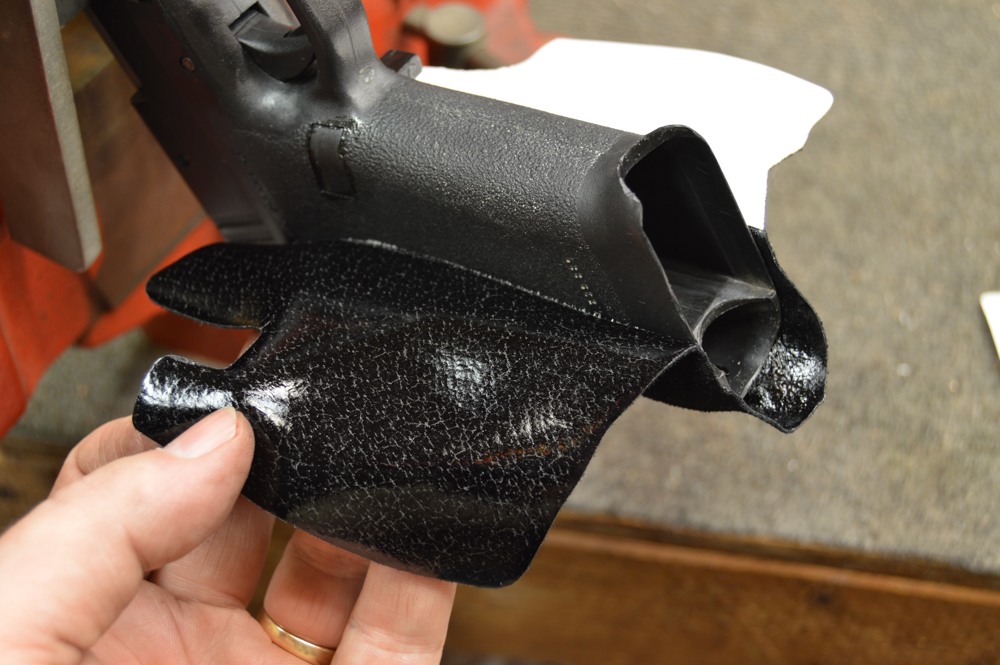
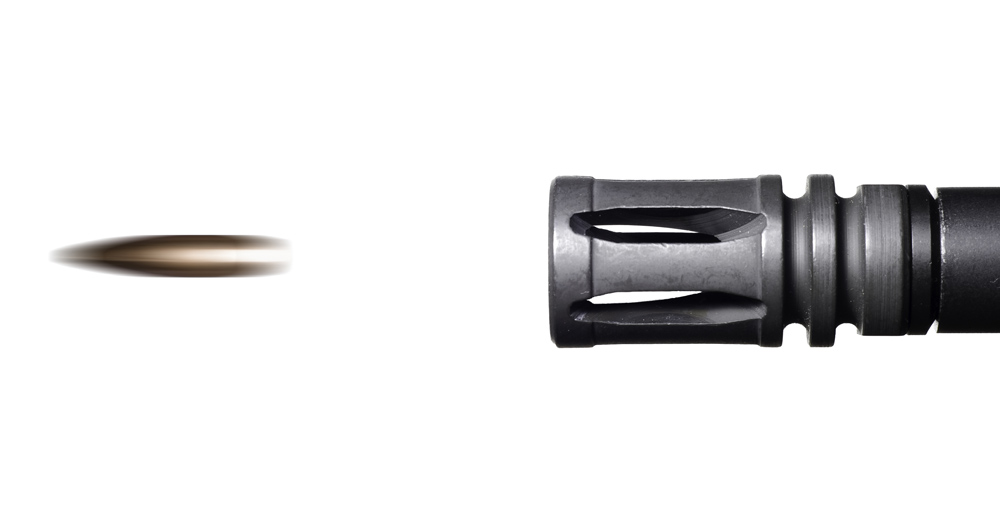
A suppressor is designed for the caliber it’s meant to handle. Find out how to choose the right suppressor, especially if you want to use it on more than one gun.
Suppressors are designed for a specific use. That is, they are made to fit a particular caliber because bullet size, gas flow and pressure matter. I don’t care how good a 5.56 suppressor you own, if you put it onto a .308 rifle you are going to be very unhappy, very quickly. Try as it might, the bullet is not going to fit through the hole in the baffles and will end up making its own holes. Thus, the importance of choosing the right suppressor.
We’re jumping ahead a bit here, but rimfire cans, 5.56 cans and 9mm ones will have the same thread pitch; one-half-inch in diameter, with threads pitched at 28 per inch.
A rimfire suppressor screwed onto a 5.56 rifle will have a short and unhappy life, and it will be even shorter and messier if it is threaded onto a 9mm pistol. If at some point in the future you have any of these combinations in firearms and suppressors, be very, very careful what you put on where. And do not let your friends, relatives or gun club buddies at the range just screw on whatever suppressor fits. If you don’t attach the right suppressor, the results could be very bad, or at least, quite expensive.
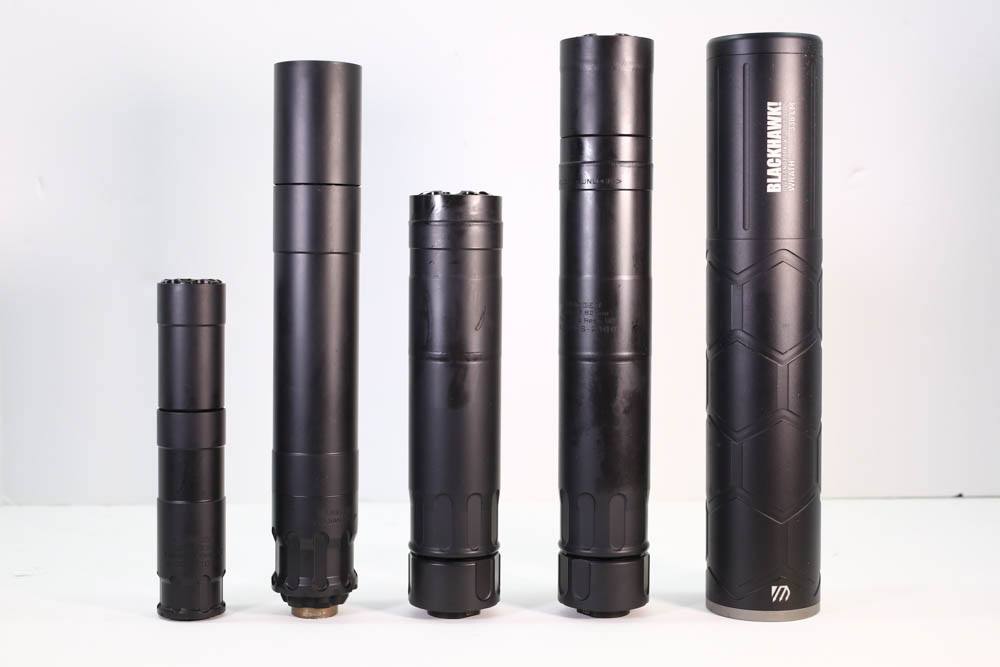
Suppressors come in a variety of sizes, for different calibers and uses. There is no “one size fits all,” so don’t expect one.
Finding The Right Suppressor By Caliber
A suppressor is designed for a particular volume and strength, according to the caliber it is meant to deal with. As a result, you’ll see limitations from the manufacturer on a suppressor. “Rated for .308 Winchester, barrels longer than 12 inches” is one example. Or, “Rated for .300 RUM down to 16-inch barrel, .300 WinMag to 12 inches and .308 to 8-inch barrel lengths.”
They have designed and constructed a suppressor that can handle a certain amount of pressure and can deal with a certain maximum gas flow volume, and they are being up-front about what their suppressor will take.
Why? Simple, the noise you hear is caused by pressure. When the cartridge is fired, the chamber pressure is at its maximum, then the pressure goes down as the bullet moves forward, due to the increasing volume of the bore, with the bullet as the plug. When the bullet leaves, there is a certain pressure at the muzzle, called the “uncorking pressure,” and that is what causes the noise we are trying to control.
The higher the initial pressure, the greater the residual pressure down the bore. The shorter the barrel, the higher the uncorking pressure, simply because the expansion volume of the bore hasn’t increased enough to drop the pressure.
Some rifles are louder than others. A short barrel will be louder, unless the caliber is markedly smaller.
And here’s the important part for those of you interested in putting the right suppressor on your big boomers: the powder you use (or the ammo company uses) also makes a difference. A slow-burning or “progressive” powder acts to keep the bore pressure up as the bullet travels forward. That is part of how it gets you more velocity. (That, and a higher starting pressure.) So, your .300 magnum, of whatever type, is going to not only burn more powder, but a slower-burning powder than a .308 would, and this increases both the volume and uncorking pressure that a suppressor has to deal with.
That’s why suppressors are rated for a minimum barrel length.
As long as you are within the pressure and volume limits the manufacturer lists, and at or under bullet diameter, you are okay.
Your .308-rated suppressor will be just fine, and happy as a clam, if you put it onto your smaller-cartridge-case rifle or smaller-bullet-diameter rifle. That is, the 6.5 Creedmoor, 6.5 Grendel, .260 Remington, 243, etc. It will find a .223/5.56 rifle a piece of cake to deal with, being both a smaller case and smaller bullet.
However, it will not be as happy with a .270 Winchester or .280 Remington, and it will be very unhappy if you put it on a 7mm Remington Magnum.
You have to consider bullet diameter, chamber pressure, case volume and expected burn rate of common powders if you are going to use a suppressor across cartridges and in different firearms.
When in doubt, drop a line to the manufacturer. They’ll be happy to tell you if what you have in mind is okay or not, and if you have the right suppressor for the job. In fact, they’d prefer it if you ask ahead of time.
Precision firearms need precision suppressors, and that’s why there is such a price range in suppressors. Not just the materials, but the tolerances to which those parts are held.
Rimfire Suppressor Considerations
Rimfires are not just rimfires. There is the common and expected (but surprisingly sharp) .22LR. The Twenty-Two Long Rifle has a chamber pressure of 21,000 PSI, but the expansion ratio (the ratio of the case compared to the case plus bore when the bullet leaves the muzzle) is so great that pressure has dropped to perhaps the firearm’s minimum by uncorking.
Change that to the .22 Magnum and things get more involved. Not because the expansion ratio is so much different, but that the magnum uses different powders and retains more pressure, garnering the extra velocity it is marketed for. Ditto the various .17s.
And then when you go to the 5.7×28, the FN cartridge, the case is a lot bigger, the expansion ratio is much smaller, and the uncorking pressure a lot more. As a result, some rimfire suppressors will be rated for the 5.7 and others will not.
As above, when in doubt, ask. Putting your perfectly fine and happy with your 10/22 rimfire suppressor on your buddy’s SBR’d FN PS90 may make for a bulged or broken suppressor.
Choosing The Best Suppressor For Handguns
The common handgun suppressor is for the 9mm, the most popular. There are others made for the .40 and .45, but they are less common. It is typical for someone who wants one suppressor to fit them all to buy a .45 and have rear cap adapters to fit it onto 9mm and .40 handguns. Yes, it has larger bore holes than would be called for in those applications, and thus will be a bit noisier, but it will amount to a decibel or a few at most. That, compared to the cost savings of having just one, appeals to many.
The Right Suppressor For A Rifle
Most people either get caliber-specific suppressors, or they invest in one or two (or more). The common approach here is to buy a .308 and use it on everything .308 and smaller, including 5.56, and add a second one that will handle the big magnums, like the .300s, or even jump up to a .338 suppressor, which will laugh at the efforts of your biggest .300 magnum.
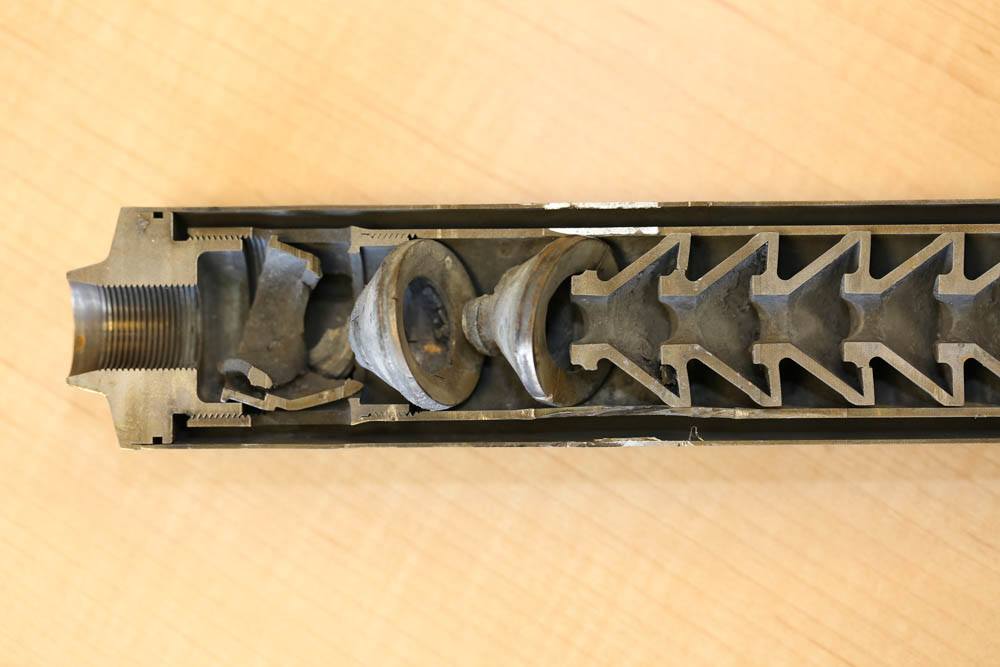
A well-built suppressor will stand up to a lot, but you can exceed the limits of anything. This suppressor was put on a belt-fed machine gun and left there until it and the barrel were visibly drooping from the heat.
How To Attach A Suppressor: Mounts
You can’t just use duct tape and baling wire to secure a suppressor. There are two types: direct-thread and quick-detach (QD). Some manufacturers have begun making suppressors with a rear cap that is a socket, and you can then thread into the socket either a direct-thread or a QD system.
Why elaborate systems to keep the suppressor on? Simple, each time you shoot, the jet of gases flow out of the muzzle, behind the bullet, and crash into the first baffle, the first surface ahead of them in the expansion chamber. “Big deal,” you say? Let’s do a quick bit of math. If the uncorking pressure of your rifle is only 7,500 PSI, and the impact surface of the baffle in the expansion chamber is only one-half of a square inch in surface, then the suppressor gets hit with a jet of gas that generates 3,750 pounds of impact. Impact that is trying to drive the suppressor off the muzzle.
That’s why you want good, sturdy threads on your barrel.
Pros And Cons Of A Direct-Thread Suppressor
This is exactly what it sounds like. An example would be a 5.56 rifle with the muzzle threaded for 1/2-28. The rear cap of the suppressor would be threaded 1/2-28, and you simply screw the suppressor on (after taking off the flash hider, if any) and tightening it to stay.
The advantages of direct-thread are obvious: It is less expensive, it is lighter and it is durable. The disadvantages are equally obvious: You have to spin your suppressor for as many turns as it takes to get it tight. If the thread pitch is 28 tpi, and you have half an inch of threaded shank, then it will be fourteen turns to tight.
Tight for a rifle suppressor is not just hand-tight. You will want to use a wrench to generate enough inch-pounds of torque to keep the suppressor on tight.
If you have one rifle and you won’t be using your suppressor on any other, then direct-thread is a no-brainer. If you are going to use it on more than one, then it is a decision between you and your wallet as to your choice.
The options are:
Buy a suppressor for each rifle;
Keep a wrench handy to swap suppressor or suppressors around on your rifles; or
Buy a suppressor that uses a QD mount and install those mounts on each rifle so you can quickly swap the suppressor.
Quick-Detach Suppressor Mounts
This also, obviously, means quick-attach. The process is simple. The manufacturer makes a device that threads onto your barrel. This device has a set of threads or a quick-lock system that the suppressor latches onto. You can screw the suppressor onto the mount with a turn and a half. Or, slide it on and turn the locking collar a half-turn to lock on the suppressor.
The advantages are several. First, you can have a flash hider or muzzle brake on your rifle, even when the suppressor is off, if that’s how the mount is made (and many are).
You can swap your suppressor from one rifle (or handgun) to another quickly, without the use of tools. Of course, this supposes the suppressor is cool, as you won’t be swapping a suppressor bare-handed when it is at 700 degrees.
The big deal with this is economics. I just did the arithmetic with a suppressor that happens to be on my desk as I write this, a Sig SRD556QD. Sig makes the same suppressor as a direct thread, the SRD556.
The SRD556QD lists at $695 and mounts are $60 each. The SRD556 is $545. By the time you buy two SRD556 suppressors, you could have bought one SRD5566QD and six extra mounts. If you have that many .223/5.56 rifles, you can swap one suppressor between them.
The downsides are also simple: a QD-built suppressor is going to cost more than a plain direct-thread model. (That is, manufacturer-specific, model-alike.) Also, because of the mount and the rear of the suppressor that has to be machined for it, the QD model will be a bit heavier than the direct-thread version. In the case of the ones just used as a comparison, the SRD556 weighs 11.5 ounces and the SRD556QD weighs 14 ounces.
Reloading is an extremely satisfying endeavor, whether you’re rolling out precise target rounds or a little something to put meat on the table. And nowadays, given the profusion of pre-packaged reloading kits, it’s a simple passion to pursue.
As you go along, you’ll discover there are little pieces of equipment you can add to your bench that will make the process easier and your ammunition all the more accurate. With that in mind, here are three things you didn’t know you needed for your reloading bench. For the most part, you could get along without these, but overall they’ll make life a bunch easier at your reloading bench.
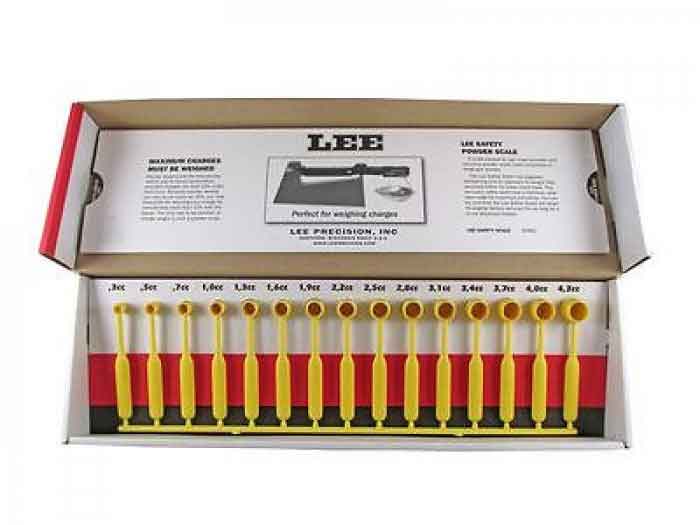
Powder Dippers Typically, we think of ammunition reloading as a bulk endeavor and really almost all modern equipment is geared that way. But what if you want to whip up a handful of your favorite coyote or deer loads and don’t want to go to the trouble of filling up the hopper on your powder thrower?
Lee Precision has the answer for every small reloading job with its Powder Measure Kit. The 15 graduated dippers are perfect for scratching together 20 rounds or less and makes cleanup a nearly non-existent task.
While the kit comes with a slide card with powder dispensing data, it’s wise to double-check them with your scale, like with all volume measurements. But once you get used to using these little marvels and discover how quick they make little reloading jobs, you’ll fall in love with small-batch handloading.
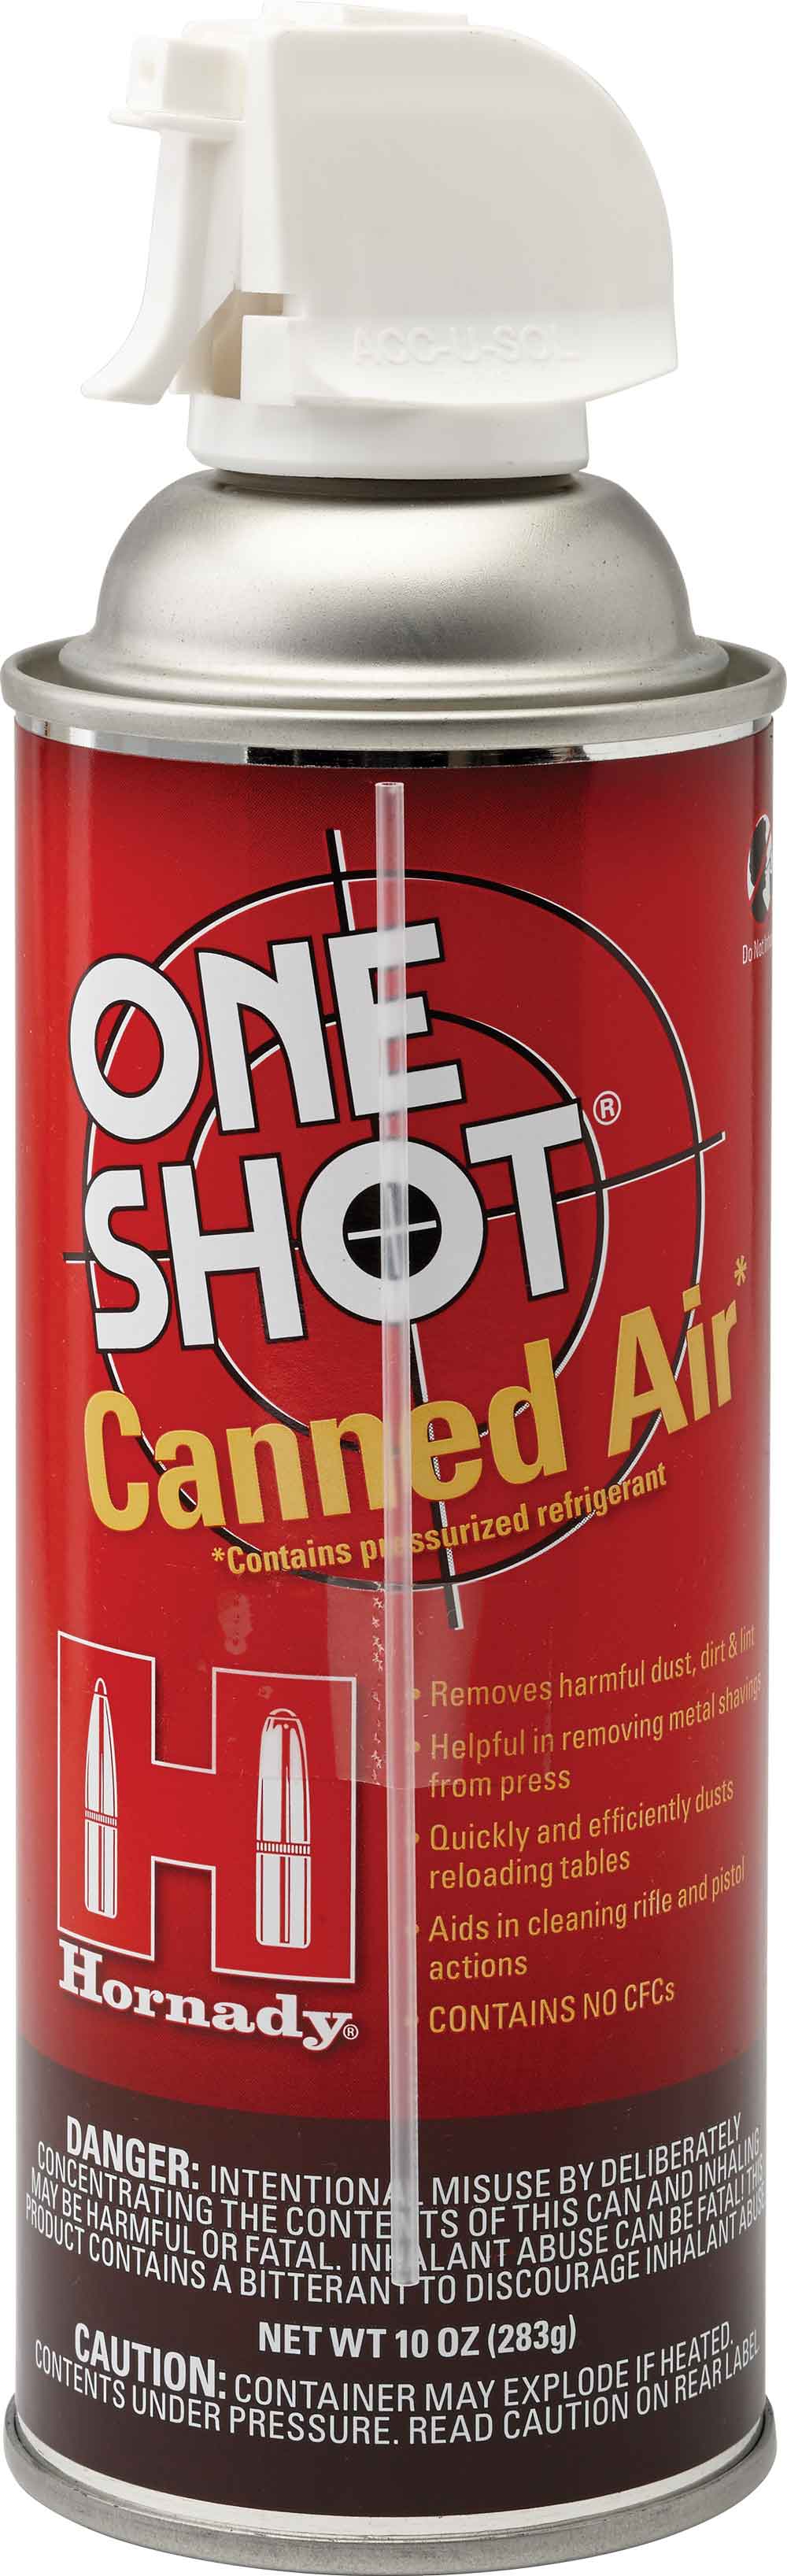
Canned Air You ever notice that there are always a few grains of cleaning medium that hold fast to the bottom of some cases out of the tumbler? Or that no matter how hard you try, inevitably a few brass shavings from chamfering end up slipping down the neck? As persnickety as reloaders are, that just won’t stand, especially if it gets lodged in the flash hole.
Luckily, there is a simple solution that doesn’t involve bending a paper clip in a vain attempt to fish out debris — canned air. A quick blast in the flash hole and the inside of your case will be as clean as the outside. Honestly, the stuff is like vaporous gold when it comes to custodial jobs at the reloading bench — even beyond case prep.
Hornady has a Quick-Shot Canned Air, but don’t think you have to buy something made by a reloading company. The stuff at your local megastore will do.
Notebook You assembled a killer load for your favorite rifle, it grouped like gangbusters at the range, and you can’t wait to put together a whole bunch more. But there were a slew of variables that came together to make that load a success — so many you’ll never remember them all.
That’s why, perhaps next to a quality reloading manual, a notebook is among your most important tools. Meticulous note taking will ensure that you have the right recipe to recreate those deadly-accurate successes that roll out of your press and it acts as a solid reminder of what just doesn’t work.
Don’t lose what came together to make a magic load because you were unwilling to spill ink. Besides, it costs less than anything else you put on your reloading bench.
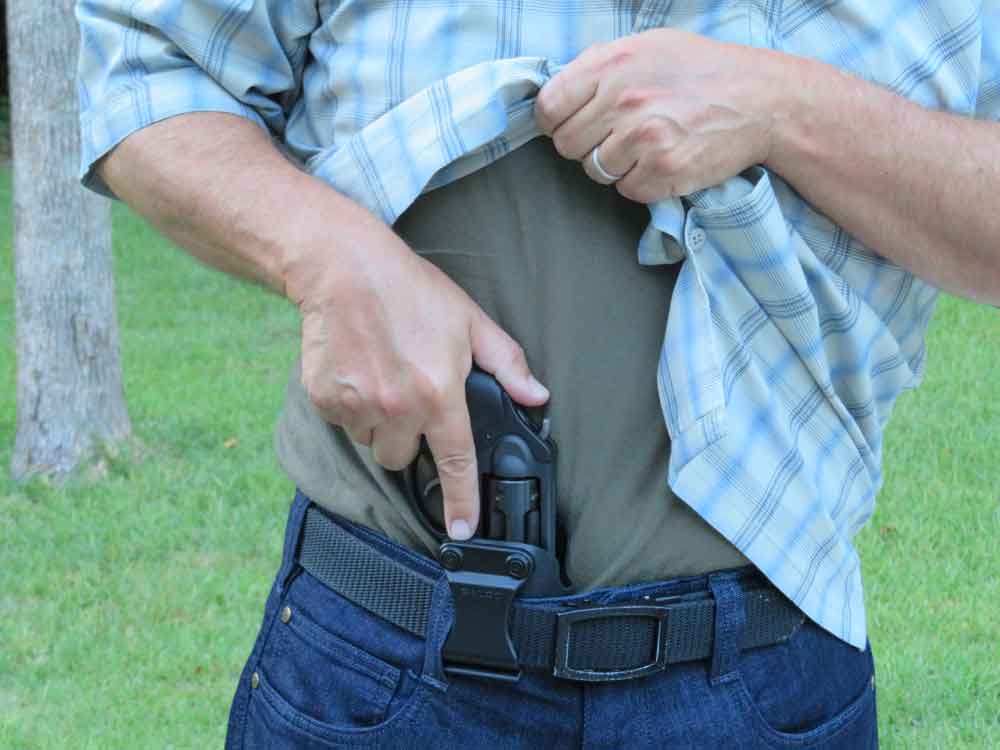
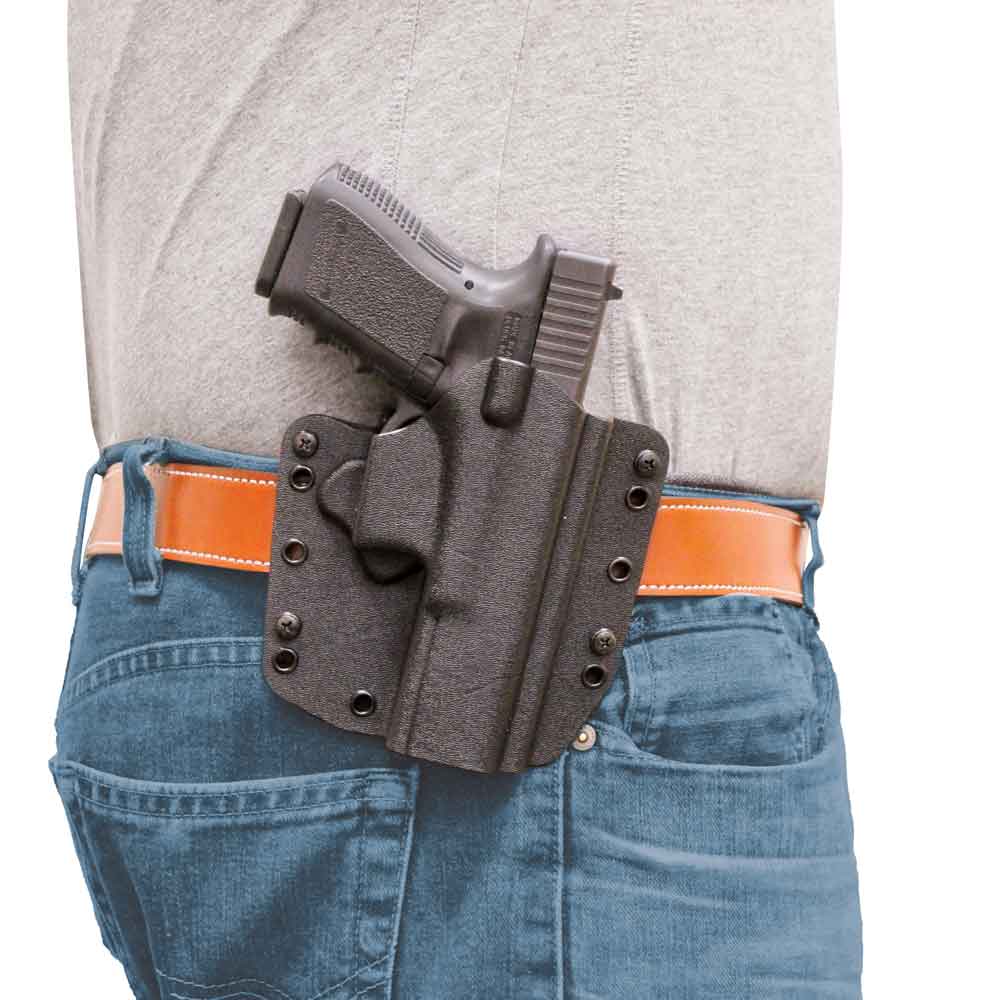
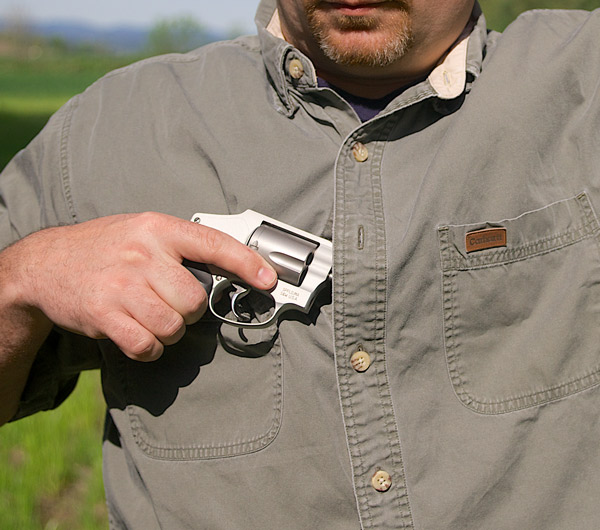
Concealed vs. Open Carry: Do we have a right to alarm innocent people?
Is open carry a wise self-defense choice?
We have the right, but is it wise to carry in a way that may alarm other citizens?
With open carry you can become a target of thieves, bullies and show-offs.
It opens us to false accusations of negligent gun use — the firearm can clearly be seen.
The author feels concealed carry offers surprise and thwarts potential “gun-grabs.”
The concealed handgun can’t be used to protect yourself and others if it is not readily accessible. If it is not discreetly concealed, well…it is no longer concealed.
Open carry is a hot-button issue in both the gun culture and the eye of the public. In some weather, this can add comfort to the carrier, since cover garments can be unduly hot. There is also an intimidation effect on potential criminals, and there is documented evidence of that.
However, that which intimidates bad guys will inevitably intimidate good guys, too. We live in a society where, for generations, media and politicians have relentlessly demonized guns and people who own them. Because people unidentifiable as law enforcement carrying guns in public are an aberration of the norm, it follows that some bystanders will perceive “aberrant person with power to kill me and others.”
Do we have a right to cause that alarm to others? We do not know if one of those passers-by, or fellow diners in the restaurant where we are open carrying, may in the past have been victimized by a criminal armed with a gun. We should be able to understand how we strangers with visible guns in their presence may alarm them.
It puts us in the position of a smoker in the presence of someone who has a severe allergy to tobacco smoke. Yes, we have a right to smoke, but not a right to trigger someone’s allergy. Yes, we have a right to bear arms, but do we have a right to alarm innocent people needlessly when we know, or should know, that might happen?
There are other concerns with open carry. One is that the exposed handgun becomes an inviting target for thieves, bullies, and show-offs. More than one good person innocently carrying a holstered gun has been disarmed by someone who had no right to touch them, sometimes with tragic results.
Finally, any experienced cop can tell you that, sometimes, bad people make false complaints to the police about good people. If that person has spotted your small, gray semi-automatic pistol in your exposed holster, he can maliciously and falsely call police and tell the officers that you threatened him and pointed your gun at him, an act of felony aggravated assault which can bring many years of incarceration. Because he will be able to correctly describe your gun due to your openly carrying it, his false accusation gains credibility. That could all have been avoided by simply carrying concealed.
This is why most in the gun culture recommend discreet, concealed carry. The concealed carrier has the element of surprise against the bad guys, and is much less likely to suffer an attempted “gun-grab.”
And the concealed carrier will not offend, alienate and antagonize innocent people.
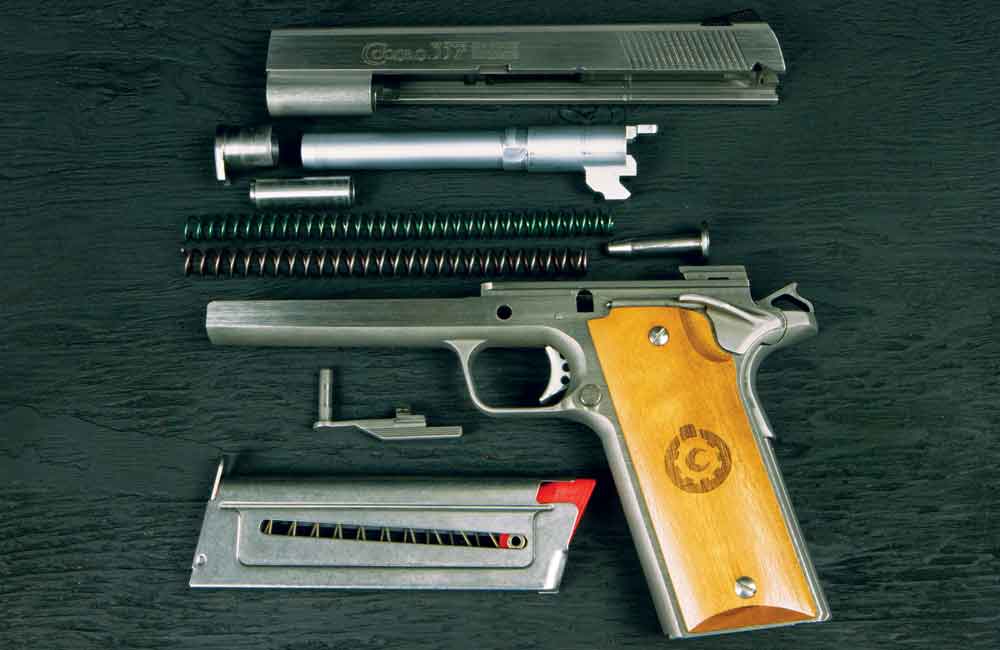
The Glock pistol made its debut in 1982. Since that time, it has become one of the most popular handguns in the world. Some people love ‘em, and some people hate ’em, but either way, the pistol has some very good features that make it an effective handgun for self-defense, offensive tactical operations, and competition.
I purchased my Glock in the late 1980s, and I’ve had quite a bit of fun with it in USPSA, IDPA, and many informal practical matches. Since that time, I’ve added a few items to it to enhance the pistol and make it more personal and “shootable,” a word which means different things to different people.
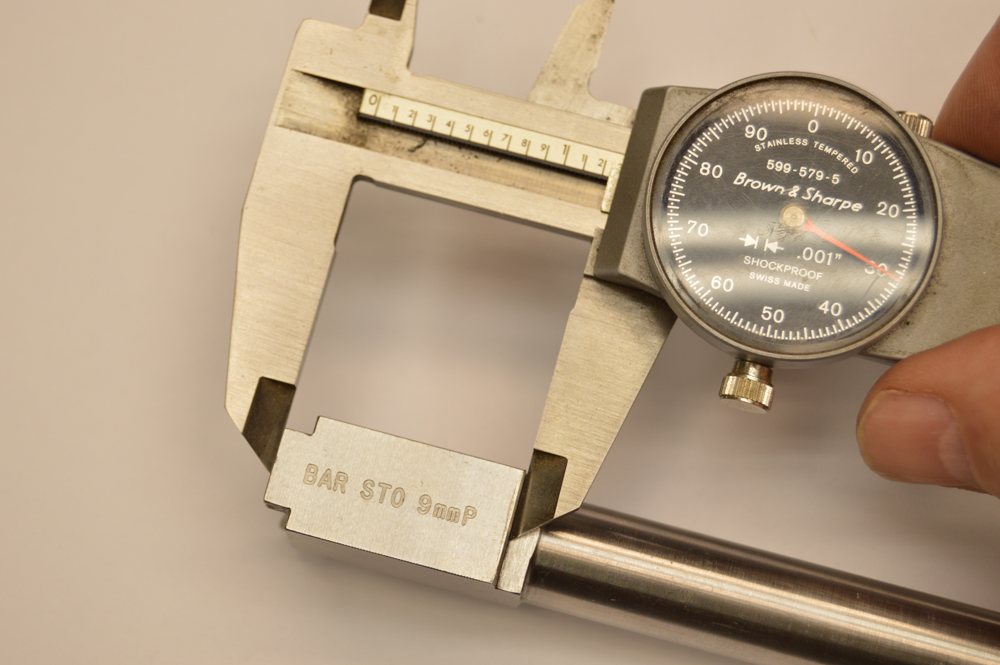
In my case, one of the first items I added was the superb Bar-Sto stainless match-grade barrel. Being an old Bullseye competitor with the Army Marksmanship Unit, I view accuracy as the Holy Grail, and the match barrel from Bar-Sto is the best there is.
I opted for the oversized barrel, although the drop-in version will give excellent accuracy as well.
Being a gunsmith has a few benefits, not the least of which is that I know my way around a #2 Swiss pattern file and an India stone, but even someone with basic gunsmithing skills can easily install a match barrel in the Glock, since there are only three fitting points, and the amount of material that needs to be removed is not much.
As long as you go slow and check your work, fitting the barrel is very straightforward and the benefits are huge.
I also installed a set of Trijicon white outline night sights, and a Brooks Tactical Grip System.
The Trijicon sights are excellent and glow very bright, but typical night sights only last about ten years and these were much older than that, so the nighttime effectiveness was severely diminished.
Lastly, the Brooks Tactical grips give excellent results and actually work better when wet, but they had worn smooth and didn’t provide the same gripping surface as they did when initially installed.
So, this section will go through the refurbishment of a Glock, with the addition of a 3.5-lb. trigger connector.
Note that the addition of a light trigger and a match barrel may change which IDPA classifications you’ll be allowed to compete, so check the rules.
Also, if the gun is to be used for self-defense, be careful about installing aftermarket parts that affect the feeding, firing, extraction and ejection of the gun. Any time such parts are added, always test the gun with a large quantity of ammunition before entrusting it with your life.
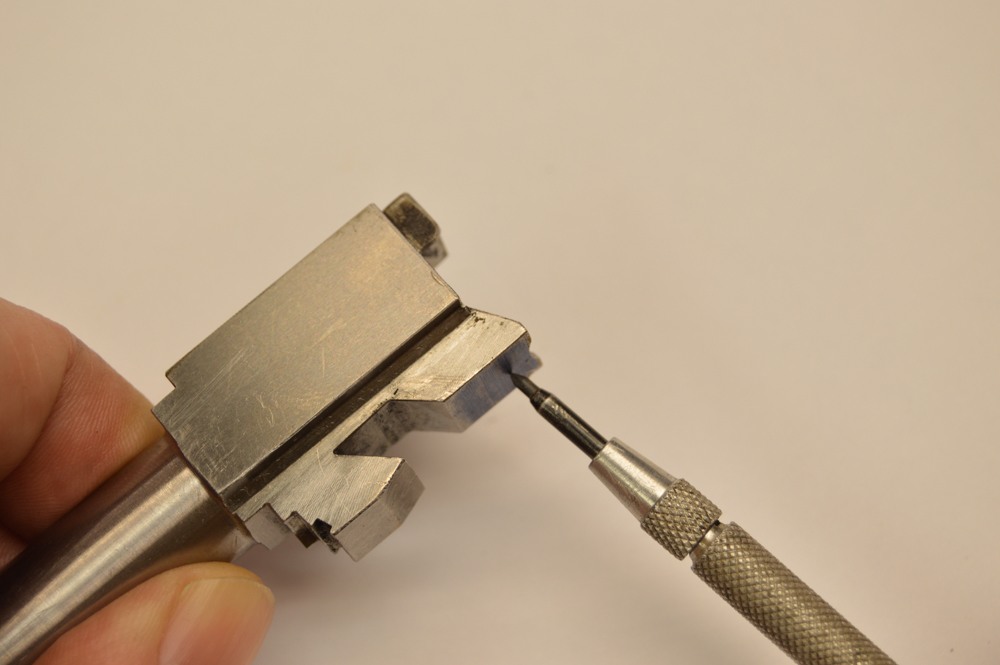
The bottom flat needs to be fit to the locking block in the frame. Go slow and check often for fit.
Add A Custom Glock Barrel
Not that we have that out of the way, let’s get started. Installing the Bar-Sto barrel, as I mentioned, is really straightforward.
There are two main fitting points — the front of the barrel hood, and the bottom flat of the barrel that sits on the Glock barrel block.
First, start by making sure the gun is unloaded (you knew that) and remove the slide from the frame. Remove the recoil spring and guide, and finally, take out the old barrel. The pistol is now field stripped, and you can begin fitting the barrel.
Measure the width and length of the hood of the Bar-Sto replacement, and measure the ejection port opening of the Glock. Subtract the length of the Glock port, from the length of the barrel hood: this is the difference you need to remove from the front edge of the Bar-Sto barrel.
Use a #4 Swiss pillar file to take down the edge. Do this by taking a stroke or two on the sides of the barrel hood, then try fitting the barrel into the slide. Press hard to make the barrel go into lockup, and use a soft nylon hammer to tap it into place.
Use a blue Magic Marker to check, making sure you are filing the surface square, taking off only the high spots. If you are a little unsure of yourself with a file, use a soft India stone to accomplish the same thing, it will just take longer.
With the stone, you don’t have a safe (non-cutting) edge as on the pillar file, so be careful not to take off material from two surfaces of the barrel at the same time. Once the sides of the barrel are fitted, fit the front of the barrel. Only the material from the front edge of the barrel hood should be removed.
Fit the barrel to the point to where you can push it up into battery and it stays locked, but will also drop out of battery with slight downward pressure of a fingertip on the hood. This is the ideal fit.
Once the barrel is fitted to the slide, remove material on the bottom flat of the barrel where the flat sits on the barrel block. Again, use Magic Marker to show the high spots where you need to remove material.
You are finished with the barrel/slide assembly when the assembly will install on the frame. If it won’t go onto the frame there is still material to be removed from the barrel flat.
Once these two fitting points are taken down so the barrel locks up fully into the slide, and the slide assembly will install onto the frame, you are done. Install the slide onto the frame and cycle the gun a few times.
The Glock rear sight pusher works on factory and aftermarket sights equally well.
Glock Sight Ideas
When talking Glock upgrades, the next place to look would be the sights. Again, Trijicon are excellent when they are new, but after 20-some odd years, the Tritium can dim.
In my case, it was time to go with something brighter that would give me day/night capability, ergo, the newer fiber optic sights. These sights absolutely are like a huge neon beacon.
Since I still want the nighttime visibility afforded by Tritium sights, but also the bright glow of the fiber optic for daytime use, I went with Tru-Glo sights. This sight combines the best of both worlds — Tritium and fiber-optic inserts — providing 24-hour visibility.
Removing the old front sight is straightforward. Just remove the 3/16th-inch nut that holds the front sight in place. It takes a special nut driver to get in there, but once it’s out, you can install the new sight.
Degrease the threads of the new sight screw and, with a toothpick, place a tiny drop of blue Loctite onto the screw threads. Place the sight into the slide, and secure it with the screw. Do not overtighten it or you will strip the threads. Just run it up snug; with the thread locker in place that sight isn’t going anywhere. This is how I installed my original Trijicon sight and it’s been securely fastened, and has had over 40,000 rounds through it without any issues.
The rear sight is different. It is mounted in a dovetail, and as such, there are certain “best practices” to use when installing into a cross dovetail. The main point is that the part, any part, is always installed from right to left into the dovetail, as looking from the rear of the gun. If you install a part from left to right, then the next time you go left to right or vice versa the dovetail slot will be opened up and the part will never be able to be installed tightly.
Dovetails are always very slightly tapered from larger to smaller, from the right side to the left of the dovetail. So, the part gets installed from right to left, and removed from left to right, always!
Use the Glock sight tool, because Glock rear sights require downward as well as sideways pressure for removal.
The Tru-Glo rear sight was a perfect fit going into the Glock M17 dovetail, and all it took was a few good raps with a nylon drift punch and a brass hammer in order to set it in the center with a light-driven, almost press fit.
I ran the sight set screw up snug, but didn’t use any threadlocker since I’ll do that once the gun has been zeroed.
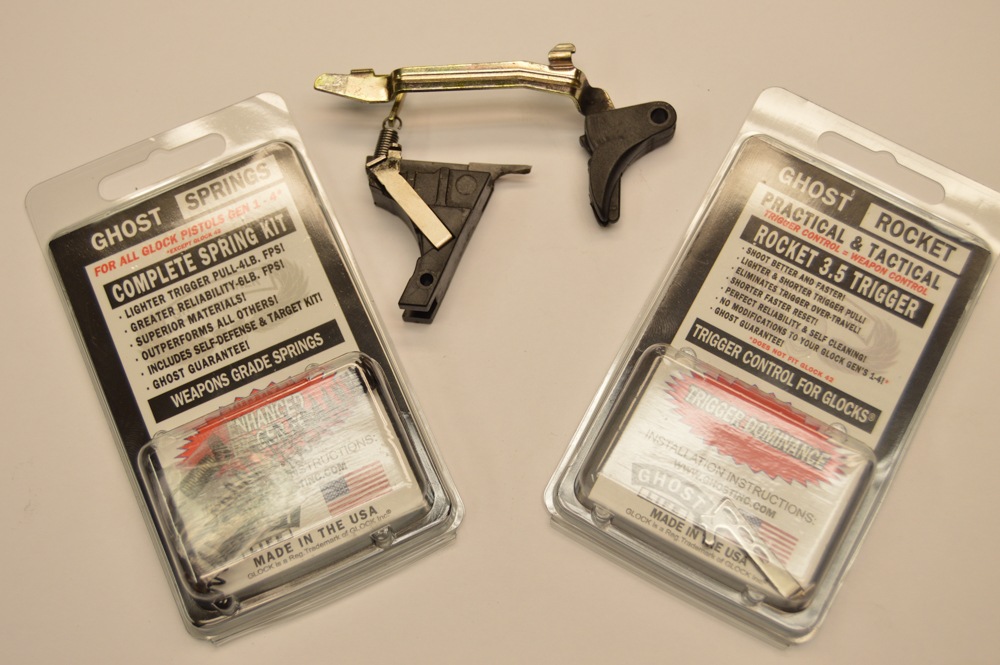
The Ghost Systems Glock aftermarket trigger is one of many available for the polymer pistol. It gives a great 3.5-lb. trigger pull and is adjustable for overtravel.
Solving Glock Trigger Woes
Now that you have the barrel and sight installed, the next of your Glock upgrades is to install the 3.5-lb. trigger connector. This will provide you a nice, light trigger, but again, if you are using the gun for purely defensive work, I would leave the original factory trigger connector and springs installed.
The Glock is a great service pistol, but it has a service pistol-grade trigger, which is fine for most uses: For example, law enforcement, personal defense and military applications, and even competition and informal plinking if you don’t mind the heavy trigger.
But if you want to use the gun strictly to compete in the various types of practical pistol competitions, then the service grade trigger is not ideal, and that’s where the 3.5-lb. trigger connector comes in.
There are a number of lightweight Glock trigger connectors available, and I chose the Ghost trigger from Ghost Industries. It comes with a 3.5-lb. trigger connector, and a variety of springs to set its weight.
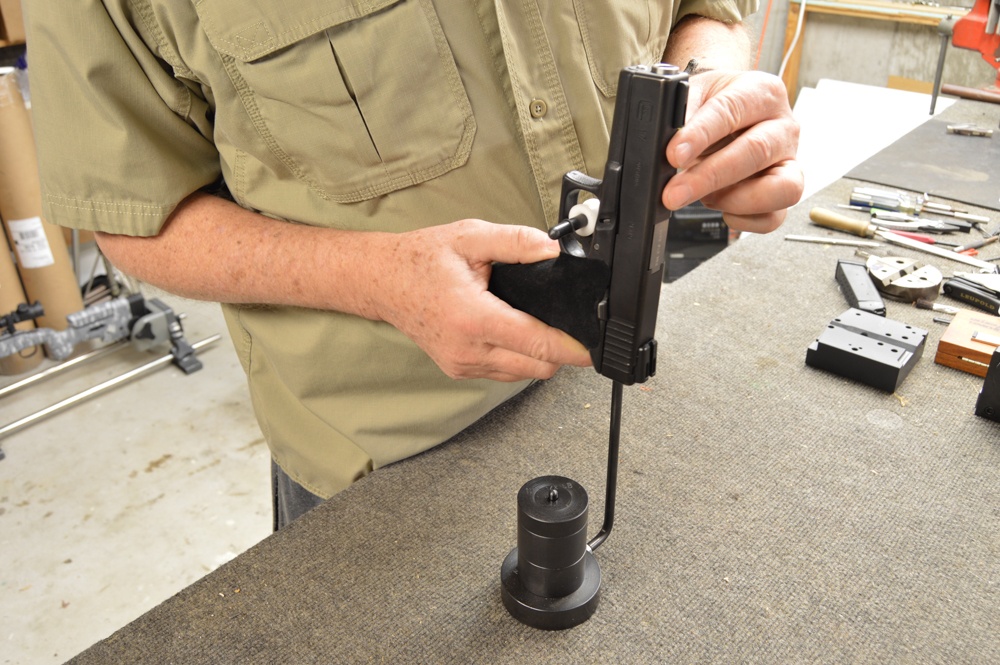
The Glock is tested after all work is complete with the NRA trigger-weight system. This is the best way to test for precise trigger pull as the weights never go out of calibration. They are what the NRA uses to check for correct trigger pull at all NRA sanctioned matches. Get some!
I installed the 3.5 connector, but opted for the heavier 6-lb. trigger and firing pin springs that will yield a little heavier trigger pull in case I do want to carry the gun out and about. The result is a trigger that breaks a little over 4.5 lbs.
The trigger connector is a direct replacement, and removing the old connector allows for replacement of the new, Ghost Industries part.
The Ghost trigger connector comes with a small tab on the connector, which requires minor fitting. This tab acts as a trigger stop — a nice feature to have on a competition gun.
The kit also comes with a clear slide backplate in order to view the sear and firing pin engagement when fitting the trigger connector.
The Brooks Tactical is a textured wrap-around grip that is easy to apply, works well even with wet or sweaty hands, and is inexpensive.
A Better Glock Grip Made Simple
The last step is to remove the old Brooks Tactical Grip, and install the new one from the same company. This is the exact same grip that I originally installed over twenty years ago, but the old one had worn with age. Installation is simple.
Once the old one is peeled off, degrease the grip area with brake cleaner, and wipe it down with the alcohol pad supplied with the new grip.
Since the grip covers the magazine button on both sides, the instructions demonstrate that the area around the mag button on both sides needs to have a tiny amount of oil applied so the grip doesn’t adhere to the mag release.
Again, I’ve had the old Brooks Tactical grip installed on my Glock forever and have never had an issue with the magazine release not functioning properly.
Wrap the new grip onto the pistol’s frame per the instructions. If it isn’t applied exactly correct, you can lift it and move it, but try not to do that too many times. (The grip overwraps itself, so if you wrap it together, it’s difficult to remove it.)
Once the grip is installed, the entire pistol gets reassembled, and function checks are done, along with functioning using dummy rounds. Checking the trigger pull with the NRA weights, mine came in at just over 4 ¾ lbs. That’s not too light or too heavy, and has minimal overtravel.
So there you have it — these Glock upgrades result in a pistol that is extremely accurate with the Bar-Sto barrel, has excellent sights with 24/7 visibility, a light, crisp trigger, and excellent textured grips that work in all environments — even better with wet or sweaty hands. Now I just need to take it out to the next IDPA match and run it through its paces.
Christensen Arms has introduced its Modern Precision Rifle, a chassis system designed to get off the bench and into the field.
What the Modern Precision Rifle brings to the table:
The Modern Precision Rifle has a lightweight carbon fiber-wrapped stainless steel barrel.
The rifle’s slender, proprietary billet aluminum chassis boasts V-bedding.
It also features a carbon fiber handguard, which further reduces weight.
Due to its construction, the 16-inch barrel .308 Win., is among the lightest chassis rifles.
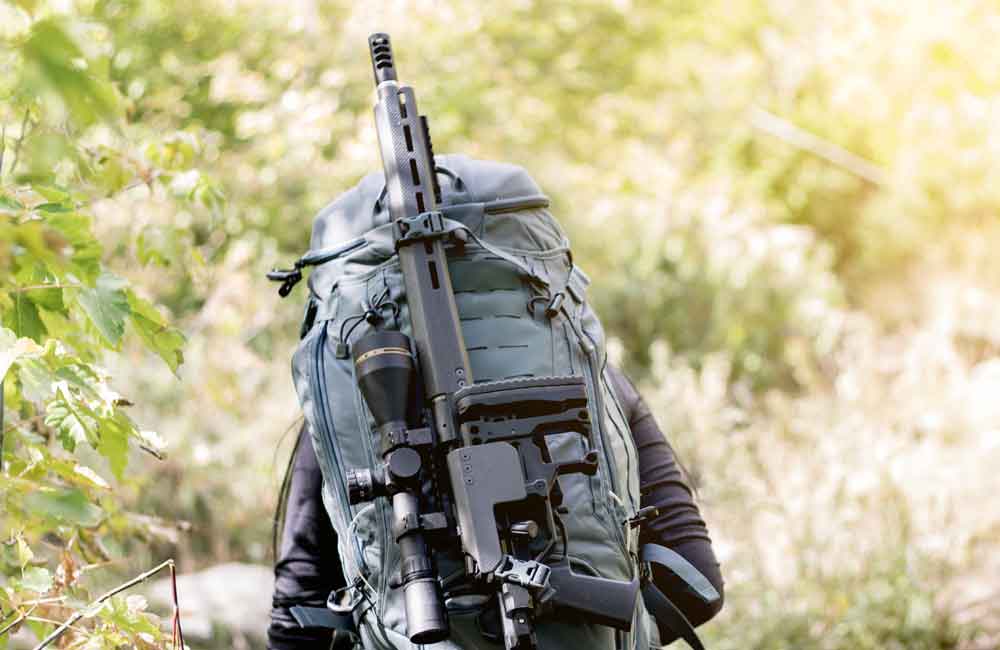
The rifle comes with a folding stock, allowing it to shrink down to backpack size.
Next to its use of advanced materials, Christensen Arms has built its reputation off highly accurate rifles. The lightweight gems that roll out of Utah have been just the ticket for making precision shots off the bench or tagging out on distant bucks during hunting season.
With this in mind, it is little surprise Christensen Arms would turn its attention to one of the most popular precision platforms sweeping the gun world presently — the chassis rifle. It also comes as little shock that the company would put its own unique twists on what it’s dubbed the Modern Precision Rifle. Perhaps chief among them being the rifle’s price.
Certainly, the $2,295 MSRP Christensen Arms has hung on the Modern Precision Rifle isn’t a drop in the bucket. Admittedly, when compared to the rest of the rifle world, precision or otherwise, it’s downright spendy. That’s the breaks in the long-range shooting game. But side-by-side with other chassis systems presently available, the price falls right in line. And measured against the rest of Christensen Arms’ catalog, particularly its other precision platforms, the Modern Precision Rifle is affordable.
Perhaps the most heartening aspect of Christensen Arms’ recent offering is the company appears not to have skimped in creating a chassis rifle. The Modern Precision Rifle boasts all the extras Christensen Arms specializes in and shooters want when they spend money with the company.
One of the most notable, along these lines, is the MPR’s carbon fiber-wrapped 416R stainless steel barrel. The target profile barrels on the 6.5 Creedmoor and .308 Win., offer nearly the same stiffness found on all metal bulls, but at a fraction of the weight. In fact, the 16-inch barreled (there are options up to 26 inches, depending on caliber) .308 version is among the lightest chassis setups out there — less than 7 pounds.
Christensen Arms also controlled for weight by going in-house for the chassis design of its new sniper rifle. The 7075 billet aluminum chassis is extremely svelte and nimble, with V-bedding ensuring the stainless steel action has a solid foundation and the overall platform has the rigidity to milk the most out of the match-grade trigger. But through its trademark use of carbon fiber for the Modern Precision Rifle’s handguard, Christensen Arms still gives the system plenty of space for a bipod and what have you.
Its slender dimensions and light weight make the MPR a practical rifle away from the range. But those are not the only assets Christensen Arms has endowed the rifle with to get it and shooters off the bench. The Modern Precision Rifle is also outfitted with a folding stock, making it ideal to pack away, say in a backpack (or at least that’s what the pictures show) for a trip into the backcountry. At the same tick, the company kept the important features anyone would want on a chassis stock — adjustable length of pull and cheek riser.
Christensen Arms has also thrown in some trimmings, common to many of their rifles, that really give the Modern Precision Rifle a custom appearance. Oversized fluted bolt knob, skeletonized bolt handle, spiral fluted twin-lug bolt and 5/8×24 pattern muzzle thread — outfitted at the factory with an adjustable side baffle break — all add a dimension of useful uniqueness to the rifle. And it goes without saying, the company has manufactured the rifle with the same attention to detail with which it tackles all firearms: match chamber, hand-lapped barrel, button rifling.
Once again, this level of gunmaking costs money, especially compared to the glut of economy bolt-action rifles that have flooded the market. But for shooters looking to get into more than an entry-level chassis, and one designed to excel away from the range and at distance, Christensen Arms certainly appears to offer a value with its Modern Precision Rifle.
Which is superior in the 7mm vs .30 caliber argument? One veteran gunwriter weighs in on the subject.
In the 7mm vs 30 caliber debate, which reigns supreme?
Any .30-caliber cartridge delivers more energy than a comparable 7mm cartridge.
However, this increase in energy comes with an increase in recoil.
The increase in recoil can be as much as 30 percent, according to the author.
The author also feels there are more bullet weights offered with the 7mm than the .30.
Both will get the job done in appropriate applications and with good shot placement.
There was a time when there was little argument among America’s hunters about calibers. For deer hunters it was the .30-30, and for larger game it was the .30-06. Oh there were other calibers to be sure—like the .270 Winchester that emerged in 1925 — but there’s no question that the .30 caliber dominated from the turn of the last century to the mid-1960s.
Today the .30 can still be called “America’s caliber,” but it is being seriously challenged by that upstart metric, the 7mm. It all started in 1957 when Remington introduced the .280, a cartridge they hoped would sway those prospective buyers contemplating either the .270 or .30-06.
The .28 caliber is as diverse as the .30 as far as performance levels are concerned. Here’s how they stack up (left to right): 7mm-08, 7×57, .284 Win., .280 Rem., 7mm Rem., 7mm Wea., 7mm Rem. SA Ultra Mag, 7mm WSM, 7mm Dakota, 7mm STW, 7mm Ultra Mag and 7.21 Lazzeroni Firebird.
It wasn’t that the .284 bore was unheard of on these shores at the time. The 7×57 had been around since 1892 and had been adopted as the martial cartridge by nine foreign countries. And it had been chambered for sporadically here in America, most notably by Winchester in its iconic Model 70.
But by and large the 7mm was still considered a “foreign” caliber. While the .280 could in no way be considered a commercial success even today, it did pave the way for the 7mm Remington Magnum that was to emerge five years later in 1962. Since then there have been more 7mm commercial and proprietary cartridges introduced than any other caliber.
I acquired my first 7mm in 1965, and over the half-century since, it’s been my caliber of choice for everything but Cape buffalo, lion and elephant. I’ve taken game on five continents using just about every commercial 7mm, from the 7×57 to Remington’s Ultra Mag., as well as several proprietary and wildcat cartridges, so I can speak with some authority on the subject.
It’s not that I haven’t had experience using other calibers. I have. I’ve been on many industry hunts, both here and abroad where I didn’t have the option to bring my own rifle or choose a specific cartridge. On most of those occasions I was handed a .30-06 or a .300 magnum, and every time it performed just as well as any 7mm I could have used.
If you compare 7mm and .30 cal. cartridges of similar capacity, driving bullets of comparable sectional densities and ballistic coefficients, it requires about 30 percent more recoil to match the trajectory of a 7mm with a .30. Shown here are pairings of 7mm-08 Rem. and .308 Win.; .280 Rem. and .30-06; 7mm STW and .300 Weatherby; and 7mm Ultra Mag and .300 Ultra Mag.
And why wouldn’t it? It’s indisputable that a .30 caliber delivers more energy than a comparable 7mm. I’m talking 7mm-08 vs. .308; .280 Rem. vs. .30-06; 7mm STW vs. .300 Wby.; 7mm Ultra Mag. vs. .300 Ultra Mag. That’s not the point, or at least it shouldn’t be whenever one hears the 7mm vs 30 caliber argument. The only logical reason for choosing a .28 caliber over a .30 has to do with the question of how much ballistic performance you need to get the job done, and what you are willing to pay for it in terms of recoil.
Again, from a purely ballistic standpoint, everything the 7mm can do the .30 can do better. By “better” I mean a bigger hole and more energy delivered, all other things equal.
If you push a .308 bullet of comparable sectional density and ballistic coefficient over the same trajectory as a .284, it will arrive with about 15 percent more energy. But doing so generates almost 30 percent more recoil, assuming rifles of equal weight.
Now there are many who feel that an extra 15 percent is worth it. I don’t. With a magnum 7mm of one variety or another I’ve shot from every conceivable field position, many times from prone, with the toe of the butt on the ground and with just the bony top of my shoulder backing the gun up. In such a position there’s a tendency to crawl up on the scope, yet in 50 years I’ve never suffered a magnum eyebrow. I can’t say the same for several .300 magnum guys I’ve shared camps with or witnessed shooting.
An experienced hunter who shoots often and year round won’t have an issue with shooting a .300 magnum, even off the bench where 27 to 28 ft.-lbs. of recoil can be … well, less than fun. But for the average hunter, that’s a lot of recoil — enough to affect one’s ability to shoot the gun up to its accuracy potential.
To back up that statement, all one has to do is look at competition shooting. Regardless of the specific discipline, whether it’s benchrest at 100 yards or F-Class at 1,000 yards, every shooter will be using the heaviest rifle the rules allow with a cartridge that gets the job done with the least amount of recoil.
There are those who contend that a .30 caliber simply provides more margin of error in case of a poor shot. If we’re talking strictly in terms of the theoretical, one might make a case for the .30, but in the real world that’s pure bull-pucky. A bad shot with a .30 is no better than a bad shot with a 7mm. Period.
Another thing I particularly like is the fact that, for the handloader, there are more bullet weights offered in 7mm than in .30. Consider: among the various manufacturers, handloaders can choose 7mm bullets of 100, 110, 115, 120, 125, 130, 139, 140, 145, 150, 154, 160, 162, 168, 170 and 175 grains. If you’ve got a particularly finicky rifle with regard to its shooting a specific bullet weight better than others, you’ve a better chance of finding it if you’ve got a .284-inch hole in the barrel.
I guess what I’m trying to say is that, based on my experiences over the half century I’ve been hunting, I’ve never been disappointed or felt the need for anything larger than a 7mm. Regardless of where I’ve hunted — from Alaska to Zambia, South Africa to Siberia, the South Pacific to the Arctic Ocean — there’s been a 7mm in my hands. And I’m talking about hunting the world’s largest non-dangerous game: eland, zebra, gemsbok, kudu, roan, sable, elk, red deer … you name it. And whenever I feel I need something more potent than a 7mm, I want something a lot more potent, like a .375 or a .416.
Editor’s Note: This article is an excerpt from the May 2015 issue of Gun Digest the Magazine.
Although gravity and wind are the main influences on a bullet’s path, there are certainly some other factors to consider as well. One of these is the initial bullet speed.
How does initial bullet speed play into external ballistics?
Bullet speed does not lessen or increase gravity’s effects.
It merely gives more or less time for the force to act on the projectile.
Three things determine speed: a bullet’s initial speed, its efficiency and environmental variables.
A longer barrel permits a faster bullet, but this doesn’t equate to more accuracy.
Temperature also can affect velocity.
Hopefully, we dispelled the myth that a fast bullet somehow resists gravity. Instead, a fast bullet merely gets to the target faster and therefore has less time to fall. Also, the longer it takes for a bullet to reach a target, the more exponentially it falls.
In an example we used, a bullet from my .308 Winchester only falls 4 inches between the 100- and 200-yard berms, but it falls almost 100 inches between the 900- and 1,000-yard berms. The bullet falls more when it’s farther away because it is traveling slower (it takes longer to cover the 100 yards between berms), and it is also falling faster.
When we discuss wind in a future article, you’ll see that the amount of time a bullet is exposed to wind (how long it takes to get to the target) also has a direct effect on how much a bullet is blown off of its original path.
Gravity And Wind
At a basic level, the two main things that will affect your bullet’s path are gravity and wind. All of the other variables you hear about — air pressure, temperature, altitude and humidity — don’t affect the bullet’s path. Instead, those variables only change how much gravity and wind can affect the bullet.
Of course, there are other things that will affect your bullet’s path. For example, the spin of the earth and the spin of your bullet can both change a bullet’s path. However, let’s save those for a future discussion once you understand the basics first.
There are three variables that determine a bullet’s speed on its way to the target:
The initial bullet speed
The efficiency of the bullet
External/environmental variables
In this piece, we’ll explore initial velocity. The other variables will be discussed in future columns.
Don’t fall into the trap of thinking that faster is always better. There are many shooters who chase the newest fad cartridge to get whatever velocity increase they can. Yes, a faster bullet has less time to fall and be affected by the wind, but just because it is faster doesn’t mean it’s necessarily better overall.
Sometimes a slower bullet can be more accurate, lighter recoil from a smaller cartridge can be easier to manage, or a heavier, slower bullet might perform better when hunting (e.g. .17 HMR vs. .30-06 Springfield while elk hunting).
Initial Bullet Speed
A bullet is never faster than when it first leaves your barrel. Just as it starts to immediately fall due to gravity, it also starts to slow down due to air resistance.
The cartridge largely dictates a bullet’s initial velocity range. The same bullet can be shot faster with more pressure up to the safe limit for a particular cartridge. Once you reach the pressure limit, you’ll need to upgrade to a cartridge that can handle more pressure.
Another way to increase initial bullet speed is to shoot a lighter bullet. Within the same cartridge, a lighter bullet can be shot faster. However, that lighter bullet will slow down faster due to air resistance, and it will be affected by wind more than a heavier bullet going the same speed.
Barrel Length
Generally, a longer barrel allows for faster bullet speed. As I mentioned above, however, this isn’t necessarily better.
For example, a shorter rifle barrel can make for a lighter rifle that is easier to carry in the field while hunting, and it can make a rifle more maneuverable in a tactical situation. Do you know what else a shorter barrel can do? It can make a rifle more accurate. Yes, you read that right. A longer barrel does not provide more accuracy; it only provides more velocity.
Consistency is the key to accuracy. A longer barrel of a certain diameter can flex and “whip” more than a shorter barrel of the same diameter. The shorter barrel is relatively “stiffer.” Imagine two sticks of the same diameter but different lengths — the longer one is easier to flex and break.
Temperature
A bullet’s initial velocity isn’t constant. Even with the same cartridge shooting the same bullet with the same powder charge, higher temperatures will result in faster velocities.
Higher temperatures can be experienced either because of the temperature of your environment (it’s a hot day) and/or the temperature of your chamber (it’s a cold day but you’ve been shooting a lot).
Powder manufacturers continue to make gunpowder that is more temperature stable (less affected by temperature). Although great advances are being made, no powder is completely immune to temperature changes. You should shoot in different temperatures and record what happens to your bullet.
This article originally appeared in the July 17 issue of Gun Digest the Magazine.
Coonan .357 Magnum 1911s in Classic and Compact are powerful defensive handguns that can be surprisingly concealable.
How Coonan brought the .357 Magnum to the 1911 platform:
Coonan tweaked the classic 1911 design to accept the rimmed .357 Magnum.
Being semi-autos, Coonan’s 1911s tend to be softer shooting than .357 Mag. revolvers.
The 5-inch barrel Classic and 4-inch barrel Compact were tested.
Both models proved accurate off the bench at 25 yards.
The author felt the Coonans were pleasant to shoot and viable for self-defense, hunting and target shooting guns.
While not everyone agrees, a lot of experienced shooters say that John Browning’s 1911 pistol is the greatest fighting handgun ever designed. Many major gun manufacturers offer them, and several smaller manufacturers exist primarily because they specialize in building them. An example is Coonan, Inc. — but there’s a twist.
Whereas most 1911s are chambered in .45 ACP or 9mm — yes, there are other chamberings — Coonan wanted more power and decided a 1911 chambered in .357 Magnum was needed. Adopted by many law enforcement agencies since its creation in 1935 and able to cleanly take some game, it developed a great reputation. However, the .357 Magnum is a rimmed cartridge and is longer than the cartridges usually used in 1911s.
That meant a redesign…
Coonan set out to get it done, and they did, although the gun still uses many of the same parts found on a standard 1911. And the controls are about the same, too, so an experienced 1911 shooter will be comfortable with a Coonan. Sure, the gun is a little larger to accommodate the longer cartridge, and therefore the grip circumference is greater, but the end result is surprisingly close to the original.
It’s so close that, despite the .357 Magnum chambering, it’s feasible to carry the gun discreetly for self-defense. Sure, it’s a bit on the larger side, but not so much that the gun is too big for someone comfortable with carrying a 1911. And as a bonus, the Coonan website lists many holster manufacturers that currently make discreet carry holsters to fit.
Packing The Power
So why would anyone want a 1911 chambered in .357 Magnum? The most obvious answer is power. A typical 230-grain .45 ACP delivers about 370 foot-pounds of muzzle energy, but the 158-grain .357 Magnum tops it with about 505 foot-pounds. And generally speaking, the more energy delivered to the target, the better chance of stopping a dangerous, felonious assault or bringing down a prized game animal.
More muzzle energy, of course, means more recoil. It’s physics. But the Coonan is surprisingly comfortable to shoot, especially when compared to the typical .357 Magnum revolver. With a revolver, recoil energy is instantaneously transmitted through the solid frame and grip to the shooter, so the impulse is sharp and heavy. But with a semi-automatic handgun, the slide and barrel move under recoil relative to the frame, and that slows delivery of the recoil impulse to the shooter. The result is softer felt recoil. Incidentally, the Coonan Classic will also shoot .38 Special rounds, which deliver even less recoil.
Pick Your Poison
Coonan makes several models, all variants of the original Coonan Classic. A Classic — the full size — and a Compact were received for testing. Both were rendered in stainless steel, although different grips and finishes are available.
The Classic and Compact share most of the same features, but even with the shorter grip, the Compact offers enough room for most to grip it with the small finger. Grips on both models are smooth, light-colored wood. The front straps and mainspring housings are also smooth, although textured mainspring housings and grips can be ordered.
The grip safety has an extended beavertail to protect against hammer bite, but it’s not upswept like those often seen on 1911s. Still, it’s functional; though, the grip safety doesn’t have the common palm hump to ensure activation.
Magazines are stainless with visible slots on each side to see remaining rounds. The magwell is also beveled for fast reloads. The checkered mag release is located in the usual position.
The thumb safety on each has a wide shelf and worked properly, with a distinct click. The slide stop is extended rearward for easier right-handed thumb activation. Many will still have to shift their grip, though, to reach it. But most top-tier schools teach students to rack the slide if it’s locked back rather than press the slide stop. While pulling the slide to the rear and releasing it worked on the Classic, it didn’t on the Compact. The slide stop had to be manually pressed.
Instead of a trigger that moves fore and aft in a straight line as on a traditional 1911, Coonan’s trigger pivots from the top. It worked well, with both guns exhibiting a bit of take-up and a clean break. The Classic’s trigger had a small bit of creep and no overtravel, while the Compact’s had no creep and a bit of overtravel. Neither proved to hinder good shooting.
The slides are slab-sided with a rounded top, just like Browning’s design. At the rear are serrations that permit a solid grip when racking the slide. Up top, Coonan has used black three-dot sights that are drift adjustable for windage and equipped with set-screws to hold them in place. They afford an efficient sight picture.
With a 4-inch barrel on the Compact model, as compared to a 5-inch barrel on the Classic, some changes needed to be made in the recoil spring assembly. While the Classic’s recoil spring guide rod, spring, retention plug and bushing resemble those of standard 1911s, the Compact uses a full-length guide rod and no bushing. So, to disassemble the Compact, a bent paper clip or similar piece of wire must be inserted into a small hole in the guide rod to retain the spring during disassembly. After the recoil spring assembly is removed, the spring bushing, guide rod and spring can be carefully disassembled for cleaning.
The Bottom Line
Both guns proved accurate off the bench at 25 yards, with the Classic besting the Compact by a small bit.
Of equal importance, no malfunctions occurred in testing. These were used guns, so it’s possible deficiencies were uncovered in prior use and corrected before being sent for review. That said, there’s no point in trying to find a problem where there isn’t one.
The Coonan Classic and Compact 1911s chambered in .357 Magnum are pleasant-shooting guns despite the magnum chambering, and each could serve a number of roles, including self defense, hunting and just having fun at the range. And in diminished light, they will certainly attract attention with the fireball emitted from the muzzle.
This article originally appeared in the Concealed Carry 2017 issue of Gun Digest the Magazine.
Looking to go armed, but are stuck in the weeds as to what to arm yourself with? Here are 20 of the best concealed carry gun options that will keep you on the defensive.