Mec-Gar has finally started making Glock-pattern magazines, starting with mags for the G17 and G19.
Mec-Gar is such a prolific purveyor of magazines that you probably own some even if you don’t know it. Not only is the 60-year-old Italian company the leader in aftermarket magazine manufacturing, but it makes OEM mags for tons of major firearm companies as well. One pattern of mag that’s been conspicuously missing from Mec-Gar’s catalog has always been Glock, but that’s just changed.
G17 version.
Mec-Gar recently introduced two Glock-compatible magazines, one for the G17 and one for the G19. However, both models hold 18 rounds. The G17 version sits flush with the grip while the G19 version extends down and has a baseplate that matches the grip, essentially giving the feel of a G17 grip when inserted. Mec-Gar’s Glock mags manage to squeeze one more round in compared to factory Glock 17 magazines because Mec-Gar omits the plastic shroud. Factory Glock mag bodies feature a plastic shroud wrapped around a steel liner, so Mec-Gar was able to slightly increase the internal volume by using just steel instead. The springs are high-tensile music wire, the follower is bright green and made of high-impact polymer and the bodies are made of heat-treated carbon steel wearing an anti-friction coating.
G19 version.
As a bonus, unlike some other all-steel aftermarket Glock mags, Mec-Gar’s do not require you to replace your magazine catch. The company says that the factory polymer catch will have no problem interfacing with its steel mags. However, Mec-Gar does note that its Glock mags are not compatible with standard Glock-pattern floorplates, nor are they compatible with the Glock 19X.
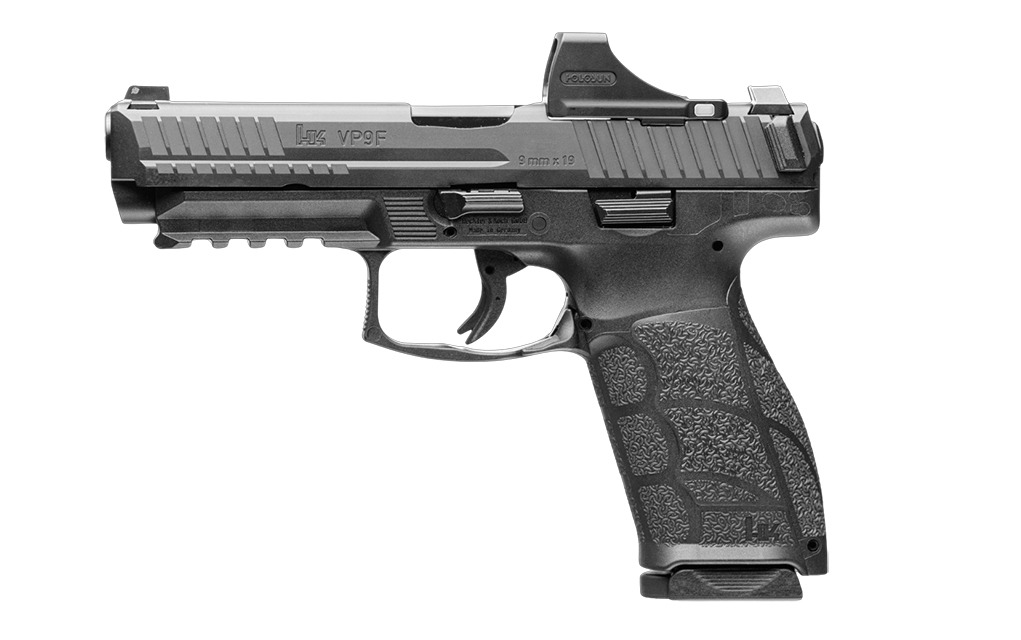
HK-USA has updated its VP9 pistol series with the VP9A1 line, here we take a quick look at what’s new.
The VP9 series of pistols has grown to be a very popular defensive handgun option since they were released 10 years ago, but now HK-USA is updating the line as the VP9A1. Featuring the full-size VP9A1 F and the compact VP9A1 K, the upgraded family of pistols sports several improvements throughout that should have fans of the original VP9 excited.
The VP9A1 F with a Holosun SCS.
Firstly, the VP9A1 F has a 4.53-inch barrel and a 17-round capacity while the VP9A1 K has a 4-inch barrel and a 15-round capacity. The standard K variant ships with two 15-round mags and the standard F variant ships with one 17-round and one 20-round mag, but both are available with lower capacities for restrictive states as well. Both models also come optics-ready and are compatible with most available footprints using the included adaptor plates, but HK also offers the guns pre-equipped with Holosun SCS optics.
The VP9A1 K shown with its modular grip panels.
Some of the VP9A1 series’ other upgrades include ambidextrous controls, flared magwells, more slide serrations, an improved Nickel-Teflon coated trigger bar, better grip ergonomics and more modular grip panels to choose from. Most of these changes were made to enhance the connection between the user and the pistol to improve the guns’ overall shootability.
Nathan Schueth, Director of Sales and Business Development at HK, said this about the new handguns:
HK has a well-deserved reputation for reliability and durability. One thing I think we don’t get enough credit for is the shootability of our pistols. True to its name as the ‘people’s pistol’, people just shoot better with the VP9 … The VP9A1 takes that ease of use to an even higher level. The best striker-fired pistol just got better.
The MSRP for both the HK VP9A1 F and VP9A1 K starts at $979 and they are available now.
Federal has just announced two new 7mm Backcountry loads, Fusion Tipped 175-grain and LRX 168-grain.
7mm Backcountry is the hottest new cartridge on the block, not just because a lot of shooters are talking about it, but because its Peak Alloy cases allow it to achieve muzzle velocities of 3,000 fps. Federal has just announced two new 7mm Backcountry loads for big game hunters to choose from: Fusion Tipped 175-grain and LRX 168-grain.
Eric Miller, Centerfire Rifle Ammunition Product Line Manager at Federal Ammunition, said this about the Fusion Tipped 175-grain load:
Fusion Tipped was just released last year yet was born from its extremely popular Fusion soft-point cousin … Fusion’s molecular bonding paired with a streamlined polymer tip gives Fusion Tipped 7mm Backcountry the ability to go the distance and deliver a devastating blow to big game. This 175-grain bullet achieves 2,975 fps from a 20-inch barrel and has a G1 BC of .575.
Miller said this about the LRX 168-grain load:
Armed with a high ballistic coefficient, polymer tip, and unique nose cavity, the all-copper LRX takes down tough game at both close range and extended distances … Barnes is a well-known, well-established brand that needs little explanation. This 168-grain bullet achieves 3,000 fps from a 20-inch barrel and has a G1 BC of .513.
MSRP for the Fusion Tipped load is $62.99 per box and MSRP for the LRX load is $81.99 per box.
How to match your home defense weapon to your needs.
Before you can discuss home defense weapons, you must first define “home defense.”
This is complicated because home defense is not the same for everyone. It’s largely dependent on what type of home you live in and where it’s located. The goal is to match the home defense weapon to your needs, and to do this effectively you must define your needs.
What is Home Defense?
Needs vary so much it’s impossible to provide definitive examples, but we can create some generalizations. For example, if you live out in the country, you may want to consider defending your yard/ranch in addition to your home. That defense could involve dealing with four- and two-legged critters. In most of the United States, the worst of those would be a black bear, but in some locations, you might need to worry about the bigger bears, cougars and even wolves. A friend who lives on Kodiak Island had to shoot a marauding brown bear right in front of his home.
If you live in the city, short of a bad accident at the zoo, humans are your main concern, and it’s possible you have no yard at all. You might live in a complex with another family just on the other side of the wall. In a situation like this, the furthest you’ll likely need to shoot is 20 or 30 feet, but you’ll need to be leery of ammunition that might pass through walls. The same is true if you live in a trailer park, but trailer parks exist in the country, too, and you still might have a yard.
When you’re implementing a home defense plan you need to consider not just your home but everyone in it who might need to use the weapon you choose.
Then, there are the in-between domiciles that are not really in the city or the country. There you might also live in a thin-walled trailer, and you very likely will have a yard. And even if you don’t need to worry about big and bad beasts, there are the lesser critters that can torment your home. This could be anything from a raccoon to a coyote, and rabid animals are always a possibility. I’ve had to deal with more than one rabid animal in my yard.
The point is, there’s no single answer to the home defense question, and what might be optimal for a friend or neighbor, might not be right for you. Ultimately, you have three different weapon systems to consider. They all have their strengths and weaknesses, and the correct answer might be all three.
Let’s look at shotguns, carbines and handguns separately to better understand how they dovetail into a good home defense plan.
The Shotgun
From a terminal performance standpoint, the shotgun can deliver the most violent blow. However, unless you’re using slugs, a shotgun has limited reach. Shotguns are also intimidating to most shooters because of their stiff recoil. Trust me on this: I was a police firearms instructor for more than a decade, and most cops don’t like to shoot shotguns. Now, you might not have an issue with shotgun recoil, but those who share your home might, and there’s no guarantee you will be the one trying to stop a threat.
Shotguns are popular for home defense but might not be the best choice for you and your family.
Shotguns can also defeat most interior walls, and the outside walls of a mobile home will only slightly slow down buckshot. However, for interior self-defense applications inside 20 or 30 feet, No. 5 or smaller shot can be very effective and there’s much less concern over overpenetration. But for those of us who live out in the wilds, you might not keep your shotgun loaded with slugs, but they should be on your shotgun … or at least near where you keep it.
To maximize the effectiveness and versatility of a shotgun for home defense, it’s wise to keep different ammo types on or with the shotgun.
A shotgun is also a two-hand weapon; to use it effectively, you need both hands. This is not really a problem until you need to call 911 while holding an assailant at gunpoint, or while you’re trying to operate a flashlight, render aid to a family member or just get them out of the way. Also, if the assault becomes a hand-to-hand engagement, it’s hard to shoot someone with a long-gun if they’re on top of you trying to beat you to a pulp, while you’re also trying to keep them from taking the shotgun away from you and using it on you.
Pros:
Maximum wounding capabilities
Versatile ammunition options
Cons:
Two-handed weapon system
Stiff recoil
Limited capacity
Heavy
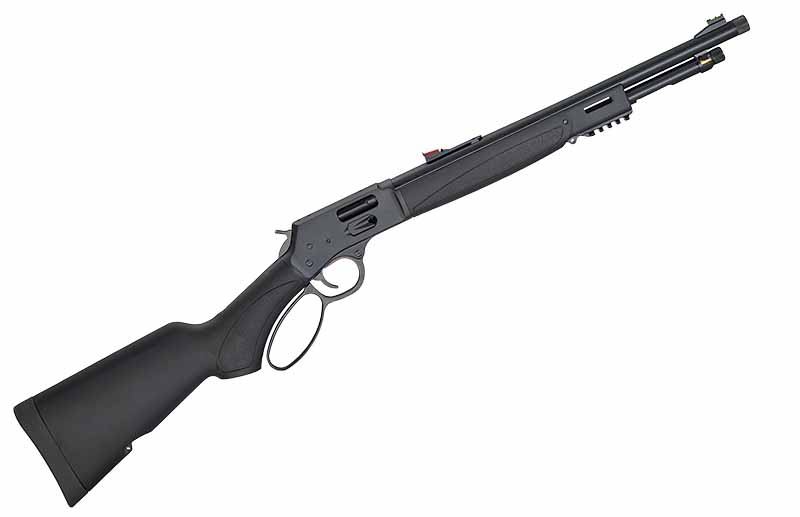
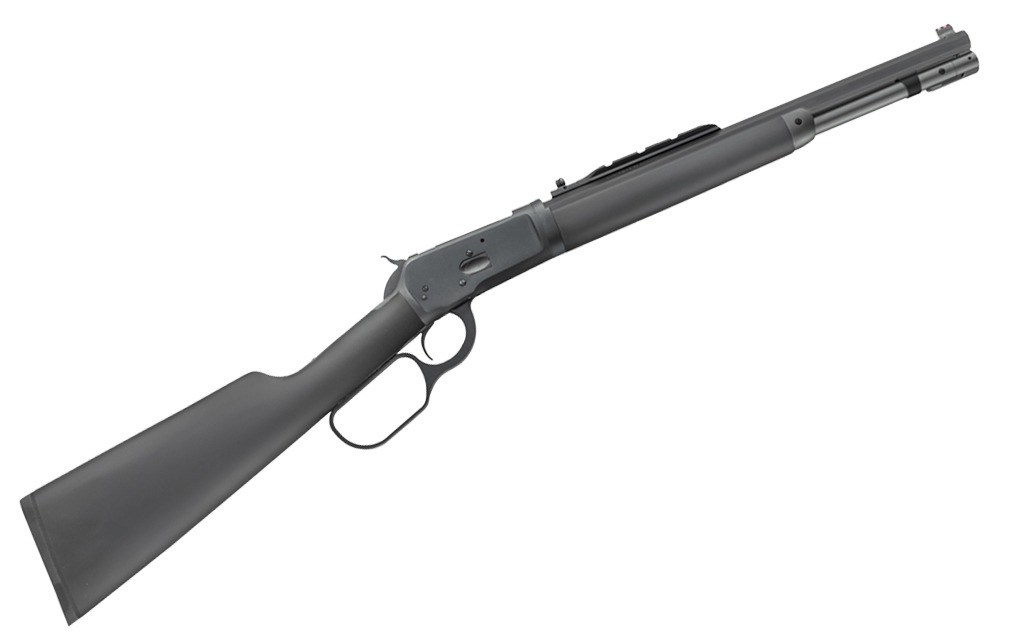
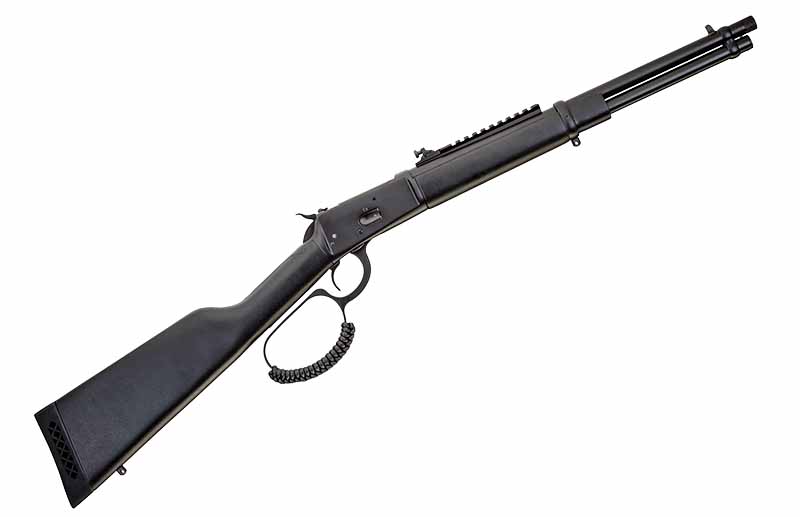
The Carbine
In most instances, I feel a carbine is superior to a shotgun for home defense. It’s still a two-handed weapon, but it has much more reach and a much higher capacity. You can also select ammunition that will provide good terminal performance without worries of overpenetration. Carbines—especially those of the AR-15 variety—are very versatile, too. You can use an optical sight and/or a reflex non-magnifying sight, you can attach a weapon light, and you can also run a suppressor. The suppressor might seem overly tactical, but have you ever shot a firearm inside a home? It’s deafening.
What I think is one of the most appealing aspects of an AR-15-style carbine is the minimal recoil. This makes the weapon system much more compatible with more family members. Like I’ve said, you could be unable to man the gun because you’re injured, or you might not even be home when the bad thing happens.
With less recoil than a shotgun, a carbine is more manageable by more people in a home defense situation.
One of the biggest drawbacks to two-handed weapon systems, like the shotgun and the carbine, is the difficulty in securely stowing them. Now, you might live alone and never have young or old visitors because no one likes you. If that’s the case, it does not matter; you can leave your long gun on the kitchen table. However, if you have children in your home, it’s nice to be able to lock firearms away. Of course, that’s easy to do with a gun safe, but how fast and easy can you access your gun safe during a home invasion?
Pros:
High capacity
Very terminally effective
Suppressor friendly
Versatile
Cons:
Two-handed weapon system
Heavy
The Handgun
For most, a handgun for home defense makes good sense. This is partly because if you are arming your home, you’re probably arming yourself for everyday activities. In other words, you carry concealed. There’s no reason your everyday carry gun cannot be your home defense gun. In fact, it makes good sense because you will be more familiar and probably better trained with your carry gun than any other gun you own. (If you’re not, you should be.)
Of course, you could have a duplicate of your carry gun you keep in that special spot for home defense. This is not a bad idea, either. Then, you can arm you and your significant other with the same weapon system. Also, you might want a weapon light on your home defense handgun but not your carry gun.
The handgun is also the most portable of your three alternatives, which makes it easier to maneuver through hallways and in dynamic situations. It’s also the best weapon system if you end up in a hand-to-hand engagement. While you’re fending off your attacker with one hand, you can shoot with the other. And, unlike with a two-handed long-gun, you can easily hold an assailant at gunpoint while you effectively do other things with your other hand. You also have the option of suppressing a handgun, though it does destroy some of the platform’s maneuverability.
Of all the home defense weapon systems, the handgun is the most portable and most usable by the most people.
Of course, handgun ammunition can be very penetrative, too, but fortunately there are a wide assortment of ammo options for the most popular self-defense handgun cartridges. Then, there’s the issue of capacity. Except for revolvers, most handguns will hold more ammo than any shotgun, but not quite as much as a carbine. How much ammo do you need? Well, that depends on a lot of things— primarily, how well you shoot and how many targets you need to shoot.
Pros:
High capacity
Can shoot accurately with one hand
Easier to securely store
More maneuverable/portable
Cons:
Least terminally effective
Pick One, or Two … or Three
I’m of the opinion that the best answer to the home defense weapon question is not a singular solution. You can conveniently store a handgun in a compact gun safe near your bed or easy chair. Hell, you can even comfortably wear a handgun around the house. But there’s no practical reason to limit yourself to just a handgun. You could also keep a long-gun as handy as possible, and it’s a sound practice if you live remote where you might need to deal with external threats or nasty critters.
If your everyday carry gun is your only gun, or the only gun you can afford for home defense, don’t feel at a disadvantage, especially if you’re competent with it. Skill at arms will always trump equipment. But you might consider working toward an additional option, even if it’s just another handgun—maybe with a weapon light—kept at a different location in your home.
There is no reason your everyday carry gun cannot be your home defense gun. And in some ways, it makes good sense.
Most importantly, consider the totality of your circumstances. It’s not what works for your neighbor or me that matters most; it’s what will work best for you and your family, inside—and/or outside—your home.
Editor’s Note: This article originally appeared in the April 2025 issue of Gun Digest the Magazine.
We take a quick look at Dead Air Silencers’ new modular titanium Mojave 45 suppressor.
Dead Air Silencers is expanding its Mojave line with the Mojave 45. Previously only available in 9mm as the Mojave 9, fans of .45 ACP and other larger-bore cartridges will now be able to enjoy what the Mojave line has to offer as well.
At the heart of the Mojave 45 is Dead Air’s Triskelion Gas Management System. Thanks to its additive manufacturing construction, the can has an advanced baffle configuration that’s strong, light and quiet. The system also greatly reduces backpressure which helps reduce felt recoil, fouling and wear. The can’s titanium construction helps keep the package lightweight as well.
The Mojave 45 is also modular, as users can quickly remove or add the front module without the use of tools. With the front module installed the suppressor has a length of 8.6 inches and a weight of 12.7 ounces. When removed, the package has a length of 6.8 inches and a weight of 10.44 ounces. The Mojave is also full-auto rated for pistol calibers up to .45 ACP with no barrel restrictions and for .300 BLK subsonic with at least an 8-inch barrel. In semi-auto, it can also handle .300 BLK supersonic, .350 Legend, .400 Legend subsonic, .450 Bushmaster subsonic and both .357 Magnum and .44 Magnum lever-actions with 16-inch barrels. That said, the suppressor can’t handle supersonic loads of 400 Legend, 450 Bushmaster or 45-70 Government.
The Dead Air Silencers Mojave 45 is available in either FDE or black and has an MSRP of $1,099.
Slapping a bunch of extra stuff on your gun can be fun, and sometimes even useful, but how much is too much?
An interesting thing happened over the past few years concerning just how much stuff we could add to our guns. Today, however, we are in the midst of some serious advances in technology concerning just what type of accessories we can attach to our firearms, and this race is leading us to some interesting places.
Five years ago, it was common to send out your slide to be milled for an RMR. Now, an increasing majority of pistols are coming standard with optic plates. This jump into the future came suddenly and, for the most part, it’s good—but there are some concerns to address during this honeymoon.
Ethical Paradigms
There is a school of thought that says you should use whatever technology is available, because chances are your enemies will use it against you if they are given the chance. Baseline, this mode of thinking negates all but the most advanced weapons and optical systems, akin to choosing to use a rotary phone when we have satellite communications.
While not quite as large of a jump, few people today realize just how advanced our firearms and optics are … and just how small and rugged they can be. I don’t take most firearms instructors all that seriously, but that’s my personal hangup. I’m not a fan of drinking Kool-Aid in most cases, and I’m a problem student when it comes to asking questions outside the area of supposed expertise. I question the instructor who recoils at the sight of a five-shot J-Frame.
Choosing a deliberate handicap isn’t something that many people consciously do. However, there are some notable exceptions, in that there are certain technological aspects we consider to be truly antiquated.
Technology, at some point, is considered to be a handicap. A single-action revolver from Ruger is probably not the best option for self-defense. A DA/SA little .38 makes a lot of sense, but the idea you’d still take the time to shoot single action is iffy at best. A purely double-action setup, while not always that accurate in terms of on-paper performance, is a better idea for a violent altercation.
Namely, if we are talking about carrying a revolver, most people will consider this to be a double-action proposition. Single-action revolvers are still very popular and especially useful when we’re talking about hunting with powerful cartridges. Are they technically more accurate than double actions? Well, considering most double actions are also capable of single-action fire, that point isn’t necessarily valid and it’s more of a personal choice.
That said, I don’t know anyone who carries a single-action revolver for self-defense, and I can’t say that I know anyone who keeps an old six-gun in the nightstand. I am sure that there are plenty of people who do, and this begs the same question we’ve been asking: Just how much technology is required?
Hindsight and Statistics
Statistically speaking, it could be argued that you will be completely fine defending yourself with a 4¾-inch Colt SAA in .45 Colt. That’s a well-known fighting cartridge and packs some serious power. It’s just as lethal now as it was when it was introduced: 270 grains of hardcast at 1,000 fps isn’t a joke by any stretch of the imagination.
So, knowing this, is simply having the gun the stopgap in a bad situation … or is there more to it?
Looking at how gunfights shake out across the board, there’s often an amount of random circumstances that dictate success, and we often find think tanks developing arms and ammunition that would have done better in a fight we already had, but are somewhat unlikely to have again. Take, for instance, the 1986 FBI Miami Shootout and the subsequent popularity of the 10mm Auto, and the fervent demand to replace 5.56 NATO with something else during the War on Terror campaigns. Neither of these things really grew legs.
What needs to be asked of this technology is this: Would it have made a real difference in the fighting itself? With hindsight always being 20/20, we have the luxury to evaluate and learn, but the next time—in the exact scenario—things might play out entirely differently.
If you were in 10 gunfights (assuming you’re just in the wrong place at the wrong time, and manage to survive each time), you’d have a pretty good sample size for this and arguably would be an expert. Few instructors I’ve met can “talk about what they did” in their time in the military or police, and fewer still are instructing on things outside of their own training and experience. Preparing for a fight you will not be in, and being trained by a person who will likely not be there with you, is just playing make-believe in a lot of ways.
The individual sample size of people out there fighting with guns regularly is rare, and if they are doing so, it’s typically with the support of the world’s largest military industrial complex backing them. All that gear is not only expensive and hard to get, but it also requires a lot of people to manage it.
The individual today, out in public, typically will have only a handgun—possibly a rifle or shotgun accessible in the home. That’s not exactly what you’d be storming the beaches with alone.
Take into account the now thousands of first-person videos being filmed in the war in Ukraine: All those casualties have armor, helmets and the same cartridges you own. Those who survive are often called upon to instruct with the knowledge they gained from such experiences. The tactics you learn from one of these types of instructors will not stop you from being killed, when in fact most of these guys learn these tactics with the expectation of taking casualties.
Think about that for a moment. Most of the common tactics we have now, and the gear you need for it, are designed around expected loss, a learning curve that takes into account how many people have been killed doing the same thing.
You’re always taking gear into action based on what happened last time.
How Much Is Too Much?
As a result of the constant technological march, we now have a near complete integration of guns, mounting surfaces, optical equipment, lights, lasers and suppressors. You can build a self-defense gun to include any and all of these things, but the considerations you make need to reflect what your reality is.
Much of my gear is set up with modern technology, but I do acknowledge that a good deal of it is perhaps a bit over-complicated. I really like my guns to look cool, which I believe is a valid consideration to make, and there’s certainly enhanced function as a result of some of these accessories. Serious drawbacks do exist, however, and I will get to that in a moment.
So what is the appropriate amount of baseline technology to have on a self-defense gun?
In general, a good light mounted to the gun is the only accessory I’d consider a must, the rest being somewhat subjective. When I’m in public, most times I dress pretty casual. I will usually have a small flashlight and a folding knife on me just for the sake of utility, and I’m not a big fan of lots of weight on my person.
My typical carry gun is a five-shot .357 Mag., in which I carry .38 Special +P loads. I’m a practical man in this aspect, and yes, I do know the details of the Miami shootout where that was not seen as a good choice in a real gunfight. Well, I won’t be going back to 1986, and I don’t care for Miami, so my odds are slim that I will be presented with the opportunity to repeat history.
Where I live, I don’t really worry about much—but I am always aware of my surroundings. My choice of equipment reflects my attire and lifestyle, as something bigger and heavier would stand out. I never want to look like the guy who appears to have a gun.
This minimalism comes with its own challenges. The little Smith & Wesson double action isn’t easy to shoot and isn’t exactly geared for accuracy … just extremely close-range standoffs. I get asked all the time if I think five shots is enough, and I typically reply: “Enough for what?” This is a great question to ask in general, because the gear race is completely real.
AR carbines are very popular for general use. This PWS-based build is pretty decked out, but in theory its Leupold optic has a low end that’s inside the magnification range of most military optics. Thermal for home defense? Probably not. But, if this is what you have, learn to use it effectively.
We have instructors doing “combat” pistol training at 50 yards or more in some of the classes I’ve attended, swapping in and out with carbines and other rifles. Tactical training, in my experience, is trending toward the ridiculous. Legally speaking, if you see a person firing a gun at something more than 50 yards away, and you decide to pull your pistol and shoot, well, that’s not a good look.
Now, I’m not saying you should get closer on purpose to an obvious threat. No technology as of late makes you bulletproof, and the more advanced technology you have at your disposal doesn’t do anything to keep you safe from the legal system.
My take on accessories is that they must do two things: increase your ability to identify threats, and not slow you down. If you are slowed down in acquiring a target by using a slide-mounted optic, don’t use one. In a real fight, you can’t script the situation, so don’t add in a piece of equipment that slows you down.
The Controversial Perspective
This segues into a topic that I think will be considered a hot take: I’m generally not into suppressors on handguns for defense. I like shooting suppressed pistols and I hunt with them; in fact, they’re really handy. I don’t, however, consider suppressors to be valid for self-defense, from the standpoint of practicality. Doubling the length of your pistol isn’t conducive to a fast draw, and you’re not going to be able to use something like that easily in tight confines. A suppressor also makes a gun that much easier to grab if a threat is close enough.
The size of suppressed handguns is sometimes hard to make practical. You’d obviously not seek to conceal this seriously, but shorter suppressors do exist. However, at a point, the smaller you get the less effective they are. Pistols featured here are a Staccato C with RMRcc and SureFire X300, True Precision custom P365 with RMRcc and Streamlight, S&W .357 Rem. Mag., and Alpha Foxtrot 1911 with SilencerCo Osprey 2.0.
Similarly, having done my fair share of shoot houses, adding a can to a home defense gun makes the maneuverability notably slower, and it’s harder to keep the pistol close to your body. As a civilian, you’re probably going to be woken up in the dead of night to glass breaking—or in the parking lot and hear someone step behind you when you’re getting your kids into the car. You won’t know when this is going to happen, and a suppressor on a pistol is likely going to slow down your defense.
For suppressors in the home, we can reasonably talk about rifles. Rifle suppressors are fantastic—I love them. I barely shoot without them unless it’s a classic military rifle. That said, things get long and heavy quickly. With a 16-inch barrel, you’re looking at what’s a functional minimum of about 6 inches for a shorty suppressor, so while the cosmetics might look smaller, in practice you’d be looking at the same length upper as a 20-inch M16 or longer in many cases.
Size is not relative when it comes to handling and weight. The little Smith is smaller than the 5.56 JK 155 suppressor on the author’s M16 Dissipator. In terms of real-world use, the size and weight of these rifles and suppressed pistols is often brushed over. These are not small accessories.
There are, of course, ways to deal with that, such as going the SBR or braced pistol routes, but in general my argument against rifles is that they’re a two-handed proposition. If you need to get help, call the cops, shepherd your kids to safety or really anything else, you’re going to have to do it at a disadvantage over a handgun with similar technology on it. There are, of course, plenty of advantages to cans in general—it’s just something to think about when you’re adding more and more to your guns.
Again, cans are great, but beware of their potential downfalls and how they might affect your situation and needs.
Stay Safe Out There
To conclude this diatribe, one of the things I strongly recommend is to actually test your upgrades and accessories where you plan to use them. Optics can get easily washed out by white light, sight bodies can obscure your vision … and so on. The weight and size are something you and your able-bodied loved ones should all know how to work around in case you’re wounded or unable to defend yourself otherwise.
Needless to say, don’t make your self-defense weapons so complicated to use for your family that they become a liability if the worst does happen. Anything you add to a gun should make it easier to use, not more likely to cause you problems.
Editor’s Note: This article originally appeared in the April 2025 issue of Gun Digest the Magazine.
If you want to find the best 5.56 NATO suppressor, you need a lot of ammo, cameras, and a few people willing to risk bodily harm. RECOIL has all of that and more, and put it to good use testing a host of suppressors at CANCON South Carolina 2024!
The FBI said that 9mm is just as good as .45 ACP, but we’re here to make the argument that sometimes bigger really is better.
Back when John Browning fine-tuned the .45 ACP (he didn’t invent it, but he did make it perfect), the premier arm of the military was the cavalry. Part of their job was stopping opposing cavalry—even if it meant stopping horses. (As horse lovers, that had to hurt.) That’s why the U.S. Army insisted on something .45 back then, when Roosevelt the First and Taft were presidents, and they would not accept the newfangled .30 and 9mm pistol cartridges that were gaining popularity in Europe.
Fast-forward a century, and the FBI kicks the .45 to the curb, as the 9mm is “as good as the .45” because of “bullet construction improvements.” Basically, they said the decision was made because they couldn’t see a difference.
I’ve said this before, but I’ll say it again: Once he got over the shock of smokeless powder and self-loading pistols, Sir Isaac Newton would have told the FBI to stuff it. Oh, he’d have been polite, and it would have been written in Latin (because all learned discourses back then were done in Latin), but he’d have given them a smackdown, because more is always more.
That the FBI cannot see it, or will not see it, matters not one whit to physics.
Now, I’m not as blinded by excess enough to say that .45 hardball is a 95 percent stopper (which was once the given, virtually dogma, in practical shooting circles a few decades ago), but it does better than 9mm ball.
“But with expanding bullets, the 9mm does it better.” Hmm, yes, perhaps … and perhaps not.
But if we’re going to compare, we have to compare like to like. Comparing .45 hardball to the latest expanding 9mm is, in the words of a long-gone radio broadcaster friend of mine, like “comparing apples to cinder blocks.”
Apples, Meet Oranges
A matched set of hollow-points in 9mm and .45 ACP? OK, the 9mm might expand to as much as the .45 starts out with, maybe even a bit more in perfect conditions. But the .45 is not going to shrink, and it will not be less than 0.451 inch in diameter. And any expansion that happens only makes the difference greater.
Anyone who makes hollow-point bullets in pistol ammo makes it for the .45 ACP. There’s no such thing as a “9mm exclusive hollow-point.”
Keep in mind the word potential, because bullets are not guaranteed to expand. I have talked to a number of people in the various aspects of practical, tactical and law enforcement shooting, and the percentage of pistol bullets that fail to expand is almost depressing to consider. So, if expansion doesn’t happen, then we’re back to comparing 0.355 inch versus 0.451 inch as the baseline consideration.
The differences can be dramatic. There was a recent shooting in Dearborn Heights, a suburb that’s contiguous to Detroit (and all that entails). The homeowner realized there was an intruder, and when challenged, the intruder started shooting. So, the homeowner responded with gunfire. After a few seconds, everyone involved had been hit by projectiles, even the sleeping girlfriend. The girlfriend and the homeowner were treated at the hospital, while the intruder, hit in the leg by a single round of .45 hardball, required more care. He eventually had to have his leg amputated. And that was with .45 hardball, no expansion.
Not to be gruesome, but ballistic gelatin is a uniform and consistent media, and people are not. It’s just that we can test in ballistic gel in a consistent and safe and legal manner.
Thorough testing of bullets has produced the best designs ever, but even at that they cannot be depended on to expand each and every time. Since that is the case, starting with bigger gives you more leeway when production is, shall we say, underwhelming. (Yes, that’s auto glass used in the testing treatment.)
Good old hardball, a jacketed 230-grain round-nose has been the standard for over a century, and with good reason. It’s accurate enough, and it’s ultra-reliable. Most pistols fed most 230-grain hardball loads are going to be more accurate than the shooter is capable. However, if you really need an extra dollop of accuracy, then you can invest in some Hornady XTP loads. They are brilliantly accurate, and they expand.
Now, it’s a rare 1911 these days (and I think of the 1911 for reliability problems more as a historical thing than a current thing) that will balk at .230 jacketed round-nose. And, with the fierce competition in the marketplace these days, everyone makes a reliable pistol, so you aren’t “stuck” with hardball. However, if you want expansion, or at least the potential, then you can go with Gold Dot.
The Rock Island Standard Full Size comes with an eight-round magazine. The current crop of 1911 magazines is the best that have ever been made and at great prices as well.
One reason you might want to go with a hollow-point bullet is when you are indoors. All handgun bullets penetrate too much on interior walls, but hollow-points penetrate less than hardball does. That’s worth a thought and some planning. When using a firearm indoors, Rule No. 4 (know your target, and what is behind it) really becomes important.
With prudence, and planning, you might find that using a .45 ACP means less of your house structure and furniture is cover for the intruder, and more of it’s merely concealment. This you have to actually think about, consider and plan for. Your builder will not be marking the parts of your house as “cover” and “concealment” for you.
While it seems the world is a 9mm place these days, you will have no lack of options for ammo and bullet design choices in the .45 ACP.
More is More. More is Better.
Now, Newton would also tell us that, while more is always more, it costs … one way or another. It costs in recoil and magazine capacity. You have to be willing to put up with the recoil of .45 in order to get the power of a .45-caliber projectile. That’s not a real problem, as there are a number of female competitors in the USPSA/IPSC circuit who are not tall nor heavy and find the recoil of a .45 ACP (or a near .45) pistol to be no big deal. If someone who stands at 5-foot-nothing and weighs 90 pounds can shoot a .45 accurately and quickly, what’s your problem? (Typically, it’s lack of practice. There, I said it.)
Does the .45 ACP have recoil? Of course. You can’t get something for nothing, but it’s easily controlled.
Capacity is another. A double-stack 9mm can still be very trim (the 9mm makers are getting down to “This holds how many?” sizes for pistols) and still be manageable. But a double-stack .45, even in the slimmest versions, is a big-hands gun. Remember that the single-stack 1911 pistol has been in continuous production since 1911 for a reason. It holds enough ammunition that you probably won’t need more, and if you do, the reloads are mighty quick.
Oh, and one more cost that I have to admit to: actual cost. As in, .45 ammunition of any kind costs more in dollars than 9mm does, if only because there is more material in it. A quick check shows 9mm 115-grain ball in un-reloadable steel cases at $200 per thousand rounds. Reloadable brass ammo runs $230 per thousand. Meanwhile, .45 ACP runs $390 per thousand in reloadable form. I’ll admit, that’s a bunch more.
Times, They Change
However, an extra bonus from the fierce competition in the .45 marketplace is that a durable, reliable, 1911-based or even 1911 pistol can be had for not much money. If you want extra features, then they don’t cost much, either.
An example is the Rock Island Rock Standard Full Size Cerakote .45 ACP. It has forward cocking serrations, Novak-style combat sights, a high-grip beavertail and ambidextrous thumb safety, all done up in a Cerakote finish. It comes with G10 grips checkered for a non-slip grip, lowered ejection port and commander hammer, and it’s built on a Series 70 frame. That means no firing pin blocking the safety plunger to potentially cause problems.
The Rock Island Standard Full Size is just that, a government sized all-steel pistol, and Rock Island adds on extra features at a bargain price.
Built on a 4140 alloy steel parts set, the small parts are parkerized, it takes any and all 1911 single-stack magazines, it comes with an eight-round magazine, and it is listed at an affordable $759. Which means you can probably find it in the display case of your local gun shop for under $700.
The sights are dovetail-mounted so you can swap them if you really feel the need (or have a compulsion for home-gunsmithing). Everything on it is as close to mil-spec dimensionally as is possible these days. So, you can change things you might not like or find that they don’t fit you.
Try that with a polymer-framed pistol.
You Can Handle It
Oh, and back to the controllability question?
When the 1911 pistol was adopted, the average height of the American man was all of 5 feet, 8 inches. (Women were 5 feet, 3 inches.) Browning knew this (he could have hardly not known), so the 1911 is as ergonomic as he could make it for the average man of his time. Today, the average height of men is 2 inches greater, so stop complaining about grip size in 1911s.
Right out of the box, I found that the Rock Island Standard Full Size hit to the sights, it shot nice-sized groups, and it has yet to fail, despite being fed a wide variety of ammunition.
The Rock Island 1911 shot to the sights, and it produces groups you can certainly depend on.
Back when I started shooting competitively (we will not discuss who was president then), just getting the sights, beavertail, custom grips and adjustable trigger—all details that the Rock Island pistol has on it—onto a box-stock 1911A1 would have run more than the cost of the Rock Island pistol. No, seriously.
Firing up the old inflation calculator, $759 in 2025 dollars equates to (darn, now I have to admit when I started this journey) $155 in 1978. I paid more than that for the first 1911A1 surplus pistol that I then handed over to a pistolsmith to have him upgrade it. And I paid more for the work than I had for that surplus pistol. Calculating forward, that first pistol ran me about $2,400 in 2025 dollars, and I still was using absolutely miserable magazines in it. That’s all we had back then.
That’s the other good thing about the .45 ACP and the 1911 these days: The current offerings of magazines are superb in function and durability. I can recommend—without hesitation—both Wilson and Chip McCormick magazines. And if eight rounds isn’t enough, you can get extended, 10-round magazines for your single-stack 1911.
So, power, style, class and more than a little retro vibe. What’s wrong with the .45 ACP? Nothing. And what’s wrong with using it in a 1911? Nothing at all.
There: FBI, take that.
Editor’s Note: This article originally appeared in the April 2025 issue of Gun Digest the Magazine.
If you want to effectively defend your domain without risk of legal trouble, you need to understand Castle Doctrine.
Castle Doctrine is a legal principle that recognizes the right to defend yourself within the safety of your home, allowing the use of force—including deadly force—without the obligation to retreat. It’s rooted in the belief that one’s home is a sanctuary, a place where individuals have the right to feel safe and secure.
This concept, deeply embedded in history, continues to shape modern self-defense laws across the United States.
Historical Origins and Legal Foundations
The origins of Castle Doctrine trace back to English common law, captured in the phrase, “An Englishman’s home is his castle.” The phrase can be traced back to Sir Edward Coke, an influential English jurist of the 17th century. In his work, “The Institutes of the Laws of England” (1628), he wrote, “For a man’s house is his castle, et domus sua cuique est tutissimum refugium [and each man’s home is his safest refuge].” This statement was part of his commentary on the protections against unlawful entry into one’s home.
This age-old principle emphasized the inviolability of the home, asserting that even the king could not enter without permission. When early colonists settled in America, they carried this belief with them, integrating it into the legal systems of the new world. Today, Castle Doctrine remains a vital legal shield, protecting the right to self-defense within one’s dwelling.
At its core, Castle Doctrine removes the duty to retreat when an individual is threatened at home. This means that if an intruder enters a residence, the homeowner is not legally required to flee but is justified in using force to protect themselves and their loved ones.
However, the application of this doctrine varies widely across the United States, creating a complex legal landscape.
State-by-State Variations
Castle Doctrine is interpreted differently across states, leading to significant variations in its application. In Massachusetts, for example, Castle Doctrine is narrowly defined, applying strictly within the four walls of the home. Stepping even one foot outside the front door reinstates the duty to retreat. Conversely, Indiana extends protection beyond the home to surrounding areas, known as “curtilage,” and even includes occupied motor vehicles. These state-specific differences highlight the importance of understanding local laws and how they define and apply Castle Doctrine, as ignorance of these nuances can lead to severe legal consequences, even when acting in self-defense.
Defining the ‘Castle’
One of the most debated aspects of Castle Doctrine is the definition of what constitutes a “castle.” In most states, this is the home itself. However, questions arise when considering other structures. Hotel rooms, for example, may be protected if occupied but not in common areas. Recreational vehicles or mobile homes are typically considered dwellings when used as residences but not when stored.
The concept of curtilage—referring to the area around the home where intimate daily activities occur—adds further complexity. In some states, curtilage includes a fenced yard, an attached garage, or a front porch. In others, the definition is narrower, excluding larger areas of land distant from the house. This ambiguity can create challenges in high-stress situations, where split-second decisions are necessary.
Who Can Claim Castle Doctrine?
Castle Doctrine protections are not universally granted to everyone within a home. Some states limit its protections to homeowners, while others extend them to guests or temporary occupants. Legal complexities arise when considering cohabitants, such as estranged spouses or roommates.
In certain states, individuals are required to retreat if both parties have a legal right to be in the home, leading to complicated legal battles and difficult moral dilemmas. For example, if a divorced couple shares ownership of a house but one partner has a restraining order, that individual loses the right to claim Castle Doctrine, even if they are still listed on the deed.
These nuances illustrate the importance of understanding the specific rules in each state, as they can significantly impact the outcome of a self-defense case.
Exceptions and Limitations
Importantly, Castle Doctrine is not a blanket justification for the use of force. Several notable exceptions limit its application. It does not apply if the defender was the initial aggressor or if the defender did not have a legal right to be in the home, such as violating a restraining order. Some states also require retreat if the attacker is a cohabitant, regardless of the defender’s right to be there.
These exceptions balance the right to self-defense with the need to prevent unnecessary violence, ensuring that Castle Doctrine is not misused. They also highlight the importance of understanding the doctrine’s limitations, as misapplication can lead to serious legal consequences.
The Importance of Legal Awareness
Castle Doctrine reflects a fundamental belief in the right to protect oneself and one’s loved ones. However, its diverse interpretations across state lines make it essential for individuals to stay informed about local laws. Ignorance of these nuances can lead to significant legal repercussions, even when acting in self-defense. It’s important to note that while this principle emphasizes the sanctity of one’s home, it does not grant absolute immunity from the law. It should not be interpreted as permission to engage in illegal activities within one’s residence.
Conclusion: Balancing Safety and Responsibility
Castle Doctrine serves as a vital legal shield, protecting the fundamental right to self-defense. Yet, its protections are not universal, and the rules governing its application are complex and ever-changing. By understanding these intricacies, individuals can exercise their rights responsibly, safeguarding themselves and their families while navigating the legal landscape.
Castle Doctrine is more than just a legal doctrine. It represents a societal value that honors personal property and the sanctity of the home. However, it also reflects the delicate balance between personal liberty and legal responsibility. As state laws continue to evolve, staying informed is crucial. By understanding Castle Doctrine’s core principles and variations, individuals can protect not only their homes but also their legal rights.
Editor’s Note: This article originally appeared in the April 2025 issue of Gun Digest the Magazine.
Looking for a new iron or piece of kit to enhance the one you already own? Check out these 7 new bits of guns and gear to grow your firearms wish list.
Smith & Wesson expands its Model 1854 series with the addition of the .357 Magnum caliber, combining classic American lever-action design with modern enhancements. Available in black polymer and stainless steel or walnut with Armornite finish, the rifle features a 19 ¼-inch threaded barrel, 10+1 capacity, adjustable XS Sights ghost ring rear sight, a Picatinny optics base and a removable magazine tube. Recognized as Ballistics’ Best Lever-Action Rifle – 2024, the Model 1854 delivers smooth action, precision and versatility. Now available in .357 Magnum, it offers enthusiasts a blend of tradition and innovation. MSRP: $1,399
FN Reflex XL MRD
FN America introduces the FN Reflex XL MRD, a concealed-carry pistol designed for accuracy and comfort. Building on the success of the FN Reflex series, the XL features a 3.8-inch cold hammer-forged barrel, extended grip, and compatibility with popular red-dot optics. With a 15-round standard capacity (18-round extended magazine), the XL balances concealability at 1.1 inches wide and 20 ounces, while improving shootability with an ergonomic grip, enhanced trigger guard and smooth 5-pound trigger pull. Available in black and FDE finishes, the FN Reflex XL offers a versatile, reliable option for everyday carry with optics-ready capability and top-tier safety features. MSRP: $719
Colt Optics-Ready 1911 Competition
Colt’s Manufacturing Company has launched the Optics-Ready 1911 Competition Pistols at the 2025 SHOT Show in Las Vegas. Available in 9mm and .45 ACP, these pistols are engineered for precision and performance, featuring Colt’s innovative optics plate system for enhanced speed, accuracy and customization. Key features include a stainless-steel Optics Ready Slide with a black nitride cover plate, Series 70 Firing System, ergonomic design for optimal control and G10 checkered grips. These pistols will be available nationwide starting April 2025, offering competitive shooters Colt’s legendary performance and cutting-edge innovation. MSRP: $1,399
YHM VICTRA-12
Yankee Hill Machine (YHM) has unveiled the VICTRA-12, a modular sound suppressor for 12-gauge shotguns. Engineered for performance, the VICTRA-12 is light-weight, durable and delivers outstanding noise reduction. Its modular design allows users to adjust lengths to 12, 10, 8 or 6 inches for tailored use. The suppressor’s innovative mounting system works with popular shotgun models and includes an interchangeable choke system, shipping with an Improved Cylinder choke and optional Full and Modified chokes. Weighing 25 ounces and full-auto rated, the VICTRA-12 sets a new standard in shotgun suppressors. MSRP: $960
Mossberg 590R & 590RM
Mossberg introduces the 590R and 590RM pump-action shotguns, groundbreaking additions to the trusted 590 platform. Designed for duty and home defense, these 12-gauge shotguns feature AR-style ergonomics, ambidextrous rotary safety selectors and user-serviceable components. The 590RM models offer detachable, double-stack magazines with a 10-round standard capacity and optional 5-, 15-, and 20-round magazines. Both models boast an 18.5-inch barrel with integrated heat shield, five-position adjustable stock, Magpul MOE+ pistol grip, and Picatinny rail for optics. Additional highlights include a crisp flat-profile trigger, M-Lok compatibility, and enhanced durability. The innovative 590R and 590RM redefine tactical performance and versatility. MSRP: 590R $1,085, 580RM $1,190
Foxtrot Mike Products VFM-9
Foxtrot Mike Products introduces the VFM-9, a new line of 9mm upper receivers designed to deliver exceptional performance and value for budget-conscious consumers. Built with a robust 4140 steel barrel rated for over 10,000 rounds, the VFM-9 offers impressive accuracy and durability. Innovative features include a thermal fit barrel design, streamlined assembly, and compatibility with Foxtrot Mike’s industry-leading Last Round Bolt Hold Open (LRBHO) system. Available in two configurations—non-reciprocating forward charging or dual charging handles—the VFM-9 delivers versatility and reliability. Backed by a lifetime warranty, it’s the ideal choice for PCC enthusiasts seeking high quality at an accessible price. MSRP: Starting at $269
KelTec PR57
The KelTec PR57 redefines concealed carry with its innovative design and lightweight build. Chambered in 5.7x28mm, the PR57 features a rotary barrel system, making it 40 percent lighter than its competitors and just 0.937-inch wide for exceptional concealability. Instead of detachable magazines, it uses an internal stripper clip-fed system, holding 20 rounds across two 10-round clips, prioritizing shootability and reliability for real-world self-defense scenarios. Designed by George Kellgren, the PR57 is optics-ready and offers the market’s easiest field strip with a simple forward push of the trigger. MSRP: $399
Editor’s Note: This article originally appeared in the March 2025 issue of Gun Digest the Magazine.
Springfield Armory has just announced a pistol version of the SAINT Victor 9mm AR.
Springfield Armory added a 9mm to its SAINT Victor line of ARs a couple of years back in the form of a carbine, but the company is now releasing a pistol variant as well. The SAINT Victor 9mm Pistol features the same dedicated 9mm upper and lower receivers as the carbine version but now with a shorter barrel and a pistol brace.
As you can imagine, most aspects of the SAINT Victor 9mm Pistol are the same as its bigger brother. That includes its rugged direct-blowback operating system, use of 32-round Colt-pattern magazines and nickel boron-coated flat trigger. Both SAINT Victors also have the same B5 Systems Type 23 P-Grips, ambidextrous safeties, similar M-LOK handguards and SA Muzzle Drums. Naturally, the biggest difference is the new pistol variant features a 5.5-inch barrel and an adjustable SB Tactical SBA3 pistol brace on the three-position receiver extension instead of a buttstock. The only other differences between the pistol and the carbine are that the carbine comes with flip-up iron sights while the pistol doesn’t and that the pistol ships with a handstop.
Steve Kramer, Vice President of Marketing for Springfield Armory., said this about the new 9mm:
The new SAINT Victor Pistol in 9mm adds yet another layer of capability to the SAINT Victor line … Offering the durability and performance of a direct blowback system, this new 9mm would make a great addition to any shooter’s firearms collection.
MSRP for the SAINT Victor 9mm Pistol is $1,099 and it ships with a padded rifle case.
When it comes to shooting handguns in the dark, is it better to have a handheld or a weapon-mounted light?
It’s no secret that bad things happen in the dark. Evil loves the absence of light, which is why some humans are afraid of the dark. Our literature and movies have contributed to this fear with monsters such as vampires and werewolves; it seems like all the really scary things love the nighttime.
Bad guys like the dark, too. They like the anonymity it offers, appreciating the advantage it gives them as an attacker … and the disadvantage it lends to their prey.
But you can fight the night with light, which is why one of the most important self-defense tools is a flashlight. The question is: Should you mount your flashlight on your weapon or carry it in your hand?
You don’t have to have a weapon light to shoot well in low light. You can do it effectively with a flashlight.
Lots of Lumens
Back when I was working the street, the high-lumen compact flashlight was just becoming popular. They were bright as hell but expensive as hell, too. This is, of course, one of the reasons most police officers carried a three-cell Maglite (the other reason being it could double as an impact weapon). I was the first officer in my department to purchase an expensive, compact, high-output flashlight, and most of the other officers ribbed me for spending so much money … well, until they worked a night shift with me and saw the advantage a high-quality flashlight can provide. Today, the high-output flashlight is more common with police officers than donuts.
Weapon lights can help you shoot better in low light, but they are not a substitute for a handheld light.
The higher lumen, lithium battery flashlight soon found its way to weapons, and today they’ve become what many consider a necessity as opposed to an accessory. Some departments now issue weapon lights for handguns, carbines and shotguns, and the advantages they offer to law enforcement apply to everyone else, too. I know folks who have a weapon light on their everyday carry gun.
However, as practical as it might seem to mount a light to your carry gun or home defense firearm, a mistake many make is to assume a weapon light circumvents the need for a flashlight. While a handheld flashlight and a weapon light can provide a distraction to an assailant—along with temporary blindness—the weapon light has a primary purpose. A weapon light is intended to help you shoot better in low-light circumstances. A weapon light is not for searching, because if you’re searching with a weapon light, you’re pointing a loaded gun at everything you want to look at.
Weapon lights have the advantage of letting you hold a handgun, carbine or shotgun normally with two hands.
Remember the second rule of firearms safety? Never let the muzzle cover anything you are not willing to destroy. This rule always applies, whether you’re on the range for recreation or competition, and even if you’re in a gunfight. You don’t want to point a loaded gun at your patrol partner, wife or one of your children. This is especially true in a high-stress situation when you might also be violating the third rule of firearms safety, which is to keep your finger off the trigger until your sights are on a target you are sure of.
In Gun or Grip?
The point of all of this is to differentiate between a handheld light and a weapon light. It’s not to promote one over the other. In fact, savvy shooters will have both.
The key to using a handheld light to shoot in low light is to practice perfectly holding the light while simultaneously aiming.
For example, let’s assume you’re walking through a dark parking building, and your carry gun has a weapon light. Are you going to pull your handgun and use that light to check your surroundings? No, of course not. The same could apply at home when you hear that bump in the night. You might grab your home defense firearm with its weapon-mounted light to investigate, but you need to be able to safely explore your surroundings without inadvertently pointing a gun at your pet or favorite child.
A more complex example could be a situation where you’re holding a threat—human or otherwise—at gunpoint in the dark. Your weapon-mounted light is keeping the threat illuminated and partially blinded, but what if you hear a noise to your left or right that needs to be scrutinized? Are you going to take your gun/light off the threat you’ve already identified to try to discover the source of another potential threat?
I hope not.
A handheld flashlight is something you should always carry or have readily available. Not only does it allow you to safely search, but you can also use it for shooting in low-light situations. However, the most practical approach is to have a handheld light and a weapon light. I’ve equipped my home defense handgun with a weapon light, as well as my home defense shotgun and carbine. However, next to them, I also have a handheld light. One is for looking, and the other is for shooting.
I do not have a weapon light on my carry gun because I’ve not found a comfortable way to carry a handgun with a weapon light, and comfort is a primary consideration for everyday carry. You, your body type and the way you dress will dictate what and how you carry.
However, I don’t leave home without my Galco Flashlight Carrier, which secures a 2.8-ounce, 350-lumen Streamlight ProTac 1L-1AA flashlight. Aside from security and safety concerns, I use that light almost daily to find stuff that rolls under the couch or my truck seat … or just to read a restaurant menu.
It’s a good idea to have a lanyard on a tactical flashlight so you can use your hand for other things and not drop your flashlight.
You should be prepared, and when it comes to a weapon or handheld light, both might be the best answer. In either case, follow the rule of the four Ls:
Lumens: Minimum of 100 lumens
Lithium: Lithium batteries last longer
LED: LED bulbs are more rugged
Lanyard: Use a lanyard on handheld lights
Fortunately—at least for right now—we don’t have to worry about vampires and werewolves. But bad humans and bad animals are a real thing, and just like the monsters we feared as a kid, they love the darkness.
Editor’s Note: This article originally appeared in the April 2025 issue of Gun Digest the Magazine.
When comparing 6.5 Creedmoor versus .308 Winchester, is one clearly better than the other? Or do both cartridges have their place?
As shooters and hunters, we’re always chasing something, be it the game or the high score in a match. As a result, we end up trying new things as well as reinventing old concepts. Today, we are debating a thin line of performance in our rifle cartridges that’s as much factual as it is sentimental, an ever-present past that we judge the future against. In a way, it’s a flat circle: We often forget what we had that worked … and have to see it come around again to remember that it wasn’t all that bad in the first place.
The ultimate success of a rifle cartridge isn’t to be the latest trend, but rather become something of a reliable choice that withstands the test of time. Until recently, there has been something of a rivalry between the classic .308 Winchester and the “new” kid on the block, the 6.5 Creedmoor.
Here I’m going to make the case for both.
A 6.5 Creedmoor versus .308 Win. on its right.
What Makes a Cartridge Stick
For a rifle cartridge to succeed, it needs to be something new enough to gather interest and also do something different than its competing class. The obvious discussion here isn’t whether the .338 Lapua Magnum is going to replace 5.56 NATO in carbines for home defense. However, it’s a good illustration of just how lost we can get in terms of discussing the realities of ballistic performance in things that are, in fact, far more similar than they are different.
Older-style case designs are a reason things get the “replacement” banter. The case design of the two NATO cartridges here didn’t take into account the later development of long-range-dedicated bullets. In general, to get a better bullet, you have to seat it deeper in the case, which isn’t always the best solution.
The nature of our industrial production, at least in America, has trended toward the modular. The AR-15 paved the path to this, and in the past decade, we now have hundreds of companies producing AR parts, and we also have an ever-growing open-source ecosystem that’s providing common parts for “Glock” pistols, Sig P365 and P320 aftermarkets, and bolt-action systems that will eventually be fully integrated into common industry standards. Even suppressors are trending to HUB base thread systems to accommodate different guns and mounting interfaces.
In the early days of this, which were not that far in the past, we didn’t have a lot of options for increasing or altering performance beyond totally custom options. The main dilemma centered on available magazines and bolt faces: introducing something outside of these specs would necessitate a completely new set of operating parts that would complicate things for the mass market and, therefore, influence the feasibility of new rounds.
In broader manufacturing, we’re somewhat stuck in the box: The ideas we have now are all somewhat limited because the base systems we shoot them out of are almost entirely rigid in their own design. Open-source rifle designs, or at least what we call “footprint” variations, are almost guaranteed to perform with cartridge options that fit in their magazines. So, what we end up with isn’t entirely a form of innovation, rather niche filling in a set space we’ve all agreed to with our wallets over decades.
The .308 was a cartridge that spurred the development of many types of rifles. Here, a Magpul AICS mag and a steel M14 magazine from Check-Mate. The 6.5 Creedmoor will feed in any .308 mags commonly available.
The .308 Winchester has been a mainstay for the American shooter for decades. It has a special reverence in our culture and is one of the most popular hunting and fighting rounds available. It has a reputation for success, and it has become so commonplace that it has been the basis for several rifle families and magazine types. The .308 Win. is the “fatherly” short-action rifle round and also is the main influence on AR-10-class rifles.
The M14, here a .308 Win. Fulton Armory build in National Match form, is an example of a rifle and cartridge that has been pressed into long-range roles by necessity. This is still an extremely accurate rifle, easily able to ring steel at long range.
So, knowing that, there was obviously some ground to start playing around in the .308’s backyard—namely in the guise of necking it up and down, but ultimately keeping its case head diameter.
As a baseline rifle cartridge that has been instrumental in establishing a host of firearms, standardized magazines, parts and ammunition types, the .308 is, in fact, very hard to beat. In today’s cartridge race, we often forget what our most established and widely available rounds are capable of. Yes, it’s somewhat easy to “beat” the .308 Win. in terms of trajectory at a given distance, but that’s only one metric of performance being considered. We tend to give advantages to things by way of marketing that are otherwise easily dismissed in ballistically identical cartridges that simply aren’t new or popular.
For instance, there are few talks about the 6mm Creedmoor besting the .243 Win., or if the 6 ARC is a viable contender in the same space. In terms of real-world performance, these three rounds each offer something great in the 100-grain +/- .243-inch bullet class. We don’t see this debate because it’s not a point of contention—none of these around are trying to “replace” the other, which, in general, was the argument of .308 Win. against 6.5 Creedmoor.
The newer 6mm ARC next to 6.5 Creedmoor, a testament to successful case design that can use bullets dedicated for longer ranges.
You’ve seen article after article by now: “Will the 6.5 Creedmoor Finally Kill the .308 Win.?” But why are we asking that at all? In a way, this was comparing apples to oranges that share a case-head diameter. The strengths of the .308 Win. have, at least in our media, been watered down to create controversy in areas it wasn’t meant for.
The 150-grain .308 Win., here from Remington, is always a solid choice for game.
The Long-Range Problem
Let’s consider the 1,000-yard benchmark and the practical effective uses we see in the field.
The shooting industry went through a pretty long zombie phase, and the 6.5 Creedmoor was introduced during this somewhat bonkers time, and it slowly began to take root. Initially, it confused many shooters, who were not familiar with metric designations on American cartridges; the bulk of 6.5mm experience was with wildcats like 6.5-284 … and classic military rounds like 6.5×55 Swedish.
It was a gamble to introduce something with a relatively unfamiliar bullet diameter during what was the height of the surplus market, with cheap ammo everywhere and the rising popularity of the modular AR-15, itself spurring the development of .30-caliber rounds like .300 Blackout.
Bullet shape plays a large role in long-range performance. The abbreviated profile of the .308 Win. isn’t necessarily a function of what can be done with .30-caliber bullets, but the best shape for the available magazine dimensions. Many .30-caliber bullets available today in dedicated long-range cartridges like .300 PRC are far longer and heavier.
Suffice to say, these two introductions, the 6.5 Creedmoor and 300 Blackout, were instrumental in changing our landscape. The 6.5 Creedmoor is largely responsible for the long-range trend we had, the .300 Blackout for helping make suppressor ownership commonplace. Today, we see a melding of these two things as shorter barrels with suppressors are becoming more the norm.
Here’s a brand-new, stripped short action from Detroit Gun Works. The dimensions of this state-of-the-art action were determined ages ago thanks to the .308 Win., the Remington 700, and the ingenuity of the American shooter to keep improving. This action is a testament to the success of the .308 Win. and just how good we can make precision rifles these days.
After we lost interest in killing zombies, the next big trend became long-range shooting—and the 6.5 Creedmoor was the newly crowned king. One-thousand yards had suddenly become accessible to the average shooter with a regular short-action rifle and cost-effective ammo. The culture moved to hits on steel as sports like PRS grew. Making contact with plates was the name of the game, and the industry responded in kind.
The practicality became lost over time, and the sports became their own punchline: bullet golf. To me, long range has always been training for field shooting on game, which takes place ethically at much shorter ranges that neglect the imaginary 1,000-yard benchmark. I’ve shot .308 Win. to a mile, as well as with .338 Lapua, 6.5 Creedmoor and .300 Win. Mag. It’s hard with any of them.
The .308 Win. enjoys a great variation in bullet types and weights, making it a viable choice for small game … up to the largest animals on the continent.
In terms of “rivalry,” what really needs to be understood is that the .308 Winchester was not designed as a long-range cartridge … while the 6.5 Creedmoor was. Of course, there was more that went into this, but the .308/7.62 NATO was a general-purpose cartridge developed in the post-World War II years to replace the .30-06 Springfield and other foreign military cartridges as the Western world aligned itself against the Soviet sphere. The standard cartridges of the era are what appeared in what was considered precision rifles, .308/7.62 NATO and 7.62x54R becoming the dominant chamberings. Over time, there were certainly attempts to increase long-range performance.
The .308 Win. and .30-06 Springfield, here both match loads by Hornady. Note the similar body profiles and bullet seating depth.
For general recreation, the 6.5 Creedmoor is a great round, and it’s worthy to note that it was far from the first 6.5mm/.264 cartridge utilized in .308 actions. The .260 Remington is still around in limited circumstances; however, it, too, was not designed with modern bullets in mind. The case dimensions and intent to use these modern bullets was what set it apart when Hornady introduced it. Everything about this cartridge was well thought out, and Hornady deserves a lot of praise for what is likely one of the most successful new cartridge introductions in history.
The main thing that needs to be understood is that the 6.5 Creedmoor was introduced into the .308’s manufacturing base with the idea it would offer an improvement for long-range shooting, whereas the .308 was designed as a cartridge, and guns were designed around it. The rivalry here is purely media bias in our own industry, neither can nor even should replace the other.
Real-World Brotherhood
I’ve taken game of various types all over the country with both the 6.5 Creedmoor and .308 Winchester. Likewise, I’ve shot matches of all kinds, from CMP military matches to long range on moving targets. In all practicality, I’ve not been one to understand the idea that one needs to beat the other. In general, I don’t get the hype for the 6.5 Creedmoor and don’t get the hate for .308 Winchester that I hear so often.
Let’s add some numerical context. The .450 Bushmaster, on a good day, is a 200-yard cartridge. Drop is measured in feet at most ranges. In contrast, the .308 and 6.5 zeroed at 100 meters are both dropping less than a half mil—mere inches—at 200 meters. In general, you don’t need to compensate too much until you get past 300 meters. Both .308 and 6.5 can easily do this with rudimentary holdovers. In fact, many chamberings can.
An ideal .308 Win. rifle build based on an Aero Precision Solus short action. The rifle uses an Aero 18-inch barrel that installs as a pre-fit option. The suppressor is a SilencerCo Scythe Ti. The barreled action is mounted into a Manners Night Stalker with an internal chassis. The optical package is a Leupold MK5 HD in ADM mount with One Hundred Concepts scope covers. The thermal clip-on is courtesy of Armasight. Tripod by Two Vets Tripods. The build is representative of all features that make a .308 valuable today. Short-action rifles are common today, thanks to the success of the .308 Winchester. There’s an endless number of varieties available today.
In practical terms, you should think about owning both of these cartridges from a purely pragmatic standpoint. The .308 Winchester established the basis for the success of the 6.5 Creedmoor, but it isn’t really competing in the same ways as the 6.5 Creedmoor has been made to compete with it in return. Both of these rounds offer unique benefits, and both are nearly interchangeable in terms of the firearms they are used in. It’s really the best of all worlds to be able to have the flexibility of .308 Winchester and the extended-range performance of 6.5 Creedmoor.
There’s no reason to declare one a winner when they are both such distinguished gentlemen in their own rights. It’s better to have more friends than fewer, at least that’s how I see things.
Editor’s Note: This article originally appeared in the April 2025 issue of Gun Digest the Magazine.
We hit the range with a Ridgeline FFT to test out Christensen Arms’ carbon-crafted precision rifle.
Though I’ve been writing about guns for more than a quarter-century, I’m a bit embarrassed I have not previously delved into the rifles produced by Christensen Arms. Carbon-fiber-wrapped rifle barrels and carbon-fiber-infused stocks are very popular today, and Christensen Arms pioneered the carbon-fiber-wrapped barrel.
They’ve also been instrumental in the development of carbon-fiber stocks. You could say I’ve been derelict in my duties, but I recently had an opportunity to correct that … and I’m glad I did. During a recent visit to Christensen Arms, I discovered the Ridgeline FFT rifle, and I’d rate it as one of the best bolt-action hunting rifles currently made.
The action on the Ridgeline FFT is a copy of the Remington 700 action. In fact, it’s compatible with Remington 700 scope mounts. However, Christensen Arms has perfected the action, correcting some of the issues often complained about.
The author helped with the assembly of the Christensen Arms Ridgeline FFT test rifle. (Photo: Christensen Arms)
For starters, Christensen Arms moved the bolt stop/release to the left side of the action. They also re-engineered the extractor from the ring/clip style used on the Remington 700 to a design similar to what’s used on an M16. Also, instead of a single plunger ejector, the bolt face on the Ridgeline FFT is fitted with two. And, finally, Christensen Arms utilizes a TriggerTech trigger that’s user adjustable.
The bolt body and cooking piece on the Ridgeline FFT has very tasteful spiral fluting, and the bolt cycles with butter-smooth ease.
The barrel is made of 416 stainless-steel, and it’s button-rifled and hand-honed at the factory. It’s also machined with steps that reduce in diameter from each end to the barrel’s center, which is a proprietary and secret process. The barrel is then wrapped in various layers of aero-grade carbon fiber and then finished for a seamless contour from breach to muzzle. The muzzle is threaded at either 5/8×24 or 1/2×28, depending on chambering, and the rifle ships with a stainless-steel, side-baffle brake. A thread protector is provided.
This is something you don’t see very often: the case from the proof load that was fired in the Ridgeline FFT test rifle. Proof loads are fired at extremely high pressure to test all new Christensen Arms rifles. (Photo: Christensen Arms)
The stock really sets this rifle apart. Using proprietary FFT technology, the stock is handcrafted in-house. It’s a monocoque design, meaning there’s no internal structuring support, and the finished stock with the buttpad installed weighs only 20 ounces. By comparison, a similar—fully finished—carbon-fiber stock from AG Composites will weigh about 25 ounces, and the fully finished stocks Melvin Forbes used on his famous Ultra Light Arms rifles weighed 18 ounces.
You might look at this stock like an eggshell, but a hell of a lot stronger. The stock does utilize carbon-fiber bedding pillars for the action screws and is glass bedded at the recoil lug to ensure free floating.
Other features include an aluminum hinged floor plate, dual sling swivel studs, an enlarged bolt knob, a spiral-fluted bolt, Cerakoted steel and left-handed versions in nine different chamberings. Since I was at the factory to help with the assembly of the test rifle, I had Christensen Arms install the Spartan Precision gunsmith adapter that works with all of the Spartan Precision bipods and tripods I so often use.
But Can She Shoot?
The day after assembling the rifle we headed to a local 1,000-yard range. The 6.5 PRC load we chose was the Berger 156-grain Elite Hunter. The day before I’d used that same load to zero the rifle in Christensen Arms’ underground test tunnel—and had fired a 0.76-inch three-shot group.
The Ridgeline FFT rifle that was tested was chambered for the 6.5 PRC, and not a single five-shot group that was fired measured more than an inch.
At the range, I first confirmed the rifle’s zero and then started whacking steel in 100-yard increments. Most of the targets were 12 inches in diameter, and I did not miss a single target until the range reached 800 yards. By then, the wind had picked up a bit and was gusting, but I still managed multiple hits out to 1,000 yards and only fired one box of ammo.
When I got the rifle home, I got more serious about precision testing. I had several boxes of Federal’s new Tipped Fusion load and some Hornady Precision Hunter. I fired three, five-shot groups with each load from a sandbag rest at 100 yards, and the overall average for the six groups fired was only 0.86 inch.
The author consulted ballistic data on the 1,000-yard range while testing the Christensen Arms Ridgeline FFT. (Photo: Christensen Arms)
However, there’s an aspect of this testing that needs to be explained: Part of the appeal of a carbon-fiber-wrapped barrel is heat dissipation, and I wanted to see how well this rifle would maintain precision with a hot barrel.
For all the groups, I used a Silencer Central Backcountry suppressor, and all five shots for each group were fired in less than 60 seconds. After each five-shot group, the barrel was allowed to cool, but it’s worth noting that these five-shot groups were fired in a hurry. It’s a testament to how well Christensen Arms has perfected the carbon barrel wrapping process.
Of course, in the real world, the practical application of a big-game rifle will rarely, if ever, require you to fire five shots in less than 60 seconds. For the big-game hunter, rifle interface and handling characteristics are more important. In addition to being incredibly light, the rifle’s stock was comfortable, and the comb positioned the head and eye almost perfectly behind the scope, which was mounted in extra low—0.418-inch high—Talley Alloy Lightweight mounts. For those who like the long-range game, Talley offers these mounts with a 20-MOA offset.
The Christensen Arms Ridgeline FFT rifle is a lightweight big-game rifle designed for the field. Depending on chambering, it only weighs about 5.4 pounds.
The muzzle brake was effective but loud, so I tossed it and went with the suppressor. Without the suppressor, the rifle balanced almost perfectly. With it, it was just a tad muzzle heavy, balancing about 2 inches forward of the front guard screw. This is a very good balance for shooting off-hand at stationary targets, and I had no issues ringing 8-inch steel from field shooting positions out to 200 yards.
Overall, the rifle functioned to perfection—and it fed, fired, extracted and ejected flawlessly. I would’ve liked a safety that locked the bolt handle down when placed on safe, especially since this rifle has an oversized bolt handle. Original Remington 700s had this feature, and it’s the only negative aspect of the modern Remington 700 action—which lacks that feature—Christensen Arms did not address.
Shooting Results
LOAD
VELOCITY
SVD
ENERGY
PRECISION
Federal Fusion 140-grain Tipped
2,890
19.3
2,596
0.94
Hornady 143-grain ELD-X Precision Hunter
2,860
26.3
2,597
0.77
AVERAGE: 0.86
NOTES: VEL = average muzzle velocity, SD = standard velocity deviation, ENG = average muzzle energy
A Few Final Words On The FFT
In 1979, I’d saved enough money to buy my first big-game rifle. It was a Remington 700, and I spent just a tad more than $200 for it. Times have changed; today, $200 will only buy you a couple boxes of ammunition. I recently compiled some data on all the rifles I’d reviewed over the past several years. What I discovered was that, to get a factory rifle that will consistently shoot five-shot groups of less than an inch with several factory loads, you’ll have to spend more than $2,000. Granted, there are exceptions, but generally that’s the cost of precision in 2025.
Though the Ridgeline FFT utilizes an internal magazine with a hinged floor plate, it’s compatible with aftermarket detachable box magazines assemblies.
The Christensen Arms Ridgeline FFT will meet that precision standard. In fact, it comes with a sub-MOA guarantee, and its suggested price is right in line with what you should expect to pay for a rifle that shoots that well.
However, with the Ridgeline FFT, you get that level of precision from a rifle that weighs less than 5.5 pounds. That puts it in a category all its own. Sure, there are lighter rifles that will shoot this good, but you’re going to have to pay half again as much as you will for the Ridgeline FFT to get one. By my estimation, that makes the Ridgeline FFT a very special rifle.
Pros
Super lightweight
Incredibly accurate, Sub-MOA gauranteed
Well balanced & good ergonomics
Available in multiple chamberings and left-hand options
Cons
Safety doesn’t lock bolt handle down
Expensive
Christensen Arms Ridgeline FFT Deals
Guns.com
Starting at $1,835
EuroOptic
$1,840
Editor’s Note: This article originally appeared in the April 2025 issue of Gun Digest the Magazine.
When legislation or preferences steer a shooter away from a semi-auto carbine, it’s time to go with Plan B: The tactical lever-action rifle.
I live in one of those onerous corners of America, where the boot heel of tyranny has attempted to exert pressure. In short, my particular municipality took a crack at banning a host of firearms. This included, of course, the venerable AR-15 among other semi-auto carbines.
Thankfully, the law was eventually rebuked by the state supreme court, but the situation did get me thinking … The times being what they are, what’s a passable stand-in for a semi-auto carbine? Not exactly the thought experiment most want to conduct, but an unfortunate one many citizens must ponder or at least should perchance the inmates ever end up running their particular asylum.
As chances have it, some gunmakers appear sensitive to this very question and, for all intents and purposes, have concocted a workable solution. Here, I speak of the tactical lever-action. By no means are the systems a one-for-one analog of an AR, AK or any other semi-auto, but the quintessentially American gun has proven itself time and again.
Crack open a history book concerning the nation’s westward expansion, and the examples are rife—from the legendary Winchester 1873 taming the frontier to the Marlin 1894 opening up the vast Alaskan backcountry. These are as carbine hard as the men who used them living off the land as they were fending the back forty. Quite a résumé! And they’ve only grown better with time. In their present modernized form, the lever-gun is equally as adept an instrument for guarding the suburban homestead as they are a do-anything option for tackling the apocalypse.
Tactical Lever-Gun Breakdown
There’s no hard and fast rule on what constitutes a tactical lever-action. Certainly, many write them off as merely polymer-stocked iterations of the originals. True, some wear plastic, but not all. And really, there are some nuances to what’s offered, besides dark finishes and ominous names, such as “Dark Series” (Marlin) and “Model X” (Henry).
Looking to build your own tactical lever-action? Upgrades, such as XS Sights’ ghost ring/rail system for the Marlin 1895 are readily available.
To the quick of the matter, tactical lever guns are generally modernization efforts, retaining the heart of the carbine—receiver, etc.—and offering more utility. In particular, it’s usually found with the combination of these four features:
Accessory Mounting: Much like AR-style rifles, Picatinny rails and M-Lok slots make adding a useful accessory such as a weapon light easy.
Threaded Muzzle: For a gun meant to defend in close quarters, the option to attach a suppressor without the aid of a gunsmith is welcome.
Sighting Systems: Many, if not most, offer faster-target acquisition systems out of the box, such as ghost ring aperture, as well as rail systems more conducive to attaching modern optics.
Aftermarket Support: Accessory manufacturers have also noted the trend of tactical lever-actions and offer a wealth of upgrades to tailor them to particular applications.
By no means do these modest improvements completely reinvent the wheel. There was no need to.
Despite more than 150 years old in concept (at least in its modern form), the system still proves among the most versatile and fastest available today. At the same tick, these features enhance the already solid firearms, better tailoring them to modern tastes and applications. So don’t fret if your predilections or local laws run counter to semi-auto currents. The tactical lever-action more than holds its own in today’s rough-and-tumble world. Here are six I’ve found that particularly excel in the role.
How We Made Our Picks
While I appreciate a good lever gun as much as the next guy, and I’ve owned and shot plenty of them over the years, the Gun Digest team is full of downright lever-action fanatics by comparison. Combined, we have extensive time behind a wide variety of lever guns, including all the tactical lever-action rifles on this list and several others that were left off. Using our combined experience, we found that the following models are the best-executed examples of the tactical lever-gun concept. From features and ergonomics to general reliability and performance, these are the top space cowboy lever gats to get.
Since Ruger acquired Marlin, the company has been reintroducing many of the most popular lever-action models, including the tactical Dark Series. However, at the time of this writing, the lineup only includes the Model 336 in .30-30 Winchester and the 1895 in .45-70 Gov’t.
For this list, I chose the latter. Sure, .45-70 may not be quite as versatile as something like .357 Mag. or .22 LR, but if you’re shopping for a tactical lever-action rifle for defense in grizzly bear country–or close quarters verses two-legged predators–the heavy-hitter can be a very smart choice. I don’t peg this rifle as a jack-of-all-trades carbine, but I find that what it does, it does well.
Notably, the pre-Ruger Marlin Dark Series rifles were not nearly as well thought out as these new models. No longer sporting wood furniture with a coat of black paint and a few pre-installed aftermarket accessories, the current production Dark Series guns were given a much more serious tactical treatment. The rifles now feature nylon-reinforced polymer furniture with M-LOK slots, a threaded barrel with a radial muzzle brake, QD sling attachment points and of course a Picatinny rail for optics.
Perhaps our favorite aspect of the entire build is the gun’s M-Lok handguard, which sadly remains an aftermarket upgrade for most lever actions–tactical or otherwise. In our book, this makes the Marlin the best overall option in tactical lever actions at present, or at least the one best living up to the moniker.
As for shooting, I found Ruger has done a phenomenal job with the 1895. With the right ammo–in our case Hornady Subsonic–the rifle prints sub-MOA. The user interface is well thought out and comfortable, making the rifle fast and accurate–particularly with the included radial brake or a suppressor. It’s about everything I wanted in a modern lever action… almost.
I found two sticky points to the gun. The snap on comb isn’t the easiest install and is necessary. And the trigger–at least on my model–had a hitch at the start of the pull. Cleaned up the gun would have been near perfect. I still think it’s dang close and with a LPVO on top believe it would serve most shooters well.
Best PCC Tactical Lever Action: Henry Model X Big Boy .45 Colt
Model X Big BoySpecs Caliber: .45 Colt Capacity: 7+1 Barrel Length: 17.4 Inches Overall Length: 36.3 Inches Weight: 7.3 Pounds Stock Material: Polymer MSRP: $1,124
Pros
Ergonomic
Smooth Lever Throw
Pistol Grip
Cons
No Picatinny Rail
Among the most popular of Henry’s rifles, the pistol-caliber carbine succeeds wildly in the company’s polymer-stock Model X line. Light and responsive, the rifle sings in the right hands and is as dependable as the day is long.
While I have an affinity for carbines chambered .357 Mag./.38 Special, and the Big Boy is available in .44 Mag./Special, shooters are well served in considering the Big Boy in .45 Colt. The gun digests spicy hunting loads, giving it plenty of hitting power and versatility—it’s a particularly apt survival option with brush-gun chops.
Especially welcome on the 17.4-inch barreled rifle (it’s threaded, mind you) is a well-thought-out polymer forend, staying true to the Big Boy’s feel while improving its utility. To this, we point out the section of Picatinny rail below the forend and the M-Lok slots at the 3 and 6 o’clock positions just above the rail.
Further back, Henry opting for a pistol-style grip (as opposed to the original’s straight grip) is appreciated and adds a level of control to the rifle—as does the company adding a side-loading gate for fast reloads. Its 7+1 capacity is ample for most circumstances, but it doesn’t hurt to have a backup to keep it in the fight.
And this gun might very well be the best tactical/hunter options on the list. I found the gun an extremely fast shooter, even without a muzzle device installed, and fairly danged accurate 50 yards and in. Stand hunting or a very manageable and overpowering defensive option, the rifle excels in either role.
About the only bone I have to pick is Henry opting for drilling and tapping the receiver; many shooters might’ve felt better served with an optics rail. Given it’s a side ejector, it would’ve worked like a beauty. Though, that’s no dealbreaker, since you can add the asset at home. As an aside, Henry also offers Model X .45-70 and .30-30 options, if those are better suited to your circumstances.
Up front, we’ll say this rifle misses a few key tactical features: threaded muzzle and accessory-attachment points. However, it makes up for these shortcomings with one notable asset. It’s a takedown.
Some might pick nits with the concept, but I still contend it’s a worthwhile way to make a long-gun more accessible away from home—be it stowed in your pickup or backpack. In this case, again I prefer the .357 Magnum/.38 Special version, but some might find the .44 Magnum/.44 Special iteration more suitable.
In either case, the Alaskan breaks down to a tidy 17-inch package. And at roughly 6 pounds empty, it isn’t much of a burden. That’s surprising, because the rifle has a thick octagon barrel and is stocked in wood with a rubber overmolding. Chiappa, the manufacturer, obviously could’ve cut a few ounces with polymer furniture, but the touch more heft feels right in this particular style of rifle.
A Winchester ’92 clone, it spits spent cases out the top. While not the best system to run an optic on, Chiappa avoids conflict on this front by moving the Weaver-style optics rail forward, scout-rifle style. I’m going to be honest here, I’m no fan of a Scout scope mount, but understand the need with the action.
The rail also includes the rear section of the iron sights system, a Skinner adjustable rear peep with an ample aperture, giving it a function much along the lines of a ghost ring. Enhanced by a bright red fiber-optic front, it’s quick to the target in a pinch, but more than capable of holding on a distant shot. The lever loop is larger than I prefer, but not Hollywood by any stretch.
Performance-wise, the gun ran smoothly through all my tests and proved acceptably accurate. I was pleased with the the mate-up of barrel and action as well. My scope maintained its zero between taking down and putting together, which is a decent sign the Alaskan was made to acceptable tolerances.
It no tack driver, averaging 1.5 inch groups at 100 yards, the trigger also could use some cleaning up and the loading gate could bite, but neither precludes this carbine from consideration in my book. I believe adding a red dot and a suppressor (it has a threaded muzzle), it’d make a dandy little home defense, truck or backpack option.
Alaskan Takedown Deals
Guns.com
$1,734
Best .22LR Tactical Lever Action: Rossi Polymer Rio Bravo .22 LR
Honestly, you needn’t have a tactical bent to go with this Rossi. Snappy and responsive, the polymer Rio is like most .22 LRs—just plain fun and difficult not to love. It’s got a lot going for it beyond enjoyment, making it a candidate for a bug-out gun or a home-defense option nearly anyone in the family can wield effectively. Among the most noteworthy, its ample 15-round tubular magazine gives the 5-pound rifle plenty of firepower.
Outside of foreign invasion, it should prove to have enough on tap to face down most circumstances. Though, I confess the addition of a side-loading gate would improve peace of mind.
As for the stock, it’s a very simple polymer affair that doesn’t stray too far off the reservation. The exception being the six M-Lok slots—three on each side—on the front of the fore. They’re well placed, near the top and just the right position to intuitively operate a light, no matter if you’re right- or left-handed.
Sights are fiber-optic three-dot, green in the rear and red upfront—very basic, but familiar to most shooters and eye-catching in all but low-light conditions. The front is shrouded so you don’t bust the pipe, and the rear is fully adjustable for windage and elevation—nice, large and tactile knobs, too.
As for accuracy, it’s fairly on target for a lever-action within reason. I often take mine to the range as a diversion between drills and can pound a 5-inch hostage plate from 30-yards all day long with it. For a lever action 22, that’s acceptable accuracy in my book.
I used to complain the only shortcoming this rifle had was the lack of a thread muzzle, but Rossi stepped up to the plate an recently rectified this with the Rio Bravo Tactical model. Essentially, it plays friendly with suppressors and has a pic rail on the receiver. But there’s a price to pay with this configuration, it drops down to a 10 round capacity. Personally, I’d rather have the ammo on board.
Like the Rio, the R92 Triple Black is just off the mark in some respects. But overall, for the right application, is a solid option.
The R92 is a proven line of Winchester ’92 clones that offer a good mix of quality and affordability. With the Triple Black, the Brazilian manufacturer tweaks the formula with some well-thought-out upgrades, while keeping the rifle tied to its roots. I made my preference of .357 Magnum clear earlier, and, despite a .44 Magnum option, I again contend shooters are better served with the smaller caliber unless they’re buying a dedicated hunter.
Perhaps my favorite aspect of the rifle is the integrated Picatinny rail/rear sighting system–even if it’s a the dreaded scout mount. Rossi opts for a peep rear with a relatively large aperture in conjunction with a large blade front, making it quite useful where nimbleness is at a premium. But most, I imagine, would take advantage of the rail and a 1x optic or multi-powered scope—both are apt for the 16.5-inch barrel gun.
Lever-actions, particularly pistol-caliber models, are well served with a suppressor and the Triple Black is threaded for action. Until you mount yours, the rifle comes with a factory-installed knurled thread protector.
However, and this is odd, the 8+1 rifle doesn’t have any accessory attachment points, which perhaps makes it better suited as a bug-out gun, rather than a home-defense specialist. That and the grip and loop, at least for me, leave something to be desired. Rossi kept the same stock design as its hardwood R92, straight; and the company couldn’t resist running a larger lever loop. Though, admittedly, it looks nice.
What can I say, other than POF cooked up what might be the coolest lever action since Winchester slapped on a loading gate. The Tombstone is a 9mm, magazine-fed lever gun with perhaps the most tactical profile of all tactical lever actions. It could be the whole package… could be.
To the good first. As I mentioned the carbine is among the most unique-looking guns almost Tombstone meets Heat. The front end resembles an AR-15, with an aluminum M-Lok handguard wrapping the lower end of the barrel. The aft is all lever action, with a largish action and an extended hammer—though the Magpul stock takes us back to modern times. The Tombstone comes with a Picatinny rail on the action to mount a scope, though POF includes a blade front and ghost-ring rear as part of the package.
Given that 9mm isn’t a lever-action cartridge—much shorter than what the platform was engineered for—the lever throw is much terser. This is where the bad creeps in. I found you had to work the action to avoid malfunctions. Generally, it was a failure to feed issues that plagued the gun, and in all fairness, these worked their way out throughout shooting. But I didn’t find the lever as smooth or enjoyable as most lever guns I’ve shot.
One other point worth considering is the way the stock is configured, low rings are advisable. Go even moderately high rings pull the cheek off the comb; with irons, my weld was perfect.
This is forgivable in some respects, given the gun is very accurate for what it is. At 50 yards, I had it printing between 1.5 to 2 MOA. With the action broken in—and aided by the included brake—the polite 9mm ammo could print out groups at double time. The Tombstone has the potential of being a defensive option if it weren’t so prone to malfunctions. At this point, I consider it more a range toy, ranch gun or competition carbine than anything else.
Tombstone Deals
Palmetto State Armory
$1,849
Guns.com
$1,734
Tactical Lever Action FAQ
Can you use a lever-action rifle for home defense?
Yes, the lever-action rifle is a solid option for home defense. While its rate of fire isn’t as great as an AR-15 or other semi-automatics, the rifles are generally accurate and fire powerful cartridges. In particular, the pistol-caliber lever-actions opens the door to a host of magnum cartridges, such as the .357 Magnum and .44 Magnum.
What are the disadvantages of a lever-action rifle?
The main disadvantages of a lever-action are its rate of fire, capacity and the need of two hands to operate it efficiently. The rifle shoots at a slower rate than AR-15s and other semi-automatics, given the operator must actuate the lever to cycle the gun. Compared to most modern semi-autos, the capacity is much lower–the AR-15 uses a 30-round magazine, while most lever actions hold 8 or less rounds. Given an operator must work the lever to cycle the gun a lever action is much more difficult to run if injured and the user only has one hand to manipulate the rifle.
Why are lever action rifles not used anymore?
Lever actions are not used as much now because semi-automatic rifles surpass them in performance. Thought, the classic design has regained favor in recent years, somewhat do to legislation limiting ownership of semi-auto rifles.
What is the most common lever action round?
While lever actions are presently found in a multitude of different calibers, the most common remains the .30-30 Winchester. Given the cartridge was originally a black-powder cartridge and its favor among deer hunters, the .30-30 in lever actions is prolific. While it might not be the most popular cartridge today, nearly every lever action designed to shoot bottleneck cartridges will have a .30-30 chambering.
CLINTON, S.C. – Palmetto State Armory has announced the return of its annual firearms and outdoor sports event, The Gathering, set to take place on March 21-22 at The Clinton House in Clinton, South Carolina.
Attendees will have the opportunity to test a variety of firearms, including rifles, shotguns, pistols, and suppressors from Palmetto State Armory and other manufacturers. The event will also feature a Vendor Village, where exhibitors from across the industry will showcase the latest in firearms accessories, outdoor gear, and lifestyle products.
In addition to hands-on experiences, limited tickets will be available for specialized activities, including a mile-long shooting range and a nighttime shooting session using night vision devices.
Looking to go armed, but are stuck in the weeds as to what to arm yourself with? Here are 20 of the best concealed carry gun options that will keep you on the defensive.