If you want to find the best 5.56 NATO suppressor, you need a lot of ammo, cameras, and a few people willing to risk bodily harm. RECOIL has all of that and more, and put it to good use testing a host of suppressors at CANCON South Carolina 2024!
When you’re not at home, how do Stand Your Ground laws impact your ability to legally defend yourself?
Following last month’s exploration of Castle Doctrine, which examined the right to defend yourself within the sanctity of your home, let’s explore its broader and more controversial counterpart: Stand Your Ground.
Understanding the Foundation
Castle Doctrine provides a clear foundation for self-defense within one’s home. It removes the obligation to retreat when facing a threat inside your home. But what happens when that threat arises outside your home? This is where Stand Your Ground comes into play.
Stand Your Ground laws reinforce the recognition of the right to self-defense to any place where a person is lawfully present. Under these laws, a person has no duty to retreat before using force—even deadly force—if they reasonably believe it’s necessary to prevent the imminent threat of death or grave bodily harm. Unlike Castle Doctrine, which is limited to the home, Stand Your Ground allows individuals to defend themselves in public spaces without first attempting to retreat.
The Legal Framework
The concept of Stand Your Ground isn’t new, as many media outlets often portray. States like Indiana have had some version of Stand Your Ground since at least the late 1800s. In the 1877 case of Runyan v. State, the Indiana Supreme Court opined that, “The weight of modern authority, in our judgment, establishes the doctrine, that, when a person, being without fault and in a place where he has a right to be, is violently assaulted, he may, without retreating, repel force by force …”
Today, over 30 states have adopted some form of Stand Your Ground. Florida’s statute is among the most well-known. It states that a person who is justified in using or threatening to use deadly force “does not have a duty to retreat and has the right to stand his or her ground if the person using or threatening to use the deadly force is not engaged in a criminal activity and is in a place where he or she has a right to be.”
Indiana’s law similarly affirms that a person has no duty to retreat if they reasonably believe that force is necessary to prevent serious bodily injury or a forcible felony. Though, Indiana law does not explicitly use the “Stand Your Ground” terminology.
The Zimmerman Trial and Media Misunderstanding
Despite its long-standing presence in American legal tradition, Stand Your Ground became a media flashpoint during the 2012 trial of George Zimmerman for the shooting of Trayvon Martin. Many media outlets framed the case as a test of Florida’s Stand Your Ground law. However, Zimmerman’s defense wasn’t based on Stand Your Ground but on traditional self-defense principles.
Zimmerman claimed that Martin attacked him and pinned him to the ground, preventing any possibility of retreat. Since Stand Your Ground only applies when retreat is possible, it was legally irrelevant in that case. Nevertheless, the media portrayal of Stand Your Ground as a “license to kill” persisted, fueling heated political and racial debate.
The Racial Narrative and Statistical Reality
A common criticism of Stand Your Ground is that it disproportionately benefits White defendants and harms minority victims. However, data from the Tampa Bay Times and the Crime Prevention Research Center challenge this assumption.
In Florida, Black defendants make up 34 percent of those who invoke Stand Your Ground, even though they account for only 16.7 percent of the state’s population. Furthermore, Black defendants invoking Stand Your Ground are acquitted at a higher rate (by 4 percentage points) than defendants. Most cases where a Black defendant successfully invoked Stand Your Ground involved the killing of another Black person.
This data calls into question the racial narrative and suggests that Stand Your Ground isn’t inherently biased—it provides legal protection to anyone, regardless of race, who faces an imminent threat of violence.
Stand Your Ground Legal Protections and Limits
Stand Your Ground, like Castle Doctrine, isn’t an open-ended justification for the use of force. For a claim of self-defense under Stand Your Ground to succeed, the following conditions must typically be met:
The person using force must be lawfully present.
The person must not be the initial aggressor.
The use of force must be reasonable and proportional to the threat faced.
The threat must be immediate and unlawful.
If any of these elements are missing, a Stand Your Ground defense will likely fail.
The Philosophical Debate
While Castle Doctrine is broadly accepted as reasonable, Stand Your Ground is more controversial because it recognizes the right to self-defense in public spaces. Critics argue that it escalates violence and undermines public safety. Supporters counter that it empowers potential victims by not placing the burden on them to retreat, allowing individuals to protect themselves without fear of legal repercussions for failing to escape an attack.
The value of Stand Your Ground is that it reduces the ability of overzealous prosecutors from second-guessing split-second decisions made under life-or-death pressure, and it relieves the innocent potential victim of the burden of attempting to retreat. Jurors, sitting in the calm of a courtroom, might wonder why a defendant didn’t flee. Stand Your Ground removes that element of hindsight, allowing individuals to defend themselves without being punished for failing to find an escape route.
Balancing Freedom and Responsibility
Stand Your Ground is a natural extension of Castle Doctrine, reinforcing the right to self-defense beyond the home. The principle reflects a fundamental belief in personal responsibility and individual autonomy, but it also demands that those who invoke it act reasonably and in accordance with the law.
Understanding these laws and their limitations is crucial for responsible self-defense. The right to protect yourself is fundamental, but with that right comes the responsibility to use force wisely and within the bounds of the law.
Stand Your Ground isn’t a license to kill. It’s a legal safeguard that allows individuals to defend themselves without the obligation to retreat—but only when the circumstances justify it. Like any tool of personal liberty, it must be wielded with care, understanding and respect for the law. Finally, even when the law doesn’t mandate retreat, it’s crucial to remember that the best course of action is to avoid a potentially fatal confrontation whenever it’s possible to do so without endangering yourself.
Editor’s Note: This article originally appeared in the May 2025 issue of Gun Digest the Magazine.
If you have to defend yourself, you don’t want to be thinking about your trigger press. Here we discuss how to train your trigger finger’s muscle memory so you don’t have to.
If you go to school to learn how to shoot a defensive handgun, you can pretty much bet the program of instruction will follow a set format. First, they’ll teach you about the different kinds of handguns and the four rules of firearms safety. Then, before the shooting commences, you’ll receive a lecture about sight alignment, sight picture and trigger control. The instructors will most likely summarize this segment with something like the secret to accurate shooting is maintaining a proper sight picture while pressing the trigger.
This is indeed the secret to shooting. If you’re a target shooter, this is how you do it successfully. If you’re shooting to save your life, this is how you stay alive. No matter what you’re shooting, maintaining the proper sight picture throughout the trigger press is the key to getting hits. The problem with this advice is that it suggests maintaining the sight picture and properly pressing the trigger are equally important. And, well, they are. However, it also suggests you need to learn them simultaneously. Let me see if I can explain this problem that’s causing a conundrum.
Regardless of the type of sight your pistol has, if you cannot press the trigger without disturbing that sight picture you’ll miss.
Understanding and learning proper sight alignment and the correct sight picture is the easiest part of shooting. I can demonstrate it to you one time, and you’ll remember it for life. It’s simple: Center the front sight in the rear sight notch so it’s not above or below the top of the rear sight. With the sights so aligned, place the front sight on the spot on the target where you want your bullets to go. Granted, there are some variations, such as with XS Big Dot sights and with a dot in a reflex sight. But the point is, this isn’t rocket science or something you need to study or practice. You see it once, and it’s with you forever.
Sight alignment and sight picture are easy to learn. Even a novice can tell this front sight isn’t centered in the rear notch of the rear sight on this pistol.
On the other hand, the proper trigger press—one that won’t disturb the sight picture—is devilishly difficult to explain and even harder to execute. In fact, you’ll spend the rest of your life trying to master the perfect trigger press, and it’ll never happen. You might get very good at pressing a trigger, but you’ll never be good enough to do it perfectly every time. If complete mastery of the trigger was possible, we’d all be grand masters, deadeye Dicks and on the Olympic shooting team.
One of the things that makes learning the proper trigger press so difficult is trying to learn how to do it while also not disturbing the sight picture. Oh, but you say that’s what we’re supposed to do, right? Ultimately, yes, that’s the goal. The problem is trying to accomplish that two-pronged goal before you know how to correctly execute both aspects of it. Let’s use basketball as an analogy. One of the most important basic skills of basketball is being able to dribble down the court while walking, jogging and running. Walking, jogging and running are easy; dribbling is hard. What’s even harder is dribbling while walking, jogging or running. You must learn to dribble effectively before ever attempting to do it while moving.
The same applies to shooting a handgun. Aligning the sights correctly, with the proper sight picture—just like walking, jogging or running—is easy. Conversely, properly pressing a trigger is difficult, and learning to do it without disturbing the sights is even more difficult—to the nth power more difficult. I’ve seen shooters struggle with only minimal improvement for years while trying to learn how to press the trigger and also keeping the sights aligned and on target. So, what’s the answer?
The shooter has properly aligned these sights, but it’s easy to see the sight picture is too low.
The answer is to practice pulling the trigger and get damned good at it before worrying about the sights. Pressing the trigger is a motor skill, and there are essentially three stages of motor learning. First you must identify and understand the skill you need to learn. Second, you must refine your movements and correct errors. And finally, you must work to make the movement automatic and consistent. Some call this process the establishment of muscle memory, but, of course, muscles don’t have memories. What you’re actually doing is conditioning your brain to drive physical activity without deliberate and conscious thought.
Let’s use another analogy. Playing a song on a guitar is a very complex physical activity. It requires the combination of a variety of chords and notes, executed by various fingers on both hands, and done in rhythm. However, if you already know how to execute the chords, and if you have practiced transitioning between them enough, playing the song is much easier. Your brain says, “This chord now,” and it happens, without the conscious thought of where to place your fingers, and without any consideration of how hard you need to press with each finger.
Some triggers, like double-action revolver triggers, are harder to learn. It requires a lot of dry practice to even approach mastery with one.
Experts on muscle learning suggest it takes anywhere from 3,000 to 50,000 repetitions to establish muscle memory. For the handgun shooter, this means you should conduct at least 3,000 trigger presses before you ever attempt to shoot. Of course, the number of repetitions required will be different for everyone. Fortunately, this is easy to do with dry-fire or dry practice. However, the mistake many make is combining the initial learning of the trigger press with sight alignment during dry practice. Isolating the trigger press and learning to do it, singularly—without moving the handgun—is key.
If you cannot press the trigger correctly you cannot get your hits—period. Mastery of the trigger helps you avoid target panic, where you’re hesitant to press the trigger for fear of moving the sights. It’ll also help you avoid jerking the trigger at the instant you see the sight alignment and sight picture you desire.
You may be wondering why shooting schools don’t teach this method of learning how to manipulate a trigger. The answer is very simple: They don’t have time. Some shooting schools last only two days, and even the weeklong schools have a lot of other stuff they want to teach you, and that you want to learn. It’s incumbent upon you to learn the trigger press beforehand, and with judicious dry practice it’s something you can get very good at on your own.
I know this process works because it’s the method I used to teach my kids to shoot. They all spent many hours pressing the trigger of a laser training gun like the SIRT from Next Level Training before they ever fired a shot. Then, they did the same with the handgun they were going to use. Eventually—just as they did—you must combine the trigger press with proper sight alignment, but it’ll all be much easier if you know how to press a trigger correctly first.
Editor’s Note: This article originally appeared in the May 2025 issue of Gun Digest the Magazine.
Looking for a new iron or piece of kit to enhance the one you already own? Check out these 7 new bits of guns and gear to grow your firearms wish list.
Rugged, reliable and suppressible out of the box, Tanfoglio Tactical Pro checks off all the boxes. Chambered in 9×19, this full-size pistol features a CNC-machined Lothar Walther bull barrel, tactical “X” thread protector and Cerakote OD Green mil-spec finish on its steel “K” frame. Designed for superior control, it boasts ergonomic aluminum grips, extended beavertail and a flared magwell. Best of all, it comes optic-ready with adjustable micrometric sights and enhanced slide serrations. If you’re looking for something tactical and competitive angled, you’ve found your gun. It ships with a 17+1 or 20+1 capacity magazine. MSRP: $1,530
Heckler & Koch VP9A1
Heckler & Koch has taken its striker-fired line into the future with VP9A1, designed specifically for the U.S. market, with enhanced usability and shootability features. Available in full-size (VP9A1 F) and compact (VP9A1 K) variants, the A1 models offer improvements such as a nickel-Teflon coated trigger bar, universal ergonomic grip and modular grip panels with length-of-pull adjustment. The VP9A1 also features ambidextrous controls, a flared magwell and added slide serrations. The VP9A1 K, with its 4-inch barrel and 15-round capacity, is a fantastic carry pistol, while the VP9A1 F is a full-size model ideal for duty, home defense or competition. MSRP: $979
Smith & Wesson CSX E-Series
Quietly, the CSX had earned a spot as a favored concealed carry piece among many armed citizens. Now, the hammer-fired pistol has gotten quite a bit better. Building on the original model, the CSX E-Series offers enhanced features, including a modular grip adapter for a customizable frame size and improved handling. Available in four 9mm configurations, with 3.1-inch or 3.6-inch barrels, the CSX E-Series includes 12-, 15- and 17-round magazines, plus 10-round compliant variants. These optics-ready pistols feature the ClearSight cut to protect the optic lens, an upgraded trigger for a lighter, cleaner break and ambidextrous controls. Smith & Wesson has continued to make the pistol quite a package. MSRP: $699
Military Armament Corporation MAC Duty 9 Double Stack
Are you in the market for a cutting-edge 1911 designed for versatility and performance? If so, shake hands with the MAC Duty 9 Double Stack. Engineered in Knoxville, Tennessee, and built by Tisas, this 9mm pistol features a factory RMR optic cut and universal light rail, making it mission ready. A 5-inch bull barrel with QPQ Tenifer finish ensures reduced recoil and superior accuracy, while the polymer grip module provides a firm yet comfortable hold. Additional highlights include a 4140 hammer-forged steel slide and frame, skeletonized hammer and trigger, fiber-optic front sight, and competition magwell. MSRP: $1,100
Taurus GX2
Affordable yet high-performing, Taurus’ GX2 might be the perfect pistol for first-time shooters—though veterans will more than appreciate it. The 9mm features a 13+1 capacity, sharpshooter barrel, ergonomic polymer frame and MIL-STD-1913 accessory rail. Its striker-fired action, hinged trigger safety and manual safety ensure confident handling. Offering premium features at an entry-level price, the Taurus GX2 is definitely something for those looking for budget-friendly personal protection. MSRP: $310
Henry Lever Action Supreme Rifle
Lever-actions are still getting head turns, and more so if they feed off AR magazines. This is why we expect Henry’s Lever Action Supreme Rifle (LASR) to garner a lot of attention. Available in .223 Rem./5.56 NATO and .300 Blackout, the rifle perfectly blends more than 150 years of Henry’s heritage with modern innovation. Some of the highlights include a quad-bar linkage and slider crank mechanism, a free-floated blued steel barrel and an internal hammer. Built with premium American walnut stocks and aerospace-grade aluminum receivers, it ships with a 10-round Magpul PMAG. MSRP: $1,300
Galco EDC Wallet
Crazy as it might sound, streamlining your wallet goes a long way to making concealed carry easier … and more comfortable. This is where Galco’s EDC Wallet comes in. Combining practicality with elegance in a slim, stylish design, this wallet makes an ideal way to lighten your load. Made from calfskin in bridle leather tan, it features angled slots for your ID, CCW permit and other cards, plus a hidden pocket for cash. A secure flap covers your essentials, while a convenient back slot provides quick access to your most-used card. Perfect for everyday carry, the wallet is a sophisticated way to keep your essentials organized … without bulk. MSRP: $89
Editor’s Note: This article originally appeared in the April 2025 issue of Gun Digest the Magazine.
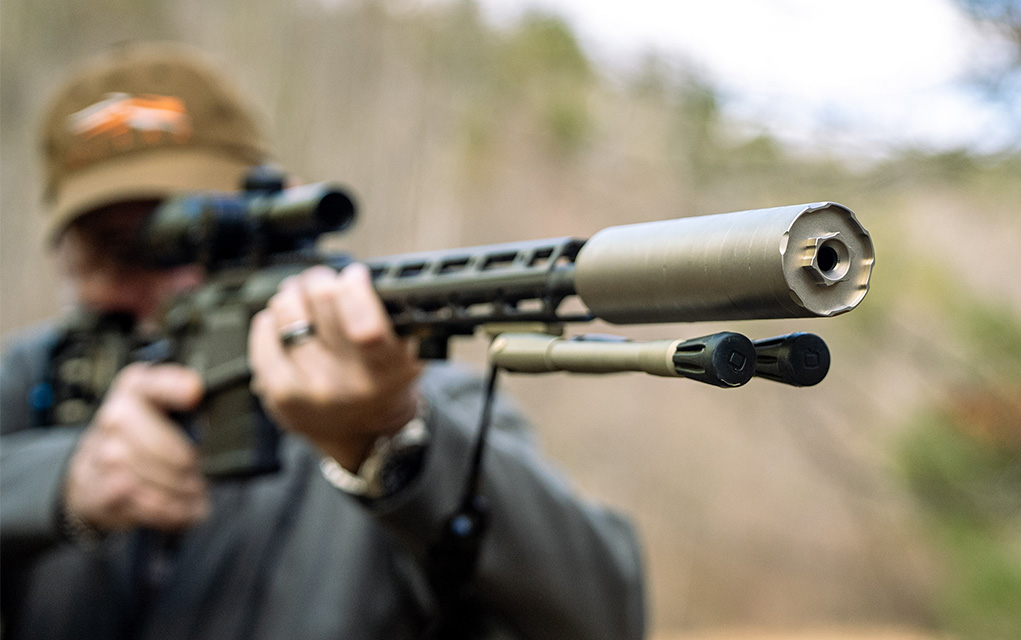
If you want to suppress a pistol and still hit your mark, you’re probably going to have to rethink your sight situation.
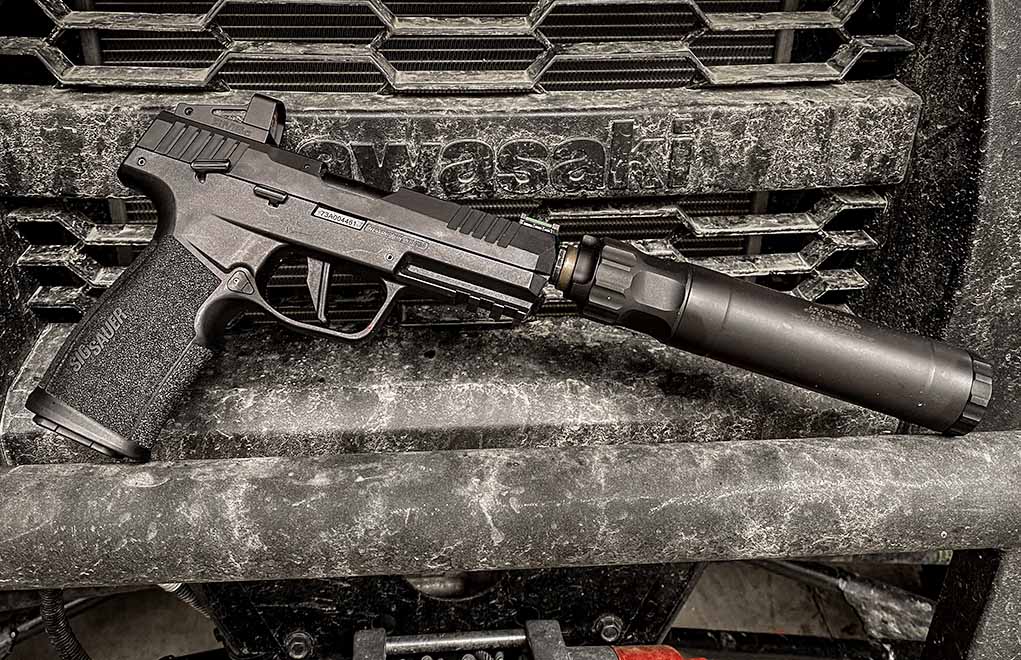
Let’s get this right out in the open: A suppressed pistol for personal protection has limited application. This is, of course, because in most personal protection situations, the ability to comfortably conceal the pistol is paramount … and it becomes exponentially more difficult when you screw a 6-inch can to your pistol’s muzzle.
Suppressors are becoming more popular on pistols, and they’re also becoming much smaller. Still, sights you can see when shooting a suppressed pistol are mandatory.
But handgun suppressors are getting shorter and lighter. The new 9K suppressor from Silencer Central is only 4.1 inches long and weighs less than 3 ounces. Still, it’s unlikely suppressors will get short enough for concealed carry, but for home defense or use with a truck gun, suppressors are becoming more practical.
Something to think about, however, are sights that are compatible with a suppressor.
Though not practical for concealed carry, a pistol equipped with a suppressor is great for recreational shooting and does have value on a home defense or truck gun.
But before we get into compatible sighting options for suppressed pistols, you might be wondering how you can make your pistol suppressor compatible. Unlike with rifles, you cannot just thread your pistol’s barrel, because it’s not long enough. You’ll need to purchase an aftermarket barrel with a threaded muzzle. The good news is that for most modern, polymer-framed, striker-fired pistols, there are drop-in barrels that don’t require fitting by a gunsmith. Once you have your threaded barrel, you can worry about which suppressor you should buy and the suppressor compatible sights to go with it.
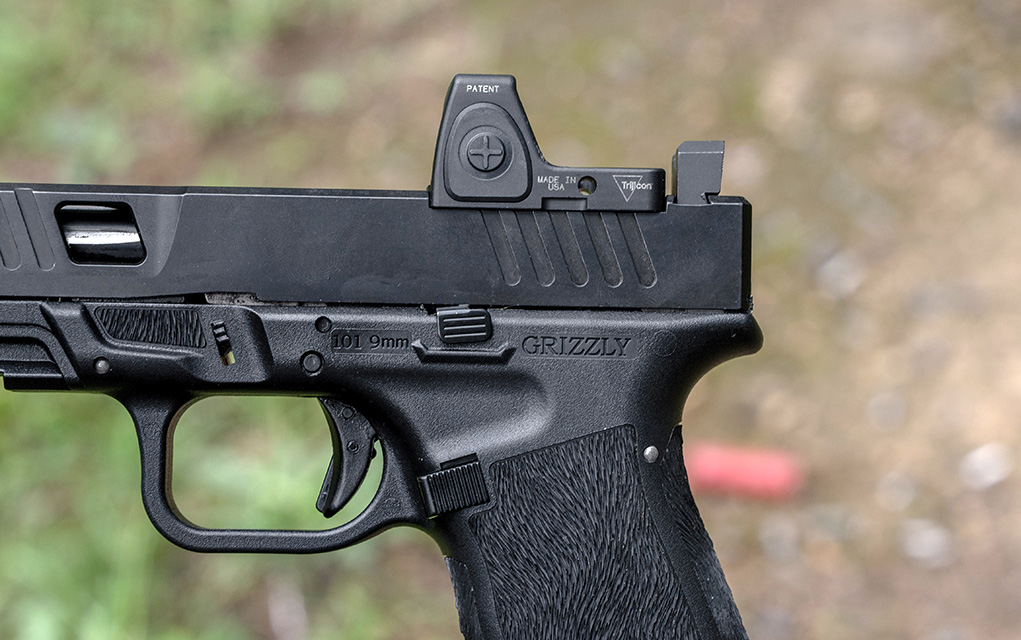
Handgun suppressors range in thickness but are generally around 1.30 to 1.40 inches in diameter, thus placing the top of the suppressor at about 0.65-inch above the centerline of the barrel. This distance will vary from pistol to pistol, but the top of the front sight on most handguns is less than 0.70 inch from the centerline of the barrel. This means that, with the suppressor installed, you won’t be able to use your sights.
One solution to this problem is to install suppressor-height sights.
Suppressor-Height Sights
A lot of companies offering aftermarket handgun sights also offer suppressor-height sights, and in some cases, you can install them on your own. For example, with the sights from XS Sights, they offer an affordable and easy-to-use sight pusher tool that allows you to install their sights while working right on your kitchen table. Some manufacturers, like Trijicon, will list the exact dimensions of their sights, and this can help you determine compatibility with your handgun and suppressor. However, generally, with a suppressor that has a diameter of about 1.3 inches, you should find most suppressor-height sights tall enough.
With the XS Sights sight installation tool, you can install XS Sights’ suppressor-height sights on your own.
With some handguns, I prefer suppressor-height sights as opposed to standard sights, because they offer a bolder profile. My Glock 43X doesn’t have a threaded barrel but it’s outfitted with a set of XS Sights R3D 2.0 suppressor-height sights. This is partly because I like them better than the standard factory sights, but also partly because I can still use them when I have a reflex sight installed on the pistol. I prefer to have a backup to battery-powered gadgetry.
Though intended for use with suppressed pistols, suppressor-height sights help provide a co-witnessing sight for reflex sight equipped pistols, with or without a suppressor.
But don’t just assume any set of suppressor-height sights will work with your suppressor and/or allow for co-witnessing with a reflex sight. This is partly because some suppressors might be larger in diameter than others, and it’s also partly because some handguns utilize plates for mounting reflex sights. When in doubt, make a call and get some expert advice from the manufacturer.
There’s another consideration concerning suppressor-height sights: Because these sights are taller, and because they rarely have radiused or smooth edges, they can hang up on clothing when trying to draw from concealment. These sharp edges can also be problematic when you’re manipulating your handgun—racking the slide. I’ve seen sharp-edged sights take hunks of meat out of shooters’ hands.
This pistol has a reflex sight and co-witnessing suppressor-height sights. It’s ready to rock, with or without a suppressor.
Reflex Sights
With many pistols, the simplest way to aim at a target when using a suppressor is with a reflex sight. Most modern handguns that come with a threaded barrel also come with a slide cut to accept a reflex sight. My Sig P322 is a perfect example. If you remove the rear sight plate, you can direct-mount a reflex sight, and the pistol becomes suppressor friendly.
The current popular trend with defensive handguns is the reflex sight. And although it should come as no surprise, shooters are realizing they can shoot more accurately if they aim with a single dot as opposed to having to line up a rear sight and a front sight with the target. This is especially true at distance, where—with practice—reflex sights also allow you to shoot faster. If your pistol is compatible with a reflex sight, it very simply solves the suppressor-sight problem, because the parallax-free dot you aim with is well above the top line of the suppressor.
Reflex sight mounting options vary widely from manufacturer to manufacturer. As mentioned, some utilize a series of mounting plates that correspond to specific reflex sight footprints. Others offer a slide cut that fits a certain reflex sight footprint. The new Ruger RXM pistol has a unique slide cut that you can modify with various pins to work with a variety of reflex sight footprints. The only real standard is that there’s no standard. You’ll need to match the reflex sight and suppressor-height open sights to the handgun and the suppressor you’ll be using.
Wilson Combat equipped this EDC X9 2.0 with a reflex sight and suppressor-height open sights by using their True Zero Handgun Optics System.
Wilson Combat has a unique approach to the reflex sight/suppressor-height sight conundrum. They offer a custom alteration for their handguns to include Glocks and Sig P320s and P365s, called their True Zero Handgun Optics System. With this system, Wilson Combat machines the slide to accept a mounting plate dedicated to a specific reflex sight footprint, and it can also incorporate a suppressor-height rear sight. This greatly simplifies the question of sight height, co-witnessing and suppressor compatibility.
Suppressors can make handgun shooting more fun and less noisy, but it’s not just as simple as screwing a can to your barrel. You gotta have your sights right … or none of those muffled shots you fire will hit where you want them to.
Editor’s Note: This article originally appeared in the 2025 suppressor special issue of Gun Digest the Magazine.
More On Suppressors:
The Suppressor: How They’re Made, How They Work, And How To Buy One
We hit the range with four different rifle suppressors—the MeatEater, Backcountry, Trash Panda and Silent Bandit—to see how they compare.
Throughout time, various trends have left their mark on the history of firearms. While these trends might have various origins, consumers are the driving force. In the 1980s, traditional muzzleloading was popular. In the ’90s, cowboy action shooting was hot. And in the early 2000s, the in-line muzzleloader was all the rage.
About a decade into the new millennium, two things happened to drive current firearm trends. First, Remington and AAC introduced the .300 AAC Blackout cartridge, which jump-started the suppressor craze. And a few years later, the movie American Sniper became the springboard for the current infatuation with long-range shooting. Combined, these two trends make up a large part of the current firearms market.
Suppressor sales are at an all-time high and manufacturers are configuring many new rifles—with shorter barrels and specific cartridges—to better interface with suppressors. Shooters have a decent understanding of rifles and cartridges, but for many, the suppressor is something new.
Here’s a look at four different suppressors that are ideally adapted for pairing with modern centerfire rifles. Together, they offer some insight into construction, serviceability, attachment methods and performance, all of which should help you choose what might be best for you.
Silencer Central Banish Backcountry
Specs
Length: 5.5 inches Diameter: 1.6 inches Weight: 7.8 ounces Caliber: 0.308 Attachment Method: Universal HUB mount Advertised dB Reduction: 30 dB dB Test Average (16-inch barreled .308 Win.): 130.15 Price: $1,099
I have more experience with the Banish Backcountry suppressor than any other. I’ve hunted with it a lot—in North America and in Africa—and I’ve used it to evaluate a lot of rifles. It’s one of the lightest and most compact rifle suppressors available. This is an all-titanium can that’s rated to handle 0.308-caliber cartridges up to the .300 Remington Ultra Magnum. It uses the 1.375×24 universal HUB mount, and you order the mount to match the thread pitch on your rifle’s muzzle. A muzzle brake attachment is optional. The main downside to the Banish Backcountry suppressor is that it’s not serviceable—you cannot take it apart and clean it. It’s what’s known as a “sealed” suppressor.
There are some arguments to support both a serviceable and sealed suppressor. Modern high-power rifle cartridges almost exclusively use jacketed bullets, and this prevents lead fouling. Many also burn most of the gunpowder in the barrel. The pressure is also immense—more than 50,000 psi—and as gases exit the barrel, they shake loose and blow out a lot of debris/fouling inside the can. Sealed suppressors can be lighter, there’s no chance you’ll put them together wrong, and they’re generally stronger. They’re very practical for a hunting rifle because you’ll not use them as much—or with lead bullets—like you might with a target or competition rifle.
The beauty of the Banish Backcountry suppressor is its compactness and service-free ruggedness. It’s very practical for hunting rifle applications. However, if you’re looking for a one-suppressor answer for a bunch of different rifles—especially including dirty shooting rimfires and those that will shoot lead bullets—a serviceable suppressor would be a better option.
Silencer Central MeatEater
Specs
Length: 5.85 inches Diameter: 1.73 inches Weight: 10.3 ounces Caliber: 6.5mm or 0.308 Attachment Method: Universal HUB mount Advertised dB Reduction: 32 dB dB Test Average (16-inch barreled .308 Win.): 131.7/132.3 dB Price: $1,299
The more features a can has, the more it will cost, and the MeatEater suppressor is feature heavy. Silencer Central constructs the MeatEater silencer from titanium, and it has an anchor brake. An anchor brake allows you to choose between—more or less—recoil or sound reduction. For example, if you open the brake, it can reduce recoil by as much as 40 percent. If you close the brake, you get less recoil reeducation but more sound suppression.
By removing and adjusting the anchor brake on the MeatEater can, you can tune sound and recoil suppression to better suit the application.
In my testing, the difference in sound reduction was only between 0.5 and 1.0 decibel (dB). However, the decibel scale is logarithmic as opposed to linear. Linearly, the difference between 131.5 and 132 dB is inconsequential; logarithmically, the difference is more than the numbers suggest.
The MeatEater suppressor is also user-serviceable. By removing the endcap/anchor brake and the HUB mount, you can use a baffle removal tool ($69.99) to take the baffles out of the can and clean them. You can also change the caliber of the hole in the front endcap with a muzzle cap insert, reducing it from 0.308- to 0.264-caliber (6.5mm). If you’re using the MeatEater can on a less than 0.308-caliber rifle, this can help with sound suppression. Also, like the Banish Backcountry, the MeatEater uses the 1.375×24 universal HUB mount.
Some manufacturers offer quick-detach suppressor mounts, but the most common method of attachment is direct thread.
If you’re looking for a suppressor to use for hunting, but one that you can also use on a variety of other rifles for recreational shooting and maybe even competition, the MeatEater could be a great option.
Q Trash Panda
Specs
Length: 6.91 inches Diameter: 1.75 inches Weight: 11.8 ounces Caliber: 0.308 Attachment Method: Proprietary muzzle device Advertised dB Reduction: Hearing safe dB Test Average (16-inch barreled .308 Win.): 132 dB Price: $1,050
Q is an interesting company, and they’re probably best known for their Honey Badger AR-15-style SBR (short-barreled rifle), and their radical bolt-action rifle called the Fix. But the lineage of Q goes back to the .300 Blackout cartridge developed by Advanced Armament Corporation (AAC). Kevin Brittingham founded AAC, and later, Q. In addition to the Honey Badger and the Fix, like AAC, Q also manufactures suppressors. The Trash Panda suppressor is one of Q’s flagship 0.308-caliber cans.
Note the ¾-inch nut on the front of the Trash Panda suppressor to aid in installation and removal.
The Trash Panda is a sealed suppressor rated as hearing safe. It’s made from 100 percent titanium and is a fully laser-welded can without an outer tube. The Trash Panda has a bead-blasted finish and ¾-inch wrench flats on the front and 1-inch wrench flats on the rear, to facilitate easy on and off. It differs from other cans in its attachment method.
The Q Trash Panda direct threads onto the Q Cherry Bomb, and the integral taper provides a secure attachment that will not shoot loose.
The Trash Panda direct threads to Q’s proprietary muzzle device called the Cherry Bomb. The 2-ounce Cherry Bomb has 360-degree porting, which means timing shims are not necessary. It also has an integral ½-inch socket ready nut at the front for installation at 30 to 40 foot-pounds. Cherry Bombs for Q firearms have a taper that precedes the threads, and this taper helps lock the muzzle device in place. (Q offers a specific flat-faced Cherry Bomb for use with non-Q firearms.)
The Q Cherry Bomb is an ingenious little muzzle device that is necessary to mount a Q Trash Panda can to a muzzle.
However, the Cherry Bomb itself has an external integral taper forward of the threads for suppressor attachment. This taper helps lock the can in place to prevent it from shooting loose, carbon buildup on the threads and reduces the rotations necessary for suppressor installation.
The Trash Panda makes a great no-worry/never service can for modern high-pressure rifle cartridges shooting jacketed bullets.
Wilson Combat Silent Bandit
Specs
Length: 5.76 inches (5-baffle) ; 6.41 inches (6-baffle) Diameter: 1.75 inches Weight: 12.1 (5-baffle) ; 13.3 (6-baffle) ounces Caliber: 0.233, 0.277, 0.308, 0.358 Attachment Method: Universal HUB mount w/ Quell K-mount compatibility Advertised dB Reduction: 31 dB dB Test Average (16-inch barreled .308 Win.): 131.8 dB Price: $1,119.95 (5-baffle) ; $1,199.95 (6-baffle)
This is a brand-new suppressor released in early 2025. It’s available in either a five- or six-baffle configuration … and in four calibers. Wilson Combat makes the Silent Bandit out of 100 percent Grade 5 titanium, and it has full circumferential welds, a removable HUB mount and front endcap. The can has a black Armor-Tuff finish, and the K-Mount has a black nitride finish.
If you want to use a non-Q can, like this Wilson Combat Silent Bandit, on a Q firearm, you’ll need a taper to flat adapter. Q firearms have a taper behind the threads to interface with their Cherry Bomb muzzle device.
One thing that sets the Silent Bandit apart is that it’s available in four calibers. You can use all the suppressors here with a smaller diameter cartridge, but using a suppressor that more closely matches the caliber of the cartridge you’re shooting helps maximize noise reduction. The Silent Bandit gives you four options: 0.224-, 0.277-, 0.308- and 0.358-caliber.
For example, if you wanted to suppress 6.5mm or smaller rifle cartridges, you would use the 0.277 Silent Bandit. If you wanted to suppress a .338 Federal or a .350 Legend, you would use the 0.358-caliber version.
The Silent Bandit is compatible with a direct thread, industry standard 1.375 (3/8) x 24 HUB mount, but it comes with Wilson Combat’s Quell K-mount HUB. The Quell K-mount is a flash hider that direct threads and has three benefits. First, it lets you have different K-mounts to match different thread pitches on various rifle muzzles. Second, it reduces the number of revolutions necessary to thread the HUB-equipped suppressor onto the barrel. And finally, with the K-mount attached at between 30 and 50 foot-pounds, it permits you to remove the HUB-mounted suppressor by hand without the K-mount coming off the rifle.
The Silent Bandit comes with a blast chamber/HUB mount spanner wrench and an endcap tool that allows for partial disassembly for cleaning. It makes a great general-purpose suppressor that will work with a broad range of calibers.
The Takeaways
I’ve used all four of these cans on various rifles, and I’d give them all five stars. Granted, their features and ideal applications vary, so a direct comparison is not fair unless you specify the specific reason you want a suppressor.
If I was looking for a dedicated suppressor for a single hunting rifle, of 0.308-caliber or less, I’d go with the Backcountry because of its compactness and lightweight. If I never wanted to worry about my suppressor shooting loose, I’d go with the Trash Panda. The varied caliber options for the Silent Bandit set it apart. And, overall, the MeatEater is the most versatile, but also the most expensive.
As you can see, just as there are various ways to skin a cat, there are multiple ways to make a suppressor. It’s not so much that some ways are better than others, it’s mostly that they are different. You must decide on the differences that best apply to you and your shooting needs.
Editor’s Note: This article originally appeared in the 2025 suppressor special issue of Gun Digest the Magazine.
More On Suppressors:
The Suppressor: How They’re Made, How They Work, And How To Buy One
If you want the best can for the job, you need to consider a suppressor’s materials alongside its baffle design, construction and features.
Suppressors have been slowly and steadily entering the mainstream discussion in hunting, range use and general recreation during the past 15 years or so. The technology from the “golden” days of gun sales during the Obama administration is quite different than what we can now access. Just as thermal optics once costing $20,000 can now be accessed for a fraction of that, suppressors have come a long way in terms of cost, performance and durability.
As something of a suppressor aficionado, I have a good amount of them and determine what they’re going to get used for based on several criteria, as not all cans are created (or printed) equal.
Canned Hunt
Getting into suppressors used to be something of a goose chase: I dove in and had to chase down results. My first suppressor took me almost 2 years to get, the process being clunky and the government websites a bit ’90s in layout and user-friendliness. The timeframe alone was enough to deter many people from wanting to get into the business of suppressors, not to mention the frustrating $200 tax we must pay on each for the ability to exercise our rights.
The bad news, as of this writing, is that the tax is still there; we might see it change, as things are trending in a good direction, but who knows when, if ever, that will be. The good news is that there’s a much more streamlined process to get your suppressors, and it’s even faster now than it’s ever been (my last two cleared in a week). If you go through places like Silencer Shop or Silencer Central, they can help you get everything done in a simple way where you don’t have to hunt around for answers.
As the market has grown, we’ve seen a lot of specialty technology emerging, where in the past most cans were somewhat simple and straightforward in materials and construction. This wasn’t because people weren’t interested in making better ones; it was rather that the process to acquire a suppressor was much more convoluted, and many states hadn’t established their legality for ownership and hunting use.
Simply put, suppressors were just not in demand due to the social and political atmosphere of the times.
But all that has changed. The product variety today is huge, and it’s no longer as simple as buying a suppressor and hoping for the best from a limited pool. You can get a suppressor for just about any end-use today, from .22 LR to 12-gauge, to .50 BMG. We’re at a point where specialization is, in fact, the name of the game, and the more unique the better, at least from the consumer perspective.
If you’re a rimfire fan, you need a rimfire can. Here, the CZ Scout is fitted with a new Vortex optic for 2025 and a SilencerCo Sparrow.
Today, a company producing suppressors is competing in a fairly crowded market. Where only a decade ago many of these companies did exist, they were producing products for the aforementioned limited audience, and, as a result, they weren’t really in a mode of innovation. To be competitive today, a can company needs to have either a very specific type of consumer they wish to market to and produce a specialized product, or really hit it hard and make something for everyone to the point where the brand becomes a mainstay for that individual buyer. For instance, SilencerCo suppressors (many of which you see in this article) share a good number of common parts and tools, making it much more feasible for the end-user to maintain and move their cans from gun to gun.
In the case of the SilencerCo Hybrid 46M, it can be converted to work on just about any centerfire firearm that can fire a bullet through its baffles, up to .460 Weatherby Mag. I’ve used this suppressor on .450 Bushmaster, .308, .30-06, 9mm, 10mm, .45 ACP, 6.5 Creedmoor, 5.56 NATO and many, many more. It’s arguably the most versatile suppressor on the current market by ability to convert alone. There are some drawbacks, such as weight, that we’ll get to below.
So, suffice to say, today’s market has you covered.
Modular Melodrama
In general, there’s a physical limit to the amount of things you can ask of a suppressor—given its materials. The same goes for guns, ammunition, optics and just about anything we use to shoot. If you want more performance, it comes at some kind of price. That performance metric is individual and personal in most cases; some want a very specific thing, others a general-purpose item.
When I’m not at the range, I fish. In fact, I probably spend more time in life with a fishing rod in my hand than I do a gun on my hip. I started out with the rod that could catch me the most fish for the buck. It wasn’t until I began to get really serious about my fishing that I started to look at specialized rods for individual tasks. Luckily, I’m married to the daughter of a prolific sportsman, so my ever-growing arsenal of rods and reels is considered the mark of a man and not a person with a spending problem.
While you can, of course, draw a comparison with just about everything in life to fishing, from eternal life to basic meditation, the same concept here exists with suppressors. If you want the purity of fly fishing for smallmouth in a creek, you’ll need something specific. Likewise, if you’re hunting squirrels often and walking a lot, you’ll want something set to that task.
Construction dictates features, and features dictate utility.
The more specialized a suppressor is, the less parts it’ll have as a rule of thumb, and it’ll often be much lighter. The more modular a suppressor, the more parts and the heavier it will be. These are generalities, but there are exceptions. Like rods and reels, you can do a lot with a base setup, but ultimately you’re going to want to meet your actual requirements for use.
The Dedicated Few
Looking at three “dedicated” suppressors here, we have various degrees of specialization in materials, acceptable pressures and end uses.
First in the specialized class is the Q LLC Jumbo Shrimp (yes, that’s the actual name), and it’s a dedicated 6.5mm hunting suppressor. It’s one single piece with no removable parts. As far as suppressors go, it’s very light at 9 ounces, being all titanium, but short and not necessarily very quiet. It’s made as a hunting suppressor for lightweight rifles, and it’s what I would call “hearing safe,” in that it drops a 16-inch 6.5 Creedmoor down to a tolerable noise level … but not as quiet as it could be.
The Jumbo Shrimp is a one-piece can that mounts to a Q thread adapter. Thermal by Armasight.
In this case—making a rifle comfortable and portable is the goal—it does require a Q-style muzzle adapter to use it, so by mere ounces it can be considered a bit more complicated than a direct-thread model. You can use this on other rifles smaller than 6.5mm, such as 5.56 and 6 ARC. The rifle in this feature photography is a Primary Weapon Systems (PWS) 6 ARC build, and the Jumbo Shrimp is very much at home on it.
A PWS 6 ARC build with Vortex Razor, Armasight thermal and Q Jumbo Shrimp.
The SilencerCo Scythe Ti is another field-style suppressor that can handle centerfire calibers from 5.56 NATO to .300 Remington Ultra Mag in any barrel length. Lighter than the Jumbo Shrimp by 2 ounces and also made of titanium, this suppressor lands in the short-but-effective category. What’s notable is that it’s somewhat modular and can be moderately adapted using some other SilencerCo parts, but it’s otherwise meant to be a direct-thread proposition.
The SilencerCo Scythe Ti comes with direct thread installation as opposed to a muzzle device mount.
The general concept of these types of cans is that you’re going to be shooting, but not a ton. In my time with this individual suppressor, I found that it was by far one of the nicest for balance when mounted on a rifle, but not necessarily as quiet as others, and it heats up very quickly, producing a lot of mirage in the optics after a handful of rounds. You will find this on many lightweight setups, not just here. I love this suppressor, and it’s easily one of my favorites. However, if I were shooting a lot—to the point of getting this can smoking—I’d not be using it for the right reasons. This is a precision suppressor ideal for hunting.
Last on my list of specialized suppressors is one that I’ve quite a few rounds through, and it has gulped up a lot of KY Jelly. Yes, you read that right. The Bowers ASP 45 is a dedicated .45 ACP pistol suppressor that has very limited use on some rifles and other handguns. It has one removable part, the Atlas thread adapter, but this part is essentially meant to be mounted on the pistol somewhat permanently. You can consider this a one-piece can like you would the Jumbo Shrimp, considering the can also needs an adapter on its host rifle.
The ASP is a wet suppressor, meaning you need to put an ablative medium in it for best results. Ablatives can be as simple as water, but the better options have a bit more stick to them, such as wire pulling gel, ultrasound jelly and Astroglide or KY Jellies. While your friends may joke about seeing that in your range bag, they won’t be laughing for long.
Since we’re adults here, the adult-oriented gels have a very good viscosity that keeps these suppressors quiet for more rounds than water or thinner gels. Using 230-grain FMJ at the standard 850-fps velocity, a 5-inch 1911 is only about as loud as a paintball gun. This suppressor is extremely quiet, considering how much lead is being launched. The caveat is that this super-light, 5-ounce suppressor, made of only aluminum, is filthy and sprays carbon-laden lube everywhere, including inside the gun and all over slide-mounted optics. I need to clean that pistol after every use. Without ablative, it also heats up very fast, making handling difficult. If you want the most suppression with a full-power handgun, this is a very specialized choice.
Changing It Up
Modular suppressors take on various forms, but they offer the end user the greatest general-use abilities. As mentioned above, the SilencerCo Hybrid 46M is arguably the king of modular cans. It can consume more centerfire calibers than just about anything on the market and is extremely rugged, but it’s somewhat heavy at about 15 ounces—and that’s not great for balance on light rifles. But it works, plain and simple.
The SilencerCo Hybrid 46M.
The weight consideration is notable; it weighs as much as the Jumbo Shrimp and Scythe Ti combined. Its construction is rugged and involves stainless-steel, titanium and inconel. It’s full-auto rated and bleeds heat in a much more controlled way than the rapid mirage of titanium-only cans. The Omega 36M is also featured here and, in fact, shares several modular parts with the 46M, but it has a 9mm-class bore. It’s also one of my favorites for large-frame semi-auto rifles in the .30-caliber class.
The SilencerCo Hybrid 46M with Rearden adapter on a Preferred Barrel Blanks .450 Bushmaster carbon-fiber barrel buildout. Rearden makes a variety of HUB adapters, but the company also has some excellent, subtle thread adapters like this.
Next up is the JK Armament 155 series. I have bores from .22 to .45, and these are very unique in their properties. I have one in titanium, but being that it’s a modular can—each baffle is a single piece—it’s not as light as the welded titanium versions. The other ones I use are constructed of aluminum and are very light and adaptable to various direct-thread and manufacturer-specific mounts. I use Rearden adapters for Q-style mounts on most of my rifles: I’ve found this to be one of the most accurate and repeatable mounts out there.
The JK modular suppressor.
The nice thing about the modular JK cans is that you can use lead bullets—lever gun owners pay attention. Sealed cans should only be used with jacketed bullets, but baffle-based cans like the JK series can be broken down and scrubbed of lead and bullet lube easily. If you like to take hardcast or your own homebrew bullets into the field, this is what you want. These are accurate suppressors for precision work, and I’ve really come to like them for their flexibility.
A special build for medium-range hunting, featuring a Detroit Gun Works barreled action, Foundation stock, Vortex optic and JK suppressor. Accessories by Scope Chaps, Armageddon Gear, SAP and Wiebad cheek pads. Tripod by Two Vets.
A special build for medium-range hunting, featuring a Detroit Gun Works barreled action, Foundation stock, Vortex optic and JK suppressor. Accessories by Scope Chaps, Armageddon Gear, SAP and Wiebad cheek pads. Tripod by Two Vets.
Unique Properties
Additionally, 3D printing is becoming a fixture of the suppressor market. PWS is a market leader in 3D printing technology, producing a variety of modular suppressors from titanium. Not only are they made with this advanced technology, but they’re also able to be disassembled into baffles and accept many standard-mount adapters. This means of manufacture is becoming more common, and the nature of this technology is coming to more shops interested in producing unconventional products.
Shapes that would be almost impossible to machine, or at least prohibitive in cost, can be easily accomplished in the 3D space, allowing for unconventional designs to become reality. This has a huge impact on the thinking we can achieve in terms of internal space inside suppressors, not to mention unexplored means of heat dispersion and gas flow.
We’re only at the beginning of this chapter of suppressor design, a far cry from where we were when suppressors were gaining commercial traction in the early 2010s. And, we’re only just now starting in terms of what can be done with sound suppression. Although things happen slowly in this industry, the next 5 to 10 years will likely look just as foreign to us as the prior 10 years does now.
And it will all be good stuff. I’m excited to see what happens.
Editor’s Note: This article originally appeared in the 2025 suppressor special issue of Gun Digest the Magazine.
More On Suppressors:
The Suppressor: How They’re Made, How They Work, And How To Buy One
A quick look at the new Marshall hunting rifle from Montana Rifle Co.
Last year we took a look at the Montana Rifle Company Junction rifle and the author walked away very impressed. Now, in collaboration with Shoot2Hunt, Rokslide and Unknown Munitions, Montana Rifle Co. is releasing the Marshall hunting rifle.
The Marshall rifle will initially be available at the end of April in .308 Winchester and 6.5 Creedmoor, but 6mm Creedmoor, 6.5 PRC and 22 Creedmoor models will be released later this year as well. Each rifle will undergo a 10-round 1.5-MOA shooting test as well as a 101-round magazine cycling test before leaving the factory to ensure accuracy and reliability. Some noteworthy features of the Marshall hunting rifle include its Unknown Munitions 3-port muzzle brake, Rokstok Trinity Rail (ARCA/Picatinny/Spartan compatible), Unknown Munitions AICS bottom metal with an ambidextrous mag release and its custom Rokstok carbon stock. Each rifle will also ship with one MDT AICS 3-round flush-fit polymer magazine and one MDT AICS 5-round metal mag.
Montana Rifle Co. said this about the Marshall’s Adaptive Controlled Round Feed feature:
The Adaptive Controlled Round Feed is an industry-leading feature, where hunters can seamlessly alternate between controlled round feed, facilitating magazine-fed ammunition, and push feed, enabling direct single round chamber loading. Recognized as the gold standard in reliability, controlled round feed ensures consistent performance in any hunting scenario. By empowering hunters to adapt their feeding method on the fly, Montana rifles are always ready for any situation in the field leading to increased success and confidence in the hunt.
MSRP for the Montana Rifle Co. Marshall is $3,850 and they’re available for pre-order now.
If you want to find the best 5.56 NATO suppressor, you need a lot of ammo, cameras, and a few people willing to risk bodily harm. RECOIL has all of that and more, and put it to good use testing a host of suppressors at CANCON South Carolina 2024!
If you’ve ever wanted an HK G36, you can now own a .22 LR lookalike made by Umarex.
The HK G36 has always been a rare bird in the U.S. Previously, those who wanted one were limited to clones made by TommyBuilt Tactical or buying an HK SL8 and paying to have it converted. Both were expensive options. Walther made a clone in .22 LR as well some years ago, but it’s no longer available. Now, those in need of having their G36 itch scratched can do it with a new officially licensed HK clone in .22 LR made by Umarex.
The HK G36 .22 LR not only looks extremely similar to the real deal, but it’s so similar that it can use genuine G36 handguards, sight rails, and stocks. There are 30-, 20- and 10-round magazines available for it. The standard model ships with one 20-round mag, but a compliant model with one 10-round mag is offered as well.
Nathan Schueth, Director of Sales & Business Development at HK USA, said this about the new rifle:
The G36 .22 has been a labor of love. The G36 .22 is the enthusiast’s rimfire: from its iconic silhouette, ambidextrous controls, and smooth recoil experience, we ensured that G36 .22 is no mere imitation – it is a fully-functional and fully-featured rifle … Our partners knocked it out of the park. The G36 .22 features wide compatibility with existing G36 accessories and is begging to be customized!
G36 .22 LR units are on their way to HK USA distributors now and the MSRP is $679.
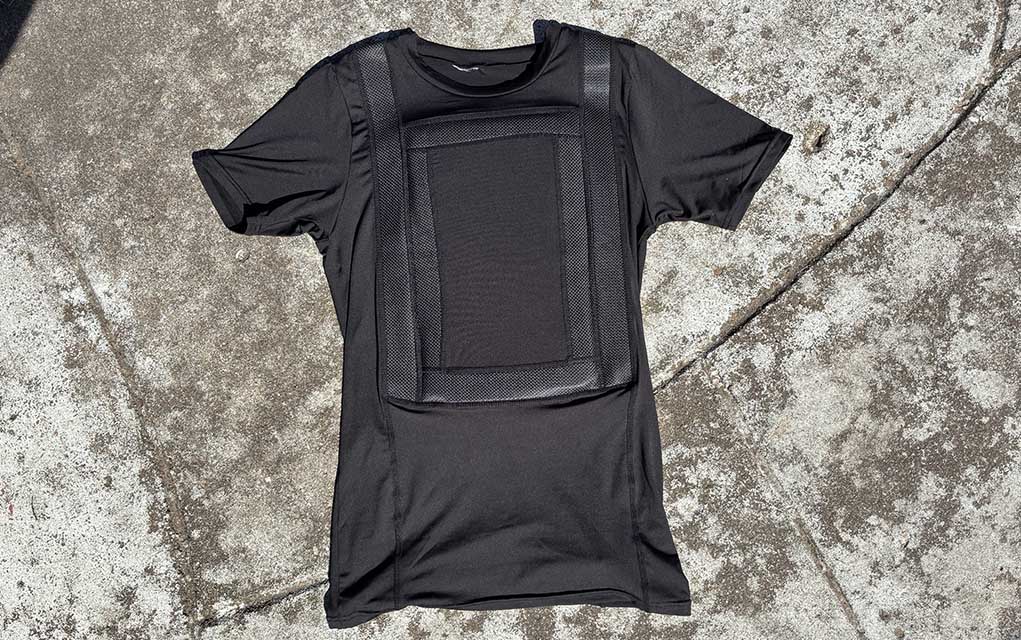
Premier Body Armor’s Everyday Armor T-Shirt offers level IIIA protection in a concealable package. Here we test how well it wears and how well it stops threats.
Some situations call for extra protection but not extra attention. Whether you work a dangerous job or just want the option of having additional peace of mind while exploring a less-than-friendly neighborhood, a concealable bulletproof vest is a great tool to have in the toolbox. One such option is Premier Body Armor’s Everyday Armor T-Shirt.
Premier was kind enough to send me two sets—one to wear and one to execute—and here I’ll be going over how the Everyday Armor T-Shirt fared in terms of concealability, comfortability and resistibility to common handgun threats.
What Is The Everyday Armor T-Shirt?
As its name suggests, the Everyday Armor T-Shirt is a T-shirt that holds armor panels and is comfortable and concealable enough to wear every day. Each set comes with two level IIIA armor panels and a polyester/elastane compression fabric shirt specifically designed to carry them.
The magic of this setup is more in the shirt itself than the armor panels. While the armor is impressively strong and light on its own, it wouldn’t be worth a damn if it couldn’t be comfortably concealed. The Everyday Armor T-Shirt accomplishes this handily.
The compression material of the shirt combined with what Premier Body Armor calls “concealment channels”, the armor panels are hugged close to the body and don’t droop or sag. That helps with both consistently protecting one’s cardiac box as well as with preventing others from noticing it. Each armor panel’s scant 0.8-pound weight helps with that as well.
The shirt is also light, breathable and soft, all excellent points since it’s designed to be worn as an undershirt. One important note is that Premier Body Armor recommends ordering a size down from what you usually wear to ensure a snug fit. I did, and it fits perfectly.
Also, if this is something you intend on wearing often, Premier sells additional shirts separately so you can regularly wash and rotate them, as the armor inserts are very easy to take in and out of their internal pouches. The shirts are available in either white or black and in sizes ranging from extra small to 4XL.
My only minor complaint about the setup is the armor panels’ ripstop edge sometimes snags on the material of the shirt which makes some noise. It’s not too loud or noticeable, and it only happens during certain movements, but it would be preferable if it was as quiet as wearing a normal piece of apparel.
The Armor
The armor panels that come with Premier Body Armor’s shirts are designed to protect the cardiac box while being as concealable as possible, so all have dimensions of 7.75 inches by 12.75 inches and a thickness of a mere 0.22 inches. They have American-made para-aramid ballistic cores, so they’re somewhat flexible, and they feature a ripstop wrap to protect them from moisture. That last point is important since the armor has to sit against your potentially sweaty torso all day. If that fails to protect them, they feature a 5-year warranty too.
It’s important to note that while the T-shirt’s armor panels are “tested to meet the NIJ ballistic standards for Level IIIA”, they are not officially rated by the NIJ.
That matters to some people more than others, but if you want to learn more about body armor and NIJ ratings you can read our level 4 plate buyer’s guide.
That said, while I trust Premier Body Armor’s own published testing data, I believe in “trust, but verify” even more so I hit the range to do some verifying.
The Shooting Test
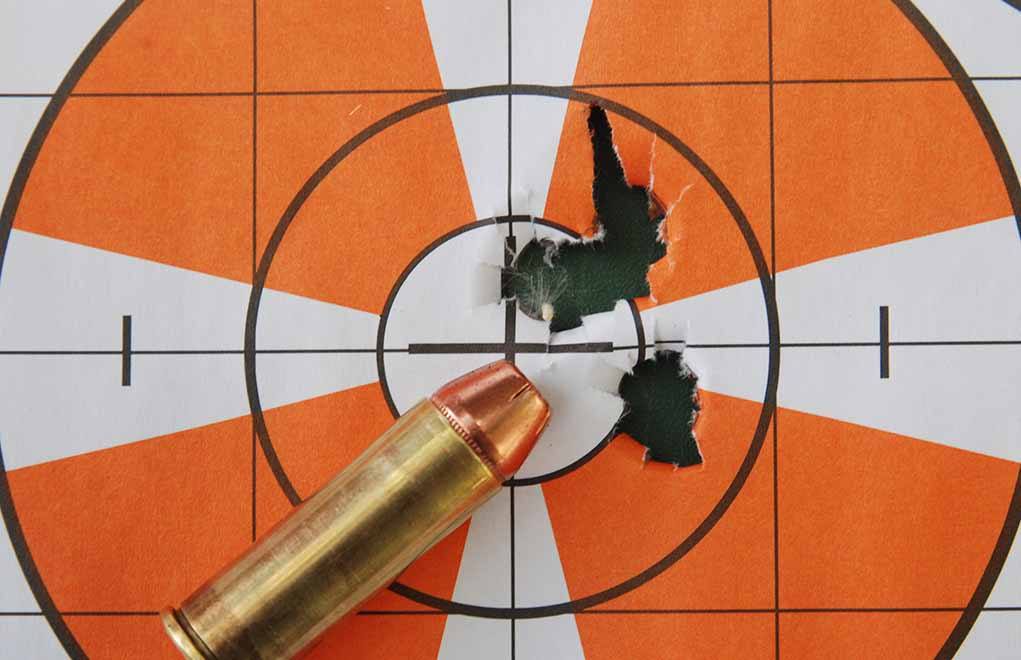
The test was simple and as scientific as I could make it with what I had on hand. That meant the Everyday Armor T-Shirt strapped to a target and a spread of relatively common handgun rounds.
All the handgun ammo used to test the armor panel sans the 7.62 Tokarev which was Romanian surplus.
One important note is that Premier tested this armor to NIJ level IIIA standards—meaning a distance of 5 meters—but I wanted to push the panels a bit harder than that. Most gunfights happen closer than 5 meters anyway, so I did my testing at about 3 meters or 10 feet.
The calibers used include .22 LR, .25 ACP, 9×18 Makarov, 9mm NATO, .45 ACP and 7.62 Tokarev, all FMJ loads. The 9×18 Makarov is standing in for .380 ACP since it’s basically just spicy .380. Also, while not a lot of criminals are running around with Tokarevs anymore, it used to be a common rumor that it could penetrate IIIA armor so I thought I’d throw it in to see how it fared against Premier’s.
The impact from the 9x18mm Makarov round.
To cut to the chase, the armored shirt fared very well, stopping all projectiles sent its way. It obviously had no problem handling .22 LR or .25 ACP, and 9×18 Makarov barely even made a perceptible backface deformation. Slightly larger dents were produced by .38 Special, 9mm NATO and .45 ACP, but nothing one wouldn’t be able to shake off if hit while wearing it.
As far as common handgun threats are concerned, the Everyday Armor T-Shirt beat all of them.
The only handgun bullet fired that I think the wearer really would have noticed is the 7.62 Tokarev. It did successfully stop it, but it left a pretty big impression on the other side. That’s because the 7.62 Tokarev is really pushing the velocities that IIIA armor can handle, although it clearly can handle it. That’s even when considering that my test shot was a borderline edge hit.
Finally, mostly for fun and to give an already shot-up armor panel a warrior’s death, I finished it off with a round of 12-gauge 00 buckshot. While it was definitely toast after that, the armor successfully prevented the shot from penetrating too. An impressive feat for a .22-inch-thick panel. That said, given the backface deformation, I would highly recommend not taking a 12-gauge to the chest at 10 feet whether you’re wearing this armor or not.
How Does It Wear?
They call it the Everyday Armor T-Shirt, but let’s be honest, you wouldn’t actually want to wear it every day. It’s very comfortable, about as comfortable as wearing any sort of armor can be in my estimation, but it’s still wearing armor. In the end, not having armor panels strapped to you will always be more comfortable than the opposite.
The same thing can be said about carrying a gun, however, and it’s up to you to decide how much physical comfort you’re willing to sacrifice for protection and peace of mind. Myself? Enough to carry a gun every day, but not enough to wear body armor every day. That said, I live in Iowa, and circumstances around the country vary wildly. Ultimately, however, I like having the Everyday Armor T-Shirt available to me as an option. One never knows when or how their circumstances regarding security might change, and having good IIIA armor that can easily be hidden under an overshirt might really come in handy someday. I have an old traditional-style IIIA vest as well, and it’s far less comfortable to wear and much harder to casually conceal in everyday attire.
Whether concealable body armor is something that you think you’d wear every day or it’s just something you’d like to have for just in case, the Everyday Armor T-Shirt is worth looking at.
Muck Boots has released its first traditional hunting boot, but is the Alpha Pursuit on point?
Often overlooked, good footwear is key to hunting—or shooting, for that matter—performance. Let your hoofs go to hell in the backcountry or a competition and you’re pondering your corns, not your wind holds.
This gets us to the point of the review, Muck Boot’s Alpha Pursuit boots. Famous for its all-weather footwear that stands up equally well to cow patties, rain, snow, and plain old swampy ground, the company’s new boots are a bit of a departure. No worries, Alpha Pursuit still keeps your piggies dry as talcum powder like all Muck Boots, but it does so in a much more rugged and, in my opinion, convenient fashion. And from my time with the footwear, the boots are some of the more innovative boots released in recent years.
What Is The Alpha Pursuit?
Alpha Pursuit Specs Upper: 3mm neoprene Exterior: Muckskin overlays Insert: Molded PU Memory foam Midsole: BioLite foam Heel: Rubber Outsole: Rubber Estimated Boot Height: 8 in. Estimated Heel Height: 2.25 in. Available Sizes: 7-5 US Mens Camo Pattern: Realtree APX MSRP: $185
These are lace-up hunting boots, with a traditional hunting boot cut. For Muck, this is an enormous leap, given everything it’s produced up to the Alpha Pursuit has fit roughly the same mold. For those not in the know that’s a slip-on Neoprene boot with a rubber toe and heel. The variation in the company’s catalog—outside of some bells and whistles—came in the height of the model, running from ankle-high up to the knee.
Don’t get me wrong, these are awesome options—which I own—but only for the right circumstances. That’s marshland, swamp or snow—but not places with jagged topography or landscapes requiring a cinched-up fit on your footwear. Think elk hunt terrain or a desert-based NRL match. Pokey, cutty things and the spongy, waterproof material known as Neoprene don’t mix.
Alpha Pursuit’s main material is Neoprene—Muck will never go away from that. So, what the heck gives with these boots?
Alpha Pursuit Muckskin Advantage
Muckskin, seen on the toe and side of the Alpha Pursuit, is the boot’s secret weapon, adding a layer of protection to the Neoprene. Apologies for the dirt on the boots, the photos were taken after wearing them through the better part of the hunting season.
Muck’s novel approach to protecting the boots’ quartering, heel and toe box is what’s called Muckskin. This is an abrasion-resistant rubber coating extending over the lower part of the Alpha Pursuit, giving the tog a tough exterior. It’s sturdy, yet flexible and ensures the boot doesn’t snag or rip on brambles, yuccas or exposed rock.
The material also plays a secondary role, providing support for the sides of the foot as well as maintaining the boots’ shape. As a bonus, the Muckskin practically adds no weight to the footwear, keeping an already light boot down at its fighting weight.
Alpha Pursuit Odds And Ends
While the upper material and its protective coating are in the spotlight for the Alpha Pursuit, there is more to the boot. Some of the noteworthy features include a thick rubber heel counter, rubber outsole with an aggressive waffle, hard plate under the arch support and a fiberglass toe shank.
Inside, Muck outfits the boot with what it calls a memory foam insert that’s perforated to allow for better airflow around the foot—a must in a neoprene boot. Interestingly—given the boots’ main material—Muck runs a layer of waterproofing lining underneath the neoprene. They don’t want you to get your feet wet.
The rear of the stack has a cutout helping to reduce fatigue when in the field.
Additionally, there isn’t any insulation, but this isn’t surprising. Neoprene retains heat well and given it seems Muck is aiming at an all-seasons option, extra insulation would have relegated it purely to winter.
The other intriguing aspect of the boot is the Alpha Pursuit’s notched heel. Just as it sounds, this is a cutout at the top rear of the upper allowing more flex in the wearer’s leg, particularly at the Achilles tendon.
Testing The Alpha Pursuit
For me, the proof is in the pudding when testing boots—it’s how they perform in the field. That’s how I put the Alpha Pursuit through its paces, using the boots from late summer through winter in a variety of hunts and training courses. This took the boots from West Texas caprock canyons to the Colorado high country and the Centennial State’s sagebrush prairie.
After nearly three months on the hoof, I’ve walked away from the boots highly impressed.
What I liked most was how light the boots were, making them nearly a second thought when on my feet. Anyone who’s done any amount of hunting—or hiking, for that matter—understands this isn’t always the case. Many traditional boots, though rugged, can feel like toting a ball and chain by the end of the day. For the most part, Alpha Pursuits were akin to wearing an athletic shoe and were easy on the foot from daybreak to sunset.
A harder rubber plate in the middle of the sole, in combination with a fiberglass shank, give the boot plenty of toe and foot support.
As for their resilience to weather, they performed as advertised. While I didn’t take them out in a downpour, I trekked them through both swampy and snowy conditions—as well as gave them a puddle test. Through it all, they proved impervious to water but there are some wrinkles to the boot’s ability to stay dry.
These aren’t traditional Mucks and only keep moisture at bay where there’s neoprene. To this end, the Achilles cuts and the upper eyelets are weak points in the system and could mean a wet foot if you misjudge the depth of a stream.
At the opposite end of the spectrum, the Alpha Pursuit was comfortable in warmer climates and didn’t make my feet swelter. The first adventure I took them on was in Texas, in early September with plenty of summer left. Even tightly laced, the boots breathed enough to blow off my perspiration and keep my feet relatively dry and comfortable.
An aggressive tread helps the Alpha Pursuit keep your footing.
Finally, on fairly rugged landscapes the boot kept my footing solid. I’ll give credit to the boots’ firm soles that bite into rock, dirt, snow and ice and didn’t let go. The tread is deep but with a respectable amount of flexibility, giving the toe the ability to dig in, even on treacherous ground.
What I Didn’t Like
While perfect for midline to semi-rugged terrain, I held taking the boots out for mule deer season. Many times, these hunts take me on some questionable routes involving relatively tough and rocky accents. Given the boots provide only the scantest ankle support—and I mostly solo hunt—I didn’t want to roll the dice with them in these circumstances.
Conclusion
Overall, for a light hunting boot—or something for an active shooting competition—the Alpha Pursuit is among the best I’ve laced up. The boots are certainly the most comfortable I’ve tested and used in a while, but don’t compromise a bit withstanding the elements and geography. I used and plan to continue using them, particularly on hunts that take me far afield.
I’m glad Muck has gone this direction. The company’s boots have always impressed me, but for the most part have a certain window of operation. With the Alpha Pursuit in its catalog, Muck had greatly expanded that window.
If you want to find the best 5.56 NATO suppressor, you need a lot of ammo, cameras, and a few people willing to risk bodily harm. RECOIL has all of that and more, and put it to good use testing a host of suppressors at CANCON South Carolina 2024!
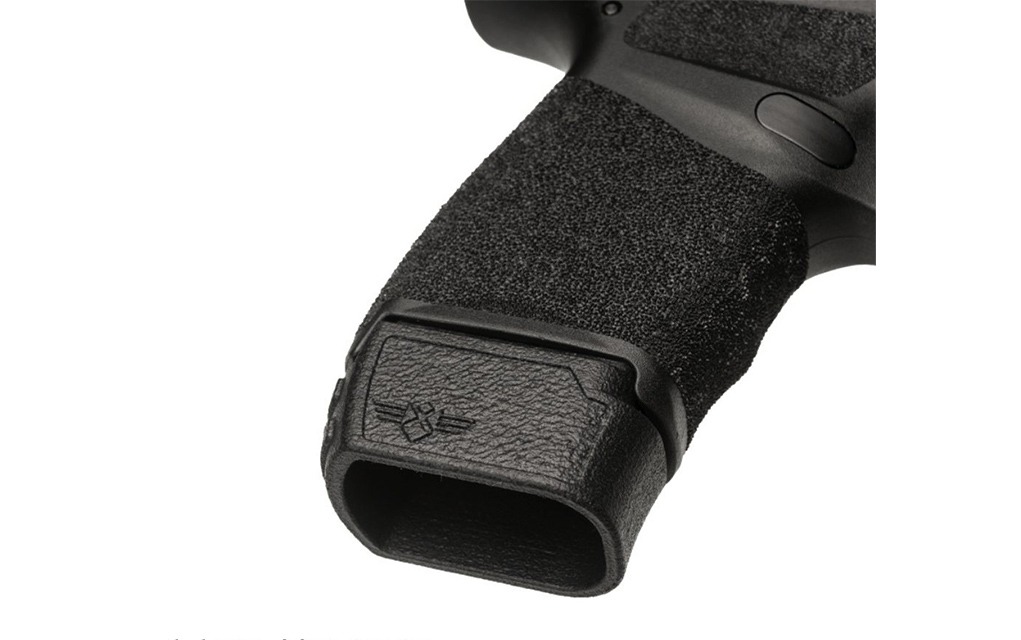
Xtech Tactical has just announced new grip extensions for the Springfield Hellcat and the Taurus GX4 as well as another Glock grip sleeve.
One of the best parts of subcompact and micro-compact pistols is their versatility. With flush-fit mags they’re maximally concealable, but by simply inserting a magazine with a grip extension you can have a full-size grip. XTech Tactical offers several such products, but the company’s latest releases are for the Springfield Hellcat and the Taurus GX4.
XTech previously offered a grip extension for 10-round Springfield Hellcat mags, but now they’re available for 11-round Hellcat mags as well. It’s made of high impact polymer, is textured to match the Hellcat’s frame and has an MSRP of $14.95.
The new grip extension for the Taurus GX4 will fit the pistol’s 10-round and 11-round mags. It’s also made of high impact polymer, textured to match the GX4’s frame and has an MSRP of $14.95.
Another similar style of product that XTech Tactical makes is the grip sleeve. These slip over a magazine’s body to provide a full-size grip when using an extended magazine in a pistol with a smaller frame size. XTech already offers these for several Glock models, but the latest version is MAG-ADAPT 29-15 which is designed for 15-round 10mm Glock 20 mags to be used in the Glock 29. It’s also textured to match the Glock’s frame and has an MSRP of $19.95.
There are plenty of good options for this big-bore cartridge, but here’s how to select the best model for your needs.
While there are many good reasons to own a .44 Magnum revolver, I think that there are plenty of reasons not to as well.
So, let’s go over what you want to look for while shopping for a .44 Magnum revolver, whether you should think twice about buying one in the first place and a few serious Big Maggies to consider adding to your arsenal.
How We Made Our Picks
The market isn’t exactly overflowing with .44 Magnum revolver options, and most of the companies brave enough to produce handguns that can handle this powerful cartridge tend to know what they’re doing. You’ll be hard-pressed to find any serious issues with the manufacturers or specific models on this list, and even the company behind our budget option has made a lot of improvements in quality in recent years. That said, many of these models are offered in several different variants, so we narrowed them down to a single exemplar to represent each handgun line. Whether you’re looking for something more compact for toting in the woods for bear defense or for a more dedicated hunting handgun, we believe that you can’t go wrong with any of these picks or one of their related variants.
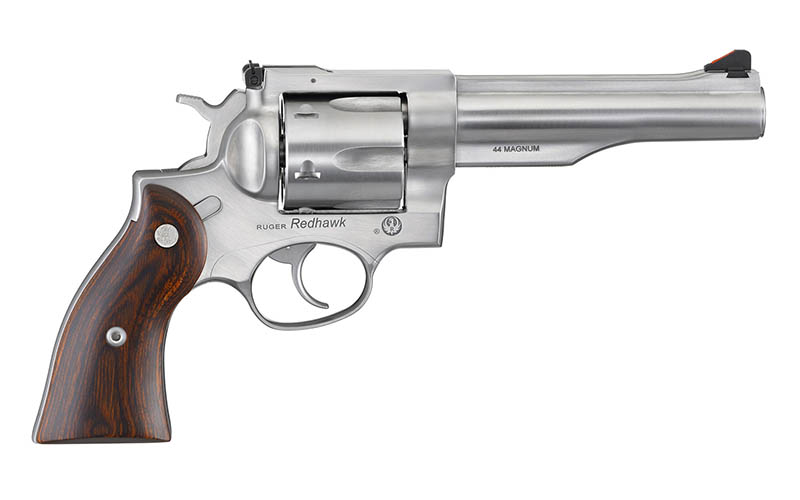
The Ruger Redhawk is the company’s large-frame double-action revolver. It comes with a stainless finish, and wood or rubber grips depending on the model. Patridge-style sights are standard, with a red ramp insert on the front sight.
Options include either a 5.5- or 7.5-inch barrel with wood grips or a 4.2-inch barrel with a Hogue grip sleeve. The Redhawk is built like a tank and makes for a fine working gun that should last a lifetime. If you plan on shooting a ludicrous amount of full-power .44 Magnum through your gun, Ruger also offers the Super Redhawk line which features even beefier frames and an integral mount for scope rings if you’d prefer an optic. Super Redhawks are great too, especially for hunting, but I prefer the more classic styling of the standard Redhawks myself.
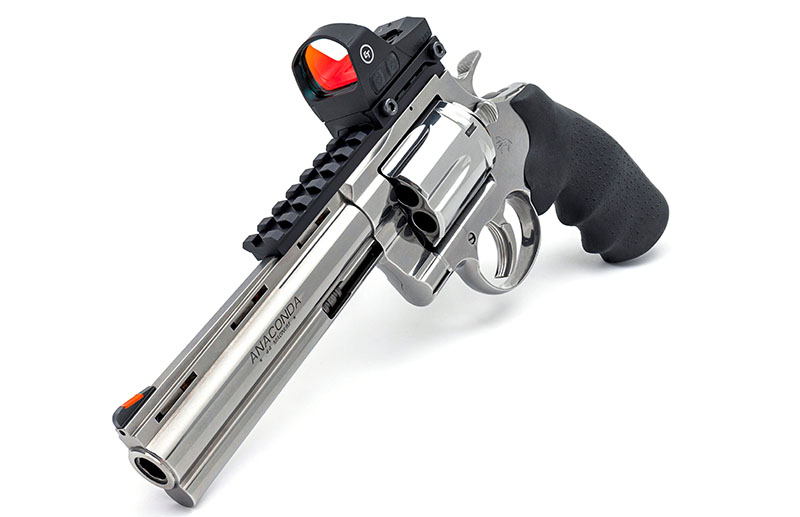
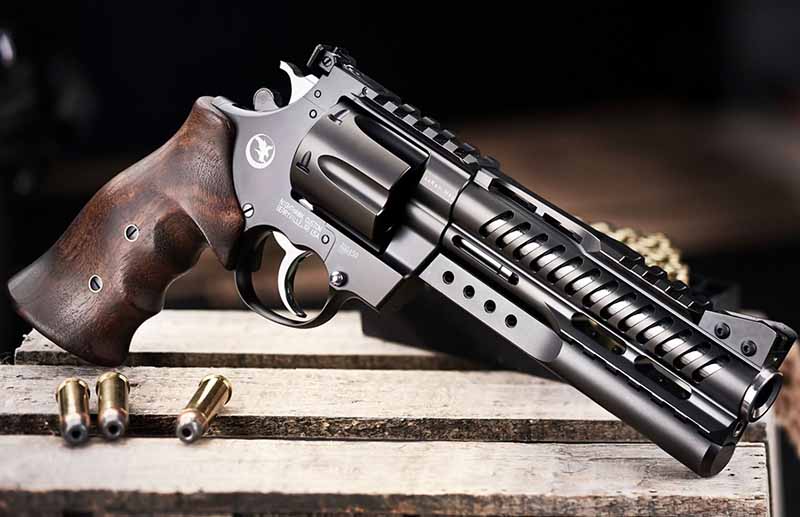
Colt recently revived the Anaconda, the big-bore cousin of the Python, and the qualities that made the original highly collectible after its relatively short production run make the modern version an attractive buy.
The frame has been augmented compared to the original, with a redesigned firing mechanism for greater durability and an amazing trigger pull for a factory revolver. It has an adjustable rear sight and pinned front ramp sight. Hogue rubber grips come standard as well which is great for shooting, but I think Anacondas just look wrong without wood grips. Thankfully, there’s an aftermarket for that.
The modern Anaconda comes tapped for scope mount as well and can be had with either a 4-, 6- or 8-inch barrel.
Korth of Germany makes some of the finest revolvers available, hand-fitted and tuned to perfection. They’re sold in the U.S. through Nighthawk, and the 6-inch model in the NXR series has all the bells and whistles one could want.
Target sights are standard, with removable front sight wings, along with a DLC finish and Turkish walnut grips. The top of the frame and barrel is railed for mounting an optic, as is the barrel underlug for a light, a laser or the included barrel weight. The NXR model wins in terms of practicality, but if you’re like me and prefer classic aesthetics more than the ability to mount optics and gadgets, Korth also offers some simpler .44 Magnum Revolver models like the Mongoose.
Despite looking like a gun from science fiction, it’s extremely functional and one of the finest revolvers that money can buy. The MSRP is staggering, but like a Nighthawk 1911, you’re paying for the exquisite craftsmanship.
Korth NXR Deals
Guns.com
Starts at $5,700
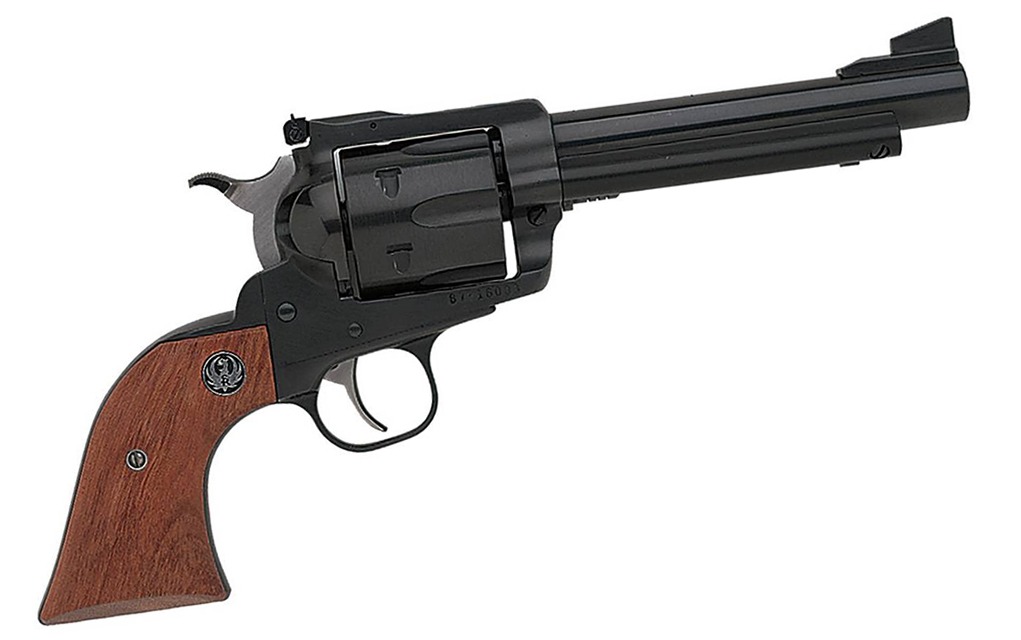
Best Hunting Revolver: Ruger New Model Super Blackhawk
When .44 Magnum was first introduced, the Ruger Blackhawk was much more widely available than Smith & Wesson’s Model 29, assisting with its initial popularity. Its reputation for quality persisted and even today it’s still a great choice for the handgun hunter. The Hunter and Bisley Hunter models (with Bisley frame and grips) have notches for mounting a scope, and rings are included as well.
The Super Blackhawk is just a Colt SAA on steroids, with a thickened top strap and cylinder to handle the high pressure. Being a huge fan of normal-sized SAAs too only makes this giant version even more endearing to me. All that extra steel is why this gun was used to develop “Ruger handloads” for .44 Magnum.
The Super Blackhawk is offered with barrel lengths from 3.75 inches to 10.5 inches and in blued or stainless finishes. The Hunter models have 7.5-inch barrels and stainless finishes only.
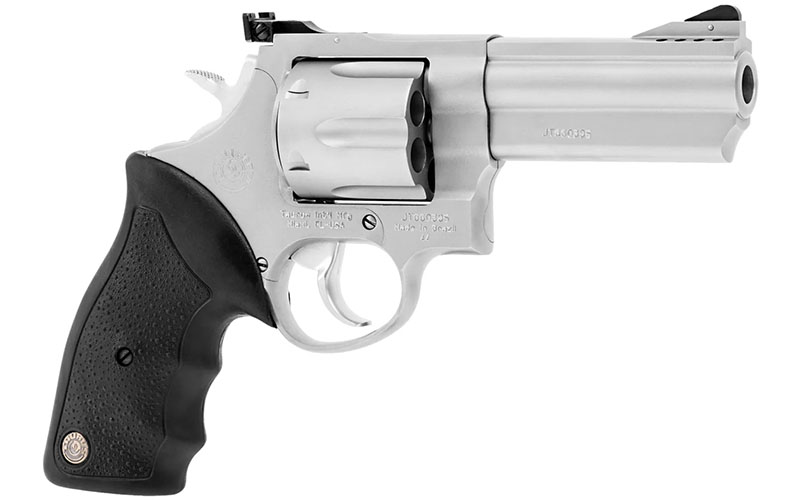
The Taurus 44 is a working man’s magnum, but it has some niceties added too. The Taurus 44 is the company’s most basic large-frame revolver, only offered with a stainless finish and rubber over-molded grips.
You get an adjustable rear sight, a pinned (and therefore swappable) front sight blade and even a ported barrel. For a relatively small .44 Magnum revolver, I found that porting to be very helpful.
The Taurus 44 is available with either a 4-, 6.5- or 8.37-inch barrel. If you wanted to add a top rail for mounting an optic, look at their Raging Hunter line too.
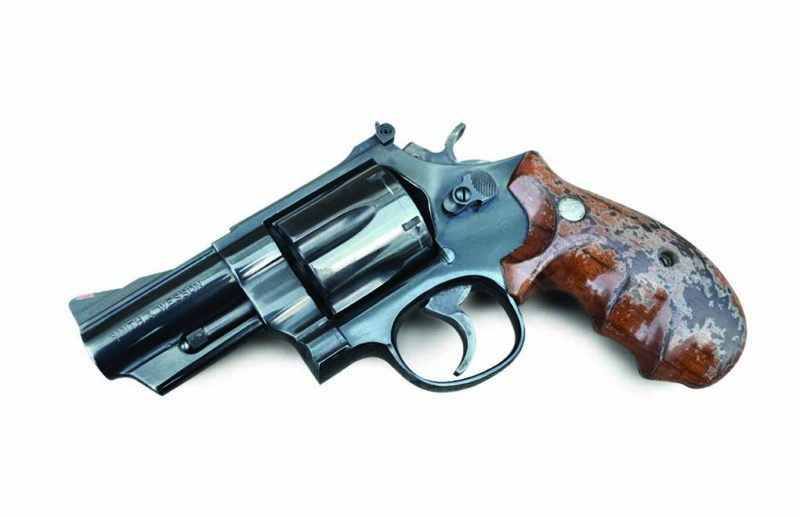
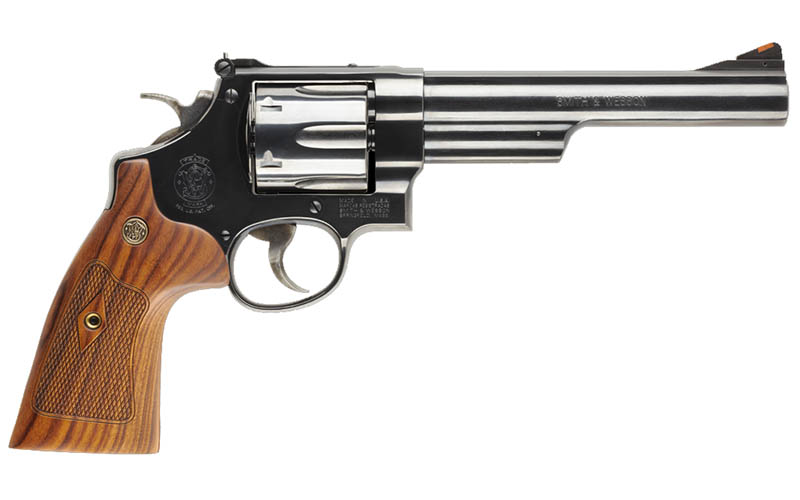
Practical, stylish, classic and desirable. The Model 29 is still the standard by which the rest are judged. Despite being so handsome, this is also a very functional handgun that can excel in nearly any role a .44 Magnum revolver may be useful in.
Blued steel and walnut grips complement its classic styling, and an adjustable rear sight, red ramp front sight and excellent factory DA/SA trigger make it very nice to shoot as well. It’s available with either a 4-inch or 6.5-inch barrel, but we all know which is the correct choice when it comes to the Model 29. I think that when it comes to guns that are this beautiful, the only trouble is actually taking them out of the safe and shooting them. But you should, because they were built to be shot.
Smith & Wesson Model 29 Deals
Sportsman’s Warehouse
$1,300
Guns.com
$1,300
Best Uses For A .44 Magnum Revolver
The .44 Magnum revolver shines as a hunting handgun, and it is arguably the standard woods handgun in bear country. It’s effective on any North American game with proper shot placement, and it has an especially good record against maleficent bruins.
Revolvers in .44 Magnum are also fantastic at separating people who think they want a big handgun from their money. Like the Desert Eagle, plenty of people desire one until the reality of owning the hand cannon kicks in.
It’s worth noting Smith & Wesson couldn’t give the Model 29 away until Dirty Harry came out. Following the movie, it became one of the most re-sold handguns of all time as stout recoil lead to buyer’s remorse.
Clint Eastwood holding the now iconic Smith & Wesson Model 29 in “Dirty Harry.” Photo: IMFDB.
Why To Not Consider A .44 Magnum Revolver
Much of the time, folks get drawn into the mythical allure of owning the “world’s most powerful handgun” (it’s not anymore, by the way) and don’t consider the more practical aspect of .44 Revolvers.
By and large, guns chambered for the cartridge are big and heavy–even in their more compact forms. A big gun is a necessity do to the pressures involved, which is tied into the other main drawback of the caliber—recoil.
For most shooters, it’s excessive and management thereof requires practice and patience. Heck, even famed lawman and gun crank Bill Jordan admitted as much in his book No Second Winner.
Self-Defense
Overall, these aspects do not add up to an optimal self-defense gun in the traditional sense. Particularly the final trait.
Recoil is a nasty obstacle, particularly pertaining to life-and-death scenarios of lethal-force encounters. At the minimum, most shooters must overcome developing a flinch, particularly if they are new to large-bore handguns.
Secondly, follow-up shots—well aimed and quickly executed—are a task. Absolutely, there are gunslingers who make .44 Magnum revolvers sing like they were rimfires. Guess what, you likely aren’t one of them. Don’t feel bad, I’m not either, and very few are.
Additionally, the .44 Magnum doesn’t acquit itself any better than most other handgun cartridges in self-defense situations. Studies comparing the details of lethal-force firearms uses have found negligible differences in efficacy between .44 Magnum and other common carry calibers, at least against humans.
And it’s a revolver, which comes with its own inherent challenges. From the perspective of self-defense, these include mastering a double-action trigger as well as reloads.
Why To Consider A .44 Magnum Revolver
OK then, a .44 Magnum checks nothing but “con” boxes. Take a hard pass, right? Not necessarily.
While for the general shooter, it might not prove the top self-defense choice, there is more to the world than lethal-force encounters.
Hunting
As alluded to earlier, the .44 Magnum revolver remains a staple for handgun hunting. And while its recoil is strong, it is considerably less so than many other big-bore options—.454 Casull and .460 Smith & Wesson, we’re looking in your direction.
This three-shot group was obtained at 50 yards with the Ruger 77/44 rifle, but it still shows that .44 Magnum is plenty accurate for use at 100 yards.
Even with its kick, average shooters have the ability to master the intricacies of a .44 Magnum revolver in the field. This is aided by most hunters opting for a larger model, generally scoped, which reduces some of the felt recoil. When it comes to hunting, .44 Magnum is considered to be an excellent round for deer and powerful enough for larger game too. The cartridge has been used to take polar bear and even elephants in the past.
Competition
The .44 Magnum is preferred by some bowling pin shooters as well due to its knockdown power. But the majority of handgun competitors who use revolvers stick with other calibers with lower recoil and cheaper ammunition.
.44 Magnum Ballistics And Revolver Barrel Length
While .44 Magnum is overkill for most shooting tasks, the massive amounts of energy it can deliver on target certainly have utility.
If the job at hand calls for it, a .44 Magnum revolver in the right configuration and loaded with proper ammo can be an extremely effective tool. The most typical barrel lengths are 4- and 6-inch models, though shorter and longer barrels are available as well.
The classic .44 Magnum loading is a 240-grain bullet (wadcutter or jacketed soft point) that travels somewhere between 1,200 to 1,500 fps and with something between 1,100 and 1,200 foot-pounds of energy.
Projectile weights range from as light as 180 grains all the way up to 340-grain hard cast dangerous game loads.
+P and +P+ loads can push velocity even further, such as Buffalo Bore’s .44 Magnum +P+ Dangerous Game load, which pushes a 340-grain hard cast bullet to 1,425 fps (and 1,533 foot-pounds of energy) from a 7.5-inch barrel Ruger Redhawk.
Three Colt Anacondas of varying barrel lengths. Photo: Wikipedia.
Generally speaking, you could expect the muzzle velocity from a 4-inch barrel .44 Magnum revolver to be about 100 to 200 fps slower compared to a 6-inch model.
While power is the primary reason people are interested in .44 Magnum, its good accuracy is another potential benefit, thanks to its relatively flat trajectory.
According to ShootersCalculator.com‘s Point Blank Range Calculator, a 240-grain bullet travelling at 1,200 fps coming out of a gun with 0.08-inch tall sights would be 0.77 inches high at 100 yards, giving a maximum point blank range of 125 yards when aiming at an 8-inch target.
This gives .44 Magnum longer legs than most other handgun cartridges.
The obvious conclusion here is that the more velocity and or range you want your .44 Magnum revolver to have, the longer the barrel should be.
Features To Look For In A .44 Magnum Revolver
Like with all gun selection, the first thing to consider is the weapon’s intended purpose. For general use or as a backup gun in bear country, a 4-inch or even 3-inch barrel is preferable due to the reduced bulk and weight. For hunting, a 6-inch or longer model will be worth the added heft for the extra velocity provided.
Sights
Almost all .44 Magnum revolvers wear Patridge-style sights, and while they are very usable, a scope or red dot will be better on a hunting pistol. If that’s a priority for you, look for a gun that’s tapped or comes with a top strap/barrel shroud rail. For a woods defense gun, I’d want one with a red dot myself.
A new-production Colt Anaconda with optional Picatinny rail being installed.
Grips
Some find the grips of large-frame revolvers to be too big, so you may also want to consider opting for a gun that has easily-sourced aftermarket grips. Many big-bore handgun shooters agree that Bisley-style grips are the best for handling recoil of this level, so also think about getting a model that includes them from the factory. I love the look of wooden grips on my revolvers, but when it comes to .44 Magnum, I think rubber is really the way to go. Your hands will thank you.
Ammunition
Also consider what and how you’ll be feeding it, as this cartridge can be very expensive. Reloading is a good cost-saving option, and can also allow you to make loads to your exact specifications. Most reloading manuals even have a section titled “Ruger and Freedom Arms Handloads,” as revolvers from these manufacturers are recommended for shooting Bubba’s White Hot Handloads due to their stronger construction.
Double-Action Vs Single-Action
The final feature that warrants discussion is the action, as with most wheelguns, .44 Magnum revolvers are available with both double-action and single-action triggers. The speed at which DA/SA guns can be brought into action makes them preferable for defensive use, but for most other applications a single-action-only will be just fine.
.44 Magnum Revolver FAQ
Is a .44 Magnum the strongest handgun?
When Dirty Harry made this claim, it was true, but .44 Magnum has since been outclassed by some other more powerful handgun cartridges like .500 S&W Magnum.
Is .44 Magnum overkill for self-defense?
Against humans? Certainly. While overkill isn’t necessarily a bad thing when it comes to defending yourself, the extra power of .44 Magnum will hinder you more than help you in this case. For self-defense against humans, a less powerful cartridge like 9x19mm Parabellum will be much easier to shoot and the pistol will be able to have a higher capacity as well.
Will .44 Magnum stop a bear?
In theory, yes it can, but not all bears were made equal. It will also heavily rely on your ability to make good hits and the ammunition that you’re using. Many people do choose .44 Magnum revolvers for bear defense, but for the biggest, meanest bears, you’ll probably want something even more powerful.
We hit the range to test out a Sig Sauer P322 paired with an SRD22X suppressor, one slick and quiet .22 LR package.
Most shooters agree that suppressed .22s are the most fun you can have with your pants on. They’re easy to shoot well, the ammo is cheap enough that you can blast all day and they have the potential to truly be “Hollywood quiet.” Here I’ll be going over Sig Sauer’s suppressed .22 combo—the P322 and the SRD22X.
Sig Sauer P322 Specs: Caliber: .22 LR Barrel Length: 4 inches Overall Length: 7 inches Weight: 17.1 ounces Magazine: 20-round Street Price: $400
Sig Sauer SRD22X Suppressor Specs: Caliber Rating: .22 LR ; .17HMR/.17 Mach II ; .22 Magnum Length: 5.8 inches Diameter: 1 inch Weight: 5.1 ounces Materials: Titanium tube/stainless steel baffles Attachment Type: Direct thread Street Price: $430
First Impressions
When I pulled the P322 out of its box, the first thing that struck me about it was its weight. This thing is light, so light that it almost feels like a toy. It does not feel cheap, however, and its polymer frame feels like the same quality that Sig Sauer uses for its centerfire handguns.
Being so light isn’t atypical for polymer-framed .22 LR pistols, but what is different about the P322 is its impressive 20-round magazine. Two are included and they fit flush inside the full-size grip.
Speaking of the grip, I love the P322’s ergonomics. The profile of the grip, along with the rest of the pistol’s aesthetics, appears to be primarily influenced by the Sig P365. As far as micro-compact 9mm carry guns go, the P365 is considered one of the most comfortable, but since the P322 wasn’t designed for concealed carry it’s a bit bigger in every dimension which makes it even nicer to hold. I have average-sized hands and can get a full grip on the pistol with some room to spare at the bottom, and although the gun is very slim, it’s not too slim as to be unpleasant.
Each P322 comes with two mags, a magazine loader, a threaded barrel adapter and an interchangeable curved trigger shoe (the pistol comes with the flat trigger installed), and it all ships in a hard case. It’s nice of Sig to include a hard case, but my first minor nitpick is that it’s too small. Just the gun and one spare mag is a tight squeeze, and if you put a red dot on it, good luck finding the one specific orientation that will allow for the case to close. Not a big deal, but it would have been nice if Sig made the case just a little larger.
The final point to touch on here is the P322’s controls. Both the safety and the slide release are easy to access with the thumb from a firing grip, and the magazine release is big, easy to push and lets mags drop free without issue. The controls are ambidextrous too and the mag release is reversible, so lefties needn’t worry.
As for the SRD22X, once I was able to bring it home and take it out of the box the first thing I noticed about it was also its weight. Featuring a titanium outer tube and steel baffles, it tips the scales at just a hair over 5 ounces. A perfect complement to a lightweight pistol.
In the suppressor’s box, you’ll also find an M9-.75 thread adaptor and a tool for removing the end cap for cleaning. The native threads are 1/2×28.
Putting It All Together
Installing the SRD22X on the P322 was a quick and easy affair. The pistol ships with a protector on its threaded muzzle, but it’s cleverly the same diameter as the barrel and is neatly hidden inside the slide. This means that those who don’t want to run a can on their P322 won’t have an unsightly protrusion on the muzzle.
For those who do wish to run a can, it’s as simple as locking the slide back, putting the gun in a vise and removing the thread protector with a wrench. The included adapter is then threaded on in its place and voilà, the pistol’s ready for its suppressor. In the case of the SRD22X, that also meant just screwing it onto the threads. Sig recommends using 45 inch-pounds of force to install the adapter and screwing the suppressor on until it’s hand-tight.
Before heading to the range, I also decided to throw a red dot on the P322 since it’s optics-ready.
Again, the process was simple. I removed the two screws in the rear sight plate and pulled it off of the slide, replaced it with the red dot and attached it using its included screws. I used a Bushnell RXC-200, but anything with an RMSc footprint will work.
With those two pieces installed, the P322 was ready to rock.
On The Range
As I usually do when testing a new gun, I like to see how it will run dry out of the box without any cleaning or lubing. If it initially has issues, it’s forgivable and gets some lube before continuing, but if it runs fine, it’s a good sign of reliability. Thankfully, the Sig P322 ran smoothly right away.
That’s not to say that it was flawlessly reliable, but the issues that it did experience were not caused by the gun itself.
The first type of malfunction encountered was due to the ammunition, something that can be expected of any direct blowback .22. I tried to run a few different loads through the P322, both suppressed and unsuppressed, and found that the only one it didn’t want to reliably cycle was Remington 22 Thunderbolt. Not much of a surprise for the cheap bulk-pack stuff. That said, it worked more than it didn’t.
As for the loads that my P322 did like, the pistol’s favorite was CCI Mini-Mag as far as supersonic ammo goes. For subsonic ammo, of the two kinds I had, only one was designed to reliably cycle semi-autos but it thankfully functioned great in the P322 as well. That load is CCI Quiet-22 and it features 45-grain lead round nose projectiles and an advertised muzzle velocity of 835 fps. I put about 400 rounds downrange without an issue, and the SRD22X made the whole affair about as quiet as possible. While it’s still probably not great for your long-term health, I felt no need to wear hearing protection while testing this setup.
The only other malfunction I encountered was the result of user error—how I loaded the magazines. They’re easy to load, but if you don’t pay attention, it’s possible for the rounds to get jumbled inside and cause feeding issues. As long as all the rounds look to be neatly stacked through the window of the mag, they should feed perfectly. This isn’t an issue, it’s just something to be aware of if you own one.
Outside of reliability, how did the P322 and SRD22X actually shoot? Very well.
As mentioned, I’m a big fan of the P322’s ergonomics. It fit my hand and accommodated a modern shooting grip very naturally. Combined with its .22 LR chambering and suppressor, you can imagine just how easy it was to control, even when shooting relatively fast.
I say only relatively fast as I couldn’t run the gun as quickly as I could with some other pistols because of its trigger. It’s not terrible, but it does leave a lot to be desired. It has more travel than I’d like and gets pretty mushy at the end, but once you learn to find the wall it’s a pretty light break. The reset is alright, but again, I’d prefer it to be a bit shorter.
Even with a not-so-great trigger, shooting the P322 was a blast and I had no problem cleaning plate racks with it. Subsonic .22 LR doesn’t knock them down with too much oomph, but it knocked them down nonetheless.
The fiber optic iron sights that come with the P322 are perfectly suitable as well, I just prefer red dots these days. The particular Bushnell optic I used has a built-in rear iron sight, but it’s so short that I can only just barely co-witness the front sight with it. If you’re shopping for a red dot for your P322, I’d look for one with a taller integral rear sight.
Parting Shot
Overall, the Sig P322 and SRD22X make for one sweet package.
When you take the P322’s features, capacity and general performance into account, I think it’s one of the best .22 LR semi-auto pistols on the market for its price. Pairing it with Sig’s .22 suppressor only makes it better.
As I mentioned, the only real complaint I had was the P322’s trigger. That said, if you only plan on using one for varmint control around your property or, like me, for casual range plinking, the trigger is perfectly acceptable. If, however, you’d like to do some more precision target shooting with it, I’d consider an aftermarket upgrade.
The pistol is also a bit more ammo-sensitive than some other semi-auto .22s out there, but it’s not hard to find a load that it likes and just feed it that.
I think this setup shines mostly as a ranch companion or a range toy, but for individuals who can’t handle anything more powerful than .22 LR, it could make for a decent defensive option as well thanks to its large capacity and ability to accept an optic, light and suppressor.
Regardless, if you’re in the market for a suppressed .22 pistol, both the P322 and SRD22X are well worth your consideration.
Pros:
Very lightweight setup
High capacity
Very quiet
Ergonomic
Cons:
Trigger isn’t great
A bit ammo-sensitive
Sig Sauer P322 Deals
Sportsman’s Warehouse
$400
Guns.com
$400
Sig Sauer SRD22X Deals
Silencer Central
$430
Silencer Shop
$400
More On Suppressors:
The Suppressor: How They’re Made, How They Work, And How To Buy One
Looking to go armed, but are stuck in the weeds as to what to arm yourself with? Here are 20 of the best concealed carry gun options that will keep you on the defensive.