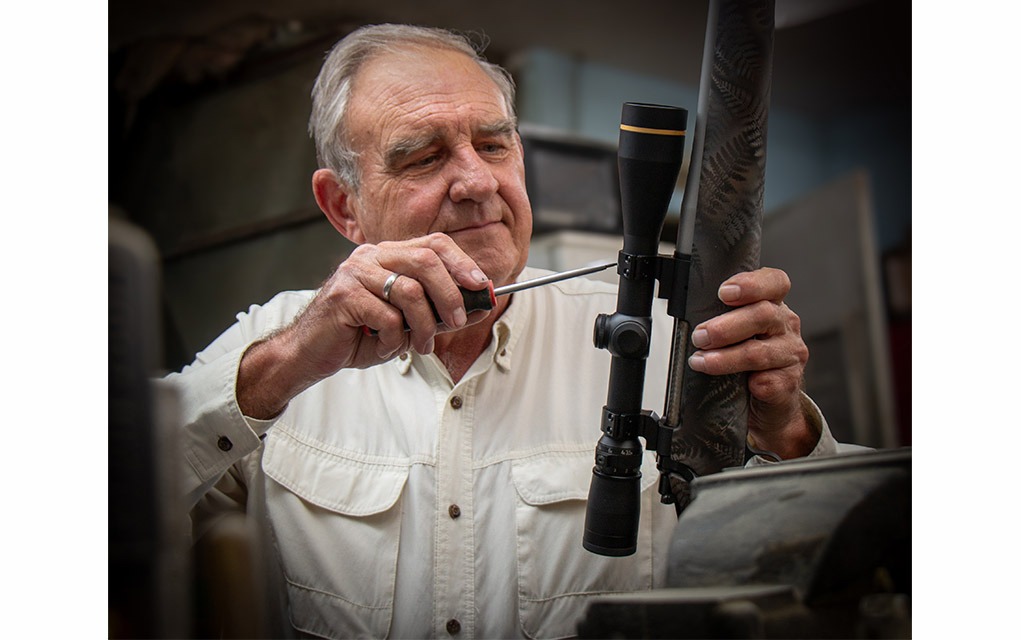
Looking to go long with your handloaded ammo? Here we discuss how to get the best results when reloading for long-range shooting.
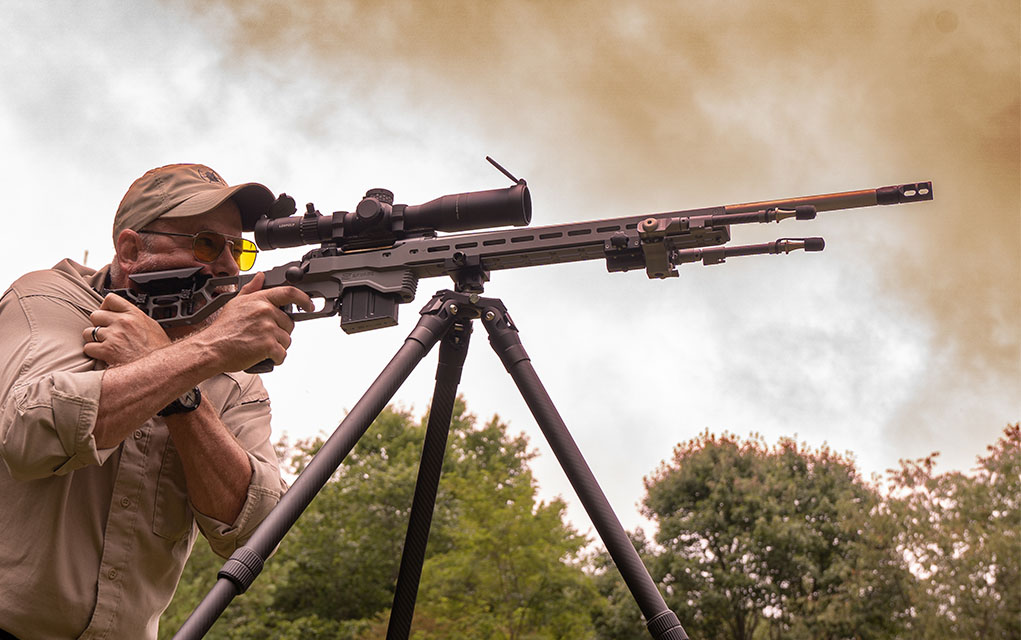
The art of long-range shooting has changed over the past quarter century, to the point where hitting a 1,000-yard steel plate has become rather uneventful. Our barrels, actions, triggers, optics and mounting systems are better than they’ve ever been, and we’re seeing more consistent results than we ever have. We have ballistic calculators that can solve trajectory and wind drift problems precisely, and our projectiles have the best, and most honest, ballistic coefficient values ever seen.
Although my passion is reloading my own ammunition, I must admit the fact that today’s factory ammunition is the best I’ve ever seen … but there remains that “control factor” associated with handloading. The last ammunition crunch has only reinforced that fact, as I watched a lot of shooters scrambling to find a suitable substitute when their favored choice was unavailable.
That aside, reloading your ammo gives the most consistent and repeatable results, so let’s take a look at some long-range reloading tips for getting the best results possible.
Get a Good Chronograph
Half of the problems associated with inaccurate handloads, at least with those properly assembled, can be identified with a good chronograph. Not only do we need to know the actual muzzle velocity of our ammunition, but observing and recording the extreme spread of our ammunition is a very valuable bit of information. I’ve found the most accurate loads are also those that have the most consistent velocities.
It’s also good to know the variations in your chosen load in changing weather conditions, in order to minimize the correction needed at the temperature extremes. Some long-range shooters prefer to “true” their rifle—actually shooting at varying distances to observe the drop—rather than relying on observed muzzle velocity and the stated B.C. value. But even then, you’ll want a reliable chronograph for load development. I use an Oehler Model 35P, and I really like it.
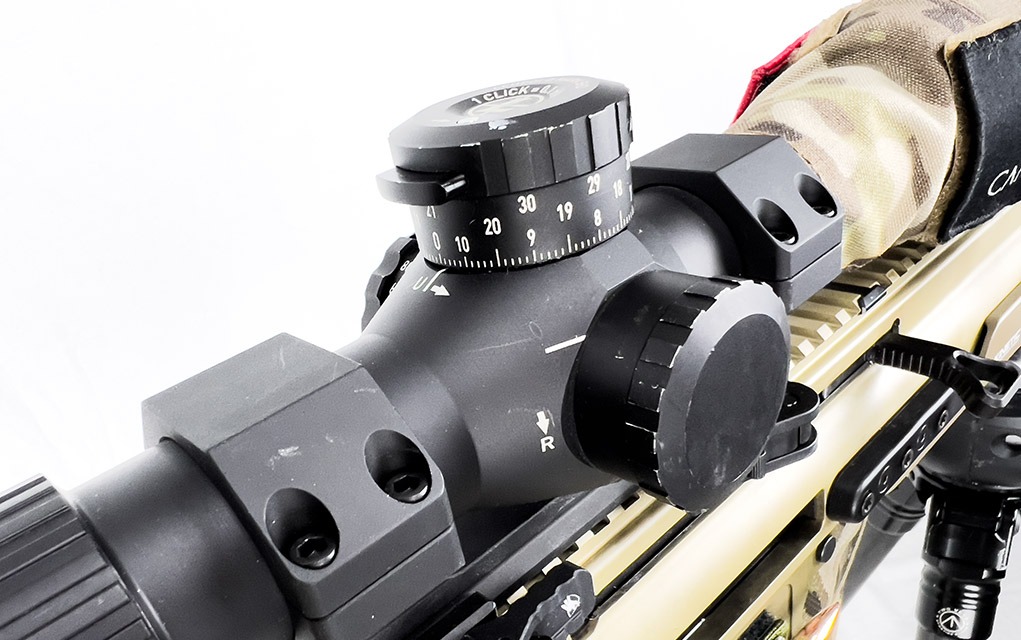
Keep Your Primer Depth Consistent
An inconsistent primer seating depth can have an effect on your velocity—and ruin what may otherwise be an accurate load. Generally speaking, you’re looking to seat your primers a minimum of 0.002 inch below the level of the case head, and you shouldn’t exceed 0.006 inch below. You never—ever—want a primer to stick up above the level of the case head, and seating your primers too deep can assuredly have an effect on velocity.
I prefer to seat my primers by hand using the Lyman E-Zee Prime hand-priming tool, as I can feel the primer seat much easier than when using any of my presses. If you feel an excessive amount of resistance when seating primers, the primer pocket might need some attention. Tools like the Little Crow Gunworks Precision Prep Tool have large and small pocket reamers that’ll keep things uniform.
Pay Attention to the Neck
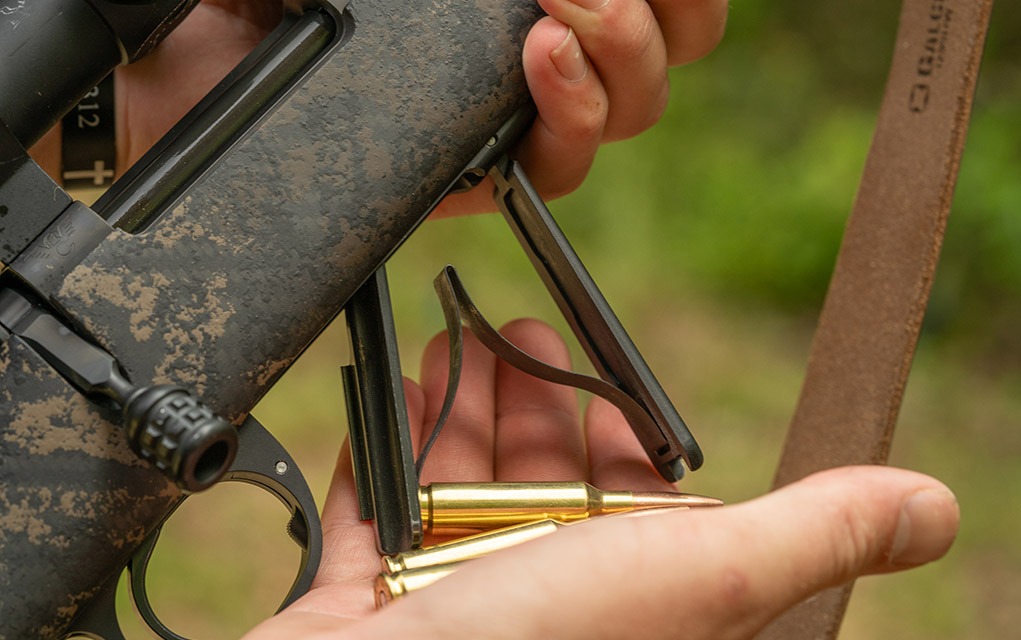
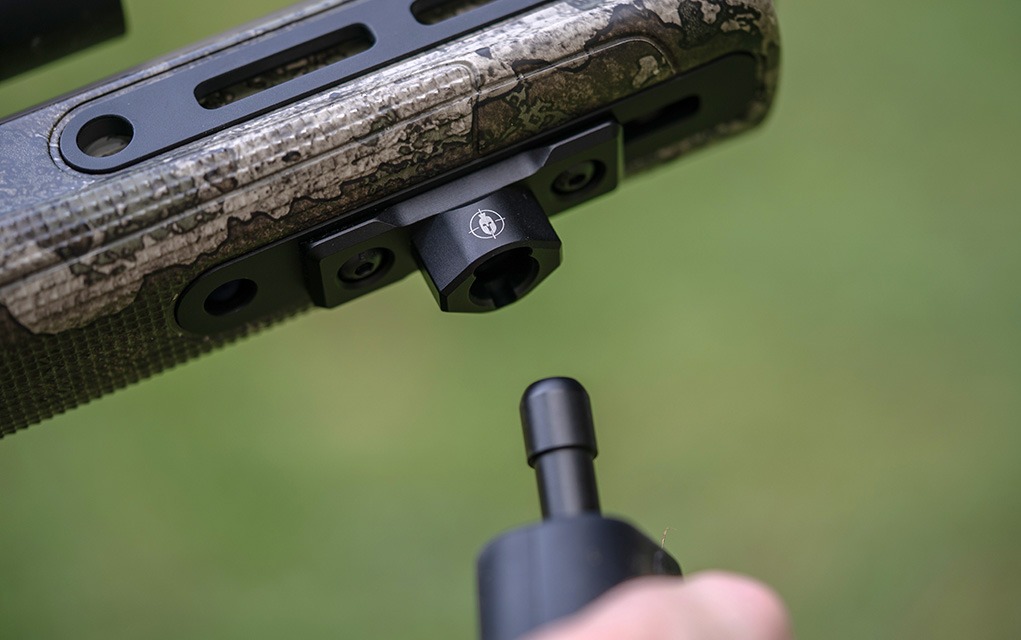
Long-range shooting is almost always associated with a projectile that’s been engineered to deliver the optimum ballistic coefficient, with jacket thicknesses held to very tight tolerances, and with their meplats either trimmed to uniformity or constructed with the best polymer or aluminum tip available. Trimming your brass is a necessary chore, but should you leave any sort of a rough surface at the case mouth, you can damage the bullet jacket and compromise your B.C., so a chamfer tool is going to be your friend.
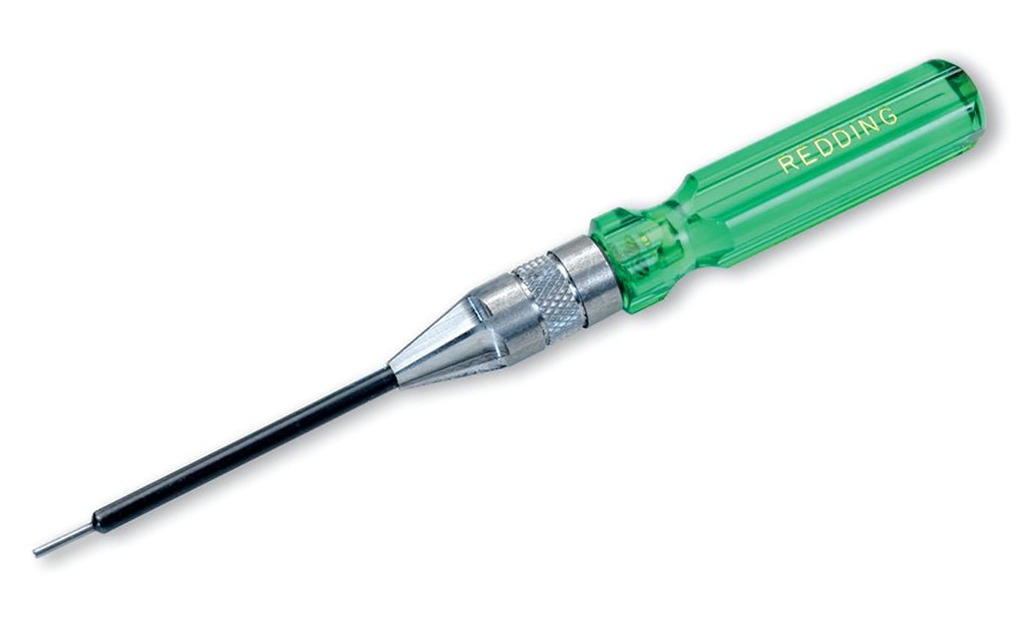
Redding’s piloted deburring tool can put the proper dressing on the inside of your case mouth, to avoid damaging the bullet jacket.
I like the Redding Piloted Deburring Tool, with the VLD cutter, for neatly and consistently putting a proper bevel on the inside of the case mouth. It maintains concentricity by centering the unit via a pilot that goes through the case’s flash hole, so if your flash hole is centered, you’ll get a nice, even chamfer on your case mouth. And speaking of flash holes, if you’re really serious about tuning up your cases, tune those flash holes as well.
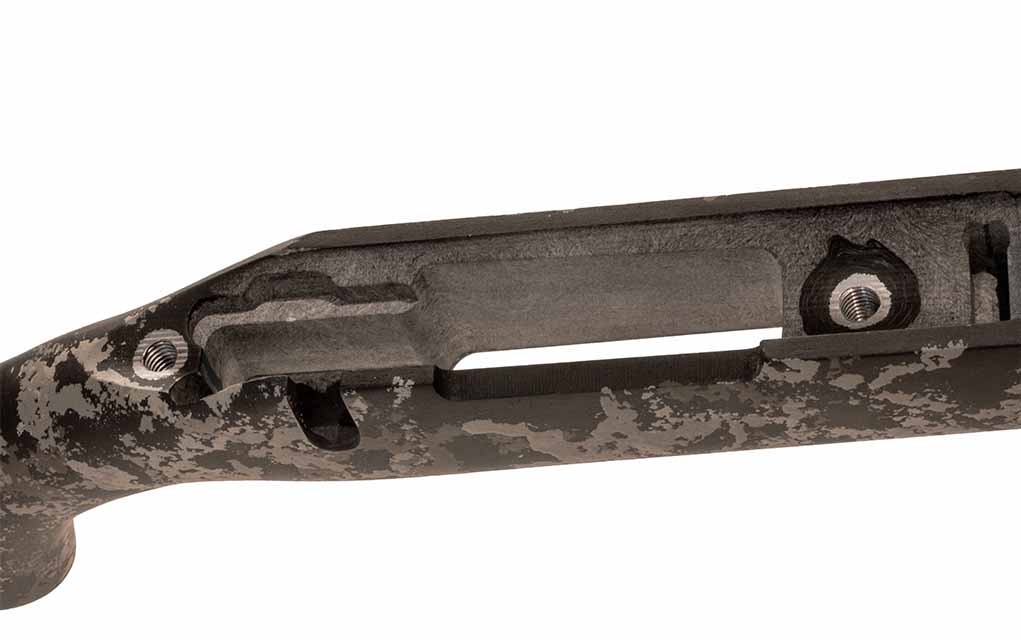
Tension Headaches
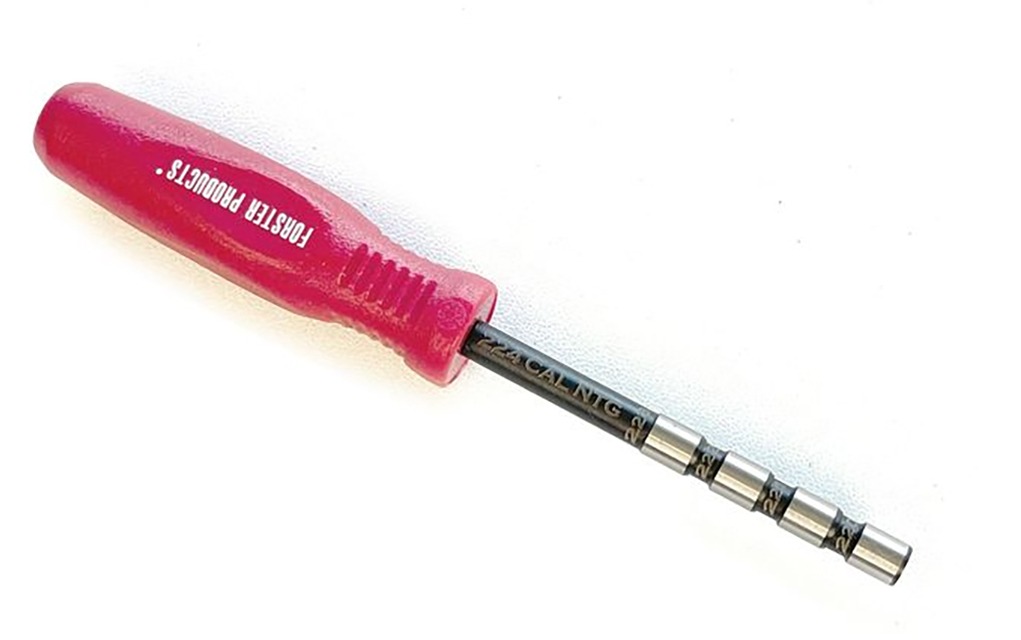
Uniform neck tension is another factor that’ll not only increase accuracy and consistency, but it will potentially minimize damage to your bullet jackets during seating. I recommend a good set of bushing dies, which will only resize your case neck as much as is needed. But to check that things are being sized the way you want, Forster has come out with their Neck Tension Gauges, which consist of a rod with areas of varying thicknesses that’ll indicate the inside diameter of your cases. Available in .224 inch, 6mm, 6.5mm, 7mm and .308 inch, these handy little gauges are just one more step to the most uniform ammo possible.
With Forster’s Neck Gauge Tool, you can observe the inside diameter of your resized cases to deliver a uniform neck tension.
Runout and Play
If a bullet isn’t concentric to the centerline of the bore, there’ll be issues upon ignition as the bullet enters the throat. Those incredible forces will distort the bullet—at least to some degree—and definitely affect your accuracy. The ability to measure the cartridge’s runout, or that variance between perfectly concentric and some amount of runout, can help the long-range shooter weed out any ammunition that won’t fit the bill.
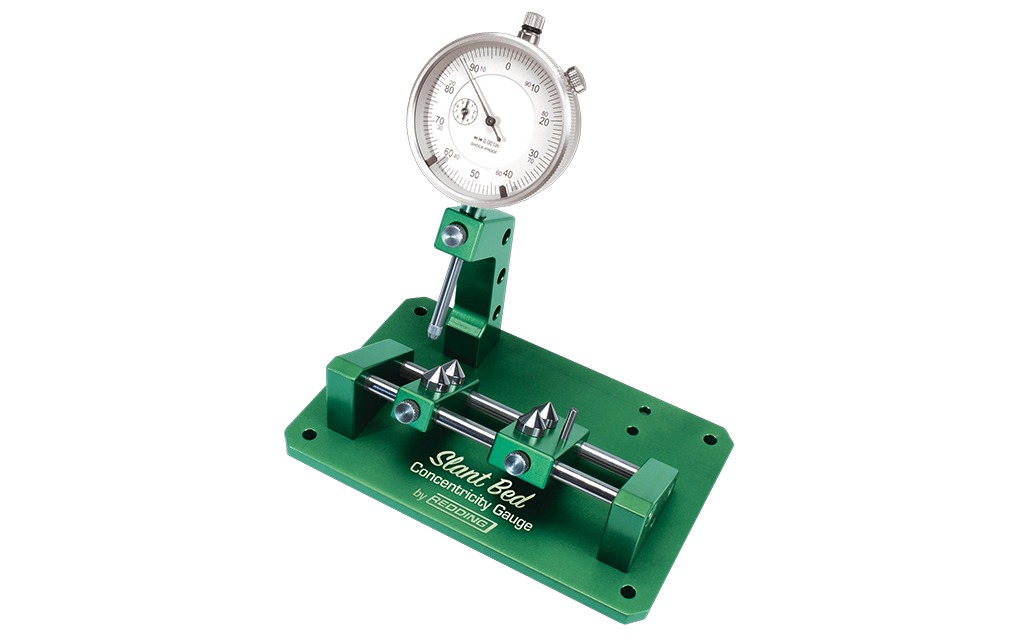
Redding’s Slant Bed Concentricity Gauge is a handy tool for measuring both factory ammunition and handloaded ammunition, as well as unloaded cases. An indicator gauge with a boldly marked dial quickly shows the amount of out-of-round and is observed at a 30-degree angle—sitting perfectly on your reloading bench. Stainless-steel bearings will last a lifetime and are easily adjustable for the case or cartridge length. The whole unit is ergonomically designed, with a downward slant away from the front, and it doesn’t take up much room on your bench.
The Redding Slant Bed Concentricity Gauge is a good means to measure the runout of cases or loaded ammunition, allowing you to cull cartridges too far out of round.
Long-range reloading definitely requires a bit more attention to the small details, as any variances are going to be magnified by the distance and the time of flight. Like any other reloading project, consistency is the key, but it becomes a bit more important when trying to really stretch out your rifle. The best components deserve the finest attention, and if you put the effort forth, you’ll see the results at the target.
Editor’s Note: This article originally appeared in the September 2022 issue of Gun Digest the Magazine.
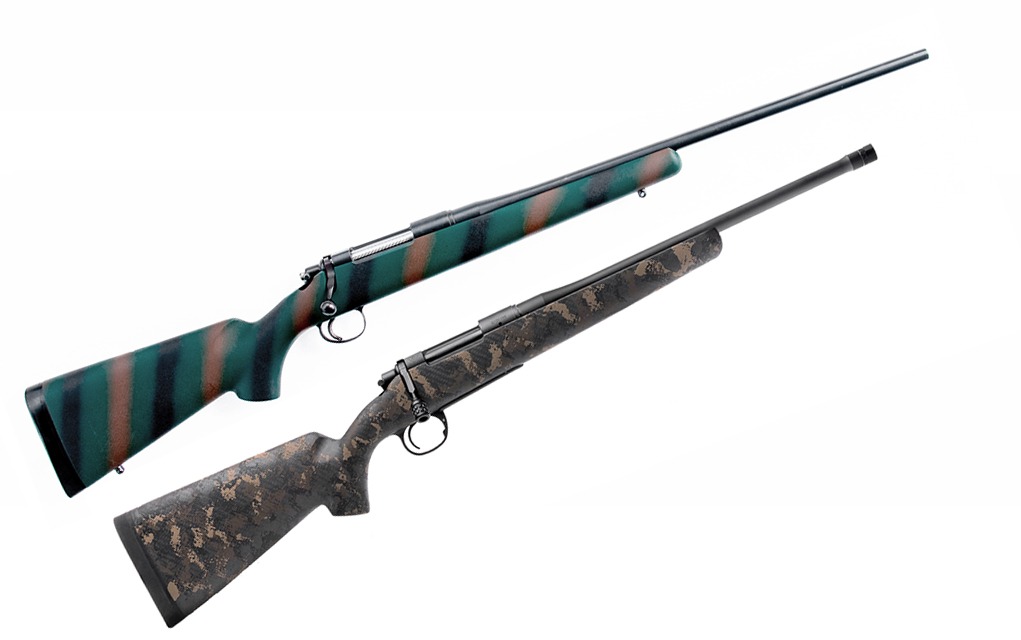
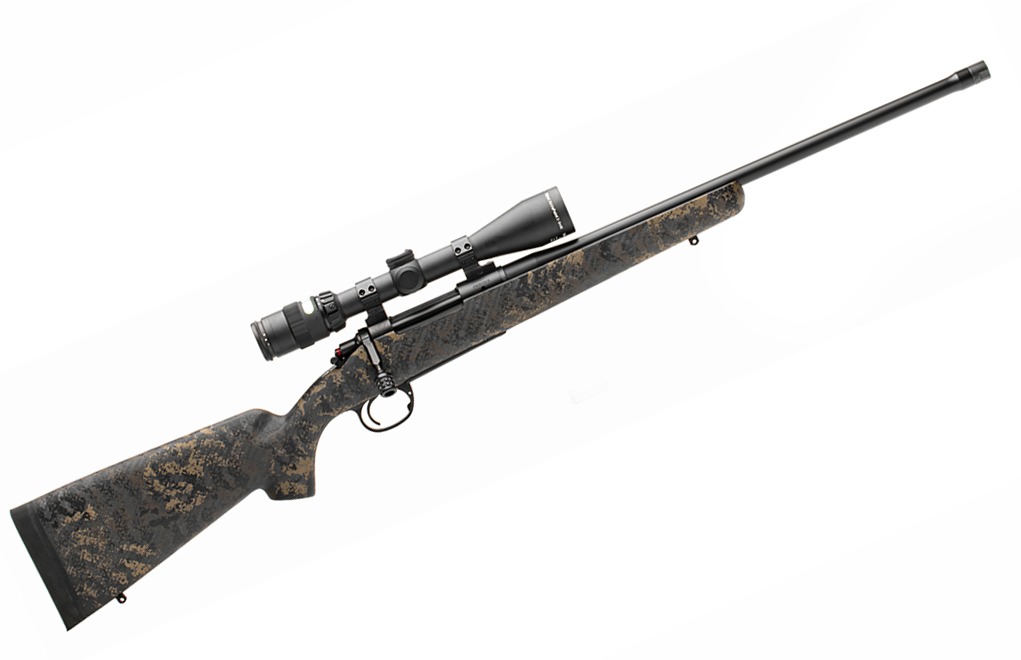
Springfield is expanding the Model 2020 rifle line with the Boundary, featuring carbon fiber stocks and a sub-MOA accuracy guarantee.
The Springfield Model 2020 series of rifles has so far included the Waypoint, the Redline and the Rimfire, but the company has just announced the latest addition to the lineup in the form of the Boundary. Compared to the Redline or the Waypoint models, the 2020 Boundary trends towards the look and layout of more traditional hunting rifles while still retaining some excellent modern features.
The Model 2020 Boundary features an AG Sportsman carbon fiber stock with a sleek, classic hunting rifle profile and a hand-painted Rogue camouflage pattern. The stock also sports QD sling cups and a Pachmayr decelerator pad. The one-piece hinged floorplate bottom metal is compatible with Remington 700-pattern receivers, and its design allows for a single setup to be used for all short-action-caliber Boundary rifles. For the long-action 2020 Boundary rifles, the use of different follower lengths and spacers allows the same bottom metal to be used for both PRC and non-PRC calibers. Available chambering options at launch include .308 Win., 6.5 Creedmoor, 6.5 PRC, .300 PRC, .300 Win. Mag., 7mm Rem. Mag. and 7mm PRC. The capacity of the internal magazine varies by chambering.
Besides the choice of caliber, each 2020 Boundary is also available with two barrel options—traditional fluted stainless steel or BSF carbon fiber. Other features worth mentioning include the rifles’ threaded muzzles with SA Radial brakes, their TriggerTech adjustable triggers and Springfield’s 0.75-MOA accuracy guarantee (measured by a three-shot group at 100 yards using quality match-grade factory ammunition in the hands of a skilled shooter).
Steve Kramer, Vice President of Marketing for Springfield Armory, said this about the new rifles:
The Model 2020 family of rifles has established itself as a pre-eminent option for the serious hunter who demands the best … With the addition of the Boundary to the Model 2020 line, hunters have a new option that combines the appeal of a traditionally configured hunting rifle with the benefits of cutting-edge performance.
Springfield Model 2020 Boundary rifles are available now and the MSRP ranges from $2,173 to $2,599.
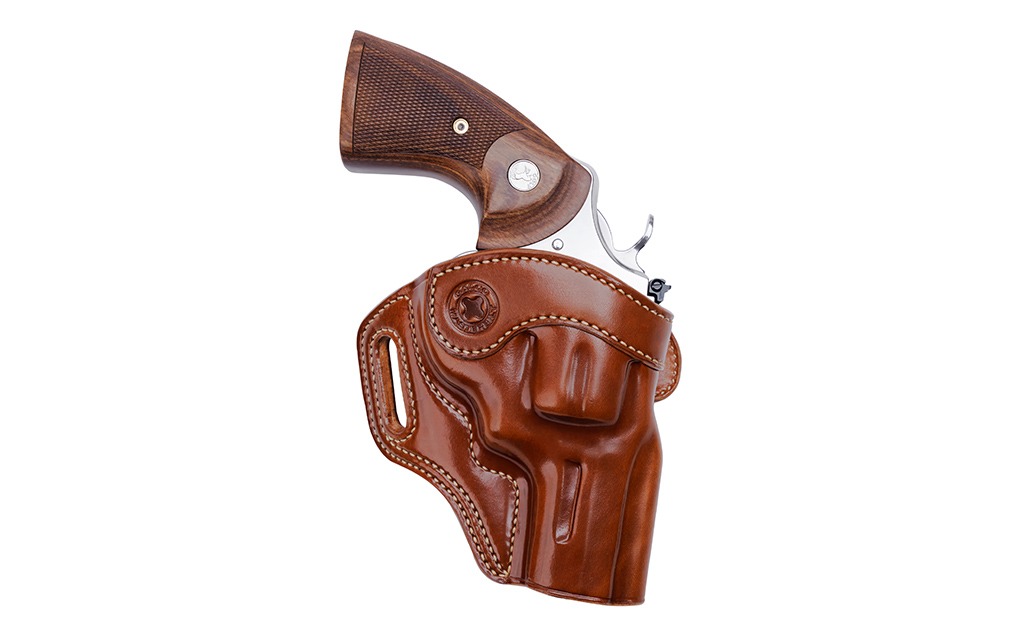
The shoulder holster isn’t just for cinematic good and bad guys. It has a role in real life as these seven upper-body rigs prove.
A suppressor will make a .308 no louder than mouse flatulence, a hit from a .45 ACP will sweep a perpetrator off his feet, and you never have to reload a six-gun. If your gun education came from the warped lens of Hollywood, you’ll swear up and down these are 24-karat, chiseled-in-stone truths. Handled anything above and beyond a cap gun, you understand their veracity is the same caliber as pitch lines for X-ray specs and political promises.
One of the most enduring cinematic fantasies is that of the shoulder holster. Mobsters, undercover cops and PIs, by the big screen accounts the way every good and bad guy carries their heater. Except it isn’t. The belt holster has and does reign supreme, given its simplicity, versatility and comfort. But that doesn’t mean the usefulness of the shoulder holster is mere La-La Land fiction.
For particular individuals who face certain circumstances, the upper-body rig proves eminently advantageous. Drivers and those seated most of their day find shoulder holsters extremely convenient and fast on the draw. And there might not be a more efficient way to amble around with a hand cannon during hunting season. It sure make it simpler to scramble up a steep grade.
Whatever your case may be, there are plenty of solid shoulder holster options out there and we’re going to look at some of the best. So without further ado, here are some of the top shoulder holster choices that give the silver screen star a role in real life.
How We Made Our Picks:
There are a lot of holster companies these days, but comparatively few of them make shoulder holsters. Of those that do, there are even fewer worth considering. Given what’s available, we weighed their features, construction qualities, fitment options and manufacturer reputations to see how they stacked up. The result is these seven picks, and we feel each one checks enough boxes to be worth considering. Whether you’re looking for a classy leather rig for daily use or something basic for the occasional hunting expedition, one of these options should serve you well.
Material: Premium Center Cut Steerhide Carry Angle: Horizontal Spare Ammo Carrier: Double Mag Pouch Hand: Left or Right MSRP: $158 Website:galcogunleather.com
Pros
Pliable, comfortable leather
Affordable for Galco
Good number of model fits to choose from
Cons
Thin leather can make reholstering difficult
Galco knows how to get the most out of gun leather, which is obvious when you catch a glimpse of effective and budget-friendly shoulder system. Modeled after the company’s professional rigs, the Classic Lite 2.0 Shoulder Holster is streamlined to make it more conducive to armed citizens, without compromising performance. In particular, this is seen in Galco’s use of the same connectors and Flexalon swivel backplate that make the pro models move naturally with the body and adjust to any frame. To boot, the Classic Lite is about as comfortable as all-leather shoulders come. Thank center cut steerhide for this.
The shoulder holster system comes complete with holster, harness, and a magazine ammo carrier. The original model previously only had one magazine pouch, but since the introduction of the improved 2.0 model it now has two. It’s also available in right- and left-hand draw configurations. The holster proper features a level-2 retention system—a metal button thumb snap—which keeps your pistol secure until you need it. Carry angle is strictly horizontal, which conceals well and draws fast.
Gould & Goodrich Gold Line Shoulder Holster
Specs
Material: Genuine Leather Carry Angle: Horizontal Spare Ammo Carrier: Double Mag Pouch Hand: Left or Right MSRP: $187.99 Website:gould-goodrich.com
Pros
Quality, durable leather
Wide shoulder straps distribute weight well
Cons
Limited number of gun model fit options
Gould & Goodrich is known for its duty-grade holsters and accessories. But if you’re aiming to go top-shelf with a shoulder holster and price isn’t a barrier, then it’s difficult to do better than the company’s Gold Line. The rig is the whole nine yards. Especially impressive is the quality of the leather. It’s thick enough to stand up to any punishment you can dish out. But it doesn’t wear heavy, with ample shoulder straps distributing the system’s weight.
Designed to move with you, a four-point back swivel keeps the rig in place even if you happen to be moving at a full sprint. A thumb break retention system secures your handgun and dual magazine carrier keeps plenty of ammo on tap. About the only knock on the shoulder holster, it’s only available for a relatively small selection of handguns—Beretta, Glock, Sig Sauer and Smith & Wesson semi-automatics.
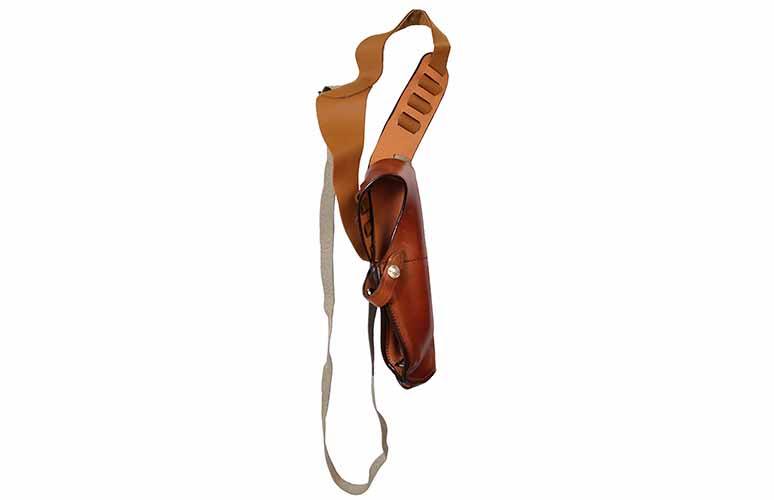
Bianchi Model X15 Vertical Shoulder Holster
Specs
Material: Full Grain Vegetable Tanned Cowhide Carry Angle: Vertical Spare Ammo Carrier: No Hand: Left or Right MSRP: $174 Website:bianchileather.com
Pros
Perfect for larger hunting handguns
Vertical angle helps conceal larger handguns under a jacket
Cons
Can’t accommodate scoped handguns
Vertical angle means a slower draw than a horizontal model
Carry big iron? Bianchi has a shoulder holster to keep it in check. While there are configurations to handle more moderately sized handguns, the X15 is fully capable of tending up to an 8-inch barrel behemoth and competently so. In turn, the Bianchi shoulder rig makes an excellent choice for your next handgun hunting adventure.
Made from full-grain, vegetable-tanned cowhide, the rugged holster has a touch of elegance—nice since it’s the type you don’t need to keep undercover. A wide X-style harness does a solid job of distributing the weight of a heavy gun, making it overall easier to carry. And the shoulder holster keeps your gun where it needs to be, with a dual spring design. It also offers more security when needed with secondary retention strap. An amazingly consistent presentation, the X15 always puts your gun where you need it. However, it is strictly a vertical draw affair and doesn’t feature a configuration to handle scoped guns.
Uncle Mike’s Sidekick Vertical Shoulder Holster
Specs
Material: Cordura Nylon Carry Angle: Vertical Spare Ammo Carrier: No Hand: Right MSRP: $45.95 Website:unclemikes.com
Pros
Fits large hunting handguns
Lighter than leather
Very affordable
Cons
Bulky, not great for concealment
Right-hand draw model is only option
Rummage around the holster market for any amount of time, you soon learn nylon holsters are often suspect. The Sidekick is a decided exception. The rig is well built, gives you excellent access to your handgun and lightens your load. That last point, weight, is among its greatest benefits, given the shoulder holster is comparatively featherlight. Since it can handle some of the largest firearms on the market, the Sidekick is a top candidate to take on the hunt. It’s also extremely budget-friendly, so you won’t weep if you beat it up. The standard model cannot accommodate a scope, but Uncle Mike’s has a variant for scoped handguns available as well.
The rig is completely adjustable to body-frame size and features belt anchorages, keeping the system tight as a drum. But it’s purely a vertical draw system and bulky. If you picked it for concealed carry, you might have difficulty keeping it from printing. Despite this, for a rough-and-tumble entry-level hunting rig, it’s among the tops.
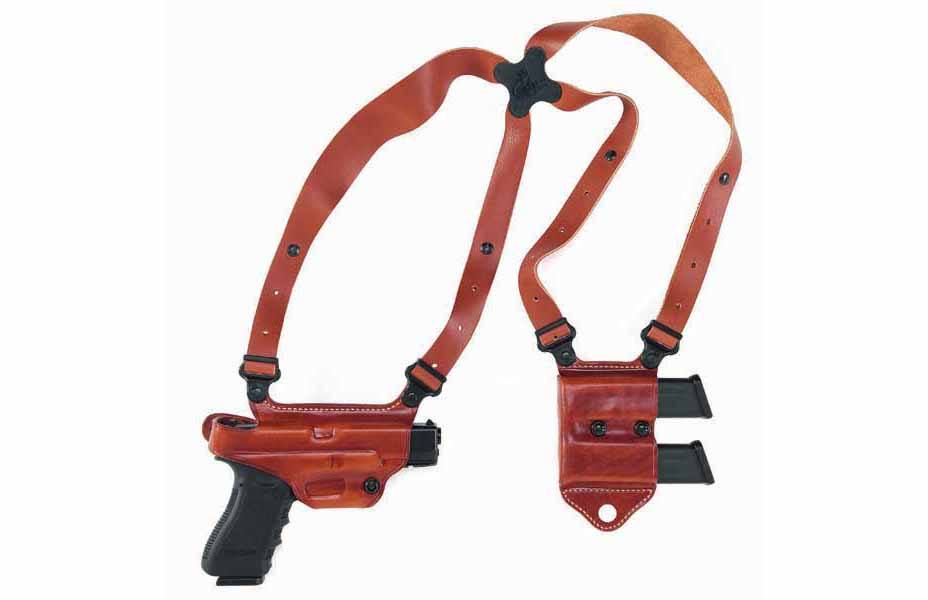
Galco Miami Classic II Shoulder System
Specs
Material: Premium Steerhide Carry Angle: Horizontal Spare Ammo Carrier: Double Mag Pouch Hand: Left or Right MSRP: $329 Website:galcogunleather.com
Pros
Excellent quality leather
Spare mags are held by retention instead of straps allowing faster retrieval
Cons
Expensive
It’s difficult to pick the Miami Classic II over the original—after all the earlier iteration is an absolute classic. But for the modern armed citizen, the new twist on the iconic system has a refinement that provides a major advantage—its magazine carrier. An open-front design, the carrier puts your spare magazines right at hand, picking up the pace of reloads. A good thing, indeed.
Practically everything else remains the same on the shoulder holster, including Galco’s top-end leather, dynamic spider harness and fully adjustable strap system. Like the Miami Classic, the II is a straight-up horizontal carry rig, which does an exceptional job concealing a firearm. But if you carry a full-sized firearm, and are smaller framed, it can prove ungainly.
DeSantis New York Undercover
Specs
Material: Top-grain Cowhide Carry Angle: Horizontal Spare Ammo Carrier: Double Mag Pouch Hand: Left or Right MSRP: $220.99 Website:desantisholsters.com
Pros
Very adjustable system enables comfortable carry
Holster placement allows for fast and intuitive draw
Cons
Expensive
A true classic in every sense of the word, the New York Undercover shoulder holster has defined the style of carry since the 1970s. It looks the role and has only gotten better over the past four decades. Particularly in the comfort department. Wide shoulder straps on the DeSantis rig do an incredible job of distributing weight evenly, making it an ideal option for heavier handguns. At the same tick, the system offers full range of motion, making it an ideal holster for those on the move.
Equally as convenient is the NY Undercover’s adjustment system. All four straps are independently adjustable, allowing the shooter to tailor the fit exactly to their frame and the position of both gun and support-side equipment (mag or cuff holders available). Drawing is fast and intuitive as well. Horizontally situated, the premium saddle leather rig presents the butt for a perfect high grip and natural break of the retention strap. The only nit to pick on the DeSantis shoulder holster is its price tag. But it’s a time-tested system, quality made and worth every penny.
Versacarry Shoulder Holster Deluxe
Specs
Material: Vegetable-Tanned Water Buffalo Leather Carry Angle: Horizontal Spare Ammo Carrier: Double Mag Pouch Hand: Right MSRP: $357.99 Website:versacarry.com
Pros
Only model on list that can accept pistols with red dot sights
Water Buffalo hide resists moisture better than other leathers
Cons
Only available for right-hand draw
Expensive
Versacarry crashed the holster scene with some true head-turning hybrids some years back. Since it’s turned its attention to building a better mousetrap when it comes to the good old shoulder holster. By all measures, the company has wildly succeeded with a rock-solid system that not only wears comfortably but also might be among the most attractive rig on the list.
Water buffalo hide is what Versacarry is known for, supple leather that nonetheless is tough as cut nails. It fairs well in a shoulder rig. Wide-cut straps disperse the weight of the system evenly over the shoulders and resist stretching over time while the Level 2 hanger doesn’t chafe under the arm. To boot, water buffalo hide does a good job resisting moisture, thus offers a level of protection to your firearm. The shoulder holster anchors firmly to the belt and comes with two magazine holders, compatible with both single- and double-stack magazines. The only knock, the holster is only available for right-hand draw.
HOLSTER
MATERIAL
CARRY ANGLE
SPARE AMMO
HAND
MSRP
Galco Classic Lite 2.0
Premium Center Cut Steerhide
Horizontal
Double Mag Pouch
Left or Right
$158
Gould & Goodrich Gold Line
Genuine Leather
Horizontal
Double Mag Pouch
Left or Right
$187.99
Bianchi Model X15
Full Grain Vegetable Tanned Cowhide
Vertical
No
Left or Right
$174
Uncle Mike’s Sidekick
Cordura Nylon
Vertical
No
Right
$45.95
Galco Miami Classic II
Premium Steerhide
Horizontal
Double Mag Pouch
Left or Right
$329
DeSantis New York Undercover
Top-grain Cowhide
Horizontal
Double Mag Pouch
Left or Right
$220.99
Versacarry Shoulder Holster Deluxe
Vegetable-Tanned Water Buffalo Leather
Horizontal
Double Mag Pouch
Right
$357.99
For more information on concealed carry holsters check out:
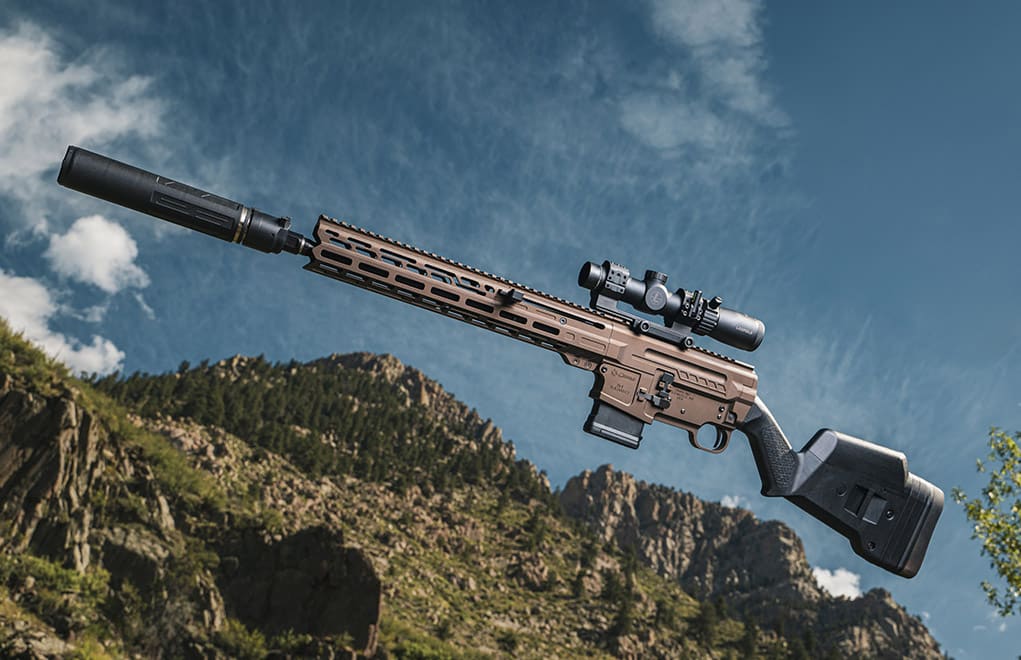
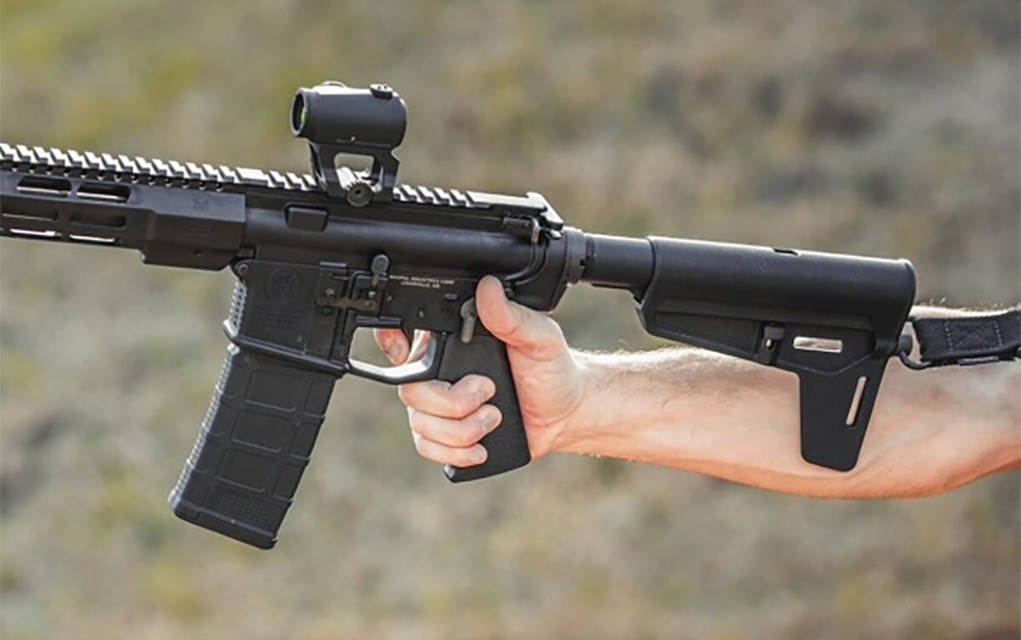
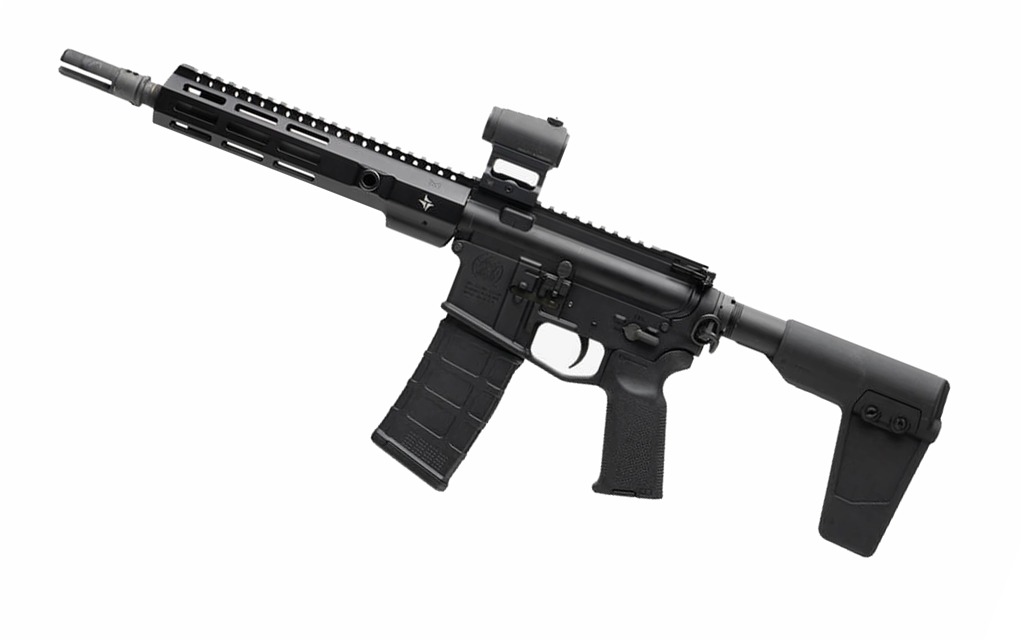
CMMG has just announced the DISSENT Br4, a line of 47-state-compliant AR rifles that feature Remington 870-pattern stocks.
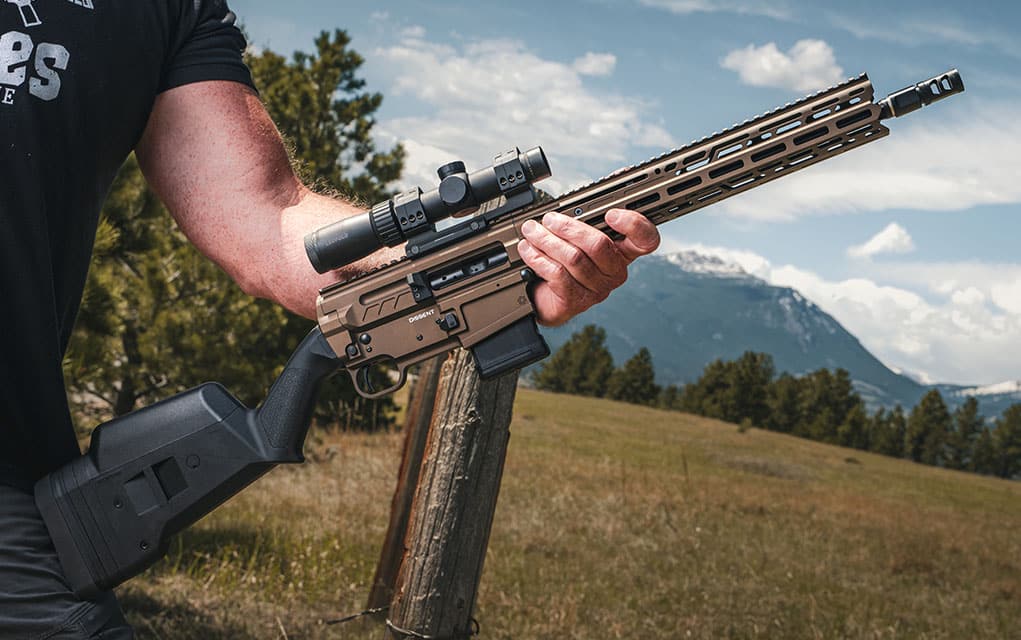
The AR-15 is America’s rifle, but some states unfortunately have restrictions that prevent or limit their ownership. In response, CMMG decided to create a rifle that they describe as “more ban-proof,” and the result is the DISSENT Br4 line. The Br4 is essentially a new lower receiver design that uses Remington 870-pattern stocks and is compatible with CMMG’s Mk4 DISSENT upper groups. These use the company’s Compact Action which eliminates the need for a buffer tube system and enables the use of 870 stocks, resulting in AR-style firearms that have ergonomics like traditional rifles and that can be sold in 47 states.
Dissent Br4 rifles feature reversible non-reciprocating side charging handles, reversible cross-bolt safeties, adjustable gas blocks, free-floated M-LOK handguards and ZEROED single-stage triggers. The mag release is also extended and ambidextrous, and the rifles are available in several Cerakote colors. The line is initially being launched with seven chambering options, including 5.56 NATO, .300 BLK, 9mm, .350 Legend, 6.5 Grendel, 6mm ARC and 22 ARC, but more calibers are expected to be released in the future. All caliber options are available with a 16.1-inch barrel, but some have a 14.5-inch pin-and-weld option as well. The standard 16.1-inch models also have threaded barrels and muzzle brakes, but the 9mm, .350 Legend, .300 BLK and 5.56 models are also available non-threaded for states where that isn’t allowed.
CMMG CEO Chris Reinkemeyer said this about the new rifles:
With the AR platform under constant attack, we knew there would be a time that we’d need a to do something for people to have a capable rifle behind the enemy lines of more restrictive states and municipalities. With this in mind, we started looking into designs for this many years ago. The introduction of our compact action in our DISSENT lineup made this possible since we no longer must stay within the confines of a buffer tube operated system. We hope the Br4 allows many doors to be opened for people that have had that door closed on them.
Each DISSENT Br4 rifle ships with a Magpul SGA stock and two 10-round magazines. All models share an MSRP of $1,899.99 and they’re available now.
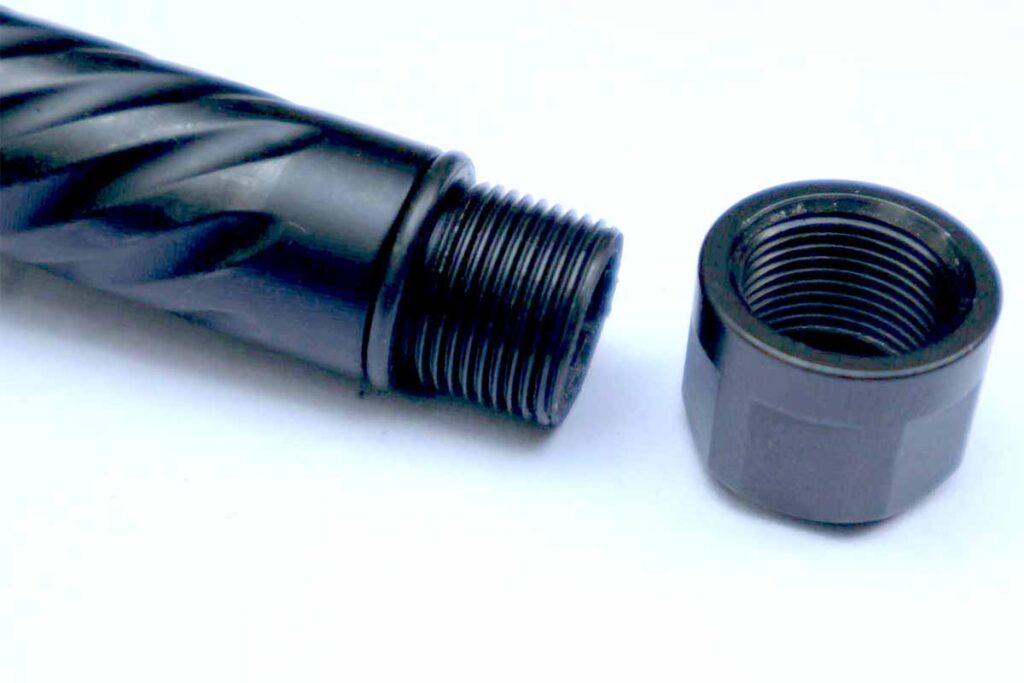
We run a Ballistic Advantage Pistol Barrel in a Glock and Glock clone to see if it perfects perfection.
Gun culture is rife with extra doodads and whatsihoozits; some of them useful and others useless. Allow me to explain why an aftermarket barrel falls into the former category.
First and foremost, the component potentially offers greater accuracy than your stock barrel—the case with the new Ballistic Advantage Glock 19 barrels I tested.
Secondly, barrel upgrades may offer some more desirable features compared to what came in your gun. This is especially true if you live in a state that allows suppressors or as I like to call them, “whisper pickles.”
Finally, there’s there is plain old vanity—you want a cooler-looking pipe for your pistol.
Suppressor-Ready Pistol Barrels
Many if not most consumer-grade pistols come with an unthreaded barrel for one of two reasons. First off, it’s illegal in some states, but mostly it’s due to the machining required for fluted/spiral fluted/dimpled/etc. barrels and the machining required for threading. In short, it’s more expensive and would drive the cost of the pistol up. It’s basic economics.
Ballistic Advantage Pistol Barrel Specs
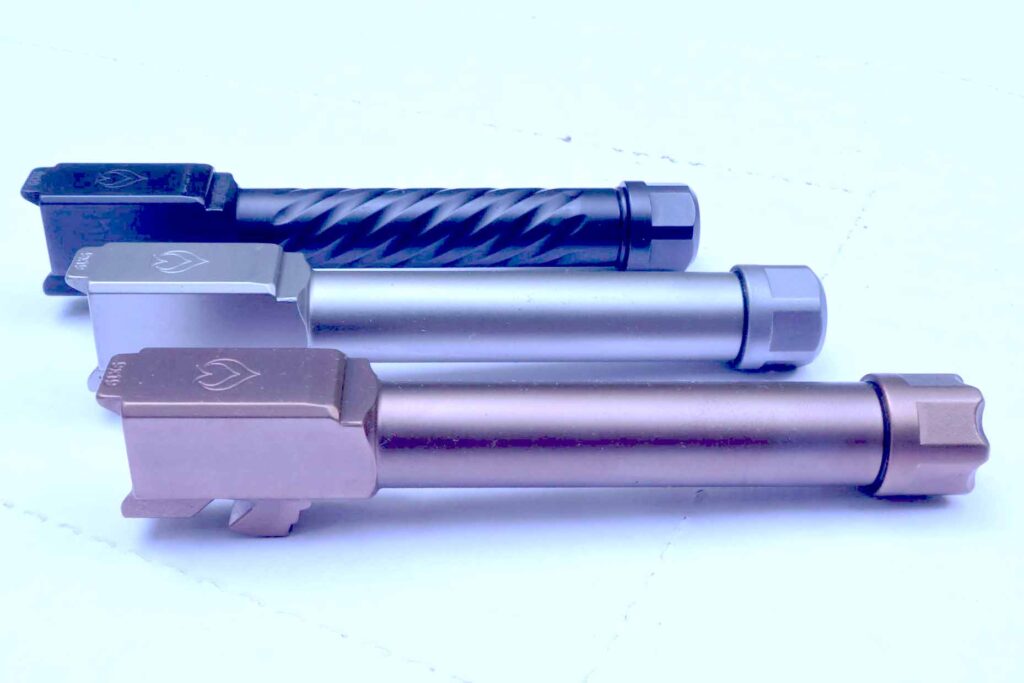
Ballistic Advantage barrels come in a variety of finishes, from oil slick to copper to QPQ and DLC, and are made of 416R hardened stainless steel. The twist rate is 1/10”, meaning for this gun, you will get almost a ½ rotation before the bullet exits the barre
The finishe on the barrels are fantastic and available in whole bunch of different styles.
The barrels are fluted, standard, or “bomber” style, with complex machining all over. Barrels tip the scales at just around 3 ounces, and sports either a standard or aggressive “skull crusher” thread protector, in addition to an O-ring. Below is a picture of the two pistols and factory ammo used for data collection.
The barrels are tumbled at Ballistic Advantage and then sent out for PVD treatment (for the colored options) and QPQ for the black nitride option.
Ballistic Advantage Pistol Barrel Fit And Finish
The fit and finish on these aftermarket barrels are remarkable, as is their packaging. They come in a nice foam-lined box, with a piece of clear plastic encasing the barrel. It reminds me a bit of Apple packaging, in that even the box tolerances are tight and it takes some jiggling to get the barrels free. The barrels also fit snugly into both a stock Glock and MR920. The stock Glock barrel undoubtedly has more “slop” than the Ballistic Advantage barrel.
The finishing on these barrels is fantastic, with the colors being true-to-name. The copper is legitimately copper, gray is gray, and the black DLC is a deep black. These barrels also come with very nice thread protectors in both a standard thread protector with an O-ring, or what they call a “Skull Crusher” which is a thread protector with some aggressive machining on the end. The copper barrel pictured below has a “skull crusher” thread protector.
Direct mount suppressors thread on cleanly and smoothly, as they should, and stay affixed. There isn’t any grit like with some threading that is as cleanly machined.
Why BA Started Making Pistol Barrels
Adam Wainio, President of Ballistic Advantage, gave the writer some insight as to the “why” behind jumping into the pistol barrel market.
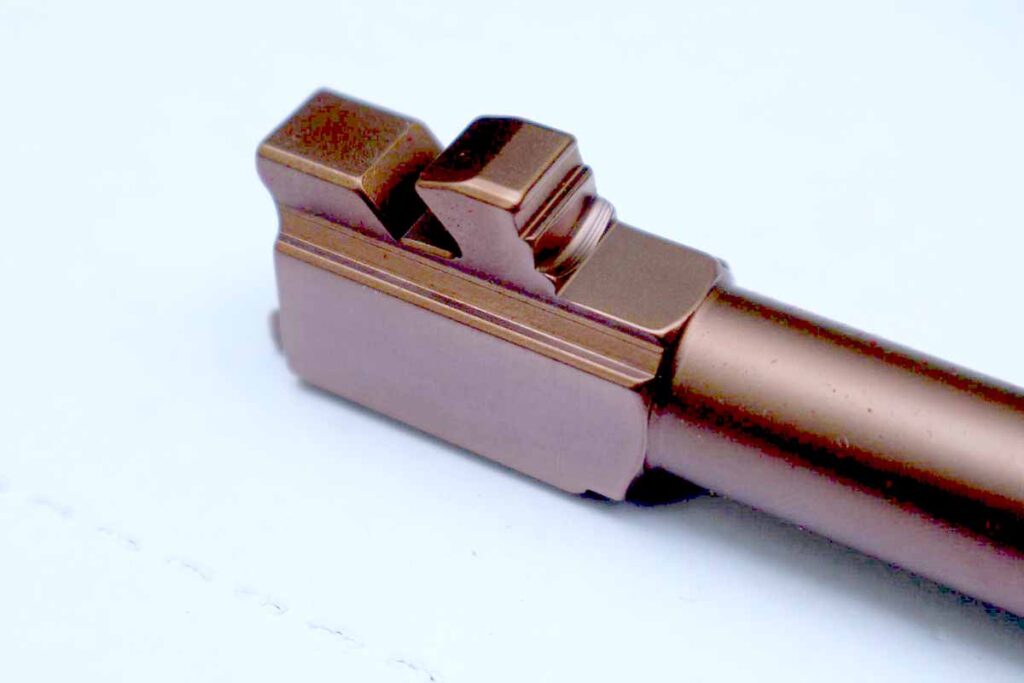
The BA barrels interface with Glocks and Glock clones seamlessly.
“We didn’t just want to simply offer another barrel to market. It was imperative there had to be a functional improvement. As we were doing market research, and 3D scanned a large variety of barrels, we were very surprised to see a drastic difference in tolerance between each brand, especially when compared to factory [barrels].
“We decided to stay true to Glock’s design while optimizing certain angles. The most obvious expression is the chamfered corners and increased angle of the breech hood. This design prevents the normal wear you see on a factory barrel, resulting in a more consistent breech unlocking and locking,” Wainio explained.
His explanation is in line with the basic accuracy testing conducted.
“We kept hearing about the necessity to follow a break-in process with a new aftermarket barrel before the gun would cycle reliably,” Wainio said. “This was shocking to me, for a customer to obtain some of the other desired features, such as threading and or fluting one would have to remove a perfectly reliable factory Glock barrel, and then introduce a less reliable optional. It was crucial to us that our barrel was drop-in ready, and reliable from day one, all while offering other features such as flutes and threading.”
Ballistic Advantage Pistol Barrel Accuracy
I tested these Ballistic Advantage barrels on two different platforms to collect data for this article.
For testing, I have data against a Glock 19 Gen 4 with a stock barrel and a Shadow Systems MR920 unthreaded barrel and RMR mounted. Admittedly, the Ballistic Advantage barrels are roughly a half-inch longer than the stock pipes. All shots were taken from a Caldwell pistol rest at 10 yards.
Pre-threaded, the BA barrels are suppressor ready.
I used 4 types of ammo: 2 factory loads,147 Grain PMC and 147 Grain Winchester Target (admittedly it was slim pickings at my local gun shop). I also tested against my 147-grain flat point reloads using Boudreau’s bullets loaded with 3.1 grains of Winchester 244, and 125 grain round nose polymer coated bullets with 3.5 grains of Winchester 244.
A series of 5-shot groups were fired at the targets, and the types of ammo were noted. The Shadow Systems MR920 boasts a match-grade barrel, and this particular barrel has between 5,000 and 10,000 rounds through it. The Glock 19 barrel has likely less than 2,500 rounds. The Ballistic Advantage barrels were tested brand new.
The results are pictured below.
Ammo
Pistol
Stock Group (Edge to Edge in inches)
BA Barrel Tightest Group in Inches
Delta Gain (Stock vs BA) in Inches
147 Grain PMC Bronze
Glock 19 Gen 4
2.4
1.66
.74
147 Grain Winchester White Box
Glock 19 Gen 4
1.54
1.29
.25
147 Grain FB Handload
Glock 19 Gen 4
2.7
1.7
1
125 Grain RN Handload
Glock 19 Gen 4
3.39
1.25
2.14
147 Grain PMC Bronze
Shadow Systems MR920
2.17
1.52
.65
147 Grain Winchester White Box
Shadow Systems MR920
1.48
2.03
.53
147 Grain FB Handload
Shadow Systems MR920
1.54
2.09
-.55
125 Grain RN Handload
Shadow Systems MR920
1.75
1.57
.18
Ballistic Advantage Results
As you can see from the results, by and large, the threaded Ballistic Advantage Barrels have much better accuracy for all types of ammo involved—from factory 147 PMC and Winchester to reloads for plinking. The Winchester had the best overall accuracy, with the 125-grain reloads being the worst performer. That said, if you remove a flier here and there from most of the accuracy results, some groups were as small as .5 MOA, with plenty of shots linking on target. In only two instances was the Ballistic Advantage barrel outperformed by a stock barrel (highlighted in bold).
Ballistic Advantage Barrel Price
You can snag a Ballistic Advantage pistol barrel for between $150-$225, but Ballistic Advantage/Aero/Stag Arms (all the same ownership) do have sales very often.
The company makes barrels for four different Glocks (and their clones): The subcompact Glock 26, Compact Glock 19 (tested), Full Size Glock 17 and Practical/Tactical Glock 34. In addition, it has a line of Sig Sauer barrels for the P365 and P320, if you shoot a plastic fantastic other than a Glock. Additionally, they have a blemish sale at the time of this writing, so you can score one for likely cheaper than outlined above.
Parting Shot
For the price point, Ballistic Advantage Glock pistol barrels are good to go. They are finished well, machined cleanly, and wildly accurate due to the tight tolerances. Also, the customer service is second to none: I got a barrel that was not performing, and they replaced it immediately. Since then, all these barrels have performed wonderfully. They come in a variety of colors and configurations, both threaded and non-threaded, and are ready to take a stock gun to the next level or add a bit of flair for your “freedom seeds” to your most recent build.
We discuss different kinds of body armor, NIJ rating levels and the best Level 4 plates on the market.
Whether you’re a tactical gear enthusiast or an armed guard or police officer who must supply their equipment, you’ve probably heard that Level 4 plates are what you should get.
We’re going to tell you why, what different levels and features mean and then look at the best types of Level 4 plates (or Level 4 body armor) to buy.
We’re also going to explain why you need to pay close attention to what the various companies selling body armor say about their products. A lot of people have been sold a tactical pig in a poke, so you might as well get the real deal.
What Is Hard Armor?
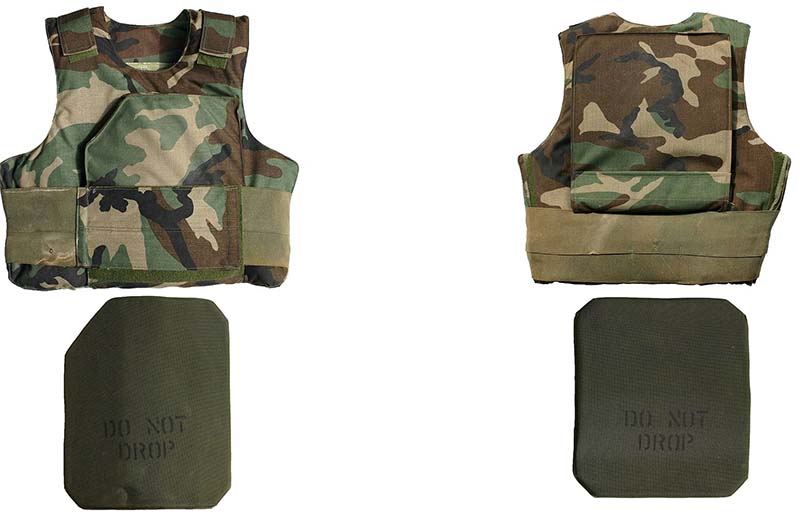
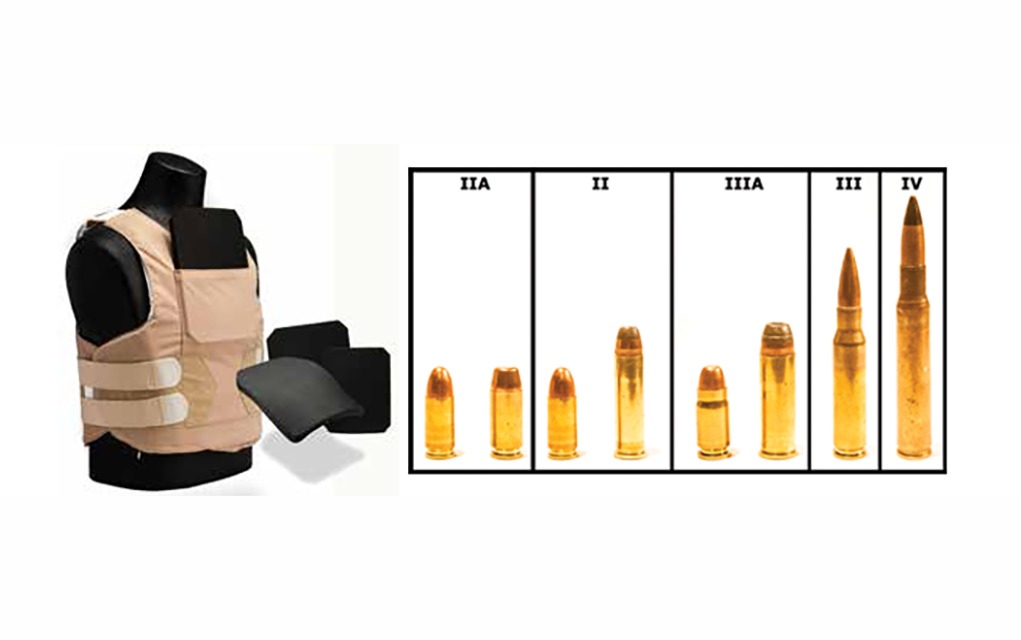
Hard armor employs plates made of rigid materials, such as ceramic or (less desirable) steel. These plates are usually worn in a plate carrier over clothing, protecting the vital organs on the front, back, and sometimes the sides. In contrast, soft armor is made from woven materials like Kevlar slow and stop bullets from penetrating.
Early Ranger Body Armor (RBA) and their ceramic SAPI plates. Photos: Wikipedia.
Generally speaking, hard armor is effective against high velocity threats, such as rifles, while soft armor can only stop low-velocity projectiles, such as handgun fire. This makes sense, given hard armor was developed for and initially used by the military. Though, through the years plate armor has tricked its way into law enforcement and civilian use, each seeking greater protection.
Body Armor Legalities
Federally, body armor is legal to own and use for anyone over the age of 18 who has not been convicted of a felony. Be aware, however, that some states have passed or attempted to pass laws restricting body armor. If you’re in the market, it pays to keep up to date with your local laws.
For instance, in Connecticut, body armor can only be sold or bought in person, and New York has outlawed the purchase of body armor except for certain approved professions. Further, most states also have laws prohibiting the use of body armor while committing a crime.
Hard Armor Material
There are three general types of materials that hard armor is made from:
Metal
Ceramic
Polyethylene
Metal Body Armor
Metal body armor plates are usually made from steel, but titanium armor exists. Steel plates are generally the cheapest of all types of hard armor but are so for a reason. Armor made of AR500 steel, for instance, can be defeated by certain loads of high velocity 5.56. When struck by a bullet, it also creates spall, tiny fragments of metal that fly away from the impact.
To minimize this, steel plates are usually coated in a truck bed liner-like material designed to catch spall. It doesn’t always do so which can prove dangerous.
Steel is, of course, also very heavy. You won’t have fun if you have to wear it for any length of time, especially if you’re moving.
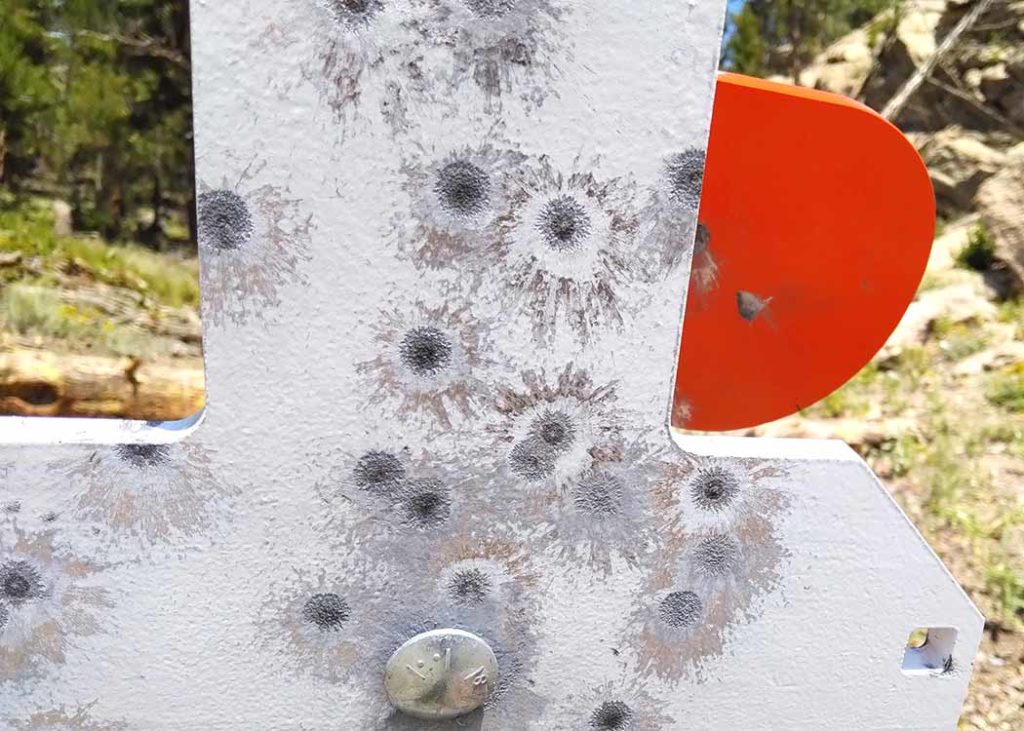
Ever shot a steel target from too close and caught a bit of spall flying back at you? Now imagine wearing it on your chest and having those fragments shooting up into your neck instead. That’s just one reason why professionals don’t use steel armor.
Ceramic Body Armor
Ceramic armor plates are typically made of boron carbide. Quality ceramic plates offer better protection against high-velocity projectiles and don’t have the same problem with spalling.
They’re lighter than steel but also more expensive, although they have been getting consistently more affordable as body armor has become more popular. SAPI/ESAPI plates, the ones issued by the U.S. military, are ceramic. That is a big, big clue about what kind of plates you should buy if you want the best protection.
Polyethylene Body Armor
Poly armor plates are made of polyethylene, specifically Ultra High Molecular Weight Polyethylene (UHMWPE). They are lighter than steel, but generally also bulkier and tend to fare worse than ceramic armor against high-velocity rifle bullets and anything with an armor-piercing projectile.
Some companies also make hybrid armor using a composite of these three materials.
Keep in mind that some hard armors are intended for use in conjunction with soft armor or a plate backer to get the best protection possible. Make sure you look closely at the fine print of whatever plate you’re looking at.
NIJ Certification And How “Level 4 Armor” Might Not Be Level 4
The NIJ, or National Institute of Justice, tests body armor and certifies it for absorbing a particular threshold of abuse by bullets. NIJ testing and certification in and of itself is a very complex topic with plenty of nuances, but we’ll try to give you the basics.
The NIJ standards determine whether a particular piece of armor will defeat a specific threat. For instance, to be rated Level 4, armor plate must stop a .30-06 armor-piercing (M2 black tip) round. You can read more about the levels here, but the short answer is Level 4 is the highest tier and will offer the greatest protection. The NIJ has the testing done by certified third-party laboratories, with tests repeated six times over five years.
The levels are officially called IIA, II, III, IIIA, and IV, but they’re commonly written using standard rather than Roman numerals when discussing them. There is no NIJ+ rating. That’s just a marketing term like Corinthian leather.
After five years, any make and model of plate must be recertified.
Here’s something else you need to know.
Not every armor manufacturer actually submits products to the NIJ, they just replicate the test…or perform their version of it. So, just because somebody says their body armor is Level 4, it doesn’t mean it is.
To save yourself the trouble of worrying, here’s the NIJ’s list of compliant body armor manufacturers and their products that are (or have been) rated by the NIJ.
The best practice is that if body armor is not certified by the NIJ, don’t buy it. Do not take the manufacturer’s word for it. Look it up for yourself and verify.
That said, just because a certification is inactive doesn’t mean it isn’t quality armor. The manufacturer has just elected not to re-certify, usually because the product is being updated into a new version.
Body Armor Plate Cuts & Other Considerations
If you’ve picked up what the last section was laying down, you should understand that to get the best protection possible you’re going to need NIJ-certified ceramic Level 4 plates. There are other factors to consider like the plates’ size and shape.
Body armor plates come in different sizes, and you’ll need to pick a size that is large enough to cover your vital organs without being so big that it inhibits your movement. A widely accepted guideline for that is your plate should span horizontally from nipple to nipple and vertically from your suprasternal notch to just above your belly button.
Diagram showing properly-sized body armor and the organs it should cover. Photo: Hesco.
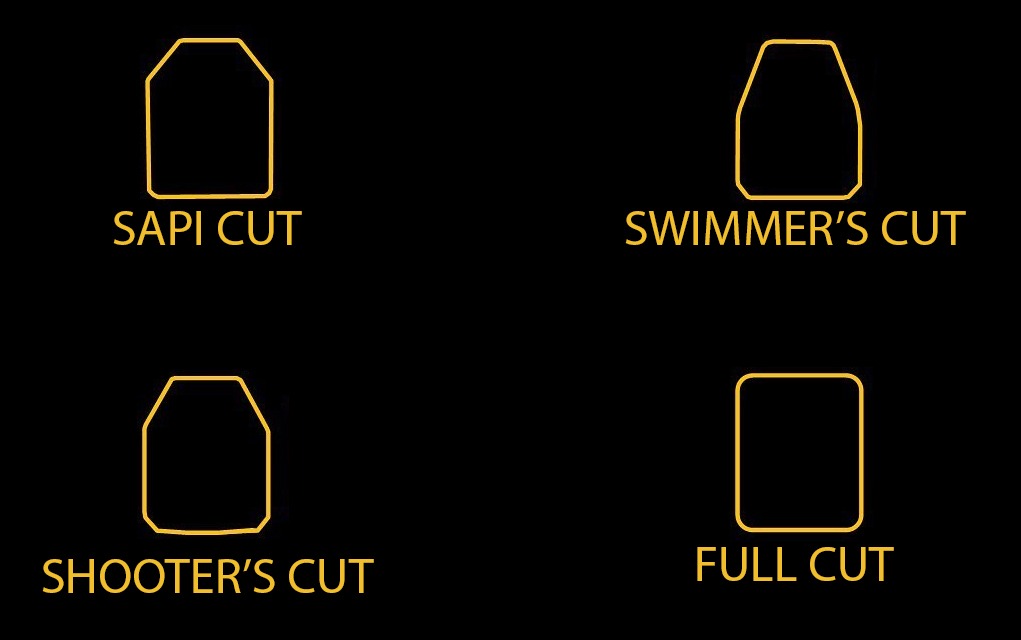
Body armor plates have different cuts, and each style offers a balance between coverage and shoulder mobility. The four most popular shapes are the Full Cut, Swimmer’s Cut, Shooter’s Cut, and the SAPI (Small Arms Protective Insert, the one specified by the U.S. military) Cut. The exact dimensions of each cut may vary between manufacturers.
Full Cut: A rectangle or square with rounded or chopped corners. This gives you the most coverage but is most likely to impede upper body movement, though it can be dealt with.
Shooter’s Cut: A chamfered Full Cut plate, cutting the top few inches of the corners at a 45-degree angle to free up a little more room for arm movement or shouldering a rifle.
Swimmer’s Cut: Similar to the Shooter’s Cut but it increases that taper, freeing up even more room to move the arms while sacrificing a little more coverage. It may be enough of a reduction that the tops of your vitals could be exposed.
SAPI Cut: Specified by the military, is very similar to the Shooter’s Cut but has less generously cut corners and provides a little more coverage.
Most people find a SAPI or Shooter’s Cut strikes the right balance, but some prefer the easier movement of a Swimmer’s cut. It’s also not uncommon at all for somebody to use a SAPI or Shooter’s Cut plate in the front and a Full Cut plate in the back.
Additionally, Level 4 plates from different manufacturers can have different thicknesses and weights, something else to pay attention to when considering what will best fit your needs. When all things are equal protection-wise, thinner and lighter is always better, but those plates are going to cost more.
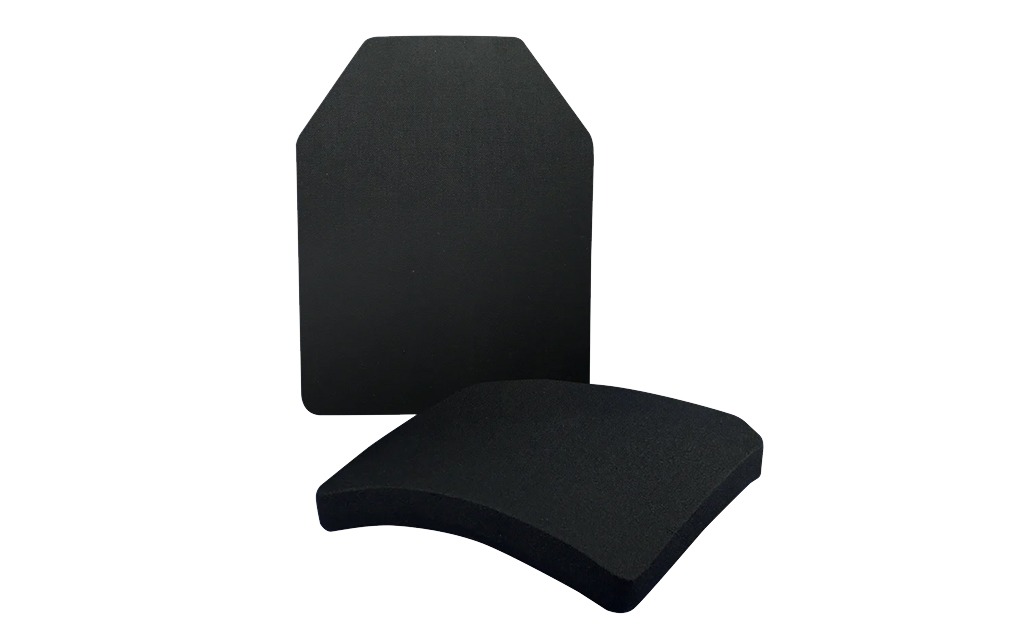
The final hard armor plate feature to remain aware of is single-curve versus multi-curve plates. In a nutshell, multi-curve plates are more comfortable, but are also harder to manufacture and therefore more expensive. If you want maximum comfort, it’s probably worth shelling out the extra money. But single-curve plates work perfectly fine for most people too.
How We Made Our Picks
There’s a lot of good body armor out there, including models not listed here, but it wasn’t too hard for us to narrow our favorite picks down to these five options. All of these are currently NIJ-certified ceramic Level 4 plates from a variety of trusted, reputable manufacturers. They vary mostly in features such as their cut and size options and details like weight and thickness. Once you pick the plates you want, just ensure that whatever plate carrier you buy is sized correctly to accommodate them.
The 5 Best Level 4 Plates:
Most of these Level 4 plates are available in different sizes and cuts, so we’ll be using specs for the medium-size SAPI Cut option whenever possible for the sake of consistency. Further, some of these plates appear to only be sold in sets of two, so we will be calculating the cost of a single plate when listing each price.
ARMOR
Size/Cut
NIJ Certified?
Thickness
Weight
Price
Hesco 4601
9.5×12.5″ SAPI Cut
Yes
1.18″
6.6 lbs.
~$553
Velocity Systems PSA Stand-Alone Level IV
10×12″ Shooter’s Cut
Yes
0.75″
6.8 lbs.
~$305
LTC 26605 Level IV Multi-Curve Plate Set
9.5×12.5″ SAPI Cut
Yes
1″
7.5 lbs.
~$360
TenCate Cratus 5200 Level IV Multi Curve Plate
10×12: SAPI Cut
Yes
1.3″
7.2 lbs.
~$700
Highcom Guardian 4s17m
9.5×12.5″ SAPI Cut
Yes
0.95″
8.2 lbs.
~$240
Hesco 4601
Specs (9.5×12.5″ SAPI Cut)
NIJ Certified Level 4: Yes, active Thickness: 1.18 Inches Weight: 6.6 Pounds Price Per Plate: ~$553 Website: hesco.com
Pros
Decent number of sizes and cut options
Good balance between weight and price for the quality
Cons
Expensive
Fairly thick
Hesco is as close to a no-brainer as it gets. They are a U.S. government supplier, and the 4601 is currently NIJ-certified Level 4.
It’s plates are available in a SAPI Cut with four size options or a Shooter’s Cut with two size options. The armor may be pricey, but it should offer excellent protection while being comfortable to wear thanks to the multi-curve contour. They are sold as either sets or as standalone plates depending on the retailer.
Velocity Systems PSA Stand-Alone Level IV
Specs(10×12″ Shooter’s Cut)
NIJ Certified Level 4: Yes, active Thickness: 0.75 Inches Weight: 6.8 Pounds Price Per Plate: ~$305 Website: velsyst.com
Pros
Thin and light
Relatively affordable
Cons
Only available in 10×12″ Shooter’s Cut
Velocity Systems produces quality tactical gear for LE and military personnel, including its line of hard armor plates. The PSA Stand-Alone Level 4 plate is a ceramic Level 4 plate with current NIJ certification.
The plate is only available in a 10×12-inch size with a Shooter’s Cut that’s a little steeper than most other options for better mobility. Velocity Systems doesn’t sell to civilians directly and instead sells them through retailers such as Brownells.
LTC 26605 Level IV Multi-Curve Plate Set
Specs (9.5×12.5″ SAPI Cut)
NIJ Certified Level 4: Yes, active Thickness: 1 Inch Weight: 7.5 Pounds Price Per Plate: ~$360 Website: ltc-ltc.com
Pros
Balance of protection, thickness and price
Decent amount of size and cut options
Cons
Heavy
Leading Technology Composites is one of the largest ceramic armor plate manufacturers in the world, and their 26605 plates are currently NIJ certified Level 4. Level 4 plates in a Swimmer’s Cut from a reputable manufacturer are not the easiest thing to find, so those looking for one will find few better options. They’re available with a SAPI Cut as well and come in several sizes.
The 26605 plates feature a triple-curve with a ceramic core, aramid fiber backing, Cordura cover and a foam-covered strike face.
TenCate Cratus 5200 Level IV Multi Curve Plate
Specs (10×12: SAPI Cut)
NIJ Certified Level 4: Yes, active Thickness: 1.3 Inches Weight: 7.2 Pounds Price Per Plate: ~$700 Website: integriscomposites.com
Pros
Size options, including side plates available
Cons
Heavy and thick
Expensive
The TenCate Cratus series is frequently white-labeled by other brands due to its incredible performance, and the 5200 series (model D1581) is currently NIJ-certified for Level 4 protection.
The Tencate Cratus 5200 Level IV Multi Curve Plate is a multi-curve SAPI Cut plate with a polyurethane cover. They’re available in seven different front/back plate sizes and have side plate options as well.
Highcom Guardian 4s17m
Specs (9.5×12.5″ SAPI Cut)
NIJ Certified Level 4: Yes, active Thickness: 0.95 Inches Weight: 8.2 Pounds Price Per Plate: ~$240 Website: highcomarmor.com
Pros
Great performance and thickness for the price
Affordable
Cons
Heavy
Only two size options
The Highcom Guardian 4s17m plate is a solid working man’s option in sets of two plates that are often under $500 and are frequently bundled with a plate carrier for less than $700.
Highcom plates are currently NIJ certified and are offered in five sizes of SAPI Cuts as well as one 10×12-inch Shooter’s Cut option, but all are multi-curve. If you’re looking for a turn-key option they’re hard to beat.
We pick top defensive handgun options for the less physically capable.
We aren’t all airborne-qualified. A lot of us can’t bench press our own weight. The bad guys know this, and preferentially target-select from those who aren’t likely to put up much of a fight. So, insisting that “the only proper self-defense cartridge starts with a four” is doing those among us who are less capable to handle that horsepower a disservice.
If you need an example, consider your grandmother. Even if you can convince her to choose a firearm, do you really think she’s going to appreciate the 9mm+P load you just handed her to try? And if you had her fire it out of the sub-compact pistol that’s “easy to carry” which you prefer, how many rounds will she put up with it?
Those of us younger, more fit, better trained, or some combination of those, can count on using something bigger. And if something bigger isn’t available, then the vigorous application of boot soles, fists and nearby objects can see you, me, the young and fit to something better. Again, that perhaps isn’t going to include your elderly relatives, who may likely be selected as an “involuntary donor” to the bad guy’s lifestyle support fund.
There’s also the matter of there not being an easy entry point. Your student or relative, elderly or not, might not have an experience with firearms at all. You may well find yourself at a range that offers rental guns and spend time just handling at the counter, before going in to try one. Don’t be surprised if a few rounds, or one magazine, later is all it takes to move on to the next choice. You’ll have to cultivate patience.
You also have to consider who is going to be using what you suggest, as far as how much enthusiasm they might put into what you might chose for yourself.
So, let’s consider some less-than-SEALs options.
Lose the Ego
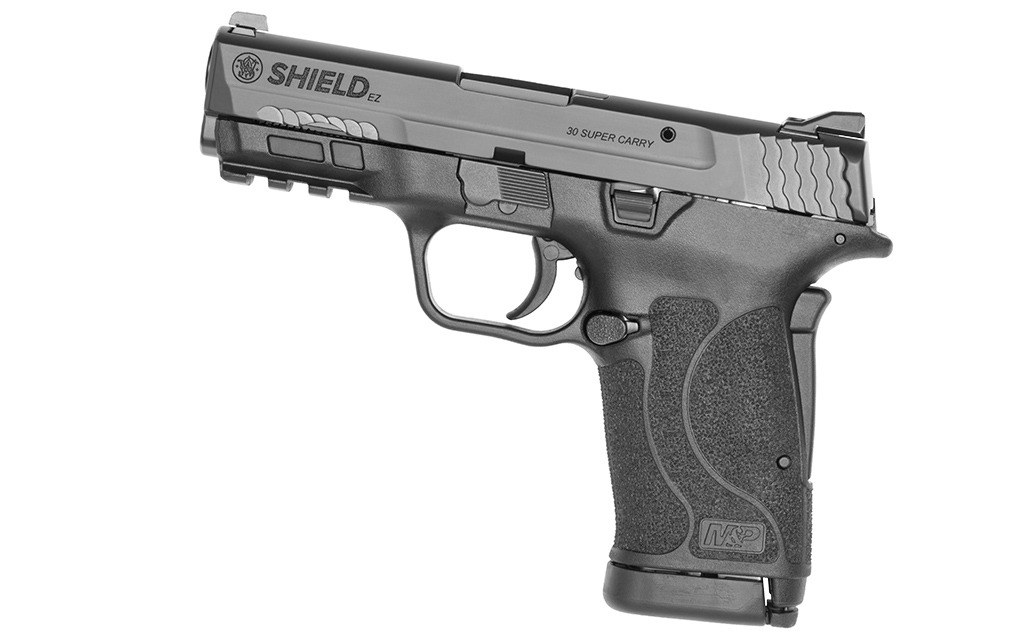
One modern choice is the Smith & Wesson EZ series. S&W made the EZ series for a particular purpose and exactly ours: an easy-to handle pistol. The slide is easier to rack than regular 9mm pistols. The magazines have an added tab that makes it easier to load the magazines. And, as long as you make sure to feed it soft-shooting 9mm loads, even grams be willing to give it a go.
You may have to put in some work yourself, carefully assessing what 9mm load seems softer or less loud than others to make it easier for her. The grip safety on the Shield adds a measure of ease of use and safety as well. The new .30 Super Carry in the EZ? Felt recoil of that new defensive cartridge is on par with that of the 9mm.
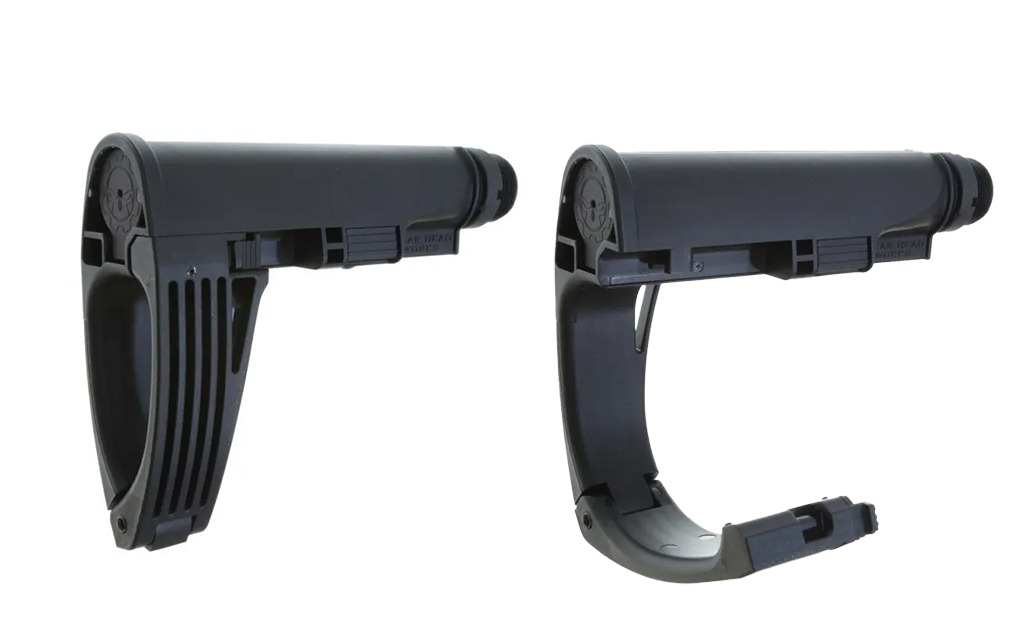
The S&W EZ series offers easier-racking slides and easier-to-load magazines.
Or, you can go with something smaller in caliber. The .380 is probably the smallest that you can tell your friends you gave your grandma and still not have them look at you with pity. A Ruger LC380 would be about as small as I’d go. Yes, smaller is less weight to handle, and less hassle, but if it’s so sharp to shoot that she isn’t going to shoot it … we’re back to not solving this problem.
So, the LC380 holds enough to be useful, is big enough that it won’t be too much to handle and yet still small enough that it isn’t seen as a cannon.
If pistols aren’t the thing, then revolvers. Again, don’t go with the smallest and lightest. A five-shot airweight revolver is one your student is likely to fire a few times, hand back to you and ask, “What else do you have?”
The trick with revolvers isn’t so much the caliber, but the grip size. Here, a round-butt design is much more likely to be comfortable. But not the Chief’s Special; it’s likely to be seen as both too small and light to shoot comfortably, with too heavy a trigger. A round-butt K-frame S&W would be the ticket here, or one of the Ruger LCRs for the easier trigger pull.
The snubbie airweight, with JHP+P ammunition, is a pro’s gun. So why press it upon grandma? Because it’s “the perfect gun” for you? That’s not a good reason.
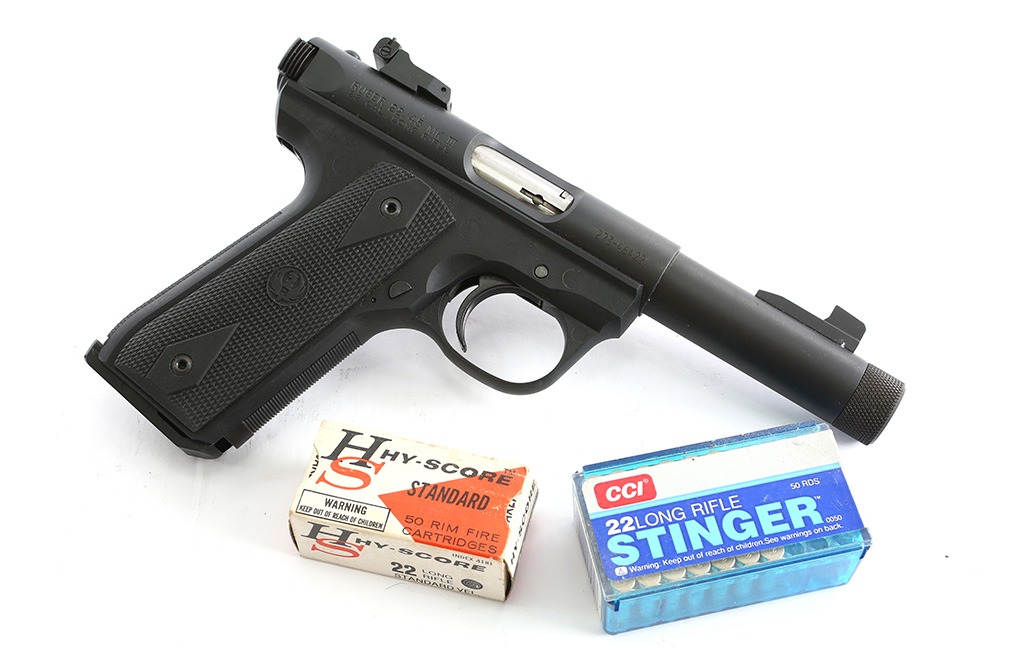
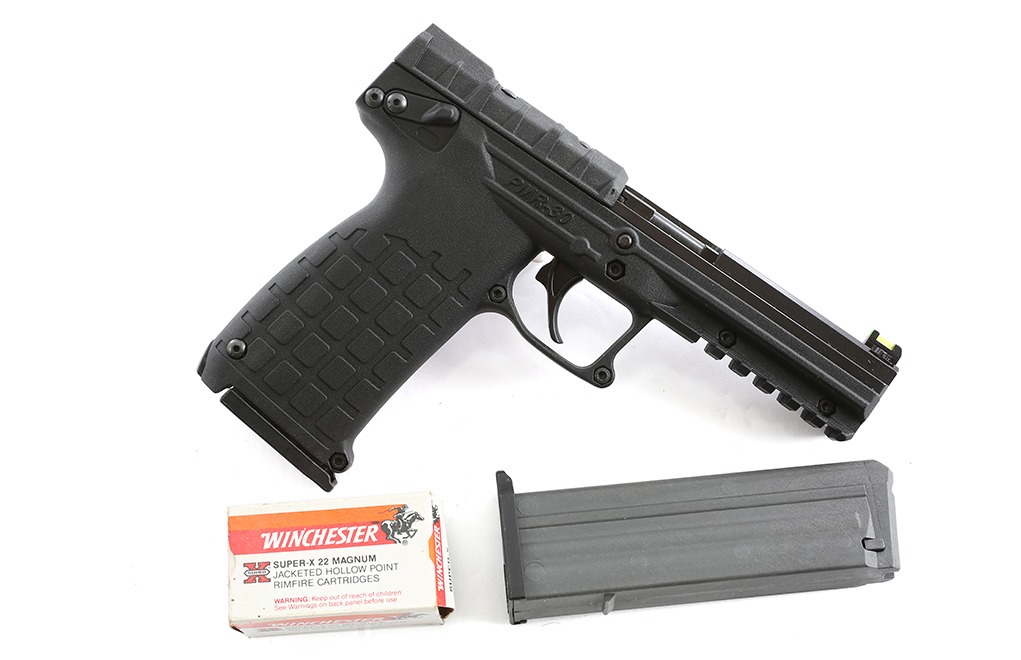
If you’re really struggling, or rather your grams (or Uncle Mort or whoever) can’t deal with a centerfire, then we can reluctantly consider a rimfire. You’ve got a few choices here, the Ruger Mark IV, in whatever size, material or grip color that makes the student say “I like that one,” or a KelTec, either the P17 or the PMR30.
The Ruger Mk IV, here in the 22/45 version, offers low-cost shooting, mild recoil and lifetime durability.
The Mark IV and the P17 are .22LR, and they have the advantages of being soft in recoil, not terribly noisy and inexpensive to shoot (a not-inconsiderable detail these days). The Ruger holds 10 rounds and the P17 holds 16. And as an added bonus for the P17, the MSRP is a mere $200, less than half the cost of the least-expensive Mark IV. The best part about the .22LR as a choice is that shooting a rimfire can actually be fun, even for the non-gun-oriented. If it’s fun, they’ll practice. (Or at least go to the range for plinking, which you’d be wise to not call practice.)
The PMR30 costs as much as the Mark IV, but it’s chambered in .22 Magnum, which adds a bit more velocity to the equation. It might add more noise than the speed is worth—that’s one reason to get to the range and do some experimenting. (Oh, excuse me, “fun range time” and see what your student likes.) The big advantage of the PMR30 is the magazine capacity: 30 rounds. The PMR30, in order to hold those 30 rounds, tends to be a bit larger than the Mark IV or the P17 in grip size, which might make enough of a difference that the P17 or the Mark IV would be the better choice here. But it’s hard to discount the sense of “oh, I have things under control” than holding a pistol that has 30 rounds in the magazine. Both the .22 LR and the .22 Magnum offer a much greater chance of the get-togethers being fun, and nothing makes learning easier than it being fun.
The KelTec PMR30, with an extra magazine, gobbles up an entire box of ammunition. That can be comforting in a stressful situation.
Ammo Really, Really Matters
We can’t consider defensive firearms for those less dedicated without considering the ammunition we’ll be putting in them. As stated, opting for a 9mm+P to make up for the “lack of stopping power” because it isn’t a .45 ACP isn’t going to work here. Grams isn’t going to use it or, if she does, she’ll use it reluctantly, poorly and ineffectively. So, we have to consider what you can get her to actually try and use.
In 9mm, that may be the softest-shooting ammo to be found, which might be 115-grain FMJ. “That’s no good, its stopping power score is miserable.” This is my story, and I’m sticking with it—remember our choices here. It would be far better for your student to learn to shoot with Winchester White Box (the default low-recoil, low-cost 9mm ammo to be found) and use it as the house-gun ammo than always have “something else to do” whenever practice time (excuse me, “plinking day”) comes up.
We’re gun people; we like to shoot. A lot of people see it as an onerous burden or, at the very least, a cost in time and effort that they simply have to do but won’t enjoy it much. I can’t stress this enough: The more enjoyable you make it, the less likely it is to be skipped.
If the 9mm is too much, then the .380 might do. The LC380 is about as small as you’d want to go, and if you can find an easy-to-rack .380 that’s bigger, start there.
In the smaller calibers, you have less of a problem over recoil, as the majority of .380 Auto ammunition isn’t exactly robust. You have to seek out the “hot” .380 loads. To that point, .22 LR is even more so, but here you can actually step up in power (admittedly by a small amount) and not have a problem.
For instance, if you start your learning time with some standard velocity target .22 LR and get your student to liking it, then they might not even notice when you add in some high velocity ammo. I’m thinking here of starting with CCI Clean standard and then adding in some Federal Punch. Send them home with a box of .22 LR Punch. Or the .22 Magnum, should you be using a KelTec, offers a similar path of progression.
Now, in the .38 Special revolver (you shouldn’t be thinking of any other caliber but this one—period, end of story), I have what might seem like a radical choice: wadcutters. No, they won’t expand. But they will retain full diameter and cut as clean a channel as possible. I’ve tested wadcutters, and the best are hard-cast ones, as the swaged are just a bit too soft for our needs. And they penetrate.
An all-steel .38 revolver isn’t going to kick much with wadcutters. Use what grip shape feels best and resist the temptation to “step up” to the JHP+P loads that experts prefer.
I have had hard-cast wadcutters, out of snubbies, doing a modest 600 fps, penetrate deeply enough in ballistic gelatin to satisfy the FBI requirements of more than 12 inches. I even tried a test shot through 3/8-inch plywood, and that round, after cutting a clean hole in the plywood, still did 12 inches of ballistic gelatin.
No, it isn’t a bonded-bullet LE-approved “wunderpellet.” It’s also easy to shoot, has low recoil and muzzle blast, and is going to be accurate. A bad guy, receiving one or more through or around the sternum isn’t likely to react by saying “that’s not funny.”
Be Smart, Not Tough
The world isn’t necessarily full of bad people, but they’re out there—and there are enough of them to be a hazard. They often preferentially prey on those less likely able to mount an effective defense, like your great aunt or grandmother. The question is: Do you make sure Nana has something—not nothing—or do you let your ego-invested attachment to “it has to be the best” (which she’s unlikely to agree with) get in the way of things?
There’s an adage that sums this up: Perfect is the enemy of good. Do good by your Nana, and don’t try to saddle her with perfection.
Editor’s Note: This article originally appeared in the April 2022 issue of Gun Digest the Magazine.
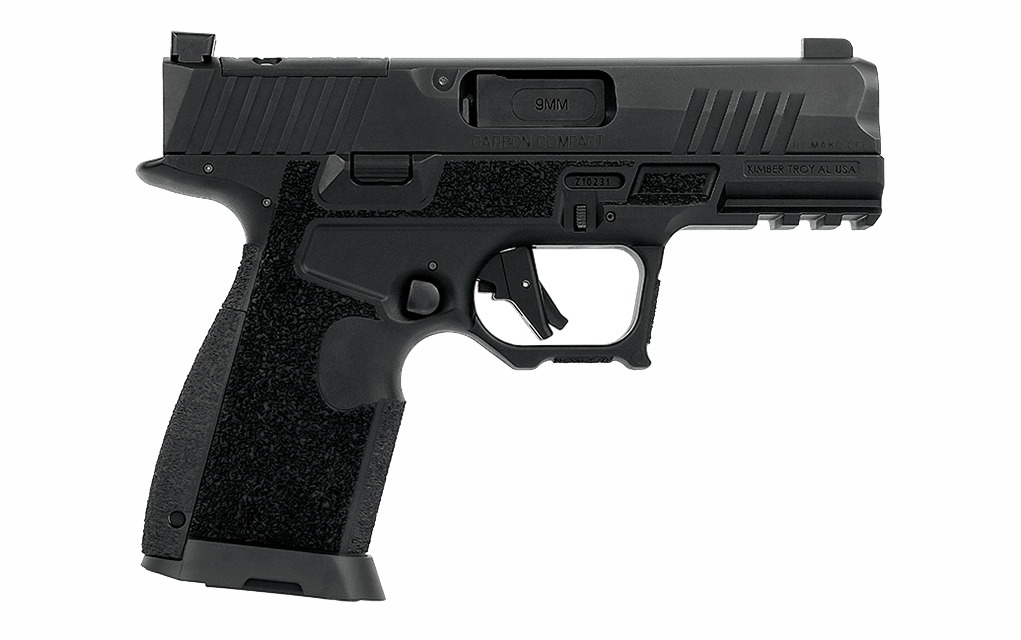
We take a look at the Kimber R7 Mako Carbon Compact, an updated and enhanced version of the company’s micro 9mm carry pistol.
The original R7 Mako was Kimber’s take on the micro 9mm carry gun craze, and it’s remained a very solid option since it first launched, but the company has just announced an enhanced version called the Carbon Compact. At its core, it’s the same old Mako, but the new features and design updates make it a very interesting option.
Firstly, the Kimber Carbon Compact gets its name from the new Carbon Fiber Matrix-filled grip housing, a material that is much stronger than typical firearms polymers. While extra durability is always nice, the more noticeable advantages of the new frame are the ergonomic changes. Namely, a forward thumb rest, a high undercut trigger guard and four interchangeable backstraps. The magwell is now flared as well.
Compared to the original Mako, the Carbon Compact pistols also feature slightly longer barrels for a little extra oomph. Of the four available variants, two have 3.9-inch barrels and two have threaded 4.4-inch barrels. The only other distinction between the four models is whether or not the pistol will come with a Holosun 407K pre-installed, as all four are optics-ready. All models are also fully ambidextrous, feature the Kimber performance carry trigger and have a rail for mounting a light or laser.
Mountie Mizer, Vice President of Sales for Kimber, said this about the updated Mako:
This new Carbon Compact delivers on all the attributes that our consumers have been asking for and will make more people familiar with where Kimber is headed with our deeper offering of polymer striker variants which feature the best triggers on the market.
Each Kimber Carbon Compact ships with two 15-round magazines and MSRP starts at $735 for the unthreaded model with no optic.
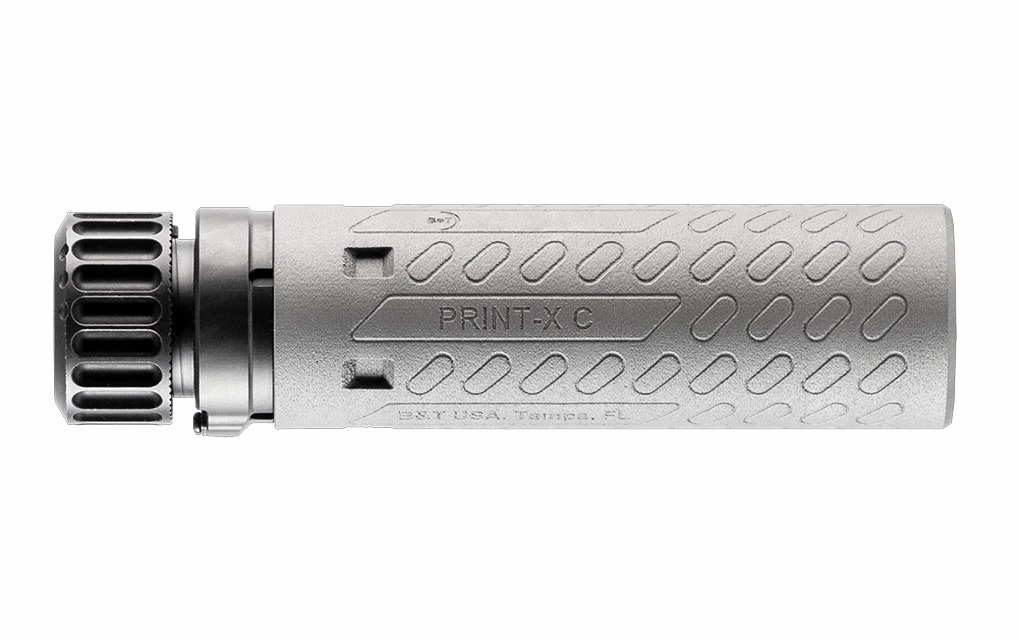
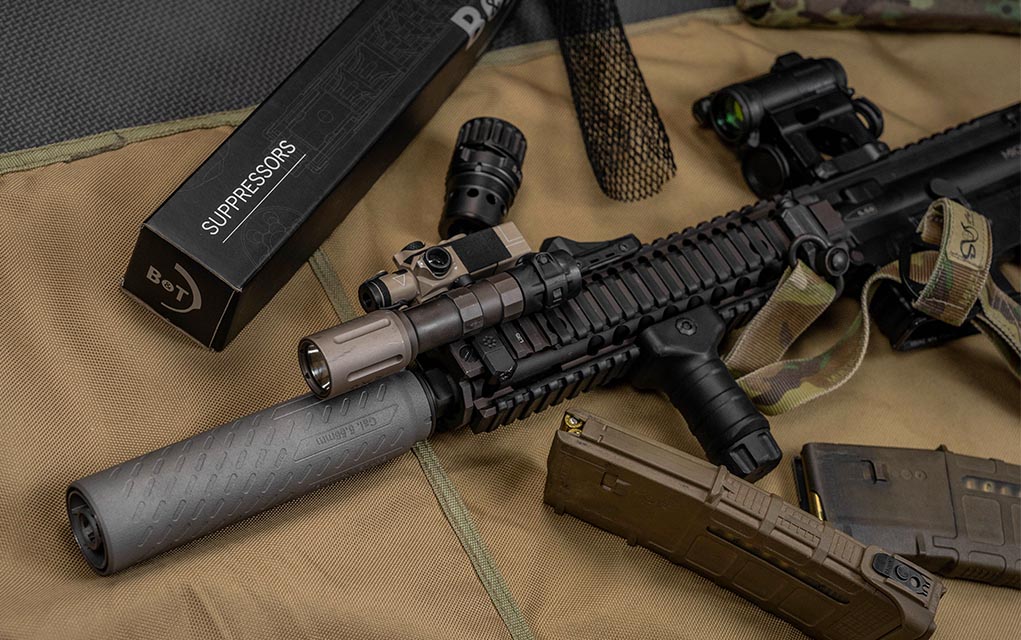
We check out B&T USA’s Rotex and the SRBS suppressors, part of the company’s new 3D-printed Print-X line of advanced rifle suppressors.
3D printing is the probable future of many kinds of manufacturing, but it almost certainly is when it comes to suppressors. B&T seems to agree, evidenced by the company’s new Print-X line of advanced rifle suppressors.
Featuring the Rotex and the SRBS (Slim Reduced Backpressure System), the 3D printed Print-X family of suppressors are made using laser bed fusion techniques, are fully weldless and are made of either pure titanium or 718 Inconel. The weldless design reduces the weight and the number of potential failure points, and each suppressor also features a low-flash endcap and a high-performance Star Baffle system. Print-X cans ship with B&T’s Rotex-SF HUB assembly which is compatible with appropriate B&T muzzle devices, but this can be replaced with any industry-standard HUB assembly.
Chris Mudgett, Vice President of Marketing for B&T USA, said this about the new suppressors:
The improvements made to our 3D printed SRBS and Rotex suppressors within the Print-X family are examples of how our customers and end-users continue to reap the benefits of our R&D team continually pushing what is possible in both material and design … As a suppressor manufacturer with nearly 700 different suppressors, it’s safe to say our engineering team refuses to leave well enough alone and our products are in a perpetual state of advancement to ensure our customers receive the most cutting-edge technology possible, providing them with a substantial advantage in the field.
Whether you’re interested in a Rotex or SRBS suppressor, both have quite a few variants available. Besides the choice of material (titanium or Inconel), both models are offered in 7.62 and 5.56 with an impressive range of sizes to choose from.
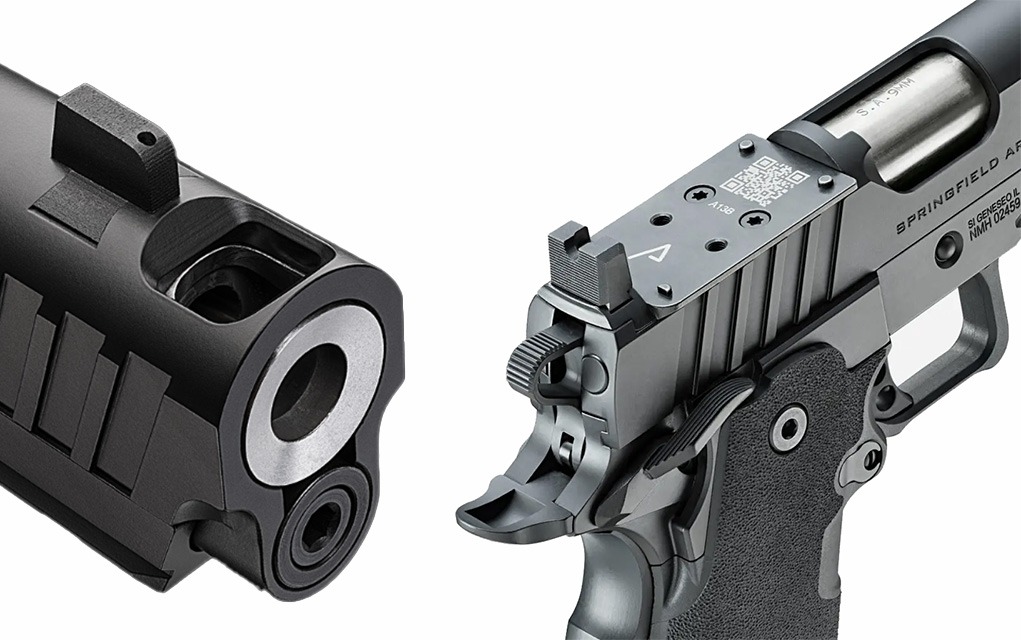
Springfield Armory has just announced two new integrally compensated versions of the 1911 DS Prodigy AOS pistol.
Springfield Armory launched the original 1911 DS Prodigy in 2022, and it’s since gained a reputation as a very solid pistol. As far as double-stack 9mm 1911s go, they’re pretty affordable as well. The latest addition to the lineup is an exciting one, as Springfield is launching two integrally compensated variants known as the 1911 DS Prodigy Comp.
The Prodigy Comp pistols are available with either a 4.25-inch or a 5-inch barrel, and because they’re integrally compensated via a single port at the top of the barrel, it doesn’t add any extra length to the package. That means that the new Comp models are the same size as the standard variants but will have less recoil and muzzle rise, enabling faster follow-up shots and improved accuracy. What’s not to love? The pistols also feature tritium front sights that are placed behind the compensator so the redirected gases don’t interfere with your sight picture.
Speaking of sights, the Springfield Prodigy Comp pistols also feature the Agency Optic System (AOS) for mounting red dots. Each pistol ships with one optic plate and a cover plate, but plates with other optic footprints are available separately. Besides the addition of an integral compensator and the tritium sight, the Prodigy Comp pistols are otherwise identical to their non-compensated counterparts.
Steve Kramer, Springfield Armory’s Vice President of Marketing, said this about the new pistols:
The Prodigy pistol has proven to be very popular with shooters looking for the appeal of the classic 1911, but with enhanced double-stack magazine capacity and modern features … The flat-shooting Prodigy Comp adds the benefit of reduced muzzle flip and faster follow-up shots to an already highly capable design.
Each Prodigy Comp pistol will ship with a handgun case and two magazines, a 17-round flush-fit and a 20-rounder (10-round mags are available as well for restricted states), and extended 26-round mags can be purchased separately. The 5-inch and 4.25-inch versions share an MSRP of $1,599 and they’re available now.
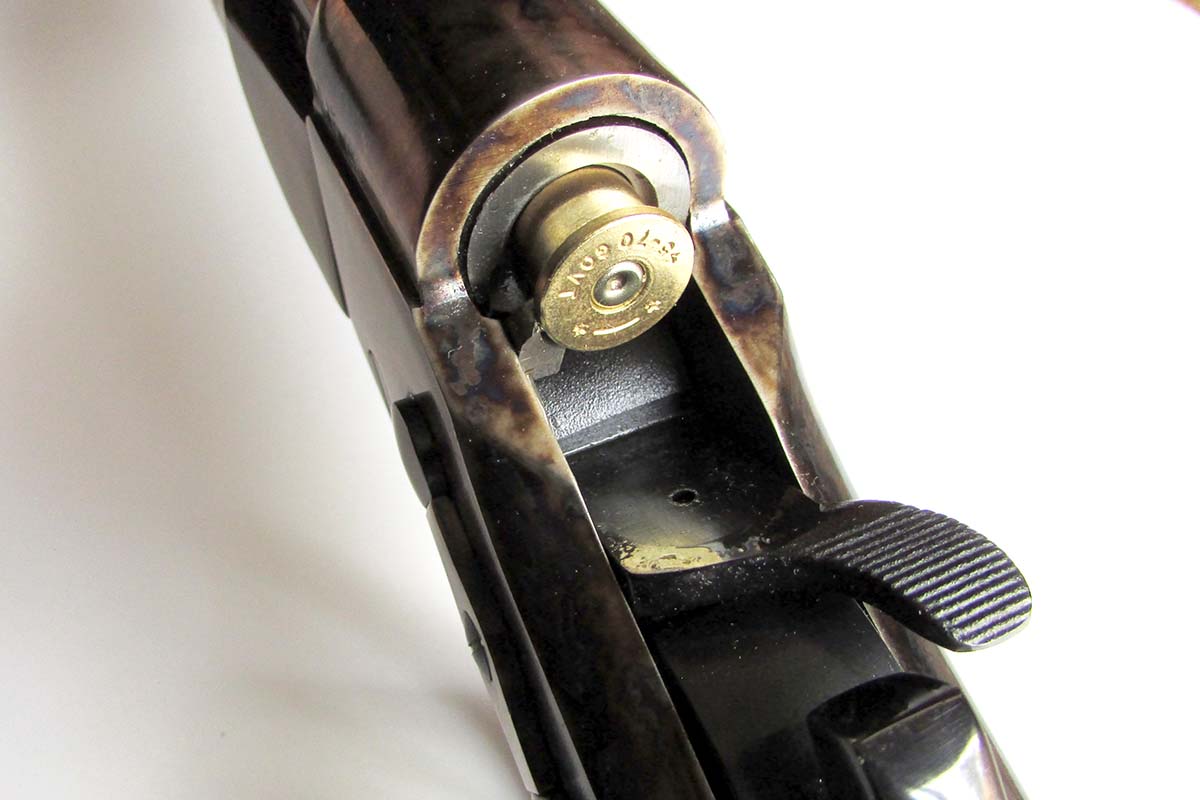
Looking to load up on .45-70 ammo? Here we take a closer look at the cartridge and discuss the top loads for hunting and the range.
The beauty of .45-70 Gov’t is its versatility, as it allows shooters to find a load tailored to a specific need among a variety of different uses. It can’t do everything, but it can do a lot, so we’re going to discuss how to go about selecting the best load for your use case and firearm.
A Brief History Of .45-70 Gov’t
The .45-70 cartridge, aka .45-70 Government, was developed for the U.S. military and was the primary service cartridge of the U.S. Army from 1873 to 1892 when it was replaced by the Krag-Jorgensen rifle and the .30-40 Krag cartridge.
The U.S. military adopted the Springfield Model 1865 as its first general-issue breech-loading cartridge rifle, but it was quickly replaced by the Model 1866. The biggest change with the updated rifle was its cartridge, as it substituted a rimfire design for a centerfire one. The standard load was a .50 caliber, 450-grain bullet on 70 grains of black powder, aka .50-70-450.
While serviceable, trajectory was problematically steep, and with average velocities of only around 1,100 fps it was feeble at longer ranges and limited its usefulness in the field. A revised gun and new load were developed around a .45 caliber bullet to improve trajectory and ballistic performance, which became .45-70 Government.
The new load was a .45 caliber, 405-grain bullet on the same 70 grains of black powder. This satisfied the basic requirements and entered service in 1873 with the 1873 Springfield rifle and cavalry carbine.
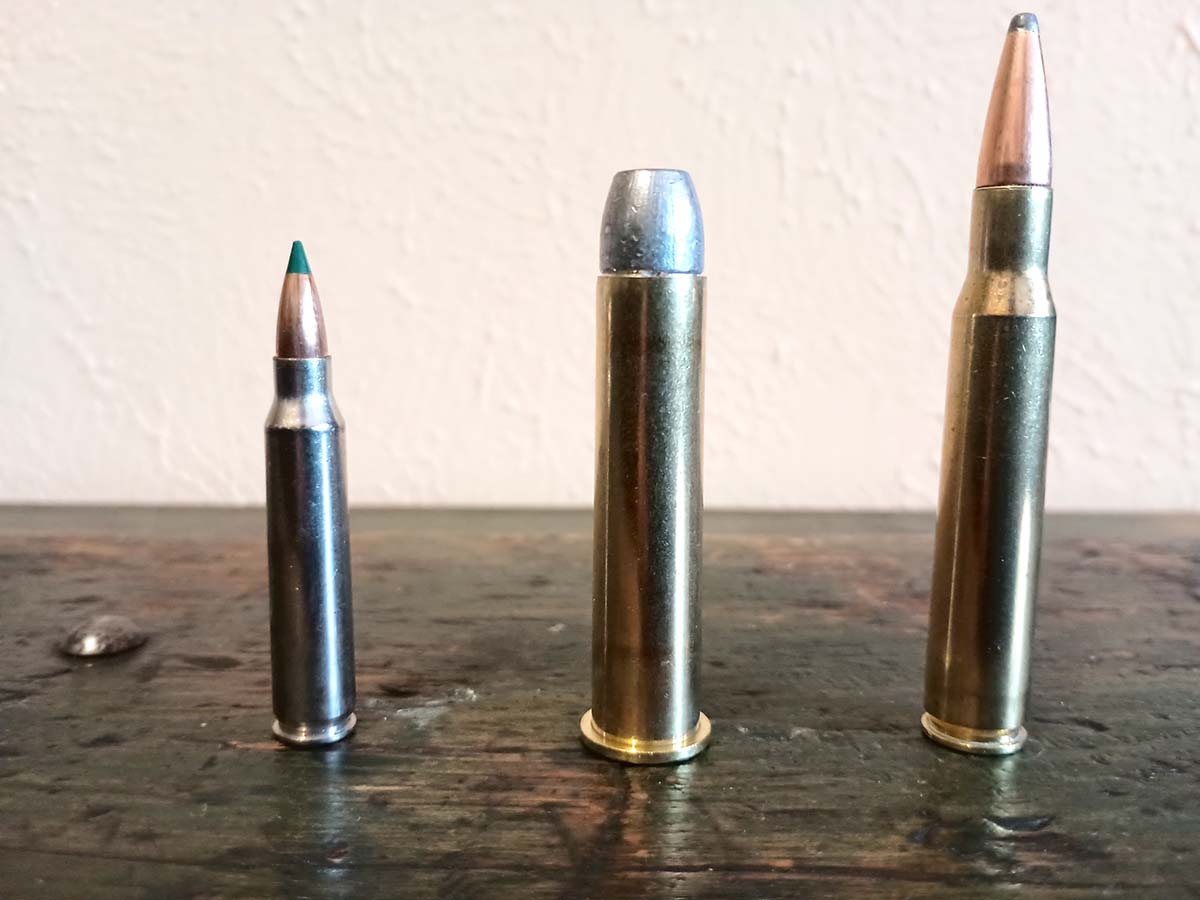
Some of the nation’s most historic guns have been chambered for the .45-70 Government, such as the Sharps Rifle, Springfield Trapdoor and the Remington Rolling Block seen here.
In 1879, the Sandy Hook Proving Ground tests evaluated different loadings for an improved version before settling on a 500-grain bullet. The .45-70-500 proved effective on man-sized targets to 1,000 yards and capable of penetrating through 3 inches of oak planks plus 8 inches of sand at 3,500 yards with a mortar-like trajectory. Keep in mind that volley fire was still an important infantry tactic of the day.
The 405-grain load was replaced with the 500-grain load that year and it became standard-issue until the government adopted the Krag-Jorgensen rifle with its .30-40 Krag cartridge in 1893.
The .45-70 On The Civilian Market
Surplus Springfield rifles were extremely popular on the civilian market, but commercial breechloader and lever-action rifles were available as well.
Some breech-loading rifles in .45-70 included the Remington Rolling Block, the Winchester 1885 and the 1874 Sharps rifle. The Sharps rifle was particularly lauded for build quality and accuracy, especially at long ranges, and was immortalized in the film Quigley Down Under.
The .45-70 Gov’t (middle), next to .223 Remington (left) and .30-06 Springfield (right).
Lever-action rifles in .45-70 were of course developed as well, such as the Marlin 1881, the John Browning-designed Winchester Model 1886 and the Marlin Model 1894, the last of which remained in production for more than a century except for a brief interregnum.
No commercial bolt actions were made for .45-70, but it was popular to convert Siamese Mausers to accept the cartridge.
.45-70 was a favorite of big game hunters, especially buffalo hunters on the plains, and was found potent enough for any North American game.
While certainly overpowered for medium game, the .45-70 had a reputation for destroying relatively little meat, with the typical refrain being to “eat around the hole.”
There was some use in African hunting as well, though it was much more sporadic compared to the big-bore Express magnums. Some modern loadings have some cache as a dangerous game cartridge, though usage is not universal as .45-70 doesn’t quite meet energy requirements in most safari jurisdictions.
With an adjustable tang-mounted aperture sight, such as the Vernier sight and others, the long-range potential of the cartridge could be maximized. Not only did that make .45-70 a fantastic choice for hunters but also for long-range shooting in its day. However, long-range .45-70 shooters then (and now) had to become experts at calculating trajectory and judging wind to be successful. Flat shooting is not an adjective that applies to this round.
.45-70 Ballistics
Today’s .45-70 shooter has many more options than just the 405- or 500-grain lead loads of yesteryear. While it remains an expert’s cartridge for long-range shooting, some loadings can stretch the practical range a bit further than you’d expect.
The recoil depends heavily on what load of .45-70 ammo you’re using, as black powder loads are just under 20 foot-pounds while modern loadings can exceed 30 foot-pounds.
The original load was relatively tame, with its 405-grain bullet on 70 grains of black powder typically producing velocities of around 1,300 to 1,350 fps. However, today’s most common loads feature a 300-grain jacketed flat-nose projectile loaded to 1,850 to 2,000 fps or a 405-grain jacketed flat-nose projectile loaded to 1,600 to 1,800 fps.
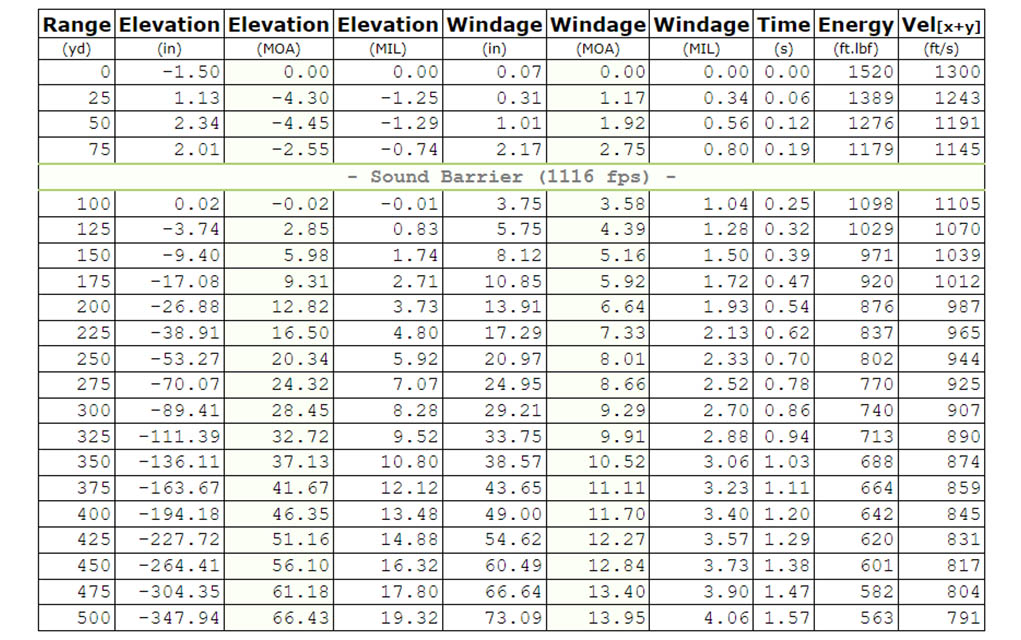
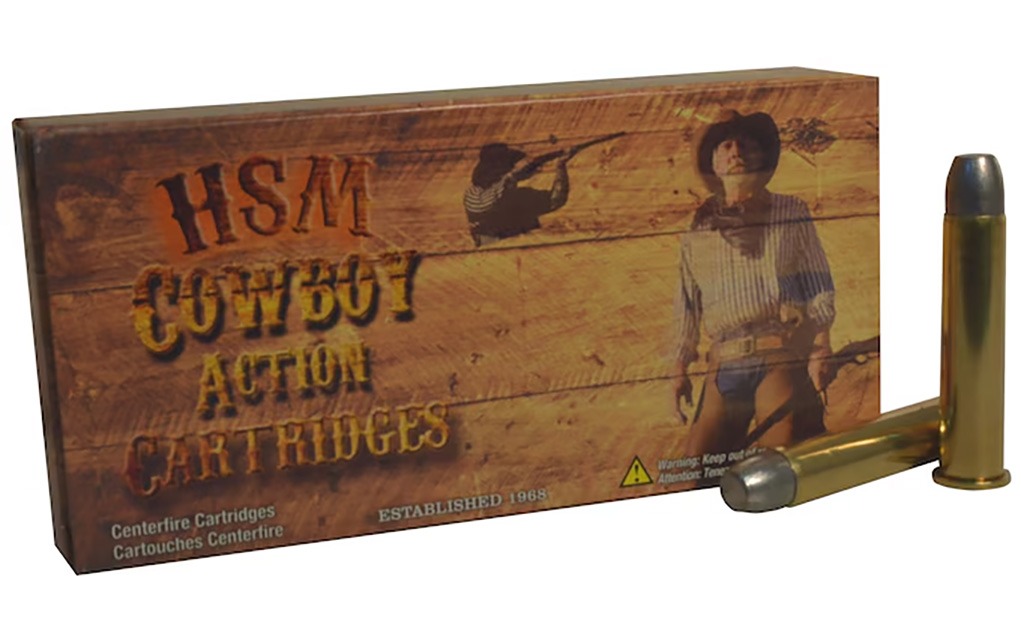
Today there are several black powder, black powder substitute and low-recoil/low-pressure loads that replicate the original 45-70 ballistics very well. To give you an idea of what that looked like, here’s a 500-yard trajectory table for HSM’s Cowboy Action 405-grain hardcast load (estimated G1 BC of 0.21). All tables shown were made using Shooter’s Calculator and presume a 100-yard zero, a 1.5-inch sight height, no corrections for atmosphere and a 10 mph 90-degree crosswind:
While the bullet goes subsonic just before 100 yards, it holds velocity fairly steadily after that, staying above 700 fps to just past 700 yards. It also drops like a rock, falling more than 26 inches at 200 yards and nearly 350 inches at 500 yards.
However, modern loads of .45-70 ammo can change the equation a bit.
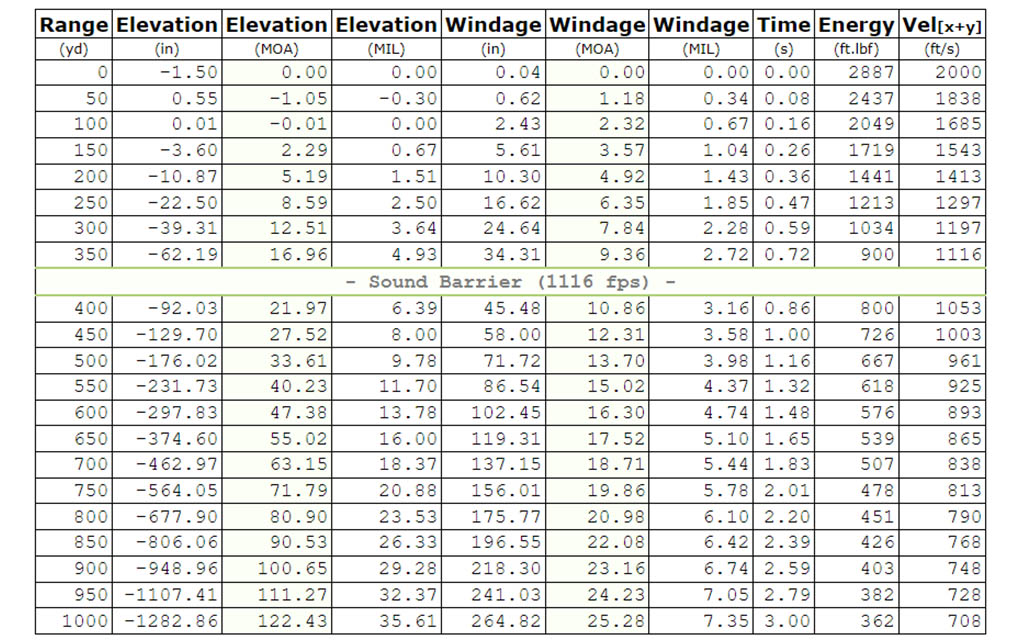
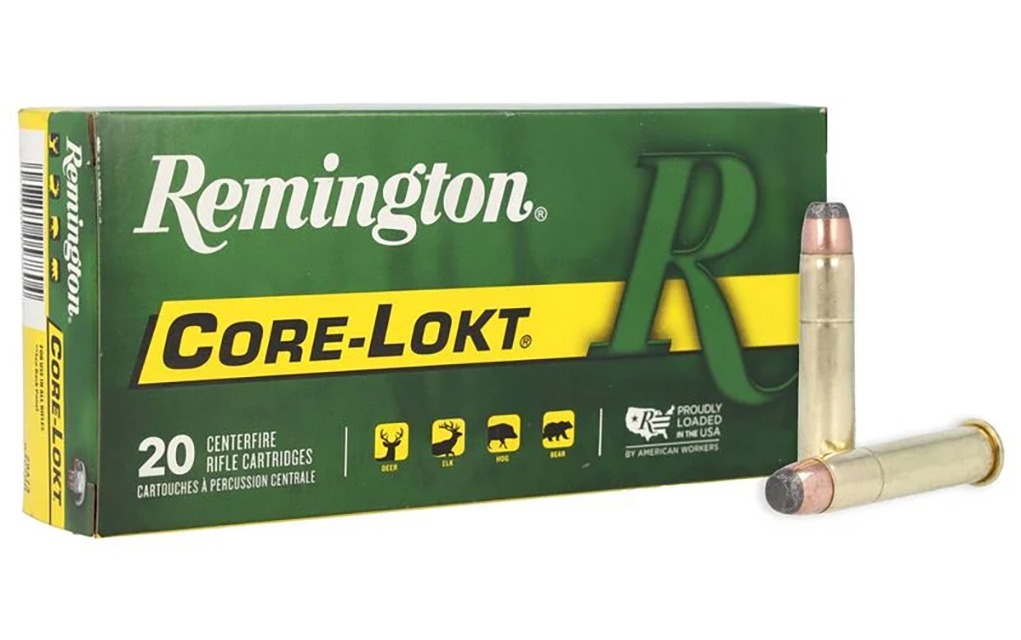
This is what the modern 405-grain ammunition can do, using the ballistic info for Remington’s 405-grain Core-Lokt load (G1 BC of 0.281):
Modern projectiles more than double the supersonic travel with only a modest increase in velocity. The Core-Lokt load drops 100 fewer inches at 500 yards than the original, and it has more energy at 1,000 yards than a 9mm has at the muzzle. This would mean it’s effective on any North American game to at least 300 yards if not farther.
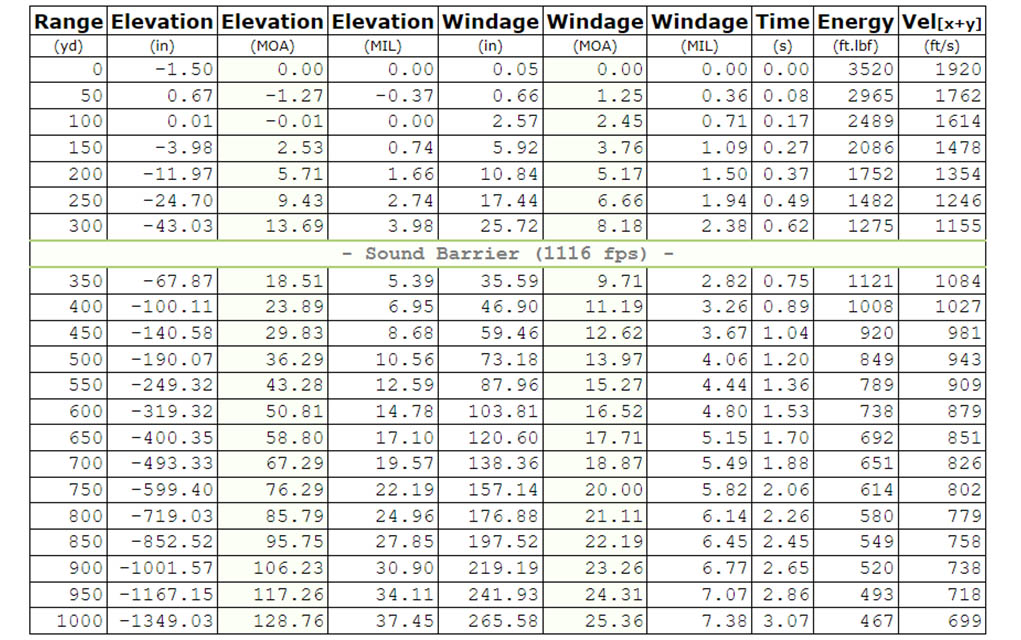
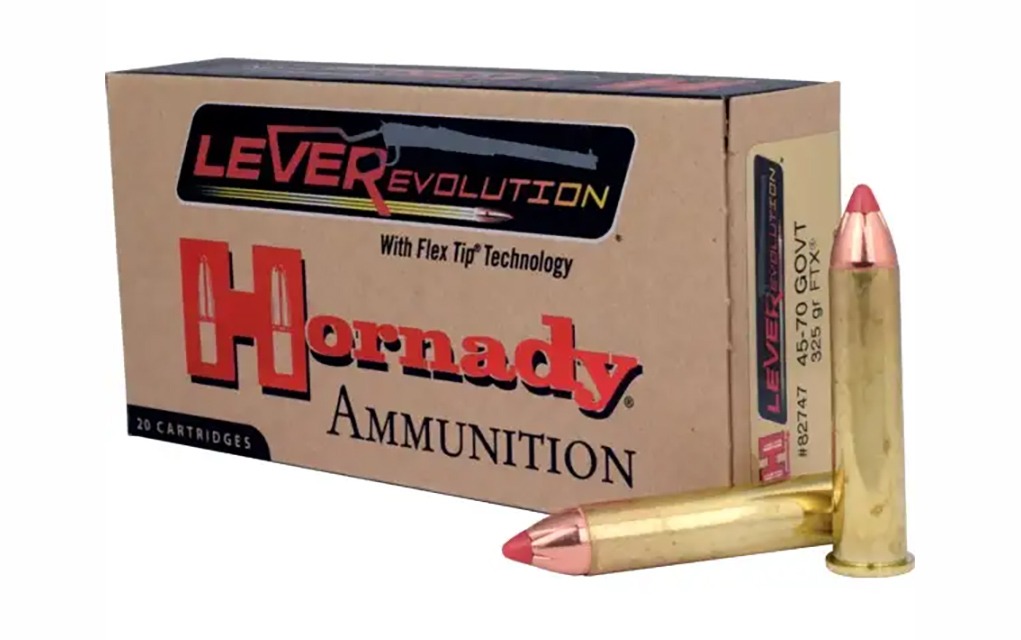
Tipped bullets will flatten the trajectory somewhat, such as Hornady’s 300- and 325-grain LEVERevolution 45-70 ammo. Here’s a 1,000-yard table for the 325-grain load (G1 BC of 0.23) using the same parameters:
While it remains supersonic just beyond 350 yards, it has roughly half the drop at 500 yards compared to the original 405-grain load and loses less velocity from 500 to 1,000 yards than it does in the first 100 yards!
Overpressure loads for dangerous game hunting, which should only be used in select rifles designed that can tolerate them, add a bit more thump for close encounters. This is a 1,000-yard table for Buffalo Bore’s 430-grain hardcast flat-nose load (G1 BC of .23):
It isn’t quite there, but it’s close to safari rifle power. It packs a tremendous wallop inside 100 yards but begins to lose velocity like any other .45-70 load beyond that. After 300 yards, it’s just like any other 400+ grain load in this caliber.
Best Applications For .45-70
The best use case for .45-70 for most people will be hunting in areas where shot opportunities are within 200 yards and you don’t want to worry about bullet deflection. It cuts through brush easily, one of the cartridge’s long-standing best qualities.
In other words, it’s best for hunting in timber or anywhere you won’t be shooting beyond a couple of hundred yards.
The .45-70 is not too powerful for deer, but load selection should be considered. A light-for-caliber, fast-expanding bullet (such as a 300-grain soft point or low-recoil load) will hit hard without destroying too much meat.
Philip Massaro with an eight-point whitetail he took with a 45-70. Photo: Massaro Media Group.
It’s also a profoundly effective killer of elk, moose, caribou and anything else of that size anywhere on the planet, including some African game with good marksmanship.
The .45-70 is also one of the known reliable stoppers of grizzly bears. Overpressure loads aren’t necessarily critical, but a tough, heavy bullet (preferably non-expanding) placed correctly by the shooter is.
While people have gone on safari with .45-70, choice of jurisdiction will be limited. Most countries that have dangerous game and allow dangerous game hunting also have an energy floor that overpressure .45-70 does not meet. If you’re going to go to the trouble and expense of hunting in Africa, you might as well not limit yourself and get a true, dedicated dangerous game rifle.
So, with that all said, what’s the best .45-70 ammo? Here are our top picks for a variety of use cases and budgets.
The Best .45-70 Ammo
Load
Bullet Weight
Bullet Type
Muzzle Velocity
Muzzle Energy
Cost
Hornady LEVERevolution 325-Grain FTX
325gr
FTX Flex Tip
2,000 fps
2,886 ft-lbs
$40-45 per box of 20
Underwood Ammunition +P430-Grain Hard Cast Flat Nose
430gr
Coated Lead Long Flat Nose Gas Check
1,925 fps
3,539 ft-lbs
$58-65 per box of 20
HSM Cowboy Action Ammunition 405-Grain Hardcast Flat Nose
405gr
Cast lead flat-nose
1,300 fps
1,520 ft-lbs
$40-45 per box of 20
Remington Core-Lokt Reduced Pressure 405-Grain Jacketed Soft Point
405gr
Jacketed flat-nose soft point
1,600 fps
2,302 ft-lbs
$50-60 per box of 20
Buffalo Bore Dangerous Game 380-Grain Mono-Metal
380gr
Lehigh Match flat-nose mono-metal
2,075 fps
3,632 ft-lbs
$95-105 per box of 20
Hornady LEVERevolution 325-Grain FTX
Specs
Bullet Weight: 325 grains Bullet Type: FTX Flex Tip Muzzle Velocity: 2,000 fps Muzzle Energy: 2,886 ft-lbs Cost: $40-45 per box of 20
Pros
Best load for stretching the .45-70’s legs
Expanding tip makes it great for most North American hunting
Cons
Expanding tip does not make it ideal for dangerous game purposes
If you have a scope on your lever gun, the Hornady LEVERevolution 325-grain FTX load improves long-range trajectory, making it relatively practical with the right scope and reticle. It’s designed for reliable expansion, so it’s not the best grizzly load, but it’s dynamite for hunting otherwise and is relatively affordable.
Underwood Ammunition +P430-Grain Hard Cast Flat Nose
Specs
Bullet Weight: 430 grains Bullet Type: Coated Lead Long Flat Nose Gas Check Muzzle Velocity: 1,925 fps Muzzle Energy: 3,539 ft-lbs Cost: $58-65 per box of 20
Pros
Coating prevents lead fouling
Powerful hardcast bullet makes it great for dangerous game defense
Cons
Can only be used in certain firearms that will handle the pressure
This load features a gas-checked flat-nose hardcast lead bullet that travels at almost 2,000 fps, perfect for putting a big hole in something. This is only intended for use in modern firearms such as Marlin lever actions and Ruger Model 1s, but it would be perfect for a grizzly load.
HSM Cowboy Action Ammunition 405-Grain Hardcast Flat Nose
Specs
Bullet Weight: 405 grains Bullet Type: Cast lead flat-nose Muzzle Velocity: 1,300 fps Muzzle Energy: 1,520 ft-lbs Cost: $40-45 per box of 20
Pros
Can be used in any .45-70 firearm
Perfect for plinking at the range or cowboy action shooting
Cons
Not ideal for hunting
Uncoated lead projectile will cause fouling
A replica of the original 405-grain black powder load, it sports a triple-grooved lubed hardcast bullet loaded to a moderate velocity. Great for cowboy action and silhouette shooters, and usable in all .45-70 firearms including Trapdoor Springfield rifles.
Remington Core-Lokt Reduced Pressure 405-Grain Jacketed Soft Point
Specs
Bullet Weight: 405 grains Bullet Type: Jacketed flat-nose soft point Muzzle Velocity: 1,600 fps Muzzle Energy: 2,302 ft-lbs Cost: $50-60 per box of 20
Pros
Perfect power for North American hunting
The lower recoil makes it more pleasant to shoot
Cons
Expanding bullet means not ideal for dangerous game purposes
A lower-pressure, lower-recoil classic JSP hunting load. It features a controlled expansion bullet that will put deer, elk, black bear or anything else of that size in the freezer without beating up your shoulder too much.
Buffalo Bore Dangerous Game 380-Grain Mono-Metal
Specs
Bullet Weight: 380 grains Bullet Type: Lehigh Match flat-nose mono-metal Muzzle Velocity: 2,075 fps Muzzle Energy: 3,632 ft-lbs Cost: $95-105 per box of 20
Pros
Very powerful dangerous game load
Cons
Can only be used in certain firearms that will handle the pressure
Very expensive
As far as dangerous game loads of .45-70 ammo go, this is a great option. It features a mono-metal projectile designed to be nearly barrier-blind, retaining its shape when hitting dense bone. However, it’s only designed for use in modern rifles.
Looking for a new iron or piece of kit to enhance the one you already own? Check out these 7 new bits of guns and gear to grow your firearms wish list.
Have the hankering to carry noir, but not break the bank on a classic, collectible snub-nosed revolver? If so, then it’s high time to check out Heritage Manufacturing and it’s freshly minted and aptly named Roscoe revolvers. The .38 specials are available in 3-inch barrel and true snubby 2-inch barrel configurations and come dripping with retro style. Especially appreciated are the hard-wood rounded grips, dark finish and throwback lines that bring to mind the S&W 36. The guns are outfitted with a frame rear sight, ramp front sight and six-round cylinders. MSRP: $364
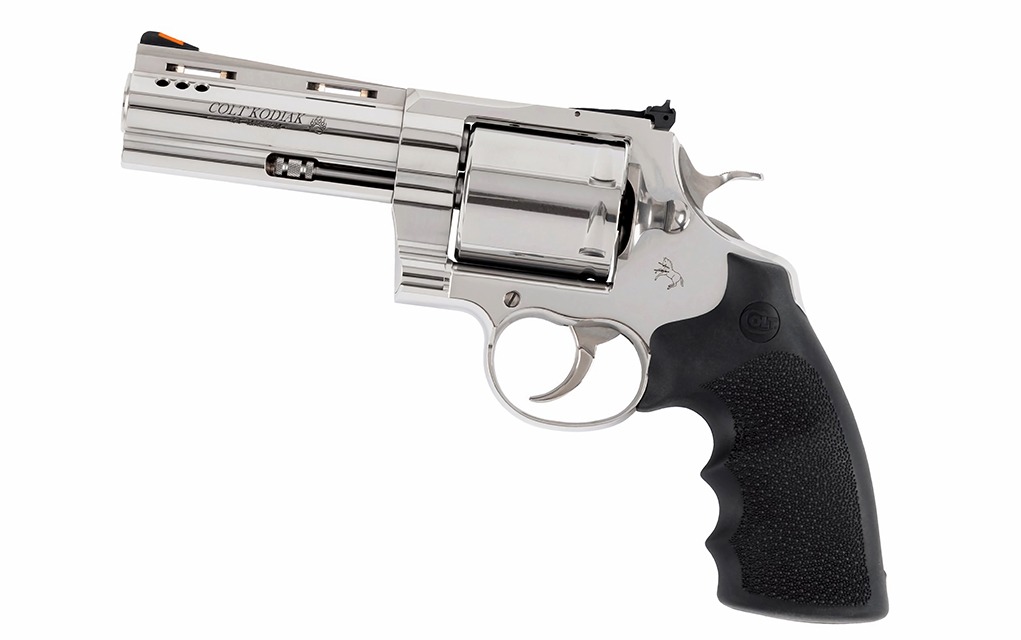
Colt Kodiak
Colt revolvers have made the jump from serpentine to ursine with the release of its Kodiak .44 Magnum. With a robust revolver design, the hand cannon is tuned to take on the most demanding hunting conditions you can seek out. Combining classic style with advanced features, the Kodiak offers an ergonomic design and recoil-absorbing Hogue OverMolded grips, interchangeable with Colt Python and Anaconda models. Its one-piece full lug, ventilated rib stainless steel barrel is ported for enhanced muzzle control and shooting stability. Key specifications include a six-round capacity, stainless-steel frame, double- and single-action trigger, red ramp front sight, adjustable target rear sight and an unloaded weight of 48.5 ounces. MSRP: $1,599
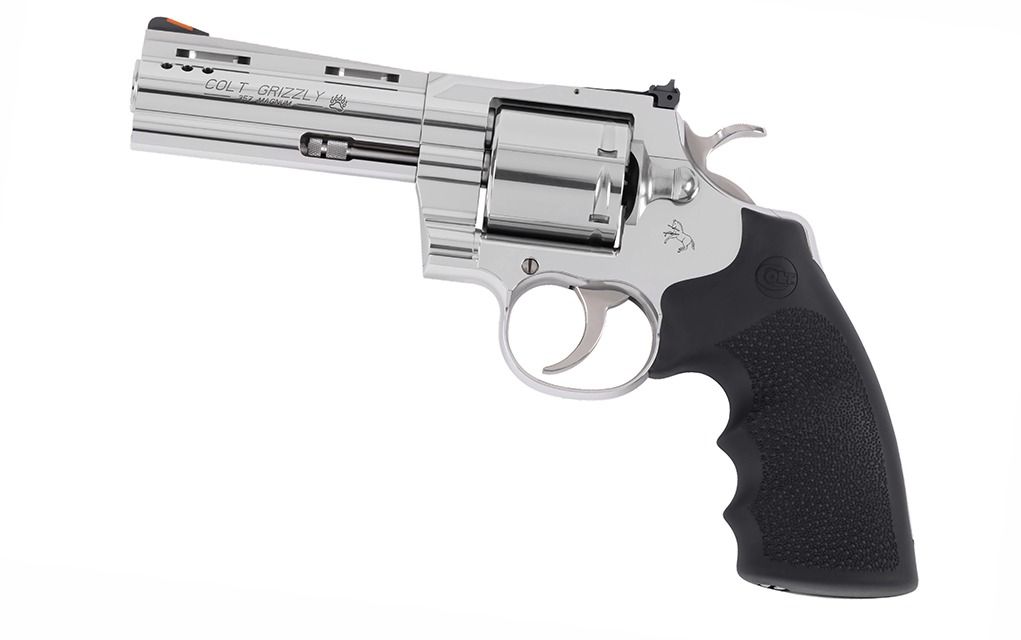
Colt Grizzly
The Kodiak isn’t the only bear on the prowl in Colt’s catalog. Released simultaneously was the Grizzly, a .357 Magnum revolver blending timeless craftsmanship with modern enhancements for backcountry hunters. The polished stainless-steel frame features a matte top rib for optimal sight acquisition, while the smooth, un-fluted cylinder adds robustness and the ergonomic Hogue OverMolded rubber grips absorb recoil, ensuring comfort. Key specifications include a six-round capacity, adjustable target rear sight, red ramp front sight, double/single-action trigger and an unloaded weight of 41.1 ounces. MSRP: $1,599
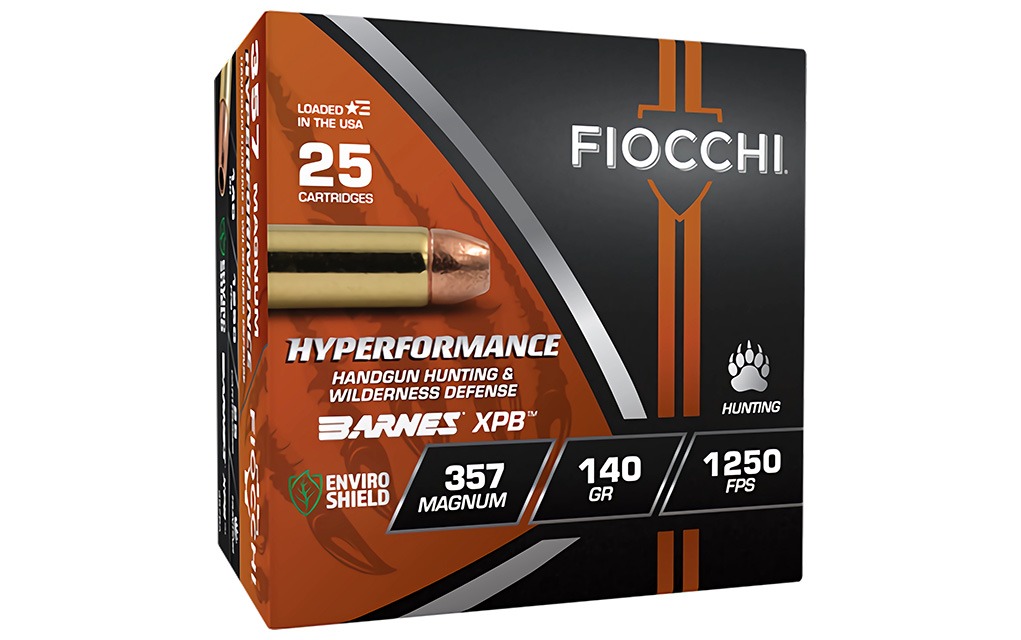
Fiocchi Hyperformance Hunt Handgun Ammo
Fiocchi, renowned for defensive, target and hunting ammunition, has turned its attention to handgun hunters with its Hyperformance Hunt Handgun ammo. This new line maintains the high standards of Fiocchi’s Hyperformance centerfire cartridges, featuring precision-formed brass cases, clean-burning primers and carefully measured powder charges for superior accuracy and reliability. Designed for no-fail terminal performance, these cartridges utilize the Barnes XPB bullet, a monolithic copper hollow-point known for its devastating expansion, weight retention and deep penetration. Available in .357 Magnum, 10mm Auto, .44 Magnum and .45 Long Colt, the Hyperformance Hunt Handgun ammo is offered in 25-round boxes. MSRP: N/A
Taurus 692 Executive Grade
Designed for the discerning revolver enthusiast, the Taurus 692 Executive Grade offers a touch of class wrapped up with hard-hitting performance. The revolver features a custom hand-tuned trigger for exceptional precision, a quick-change cylinder system for seamless transitions between 9mm and .357 Magnum, and a ported barrel to reduce recoil for enhanced control. The target barrel, paired with a brass front sight, ensures pinpoint accuracy. Assembled in a dedicated production area, it boasts a hand-polished satin finish and a luxurious checkered walnut grip. The 692 Executive Grade includes two cylinders (.357 Magnum/.38 Special +P and 9mm) for versatile shooting scenarios. MSRP: $1,107
Galco Revenger Belt Holster
The Galco Revenger Belt Holster, part of Galco’s Masterbilt series, might be the best of both worlds. The all-leather hanger is designed for everyday carry guns but is more than suited for elegant special-occasion revolvers. This premier-grade holster is crafted from a fully lined premium steerhide, offering hand-molded detail for secure retention and an attractive appearance. Its smooth leather lining enhances tactile feedback and protects delicate finishes. The near-neutral cant allows for a fast, wrist-locked draw stroke, while a reinforced opening facilitates easy, one-handed re-holstering. The metal-reinforced tunnel-style belt loop ensures rigidity, and the trailing belt slot aids in concealing larger revolvers. Additionally, a molded sight rail prevents snagging during the draw. MSRP: $259
Smith & Wesson Limited-Release, Jerry Miculek-Inspired M327
Smith & Wesson announces the limited-release Performance Center Model 327 WR, inspired by legendary shooter Jerry Miculek. This lightweight 9mm revolver features a scandium N-Frame and titanium cylinder for rapid target transitions. It includes a brass bead front sight, adjustable rear sight, Vortex CompDot and C.O.R.E. optic-plate system. Plus, the JM Signature laminated wood grip ensures optimal ergonomics. With an eight-round capacity, 5-inch ported stainless-steel barrel and smooth double-action trigger, this revolver is limited to 1,880 units, commemorating Jerry’s record of hitting six steel plates in 1.88 seconds. It ships in a custom Pelican case with a foam insert. MSRP: Starting at $3,499
Editor’s Note: This article originally appeared in the August 2024 issue of Gun Digest the Magazine.
Want to maintain a repeatable rifle zero while switching an optic between guns? With modern machining, that’s now pretty easy.
The subject of rifle zeros comes up constantly, sometimes to the point of being repetitive and annoying. People treat a proper zero as a one-time thing, almost like a rare occurrence, often specific to a single load that they use.
What I plan to show you here is that getting a zero on a rifle is not only very easy, but you can also go so far as to have repeatable zeros after taking off the scope and moving it from gun to gun and load to load.
This isn’t magic with today’s optics technology. In fact, it’s simple.
Zero Understanding of the Topic
A longtime myth has persisted that a zero is hard to achieve, and it shouldn’t be touched once you get it “on.”
For a large part of our history, as shooters, we had a bit of a conundrum in that the rifles were very accurate, but the only way to aim them was with metallic sights. Optical sights, at the same time, were less than ideal and very fragile. Metallic sights were arguably perfected in the 1860s to 1880s and reached zenith during the height of Western expansion. Finely adjustable sights were relatively commonplace and ended up being simplified and further refined as the smokeless powder era began.
For a time, military rifles—not just target versions—had metallic sights that offered correction not just for elevation and windage, but also for spin drift. All these advancements were great … but limited by human eyesight. The final, and truly remarkable, set of adjustable sights came with the M1 Garand, later translated to the M14. Unlike their European counterparts who relied on their squad or division armorer to make sight adjustments, the individual American was able to independently zero their own rifle and make use of functional bullet drop compensation by way of a generalized elevation turret for as-issued ammo.
Zeroing the M1 rifle is very simple. Bottom out the rear sight, center it to the middle indicator line and count up eight clicks. You should be on for point-blank impact out to around 250 yards on a man-sized target with 150-grain M2 Ball loads. It’s just as simple on the M14 and M16 variants … but with some minor changes.
What you should understand is that, as a mechanical issue, zeroing generally isn’t hard to accomplish. What was hard to accomplish for the better part of a century was the manufacture of reliable optics.
Today, we’re at that point where optics have essentially caught up to guns in terms of repeatability, and the marriage of these systems is making for much more flexible, complete packages. Think of today’s optics in this sense, the same as a good set of irons. There isn’t a need to complicate it past that in regard to mechanical terms. The rest is largely subjective in value from one shooter to the next.
The base 4X TA31 ACOG can be used on its own, with night vision and thermal interchangeably. There’s no mystery to getting a zero on this optic; it’s fast and easy to use in the field.
Chasing Perfection
Simply put, the zero of a rifle is the location in which your primary aiming point intersects the bullet’s flight path. Where it gets muddy is trying to understand why people use different zeros, such as the 25-meter, 50-yard, 100-yard, etc. The baseline understanding you need here is that bullets never “rise,” as in gain altitude in relation to the barrel. Once they exit the muzzle, they begin falling.
When you hear or read about the bullet in this sense, it is, in fact, in relation to what you’re seeing through the optic or sights. The sights are mounted at an angle to the barrel in all cases, even if it’s minute. It’s possible for the bullet to rise and fall within your sight in relation to the aiming point, but it’s always dropping.
Depending on the cartridge, there can be a little or a lot of variation to this situation. As an illustrative example, I’ll use the .450 Bushmaster, a cartridge I’ve used heavily for hunting.
Let’s assume that we’re using a 245-grain Hornady American Whitetail factory load. This is a common, reliable load that I’ve used favorably for years. In a mil reticle, using a 100-meter zero (I like mils in metric because of how easy the divisions are, and my home range is in meters, so it all meshes well), I will have 2 mils of drop at 200 meters. Fairly cut and dry.
To the shooter’s eye, that appears to be a lot of drop at that distance, making for a less confident shot if using only holdover to aim. I could dial 2.0 mil and be perfectly on, which is very applicable to this situation given a known range.
So, what happens if a buck walks out at 75 yards? Well, you’ll be pretty high unless you crank that turret back down. The best solution is to zero the rifle 1 mil high at 100 meters, making for a drop of 1 mil at 200 and perfect zero at 150 meters. This allows the shooter (me) to aim essentially dead-on at all ranges inside 200 meters, which is usually the max I will fire a straight-wall case for hunting, given how I hunt.
See, the bullet is dropping at the same rate no matter what I do. By using a modern optic, I can make use of the perceived advantage of fast aiming points.
Is holding at 2 mils with a 100-meter zero the same as holding at 1 mil on a 150-meter zero? To answer my own question, it is, in fact, different in practice, just not in general principle. It’s all how the eye interprets what you know to be the trajectory under pressure.
Now, just to make things worse, let’s throw in another load I like a lot, the Remington 260-grain Core-Lokt Tipped. Now, it does shoot a bit flatter than the Hornady load in my rifle. As a result, I have a 150-meter zero that’s .3 mil high and .3 left. I can very easily move my optic up to this new zero and enjoy only a .5 mil drop at 200 meters, not crossing the 2 mil line until 250 meters. I can keep this data handy in case I need to swap in ammo for a given hunt.
Keeping notes of zero isn’t hard and is especially important when you also shoot subsonic … in this case, the 395-grain Hornady SubX.
Tracking a third zero on one scope isn’t hard, either. For instance, I drop 5 mils off zero compared to supersonic, but at 100 meters, it’s still lethal and pretty quiet through a suppressor. On a straight-wall case hunting rifle, I’m tracking three zeros on one scope like it’s nothing. You can do this, too, and it isn’t magic. Once you break the code on zeros, it becomes just like the M1 sight we mentioned here: a simple, repeatable means of making the most of your gear. Most high-end scopes have zero stops these days, making resetting your equipment to baseline zero very easy.
The old days of the voodoo of zeroing are gone, so let’s now look at more things to challenge the foundation of your zero understanding.
Plug-and-Play
Taking the zeroed scope off a rifle used to be utterly verboten if you were a serious shooter. There is nothing wrong with installing a scope and not moving it, but things happen and you may find yourself in need of removing it. Now, bear in mind this is again a new-age proposition. To take advantage of this capability, you need mounts that return to zero after being taken off, meaning that they will be within +/- your established zero. I have found that ADM, KDG, LaRue, and Midwest Industries make some extremely repeatable QD mounts. I have field experience with all these brands, but I use ADM the most.
Have no fear when removing optics with good QD mounts. There’s no magic, just machining.
So why would a person want to have multiple scopes for one gun … or even the ability to swap optics out to begin with? The answer is the same as before: We have the tech now, so why limit yourself?
When I started using night vision and thermal optics, this became a must. I often have zeros established not just for a given load but also for a given rifle. Yes, I do swap in different optics for the purposes I may need them. For instance, I keep my Leupold MK5 HD 5-25X zeroed for my customized FN SCAR 20S in .308 Win. at 200 meters with BHA 168-grain Match, but I also keep zero records for Remington 150-grain Tipped Core-Lokt and Hornady 178-grain ELD loads.
The Leupold MK5 HD in this article has been used on dozens of the author’s work and personal guns, and to shoot competition, take game and all sorts of gun writer nonsense, from .50 BMG down to .22 LR. This optic has been in service for years and has retained repeatable zeros … even after many swaps.
This scope also has recorded zeros for my .450 Bushmaster, 6.5 Creedmoor bolt guns and another .308 bolt gun. I like this scope as a day optic, but I can use it with thermal or night vision clip-on systems as well. If I want a dedicated thermal sight, I simply detach my Leupold and install the Armasight optic I have here in a KDG mount. This optic is advanced, and I can keep track of zeros on it as well. The entire system is seamless, and because these mounts can be installed with the exact same pressure each time, I don’t have to worry about losing zero at all.
The author’s highly customized pig hunting rifle, a SCAR 20S set up for maximum modularity and compact size. It has a Sig folding stock, KDG and PMM mounting hardware, Lingle Industries aluminum lower and Geissele trigger, brand-new KDG extended rail system, SilencercCo suppressor and much more. Collapsed and with the suppressor removed, the rifle fits in a backpack. Of note is the SCARborator adjustable gas plug. This little device turns the otherwise picky rifle into a pussycat.
Troubleshooting Zeros
Now let’s talk about some problems shooters have encountered when I’ve shown them these systems between rifles and cartridges, as well as how the optics interact with them:
1. Reticle Types
The reticle type you’re using doesn’t matter. There, I said it. For all purposes, bullet A is leaving the muzzle at X velocity and will travel a predictable trajectory. Bullet B does its own thing, but both are falling at their respective rates. If you like mils, use them. The same goes with MOA. I have probably a dozen different reticles I use in all measurements—it’s not hard, but you do have to take the time to learn your system. Again, back to our M1 sight: The mechanical function is ignorant of the rifle you mount it to. It’ll zero again if your mount is repeatable, and you move the adjustments to their known point of zero.
2. Height Over Bore
Optical height over bore doesn’t matter. It’s been proven that you can mount a scope a foot above the gun and still use it normally in a functional sense … but not an ergonomic one. Most of my optical mounts are at about 1½ inches above the optical centerline. I can use clip-on thermal or NVDs at this height and that’s what I like the most. Some people like lower centers, but that is a preference and I respect it. Lowering your scope to the bore doesn’t flatten bullet trajectory. Remember that the bullet is leaving the muzzle and dropping at a constant rate.
While it appears far larger and more skeletal than the SCAR 20S, this FX7-based M24 build can swap out optics at the same 1.5-inch centerline height. One of the bigger issues swapping out main optics is rail cant—I have come to prefer no incline in my bolt-gun rails because I end up needing to do a lot of cranking on the elevation turret to get a zero back. Most optics today don’t need 20 MOA bases, and I don’t like using them anymore because of my use of NVDs.
3. Zeroing Problems
These are machines we’re talking about here, and like any human invention, they can be made to fail … or simply fail on their own. People have trouble zeroing in most cases because they often skimp on their mounts or don’t properly install scope bases. In most cases, you get what you get in life where quality is concerned. If you cut costs, you’ll get a degree of performance relative to that. Most guns shoot well enough today to take advantage of high-end optics. There’s somehow a mental hang-up with people putting good glass on budget guns, but if you have a QD mount and recorded zeros, why not use the better optics? You can have a couple guns and one good scope. As long as the quality is good (gun, optics and mounts), you can mix and match with confidence. Just don’t expect this at lower price points.
4. QD vs. Clamp Mounting
This is where I separate from some professional shooters and writers. I don’t like torque wrenches to install optics. I used to do this with my Geissele and Badger mounts, and I found that I was getting less-than-ideal results for repeatability, gun-to-gun. The thing I found is that the recommended foot-pounds to tighten the mounts down varies from rail-to-rail and gun-to-gun. That’s no good. Now I need to not only record rail position, but screw torque for each gun? That’s ineffective, and I don’t recommend it.
The US Optics scope here isn’t mounted in an NVD-height QD mount, meaning that you’d need to manually attach it to the front of the optic—not a deal-breaker, but a pain for sure. The QD attachment here can be repeated if the author swaps the gun from a .308 Win. to 6.5 Creedmoor.
I like the lever-style QD mounts because they offer simple, repeatable pressure per gun with no additional tools. These mounts have faceted screws that control lever pressure. Basically, you’re “zeroing” your base to the individual rail on each gun. I establish a “base” gun for each mount where it usually lives. Then, if I need to mount it on another gun, I just move it the appropriate number of clicks to that spot, and voila, I have consistent locking pressure every time without needing a wrench.
That said, I will usually not remove mounts like the Geissele and Badger once I have them installed because of needing to torque them to one gun at a time for repeat zero. The risk of crushing the rail or damaging the mount is much higher here as well, and if you damage the threads, it will change mounting pressure.
Many people see 65 foot-pounds of torque and say, “Well, if 65 foot-pounds is good, 85 foot-pounds must be better.”
Yikes.
Editor’s Note: This article originally appeared in the September 2024 issue of Gun Digest the Magazine.
More On Scope Mounts & Rings:
A Ring For Every Occasion: Scope Rings And Base Systems
We test out a Wilson Combat NULA Model 20 rifle and discuss how the company is continuing Melvin Forbes’ legacy.
In 1985, a West Virginia gunsmith named Melvin Forbes introduced the world to the lightest and most accurate bolt-action hunting rifle ever made. Not only was this rifle light and accurate, but it also earned the distinction of being the pound-for-pound most accurate rifle of all time. In 2022, the company Forbes started—New Ultra Light Arms/NULA—was purchased by Wilson Combat. It marked the end of a nearly 40-year dynasty of lightweight hunting rifles. But now Wilson Combat is continuing the legacy with a modernized version of Forbes’ famous rifle and carrying on the NULA name.
Top: Original NULA Model 20 with a 24-inch barrel. Bottom: Wilson Combat NULA Model 20 with a 20-inch barrel.
The Wilson Combat NULA
Forbes machined Original NULA rifles by hand. Wilson Combat NULA actions are CNC/EDM cut. Just like the originals, they’re cylindrical and slim at only 1.22 inches in diameter and made of 4140 steel. The bolt has two lugs and is CNC machined from 4340 barstock, and just like with the originals the bolt is only 0.585 inch in diameter. Perfectly sized and no larger than necessary. The bolt has a Sako-style extractor and a plunger ejector and is fitted with a swappable and grooved bolt knob that’s slightly oversized. There’s also a red “cocked” indicator visible at the rear of the bolt.
Unlike many modern bolt-action rifles, the bolt on the Wilson Combat NULA is—just like with the originals—no larger than it needs to be.
Timney made the triggers for the original NULAs, and Wilson Combat worked with Timney to adapt one of their Elite Hunter triggers to their NULA. Just as with the original, the safety—when placed on “safe”—locks the bolt handle down. Another change Wilson Combat made was to drill and tap the action for 8×40 screws as opposed to 6×40. But the action still accepts the same style of one-piece scope rings designed by Forbes and now made by Talley. They only weigh 1.5 ounces per set.
There’s a red “cocked” indicator on the bolt of the Wilson Combat NULA rifle.
Wilson Combat makes their own barrels from 416R stainless steel. They’re lean and trim and unusually tapered. As opposed to using set contours, Wilson Combat tapers barrels so they all have the same wall thickness at the muzzle. This shaves weight from the original NULA standard contoured Douglas barrels, and every caliber barrel has its unique contour. I know of no other manufacturer doing this. Threading at 5/8×24 is an option for all calibers and barrel lengths.
If you opt for a threaded muzzle on your Wilson Combat NULA Model 20, it’ll come with a thread protector.
The barreled action is placed in a pillar bedded AG Composites carbon-fiber stock that’s also fitted with a featherlight (2.6 ounce) hard anodized aluminum floorplate. The barrel is free-floated, and the stock is finished in one of two camo patterns or a speckled charcoal gray. Finally, a Limbsaver recoil pad is expertly fitted and complete, the stock weighs less than 25 ounces. A complete rifle—less scope rings—weighs only 5.17 pounds. Of course, weight will vary slightly depending on barrel length and cartridge. Just the other day I received a new Wilson Combat NULA in .358 Winchester, and with its 16.25-inch barrel, it weighs only 4.94 pounds.
Here you can see the pillar bedding used by AG Composites on the stock for the Wilson Combat NULA rifles.
The 7mm-08 is the third new NULA rifle from Wilson Combat I’ve thoroughly evaluated. The first two were a 6.5 Creedmoor and a .308 Winchester. All were tested with multiple hunting loads from a bench rest at 100 yards, and all three rifles averaged between 1.02 and 1.07 inches when every group fired was considered. This is noteworthy because when it comes to precision, most rifle reviews in gun magazines represent the evaluation of an example of one. It clearly demonstrates that you can expect MOA performance with any new NULA Model 20 rifle for five-shot groups, and less than that for three-shot groups. These rifles will shoot!
Wilson Combat Model 20 NULA. Photo credit: Wilson Combat
But more importantly for the hunter, these rifles handle well. The 20-inch barreled 7mm-08 balanced right at the front guard screw, which puts the weight right between your hands. This is ideal for a rifle that will be shot in field conditions, because it offers the best equilibrium between handling and shootability. Now, adding a suppressor will make the rifle a bit muzzle heavy, which isn’t ideal for shooting running game or snap shooting. But, if that’s the type of shooting you expect to do when hunting, you might want to consider the shorter 16.25-inch barrel option.
The addition of the hinged floorplate Wilson Combat chose to include on their version of the NULA Model 20 is a nice touch on the range and in the field. Thank goodness they didn’t opt for a detachable magazine, which I think is somewhat foolish and even a bad idea on any straight-up hunting rifle. The hinged floor plate makes unloading the rifle much faster, easier and safer than cycling all the loaded cartridges through the action.
The hinged floor plate is one of the modernizations Wilson Combat applied to the NULA rifle after acquiring the design from Melvin Forbes.
I can’t say I loved everything about the rifle. Though the ribbed bolt handle provided a solid grip for positive functioning, I prefer the round handle of the original. As for the stock, I think AG Composites currently make the best carbon-fiber stocks. However, I would’ve preferred Wilson Combat to have carried on with the hand-laid carbon-fiber/Kevlar stock Forbes pioneered. It was the lightest and most stable synthetic rifle stock ever created.
LOAD TESTED
VELOCITY
ENERGY
PRECISION
Hornady 139-grain SST American Whitetail
2,802
2,423
1.280
Nosler Trophy Grade 140-grain AccuBond
2,788
2,416
0.972
Lehigh Defense 142-grain Controlled Chaos
2,740
2,367
0.881
AVERAGE: 1.044
In the Field with the Wilson Combat NULA
I’ve hunted all over the world with original NULA rifles, and I’m carrying on that tradition with the Wilson Combat version. In early 2024, I took the Model 20 in 7mm-08 Remington to Texas on a Whitetail deer hunt. This was a hunt hosted by Trijicon, and I mounted a Trijicon AccuPoint 3-18X50 riflescope on the NULA in 30mm Talley rings. This was a high-end hunt; we set in fancy box blinds, and there was no walking and little hunting involved. On the third day, I took a nice buck, but it wasn’t much of a test of the rifle. However, the outfitter had a 600-yard range, and after my hunt, I proceeded to ring 8-inch steel plates from 100 out to 600 yards and never missed a shot.
Photographer/videographer Sabastian “Bat” Mann with a blesbok ram he took with the 7mm-08 Wilson Combat NULA.
In March of this year, I embarked on a six-week safari in Africa. During the first week, I was in the Eastern Cape with my wife. She used the Wilson Combat NULA in 7mm-08 to take a blue wildebeest, two black wildebeest, an impala, a warthog, a jackal and several rock hyraxes. She never missed, and even with the large Swarovski Z8i 2-16×50 P riflescope and a Silencer Central Banish Backcountry suppressor attached, the rifle was a joy to carry.
The author’s wife, Drema Mann, with her first jackal. It was taken with the 7mm-08 Wilson Combat NULA and a 142-grain Lehigh Defense Controlled Chaos bullet.
Several weeks later, my son joined me in the Northern Cape. He was there on a photography assignment but had a few days to hunt. He latched on to the NULA in 7mm-08, mostly because I think it was so similar to his original NULA in 6.5 Creedmoor. He took one blesbok ram on the other side of 300 yards, another at about half that distance and used the rifle to whack several warthogs during eradication operations.
As Good as the Best?
In 2021, I authored an article about Forbes’ custom NULA rifles for Gun Digest and proclaimed them the best bolt-action hunting rifles ever made. My opinion hasn’t changed. However, Wilson Combat’s purchase of New Ultra Light Arms brought the production of those rifles with their magical stocks to an end. The new NULA rifles are slightly modernized and very similar to the originals, and—very importantly—they’re $1,500 cheaper. Are they as good as the originals? I’d not go that far. But since the originals are no longer in production, with confidence, I’ll say the Wilson Combat NULA is now the best bolt-action hunting rifle in production.
Melvin Forbes at the workbench with one of his original NULA rifles.
Forbes often said his NULA rifles—the originals—were like his children and that the people who sent him money for them were just renting them, because they’d always be his. If Bill Wilson and Wilson Combat take that same approach with their modernized NULAs, they’ll do just fine at crafting the legendary rifle Forbes created.
Pros
Incredibly light and accurate
$1,500 less expensive than an original
Some useful modernizations like its hinged floorplate
Cons
The author preferred the original round bolt handle to Wilson Combat’s ribbed version
Stock isn’t quite as nice as what Forbes used on original NULA rifles
Editor’s Note: This article originally appeared in the September 2024 issue of Gun Digest the Magazine.
We discuss the different types of shooting supports and take a look at some of the best examples of each.
In 1997, Jeff Cooper published The Art of the Rifle. The book contains many lessons for riflemen but maybe the most important is the solid axiom: If you can get closer, get closer; if you can get steadier, get steadier. Both improve your chances for making an accurate shot, but sometimes getting closer is not an option. When that happens, getting steadier is the rule.
“Getting steadier” has generally meant assuming an intermediate position like kneeling, sitting or prone and using a shooting sling. However, sometimes that’s still not enough. What’s needed is a shooting support.
Shooting supports do not negate the need to follow the basic principles of marksmanship. They only provide a steadier shooting platform.
A shooting support can be almost anything, natural or man-made. A backpack, log or limb, and even a buddy can sometimes become a shooting support. Hunting in Idaho’s Frank Church Wilderness a few years back, I needed a shooting support, but nothing was available; the trees were too large to offer support. I ended up sticking my knife in the side of a tree and resting the rifle over it to make a long shot on a black bear. It worked, but there are better options, such as bipods, tripods and shooting sticks.
Shooting supports can be almost anything. Even a knife stuck in the side of a tree.
Shooting Supports Types
I classify shooting supports in two categories. First are the independent sticks that require no special interface to work with the rifle. These can be as simple as the two-leg cross sticks used by old-time American bison hunters, or the three-leg sticks so common on African safaris. With these, you simply rest the rifle across them. The other type is those that are semi-permanently attached to, or that can be quickly connected to, the rifle.
Shooting supports that can attach or detach from the rifle quickly are generally the most convenient and versatile.
Independent shooting sticks are great for guides and professional hunters because they can work with any rifle without an adapter. They’re also very fast to use and some even allow for rapid height adjustment. If you’re a static shooter/hunter who only plans to shoot from one position with limited movement, an attached bipod makes sense … however, its primary advantage is also its disadvantage: They add weight to your rifle.
Many bipod shooting supports semipermanently attach to the rifle. This keeps them handy, but they add weight to the rifle.
For most shooting and hunting situations, one of the quick-attach systems is generally a better option. These often provide the most stability and versatility.
Here are some of my favorite shooting supports of both types:
The independent shooting sticks that do not attach to your rifle are very popular in Africa.
A lot of the shooting during an African safari requires shots from the standing position, and this means tall shooting sticks are generally best. There’s a lot to choose from here, but there’s also a certain nostalgic connection to traditional safari shooting sticks made of wood. These can be bulky and heavy, but they can also be very stable. The best source I’ve found is African Sporting Creations. They offer a variety of styles, and some are even made of exotic woods and come in sections for easy transport. These sticks do not represent the latest technology, but you’ll look the part and feel the connection to old Africa. Prices start at around $230. Website: AfricanSportingCreations.com.
The Harris Bipod
For many years, the Harris bipod was the most popular shooting support in America. With the adapters they now offer, a Harris bipod can be attached to most any rifle and provide a very steady platform. Versions are available in various adjustment ranges from 6 to 9 inches, all the way up to 13 to 27 inches. These bipods are quick to deploy but they tend to be heavy; the lightest bipod Harris offers weighs 11 ounces. On the plus side, they’re relatively inexpensive, with prices ranging from around $83 to a little over $200. Website: HarrisBipods.com.
Magpul Bipod
The Magpul bipod is made of mostly polymer, so it’s very lightweight. They’re offered with various attachment systems.
Magpul is well known for their quality polymer rifle accessories, and they have a full line of bipods including a quick detach model that you can attach to a rifle via the sling swivel stud, Picatinny rail, M-Lok or the A.R.M.S. 17S system. These bipods are adjustable in ½-inch increments from 7 to 10 inches, and at only 8 ounces, they’re reasonably lightweight. They’re not very expensive, either. Prices range from about $75 to $130. Website: Magpul.com.
Primos Trigger Stick
One of the most popular shooting sticks I see in use is the Primos Trigger Stick. This is an independent shooting stick that comes with a V-type rest. Its primary appeal is how quickly you can adjust it for height by simply pulling the trigger. This means you can carry it compressed and lengthen it very quickly as needed. You can adjust the bipod and tripod versions from 24 to 62 inches, and shorter versions you can adjust from 18 to 38 inches are also available. One downside is weight: You’ll be toting around between 2.5 and 3.5 pounds. Prices range from around $95 to $175. Website: Primos.com.
Saddle Tripods
With the rise of long-range precision shooting, a new shooting support often called the “saddle tripod” has become popular. It’s essentially a vice mounted to a tripod that you clamp your rifle into. They’re offered by various manufacturers, and Primos has their own version in their Edge Series of tripods. It has a collapsed length of 33 inches, and you can adjust it to provide between 9 and 67 inches of shooting support. It also offers 360-degree panning. What many like about the vice system is that the tripod can support your rifle by itself. This leaves you free to glass, work an elk call or just relax while waiting for a shot. But at 5.75 pounds, it’s heavy and a little slow to set up. Suggested retail is $170, and a fast-adjust Trigger Stick version is available for $500. Website: Primos.com.
The Spartan System
If you want the best shooting support system, and if you don’t mind paying for it, Spartan Precision Equipment is a one-stop shop. Their entire line of shooting supports work with the same magnetic attachment system that interfaces with a wide selection of rifle adapters.
Spartan Precision Equipment shooting supports all attach by an ingenious magnetic stud that interfaces with a wide selection of adapters.
They offer the incredibly lightweight 4.8-ounce, 7-inch Javelin bipod ($150), and the Pro Hunt Tac version ($300) is adjustable from 7 to 9 inches or 9 to 12 inches. It weighs between 7.6 and 8.3 ounces. They also have the Springbok bipod ($200), and it’s adjustable from 22 to 38 inches and weighs only 10.6 ounces. It’s great for shooting from sitting or kneeling and especially applicable to mountain hunting.
Spartan Precision Javelin Bipods are very light, can be attached in an instant, and even carried in your pocket.
Because these are quick—like 2 seconds—attachable bipods, there’s no need to keep them on the rifle. Spartan is working on a four-leg version of the Springbok a group of us recently tested in Africa. It was crazy stable, light and easy to adjust. It should be available soon.
Spartan’s Ascent Tripod is one of the best of all the shooting supports because of its versatility.
My favorite Spartan shooting support is their Ascent Tripod ($1,100). This 3.75-pound tripod is adjustable from 12 to 70 inches, offers 360-degree rotation and a 45-degree cant. It can hold your rifle by itself, your spotting scope, binoculars, and camera and you can even use it as a back rest when seated and glassing for long hours. It also has a weight hook where you can hang your pack for added stability to the platform.Website: JavelinBipod.com.
Primos & Spartan Collaboration
The Spartan Precision equipment magnetic attachment system is so practical that Primos has incorporated it into their Edge series of tripods. This allows the Edge Tripod ($250) to interface with any of the Spartan Precision Equipment rifle adapters. For an additional $300, you can get a Primos fast-adjust Trigger stick version that has the same magnetic attachment.
Editor’s Note: This article originally appeared in the September 2024 issue of Gun Digest the Magazine.
Want a short-barreled AR-15 without dealing with the hassle of the NFA? Good news, AR pistol braces are back on the menu.
AR pistols, AR-style firearms with no buttstock and a barrel shorter than 16 inches, have always been legal. AR pistol braces, on the other hand, have not been.
Between the advent of AR pistol braces and today, the legality of the accessory has gone back and forth several times thanks to the ATF’s multiple contradictory rulings over the years. Will they always be legal? Who knows? But thankfully at the time of this writing, they’re perfectly acceptable to own, be attached to and use with your AR pistol (or any other large-format pistol).
This is excellent news, as AR pistol braces make these guns supremely more shootable and useful. That said, there are many options currently available, so we’re going over important features to consider when shopping for one and our picks of the 10 best models to buy.
What Is a Pistol Brace?
Shooting a large-format pistol, which by definition can’t have a stock, isn’t easy to do offhand. Before the introduction of pistol braces, the best solution for enhancing shooting stability without a stock was using the sling to create tension. While the SAS sure looked cool doing it with their MP5s, it’s not as good as having another point of contact, something pistol braces and traditional stocks both provide.
The official way pistol braces were designed for use is by attaching or pressing the brace to the firing hand forearm, stabilizing the gun for a bit more control in an unconventional position. Some people also choose to shoulder them like a real buttstock, and they work for that as well, but that’s another legal conundrum the ATF has muddied with various statements. Whether you intend to use your brace the way it was officially designed or by pressing it to your shoulder is up to you, we’re not lawyers and we don’t take responsibility if you end up making the ATF mad. Whichever method you choose, it will make the pistol much more shootable than if it had no brace at all.
What this all means is that AR pistols equipped with braces get you pretty damn close to owning an SBR without dealing with ATF registration. That means no paperwork, no wait times, no extra regulations and no paying for a $200 tax stamp. At the time of this writing, as long as you can legally purchase any other kind of handgun, you can walk into a store and buy a braced AR pistol.
Pistol Brace Origins
The original brace was invented by Alex Bosco (a veteran of the U.S. Army and U.S. Marine Corps.) for a friend who was unable to shoot their rifle from the shoulder anymore due to a service-related injury. After making a prototype, Bosco saw potential and co-founded the company SB Tactical to produce them. That’s where all this started.
The prototype SB Tactical AR pistol brace. Photo: SB Tactical.
AR Pistol Brace Legalities
Currently, they’re legal…but that could change.
Before production at SB Tactical started in 2012, the company collaborated with the Bureau of Alcohol, Tobacco, Firearms and Explosives to get a ruling on whether the device ran afoul of National Firearms Act regulations. They replied to Bosco approving his original design, and this decision inadvertently got the ball rolling on the pistol brace concept in general as well.
The ATF has reversed course only to re-reverse course several times since.
You can go read more in-depth about the history of pistol brace legality if it interests you, but the only detail that really matters at the time of this writing is the most recent decision made on June 13th, 2024. That’s when a Texas-based District Court vacated the ATF’s rule that attempted to largely prohibit the use of pistol braces, meaning that they are currently fully legal at the federal level.
Types Of AR Pistol Braces
Pistol braces generally conform to one of two styles—wraparound or blade.
The blade style of brace features a narrow blade that sits against the inside of the arm. They’re designed to increase shooting stability by being pressed against the inside of one’s forearm while the shooting arm is extended.
Shooting a blade-style AR pistol brace demonstrated with Magpul’s BSL. Photo: Magpul.
Wraparound braces are designed to sit on top of the arm and have a fastening fabric loop to connect the brace to the firing hand arm. The original SB Tactical brace, the SB15, was the progenitor of this style.
Shooting a wraparound-style brace, demonstrated with a SB Tactical SOB. Photo: SB Tactical.
A small number of braces are hybrid designs and have features of both, meaning a blade-like brace with some provision that allows you to use the brace in either fashion.
Which Brace Is Right For You?
Which type is best for you depends on personal preference and how you plan to use it. If you use them the way they were technically designed, the wraparound style will provide more stability and security but is also slower since you must strap them to your arm. Blade-style braces are quicker and simpler but won’t be as stable.
If you intend to shoulder your pistol brace, different details matter. For shouldering, wraparound styles with a wider rear end will generally be more comfortable, but that doesn’t mean that blade-style braces can’t be used that way. Most large-format pistols that a brace would be attached to are chambered for 5.56 or 9mm anyway, and those aren’t exactly shoulder killers.
Pistol Brace Attachment Methods
There are different pistol brace attachment methods for different firearms platforms, but today we’re discussing those designed for installation on standard AR pistols that feature a buffer tube. On that note, pay attention to which buffer tube spec the brace is made for. Some are only designed for pistol buffer tubes, but others are made for standard, mil-spec tubes. Some other braces may require a proprietary buffer tube, but those usually ship with the one you need.
Some people also want the ability to adjust their AR pistol brace’s length of pull, but not all are capable of doing so. Whether it’s for storage or ergonomic reasons, adjustability is a nice feature, but it’s not strictly necessary.
Finally, if you want to attach a sling to your brace, you should ensure it has the type of attachment point you’ll need.
Style: Blade Adjustable Length: No Sling Attachment: QD socket on rear Buffer Tube Compatibility: Any MSRP: $59.95 Website:magpul.com
Pros
Great buffer tube compatibility
QD sling attachment point rear placement aids in shooting 1-handed
Cons
Not adjustable
Sling socket on rear could interfere with shouldering with sling attached
Magpul’s BDA Arm Brace is a minimalist, non-adjustable blade compatible with any buffer tube style via its locking clamp. There’s a QD socket cup on the back and nothing else. Everything you need, nothing you don’t, and it works with any gun.
SB Tactical SOB
Specs
Style: Wraparound Adjustable Length: No Sling Attachment: No Buffer Tube Compatibility: Pistol-style MSRP: $74.99 Website:sb-tactical.com
Pros
Great cheek weld if shouldering
Cons
Not adjustable
No dedicated sling attachment points
The SOB, a simplified version of SB Tactical’s original SB15 brace, is a wraparound style, with a 1-inch adjustable loop for attaching to the arm. It attaches to pistol buffer tubes and does not have an adjustable length of pull or any dedicated sling attachment points. If all you need is a solid brace with no frills, it’s a very comfortable option.
The Tailhook design by Gear Head Works is a quasi-hybrid design, in that it hooks around the arm like a wraparound but is closer to a blade in function. Instead of a soft strap, the brace features an unfolding, rigid arm that lets the shooter put their arm into the brace, hooking the shooting arm without locking it in place. The Tailhook requires a proprietary buffer tube (included with purchase) that includes length adjustment detents. They also feature a loop on each side for a traditional web sling.
Some users feel that the rubber is too soft compared to other SB Tactical braces
The SBA3 is compatible with any mil-spec carbine buffer tube, and it works with buffer tube detents so you can adjust the length of pull. It’s a wraparound style with an adjustable strap and features a QD socket on each side for mounting a sling. It’s available in multiple colors as well.
Maxim Defense braces are based on their CQB collapsing stock, designed in conjunction with SB Tactical. It has the same telescoping system for rapid deployment as the CQB stock, but instead has a wraparound style brace with an adjustable loop at the end. It’s compatible with standard buffer systems and features a QD socket on each side. For colors, it’s offered in black or FDE for a bit more money.
Magpul BSL Arm Brace
Specs
Style: Blade Adjustable Length: Yes Sling Attachment: QD socket on rear + two web sling loops Buffer Tube Compatibility: Mil-spec MSRP: $59.95 Website:magpul.com
Pros
QD sling attachment point rear placement aids in shooting 1-handed
Adjustable LoP
Cons
Sling socket on rear could interfere with shouldering with sling attached
Magpul’s BSL Arm Brace is a blade-style brace that works with any mil-spec buffer tube. It locks into buffer tube detents with the spring-loaded plunger, so the length of pull is adjustable. It includes a QD socket on the back of the brace as well as two web sling loop mounting points. Simple, rugged, and available in any color you like so long as it’s black.
SB Tactical SBM4
Specs
Style: Wraparound Adjustable Length: No Sling Attachment: No Buffer Tube Compatibility: Pistol-style MSRP: $74.99 Website:sb-tactical.com
Pros
Good cheek weld if shouldering
Cool M4-esque style
Cons
Not adjustable
No dedicated sling attachment points
Some report that the rubber tears beard hairs
Another simple wraparound design, the SBM4 is non-adjustable and only compatible with pistol buffer tubes. It’s styled after the M4 stock and is only available in black. This is a good option if you already have an AR pistol with a pistol-style buffer tube you don’t want to swap out.
The Tailhook Mod 1 has the same general features as the Mod 2, a folding tailhook and sling loop, but instead of requiring a proprietary buffer it simply clamps onto any pistol buffer tube you want it to. Loosen the screws, slide it onto the end of the buffer tube and tighten. One bonus is that this version features an aluminum billet construction so it should be more durable than rubber or plastic models.
This model is nearly identical to the SBM4 stock except it was designed for use with mil-spec buffer tubes and features an adjustable length of pull and a QD sling socket.
Strike Industries AR Pistol Stabilizer
Specs
Style: Blade Adjustable Length: No Sling Attachment: QD sockets + web sling loop Buffer Tube Compatibility: Pistol-style MSRP: $35.95 Website:strikeindustries.com
Pros
Most affordable
QD sling sockets and web sling loops
Cons
Not adjustable
Yes, Strike Industries may have a certain reputation due to the red aluminum parts in their catalog, but their AR Pistol Stabilizer has more merit than you’d think. It’s a molded polymer blade-style brace compatible with pistol buffer tubes. It locks in place with a set screw, so it attaches securely. It has ambidextrous QD socket cups as well as a loop for a web sling. Best of all, they’re one of the most affordable models available at less than $40.
Looking to go armed, but are stuck in the weeds as to what to arm yourself with? Here are 20 of the best concealed carry gun options that will keep you on the defensive.