It’s scanning, not head bobbing. Tune up your situational awareness or pay the price.
You see it all the time. A shooter at the range takes a few shots with his handgun, pulls it back into his workspace, then jerks his head right and left fast as if he’s watching stock cars race by. He’ll tell you he’s scanning … for threats, that is. But is he really?
More than likely, this sad stranger is only going through the motions. There could have been a pile of gold bricks off to his side and he’d have never seen it for all the good his bobbing did. It was more form than function.
Should you get into the habit of scanning? Absolutely. But how and when you do matters, otherwise you’re putting yourself at a major disadvantage.
First and foremost, scanning isn’t simply something you do after engaging a threat. It’s a constant routine, a tool you use all the time. You probably know it by a different name – situational awareness.
As to how you execute scanning, there is no set rule. However, it is safe to say you must become cognizant of your surroundings and what’s happening no matter how you go about it. It’s safe to say, a couple of head shakes isn’t going to accomplish that. Much like training an efficient handgun presentation, you need to learn festina lente — hurry slowly. Doing so ensures you take in all vital situational data to make rational and effective decisions.
Like anything else that concerns the defensive handgun, learning to properly scan your surroundings doesn’t just happen. You must hone this skill. Luckily, it’s something you can do away from the range and without a firearm. Get in the habit of looking around when out and about, taking in particulars of individuals — shirt color, hair color, etc. — and what they happen to be doing at that moment. Picking out minute details forces you to take notice of those around you. Do it consistently and it becomes second nature.
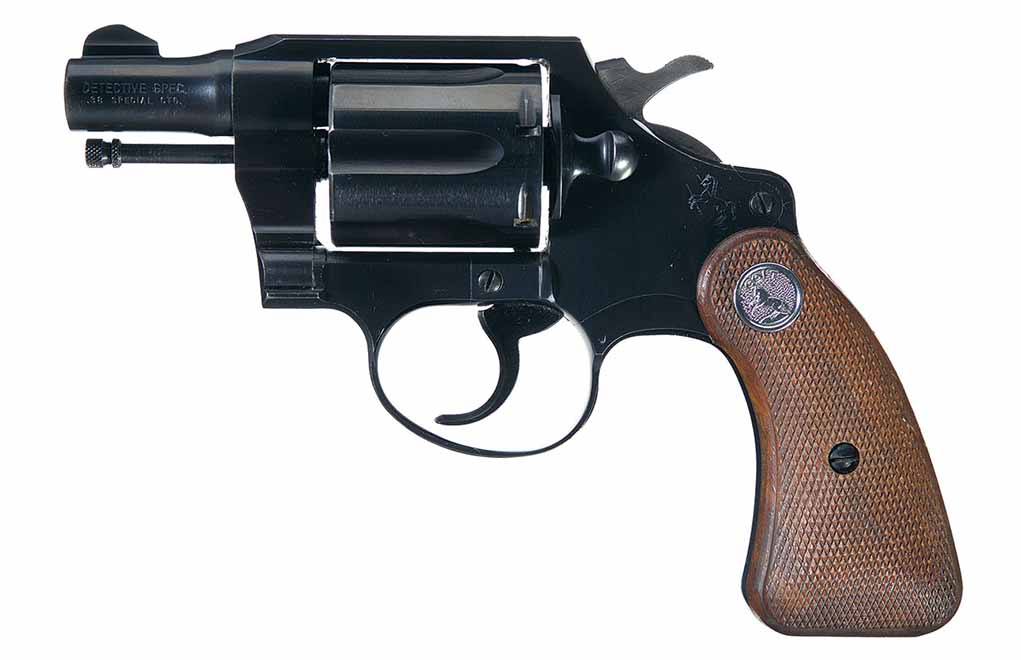
Whether in the hands of cops or robbers, the Colt Detective Special is a true icon among snubby revolvers.
What Makes The Detective Special A Legend:
When introduced in 1927, it was considered the ideal compromise between size and power.
Became iconic on the silver screen in the hands of both cops and robbers.
Essentially a Police Positive with a 2-inch barrel.
The Banker’s Special model was introduced within months of the Detective Special’s release.
Given its serial number range overlaps the Police Positive Special, it is not exactly known how many Detective Specials were made.
In 1927, Colt introduced one of the true icons of American handgun history: the Detective Special. The snub-nose .38 Special revolver became very popular with the shooting public, as well as the market for which it was created, undercover and plainclothes police officers. At the time, it was considered an ideal compromise between size and power — a compact and relatively lightweight gun chambered for the popular .38 Special cartridge.
Hollywood caught on quickly, and for years, a “snubby” or “belly gun” appeared in virtually every movie about cops and robbers, including many of the film noir classics of the ‘40s and ‘50s. Many of these movie guns were Detective Specials or one of the Colt variants, which made them even more popular with the general public.
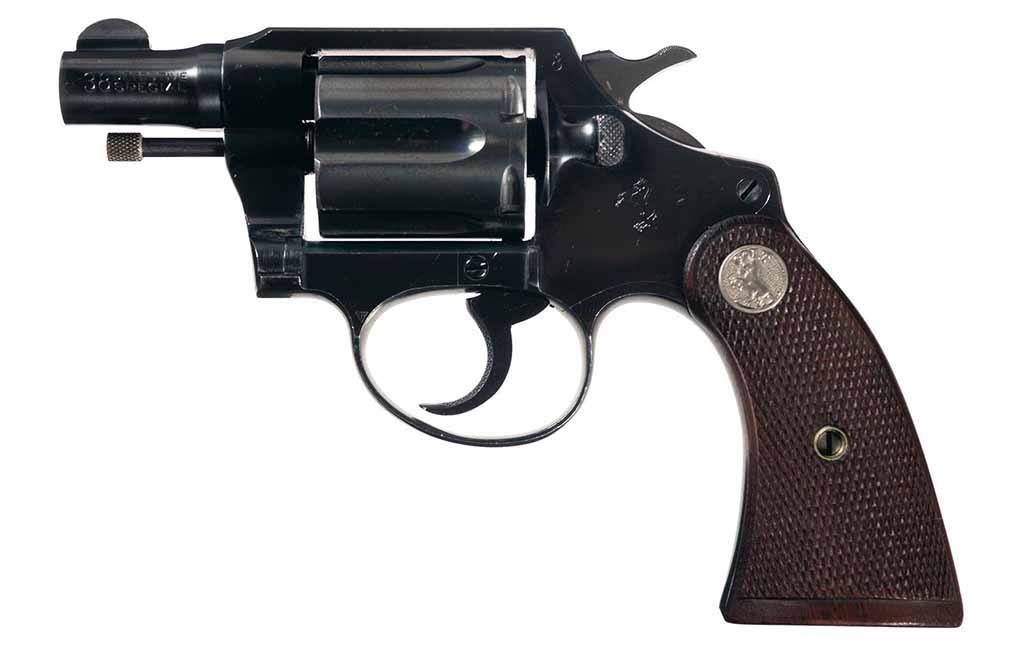
The Detective Special was basically a Police Positive Special with a 2-inch barrel, and the two models shared the same serial number range. It was only available in .38 Special, while other Colt snub-nose revolvers were chambered for milder rounds, such as .38 Colt New Police (aka .38 S&W), .32 Short and Long Colt, and .22 rimfire.
Within a few months of the 1927 birth of the Detective Special, the Banker’s Special was introduced. It was identical to the Detective Special except for the shorter (by 1/8-inch) cylinder for its chamberings, which were for the .38 Colt New Police and .22 Long Rifle. Both models are roll-marked on the left side of the 2-inch barrel, “Detective Special” and “Banker’s Special.”
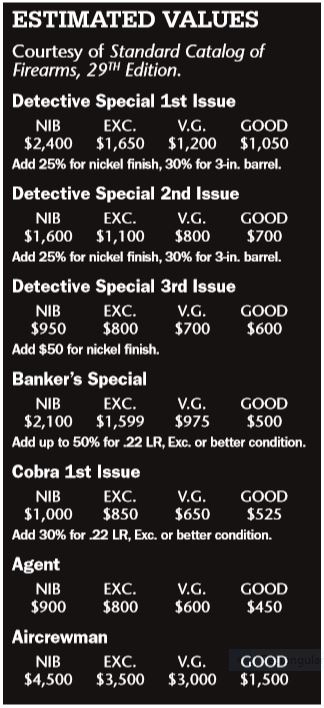
This is a 1st Issue Model, made between 1927 and 1946.
The exact number of Detective Specials made is not known, due to the fact that its serial number range overlapped that of the Police Positive Special. However, it’s estimated that more than 400,000 were produced between 1927 and 1985. [1]
There were four generations of Detective Specials, or “issues” as defined by the manufacturer and collectors.
1st Issue
Manufactured from 1927 to 1946. Originally chambered in .38 Special only with wood grips and a square butt until 1932, with round-butt models beginning in 1933. This model and all subsequent Detective Specials had a six-round cylinder.
2nd Issue
Manufactured from 1947 to 1972. Added calibers were .32 Colt New Police, .38 Colt New Police with a slightly deeper frame. Some were made with a 3-inch barrel. Grips changed to plastic in 1947, back to wood from 1955 to 1965, wrap-around grips from 1966 to 1972.
The 2nd Issue Model is a pre-WWII version, made between 1946 and 1972.
3rd Issue
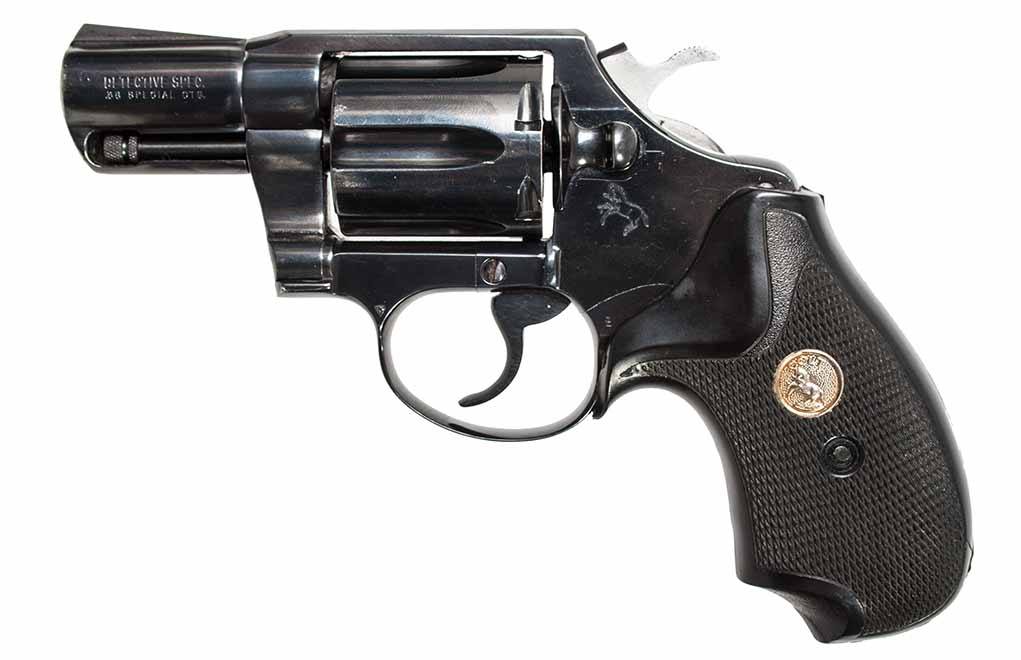
Manufactured from 1972 to 1986. Shrouded ejector rod with 2- or 3-inch barrel, wrap-around walnut grips, blue or nickel finish. Chambered only in .38 Special.
4th Issue
Manufactured from 1993 to 1995. Shrouded ejector rod with 2-inch barrel, blue finish, wrap-around black composition grips with gold medallions. Chambered only in .38 Special. A double-action only version with bobbed hammer was available.
Other variants of the Detective Special design include the following:
Banker’s Special, previously mentioned, in production from 1927-1943. Approximately 35,000 were made in .38 Colt New Police or .22 LR. Exact numbers of each caliber are unknown, but more were .38s than .22s, resulting in a higher price for the rimfire models.
The 3rd Issue Model, made between 1972 and 1986, featured a shrouded barrel and wrap-around grips.
The Cobra (first issue) was made from 1950 to 1972. This model had an alloy frame and came with a 2-, 3- or 4-inch barrel, and in .22 LR, .32 Colt New Police, .38 Colt New Police or .38 Special.
The Cobra (second issue) was similar to the first issue except it had a shrouded ejector rod. Made from 1973 to 1981.
The Agent, which was similar to the Cobra but with a shorter grip frame. Made from 1955 to 1973 in .38 Special. The Courier was made in .22 LR and .32 Colt New Police with a 3-inch barrel and short grip frame. Approximately 3,000 were made from 1953 to 1956.
The Aircrewman, a very rare model, was made for U.S. Air Force pilots. Weighing just 11 ounces, it was worn in the cockpit and meant to be used if the pilot was forced down in enemy territory. These 2-inch .38 Special revolvers were blued with checkered walnut grips, and marked “U.S.” or “A.F.” Less than 1,200 were made, and most of them in 1951 during the Korean conflict.
A model named the DSII was introduced in 1997 as a replacement for the Detective Special series. It featured a new internal lock-work and transfer-bar safety system. Grips were rubber combat style and the finish was stainless-steel. In production through 1998, most were .38 Specials, but a few were chambered in .357 Magnum. The DS in DSII designates “Detective Special,” but this model is essentially a totally new design.
FOOTNOTES: 1. Colt: An American Legend by R.L. Wilson. Abbeville Press, 1985
Editor’s Note: This article originally appeared in the March 2019 issue of Gun Digest the Magazine.
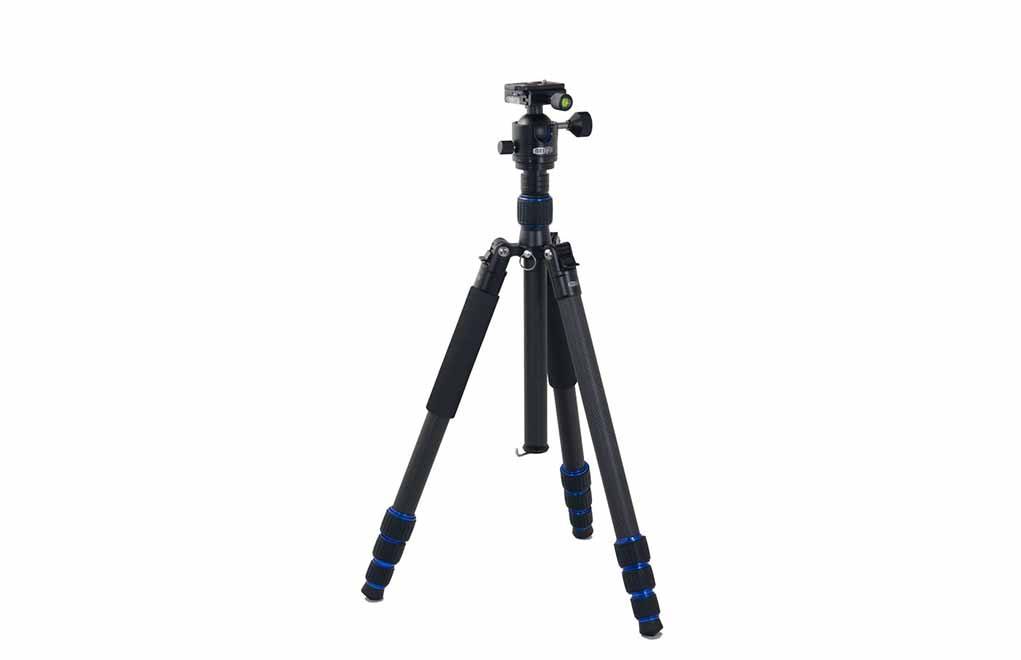
Stable and lightweight, the Meopta Carbon Fiber Tripod gets top performance out of your optics.
What Features Meopta Carbon Fiber Tripod Offers:
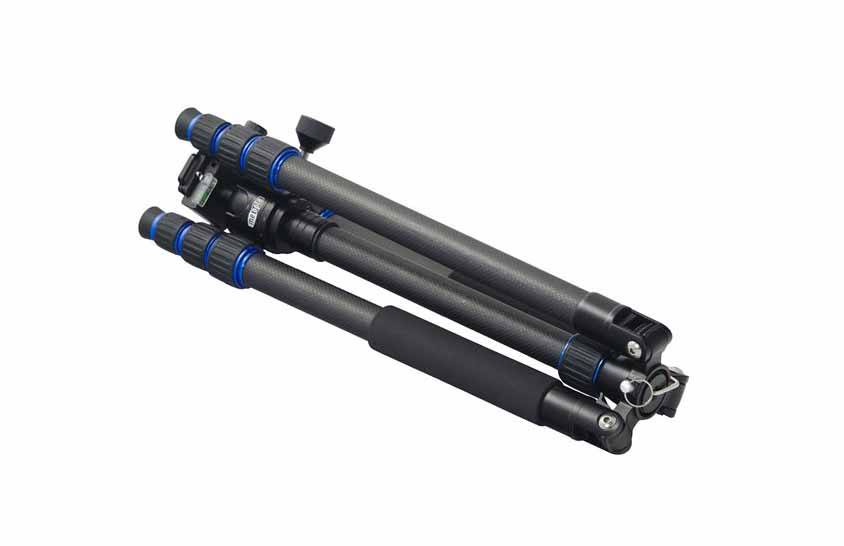
Carbon Fiber Tripod
Ball Head With 2 Mounting Plates
Fluid Head With 2 Mounting Plates
Smartphone Tripod Adapter
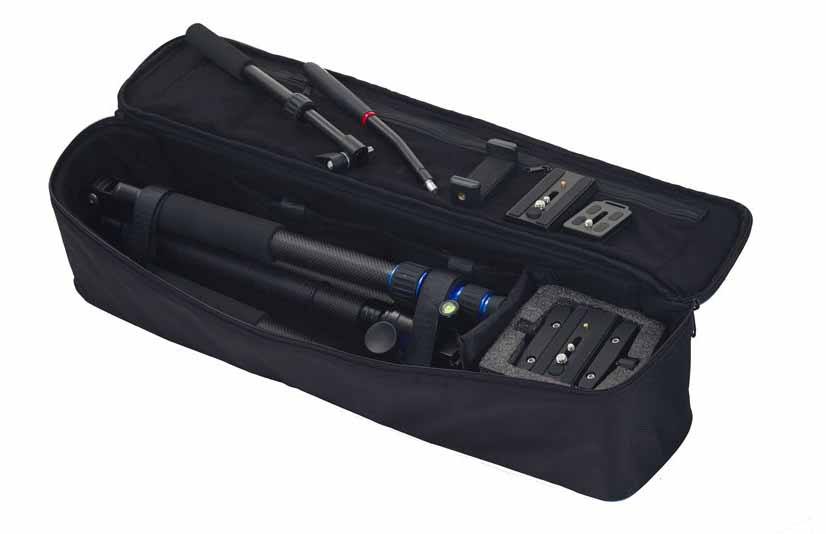
Padded Carrying Case
4-Pound Weight
Folds To 18 Inches
70 Inches Total Rise
Admittedly, optics tripods … not the sexiest topic. Practical, however. Don’t believe me? Pick any old one off the bargain shelf and see if it doesn’t A: Weight you down, B: Drive you insane trying to adjust it, C: Fray your nerves because it wobbles like mad, thus makes it impossible to focus downrange, or D: All of the above.
Better to spend a little money and get the right tool for the job, which is what Meopta USA Sport Optics appears to have come out with recently. If it lives up to its billing, the Meopta Carbon Fiber Tripod looks to be a solid base for spotting scopes and binoculars that cuts down on the bulk. Collapsing to 18-inches and weighing 4 pounds, the optics base shouldn’t prove a hassle to pack in and out either, even if you plan to hump a couple miles to your favorite hunting spot. And it boasts functionality to boot, with 70-inches of rise, fluid and ball heads, quick-release plates, detachable-leg monopod and phone adapter.
The catch, they aren’t giving away the Meopta Carbon Fiber Tripod. The accessory has a suggested retail price of $300. But if you’re going to spend big money on an optic, might as well get the goods that will make it perform.
More from Meopta:
TAMPA, FL – Meopta USA Sport Optics is pleased to introduce the Meopta Carbon Fiber Tripod. This lightweight, extremely durable tripod is ideal for hunters who need a rugged, easily portable, and highly stable tripod in the field. The Carbon Fiber Tripod comes standard with a ball head, pan-tilt head, universal smartphone adapter, and premium carrying case.
The Meopta Carbon Fiber Tripod is designed for spotting scopes of all makes and models as well as binoculars with the use of a standard tripod adapter. The fluid heads deliver smooth, vibration-free movement making it easier to glass vast areas. The phone adapter works with all brands of smartphones and can be attached to the tripod to take quality photos and videos in the field.
“Efficient and effective glassing is crucial on many hunts, and we want to offer our customers a rugged, lightweight, highly stable tripod at a great price,” said Randy Garrison, Director of Meopta USA Sport Optics. “With the Meopta Carbon Fiber Tripod, our customers have the convenience of getting all their optical equipment in one place and the confidence of knowing we stand behind the performance.”
Weighing just 4 lbs., the Meopta Carbon Fiber Tripod folds to 18 inches for easy carrying and comes with a stylish premium nylon carrying case. The maximum total rise with center riser extended is 70 inches, and there is a center hook on which to hang extra weight, such as a backpack, for additional stability if desired. The kit also comes with four quick-release (QR) plates (two for each head) to speed deployment in the field, and one leg of the tripod is detachable for use as a monopod.
Meopta is offering a special package deal which includes the Meopta MeoPro HD 80 Spotting Scope (straight or angled) and Carbon Fiber Tripod. This kit will retail for $1,699 vs. $1,599 for the HD 80 Spotting Scope alone, creating a $200 value for the consumer.
Retail Pricing: Meopta Carbon Fiber Tripod: $ 299.95 Meopta Carbon Fiber Tripod and MeoPro HD 80 Spotting Scope Kit: $1,699.95
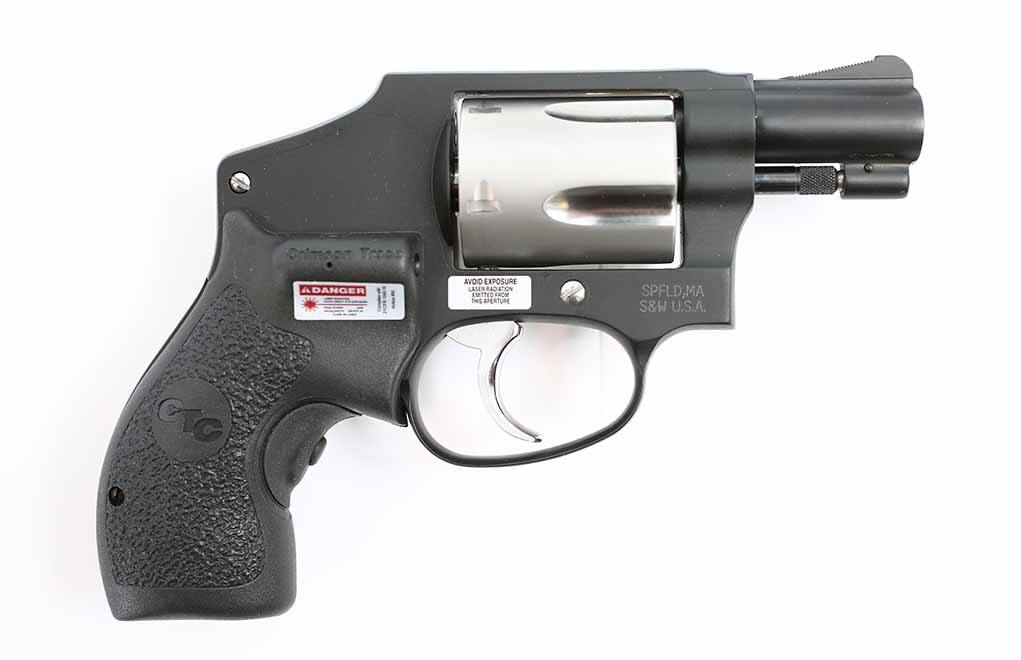
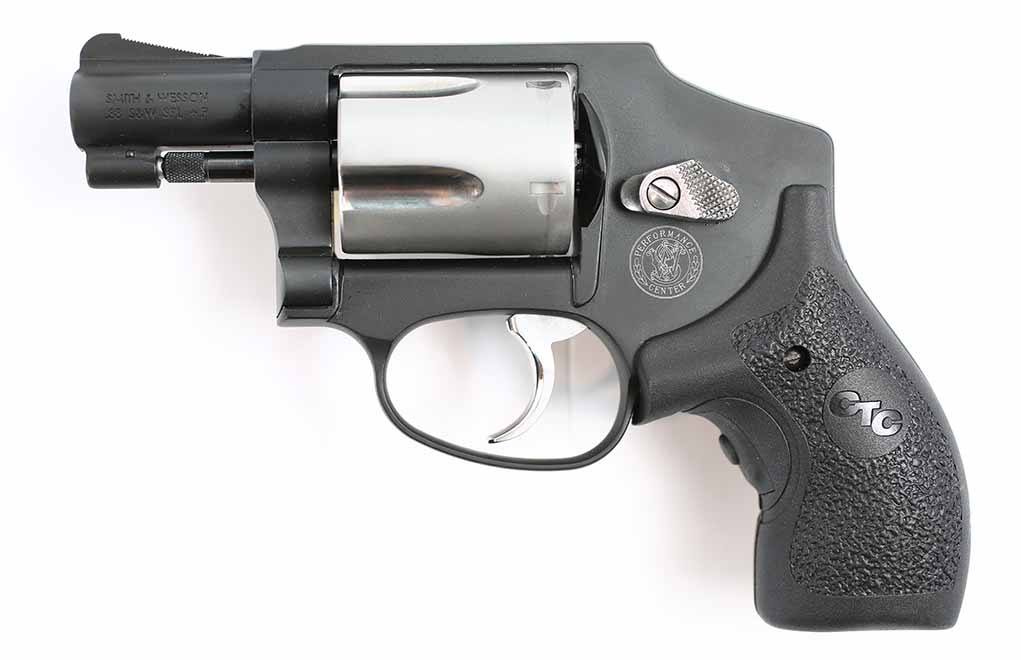
Smith & Wesson rolls out the highly tuned and responsive Performance Center Model 442 snubbie.
How The Performance Center Model 442 Goes The Extra Mile:
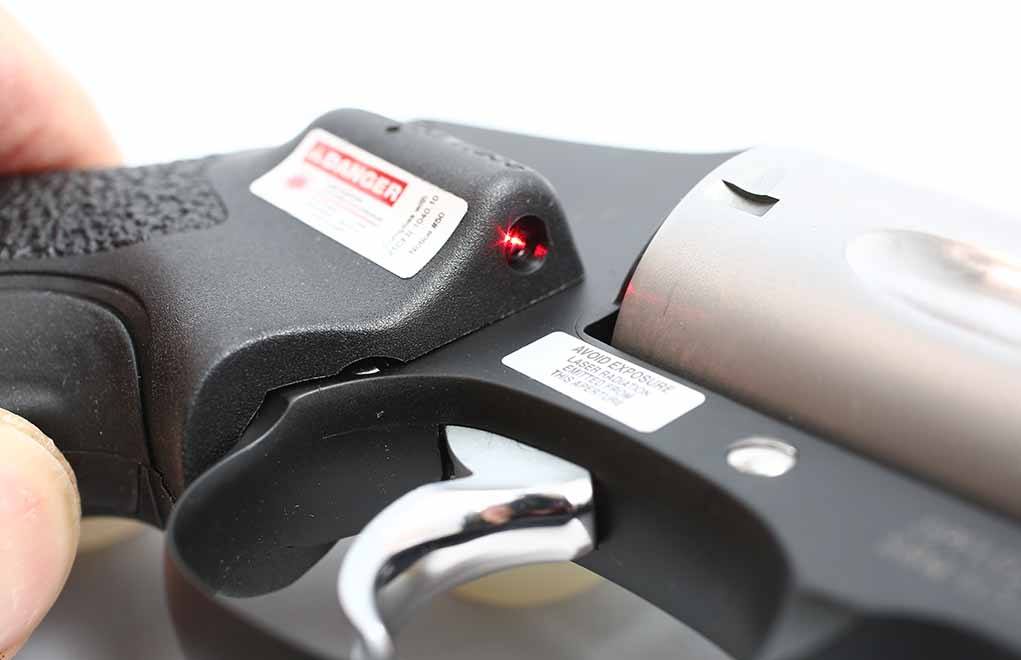
Features Crimson Trace laser grip.
Grip not only activates laser sight, but also better fits the revolver to the hand and soaks up recoil.
Laser is situated on the right side, out of the way of the hand and closer to the bore axis.
Revolver is hand-assembled and inspected.
When the double-action revolver was perfected by Smith & Wesson more than a century ago, the idea of a short-barreled revolver wasn’t top on the list of must-haves. People still rode horses. Automobiles were rich men’s playthings. Walking to work was still a “thing.” And men wore actual suits.
No, it wasn’t until the 1920s, when Prohibition was in full swing, that the first snub-nosed revolver came about as a factory item.
S&W offered its own version of the snubbie. One that’s the “holy grail” of collectors—and was a grand carry revolver—was the Centennial, unveiled in 1952. It was a small-framed DA revolver with the hammer completely enclosed by the frame. Soon afterward, this became the Model 40, which also had a grip safety on the back of the grip portion of the frame because, well, I don’t know. Someone thought it was a good idea, but it did add cost.
The beauty of the revolver: The parts and controls are interior. You can see the hand slot, the centerpin stud and the firing pin bushing. All are easy to keep clean.
That part of it got dropped, and S&W developed another shrouded-hammer design that still left part of the spur exposed. In the goodness of time, S&W added an airweight option, with an aluminum frame and steel barrel and cylinder. And then came a stainless steel version. The J-frame (the frame size these were built on) was always popular. Although it was all-steel construction, this light, handy five-shot revolver was an obvious choice for daily carry or as a backup gun if you packed something bigger.
Fast forward to the 21st century, and lots and lots of people are carrying daily. And you know what? A lot of them find that a compact DA revolver—the grand, old snubbie—still works.
J-Frame Update
The J-frame has seen a lot of improvements (as well as options) in the metal used. One big change happened back in the Reagan era, when S&W started investing in CNC machinery in a big way. Yes, we all love, and loved, hand-built handguns, but the advantage of CNC machinery is that hand-building becomes less necessary. And, fine-tuning a CNC-made revolver produces an even more superior product.
Pressing the button activates the laser. Easing up on your grip turns it off.
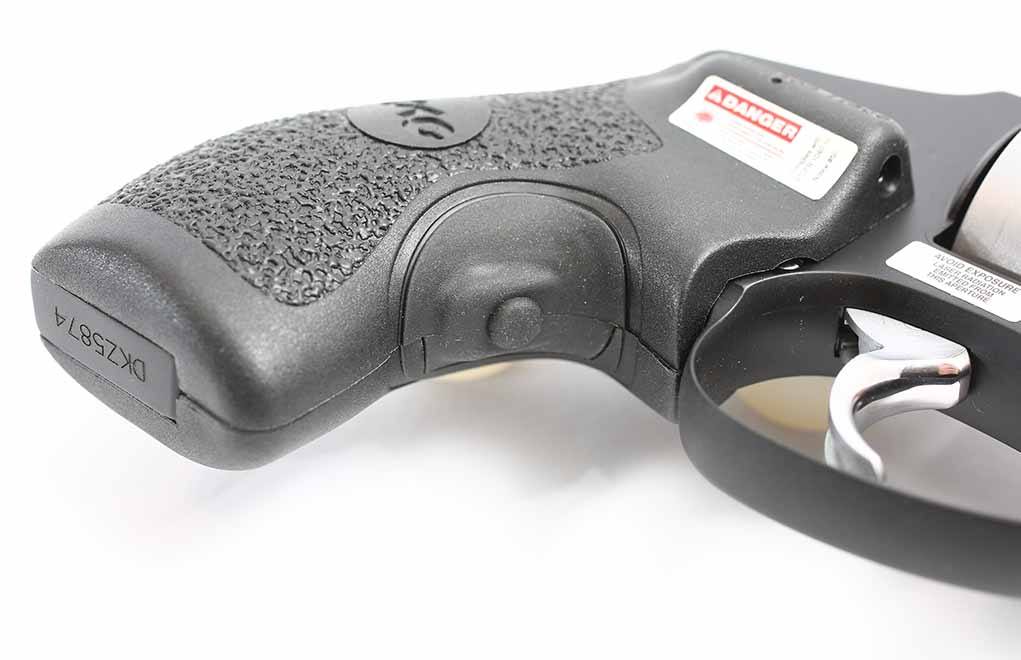
Case in point: the Model 442 Performance Center revolver discussed in this article. The obvious change is the Crimson Trace laser grip, with its soft rubber construction, so we’ll cover this first.
The shape is what we used to call a “boot grip contour,” and it fits the hand (oh, does it fit the hand!). The rubber construction soaks up felt recoil, so even if you are using hot .38 Special loads, you won’t find it abusive to shoot.
There is a button In the middle of the front strap of the grip. When you press the button, as you would when holding the 442 in a firing grip, it turns on the laser. The emitter is located on the right-hand side, up above your hand. This both puts it out of the way of your hands and gets it closer to the bore axis without being awkward.
You can see the activation button on the grip, and the laser emitter is located up near the cylinder.
When you squeeze, the laser is on. Ease up on your grip, and the laser turns off. In checking the sights and the point of impact, I found the crossing point to be about 15 yards downrange. Crossing point? Yes. The laser starts, from your position, low and right of the bore axis. It is pointed very slightly up and left, so it will intersect the trajectory of the bullet. On this 442, that crossing is about 15 yards downrange. So, simple geometry tells us that at the muzzle, the laser is an inch or so low-right. It is dead-on at 15 yards, and then at 30 yards, it would be just a bit high-left.
“Within Spec” — Just The Start
Complicating all this is the trajectory of the bullet—a parabolic arc—and the shooting ability of the shooter. I mean, really, we’re worried about the precision of bore-laser alignment at 15 yards in fractions of an inch when we are likely going to be shooting 3- and 4-inch groups at best. Keep it simple: The bullet hits where the dot is at any distance you are going to be using a snub-nosed revolver.
However, the Performance Center makes that easier. Every S&W revolver gets hand-assembled, inspected and then test-fired before being shipped. I’ve walked through the assembly and test-fire areas, and they are staffed by hardworking people who are intent on making sure S&W only makes and ships top-notch products.
The “magic” is found on the right side: a Crimson Trace grip with laser emitter at the top of the grip.
But the Performance Center goes a step—or three—further. Its gunsmiths receive parts for assembly and then pore over them. “Within spec” is just the start for them, and each PC 442 is handbuilt from parts that match the blueprints as closely as possible. These days, with CNC machining centers producing the parts, the dimensional variance that comes off the machines is a lot narrower than it was in the old days. As a result, the parts don’t need to be hand-fitted and matched to each other as they used to, so that just means the Performance Center ‘smiths have more time to fine-tune fit and function.
And so it was with this one. I learned to build S&W revolvers back in the old days when I was replacing worn or broken parts or overhauling high-mileage service revolvers. In checking out the PC 442, I just kept smiling as I measured cylinder gap, endshake and timing and felt the trigger weight.
PC 442 Action
The action is smooth and relatively light. The geometry of the J-frame parts means that your five-shot S&W can’t be built to be as light as, say, a K-frame would be. But that is the price of getting a much smaller package.
From the left side, the PC 442 looks like one of many J-frame snubbies built by S&W.
Nevertheless, Performance Center has worked its magic, and the PC 442 has a lighter and a smoother action than I recall the factory K-frames of yore had. There is no stacking, the action locks up just before the hammer falls (there is a hammer in there, even though you can’t see it), and the rest is quick and crisp, not sluggish.
The S&W J-frame in the hammerless versions has always been a round-butt configuration. When we all went to DA shooting, most of us found that the round-butt contour was much more comfortable and controllable than the square-butt ones had been. And because there is no hammer to be thumb-cocked, all your shooting is DA only. You should keep that in mind when you look over the accuracy testing. Also, we’re talking about a handgun that weighs under a pound, rated for use with +P ammunition. Yes, the PC 442, like all 442s, is rated for use with .38 Special+P ammunition. It will probably stand up to it better than you will, because the additional pressure and velocity really add to felt recoil.
The laser, despite being spot-on out past where you’d be using a snubbie, is for use when you can’t readily get to the sights. In a darkened hallway, the red dot of a laser makes it clear where your muzzle is pointed. If you are in a struggle and can’t align the sights, you can count on one thing: The bullet will go where the laser dot is. Aim when you can, but if you can’t, the laser lets you know what the sights can’t.
I’m sure some will look at the PC 442 and think, “the perfect pocket pistol!” Don’t.
Learn from my experience back in the old days, when wheelguns were common carry guns: Pockets are not good carry options. It took me just a few times of putting a snubbie in a pocket as my carry option to find that it wasn’t pointed the way I expected. So, I changed my carry mode to a holster. The first time you go to draw your pocketed snubbie—only to find it upside down and pointing backward—you’ll get it … and be looking for a holster.
Lifetime Friearm
There’s also the matter of the durability of an airweight revolver. With an aluminum frame, how many rounds can it take? You’d be surprised.
I have steel revolvers that haven’t been hammered with heavy magnum loads that have seen tens of thousands of rounds. Let’s do some back-of-the-envelope arithmetic here. Let’s assume your PC 442 will only last 10,000 rounds (I’d bet on a much higher figure) and that you shoot, without fail, a box of 50 rounds each week. That’s 2,600 rounds a year, and you will be two months short of four years reaching that 10,000 figure.
Oh, and if you do that—and practice properly—you will be an absolute monster with a revolver by the time you theoretically have to replace the PC 442. And even then, it will theoretically be in need of replacement. There will still be a lot of pistolsmiths who know how to rebuild a J-frame … and the Performance Center will be standing by, curious about what you did to wear one out so soon.
With the actual firing and practice schedule most of us have, your PC 442 is a lifetime gun. You’ll be leaving it to your heirs in your will (assuming that half a century from now, we don’t have phased plasma rifles but do have handguns). And with all the dry-firing you’ve been doing, it will be even slicker than when you started.
Editor’s Note: This article originally appeared in the 2019 Shooter’s Guide issue of Gun Digest the Magazine.
The heavyweight Model 648 is a looker and a doer, boasting features that help the rimfire own the bullseye.
What Are The Model 648 Top Features:
6-inch barrel for improved sight radius
Hefty medium K-Frame to soak up recoil
Attractive full lug
Adjustable rear sight
The Smith & Wesson Model 648 has a spectral history, vanishing and reappearing in the Massachusetts gunmaker’s catalog several times since its release in 1989. Again, the stainless-steel .22 WMR revolver is back in all its glory after a nearly 14-year absence, giving rimfire fans not only an attractive option, but one with a reputation for light’s out accuracy. Though, you’ll have to drop some coin to add one to your collection.
As far as .22 wheelguns go, the Model 648 is certainly on the spendy side – a cool $749 suggested retail price. Yet, Smith & Wesson gives plenty of bang for the buck, so diehards of this corner of the gun world most certainly should find plenty of value in the medium K-Frame revolver. That’s especially true if you happen to favor shootability.
The .22 WMR isn’t a wrist-snapper in a light revolver by any stretch of the imagination, but should be tamed considerably out of the rather weighty Model 648. The revolver tips the scales at an impressive 46 ounces, if you’re keeping count that just shy of 3 pounds. While its K-Frame does plenty to add to its heft, the 648’s 6-inch barrel, sporting a full lug, also plays a role. Yeah, the features don’t exactly make the revolver a go-to backpack gun, for backcountry plinking.
On the other hand, they go a long way in upping the gun’s overall accuracy potential. Mostly this is due to the double-action revolver’s ample sight radius. But also, depending on the load, the .22 WMR tends to perform well out of longer-barreled guns.
Some other notables on the Model 648 include black synthetic finger groove grips, a black Patridge front sight, adjustable rear sight and 8-round capacity. Smith & Wesson presently has a somewhat decent selection of .22 rimfire revolver, both Long Rifle and Magnum, including the Model 63, Model 317 Kit Gun, Model 17 Masterpiece, Model 617, Model 351 and Model 48.
It’s assumed barrel length and velocity walk hand in hand, but in reality, there are many other variables at play.
What You Need To Know About Barrel Length And Velocity:
The assumed 25 fps velocity increase per inch of barrel, in most cases, proves a wive’s tale.
Tests on barrel length/velocity are often very limited in scope and overall add up to simple guesses.
Other factors — chamber dimension, bore dimension — also play a role in velocity.
Burn rate of powder can be an especially important factor in velocity.
There’s a lot of discussion about how barrel length can affect velocity. It can be important, particularly with defensive handgun cartridges, because you need enough velocity to make the bullet expand. And, too, velocity has an impact on wounding potential. The problem with blanket estimations is that they’re only that — estimates. If you base your beliefs on estimates or guesses, you could be considered delusional.
The main problem with the blanket estimate is that some guns generate higher or lower muzzle velocities than anticipated. This is due to variations in actual bore dimensions. Chamber dimensions also vary and affect pressure, which translates to velocity. To say a particular load will generate a certain velocity from a specific barrel length — based on what it generated in another barrel length — is nothing but a guess.
Still, we make assumptions, and we do this based on averages. Tests to support these conclusions are often conducted by using one load, as well as cutting a barrel off — an inch at a time — and then measuring the velocity at each length. I’m not much for cutting guns into pieces, but fortunately, I have some data that might shed some light on how much guessing we’ve been doing.
Is Sectional Density A Good Measure Of A Bullet’s Penetration Potential?
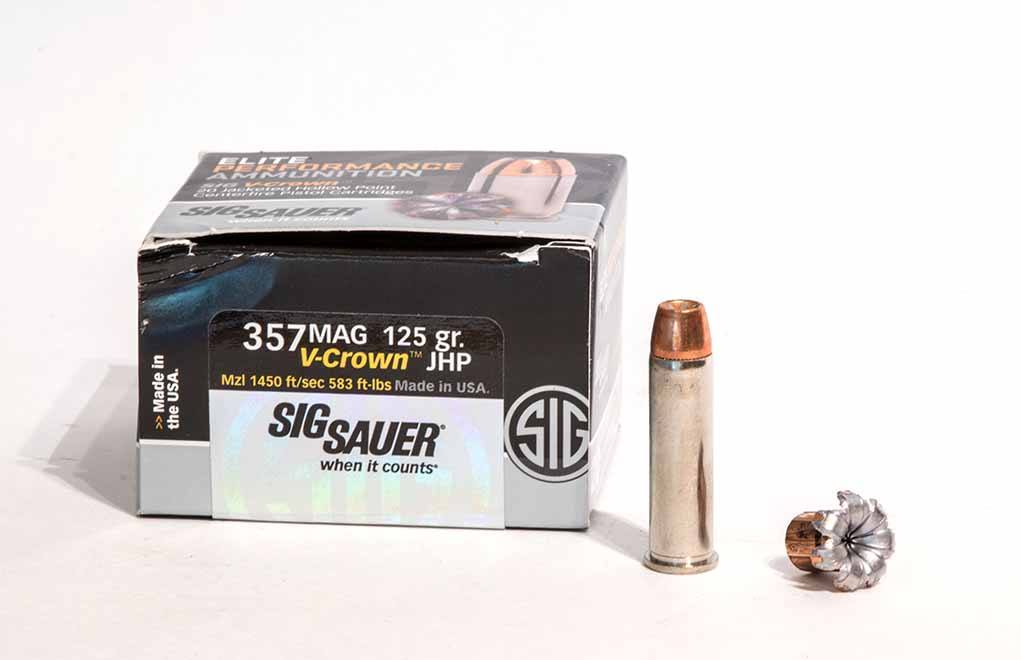
I’d tested eight .32 H&R Magnum and nine .327 Federal Magnum factory loads in four different firearms, with barrel lengths ranging from 3 to 16 inches. What you’ve been told or thought was fact all these years might just be a wild guess … or, well, complete BS.
Comparing 17 loads out of two revolvers with a 3.0- and a 4.6-inch barrel, respectively, I found that seven of the loads produced a lower velocity from the longer barrel. The average increase in velocity from a barrel 1.6 inches longer was only 12.47 fps, or 1.03 percent. This illustrates how different guns can produce radically different velocities. The learning point here is that just because you choose a handgun with a barrel 1.5 inches longer than another does not mean it will generate higher velocities.
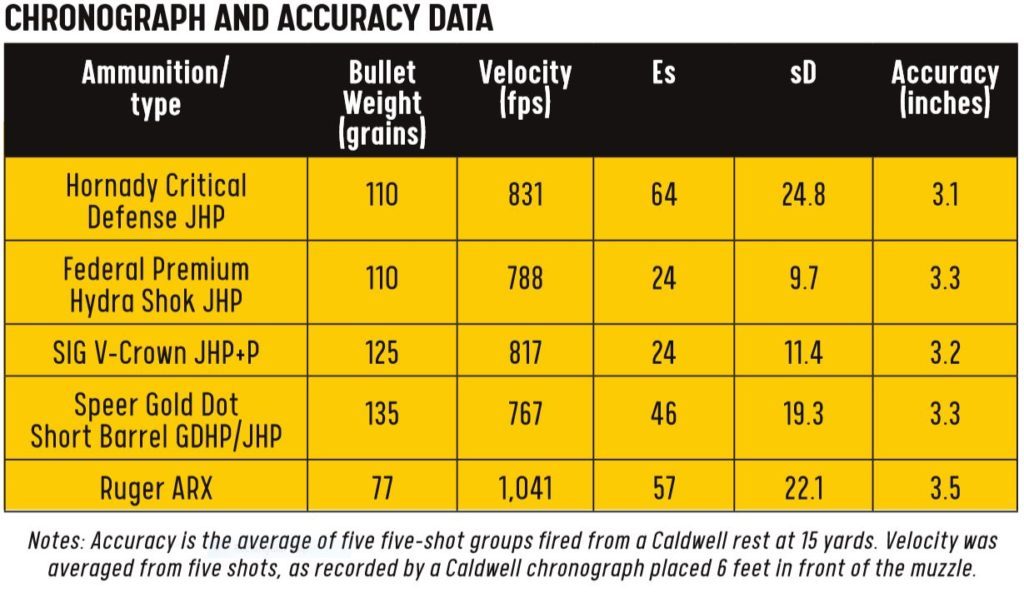
The 125-grain V-Crown load from Sig Sauer is a wicked performer. Its balance of penetration and expansion directly correlates to velocity. The only way we can be sure of that velocity is to test it.
Comparing the 3-inch-barreled revolver to one with a 5.5-inch barrel produced much more conventionally acceptable results. Here, the average velocity gain was 142.2 fps, which is an average increase of 56.88 fps per inch. But, again, we’re making a broad estimate. One load showed a gain of only 39 fps; another showed an increase of 414 fps!
Why the tremendous discrepancy? Gunpowder mostly. Some powders burn very fast and reach peak pressure — peak velocity — very soon. Others take more time.
On average, the velocity increase from a 3-inch to a 16-inch barrel was 487.7 fps, which works out to 37.51 fps per inch of barrel. That’s closer to the assumed 25 fps per inch of barrel most expect to see. But here, again, that’s not a reasonable depiction of the difference. One load only generated 1,340 fps from the 3-inch barrel but blistered out of the 16-inch barrel at 2,155 fps. That’s a 60.82 percent (815 fps) velocity gain, or 62.69 fps per inch of barrel. Another load only showed an increase of 262 fps — 20.15 fps per barrel-inch — which is well below the 487 fps average.
The main takeaway from all of this is that you cannot use some arbitrary experiment or number to make a blanket prediction about barrel length and velocity. Every load is different, and every gun is different. Some loads need more barrel to deliver maximum performance, and some guns — due to dimensional variations — will produce lower- or higher-than-expected velocities. The often-trusted 25 fps per inch of barrel length is an old wives’ tale, and, well … complete BS.
Editor’s Note: This article originally appeared in the May 2019 issue of Gun Digest the Magazine.
Over the past three decades, I’ve had to extract every bit of accuracy potential from both my recreational and duty rifles. Coached by my precision-driven father on the handloading bench during my teenage years, I developed this same obsession at an early age.
This passion has continued for me as a long-range hunter and a marksmanship, tactics and sniper instructor, as well as when developing and running my agency’s first Designated Marksman Observer (DMO) team in 2014. Throughout it all, attaining quarter-minute-of-angle (MOA) accuracy from any rifle system has been an objective.
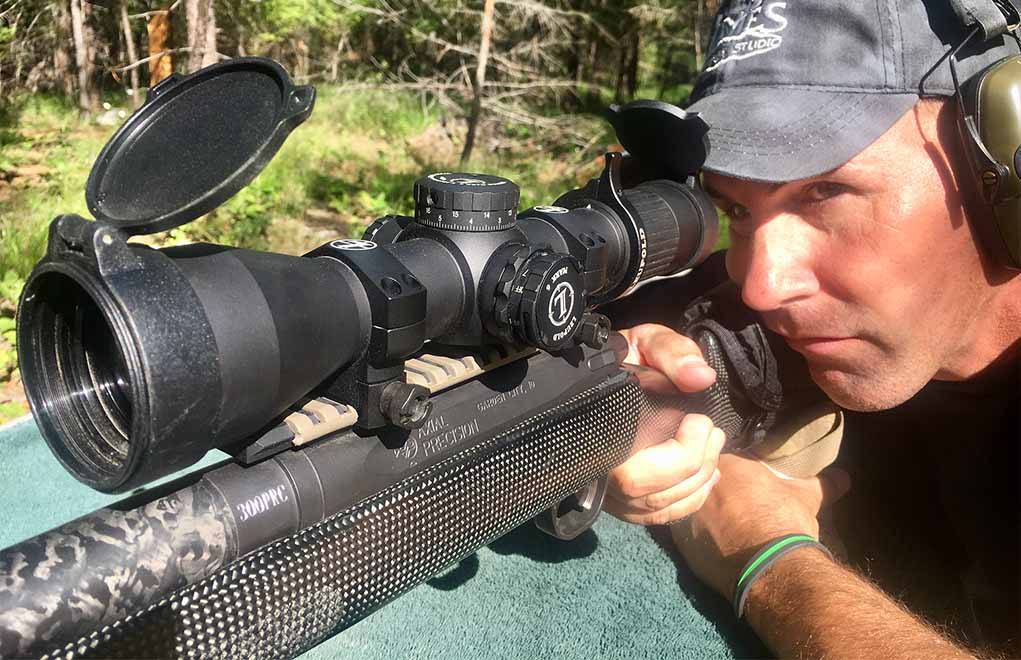
The author acquired quick success while zeroing from the bench after completing the scope bedding process for his long-range precision rifle system.
Today, the interest in long-range accuracy among the shooting community has never been greater. The exponential increase in the amount of precision rifle platforms over the past decade has been overwhelming for long-range shooting enthusiasts, with a plethora of rifle and optic options now available in a wide range of both new precision-oriented calibers and the time-tested classics.
For any precision rifle to perform at peak potential, all three components within the system (rifle, scope and ammunition) must be of high quality with extremely narrow tolerances to provide repeatable quarter-minute accuracy or better.
For the focus of this article, let’s assume we’re working with a vetted precision rifle from a reliable manufacturer; a quality scope that’s robust and proven to be reliable under even the heaviest recoil stresses from modern, big-bore, long-range calibers (.338 Lapua, .300 PRC, .300 RUM, etc.); and, of course, quality match-grade ammunition with bullets capable of remaining stable and hitting consistently past 2,000 yards.
With those base-level equipment requirements covered, let’s focus on techniques for securely mounting and setting up that tier one optic on your precision rifle system.
Building The Perfect Bond
For decades, I’ve carefully mounted my single and two-piece bases to all my rifles the way I was taught by my gun-building and precision handloading mentors. This two-step process includes mounting the base(s) to the rifle’s receiver by mating a completely clean and degreased base set to a clean and degreased receiver before carefully anchoring the two together.
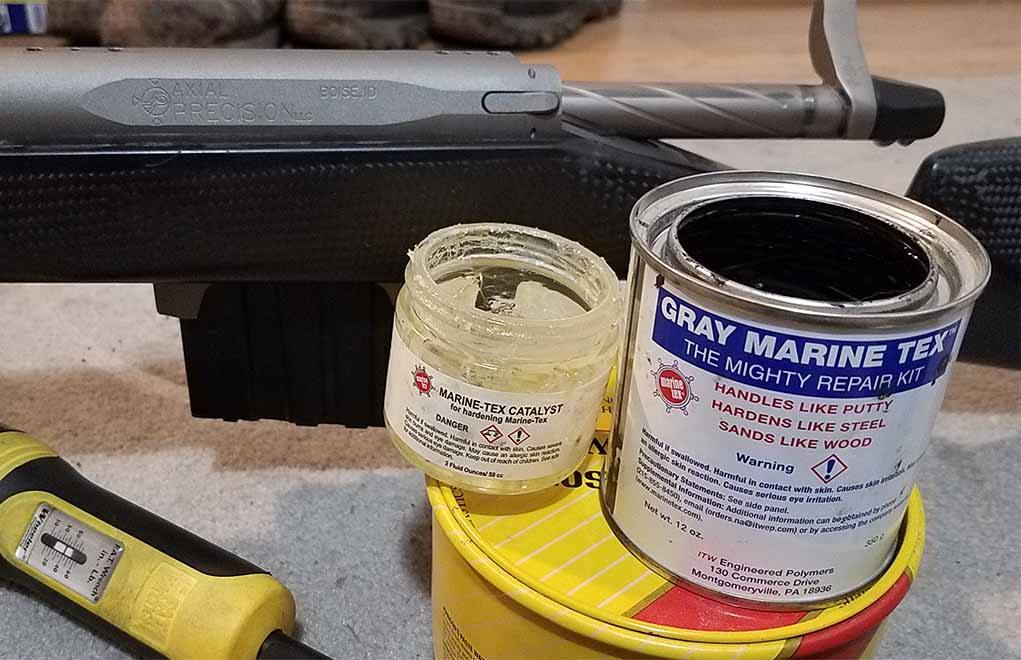
Use the right products to do your long-range scope bedding project. A quality torque wrench calibrated in inch-pounds, a good bedding compound such as Marine Tex and an easy-to-get release agent such as Johnson’s Floor Wax will work well.
To ensure the base screws would not vibrate loose during barrel whip and harmonics when being fired, I routinely anchor the two base(s) and receiver together using a very small amount of medium Loctite in a few of the threads in the lower third of the base screws. This is done to make sure the thread-locking compound will be effective below the contact point and into the rifle’s receiver for maximum contact. It is critical to only use medium Loctite during this process so you can remove your base screws without problems if you need to in the future.
While this process has proved effective overall for my rifles, I have occasionally witnessed other shooters having sudden zero shifts with their tack-drivers using this common base-mounting process. Even with Loctite added appropriately, those base screws can, and do, stretch over time. Repeated harmonic vibration (especially in the larger-caliber, magnum-class, long-range cartridges) whipping through your rifle with each shot can loosen your base screws and cause significant zero shift.
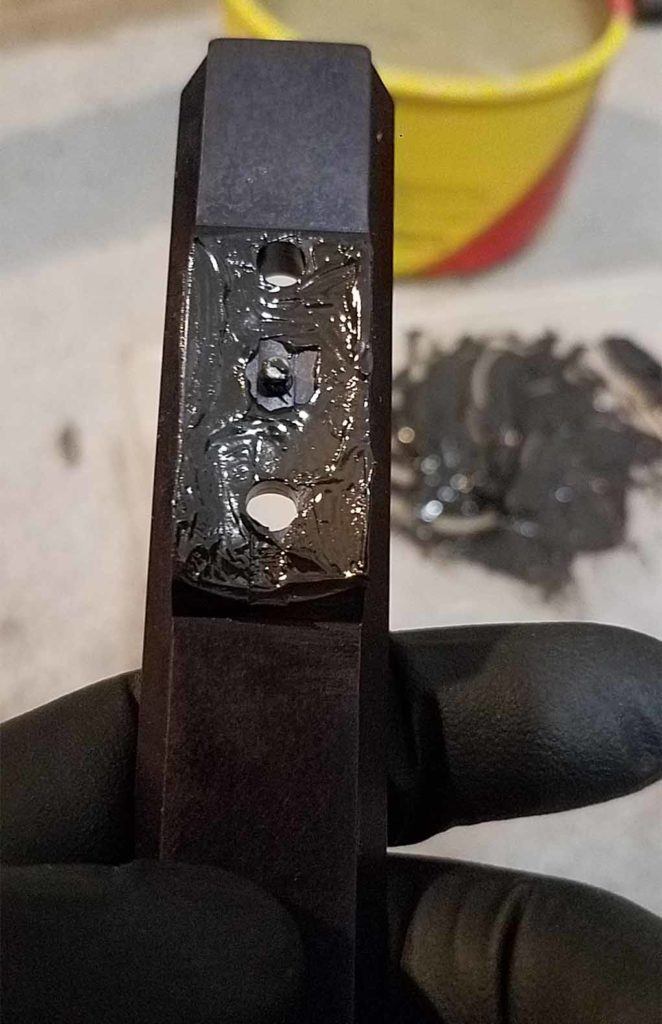
Apply a 1/16-inch layer of bedding compound on the bottom of your one-piece scope base. Bedding material is only applied to all points of contact with your rifle’s receiver before anchoring the scope base to your rifle.
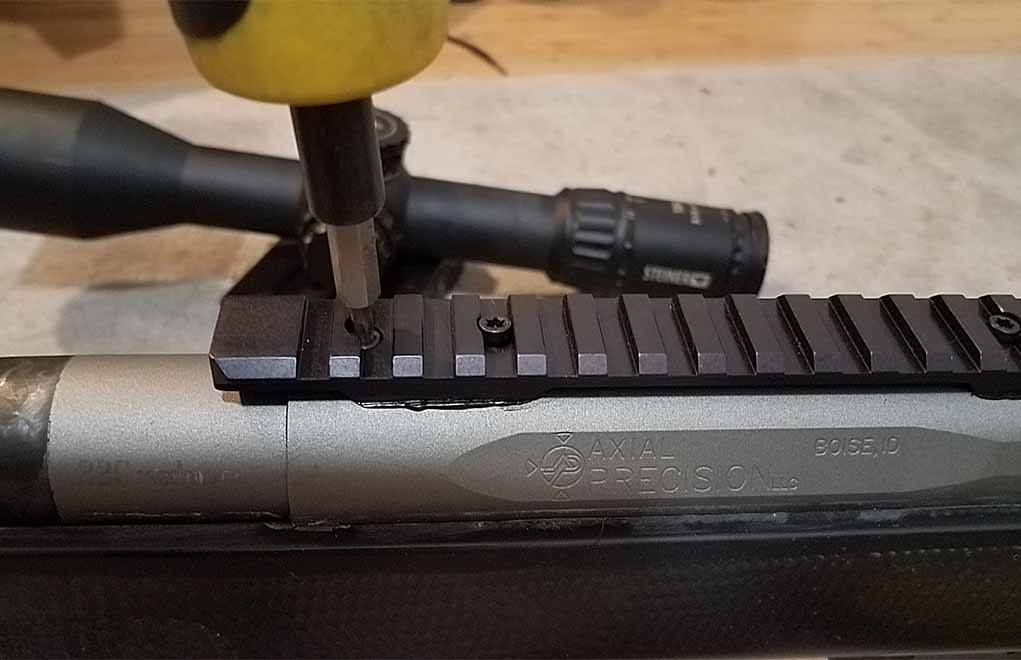
An even more precise and secure process of mounting your scope to your precision rifle is direct bedding. My friend, Marc LeQuieu, over at Axial Precision, introduced me to this process earlier this year, and I’ve found it to be a straightforward, rock-solid and reliable way to eliminate inconsistent accuracy problems generated at your scope base.
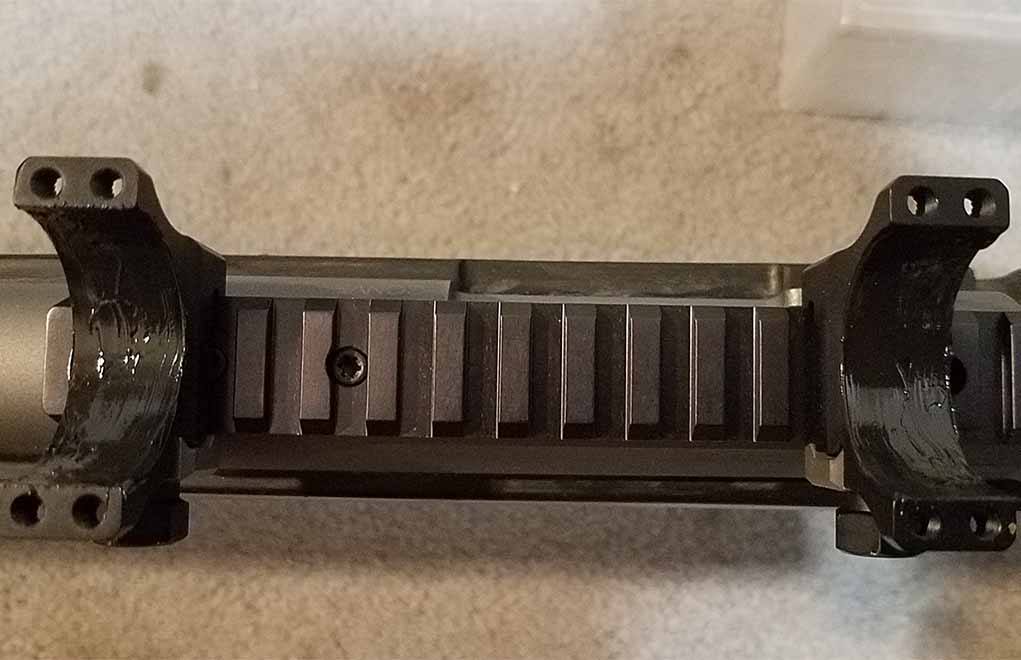
As with all other components that comprise your precision rifle system, only use bases manufactured to very high tolerances. Regardless of whether you’re using a two-piece base, a single-piece, hunting-style base or a robust, one-piece tactical Picatinny rail base, the technique remains the same. I prefer a single-piece Picatinny base, because its inherent strength over a two-piece base eliminates more variables for inconstancy over the long run.
Using single-piece bases on your precision rifles also allows you to easily move an optic and scope ring set among a variety of rifles. The process for mounting a Picatinny rail is also much simpler, given its one-piece design. Granted, the overall weight of your precision rifle platform will increase a bit with a one-piece base, but the numerous advantages outweigh the weight gain—a small price to pay to guarantee the maximum strength, stability and consistency possible in your long-range optics kit.
Bedding the Scope Base(s)
Bedding the base rail to the top of the receiver with a light layer of Marine Tex bedding compound (the same compound used by Axial Precision and other tier I precision rifle builders to bed their stocks to their receivers) is the best option. A 1/16-inch-thick layer of compound spread evenly along the entire bottom surface of the base rail allows the rail to mate perfectly to the contours of the receiver. It will also eliminate any gaps created by machining errors or profile variations in either the top of the receiver itself or the bottom of the rail.
Use an effective release agent (such as Johnson’s Floor Wax, pictured here) on your scope’s tube before mating the rings to the scope. This will prevent the scope from being permanently bonded to the rings and allow you to remove your scope from the rings later on if needed.
To prepare the surface of the receiver before beginning the bedding process, use either Johnson’s floor wax or a commercially available release agent to ensure the rail does not become permanently attached to the rifle. Prepare the base rail screws for release by waxing them as well. The Marine Tex compound acts as a cushion between the receiver and rail surfaces when it is still pliable before you tighten the base screws just to the point at which the bedding compound begins to squeeze out between the rail and receiver. This bedding process allows for a perfect mating of the rail and action.
At this point, begin torquing your rail screws down to 22 inch-pounds before removing the excess bedding material that has seeped out around base screw contact areas. Do so in a systematic, back-and-forth method to make sure there is incremental and uniform torque pressure on all anchoring points along the rail. This will guarantee that the bedded rail is now rigid and extremely secure.
Bedding the Scope Rings
We use the same process to bed scope rings as we do when bedding the base rail to the rifle receiver—regardless of what ring set you use for your long-range optic kit.
An ideal and even spread of bedding compound should be applied to your scope rings before bedding the scope in your rings. This same amount of bedding compound needs to be applied to the top scope rings as well, allowing for 360-degree coverage of bedding compound on your rings to ensure 100 percent contact with your scope.
Traditionally, I’ve carefully and tediously hand-lapped my scope rings until attaining as close to 100 percent contact between the bearing surface of the entire scope tube and the complete surface area of each scope ring. This process works effectively but is a bit messy … and very time-consuming.
An easier and faster method is bedding your scope rings to your scope just as you do when bedding the scope base to your precision rifle’s receiver. Start by using the same bedding compound on the inside surfaces of the ring set. Just as when bedding your scope base, a 1/16-inch layer of Marine Tex on the entire inner circumference of the top and bottom ring halves will suffice. Use the same release agent on the scope’s main tube to ensure the rings do not become permanently bonded to the scope.
The objective is to create a complete match between the scope rings and optic with 100 percent contact between the inner circumferences of both rings and the scope tube itself. Be careful not to put too much bedding compound on these parts during the process, because more than a 1/16-inch layer of bedding compound in the right places can get messy.
Mils vs. MOA: Which Is The Best Long-Range Language?
Just as on your one-piece base, tighten the screws down only enough to see the compound start to squeeze out from between the rings and main tube of your scope. Once you’ve reached this level of contact pressure on all your ring screws, wipe off and remove the excess bedding compound from the edge of your rings; continue to systematically tighten them down in small increments until you reach an ideal torque level of 18 to 22 inch/pounds. Do not tighten past 22 inch/pounds! Also make sure each ring screw is torqued to the same pressure before completion.
While this process takes some time, it is a straightforward end-user method to avoid micro shifts in your precision rifle’s zero that can be completed without paying a gunsmith to do so.
Torquing Base and Ring Screws
As we’ve touched on earlier, all base and ring screws must be torqued to proper levels in an incremental and systematic method to ensure maximum strength and consistency.
Systematically torquing the base screws down into the receiver to 18 to 22 inch-pounds during the bedding process. Note the ideal small amount of excess bedding compound seeping out from around the base screw and rifle receiver contact points.
For example, if you’re working with a single-piece Picatinny rail scope base that has four base screw holes mated to your rifle receiver’s tapped scope base threaded holes, start all four screws into their slots only to the point of the threads catching in the rifle’s receiver. Using a systematic approach, torque the far-forward (closest to the rifle’s muzzle) base screw down only one full turn before moving to the far-rear (closest to the back of the rifle’s receiver) base screw and doing the same. Go to the next base screw behind the far-forward one and anchor it with just one turn to set the screw into the receiver’s threads. Then, continue to the next rearward screw and do the same.
Repeat this back-and-forth process systematically on all four base screws until you feel resistance and free spin on all four has stopped. Once there, continue working systematically back and forth between the four screws until all the excess bedding compound has seeped out between the two bearing surfaces and you’ve reached the desired amount of torque on each screw (18 to 22 inch-pounds).
Systematically Torquing Scope Ring Screws
For ring screws, the same method applies. What’s different in this case is that you will have many more screws to deal with on each ring set (usually at least four screws for each scope ring on quality optics). Not to worry: Just follow the same process as described for the base screws. For systematic torquing on multiple ring screws, remember to do so in a repeatable pattern.
This is an ideal front scope ring bedding example with 100 percent contact between the scope and scope rings.
For instance, when dealing with two scope rings that have four screws each, start with getting all eight screws started into their threads before proceeding to the next step. Now, using a repeatable crisscross pattern (similar to tightening lug nuts during a tire-and-wheel replacement) for all eight screws on both scope rings, torque in short increments until you feel resistance from each. Continue incremental torquing on each of the eight screws until all the excess bedding compound has seeped out from under the bearing surface of the scope ring. Once all screws are torqued to this pressure, continue the crisscross torque pattern in short increments again until all screws are at the same torque level of 18 inch/pounds.
For Picatinny rail-compatible scope rings that use a typical ½-inch locking nut at the base of each scope ring, use the back-and-forth and incremental torque pressure on each ring nut until you reach the prescribed torque level (65 inch-pounds for steel rings and manufacturer specifications for aluminum rings).
Scope Alignment
For long-range shooting consistency and success, proper scope alignment is critical.
We’ve all been frustrated while trying to twist our scope’s tube carefully left or right to find that level sight picture through our eyepiece during the scope mounting process. Using the vertical and horizontal crosshairs in the scope’s reticle as a reference, we find a sight picture that looks level and then start to systematically torque down our scope ring screws to the prescribed 18 inch/pounds. When shouldering the rifle and looking through the scope again, the crosshair now looks out of alignment—canting left or right of where we felt it was ideal just minutes before. We go through the process again, sometimes repeatedly for hours, without reaching a satisfying scope image.
Here’s, an ideal rear scope ring bedding example with 100 percent contact between the scope and scope rings. Note the even amount of bedding compound seeping out from the scope ring and scope tube contact points.
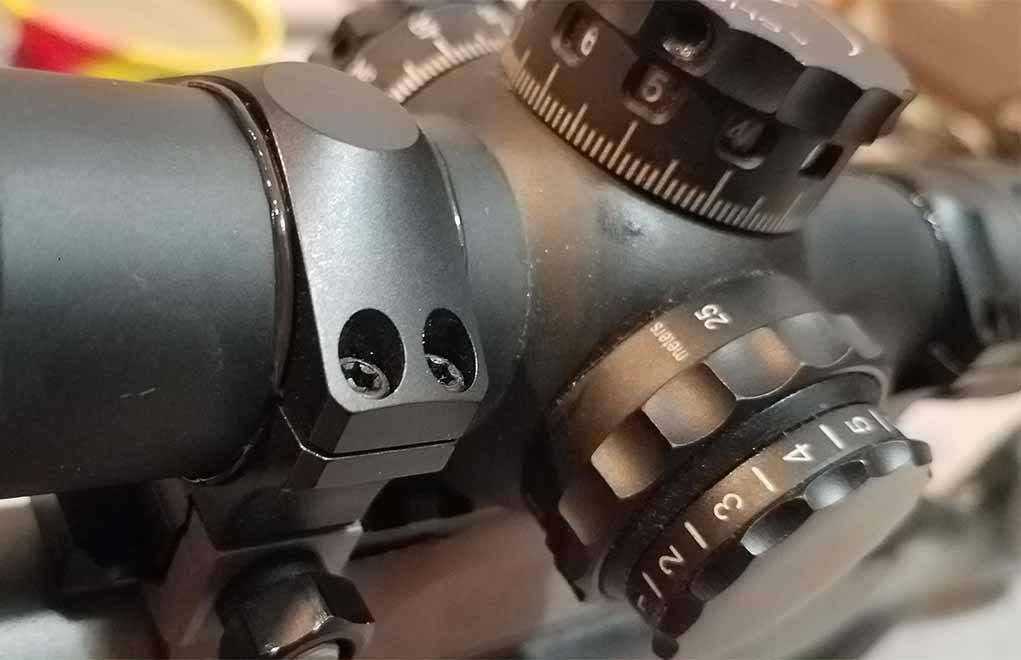
In the past, I’ve used scope-leveling kits with two magnetic bubble levels (one for your scope and one for your rifle’s receiver) with mixed results. However, a much easier scope alignment method works well to remedy this frustration: Having a rear scope ring that utilizes a small bubble level mounted at the top of the ring ensures you’re level with the target when taking a long-range shot. This eliminates any cant error effect on your shot’s point of impact for an accurate hit.
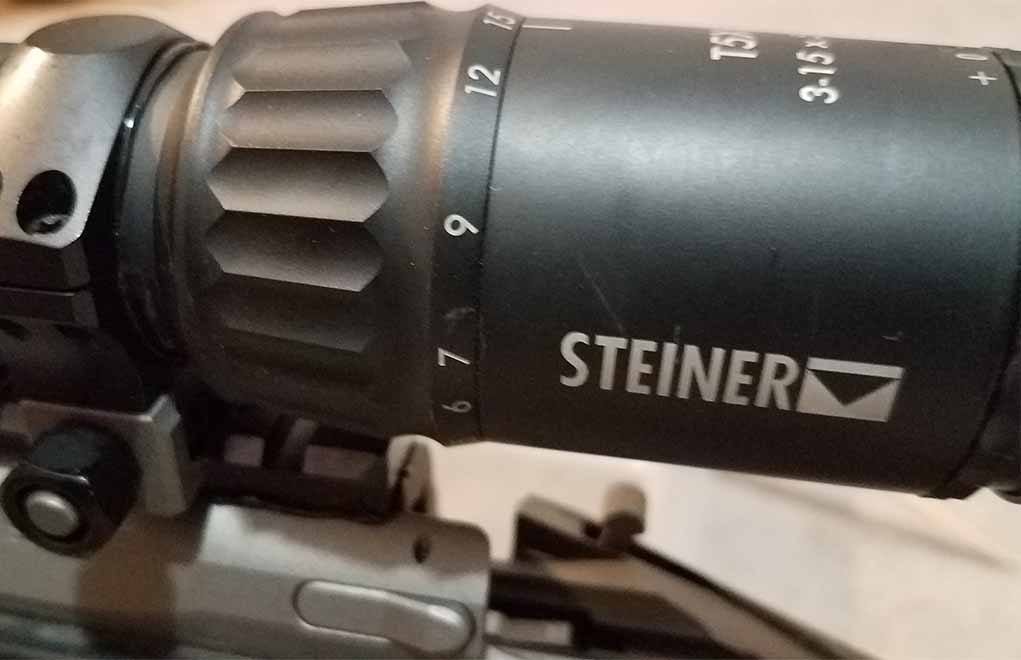
Steiner makes an excellent set of steel rings with this embedded bubble level feature that is both durable and streamlined. By making sure your bubble is centered in its tube and is level with the horizontal crosshair of your scope’s reticle, you’ll attain proper scope alignment—regardless of shooting position or individual body mechanics—when mounting the rifle. While effective, this method is also a lot easier and less time-consuming than all the others I’ve tried through trial and error over the years.
Well Worth the Time and Effort
The techniques outlined here comprise the starting point to achieving the best possible results with your precision rifle—well before you fire your first shot. While these procedures require a time investment and attention to detail, the results are well worth it.
A sudden zero shift and inconsistent group placement caused by a poorly mounted optic is not only frustrating, it also engenders doubt and a lack of confidence in your precision rifle system—a nightmare for all of us long-range enthusiasts. With so many environmental variables already in play that affect accurate shot placement at longer ranges that we can’t control, preparing your precision rifle system properly right out of the box will eliminate the variables that you can control.
This saves time, frustration and, just as importantly, it keeps the shooting process fun—as it should be when you make that rewarding first hit on steel at a mile.
Editor’s Note: This article originally appeared in the 2019 Long-Range Shooting issue of Gun Digest the Magazine.
Is there a proper handgun shooting stance when it comes to self-defense?
Modern shooters are typically faced with a dichotomy when it comes to a handgun shooting stances: Weaver and Isosceles. Firearms trainers, range buddies and self-defense experts endlessly drum away about the virtues of their preferred deportment, making it the panacea of pistol and revolver marksmanship. That’s all fine and good on the firing line, but away picking one shooting stance over the other proves a false choice.
Dynamic shooting events – say 3 a.m. in an empty parking lot when your life is on the line – is not time to play favorites. What works then is what works then. Which is to say, you’d better be able to adapt on the fly, otherwise your skin is on the line. This means becoming proficient at not simply the Weaver and Isosceles stances, but a host of others, not to mention positions.
Certainly, it’s a tall order to say you’ll master every possible contortion you might need to make in a practical handgun shot. There are only so many minutes your range time. But putting effort in getting out of your comfort zone – breaking shots sitting, kneeling, from the ground – goes a long way to acclimating you to dynamic handgun marksmanship. With time you will become skillful enough with each that, if need be, you’ll perform if circumstances call for it.
This is a through-the-scope view of the tall target and 4-foot level used when checking riflescope tracking. A long level is the easiest way to test tracking accurately.
Have you tested your riflescope for tracking accuracy lately? You should.
Riflescope Tracking Test Checklist:
Tall-target test your scope, regardless of its cost.
Use a 24-inch-tall target, and 36 inches is better.
The non-firing method is preferred.
Secure the scope to minimize any movement.
Record the values in your databook.
Fix the errors in your software.
Riflescopes, regardless of how much money you spend, are the weakest link in the shooting system. Why? Well, it’s mechanical and often only tested in small batches back at the factory. Errors in scope adjustment are far more common than people realize.
In today’s “precision shooting economy,” less than $1,500 spent on a scope is considered the low end. Thanks to a steady training schedule, we see a lot of different setups across a wide variety of optics. In other words, we have experience. It’s typical to see a 2 percent error factor in scopes at or below this price point, and that has a cascading effect on accuracy results. If you’re using any ballistic software, this is your most significant point of failure when the ballistic curve does not line up with your rig.
(above) Here’s a close-up of the scope-tracking tool. The heavier the tool, the more precise the results will be due to minimized (hopefully eliminated) scope movement.
Testing your scope is just as crucial as zeroing your rifle, and you need distance for the errors to appear because we’re dealing with angles. The more you adjust your scope, the farther the point-of-impact will move from the starting point. Because of this angle, we need for the errors to grow enough to be noticed and assessed.
The Tall Target Test
I highly recommend box testing your optics across 100 percent of the usable travel, and to perform the box test with a minimum of 24 inches of adjustment: That’s as small as you want to build your tall target.
Instructor Marc Taylor shows the scope mounted on the scope-tracking tool. The extra weight of the tool helps keep the scope in place when adjusting the turrets.
There are two common methods of box testing: the live-fire method, and the non-live fire method. They do the same thing, but one is subject to the system’s ability to accurately group the rifle. If you’re typically shooting a 5/8-inch group at 100 yards, then that means you need the errors to be larger than your group size, which is one of the reasons why I use the non-live fire method to test our scopes.
You need a tall target — again, something more than 24 inches. You’ll also want to use a level (I recommend at least a 4-footer) and a Sharpie. I highly recommend you build this target at home and then bring it to the range.
This is a screenshot of the ColdBore App that has a utility to check scope tracking. The app makes doing the math easier, and the solution can be inserted into the program after.
Using the level and Sharpie, draw a straight line the maximum distance possible, from top to bottom, directly down the middle of the target. Thirty-six inches is a great value to use because that measures 10 mils with mil-based scopes and 36 inches with an MOA scope. You also need a starting point at the top of the target and a defined ending point at the bottom.
I highly recommend the optic being taken off the rifle and mounted as securely as possible. I designed and use a custom scope-tracking tool that weighs 30 pounds, so the riflescope doesn’t move when being adjusted. Many shooters have a spare mount that’s been attached to a platform or and I-beam to stabilize the optic.
With the scope’s reticle placed at the top of the tall target for testing, the shooter will move the elevation up a set value, which will bring the reticle down. With the scope securely locked in place, you can also monitor the travel of the reticle to make sure it’s not curving off the vertical line. You then compare the travel of the optic to the travel observed on paper. Did the scope track accurately across the entire adjustment range? Do this more than once to make sure you’re not missing anything.
Instructor Marc Taylor is checking the tracking on a student’s scope. This is done in every Precision Rifle 2 Class the author instructs.
And be sure to adjust your parallax properly. A parallax error is a place where the offset can and will bite you. With the scope off the rifle, you will have a floating cheek weld. Keeping the reticle properly on target will require a perfectly adjusted parallax knob. Don’t overlook this step.
Testing With Live Fire
The firing method works, too. You hold a central aiming point and adjust the scope up. By using the same aiming point and adjusting the scope turrets, the bullet impacts should track along with the line drawn on the target. It’s easier, but it’s not as accurate because of system errors: shooter error, movement, etc. You can also pick random points on the paper with the reticle, dial to them and make sure you impact where you dialed via the central aiming point. It’s a fun little drill to place random dots on the paper, read the reticle and then shoot for impact.
For any drill, the distance from the target to the turrets should be a perfect 100 yards. You can also work in meters, but make sure the distance is correct. Public ranges are not always accurate, so trust but verify when checking the range value. If you’re off a little bit due to the range, you can fix it in the formulas. In fact, I use software to check my tracking: Both ColdBore and Field Firing Solutions have utilities to do the work for you.
Mils vs. MOA: Which Is The Best Long-Range Language?
If you do discover an issue — and as I said, 2 percent is pretty standard — you can easily account for this in your software. A 2 percent error will be considered spec by the manufacturing company, so don’t waste your time with customer service. However, if you find errors that measure 5 percent or higher, send it in for a fix.
Setting A Standard
When I review any new scope, I test tracking each trip to the range. It’s important to see if any changes appear. I can also follow along with my dope because the rifle and ammo combination should not change. If my data has consistently shown that I need 7.2 mils to reach at 1,000 yards, and suddenly with the same rifle and ammo combination I need 7.4 mils, the scope would be my first check. And remember: We want data. The better the records we keep, the more accurate we will be downrange.
Editor’s Note: This article originally appeared in the February 2019 issue of Gun Digest the Magazine.
It’s difficult to top perfection. And that’s what the Remington 870 is a whisker away from being.
Designed in 1950 and still in full-throttle production, the pump-action 12-gauge has nary a chink in its armor. It’s a twin action-bar monster with a milled-steel receiver heart. It gobbles up whatever it’s fed. It never complains. It competently accomplishes any task demanded, short of Afghanistan-range sniper shots. It just plain dominates.
It’s no wonder why more than 11 million have been built in its more than half a century of manufacture. That’s epic, more than any other shotgun (though the Mossberg 500 is hot on its heels). And one gets the feeling the venerable smoothbore is only just beginning to stretch its legs.
Carving its niche through near boredom-level performance, the Remington 870 has earned its spot in the pantheon of great American guns from its dependability. Well, sort of. There’s another angle to the shotgun’s success – its versatility. Originally conceived as a field gun, the 870 has far exceeded its original job description of tea kettling quail and mallards awing.
The shotgun has eternally shed its skin to become something anew – riot gun, SWAT tool, home-defense howitzer, and military implement. Most recently it’s been hung with the moniker ‘tactical,’ though in the appropriate hands it’s always been that. Nevertheless, the Remington 870 as a tactical tool is perhaps among its most popular guises presently.
Of the 30 variations presently in production, a full quarter of the 870s could be considered tactical in nature. But what does that mean in particular? Tactical, like beauty, is somewhat in the eye of the beholder. However, we can narrow it down to a few basic traits most look for when the shop for a tactical shotgun:
Enhanced capacity.
Maneuverable barrel (generally 18 inches).
Defensive in nature.
Certainly, you could tack on some extras such as sling system or enhanced sights, maybe a rail. Handy as those features are, a tactical shotgun they do not make. They’re icing, easily added to a shotgun already tactical in nature. Besides, sticking to the three previously mentioned features opens the field to excellent shotguns that excel in a tactical role, even if they aren’t marketed that way.
So, with a loose definition in hand, here are the top four Remington 870 tactical options available today. They hit nearly every price point and cover nearly every application. Most of all, they’re ready to perform the minute you rack the slide.
870 Home Defense
As plain and simple as it gets when it comes to Remington 870 tactical shotguns, the Home Defense is a knock-out bargain. There are cheaper 870s available, but none set up to excel like this one.
In particular, its 6-round tubular magazine – two more than standard 870 models – gives you more than enough firepower to handle anything outside a Hunnish siege. Additionally, it’s configured to excel in close-quarters action with a compact 18 ½ barrel and fixed cylinder choke. The gun’s 7.5-pound heft also does its part to make it practical, keeping the 12-gauge’s recoil manageable, especially if you opt for 3-inch shells.
Matte blue finish on the metal components and satin on the stock, the Home Defense has a Prohibition-era intimidation factor. Though, there is a hitch in its giddyap – sights. Outfitted with a single brass front bead, the Home Defense isn’t decked out for precision work. A rectifiable situation, given the abundance of sighting upgrades available today. Furthermore, a bit more aggressive texturing, at least on the fore-end, would make a bit easier to manipulate. MSRP: $420
870 Express Tactical
When it comes to Remington 870 tactical options, this particular model is what generally comes to mind. Widely utilized by law-enforcement agencies, the Express Tactical comes out of the box with nearly everything you need on a solid defensive shotgun and a bit more.
Arguably, the bit more is the extended ported Tactical Rem Choke. The porting is solid, helping to tame some of the 7.5-pound pump-action’s recoil, especially if you run 3-inch shells. But a door breaching configuration is a little over the top. Additionally, it essentially makes the 18.5-inch barrel 20.5 inches.
Better to have it and not need it, I suppose. Besides, you can swap the choke out.
On the plus side, the shotgun is quick on the aim with a fully-adjustable XS Ghost Ring rear sight and front blade. The system is proven, and once you’re comfortable with it few other iron sights acquire targets as quickly or intuitively. A nod to optics, a length of 1913 Picatinny rail runs atop the 870’s receiver and it is tapped and drilled for scope mounts. Additionally, it comes with sling swivels, which really round out its tactical nature. The synthetic fore-end is well ribbed and gives you a solid grip to cycle the shotgun through the 6+1 capacity in the blink of an eye.
There is a 6-position stock model, which comes with a pistol grip, priced the same as the Express Tactical and a slightly less expensive one dressed in a Magpul stock. Both end up falling short of the original given their bead sights. MSRP: $601
870 DM Magpul
Chewing through ammunition like it’s rabid, there is no faster shooting Remington 870 tactical model than the DM Magpul. Unless you’ve been on extended vacation to a gun-hostile country, you already know DM stands for “detachable magazine” – the hot new in shotguns. The new configuration might bend some shotgun purists’ noses out of place. However, the system excels at what it’s meant to do – make reloading the pump-action faster than ever before.
At a safe estimate, the gun could chew through its 6+1 capacity (there are also 3-round magazines) twice over in half the time of a tried-and-true tube mag 870. Let’s not split hairs, that’s a lot of firepower. There’s also an element of versatility, given it’s possible to jump to different loads in the blink of an eye.
Is it a deal with the devil? Somewhat, given it changes the balance and forces you to choke up on the fore-end or run a chance at hitting the forward-facing magazine release. That’s undesirable not simply from the pinch your hand receives, but also from the off chance of releasing the magazine.
From a purely defensive standpoint, the DM Magpul makes the most sense of all the new box magazine models. It comes decked out – ghost ring rear sight, front blade, Tactical Rem Choke and Picatinny rail. Additionally, the Magpul furniture is top-notch, sporting an SGA stock and fore-end. The stock is especially nice, since length of pull is adjustable through a spacer system. The sticky point on the new DM design is cost; it’s a pretty penny for an 870 – even one with a box magazine. MSRP: $799
870 Special Purpose Marine
As far as the selection of Remington 870 tactical-style shotguns goes, this might be the best looking. There’s something wicked about stainless steel, even if it’s ersatz stainless steel.
The Special Purpose Marine is certainly a top choice for boat owners, those in muggy climates and any residence near or on saltwater. However, blue-water naval service isn’t a pre-requisite for owning a Special Purpose Marine. Coated in electroless nickel, the finish has excellent corrosion resistance along with its dashing good looks. In turn, the shotgun should excel anywhere routine maintenance might not end up routine– camper, cabin, truck or trunk.
Additionally, the 18.5-inch barreled shotgun comes with a few nice touches, such as sling swivels and 6+1 capacity. Where the Marine loses points is its sighting system, which is a single bead. Fast and relatively accurate, it won’t hold the shotgun back in most close-quarters confrontations. But again, it does cost in surgical accuracy. MSRP: $841
Uncover Expert Advice on Choosing the Right Shotgun
Savage’s first bolt-action in .224 Valkyrie hits the scene just in time for hunting season.
What The 110 Prairie Hunter Has To Offer:
AccuTrigger adjustable trigger
AccuStock internal chassis stock
AccuFit adjustments for length of pull and comb rise
22-inch carbon-steel barrel with target crown and threaded muzzle
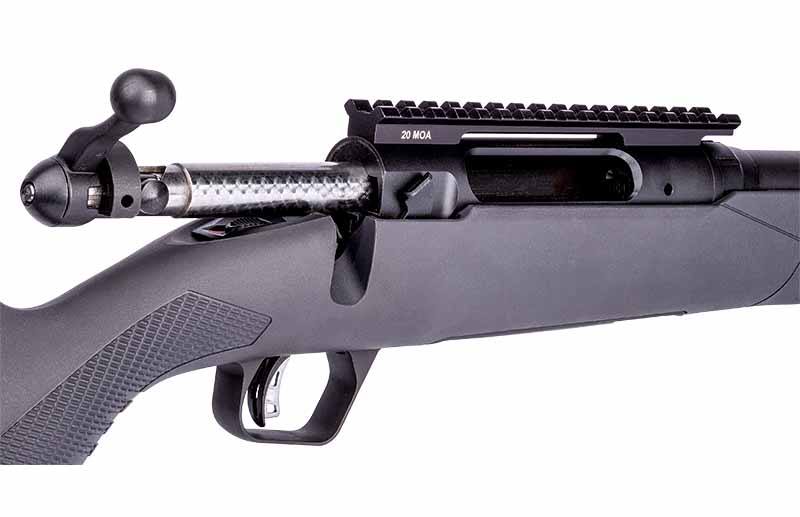
20 MOA rail mounted on a drilled and tapped receiver
Over the past couple years, a lot has been made about the .224 Valkyrie. Understandable, given shooters’ interest in long-range marksmanship, and the cartridge’s ability to deliver way out in a very manageable fashion. Though, when it comes to production rifles, the Valkyrie has primarily been an AR-15 affair. Until now.
The 110 Prairie Hunter is Savage Arms’ first foray into a bolt-action for the cartridge, and it appears a fairly tidy package. As could be gleaned from its name, it’s built around the company time-tested 110 action and has some nice extras. Most noteworthy, it’s outfitted with Savage’s full assortment of “Accu” features: adjustable pull weight AccuTrigger, adjustable length of pull and comb height AccuFit stock, and internal chassis AccuStock. A few of the other areas on the 110 Prairie Hunter worth mentioning is its 22-inch carbon-steel barrel with a threaded muzzle, 3-round detachable box magazine, one-piece 20 MOA rail and target crown on the muzzle.
Savage appears to have turned out a handy predator or varmint rifle with the 110 Prairie Hunter, one that could open a hunter up for a longer shot. The MSRP on the rifle is $759.
WESTFIELD, Massachusetts –– Savage is excited to launch its new 110 Prairie Hunter, a precision bolt-action 110 platform rifle built for the cartridge that rewrote the rules of ballistics. Shipments of these firearms have been delivered to dealers.
“This new configuration, built on our time-tested 110 bolt action, is our first 224 Valkyrie rifle and its features are specifically designed for long-distance shooting,” said Savage Senior Brand Manager Jessica Treglia. “The wide variety of bullet options available in the 224 Valkyrie cartridge makes Savage’s 110 Prairie Hunter ideal for long-distance target shooters, hunters targeting medium-sized game such as pronghorn, varmint hunters or backyard plinkers.”
The 110 Prairie Hunter unleashes the full power and accuracy of 224 Valkyrie. Its AccuFit system makes it easy to customize comb height and length-of-pull to any hunter. Combined with its user-adjustable AccuTrigger, 22-inch button-rifled barrel and target crown, the rifle delivers the most consistent accuracy at extreme ranges. The 110 Prairie Hunter features a threaded muzzle, synthetic stock with a beavertail fore-end, three QD studs and a detachable box magazine.
Features ·Bolt-action 224 Valkyrie ·Cartridge offers the least wind drift and drop in its class and less than half the recoil of cartridges with similar ballistics ·AccuFit system: Ergonomic synthetic stock with adjustable length-of-pull and comb height ·22-inch carbon steel threaded barrel (1/2-28) with cap ·Drilled and tapped with one-piece 20 MOA rail ·Detachable box magazine ·User-adjustable AccuTrigger ·Gray synthetic stock with beavertail fore-end and three QD studs ·Target crown Part No. / Description / MSRP 57409 / Model 110 Prairie Hunter, 22-inch barrel / $759
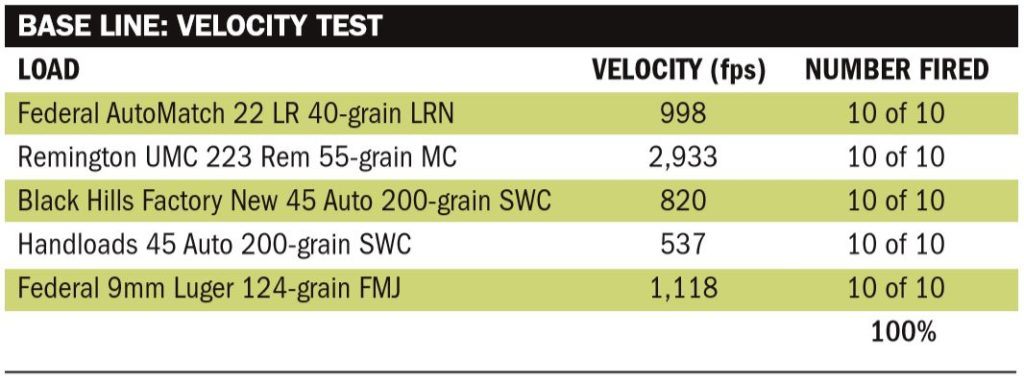
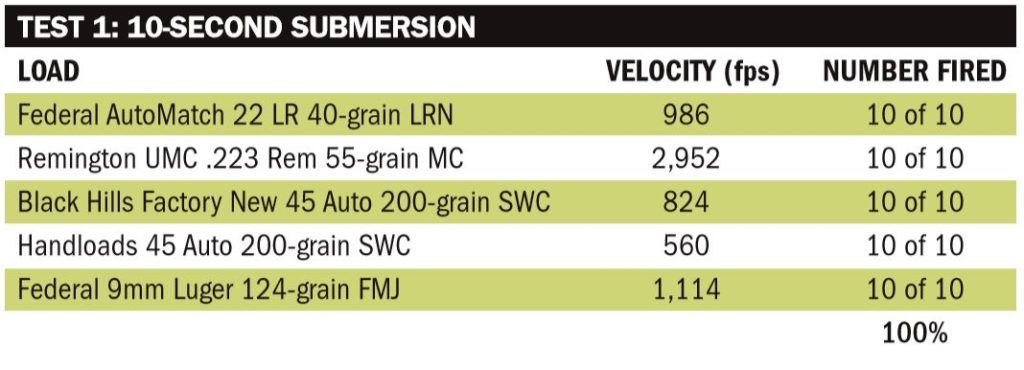
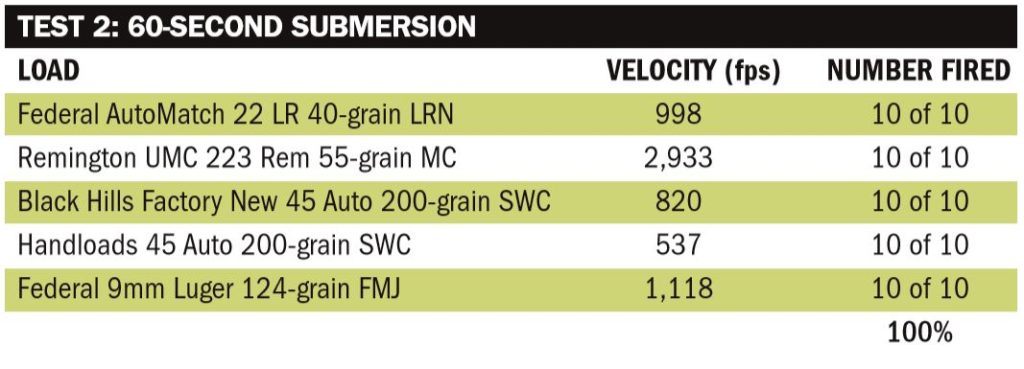
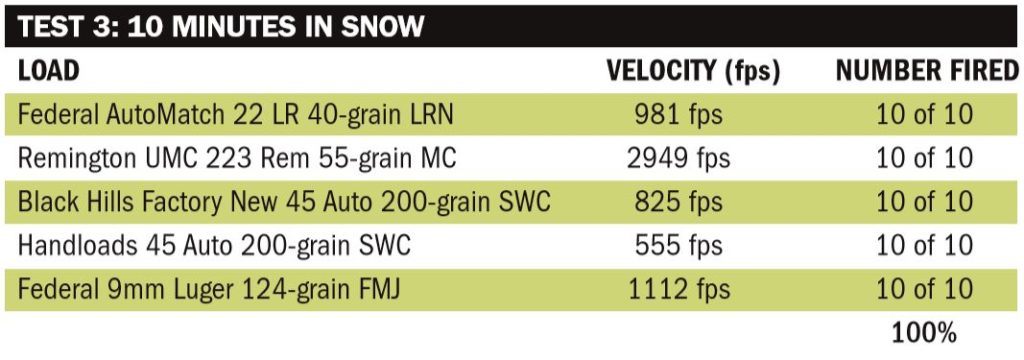
Penetration tests in ballistic gel, particularly in the FBI protocol, are good indicators of a defensive round’s terminal potential. But they’re not the final word.
What You Need To Know About Ballistic Gel:
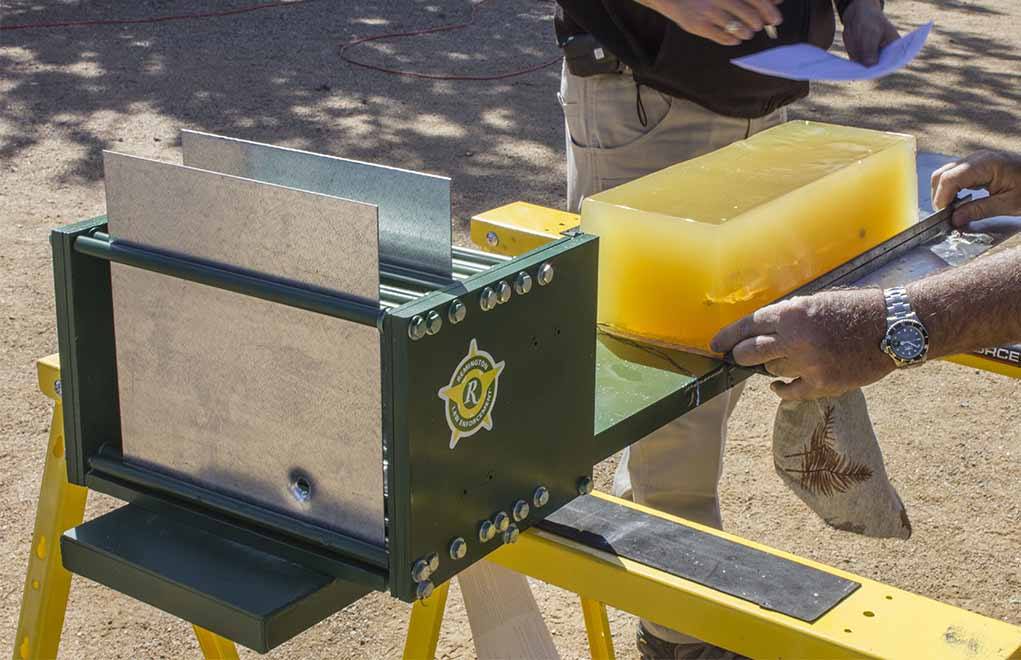
Developed by wound ballistics expert Martin L. Fackler to roughly mimic human muscle tissue.
Ten-percent ballistic gel is mixed — by weight — at a 9:1 ratio with water.
It is melted, making certain heat does not exceed 40-degrees Celsius, then chilled to 4-degrees Celsius.
The block is calibrated by firing a .177 steel BB, requiring 8.3 to 9.5 cm of penetration at a velocity of 183 ± 3 m/s.
It all started in April 1986 with a silver bullet. Well, not a bullet made from silver, but with a Winchester Silvertip. The bullet stopped an inch from a bad guy’s heart, and then the bad guy proceeded to wreak havoc on a triad of FBI agents. That 9mm Silvertip bullet penetrated the bicep muscle of the arm, exited, entered the chest and drove into the lower lobe of the lung. It expanded as designed, and the medical examiner described it as “markedly deformed.”
Actually, this was reasonably good terminal performance, especially given that handgun bullets generally don’t do very well with tissue transition after expansion. Nonetheless, in 1987, the FBI sponsored a Wound Ballistics Workshop, made up of ballisticians, medical examiners and policemen.
As a result, the FBI pulled the 115-grain Silvertip from the field, ignoring the fact that it had an excellent record on the street. The FBI’s thinking was that it needed a bullet that would penetrate 16 to 18 inches. Of course, the problem with this notion is that for a defensive handgun bullet from common duty cartridges to penetrate that deeply, it cannot expand very wide.
Since before the turn of the century, 10 percent ordnance gelatin has become the standard for evaluating the terminal performance of ammuntion. However, it’s far from the perfect solution.
When it comes to terminal performance, one axiom always applies: If a bullet expands wide, it cannot penetrate deeply … and if a bullet penetrates deeply, it cannot expand or deform with a wide frontal diameter. Smart folks call this logic “physics.”
The result of the application of all the FBI’s wisdom was the creation of a “defensive/duty handgun ammunition test protocol” that involved shooting through a variety of barriers, including heavy clothing, steel, wallboard, plywood and automotive glass. After passing through these barriers, the bullet would be caught in 10 percent ballistic gel. Then, the bullet would be extracted, and its total penetration and expanded frontal diameter measured.
The first result of this testing was the creation of the .40 S&W cartridge, which is essentially a 10mm light. Law enforcement agencies from coast to coast soon adopted handguns in this chambering, and civilians, as they always do, followed suit. This “protocol,” if you will, caught on, too, because it seemed very pragmatic. For the past 20 years, police and those interested in protecting themselves with a defensive handgun have come to believe two things:
Had the bad guy in Miami been shot with a .45 caliber hardball bullet, it would have likely reached the heart. The question is, would the outcome have been any different.
The first is that if a bullet/load does not do well in FBI testing, it’s not suitable for personal protection. The second is that no one seems to take any terminal performance testing for real unless it has been conducted in 10 percent ordnance gelatin (more commonly known as ballistic gel), which has been prepared to FBI specifications and then used as the FBI specifies. Both assumptions are patently incorrect.
For starters, the ability of a bullet to “stop” a bad guy does not hinge on the score it receives while being subjected to FBI testing. Shot placement, the mental state of the bad guy, and his or her conscious and subconscious response to getting shot has a lot more to do with instantaneous or fast incapacitation (or the reversal of bad behavior) than any number score derived from shooting big blocks of a Jell-O-like substance.
And finally, the only folks who adhere to the FBI testing protocol are … members of the FBI. Bullet manufacturers subject their bullets and ammo to a wide range of tests in a wide range of mediums. Some use 10 percent ballistic gel, some use 20 percent gel. Heck, some use a glue-like substance, and some use wax. And others simply use water. There’s nothing magical about 10 percent ballistic gel — or the FBI tests.
Because FBI testing relies so heavily on barrier testing, the protocol might be better at finding bullets that shoot through things as opposed to bullets that stop bad guys.
Am I saying the FBI testing protocol and 10 percent ballistic gel are gimmicks? No. Am I saying that the data obtained with this testing is no good or only useful to the FBI? No. What I am saying is that results obtained in 10 percent ballistic gel and the FBI’s protocol are only indicators, not the final word. It’s not gospel; it’s simply the findings of a government agency.
Editor’s Note: This article originally appeared in the May 2019 issue of Gun Digest the Magazine.
There are pros and cons to every carry position, knowing them ahead of time will help you figure out what is best for you.
To sum up, going armed, it’s a trial of considerations and compromises. Considering an extremely compact pistol, you’ll most likely compromise on capacity. Inversely, pondering a full-sized option, expect to concede on the style of carry and perhaps comfort – depending on your lifestyle. Nowhere else does consideration and compromise manifest itself more definitely than the position you carry your defensive handgun.
Whether you’re talking inside the waistband, outside the waistband, 3 o’clock, appendix, what have you, each one involves a compromise of some kind you’ll need to consider. On the bright side, they also offer advantages for particular applications.
The tough part in choosing a carry position, conversely a holster tailored to it, you’re pretty much flying blind at first. Certainly, if you’re thinking along the lines of concealed carry, you’ll know going in you’ll most likely be better served with an IWB style of carry and holster. However, there’s more minutia to it. If you sit for long periods, a hybrid-holster positioned at 5 o’clock might become a literal pain in the back, and an appendix rig could impede your draw stroke. Neither good.
Trial and error, plenty of it, generally becomes the rule in choosing a carry position and the holster that best accommodates it. To be sure, many don’t want to hear that particular line of thinking. But the sooner you accept you’ll at the very least end up with a few, if not a closet-full, of holsters that just didn’t work out in the position you carried them, the sooner you’ll find the combination that will.
Aside from understanding some of the basic pros and cons of carry position Richard Mann spells out in the video, an openness to experiment does a lot to get you to the promised land. You never know what’s actually going to work for you until you give it a try.
A culmination of a slew of incremental changes, the LWRCI Six8 aims to tackle the 5.56 AR’s supremacy.
What The LWRCI Six8 Stands Out :
The barrel is 8.5 inches long, NiCorr treated and has a twist of 1:10 inches.
Barrel is heavy profile, which keeps it a bit nose-heavy (I find this good for follow-through and tracking a moving target) and soaks up heat.
With a threaded muzzle and adjustable piston system, the pistol can easily accommodate a suppressor.
Lower handguard bolts directly to the upper receiver, leaving the barrel nut to do its job without being imposed upon.
A standard bolt has been built it for the 6.8.
Six8 magazine is wider than a USGI 5.56 magazine to properly stack the fatter 6.8 cases.
The LWRCI Six8 is the culmination of many incremental changes. It’s fashionable to be “revolutionary” or “boundary-pushing” these days. Well, real progress is made with incremental changes that add up to something that’s far beyond the original. The Six8 is what the AR would have been if the powers-that-be hadn’t been so invested in NIH — Not Invented Here.
There has always been a cohort of shooters who have not been happy with the AR-15. Some didn’t like the gas system. Others found the aluminum and plastic construction just not “manly” (not enough steel and no walnut).
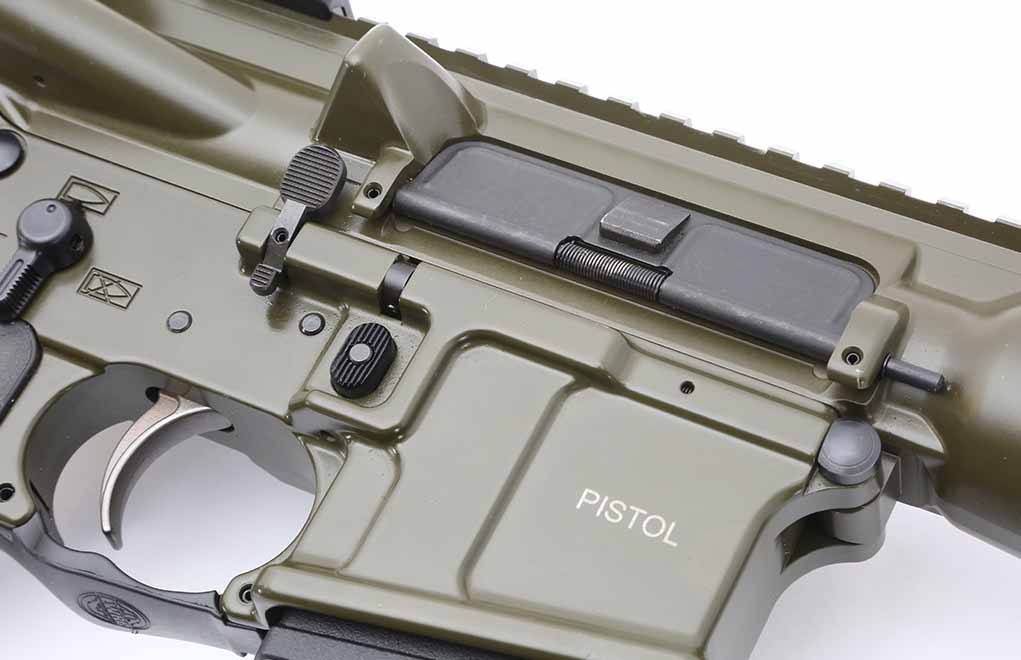
From the right side, there’s only one clue the LWRCI is ambidextrous: the bolt release, which is located above and behind the magazine button.
And others objected to the 5.56 NATO cartridge. As a CQB and jungle cartridge, it actually worked then, and it works now, at least in the full-sized rifle. Push the 55-grain FMJs out of a carbine or an SBR, and the distance at which it works closes in sharply.
How It Works
Briefly, the 55 FMJ works through yaw and fragmentation. When it loses enough velocity, it fails to fragment. Out of a rifle, the 55-grain FMJ bullet — the load commonly known as M-193 or XM-193 — fragments out to 200 yards or so. But as you shorten the barrel, you lose velocity, and that pulls in the fragmentation distance. By the time you get down to the SBRs, the pistols — the real shorties —you can have a firearm with a zero frag distance. No, really, an AR pistol with a 7-inch barrel has lost so much velocity that the bullet will not yaw and fragment at any distance.
What to do? Well, the Army had a chance some years ago and passed on it. The project was spearheaded by service personnel in the know and was pushed by the SF community. It was called the 6.8 SPC … actually, the 6.8 Remington SPC, to be complete.
The problem with the 5.56 was, well, being 5.56mm. To get more weight, you needed to increase diameter. But the .223 case was too small to get heavier bullets up to useful velocities.
The Magpul-made magazine is not only 6.8 specific, it is also LWRCI specific.
So, Remington took the old .30 Remington case, developed back before World War I, shortened it, necked it down to accept a .277-diameter bullet and made the package fit an AR-15 magazine. The result was a cartridge that could push a 115-grain bullet to almost 2,600 fps out of a rifle.
The advantages were seen as many: It fit into the AR. It needed only a new bolt and a new barrel to swap rifles and carbines. It even used the same magazines.
Pros and Cons
However, there were problems. Oh, the big problem was that Army ordnance wasn’t interested in anything that wouldn’t culminate in a multi-billion-dollar project. The Army had to have something that was so great a leap over the existing system that it would be hailed as a genius for having developed it. (OK, I’ll lay off the coffee and get back to our LWRCI Six8 now.)
The mechanical problems with the 6.8 SPC come down to two things: the bolt and the magazine. By simply opening up the existing bolt face, it’s easy to accommodate the 6.8 in an AR package. But the bolt for the AR was designed and proportioned for the 5.56. Asking it to handle a bigger cartridge that’s firing a heavier bullet is asking a lot.
On the left side of the lower receiver, you can see all the ambidextrous goodness the LWRCI Six8-A5 has.
The idea of not having to change magazines was also appealing. However, the magazine for the AR, like the bolt, was designed for a smaller cartridge. Does the 6.8 work out of AR mags? Yes and no. I have a sample of 6.8 rifles, all rebuilt from 5.56. One of them was a real pain in the neck. It refused to feed reliably until I had sorted out the magazines it likes. I have them labeled, and I keep them with it, because if I use other mags it refuses to work reliably. This became so apparent so quickly that magazine makers altered AR mags to be 6.8-specific and offered them as such.
This actually makes the problem worse. We now find ourselves with two sets of magazines, and both fit both rifles. Both hold both cartridges, and yet, each will fail to feed if used in the wrong rifle-magazine-ammunition combination.
LWRCI to the Rescue
So LWRCI set about solving this problem. Oh, and they solved another one along the way.
There are actually two 6.8 SPC chambers. One is the original, and the other is the 6.8 SPC II. The difference is the length of the leade; yes, this’s exactly the same situation as we find in the .223 versus 5.56 chamber dimensions. You want a 6.8 SPC II chamber in your 6.8.
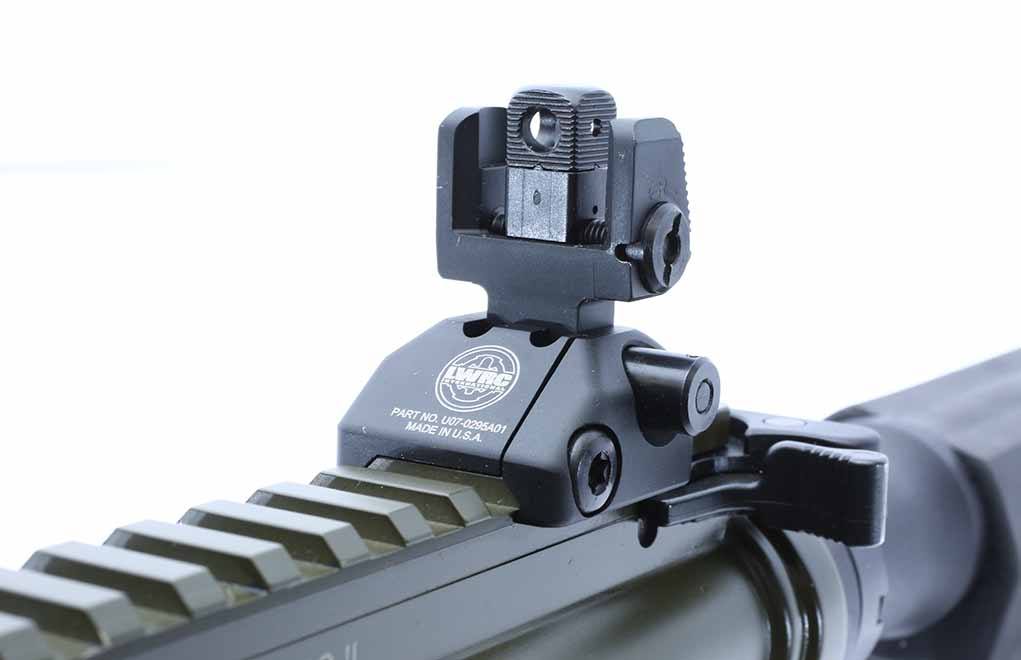
The LWRCI Skirmish sights fold, and the rear rotates to give you a small or larger aperture.
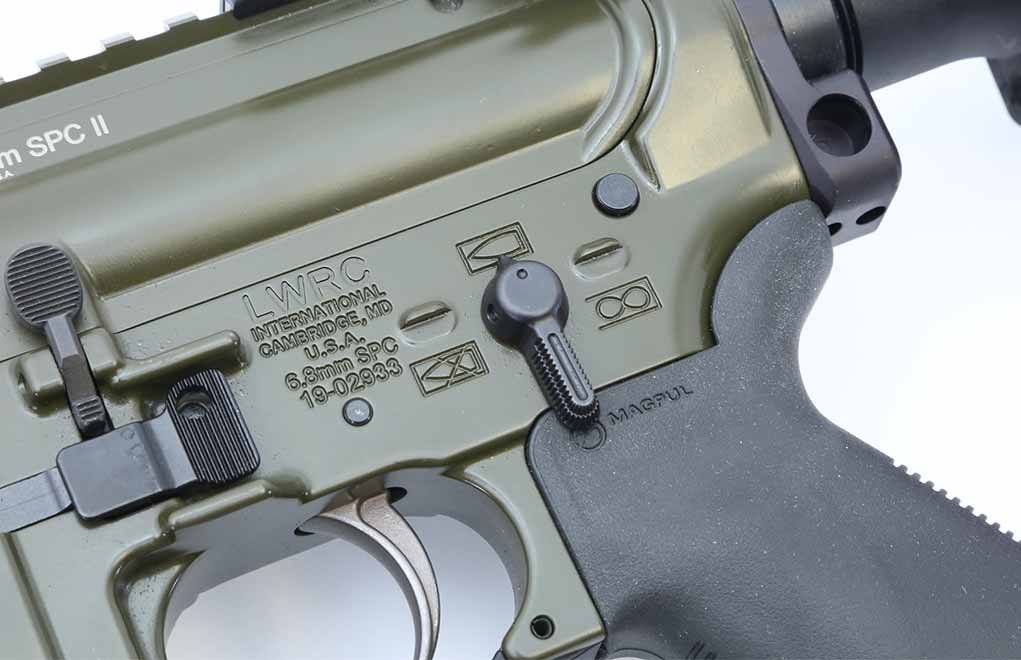
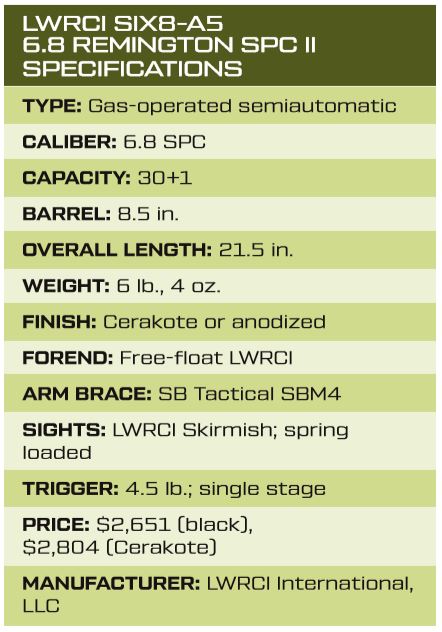
The subject of our inquiry is the LWRCI Six8 pistol. The model sent to me was the Six8-A5, done up in OD Green. You can have yours in OD Green, Patriot Brown, Flat Dark Earth or black. The colors are Cerakote, applied in-house by LWRCI. The black is mil-spec anodizing.
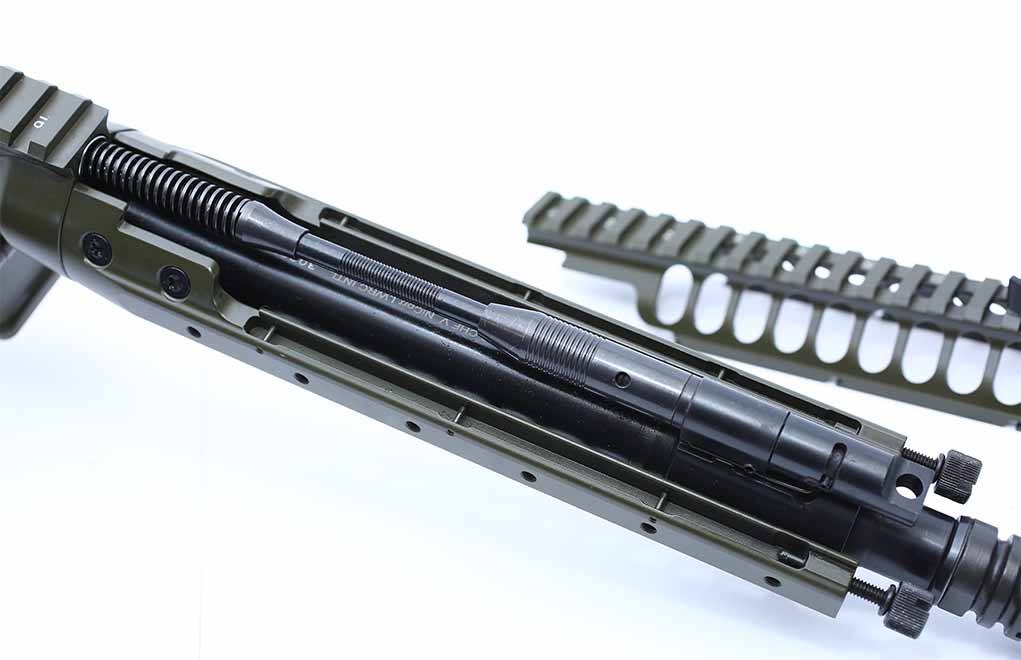
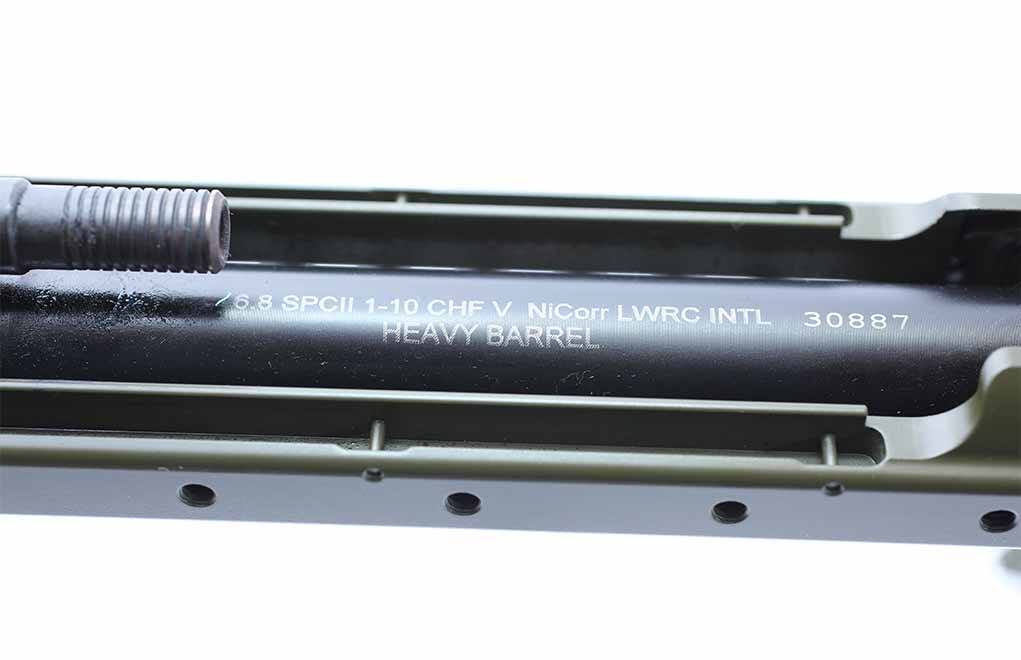
The barrel is 8.5 inches long, NiCorr treated and has a twist of 1:10 inches. NiCorr is a nitride surface treatment, done to the LWRCI cold hammer-forged barrel. It increases surface hardness to a marked degree and also increases corrosion resistance. As a result, there’s no need for a hard chrome plating in the bore. The 1:10 twist is plenty fast enough to stabilize any bullet you’re going to be using in the 6.8.
The barrel is given a heavy profile, which keeps it a bit nose-heavy (I find this good for follow-through and tracking a moving target) and soaks up heat. Despite the barrel diameter, the Six8-A5 pistol only tips the scales at 6¼ pounds. The muzzle is threaded 5/8×24, so you can mount a muzzle device other than the flash hider LWRCI ships it with. The piston system is adjustable, so it can easily accommodate a suppressor. At the other end, LWRCI reams the Six8 to the 6.8 SPC II chamber dimensions.
Above the barrel is the LWRCI piston system. This is a spring assembly, rod and cup, and they can be removed (but not without a bit of a struggle) for cleaning. The piston system removes the big objection some have with the direct-impingement design, because with a piston, none of the hot gases are directed back into the upper receiver.
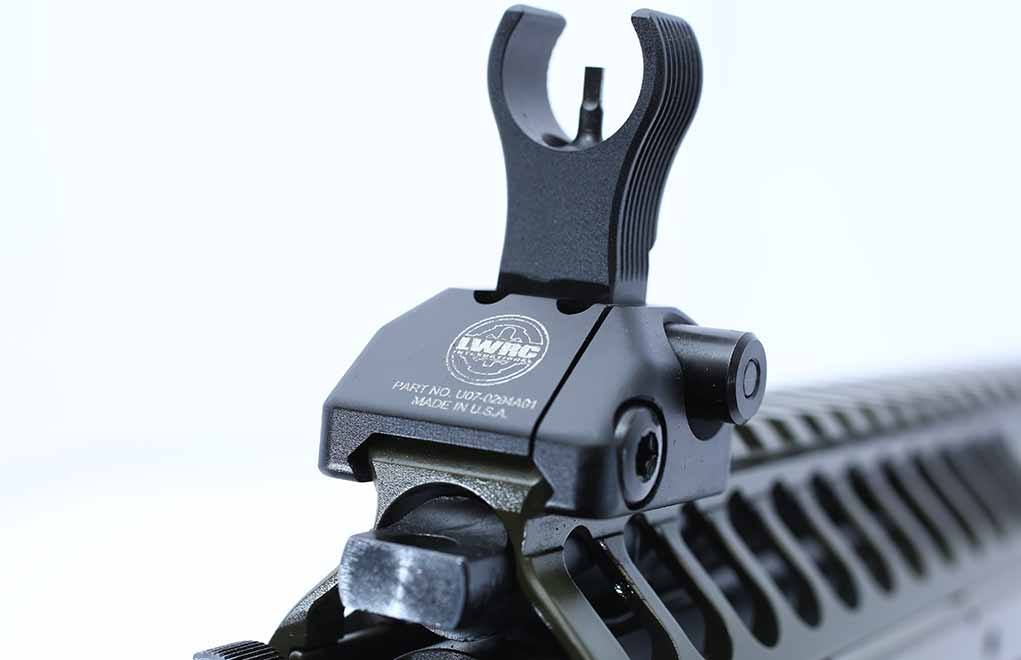
The LWRCI Skirmish front sight.
The free-float handguard has a removable top. By unscrewing the knobs on the front of the handguard, you can slide the upper portion a bit and then lift it off. Doing this gains you access to the piston system, should you ever want to disassemble and clean it. I’ve been running a couple of other LWRCI carbines for some time now, and I have managed to resist the temptation to clean the piston system. Even so, they have yet to fail me.
Instead of clamping the handguards onto a mil-spec barrel nut or a proprietary one, the front of the upper receiver is altered to be the base of the lower handguard. The handguard bolts directly to the upper receiver, leaving the barrel nut to do its job without being imposed upon.
The upper handguard is also railed its full length and meshes perfectly with the rail of the upper receiver. LWRCI installs its own Skirmish sights, folding BUIS front and rear, so you’re ready to go right out of the box.
To complete the ensemble of the upper assembly, LWRCI uses an ambidextrous charging handle. The lower is full ambidextrous, with mag catch, bolt release and selector working on both sides.
Here, you see the top of the handguard off, ready for piston disassembly.
The receiver extension, aka “buffer tube,” is a simple tube with a raised collar to stop the arm brace from moving forward. Clamped between the rear of the receiver and the castle nut, LWRCI has positioned a QD sling swivel attachment point. Again, it’s ambidextrous.
Noteworthy Alterations
The two big changes that LWRCI has made in order to make the Six8 work the way the original project was intended to are not readily apparent.
First up: the bolt. LWRCI took the standard bolt and built it for the 6.8. It has a fully supported bolt face, the extractor has dual springs to power it, and the extractor claw has been improved to gain 20 percent more purchase on the rim. The company machined a recess around the rim of the bolt face to collect debris and to keep it from causing problems before you can scrub it away.
The bolt and carrier are nickel-boron coated for increased lubricity, ease of cleaning and easy identification. All these steps improve function, durability and service life of the bolt. The other big change is the magazine. LWRCI collaborated with Magpul, and they made sure the new cartridge got a proper magazine.
The barrel is clearly marked, and the NiCorr treatment makes it harder than sin and tougher than an auditor’s heart.
The Six8 magazine is wider than a USGI 5.56 magazine to properly stack the fatter 6.8 cases. The magazine has feed lips proportioned to feed the 6.8 out of the proper double-stack configuration. Internally, the Six8 magazine is a continuous-curve shell. The USGI 30 round magazines are a straight upper tube with a curved lower half. The lower receiver is machined to accept this new magazine.
And, as a very clever decision, LWRCI and Magpul moved the magazine catch slot just enough so that a regular AR magazine won’t lock into place in the Six8. As a final touch, the magazine features a bright-red follower so you can tell at a glance which is which.
The resulting package is a compact, relatively lightweight (a comparable AR-15 in 5.56 can be had under 6 pounds, but to do that, you give up the piston system and the heavy barrel) self-loading rifle that holds 30 rounds of 6.8 Remington SPC ammo.
Why Choose the 6.8?
Now, one might ask: Why a 6.8 pistol? Aren’t you giving up the power advantage the 6.8 gives you over the 5.56? You aren’t, and the answer is related to the square-cube law — that is, the size or strength of something goes up by the square, but the mass goes up by the cube.
A 115-grain 6.8 bullet doesn’t have to depend on fragmentation to work. You can count on expansion … if you want expansion. If you’re using FMJs, the mass (the 6.8, at 115 grains, has 209 percent the mass of the 55-grain bullet in an M-193 load) delivers the ballistic punch. If you need barrier performance, a bonded 115-grain 6.8 bullet is going to do much better than any similarly constructed 5.56 bullet. And the chronograph results tell us just what a barrel as stubby as the Six8-A5 can deliver.
One thing to keep in mind if you decide to reload your 6.8 ammo: primers. The original design, done by Remington, called for a large rifle primer. That, like the original short-leade chamber dimension, has been retained by Remington. Hornady loads the SPC with small rifle primers. If you order up new brass from Starline, they, too, will ship you cases with small rifle primer pockets.
As a “truck gun,” the LWRCI Six8-A5 would be a great little emergency tool. You have plenty of oomph to defeat barriers. You have the power to reach out past the immediate vicinity. If you’re out in the country and have need of it, the 6.8 SPCII can easily reach out to a couple of hundred yards. With a low-powered scope on it, that would be even easier.
For more information on the Six8, please visit www.lwrci.com.
Editor’s Note: This article originally appeared in the May 2019 issue of Gun Digest the Magazine.
If you stack the one-gunsmith made Nighthawk Custom T4 against the production Springfield Armory Range Officer Compact, how do things shake out?
What Are The Highpoints Of Each 1911:
The T4 is a high-quality gun built by one gunsmith.
Front strap is cut higher and contoured for a high grip to aid in fast recoil recovery.
Rear sight is a Heinie Straight Eight Slant Pro Tritium night sight with a tritium front sight.
Range Officer Compat features a 4-inch, stainless, match-grade, fully supported bull barrel.
The pistol’s sights are fiber-optic front and low-profile combat rear.
Its rigger and hammer are skeletonized, and the trigger is backlash adjustable.
Like a million other subjects for discussion, the question of what makes the best pistol for personal defense will never be resolved—and for good reason. We all have different lifestyles; but if we were all the same, there would be only one universal defensive pistol—and, I suppose, one each of all other categories of products.
The Nighthawk Custom T4
I recently reviewed a truly exceptional defensive pistol that only a few people will choose to carry: Nighthawk’s T4. However, if there’s a group of gun enthusiasts who appreciate this level of craftsmanship geared for everyday use, it’s the readers of Gun Digest.
It’s a high-quality gun built by one gunsmith (who stamps his initials on the gun before it leaves the factory) and is built on the officer-sized frame with a 3.8-inch match-grade bull barrel. This makes it more compact but only sacrifices one round of capacity. There are cuts to reduce weight, the frame is thinned, and the G10 grips are thinner than normal for better concealability.
Also available in 9mm, my test gun was a .45 ACP. Everything about this gun spells “custom build.” With 25-lines-per-inch checkering on the front and back straps, aggressive G10 grip panels and coarse cocking serrations, there will be no problems with the T4’s grip. There’s a substantial beavertail that’s melted for comfort, as well as the thumb safety, and every surface is dehorned and shaped for smoothness and comfort.
The T4’s beavertail is generous, with a grip safety bump for thinner hands.
The front strap is cut higher and contoured for a high grip to aid in fast recoil recovery. The rear sight is a Heinie Straight Eight Slant Pro Tritium night sight with a tritium front sight. The trigger is adjustable for backlash and skeletonized, as is the hammer. The T4 comes in a very nice soft case, along with two magazines and a sample target signed by the builder.
As one would expect, the T4 is accurate, reliable and a pleasure to shoot. However, a lot of guns are accurate, reliable and a pleasure to shoot. I suspect that a lot of people would choose a Nighthawk Customs T4 … except for one issue: It has an MSRP of $3,499.
I live in central North Carolina, where we have mild winters and hot summers. I live an active lifestyle, wear shorts and a light shirt in summer and am frequently in public. When I did the original review, Galco’s Mike Barham was kind enough to send me a Galco Concealable Belt Holster. I carried the T4 in this holster for a couple of weeks. The melted edges and thin profile made it easy enough to conceal under an untucked shirt (although I’m normally a tucked-in kind of guy.)
As noted above, it’s a pleasure to shoot a firearm that has great sights, as well as a trigger that would satisfy the most picky trigger finger. Functioning was 100 percent as expected, and it was far more accurate than I’m capable of achieving. At 15 yards in slow, aimed fire, it shot ragged holes. Controlled pairs and doubletaps were easily manageable, partly as a result of the T4’s 34-ounce weight and partly because of the well-tuned Everlast flat spring recoil system.
Every detail of the T4 is carefully shaped and finished for a flawless pistol that has potential as a family heirloom.
The Nighthawk Customs T4 is as good as the gun-making art gets. Fit, finish, materials choices, sights and magazines are the best the world has to offer. There are zero shortcomings.
The Springfield Range Officer Compact
I shoot a lot of different guns, and I’m amazed at just how many excellent guns are available today. It’s harder now to buy a bad gun than it is to purchase a good one. Modern technology and design methods have created a wonderland of excellent firearms at very reasonable prices.
he Range Officer comes in a hard case with a holster, magazine pouch, loader and two six-round magazines. And, with an MSRP of $924, it’s about one-fourth the price of the Nighthawk Custom T4.
Springfield Armory’s Range Officer Compact is just such a gun. It is also an officer-sized 1911 with an officer-sized frame. It features a 4-inch, stainless, match-grade, fully supported bull barrel. It also has a flat wire recoil spring on a full-length guide rod, along with a forged alloy frame and a carbon-steel forged slide. The Range Officer’s sights are fiber-optic front and low-profile combat rear. The trigger and hammer are skeletonized, and the trigger is backlash adjustable.
The Range Officer comes in a hard case with a holster, magazine pouch, loader and two six-round magazines. It’s accurate, reliable and fun to shoot. The MSRP is $924; the gun shop price is well under one-fourth the price of the Nighthawk Custom T4.
In thinking about this article, I pulled my Range Officer Compact out of the safe. I did a review on this gun a few years back—and wound up sending Springfield a check instead of sending back the gun.
As a writer, I’ve tested almost every gun in Springfield’s lineup—from a Super Match M1A to the diminutive 911 subcompact. In testing, I’ve never experienced a single malfunction from all those guns. My go-to production-class pistol is a well-worn XDm 9. Thousands of rounds have gone through it—with zero malfunctions, except for two bad rounds.
Comparisons
I tested the Range Officer and the Nighthawk in the same session and discovered noticeable differences.
While the Range Officer has a good trigger, the Nighthawk has an exceptionally good trigger. Racking the slide on the Nighthawk impresses one with extreme high-tolerance fit. The Heinie Straight Eight Slant Pro rear sight on the Nighthawk enhances the ability to cycle the gun easily with one hand and provides a good sight picture in any light. I have no doubt the Nighthawk is more accurate, although few shooters have the skill level to exploit that accuracy.
So, the question is, Why spend four times as much money for a gun that has similar features and, for all intents and purposes, performs the same functions?
To use an old cliché, “Pride of ownership is what separates us from animals.” It’s the same reason some people wear a Timex watch and some wear a Rolex. No one who wears a Timex watch smiles with satisfaction when he straps it on his wrist. No one ever tells the story of how their grandpa passed his Timex watch down.
Both guns are excellent defensive pistols. Both perform well and will do the job we hope we never need to use them for. It’s your money, it’s your holster, it’s your choice. Isn’t it nice that we get to choose?
Editor’s Note: This article originally appeared in the 2019 Shooter Guide of Gun Digest the Magazine.
There’s truth in the adage “Keep your powder dry,” especially in the days of frizzen pans and blackpowder. But in the age of metallic cartridges, what is the effect of moisture on ammunition?
How Did Moisture Affect Ammunition In The Tests:
Short term exposure for 10 minutes or less saw no effect on performance.
Long term exposure, 24 hours, affected most ammunition in one way or another.
Generally, moisture effects manifested in misfires and reduced velocity.
The maxim, “Keep your powder dry,” has been attributed to Oliver Cromwell. It first appeared in an 1834 poem written by William Blacker, with the full passage being, “Put your trust in God, my boys, and keep your powder dry.” It became a common salutation with mountain men who were hardy folk, who without dry powder would not have lived long at all. Though particularly good advice to anyone relying on a firearm for survival — wet gunpowder will not burn — the adage has since morphed into advice of a more general nature, suggesting you should always be prepared to take action.
If I’ve heard it once, I’ve heard it a thousand times, and more than 20 years ago I realized first hand how important this guidance could be. I was assigned as the designated marksman for the police agency I worked for. We had secured a dozen cases of Federal Match ammunition. Being a small department, this was a major investment, and the stuff shot exceptionally well in my issue Remington 700 Police rifle. Then, it started raining, and it seemed like it would never stop. When it did stop, the water was more than a foot deep in the police department armory.
To test the notion that you can seal ammunition from water contamination with fingernail polish, these 20 cartridges were painted and submerged in water for 24 hours.
We’d stored our ammunition on the floor and it had all been submerged for more than 24 hours. The concern was that it would not go bang. This, of course, might not be all that big of a deal on the target range or while deer hunting. In a police situation, it is unacceptable. I took a case of the ammo to the range and began shooting. Surprisingly, I found that 85 percent of the ammunition worked perfectly, the other 15 would not fire.
How Much Water Can Ammo Handle? I had not thought all that much about how water resistant that ammunition had seemed to be until last year when I left some hunting ammunition in the back of an ATV. It rained all night and the ammo became completely submerged. The next day I tested the ammo and every single round went off and hit the target. Commercial ammunition is not waterproofed by manufacturers but this got me to wondering — in a general sense — just how long ammunition can be exposed to water and still be expected to deliver 100 percent reliability. So, I conducted a test.
The five loads that were tested were submerged in water at varying periods between 10 seconds and 24 hours.
I selected five loads and submitted them to four different levels of water exposure. However, before anything got wet, I shot 10 rounds of each load over a chronograph to establish a performance standard. Then, I submerged each load in water for 10 seconds to simulate dropping a cartridge in a mud puddle or stream like you might while on the range or hunting. This had absolutely no effect on the ammo. Velocities remained constant and every cartridge fired. In the next test, I submerged the cartridges for a full 60 seconds. The results were exactly like the first test. Velocities were consistent and every round fired.
While right in the middle of this experiment we were hit with 16 inches of snow. Though after the previous water tests I figured the effort a waste, I still tossed 10 cartridges from each load into the snow for 10 minutes. This could obviously happen in real life; if you’ve every dropped some loose rounds in snow, you know how long it can take to find them all. The results, as expected at this point, were just like the two previous water tests: The snow had no effect on the ammunition.
For this test the ammunition was dropped in snow for 10 minutes. This exposure had no impact at all on performance.
Though short of a flood or total incompetence on your part, having your ammunition submerged for a full day is very unlikely. Still, I wanted to test the long-term water-resistance of the ammunition, so submerged 10 rounds of each load for 24 hours. That’s when things started getting interesting.
Only two of the loads — the Black Hills 45 Auto load and the Federal 9mm load — delivered 100 percent reliability. The Remington .223 load had one misfire out of 10, and my 45 Auto handloads were also 90 percent reliable. The load that was most affected by the water was the Federal 22 LR load; out of 10 rounds, only one fired, and the velocity was 13 percent slower.
After soaking in water for the specified periods, the ammunition was strained with a strainer and then fired without having time to dry.
Interestingly, the velocities for my handloads seemed to be even more affected; they were 15 percent slower. We can assume that in the case — no pun intended — of these cartridges, the water might have contaminated some of the power.
Homemade Water Resistance This got me to thinking. I’ve been told numerous times you can waterproof your ammo by sealing the primer and bullet with fingernail polish. It sounded logical and I’d just assumed it would work. Since I was right in the middle of a wet mess, I figured I might as well test that, too. I sealed the bullet and primer of 10 of the Remington .223 cartridges and 10 of my 45 Auto handloads. I let the polish dry for 24 hours and then submerged the rounds in water for 24 hours.
Granted, a 10-round test in any of these experiments is not a very large sample. However, I was not looking for definitive answers — I was looking for indicators of how water would or could negatively impact the performance of ammunition.
In the fingernail polish sealing test, 100 percent of the .223 Remington rounds fired, but only eight out of 10 of my handloads fired. For all practical purposes, the velocity of the sealed .223 Remington rounds was identical to the unsealed rounds, which had also been submerged for 24 hours. However, my sealed handloads had and average velocity identical to those that never saw water. Still, I’m going to go out on a limb and say you’re wasting your time trying to seal ammunition with fingernail polish. With both loads, the overall reliability percentage was the same — 18 out of 20 unsealed, and 18 out of 20 sealed.
The Federal American Eagle 9mm Luger ammo was exposed to all five tests and remained 100 percent reliable.
Military ammunition is about the only “sealed” ammunition and it is subjected to rigorous testing. According to Mike Lake at Nosler, “The requirements generally involve a few types of tests — humidity, submersion and temperature. Testing is done at different temperatures and pressure/vacuum levels to simulate deep-water submersion and airplane rides in humid environments. That, plus temperature change, will actually draw moisture inside the case through the bullet/neck and primer/pocket interfaces.
“Sealing involves the use of low-viscosity wicking sealants that are applied to these interfaces after loading,” he added. “They are typically UV cured or anaerobic sealing compounds. I’ve also seen the old-school type where they applied a tar-like substance inside the case mouth before seating the bullet. It would form a seal when the bullet was squished [seated] home.”
Comprehensive Analysis What does all this and my testing tell us? Well, if your ammunition — common consumer/sporting ammunition — gets submerged in water for a minute or less, don’t worry about it. However, after somewhere between 60 seconds and 24 hours of submersion, you can start to expect to potentially see deterioration in performance. But, aside from about a 10 percent failure rate, and possibly very slightly slower velocities, are there any other concerns?
Of all the ammo tested 22 LR ammunition was the most susceptible to water. This is not a brand thing; it’s a characteristic of rimfire ammo, regardless of manufacturer.
There is. According to Gary Gronfor, one of the smart guys at Federal Ammunition, “Once ammunition has been wet, submerged or in a wet range bag or hunting coat, it becomes unreliable and untrustworthy. Moisture can enter thru the primer pocket, the crimp, the case mouth, or around the head on a shotshell, contaminating the primer and/or the propellant. The result is a bullet or wad in bore [a squib load where the bullet fails to fully exit the barrel] which undetected leads to bulged or blown barrels, other types of gun damage and possible injury to the shooter or bystander. Numerous times every year, we get ammunition and damaged guns and barrels that we are able to determine, that the ammo has been moisture contaminated.
“End-user hunters and target shooters aren’t the only ones who experience moisture contamination,” Gronfor added. “Over the years, we’ve had Law Enforcement Departments and Agencies who dump their training ammo into large buckets to facilitate easier loading for training or qualifications, and normally these sessions are conducted in rain, snow or shine. The buckets hold water and when the ammo isn’t all shot during the session, the range officers forget to empty the water. So, the next day or week when training is continued, suddenly the shooters experience misfires or bloopers or bullets/wads in bore and think they have an ammo issue, never thinking that this is an issue of their own making.”
This Black Hills .45 Auto load remained 100 percent reliable after being exposed to 24 hours of submersion in water.
Going forward, I’d feel confident trusting any ammunition that had not been exposed — fully submerged — in water for more than a minute or so. For ammunition that has been underwater for anything longer than a minute, and if I was planning to use it to save my life, I’d replace it. You could regulate any potential water damaged munitions to practice and plinking but should do so with caution; a squib load — undetected — could end your day at the range, your gun, and possibly your fingers and eyesight.
Interestingly, the last words of advice from Gronfor at Federal were, “… one thing hasn’t changed since the invention of black powder: ‘Keep your powder dry’ are words to live by if you own a firearm.” Here’s a tip of the hat to Mr. Cromwell.
Editor’s Note: This article originally appeared in the February 2019 issue of Gun Digest the Magazine.
Looking to go armed, but are stuck in the weeds as to what to arm yourself with? Here are 20 of the best concealed carry gun options that will keep you on the defensive.