Be it nestled deep in a sniper’s hide or keeping the upper hand in defending your family, tactical guns and gear can give you a decisive advantage. Here are seven pieces of new kit that will make certain you thrive no matter your mission.
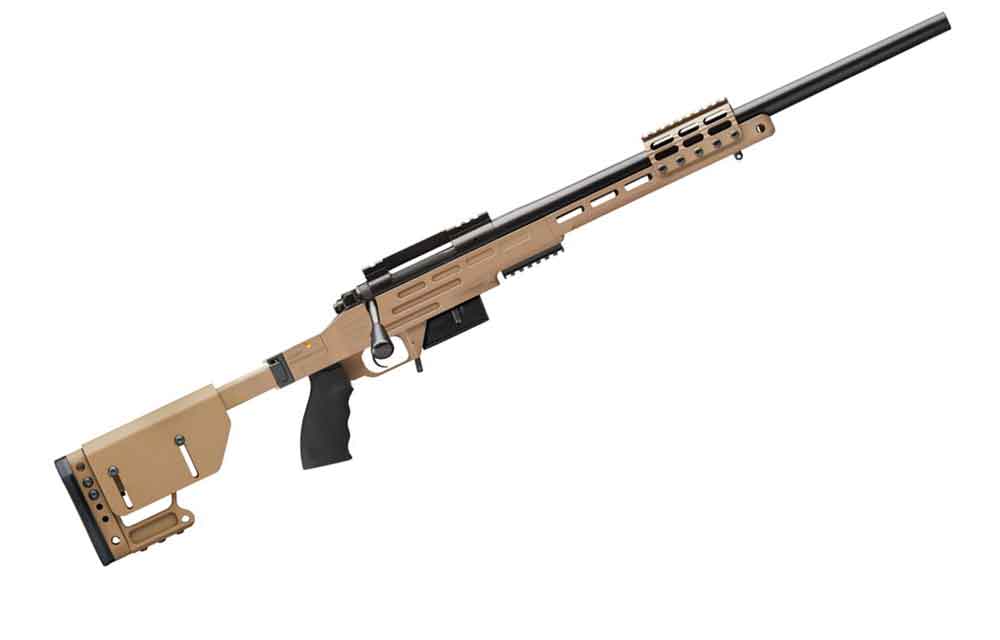
A no-compromise rifle built to meet the requirements of military, law enforcement professionals and serious precision rifle shooters, the Kimber Advanced Tactical SOC II (Special Operations Capable) is built by hand, boasting an adjustable aluminum folding stock, detachable box magazine and a threaded muzzle with thread protector. Available in 6.5 Creedmoor and .308 Win. chamberings, the Advanced Tactical SOC II boasts a highly coveted sub-0.5-MOA guarantee. Features include a match-grade chamber, M-LOK accessory rail, night vision mount and a three-position safety. $2,449.99
Nikon P-Tactical Spur Reflex Sight
Engineered with fully multi-coated lenses and Nikon’s proprietary TruColor coating — designed to eliminate the bluish tint that is common on reflex sights — the P-Tactical Spur features a clear view for both-eyes-open sighting. The sight’s 3-MOA dot is adjustable with 10 levels of brightness — the first two settings are night vision compatible — and centered within a 27x16mm sighting window for an extra-wide field of view with unlimited eye relief. Battery life is estimated at 15,000 hours of continuous usage, and the red dot in the display will flash to indicate low battery strength. $219.95
CMMG MkW Anvil XLR2
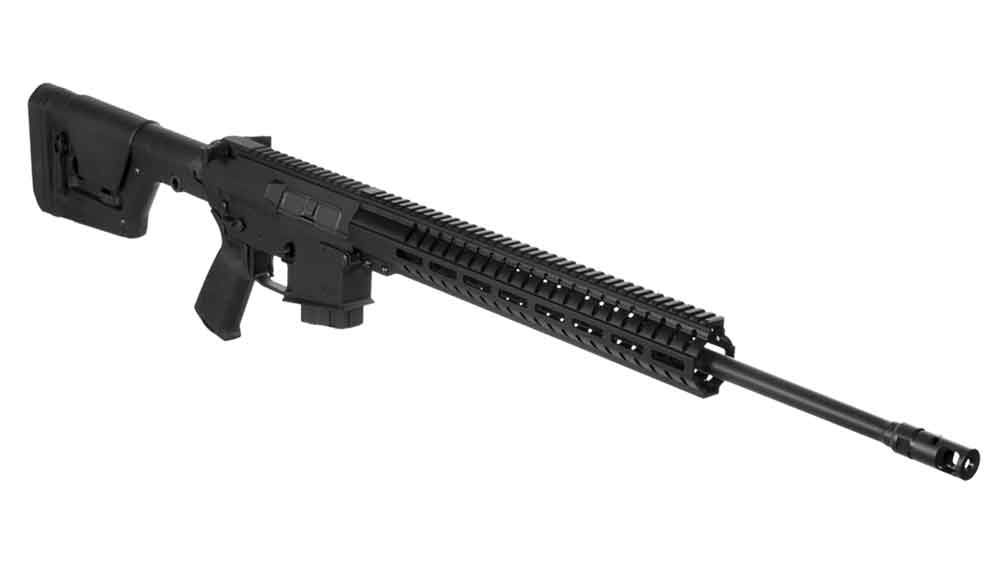
The all-new CMMG MkW Anvil XLR2 is chambered in 6.5 Grendel and features a 22-inch medium-taper barrel. The MkW Anvil is built on an AR-10-sized frame with the upper receiver shortened by ¾-inch to minimize weight and increase ergonomics, but the magwell on the lower receiver has been uniquely designed to accept standard AR-15 magazines to utilize the AR-10-sized bolt with calibers such as the 6.5 Grendel. Other features include a Geissele Automatics SSA 2-stage trigger, ambidextrous charging handle and safety selector, CMMG SV muzzle brake and M-LOK handguard. $2,299.95
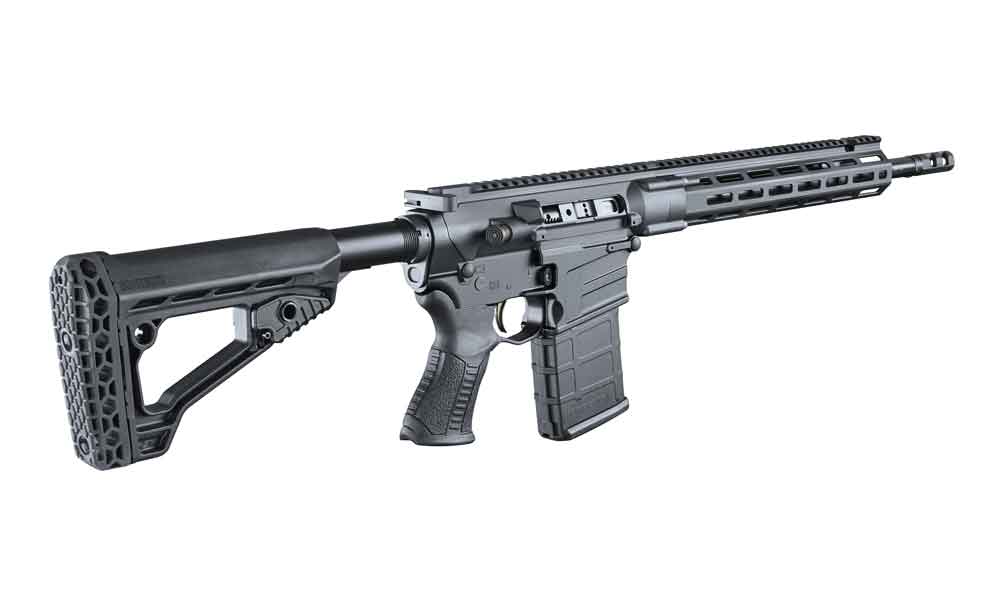
Savage MSR 10 In.338 Federal
Savage’s MSR 10 Hunter is now available in .338 Federal. The MSR 10 Hunter delivers performance from its upgraded Savage barrel with 5R rifling, 2-stage trigger and tough Melonite QPQ finish. Other upgrades including a free-float forend, custom-forged lower receiver and Blackhawk adjustable buttstock and pistol grip. Built on the .308 Win. case and necked up to hold a .338-inch diameter bullet, the .338 Federal offers hunters a faster muzzle velocity than the .308 Win. — but with a heavier bullet. As a result, the short-action cartridge provides magnum energy for devastating performance on game, without magnum recoil. $1,479
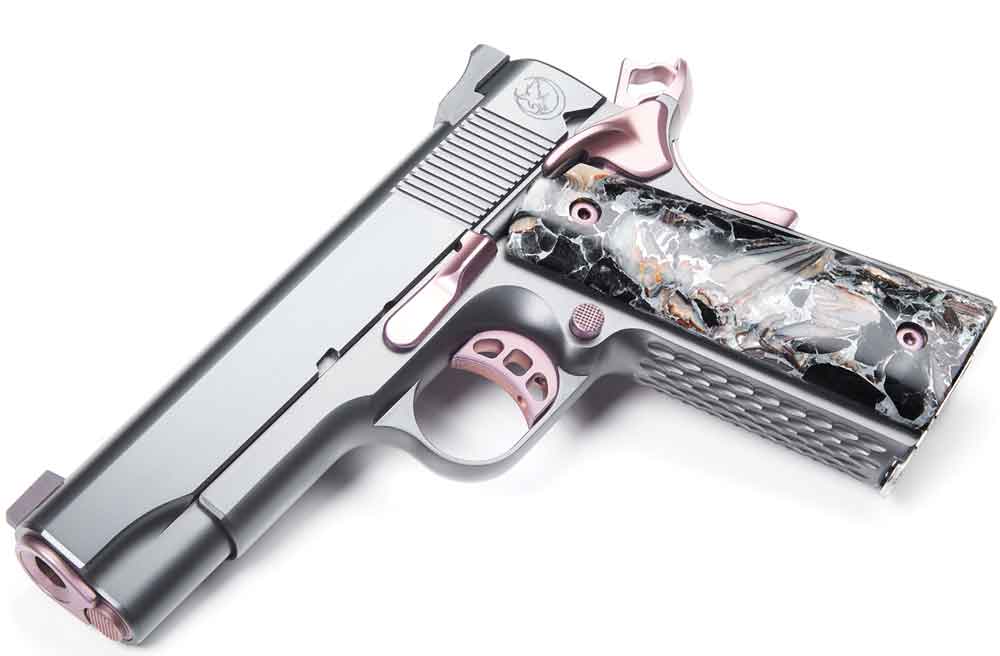
Nighthawk Custom Ladyhawk 2.0 Pistol
The Ladyhawk 2.0 is the first major upgrade to the Ladyhawk series of pistols. The slim-framed, commander-sized gun is available in both 9mm and .45 ACP, and the Ladyhawk 2.0 marries modern coating options, such as DLC and rose gold TICN with obsidian, abalone and zinc — creating a feminine pistol that boasts jaw-dropping aesthetics in addition to unparalleled function. Additional features include Heinie Slant Pro Straight Eight tritium night sights, thinned front strap and mainspring housing, serrated slide top, scalloped front strap and mainspring housing, shortened slide stop and beveled frame, and lightweight aluminum Nighthawk Custom tri-cavity trigger. $4,695
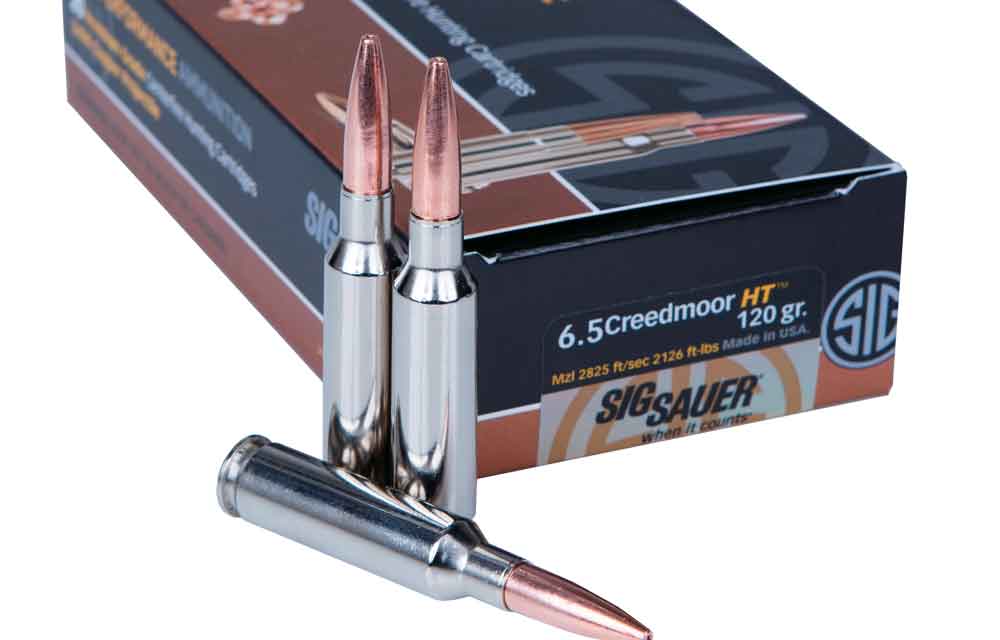
SIG SAUER 6.5 Creedmoor SIG HT Ammunition
Like all SIG HT Elite Performance Ammunition offerings, the 6.5 Creedmoor features an all-copper bullet that delivers deep penetration and consistent 1.8X diameter expansion. The 120-grain bullet is capable of producing a muzzle velocity of 2,825 fps with muzzle energy of 2,126 fpe. In addition, SIG HT cartridges are made with nickel-plated shell cases, and flash-reduced propellant is used to minimize visible signature while shooting in low-light situations. SIG HT copper hunting ammunition is now available in five calibers: .300 BLK, .223 Rem., .308 Win., .300 Win. Mag. and 6.5 Creedmoor. $27.95
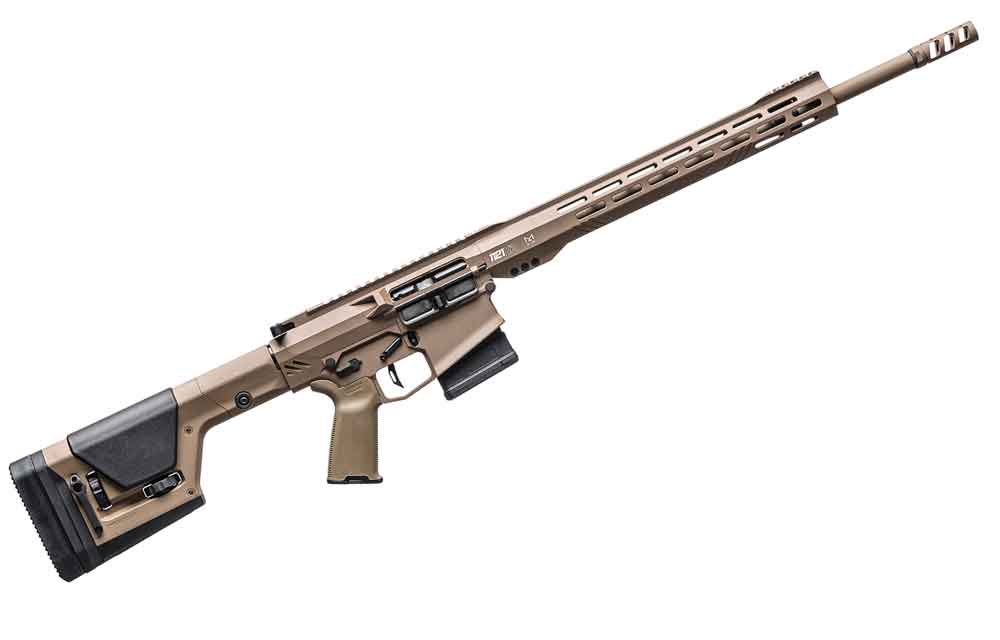
RISE Armament 1121XR 6.5 Creedmoor
The 1121XR precision rifle is designed for those who want more out of a gas firearm. RISE has significantly reduced the weight while still guaranteeing sub-1 MOA accuracy. With the 1121XR, competitors and long-range shooters can have the accuracy of a bolt gun with the benefit of quick follow-up shots. The gun sports a 15-inch streamlined billet aluminum handguard that’s M-LOK compatible with a Picatinny upper rail. The RISE Armament RA-535 Advanced-Performance Trigger with a 3.5-pound pull boasts an incredibly crisp release and a short reset. Specifications include barrel length of 22 inches; overall length of 44 inches; and a weight of 10 pounds, 4 ounces. $2,449
Editor’s Note: This article originally appeared in the May 2018 issue of Gun Digest the Magazine.
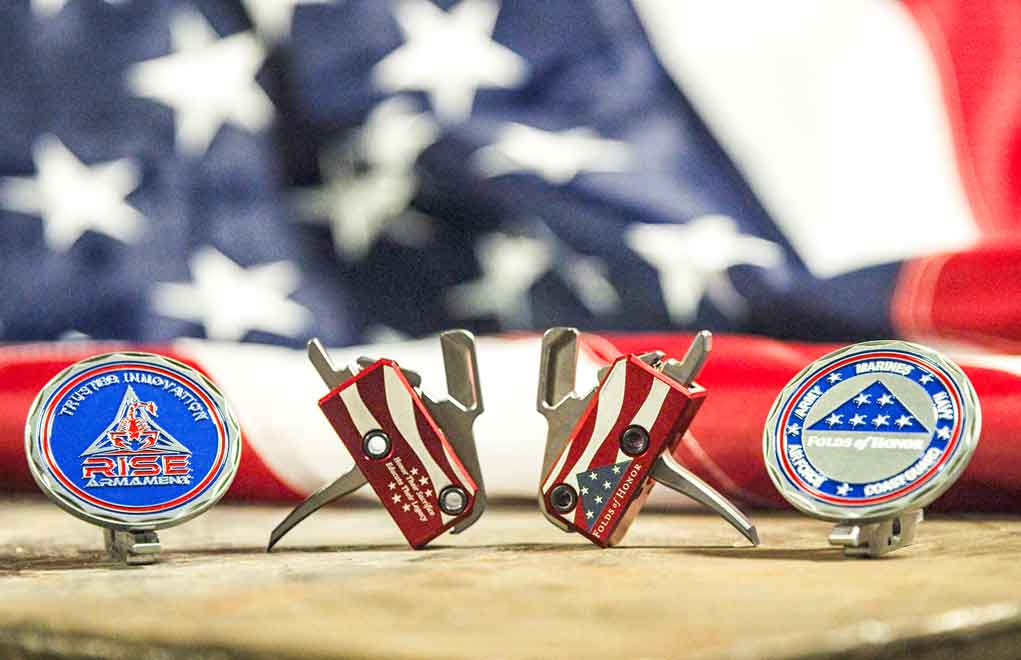
A portion of every Patriot High-Performance Trigger sold is donated to Folds of Honor.
How RISE’s new trigger is on target:
It is a single-stage drop-in trigger group with a feather-light 3.5-pound break and extremely short reset.
The straight trigger blade enhances shooter control and adds to a lighter-feeling pull weight.
An EXO nickel boron coating on interior parts reduces friction on contact surfaces.
The housing is bright red 8625 hardcoat anodized aluminum with an American flag and the Folds of Honor logo.
Included with the trigger is commemorative challenge coin with Folds of Honor on one side and RISE Armament on the other.
Study RISE Armament for any amount of time and you’ll find the Oklahoma company has an obsession — triggers. From the gunmaker’s standpoint, the entirety of a rifle — its performance, accuracy, dependability — all hinge off this one little feature. RISE’s preoccupation with triggers runs so deep they even designed a gun — the 1121XR Precision Rifle — around the company’s RA-535 Advanced Performance Trigger.
Memorial Day weekend RISE will release its latest precision trigger, fittingly named the Patriot High-Performance Trigger. And more than just sporting a red, white and blue finish, the upgrade shoots to go the extra mile in supporting veterans and their families. A portion of each sale of the Patriot High-Performance Trigger goes to Folds of Honor, which provides educational scholarships to the children and spouses of those who were killed or disabled while serving our nation.
“Saying we’re proud to help out and donate to Folds of Honor is an understatement,” says Matt Torres, president of RISE Armament. “Veterans’ families are often overlooked, which is really a shame. Our troops and their families have tremendous courage and have made so many sacrifices. It’s our duty as Americans, as patriots, to take care of them and honor what they’ve done for us all.”
The Patriot High-Performance Trigger itself sports some pretty impressive specs. The single-stage drop-in trigger group has a feather-light 3.5-pound break and extremely short reset, aiding both accuracy and rate of fire. Furthermore, it boasts a straight trigger blade for enhanced shooter control, as well as adding to a lighter-feeling pull weight.
The Patriot has a premium EXO nickel boron coating on interior parts for reduced friction and smoother contact surfaces. Additionally, it features a bright red 8625 hard coat anodized aluminum cassette housing with an American flag design and the Folds of Honor logo. Topping it off, it includes a commemorative challenge coin, which features Folds of Honor on one side and RISE Armament on the other.
The trigger is sold with free anti-walk pins and wrenches for installation and fits .223/5.56 and .308 AR-style platforms with Mil-Spec dimensions. Rise did not release the Patriot High-Performance Trigger’s MSRP.
For more information on the RISE Armament’s new trigger, please visit: www.risearmament.com
When a gun has been in production for more than 100 years like the SA-22, labeling its design as a ‘success’ is a massive understatement.
Why this semi-auto rimfire is one slick shooter:
The svelte little .22 rifle has been in production for more than a century.
It was designed by John Browning.
It was also the first semi-auto chambered for the .22 rimfire cartridge.
Spent casing are ejected downward.
The cocking button is on the underside of the receiver.
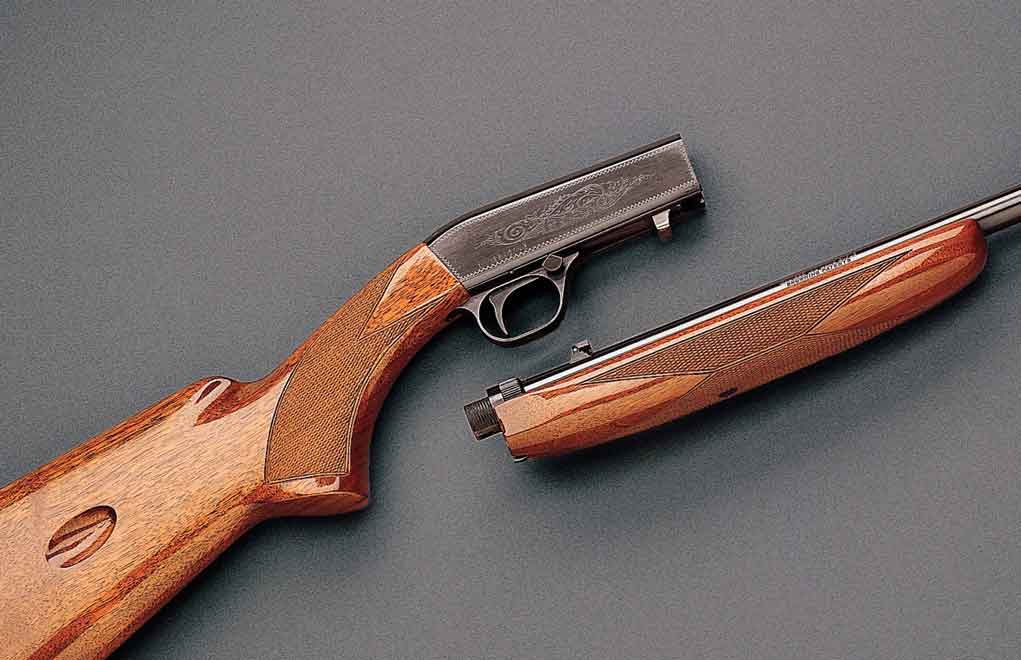
The Browning .22 Auto Rifle is a takedown.
Top examples of certain Belgium-made versions of the rifle can fetch $3,250.
The svelte little .22 rifle, known by Browning variously as the SA-22, .22 Semi-Auto or just Auto Rifle, has been in production for more than a century. The John M. Browning design was the first semi-auto rifle made for the .22 rimfire cartridge. It has been called a rifle that was appropriately designed for its cartridge — slim, light and easy handling. It was manufactured by Fabrique Nationale in Belgium beginning from 1914, but it wasn’t imported to the United States until 1956. Production continued at FN until 1974, when it was moved to Miroku in Japan, where most Browning rifles and shotguns have been made ever since.
This Limited Edition SA-22 commemorates the 100th anniversary of the rifle.
A similar rifle was made by Remington from 1919 to 1949 as the Model 24 and 241, under license from Browning. The main difference in the Browning and Remington versions had to do with a slight variation in the take-down system for removing the barrel. The Brownings were also cosmetically a bit nicer, with attractive checkering, wood, fit and finish.
I recall as a youngster seeing my first Browning .22 Semi-Auto at a gun store in downtown Austin, Texas, and being quite impressed. This was in the late ‘50s, and I recall the price being about $85. I was especially impressed with the .22 Short model.
My experiences with Texas fox squirrels taught me that .22 Short hollow-points were a fine choice for bushy-tails at reasonable ranges. Over the years I kept telling myself that I really needed one of the Short models, but somehow I never got around to buying it. They have been discontinued for several years, and these days the used ones are going for $1,000 or more. Lesson here for younger shooters — don’t wait too long for something you really “need.”
The Unique Browning .22 Auto Rifle
The .22 Auto Rifle design has several unique features that many shooters find appealing. The most noticeable is the downward ejection of empties. I’ve heard that this was to avoid ejecting the shells into the face of a person standing next to the shooter — the downside is that a hot shell can drop down into the sleeve of the shooter’s shirt.
One of the SA-22’s flagship features is an easy take-down system for removing the barrel.
Another distinctive feature is the cocking button on the underside of the receiver. This design, coupled with the ejection port on the bottom, gives the SA-22 a nice, flat surface on both the right and left sides of the receiver. Previously mentioned is the take-down feature, allowing the barrel to be easily removed without tools by way of the knurled ring at the rear of the barrel that can be turned with the fingers.
Operation of the Browning .22 Auto is simple: Turn the loading tube in the buttplate to the left and pull it out far enough to expose the port on the right side of the buttstock, insert up to 10 .22 LR cartridges or 16 shorts (if you have a shorts-only model), reach under the receiver in front of the trigger guard, and pull back and release the cocking lever.
Make sure to use the button-operated safety in the front part of the trigger guard. Some of the early models have the loading port on top of the buttstock, directly behind where the stock meets the receiver. I believe these models are made in Belgium and marked “Fabrique Nationale” and not “Browning.”
What To Look For In A Browning .22 Auto Rifle
There have been several high-grade models with varying levels of engraving and wood. Some SA-22s I’ve seen had very nicely figured walnut stocks. The chart shows some current values, courtesy of the 2017 edition of Standard Catalog of Firearms.
Many collectors, as is often the case, are mainly interested in older models, especially those made in Belgium. The Miroku rifles, however, are very high quality and will likely show increases in value in the future. For small-game hunting or casual plinking, there isn’t a nicer .22 to take on a stroll in the woods than the Browning SA-22.
Editor’s Note: This article originally appeared in the May 2018 issue of Gun Digest the Magazine.
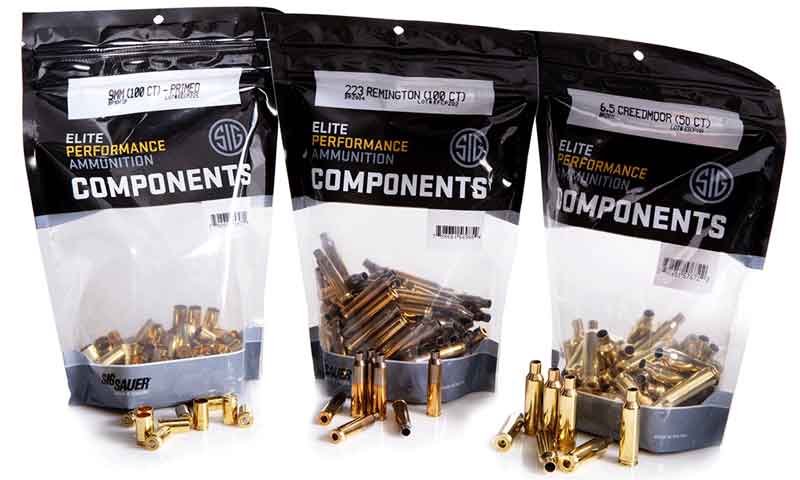
Making reloading a whole load more precise, SIG has released a full selection of pistol and rifle brass as individual components.
The word on SIG’s cases:
These are the first individual reloading components SIG has offered.
There are eight pistol calibers available and nine rifle.
Reloaders have the option between primed and unprimed pistol brass.
Pistol case come in 100-count bags, rifle 50-count; there is no word on MSRP.
At one time reloaders were a bit of an oddity. While the rest of us were out shooting, they were whiling away their time in some musty basement making certain no meplat went untrimmed or primer pocket un-swaged. They were kind of the obsessive-compulsive cousins in the shooting family tree.
Now, everyone reloads seems to reload. It makes a world of sense the discipline has burned hotter than a .22-250 round with a compressed load of H380 as of late — the industry has made it easy. The equipment and components have never been better made, more accessible or more affordable than today. And the list of players in the handloading game continues to grow.
The most recent entrant is SIG Sauer, who this week announced it would offer ammunition components for handloading immediately. This is a fast pivot for the company, given it was only a few years back SIG first began manufacturing ammunition in the first place. But in a short time it has made quite a name for itself with its Elite Performance Ammunition.
Initially, SIG is concentrating on shell casings with full lines of rifle and pistol brass for some of the most popular calibers. There is no word if they plan to expand operations from there, which might be OK given the attention it’s paying to oh-so-vital brass.
“Each brass case undergoes rigorous in-line and post-production quality assurance testing to ensure a flawless casing,” said Brad Criner, Senior Director, Brand Management and Business Development at SIG SAUER Ammunition. “The result is unparalleled durability and dependability.”
Interestingly, the Elite Performance Ammunition cases have two options in its pistol brass — primed and unprimed. This is somewhat unusual, but for those willing to give up a bit of control on the ammunition they churn out it could prove a real timesaver. All the rifle shells, on the other hand, are unprimed; they are, however, induction annealed for consistent bullet retention.
SIG has made a particular point to talk up the tight tolerances and geometric consistency of its primer pockets and flash holes. Additionally, it promises superior “metallurgical properties” in their cases, leading to their long reloading lives.
Pistol component cases are available, primed or unprimed, in bags of 100 in the following calibers: 380 Auto, 9mm Luger, 357 SIG, 38 Spl, 357 Mag, 40 S&W, 10mm, 45 Auto.
Rifle component cases are unprimed and available in bags of 50 in the following calibers: 223 Rem, 22-250 Rem, 243 Win, 300 BLK, 300 Win Mag, 308 Win and 6.5 Creedmoor. Coming soon in: 270 Win and 30-06 SPRG.
For more information on SIG Sauer reloading components, please visit: www.sigsauer.com
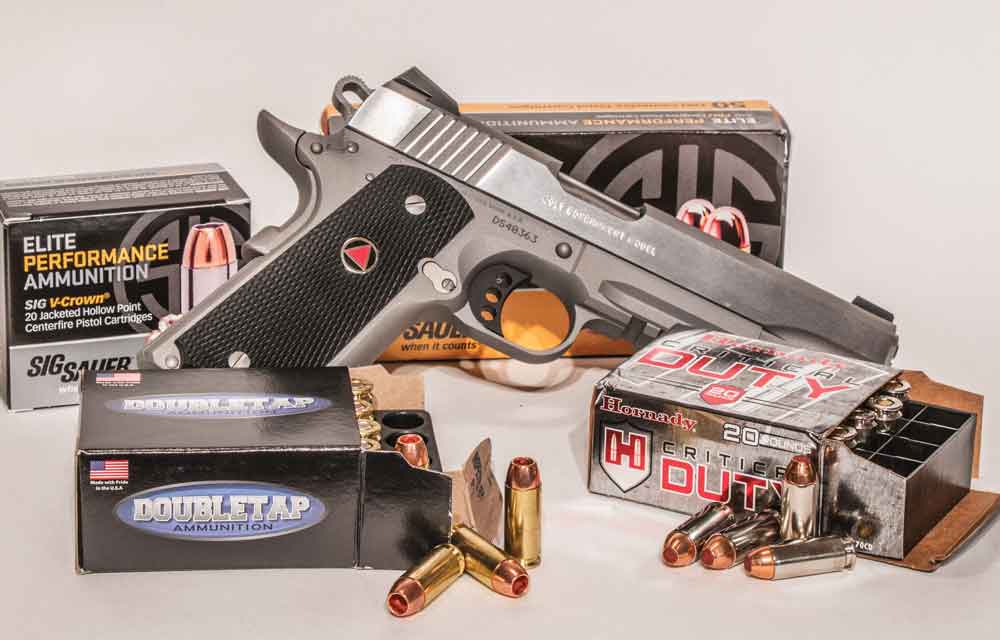
Shooting the 30th Anniversary Colt Delta Elite proves the 10mm ammo has come a long way.
How is the old 10mm new again?:
The round has languished since the birth of the .40 S&W.
In 2002, Doubletap began offering 10mm loads, which help rejuvenate intrest in the round.
Able to spite a 165-grain bullet 1,350+ fps at the muzzle, the round is a stiff shooter.
However, there are loads — such as from Hornady — that make the caliber as manageble as shooting a +P .45 ammo.
The 10mm Auto cartridge was introduced in 1983 for the infamous and now defunct Bren Ten pistol. Though some credit Jeff Cooper as the inventor of both, he was not. An inspiration, on the other hand, he was. The round appeals to defensive handgunners because it replicates the power of the .357 Magnum out of a semi-auto pistol, with a higher capacity than the .45 Auto. But it never really caught on. The high price of the ammo was proportional to its recoil, and most shooters find both unpleasant.
The 10mm gained its fame in the Colt Delta Elite (1987) and was briefly the darling of the FBI. This short-lived affair faded with the birth of the .40 S&W, and the 10mm has sort of languished since. However, Doubletap — initially a boutique ammunition manufacturer out of Utah — began offering a variety of 10mm loads in 2002. This fed the limited but enthusiastic demand and unquestionably rejuvenated interest in the cartridge. So much so, for 2017 Colt celebrated the 30th anniversary of its Delta Elite with a new version equipped with a rail. I procured one for testing and figured it an ideal opportunity to discover what external ballistics could reasonably be expected with modern 10mm loads.
If you can handle the recoil of a .45 Auto, you can handle a 10mm. However, handle and manage are two different things. A 165-grain bullet exiting the barrel of a 40-ounce gun at a confirmed 1,350+ fps generates more than 650 foot-pounds of energy. If you describe that as pleasant, you’re lying. If you think you can control it as easily as a .45 Auto, you’re full of sheep dip. On the other hand, available 10mm loads from Hornady will emulate the recoil of +P .45 Auto loads, which are stiff but not hand-numbing.
The 10mm genuinely fills the niche of a semi-automatic hunting handgun, and high-end shops such as Nighthawk and Wilson Combat offer pistols ideally suited for that pursuit. Of course, if you have a Napoleon complex, the round will surely impress your friends, or at least yourself, while at the range.
Though the new Colt Delta Elite Rail Gun exhibited all the sharp edges common to Colt’s 1911s, the trigger was decent, functioning was excellent, and accuracy superb. You can pick one up for about a grand. And, you now have a lot of 10mm loads to choose from. Some of those epitomize pure wickedness; others remind you of a .40 S&W. Like Baby Bear, you should be able to find one just right for you.
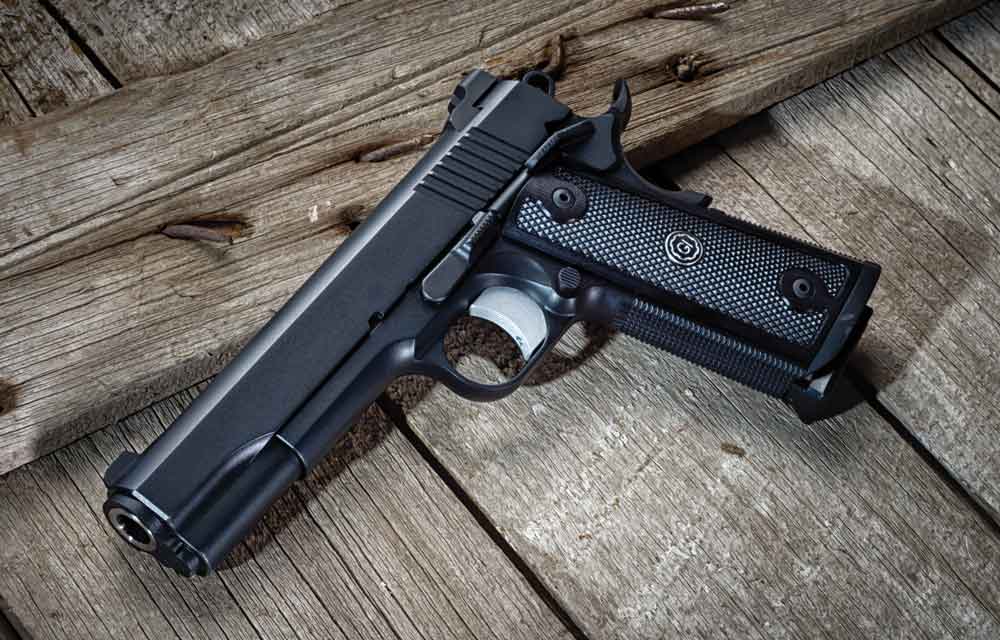
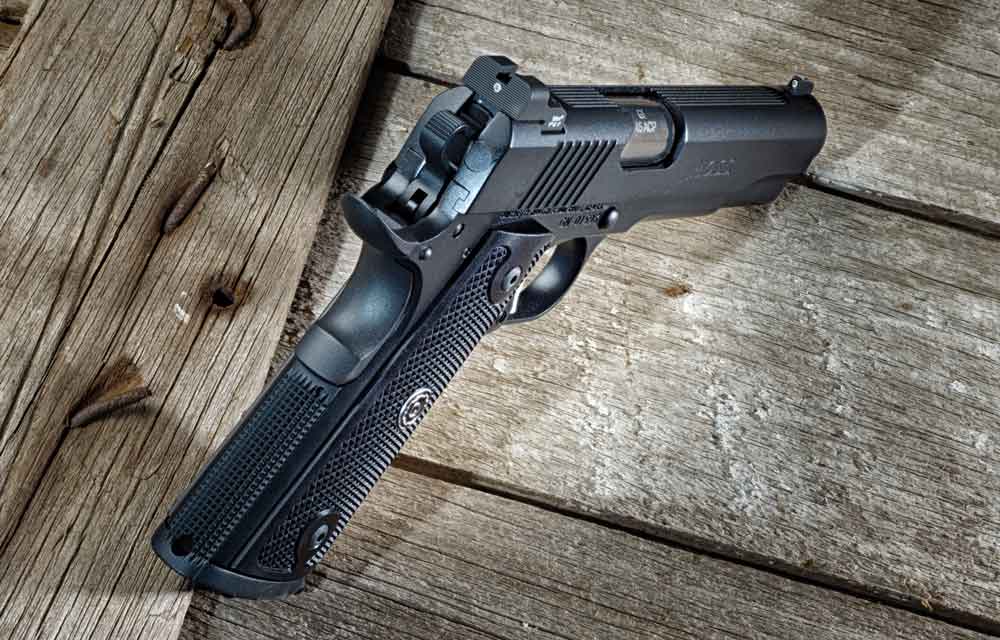
The Guncrafter HOSS is an overbuilt version of Browning’s classic 1911, designed to address some of the common failure points on that particular pistol.
How this beefed up 1911 is engineered to last a lifetime:
The Guncrafter HOSS was conceived as a 1911 that would last a lifetime.
To do this, Guncrafter’s engineers addressed common failures in the design one by one.
Nearly every facet of the gun is beefed up, from its magnum-sized extractor to a larger barrel link.
Additionally, the barrel wall thickness was increased by 56 percent.
With extremely tight fitting, the gun performs admirably and is as accurate as fussier 1911s.
The 40-ounce Guncrafter HOSS has 8+1 capacity and is constructed from stainless steel.
The pistol’s MSRP is $3,700.
If there were a book of firearms successes, probably the first chapter would be dedicated to John Browning’s 1911 pistol. Designed in 1908 and adopted by the U.S. Army in 1911, it’s a design that’s stood the test of time for more than 100 years, and it’s still as popular as ever. There are dozens of companies producing 1911s, but only a few of those makers truly approach the undertaking of building the best pistol possible as a serious challenge.
The HOSS is expensive, sure, but it’s a perfect combination of good looks and rugged durability.
Obviously, the pistols Guncrafter Industries — located in Huntsville, Arkansas — makes are built to sell, but they’re built to sell to the most discriminating buyer who’s only satisfied with the best gun money can buy. In my experience as a writer, I’ve tested four Guncrafter guns and never experienced a single malfunction. It’s easy to build a 1911 that doesn’t malfunction, but to build a 1911 that’s capable of shooting rifle-sized groups off a Ransom Rest without malfunctions is another story.
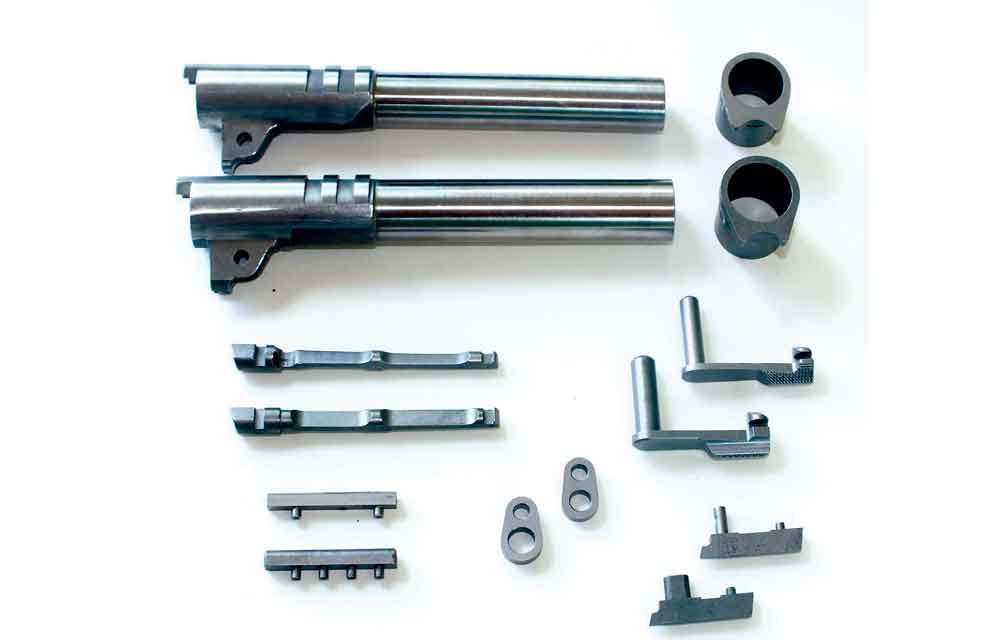
Beefing Up The Hoss
When the HOSS project was undertaken, the idea was to build a pistol that not only was accurate, but also reliable, not just for range sessions, but for a lifetime. Like all other mechanical devices, the 1911 design has weaknesses: Those who’ve shot thousands of rounds through them have experienced breakages that relate to those weaknesses.
The engineers at Guncrafter Industries considered every one of those common failures and addressed them — one by one. The extractor is beefed up, and the slide stop pin is increased in diameter by 33 percent. The plunger tube is also fattened up, and two more location pins are added. The ejector is increased to twice the normal size, and the width of the barrel link is increased and the material improved over standard.
In addition, barrel wall thickness is increased by 56 percent. The lower lugs are beefed up, and, finally, the barrel bushing is not only larger in diameter to accommodate the larger diameter barrel, but it’s also thicker in the front portion that locks into the recoil spring plug.
A tight fit between the slide and frame is always an important factor on a 1911, and Guncrafter’s HOSS doesn’t disappoint.
Each of these modifications represents the elimination, or at least a greatly reduced chance, of failure of these parts. The official reasoning behind the “HOSS” designation of this model is “Heavy Operating Shooting System.” Personally, when Alex Zimmerman described the gun and told me the name, I automatically agreed “HOSS” was perfect, thinking of Hoss Cartwright of the Bonanza TV series.
Maintaining The Hoss’ Finesse
So, it’s established that the new gun from Guncrafter Industries is designed to be reliable, both in the short and long-term, but making a gun reliable generally comes at the price of gilt-edged accuracy. Super accurate 1911s have a reputation for being fussy about ammunition and somewhat fragile. Accomplishing extreme reliability while maintaining pinpoint accuracy is where the gunmaker’s art comes into the equation.
Accuracy in a short-recoil-operated pistol requires precise fit of several critical parts. First, the barrel must fit closely in the bushing or bearing surface on the front of the slide where the barrel moves. Second, the barrel must lock up consistently to make sure there’s no barrel tilt when the gun is fully into battery. With a 1911, this is accomplished by careful fitting of the locking lugs and having the correct barrel link to assure the barrel is fully engaged in the top of the slide recesses.
Third, the slide itself must have a minimum of play on the slide rails because it controls the front of the barrel, and the sights are mounted on the reciprocating slide. Proper fitting of the slide on the rails assures repeatable positioning when in battery. All these operations, along with a high-quality barrel, provide accuracy, but of course, the better the work, the more accurate the gun.
Seven components of the basic 1911 were beefed up to produce an even more bulletproof gun than a standard 1911. (Author Photo)
There are other factors that affect accuracy in terms of the shooter interfacing with the firearm because if the gun has poor sights or an inconsistent trigger, the shooter will be unable to utilize the inherent capabilities of the gun. To allow an improved level of interface, the Guncrafter Industries HOSS is provided with high-quality sights: low mount night sights with Tritium inserts grace the slide and allow heel cocking off the stepped forward face of the rear sight.
While a gun with a mediocre trigger can provide great accuracy, it makes it much harder for the shooter to achieve that accuracy. Guncrafter Industries has provided the shooter with the optimum opportunity to utilize the accuracy potential of the HOSS by shipping it with one the best triggers I’ve ever felt on a 1911. The trigger break is crisp with no creep, and there’s no visible or tactile backlash. My test gun broke at 4.5 pounds, the lightest trigger that should be used for a defensive pistol.
The Hoss Proves A Theory
Of course, I had no expectations of being able to test the HOSS to failure level. The time-tested 1911 has the reputation for extreme reliability in the toughest of conditions, and I expected no less of the HOSS. Still, I decided to run a few hundred rounds through the HOSS, and, as expected, I didn’t experience a single malfunction, even with light-loaded semi-wadcutter match loads. Accuracy was far beyond my capability, as has been the case with every gun I’ve ever tested from Guncrafter.
I tested it with Winchester 230-grain hardball, Winchester 185-grain Silvertip defensive ammunition and even some 185-grain semi-wadcutter match loads. Normally, those light loads won’t run in guns set up for service or defensive loads, but the HOSS is so well fitted and smooth operating that they ran without a hitch. On a couple of occasions, the slide didn’t lock back on the last round, but these loads aren’t meant for use in guns with standard recoil springs and generally give guns with standard springs a fit.
Off the bench, I managed a 10-shot, 1.123-inch group at 25 yards with the Winchester 230-grain hardball. I feel certain a good shooter could win leg points in a CMP Distinguished Pistol Shot match with this out-of-the-box handgun, and that’s quite a statement. My standing 10-shot groups at 15 yards were ragged holes, and fast shooting at that distance produced well-centered groups. While the refined build and quality barrel contributed greatly to this, the excellent sights and trigger made shooting much easier.
Magazine changes were easily accomplished; the magazine release was positive, and the extended magazine well made fast insertion easy. Recoil was manageable, and the night sights were easy to find during recoil recovery.
Alright, I know a pistol with an almost $3,800 price tag isn’t for everybody, and even if it was, the price would be even higher because not many gunsmiths can accomplish what Guncrafter has in the HOSS. The HOSS, like all the other models in the Guncrafter line, is a gun built for a shooter who wants the very best and is willing to pay for that kind of quality. It’s an heirloom gun that will last for generations and provide its owner with the pride of knowing you can’t buy a better pistol.
Editor’s Note: This article is an excerpt from the Concealed Carry 2017 issue of Gun Digest the Magazine.
Laser sights could provide a decisive advantage in a defensive situation, but they require proper training and an understanding of their limitations to get the most out of them.
Do laser sights shine as an aiming solution?
There are many dubious about the effectiveness of laser sights.
Generally, it’s a question of reliability.
To effectively use a laser sight, you need to be trained in its application and limitations.
You should still draw to your sights every time, even with a laser sight, as a redundancy.
But when sighted and working properly, you’ll find the dot on your target before your handgun is fully presented.
Many consider laser sights to be nothing but a gimmick. Folks of this ilk are mostly of the old guard and consider the notion of trusting your life to an electronic sighting device bad judgment. I don’t have a problem with shooters who don’t like lasers, but I do think it inappropriate to speak negatively of a tool you do not understand. To effectively use a laser sight, you need to be trained in its application and limitations, just as with any other tool. And, most who preach against the use of lasers have little or no experience with them.
Some shooters discount the benefit of lasers on defensive handguns. Before you do that, take the time to learn how they should be employed.
It’s true that when you draw your handgun in a lethal confrontation, the laser might not work because you did not establish a grip capable of activating it. It might not work because the batteries have died. And, it might be working, but the light is so bright outside, you simply cannot see the laser dot. These are all valid considerations, but this is also the reason you should train to draw to the sights. In other words, as you present your handgun towards the threat, you look for the sights just like you’ve been trained. However, if your laser is adjusted properly—and working like it most likely will be—it should appear on the target just above your front sight. With practice, you’ll learn to see that bright dot on your target before your handgun is fully presented, and before you’ve found your sights. If, for whatever reason, you do not see the laser, engage as normal with the pistol’s sights.
The laser is not some magical device that makes you shoot every shot like Jerry Miculek; it is a tool that can improve your shooting precision and speed, and quite possibly help you stay alive. Learn how to properly use it before you bash it!
Editor’s Note: This article originally appeared in the July 2017 issue of Gun Digest the Magazine.
Featuring heavy barrels and a number of other enhancements, the Rascal Target and FV-SR look to own the bullseye.
How Savage is rounding out its Rascal line:
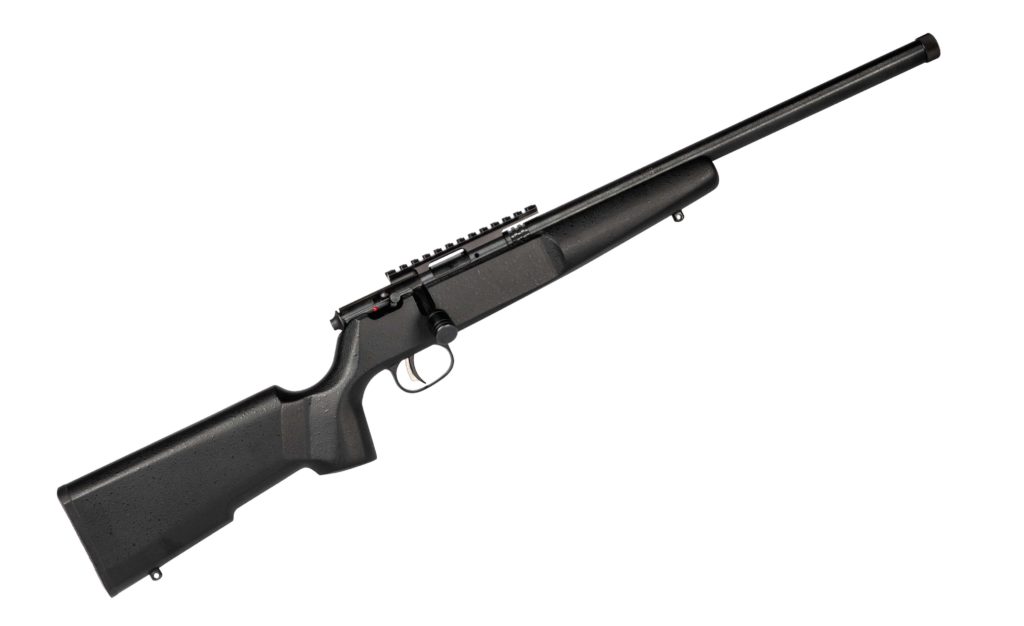
The Rascal Target is an optimized version of the rifle, featuring a heavy barrel.
The new single-shot rifle is aimed at adult shooters with a full-sized stock.
The Rascal Target XP has the same features as the Target model, but comes with scope and a bipod sling swivel mount.
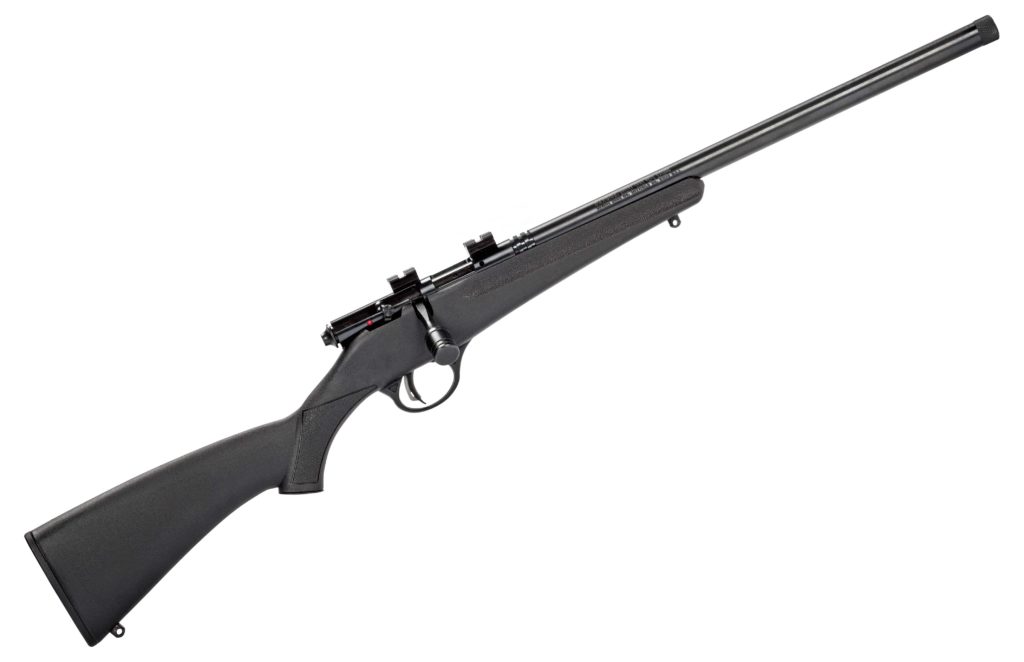
The Rascal FV-SR is a youth gun, but boasts a heavy target barrel.
Of all the thrills in life, there are few that come close to those first shots you ever take with a gun. The nerves of trying to do everything the way you were taught. The crack of the rifle as the pin strikes and the thrill of seeing a can tumble or the target printed that first time — it’s Christmas and getting your driver’s license all wrapped up in one.
Target
Chances are, your right of passage was like many other Americans and was done behind the business end of a single-shot .22 rifle. And in the contemporary era, the Savage Rascal is a popular choice on which new shooters can cut their teeth. Accurate, simple, safe — it’s just about the perfect training tool and about as much fun as should be legal.
Savage continues to build off the success of this nifty line of little rimfires, introducing two new models to the Rascal family — the Rascal FV-SR and the Rascal Target. The rifles keep much of what has made the line popular in the first place, but enhances in ways that should make these little gems lights out tack tappers.
The Rascal Target ($314 MSRP) is the more curious of the two new rifles, given it’s designed to fit adult shooters with its full-sized stock. The hardwood stock is also a break from the company’s earlier models, given it’s enhanced for precision shooting with a pistol grip and a flat forend for more stability when shooting off sandbags. Going a bit further, Savage also mated the Rascal action to 16.125-inch a heavy barrel, target crowned and with a 1/2-28 TPI threaded muzzle. In addition to putting the rifle’s accuracy potential through the roof, the heavy barrel should also make recoil nearly non-existent.
FV-SR
Savage also offers the Rascal Target XP ($399 MSRP), which has all the amenities of the Target model, but also comes with a 4x32mm scope as well as a bipod sling swivel mount.
The Rascal FV-SR ($219 MSRP) stays true to the line’s roots and is aimed at young shooters. But it arms them with a rifle that should get them on target posthaste, with an accuracy optimizing heavy barrel. Savage gives few specs about on this feature, other than its 1/2-28 TPI threaded muzzle, but it certainly appears a solid upgrade for adolescents just dying to knock the bullseye out.
Savage’s new rimfires can shoot 22 Short, 22 Long or 22 Long Rifle ammunition. The single-shot rifles feature Savage’s user-adjustable Accu-Trigger system. Like the original, they cock by lifting the bolt and unload easily — without pulling the trigger.
For more information on Savage’s new rimfire rifles, please visit: www.savagearms.com
Completely customizable to any mixture of firearms and any size gun collection, the Agile Gun Safe might be the ultimate in gun storage systems.
It’s safe to say, gun gear breaks down into two basic categories: “Here, take my money!” and “Blast ye gods, do I really have to open up my wallet for that?” Generally, gun storage falls squarely into the second column. Except, perhaps SecureIt Gun Storage and its Agile Gun Safe system. An intriguing take on gun security, the ultralight safes not only keep your guns under lock and key, they also organize your gear so it’s always within reach.
The magic of the SecureIt system is a completely customizable interior that allows shooters to configure an Agile Gun Safe to their needs. With available rifle stands, handgun hangers, mag hangers, parts bins and a load of other organization devices, the lightweight safes adapt to any gun collection.
A bit nuanced, but the other interesting advantage of the Agile Gun Safe is how it stows your gear and keeps it at hand and ready if you need it in a pinch. Pistol grips are immediately within reach and rifles and shotguns have a clear line of access, unlike traditional safes that isolate all but the first guns in each row. On top of this, the support system adapts to the size of your long guns, so an AR pistol can reside right next to your magnum goose gun in good order.
Additionally, when your arsenal grows the Agile Gun Safe system grows with it since the Agile 52 and Agile 42 gun safes are stackable and can bolt together side by side. The safe is dynamic, not simply a lump of metal eating away space.
Certainly, SecureIt has yet to find a way to make gun storage as sexy as the hot new tactical rifle. But the company has come within a whisker with its Agile Gun Safe.
It might seem small, but the location of cocking serrations on a pistol’s slide can make a big difference in how quickly you can get it loaded and into action.
Unless you’ve already become a diehard fan of the Beretta APX line of pistols, cocking serrations are most likely an afterthought on your defensive handgun. They’re there, they work, what more do you need to worry about? More than you might expect.
As Mark Redl explains in the above video, searching out a pistol with forward cocking serrations or having them milled on an existing one can give you an incredible advantage. The ability to rack the slide from the front puts your hands in immediate position to grip the pistol. Whereas, operating the gun from the rear sends your off-hand into flying back at you. This separates your hands, requiring more motion to get into the proper position.
Additionally, notice the style Redl uses to execute the maneuver — pushing the gun forward instead of pulling the slide back. Not only does this give him more control, but a keeps his off-hand relatively static and ready to immediately assume a proper grip. There’s an argument this technique could even make working the slide easier for those with less hand strength.
Redl, a pro shooter for Aguila Ammunition, approaches front serrations from a competitor’s standpoint. It makes a world of sense since he’s gunning against the best around. His ability to shave seconds on a reload from a draw or off a table is a positive must. But the concept is more than applicable to self-defense and might give you a life-saving advantage. There’s no reason why you wouldn’t want to get your pistol into the fight faster in a lethal-force event.
For more information on Aguila Ammunition, please visit: www.aguilaammo.com
We were building the office I’m writing from right now. My brother in law, Bernie, was a builder and he was supervising my business partner, Billy, and me. He was using a nail gun and reminded us they were dangerous. “Guys, when I use the nail gun, make sure you’re behind me. This thing can kill you.”
“Yeah,” Billy said, “Danny Glover used a nail gun to kill a guy who broke into his house.” Bernie stopped what he was doing and turned around, “Really? How could that happen?” It occurred to me that Bernie didn’t watch a lot of movies.
Billy explained, “Danny was a cop and the guy wanted to kill him to prevent him from testifying.”
Bernie still hadn’t caught on. “So this guy, Danny, used a nail gun to kill the guy and was a cop?”
Now Billy realized that Bernie thought Danny was a real person and that it was a real situation being discussed. I saw his smile. “Yup, in that movie he was a cop.”
In a real life-or-death situation, a home invasion isn’t a laughing matter, and unfortunately, it’s become a much more common occurrence. If a hammer or a nail gun is all you have to defend yourself, that’s better than nothing — but there are much better options. Home invasions happen every day, and it’s only reasonable to be fully prepared.
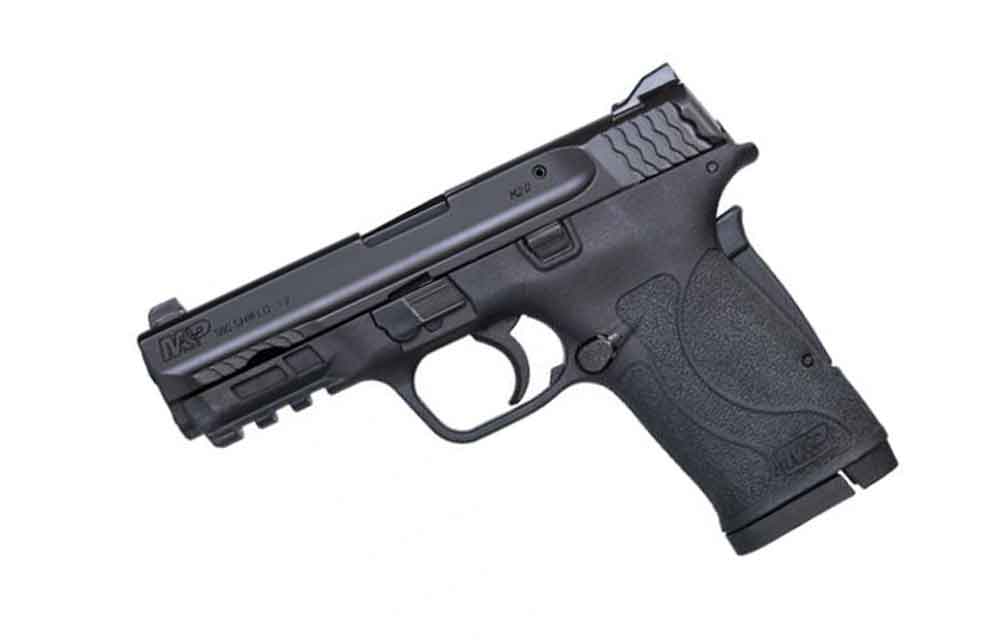
S&W Shield EZ
Many of the people I train are relatively new to firearms, and most want to purchase only one firearm for their daily protection. For that to occur, the gun chosen must be concealable, so the home defense gun functions as the same gun that’s carried on a daily basis. There might be better options, but any handgun is definitely more effective than a nail gun.
A great starting point for home defense is the personal firearm you carry every day. It’s something you’re comfortable with: It’s capable, and it’s going to be easy to access. Obviously, we have a myriad of good choices for carry guns, but for some people, many of those choices just won’t work. As an instructor, I often train older citizens who sometimes don’t have the hand strength to operate the slide of a 9mm or the double-action trigger of a revolver. For them, those choices are limited.
With the introduction of the Smith and Wesson Shield EZ, that problem has been addressed. The S&W Shield has established itself as the most popular concealed carry handgun in America, and the first point of home defense comes with your daily carry handgun. While the Shield and other similar guns are great guns, they require more hand strength than some people are able to generate.
The Shield EZ resolves those problems by providing a .380-caliber pistol that’s larger and therefore easier to manipulate than the pocket-sized guns. The lighter caliber and slightly heavier slide allow for a very light recoil spring. The rear of the slide is recessed in the gripping area, providing a better surface and shape for hands weakened by arthritis and time. The trigger has a lighter break and is more tactile in reset. Magazines are easier to load, and the Shield EZ has a passive grip safety, allowing safe carry with or without the optional manually operated safety.
The upshot of this is that Smith & Wesson has finally developed a defensive pistol that can be operated by nearly anyone, allowing people with less hand strength the ability to defend themselves both at home and away from home.
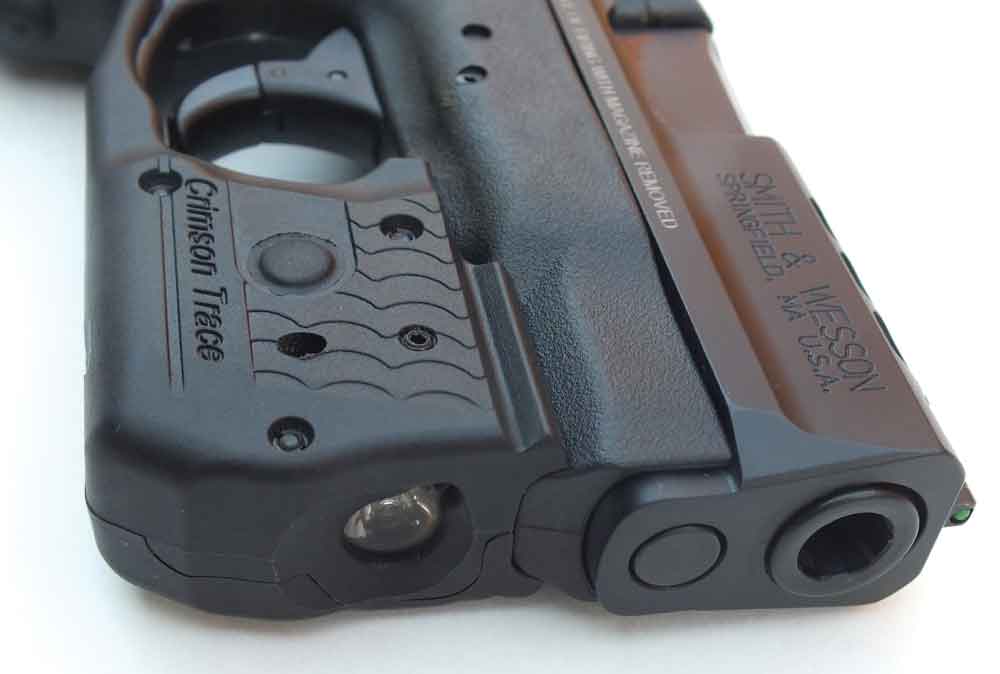
Crimson Trace Laserguard Pro
Whether you like lasers or not, most people fail to consider that 70 percent of defensive situations occur in low light. The ability to see is of particular importance in a nighttime home invasion. The Crimson Trace Laserguard Pro light/laser combination mounts to the lower frame of the gun with a rearward extension that provides a front-mounted activation switch.
Normal gripping of the gun passively activates the laser/light in four different chosen modes: light/laser, laser only, light only and flashing light/laser. Changing modes is accomplished by pressing the activation switch and the selector switch for five seconds. There’s also a bottom-mounted switch to turn the unit off. All controls are accessible when the gun is properly held in a two-hand grip.
Properly set up, the laser isn’t the primary sighting system but rather a backup sighting system in the event of low-light conditions. Lasers should be set up so the shooter can’t see the laser when using a proper sight picture because it’s obscured by the front sight. The point of impact is only slightly higher if low-light conditions require use of the laser.
This way, the shooter trains with the sights, but he or she has the option of using the laser in the event of a low-light defensive situation. Equipped this way, the light, sighting system and handgun are all one unit, and the only thing the defender who’s under the extreme stress of a deadly force event has to manage. The Laserguard Pro is available to fit multiple defensive handguns and is a viable asset in home defense.
Mossberg Shockwave and Remington Tac-14
While I’m not an advocate of the Joe Biden-double-barreled-shotgun-fired-off-the-porch method of home defense, there’s no question shotguns are extremely effective in home defense, and they require less training to be used effectively. At close range, shotguns deliver a deadly and lethal blow. Mossberg’s Shockwave and Remington’s Tac-14 represent the ultimate in shotgun handiness and effective stopping power in a compact and affordable package.
With a total length just over the 26-inch minimum length designated by the 1934 National Firearms Act and a weight of around 5 pounds, they’re effective, handy and easily stored. Capacity of the Tac-14 is 4+1, and it’s 6+1 with the Shockwave. Level of penetration of exterior walls can be controlled by choosing shot size from bird shot to buckshot. These new firearms represent a major step forward in home protection against an active invader.
Gun Box
Taking an active role in defending your home means exposing family members, children and visitors to tools of deadly force, and laws require gun owners’ due diligence in keeping firearms out of the hands of those who shouldn’t have access to them. Whatever method of home defense you choose, you must have the capability to secure it. That method of security must allow you fast access and prevent access from others. Gun Box 2.0 does just that and without making it obvious a firearm is present and at the ready.
Available in five colors and accessible by biometric, cellphone or RFID technology, Gun Box is available in sizes to accommodate shotguns, carbines or handguns, and some models even serve as a Bluetooth speaker system. It’s TSA and FAA approved, has a motion-tamper alarm and an internal light, and it opens automatically when activated. It’s truly the most innovative and user-friendly system I’ve seen. Pricing begins at $149.
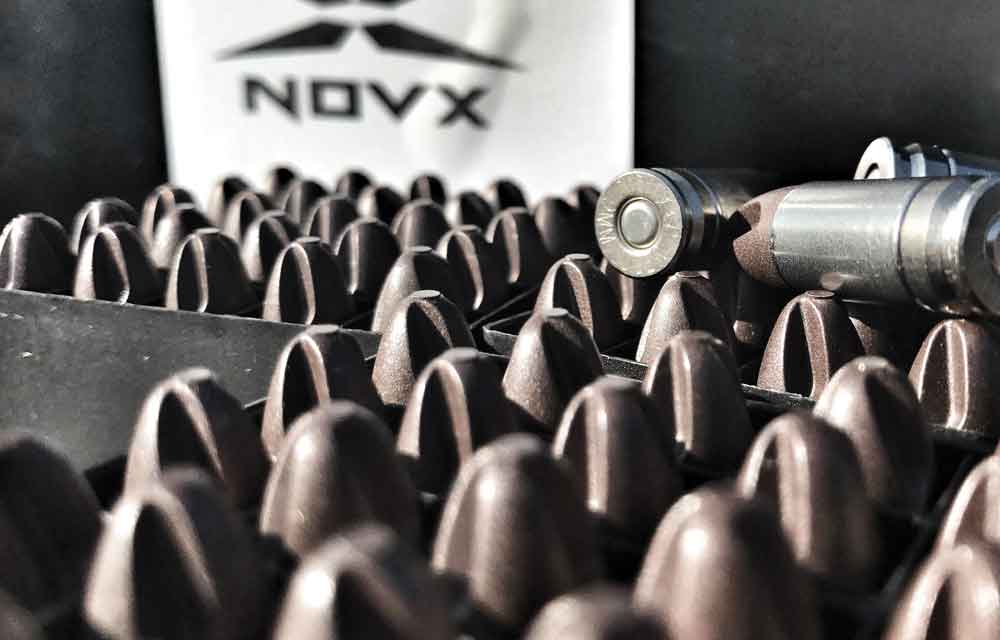
NovX 9mm Defensive Ammunition
A major concern in any defensive situation is where the bullet goes if it fails to contact the assailant or if it passes through. While civilian defenders have a better record for collateral damage than sworn law enforcement, the fact is, you’re responsible for every projectile you launch. In home defense, excessive penetration is an extreme liability, and the new NovX 9mm ammunition promises to be both safer and more effective in those situations.
NovX ammunition is a radical departure from conventional ammunition in several ways. The case is unconventional in that it’s partially aluminum and partially stainless-steel to provide corrosion resistance and self-lubricating properties for better feeding. The most drastic departure from convention is the projectile. Made from polycarbonate and copper, bullet weight is much lighter, just 65 grains for the self-defense load. A lighter projectile allows a much higher velocity — 1,655 feet per second.
Another drastic departure is that the bullet is non-expanding and achieves a lethal wound channel by spiral flutes that push tissue away from the wound channel and create more damage than an expanding bullet. While it’s still new and stopping effects haven’t been established, the higher velocity and lighter projectile will certainly reduce recoil and reduce the likelihood of projectiles penetrating walls, making collateral damage less likely. Currently available in 9mm only, a round-nosed practice loading is also available.
All of these are new products in a fast-growing segment of the firearms industry. Home defense is a serious matter and should be approached with serious consideration. Take your specific situation when making choices, and remember that any home defense plan is better than simply allowing yourself to be a helpless victim. Also, take into consideration that there are much better choices than a nail gun.
Editor’s Note: This article originally appeared in the March 2018 issue of Gun Digest the Magazine.
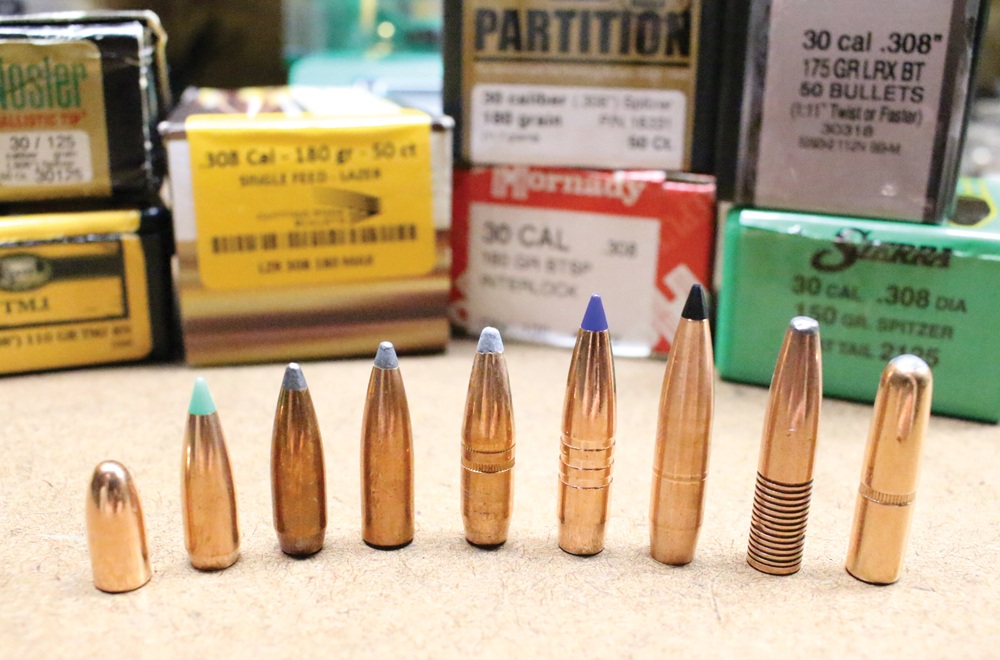
When it comes to powder and bullet combinations, few cartridges beat the grand old .30-06 Springfield.
Like its applications, the .30-06 Springfield’s reloading potential is incredibly versatile.
Its bullet section is vast, additionally, it might be compatible with the widest varieties of powders of any cartridge.
Given these factors, the .30-06 is open to a lot of experimentation.
Generally, the neck tension is good enough that it doesn’t require crimping.
The author has had the best results with Federal Gold Medal Match GM210M powder.
The .30-06 Springfield is highly versatile, capable of launching bullets with weights ranging from about 100 to 240 grains.
Just as the cartridge itself is incredibly versatile, so is its reloading potential. The .30-06 might be the cartridge that can use the widest variety of powders; I’ve personally used powders as fast as IMR3031, and as slow as Reloder 25, and just about everything in between. IMR4350 is a good all-around powder, as is IMR 4064, depending on the bullet style and weight.
The ’06 runs on a standard large rifle primer; I’ve had my best results with the Federal Gold Medal Match GM210M. I keep my cases trimmed to the SAAMI-specified length of 2.494 inches to keep things uniform, and as the case offers good neck tension, I rarely — if ever — crimp my cases.
All that versatility — in both powder choice and bullet type — can lead to quite a bit of experimentation, but after all, that’s half the fun of owning such a flexible cartridge. If you run a bolt-action rifle, neck sizing may tighten group sizes up a bit, but I’ve achieved really good accuracy in many .30-06 rifles without too much trouble or having to get too awful fancy. You might find it difficult to match the velocities of the factory ammunition, but I wouldn’t worry too much about that; the .30-06 gives you plenty of velocity for hunting, and 50 fps either way isn’t going to make or break your hunt.
Editor’s Note: This article originally appeared in the October 2017 issue of Gun Digest the Magazine.
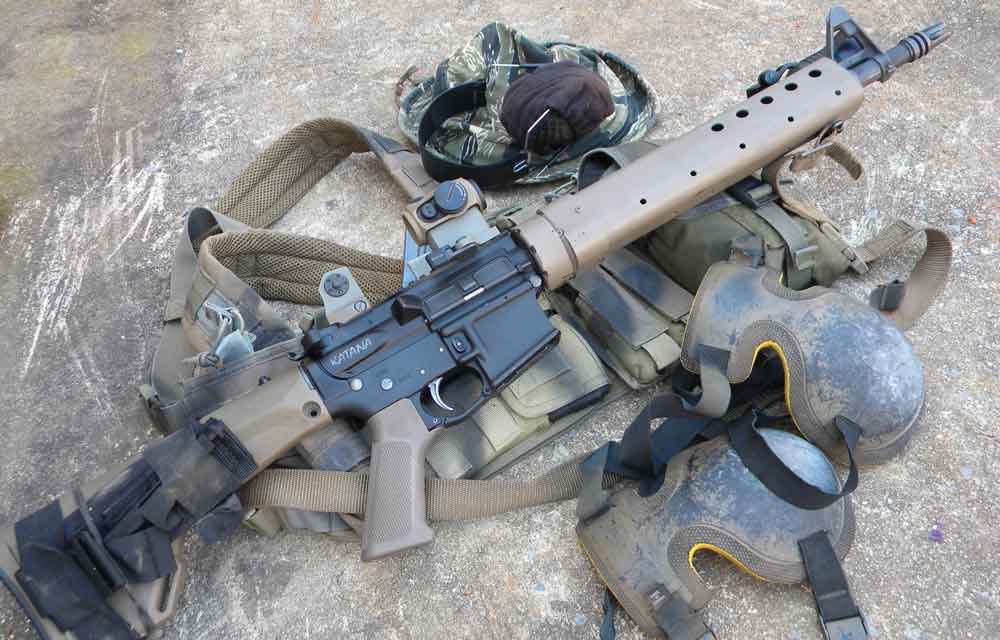
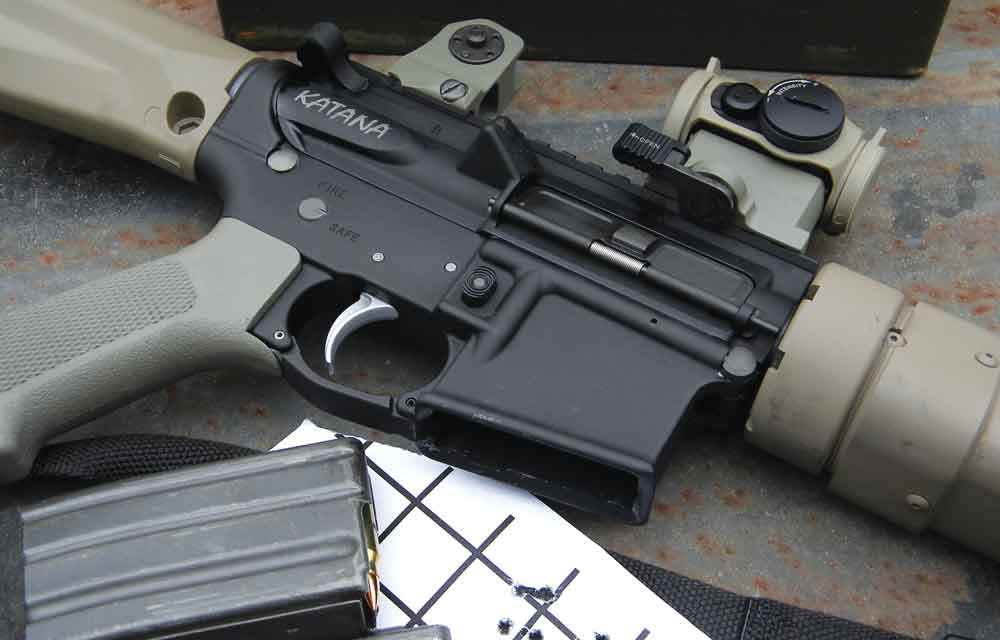
The best thing about the AR platform is its modular design: You can configure it to fit any application, assembling an AR to meet your specific needs. I’m often asked about how my AR is set up, so I thought this would be a good time to share my setup with you.
Search For Simplicity
The primary purpose for my AR is self-defense, and therefore it’s lightweight — just a tad over 6 pounds. You never know how long you might have to carry your rifle or carbine. The last time we had bad tornadoes here, there was lootin’ ‘n shootin’ in areas nearby. We carried our ARs for 3 days until things settled down. Regardless of the application, unless you only shoot off a bench, weight is always an issue.
Simplicity is another goal, and it’s a concept I apply to all my long guns. The simpler the setup, the easier it is to use under stress. This is especially true for self-defense, when circumstances are likely to be less than ideal.
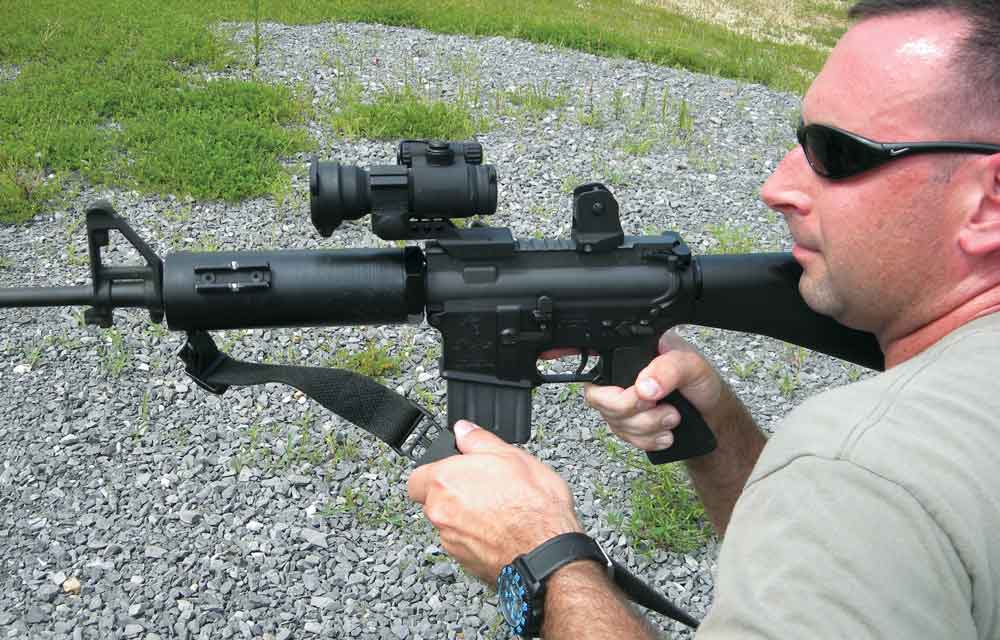
The Sling
My sling is a simple two-point design with a quick-release buckle. It’s normally used as a carry sling, looping over the support side shoulder. If I need both hands-free, it’s looped over my neck — what I call a “hasty” sling. Looping over the neck can get tiring, even with a lightweight carbine, so for use over extended periods of time I run my support arm through the sling and use it as a tactical sling. A quick-release buckle is mandatory to be able to get loose of the rifle if necessary. It’s a simple design, but it does everything I need. The simplicity concept carries over to other parts of my AR, too.
Stock Selection
I prefer fixed stocks to adjustable models, and use Magpul’s MOE rifle stock almost exclusively. It’s shorter than the A2-length stock, which is a little too long for many shooters. The comb of the stock is wider and sloping, providing a positive, consistent cheek weld. The butt is shaped just right to fit into the pocket of the shoulder, and it has a storage compartment for oil, batteries and other essentials, such as small parts that might need replacing in the field — or small survival items.
In addition, there are multiple locations to attach the sling. I like it on the left rear so, when slung, the carbine lays flat against my body. (Magpul has the same shaped stock in an adjustable version.) On the left side of the stock is a SOF tourniquet.
Grabbing A Grip
If the AR has a design flaw, it’s the sharp corner between the grip and trigger guard. When manipulating the AR, you normally control it with the strong hand on the grip. This places a lot of weight on that “corner,” so it bites into your middle finger.
Any sling that will be looped around the body should have a quick-disconnect buckle. Whether you need to swap shoulders due to an injury or you’re getting dragged down the road ‘cause the sling is hooked on a truck bumper — you need to get free immediately.
The DuckBill Tactical grip has an extension that smoothes out the transition between grip and trigger guard, alleviating the potential for getting scars on your middle finger. This is important: If your rifle causes pain, you won’t practice, and repetition is mandatory to learn and apply your skills.
The Handguard
Eugene Stoner — considered the father of the AR — was a genius in the ergonomics department. The original ARs had triangular or delta-shaped handguards, which fit the hand really well. But, the design had two problems: The material they were made of cracked and broke easily, and each side required a separate mold to make — one for the left side and one for the right. Later versions of the AR/M16 used round handguards made of stronger material and a single mold.
These days, Precision Reflex Incorporated makes a delta-shaped handguard out of carbon fiber, the Gen III forearm. It fits your hands well, is ultra durable and has plenty of locations to attach a Pic rail as needed. Depending on the position I’m shooting from, I grab the front of the sling in my fist to add stability, so I attach the front sling to the bottom of the handguard.
Vertical Grips
Vertical grips were designed for full-auto fire because the handguard gets too hot to hold. I don’t use vertical grips because they have some disadvantages for general use. First, you’re holding the grip well below the barrel, so all the weight is up high. Think about holding a really heavy lollipop by the stick … it wants to tilt over to the left or right.
Vertical grips also limit where you can locate the support hand, and the location of the support hand varies according to what body position you’re firing from. On top of all that, vertical grips restrict where you can brace or rest the handguard against an object for stability. Simple works well, and it’s versatile.
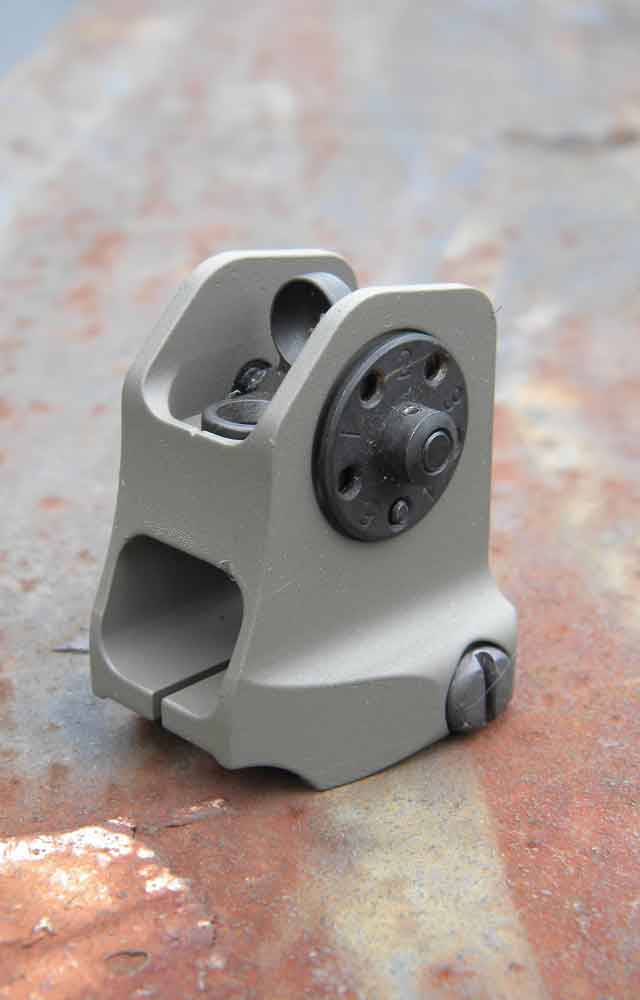
Sights And Lights
The author is a big fan of Daniel Defense’s A1.5 rear sight because, if the primary red-dot fails, there’s a backup ready for use. It doesn’t have elevation adjustment, but “simple is easy” is key.
The “keep it simple” concept also applies to my sights. I use Aimpoint’s “Micro” red-dots. They’re small, rugged and dependable, and they come in several different versions. The sight also stays activated, so if I have to grab it in a hurry I don’t have to worry about turning it on. The battery lasts a long time, but just to be safe I change the battery every other month.
Regardless of what type of optic you run on your AR, you need back-up sights. I prefer fixed sights, and on my favorite rig the front is a standard fixed post, and the rear is a Daniel Defense A1.5 clamp-on that attaches to the Pic rail of the receiver. The Aimpoint is mounted in a 1/3 co-witness position, so the iron sights appear in the bottom third of the red-dot’s window. If the red-dot stops working, all I have to do is lower my cheek weld slightly, acquire the iron sights and keep shooting. If you have flip-up sights, I recommend keeping them up and ready for use.
All long guns for self-defense must have a light. Yes, there are techniques for using a hand-held light, but a weapon-mounted light makes things simple. I use Streamlight’s Super Tac, which is lightweight and simple to use. It’s mounted at an 11 o’clock position, which works well for rolling to the right, left or over the top of cover, and for clearing corners.
The left thumb operates the light, which features a push of the button for momentary light and a click for on and off. The bezel is designed so it throws a wide beam, but it also has an intense cone in the center that allows for identification of objects well past 100 yards. A quick-release scope mount clamped on the light attaches it to the rail on the handguards.
You Gotta Have Good Guts
A sure way to spark a debate between AR shooters is to bring up triggers. As I mentioned previously, my ARs are for self-defense, so a match or competition trigger is not an option. Using a trigger that’s too light under stressful conditions is a sure way to cause negligent, unintentional discharges, and those are scary.
ALG’s ACT trigger is my idea of the “perfect” trigger. It’s an enhanced mil-spec assembly with smoothed surfaces, and it features a nickel-boron-coated trigger with a Teflon coating on the hammer, disconnector and pins. The group comes with two springs that provide a 4½- or 5½-pound trigger pull. I run the 5½-pound spring.
Even though this AR isn’t a precision rifle, it’s still capable of shooting tight groups. The key is using a 2-MOA dot and getting the proper zero so shots are striking in the center of the dot.
The bolt group is probably the most critical part of the AR. I run nickel-boron-coated bolt carriers and bolts. They’re slick and easy to clean. Inside the bolt I run the Colt Gold extractor spring. I use the original style solid firing pin retaining pin, as opposed to the split cotter pin found in most bolt groups. The solid pins don’t get bent out of shape and are easier to install.
For the small parts — ejector spring, gas rings and other springs, detents and pins — I use Colt parts. I know Colt doesn’t make all their parts, but I can rest assured that they will be true mil-spec. To cycle everything, I use a Mech Armor Defense ambidextrous charging handle, which is well designed and almost bulletproof.
A True Custom Fit
That’s my defensive AR. Most all my other ARs are set up similarly. They are frighteningly similar in fact, which means regardless of which one I’m working with, it’s the same manual of arms.
Is my setup the perfect configuration for you? Maybe not, but you can take the same principles and apply them to your application.
Editor’s Note: This article originally appeared in the April 2018 issue of Gun Digest the Magazine.
The subject of stopping power is often brought up when discussing defensive caliber and ammo options. But, what does it mean — and how important is it?
Before we go any further, let‘s make one thing clear: We are discussing lethal threat encounters. I’m not talking about a fist fight at a backyard BBQ, unless you live in a place where those things commonly turn into gunfights. We’re talking a lethal threat, situations that fulfill the legal requirements for “I feared for my life, your honor,” and nothing else.
Stopping power? Really? You want to argue stopping power, with your magnum and its 240 grains, against this 12-gauge slug, at 528 grains (1.2 ounces, by the way)?
The requirements differ, depending on the jurisdiction in which you live or find yourself at the moment, whether or not you are a sworn law enforcement officer.
Before we can even begin to try and wrap our heads and hands around a stopping power theory, we must have a grasp of what goes on in a situation where we might use a firearm.
An understanding of the word “anecdote” is important to our discussion. An anecdote is a story, lesson or event that stands alone. A bad guy gets shot with a given cartridge, and he does or does not stop doing bad things. That event is an anecdote. It’s important to keep in mind this important point: The plural of anecdote is not data.
In order for the event to be a piece of data, we’d have to know everything about it: the victim’s mindset, chemical state (if any), plans and determination; the caliber, velocity and construction of the bullet; and the exact path of the wound track. Lacking all of the above, we cannot do more than call it an anecdote. The more of those variables we have, the better we can assign confidence in the information we have, and place it with the thousands of others we’d need to plot a reasonably accurate graph.
A theoretical example: A given police department issues two types of 9mm ammunition. One is a lightweight, high-speed bullet, the other a full-weight moderate-velocity load. The department tracks the results in shootings and finds that the X load is more effective than the Y load. This is useful if the ammunition is evenly distributed in the department and if it is evenly distributed in lethal force encounters. However, if the X load is issued to the SWAT team and the Y load is for general use, then to misquote the Spaniard in The Princess Bride: “I don’t think that information means what you think it means.”
If the SWAT team has a more frequent range schedule and is composed of officers who have demonstrated greater firearms proficiency, then the difference in effectiveness might be a matter of marksmanship and not terminal ballistics. If you don’t know the differences between the two groups, then the information is anecdotal at best, and not data. This makes it difficult to measure the effectiveness of load X used in one department compared to load Y used in a different department.
Determining Lethality
Stopping power? Really? You want to argue stopping power, with your magnum and its 240 grains, against this 12-gauge slug, at 528 grains (1.2 ounces, by the way)?
Here’s a conundrum for you: Modern medical knowledge and physicians’ skills are so good in the 21st century that four out of five people shot with a handgun survive the encounter. In fact, it’s a much greater percentage if the victim arrives at the hospital with a pulse. Think about that.
But, it’s the potential for lethality that defines the tool you will use, not the actual. Your neighborhood kids, playing baseball, are doing so with objects that could, in different circumstances, be lethal weapons. However, that does not in and of itself mean anything. The bad guy who just demanded your wallet, and upon receiving it is still winding up to strike you, has a lethal weapon.
We are not, however, concerned with lethality. Lethality is not our goal. A .22 LR can be lethal. Indeed, people have died from lesser projectiles. We are not interested in lethality. However, in defense with lethal force, we use force that may well be lethal itself. Until phasers set on stun are available to us, the only option remains the use of tools that are potentially lethal by their very design. That, or surrender.
I thought not.
So, if stopping power is a myth, why do we search for it so enthusiastically? Because in a bad situation, we want every assurance that things will work out all right. And that leads us to the first step in understanding stopping power: Most of the time it’s mental.
The Two Sides Of Stopping Power
To speak of “stopping power” in handguns is to miss the point. If you really want to be stopping things — people, animals and vehicles — you need to drastically up your game. This 12-gauge slug is 1 ounce and travels at 1,600 fps. No handgun does that.
There are two aspects to a fight: mental and physical. If someone is mentally prepared and psychologically attuned, they will be able to bring all their physical skills to the process. Those skills might not amount to much, but they can bring all of them to the table.
On the flip side, someone unprepared and/or psychologically untrained will react quite differently, regardless of physical capabilities. There’s also the matter of prior conditioning. Mental state and expectation play a big part in the results of conflict.
On the physical side, there’s good news and bad news. The bad news is that your opponent has, through evolution, been created as a difficult opponent. Key parts of his anatomy are armored, he has redundancy in critical systems. His body will adapt to injury and, if given even a short time and minimal care, he can heal and rebuild. He’s equipped with fast reflexes, an adaptable central processing unit and the decision-making processing power to change plans in mid-stream. He has strength, stamina, adaptability and agility.
The good news? That also describes me. And you.
Physically, there are two ways to stop an opponent. You can deal a damaging blow to the central nervous system. You can cause sufficient blood loss that blood pressure drops below the operational level. Those are it, physically.
Let’s take a look at a statistically significant number of lethal threat encounters. We’ll start with a nice, round number — one thousand.
A thousand times, lawfully armed citizens find themselves in a situation where a firearm is needed. Of those thousand times, somewhere between 500 and 900 will be defused by simply showing the gun. This is a subject and a number that has been greatly debated. The pro-gun side posits that the number is large, and perhaps unknowable, simply because most people in that situation do not report it.
Nine hundred incidents never happen, simply because the gun was there. Of the remaining 100, another 50 actually required it be handled. Of those 50, shots were fired, and 40 times everyone involved missed. I kid you not, people miss. They miss a lot. And that’s usually not a bad thing.
The Dilemma Of Stopping Power
Quiz time. In the 950 incidents, how important was stopping power? Anyone who gave any answer other than “not at all” ought to go back and start over. The stopping power of the firearms used, or not used, was utterly immaterial.
Stopping power may be of importance in the remaining 50, but then again maybe not. Of those 50, with shots fired, 30 of the bad guys run away as soon as they’re hit. Hit anywhere — with anything. Twenty left. Ten of them take solid hits and flee. They will need serious medical attention, but they still have enough strength to get out of Dodge.
Ten are left of our original thousand, and they fight. Some not so well, others with ferocity and tenacity. Those are the 10 we will spend the most time discussing, but they’re also the highlights that define our dilemma.
In another situation, relayed to me by a friend with decades of experience in a big city with a whole lot of crime, a bad guy breaks into the home, the homeowner phones the police and calls out, “I have a gun.” Bad guy starts up the stairs, the homeowner the whole time shouting, “I have a gun,” which is pointed at the bad guy.
Homeowner decides enough is enough; he shoots. The bad guy takes a full-power factory .44 Magnum underneath the left eye. Bad guy tumbles down the stairs, gets up and walks out of the house. When the police arrive they begin a search and find the bad guy around the corner, next to his car, keys on the ground, dead.
A council of experts could argue the question, “Was there enough stopping power?” on this one until the cows come home. On the “yes” side, the bad guy stopped doing what he was doing. On the “no” side, he decided to do something else instead, and could have spent that last minute fighting instead of fumbling with his car keys. And by the time we’re done, you’ll agree with both of them.
(Top) Testing is one thing, showing off is another. There is no correlation between melons and people, and using produce to “demonstrate” a cartridge or load is silly. (Bottom) However, demonstrations can be fun. This is that watermelon, struck by a 12-gauge slug, and those who stood too close smelled of vaporized watermelon for the rest of the day.
The dilemma of our situation, our life’s work in firearms is this — statistically speaking, caliber doesn’t matter. In 990 times out of 1,000, caliber didn’t matter.
You can quibble with the actual numbers, but the point is this: The subset of potentially lethal encounters where stopping power becomes the determinate factor is very small. You are better served with proper situational awareness, having a plan, knowing the law and being proactive than in obsessing over a few percentage points on a theoretical scale of “stopping power.” Put your effort where it will deliver the greatest return.
Also, if we were going strictly by statistics we wouldn’t be carrying a gun. It’s the job of the police to deal with crime, with violent people, and to be in harm’s way. And there are departments full of officers who have not killed anyone with their sidearm. It’s not unusual to find many departments where there’s only one officer who has been in a shooting incident. The rest? They will wear a sidearm for their entire career and might, a dozen times, point it at someone, but never discharge it in their official capacity and retire having never been in a gunfight. If that’s the police, what are the statistics for those of us who do not seek out danger as a professional requirement?
But, the third side of this two-sided coin is this: If you’re one of those 10 in 1,000 — and you do not have a gun — there and then statistics mean nothing.
So, what is stopping power? When you find a final, true, convincing answer, let me know.
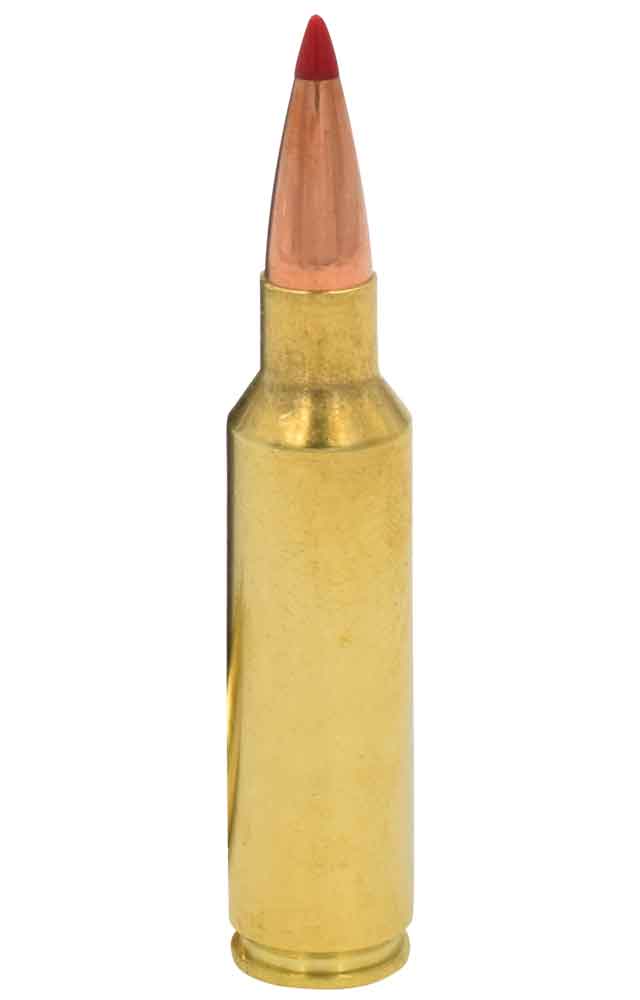
The relatively new .300 WSM offers the best of both worlds — power and efficiency.
Short and fast on this smoking short magnum:
The .300 Winchester Short Magnum was introduced in 2000.
Initially, it was chambered in short, light Browning and Winchester rifles.
The .300 WSM duplicates .300 Win. Mag. velocities, while consuming about 10 percent less powder.
At one point, it and other WSM cartridges were embroiled in a legal battle over intellectual property infringements.
This, in part, stifled some Winchester Super Short Magnum’s popularity.
Though, the .300 WSM developed a robust following.
Introduced in 2000 and chambered in short, light Browning and Winchester rifles, the .300 Winchester Short Magnum demonstrated a remarkably accurate ability to duplicate .300 Win. Mag. velocities, while consuming about 10 percent less powder.
The .300 WSM, an original Winchester design, fits handily into bolt-actions sized for a cartridge length of 2.860 inches. For highly efficient and consistent powder burning, the .300 WSM has a short-fat powder column geometry, a concept revered by accuracy-obsessed benchrest shooters for nearly three decades.
This cartridge — and all its Winchester Short Magnum siblings — became embroiled in a legal battle, and the end result was a less than enthusiastic appeal on the part of other manufacturers to offer rifles and/or ammunition for sale. However, unlike the Winchester Super Short Magnums that are collecting dust on the shelves or in shooters’ gun racks, the WSM line still enjoys moderate appeal, especially the .270 and .300 offerings.
Editor’s Note: This article originally appeared in the April 2018 issue of Gun Digest the Magazine.
Savage bolsters both ends of its MSR 15 line with long-range and pistol additions.
What’s new in Savage ARs:
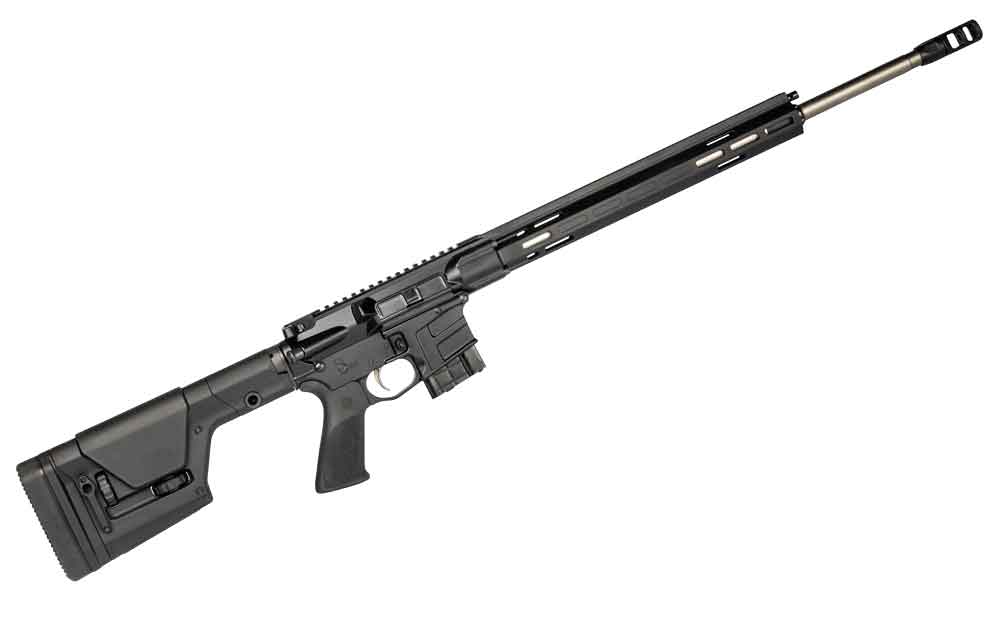
The MSR 15 Long Range is chambered for the new .224 Valkyrie.
It boasts a 22-inch barrel topped with a two-port adjustable muzzle brake.
It also has a custom-length gas system and adjustable gas block.
The rifle’s MSRP is $1,849.
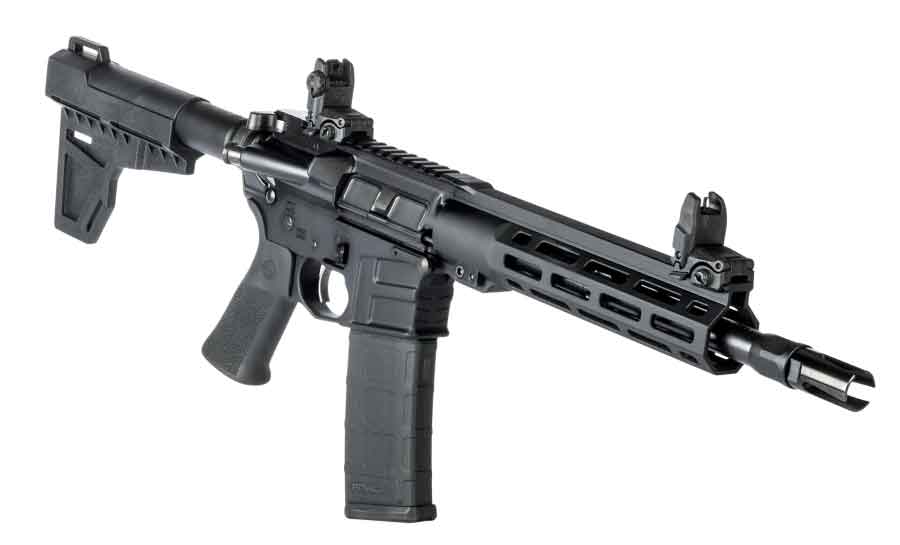
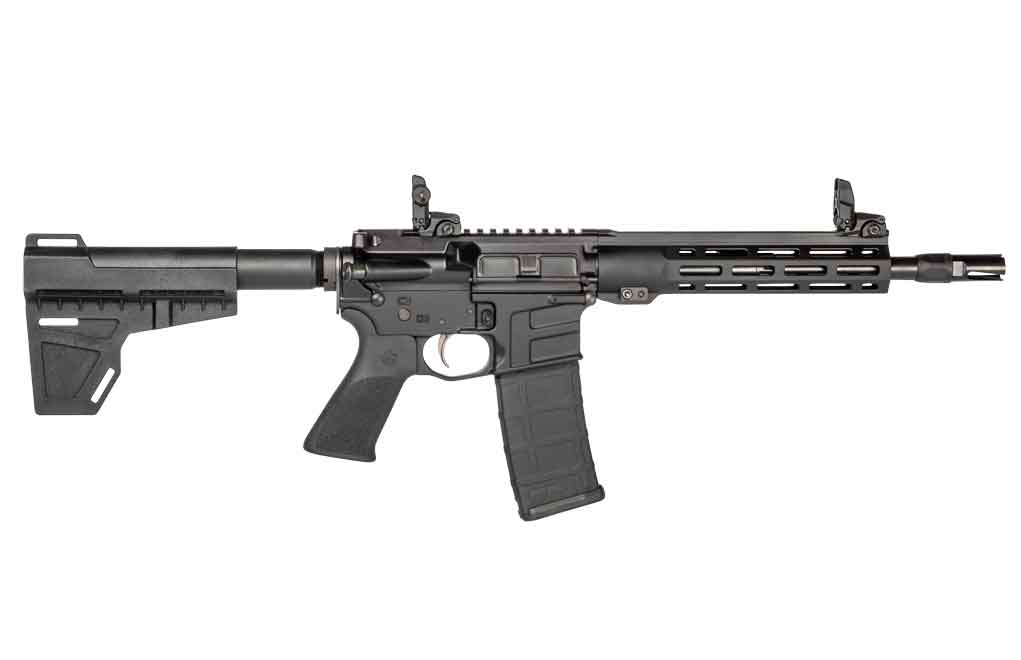
The MSR 15 Blackout Pistol is Savage’s first AR pistol.
It is chambered for .300 Blackout and comes outfitted with a KAK Shockwave stabilizer.
The gun has a 10.5-inch barrel and measures around 29 inches in overall length.
The pistol’s MSRP is $1,099.
Steady as a slab foundation, Savage Arms has earned its living in the modern era of firearms off one particular style of rifle — the bolt-action. The company has been so consistent, in fact, that since the demise of its legendary lever-action, the Model 99, at the turn of the century it has produced little else. It seemed, to some extent, the seas would boil and the sun turn the color of sackcloth before old Savage ever expanded its horizons from its Model 10 and 110 rifles.
Luckily, it didn’t require end days for the company to turn it studied eye and manufacturing prowess to AR-style firearms. The company went big into the highly popular platform in 2017 and hasn’t looked back since. Along the way, it’s even ridden the crest of innovation, embracing one of the hottest new cartridges on the market. And, if recent additions to its catalog are any indication, the gunmaker shows no signs of slowing up in its newfound love for the black rifle.
Savage expanded its MSR line at the NRA 2018 Meetings and Exhibits in Dallas with the two new AR firearms — the MSR 15 Long Range and MSR 15 300 Blackout Pistol. In all, the company now has nine AR models with configurations to fit nearly every shooting application from chasing down hogs to long-range bullseyes.
MSR 15 Long Range
The MSR 15 Long Range is among the most pioneering AR-style rifles Savage has put out, given it is among the first chambered for the smoking .224 Valkyrie (actually Savage’s second). It’s the long-range-optimized companion to the company’s initial offering for the cartridge, the MSR 15 Valkyrie.
While MSR 15 Long Range is similar to the earlier iteration, it boasts a 22-inch stainless steel barrel to milk the most out of the round. Furthermore, the rifle is topped with a two-port adjustable muzzle brake, allowing shooters to tune the recoil impulse to stabilize the muzzle. Finally, the rifle features a custom-length gas system paired with a low-profile adjustable gas block, aiding it in cycling any load is run through it. Presently the rifle’s MSRP is $1,849.
MSR 15 Blackout Pistol
The MSR 15 Blackout Pistol is the first AR pistol Savage has produced and comes outfitted with one of the more cutting-edge stabilizers on the market. The KAK Shockwave Brace, manufactured by Shockwave Technologies, is among the most Spartan stabilizer available and looks to make the pistol, chambered 300 BLK, as maneuverable as ever.
The MSR 15 pistol has a 10.5-inch barrel, measures in at around 29 inches in overall length and tips the scales a tick over 6 pounds. Other notables on the gun include Hogue pistol grip, free-floating M-LOK handguard, Savage helic flash hider and Magpul MBUS front and rear flip-up sights. Presently, the pistol’s MSRP is $1,099.
For more information on Savage Arms’ MSR 15 line extension, please visit: www.savagearms.com
MSR 15 Long Range Specs Magazine: Detachable box Stock Material: Synthetic Barrel Material: Stainless Steel Barrel Finish: Matte Barrel Color: Natural Features: Non-reciprocating side charging handle, low-profile adjustable gas block, Hogue pistol grip, cutom-forged upper and lower receivers, custom-length gas system, two-stage trigger, free-float handuard with MLock, two-port muzzle brake with taper-lock interfa
MSR 15 Blackout Pistol Specs Magazine: Detachable box Stock Material: Synthetic Barrel Material: Carbon Steel Barrel Finish: Matte Barrel Color: Black Sights: Magpul MBUS flip-up front and rear sights Features: Aluminum receiver, Fixed pistol-length gas system, Custom-forged lower receiver, KAK Shockwave brace, Savage helical flash hider, Hogue pistol grip, Free-float handgaurd with M-LOK, 5/8×24 threaded barrel, Savage 10.5
Looking to go armed, but are stuck in the weeds as to what to arm yourself with? Here are 20 of the best concealed carry gun options that will keep you on the defensive.