Check out a few of our highlights from the fourth day of SHOT Show 2025!
SNT MOTIV
Gun nerds love military-issue weapons. And they really love uncommon and less-known ones from smaller countries. South Korea, for example, fielded the K2 assault rifle in 1984. A gas-operated AKM-style long-stroke piston 5.56mm rifle, it looks reminiscent of an AR-18.
Founded in 1981, S&T Motiv Company is the preeminent firearms company for the Korean military. It was originally called Daewoo Precision Industries. They’re finally going to make guns available in the U.S., rebranding as SNT and establishing a presence here. SNT Defense is the new U.S. subsidiary in Las Vegas and will manufacture SNT Motiv’s rifles and pistols right here in the US. These guns will be offered to the commercial market later in 2025.
In addition to the K2S, a semi-auto version of the K2 rifle, SNT Defense plans to offer the future 5.56mm standard rifle for Korean special forces, the K13.
They’ll also build the K14, a 7.62mm bolt-action rifle, and the DP51, an older fast action/triple action pistol that would appeal to collectors.
Insite Armory American SVD
Another highly coveted military rifle that’s practically unobtanium in the U.S. is the Dragunov sniper rifle, aka the SVD. Just about everyone knows what this classic Cold War Soviet DMR is, but due to very low numbers ever being imported into the U.S., they’re very rare and typically demand a price of nearly $10,000 at the bottom end. Fans of the rifle have longed for a domestically produced variant for years given the lack of viable imports, and it finally looks like that’s just what we’re getting.
Insite Armory of Huston has been working on this project for years, and the company’s goal is simple—make an SVD clone in America that’s more available and attainably priced than any of the existing imports. So far, it seems they’re on track to do just that.
The two prototypes Insite Armory had on display at SHOT Show 2025 weren’t quite done yet, but all the major pieces were there. The company says that it’s aiming to have rifles shipping by Q4 with a price of $4,000. That’s still expensive, but for those who’ve been dreaming of owning a Dragunov, it feels like a relative steal. Insite Armory is starting with the original classic version with wood furniture in 7.62x54R, but they also plan on offering other chambering options and variants down the road. We’re very excited to see this come to fruition, so keep an eye out for our full review when it launches.
Dead Air Sandman X
Ten years ago, Dead Air hit the market behind what would become a legendary suppressor—the Sandman. A decade into the game, what better way to celebrate their success than with a revamp of the suppressor that put them on the map? Say hello to the Sandman X. This is nearly an entire conceptualization of the suppressor, incorporating many advancements that have come down the pike in the past 10 years. Perhaps the most intriguing aspect is the 3D-printed baffles, which are designed not only to reduce the sound signature but also to eliminate back pressure. It achieves this through a spiral that’s only possible through additive manufacturing. Furthermore, Dead Air has included multiple mounting options for the can, including KeyMo, Xeno, and Direct Thread. Finally, the Sandman X was engineered to take whatever you have mounted on throughs at it with the 30-caliber can rated up to .300 RUM. Best of all, at $1,059 the suppressor won’t break the bank like other 3D-printed options.
Check out a few of our highlights from the third day of SHOT Show 2025!
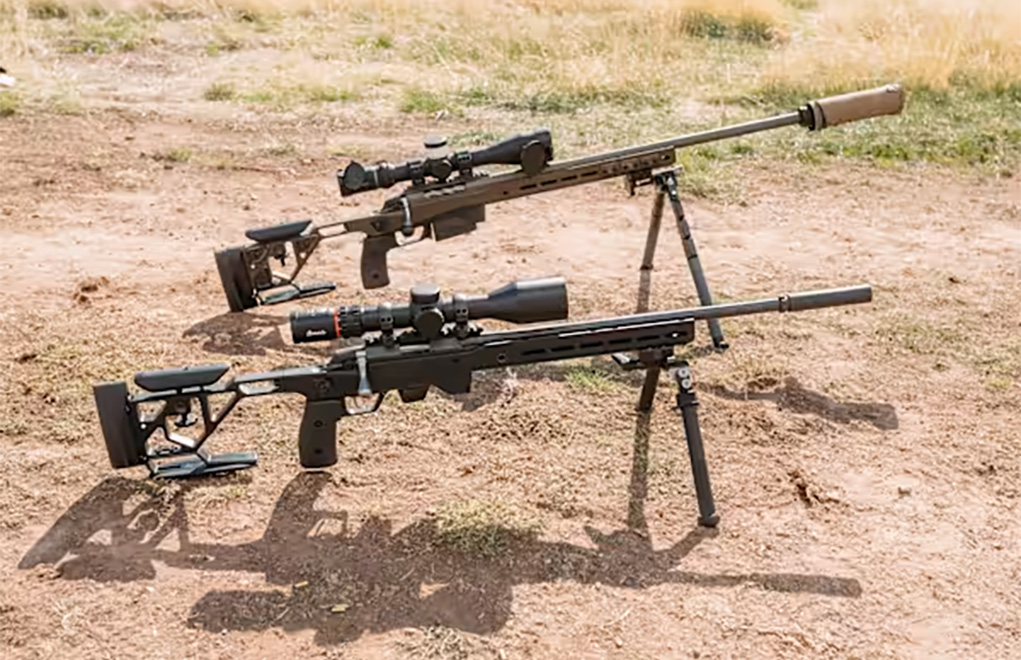
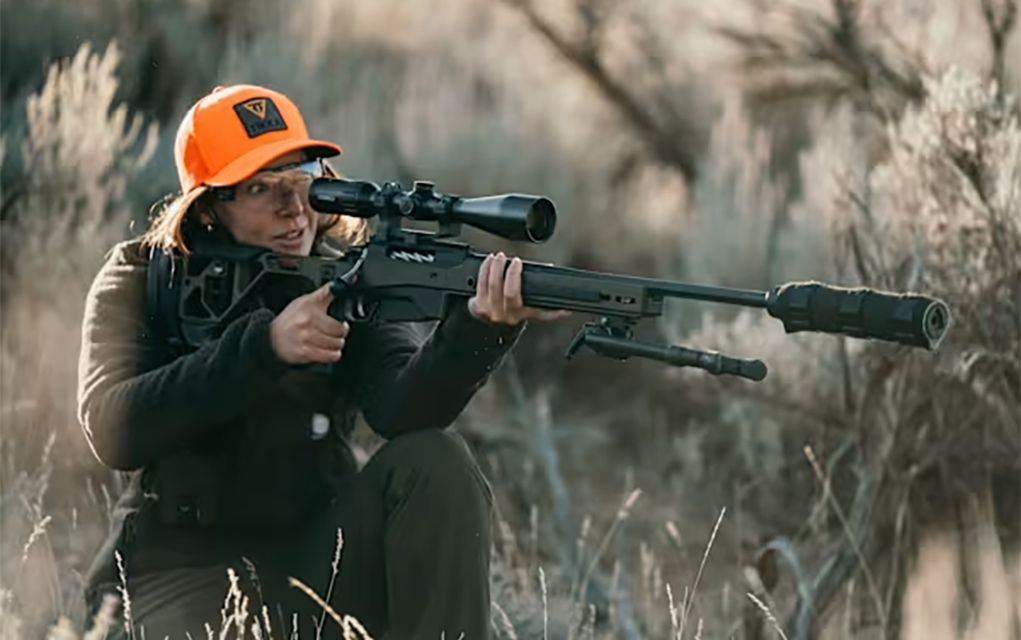
Hera H6
This beauty was teased at IWA a couple of years back and this side of the pond has been champing at the bit to get their hands on it. Now the unique side-loading Hera H6 will be available in the good old U.S of A. Hera showcased the idiosyncratic iron at SHOT Show 2025 and aims to have the bolt-action on the market around April. And there’s more appeal to the rifle than its unique configuration. First, the gun is whisper light, weighing in at a tick under 6 pounds. It’s dressed in a useful M-Lok handguard, so decking out the rifle is a snap. But the absolute show-stealer is the H6’s trigger.
A single-stage affaire manufactured by Recknagle, the switch trips at a mere 2 pounds (it actually feels like less when you get your digit on it). This aids the gun in being a veritable tack driver, with the good folks at Hera reporting it turned in a consistent sub-MOA performance at range day. Hera will release the gun in .223 Wylde and .300 Blackout when it becomes available and will have a price tag of around $1,500. Hera has our interest, expect a review inthe near future.
BSD/B&T VSS Vintorez Clone
The Soviets made a lot of interesting guns, but one of the coolest and most widely sought-after is the VSS Vintorez. This integrally-suppressed special purpose rifle chambered for 9x39mm has become widely known in the gun world through video games and war footage since its introduction in 1987, but unlike some other Russian guns, the VSS has never been available in the U.S. That, however, is about to change.
A company called BSD Fabrication has teamed up with B&T to produce American-made VSS Vintorez clones, with B&T making the integral suppressor portion. It’s not an exact clone, but the changes made are improvements, especially for the American market like its .300 BLK chambering. BSD is hoping to have these out the door by the end of this year, and we hope so too because these won’t just be cool to look at, they should be incredibly quiet and great shooters.
Shadow Systems On The California Roster
Every 2A supporter should hate the fact that the California Roster of Safe Handguns exists, but while it exists it’s always heartwarming to see new pistols being added to it for our brothers and sisters in ammo that are trapped under the tyrannical rule of the California legislature.
The latest addition to the roster comes from Shadow Systems! Added just today to the roster, Californians can now get Shadow Systems XR920, DR920, and MR920 pistols. All three models come with or without a new compensator using a non-threaded, non-lug design for the California market.
The new Shadow System pistols also feature a new magazine safety that disables the trigger when the magazine is not inserted (a requirement of the CA roster). Fun fact, the magazine safety is a part of the trigger shoe. If you replace the shoe…
Hornady 3-In-1 High-Speed Case Trimmer
Announced late in 2024 we finally got a close look at the new trimmer and it is nothing short of awesome. If you need precision brass and process a good amount of it, such as PRS and NRL:H shooters, this new trimmer is going to be hard to beat for features and price.
Precision hard stops with a click micro-adjustment screw, multiple Hornady collets included to cover most bolt faces, and a motor that was nearly whisper quiet. A huge step forward for trimmers that we’re excited to see!
CRKT Provoke X Axe
An axe in your pocket? You bet your ass, thanks to the mad geniuses at CRKT. The Provoke X Axe was dropped at the show, the latest addition to the company’s forward-looking Provoke line. Designed by Joe Caswell, the hacker’s head and spike fold up flush against the handle and deploy with the flick of the wrist. The Provoke X has a definite tactical bent to it, with the D2 steel tool too light to fall all but the smallest trees. But in its intended role, boy howdy, does it look like it could do some damage. The axe has an MSRP of $350 and is expected to be released later this year.
Check out a few of our highlights from the second day of SHOT Show 2025!
Century Arms/MKE AP5-SD
The MP5 is probably the best SMG ever made, and the MP5SD is its coolest variant. Unfortunately for Americans, lookalikes have been expensive and difficult to procure. Until now. Century Arms has started importing a new AP5 variant made by MKE in Turkey called the AP5-SD, and it’s going to help make MP5SD lookalikes far more accessible. It’s sold as a pistol with a 5.75-inch barrel that’s covered by a faux suppressor shroud, all housed neatly beneath the iconic MP5SD shrouded handguard. The faux suppressor can then be easily removed and replaced with a real suppressor. The AP5-SD is currently available in two versions, a standard pistol (MSRP $1,699.99) and a brace model that comes with a Magpul MP BSL Brace (MSRP $1,799.99). This one has us excited, so stay tuned for our full review later this year.
C+H Precision Comp Max
C+H Precision has proven aggressive in the optics sphere offering up a solid collection of red dots made to go the distance. The as-of-Tuesday-released Comp Max certainly fits this bill. Everything on this RMR-footprint optic screams speed from its large 28mm window to its 2 MOA dot—with circle and circle dot reticle settings. Further, the optic has 10 brightness settings with levels 1 and 2 compatible with night vision. C+H also made this competition-ready option fit for hard use, building the housing out of aircraft-grade aluminum that should absorb any mishandling from your butterfingers. It leans to the tonier side of reflex red dots at $340 but puts a lot on the table to warrant the price.
Faxon Firearms CMP M1 Barrels
Faxon Firearms has a host of cool things to show off this year like their new line of suppressors with new baffle designs, new chamber options for their AR barrels like 338 ARC, and even the FX-7 has some magic happening. But something that might fly under the radar for most people is the new M1 barrels Faxon is making for the Civilian Marksmanship Program.
The CMP might not be the most flashy thing happening in shooting sports, but it’s one of the few government programs that directly supports the Second Amendment and its continuing historical legacy. Helping preserve these rifles for the next generation is a great thing to see and support.
Armasight Three New Thermals: Commander 640, Warden 640, & Operator 640
Armasight has awesome thermals but they have newer and more awesome thermals releasing right now! A clip-on, monocular, and dedicated scope all with improved electronics and packed with features. All three thermals use the same ArmaCORE 640-x480 12-micro thermal sensor boating 60Hz performance. Combined with 35mm Germanium lens this new lineup pushes thermal detection to 1,300 meters. We’ll be excited to dive deeper into these new optics later this year!
Check out a few of our highlights from the first day of SHOT Show 2025!
Spandau S2
This is a sweet little package waterfowlers will appreciate—the Spandau S2. Delivering all the features and performance of a high-end inertia-driven shotgun, the S2 comes with a price tag anyone can afford. Dressed in Realtree Max-7 or APX, the 12-gauge comes at a forgiving $499. It has a few tricks up its sleeves making it all the more useful in the duck marshes. Fluting makes the bolt lighter, thus less punishing for those heavy flights with a lot of shots. An oversized charging handle eliminates fumbling around to get or keep the gun in action. And most nuanced, but maybe the best asset, an enlarged and chamfered loading gate eliminates any pinch when topping off the magazine—plus makes it very friendly to gloved hands. Overall, it is a solid and economical option for duck or goose season.
Diamondback SDR 3”
Oh yeah, size matters—particularly with the .357 Magnum. The legendary defensive round is fairly neutered coming out of a snubbie revolver, resulting in more muzzle blast and knuckle pain than velocity downrange. Diamondback Arms has cooked up a new addition to its concealable SDR line of revolvers, now offering a 3-inch barreled model. The wheelie remains highly concealable but gives the magnum enough bore to get the performance most look for out of the cartridge. To boot, it also has a bit more sight radius to improve its accuracy potential. What struck us at range day about the gun—and its predecessor 2-inch barreled model—is its silk and stageable trigger. It’s also a looker with a full integral lug. For $837, it’s a pretty tough little revolver to beat.
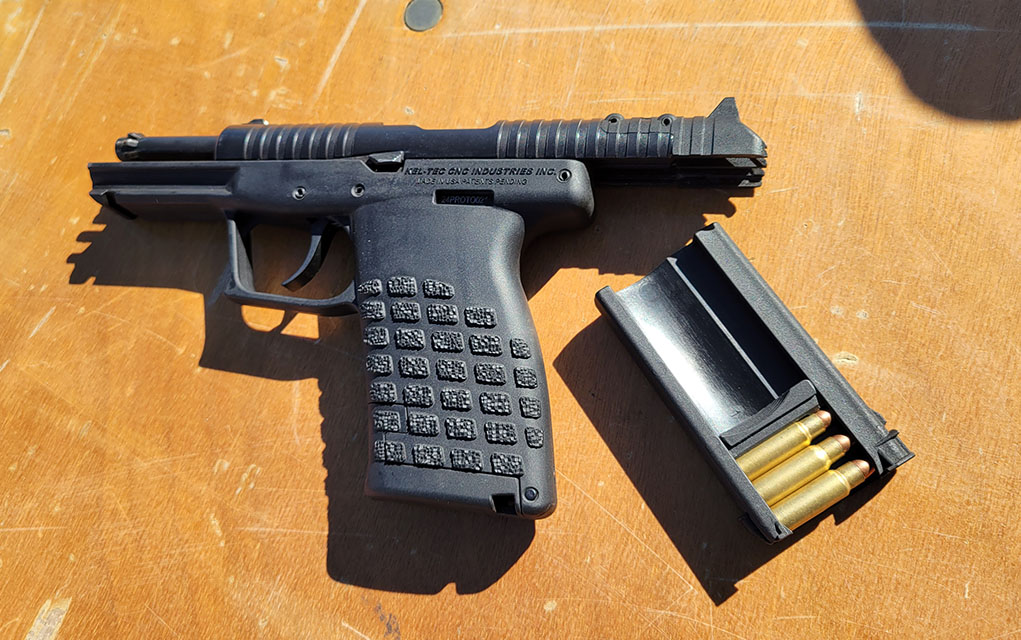
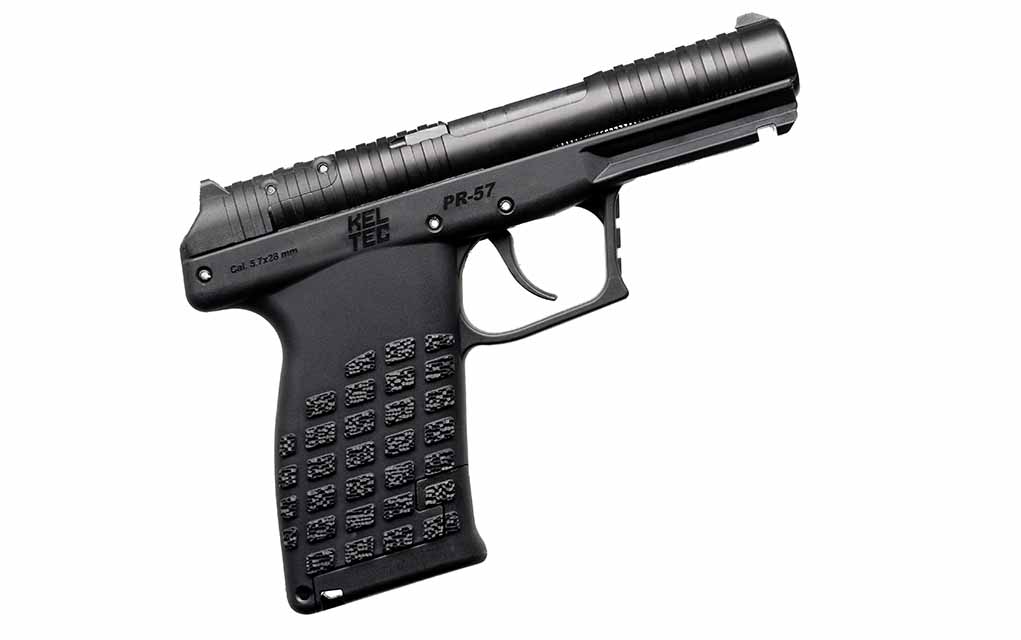
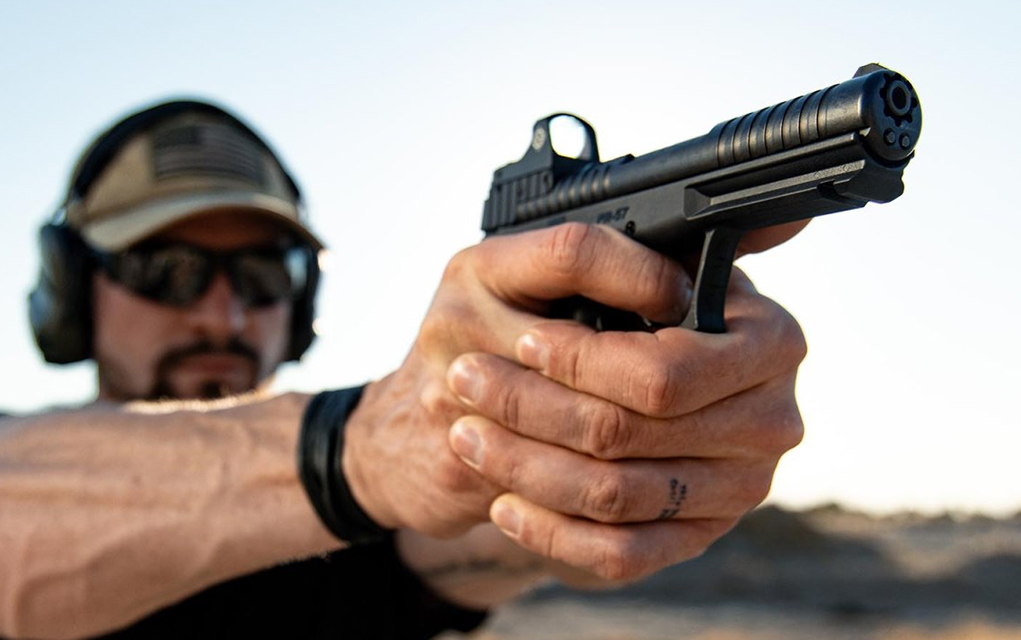
KelTec PR57
In typical KelTec fashion, the company’s latest design has been turning heads and forming long queues at its SHOT Show debut. Not because it’s the “best gun” out here, but one could certainly make the argument that it’s the most different and interesting. The stats already looked impressive on paper, but it’s hard to convey just how light and slim the PR57 is without holding one yourself. It feels like a toy in hand, but putting some 5.7x28mm through it quickly reminds one that it’s anything but. Despite the gun’s light weight, it’s a smooth shooter too. We’re definitely keeping this little stripper clip-fed pistol on our radar and will hopefully conduct a full review in the future.
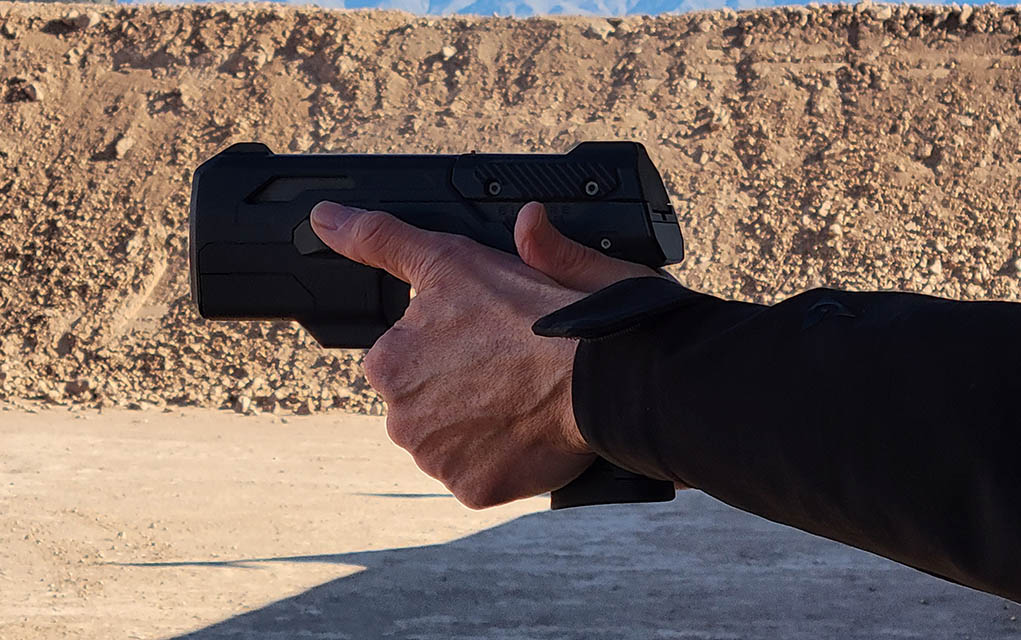
Biofire Smart Gun
Sure to be a divisive product, Biofire is a biometrically locked smart gun that uses fingerprints and/or facial recognition to allow access only to a limited number of users. We first looked at the pistol in 2023, but this year the company is ready to start shipping units to backers, media, and customers.
Getting first shots with it at SHOT Show Range Day 2025, the pistol isn’t what you probably expect. Bulky and strange looking, it actually shot remarkably well for the 15 or so rounds we shot it for. We’ll withhold judgment until we can get one in for a full and detailed review. MSRP: $1,499
Smith & Wesson has announced the return of three classic revolvers sans the dreaded lock.
Just about everyone loves classic Smith & Wesson revolvers, but nobody liked the Hillary Hole. Thankfully, Smith & Wesson has just announced the No-Lock Classic Revolver series, featuring three S&W DA/SA classics without an internal lock.
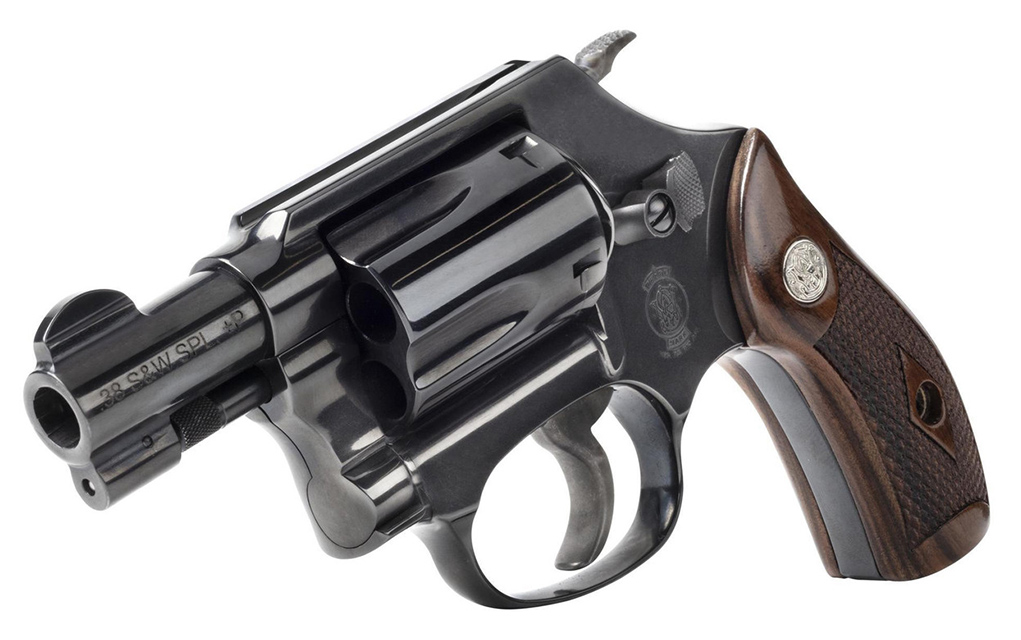
For those looking for a classic concealed carry gun, there’s the S&W Model 36 Classic. The 5-shot .38 SPL +P J-frame features a 1.88-inch barrel and a fixed blade front sight/integral slot-in-frame rear sight. The steel frame and barrel sport a blued carbon finish and the grips are checkered wood.
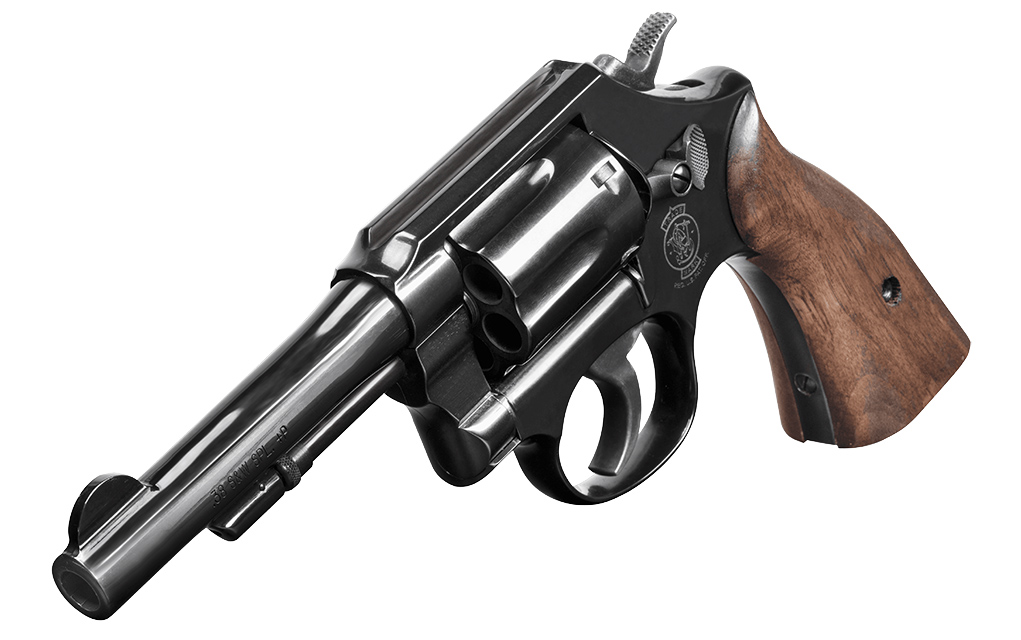
Next is the Model 10 Classic, a 6-shot .38 SPL +P K-frame with a 4-inch barrel. It also has a fixed blade front sight/integral slot-in-frame rear sight and a blued carbon finish, but the grips are Tyler Gun Works walnut grips.
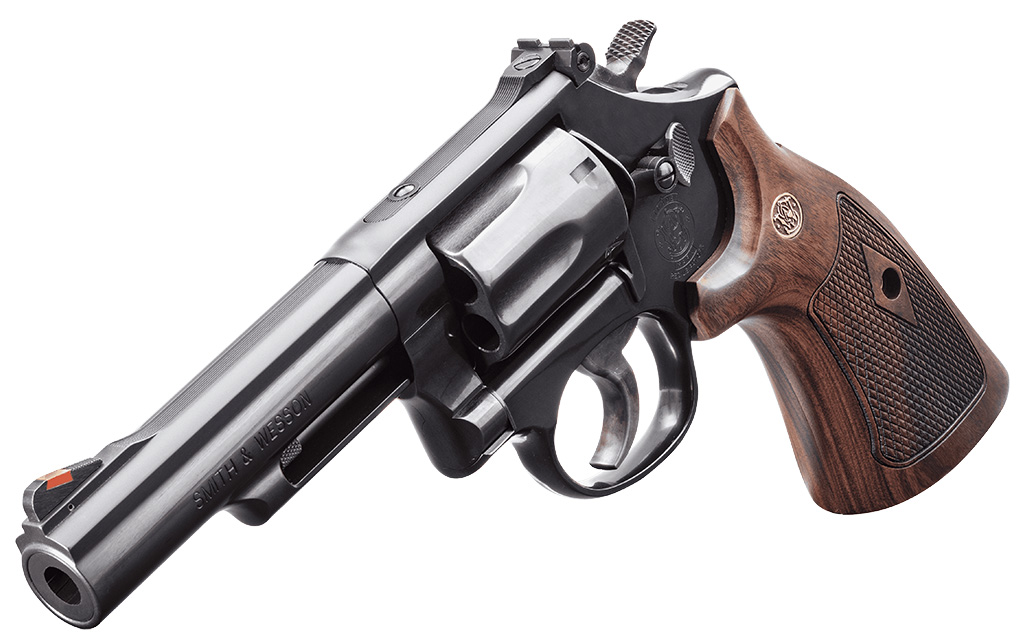
Last is the Model 19 Classic, a 6-shot .357 Magnum K-frame with a 4.25-inch barrel. It has the same blued carbon finish but features a red ramp insert front sight, adjustable black blade rear sight and checkered wood grips.
MSRPs for the no-lock revolvers are $849 for the Model 36 Classic, $979 for the Model 10 Classic and $1,099 for the Model 19 Classic.
We take a quick look at the KelTec PR57, an interesting 5.7 concealed carry pistol that’s loaded via stripper clip.
While some people deride KelTec for its often unorthodox designs, others appreciate the company for its interesting, innovative firearms that step outside the mold. KelTec’s latest gun, the PR57, is a testament to that and has already sparked some heated debate online. Even at a glance, it’s easy to see why, as this concealed carry pistol is top-loaded with stripper clips.
Designed by the legendary George Kellgren and chambered for 5.7x28mm, the PR57 is not a typical concealed carry pistol by contemporary standards. In a world of micro 9mms, 5.7 pistols have typically been relegated to the nightstand or open carry given their large size, but KelTec has now managed to build a handgun for the caliber that’s small enough to conceal. The root of this innovation lies in the PR57’s rotary barrel, and that’s what the “R” stands for in the gun’s name. The rotary barrel system is what allows the PR57 to be 40% lighter than the next lightest 5.7 pistol currently on the market. Combined with the compact size, it should be very easy to carry concealed.
As for the gun’s chambering and the decision to use an internal stripper clip-fed magazine, KelTec has clearly laid out its reasoning. Since data shows that most self-defense encounters are quick, at close range and see only three shots fired, the company felt that a pistol that focused on shootability, reliability and concealability was more valuable on most people’s hips than a more powerful gun that can be rapidly reloaded. With 20 rounds of 5.7 on tap, the idea is that the capacity is sufficient enough to eliminate the need for speed reloads. The caliber also produces very little recoil, making it easy to shoot for new and experienced shooters alike. Further, by omitting detachable box magazines, the PR57 can be very slim despite its large capacity and is only 0.937 inches at its widest point. The pistol is loaded with two 10-round stripper clips, two are included with each gun and more can be purchased separately.
The two final notable details of the PR57 are that it’s optics-ready and very easy to disassemble. By just pushing the trigger forward, the slide can be pulled right off, and KelTec is calling it “the quickest and easiest fieldstrip on the market.”
The KelTec PR57 is expected to begin shipping in Q1 with an MSRP of $399.
Choosing the right suppressor can be hard, but Allen Arms Tactical can help you make the right pairing.
Suppressors are probably the fastest-growing segment of the firearms industry at the moment, and the market is getting a bit crowded. That’s not necessarily a bad thing, but it does often lead to choice paralysis for shooters looking to buy a can. But why shouldn’t it? A suppressor is a big purchase, after all. Not only are they expensive, but the NFA’s registration requirements make them feel like a semi-permanent purchase. How, then, does one ensure that they’re buying the right can?
One good method is allowing Allen Arms Tactical to be your suppressor sommelier.
Only The Best
Just like wine, the world of suppressors is vast, complicated and requires a certain level of knowledge to navigate deftly. A level of knowledge that most wine drinkers nor suppressor users have. And that’s OK, not everyone needs to be a specialist. That’s why both fields have experts to call on for assistance. Just as you’d trust a sommelier to never recommend a bad bottle, you can trust Allen Arms Tactical to not carry bad suppressors.
To be clear, Allen Arms Tactical is a distributor. That means that they sell suppressors to FFLs, not to end-consumers, but they can still be of help to the average Joe looking to make a purchase.
Michael Leccese, a sales rep for Allen Arms Tactical, laid out the company’s business model for me at CANCON South Carolina 2024. In a nutshell, Allen Arms Tactical chooses to only distribute suppressors that the company deems are of a high enough quality to be a part of its catalog. At the time of writing, that esteemed list features just 25 manufacturers including SilencerCo, HUXWRX, SureFire and YHM to name a few. Point being, because of Allen Arms’ collective technical knowledge and extensive, unbiased testing (more on that later), if it’s a suppressor they carry, you can rest assured that it’s pretty damn good.
The company has a dealer locator on its website too, so you can easily find your nearest FFL supplied by them.
Gun And Can Pairing
Continuing the sommelier analogy, pairing is incredibly important for both wine and suppressors. Even great wine will taste off when paired with the wrong food, and even amazing suppressors can be disappointing when mounted on the wrong gun. Thankfully, Allen Arms works with Thunder Beast Arms (one of its manufacturers) to help users make informed decisions.
That help comes in the form of data, extensive, professionally gathered data from Thunder Beast’s Silencer Summit.
Testing being conducted at the Silencer Summit. Photo: Thunder Beast Arms Corporation.
The Silencer Summit, so far hosted in 2023 and 2024, is a sound testing event with a primary goal of measuring the performance of as many suppressors as possible at the same time while using a uniform methodology. Between the two summits, about 550 different gun and suppressor combinations have been tested so far. The nitty gritty of the science is too complicated to get into here, but it’s all laid out in the reports for those who are curious.
More relevant to most shooters is the data itself, and it’s freely available on TBAC’s website for 2023 and 2024.
For anyone looking to purchase a suppressor, these reports are well worth looking at. Presuming the can you’re interested in was one that was tested, the data will give you the clearest picture of how well it actually reduces noise compared to its peers. This large-scale, uniform testing really helps produce unbiased and consistent data for all models involved.
For example, if you were in the market for a suppressor for a 16-inch AR-15, you could look at the respective table from 2024 and see how 51 different cans stack up in terms of decibel readings. The results might reaffirm your choice, or they might lead you toward a different model. Either way, data like this will only make it easier for you to choose the right can for the job.
Open For Business
For any Federal Firearm Licensees reading, you should also be aware that Allen Arms Tactical is always looking to expand its dealer network. The company is happy to work with small and home-based FFLs and has no order minimums, and its close relationships with its manufacturers make it easy for Allen Arms to answer any questions or resolve any issues. Any interested FFLs can visit their Dealer Registration page to sign up.
We take a quick look at the new Tikka T1x Ace Target, T3x Ace Target and T3x Ace Game precision rifles.
Tikka is world-renowned for its excellently built precision rifles. Whether they’re being used for hunting, competition or something more tactical, the company’s bolt guns are known to be some of the best. Now, Tikka is adding three new rifles to its catalog that were designed with the goal of unparalleled precision in mind.
First in the lineup is the Tikka T3x Ace Target rifle. Available in .308 Winchester, 6.5 Creedmoor and .233 Remington, this rifle has a lot of features that will make the job of reaching out and touching things easier. Firstly, it has a heavy, vibration-free barrel that can withstand heat and deliver excellent accuracy. The barrel is also free-floated, cold hammer-forged, available in multiple lengths and has a 5/8×24 threaded muzzle for suppressors or brakes. The rifle features a crisp, adjustable two-stage trigger and feeds from durable 10-round metal magazines.
Next is the T1x Ace Target. Available in .17 HMR and .22 LR, this rifle was designed to mimic the T3x centerfire variant for training purposes, but it could equally excel in competition. It features a single-stage trigger, a smooth 45-degree bolt throw, a 10-round magazine capacity and a threaded, cross-over, free-floated cold hammer-forged barrel that’s available in 16- and 20-inch lengths.
Third is the Tikka T3x Ace Game. Designed with hunters in mind, this model is available in .223 Remington, .308 Winchester, 7mm PRC, .300 Win. Mag., .22-250 Remington, 6.5 PRC, 6.5 Creedmoor and 7mm Rem. Mag. It also has a lot in common with the T3x Ace Target, but some of its features cater more towards hunting like the lightweight, fluted medium contour barrel (threaded 5/8×24), adjustable single-stage trigger and interchangeable magwell. The Game model is available in multiple barrel lengths as well.
Further, all T3x, T1X and T3 barreled actions share stock compatibility. That means that all three models of Tikka Ace rifle feature an adjustable length of pull, cheek rest and recoil pad, an ambidextrous thumb rest and AR-pattern pistol grips. The stocks also feature a 20 MOA Picatinny rail for optics and M-LOK and Arca rails for mounting other accessories.
Pistol caliber carbines (PCC) have been likened to putting a moped engine into a truck. In the case of the 10mm carbine, it’s a slightly larger moped engine with a bit more giddyap.
Hyperbole aside, the 10mm has redlined in recent years, with everybody and their brother rediscovering the powerful automatic handgun cartridge. Hand in hand with the trend, we’ve seen a rising interest in long-guns chambered for the “Perfect 10”, a demand manufacturers have met with lukewarm enthusiasm.
Essentially the 10mm carbine is still an oddity and when it comes to options pickings are slim. No, not impossible to find. Yet, don’t waltz into this firearms niche expecting to trip over every shape, size and configuration. With expectations lowered, the good news is there are some good names in the 10mm carbine biz and utterly unique designs, not cookie-cutter pistol-caliber ARs. We’re going to take a gander at a few of the top on the market—or more exactly, the guns that pretty much make up the market presently.
Should I Go 10mm Carbine?
Before we saunter into what’s available, perhaps we should discuss if a 10mm carbine is a wise investment in the first place. If you practically throw your back out because your wallet is so thick and buying a new gun to you is akin to picking up a pack of chewing gum, well any firearms purchase is likely to be wise. After all, it’s a gun. For those of us with meeker incomes and tighter belts, there are more considerations. And the answer as to the worthiness of a 10mm carbine is similar to any other gun—it depends.
Extra bore certainly adds up to more velocity, since there is a more complete powder burn. But the 10mm isn’t suddenly turned into a brand-new cartridge coming out of a carbine. In general terms, the velocity improvement is in the neighborhood of 20 percent or less out of a 16-inch barreled carbine as compared to a 4-inch barreled pistol. Good, but that’s still with a pistol bullet, which suffers from all the ballistic sandbags of its ilk. You aren’t getting a long-range, heck even really a medium-range upgrade with a 10mm carbine.
That said, the 10mm in its pistol form isn’t for everyone. While no revolver magnum in recoil, the cartridge is still stout enough to require practice to become effective—particularly shot-to-shot. The 10mm in a carbine eliminates much of this. Certainly, nearly every long-gun chambered such is a bucky simple blowback operating system or derivative thereof. Even so, they’re heftier, which eats recoil, and brings the shoulder into the shooting equation.
Then there’s the issue of affordability. More recently, economical 10mm ammunition has hit the market, giving you a bit more bang for your buck. But it still pales to the likes of 9mm. It’s safe to say, there are ample 9mm options in the 20₵ to 30₵ per round range, while the same class of 10mm ammo runs roughly 10₵ more. Might not sound like a huge margin, but start sending a lot of rounds downrange it adds up. At 25₵ a round, 1,000 rounds of 9mm runs you $250; at 35₵ per round, 10mm will run you $350 for the same volume of ammo. If you’re searching for a plinker pistol-caliber carbine, a 10mm fits the bill, but there are cheaper-to-shoot options available if you aren’t married to the Perfect 10.
How I Picked The Best 10mm Carbines
When it comes to PCCs, whether being used for home defense, survival or just on the range, there are a few things they need to be able to do well. In my mind, the two most important qualities are reliability and shootability. Any gun that won’t go bang consistently is worthless, and any gun with too much recoil is hard to shoot both fast and accurately.
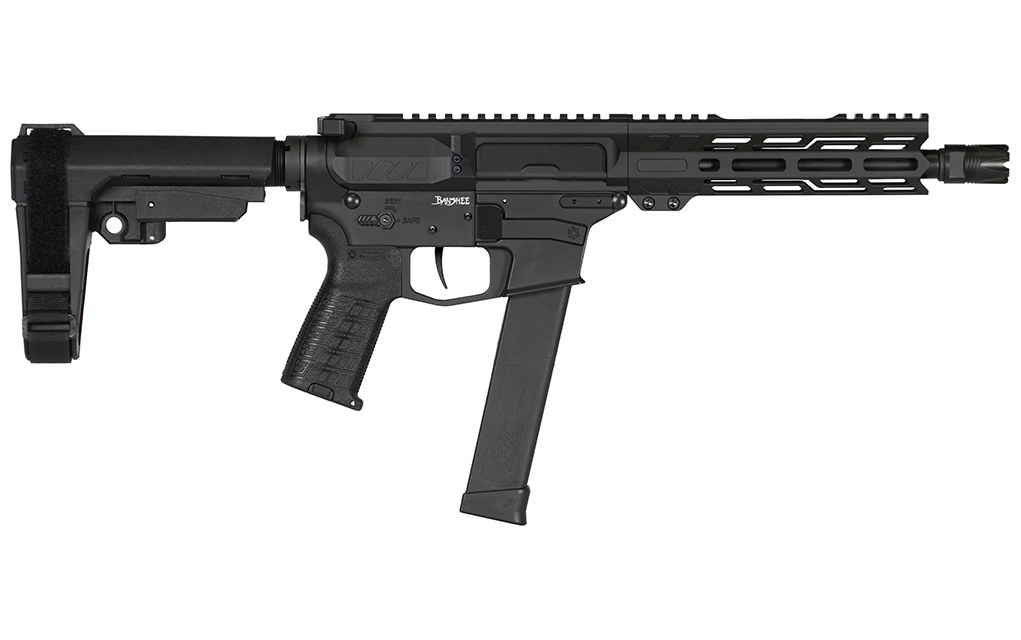
Released in 2019, the CMMG Banshee Mk10 is the most AR-like of the 10mm PCCs on this list. Its 8-inch barrel makes it legally classified as a pistol, so it’s sold with a brace instead of a stock.
While the Banshee Mk10 is the most AR-like on this list, it is still quite different from standard AR-15s and even standard pistol-caliber ARs. The former typically use a type of direct-impingement system, and the latter are usually direct-blowback, but CMMG opted for a different type of action that makes their PCCs stand out above the competition. Called Radial Delayed Blowback, CMMG originally developed the system for their .45 ACP PCCs. It’s now been adapted for 10mm, and we think the result is a match made in heaven. Even direct-blowback PCCs chambered for 9mm can have a harsh recoil impulse, and their bolts are usually fat and heavy. CMMG’s RDB system not only allows the bolt (and subsequently the whole gun) to be lighter, but also reduces the felt recoil. I think that this is easily the nicest shooting 10mm carbine on the list.
The Mk10 also thankfully utilizes Glock-pattern magazines rather than a proprietary design, so it should be relatively cheap and painless to stack them deep for this gun compared to some other PCCs. Another extremely desirable feature not found on most PCCs is the Banshee’s last-round hold-open system, allowing for magazine changes to be just as fast as on a standard AR-15. As a bonus, the Banshee is available in several different Cerakote color finishes as well.
Prepping is an area where the pistol-caliber carbine concept thrives. Feeding a pistol and long-gun from the same trough is a robust strategy, one which TNW allows you to embrace wholeheartedly.
Flexibility is the name of the game with the Aero Survival Rifle, but you aren’t purely confined to a 10mm carbine investing in one. Quick-change barrels give you the option to jump between .22LR, .45 ACP, .45 ACP and .357 SIG in addition to Perfect 10. Peace of mind, when versatility most certainly can save your life.
Originally conceived as survival option for pilots, TNW has engineered some other interesting facets into the carbine. Most notable, in our opinion, is that it’s a takedown rifle with the carbine breaking down to a package no larger than its 16-inch barrel. It’s also light—5.5 pounds—making it ideal for your rucksack and backcountry adventures.
Like most guns in its class, the Aero isn’t quite as quick to manipulate as say an AR—a function of the side-charging carbine’s heavy bolt and spring. However, it will load, go BANG! and reload every time you need it to—which is exactly what you want out of a survival gun. Oh yes, it’s Glock magazine compatible to boot.
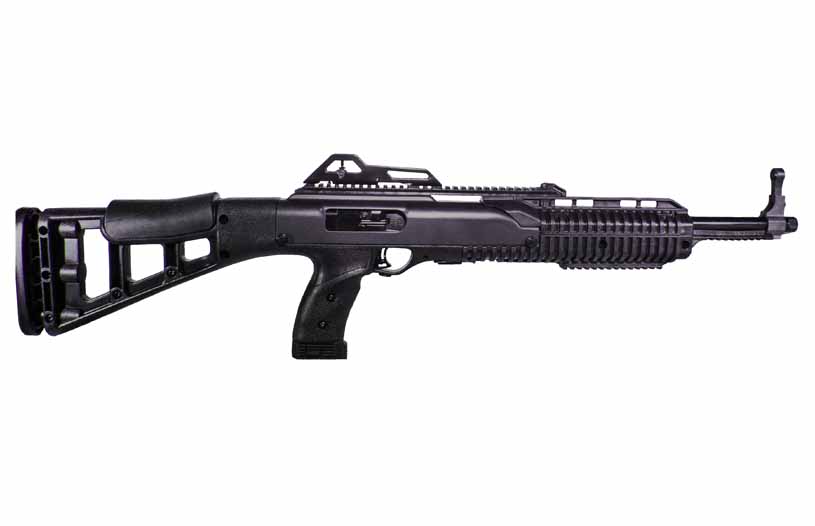
Admit it, you look at this at the gun show and checked your pockets for the spare change to take it home. Don’t feel ashamed, we all have, because what the Hi-Point 1095 lacks in style and grace, it more than makes up for in reliability. Not to mention, you aren’t going to cry if you dent its fender.
Nobody is going to claim the blue-light special 10mm carbine is a tack driver, but it more than has the stuff to fill any utility, home defense or hunting role. Basic as a long-gun comes, the 1095’s simple blowback action gives it the chops to chew through any ammo you feed it. And weighing in at a hefty 7 pounds, the gun makes the 10mm a veritable kitten—even the hot stuff. Slap a suppressor on it—yes, it has a threaded muzzle—and the carbine might be one of the most manageable on the market. Another feature I appreciate is that, unlike many other PCC options, the 1095 has last-round hold open.
To the downside, it’s ugly and it has several undesirable design points. Did I mention that it’s ugly? The sights are no picnic but can be removed via set screws if you want to run a red-dot. And the body is made of polymer, which doesn’t give it quite a premium feel or look. But the real kick in the pants is the magazine, it’s proprietary and only 10-rounds. Still, if you’ve got a beggars-can’t-be-choosers budget, Hi-Point has you covered and dependably so.
One thing to be said, if you settle on a Vector as your 10mm carbine, you’ll likely have the most unique gun at the range. Not to mention, perhaps one of the most advanced PCC systems available.
Behind the Buck Rodger’s design, the gun has some top-end engineering, which starts with its blowback system. What Kriss calls its Super V System, the non-linear bolt travel directs energy down, not only reducing felt recoil, but also mitigating muzzle lift. This is further aided by the Vector’s low bore axis, easily seen in the gun’s profile. Certainly, it’s a step away from the ordinary, but once you have one in your hands you find so is its performance—particularly when you press on the accelerator a bit. I found that you can easily pick up the pace with the Vector, accurately so.
As unorthodox as the Vector appears, the PCC is very intuitive to run. Your support hand operates the bolt and mag release, while your strong hand manages the safety and, obviously, the trigger. I was surprised at how ergonomic it felt the first time I picked one up. Other notables include Glock magazine compatibility, top Picatinny rail and tool-less takedown (just pop four pins). It’s on the spendy side, but if you’re aiming for a high-performance PCC we think the Vector is hard to beat. The biggest downside is that despite the large faux suppressor covering the 16-inch barrel, the gun is difficult to suppress without putting in extra money for custom work and likely an SBR tax stamp as well.
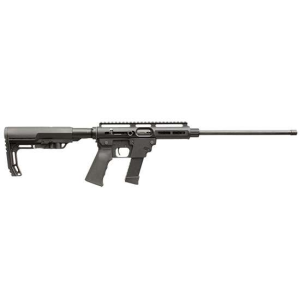
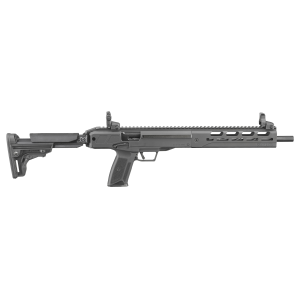
Released in 2024, Ruger’s LC Carbine in 10mm brings a lot to the table. I like to think of it as the premium, more feature-rich version of the Hi-Point 1095. In common with the budget blaster is its general form, as it accepts its magazines in the pistol grip rather than an independent magwell, but besides the chambering, that’s where most similarities end.
As the newest model on this list, it should be no surprise that the Ruger LC Carbine has some of the most modern features as well. It comes standard with an aluminum free-floated M-LOK handguard, QD sling points and a reversible, adjustable folding stock. The stock can be replaced with other AR-pattern stocks as well, so you won’t feel limited when trying to accessorize. The full-length Picatinny rail on top, shorter rail segment on the bottom and threaded barrel ensure that you’ll have no problem attaching optics, lights or suppressors either. Many of the controls are either ambidextrous or reversible as well, so lefties have nothing to worry about. Oh yeah, it accepts Glock mags too, which we think is the best option for 10mm PCCs given their abundance and capacity potential.
While the gun is well-balanced and shoots quite nicely, given its simple blowback design, it’s not quite as nice as the CMMG or Kriss Vector. That said, if you need a highly customizable, rapidly deployable 10mm carbine that can fold down small enough to stick in a backpack or under a truck seat, we think this Ruger is hard to beat.
The answer to this depends on how you define effective range. If you’re strictly referring to the bullet’s energy and ability to be lethal, it’s quite a lot further, but in terms of accurately hitting what you’re aiming at the effective range is about 100 yards for a 16-inch barrel. Beyond that distance 10mm starts to drop pretty quickly, and for 10mm PCC applications you don’t want to be calculating holdovers. The exact load in question will also impact this.
Is 10mm Stronger Than .45 ACP?
Yes. 10mm Auto has a higher muzzle velocity and more energy than .45 ACP, it also retains more of that velocity and energy over greater distances. That said, “stronger” isn’t a well-defined term when it comes to comparing handgun cartridges, and .45 ACP’s larger diameter and typically heavier projectiles lends itself to potentially better expansion with hollow-points.
Will a 10mm Stop A Grizzly Bear?
Yes, but only with proper shot placement. 10mm is on record as having killed grizzly bears before, but you still have to do your part to hit the right spots.
Why Did The FBI Get Rid Of 10mm?
While the FBI did adopt 10mm Auto and then subsequently decommission it, it’s only partly true to say that they “got rid of it.” The cartridge’s hefty recoil combined with the large grips of the Smith & Wesson 1076 pistol were too much to handle for most average FBI agents, leading them to adopt .40 S&W instead. However, FBI HRT and SWAT teams did continue to use it, at least for a period.
Editor’s Note: Adam Borisenko contributed to this article.
A quick look at KRISS USA’s new modular KYMERA 9mm DA/SA hammer-fired pistol.
KRISS USA has just announced the KYMERA, a 9mm handgun with the kind of futuristic flair one might expect from the company. While the KYMERA is a double-action/single-action hammer-fired pistol at its heart, its other features appear to be more tailored to the 21st century.
The biggest of those, as the KYMERA name implies, is that the pistol is modular. Featuring replaceable grip modules, users will be able to swap between grips of different angles and sizes. Regardless of your preferred shooting style or hand size, or whether you’re running a full-size or compact grip module, all configurations will be compatible with the original magazines. The KYMERA will also feature Agency Arms’ optics mounting system (AOS) that’s compatible with a wide variety of red dot sights. An integral rear sight cut is present as well to ensure that co-witnessing is possible with different setups.
KRISS USA hasn’t released much more information about the pistol, but we’ll report back after taking a closer look at it in person at SHOT Show 2025. It will be interesting to see just how many different grip module options the company will have available at launch, as well as the pistol’s specs, price and any other interesting features that are yet to be announced.
Henry has just released the Lever Action Supreme Rifle, an AR magazine-fed lever-action available in .223 Rem. and .300 BLK.
Since lever-actions began soaring in popularity again a few years ago, manufacturers have approached the trend in different ways. Some kept things simple and classic while others went modern and tactical. Somewhere in the middle is the new Henry Lever Action Supreme Rifle, or LASR. Featuring wood furniture and mostly traditional looks, the lever-action has a few modern tricks up its sleeve too.
First and foremost, the Lever Action Supreme is available in either .223 Rem./5.56 NATO or .300 BLK and feeds from standard AR-15 magazines. Switching from a traditional tube magazine to box mags enabled Henry to chamber the rifle for these common cartridges, something typically not possible due to their pointy spitzer bullets. The change also increases the gun’s potential capacity, as even though each Lever Action Supreme will ship with a 5-round (10-round with limiter) PMAG, the guns can accept any standard AR-pattern magazine.
Other features include threaded barrels (1/2×28 for 5.56, 5/8×24 for .300 BLK) and drilled and tapped receivers for mounting optics. The rifles also have match-grade adjustable triggers, adjustable rear sights and ambidextrous controls. Further, Henry says that the actions are exceptionally smooth and that the free-floated barrels are capable of sub-MOA accuracy (18-inch barrels for the 5.56 model, 16.5-inch barrels for the .300 BLK model). Despite some of those more modern details, the Henry Lever Action Supreme still looks pretty classic thanks to its American walnut stock and forend. The furniture also features a rubber recoil pad and sling swivel studs.
Andy Wickstrom, President of Henry Repeating Arms, said this about the new rifle:
The Lever Action Supreme Rifle is a testament to our commitment to innovation and pushing boundaries while preserving the soul of the platform that brought us to the dance … With several patent-pending advancements on board, we’ve created a rifle that propels the lever action into the future.
The .223 Rem./5.56 NATO and .300 BLK Henry Lever Action Supreme Rifles share an MSRP of $1,299 and both are available now.
Blaser has just announced that integrally-suppressed R8 Silence barrels will now be available in the U.S.
Suppressors have exploded in popularity in recent years. Not just on the range or mounted to home-defense setups, but in the field as well. As suppressors have begun gaining mainstream acceptance in the hunting world, hunting rifles have been forced to adapt to keep up with the times as well. Typically, that’s manifested in more hunting rifle barrels coming threaded from the factory, and they’re often shorter than average as well to accommodate the added length of a suppressor. That’s not the only way to go about suppressing a hunting rifle, however, as Blaser has just announced the R8 Silence barrel.
Previously only available in some foreign markets, Blaser R8 Silence barrels are now available Stateside exclusively through Silencer Central. These integrally-suppressed barrels are compatible with existing Blaser R8 rifles as long as the forend is properly relieved to accommodate it (such as the Silence Ultimate forend that’s sold separately by Blaser). R8 Silence barrels will initially be available in .308 Winchester, .30-06 Springfield and .300 Winchester Magnum, but .223 Remington, .243 Remington and 6.5 Creedmoor options will be available later this year as well. The barrel length varies between calibers, but regardless, all will decrease the overall length by 8 to 10 inches when compared to a traditional setup.
The suppressor portion of the barrel is called the Blaser Integral Silencer or ISD, and it was designed to offer everything hunters are looking for in a rifle can. Besides being more compact, it also provides excellent sound suppression and recoil reduction while maintaining sleek, classic hunting rifle aesthetics. The barrel’s titanium outer sleeve helps keep things lightweight and balanced, too.
Until the world recently started truly going to hell in a handbasket, the .380 ACP pistol was all the rage. Not that it still isn’t. Any gun is better than no gun in the past couple of years. That said, full-sized 9mms with readily available extended-capacity magazines are looking pretty dang good right now. Who cares if it prints? But I digress.
Raising the humble .380 from the dead was one main factor: ammunition. Improvements in bullet design, providing consistent penetration and expansion took what was once a marginal self-defense cartridge and made it, well … marginally better. This is to say, the debate over whether it’s a smart move to carry a .380 ACP as your primary self-defense gun is alive, well and hot as ever.
So, before we ramble on to the top .380 pistol options available today, we should hit some of the pros and cons of the demure 9mm and its handguns.
Why You Want A .380 Pistol
Peruse .380 pistol options and it becomes evident the caliber has a huge advantage over almost every other. They’re small, downright minuscule. Over the years, the ubiquitous 9mm has made up ground. The likes of the Sig Sauer P365’s dimensions encroach on .380 territory. Still, this is the exception, not the rule … yet.
Since the key to concealed carry is concealing your firearms, these pocket pistols have a leg up. If you reside in a shorts and T-shirt climate, a Government Model 1911 is awfully difficult to keep under wraps. A Ruger LCP not so much. In turn, keeping a .380 pistol concealed is a somewhat easy task.
However, the clandestine nature of .380 handguns isn’t the main selling point. Fostering program compliance is. In layman’s terms, this means a gun you’ll carry every day. Easier said than done. However, smaller, lighter guns tend to promote diligence.
A big plus for the .380, yet, there are some less-than-desirable facets to the caliber and its guns that deserve thought.
Take Aim On The .380 ACP:
Concealed Carry: Is The .380 ACP Enough For Self-Defense?
The size of .380 pistols is a major advantage, but it isn’t wholly a bed of roses. By and large, small guns are difficult to shoot well. Not impossible mind you, but to become proficient with a micro .380 takes more practice than say with a Glock 17.
There are some blatant reasons for this discrepancy:
Short Sight Radius: Sight radius is the distance between the front and rear sights. The less of it there is, the more difficult it becomes to hold on a target.
Abbreviated Grip: Most .380 pistols have a small grip, both in height and circumference. In turn, the guns prove difficult to keep firm control over, particularly in faster shot sequences.
Lightweight: It sure it is nice to have a featherweight on the hip until the time comes to pull the trigger. The lack of heft in most .380 pistols amplifies recoil. Add in the smaller grips, you’ve created a downright bucky handgun.
Low Capacity: The tradeoff for a highly concealable gun is the lack of rounds on tap. Expect a 6-round magazine to be the norm.
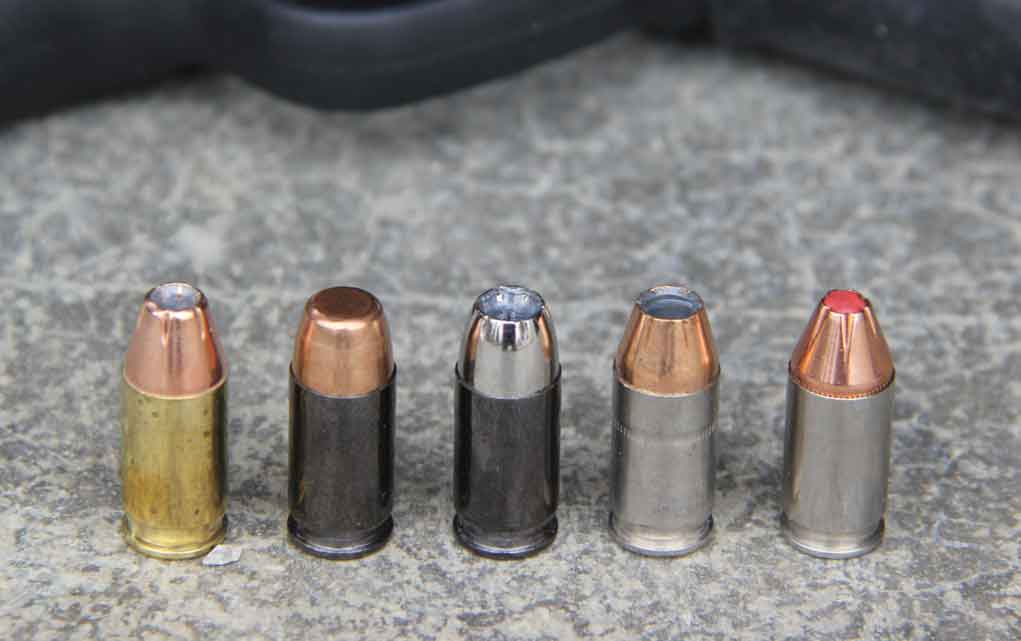
Ammunition is also a concern. While its indisputable .380 ACP has improved over the years, it still suffers from one major fault—middling velocities for the caliber. Worrisome, given velocity is the main variable dictating modern bullets’ performance. If not enough of it, the projectile won’t penetrate deep enough nor expand properly, if at all.
Does this mean the .380 isn’t legitimate for self-defense? Far from it. But it does mean doing your homework on the ammunition you’ll use to guard your life. Choose carefully.
How I Picked The Best .380 Pistols
I selected these guns for this list from a number of criteria pertinent to concealed carry. First and foremost for a defensive pistol, in testing the guns had to prove reliable. Next came accuracy, within reasonable defensive parameters—7 and 10 yards. Concealability, how easy the pistol is kept under wraps when on the body through carrying the guns was also considered. As was ergonomics, how well the pistol’s controls were laid out and how comfortable the gun felt in hand, particularly when being shot—not an easy hurdle for borderline mouse guns.
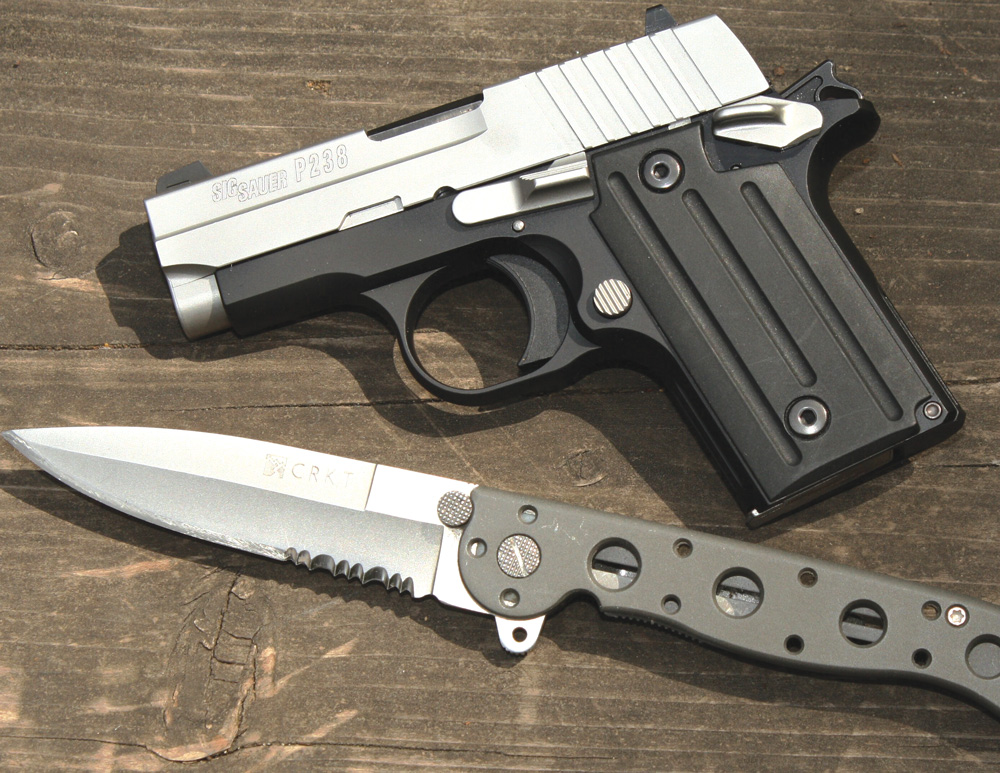
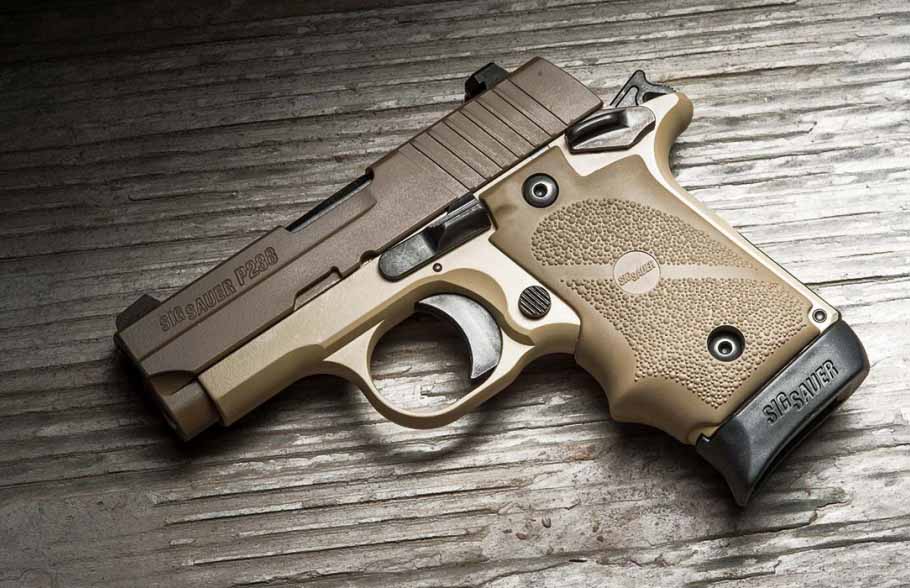
Ticking like a Swiss-made timepiece, the P238 had folks looking .380 ACP long before the cartridge regained popularity. And the carry-tailored SAS model is the cream of the cream.
Of course, Sig invested some sound engineering to conjure up a pocket pistol that runs like a full-size iron.
At its essence, the .380 pistol is a micro 1911 offering all the assets John M. Browning intended in perhaps his most famous design. A good example is a smashing single-action trigger that works overtime to ensure the 3-inch barreled gun’s accuracy.
As far as concealability, few beat the P238 SAS. At 3.9 inches in height and 16 ounces unloaded, it is legitimately a pocket pistol and would do well in this role.
I found the gun excellent in the accuracy department, able to keep on target consistently out to 10 yards. Furthermore, I found it comfortable to shoot—a rarity of small .380 pistols. This facet is aided in large part to the SAS’s rubberized and ergonomic grips that do a lot to overcome the short grip.
For some, there are sticky points. The thumb safety is one, the cost is the other. The 6+1 capacity P238 runs on the spendier end of the spectrum. Take solace, few ever feel the pistol is a waste of money.
One last bone to pick with the micro compact, it’s not the best-looking gun ever made. Sig tries to hide its blocky lines with flourishes on sub-models—different colors, scrollwork, etc. But lipstick doesn’t do much for the pig. If it saves your life, does any of that really matter.
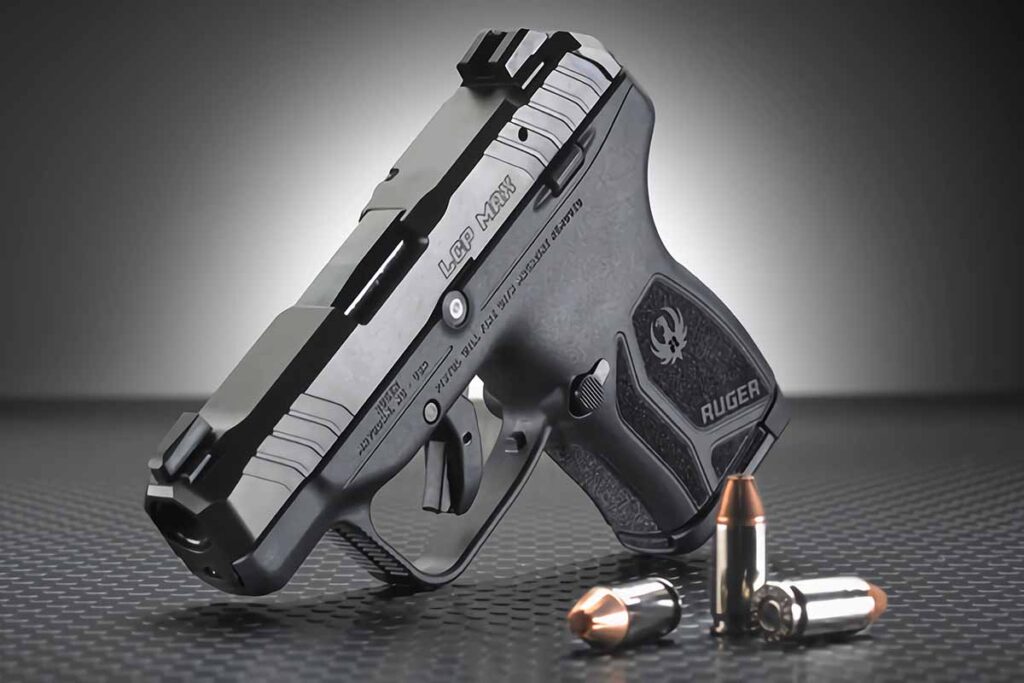
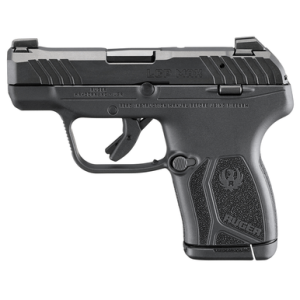
Was the third time the charm? If you’re talking about Ruger’s LCP, then it’s a resounding yes!
The third iteration of the nearly legendary .380 pistol boasts nearly everything fans of the design have begged for. Chief among these is normal dang sights.
I can’t tell you what a difference this upgrade is, given I found the integral sights of the LCP II (now a .22LR) abhorrent. The more prominent and white outlined rear sight in conjunction with the Tridium front makes for a workable aiming system. And the gun response, within workable defensive distances.
I won’t say I found the Max a tack driver, but I was more than capable of connecting consistently at center mass from 10 yards. Essentially, that makes the cut for a .380 defensive pistol.
Almost as good, the gun has nearly a best-in-class capacity carrying 10-1 rounds. Ruger turned to a double-stack magazine to accomplish this, slightly widening the grip of the hammer-fired gun. As a side benefit, I found the Max more comfortable in hand than the previous LCPs.
All this, the gun isn’t one you’ll pick up for pleasure. Like its predecessors it’s a jumpy pistol and feels like shooting exactly what it is, a .380 pocket pistol. But very concealable and accurate as it needs to be, you won’t lose any love for its deficit as a plinker.
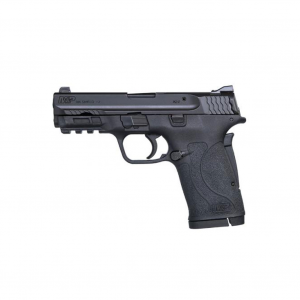
Everyone knows the skinny on Smith & Wesson’s EZ line—the hammer-fired gun has an extremely easy (get it) slide to manipulate. The idea behind the pistol is to give those who have trouble with heavy slide-rack weight an option in what otherwise might prove a prohibitive class of guns.
Yet, I’d argue the EZ .380 is on target for nearly any shooter in the market for this caliber of pistol. Yeah, you might get razed by your buddies and your manhood questioned—endure this and you have a fine defensive option, one you can trust your life with.
Aside from a slide you can rack with your pinky, the EZs I’ve shot are spot-on accurate and honestly quick to manipulate.
The sights are high, made of metal and very familiar to anyone used to the three-dot system. And in my opinion, Smith & Wesson got grip texturing right on the M&P line—a solid purchase on the pistol and it’s not going anywhere.
As for the bad aspects of the gun, I don’t dig grip safety, namely for aesthetics. In use, I barely noticed it, if you get a solid fundamental grip.
My other point of contention is the front cocking serrations or the very minimal amount of them. They’re there, peppered just around the release cut, but that’s about it. For most, this isn’t an issue, given you can nab slick metal on the slide and its lack of resistance still means you can actuate it.
But it does concern me for those the gun is aimed at—those with poor hand strength.
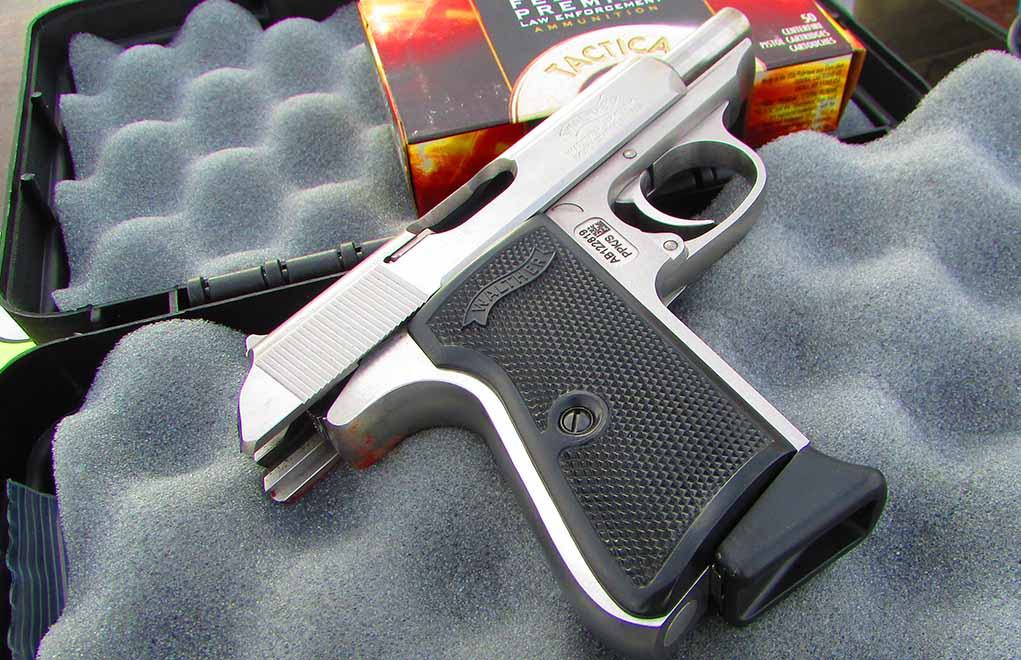
PPK/S Specs Capacity: 7+1 Barrel Length: 3.3 inches Overall Length: 6.1 inches Width: 1 inch Weight: 19 ounces Height: 4.3 inches Safety: Thumb Trigger Pull Weight: DA: 13.4 pounds; SA 6.1 pounds MSRP: $970
As someone who grew up on James Bond flicks, the PPK line has always stirred my imagination. Truly, it’s one of the classics. And while the design is long in the tooth, the pistol still holds its own in modern concealed carry. Larger than the original PPK, the PPK/S is easier to shoot and is accurate as the day is long.
At the same tick, the .380 pistol is plum concealable in every sense of the word. More suited to tote around on the hip—19 ounces—the PPK/S can pull pocket-carry duty in a pinch.
As far as accuracy, two words sum up the pistol: dead nuts. Much of this is thanks to a fixed barrel, a feature that eliminates any barrel wiggle and makes the dashing heater a natural pointer.
However, it is a straight blowback action, which means it tends to produce stouter felt recoil. Additionally, the PPK/S has a DA/SA trigger. A good one, mind you. But you must remember that the first trigger pull is a hefty 13 pounds or thereabouts.
I’ll point out two other issues I encountered. I got bitten by the slide, which could have been due to larger hands. And the magazines wouldn’t play nice with some brands of ammo. Not the gun mind you, but the magazines couldn’t load hollow points with large cavities—think Sig Sauer.
All that said, the pistol remains the cream of .380 and is more than proficient at defending your life. And there’s no better time than now to get one, as Walther is once again the exclusive manufacturer, which adds up to excellent fit, finish and quality control.
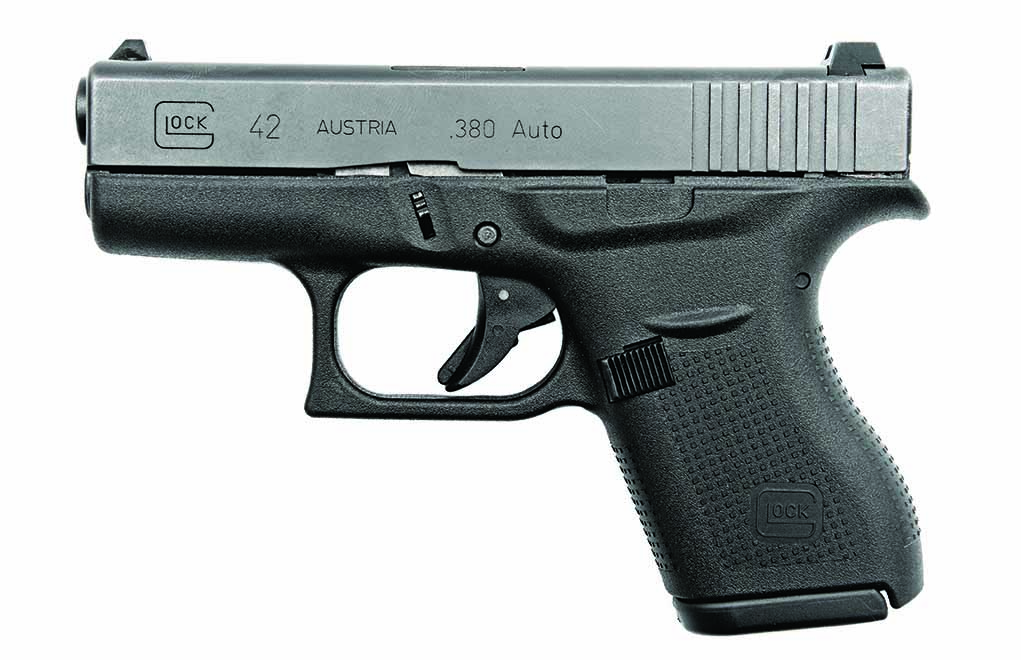
Among the most highly anticipated guns in the past decade, the G42 didn’t disappoint. Concealable, familiar and, above all, reliable, the .380 pistol ticked all the boxes of a deep-cover concealed carry piece. In short, it’s a Glock.
Admittedly, the G42 has been overshadowed in recent years by Glock’s petite 9mm offerings. But it still has a place in on-person defense. Particularly due to its shootability. Its larger size relative to other .380s is partly to thank for this, with the gun measuring 4.13 inches in height and .98 inches in width.
Like most Glocks, the striker-fired has a decently crisp trigger out of the box and a short reset. In turn, those familiar with the gun can run it fast, and accurately so. However, if it or any other part of the G42 isn’t up to your standards, the Glock aftermarket is huge and the pistol is upgradeable.
I will say, like many, I’m not overly fond of the steep grip rake of the G42 or any Glock for that matter. And the dimensions of the gun are great enough you might as well upgrade to a 9mm micro-compact.
Glock 42 Deals
Palmetto State Armory
$519
Guns.com
$399
Sportsmans Warehouse
$399
.380 FAQ
Is a 380 a good carry gun?
As renowned self-defense expert Massad Ayoob has stated, the .380 is minimal for self-defense. In the same breath, he’s said it’s better than being unarmed. Overall, the appeal of the .380 ACP are the guns chambered for it are small and easy to carry—thus, you’ll be more likely to have it on your person at all times. However, it certainly doesn’t have the same power and proven threat neutralization as the 9mm and larger caliber pistols. For more information, please see our article Is The .380 ACP Enough For Self-Defense?
What does the ACP stand for in 380?
The ACP stands for Automatic Colt Pistol, a designation shared with another famous pistol cartridge—the .45 ACP. Both were developed by famed gun designer John Moses Browning at the turn of the 20th century for the burgeoning class of semi-automatic pistols, which were gaining in popularity.
Is a 380 as powerful as a 9mm?
No, the .380 is not as powerful as a the 9mm. Depending on the load, the .380 has a muzzle velocity of 950-1,000 feet per second, whereas the 9mm operates between 1,100-1,250 feet per second. Furthermore, the .380 shoots a lighter bullet, with the most common weights 85 to 85 grains. The most popular bullet weights for 9mm are 115- and 124-grain. Greater velocity and mass of the 9mm results in greater energy on target, thus more penetration potential. For more information on the cartridges, please see our article on .380 Vs 9mm.
What caliber is best for self-defense?
Generally speaking, the acceptable self-defense handgun calibers start at .380 and go up. By and far, the most utilized self-defense cartridge is 9mm given its balance between power and manageability. Other highly utilized cartridges include .45 ACP, .38 Special, .40 S&W, .357 Magnum and 10mm. For more discussion on self-defense cartridges please visit our article Best Caliber for Self Defense.
We hit the range to test out some of DA Targets’ self-healing, color-changing polymer targets.
At shooting events like CANCON, we need targets as much as we need guns and ammo. With thousands of attendees looking to dump as many rounds down range as possible, however, that means not just any targets will cut it.
Paper targets are obviously out. These would get torn to shreds instantly and need constant replacing. Steel targets are great in a lot of ways, and we used them on certain bays at CANCON too, but there are several reasons why they’re not ideal either. At closer ranges, there’s a risk of ricocheted bullets or spall flying back. Both can be exacerbated by cratering on the target’s surface after they’ve been subjected to heavy abuse. Plus, they’re expensive, and the sheer number needed to supply an entire range day event makes steel target companies less than eager to provide them.
The solution? For us, it was DA Targets.
Made of self-healing polymer, DA Targets are designed to withstand thousands of rounds before needing to be replaced. They also can be shot at any distance without risking a ricochet. The combination of the targets’ longevity and safety made them ideal for use at CANCON, as even the most heavily shot-up targets were still good and ready for continued use when the event was over. Sure, after taking thousands of rounds, they look a bit peppered compared to new ones, but that doesn’t stop them from being just as effective as the day they came out of the box.
A new DA Targets gong next to one that was used at CANCON. It would take a lot of time and a lot of bullets before you’d be able to make one look as peppered as that.
While you’re probably not planning on hosting a range day event any time soon, if you like to shoot, DA Targets have a lot to offer you.
The DA Targets Advantage
We already covered that self-healing DA Targets have an incredible lifespan and can be safely shot at any distance. Those are huge benefits for both range events and individual users, but the targets have a few more advantages more noticeable when using them for personal target practice.
An obvious one, they’re way lighter than steel. Anyone that shoots at a range where they must drag out, set up and eventually collect their steel targets for every practice session is well aware of what a pain in the ass that is. Even DA Targets’ full-size silhouettes weigh less than 5 pounds each. Whenever moving them around is a consideration, you’ll appreciate just how handy they are more than you might think. Plus, it makes it way less of a headache to set up multiple targets for drills.
Speaking of training, DA Targets can potentially improve your shooting even more than steel targets. When steel dings, most people just mark it as a hit without caring or checking whether it went in the A-zone or only nicked the edge. Even if you cared to check, the target would need to constantly be repainted to differentiate between new and old hits. Not a problem with DA Targets, at least not with their color-changing variety (all silhouette DA Targets are color-changing, but the gongs are available as either color-changing or not).
As the name implies, these targets temporarily change color at the point of impact and turn from red to bright, fluorescent yellow. This makes it easy to see exactly where your shots are landing and whether you need to adjust your aim or not. It’s not quite as primally satisfying as hearing the ring of steel, but it does a much better job of letting you know where you’re hitting.
The only minor limitations of DA Targets pertain to projectile types and ambient temperature. To help them last as long as possible, FMJ bullets should be used as hollow points, wadcutters and blunt-faced projectiles will tear them up faster. Also, because the color-changing properties come from the heat of a bullet, each target is sold as being rated for either cool (45-80°), mild (60-80°) or warm (60-100°) temperatures. Depending on where you live, you might need to get more than one if you want the color-change feature to be effective year-round. Also, the company warns that projectiles traveling slower than 800 fps still have a chance to ricochet, so be mindful of that.
DA Targets’ Options
DA Targets has several different target sizes and styles available to cater to a variety of shooting needs. The silhouettes are offered in C-zone, half- and full-size options, and the gongs are available in 4- and 6-inch sizes with either hanging straps or as knockdown targets. All of these are officially rated for .22 LR up to .308 Winchester, but they can withstand even larger, more powerful rounds to a certain degree as well.
If you’re looking to shoot these with .50 BMG or a similarly powerful round, you’ll have to use the company’s new 4-inch Rifle Target. This model isn’t color-changing, but it is thick enough to handle the really big stuff.
The .50 BMG-rated 4-inch rifle target.
Parting Shot
The next time you’re setting up steel targets at your range, while you catch your breath, think about how you could be dealing with lightweight polymer targets instead. Polymer that can last as long if not longer than steel, can be shot at any distance and can change color upon impact to show your hits. You’ll probably decide it’s time to give DA Targets a try.
For more information, visit da-targets.com, or if you’re attending SHOT Show 2025, swing by booth 42654 to see the company’s new stuff in person.
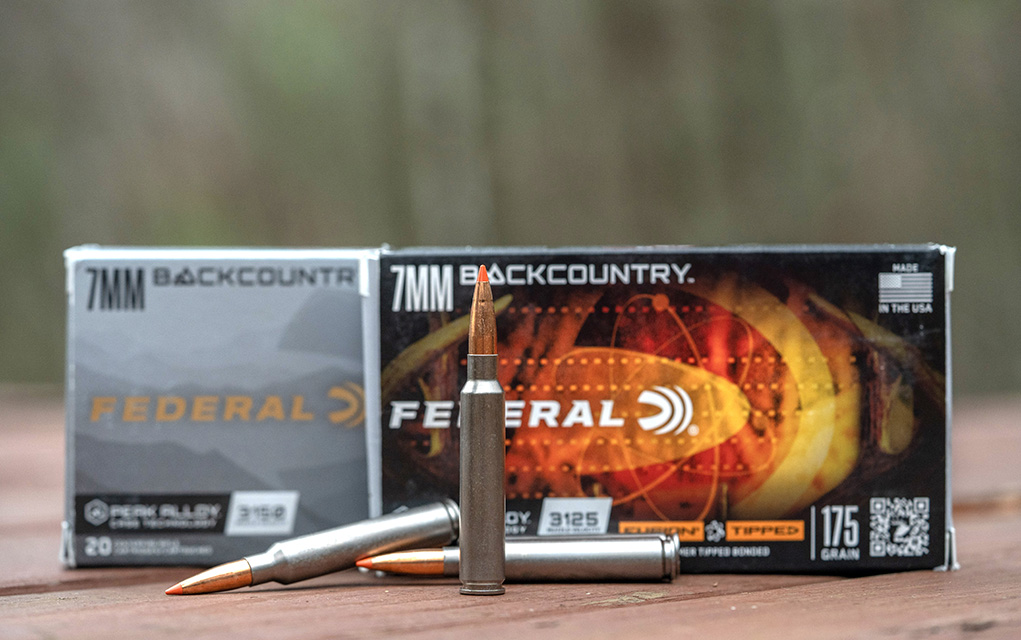
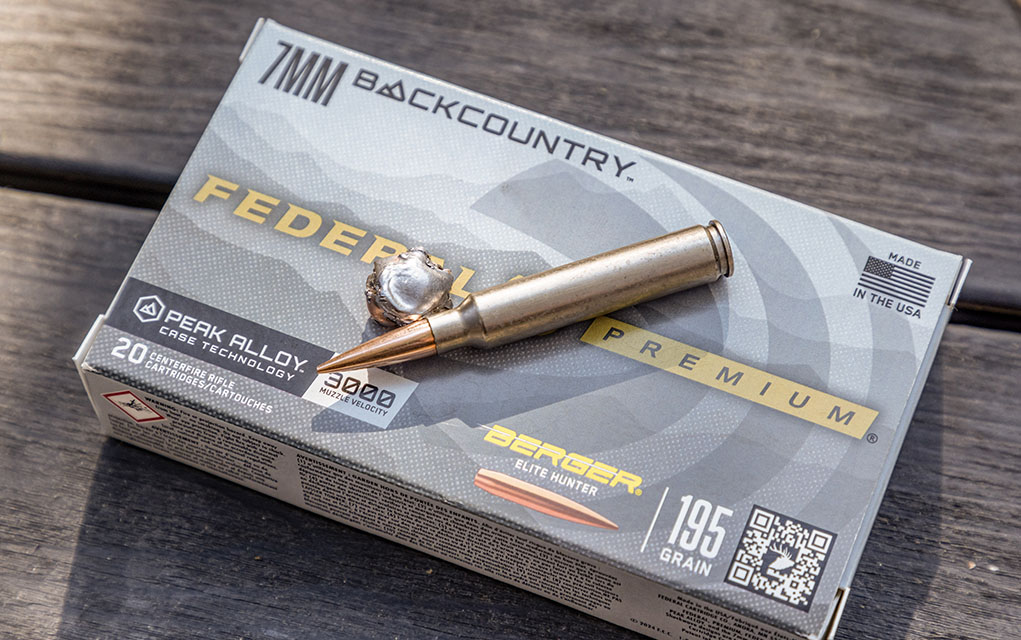
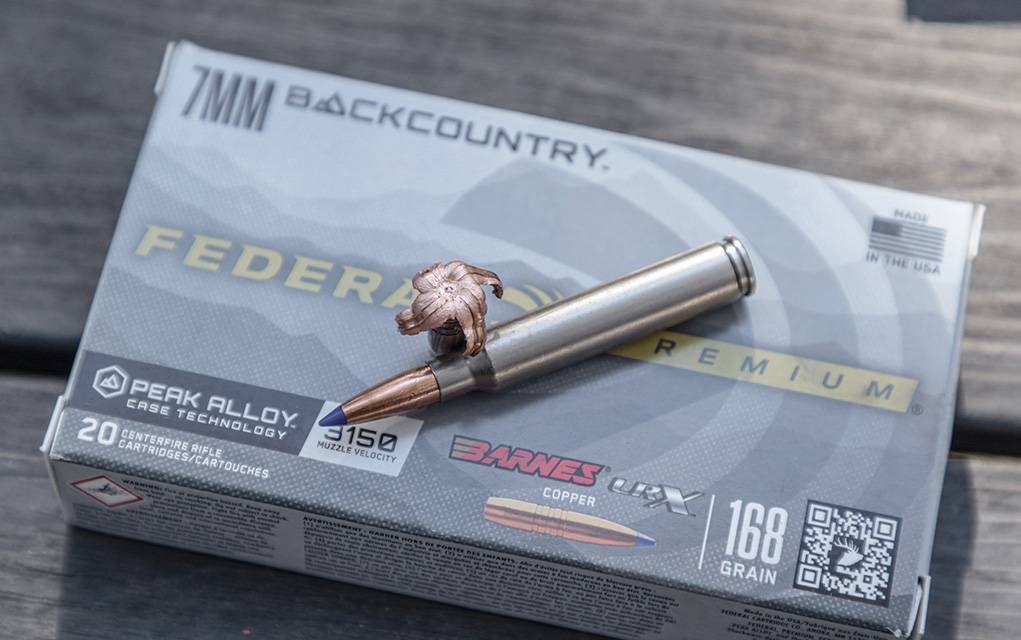
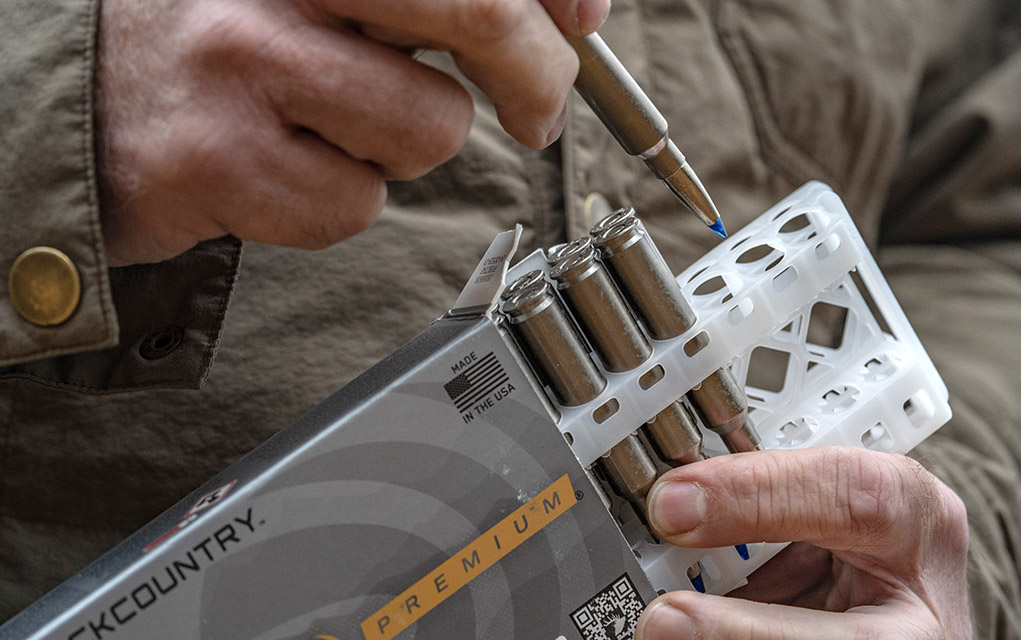
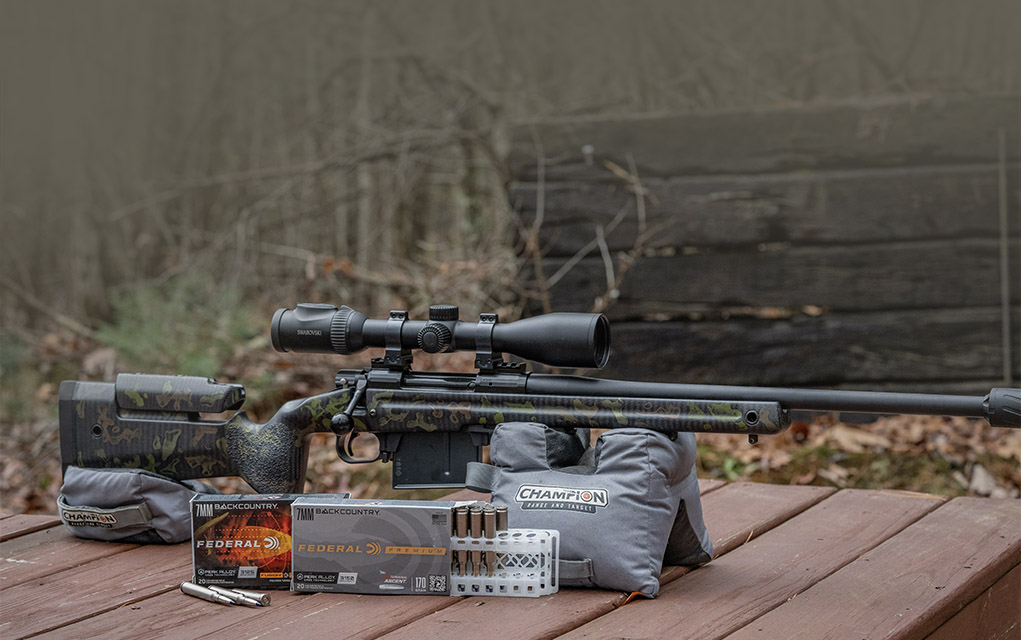
We take a closer look at Federal’s new 7mm Backcountry cartridge, the fastest 7mm on the planet.
Federal’s introduction of the 7mm Backcountry rifle cartridge is the most important advancement we’ve seen with metallic cartridges in more than a century. This is partly because the cartridge has a lot to offer hunters, but it’s mostly because of the new technology behind it.
Federal invited me to a soiree they hosted to introduce this cartridge, and that’s where I first got to see it in action and shoot it. Since then, I’ve been working with the 7mm Backcountry cartridge in a new prototype rifle outfitted with a Silencer Central Banish 30 suppressor on my home range.
Based on what I’ve seen so far, this cartridge—and the associated technology that comes with it—is going to revolutionize the world of metallic cartridges.
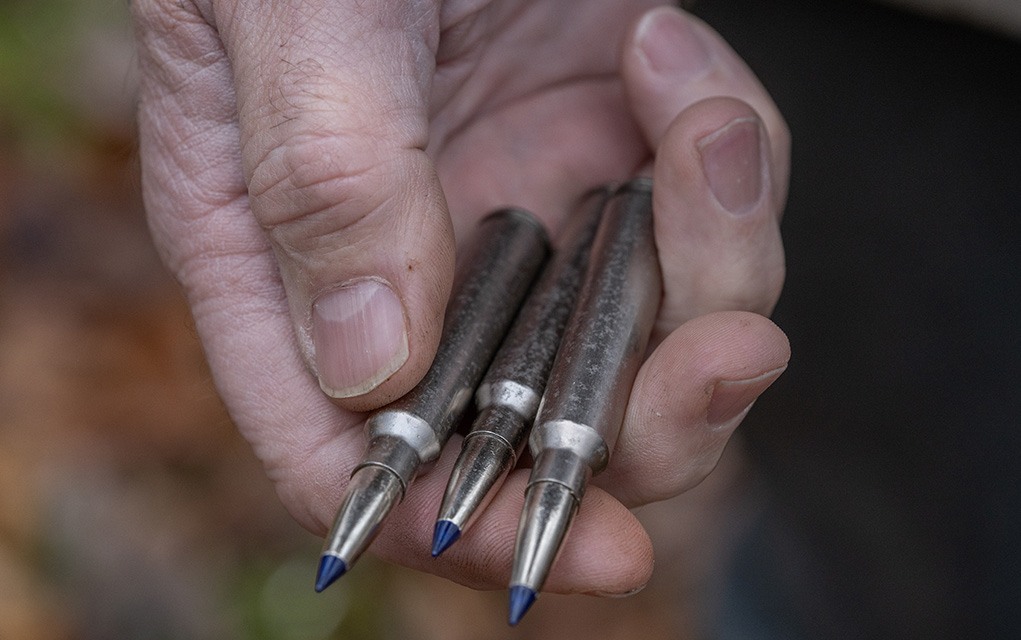
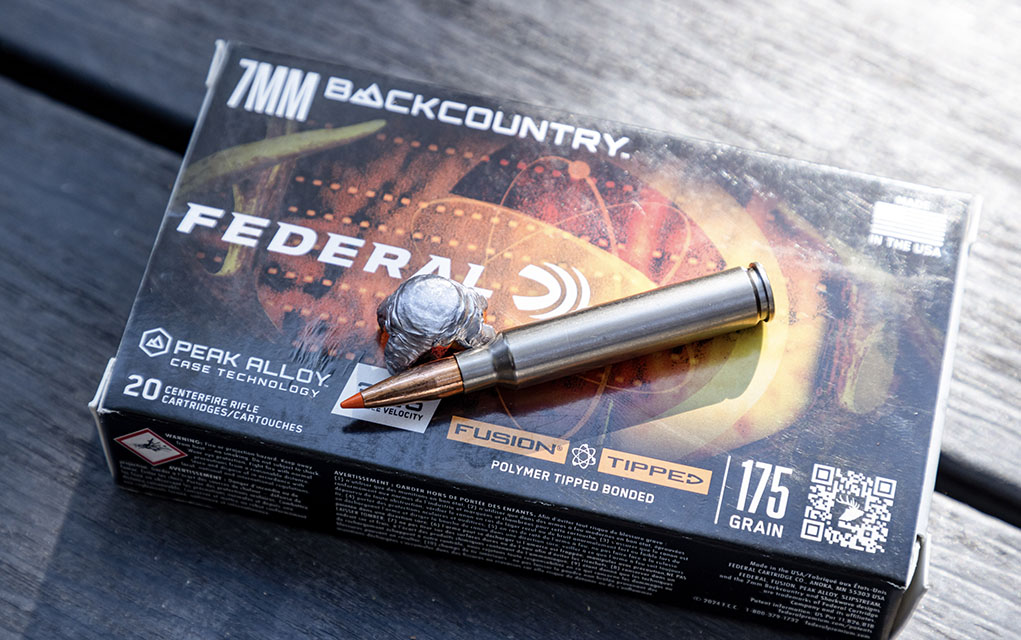
Outwardly, there’s nothing unusual that stands out about the 7mm Backcountry cartridge other than its gray case.
The History and the Concept
Kevin Brittingham, the current owner of Q Firearms, designed the .300 Blackout cartridge and Remington introduced it in 2009/2010. The .300 Blackout was the first commercial cartridge specifically intended for subsonic application, and before it came along, suppressors were mostly a novelty. The .300 Blackout changed all that and is mostly to credit for the current popularity of suppressors, which could very well be the fastest-growing segment of the firearms industry.
With the coast-to-coast acceptance of suppressors, hunters started appreciating the reduced recoil and muffled sound they offered. However, up until just the past few years, most new hunting rifles came with long barrels that weren’t very suppressor friendly.
Now, centerfire hunting rifles with barrels as short as 16 inches are common. In fact, the Fix rifle from Q firearms is a hunting rifle that was purpose built with a short barrel to be more suppressor friendly. This rising interest in suppressed hunting is to some extent what prompted Federal to seek out new technology so they could offer the best performing suppressor friendly/short-barrel centerfire rifle cartridge for big-game hunting.
The Technology
A century ago, Winchester introduced the .270 Winchester, and many continue to herald it as one of the best big-game hunting cartridges. But that didn’t stop efforts to improve it. At first, the ballistic improvements came with larger cases that held more gunpowder. It’s how we ended up with the 7mm Remington Magnum.
But it didn’t take long for ballistic engineers to reach a limit in how much gunpowder they could put in a cartridge case that would fit in a sporting rifle, and how much recoil a hunter could comfortably tolerate.
In 2014, Hornady introduced the 6.5 Creedmoor with a fast 1:8 twist barrel. The Creedmoor did not shoot faster than the 270 Winchester, but with its fast twist it could stabilize longer and heavier bullets with higher ballistic coefficients. Inside 300 to 400 yards, the Creedmoor offered no advantage, but as the distance increased the benefits of the higher BC bullets paid off.
Hornady expanded on this success in the same way we tried to improve the .270; they introduced the 6.5, 7mm and 300 PRC cartridges—also with fast-twist barrels—that held more gunpowder.
But, just as before, cartridge case size and recoil tolerance limited the ballistic improvement that was possible.
Federal Ammunition took a different approach. They wanted to create a long-range hunting cartridge that would outperform our current magnums, without being as large as a cigar … or with a substantial increase in recoil. They also wanted the cartridge to do this out of a shorter barrel to be more suppressor friendly. Federal took a brave approach and abandoned the brass cartridge case altogether, because with a maximum chamber pressure threshold of about 65,000 psi, the brass case was the limiting component.
The Peak Alloy steel case is what sets this cartridge apart. It allows the 7mm Backcountry to operate at a staggering 80,000 psi.
For the 7mm Backcountry, Federal went with the new Peak Alloy plated steel case—created in response to a military request—because it could manage pressures as high as 80,000 psi. That’s a substantial increase over what a brass cartridge case can tolerate.
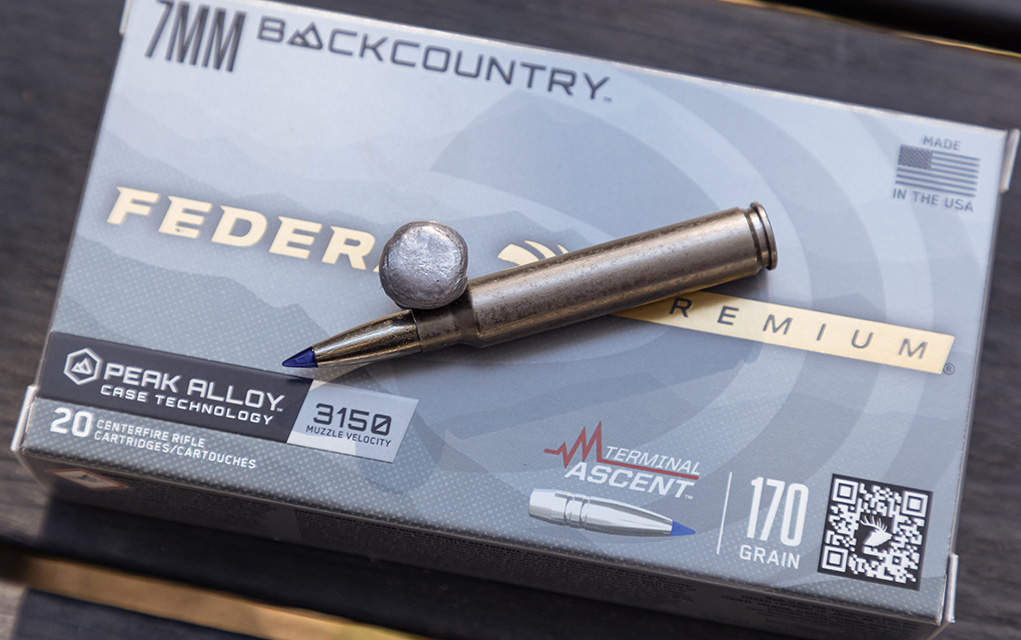
With all that pressure to work with, Federal didn’t need a large capacity case because they could use faster burning powders. So, they settled on a case with the same rim diameter as the .270 Winchester, and with external dimensions very similar to the .280 Ackley Improved. This gave them a 7mm rifle cartridge that works in standard rifle actions, and unlike other conventional steel-cased ammunition, the Peak Alloy cases can be reloaded. It’s also capable of pushing a 175-grain bullet to 3,000 fps from a suppressor-friendly, 20-inch barrel. Add in a high BC bullet and a fast 1:8 twist, and you have something very special.
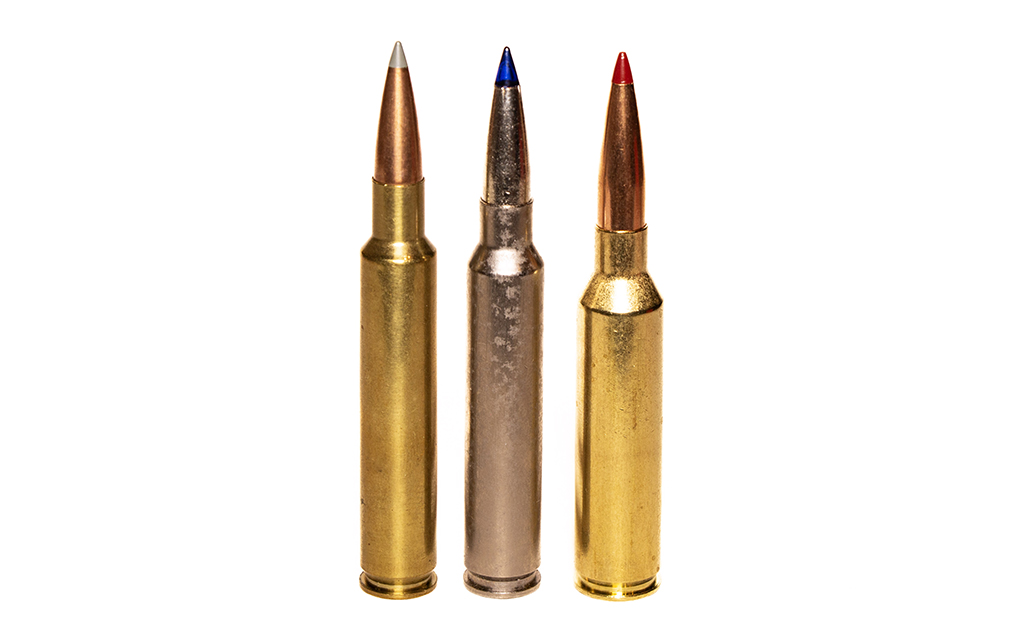
The 7mm Backcountry cartridge (left) has the same case and rim diameter as the .270 Winchester. The 7mm PRC cartridge case (right) is much larger and limits magazine capacity.
Comparing Apples
How does this new cartridge stack up to the best of what’s currently out there? Most will agree that the 7mm PRC is one of the finest long-range hunting cartridges. Hornady advertises that it will launch a 175-grain ELD-X bullet with a G1 BC of 0.689 at 3,000 fps from a 24-inch barrel. It will take that bullet about 1.3 seconds to reach 1,000 yards, and if you zero the rifle at 100 yards, the bullet will drop 243 inches at that distance.
Left to right: .280 Ackley Improved, Federal 7mm Backcountry, and Hornady 7mm PRC.
The 7mm Backcountry will launch a 170-grain Terminal Ascent bullet with a G1 BC of 0.645 at 3,150 fps from a 24-inch barrel. It will arrive at 1,000 yards in only 1.26 seconds, and the bullet drop at that distance is only 224 inches. But Federal designed this cartridge to work with shorter barrels and be more suppressor friendly. Out of a 20-inch barrel, this 170-grain bullet has almost the same velocity as the 175-grain 7mm PRC Hornady load does from a 24-inch barrel.
Initially, Federal is offering five loads for the 7mm Backcountry. In addition to the 170-grain Terminal Ascent, they’re offering a 175-grain Tipped Fusion load with a BC of 0.575 and a 20-inch barrel velocity of 2,975 fps. There’s also a 195-grain Berger Elite Hunter bullet with a BC of 0.755 and a 20-inch barrel velocity of 2,850 fps.
For the best long-range performance, the 195-grain Berger Elite Hunter bullet with its high BC of 0.755 is a great choice.
If you like mono-metal bullets, there’s also a 168-grain Barnes LRX bullet with a BC of 0.513 and a 20-inch barrel velocity of 3,000 fps. And if you have a need for speed, Federal’s 155-grain Terminal Ascent load has a BC of 0.586 and a 20-inch barrel velocity of 3,150 fps.
The 168-grain Barnes LRX bullet would be a great choice in the 7mm Backcountry if you need deep penetration.
To see how these loads compare to other long-range hunting cartridges, just plug the data into your ballistics calculator. Retail price per box of 20 will range from $55 to $82.
Federal will be offering a 155- and a 170-grain Terminal Ascent load for the 7mm Backcountry.
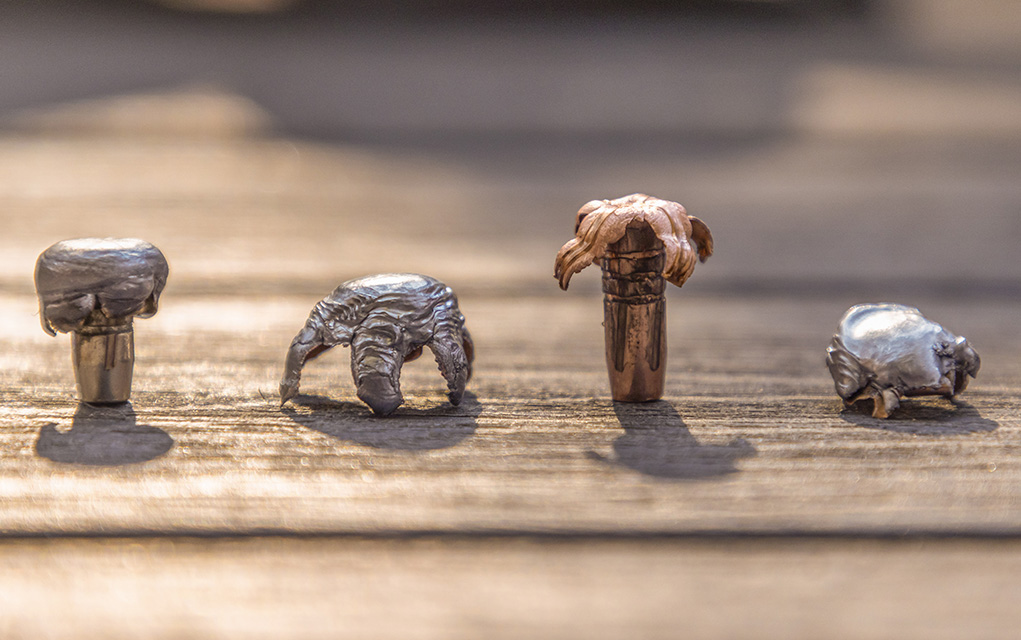
Testing the Technology
Federal also conducted terminal performance testing during my visit. They placed blocks of Clear Ballistics down range at 100 yards, and then shot them with four of the five loads they’ll be offering. Though this cartridge is purpose built for shots at much longer distances, it’s good to know the bullets they’re loading will stand up to close-range impact. Terminal performance data is shown in the accompanying table.
These four bullets were fired into blocks of Clear Ballistics at 100 yards and illustrate that they can stand up to the impact velocity of the 7mm Backcountry at close range. Photo credit: Federal
While at Federal, I also got to shoot a wide variety of rifles from several different manufacturers that’ll be chambering the 7mm Backcountry: Christensen Arms, Weatherby, Proof, Horizon Firearms and Seekins Precision.
The Geissele King Hunter rifle is one of many new bolt-action rifles that will be available in 7mm Backcountry.
One of the rifles that caught my eye was the new King Hunter from Geissele. They loaned me a prototype to use so I could continue evaluating the 7mm Backcountry, and Federal provided some pre-production samples of the 170-grain Terminal Ascent and 175-grain Tipped Fusion load.
For maximum tissue destruction, the Tipped Fusion load for the 7mm Backcountry would be ideal.
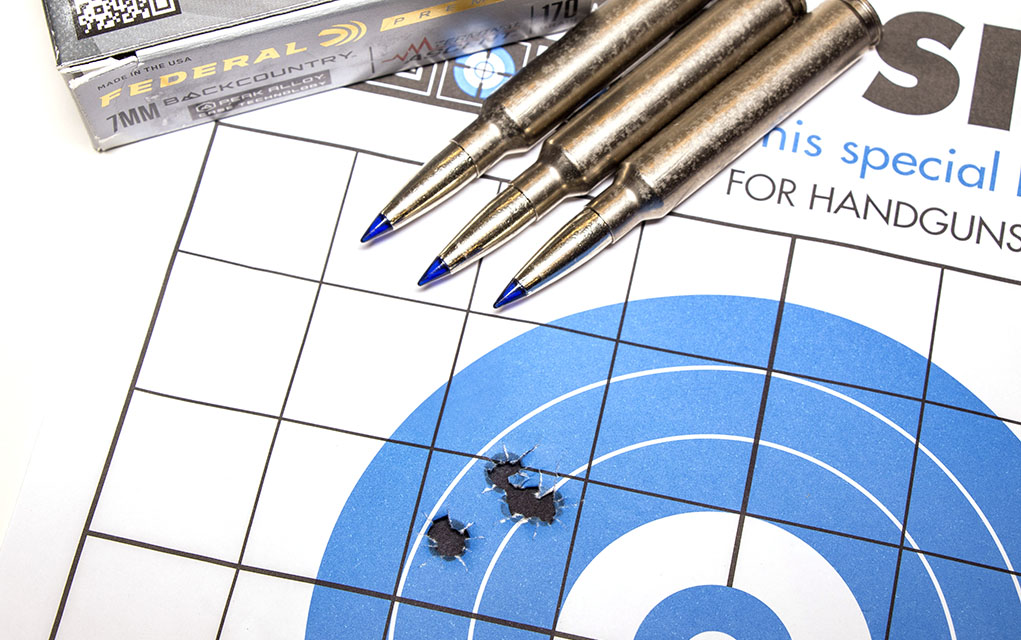
Out of the King Hunter’s 20-inch barrel, the Terminal Ascent load registered 3,120 fps and the Fusion load 3,105 fps. This is well above Federal’s advertised velocities, and both loads also turned in respectable precision for five, five-shot groups.
As for recoil, the 7mm Backcountry has a snappy jump, there’s no getting around Newton’s third law. I’d rate it as very similar to a 7mm PRC.
7mm Backcountry External Ballistics Test Results
LOAD
MV (FPS)
ME (FT-LB)
PEN (Inches)
RD (Inches)
RW (Grains)
Barnes 168-grain LRX
3,000
3,357
32.0
0.71
167
Federal 170-grain Terminal Ascent
3,000
3,397
30.0
0.58
168
Fusion 175-grain Tipped
2,975
3,439
17.5
0.86
157
Berger 195-grain Elite Hunter
2,850
3,517
17.5
0.66
101
More to Come?
You must admit this is all quite exciting, but at the same time you might have no interest in long-range hunting or owning the fastest 7mm cartridge on the planet. That’s fine, but don’t overlook what I consider the real story here. Federal can apply this Peak Alloy case technology to other cartridges.
The Geissele King Hunter rifle delivered exceptional precision.
Now, they cannot start offering .308 Winchester ammunition loaded in Peak Alloy cases at 80,000 psi, because it wouldn’t fall within the standards approved by the Sporting Arms and Ammunition Manufacturer’s Institute (SAAMI) that regulates American-made ammunition. But Federal can introduce other new cartridges in different calibers to take advantage of the increased performance this new case technology offers.
While at Federal, I got to shoot some 5.56 NATO ammo—the 5.56 NATO isn’t a SAAMI-approved cartridge—loaded in Peak Alloy cases. When compared to standard 5.56 NATO ammo loaded with the same bullet, the loads using Peak Alloy cases were 300-fps faster.
I immediately suggested Federal legitimize the 2Fity-Hillbilly—.25 Creedmoor—cartridge I wildcatted some years back with the Peak Alloy cases. It would be a Creedmoor killer for sure. I doubt they’ll take my advice, but I know they have some secrets they’re not sharing. Just imagine the possibilities and what the future holds for shooters at 80,000 psi.
Editor’s Note: This article originally appeared in the February 2025 issue of Gun Digest the Magazine.
We take a quick look at the Taurus GX2, a pistol that the company says will set a new standard for affordable, entry-level self-defense firearms.
Taurus has just announced the GX2, a 9mm self-defense pistol that’s being marketed toward first-time and entry-level shooters. Between its good reliability and affordable price, the GX2 is aiming to make personal protection more easily accessible to all law-abiding citizens.
The Taurus GX2 doesn’t have any fancy tricks hidden up its sleeve, and, in fact, it’s pretty basic as far as polymer-frame 9mm self-defense guns go. But that’s not a bad thing. For personal protection, a pistol really only needs to be reliable, shootable and priced within the prospective buyer’s means. By most standards, it seems that the GX2 hits all three.
Chambered for 9mm, each pistol will ship with two 13-round magazines. Its polymer frame is compact and lightweight yet durable, and the 3.38-inch Sharpshooter barrel keeps it easy to carry concealed while helping to enhance accuracy. Other features include a manual thumb safety as well as a trigger safety, replaceable white dot sights, front/rear slide serrations and an accessory rail for a light or laser. As for the GX2’s reliability, Taurus tested it at a Gunsite Academy event over three days. In the end, the company described the thousands of rounds put through the pistol as “trouble-free.”
An entry-level pistol also needs an entry-level price. The GX2 has an MSRP of $309.99, but they’ve already started to be listed for sale online at almost $70 less than that. For a reliable, no-frills self-defense pistol, that seems pretty good.
Looking to go armed, but are stuck in the weeds as to what to arm yourself with? Here are 20 of the best concealed carry gun options that will keep you on the defensive.