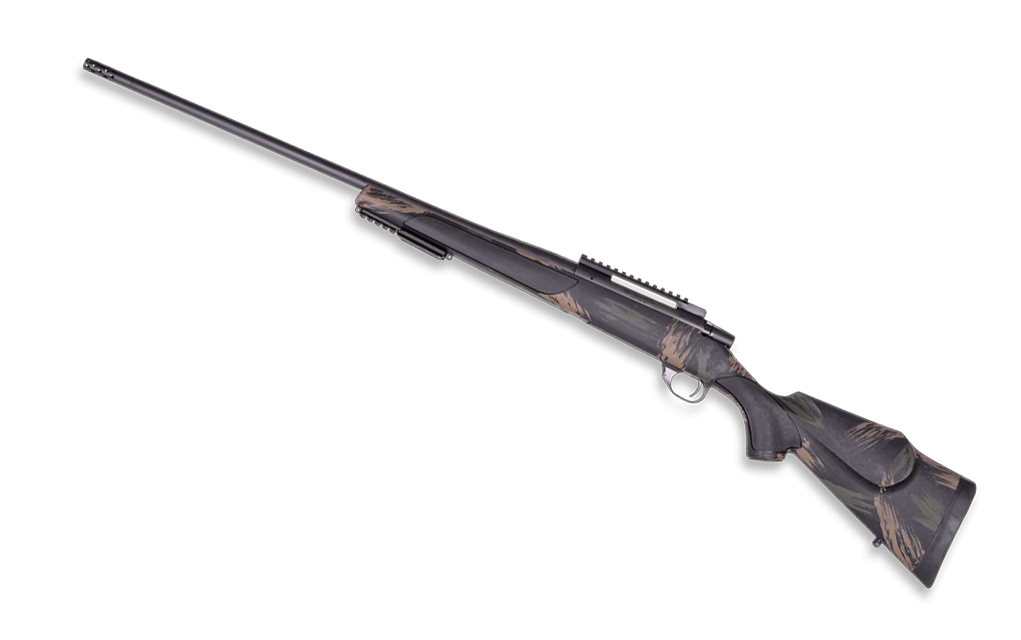
A quick look at the new Weatherby Vanguard Black Hills, a rifle designed to deliver utmost precision in harsh environments.
Named after the rugged Black Hills of South Dakota, the new Weatherby Vanguard Black Hills rifle was built with tough environments in mind. If you require precision on difficult hunts, this model seems quite worthy of consideration.
Featuring a cold hammer-forged barrel with either a #2 or #3 contour, a Vanguard action and a match-grade two-stage trigger, Weatherby guarantees that the Vanguard Black Hills is capable of sub-MOA accuracy out of the box (.99” or less 3-shot group at 100 yards with Weatherby factory or premium ammunition). Barrel lengths range between 20 and 26 inches depending on the caliber. The rifle also has a three-position safety, an integral recoil lug and a hand-painted Monte Carlo synthetic stock.
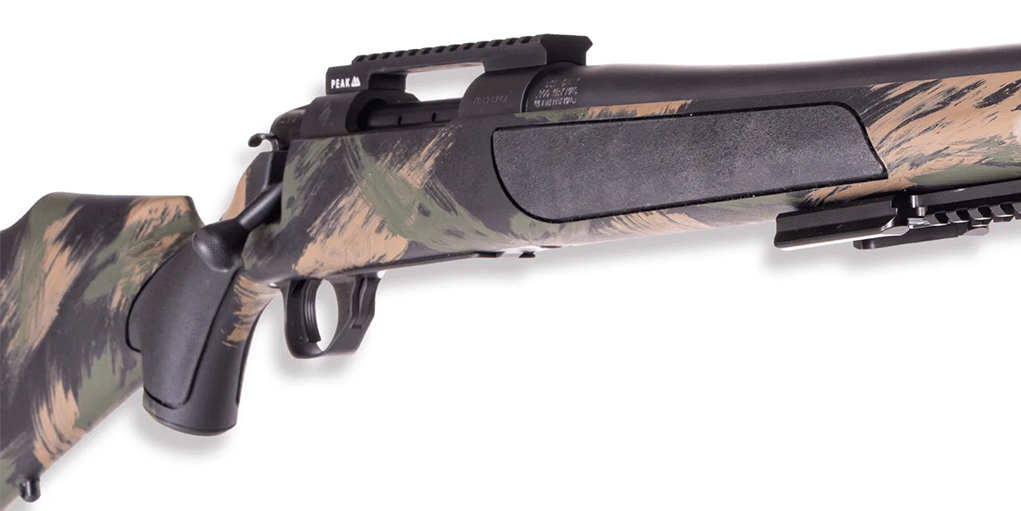
Other features of the Vanguard Black Hills include a Peak 44 Picatinny JRAIL for optics, a Peak 44 Arca/Pic Adapter on the forend for accessories like bipods and a threaded muzzle for suppressors or brakes. Every caliber variant ships with an Accubrake ST except for the 350 Legend model. The full list of available calibers includes .22-250 Remington, .223 Remington, .243 Winchester, .25-06 Remington, .257 Weatherby Magnum, .30-06 Springfield, .300 Weatherby Magnum, .300 Winchester, .308 Winchester, 6.5 Creedmoor, 6.5 PRC, 6.5-300 Weatherby Magnum, 7mm Remington, 7mm-08 Remington, 350 Legend and 7mm PRC.
The Weatherby Vanguard Black Hills has an MSRP of $769 and is available now.
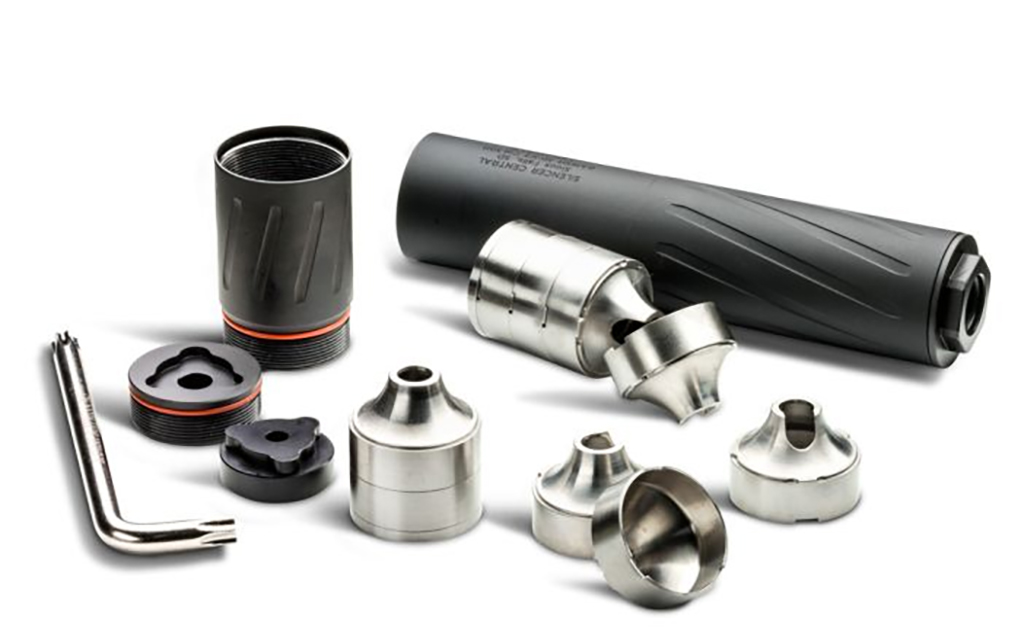
BANISH recently announced the BANISH 30-V2, an updated version of the original BANISH 30 that’s better in every way.
The original BANISH 30 is a good suppressor, but there’s always room for improvement. So, the company set out to do just that with the new and improved BANISH 30-V2. Namely, it now features the industry-standard HUB mount and is shorter, lighter and even quieter than the first version.
How does it accomplish all that? The BANISH 30-V2 features a full titanium construction. That allows it to be 1.8 ounces lighter than the original. Presumably thanks to an improved internal design, the suppressor also manages to be 0.8 inches shorter while being quieter as well. When tested with a .308 rifle, the BANISH 30-V2 had a maximum average decibel reduction of 34.5 dB. It’s rated for .17 HMR through .300 Weatherby Magnum, and like the original, it’s modular as well. This allows you to run it in either an 11-baffle, 8.17-inch-long configuration or an 8-baffle, 6.4-inch configuration.
Lukas VanLaecken, Director of Engineering for BANISH Suppressors, said this about the new can:
The Banish 30-V2 builds upon the great performance of the Banish 30 while keeping it modular and serviceable, giving shooters the choice on overall size and sound performance … The new design reduces the overall length by 0.8 in. and weight by 1.8 oz. while improving performance for an overall quieter shooting experience. The addition of a HUB mount system offers more options and ease of use with multiple mounting systems and firearm configurations.
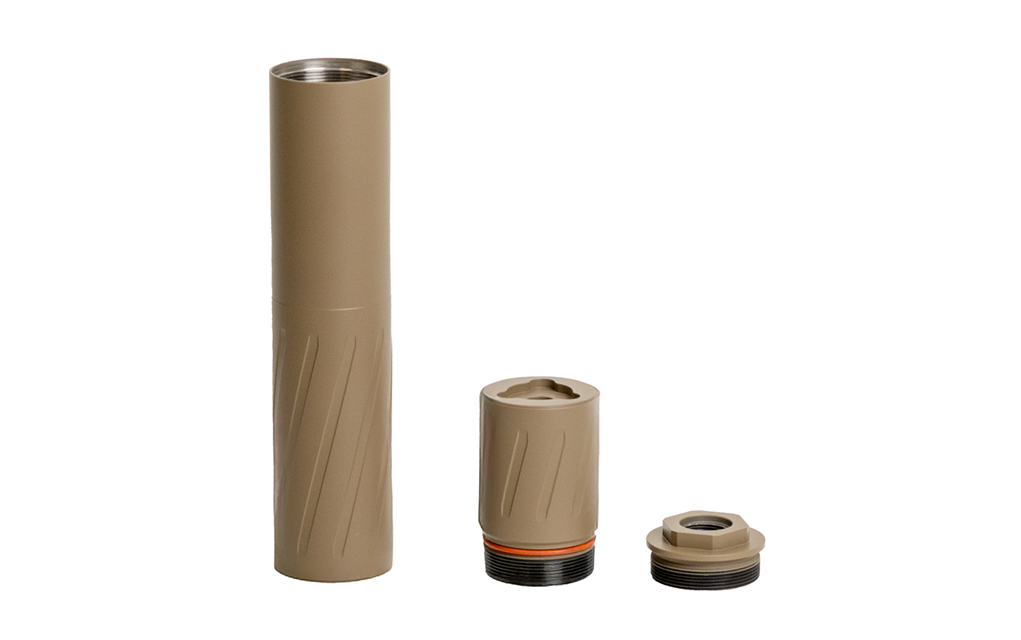
Each BANISH 30-V2 comes with a 5/8×24 direct-thread mount and they can be ordered with either a black or tan finish. They’re available now and have an MSRP of $999.
Two of my favorite cartridges, .270 Winchester and .300 Holland & Holland Magnum, have just celebrated their centennial birthday.
Maintaining popularity for more than a century is quite the accomplishment in the cartridge world. For every one of the “classics” that have made that mark, there are several that fell out of vogue, and many others that have disappeared altogether.
Sure, the .30-06 Springfield, .45-70 Government, .45 ACP, 9mm Luger, .22 Long Rifle and .30-30 Winchester have all made that mark, but the .30-40 Krag, .38-55 Winchester, .300 Savage and .22 Short have lost much of their following of late. And while much of the cartridge market seems to be a popularity contest, a cartridge has to have something substantial to offer to maintain any sort of popularity for more than a century … especially considering the recent advancements in powder and bullet technologies.
Celebrating their 100th trip around the sun this year are two classic cartridges: the .270 Winchester and the .300 Holland & Holland Magnum. One is an undeniable success story that remains a highly popular choice among big game hunters, and the other has a provenance that cannot be denied, even if other cartridges have pushed it out of the limelight.
.270 Winchester
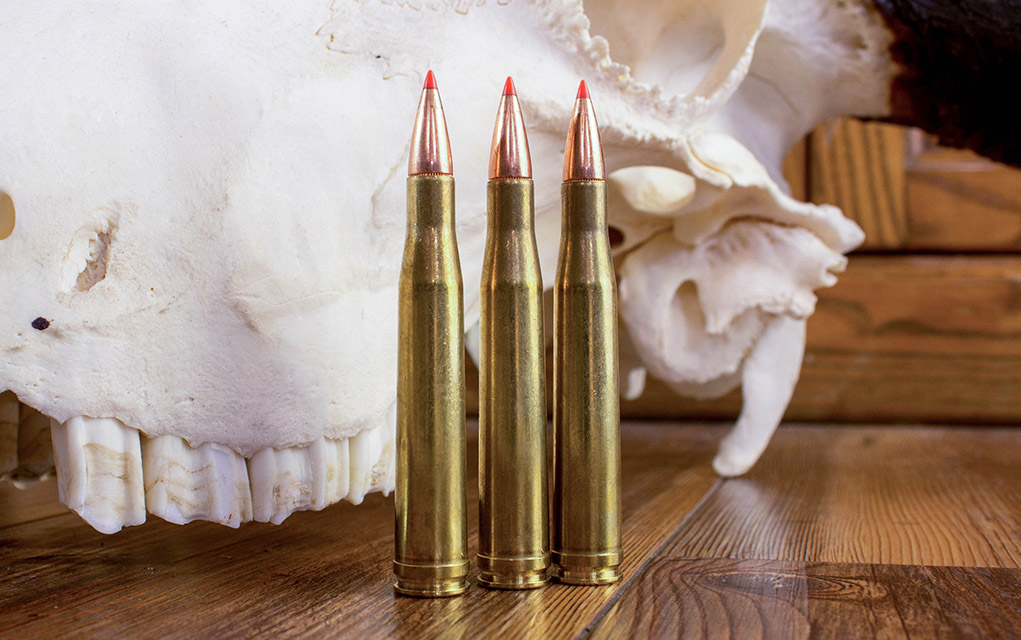
The .270 Winchester was a great choice a century ago, but premium bullets like the Nosler Partition make its performance even better. Photo: Massaro Media Group.
Starting with the more popular of the two—Winchester’s famous .270—you’ll find the most popular of the offspring of the .30-06 Springfield. Or, since we are delving into the history of the birthday cartridges, we might more properly say the offspring of the .30-03 Springfield, which came a bit earlier and has a case length just a bit longer than its much more popular sibling.
The .270 Winchester retains the .30-03 Springfield’s 2.54-inch case length, and the 17½-degree shoulder to handle the headspacing. It has the 0.473-inch case head diameter, which was carried over from the Mauser cartridges and fits perfectly in any long-action receiver.
It might be difficult to come up with a better combination for whitetail deer than a Nosler Ballistic Tip and the .270 Winchester. Photo: Massaro Media Group.
Exactly where the .277-inch bore diameter came from is, sadly, lost to history. Some say it was an attempt to bridge the gap between the 6.5mm and 7mm bores, without using a metric denomination; others feel it might have been adopted from the groove diameter of the 7mm/275 Rigby. But, as far as I know, there is no definitive answer. In all my research, it seems that Winchester pulled 0.277 inch out of the air, much like they did with the 0.338-inch bullets of the .33 Winchester, and as Rigby did with their now-famous 0.416-inch bore.
Nonetheless, 1925 saw the release of the new Winchester Model 54 bolt-action rifle, chambered for the newfangled .270 Winchester. While it certainly possessed the velocity that would become so popular over the coming decades, rifle optics weren’t in vogue in that era, and the Model 54 was designed and stocked for iron sights.
Offering an enhanced velocity level in comparison to the majority of the most popular cartridges in 1925, the .270 Winchester offered bullet weights between 100 grains—a sound choice for the larger furbearers and all varmints—and 150 grains, which was considered suitable for an all-around big-game bullet. The 130-grain bullets performed wonderfully on whitetail deer, wild sheep, pronghorn antelope and black bear, while those 140- and 150-grain slugs were employed against moose, elk and other large game.
The .270 Win. Got Jacked
One would think that the flexibility and popularity of the .30-06 Springfield might have killed the .270 Winchester before it even got out of the gate, as the 150-grain ammo was stellar on lighter big- game species, and those massive 220-grain round-nose bullets would neatly handle even the heavyweight coastal bears of Alaska. But Professor Jack O’Connor embraced the fledgling cartridge, taking in from the deserts of Arizona and Mexico to the wilds of Canada, and most places in between. His writings in Outdoor Life—in an era where the opinion of a gun writer carried more weight than it seems to today—propelled Winchester’s cartridge into the annals of history, and O’Connor seemed to guarantee the future success of the cartridge.
For the handloaders, a .270 Winchester and a 130-grain Nosler Ballistic Tip makes affordable and highly potent whitetail medicine. Photo: Massaro Media Group.
Making good use of the original 130-grain load—with a muzzle velocity of 3,160 fps—O’Connor waxed poetically about the cartridge, ushering in the era of speed, in complete opposition to the heavy-and-slow mentality of the era. Readers followed suit, and it turned out that the .270 Winchester made one helluva whitetail cartridge. The rest is essentially history, because the generation of O’Connor readers took the torch and ran with it. Because it was so popular, it was readily available, and because it was readily available, it remained highly popular.
Truth is, the cartridge is a sound balance of velocity, striking energy and manageable recoil. The .270 Winchester has the attributes desirable for both Eastern deer hunters and Western hunters after mule deer, pronghorn and, yes, despite so many arguments, bull elk. As the cartridge aged, bullet technology only improved the capabilities of the cartridge, and today—in spite of the developments in cartridge, bullet, and optic technology—it still works just fine.
Despite a couple attempts at dethroning the king— namely in the .270 Weatherby Magnum and .270 Winchester Short Magnum—the only real threat to the .270 Winchester is the 6.8 Western, which employs a faster twist rate to utilize bullets heavier than those normally associated with the .277-inch bore.
And, although I’m a big fan of new cartridges, I don’t think the .270 Winchester will ever be unseated.
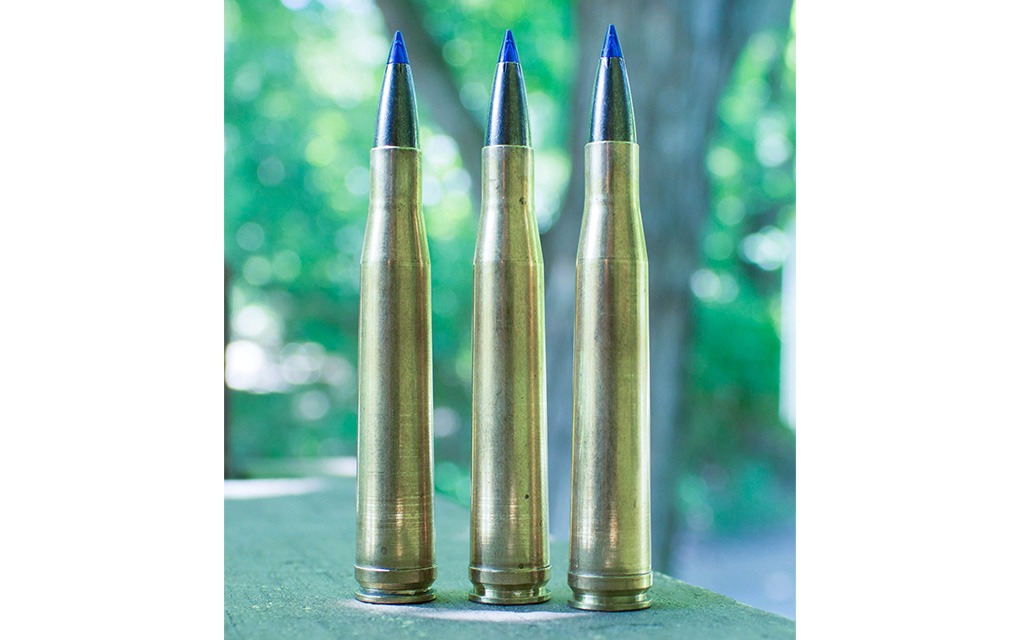
.300 H&H Magnum
Whether on the African plains, the deep woods of the Northeast or the Rocky Mountains, the .300 H&H is right at home. It makes a great all-around rifle chambering. Photo: Massaro Media Group.
Crossing the “pond,” the prestigious London firm of Holland & Holland announced the arrival of the .300 Holland & Holland Belted Magnum—the Super 30—in 1925. The fourth in the H&H line of belted cases—following the .375 Velopex, the .375 H&H Belted Magnum and the .275 H&H Belted Magnum—it mated the successful .375 H&H Magnum case with the .30-caliber bullets of the .30-40 Krag and .30-06 Springfield.
The first commercially successful .300 Magnum, H&H’s cartridge used the 2.85-inch case and 3.60-inch overall length of the .375 H&H Magnum, best housed in a magnum-length receiver. Factory ammunition saw a 180-grain bullet sent at a muzzle velocity of right around 2,700 fps—seemingly loaded down to the level of the .30-06 Springfield in anticipation of the effects of the heat of the tropics on Cordite—but handloaders could easily beat that figure.
Holland’s Super 30 is immediately recognizable, with its signature belt of brass and slight, sloping shoulder. Photo: Massaro Media Group.
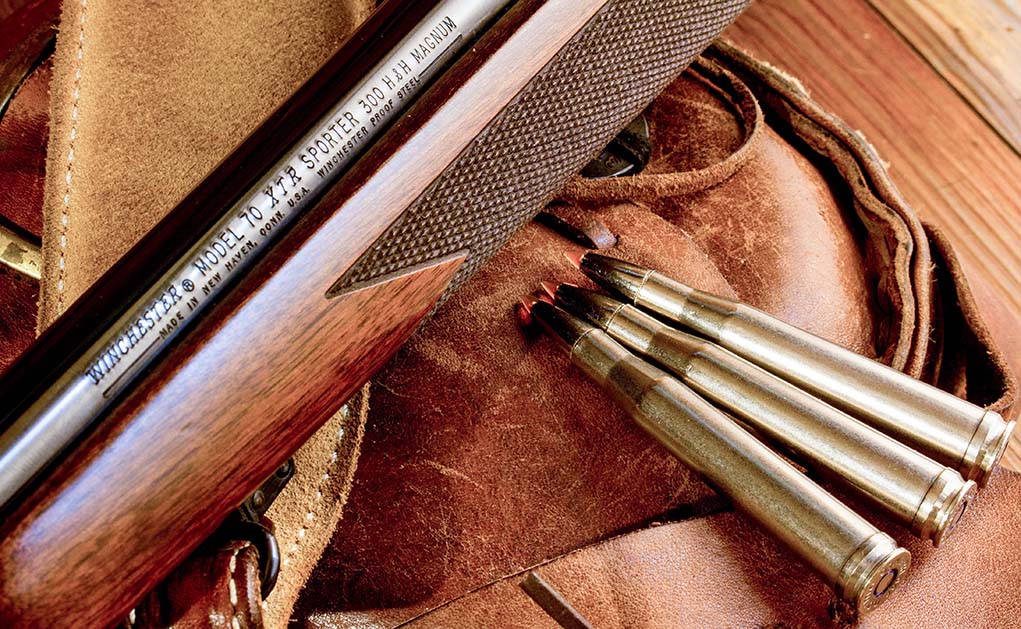
The .300 H&H, like the .375 H&H, was picked up by Winchester, Western, Peters and other ammunition companies, with Winchester and Remington offering American-made rifles. In fact, in 1936 Winchester offered the .300 H&H Magnum in the initial release of the Model 70, and Remington’s 722 was embraced by many hunters as well. Ben Comfort used the cartridge to win the Wimbledon Cup—the Camp Perry 1,000-yard shooting competition—with a custom Griffin & Howe Remington 30-S rifle, proving the capabilities of the belted beast.
In the hunting fields, many successful reports drew attention to the magnum—whether or not that was a placebo effect—and the three initial loads featuring 150-, 180- and 220-grain bullets covered nearly all the bases in the big-game world, save the true heavyweights. As powder technology improved, the .300 H&H just got better, with ammunition seeing the 180-grain slugs pushed to a muzzle velocity between 2,850 fps and 2,950 fps in modern ammo. The slight 8½-degree shoulder allows the cartridge to feed ever so smoothly, while the belt of brass just north of the extractor groove handles the headspacing duties.
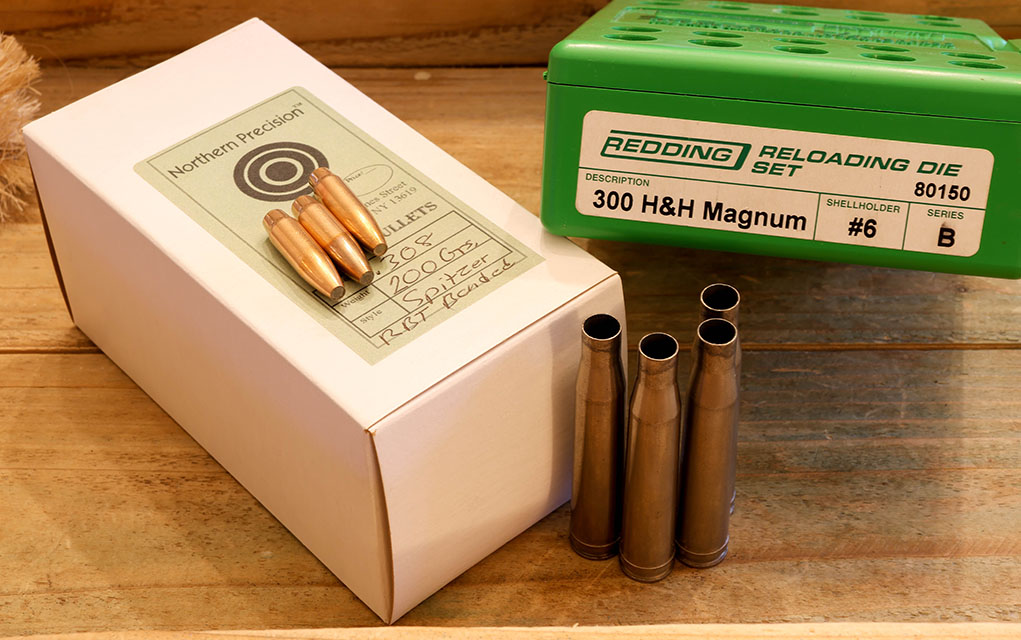
With factory ammunition choices quite limited these days, handloading for the .300 H&H sure makes sense. The author’s rifle is fond of these Northern Precision 200-grain spitzer boat-tails. Photo: Massaro Media Group.
For those who might be recoil sensitive, yet are interested in magnum-level performance, the .300 H&H makes a fantastic choice for a hunting cartridge. I have found that, among the myriad choices of .300 magnums, the ,300 H&H is among the easiest on the shoulder, yet offers solid field performance. Yes, John Nosler was carrying this cartridge when the 1940s bullet technology let him down hard on a Canadian bull moose, but modern bullets have done nothing but help the century-old cartridge. I have taken the .300 H&H Magnum across the pond on a couple of safaris, not to mention hunting here in the United States; it has been good to me in a number of different scenarios. From whitetail deer in my native New York, to Hartmann’s mountain zebra, red hartebeest and eland in Africa, the cartridge has yet to let me down.
The author took this respectable red hartebeest bull at 250 yards in central Namibia, putting him down with a single shot from the .300 H&H Magnum. Photo: Massaro Media Group.
I’ve had a couple of rifles chambered for the excellent cartridge, including a 1959-vintage Colt Coltsman bolt gun, which my wife used to take a great blue wildebeest bull, and my current love, a mid-1980s Winchester 70 push-feed with one of the most beautiful pieces of flamed walnut I’ve ever encountered in a factory stock. The latter rifle prefers bullets with lots of bearing surface and will put three Nosler AccuBond 200-grain bullets into ¾-inch groups all the livelong day.
The Athletic Younger Brother
Marketing being a funny thing, Winchester’s own .300 Magnum is what pushed the H&H design out of the limelight. The shorter case of the .300 Winchester Magnum allowed it to be housed in a budget-friendly long-action receiver, while the ballistics of the younger case actually bettered those of the .300 H&H.
In spite of the large number of modern .300 magnums that have come to light in the past quarter century, the .300 H&H Magnum still has that “cool” factor; whenever I pull mine out at a range session or on a hunt, guys look on wide-eyed. I’ve had more than one African Professional Hunter ask to shoot my rifle or beg a cartridge for their collection. Does it make financial sense, being a rarity these days? Probably not, but there are no flies on the ballistic formula, and I will happily attest to the fact that no animal has ever been able to determine whether I was carrying a .300 H&H or a .300 Winchester.
The slight shoulder, the long, tapered case and the history that comes attached to Holland’s little gem all combine to offer an undeniable classic rifle experience, harkening back to an era when “300 Magnum” was inscribed on the barrel, and shooters knew it was a .300 H&H Magnum, as there was no commercial offering before 1963.
The author’s current .300 H&H rifle: a mid-1980s Winchester push-feed Model 70, gifted to him by a friend, and it’s become one of his favorites. Photo: Massaro Media Group.
Whether loaded with modern polymer-tipped boat-tails or a good old round-nosed thumper of a bullet, the .300 H&H is equally at home in the woods of the East in pursuit of whitetails or black bear, as it is on an elk hunt in the Rockies, or in a leopard blind in the Zimbabwean lowveld.
With modern factory ammunition choices being limited, handloading is assuredly the way to keep your .300 H&H properly fed. It seems to be a forgiving cartridge, as you can use a good number of common propellants, and the choices of component bullets are nearly limitless. Grab a good set of dies and source enough brass to keep yourself in business, and you can hunt the rest of your days with a .300 H&H Magnum. I like a 180- or 200-grain bullet for most applications, though the .300 H&H Magnum will handle the 150-grain bullets very well, unlike many other .300 magnum cases.
Time Marches On
So, with all the progress we’ve made over the last century in case, powder and bullet technology, why in the world would a new hunter even consider one of these centennial cartridges? Well, both possess the attributes that any hunter would appreciate, giving a blend of usable features, and both have the pedigree to create that inexorable tie to the past that hunters crave so much.
And, frankly, both of these work—at normal hunting ranges—just as well as anything that has come along in the century since they were introduced. Neither was designed for dedicated target cartridge, though both have the capability to deliver fine accuracy.
Happy 100th birthday to the .270 Winchester and .300 H&H Magnum … and to many happy returns.
Editor’s Note: This article originally appeared in the July 2025 issue of Gun Digest the Magazine.
Laser Ammo has just added a 2011 model to its lineup of laser training pistols based on an AW Custom HX26 Compact Hi-CAPA recoil pistol.
The more you can train with your handgun the better, but bullets are expensive and going to the range takes time. Solution? Laser trainer pistols that allow you to hone your skills at home. Laser Ammo has an extensive catalog of different models, but the company has just added a 2011 as well to meet the demand for this increasingly popular pistol model.
Like Laser Ammo’s other recoiling training guns, they built it by converting an airsoft gun, in the case of the 2011 they used an AW Custom HX26 Compact Hi-CAPA recoil pistol. Powered by green gas, the pistol’s slide recoils when fired. Combined with the full-metal construction, this is about as close as you can get to the feel of firing a real 2011 without gunpowder involved. It’s designed for use with either Smokeless Range or Laser Ammo reactive targets, is available with a red or infrared laser and is adjustable for both windage and elevation so you can ensure that your laser training will translate to shooting your real 2011.
The 2011 laser trainer appears to be optics-ready, but neither Laser Ammo nor AW Custom specify what footprint the mount is. However, the pistol does have an accessory rail and a flared magwell for quicker reloads.
Patrick McMahon, a member of Laser Ammo’s Mil/LE sales team and the head of Laser Ammo’s competition division said this about the new 2011:
After checking various other 2011-style firearms, Laser Ammo chose the HX26 “Match King” specifically, as it was decidedly the best fit for our customer’s needs … The 2011 is a popular gun with competition shooters, as it is red dot ready. The gun delivers an unmatched level of realism when combined with our advanced training solutions. We believe it will exceed the expectations of serious shooters seeking reliable, high-quality training tools and will prove to be the top-tier choice on the market.
The Laser Ammo 2011 training pistol has an MSRP of $440 and is available now.
Recoil Offgrid Undisclosed is a one-of-a-kind immersive event designed to test the participants limits of preparedness, tactical knowledge, and problem-solving under high-pressure scenarios.
Training is Valuable, Experience is Better
Having the access to some of the most respected elite trainers the community during a training single event presents an incredible opportunity for any preparedness enthusiast, but putting that training to the test truly solidifies the lessons!
Undisclosed takes the typical training-followed-by-practice method to the next level by plunging participants into a dynamic, evolving narrative that challenges them to apply what they’ve learned in a high-stakes, real-world scenario that takes place across several days. From the moment they arrive, participants will have no idea what to expect.
Expect the Unexpected
Undisclosed challenges participants to not just use what the skills they learned but also plan, act, and react to an ever evolving scenario packed with all the obstacles that can occur in a real life clandestine mission.
Nothing about Undisclosed will be easy. Participants will face unknown terrain, unpredictable weather conditions, the heat of the day, and the darkness of night to accomplish their goals and that is just the beginning! Participants will be pushed to their limits throughout the scenario. testing not just their hard earned skills but their ability to work as a team, make critical decisions under pressure, and properly execute tactical operations – and failure will have consequences!
The Details are Undisclosed
We have provided a vague description of what to expect at Recoil Offgrid Undisclosed, and that is all you will get until after the event! Not even the chosen participants will have full awareness of the itinerary or when the training ends and the scenario begins.
Every element of Undisclosed including the location, training professionals, support personnel, and equipment has been carefully selected and vetted by our team to not just convey valuable skills, but also provide the most immersive and memorable training experience the participant’s will ever have!
Skills Are Not the Only Reward
Developing valuable skills that can save your life in a real world emergency and participating in a unique scenario with some industry elites is a reward in itself, but there is more! All participants will have their activities featured here at Recoil Offgrid and through our other magazines, social media channels, and video platforms.
Participants will also get their hands on some of the hottest gear from top industry brands, and their may even be some rewards for exceptional performances – but as expected those details are undisclosed!
Your Mission is Undisclosed
The high-level nature of Undisclosed results in an extremely limited participant spots and the competition for selection will be fierce. If you are ready to join the elite and face the unknown, check the link below and apply. Even if you are not selected for this mission there will be opportunities to participate in future Undisclosed Events.
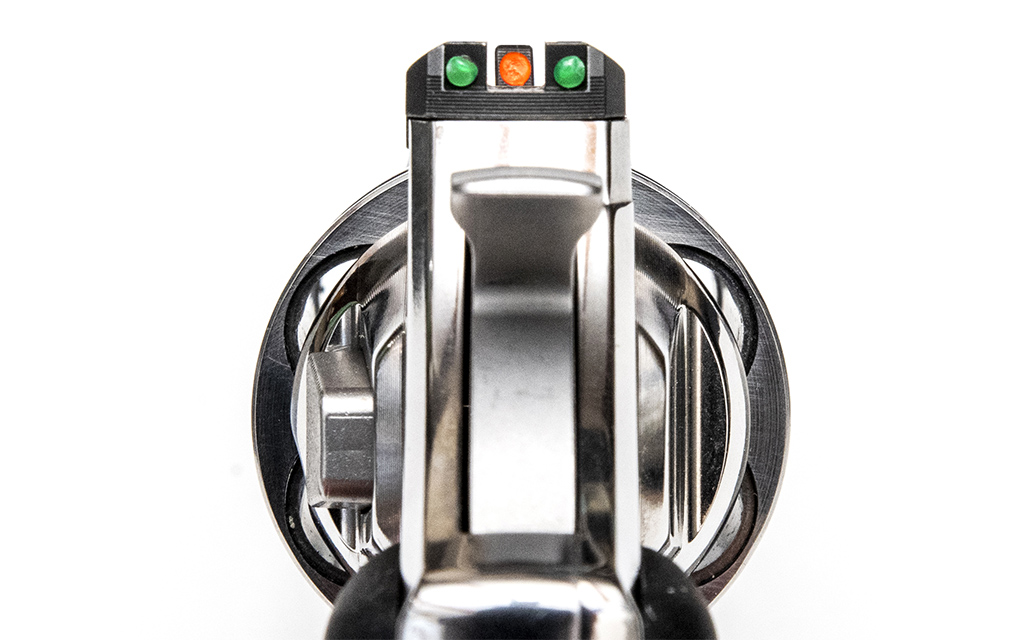
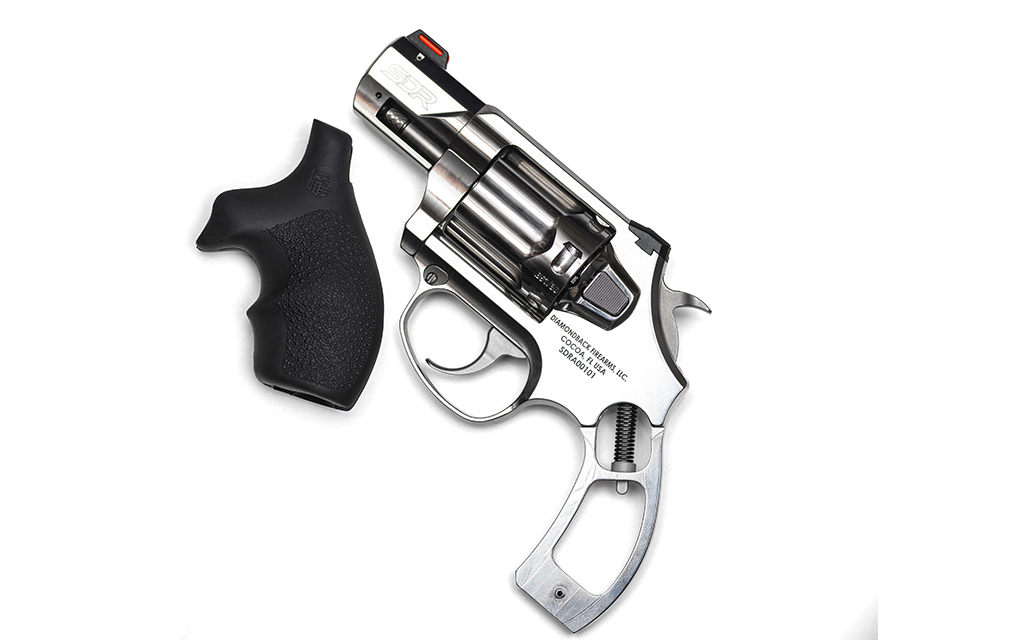
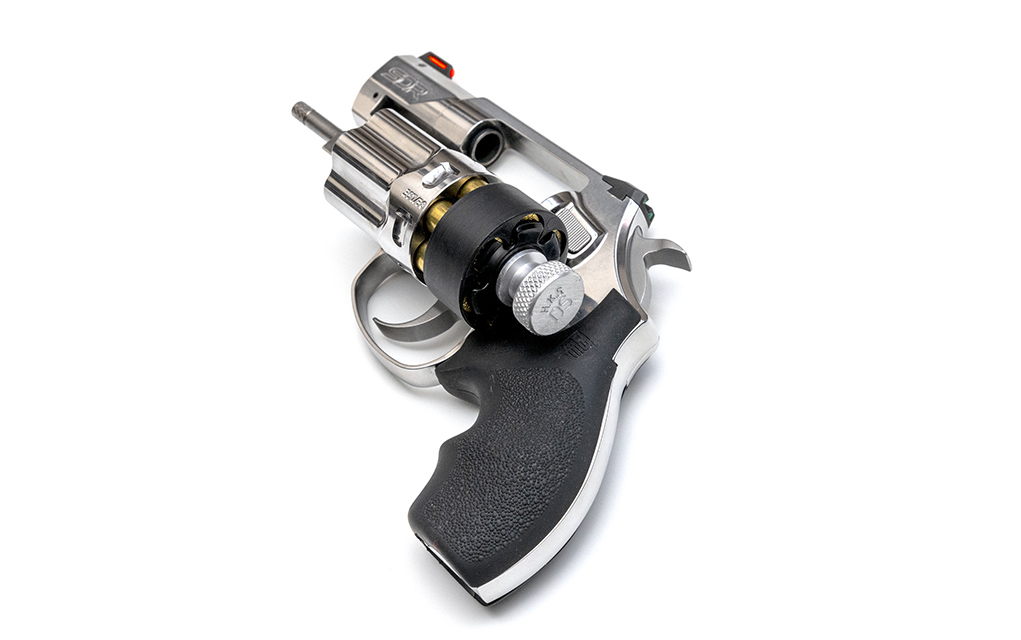
I hit the range with a Diamondback SDR in .357 Magnum to see how the Self-Defense Revolver really handles.
Diamondback has been in the manufacturing space for decades and producing their own firearms since 2009. A believer in American production, Diamondback Firearms brings groundbreaking designs to market (a 5.7mm PDW, the DB57, was featured on the cover of sister pub RECOIL Magazine Issue 53) in quantity and at prices people can afford.
Diamondback started their revolver journey a couple years ago with what many would consider a toy: the Sidekick series of .22 wheel guns. Instead of six rounds, they take nine. Instead of one caliber, they come with two cylinders (.22 LR and .22 WMR).
The folks at Diamondback took some lessons learned there to bring us their latest: the Self-Defense Revolver (SDR)
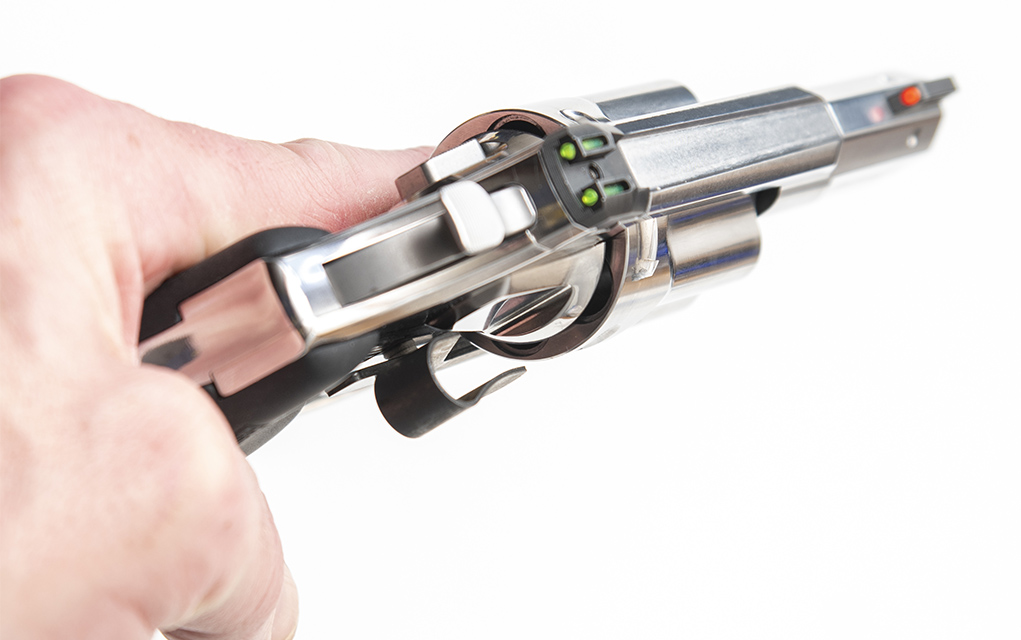
The cylinder disconnect is just above and forward of the trigger. It’s easy and you’ll never hit it by accident.
In late 2021, lead designers Stuart Braudrick and Dave McCabe began sketching out their self-defense revolver concept. The SDR idea emerged from collaborative brainstorming; inspired by traditional wheel guns, but enhanced by modern innovation for performance and aesthetics. Since those early days, many team members at Diamondback have contributed to the refinement and success of the SDR.
The Diamondback SDR you see on these pages is technically a preproduction, but only just technically. There are no anticipated changes between our example and the one on the shelf in your local shop; the difference mostly comes down to ours not coming with a manual.
Firearms manufacturers often use code words. “Tactical” means that it comes in matte black or baby poop brown. Marketed to women? Shrink it and pink it. Self-defense? Ugly or unrefined, but with claimed reliability. The SDR has self-defense right in the name, but it’s far from crude.
The OEM fiber-optic sights are bright, eye-catching, and easy to track under recoil.
What is the Diamondback SDR? A gun that looks like a classic Smith & Wesson J-frame in the hand. But instead of five shots, there are six. Instead of .38 Special, it’s .357 Magnum. Instead of a basic blade sight, there are dovetailed fiber-optics.
The stainless-steel is smooth, beautiful, and highly polished (enough to make taking pictures of it a pain!). And it’s all finished off with a Diamondback-marked Hogue rubberized grip.
But if you don’t like Hogue, no worries. The Diamondback SDR is compatible with J-frame grips so you go as classy or as trashy as you’d like.
The SDR accepts J-frame grips but the OEM Hogue is very nice.
Trigger
The universal comment of the SDR while on the range was about how excellent the trigger is. Diamondback describes the trigger as match grade, but that’s underselling it—it’s downright indulgent. The trigger doesn’t stack; there’s no sudden weight increase at the end.
However, you can feel a “stop” before the break, not unlike a good Smith & Wesson trigger. It’s immediately recognizable and consistent. All told, the double-action pull is a smooth 10 pounds. If you thumb the hammer back for a single-action shot, you’re gifted with an extremely short (measured in the hundredths of an inch) pull that breaks just a hair under 3 pounds. The SDR might just be the best factory snubby trigger out of the box. You can do better, but you’ll have to go custom to do it.
Controls
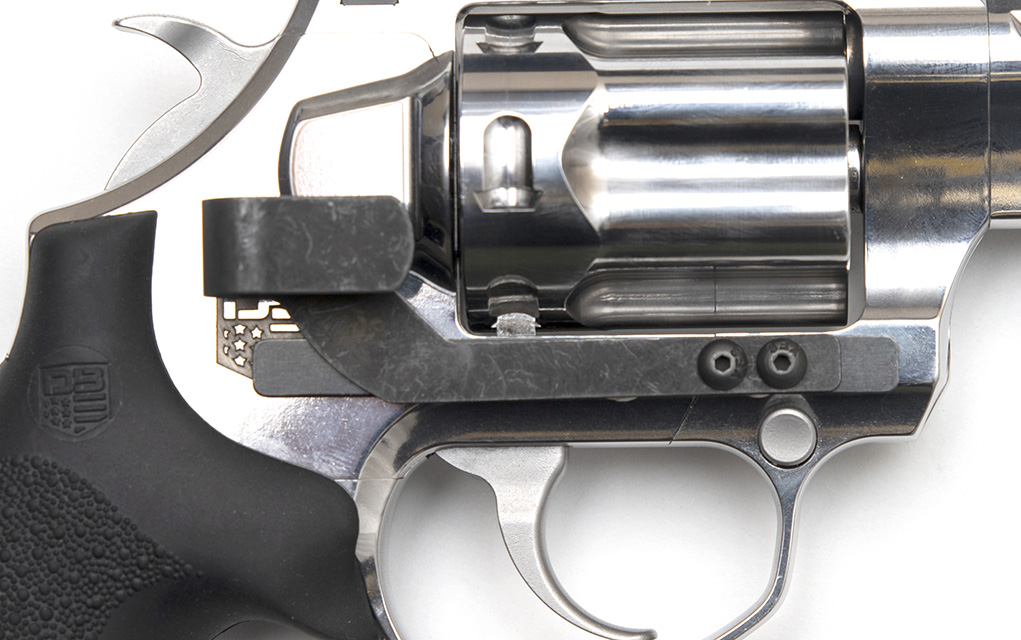
One of the nice parts about developing something new is that you get to make some decisions. Controls can be a funny thing, and a great many debates have been had about push-versus-pull cylinder releases. Diamondback said screw those, and instead of copying Smith or Colt, we commend Diamondback for aping Ruger’s push-button release.
The cylinder release is a simple push button and very smooth.
But there’s another curious button on the right side, just above and forward of the trigger. This one is for removing the cylinder entirely, a trick Diamondback learned with their Sidekick. While someday Diamondback may sell spare cylinders (we had visions of using them for rapid reloads just like on some 19th century single-actions), this is mostly for ease of cleaning and other maintenance.
As a nice note, with the cylinder not in place (either for reloading or removed), both the trigger and hammer lock up.
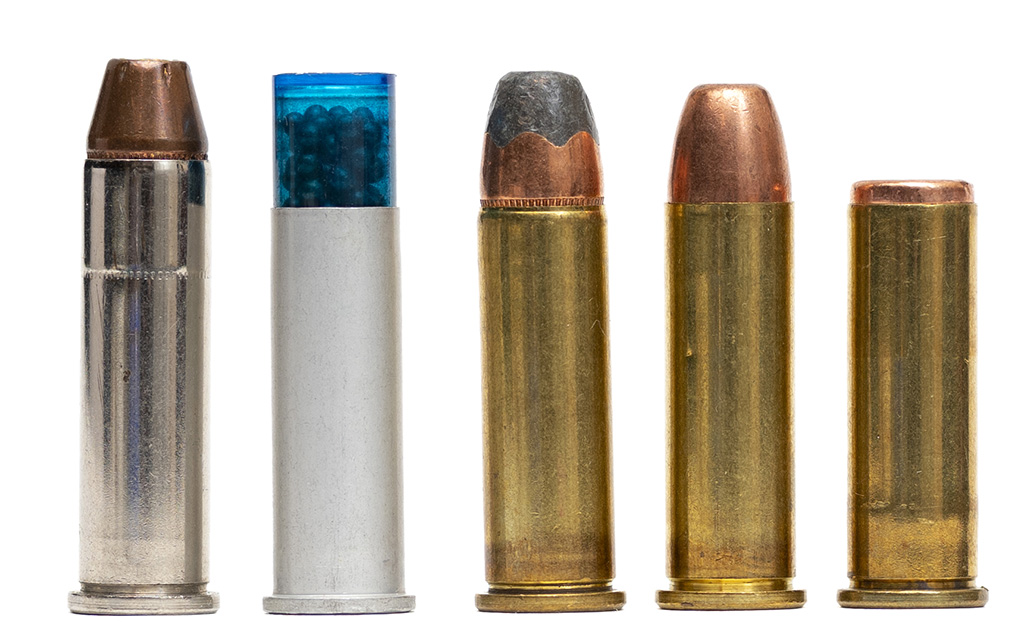
Caliber
The .357 Magnum was developed in the early 20th century essentially as a hot-rodded .38 Special. Because the newer .357 has more ass than the parent cartridge, the brass gained an extra eighth of an inch to prevent chambering in older guns. By nature of design, ammunition fired from revolvers performs under their potential; a great deal of gas escapes in the gap between the cylinder and barrel (and also the reason why revolvers, unless modified very particularly, are terrible with silencers).
To really see the advantages of .357 Magnum over .38 Special from a revolver, you need a barrel length of 4 inches or more. Or put another way, a barrel twice as long as the SDR. Granted, more is still more—but along with that marginal velocity increase from a short barrel, the flash and felt recoil also ramp up considerably.
While the typical plan for a .357 revolver is to practice with .38 Special and carry the Magnum, here it’s probably best to carry a stout .38 +P round instead (but keep some .357 on-hand for range time with friends).
One of the advantages of revolvers in general is that the ammunition selection doesn’t matter as much in terms of function of the firearm. You can feed it everything from underpowered shotshells to supercharged magnums without complaint.
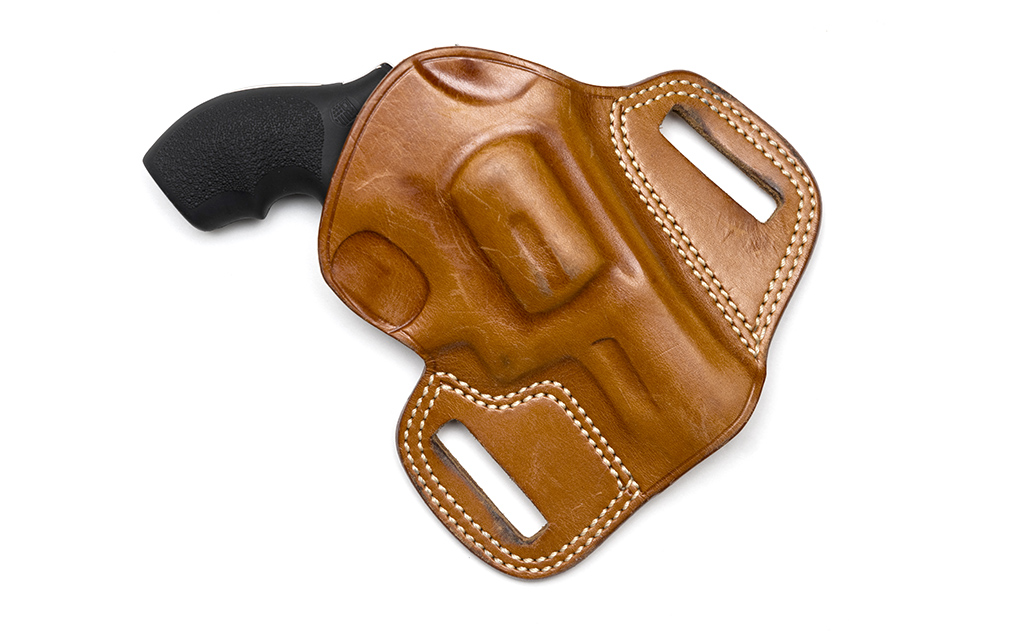
Diamondback SDR Holsters & Accessories
Holsters are a continual problem for new guns in general, but frankly it’s not so bad when it comes to revolvers. While you might get the Diamondback SDR into a Kydex or other thermoplastic holster mean for a five-shot .38 Special, you can definitely get one inside the great many leather options out there.
And even still, while we wouldn’t be the first ones to advocate for a clip-type holster for a semi-auto, it can be a different story when it comes to revolvers. While the trigger on the Diamondback SDR is incredibly smooth, it still takes a double-digit pull and a considerable amount of travel to touch it off when in double-action mode. Which is to say, these guns are much safer (rather than “safe”) than striker-fires inside the pants, purse or pocket even if the trigger ends up exposed.
While the SDR fits a great many things intended for the J-frame, the ClipDraw itself isn’t one of them because of dissimilar screw placement (though they have a universal with 3M adhesive—which might be worthwhile if you prep it properly). As the SDR accepts J-frame grips, other options include the DeSantis ClipGrip and the Barami Hip-Grip.
A universal Clip-Draw works with the SDR but certainly isn’t aesthetic.
No, there are no provisions for weapon-mounted lights on this one. But yes, you can still get one in the form of weird grips like the Hyskore. Laser grips like Crimson Trace will also work but you may have to look elsewhere for ones that bolt to the frame.
If you’re not a fan of the fiber-optic sights, Diamondback has already been working with some aftermarket companies to increase your options. A little MRDS would be hot fire, and it certainly wouldn’t be difficult to make an adapter.
HKS DS-A speedloaders work great, and of course speed strips can be used too.
In terms of reloads, we know the cylinder swap is out (for now) but you still got options. You can use flat speed strips, which are great in the pocket but universally slow. For speedloaders, the HKS DS-A is compatible, as is the 5 Star D6-357/38, and the Speed Beez for the Kimber K6. Undoubtedly more as well, but these we can confirm.
The Future & Loose Rounds
The Diamondback SDR meets or exceeds everything you’d ask for in a snubby. There’s just something about a nice revolver, done right. The polished stainless steel of the SDR enhances the je ne sais quoi, and even the black rubberized grips in lieu of hardwood seem perfectly in place.
It’d be really great to see a factory dot option in the future, or at the very least an adapter. This gun is practically begging for a bobbed or concealed hammer model, especially with the slick-smooth double-action trigger. And although they don’t see as much use in the 21st century, an SDR with a barrel long enough to take advantage of .357 ballistics would be welcome, at least for those who want to play space-cowboy-future-Dirty-Harry, or the hunters among us.
When we asked about these features, Diamondback told us, “All of these are potentials. We are committed to making a name for ourselves in the revolver world, first with the Sidekick two years ago, and now with the SDR. We have no plans to stop.”
No plans to stop? Hot damn—we’re here for it.
Pros
Amazing trigger
Good Ruger-style cylinder release
An overall well-made revolver
Cons
Not optics-ready
No bobbed hammer option
No long barrel options
Diamondback SDR Deals
Midway USA
$648
Battlehawk Armory
$684
Editor’s Note: This article originally appeared in the August 2024 issue of Gun Digest the Magazine.
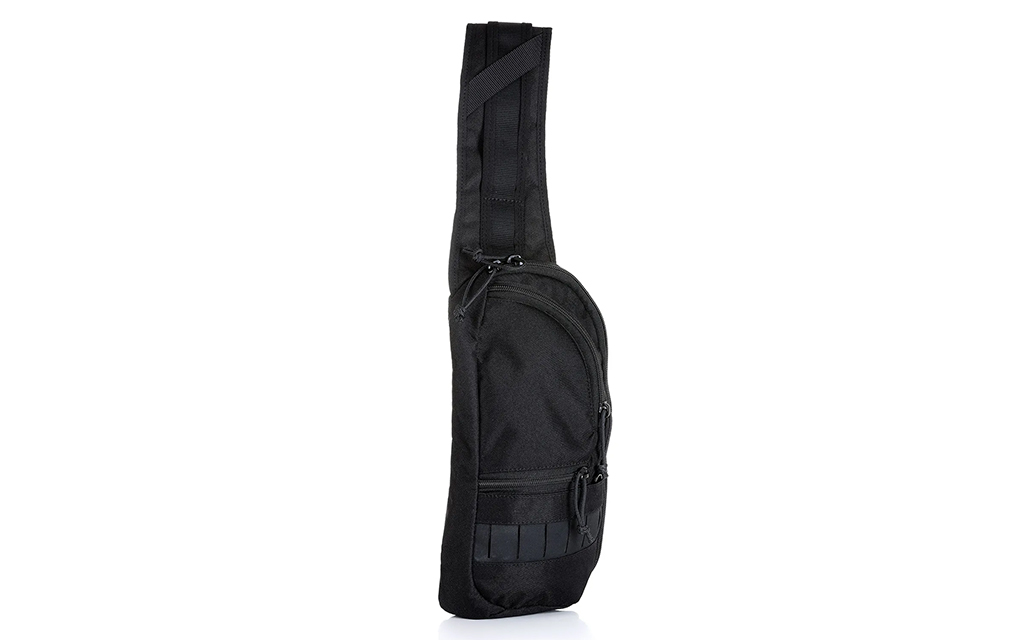
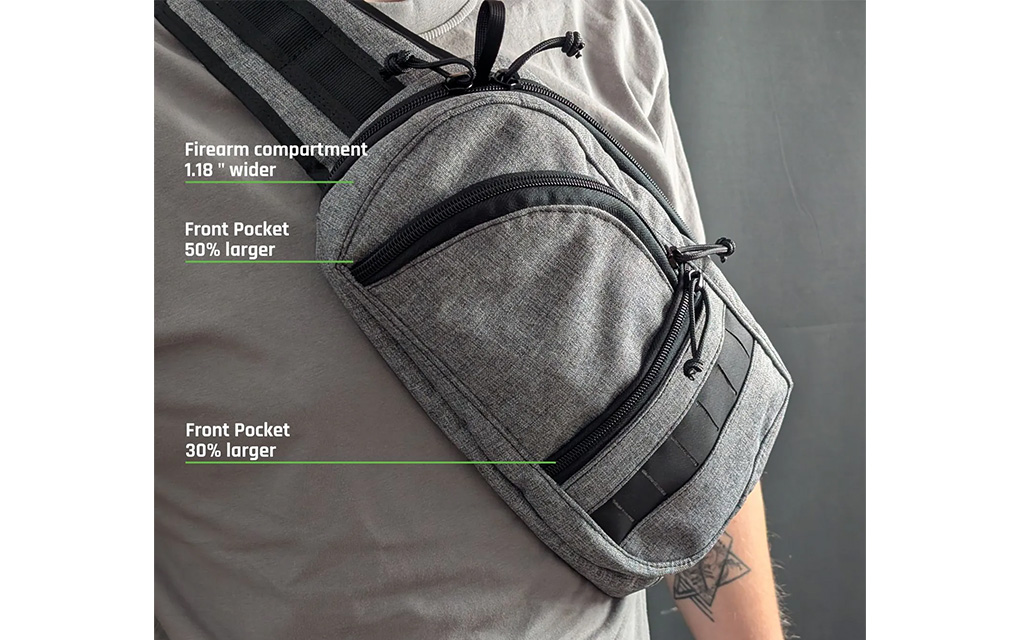
FALCO Holsters has just upgraded its G122 Sling Bag to make it even easier to draw a concealed handgun.
We’ve discussed the benefits of fanny pack carry before, but the reality is that a lot of guys just don’t want to be seen wearing a fanny pack. For many, a decent alternative for off-body carry may be the sling bag. FALCO Holsters offers the G122 Sling Bag designed just for that purpose, and the company has just upgraded it based on user feedback.
Comfortable, discreet and available in multiple colors, the G122 Sling Bag has been made larger to accommodate a wider variety of handguns and facilitate an easier draw. Compared to the original, the firearm compartment is 1.18 inches wider, and the two zippered front pockets have been made significantly bigger as well for carrying everyday items. Other features worth mentioning include the bag and strap’s anti-slip rubber lining, the removable elastic holster that can accommodate guns with lights or lasers and MOLLE on the front for attaching additional gear.
Robert Kovac, CEO of FALCO Holsters, said this about the improved sling bag:
At FALCO, we constantly refine our designs to improve the daily carry experience of our customers … Sometimes that means upgrading a proven concealed carry bag, and other times it means developing entirely new innovations such as our carbon fiber or 3D-printed holsters. In every case, the goal is the same: to bring practical value to the people who trust us with their protection. That’s why we listened, refined, and relaunched the G122 with purpose, and without increasing the cost.
The upgraded FALCO G122 Sling Bag is available now and has an MSRP of $130.
What are the most popular firearms of all time? Here we discuss the guns that went platinum.
The boss asked me, “How about a musing on the most popular firearms of all time? Or the past century?”
OK, I’m game … but we have to have some rules here.
I mean, if we’re going to go simply by the number made, then the 1898 Mauser and the AK-47 are the tops of the top. But they were made in such volume because governments bought them. Popular had little to do with it.
So, “popular” in that they were something that people reached into their pockets and pulled out their own cash to buy is what we’re looking for here.
I used to work on radio broadcasting, where I first heard the “went platinum” term. That meant 1 million albums and 2 million singles. (There were other limits back in the old days, but the first million-seller was Glenn Miller. Yes, that Glenn Miller.)
So, million-selling firearms that people paid for with their own money. And if not a million, then a whole heck of a lot.
Remington 700
The Remington 700 is a simple manufacturing item, and it can be improved to the point where it is almost a different firearm.
The Remington 700 was an engineering marvel when it came out. Gone was the forged receiver that required a day’s worth of machining operations to craft—instead, a seamless steel tube, broached for rails and locking lugs, and threaded for a barrel. The recoil lug is simply a plate trapped between the screwed-in barrel and the receiver. Not only was it inexpensive to manufacture, but it proved to be eminently suited to “blueprinting.” This is where someone with precision machine tools makes butting shoulders square, threads concentric, locking lugs perfectly mating and everything that moves, smooth.
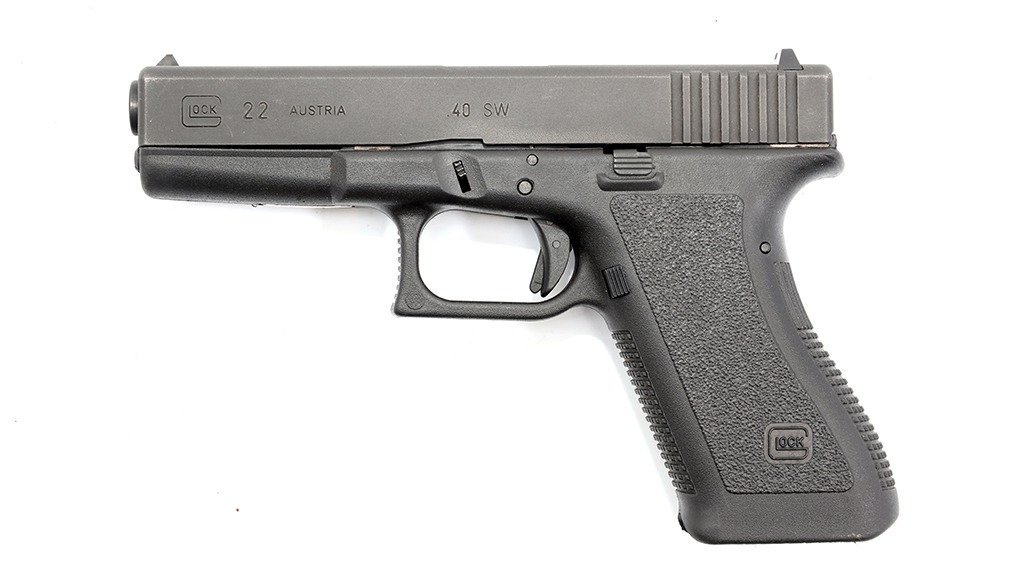
Made in the millions (5 at last count), it’s so popular that new, ultra-precision rifles are quick to mention “700 pattern” in the bolt and receiver.
Glock
The Glock, in all its variants, has been made for 45 years, and more than 20 million of them are to be found.
The Glock 17 started it, and the ease of production and low cost meant the Glock was going to be popular—so popular that it seems there is an entire industry devoted to making a close that is better. (And some, perhaps many, are.) Fiercely opaque about many things, the Glock company doesn’t shout out sales figures, but the import numbers have to be recorded by Federal regulation, and the serial numbers give a lot a way as well.
Starting with AAA001, that pattern alone meant they had made 1.7 million by the time they had to change the serial number pattern. Travel anywhere in the world, see a holstered pistol on a police officer, and it’s likely a Glock. Last I checked, it’s something on the order of 20 million.
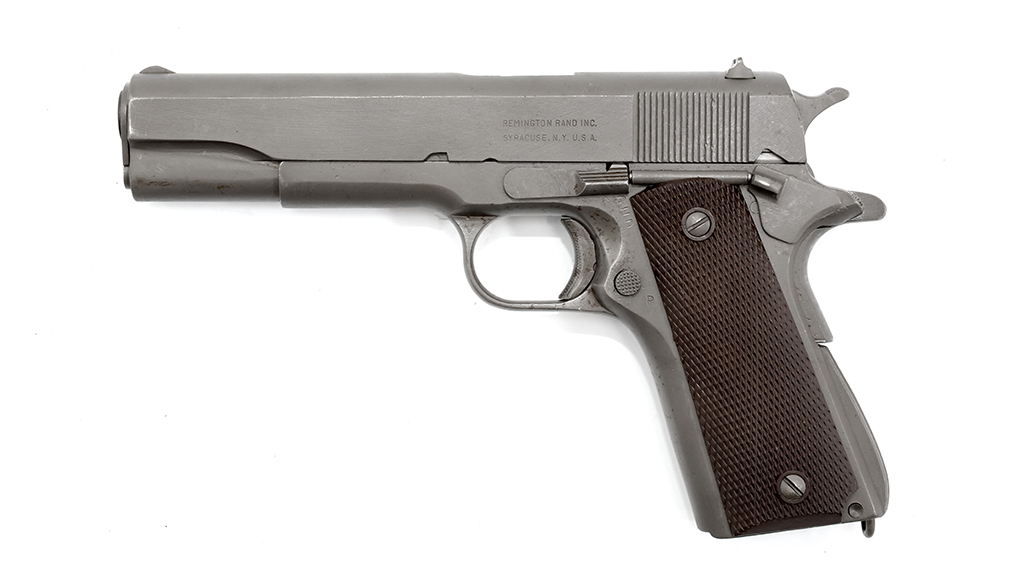
1911
The 1911 and the 1911A1 have been so popular that the production lines have never stopped. And the number of makers has only increased. A 1911 is a forever tool.
Yes, the government bought a bunch, but then we bought those from the government. The 1911 has been in continual production since it was adopted in 1911, and in the past few decades, there have been more makers of this design than ever before.
So great is the demand that there are manufacturers in Turkey, the Philippines and elsewhere that are making and shipping them to the United States. If you can find a gun shop that doesn’t have a 1911 in the display case made by someone, you have to wonder what they do sell. Ten million? Not unreasonable.
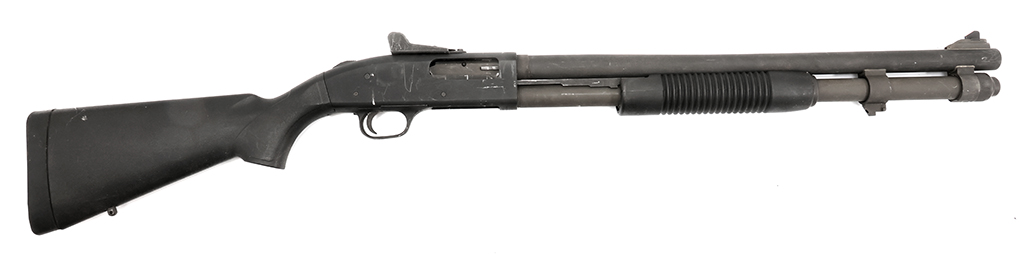
Mossberg 500
The Mossberg 500 has evolved into the 590, and has been bought by the military because a good shotgun is always a useful tool.
Starting in 1961, the Mossberg 500 offered advances and advantages not seen before, like the aluminum receiver and the safety on the tang, equally usable by both right- and left-handed shooters. The bolt locks to the barrel extension, so the receiver does not take any of the force of combustion, so it can be aluminum.
And barrels can readily be swapped. Add in the lower cost than the competitors of the time, and it is no wonder Mossberg was a hit, then and now. Then, they were adopted by the U.S. military, and the 500 just kept evolving. Last I heard, more than 12 million have been made … and more are pouring out.
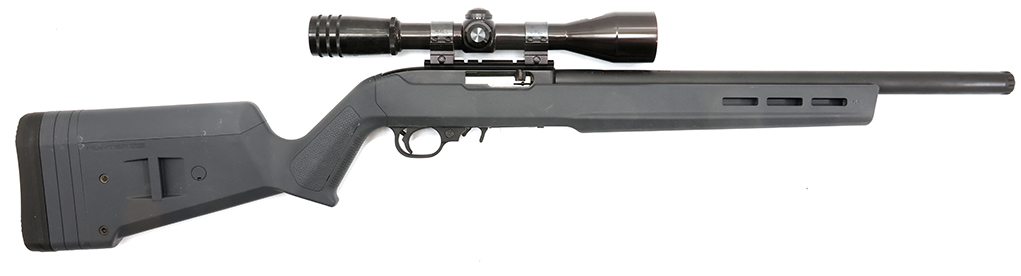
Ruger 10/22
The Ruger 10/22 is so common that you can even build one from parts, none of which were made by Ruger.
Before the Ruger 10/22, .22 LR semi-autos were finicky, hard to clean, not particularly accurate, and could not be serviced by the owner. The 10/22 changed all that. The rotary magazine made feeding ultra-reliable. The ease of disassembly and cleaning meant even more reliability. And once aftermarket makers figured things out, swapping stocks, barrels and triggers became a winter hobby.
From a short-range plinker, the .22 LR rifle could become a long-range target rifle. I’ve spent more than one afternoon tagging steel plates at 200 and 300 yards. The platform is so popular that you can now buy all of the parts, none made by Ruger, and assemble your own 10/22. Over 6 million served.
Remington 870
The Remington 870 is ultra-reliable. The author has won more than his fair share of loot in various competitions in the decades since he acquired it.
There was a time when “pump shotgun” meant “Remington 870.” Before the 870, a spare barrel also had to have the hardware for attaching it to the receiver as part of the swap. That meant extra expense. By locking the bolt to the barrel extension, Remington took forces off of the receiver and could make the barrel swap easier and less expensive.
From riot to Trap, with rib and bead or rifle sights, you could change your 870 almost daily. No wonder they’ve sold (well before bankruptcy, anyway) 11 million of them.
Ruger Standard
The Ruger MkIV, the latest iteration of the Standard that began it all in 1949.
Now up to the Mk IV, the Ruger pistol was the firearm that made Ruger. Another marvel of engineering efficiency and insight, the Ruger Standard was a Colt killer, a High Standard replacement, and a high-enough bar to future competitors that trying to compete is not an easy task. You can’t just offer up your take on a .22 LR pistol, and expect prospective buyers to not compare it to the Ruger MkIV next to it in the case. Now, the earlier models had a reassembly trick that was aggravating, but the MkIV solved that. And since it was introduced in 1949, Ruger has made over 3 million of them.
S&W K Frame
The S&W K Frame, this a Model 14, has been around since 1898 and deservedly so.
The K Frame has been with us since 1898, when S&W unveiled it in .32-20. The next year they added their own cartridge, the .38 S&W Special. The pair have been with us ever since. A K Frame made today, while some parts won’t fully interchange, is so much so the same as the first ones made that a pistolsmith who was working in the first Roosevelt era could work on one made yesterday and not be at all out of sync.
The K Frame is perfectly sized for the .38, and it’s an ergonomic marvel. If someone has the hand size big enough to handle a firearm at all, and the strength to handle a cartridge at all, they can handle the K Frame in .38 Special. Once fully adopted by police officers and departments (right after The Great War) it went on to serve for the next 7 decades without being seriously challenged. As a result, there have been some 6 million of them made … and S&W is still making them.
Remington 1100
Before the Remington 1100, auto shotguns were not common. Oh, the Browning Auto 5 was well-known, but it was expensive, it still hammered you in use, and it required some special maintenance in order to work well and not beat itself up. The 1100? Soft-shooting. And, like the 870, it was easy to swap barrels. The 1100 soon ruled the skeet and trap fields, and it was so common in duck and geese blinds that to show up with something else was to require explanations.
As a gunsmith, I could count on the time between Labor Day and Opening Day as “1100 time.” They would pour in, needing cleaning, rust removal, parts replacement and cracked wood repairs. Not because they were particularly fragile, but because there were so many, and they often led hard lives. Many were simply stashed away in the closet after duck season, and the next summer emerged needing work.
As to the volume, Remington made more than 4 million of them, and none of them seemed to ever be kept as safe queens. They all got used, and I felt at times as if I had worked on half of them.
AR-15
You thought I had forgotten this one, didn’t you?
Before the end of the 20th century, production wasn’t all that great, because we were still in the blued steel and walnut era … and not yet fully into the “ban all gun” era. Once it became clear that those who wanted guns gone wanted them all gone, starting with the AR-15, sales took off. (If you want to sell something to Americans, tell them they can’t have it, or someone wants to take it away.)
Since then, it seemed like each year was a new record-breaking production year. It’s not easy to pin down, but I’ve seen estimates as high as 25 million. And not a single one of those was made for government use, or paid for by the government. Each one was paid for with hard-earned cash by a U.S. citizen. So, winner and still champion, is the AR-15.
Others
Now there are some that deserve to be mentioned even though they don’t quite meet our rules. (Hey, I have to draw the line someplace.)
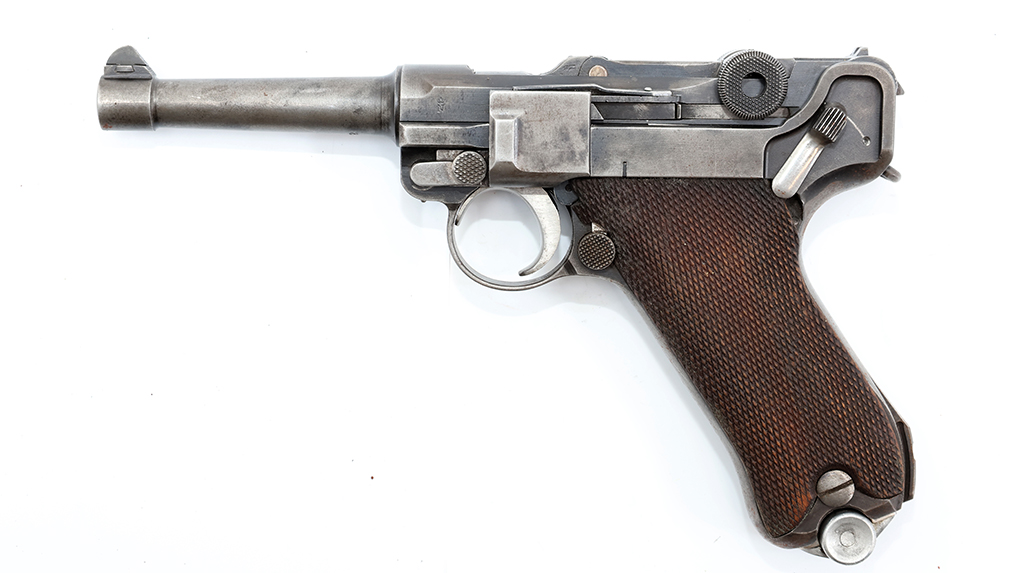
Luger
The Luger, while iconic, is an almost all a military-made product, and while there is lust, it isn’t a big seller.
Yes, this is iconic. There were 3 million made, but the vast majority of them were made for military use. Those that shooters here own were bring-backs, souvenirs and collectibles. No one uses them in target competition. No one uses them in practical shooting matches. No one selects a Luger to use as a daily-carry pistol, or as a home-defense pistol. Oh, I’m sure there are some being used that way, but that’s not the norm.
Many look longingly at a Luger, perhaps even lustfully. But few break out their wallet and buy one.
Browning Hi-Power
The Browning Hi Power is sought-after, but hasn’t quite gotten the love that so many other firearms received.
Another lustfully desired pistol, but not one that has been all that common, actually. The last of the John Browning designs, brought to fruition by Saive, suffered by comparison to the 1911. For a long time 9mm ammo wasn’t a first choice, and the Browning Hi-Power was only a 9mm.
Estimates of production are all over the map: A million-plus by FN in Belgium. But then there were the Inglis pistols, and the Indian Army made truckloads of them. Now, the Turkish firearms makers are offering better-than-ever BHPs, with harder steel and tighter tolerances than the classic FNs. This one is in an in-between status. Classic like the Luger, but with increased production and interest, it could make the leap up to the big list with the others.
Don’t Forget Military Guns
And what about the military-production firearms? The numbers are impressive, even a bit staggering. And also broad estimates, due to secrecy and wartime losses. So, the 1898 Mauser, in all its variants, numbers something like 30 to 40 million.
The AK-47, depending on who you believe, numbers more than 40 million, and perhaps more than 100 million. (No wonder you can’t turn over a rock without finding an AK buried under it.) Mosin-Nagant? Easily more than 30 million.
The M16 lifetime production run is closing in on 20 million, and that doesn’t include the AR-15. Also: Lee-Enfield, FAL, G3, Arisakas and Garands … all in the millions each.
Editor’s Note: This article originally appeared in the July 2025 issue of Gun Digest the Magazine.
Three lots of Magtech 5.56 have just been recalled, here’s how to check if your ammo is safe to shoot.
Magtech has just recalled three lots of 5.56 M193 ammo. Here is the full press release from Magtech that explains how to check if your ammo is affected by the recall:
Magtech is recalling three (3) lots of 5.56 x 45mm Ball M193 centerfire ammunition.
Symbol: 556A
Lot Number: CBC546/24
Lot Number: CBC591/24
Lot Number: CBC601/24
WARNING: Magtech has determined that the above lots of 5.56 x 45mm ammunition may contain incorrect powder charges. Ammunition with incorrect powder charges may cause firearm damage, render it inoperable, and expose the shooter and bystanders to a risk of serious personal injury or death.
DO NOT USE Magtech® 5.56 x 45mm Ball M193 SYMBOL 556A WITH LOT NUMBER CBC546/24, CBC591/24, or CBC601/24. The ammunition Lot Number and Symbol are printed on the top flap of the 50-round box as indicated here, for example.
To determine if your ammunition is subject to this notice, check the Symbol and Lot Number. If the Symbol is 556A and the Lot Number is CBC546/24, CBC591/24, or CBC601/24, immediately discontinue use and contact Magtech at 763-235-4000. Magtech will arrange for the return shipment of your ammunition, and upon receipt, will send you replacement ammunition at no cost to you.
This notice applies only to Symbol 556A with Lot Number CBC546/24, CBC591/24, or CBC601/24. Other Symbols or Lot Numbers are not subject to this recall.
If you have any questions concerning this 5.56x45mm centerfire ammunition recall or if you are unsure whether you possess any ammunition covered by this recall, please call 763-235-4000, write to Magtech (9100 Wyoming Ave N #515, Brooklyn Park, MN, Attn: Recall), or visit our website at www.magtechammunition.com.
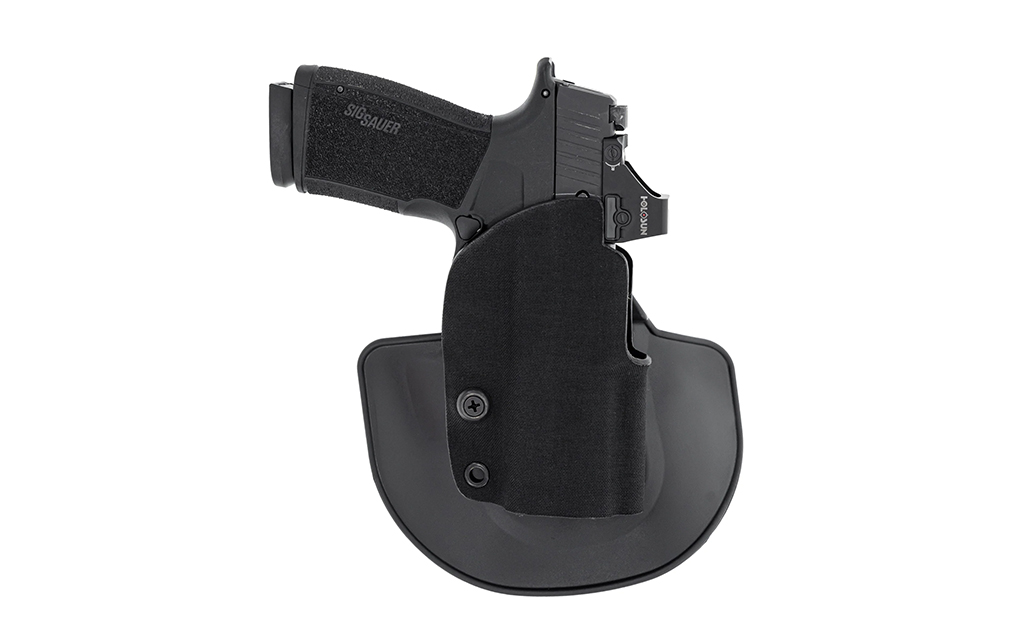
A quick look at Safariland’s new Gravity OWB holster, a lightweight retention holster for everyday carry.
For those with a preference for outside-the-waistband carry, Safariland has just released a new OWB holster called the Gravity. Featuring a streamlined, lightweight design, the Gravity holster was made to offer another comfortable everyday carry option for popular concealed carry pistol models.
The Gravity is a retention holster made from Safarilaminate with a Cordura exterior, and it comes mounted on Safariland’s 568BL injection-molded paddle. The Cordura wrap is also available in 8 different colors and camo patterns. The holster’s tension and carry angle cant are both adjustable and it features Safariland’s 3-hole pattern mount so it can be adapted for other carry methods as well. It can be ordered with an optics cutout and is available for several popular handgun models from Glock, Springfield Armory, Shadow Systems, Taurus, Wilson and Sig Sauer.
Eric Gasvoda, Vice President and General Manager of Duty Gear for Safariland, said this about the new holster:
With the Gravity, we wanted to offer more than just function … This holster delivers the trusted security and comfort our users expect—but with Cordura wrap options, it also allows them to express their own style without sacrificing comfort or performance.
The Safariland Gravity holster is available now in right-hand configuration only and it has an MSRP of $65.
Want to ensure that your EDC knife keeps its edge? Here we check out the DMT Glide-Pro pocket-size knife sharpener.
Knives are hazardous … and dull knives are particularly hazardous because you have to use more force to cut, and that means any error can lead to gashes.
The solution?
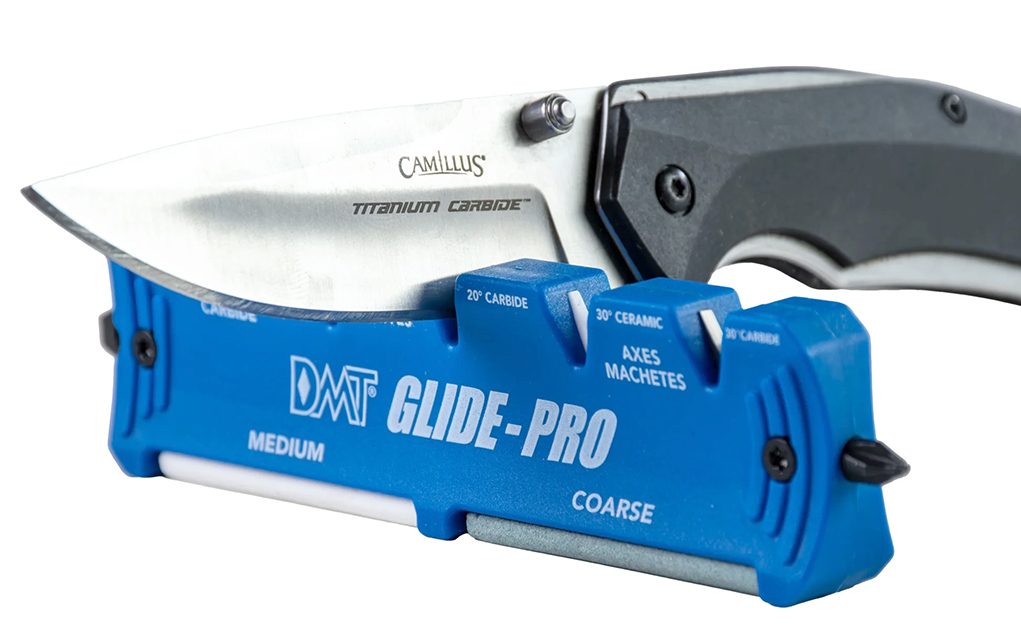
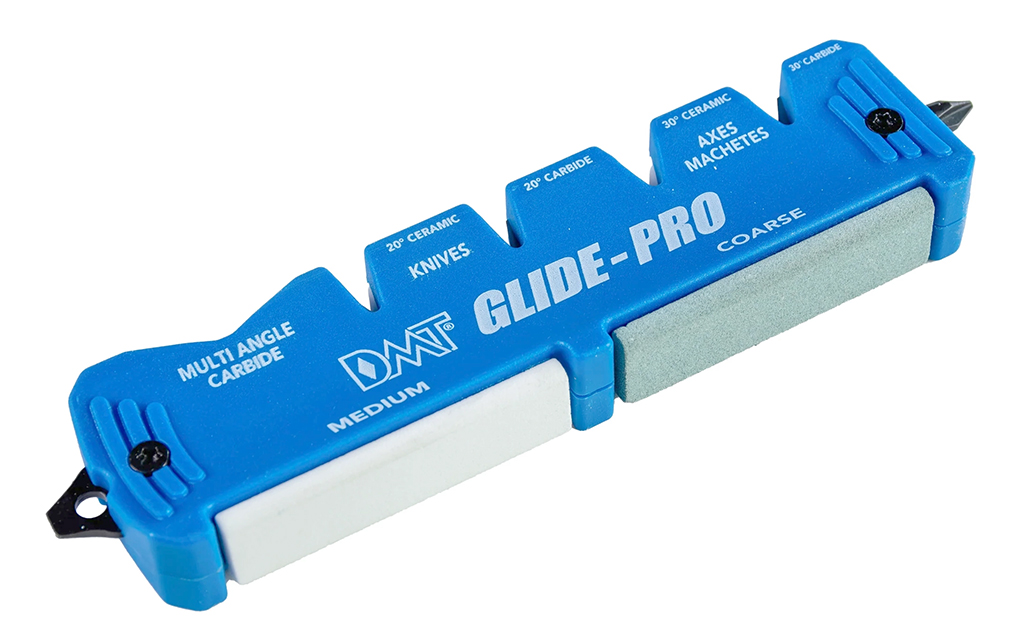
DMT, the maker of diamond-sharpening tools, has a pocket-sized sharpener so compact that you might lose it in your gear bag or toolbag: the Glide-Pro.
It has four angled pull-through sharpeners, a carbide and ceramic 20-degree, and a carbide and ceramic 30-degree sharpener. There are medium and coarse flat sharpeners, a carbide plate that lets you free-hand the angle you need, two stones on the bottom and the two ends feature one each of flat-blade and Phillips-head screwdriver.
So, if you have a pistol grip or such that is a tad loose, the Glide-Pro can tighten it for the next job. The flat-blade screwdriver end is also a lanyard loop, so you can keep it attached to the bag it rides in, and it won’t get lost. That could happen, as the Glide-Pro is only a bit over 5 inches long, and 0.5 inch by 1.25 inches in size. Yes, it fits into a pocket.
Now, if you’re resurrecting a dulled edge on a knife or an axe, this clearly isn’t the tool for the job. Oh, you can get it done, but DMT offers much better tools for those tasks. No, the Glide-Pro is the tool you have handy in your toolbag for when you realize the knife, axe or whatever you’re using is getting dull and needs a bit of tuning up.
The Glide-Pro is compact at just over 5 inches long. It’s small and inexpensive enough to keep in your gear bag for when needed.
While DMT makes a whole series of bench-mount and much larger tools, I can see the Glide-Pro being a lot more useful in the workshop. Yes, it’s a “hold with one hand, sharpen with the other” design, but it’s tough enough that you could gently clamp it in a bench vise and then use it to sharpen with.
A word about technique: pull.
You do not sharpen with a setup like this by sawing the knife blade back and forth across the V-gap. Set the cutting edge closest to the handle in the V. Draw it back in one smooth motion. As you do so, listen to the rasp of the cutting. (You can even use a Sharpie to darken the edge, and after the first pull, look at where the ink has been rubbed off.) You can hear the change in tone of the rasp as you cut more steel on each pass. When the tone doesn’t change, you have gotten to an equal edge along the blade.
You can also see sharpness. No, I’m not kidding. If you’re in good light (and have good eyesight), hold the blade point up with the edge pointing directly at you (not the point—the edge). You’ll then be able to see a flat on the edge where it’s dull. Where it’s still sharp (blades get dull where used and are still sharp where less used), you won’t see an edge. As you sharpen the blade, the flat will get shorter and shorter, or narrower and narrower.
The DMT Glide-Pro has multiple angles and options for sharpening up whatever it is you cut with.
To use the Glide-Pro, look at the edge before you start and then after each pull. With a bit of experience, you’ll be able to see the progression and know when it is sharp. None of this licking a thumb and rubbing it across the edge Hollywood nonsense. Use your eyes. Use the Glide-Pro.
And … you can get this for a list price of 18 bucks (and I’ve seen them online for $15). It’s inexpensive enough that when you lose the first one (or one of your buddies heists it), it isn’t a big deal to buy the replacement.
Editor’s Note: This article originally appeared in the July 2025 issue of Gun Digest the Magazine.
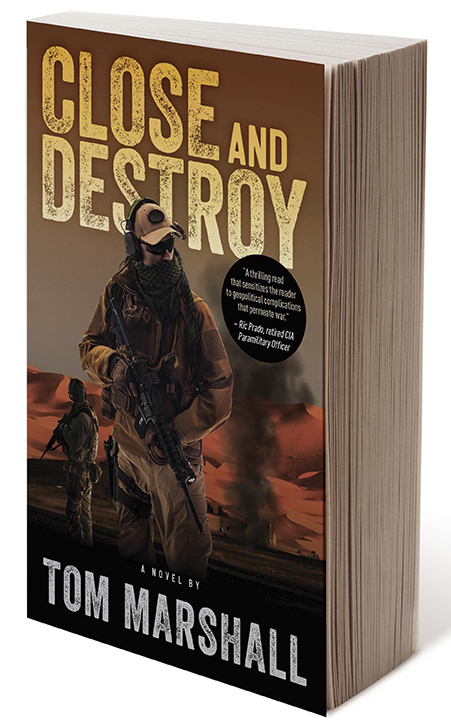
Enjoy military thrillers? Check out this excerpt from Close and Destroy, Gun Digest’s first feature-length fiction novel.
Earlier this year, Gun Digest’s parent publisher Caribou Media, LLC released its debut foray into commercial fiction, penned by former staff editor Tom Marshall. Some of you may know his byline from his Vets Vices column in RECOIL, or from his time as editor of RECOIL OFFGRID, but he’s also been harboring a lifelong passion for military thriller fiction that has manifested in his first full-length novel: Close and Destroy.
Close and Destroy follows the men and women of Windsor Kraft Strategies, a well-heeled private military company combating a thriving insurgency in the (mostly) fictitious failing nation state of Daristan. If the premise sounds ripped-from-the-headlines, that’s because it’s informed directly by Tom’s own experience in Iraq and Afghanistan where he logged 14 separate deployments between the two theaters as both a U.S. Army officer and a private military contractor.
What follows are two separate excerpts from the novel, as well as photos depicting the real-world guns and gear featured throughout. Stay tuned for more detailed coverage of the top-notch kit shown here.
Hilton Pierce
Callsign “Alley Cat” Recce Troop – Windsor Kraft Strategies Tarkent International Airport Tarkent, Daristan 1540 hours, local
Through the darkness, Hilton felt the afternoon sun against his face, bright and brutal. The sour, peaty stench of unwashed people—punctuated by the sweet chemical tinge of burnt explosives—filled the front of his skull. It wasn’t until someone stepped on his ankle that his eyes snapped open in a bolt of pain. That’s when he realized his ears were ringing—again—and the world was sideways. All he could see were smears of pasty gray muck and brown, sandal-clad feet.
Still in the fetal position, Hilton’s hands clawed for the hem of his button-down, plaid shirt. In a motion rehearsed thousands of times over the last decade, his left hand hiked the shirt up as his right snatched a Staccato HD pistol out of the holster tucked into his jeans just behind the zipper. A chorus of screams and the intermittent popping of AK-47 fire overtook the ringing in his ears.
Close and Destroy follows the men and women of Windsor Kraft Strategies, a well-heeled private military company combating a thriving insurgency in the (mostly) fictitious failing nation state of Daristan.
Holding the pistol tight to his chest, Hilton rolled to all fours, then reared back on his heels before clamoring to his feet in a low crouch. He craned his head to look over one shoulder. Behind him was the airport’s pedestrian gate—an earthen wall interrupted by chain-link fence, shielded by a line of American paratroopers from the 82nd Airborne. A herd of Daristani civilians crashed against their riot line like waves on the shore. Already desperate to flee their collapsing country, the explosion in the crowd rocked them forward en masse against the group of young soldiers. On the walls above them, more paratroopers huddled behind their M4 carbines and M240 machine guns. Some fired short strings over top of the crowd while others swept their muzzles frantically back and forth, unable to shoot without killing innocents.
Hilton’s head whipped forward, following the gunfire. At the back edge of the crowd was a shallow, scorched crater where the suicide bomber had detonated. A macabre confetti of blood and viscera scattered around the charred cement. Further back, across the street, a squad of black-clad insurgents with AKs fired wildly toward the gate.
Hilton pushed his way through the crowd, stepping over fallen bodies shot or trampled in the panic. Once he was on the edge of the chaos, Hilton leveled the Staccato, placing its red-dot sight over an insurgent fumbling to reload his AK. He let out a slow breath and pressed the trigger four times in a row. Just as the insurgent started to collapse, someone burst out of the crowd and grabbed Hilton’s pistol, wrenching it out of his grip. As Hilton scrambled to put space between them, the man raised a large screwdriver, its slotted head sharpened to a crude point. Hilton shoved the man away from him and backpedaled, hands digging under his shirt once more. The man regained his balance and charged Hilton with the screwdriver, but Hilton’s hand came back up with a double-edged Contingency dagger just as the two collided like linebackers. Hilton went down on his back, and the insurgent plunged the screwdriver down into his chest. The point of the screwdriver skipped off the front plate of Hilton’s body armor—hidden under his shirt—and sank an inch deep into the edge of his pectoral muscle.
Hilton rolled into the stab wound, then back the other way, burying his knife deep into the man’s armpit in a backhanded stabbing motion. The angled point of Hilton’s dagger severed the man’s brachial artery. Hilton pulled the knife out and stabbed again, this time slamming his blade into the side of the man’s neck. Instinctively, the man grabbed Hilton’s forearm with both hands and pushed the blade out. A pulse of bright, red blood sprayed across Hilton’s face as the man collapsed on top of him, gurgling and wheezing frantically as blood from the severed vessels poured into his lungs. Hilton bear-hugged the man and rolled them both over.
Now on top of his attacker, Hilton stabbed him directly through one eye, dropping his full bodyweight onto the pommel of the knife. The man let out a feral wet scream. Hilton heaved downward again, using his armor plate to hammer the knife through the man’s orbital socket. The scream stopped short, like shutting off a light switch.
Hilton leaned back, placed a knee on the man’s chest, and pried the knife free. He sheathed the blade on his belt and climbed off the corpse, scrabbling around on all fours to find his handgun as more bullets snapped overhead …
Jimmy Tooms
Callsign “Jameson” Combat Advisory Troop – Windsor Kraft Strategies Hafiza, Daristan (350KM west of Tarkent) 0618 hours, local
Jimmy chugged half the lukewarm water bottle, then poured the rest over his head, blowing out a long breath as the water cascaded over his nose and mouth. Tossing the bottle into the dirt behind him, he picked up the garden hose draped over the Hilux’s tailgate. He squeezed the pistol grip in a quick double-tap to test water pressure. Then, he put one foot on the truck’s back tire and hoisted himself over the sidewall into the truck bed. He squatted down on his heels and started spraying.
Swirling eddies of water, the color and consistency of grapefruit juice, sluiced back and forth across the truck bed, and the tops of Jimmy’s boots. He angled the hose nozzle, using water pressure to push bits of flesh and fragments of bone off the tailgate, onto the dirt behind the truck. Several skull fragments still had hair stuck to them.
Four dead, out of his 15-man team of Daristani commandos. The locals called them Owls, because they were cunning, moved quietly and hunted at night. Also, the night-vision goggles they wore gave them the appearance of unnaturally large, owl-like eyes. It didn’t sound as fearsome as other indigenous guerrilla units he’d worked with in the past—who always wanted to name themselves after tigers or panthers or some other big cat. But he liked it.
Jimmy wagged the hose nozzle back and forth, using the water jet like a push broom to sweep human remains out of the truck bed. When the water in the bed finally dripped clear, he hopped off the truck, slammed the tailgate closed, and used the same wagging motion to rinse a trail of bloody handprints off the tailgate itself, as well as off the rear quarter panels and cab doors.
The trail of prints told a very clear story; a gaggle of men—bleeding and fleeing—ripping open the doors or pulling themselves over the quarters, seeking shelter from hundreds of incoming AK and PKM rounds. One side of the truck had a torso-width smear of blood where two of the survivors had pulled their comrade’s corpse into the truck bed before speeding off. It was the only body of four recovered off the objective. Jimmy wouldn’t be able to wash off the multiple strings of bullet holes, but those were far less shocking to the psyche than the dozens of smeared bloody handprints.
“Hey brother, I’ll give you a hand with that.”
Jimmy turned around to Ben Gordon, callsign “Flash.” Ben was a former SARC—Special Amphibious Reconnaissance Corpsman—who ran another 15-man Owl team alongside Jimmy the night before. He dressed identically to Jimmy: 5.11 combat pants and matching shirt, drop-leg holster slung off one hip. Streaks of dried blood, now the color of bricks, ran down both of Ben’s sleeves and one whole pant leg. As a former recon medic, he’d spent most of the night performing first aid on wounded Owls. He’d only lost one, but nine of his 15 had been shot over the course of the two-hour firefight with Al Badari’s insurgents.
Jimmy shook his head, shrugging off the help. “I got it,” he said.
One corner of Ben’s mouth turned up. He understood the reluctance. But he persisted. “C’mon, Jameson. You don’t clean up your own dead.”
Jimmy turned back to the truck and started spraying again. Ben put a hand on his shoulder. Jimmy tensed for a moment but stopped spraying. He looked over his shoulder at Ben. “I don’t need a hug, doc.”
“Good, ’cause I’m out of those. What I do have is empty mags. You pull ammo out of the connex, I’ll finish cleaning the trucks.”
“I know what you’re doing,” Jimmy said.
“While you’re at it, we need 40 mike-mike, flash-bangs, and two thermite grenades. I tossed both of mine in the police station.”
“On it,” Jimmy said, holding out the hose. Ben took it, and Jimmy walked away to the half-dozen shipping containers full of ordnance a hundred meters behind them.
Al Badari’s forces had overrun the Hafiza regional police precinct. Ben and Jimmy, with their Owl commando teams, had helped local police officers repel the initial assault. But Al Badari returned with a larger wave of attackers, this time using trucks, RPGs, recoilless rifles and one mortar. When it became clear they couldn’t hold the ground, Ben set the precinct on fire with incendiary grenades and left the compound burning behind them as they broke contact.
When Jimmy was out of sight, Ben looked over the truck, front to back. Under the rear bumper was a mud puddle, mired with thick strings of red runoff and ivory-colored flecks. Ben clenched his teeth and punched the side of the Hilux hard enough to dent the door panel. After two deep, sucking breaths, he wiggled his fingers to check for broken bones. Then, he went back to spraying …
Looking for a new iron or piece of kit to enhance the one you already own? Check out these 7 new bits of guns and gear to grow your firearms wish list.
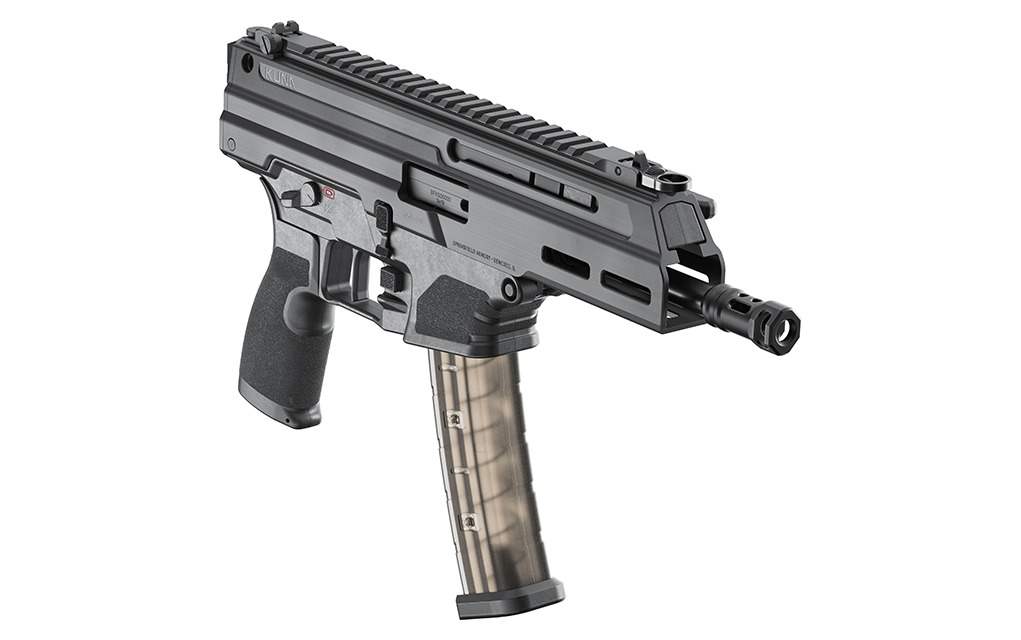
Springfield Armory just launched the Kuna, a roller-delayed 9mm PDW built for fast handling and rock-solid performance. Named after Croatia’s fierce pine marten, this pint-sized powerhouse features a rugged monolithic aluminum upper, a fixed 6-inch cold-hammer-forged barrel and fully ambidextrous controls. The roller-delayed system cuts recoil and muzzle rise for smooth, flat shooting. Add translucent 30-round mags, flip-up hybrid sights and AR-style ergonomics, and you’ve got a seriously capable personal defense tool. Available with a Pic rail end plate or with a Strike Industries folding brace. Compact, smartly built and ready for anything—the Kuna delivers. MSRP: Starting at $999
Caldwell Velociradar
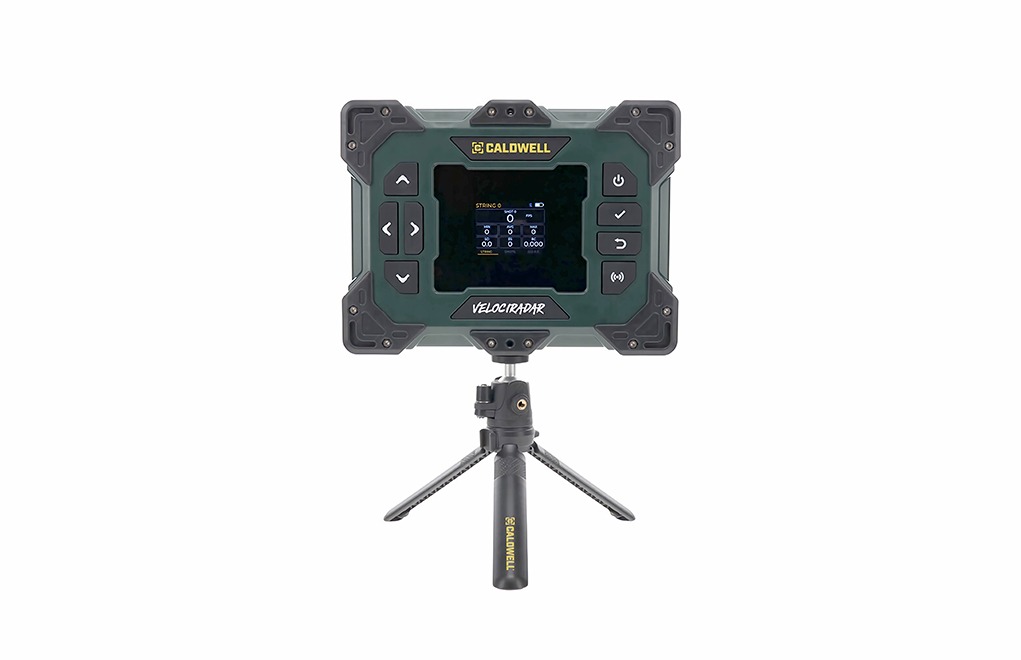
The Caldwell Velociradar is a feature-packed chronograph that’s built like a tank and smart as a whip. Designed for shooters who dabble in everything from rifle to archery, this full-figured unit skips the fragile touchscreens for big, glove-friendly buttons—perfect for cold-weather range days. It uses Chirp Radar tech to calculate DOPE charts from a single shot and syncs with a slick, glitch-free app to track profiles and sessions. While slug and pellet readings can be finicky, its rifle performance shines. The Velociradar is a worthy tool for serious shooters who want reliable data and versatile functionality. MSRP: $550
Defiance Deviant CRF Action
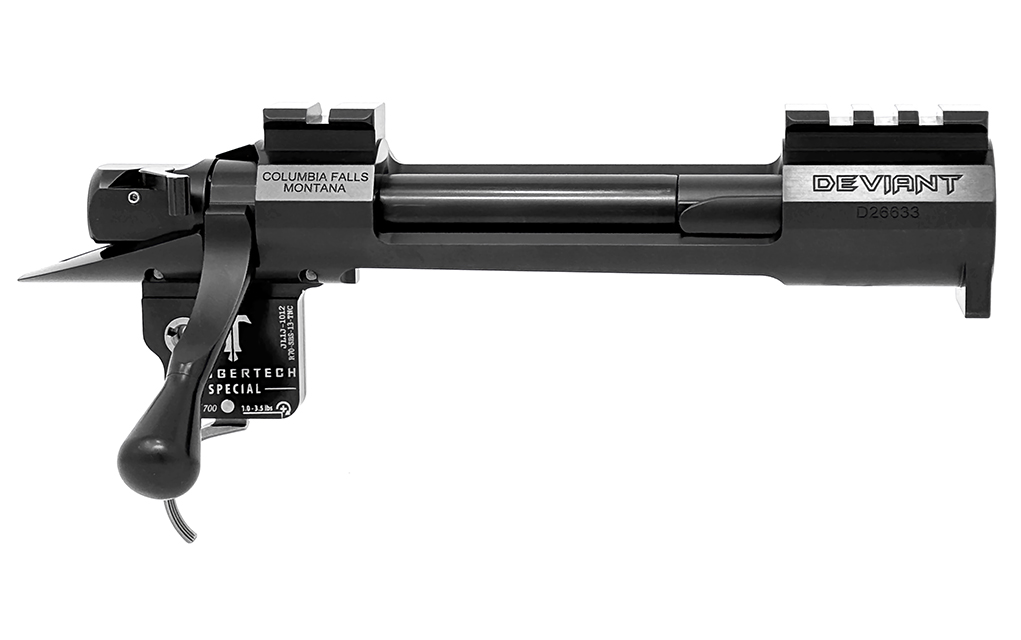
Defiance Machine just dropped its new Deviant Controlled Round Feed (CRF) action—a modern take on the time-tested Mauser-style design. Beloved by dangerous game hunters, CRF actions maintain control of the cartridge from mag to chamber, reducing feeding errors and preventing double feeds. Unlike legacy CRFs, the Deviant CRF is single-load safe, letting the extractor snap over the rim without damage. It also features a Winchester-style three-position safety. Offered in short, medium and long actions with standard or magnum bolt faces, the Defiance CRF is certain to be on target for a certain segment of shooters. MSRP: $2,995
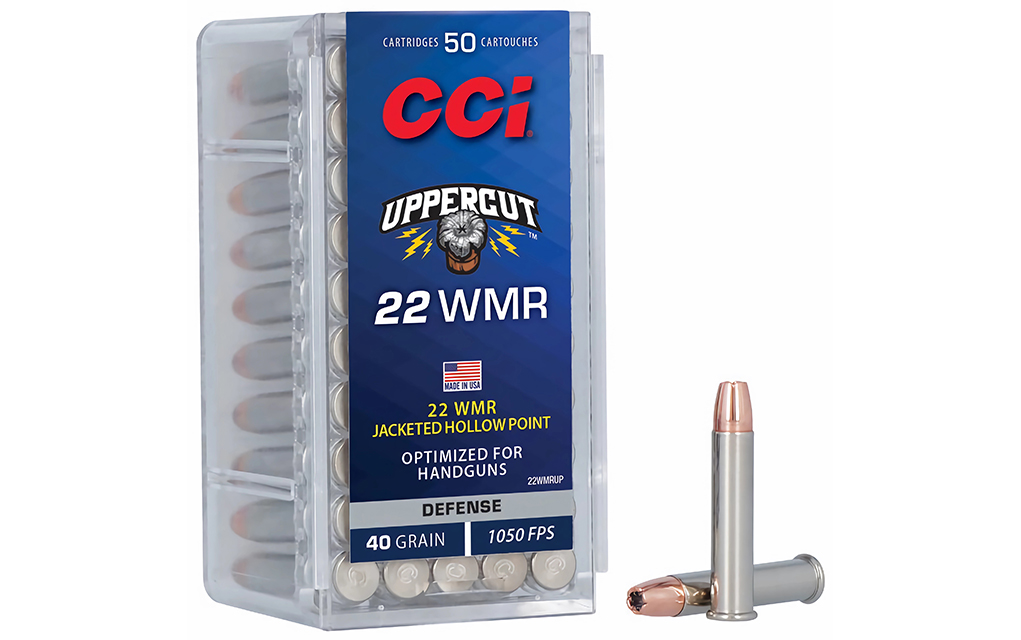
CCI Uppercut .22 WMR 40-grain
CCI just upped the rimfire self-defense game with its all-new Uppercut 22 WMR. Loaded with a 40-grain jacketed hollow-point featuring precision nose skiving, this round delivers consistent, reliable expansion and the penetration needed to stop threats. It’s the first defensive rimfire load in CCI’s history—yet it performs like a veteran. From revolvers to semi-autos, Uppercut performs across platforms with the accuracy and ignition reliability CCI is known for. Whether you’re carrying for personal protection or building a backup kit, Uppercut 22 WMR brings serious punch to the rimfire world. MSRP: $25.99 per box of 50
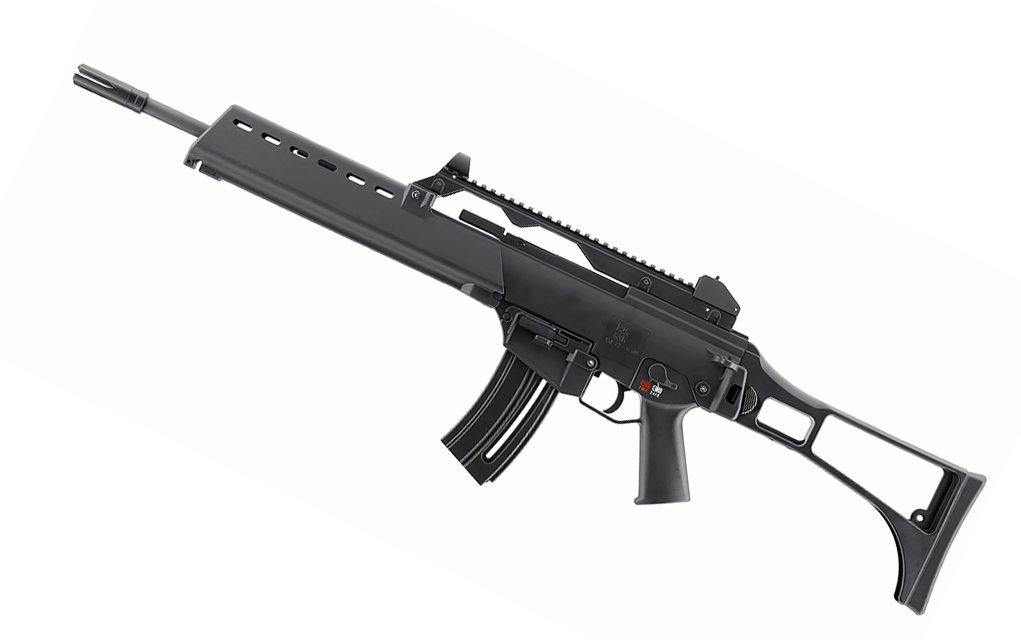
Heckler & Koch G36 .22LR
Heckler & Koch just dropped a rimfire twist on a modern military classic—the HK G36 .22LR. Built-in collaboration with Umarex, this scaled-down version of the iconic German service rifle is ideal for low-cost training or just pure plinking fun. With an 18.125-inch barrel, skeletonized folding stock and ambidextrous controls, it’s got the looks and feel of the original … but it shoots the affordable .22 LR. Choose between 10- or 20-round mags and start customizing—the G36 .22 is compatible with existing G36 accessories. Expect smooth shooting, full function and a whole lot of range-day grins. MSRP: $679
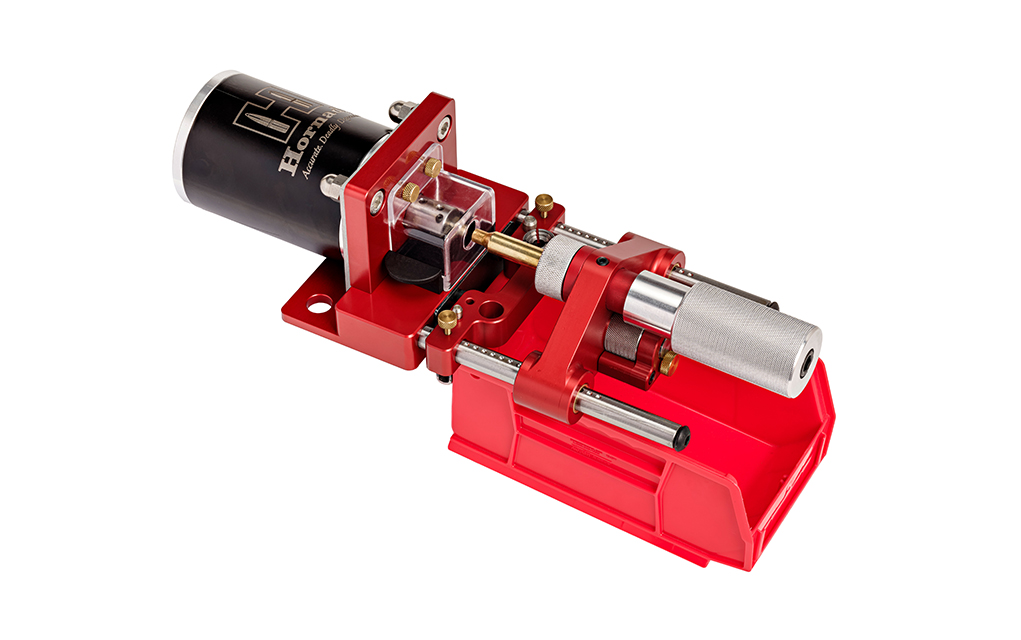
Hornady 3-in-1 Power Case Trimmer
Hornady’s new 3-in-1 Power Case Trimmer is a game-changer for high-volume reloaders. With its 2,000-plus-rpm motor, this bench beast trims, chamfers and deburrs in a single, seamless step—saving time without skimping on precision. It handles cases from 22- to .0-caliber and lengths from 1.450 inches to 3.5 inches, with micro-adjustments down to 0.001 inch for dead-on accuracy. Built-in carbide blades and a click-adjustable dial ensure every piece of brass is consistent and clean. Quiet, powerful and ergonomic, this is the tool reloaders have been waiting for. Fast brass prep just got way more precise. MSRP: $775
JK Armament 155 RPX .30CAL
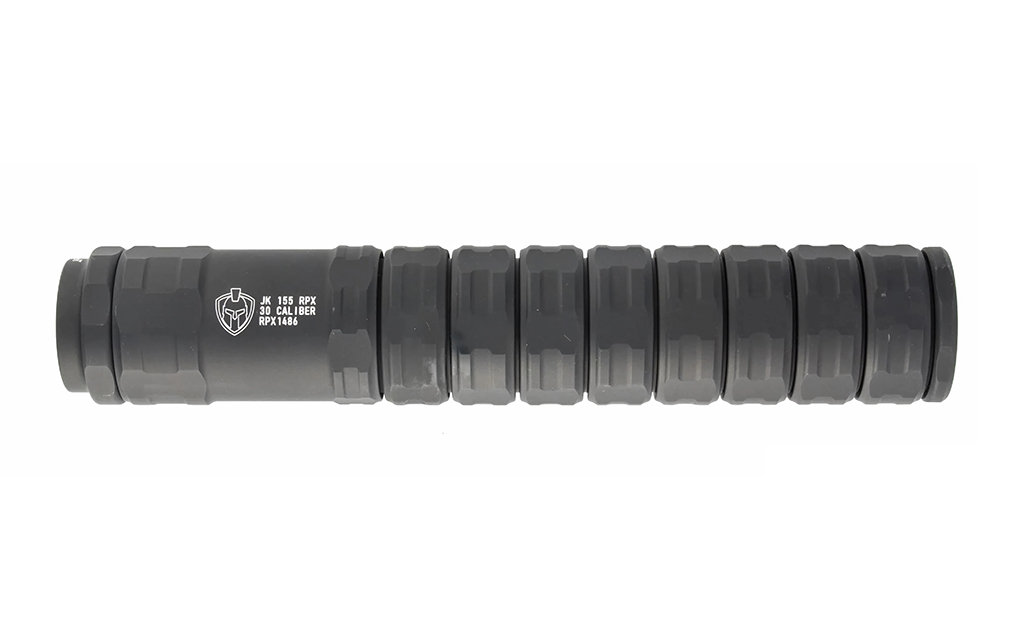
JK Armament’s new 155 RPX .30CAL might just be the most versatile suppressor on the market. This featherweight, mission-configurable can is built for everything from 9mm pistols to .300 Win. Mag.—with just a quick endcap swap. Featuring a Grade 5 titanium blast baffle and seven modular aluminum baffles, it’s tough enough for full-auto and light enough for hunting. The .36-cal bore and HUB threading mean it fits your entire arsenal, and it runs whisper-quiet on both rifles and pistols. Oh, and it’s backed by an unlimited lifetime warranty. What’s not to like? MSRP: $849
Editor’s Note: This article originally appeared in the June 2025 issue of Gun Digest the Magazine.
How do self-loading rifles function? There are different ways, but here I break down the major types of rifle gas systems.
It’s fair to assume that most shooters have at least a general understanding of how their guns work on a technical level. The ins and outs of specific designs can be a fairly specialized knowledge set, but I’d wager that most people using common semi-autos know they are, in large part, gas operated.
However, there is quite a bit of nuance that we’re going to dive into here talking about the various gas systems and how they work, especially with suppressors and how things like gas flow and bleed-offs work. This is a technical topic, but I’ll spare the jargon and try to relay as much of this as possible in layman’s terms so everyone ends on the same page.
Gas System Types
For what we’re talking about here, we’re going to be discounting such rifles as bolt actions and anything manually operated. There are, of course, ways that gas interacts with these guns and suppressors, but those are their own topic. Specifically, we’re going to look at direct gas and piston-operated rifles, each with its own problems and advantages.
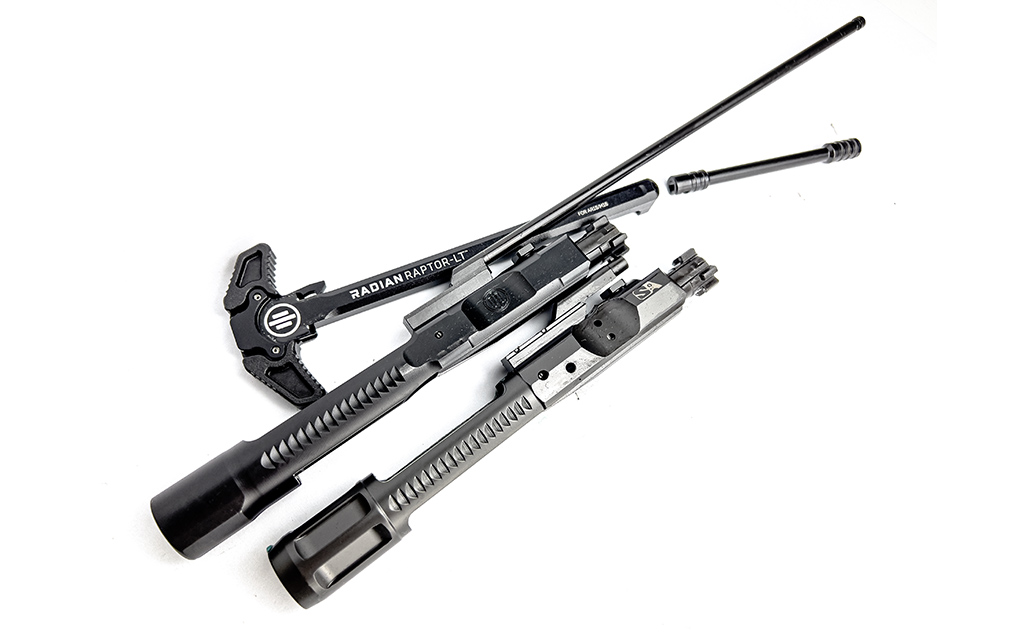
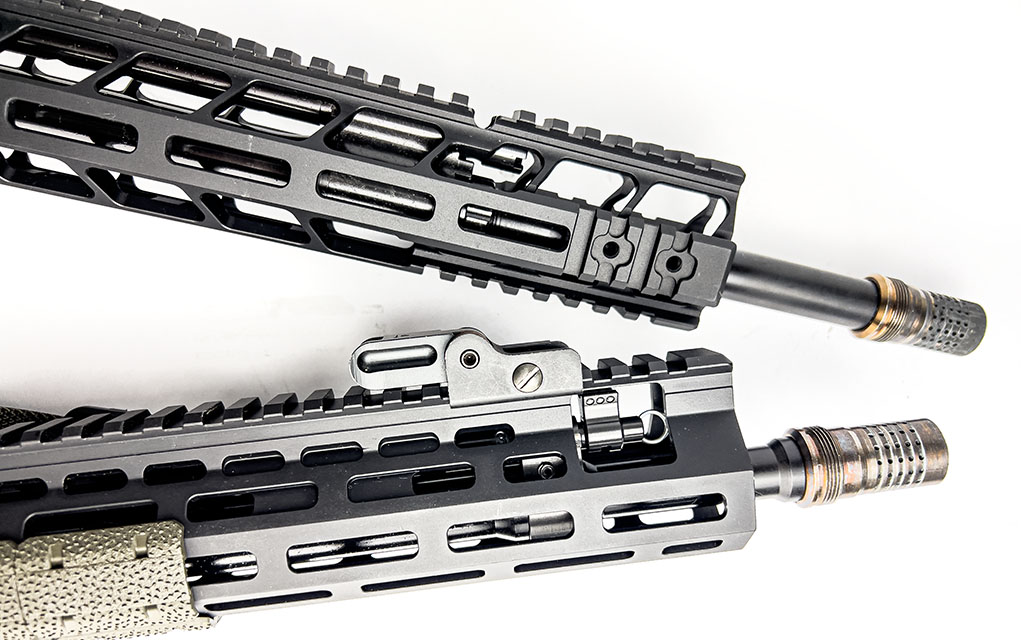
A PWS gas system against a standard direct gas carrier. In this case, the DI carrier by SA has interior chrome lining and is far and above easier to keep clean … with all the gas being blowing directly into it.
The baseline situation with these guns is that the rifle operates using a port in the barrel that acts as an avenue for gas pressure to be directed. If you are new to this topic, yes, there is in fact a hole in the barrel that is drilled through into the bore itself. This hole is typically called the gas port. A gas block is mounted to this—a fixture that is the interaction point between the barrel and whatever gas system is in use. The shape and style of the gas block varies depending on what is being asked of it, but for our purposes we’re going to look at it as a very important piece of this equation.
These two Ballistic Advantage barrels demonstrate different gas port locations. Depending on your cartridge and barrel length, you’ll want to pay attention to this.
Before we go too far into gas blocks, we need to look at operating systems. At a point, their function is well-established, and I’ll only go into a brief discussion on their designs to save space here. The two basic forms mentioned above are both in common use, with direct gas being the more common today in the AR platform.
Direct-gas guns take the gas pressure from the firing cycle and vent it through the gas block into a thin metal tube, of course called a gas tube. This little tube takes the gas pressure built up in it and blasts it directly into the gas key, a hollow structure atop the bolt carrier group. This gas pressure forces the bolt carrier group rearward, thus unlocking the bolt, ejecting the spent cartridge, and then, by spring power, travels forward to strip a fresh round off the magazine, thus starting the cycle again.
The downside of this otherwise reliable method of gas operation is that it is, comparatively, very dirty. When firing suppressed, the average AR becomes a mess very quickly. I have been firing all my AR rifles suppressed now for years, and fouling in the guns is about 10 times worse than firing unsuppressed. Your mileage may vary … but be prepared to do a lot of cleaning. I’m not above just blasting out an AR with a hose and Dawn soap in the backyard.
Piston rifles, by design, are much cleaner in operation. There are endless debates about the reliability of piston guns over direct-gas guns. But the jury is permanently out, as the entire world uses variations of both systems with many nations, including our own, using both in various capacities.
Piston rifles vary a lot in terms of design; some use a fixed piston, such as the AK series rifles, and others have a push rod system where the bolt group is separate from the piston. A rod in the gas tube will push the carrier back. Some argue this is better from the standpoint of maintenance and reduced bolt carrier mass for softer cycling, but again, the jury is out.
There are too many successful designs out there that use fixed pistons or push rods, and all of them are pretty good … just different. In either case, the vented gas is used to actuate the piston in what amounts to a closed system, thus keeping propellant gas out of the receiver. Wisdom says that this is more ideal for suppressor use in that it keeps the interior of the gun very clean. In my personal experience, I have found this to be largely true and have come to enjoy the lack of cleaning piston guns offer.
Staying In Tune
The commonality among these systems, aside from being gas operated, is how we can alter the flow of this gas to change the internal pressure in the gun. It works in largely the same way regardless of a rifle being direct gas or piston.
That said, piston guns are somewhat less flexible in how they interact with the gas cycle. While not the rule entirely, rare is a single piston system that’s as modular as the direct gas system on the AR platform. Most piston guns are designed to work only as their set specs allow and are often from a single manufacturer.
The Brownells BRN180 is in its third generation; it’s a very reliable design.
For instance, the BRN 180 is a piston gun, and so is the FN SCAR. They are in no way compatible, and there isn’t anything that can be done on a real level to affect the way these guns work in terms of reliable cycling. You pretty much get what you get; you can regulate the system by reducing the amount of gas … and therefore pressure in the system.
The AR series is quite the opposite. There are many distinct gas system lengths that are quite modular, and you can select the type of gas system you need for your individual build. The shorter the gas system, the higher the initial operating pressure. This is why many shorty builds feel snappy compared to a 20-inch barrel with a rifle-length gas system, a combination most regard as very smooth and easy to shoot.
The AR can also be adjusted by using a lightweight bolt carrier and various weights of buffer to achieve the desired balance in the gun. Depending on the cartridge you’re using, you will want to pick a gas system based on what kind of pressure it uses, such as .300 Blackout, which is best with a very short gas system due to its sometimes very minimal powder charges in subsonic form. It often won’t generate enough pressure to cycle the action without a suppressor to help.
A problem that can exist in some cases is over-gassing, especially with suppressor use. What we don’t want is to take a rifle that has a gas system regulated for unsuppressed use and then create a situation where the gun is beating the hell out of itself. Bleeding off gas is the way to solve this, and in some cases with more modular platforms like the AR, you can select different internal parts to help slow the bolt travel, making it less violent.
While most guns won’t be horribly damaged by over-gassing, it isn’t a great idea and can pretty easily result in parts wearing out quickly. Now, of note if you are using a suppressor, this means that in some cases your rifle will need the suppressor installed to cycle properly. Ideally, your adjusted gas system will kick all your brass out nicely in the same spot. A symptom of over-gassing is erratic brass ejection. When I tune my gas systems, I can expect the rifle to be very gentle in the firing cycle and drop brass consistently in the same area.
It’s surprising how little gas you need to cycle a suppressed semi-auto. Some of my rifles will still cycle unsuppressed, but ejections are weak, and the bolt may not lock back. Many rifles have a factory installed gas selector that lets you switch essentially between “suppressed” and “unsuppressed.” In reality, this is a basic gas bleed-off that keeps it simple for the causal shooter.
The PWS rifle and BRN180 both have factory-standard adjustable gas systems.
If you are a dedicated suppressor shooter, you’ll want a more finely adjustable gas block that allows you to really dial in your pressure curve inside the gun for best handling and therefore function. A suppressed semi-auto rifle with a properly adjusted gas system should feel smooth and run like a sewing machine with no “thumping” as the bolt moves. In calibers like 5.56 NATO, you can work this to make your rifle have virtually no felt recoil, sometimes to the point of it not moving at all. This is especially great when hunting smaller game at longer ranges and with thermal optics.
Tuning gas systems on unsuppressed rifles can offer a number of benefits—not so much on direct gas rifles, but on piston guns especially. Many piston rifles are almost over-gassed from the factory and could do for a calming down. Military-based piston rifles are known to cycle hard and for good reason, they are often asked to work with whatever 5.56 or 7.62 NATO is laying around, and it’s better to err on the side of function.
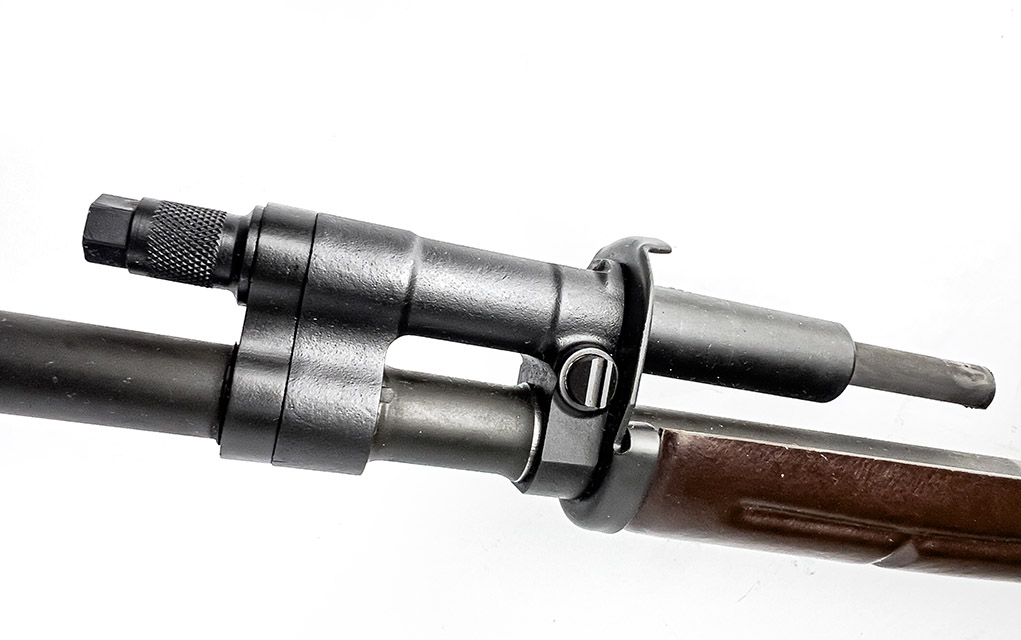
The M14 rifle is one that strongly benefits from an adjustable gas plug (note that the M14 has a separate screw-in plug that caps off its gas system), and it can be regulated to be very smooth, especially for match shooting. On these types of rifles, you can really extend the life of parts by smoothing out the system pressure. In the M14 especially, which can be an extremely accurate rifle in defiance of many known accuracy trends, a smoother cycling action just makes it that much more able to compete and shoot with.
Detail of the M14 gas system. Note the “push rod” is extended rearward.
My own M14 is a Fulton Armory rifle. They recently sent me their brand-new muzzle thread adapter and an adjustable gas plug to allow suppressed use with the rifle, itself featured in many of my Gun Digest topics. When I started to use the rifle suppressed, I was immediately impressed with the difference the upgrades made. The M14 is already soft-recoiling for a .308/7.62 rifle, but with the suppressor and FA adjustable plug, it was easy to get it down to nearly unnoticeable levels of recoil. Having shot CMP sports for most of my life locally and at Camp Perry, I can’t imagine a better match-shooting machine than this.
Notable Aftermarket Gas System Parts
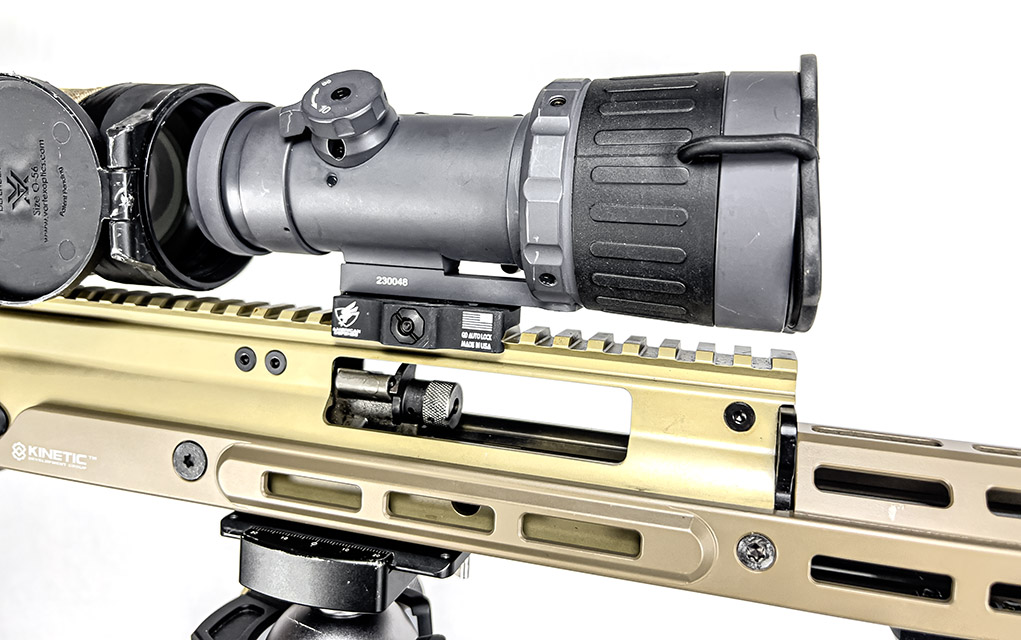
I have a lot of miles on the suppressed SCAR system. The SCAR has a reputation for being hard on optics, and a good amount of this lore comes from the early days it was in use. A cursory internet search shows hundreds of forum posts about SCAR owners breaking scopes. The SCAR 20S that has appeared on these pages boasts a small but necessary part—an adjustable gas plug called the SCARburator from Mototech Engineering. This little part absolutely changes the SCAR for the better and is arguably a must for shooting the SCAR suppressed.
The SCARburator adjustable plug is visible inside the window above the handguard. Rail system by KDG, night vision clip-on by Armasight.
The SCAR is a very modular platform but isn’t widely owned by comparison to the AR-15 and AR-10 class rifles. I really like it in general … if I can adapt the lower for SR25 mags in .308. This single part is a must for any SCAR owner in my opinion, on the merit of how these guns handle their gas pressure. While not exactly cheap at $149, these aren’t cheap guns anyway. Just get one.
Superlative Arms might be the biggest player on the block when it comes to blocks … of the gas variety. When I get guns from the factory, I typically don’t mess with them much, but most guns you see in my photography on these pages I put together myself. I not only build them for photos, but I really do also use them in the field. Range use only does so much, and I believe in only featuring parts and guns that I would personally trust if I was in adverse conditions.
Superlative gas blocks are very easy to use and install, and they come in a variety of finishes. All my direct-gas guns, aside from historical and military builds, have them installed. They operate simply and have a “click” adjustable plug that allows you to repeatably tune your gas system. When bottomed out, the gas is off, and basically you’d have a straight-pull bolt action.
I typically bottom them out as a starting point, and then I open it five clicks to start. You can go one at a time, but in my use of these blocks, five is the minimum to cycle with a rifle-length gas tube and suppressor.
Of note is that Superlative also makes some very smart parts. Their bolt carrier has an internal chrome lining, which is incredible for suppressed use. I hate cleaning my bolt carriers, but it’s a must for good operation, and the fact that they hard chromed the inside of it makes my work so much faster and easier. It’s honestly a great feature across the board that I don’t know why it isn’t standard.
Gassed Out
As we march forward in terms of technology and knowledge in our industry, the pioneers will always be somewhat alone on the frontier … waiting for the rest to catch up. We are in a good place now when it comes to our understanding of gas-operated rifles, but the future will undoubtedly hold a much higher degree of standardization for use to perfect and then continue to expand upon.
The products in this article are decidedly aftermarket and will need to be worked on by you, the home builder. The sheer number of products out there, combined with the endless variety of suppressors and ammunition types, makes it so that this discussion is somewhat personal and truly up to you for the time being. Your mileage will vary depending on your chosen end use, but if you are in the business of playing with suppressors and getting your rifles cycling smooth, you need the ability to alter your gas flow—that much is certain.
Editor’s Note: This article originally appeared in the July 2025 issue of Gun Digest the Magazine.
We take a quick look at .450 Marlin, a big and nasty capable performer for any task.
Hornady and Marlin announced the .450 Marlin at the 2000 SHOT Show. This was the first new chambering from Marlin since the introduction of the .444 Marlin, in mid-1964. The motivation for this cartridge is simple: Handloaders had been souping up .45-70 loads for use in Marlin’s modern 1895 since the day that gun was introduced. Owing to the many weaker .45-70 rifles still in use, Marlin could not condone this practice, nor could the company stop it.
Some have asked why Marlin didn’t simply lengthen the .45-70 case and standardize a new higher-pressure cartridge. That alternative wasn’t tenable, because such a cartridge would have chambered in older (potentially weaker) rifles designed for the .45-90, .45-110, etc.
General Comments
When one considers a simple approach that could have been taken, this cartridge design is a poor, second-best choice for chambering in the M-1895 Marlin. The simple adoption of an Ackley Improved version of the .45-70 would have provided a superior case design with a cartridge that would function better through the Marlin rifle and would not chamber in any older factory firearm.
In any case, the .450 Marlin offers lever-action fans a factory chambering with significant ballistic potential. Shooters in this country have a long history of fascination with large-bore lever-action rifles. Except for caliber, Marlin’s cartridge recalls Winchester’s circa-1903 .50-110 Winchester High Velocity load, which originated for the same reason; muzzle energy is essentially identical. This cartridge and rifle make a fine and versatile combination for those who hunt dangerous game under the worst possible conditions.
Given correct bullet choice and shot placement, this is a capable performer for any task.
Interestingly, Lewis Potter, proprietor of Potter & Walker (Evasham, Worcestershire, UK), reports that, around the time the .450 Marlin was being introduced, he—quite coincidentally—successfully shortened and reformed .375 H&H Magnum cases to something quite similar to the new Marlin number, for use in a client’s modified Ruger No. 1. Potter’s wildcat, the performance of which fell somewhere between that of a high-end .45-70 and the .450 Marlin, was playfully christened the .45-70 Nitro Express.
Springfield Armory has just released the Model 2020 Heatseeker, a compact chassis rifle with AR modularity and bolt-action precision.
Springfield Armory’s latest addition to its Model 2020 line is the Heatseeker. Unlike previous Model 2020 rifles, the Heatseeker is chassis-based and more of a tactical or competition gun than a traditional hunting rifle.
At its core, the Heatseeker features the same Model 2020 action as its cousins. It comes sporting a Coyote Brown Cerakote finish and is available in 6.5 Creedmoor .308 Winchester. Where it differs is its Sharps Bros. chassis. Made of a single piece of high-strength 6061-T6 aluminum, it features plenty of M-LOK slots and QD cups on its forend for accessories and the action housing can accept AR-15 buffer tubes/stocks and AR-pattern pistol grips. The rifles ship with a B5 Systems CPS stock and a B5 Systems P-Grip 23 grip. The Heatseeker also uses AICS-pattern magazines (ships with one 5-round mag) and has a threaded barrel (thread protector included).
The Heatseeker also comes with a .75-MOA accuracy guarantee (for a three-shot group at 100 yards with quality match-grade factory ammunition, in the hands of a skilled shooter), no doubt partly due to its free-floated 16-inch BSF barrel jacketed in a roll-wrapped carbon fiber sleeve and its adjustable TriggerTech Field Trigger.
Steve Kramer, Vice President of Marketing for Springfield Armory, said this about the new rifle:
The Model 2020 line of bolt-action rifles has established a solid reputation for uncompromising performance and quality … This new Model 2020 Heatseeker adds a new dimension to the line, one that is as equally at home in the field as it is on the range.
The Model 2020 Heatseeker is available now, ships with a rifle case and has an MSRP of $2,355.
Looking to go armed, but are stuck in the weeds as to what to arm yourself with? Here are 20 of the best concealed carry gun options that will keep you on the defensive.