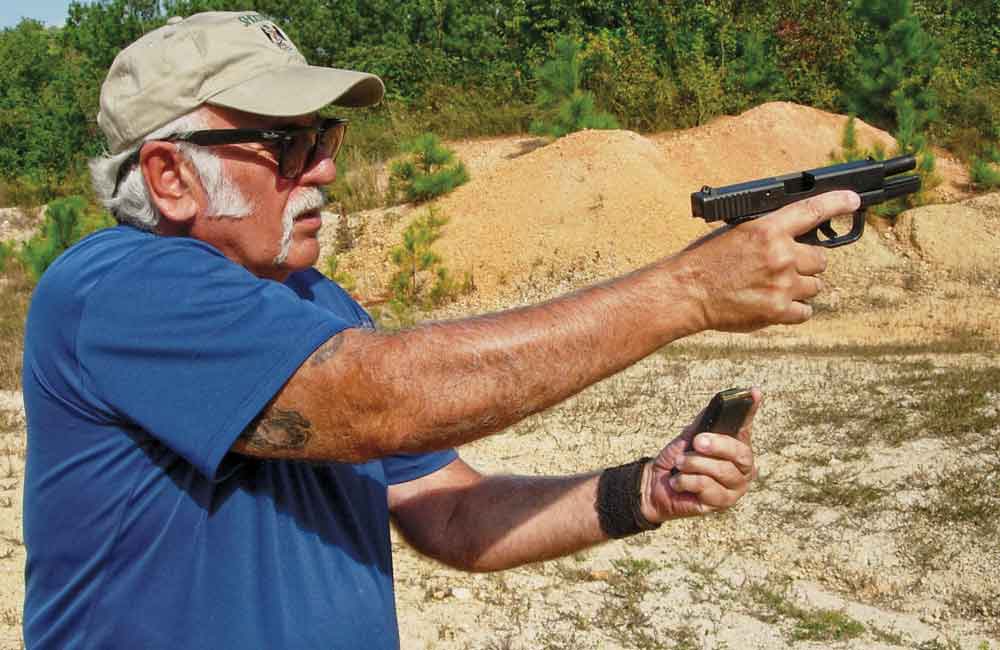
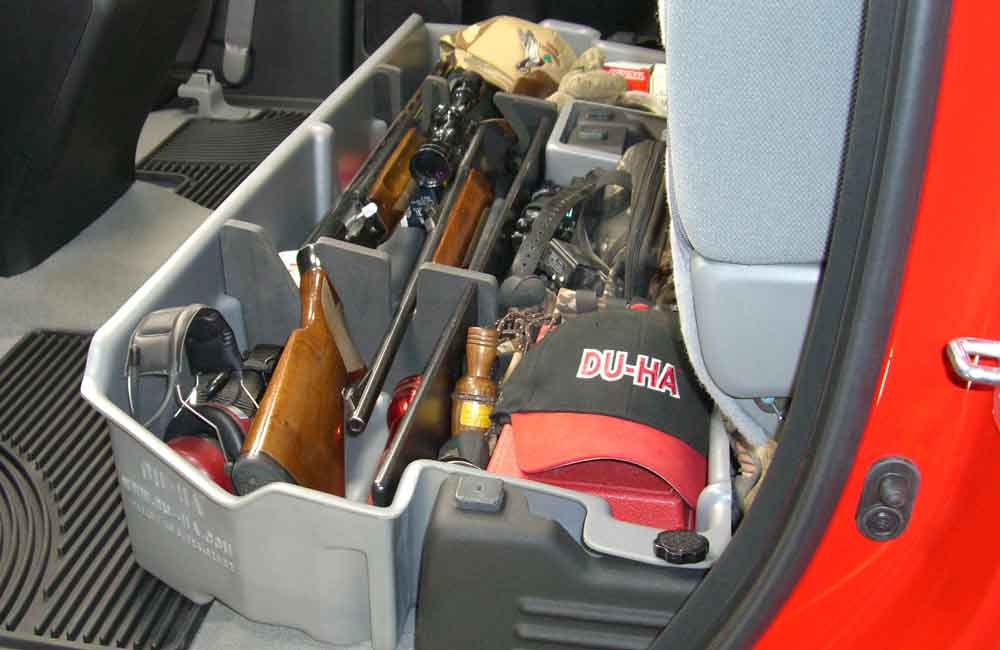
A proven resource in creating a marksman is the use of inexpensive .22-caliber ammunition and firearms. The rimfire offers little or no recoil, minimal report and good accuracy.
If you own a full-caliber defensive revolver, having a .22 counterpart to it makes a fantastic understudy for training.
It is recognized as a foundational training aid for pure marksmanship, that is, trigger control and learning sight alignment and sight picture.
In today’s tight economy, we see both .22-caliber conversions and dedicated firearms of the diminutive caliber pressed into service in training. With the high and increasing costs of training, .22 conversion units and purpose-built rimfire guns are a good buy.
Any way you slice it, the difference in price between rimfire and centerfire ammunition allows you to fire many more rounds of rimfire than is possible in a single service cartridge of centerfire. The .22 can be used in ranges that would not be safe with high-powered firearms.
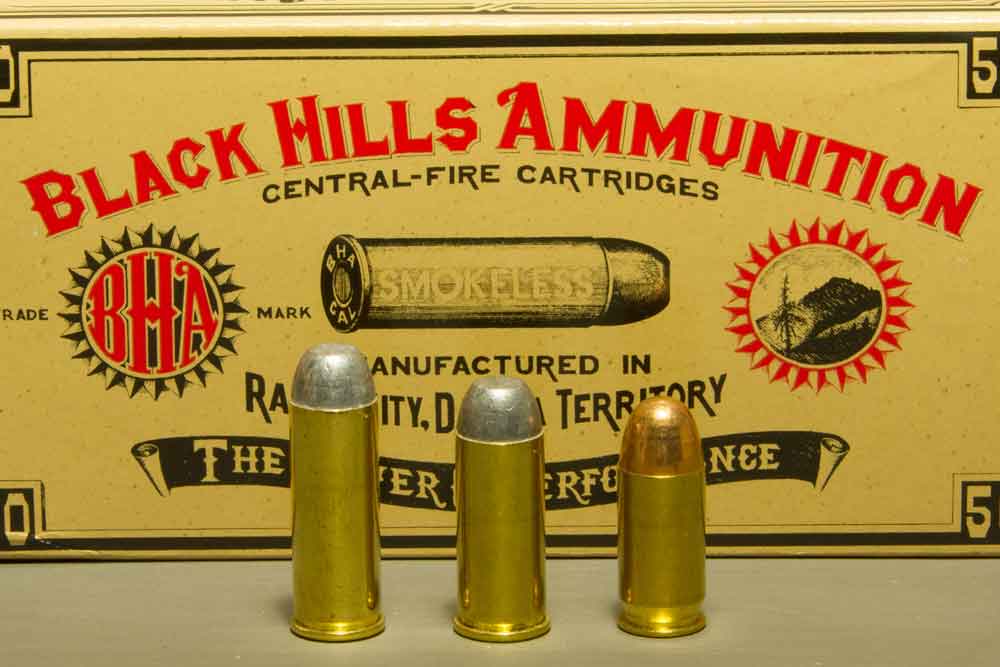
My first .22 revolver was an Arminius swing-out cylinder double-action from Germany. It was a great revolver, with high-visibility fixed sights and a relatively smooth trigger action. It featured a nine-shot cylinder and six-inch barrel, as well as hand-fitting grips.
I shot over 2,000 cartridges in it the first summer I owned it. A lot of hard work earned the revolver and those cartridges, even though they were less than a dollar a box and I think eight or nine dollars per five-hundred round brick. I fired it until the vent rib fell off! (The Arminius was an affordable brand not to be confused with the junk-grade RG.)
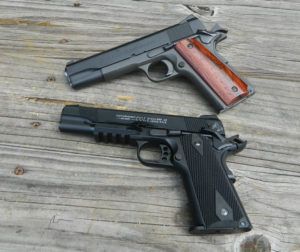
It isn’t a bad idea to have a rimfire doppelganger for the centerfire handgun. A 1911 .45 and a 1911 .22 are a classic combination.
I graduated to a Smith and Wesson Kit Gun, which I did not use very well, trained at college in the Criminal Justice program with a first-quality Smith and Wesson Combat Masterpiece, and later a Ruger Single Six. I shot these .22s every chance I had.
They were simple to use well, accurate, affordable to shoot and friendly for extensive handgun training. By friendly, I mean no sharp edges and a decent trigger pull combined with low recoil and good, practical accuracy.
I simply enjoyed shooting but, as time went by, I became a better shot. Quite a few shooters purchasing more powerful handguns such as the .357 Magnum for their first revolver had unprofitable experiences.
They learned how flinch destroys accuracy and the economic reality of attempting to become a good shot with expensive factory ammunition. Some folks develop bad shooting habits and become doubtful of their own ability.
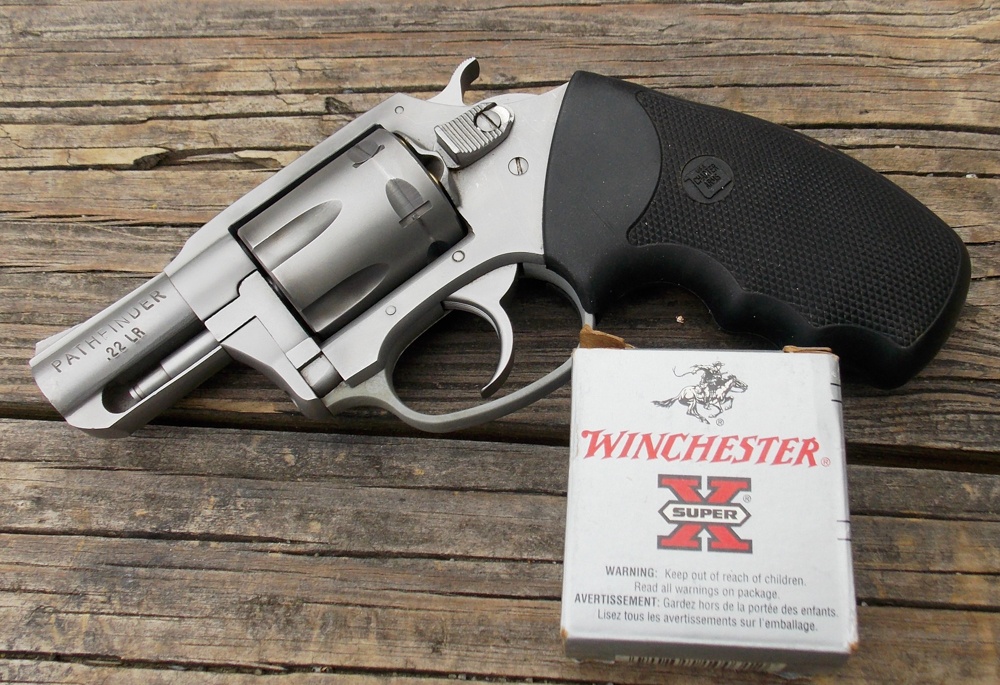
The Charter Arms Pathfinder is a neat little revolver for field or tackle box use. It isn’t the most accurate revolver but it is light and handy.
When you choose your personal .22, the field is broad and there are a number of choices that give good results. The Walther P22 and the similar Ruger SR22 are lightweight handguns, but provide respectable results in training. They are not as accurate as the Ruger Standard Model but are usually reliable and useful for training.
Your first .22 should not be too small. A 2-inch barrel revolver is too light for most shooters to deal with as a first gun — its short sight radius will play against you.
Ruger’s new Mark IV .22 is a great addition to the Ruger line. It’s a very accurate handgun.
A reasonably light handgun, such as a 4-inch barrel revolver is a better choice, or even the Walther P22 I mentioned earlier. If you are going to use the handgun and carry it consistently in the field and on the range, then light weight and comfort are important. If the handgun is too heavy it will be at home instead of on the hip in your handgun training.
Accuracy should not be compromised. And the baseline for what you wish to accomplish must be considered.
An all-around field gun should be accurate enough to take a squirrel in a tall tree, behead a dangerous snake at a few paces, and provide meaningful practice.
Accuracy and weight must be balanced. While the ultra-lights are not accurate enough for some uses, the Ruger MK III with 4-inch barrel is light enough and offers a combination of good hand fit and excellent accuracy. The Ruger is the standard by which all others are judged, and most typically come up short.
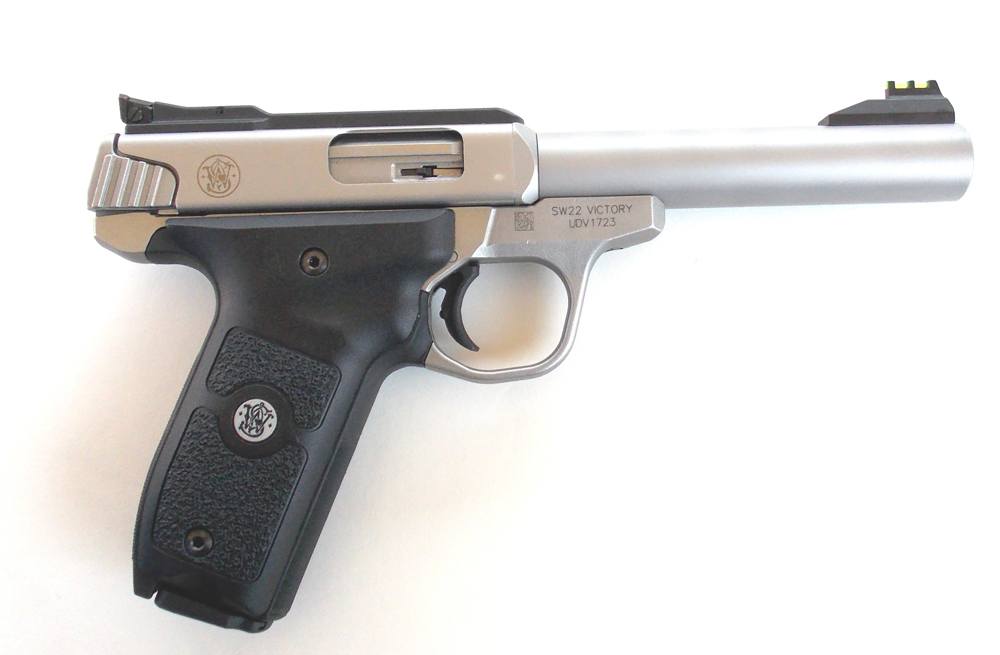
Smith and Wesson’s Victory .22 is a great shooter and one of the bright stars introduced recently.
Smith & Wesson Victory .22
The new Smith and Wesson Victory .22 is a solid choice that performs exceptionally well. The Victory just may become the new baseline in .22 pistols. Let’s take a hard look at it and then you can judge the others based on the performance of this handgun.
The Victory has garnered a lot of interest since its introduction. It is intended to compete with similar .22s such as the Browning Buckmark and Ruger Standard Model.
As such, it has good features, is reliable, and has acceptable accuracy. The price point is also important. Smith and Wesson’s previous .22 self-loaders were not in the same class as this pistol and, as such, high hopes have been pinned on the Victory, not without justification.
The Victory is a modern .22 with tons of useful features and excellent performance. Known as the “SW22,” it’s a winner and a fun gun as well. Smith and Wesson calls the SW22 Victory a “modern, classic target pistol.” Indeed, it fits the bill in that sense — a handgun intended for informal target practice, marksmanship training and small game hunting. It isn’t a Smith and Wesson Model 41, but then what is?
The U.S. has had a love of the .45-caliber cartridge for many years. Nowhere is this more apparent than in the enduring popularity of the .45 ACP, and its earlier predecessor, the .45 Colt.
How did the .45 Auto, or .45 ACP, cartridge come into being?
The U.S. adopted the .45 Colt in 1873, pairing it with Colt’s Single Action Army revolver.
It served for almost two decades before replacement by the .38 Long Colt.
Complaints were made during the Phillipine Insurrection about the .38’s stopping power.
The .45 Colt was reissued, and it remained in service until the .45 ACP’s adoption.
The .45 ACP was adopted in Browning’s M1911.
However, it first saw action in World War I in a double-action revolver.
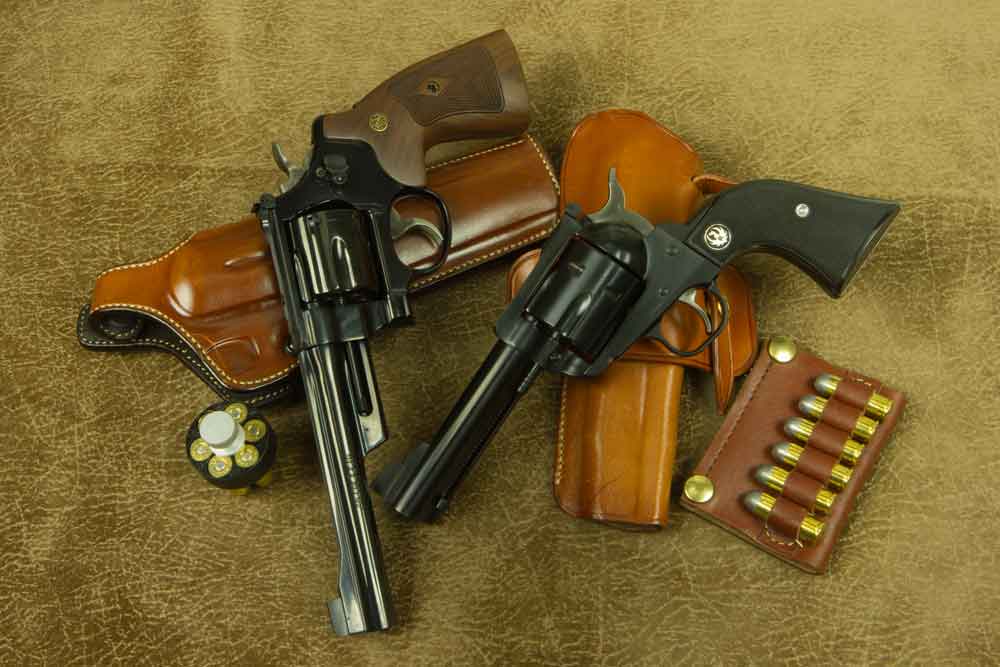
To celebrate the .45-caliber handgun cartridge, a group of writers recently met at Gunsite Academy to experience shooting semi-automatics, and single-action and double-action revolvers all chambered in .45.
Contact range to long-range shooting and training was conducted using a Ruger New Blackhawk single-action revolver, a Smith & Wesson Model 25 Classic double-action revolver with Pachmayr Decelerator Grips — both in .45 Colt — and a Nighthawk Custom 1911 chambered in .45 ACP. Black Hills supplied ammunition, and Galco provided holsters. Everything worked flawlessly, with each gun representing a step in the evolution of the .45.
In 1873 the U.S. Government adopted the .45 Colt cartridge for its new standard sidearm, the Single Action Army revolver. It fired a 250-grain lead bullet that left the muzzle at about 900 feet per second (fps), making it a powerful handgun round that soon gained a good reputation for protection.
For nearly two decades, the Single Action Army in its .45-caliber chambering remained the official government sidearm, but about 1890 it was replaced with a revolver chambered in .38 Long Colt. The new cartridge proved to be inadequate though for stopping Moro fighters during the Philippine Insurrection, so the 1873 Single Action Army revolver chambered in .45 Colt was quickly reissued. The .45 Colt cartridge remained in government use then until John Browning’s M1911 that chambered the .45 ACP was adopted in 1911.
Even though the government had adopted the semi-auto 1911, a double-action revolver chambered in .45 ACP was pressed into use during World War I. At Gunsite, the M25 Classic represented this class of guns, although it was not one that was used during WWI.
The .45 Colt and the .45 ACP have about the same ballistics, so the .45 could be called “America’s handgun caliber.” It has served our military, police and law-abiding citizens well for more than a century, and, to some people, challenging its supremacy is heresy.
Editor’s Note: This article is an excerpt from the September 2017 issue of Gun Digest the Magazine.
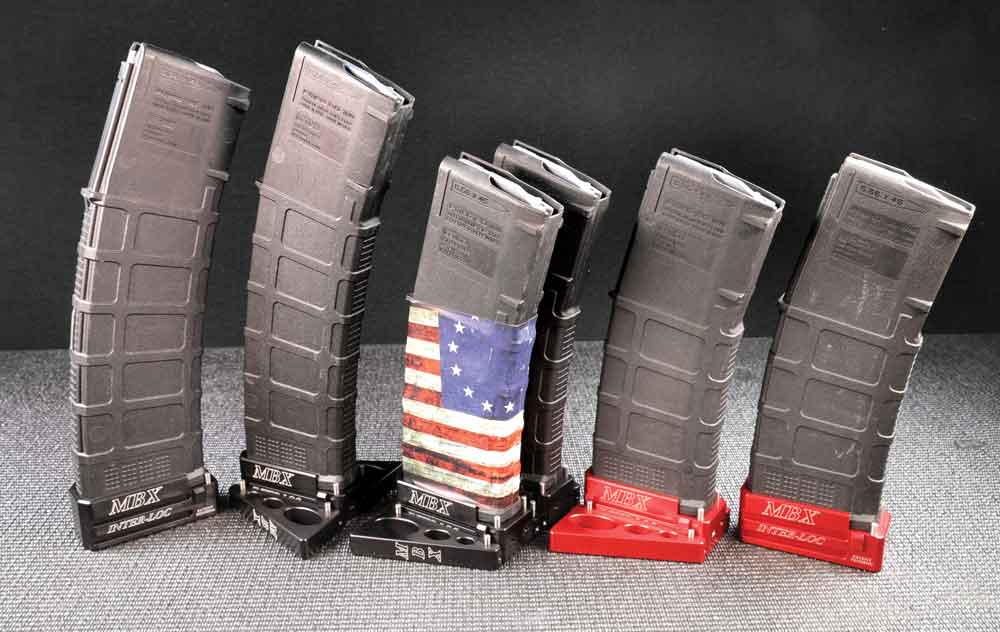
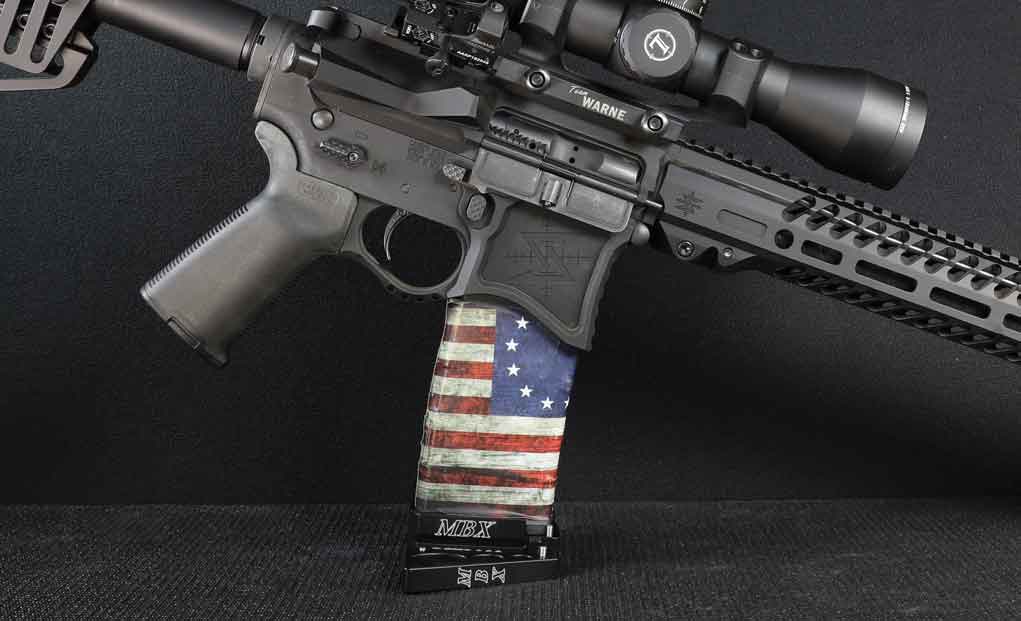
The Basepad Extension and Inter-Loc System from MBX Extreme offer speed and stability for all genres of shooting.
What advantages do the MBX Extreme Extension and Inter-Loc System offer?
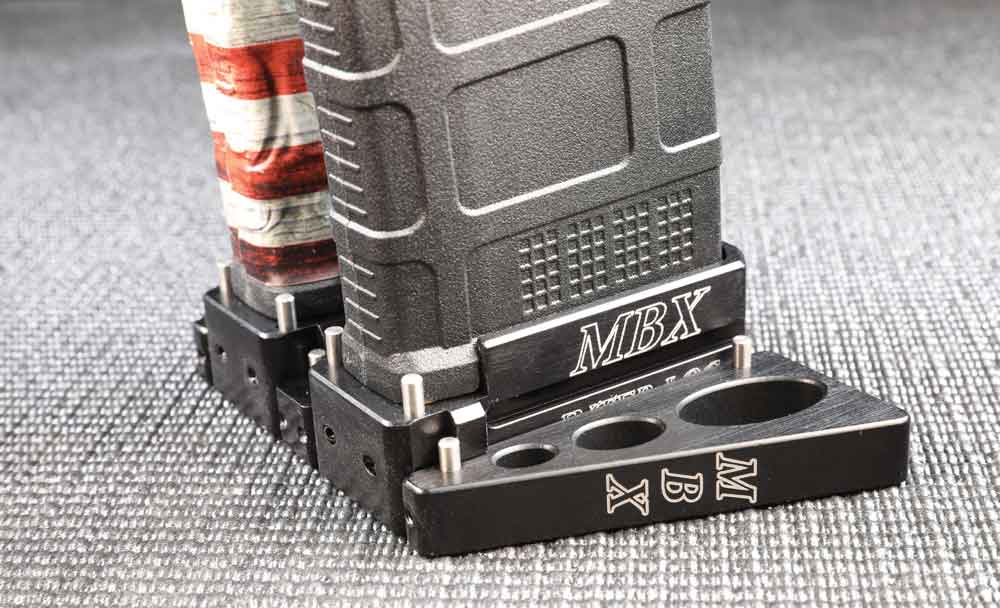
The MBX Extreme Inter-Loc System is a clever way of coupling magazines.
It also increases their capacity.
The attachment of wings to the Inter-Loc System doubles as a shooting rest.
This keeps shooters from having to compete in the open class of 3-Gun.
Best of all, it can be modified without tools, allowing for adjustment on the fly.
Extreme sports tend to lead to unique innovations that might not otherwise occur. Consider drag racing for example. Nearly 100 years ago, drivers raced each other on a straight quarter-mile raceway. The desire to win led to improvements in engines, tires and transmissions — anything that could make a car go faster. Early advances in drag racing even led to better aircraft engines that helped the United States in World War II.
Shooting sports has its share of people who invent things to help with speed and accuracy. Many shooting disciplines, such as 3-gun, employ what’s known as “time-plus” scoring. That is, the winner is the fastest shooter after adding in any penalties for missing targets. A shooter’s need for speed leads tinkerers down the innovation path. Adrian Cobb is one of these firearms innovators.
Cobb’s story begins in California by way of the United Kingdom. Originally from England, he moved to the Golden State at the age of 21 after marrying an American citizen. There he got involved in racing Triumph motorcycles and eventually car racing. A self-taught engineer, he modified engines and cars as he strived to go ever faster.
“I basically learned engineering skills from the ground up,” said Cobb. As time went on, I started to do competitive shooting. The two sports are similar in that there is a timer and you try to go faster and faster.”
Cobb started modifying magazines and guns for people, eventually starting a business called Mag Blueprinting. When he finally got his FFL, Cobb had to come up with a new company name, and he started with “MB” from Mag Blueprinting.
“I noticed every company had a three-letter acronym. I put an X on there and, well, Extreme sounded good, too,” he quipped. MBX Extreme was born.
“Originally, I started with tuning magazines,” Cobb added. “After a while, I couldn’t get magazines because they weren’t available. I could see there were some design issues with what was out there. I sat down and set out to design a magazine that people would want.”
Over a couple of years in his shop, Cobb designed, tested and failed, until one day he made a magazine that worked. His company still makes high-quality pistol magazines for the following styles: STI, Caspian/Tangfolio and Para/Armscor.
Playing The Field
In the same way that drag racing has classes such as top-fuel dragsters, funny cars or pro stock, 3-gun and other timed shooting sports have classes based on gear. Magazine lengths are regulated as a way to level the playing field in a given class. Working within the constraint of length, Cobb designed magazines that would hold more rounds.
“I try to design things that people have overlooked,” said Cobb. “I used to tune magazines to hold 29 rounds or 21 rounds or whatever, and in the competitive shooting world, having an extra round can be a big advantage.”
A few extra rounds might not seem like much of an advantage at first. However, when a match might be decided by tenths of a second, an unnecessary magazine change can prevent a trip to the podium.
The Birth Of The Inter-Loc System
One of Cobb’s latest developments is the Inter-Loc System for magazines. This patent-pending gear is a magazine extension system for black rifles that allows the shooter to couple and decouple two magazines without the use of tools. The base pads are machined from aluminum and come in a variety of colors, and they attach to Magpul Gen 3 magazines. The system also has “wings” that may be attached to the sides of the base plates to provide a stable rest for the shooter, and this too may be done without tools.
In most competitions, shooters who use a bipod on their rifle are pushed into the “open” or unlimited class where there are few, if any, gear restrictions — resting one’s rifle on coupled magazines is usually permitted without having to go to the open class, however. This is one place where the Inter-Loc System shines. The platform the system creates is extremely solid and not much different than shooting from a bipod.
In addition to providing a stable shooting platform, the advantages of the Inter-Loc System include capacity (adding 4-5 rounds on a 40-round magazine), weight (helps with dropping an empty magazine clear of the rifle) and versatility. The latter is due to the ability to change configurations without tools. Magazines may be coupled, decoupled, have wings added or removed with no tools. This is a great advantage for competition shooters who often optimize their gear from stage to stage.
Suppose for example a shooter used coupled mags with wings on a 3-gun stage that required precision prone shooting. The next stage might not have that requirement, so the shooter may quickly decouple the mags, remove the wings, and simply use the higher capacity magazines. These adjustments can be done in seconds. Versatility is also provided in the form of different colors. Colored pads may seem like a fashion statement or novelty at first, but shooters often use different (expensive) ammunition for long-range steel rifle targets as compared to close-range paper targets. Color-coded magazine bases help keep things organized, and they are easy to identify under pressure.
Cobb has been surprised at how people have used the MBX Extreme Inter-Loc System more than anything else.
“It was originally designed to have the wings at the back and to be used as a platform,” said Cobb. “People have used them to stage a gun or use the wing to keep the grip up off the deck so they can grab the gun more easily. Some people have liked putting one wing one way and one wing the other way because they like the support it gives.”
In spite of his success with a variety of MBX Extreme products, Adrian Cobb is probably just getting started. When he first arrived in the United States, he found the opportunities here captivating and unlimited.
“I was like a kid in a candy store,” remarked Cobb. “I think you tend to appreciate the opportunities if you come from a different country where there aren’t as many. Many people I’ve met don’t really recognize how lucky they are with all you can do here and the freedom you have. I think this gives me a certain drive because I didn’t have these opportunities [in England] and, suddenly, I did.”
It was clear from the conversation that Cobb not only saw the opportunities here in the United States, he pursued them aggressively. True to his racing roots, he gave no indication of slowing down anytime soon.
Editor’s Note: This “Modern Gunnery” column is an excerpt from the September 2017 issue of Gun Digest the Magazine.
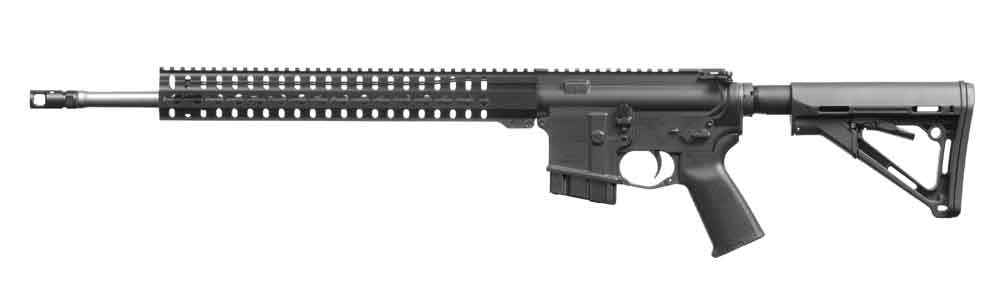
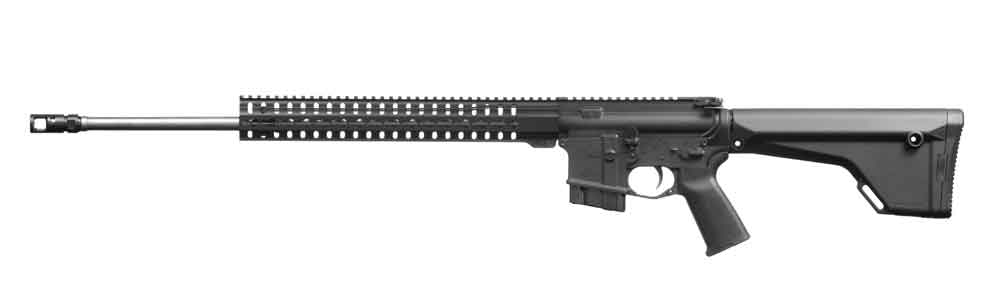
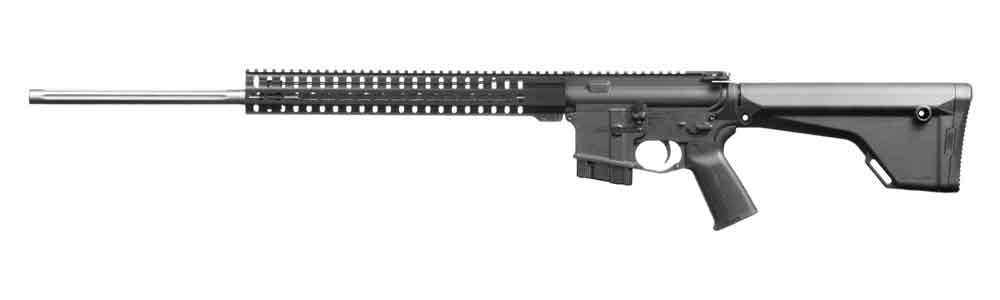
The CMMG Mk4 is the latest platform tailored to embrace the scorching 22 Nosler, with four models now being chambered for the cartridge.
CMMG has introduced four Mk4 models configured for the 22 Nosler.
The four models come with 18-, 22- or 24-inch barrels.
Each rifle’s barrel utilizes optimized 1:8 twist rates.
CMMG also released complete uppers and barrels in 22 Nosler.
In recent years, Nosler’s ballisticians have appeared to do their darndest to tear the copper jacket off the company’s bullets. The ammo maker’s proprietary cartridges are by far among the hottest available for their respective calibers. And the gun-manufacturing end of the industry has been quick to embrace this blistering ammunition.
CMMG recently jumped on the Nosler bandwagon, embracing a cartridge the Oregon ammo company cooked up especially for the AR-15 platform. The Missouri gunmaker now offers its CMMG Mk4 rifle chambered for the fast and flat-shooting 22 Nosler, which was just released at the 2017 SHOT Show. For varmint hunters or competitors searching for a way to reach out a bit farther or hit harder, this should prove a solid match between cartridge and rifle.
CMMG hasn’t held back in embracing the Nosler creation, serving up four Mk4 models in the line, all well-tailored for practical applications of the 22 Nosler. On the roster are the Mk4 RCE, Mk4 S, Mk4 P and Mk4 V2.
Depending on the model, nearly all the rifles come with an 18- or 22-inch medium taper barrel, all outfitted with rifle-length gas systems and a muzzle brake or compensator. The exception to this is the Mk4 V2, which has a medium tapered stainless steel fluted barrel and is cut with a target crown.
The new line of Mk4s also all boast CMMG’s RKM14 handguard, which free-float the barrel and utilize the KeyMod system at 3, 6 and 9 o’clock positions for the addition of accessories. Additionally, the handguard has a full-length Picatinny rail that runs directly into the upper receiver, giving ample real estate to attach an optic.
Shooters also have the option for upgraded triggers on two of the 22 Nosler models, with the CMMG Mk4 RCE and Mk4 V2 outfitted with Geissele Automatics SSA Two-Stage triggers. The Mk P and S each come with single-stage Mil-Spec-style triggers.
The cartridge itself is proving to live up to its billing as the most powerful .22 caliber on the market. The 22 Nosler can push a 55-grain bullet upward of 3,500 fps out of a 24-inch barrel and shows little to no drop out to 200 yards. Nosler achieved these impressive results by super-sizing the 22 Nosler’s case, a 25-percent increase in case capacity over the .223 Rem. These larger-diameter cases, however, forced Nosler to turn to 6.8 SPC magazines to ensure proper feeding (CMMG includes one 10-round mag with all its rifles).
CMMG is ahead of the curve when it comes to rifles chambered in 22 Nosler. While there are examples on the market, they have not become ubiquitous. And the company, in its typical fashion, has also turned its eye to those who wish to build or configure an existing AR to shoot 22 Nosler, offering both barrels and complete uppers. Presently, the CMMG Mk4 22 Nosler models run from $1,099.95 to $1,449.95 for a complete rifle. Barrels run from $209.95 to $349.95, and complete uppers from $799.95 to $899.95.
Specifications:
CMMG Mk4 in 22 Nosler
Mk4 S Barrel: 18 in., 1:8 Twist, 22 Nosler, Medium Taper 416SS Barrel Muzzle: A2 comp., threaded 1/2-28 Handguard: CMMG RKM14 KeyMod handguard Furniture: A2 pistol grip, M4 butt stock with 6-pos Mil-Spec receiver extension Receivers: Forged 7075-T6 AL M4 type upper, AR15 type lower Trigger: Single stage mil-spec style trigger Weight: 6.5 lbs. (UNLOADED) Length: 34.5 in. (STOCK COLLAPSED) MSRP: $1,099.95
To gain the full tactical advantage a shotgun offers in a self-defense situation, it takes a strategic game plan. Here are four tips to boost your tactical shotgun skills.
Four considerations for improving your tactical shotgun skills:
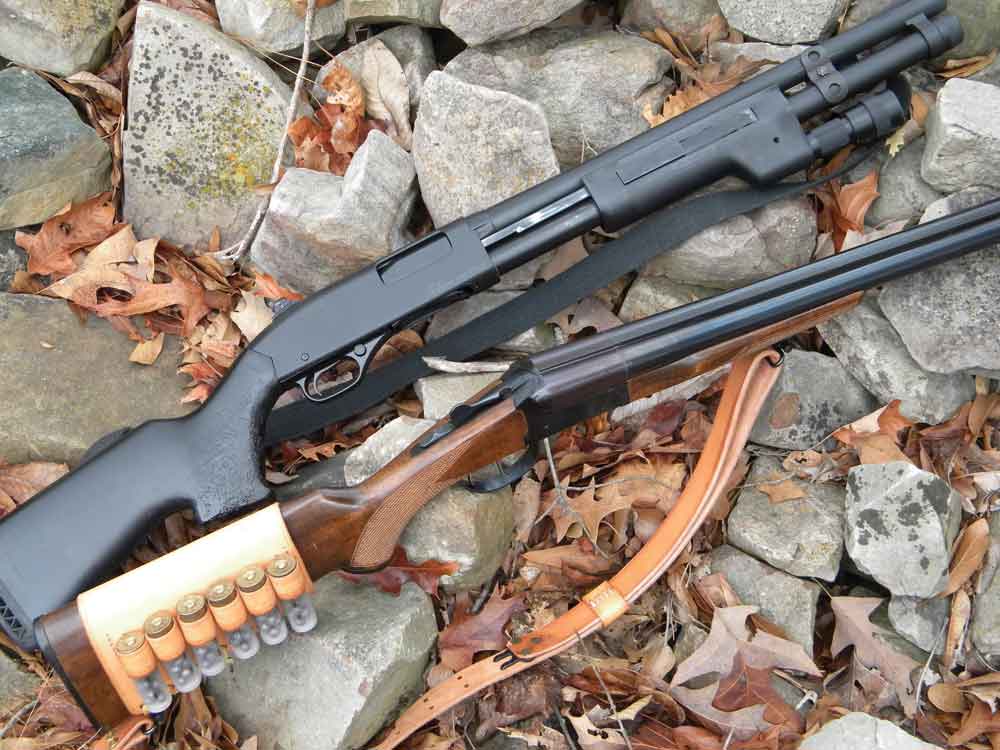
Shotguns have a long and successful history. The first use of the term shotgun dates back to the late 1700s. The military has used shotguns extensively. They were popular with cavalry on both sides during the War Between the States, Germany filed an official complaint against the U.S. during WWI for the use of “trench guns,” and both French and U.S. forces used shotguns in the jungles of Vietnam. Almost every law enforcement agency issues “riot guns,” although AR’s seem to be steadily replacing them. Ask homeowners what weapon they have for home protection and the answer was and usually is a shotgun. It is truly a versatile weapon, especially considering the wide variety of ammo available today. The key to shotguns is setting one up for proper home defense and having mastery of basic tactical shotgun skills to be able to use it well.
Choose Your Action
Shotguns come in all types, from single-shot and double-barrel break tops, lever, bolt and pump actions to semi- and even full-auto. The most versatile shotguns are pump actions. A lot of the semi-auto guns are ammo sensitive; a pump gun works with reduced recoil rounds, “dragon-breath” flame-throwing rounds, non-lethal rounds and, of course, standard tactical and home defense loads. Single and double barrels will also work with the various rounds; you’ll just have to learn to reload more efficiently.
Rig It For Defense
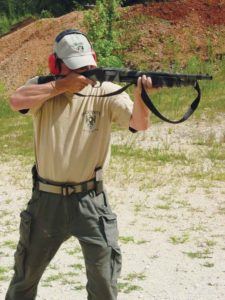
When it comes to setting up your home defense shotgun, a sling is mandatory. The sling for the shotgun is like the holster for your pistol. I prefer a simple two-point sling, which can be looped around my neck for a hands-free mode. “Tactical” slings, the term I use for anything that loops around the body, have their place, just keep in mind in the middle of the night when you’re grabbing the gun there may not be time to loop it up. Practice some without having the sling looped around your body.
The standard front sight is a round bead. For fighting we need a sight that’s quick to pick up in the daylight as well as when it’s dark. Again, there are a lot of options. My favorite is the XS brand sights. They offer replacement front sights, and sets with front and rear sights. Adjustable sights are good, especially if you’re shooting slugs for accuracy. Another option is the red-dot sight, which works as well on shotguns as they do on carbines.
Equipping the shotgun with a light is a good idea. You can run a handheld light with a pistol or carbine, but operating a pump shotgun with a handheld light never works out very well. Just keep in mind that the recoil of a shotgun places a lot more stress on the light system, so do plenty of research to find out what your best option is.
It’s also a good idea to carry extra ammo. I use either a butt-cuff, strapped around the stock, a side-saddle, which holds extra rounds on the side of the receiver, or both. There are a lot of other accessories for shotguns, but not everyone needs all of them. I prefer to lean toward simplicity and light weight. As you train and begin to improve your tactical shotgun skills, don’t be afraid to experiment with different parts and accessories until discovering the right combination for you.
To use a shotgun properly requires training and practice. Training is an introduction to the shotgun skills you need; practice is the repetition necessary to actually learn these skills. You start with loading, which is more complicated than most people actually think, particularly in a high-stress situation.
After that, you learn unloading without cycling the action back and forth and dumping your rounds on the ground. You’ll also learn how and why to cycle the pump action aggressively, using the elbow instead of the shoulder joint.
Racking the action correctly prevents the action bars from binding, or locking up, and “short-stroking,” which is a major cause of most shotgun malfunctions. You need to know how to clear malfunctions and most importantly how to reload.
Feed The Machine
There are a variety of reloading techniques for the shotgun. The main thing to keep in mind is that you have to feed the machine. Shotguns have a limited round count, and while you shouldn’t need a lot of ammo, you never know what may be required to win the fight.
What I call a “tactical” reload, keeping the gun topped off, is a good shotgun skill to have and is easily performed. You fire two rounds, and then you feed two more fresh rounds into the magazine tube. By learning to consciously perform this task, you will ensure you never empty your shotgun.
There are a lot of names for the empty reload. The shotgun is empty, but you still need to be shooting. Basically, on a pump gun, it comes down to opening the action, shoving a shell into the port, closing the action, firing and repeating the process as necessary. This should be practiced while moving from a variety of different firing positions, and especially in the dark. The shotgun also allows you to load a different type of round during the confrontation, say switching from the buckshot in the mag tube by feeding in a slug and cycling the action to chamber it.
Choosing the right ammo is critical with the shotgun. One of the big concerns for home defense is over-penetration. Buckshot can travel through a lot of sheetrock and material until it comes to rest. Slugs can go through your house, out of it and into the neighbor’s home. Birdshot is often a much better choice. At the distances you’ll find inside your home, a healthy dose of birdshot in a tight pattern is very effective.
Once you determine the type of round you need, it’s off to the range to test and pattern. Patterning your ammo allows you to determine what brand/type of ammo works best in your gun and exactly how the round will perform at various distances. One of the common myths of a shotgun is that you just need to point it and blast away. Most beginners are amazed at how little the pattern spreads. This is especially true with modern defensive ammo that produces consistent and tight patterns. So, yes, you still have to aim the shotgun.
Pattern The Shotgun
Patterning the shotgun also provides you with data on your point of aim versus the point of impact of the shot or slugs. Should you find yourself in a unique situation and being forced to defend yourself from a threat at a great distance, it’s good to know in advance that you need to aim a little to the left to hit your target dead center.
Another point you need to consider is the shotgun’s “ready” mode. Again there are a lot of terms used, but one mode would be with it fully loaded, with a full mag tube and a round in the chamber. It’s ready for use, but one factor to consider is that a lot of shotguns have a free-floating firing pin.
Every time you load the shotgun there is a possibility of a “slam-fire,” or firing a round as the bolt chambers it. This also means that, with a round in the chamber, a sharp, sudden thump, like a car rear-ending your vehicle or hitting a large hole or speed bump can possibly cause a round to discharge from the shotgun.
Another ready mode would be having the magazine tube loaded, but with no round in the chamber. To make it ready to fire, you have to chamber a round. This takes time and must be a habit, so if this is your mode, then part of retrieving the shotgun includes chambering a round. Another factor is the noise of racking a round into the chamber.
One school of thought is that this will scare away an intruder. The other side of that coin is that it alerts the threat that you are armed, and they may choose to start firing first.
Using any firearm well is an art. The same applies to the shotgun, and maybe more so than other weapons. In some ways shotguns are simple, but then there are other aspects, such as keeping it loaded and firing under duress, that can be more complicated. These are shotgun skills that need to be mastered. Shotguns are versatile weapons, but they won’t do everything. However, with the right equipment, and plenty of training and practice, you can become a shotgun artist — a skill that will serve you well.
Does Your Shotgun Fit?
One of the first steps in selecting or outfitting a shotgun is making it fit correctly by choosing or modifying the weapon so it matches your body size.
Start with the stock. To shoot and manipulate it efficiently you need the proper LOP — length of pull — which is the distance between trigger and the back of the stock. Most shotguns come with a long LOP. Most people need a short length LOP. Manufacturers offer youth models, which are about the proper size for most adults, or you can install a youth stock on a shotgun. Just watching someone firing a shotgun that doesn’t fit is a painful experience. With a long stock, you can’t seat it into the actual pocket of the shoulder. Most people end up holding it outside the pocket and on the deltoid muscle, producing pain every time they press the trigger. This leads to a big flinch with each shot and creates ugly, and unnecessary, bruising.
The proper LOP assists the shooter in becoming more accurate, in recovering from the recoil and in manipulating the weapon properly. There’s a lot of information on determining the proper LOP on the Internet, but ultimately it should be determined by what feels and works best for you.
Editor’s Note: This article is an excerpt from the March 2015 issue of Gun Digest the Magazine.
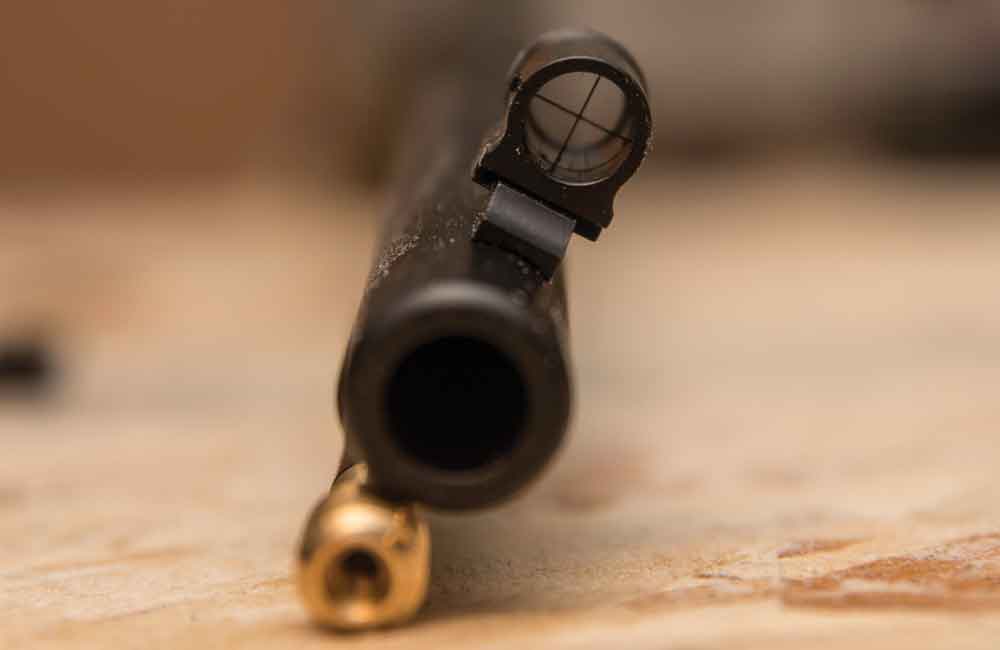
Whether it’s because of preference or state restrictions on optics, many hunters rely on iron sights for muzzleloaders when heading afield. While most muzzleloader manufacturers offer the choice of fiber optic sights, they often don’t optimize longer-range shots. Instead, the fiber optic bead, which is usually pretty large, covers the target and makes long-range accuracy a difficult proposition.
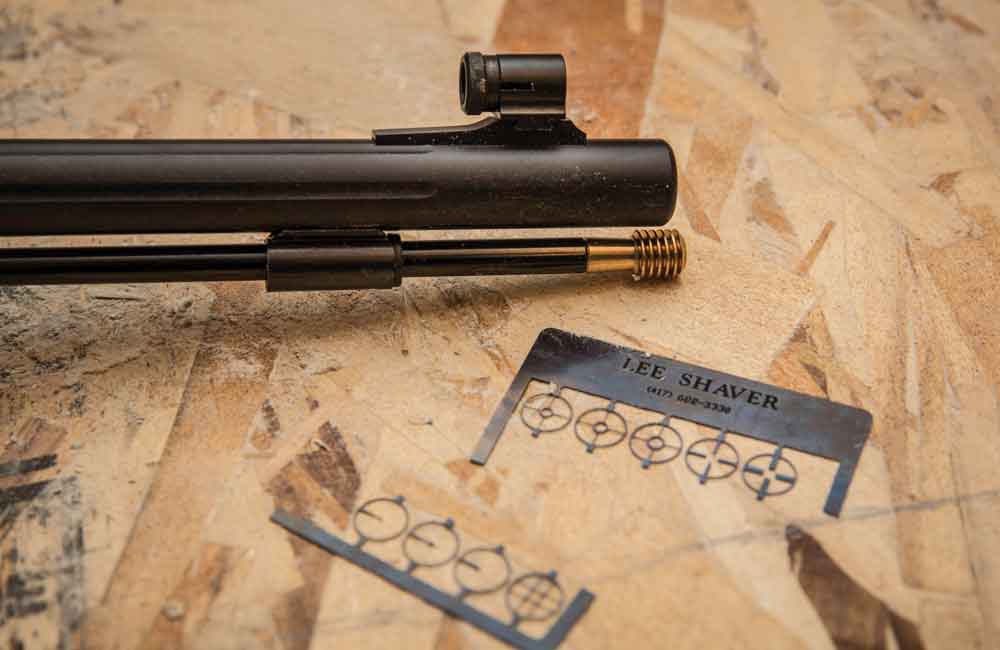
There is an alternative way to extend your accuracy with an open-sighted muzzleloader, however, and it’s both quick and easy. With only a few parts ordered from Brownells, the right sight setup is right around $100 and a few minutes of installation away from becoming part of your future. The only tools required are a screwdriver and a tube of Loctite, and the whole process takes just minutes (minus the time spent sighting in your smoke pole). For the purpose of this article, I upgraded the sights on a CVA Accura V2, which comes pre-drilled and tapped for either iron sights or optics.
Brownells Parts & Components
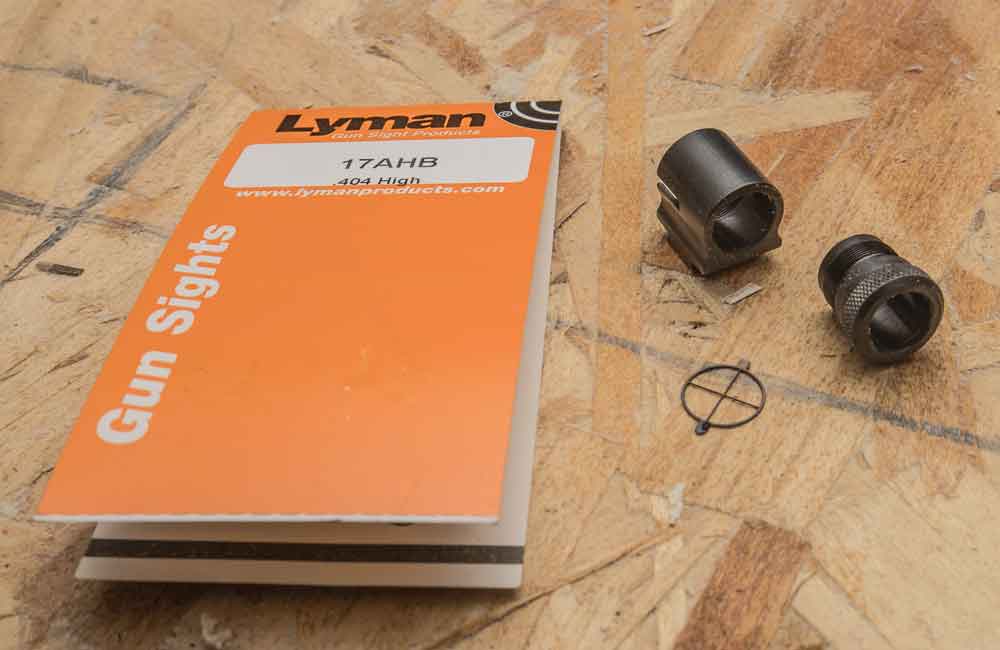
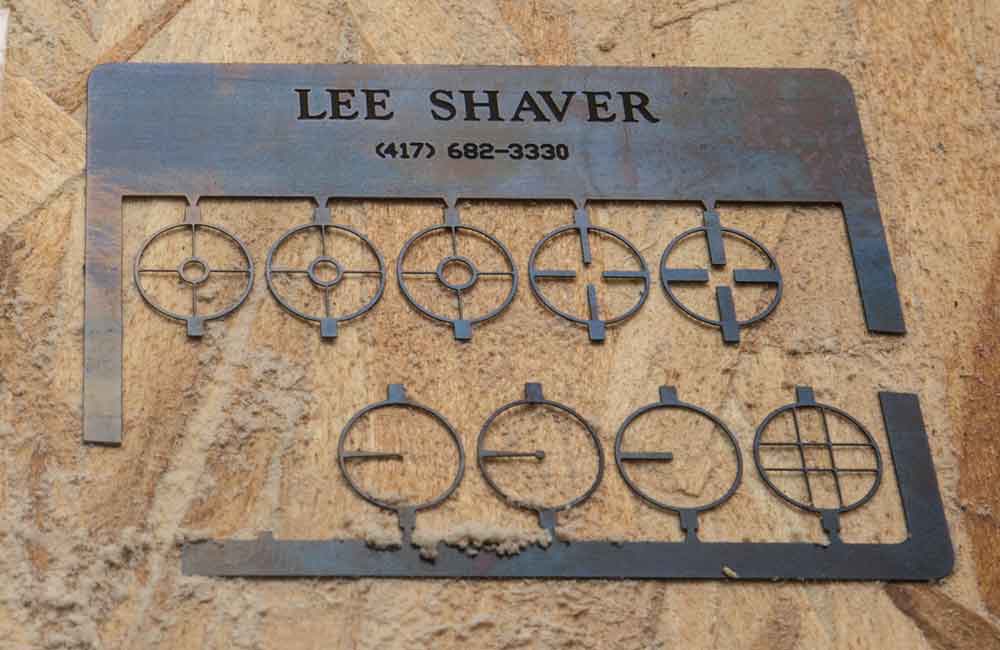
First, you’ll need a Lyman globe sight, which will attach to the front of the barrel, and a Marble Arms dovetail front ramp to mount it on. The front ramp attaches with a single screw, and the Lyman globe sight (with dovetail base) slides into place. While the Lyman globe sight comes with several inserts, I find them to be too large for my preference. To get smaller cut crosshair lines, I went with Lee Shaver’s globe sight inserts (10 total options for you to choose from). Finally, you’ll need a rear sight; I went with the Williams Gun Sight, which also attaches with a single or double screw setup (whichever your muzzleloader is drilled and tapped to fit). The Williams sight runs $35, the Lyman globe sight $40, Lee Shaver inserts $22, and the Marble Arms front ramp $12. If my high school math serves me right, that’s $109, before tax. Not bad, especially when you consider how much time and money you’ve likely invested in preference points and statewide draws to get that coveted muzzleloader tag.
Attaching The Front Ramp
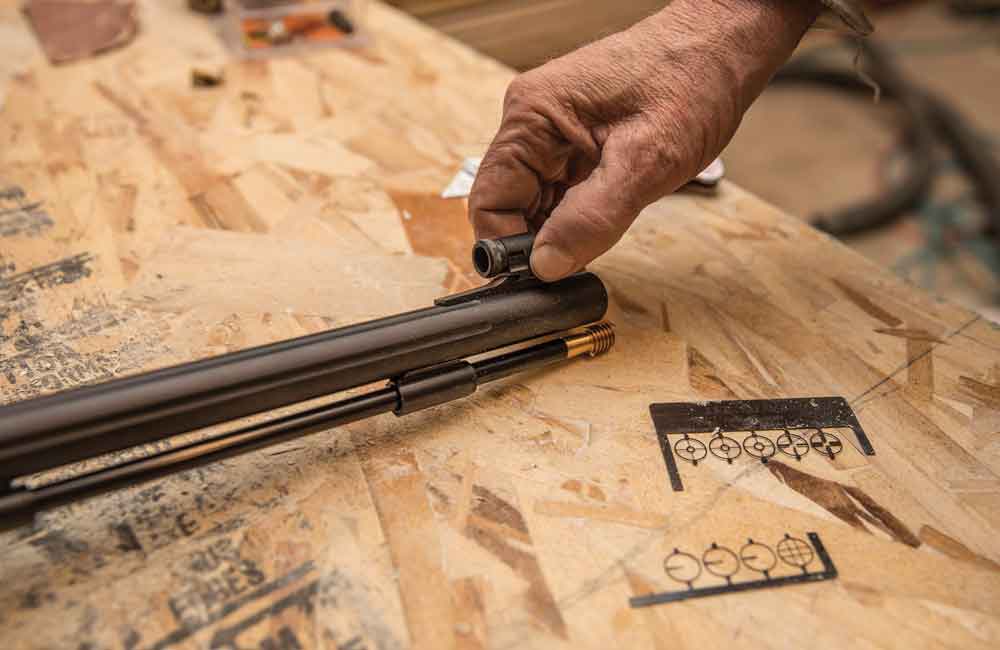
First, you’ll want to start by attaching the Marble Arms front ramp to the barrel of the muzzleloader. Here’s where I’d recommend Loctite or a similar thread locker to prevent screws coming loose.
Placing The Sight Insert
You can now turn to the Lyman globe sight. Unscrew the front of the sight, and then remove the insert that it came with. Take a pair of wire cutters or tin snips and remove the Lee Shaver insert you’d like to use on your muzzleloader. For this review, I used the classic cross-shaped crosshair — it’s simple and effective, and the fine lines won’t cover your target even at considerable ranges. Once the insert is in place, simply screw the cap back on the globe sight.
Attaching The Globe Sight
Once your insert is secured in the globe sight, you’ll want to attach the sight to the front ramp via the dovetail base. Here’s where things got interesting for me. When I went to slide the globe sight into the base, it was too loose to lock securely in place. What to do? Call the Brownells Gun Tech hotline, that’s what. After a minute or so on hold, I spoke with a friendly gentleman who informed me that Lyman had stopped making front ramps years ago, which means that some of the bases (produced by Marble Arms) don’t have an exact fit. But there’s an easy enough solution that I employed — a piece of duct tape and super glue. With tape in place the fit becomes incredibly tight, and the glue holds everything in place. This probably fits the definition of redneck engineering, but it hasn’t failed me yet (at least in this instance).
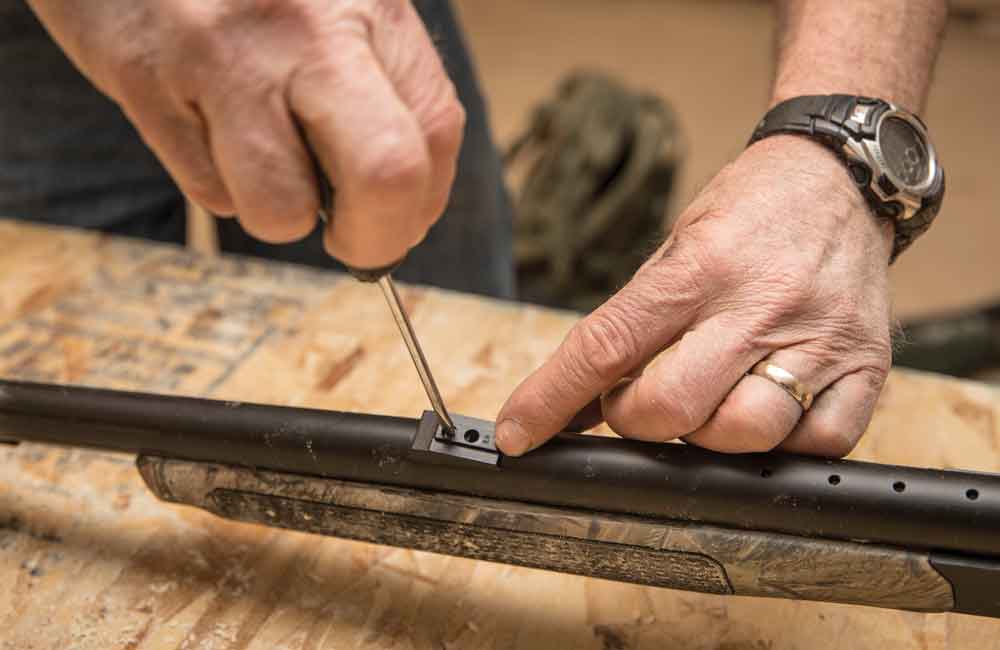
Attaching The Rear Sight
Once you’ve got your front globe sight mounted on the front ramp, it’s time to focus your attention on the rear sight from Williams. First, remove the side screw that allows the aperture to move up and down the base of the sight. Simply slide the aperture until it comes off. This reveals a setscrew, which you can now secure to the barrel of the muzzleloader. If your barrel doesn’t have adequate screw holes, a gunsmith can hook you up in no time. Loctite, secure the base, and then reattach the top portion of the sight. This slides up and down to make elevation adjustments at the range.
That’s it. Now that you’ve got your sights in place, it’s time to head to the range and see what the ol’ smoke pole can do. I think you’ll find, as I did, that it’s well worth the $100 and 15 minutes spent installing sights. I’ve successfully extended my range with iron sights well past the 100-yard range, something I was apprehensive to do with fiber optics. That means when the preference points add up and I’ve got a trophy bull or buck in my sights, I won’t have to question my ability — or that of the CVA Accura V2, which is a tack driver in its own right.
Editor’s Note: This article originally appeared in the May 2017 issue of Gun Digest the Magazine.
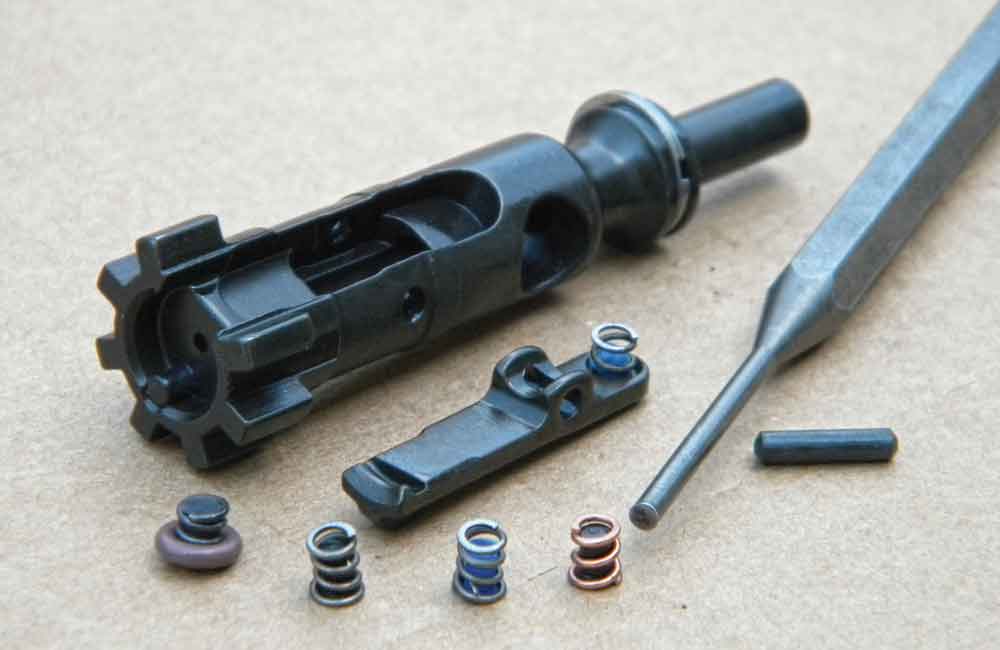
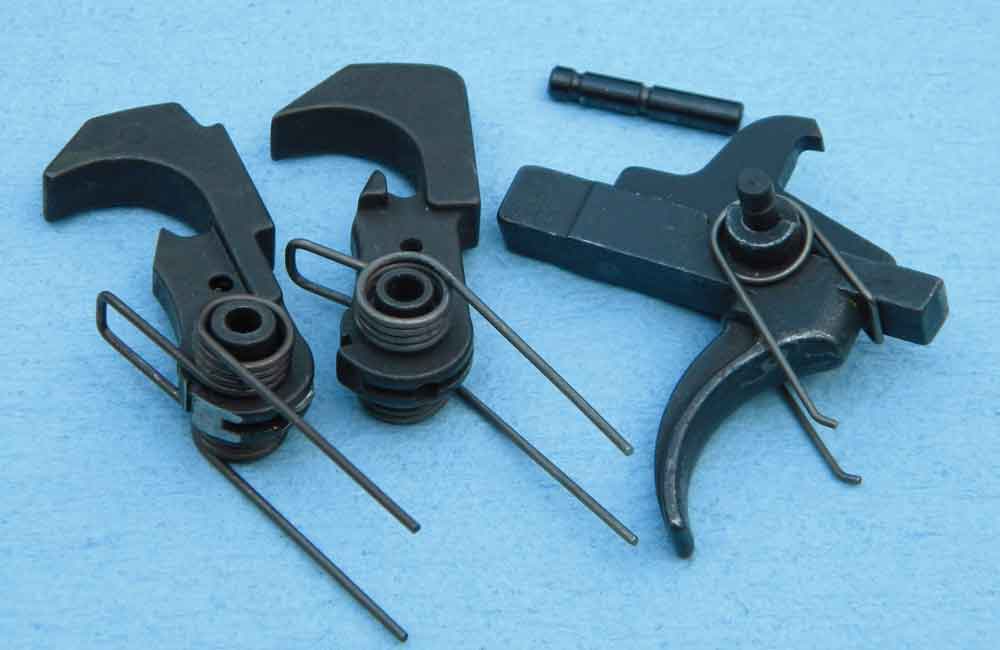
One of the more overlooked components of the AR-15, properly functioning AR springs are vital to the platform’s performance.
Springs in the buffer assembly, bolt group and trigger group are important to maintain.
Proper care and ensuring functionality of those go a long way in ensuring reliability.
The “buffer” or action spring has a large surface area which needs lubrication.
Extractor and ejector springs in the bolt group need to be maintained.
Three springs in the trigger group — trigger, hammer and disconnector — require care.
Springs are important, but often overlooked, parts for the AR. There are a lot of options out there, and not all springs are created equally. Choosing the right springs ensures reliability for your AR rifle or carbine. For this discussion, we’re going to focus on the springs related to three important areas: the buffer assembly, the bolt and the trigger group.
Buffer Springs
There are two basic “buffer” or action springs. The spring for fixed stocks is around 12½ inches in length. The carbine spring, for ARs with adjustable stocks, is shorter, at about 11 ¼ inches long. (Buffer springs can vary up to about a half-inch in length.) For a “fighting” AR — self-defense, law enforcement or field use — I prefer standard Mil-Spec springs, which are made from round wire. There are other options out there, such as “universal” springs that use one length spring for fixed and adjustable stocks. These springs often increase the spring pressure, making it difficult to cycle the action efficiently. I also don’t like springs made from flat wire. They create a lot of friction and wear in the extension tube. Unless you’re fine-tuning an AR for a specific application and ammo, Mil-Spec is the way to go.
The buffer spring is a large friction surface and needs to be lubed. Cycle the charging handle. If you hear/feel a gritty action from the buffer spring, it needs lubing. Remove the spring by pressing the buffer detent — at the front of the extension tube on the bottom — down and pulling the buffer and spring forward. Clean the spring and inside of the tube, then lube the spring. I use SLIP 2000 EWL. Reinstall the buffer and spring, cycle the charging handle a few times, and you should hear and feel a difference.
Bolt Springs
The bolt contains two springs — the extractor and ejector spring. During firing, the extractor pulls the empty case from the chamber, or, when unloading, it extracts a loaded round, and the ejector kicks it out.
The extractor spring provides the tension necessary for the extractor to hold the cartridge case. Too little pressure and the extractor slips off the empty brass as it tries to pull it from the chamber. However, an extractor spring with too much pressure will cause feeding problems. The round will have trouble slipping under the extractor, or the extractor will damage the rim on the brass as it’s chambered. (Note: Steel-cased ammo will cause accelerated wear with your AR.) I feel safe saying this is the most important spring in the AR.
It took Colt more than 35 years to work out the proper spring weight on the extractor for the carbine. During this time, there were lots of different aftermarket extractor springs developed in order to correct this problem. There were also other “fixes,” like O-rings and wedges, to strengthen the existing extractor springs. None of these work well.
Today we have Colt Gold extractor springs. Colt spent a lot of time and money researching and developing this spring. The Gold spring, which actually has a copper color finish, will ensure proper function and longevity.
The ejector, with its spring, kicks out empty cases. Again, this spring can be too heavy or light. An ejector spring that’s too strong causes feeding problems, making it difficult for fresh rounds to slide in behind the extractor when chambering a round. If the ejector spring is weak, you’ll experience failures to eject empty cases.
To test the ejector spring, use your fingernail and moderate pressure to press it into the bolt. During live fire, empty cases should eject a few feet and back at about 4 o’clock. If it’s ejecting in front of you — 2 to 3 o’clock — it’s time to replace the ejector spring. A spring that’s too strong will kick cases 10 or 12 feet out. With both the extractor and ejector spring, you’re looking for “just right.” I use Colt springs from Brownells. I know these are high-quality parts that are truly Mil-Spec.
One reason the extractor and ejector springs fail is due to heat. After extended firing, lock the bolt open. This prevents heat from transferring from the barrel extension, the rear of the barrel where the lugs are, to the spring of the bolt and will extend their life.
Trigger Springs
The AR trigger group has three springs — trigger, hammer and disconnector. The design is simple and reliable, unless you start messing with spring weights or install them incorrectly. There is a big trend today for shooters to install lightweight springs in order to improve the trigger action. This can lead to trouble in several ways.
Remember, under stress — lives depend on your actions — your fingers lose dexterity and feeling. A 3-pound trigger will “feel” like 3 ounces. In defensive or combative applications, a match, competition or lightweight trigger will lead to negligent discharges. This is unacceptable.
Light hammer springs cause light primer strikes. This will be trouble with Mil-Spec or imported ammo, which usually have harder primers. On the range or during a match, a light primer strike is embarrassing. In a fight, it could be tragic.
I would also avoid lightweight disconnector springs. A disconnector spring that’s too light leads to the AR “double tapping,” firing off rounds as the bolt seats into battery and the hammer jumps forward. Sometimes it will cause your AR to go full auto. (Colt modified the AR’s bolt and hammer, creating an “interrupter” to prevent this from occurring.) When it comes to the trigger group, stick with Mil-Spec springs.
The proper positioning of the hammer spring seems simple, but I see a lot of problems with them installed improperly, especially with home-built ARs. The legs of the hammer spring provide the force necessary to ignite the primer. If the hammer spring is positioned on the hammer improperly, you’ll have light primer strikes.
The hammer spring’s legs also hold the trigger pin in place. If the spring is weak, had one leg shortened/cut or it’s installed improperly, it allows the trigger pin to walk out of the receiver. This can cause negligent shots and full-auto fire. If the pin walks out of the receiver, it can also allow the hammer to fall when the AR is set down, bumped or anything else that jars the internals enough for the hammer to slip. There have been people killed by ARs because of this. If you’re not sure about what you’re doing, get a qualified gunsmith to do your AR work. This is not something you should be experimenting with.
The AR is a great firearm. This platform has been in service with our military since the mid 1960s, with no retirement in sight. With the right parts installed correctly, it will provide you with years of reliable service and be something you can pass on to future generations.
This “AR Essentials” column is an excerpt from the Fall 2017 issue of Gun Digest the Magazine.
The MCX Virtus is the new upgraded version of SIG Sauer’s innovative modular firearm, offering shooters a more robust and flexible platform, ready to tackle any situation.
The MCX Virtus features beefier barrels and SIG’s Matchlite Duo Trigger.
It also has an improved bolt lug and increased handguard selection.
Modularity is still the firearm’s main attribute.
The handguard, barrels and buttstock are all easily swapped with minimal tools.
The MCX Virtus maintains familiar AR controls, making it extremely intuitive to use.
Like a wildfire, the concept of modular firearms has swept through the gun world the past few years. The idea is a solid one, allowing shooters to quickly reconfigure — often without tools — a pistol or rifle to different sizes and calibers to meet the situation at hand. And when it comes to these highly versatile weapons systems, SIG Sauer has been at the forefront.
One of the New Hampshire-based gunmaker’s most heralded introductions into this emerging end of the market is the MCX, a piston-driven AR system (really a hybrid) that can go from rifle to pistol as quickly as it can peel off rounds.
Introduced just before the 2015 SHOT Show, SIG Sauer has been quick to improve the already impressive system, recently releasing the MCX Virtus. Boasting more robust barrels, SIG’s Matchlite Duo Trigger, an improved bolt lug and increased handguard selection, the AR system is wicked as ever. But as Gun Digest Editor Luke Hartle notes in his up-close-and-personal with the MCX Virtus in the above video, the firearm’s modularity is still its main attraction.
The handguard can be removed without tools, simply by releasing a captured pivot pin. Swapping out barrels takes seconds through a unique retention system that utilizes two T27 screws and requires absolutely no head spacing checks. And the buttstock is quickly plucked and replaced with the same screwdriver, also held into place by T27 screws. What makes much of this modularity possible is the innovative short-stroke piston system and unique recoil assembly placed above the bolt carrier group.
While under the hood is a world apart from most ARs and their hybrids, the controls are as familiar as an old pair of shoes, with the mag release, safety and charging handle configured the same as any other AR. This is by design, allowing shooters to harness the technical advantage of the MCX Virtus without learning a new manual of arms.
Find out more about what SIG Sauer is offering in this improved weapons system in the above video, and see why it really is the firearm capable of 500 different configurations.
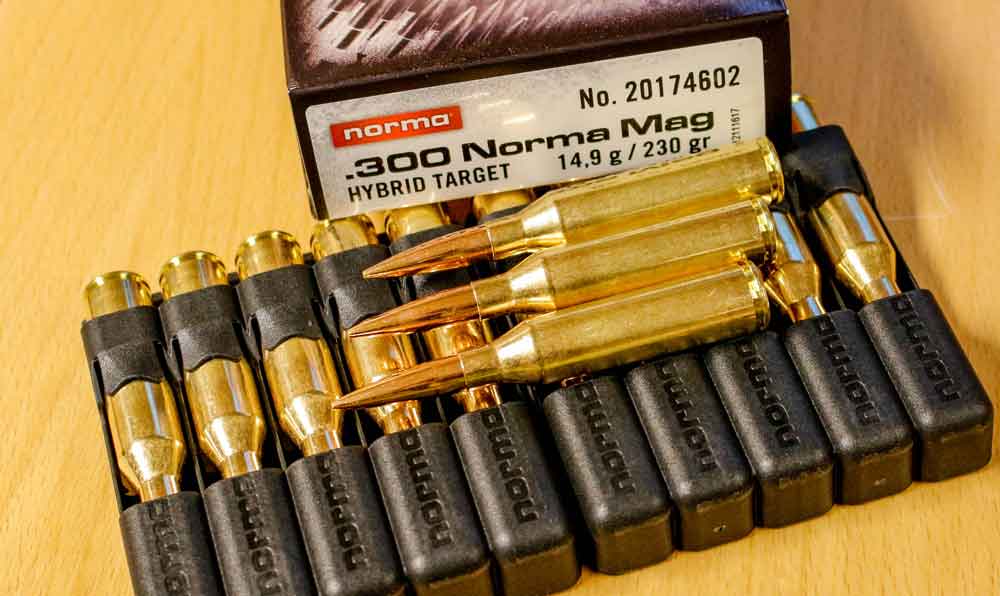
Is the relatively new .300 Norma Magnum a true heavyweight contender, and what can handloaders do with it?
The .300 Norma Magnum is based on the earlier .338 Norma Magnum.
At the range, the .300 Norma Magnum held sub-MOA with several bullets designs.
One group shot at 500 meters measured 1.45 inches.
Bullet choice for reloaders depends on the intended application — many options exist.
With a 230-grain bullet, the .300 Norma Magnum remains supersonic to 1,500 yards.
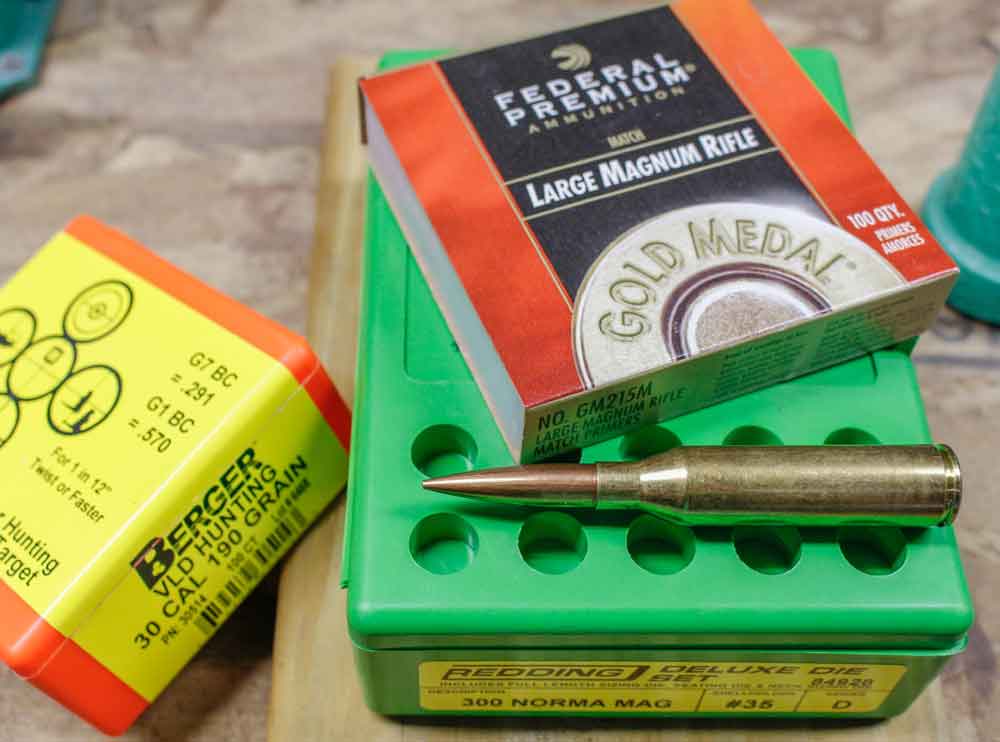
Amotfors, Sweden was not quite the town I expected. It lies just east of the Norwegian border and is rather quaint with its White Moose Hotel, a surprisingly decent pizza joint and an American sports bar. It has a large railway station, and the waterfront in town will actually bring you out to the North Sea. However, its claim to fame is that it is where Norma Precision AB calls home. I was invited to visit the factory — where the magic happens — and meet the key players involved in the development of Norma’s fantastic ammunition and components; it was certainly an eye opener.
The plant employs over 200 people, including some who have enough shooting medals to sink a battleship. First, as a reloader, let me report that the processes involved with making their brass cartridge cases were correlative to the quality of that brass; I now understand why I like it so much. But among all the wonderful folks I met, and all of the sneak peeks behind the curtain, the thing that intrigued me the most was Norma’s new .300 Magnum.
Now, Norma is no stranger to cartridge development, with its .308 Norma Magnum predating the .300 Winchester Magnum and its 6.5-284 Norma firmly established as a benchrest cartridge, not to mention the .358 Norma Magnum. However, the .300 Norma, and its big brother, the .338 Norma Magnum are two very solid developments, each capable of excellent accuracy as well as high velocity.
Introduction To The .300 Norma Magnum
My first date with the pair was at the RWS factory in Nuremburg, Germany, when, at a shooting competition among gun writers, I took second by printing a 1.69-inch three-shot group on the 500-meter range. Yes, that’s right. I was beat by a group measuring 1.45 inches; this cartridge is a shooter.
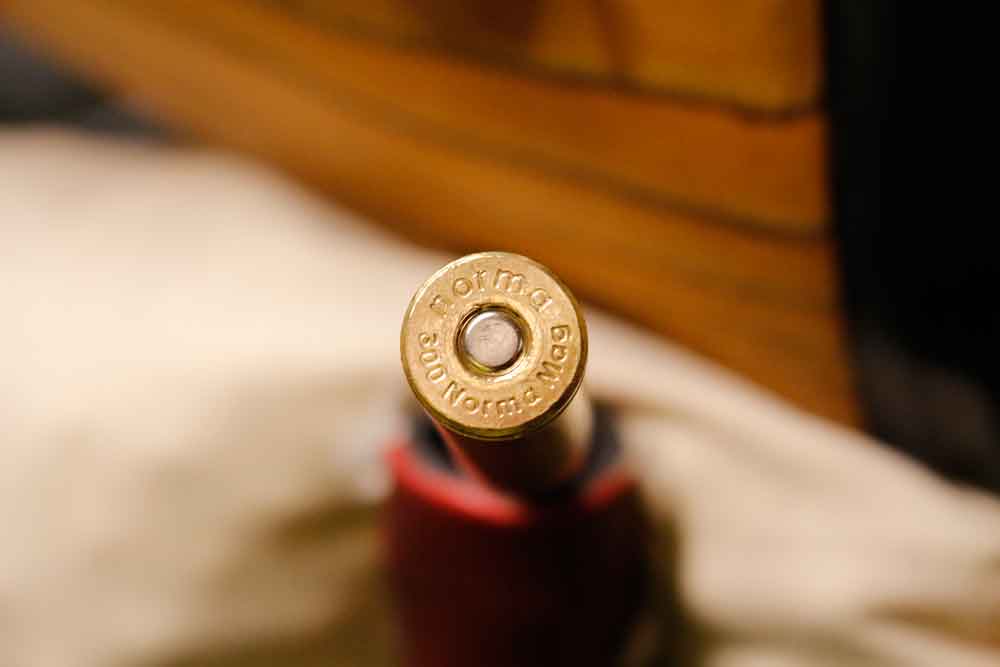
I got the skinny on the younger brother — the .300 Norma — while having a sit down in the Norma Headquarters and immediately recognized the handloading potential of an already excellent factory cartridge. The pair of cartridges is based on the .338 Lapua — in turn based on the .416 Rigby case — shortened to 2.492 inches, yet maintaining a maximum C.O.L. of 3.600 inches — the same as the .375 H&H Magnum. This allows the longest and sleekest bullets to be seated out plenty far enough to maximize the case capacity.
With a case head diameter of 0.588 inch and a steep 20-degree shoulder, the .300 Norma Magnum has a large powder column, but it resembles the profile of the short magnums more than the long, thin belted magnums of the 1960s. The design was a joint effort between Jimmy Sloan and Norma, and it has proved to be more efficient than the longer Lapua offering.
Powder & Primer Considerations
At the range, the .300 Norma Magnum proved to be a very accurate cartridge, holding sub-MOA accuracy with several different bullets. Factory stuff aside, in the handloading realm, I was curious to find out what makes the .300 Norma tick, so we can find an easy starting point for our handloads. What I’ve found makes perfect sense and might cause you to experiment with some different powders that might be foreign to you. Norma Precision — rather obviously — uses Norma powder for its ammunition. Here in the United States, Norma powder is imported and distributed by Western Powder (WesternPowders.com) and is a vastly overlooked source of excellent handloads. I’ve used Norma 200 to fuel several safaris, as it makes a wonderful choice in the .375 H&H Magnum and will deliver serious accuracy with the 235- and 250-grain bullets.
Norma recommends two powders for use in the .300 Norma Magnum: the proven MRP and Norma 217. To translate into terms we all know, the MRP has a burn rate in the vicinity of Alliant Reloder 22 or IMR 7828, while Norma 217 is one of the slowest burning powders, hanging out with Alliant Reloder 25. So, even if you don’t choose to follow in Norma’s powder choice, this should give you an idea where to start; powders with a burn rate equal to or slower than RL-22 should give positive results. I’m certain that the Enduron IMR7977 and Hodgdon’s RETUMBO would also make worthy candidates. The .300 Norma case has a capacity of 103.0 grains of water, so powder charges will approach 90 grains or more, depending on the bullet weight.
Regarding primer choice for the .300 Norma Magnum, you’ll most definitely want a good large rifle magnum primer to ignite that powder column, especially since powder charges can exceed 90 grains. Experimenting with different primer types (please start load development from the bottom of the load data, as pressures can spike quickly in a cartridge this large) might show a significant difference in accuracy results, and once you find that combination of powder/primer/bullet in your rifle, get it tattooed on you forearm, so it’s never lost.
The Right Bullet For The Job
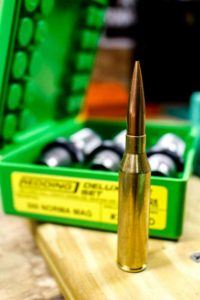
A good set of dies, like Redding’s deluxe die set with neck sizer, is paramount.
Bullet choice for the .300 Norma Magnum is going to depend on the application. If you’re into the truly long-range game, the .300 Norma Magnum might be a dream come true, as it was designed around the 230-grain Berger OTM Hybrid bullet. This bullet uses an optimum blend of secant and tangent ogive curves to best engage the rifling and yet maximize downrange performance. I like any bullet of 180-grains on upward, with the best ballistic coefficient (BC) I can obtain.
For the target game, think the Sierra 220-grain MatchKing, the Hornady 225-grain ELD-Match (with a G1 BC of 0.777, woof!), those great Berger offerings and the like. For a hunting scenario — and I feel the .300 Norma Magnum could make a great elk, moose and bear rifle — bullets like the 180-grain Swift Scirocco II, the 220-grain ELD-X and the Nosler AccuBond Long Range at 190 and 210 grains will all provide excellent terminal ballistics, in addition to good wind deflection characteristics.
And the beauty of the .300 Norma Magnum is that all of these long-for-caliber bullets can be seated out far enough to keep the shank of the bullet — before the ogive — at the case mouth. I’ve had issues with the .300 Win. Mag. when trying to use long-ogive bullets and maintain the SAAMI-specified C.O.L. measurement.
What about the velocity? Well, with a case like the .300 Norma, the velocity is certainly there. The 220-grain slugs can be driven to just over 3,000 fps, and the 230-grain bullets just 50 fps slower. A good 180-grain hunting bullet can easily reach 3,250 fps, putting the .300 Norma in between the .300 Weatherby/30 Nosler and .300 Remington Ultra Magnum/.30-378 Weatherby on the velocity scale. In my experience, the recoil of the .300 Norma is manageable, about on par with the .300 Winchester, maybe a bit more, but nothing horrendous.
Parting Shots
So, do we need another .30-caliber magnum? I mean, with the plethora of cartridges launching a .30-caliber bullet, couldn’t we make do with what we have already? The .300 Winchester Magnum is a fantastic cartridge, and the .300 Weatherby and .300 Holland & Holland each have their following, not to mention the .300 Remington Ultra Magnum crowd, as well as those who’ve taken to the .300 Winchester Short Magnum.
Well, the U.S. military seems to believe the answer to that first question is a definite affirmative. SOCOM has adopted the .300 Norma Magnum for its Advanced Sniper Rifle, more than likely due to the fact that the .300 Norma will remain supersonic — with the 230-grain bullet — as far as the .338 Lapua will with its 300-grain pill; both go transonic somewhere around 1,500 yards. Based on my experiences with the factory loads for the .300 Norma Magnum, I am eagerly awaiting my test rifle so I can begin tweaking the handloads. Keep your eye on this cartridge; I feel Norma has got something very special here.
Editor’s Note: This “Reloading Bench” column is an excerpt from the August 2017 issue of Gun Digest the Magazine.
The Remington Model 8, and later the Model 81 Woodsmaster, was a classic John Browning designed semi-auto, and one of the earliest to see real success.
The Remington Model 8 was patented in 1900.
The Models 8 and, later, 81 were produced from 1906 to 1950.
The Model 8/81 Woodsmaster were both offered in high-grade models.
High-capacity magazine police models and models in .25 Remington are more valuable.
The Remington Model 8 semi-automatic rifle was one of the many firearms designed by John M. Browning. Its history goes back to the turn of the 20th Century when Browning was granted a patent for the rifle on October 16, 1900. Production didn’t begin until 1906, and for 5 years it was known simply as the “Remington Autoloading Rifle.” The designation became the Remington Model 8 in 1911, and its production run lasted until 1936, at which time a few design changes were made and the Model 81 was introduced.
Browning made an agreement with Fabrique Nationale (FN) in Belgium to manufacturer the Model 8 as the FN Model 1900 with sales limited to areas outside the United States. The FN model was in production from 1910 until 1929 and was not a big success. Only 4,913 were made and these were sold mainly in Western Europe and Canada.
The Remington Model 8 was essentially a rifle version of the Browning Auto-5 shotgun. The 22-inch barrel was covered by a full-length tube enclosing the recoil spring. The rifle operated on the same type of long recoil action as the Auto-5, in which the barrel and bolt move to the rear of the receiver when fired. They then unlock to eject the fired round and move forward to chamber another one.
Leading The Pack As one of the first successful semi-autos, the Remington Model 8 became quite popular. More than 160,000 Model 8s and 81s were sold from 1906 until 1950, when the 81 went out of production. Here’s a breakdown of production figures:
Remington Autoloading Rifle (1906-1911) 26,000 Model 8 (1911-1936) 80,600 Model 81 (1936-1950) 55,581 Total production 162,181
The Remington Model 8 gave birth to several new cartridges: .25 Remington, .30 Remington, .32 Remington and .35 Remington. The .35 Remington was the most popular and still is today. These are all rimless cartridges and were designed to reliably operate from the Model 8’s five-round fixed magazine. The most sought-after chambering for the Model 8 is the .25 Remington. Buyers should be expected to pay a premium of 30 to 35 percent for this caliber.
The Model 81 was introduced in 1936, and the .25 Remington was dropped a year later. The .300 Savage was added in 1940 and the .32 Remington was not made after WWII. Since very few .25 Remington Model 81s were made, a premium of 30 to 35 percent would also apply for this model.
The Models 8 and 81 were both offered in high-grade models with engraving and better walnut stocks. These were known as the A, C, D, E and F grades, sometimes referred to as Standard, Special, Peerless, Expert and Premier grades.
Another special series was the Police Model. These models featured higher capacity magazines holding 10, 15 or 20 rounds, some with larger fore-ends and some featuring engraving for individual police departments. The Peace Officer’s Equipment (POE) of St. Joseph, Missouri, was the major source for these customized police rifles, and another was Hawkeye Protective Appliance Co. of Des Moines, Iowa.
Remington recognized an opportunity to extend its market for the Model 81 and, in 1938, began plans to create Special Police models, in some cases working with the POE company. Limited numbers of these Model 81 Police Models were manufactured, but no source apparently has info on how many. Buyers should expect to pay a substantial premium for one of these.
A Semi-Auto Celebrity The most famous Model 8 is the Bonnie and Clyde rifle. This is the rifle carried by former Texas Ranger Frank Hamer, who came out of retirement in 1934 to go after the infamous depression-era bank robbers Bonnie Parker and Clyde Barrow. Hamer bought his Model 8 in .35 Remington at Petmeckey’s Sporting Goods Store in Austin and had it fitted with a 20-round magazine by the POE company. He trailed Bonnie and Clyde for several weeks before leading the assault — really more of an ambush — on May 23rd, 1934, on Louisiana Highway 154 in Bienville Parish that abruptly ended the couple’s career in the banking business.
The posse included six police officers, four from Texas (including Hamer) and two from Louisiana. Each one had a shotgun, handgun and a semi-auto rifle. At least one of the rifles was a Browning BAR, and it’s likely that, in addition to Hamer’s, some of the others were Model 8s. News reports at the time said more than 130 rounds were fired into Bonnie and Clyde’s Ford V-8, killing them instantly. There were subsequent reports that Frank Hamer’s rifle was a Model 81, obviously incorrect since the 81 was not introduced until 1936. His Model 8 is on display at the Texas Ranger Museum in Waco.
The Model 81 remained in production through 1950, and it was 5 years before Remington replaced it with the Model 740, a gas-operated semi-auto that picked up the Woodsmaster nickname from the earlier Models 8 and 81. The 740 evolved into the 742, 7400 and 750 through the years, with the 750 being discontinued at the end of 2016, leaving the R-15/R-25 AR-types as the only centerfire semi-auto rifles in the Remington line.
Here are some estimated values of the Model 8 and Model 81 series, courtesy of Standard Catalog of Firearms 2017 Edition:
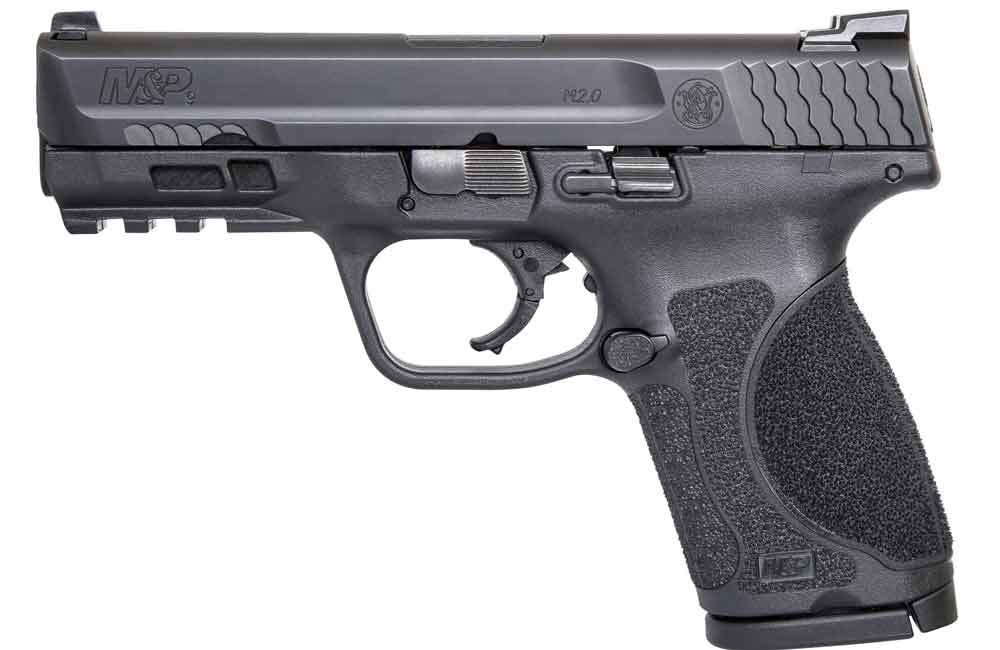
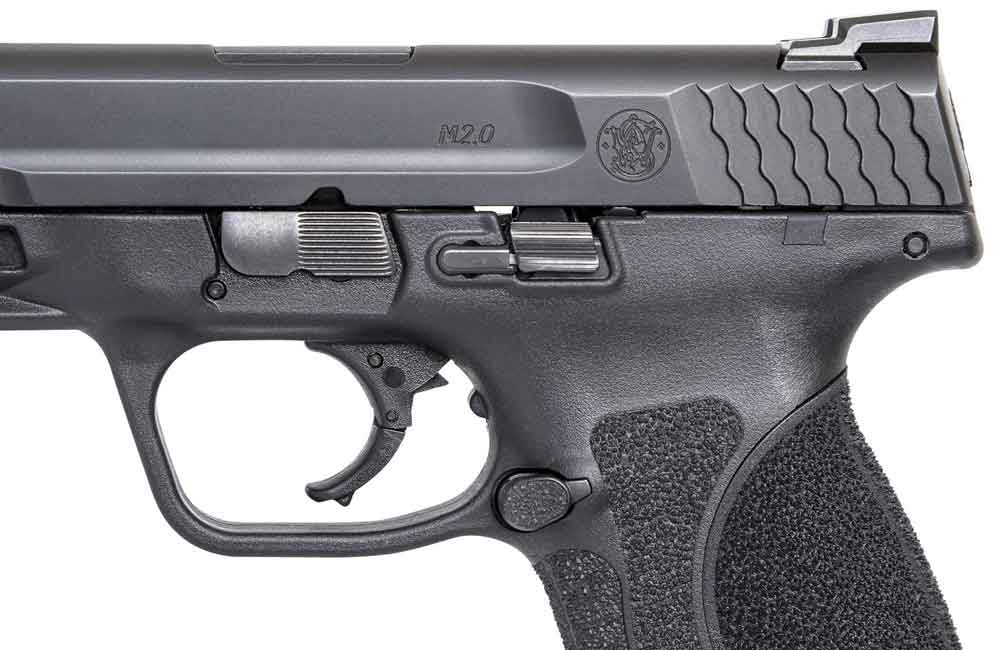
Smith & Wesson’s M&P M2.0 Compact Series boasts the same new design points as the rest of the next generation pistols and a few extras that should appeal to those in the market for a concealable striker-fired pistol.
Smith & Wesson has added the M&P M2.0 Compact Series, in 9mm and .40 S&W.
The M&P M2.0 Compact Series has a 4-inch barrel on the 9mm (4.25-inch on .40 S&W).
The M&P M2.0 Compact Series has enhanced capacity — 15+1 (M&P9), 13+1 (M&P40).
New models feature all the new design points common to the M&P M2.0 line.
The Smith & Wesson M&P line of pistols have formed a dedicated following since its introduction in 2005. It’s safe to say, for certain segments of the shooting world, the line represents the best of the best when it comes to striker-fired, polymer-framed pistols.
That is why, to some extent, concerned rumblings came out when the Massachusetts gunmaker released the next generation of the line’s full-sized models earlier this year. Would Smith & Wesson dare tinker with perfection and in the process produce something that didn’t strike the same sweet notes as the original M&P?
Luckily, the company was sober in upgrading its pistols, with the M2.0 nuanced in its redesign and proving a more shootable handgun. Smith & Wesson has now turned its attention to the other end of the M&P line’s spectrum, recently releasing the M2.0 Compact Series.
A bit more drastic than the once-over the company gave its full-sized pistols, the small and concealable 9mm and .40 S&W appear destined to enthrall shooters the same way as its larger compatriots. But, in addition to the improved design features common to the entire M&P M2.0 line, the Compact Series also received some specific tweaks particular to the models.
First off, the pistol’s 4-inch barrel on the 9mm and 4.25-inch barrel on the .40 S&W is slightly longer than the originals’. In both chamberings, it was 3.5 inches. While this does swell the guns’ overall dimensions, it does not do so in dramatic fashion. Outside of overall length, most of the Compact Series’ measurements have increased by tenths or hundredths of an inch.
In most respects, these tweaks should go fairly unnoticed. It would be a princess-and-the-pea scenario for an armed citizen to notice this growth or see a marked change in the M2.0’s comfort and concealability.
Perhaps the more weighty modifications are the models’ enhanced capacity — a whole three rounds for both the M2.0 Compact Series 9mm (15+1) and .40S&W (13+1). This puts it on par with or surpasses the majority of other comparable compact striker-fired available today.
Like the rest of the M2.0 line that has already been released, the Compact Series has the same lower bore axis, helping the pistol mitigate recoil and make it more controllable. It boasts the same aggressive grip texturing, meant to facilitate a solid positive grip, and comes with 4 palmswell inserts to fit any shooter’s hand. Outfitted with a stainless steel chassis, the design is more rigid, creating a more stable shooting platform. And it has the improved M2.0 trigger that is noticeably lighter than the original with a short, tactile reset.
The MSRP for the 9mm M&P M2.0 Compact Series comes in the same as the original at $569, while the M&P40 is bit more expensive at $599. And with the enhancements Smith & Wesson has included, that should provide plenty of incentive for the M&P’s fans to see how the next generation performs.
You’re rapidly engaging targets with accurate hits. The weapon runs dry, action locking back on the empty magazine. It’s time to reload. Or, given the option and opportunity, maybe you’ve reloaded before running empty.
If you’re carrying multiple weapons, you might perform a “New York” — transitioning to another weapon — as Jim Cirillo describes below. Regardless of technique used, in order to properly apply these skills, one must understand the details of each specific technique and the principles involved.
Then, practice until these actions become reflexive — automatic. The reloading techniques are easy to understand, but to apply them correctly and with certainty takes plenty of practice.
The ‘Empty’ Reload You’re firing and the weapon runs dry; the slide on your pistol or the bolt on the AR locks back on the empty magazine. You dump the empty mag, install a fresh one and chamber a round.
During “functional” manipulations — the empty reload or clearing malfunctions — I teach students to keep the muzzle and sights on target. Your goal is efficiency, accomplishing the task in the shortest amount of time. If you take the muzzle off target to reload and it’s necessary to fire additional shots, you have to get the sights back on target. Cutting out unnecessary movement creates efficiency.
Moving the weapon off target shows the threat(s) that your firearm is empty. Keep the weapon on target, and by the time they realize you’re out, the weapon is reloaded. Remember, threats will be moving. Keep your eyes on target, visually tracking. The hands fix the problem while the body tracks the target with the muzzle.
Reloading begins by taking your finger off the trigger and positioning it outside the trigger guard. No manipulations should occur with that finger anywhere near the trigger. Press the mag release. Right-handed shooters use the right thumb. Lefties use their trigger finger to press the release. With an ambi mag release, left-handed shooters use the thumb of their shooting hand. You will probably need to reposition the gun in your hand to release the mag, but once the mag is out, reacquire a proper firing grip.
With the AR, a right-handed shooter uses their trigger finger to release the mag. Left-handed AR shooters bring the right hand back and use the right thumb to hit the release.
Most pistols and ARs drop the mag free when the release is pressed. Some handguns, such as Glocks with early generation mags, require you to pull the mag free. A sign of a healthy AR and mags is that it drops cleanly.
Let the empty magazine drop to the ground. Unless you’re in the military, empty mags are worthless. The support hand acquires a fresh magazine, making sure to get the mag positioned properly in the hand. For pistol mags, the first finger should be running up the front of the mag, touching the top round. The thumb and other fingers are on the sides of the mag, with the basepad or bottom of the mag at the heel of the hand. The first finger on the top round tells you the mag is loaded, and if the round was sticking partially out, you can push it back in the mag or flip it out of the way. This position also makes it easy to align the mag and seat it into the magwell. Consistency is the key, especially with “small” things. Every time you grab a mag, use the proper technique.
The same technique as above works for 20-round AR magazines. With 30-round mags I use a “beer can” grip. The fingers wrap around the front of the mag, clamping the mag between fingers and the heel of the hand. The thumb can wrap around the rear of the mag or point forward in the same direction as the fingers. Grab the 30-round mag down low, toward the bottom. If the hand is too high you’ll have to move it down, repositioning in order to lock the mag in the magwell.
The support hand brings the mag up to the magwell and indexes the back of the magazine with the rear of the magwell. This is the same for pistol and AR mags and it’s a positive index that’s easy to feel, as opposed to having to look. Learn how to manipulate your weapons based on feel instead of having to look at them. This keeps your eyes on target. Plus, it’s likely to be dark, which means you won’t be able to see your weapon anyway.
Once the mag is indexed, align it with the magwell, and aggressively seat and lock it in place. With pistol mags and 20-round AR mags, open up the fingers and thumb so the heel of the hand is on the baseplate or bottom of the mag. During training/practice, use more force than necessary when seating the mag to ensure it locks in place. Then, if you’re a little distracted in an actual confrontation — like if someone is trying to kill you — and use less force than normal, it’s still enough to do the job. With 30-round AR mags, the hand maintains its grip as you seat the mag. Then tug on the mag to ensure it’s seated.
Once the mag is locked in, it’s time to chamber a round. For the pistol, we teach racking the slide to chamber. This is the way the pistol’s designed to function. When the slide is locked rearward, it will still come back a little when you pull it to the rear, so you’re getting full spring pressure to chamber the round. Plus, some pistols don’t have an external slide lock. Racking/cycling the slide is the only way they work. You want one set of skills that works with any pistol because there’s nothing that says you’ll always have your pistol. Finally, cycling the slide is consistent with all my other handgun manipulations.
To release the bolt on an AR, use the bolt catch as a release, which is how the AR is designed to function. For loading/unloading, use the charging handle to manually cycle the action. The more you mess with the charging handle, the more likely you’ll mess it up by short cycling or letting your hand ride it, slowing down its action and creating a stoppage. Using the bolt catch as a release is quick and ergonomic. Right-handed shooters use their left thumb to release the bolt. The left hand is already on the mag so you just slide up the mag and magwell, and the thumb releases the bolt. Lefties use their trigger finger to press.
The empty reload is complete, and if necessary, you’re ready to shoot. Make sure the next shot after reloading is accurate. Many rush the shot, trying to make up for lost time. There ain’t no “catchup,” except on hamburgers and hotdogs. You were forced to reload, so now get a good hit.
The Empty Reload review: Keep on target. Old mag out, new mag in. Chamber a round. Fire if necessary.
The ‘Speed’ Reload The first targets are engaged with accurate hits. You move to cover to acquire the next targets. While moving, you dump the partial mag, replacing it with a full one. You’re in position, engaging fresh targets.
The speed reload is a preemptive action. You know the weapon is about to be empty, so you go ahead and get a full mag in. The partial mag from the weapon is dumped to the ground.
In my opinion, the speed reload is for competition only. I don’t like throwing live rounds on the ground, especially if I have only one spare mag. I’m also not a fan of moving with a one-shot-wonder weapon. In real life, everything is fluid and dynamic, and everyone is moving. The situation might require me to fire before I thought it would, like while moving from one location to another. If things are “hot” — there’s still the possibility of targets — I’m not moving without my weapon ready.
I am, however, a fan of the “tactical” reload.
The ‘Tactical’ Reload The threat(s) are down or gone. From behind cover you scan, checking the environment. It appears to be safe. You don’t know how long it will be until everything is truly secured. You might have to hold a few minutes, or several hours. Since you don’t know what might happen between now and then, you decide to perform a tactical reload. You are reloading when you want to, as opposed to being forced to reload.
To perform a tactical reload, you install a full, fresh magazine while retaining possession of the partial mag you removed from the weapon. Note: You still have a round in the chamber, so it’s not necessary to chamber a round. The tactical reload is almost an “administrative” manipulation. If you thought it needed to be done in a hurry — you’re not sure the immediate danger is over — then you should probably hold with what you’ve got.
During the tactical reload, your weapon is in a low-ready position. The safety is on or the weapon is decocked, with the finger off the trigger and clear of the trigger guard. Hands and arms are low, muzzle pointing downward. The same technique applies to the AR, only the stock is in the shoulder and muzzle down. This allows you to visually monitor the environment without your body parts or your weapon blocking your sight.
The pistol’s tactical reload starts by acquiring a fresh magazine, positioning it in the hand just like always. As you bring it up, drop the first finger to the inboard side of the magazine. (Left side of the mag for right-handed shooters; right side for lefties.) This frees up the thumb and first finger to collect the mag from the pistol. Bring the support hand underneath the gun, release the mag and trap it between thumb and first finger. Pull the partial mag out, index, align and seat the fresh mag. Position the partial in the hand as you normally do, feeling to make sure there’s some ammo in it.
Check the mag you removed for ammo. If there’s ammo, keep it. I put partial mags in my back pocket. Pouches are for full mags, and you can get to the back pocket regardless of body position — you can’t get to front pockets when kneeling or sitting. Empty mags are dropped, unless it’s a military/field action. Reestablish your firing grip and start scanning again, moving to better cover if necessary.
For 20-round AR mags, I use the technique just described. Due to their size, 30-rounders are a little different.
As always, grab the fresh mag down low. Bring it up to the one in the AR and grab it up high, clamping the two mags together. Press the mag release, and pull the partial mag out. Now the mags are staggered, with the fresh mag in the high position. Index and seat the full mag into the magwell.
During tactical reloads, the bolt is in battery. To lock the new mag in, the bolt carrier will press the top round down into the mag. Make sure you don’t overload. This makes it hard if not impossible to seat in place. I load 25 rounds in 30-round magazines.
The need for the tactical reload depends on how many rounds your weapon holds and how many were fired. Your 1911 holds eight rounds. It takes four shots to stop the threat. Once you’re behind cover and have made sure things are safe, you perform a tactical reload. Firing four rounds from a high-capacity or double-stack mag is a small percentage compared to what the magazine holds. The same is true for the AR, except that you have a lot more rounds in the magazine.
The ‘New York’ Reload Your weapon runs out. You then present another, continuing to fire.
The “New York” reload is the quickest way to get hits on target once your primary weapon runs dry or malfunctions. Mas Ayoob coined the phrase “New York Reload” after Jim Cirillo — a member of the New York Stakeout Squad — told him, “I don’t put too much emphasis on the reload, because when my first gun goes out I go to the second one, and when that goes out I go to the third gun …” (Jim Cirillo’s Tales of the Stakeout Squad, Paul Kirchner, pg 35.)
The “New York” reload for the AR is transitioning to the handgun. Shifting to another weapon is going to be at least 50 percent quicker than reloading. With malfunctions, the time saved by transitioning to another weapon will be even greater.
Perfecting Your Reloading There are many different reloading techniques. The task is to discover what works best for your application. Regardless of the techniques you choose, practice is mandatory to learn how and when to apply them.
The best way to practice is dry fire, using dummy ammunition, working the different reloads over and over. Once these actions feel good, start practicing with your eyes closed. You need to know what it feels like and acquire the ability to manipulate your weapon without having or needing to see it.
Next, practice reloading from various positions — prone, on your back, upside down and kneeling. I highly recommend learning how to reload using only one hand. Hand/arm injuries are common in fights. Whenever you get the chance, practice using other styles and types of firearms.
You’re firing, engaging targets. You feel the weapon run empty, action locking to the rear. Immediately, the conscious mind says, “Reload.” The subconscious takes over, effortlessly and efficiently reloading. More accurate hits follow. You are in control, winning the fight.
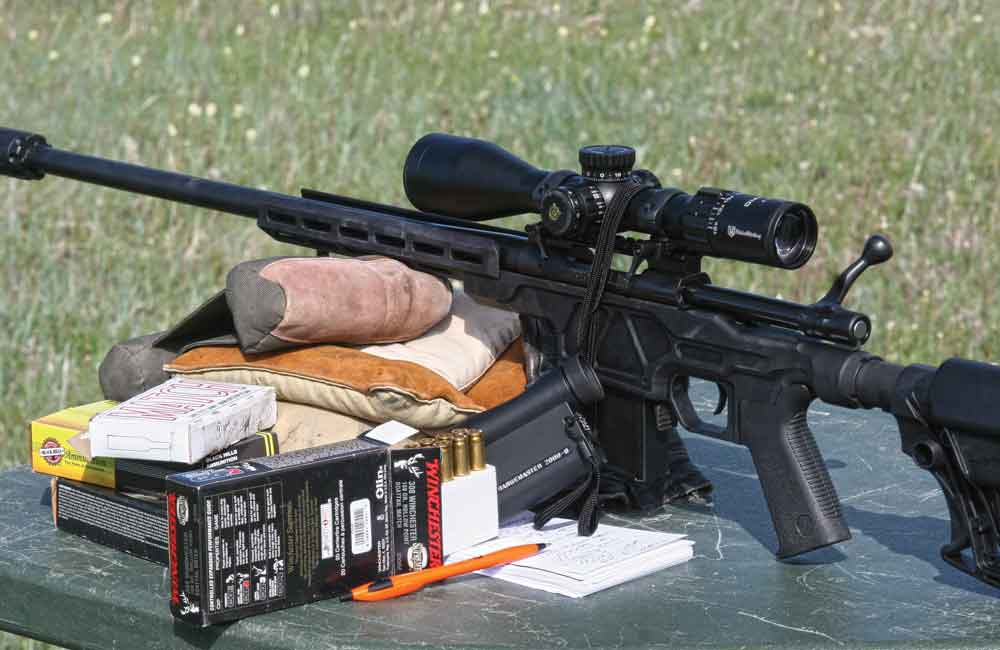
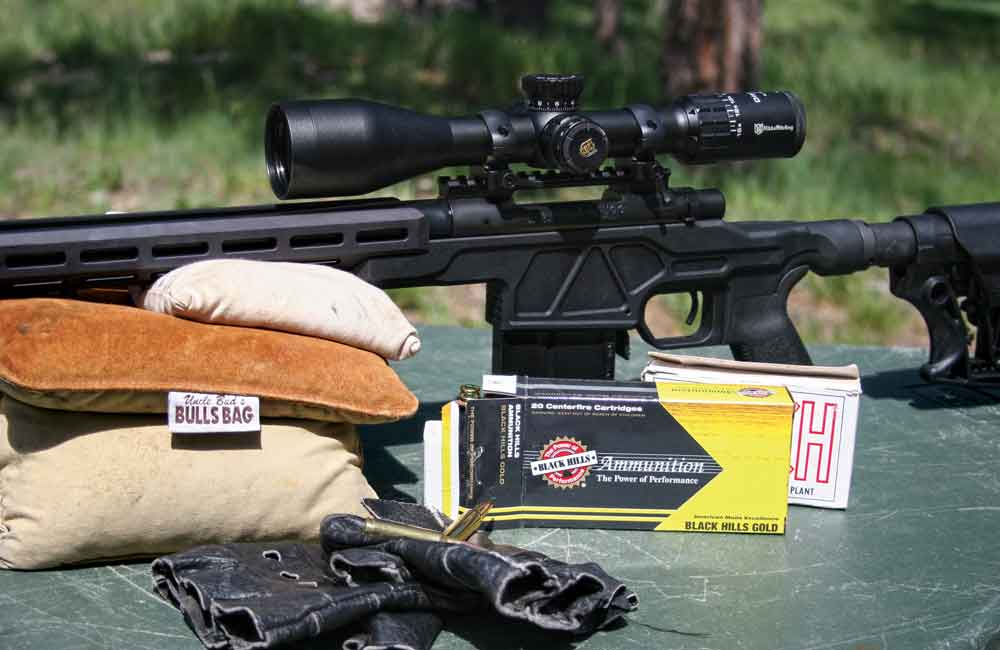
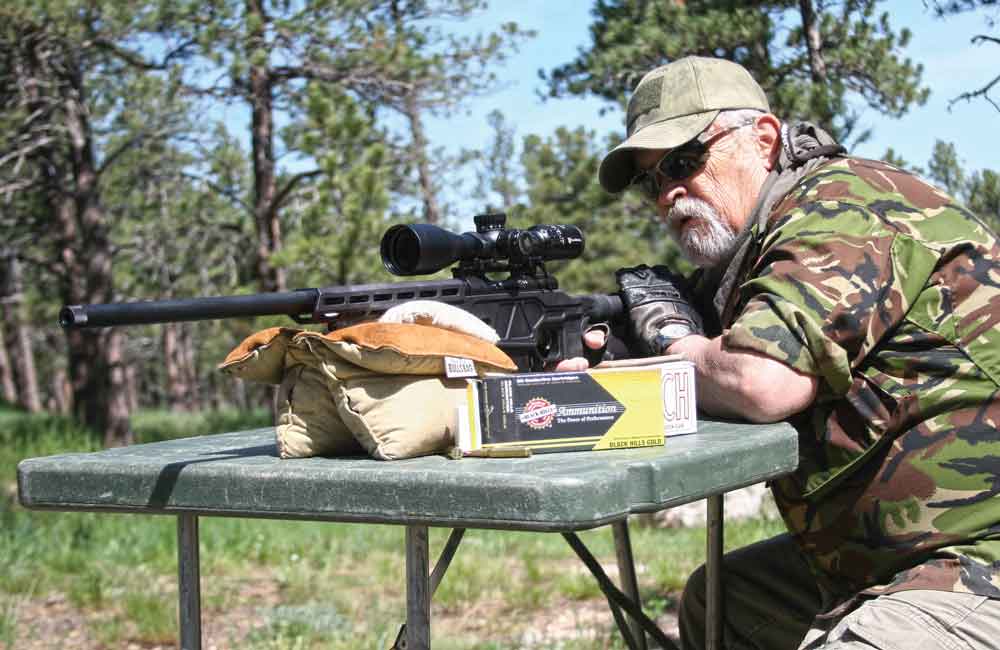
When it comes to a precision chassis rifle, the Howa HCR hits the sweet spot on accuracy and affordability.
Does the Howa HCR go the distance?
The new Howa HCR is available in .308 Win., .223 Rem., .243 Win., and 6.5 Creedmoor.
It boasts a 24-inch barrel with a medium-heavy contour and Howa’s 1500 action.
Accurate-Mag builds the chassis, milled from 6061-T6 aluminum.
It successfully and consistently engaged targets around 600 and 909 yards downrange.
It’s priced reasonably compared to other chassis rifles yet remains highly accurate.
It’s safe to say that I go back a ways with chassis rifles and Howa firearms manufacturing. I’ve hauled around my personal Weatherby Vanguard Back Country in .257 Weatherby Magnum for many years, and because the folks at Howa manufacture the Vanguard action and barrel, I feel pretty safe in saying that the Howa is a top-end barreled action, and well worthy of respect among serious shooters.
I’m also no stranger to chassis-style rifles. I’ve published three books on the subject of long-range high-performance rifles, and am in the process of writing a fourth, and in the course of researching and testing rifles for those projects, I’ve come across many different chassis rifle designs. In the past 7 years or so, the topic of chassis rifles has figured prominently in my written work. There is no doubt in my mind that this design has completely revolutionized the whole quest for rifle accuracy within the past 10 years. In fact, its promise is clearly evident based on the fact that just about every major rifle maker in the industry is now offering a chassis rifle as part of its lineup.
The Howa HCR chassis rifle is a representative example of the all-metal rifle versus the more conventionally stocked products available to shooters. Long-range, target and military shooters learned long ago that when a barreled action is married to a rifle stock system with a solid bolt-to-frame link up, the end result is no variation of drift or accuracy. The bottom line here is that the total system won’t change the impact point of bullets, as will some of the more standard wood- and plastic-stocked designs.
A Rifle of Many Faces
Howa builds a vast number of different models of the HCR rifle, so I can only state that due to space and time constraints here, the buyer needs to check out a complete catalogue to see all the available offerings. I quit counting the number of different models, which vary in terms of chambering, furniture additions, colors, as well as a multitude of add-on features, at number 110. Yes, there were more. The Howa HCR is offered in a total of 19 base combinations, and each of those retains from six to eight variants as well. While some companies offer a chassis rifle (one or two), Howa pulled the plug out of the bathtub on this deal. Just think about it, they build it as an over the counter box rifle.
The rifle sent to me by Legacy Sports International/Howa was quite representative of this chassis rifle line. My rifle retained a medium-heavy barrel (.880 inch) that also had the threaded muzzle with steel cap installed as a suppressor-ready system. The HCR, being chambered in .308 Winchester, is also available in .223 Rem, .243 Win. and 6.5 Creedmoor. The .308 Winchester model utilized a 24-inch barrel with a 1:10 twist (right hand). When the rifle is ordered in the 6.5 Creedmoor or .308 Winchester, a longer 26-inch barrel can also be obtained as another option.
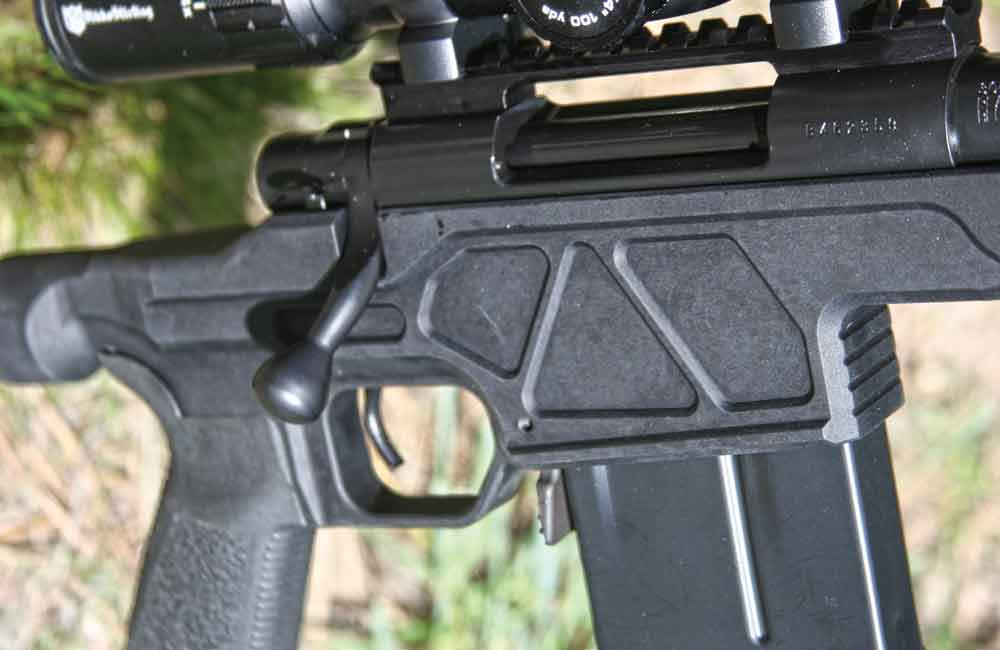
The receiver of the chassis rifle is the basic Howa Model 1500, which is CNC machined from a single steel block. As a “short action” throw, this push-feed twin-lug bolt travels 4.540 inches. Howa changes the bolt travel length based on cartridge length. Receiver controls consisted of a left-side bolt release that is simple to use and a sliding thumb safety on the right side of the receiver’s rear. The 10-round AI-style Accurate-Mag box is coated so as to aid in smooth magazine well function.
The forend and receiver base housing is built using 6061-T6 aluminum. This is not grandma’s pots and pans aluminum but rather a special blend to aid in strength retention, and it offers some ability to fight off field wear as well. This complete chassis is built by Accurate-Mag with a free-floating M-LOK mounting system.
Again, one of the outstanding qualities of a chassis rifle is that they all make use of a barrel that stands alone down the forend tube, being attached only to the receiver ring itself. The butt stock as a system is AR styled with full length of pull and comb adjustments on board. This system is the LUTH-AR MBA-3, and it provides six-position adjustment for length by way of the AR-style primary tube. The chassis stock is also adaptable in terms of add-on AR-type accessories. Whereas the rifle could be used for competitive shooting, varmint applications or informal long-range steel shooting, it has been built with the ability to become exactly what the shooter desires.
The trigger on this Howa HCR is a two-stage system with a measured break of 2 pounds, 9 ounces, based on my Timney trigger scale. The trigger is very smooth, with a clean, sharp let off. I’ll talk more on this later when I cover accuracy testing.
As a package rifle — and all of these systems are just that, with many options available to the shooter — my test rifle retained a set of high rings and bases that locked onto a 20 MOA angled, Weaver-style rail. The scope used on this rifle was a Nikko Stirling Diamond Long Range. This glass features a 4-16×50 optic with MOA graduations on a large volume turret setup. With 4 MOA available off the reticle directly, the second focal plane system was without question set up for direct turret elevation applications.
When under live fire testing at extended ranges, it becomes evident that this rifle was set up for long-range applications. And at its fair price of less than $1,600, it’s an affordable option to budget-conscious shooters looking to make the jump into long range. Included in this package system is a complete bottom metal system in the event the owner wants to set a standard plastic or wood stock system against the barreled action for lighter carry weight for use in hunting applications, etc. The short form here is that Howa has thought of just about everything in terms of marketing this rifle to serious long-range shooters.
DownRange
With bad weather closing fast within the week on the great western Dakota prairie country, getting out to the range and performing an accuracy test before the weather worsened was vital. I needed to establish a zero with the scope and then shoot and measure some representative groups at 100 yards. Once I established a zero at 100 yards and shot several groups, my next step would be to stretch the Howa’s legs and see how it performed at long range.
When shooting for groups at 100 yards, I found that the new Sierra (Tipped MatchKing) TMK 168-grain bullet handloads I had loaded off my old RCBS C frame at home using military match cases and Varget powder had taken top marks. The best three-shot group with this Sierra handload measured .770 inch. Later on in testing, I would use this same load for the lion’s share of the work on the long-range targets.
I continued to use the Sierra TMK projectile, but this time a 155-grain offering from Black Hills Ammunition, and it produced a best group of .862 inch at 100 yards. The final entry selected as a test round would be Winchester’s 168-grain HPBT Match load. This round again produced solid groups of .972 inch during the zero process and did well in green-bore shooting prior to going long with the now prepped and seasoned rifling.
I mounted a 12-inch Mack Brothers “Varmint” series suppressor from Dakota Silencer, Inc., to the Howa’s 24-inch barrel, ending up with a combined length of 36 inches. This would do two things for my long-range shooting. First, it would increase velocity at the muzzle regardless of the bullet or load, and secondly, it made for an almost recoil-free environment when I tried to follow my bullet impacts (splash) for target correction at long range.
In general, and this is mostly just a WAG (wild ass guess), the .308 168-grain bullet, by my estimations, would now carry as much velocity at 3,400 feet above sea level as would the .30-06 Springfield round at sea level. I do know that going from shooting at sea level to shooting at 13,000 feet in the mountains changes everything about a bullet’s performance downrange. Based on this element of performance enhancement, the Howa HCR in .308 Winchester had a good chance of showing some good stuff against targets even a half-mile or more away.
Open Range With zeroing, bore prep and a general shakedown of the rifle completed on day one, I then turned to a second morning out on the vast South Dakota prairie. This time my focus would be on engaging selected targets at long range. I set up my portable bench rest and ranged a target out at just under 600 yards, based on readings from my Leica 2000 rangefinder.
Clicking 12.6 MOA up on the scope’s turret, based on my pre-configured DOPE, I then pushed a full MOA into a 35-percent value cross wind of 8 mph and gusting. I sent the first round, one of my 168-grain Sierra TMK handloads, downrange at a basketball-sized round boulder. At the shot, the earth erupted just over the top of my target, sending a cloud of dust into the air. With a single click correction, the next round returned a solid slap and rock chips went everywhere.
With two more confirming shots on the small boulder, and then two additional solid hits, I turned my attention toward a small dark rock against a high butte that the Leica measured at 909 yards downrange. The target measured about 25 inches in size, and the range required a 26.3 MOA click adjustment from zero. I had a wind advantage now, as my shot would carry in an almost following airflow. It took two rounds to get zeroed on the target (visual splash), but round three slapped dead on, and that shot was followed by a series of eight timed shots that produced three solid hits and two skimmers against my almost 1,000-yard small boulder target.
Shooting on the third day afield produced some very interesting target events. I wanted to test the Howa HCR on a warm target, and with that in mind, I searched out a 100 or so acre prairie dog town that stood above a large stock tank.
From a static position, I let loose some of the Black Hills 155-grain Sierra TMKs at dogs ranging from 174 to 300 yards. Dialing up or down, and taking my time by keeping my suppressor and barrel cool, the rifle flat out performed like a well-oiled machine. Over the course of an hour’s time, I had 27 kills and four missed dogs stacked up to the rifle’s credit.
Additional fun, however, came when I cranked up on the turret adjustments and then sent some Winchester 168-grain Match rounds out to 799 yards, and straight through the passenger window of an old junk Desoto. Many readers here might not even know what a Desoto is, a dead giveaway as to the car’s age, and mine as well for that matter.
I spent the next hour shooting parts off junk pile vehicles at one half-mile away. I quickly came to the realization that the Howa HCR in any of its massive number of variants will shoot right along with any of the high-grade long-range systems on the market today. The only thing holding this rifle back from the super one-mile-plus rifles is cartridge size, bullet weight and muzzle velocity. Until the .308 cartridges used in this test went transonic, the Howa HCR did everything required of it and more.
Specifications:
Howa HCR Type: Bolt-Action, Chassis Caliber: .308 Win., .243 Win., .223 Rem., 6.5 Creedmoor Action: Howa 1500 Barrel: 20 to 24 in. Overall Length: 39 to 47.25 in. Weight: 9 to 10.5 lbs. Finish: Black, Multicam/FDE, many options MSRP: $1,239 to $1,725
At more than a century old, the .38 Special is still one of the most ubiquitous and well-rounded handgun cartridges available.
The .38 Special was developed in 1902 by S&W for its Military & Police Model revolver.
It is known as one of the best-balanced, all-round handgun cartridges ever devised.
The .38 Special can be loaded with a wide range of bullet weights (95 to 200 grain).
Also known as the .38 Colt Special and, more generally, as simply the .38 Special, this cartridge was developed by S&W and introduced with its Military & Police Model revolver, in 1902. This was originally a military cartridge meant to replace the unsatisfactory .38 Long Colt then in use by the Army. Colt brought out its version in 1909, which differs from the original only in bullet shape, the Colt being a flat-point style. Colt, Smith & Wesson, and others make revolvers specifically for this cartridge.
The .38 Special is considered one of the best-balanced, all-round handgun cartridges ever designed. It is also one of the most accurate and is very widely used for match shooting. Any .357 Magnum revolver will also shoot the .38 Special. It was once the standard police cartridge here and largely in Mexico and Canada. The .38 Special is also a popular sporting cartridge for small to medium game and varmints. With modern hunting bullets, it is effective for this purpose. Because of its moderate recoil, the average person can learn to shoot well with it in a short time, something not true of the .357 or .44 Magnums. The .38 Special is loaded by all major commercial ammunition manufacturers. Bullet weights from 95 to 200 grains have been available.
Editor’s Note: This brief is an excerpt from Cartridges of the World 14th Edition.
Developing your natural point of aim is key in placing shots accurately and consistently with your handgun. And it only takes a few steps to perfect.
What is natural point of aim and how does it make you more accurate?
Natural point of aim is a comfortable, natural position from which to engage targets.
This position, when correct, facilitates consistent accuracy with a handgun.
To diagnose, close your eyes, punch your handgun out, and see if it’s aligned on target.
To correct a misalignment, simply adjust your strong-side leg backward or forward.
What do your feet have to do with your eyes? Plenty, when you’re talking about determining your natural point of aim.
In short, natural point of aim is the most comfortable position you can assume that allows you to accurately and consistently place your shots in the center of your target. As you can imagine, this is a key concept for any handgun shooter, whether it be for target practice, self-defense or competition. And developing it so you’re always on center mass only takes a few steps, as Mark Redl demonstrates in the above video.
Redl goes over the basics of determining your natural point of aim and then the process to correct it so you’re always on target. This requires little more than moving the strong-side leg back if you’re off to the weak side and forward if you’re off to the strong.
Conveniently, ironing out your natural point of aim doesn’t require a trip to the shooting range. A little time during dry-fire practice at home is typically enough to work out the kinks.
While this is typically one of those bedrock skills new shooters need to work on when they’re first getting into the game, it is also something seasoned handgunners should evaluate every now and again. There are any number of things that can throw off or even modify stance, thus your natural point of aim. It is well worth the extra effort to occasionally gauge how your position affects your accuracy, especially when you’re fighting to gain an intuitive sight picture or have one too many fliers.
Can I carry my gun while traveling in my car? In many cases yes, but there are certain considerations to concealed carry in your car.
Can you carry a gun in your car?
Before you concealed carry in your car, know state and local gun laws.
With more room in a vehicle, carrying a secured rifle or shotgun is an option.
The console and glove box are two options for a handgun, but there are others.
If you carry a gun in your car, check it regularly.
This is done not only to ensure functionality but also that it has not been stolen.
Most people don’t think of their car or truck as part of their concealed-carry system. But keeping a gun in your car, especially a shotgun or rifle, can absolutely be part of your personal defense plans. I would caution anyone doing this to be mindful of local and state laws as they relate to concealed carry in your car, especially if you cross state lines.
Living close to the Maryland/Washington, D.C. border — two of the least gun-friendly places in the United States — and conducting business and having family in both places, I do not keep a gun in my car. I don’t want to take the chance that I might forget that my gun is in my car and end up arrested. In D.C., it’s a felony to even have ammunition.
A close friend put it better than I could regarding why vehicle carry is a good idea. The fact is, he explained, a handgun is completely unsuitable for self defense. The only reason anyone carries or uses handguns is that they are smaller and more convenient than rifles or shotguns. A handgun, for him, was primarily a tool to use in an emergency that could help him get to a “real” gun. Rifles and shotguns are far more powerful than handguns, and accurate from longer distances.
Vehicle carry of long guns is especially appealing when traveling. If you’re planning a weeklong getaway to the mountains or the beach — even if you have no plans to go shooting — it’s a great comfort knowing you have the means with you for serious personal protection. Likewise, if you are on a drive far from home where there’s a possibility of being stuck or stranded, you might feel under-armed with just your pocket pistol.
Keeping a loaded (or unloaded, depending on local laws) rifle and/or shotgun in a case in your vehicle is a good backup for times when your handgun might not be enough gun. With this type of carry, make sure to keep your long gun cased and preferably locked or secured in some manner, in case your car gets stolen or broken into. You will also want to keep the case out of sight, because thieves will often smash and grab what they can see of value.
There are rifle cases for carbines designed to look like a tennis racket case. Blackhawk makes a whole line of these “Diversion” bags. Renegade Ridge Tactical makes a great diversion bag for a carbine rifle that fits on the back of the driver’s or passenger’s seat in a vehicle and allows for very fast access of a loaded rifle.
Of course, many people also choose to carry handguns in their vehicles. Depending on your state and local laws, you may be able to carry a loaded or unloaded gun with you at all times in your car. You may be able to keep it unlocked and within reach, say in a center console or glove box. Of course, if you have a concealed-carry permit, you will have more options in this regard.
Several companies make gun cases, car handgun safes and other options specifically for concealed carry in your car. One innovative design comes from Titan Gun Vault, which has a locking steel case that pops the gun up grip first when you open it. It also has a separate area for a loaded magazine so you can carry an unloaded gun and load it very quickly if needed. Be aware that in some areas, a full magazine within reach of a semi-automatic pistol could be considered a loaded gun.
There are other concealed carry car holsters available. Some actually secure the gun, such as The RAC, which looks like a bike lock. Some vehicle gun mounts only hold a firearm in place with a simple holster or magnet, such as the one from Magna-Arm. This type of car gun holster might also be suitable for people who are not allowed to carry at work. At least you can be armed while going to and from work.
One of my concerns with keeping a gun in my car — besides the fact that if it’s the only gun I carry, I’m defenseless when I’m away from my car — is that it could get stolen. For this reason, you probably shouldn’t keep your most expensive guns or family heirlooms in your vehicle on a full-time basis. A friend keeps a cheap but reliable shotgun and rifle in his vehicle, what some folks refer to as “trunk” guns.
Unless you are always parked in a climate-controlled garage, your vehicle will be subject to temperature extremes, humidity and the usual bumps and shakes as you drive. All of this is harmful to guns and ammunition over the long term — the more exposure, the worse the problem becomes.
My recommendation is to check on your gun at least every couple of weeks to make sure it’s still there and that it has not developed any rust or maintenance issues. Any ammunition you keep in your car should be replaced at least annually, if not every 6 months. Take it to the range and shoot it up. This will help improve your shooting while ensuring that your ammunition is as functional as possible at all times.
Finally, there’s a very important caveat. If you lend your car to anyone, make sure they are aware that you keep firearms inside, that they are not a prohibited person or will not be violating any laws by transporting the firearms, and that they will not be traveling to any place where the firearms are not legal to transport or possess. Better yet, remove the firearms from your vehicle before lending it to anyone if there are any doubts at all.
Looking to go armed, but are stuck in the weeds as to what to arm yourself with? Here are 20 of the best concealed carry gun options that will keep you on the defensive.