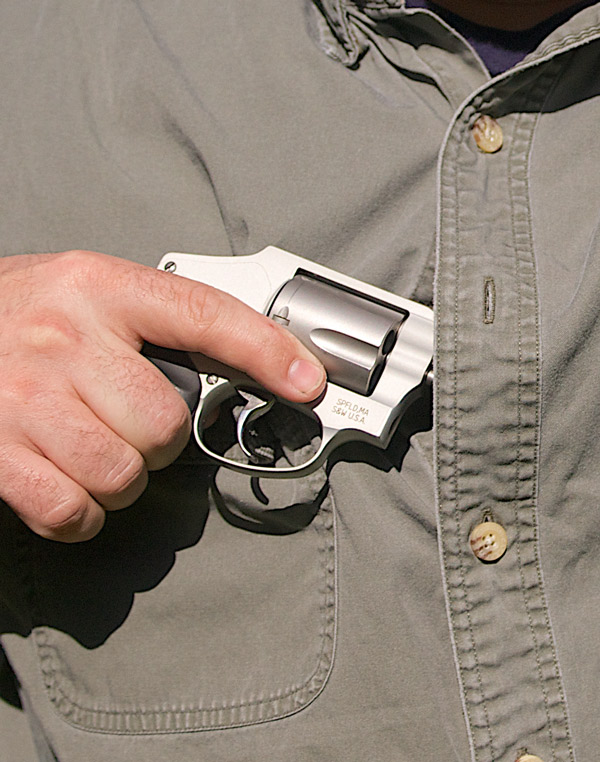
J-frame revolvers make practical and effective concealed carry handguns.Glenn Duncan — Duncan’s Outdoor Shop, Bay City, Mich.
The biggest customer need here is for new, small carry revolvers, says owner Glenn Duncan. Top of their wish list are Smith & Wesson J-Frame revolvers, especially the Model 442. He can’t get enough 442s to satisfy demand, though S&W’s new Bodyguard 38 revolver and Bodyguard 380 semi-automatic are taking up much of the slack.
“We still have a number of the higher-end AR’s on backorder, and the demand’s there,” he says. “But the $1,000 and under AR’s? The pipeline’s pretty much filled up with those; sales are good, but down considerably from earlier this year.”
.22 LR rimfire ammunition is still tough to get, and the store limits customers to 100 rounds per day (50 rounds for all other calibers). They’ve kept their standard profit margins on ammo, Duncan notes, but his prices keep going up. “Federal .22 rimfire just went up 12 percent my cost, so we had to adjust accordingly.”
Editors note, this article appeared in the Oct. 21, 2013 edition of Gun Digest the Magazine.
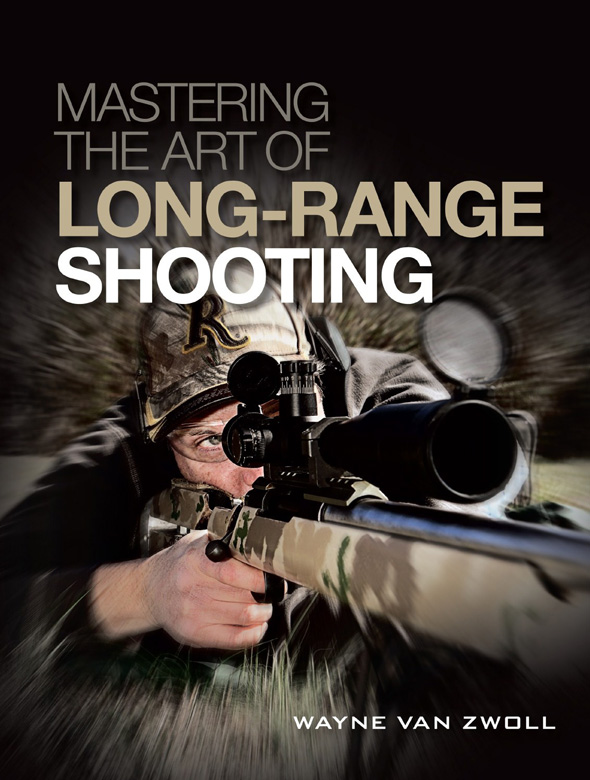
Mastering the Art of Long-Range Shooting is a complete guide to the science behind shooting long distance, an ideal book for anyone interested in hunting or competitive shooting.
Cincinnati, Ohio (December 6, 2013) – Long-range shooting requires a well-trained eye to be successful. In Mastering the Art of the Long-Range Shooting, the newest title from Gun Digest Books, award-winning author Wayne van Zwoll aims to improve reader eyes, confidence and accuracy with his expert advice on the precision that goes into long-range shooting.
The book starts at the beginning with the history of snipers from the Civil War era and travels to the present, exploring the colorful history of marksmanship along the way. van Zwoll gives readers tools – including tables on long-range loads for centerfires, a section on expert military and competitive shooting techniques and an analysis of the equipment that does not help accuracy over distance – designed to ease readers into a better understanding of long-range shooting technique.
More than 300 full-color images illustrate van Zwoll’s key points and anecdotes of famous marksmanship feats sprinkled throughout the book further inspire readers to hone their skills. Readers will close the book with knowledge of how to choose the right hardware, deal with varying conditions and accurately evaluate shooting success at a distance. With their interest in long-range shooting effectively piqued, van Zwoll then guides readers to finding the best equipment with ballistics to match dozens of today’s long guns and load choices.
Pick up a copy of Wayne van Zwoll’s Mastering the Art of Long-Range Shooting at www.gundigeststore.com, all major trade and specialty book stores, or as an ebook through most major vendors, including Amazon and Barnes & Noble.
Mastering the Art of Long-Range Shooting by Wayne van Zwoll, Gun Digest Books ISBN-13: 978-1-4402-3465-1 ∙ Price: $29.99 ∙ Paperback: 8.25 x 10.88
About the Author Award-winning author Wayne van Zwoll is the author of hundreds of magazine articles and 15 books, including The Complete Book of the .22, Gun Digest’s Shooter’s Guide to Rifles and Bolt Action Rifles. He is a regular contributor to the annual Gun Digest volume and a winner of that book’s John T. Amber award for writing excellence.
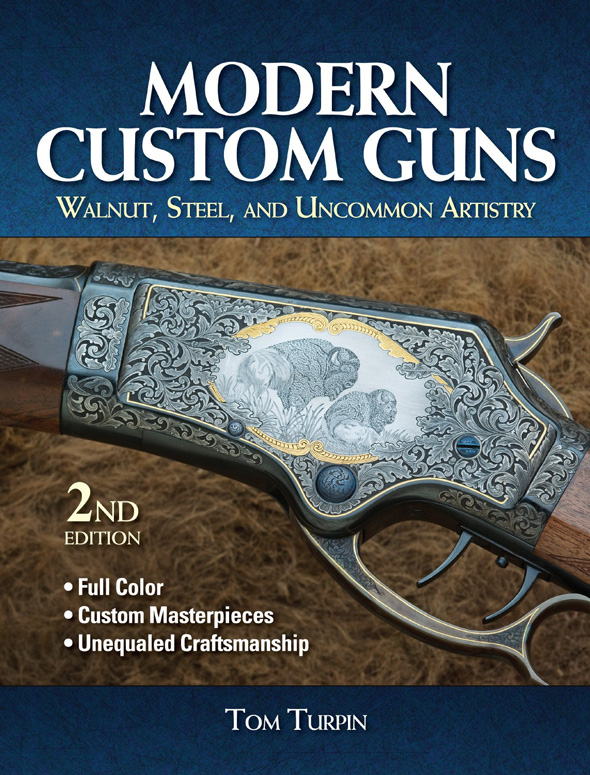
Modern Custom Guns 2nd Edition packs an abundance of information and 200 color photographs into its 208 pages. In addition to the spectacular photography filling its pages, readers will also gain insight into the creation process and the industry with features that put the spotlight on today’s most talented men and women artisans.
Cincinnati, Ohio (November 13, 2013) – The first edition of Modern Custom Guns hit bookstores 16 years ago. This month, Gun Digest Books puts the “modern” back in the title with the release of Modern Custom Guns 2nd Edition.
Features include an examination of how today’s guilds for stockmakers and engravers are making a difference and the histories behind some of today’s master craftsmen and women.
For beginners looking to educate themselves on the art, the included complete custom gun maker glossary gives them a vocabulary for better understanding and discussing the craft. Experienced collectors and those looking to start a collection will enjoy referencing the complete artist listings included in Modern Custom Guns.
Renowned firearms authority and author Tom Turpin is at the helm of this latest edition, bringing a wealth of experience and an exceptional interest in the art of creating custom guns. With Modern Custom Guns, Turpin aims to showcase the unequaled craftsmanship behind every custom masterpiece on the market today.
“I write about custom guns because I’m a big fan of custom guns in general and custom rifles in particular,” Turpin says. “My preference runs to classic styling, and I follow the principle that if any one facet of a custom rifle immediately jumps out at you, it is surely overdone. Quiet elegance is best for me.”
Explore the beautiful world of custom firearms with Turpin’s Modern Custom Guns 2nd Edition, available now at www.gundigeststore.com and all major booksellers.
Modern Custom Guns 2nd Edition by Tom Turpin, Gun Digest Books ISBN-13: 978-1-4402-3644-0 ∙ Price: $59.99 ∙ Hardcover 8.25 x 10.88
About Tom Turpin Tom Turpin has been a professional writer in the outdoor industry for more than 40 years. He has several hundred published articles, four books, and substantial contributions to several more to his credit. He is presently a contributing editor to the annual Gun Digest volume, and Gun Digest recently reprinted his book Custom Guns: Mastery of Wood & Metal. An avid hunter, Tom has taken game on four continents. Retired as a lieutenant colonel from the U.S. Army, in 1986, after a 26-year career, Tom and his wife, Pauline, live and work in the wonderful high desert community of Sierra Vista, Arizona.
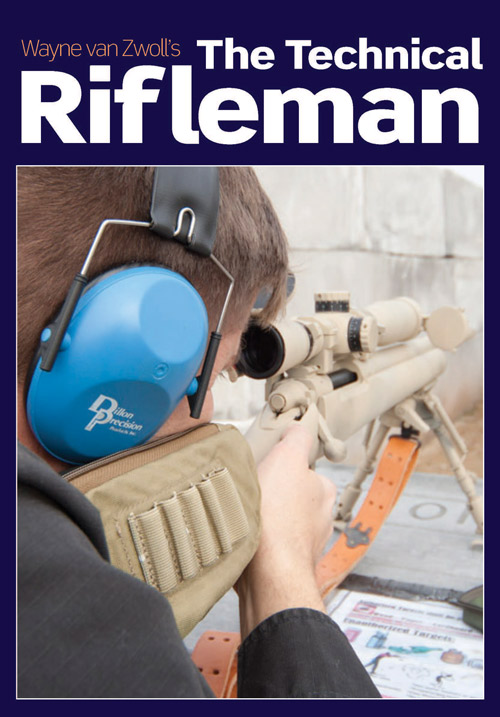
In The Technical Rifleman, the latest e-book release from Gun Digest Books, rifle expert Wayne van Zwoll shares his best advice for mastering shooting basics and excelling at marksmanship.
From new gun owners to hunters to experienced shooters, The Technical Rifleman contains something of value for everyone. Wayne van Zwoll — an industry-leading author who has spent a lifetime in competitive shooting and hunting — showcases his experience as he thoroughly covers the technical aspects of rifle shooting in a conversational, engaging voice.
The eBook is the compilation of van Zwoll’s blog series of the same name on GunDigest.com. From milliradians and walnut stocks to exploding rifle chambers and disintegrating bullets, van Zwoll covers it all.
In addition to detailing the basics of rifle shooting, van Zwoll offers his favorite advanced shooting tips and guides readers through a how-to for choosing the best rifle based on hunting game preferences. Readers will also enjoy a tutorial on riflescope options and nomenclature.
The Technical Rifleman by Wayne van Zwoll, Gun Digest Books ISBN-13: 978-1-4402-3656-3 ∙ Price: $7.99 ∙ E-Book
About Wayne van Zwoll Wayne van Zwoll is a regular contributor to the Gun Digest annual, and author of Gun Digest Shooter’s Guide to Rifles. He is a nationally recognized expert on rifles, optics and Western hunting.
About Gun Digest Gun Digest is the world’s foremost authority on guns in print and online. In addition to Gun Digest the Magazine, the brand’s portfolio includes the Gun Digest Books line, Standard Catalog of Firearms, the GunDigest.com online community, and ecommerce specialty store, www.gundigeststore.com. For more information, visit gundigest.com, the Gun Digest Facebook page, or follow on Twitter @gundigest. Gun Digest is an imprint of Gun Digest Media.
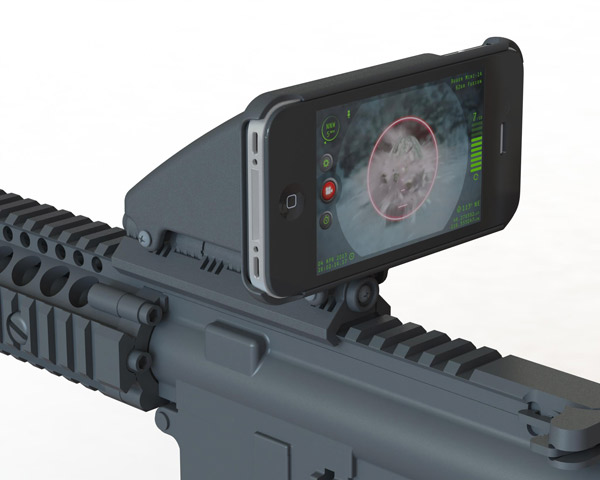
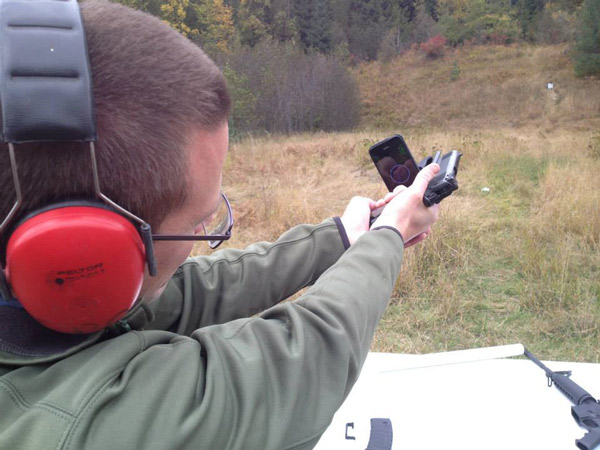
Inteliscope turns your iPhone into a digital scope. A digital tactical scope – you bet there’s an app for that!
The Inteliscope Tactical Rifle Adapter App hit the market in June, giving shooters easy access to what is becoming a popular option in firearms optics. The iPhone and iPod Touch compatible app gives shooters a range of functions – from a catalog of reticles to windage and ballistic data, even the option to record video.
The Sandpoint, Idaho company recently took the app to the next level with its 1.4 release doing a lot of heavy lifting when it comes to ballistic calculation. The defining feature of the update is the app’s ability to calculate bullet trajectory, even if the gun is not kept on an even plane.
Be the gun tilted or completely upside down, the software’s algorithm predicts the bullet’s trajectory and corrects the aiming point in the direction in which gravity is pulling. The app continuously adjusts to the gun’s angle putting the reticle on target, no matter the shooter’s position.
The trajectory prediction algorithm is not the only new bell and whistle in the update. The app also offers a novel way to sight in. The app shifts the background video of the shot, rather than the reticle, in turn the crosshairs always remain centered on screen. Inteliscope predicts a bullet’s trajectory, no matter a shooter’s position. This changes, the company boasts, “coupled with the wide viewing area of the Inteliscope system, significantly improves time-on-target and allows shooters to easily aim around obstacles with zero head exposure!”
Considering the price of rifle optics today, Inteliscope is extremely affordable – it’s free for download at the Apple App Store. The Inteliscope Tactical Rifle Adapter is available for $99.
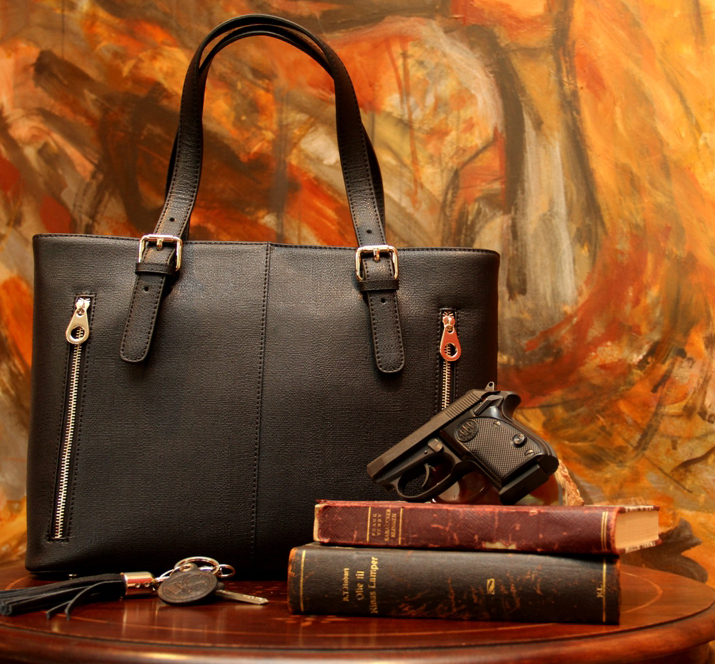
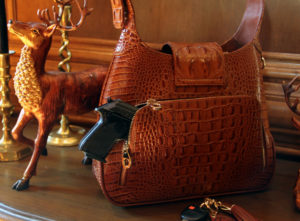
Necessity may be the mother of invention, but for the founder of Concealed Carrie — a company that makes high-end purses and handbags for women who carry concealed handguns — there’s no reason why that invention needs to be ugly. Here is the story of Leslie Deets, and her war on hideous handbags.
It all started at a handgun training class for women. They showed up with guns stuck in their bras, in cumbersome holsters and in ugly tactical handbags.
“The handbags looked hideous,” says Leslie Deets, founder of Concealed Carrie, a maker of fashionable handbags that can conceal handguns.
The other women in the class agreed: the current concealed carry options for women were pretty unfashionable and that gave Deets the sudden inspiration to start her new business.
A designer by trade, she studied trends in high-end handbags, drew up her own designs with a separate compartment that conceals a handgun securely, yet allows for quick access.
Each handbag has a removable and adjustable holster so users can arrange the way they draw their handgun according to their liking. The line of handbags includes totes, satchels, hobos and computer carry-alls that come in ostrich and crocodile prints and smooth and distressed leather.
“We had a lot of men purchasing these handbags for their wives over the holidays,” said Deets. Her philosophy is that fashion should not be completely sacrificed to function.
She even believes her handbags will encourage women to carry a handgun more often since many fashion-conscious women would rather not carry any handgun at all if it means lugging around a military-styled man purse or having to wear a holster that sticks out in the wrong places. Prices range from $249 to $299.
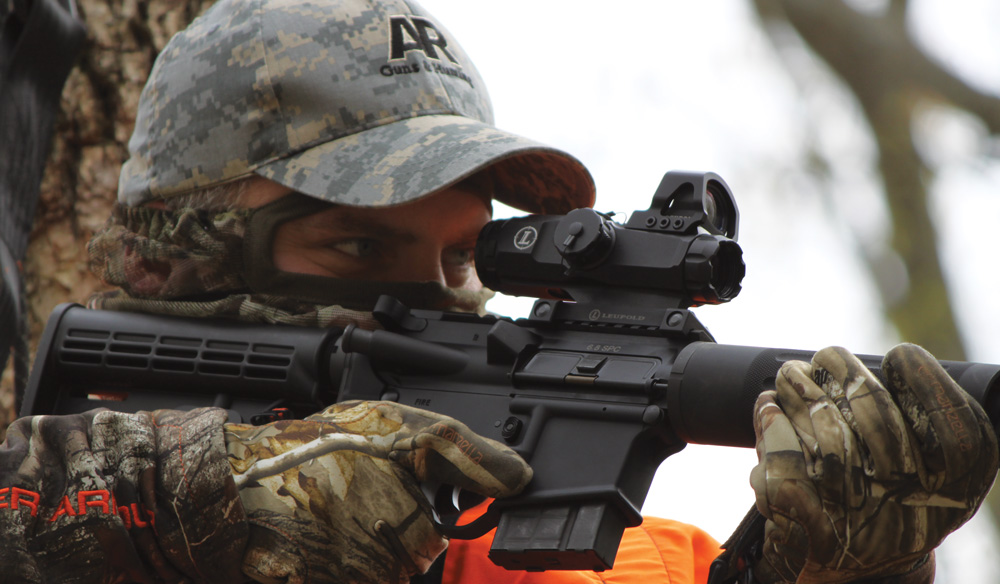
Modern hunters want modern guns and the light-hitting .223 isn’t the only caliber offering for tactical rifles.
Choose the Right AR
The first decision you’ll have to make is what size AR you want. There are two sizes to choose from, with the most popular being the AR-15 that our military uses. Then there is the larger original size most commonly referred to as the AR-10—most commonly chambered in .308 Winchester.
Whether you choose the standard sized AR or the larger size will determine what calibers you’ll have available to you. The larger sized AR will give you options in the high-power cartridge range, such as the .308 Win. The standard sized AR has fewer whitetail cartridge options, but its smaller, lighter size is better suited for hunting in tree stands and confined spaces such as deer blinds and is easier to carry.
Small-Platform Calibers
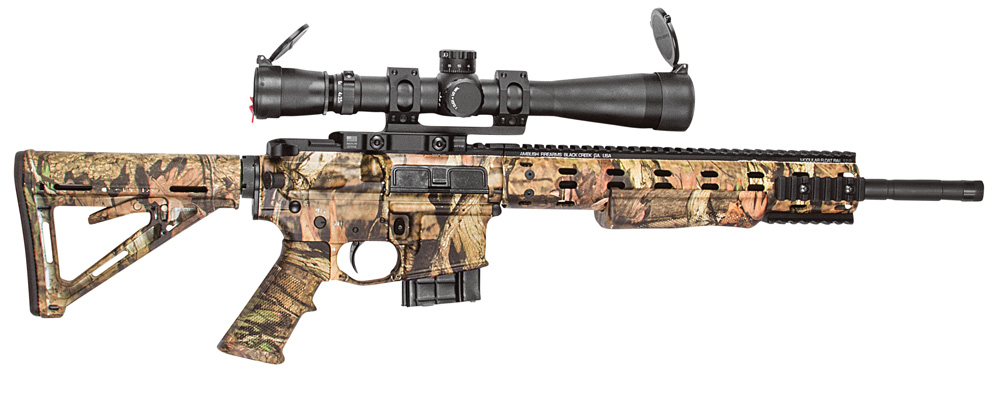
Ambush Firearms 6.8 SPC II.
Whitetail hunting for me is spent in a tiny hang-on tree stand or sitting in a tripod blind. The best choice for these confined spaces is the standard AR-sized rifle.
The small receiver with carbine length barrel and collapsible stock are tough to beat when maneuverability is important. Following are two deer-suitable calibers that are growing rapidly in popularity for these smaller rifles. Note that I limited the choices to those that are most easily found on the shelves of local stores.
In the spirit of full disclosure, I’m a huge advocate of the 6.8 SPC (Special Purpose Cartridge). It’s my favorite AR cartridge.
A lot of shooters agree, with it being the second-best selling AR cartridge on the market right now, and it’s not because of a big corporate push, but rather the people who shoot it and hunt with it. Thankfully, more ammunition manufacturers are jumping on the 6.8 SPC wagon, making it more common on store shelves and everywhere online.
Offerings range from good-quality budget ammo from Sellier & Ballot and American Eagle to high-end custom loads from Wilson Combat. Silver State Armory makes excellent ammo at a great price, as does Federal Ammunition.
Having a giant like Federal behind the cartridge makes it a sure bet you’ll be seeing more of it. Additionally, just this year Federal released the Fusion MSR 6.8, ammunition specifically designed for hunting with 6.8 SPC ARs.
Of all the AR deer cartridges on the market, the 6.8 SPC is the most versatile, and I believe it’s the best. It’s perfect for whitetail, great for hogs and it doubles as a fantastic defensive round. The .270-caliber bullet shoots flat and retains its energy well down range. A 95-grain bullet leaves the barrel at 2,850 feet per second and has 1,715 foot-pounds of energy. A 110-grain bullet flies at 2,700 fps with 1,780 ft.-lbs. of energy.
Hot on the heels of the 6.8 SPC in popularity is the .300 BLK (AAC Blackout). But I have to confess, I’m not on the bandwagon here.
Still, it’s very popular and has a growing fan base of hunters. The primary advantage to the .300 BLK is that it is available in subsonic rounds in stores. However, subsonic performance on whitetails negates this advantage. I talked to Chris Lucci, owner/operator of the Wild River Ranch (WRR) in Texas, about the .300 BLK. Chris tests this stuff, using it in the real world, and between him, his staff and his clients, a lot of whitetail and hogs are killed at the WRR.
Hunting subsonic with the .300 BLK is, as far as ballistics are concerned, like hunting with a 9mm MP5, and the deer don’t always go down like they should. A suppressed 220-grain bullet has a velocity of 1,020 fps and 508 ft.-lbs. of energy.
A supersonic, nonsuppressed, 110-grain bullet has a velocity of 2,350 fps with 1,349 ft.-lbs. of energy. If opting for the .300 BLK, I would recommend staying away from the subsonic rounds. For most hunters, it simply won’t matter.
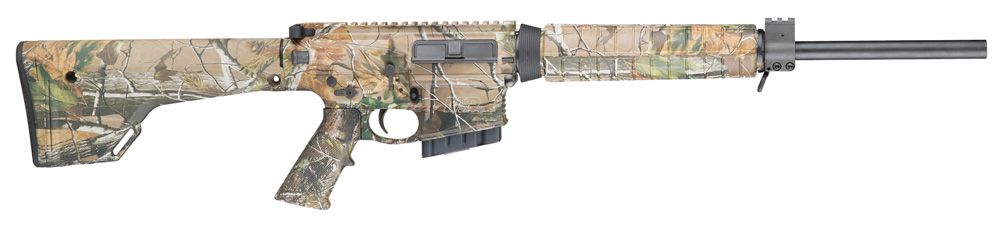
M&P10 (.308 Win. MSRP $1,729). What’s not to like about this 8.1-pound camouflage beauty? Comes with a Magpul MOE stock and an 18-inch barrel, which makes it maneuverable.
Large-Platform Calibers
When not constrained by the tight confines of a small blind or platform, the larger sized ARs in the AR-10/SR-25 models give you a lot of excellent choices in caliber, and most weigh in at around eight to 10 pounds, so they’re still plenty light. Here are five calibers that all make excellent choices:
.308 Win.—The .308 Winchester, also known as the 7.62x51mm NATO, is one of my top two favorite cartridges of all time. An excellent all-around deer hunting cartridge, the .308 Win. was designed to replicate the ballistics of the .30-06 Springfield, but in a length that fits in a standard-length action rifle. The .308 Win. has more bullet options from more manufactures than just about any other rifle cartridge. It’s capable of excellent accuracy with excellent performance—a 150-grain bullet leaves the barrel at 2,820 fps and has 2,648 ft.-lbs. of energy, twice the energy of the .223 Rem.
7mm-08 Rem.—Much can be said about the flat-shooting 7mm (.284 caliber), and with its outstanding accuracy, it makes an excellent long-range whitetail choice. Based off a necked-down .308 Win. case, the 7mm-08 has all the virtues of the 7mm, but delivers it in the AR-10/SR-25 platform. A 140-grain soft point exits the barrel at 2,860 fps with 2,542 ft.-lbs. of energy.
.243 Win.—Developed in 1955, the .243 Win. (6mm) met immediate success and was soon chambered in the rifles of several U.S. manufacturers and almost every European gunmaker. Its parent cartridge is the .308 Win., which makes it perfect for the AR-10/SR-25 platform. At the light end of bullets, its high velocity makes it an excellent choice for smaller game, and at the heavy end it’s suitable for whitetail. The 80-grain is fast at 3,550 fps and 1,993 ft.-lbs. of energy. For whitetail, the 100-grain bullet leaves the muzzle at 2,960 fps with 1945 ft.-lbs. of energy. New bullets from Barnes, Hornady and Lapua have made this an even more lethal whitetail bullet.
.260 Rem.—Another cartridge from the .308 Win. family, the .260 Rem. is a good long-range cartridge and is excellent for whitetail. It’s also a good choice for shooters who are recoil sensitive. Performance wise, the .260 Rem. far exceeds the .243 Win. and is not far behind the 7mm-08 Rem. A 140-grain bullet leaves the muzzle at 2,750 fps and has 2,351 ft.-lbs. of energy.
.338 Fed.—Following a trend, the .338 Fed. was spawned from the .308 Win. and necked up to a .338-caliber bullet. Excellent for close- to mid-range whitetail, elk and bear, it’s borderline big in areas with small-framed whitetails, but will still work. Surprisingly mild in recoil compared to other cartridges in this caliber range, a 180-grain bullet travels at 2,830 fps with 3,200 ft.-lbs. of energy.
The continued growth of the AR in the hunting field demonstrates the effectiveness of the rifle. With more makers designing them for hunters and the continued expansion in caliber choices, it’s no wonder why they’ve become so popular. With the effectiveness of these .223-alternatives, there’s little reason to use the .223, even in areas where legal.
The full auto Glock 18 can throw a whole lot of lead in a quick hurry. Watch this super slow-motion 600 frames/second video capturing dual Glocks lettin’ ‘er rip.
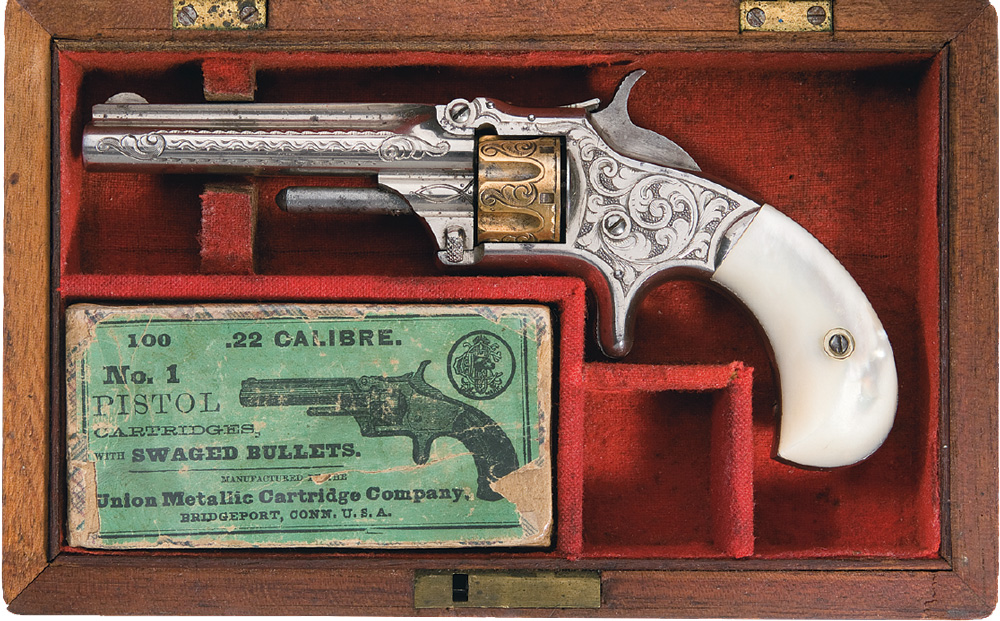
Cased Smith & Wesson No. 1, Third Issue revolver with mahogany case and a empty carton of .22 caliber cartridges sold for $4312.50 in a Rock Island Auction. It goes to show that antique .22 caliber revolvers run the gamut from the common affordable variety to exquisite high end custom. Photos Courtesy of Rock Island Auction Company.
A Colt 1861 Navy revolver at a $700 asking price is a fine gun, and a worthwhile addition to any gun collection. But what does the gun enthusiast who doesn’t have that kind of money to spend on one gun do? Consider the affordable antique .22-caliber revolver.
The percussion purist may laugh, but consider the antique .22-cartridge revolver. In that field, $700 will buy 20 or more guns, these covering the period from the first American cartridge revolver, made in 1857, through the 1890 models that have most of today’s modern revolver features.
The typical .22 antique cartridge revolver is a compact seven-shot arm with a 2- or 3-inch barrel and hardwood, bird’s-head grips. They’ll weigh about 10 ounces, their length a little over 6 inches. Most were made to fire a .22-caliber Short, but not the .22 Short we know now. The smokeless powder of today is too powerful for your antique .22 so don’t ever try it.
The .22-Rimfire History
The story of the small revolvers began in 1854 with the patent of a metallic cartridge by Horace Smith and Daniel B. Wesson. To enable them to manufacture a revolver for this cartridge they had to acquire the patent of Rollin White, a former Colt employee, who held a patent issued April 3, 1855, for a bored-through cylinder to accommodate the breech loading of cartridges.
Rollin White had tried unsuccessfully to sell the rights to Colt. These patents and subsequent improvement patents gave Smith & Wesson (S&W) the sole right to the breech-loading cartridge revolver market for 12 years, until the expiration of those rights in 1869. During this period, S&W produced some 126,000 .22-caliber revolvers in three variations of the model No. 1, plus .32-caliber types as well.
Other makers were not unwilling to try to circumvent these patent rights. White, as part of his contract with S&W, defended the patent vigorously through many court cases. Many well-known names were ordered to cease manufacture, among them Allen & Wheelock, Moore Patent Firearms Co., L. W. Pond Co. and E. A. Prescott. A few companies became licensees, and their revolvers were thereafter marked “Made for Smith & Wesson.” These infringing guns, which usually show a marked resemblance to the S&W original, provide an interesting comparison.
Early S&W .22 revolvers were carried by Civil War soldiers as personal pocket weapons. Their use or effectiveness was minimal but they provided some feeling of protection. Following the Civil War, the little .22 was the traveler’s companion by stagecoach and train. The homeowner and shopkeeper had one in the drawer for protection against itinerants. Despite the publicity given to the two-shot Derringer, ladies of the evening and gamblers often preferred the compact seven-shot revolver. Young boys found them a must for July Fourth celebrations, with blanks of course.
In 1870, the S&W patent expired. Renewal was denied, some say, because President Ulysses S. Grant was still irked about poor Northern ordnance supply during the Civil War. The gates were opened and some 50 manufacturers began turning out .22-caliber revolvers of varying quality. Some were priced as low as $6, and the quality reflected this price. Possibly because the maker didn’t care to share responsibility for malfunction or accident, numerous guns carried only a pet name for identity.
Mail order houses that contracted with a manufacturer sold these for their production. Most often, the mail order firm name did not appear on the gun. Such names on the barrel as Protector, Tramps Terror, Little Giant, ad infinitum, were the only markings.
One manufacturer might produce 25 to 50 variations of the same model with only a name change and a slightly different grip or finish.
Many of these “name-only” revolvers can be traced to a maker, but the process is often difficult. In the more specific area of known manufacturer’s models, the author has compiled a table of some 50 makers, including brief specifications of their early .22 models and the range of their current values to collectors.
An example of an excellent Colt Open Top .22 Revolver with Box. Photo courtesy of Rock Island Auction Company.
Prices and Value
It is worthwhile to remember Oscar Wilde’s definition of a cynic, quoted also by C. E. Chapel in his handbook, as one who “knows the price of everything and the value of nothing.” You may value a revolver in very good condition that fills a void in your collection beyond any book value. Finding such a piece is an exciting discovery and a thrill that cannot be calculated in dollars.
Interest in the small .22-caliber revolver field is increasing, but fortunately prices have not gone upward quite as rapidly as have many others of makes and types.
If you select this area as your specialty, you will find prices range from $20 to $50 for most makes, with such better-known and higher-quality names as Colt, Remington and S&W bringing $75 dollars or more. First models, obviously, are worth more, but few values have gone over $200, at least not so far!
Be discriminating about the condition of any antique revolver you contemplate buying. There are several “musts.” All parts should be intact and the gun in good working order. While some nicks and age marks are to be expected, 80 percent or more of original finish, with the markings sharp, is required to qualify as excellent. In some cases a patina or thin coating of age over the finish is found. Do not attempt to remove this for you would destroy the character of antiquity.
A sanded or buffed gun, one newly plated or brilliantly brightened, will have lost value, often drastically. Leave ‘em alone!
Your first inclination on acquiring a revolver of 1880 may be to disassemble it. In a word, don’t. The integral parts have operated for almost a century without your probing screwdriver and only harm can result from your efforts.
Oil lightly if you wish, but leave the piece intact. If operation problems occur, try to find an “exploded” or isometric drawing of the model. Then, and only then, should disassembly be attempted—and make sure your screwdrivers really fit. The general rule in the care and repair of antique models is “the less done, the better.”
Before buying that first antique .22, you should know and comply with the gun laws of your particular city and state. In many cases, antique guns (those manufactured prior to 1898) are exempt from regulations applied to modern guns. It is best, however, to have whatever registration is required before doing any buying. Your collection might include a gun made in 1899 or later, or you might be called on to prove date of manufacture of a borderline piece.
With knowledge of values, or at least prices, you are ready to begin your search. Your local gun store may deal primarily in new or current model handguns with a stray antique offered only occasionally. Where then can you look?
When you have acquired several specimens, you will begin to appreciate the reasons that led you to select the antique .22 revolver as your specialty. Although somewhat similar in overall appearance, you will discover interesting variations in the cylinder construction, barrels and cylinder pins, and grips and side plate versus solid-frame construction. Like people, each make has its own characteristics.
Storage of these small, compact guns is relatively easy. A tool chest with two shallow drawers is perfect. Line the drawers with a soft-finished, yet firm cloth, and you’ll have storage for a dozen or so guns. The top area is ideal for tools and parts.
As each succeeding gun is located and added to your collection, your knowledge and mechanical abilities will increase. The pride felt in learning these things is hard to explain, but you’ll find that a new facet has been added to your life activities. In time to come, you may even set down to write pieces like this!
Beyond the true joy of watching your collection and knowledge grow is the health-giving therapy of being totally immersed in your hobby, which often shuts out those everyday problems and worries. As every collector knows, the peak thrill is the excitement of a rare find, at the right price, that fills a void in your collection. I defy you to match the chill that overcomes you as you spot that rare gun.
You may find it hard to convince your wife that these $30 expenditures at various times are worthwhile. If you do, point out to her that antique guns are always a diminishing quantity through destruction by intention or accident. Demand, however, is always increasing as new collectors join the gun field. More demand, less supply means rising prices in years to come.
A representative collection of these small guns provides a historical picture of the 19th century developments leading to our modern-day cartridge handgun. The world of the antique .22-caliber revolver is a great area for a collection specialty. Come join me!
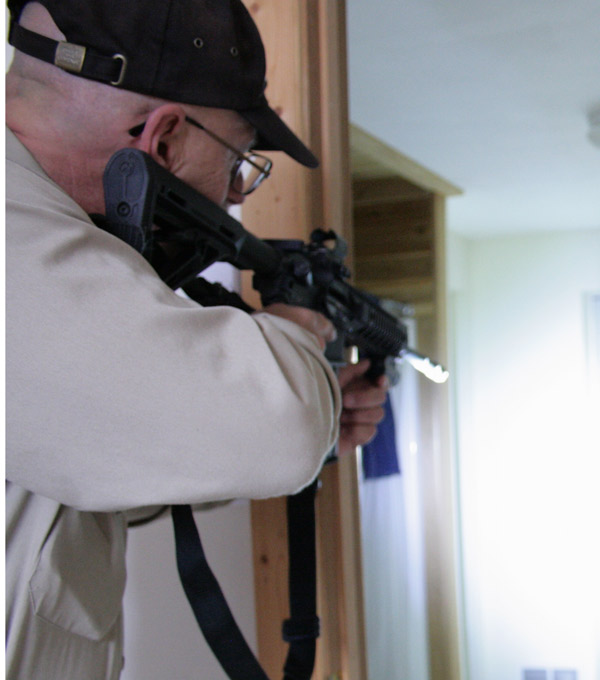
Sights and lights are among the most important accessories in building a defensive AR.
When it comes to an AR-15 that I plan to use exclusively for defensive reasons, there are really only two items I like to add to the gun: some sort of white light and a sighting device other than iron sights. I don’t have anything against iron sights, but in low light situations, they can come up short. There are a many other extras that can be added to a tactical rifle, and special operators may even need others for a particular mission, but the simple AR with these two necessities is not only all a guy needs, but may prove to be tactically superior to a rifle with a bunch of additional items strapped on.
Choosing Your Sight As far as a sight is concerned, I like the red-dot types. For my high mileage eyes something like an EOTech, AimPoint or one of the mini-red dots really improves my speed in lining up on target—particularly in low-light situations. Another great option for the defensive rifle is one of the 1.5×5 scopes that can be like a red dot on low power, but also offers some magnification for longer distance shots. Leupold’s MRT is a great choice in this department.
Depending on your intended use, this might even be a better choice, but for most home defensive and close-quarter situations, a red-dot or iron sight will be a better choice. Remember, it’s not outside the scope of operation to make long shots with a red-dot or iron sights, particularly with good eyes and practice so don’t discount these options just because you expect to shoot farther than 50 or 100 yards now and then. My patrol rifle is topped with an unmagnified EOTech and it’s capable of accurate 300-yard connections.
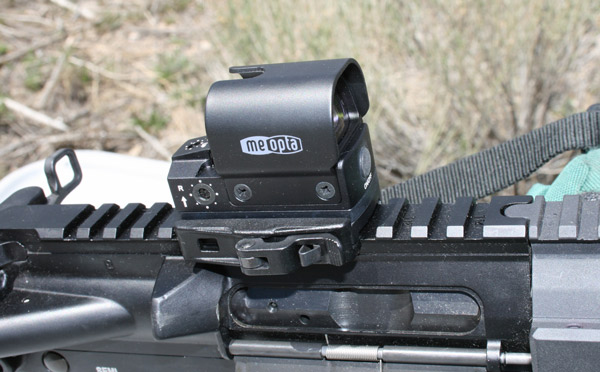
I had an opportunity to try out a medium-sized red dot from Meopta recently—the M-RAD, which proved to be a rugged little unit that can be used on a Picatinny-railed AR without a lot of added weight. It has a heavy hood to protect the optic and the on/off button is on the forward side of the sight for easy manipulation when shouldering the rifle. The same button can be manipulated when the sight is turned on at the shoulder to get the brightness appropriate for conditions.
The Meopta sight on my Sig 516 Patrol rifle. Small, effective and quick sight picture for a pair of high mileage eyes.
The unit comes with a pocket-sized wallet with all the tools and extra mounting pads to get the correct height for the individual shooter. The battery cap can be removed with a coin, but it’s easier to take off with the provided tool. The sight can be quickly put on and taken off the rifle with a robust clamping lever. The lever also has a spring loaded safety to keep it from coming off during rugged use. This would make swapping it out with a scoped sight easy in the field if the mission dictates.
It was literally a snap to mount it on the SIG 516 Patrol rifle I was shooting, and within seconds, I was on the range sighting it in. The tool wallet has a small screwdriver for adjusting the sight making elevation and windage corrections easy. Within a few shots I was sighted in. On the AR platform, the shot will hit low on close quarter shots because the barrel is a few inches low of the sight. At 100 yards it was dead on.
I ran it through some quick double taps around a barricade and the sight jumped right to the target. In fact, it was easy for me to double tap inch and a half groups. The M-RAD would also be small enough to mount at an angle on a competition gun that bears a scope for close shot versatility.
Light Selection With sights decided upon, it’s now time to be prepared to precisely evaluate any threat while maintaining the ultimate level of readiness. You cannot evaluate a threat properly if you cannot see it. One of the best advancements that I have seen over the years pointing guns at people in the dark is lighting.
One of the first “modern” lights I owned was a Streamlight rechargeable flashlight. It was big and heavy, but much brighter than its predecessors. Now, almost 30 years later, I still look to Streamlight for my lighting needs. The lights are smaller, brighter and have functions like strobe, which in law enforcement, we were always taught to do manually.
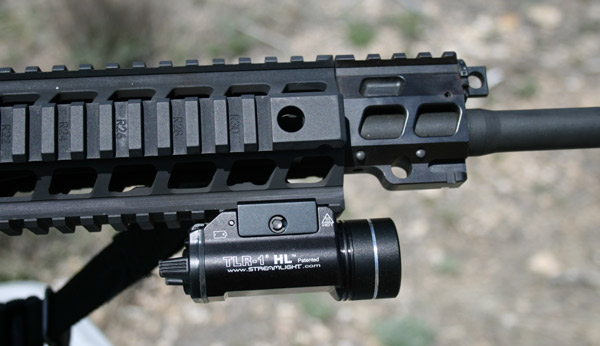
Streamlight’s TLR-1 HL, which I assume stands for high lumens, busts out a whopping 630 lumens of light with a pistol-sized gun light. For close quarters defensive use this light is adequate on the carbine as well as the pistol. On the rifle it doesn’t add much weight or size and will light up, or blind, anyone in the room or area you are searching. It has an easily manipulated on /off switch, which allows the user to set it to momentary, all-on or strobe illumination.
The Streamlight TLR-2 HL boasts the same 630 lumens with a built in laser, which could be an alternate sighting device on your carbine or pistol should the condition dictate. Normally I’m not a fan of lasers, but for no extra weight or convenience, a laser can be waiting for duty should you need to make a shot without a sight picture. I mounted this light with Streamlight’s quick mount on the bottom rail of my AR. It was amazing how well it lit up any room in the house or outside around the house. I could evaluate a person’s hands at 25 yards easily.
The TLR 1 on the 516 Patrol Rifle. I like it mounted on the bottom rail.
This light also snaps on the duty pistol rail and is easily manipulated with the weak hand thumb or first finger. The 630 lumens really lights up the search area, and there is enough ambient light to see the sights as well when using open or other iron-type sights. I remember searching buildings in patrol back in the day with lights that were the brightest available, but were dismal at best compared to the products we have now.
The amount of light emitted by these new units in such a small package is unbelievable. I lit up an area around where my new shop is going in from 35 yards away with the TLR-1 on a carbine and it made everything in the area stand out as if it were in daylight. The smaller pistol/carbine light brightens up a bigger area than the beam oriented rifle light they also offer. This is great for searching as it gives plenty of peripheral vision around where the carbine is pointed.
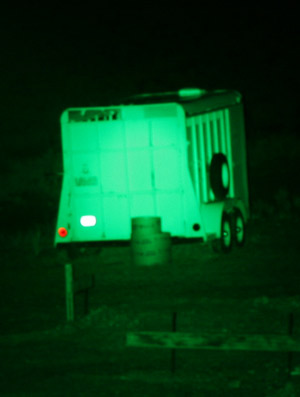
Streamlight makes a version of the TLR-1 light in a rifle format. The unit is similar, but the lens is more suited to sending light in a beam for longer distance target identification. They also make it with a green LED for hunting as the green light is less spooky to game. I thought the green light would be less bright as the distance increased but it illuminated my 100-yard target board with ease. The center of the beam is bright and through a scope the target has plenty of light for a shot. Both of these units are extremely rugged and I have abused them both on purpose without a fail. The units take two of the CR123 lithium batteries that provide 6 volts of power behind the LED.
Either of these lights can be mounted on the Picatinny 4 rail forearm in any position that is comfortable to the shooter. I like mine on the bottom. The activation button is ambidextrous, and I use my index finger on the right side to operate the light. This gives me a comfortable grip on the forend of the gun, and I have light when I need it. Streamlight also makes an attachment for the back of the unit that has a pressure switch wired to it so a user can put the switch anywhere else on the gun that suits them.
The Game Getter green light had ample light to isolate a threat. The rifle version prints a more focused bright spot for shots at a precise target.
I haven’t used the green light on game, but the white light version seems to stop coyotes in their tracks. I think they are mesmerized by the brightness of the light. The green light really lights up the area out plenty far for a calling shot as I tested it on my 100-yard target. It’s kinda like using a Generation 1 Night vision scope, but the image is clearer. Both of these lights operate on lithium batteries. The run time on the light at 630 lumens is 1.25 hours and the laser if equipped has a runtime of 45 hours. One thing nice about a battery unit is when batteries start to weaken, it’s just a matter of putting fresh ones in. Rechargeable lights don’t give the operator that option.
I really like both of these lights and I’m sure one day they will even be dim compared to the new fangled creations they come up with in the future. But for now, paired with a good red-dot sight, I feel I have everything I need on my AR to safely defend my home.
Nothing warms up a frozen deer hunter like hot cocoa, hand warmers and a new gun book.
Back when I was young, I didn’t fully understand what Dad meant when he said the best part of deer season was getting ready—the week leading up to gun season and the excitement of preparation. Sitting on a cold stump and staring at trees was not as much fun, he said. I thought he was just being a curmudgeon; he turned out to be the voice of experience.
In a similar vein, the late Dan Shideler (who edited the Gun Digest annual book and Standard Catalog of Firearms) said he’d got almost as much enjoyment from reading about guns as shooting them. I thought about this parallel as I sat there on opening morning trying desperately to keep warm by forming my little hand warmer packet into all sorts of fun shapes.
That’s when it struck me. I’d crossed the Rubicon. It must have been the near hypothermic condition into which I’d gradually slipped that made me see the wisdom of those who had gone before. Yes, a warm house and a good gun book started to sound damn good!
Now, nothing makes you appreciate that warm house more than an all-day sit in a frozen ground blind as you watch your dreams of a big buck evaporate like a desert mirage.
Not helping matters: Quite possibly the coldest Wisconsin deer season ever recorded, at least since the last ice age. So I sat shivering, feeling like part of some weird experiment in human endurance. I thought of Jack London’s novel, To Build a Fire, the horrific story of a Yukon gold panner who gets caught in the sub-zero arctic and slowly freezes to death because his fingers stop working. That didn’t inspire any happy feelings.
It did make me relish the annual pilgrimage to the local Fleet Farm the day before. You see, that was the getting ready part. It was the warm part.
Sometimes, there in my blind, I’d just stare at the beautifully figured stock of my .280, and take my mind off the cold pain for a split second. But then the ache would creep up each finger as the nerve endings began to freeze again.
Eventually, a deer would mosey on by. Its luck would run out. The rifle would get to do what it was designed to do: Shoot game.
This tool, fashioned from wood and metal, works like a precision clock whose internal gears and windings all do their part to produce the end product of time keeping.
The rifle’s trigger assembly actuates the firing pin. The pin ignites the primer, in turn the powder. The bullet is driven with a precise amount of pressure down the bore. The exacting tolerances deliver the bullet down the scope’s path to its intended target.
All time and space comes together right here: Intricate systems meeting a wild animal in one place. All have to work in order for man to eat.
The shot happens, and wonder of wonders; I’m no longer cold.
With the deer down, there follows hard work—gutting, dragging, lifting, hoisting and butchering.
Later that night, in a warm abode (the couch, tucked under five blankets and two comforters), with a hot chocolate milk in one hand and a good gun book like Gun Digest 2014 in the other, there is only one thing left to do—reflect.
Here is warmth and comfort, an opportunity to think back on the day’s hunt. I open the book and find only good things. No cold, no hard work, just page after page of reading enjoyment and wonderment—like an endless catalog in which a gun owner (a warm, comfortable gun owner)—can window shop and dream.
Dad, and Dan, both gone now, were sure right. The day before the hunt. A good gun book. These gems are almost as good as the real thing. Well, almost.
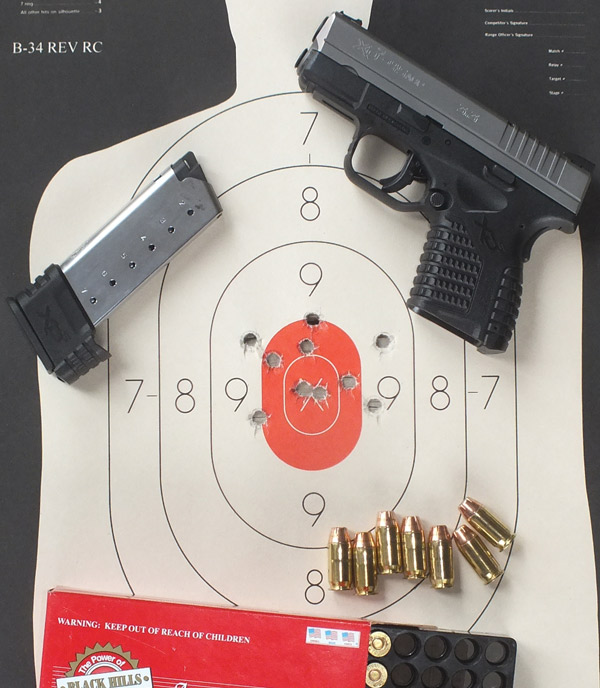
The good trigger and sights allow real accuracy with these guns. I made no adjustment to get this well centered up group. Ten shots Ten yards Standing, Two magazines.One way I make my money is in teaching the North Carolina Concealed Carry certification course. I enjoy teaching the classes, and I’m overjoyed that so many people who take my classes are new gun owners.
These folks see the value of firearms ownership as a way to take a proactive part in defending themselves against crime. They are refreshing to teach because their minds are open and they’re willing to accept new methods and equipment.
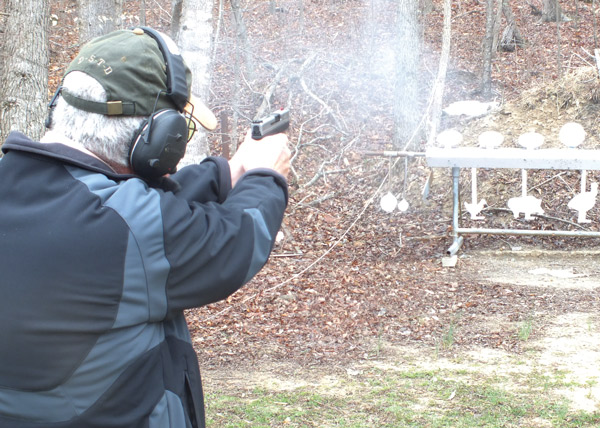
There’s a whole generation of new pistols for concealed carry, and I’m impressed with the thought and engineering that’s gone into many of them. Recently, I assisted in a test of four .45 ACP single-stack concealed carry semi-autos. I was impressed with the XDs then and when I got a chance to test one myself more extensively, I jumped on the opportunity.
Springfield Armory’s line of XD pistols has been a smashing success. The features of these striker fired guns make them unique in that they are ambidextrous and feature a grip safety, a valuable asset in a striker fired gun that allows a lighter, shorter stroke trigger with a similar or greater level of safety.
I can run the plates with the XDs at ten yards, but I think my time would be a bit slow. Living Up to Its Reputation I used a Springfield XDs 5.25 in last year’s Bianchi Cup. My choice was based on the XDs’ reputation for accuracy and reliability so when my editor suggested shooting production class, the 5.25 was an easy choice.
Made in Croatia and parented by the first Croatian pistol manufactured, the PHP, the XD series of pistols have become viable contenders for the civilian as well as police and military markets. My XDm has yet to malfunction through thousands of rounds.
Like other XD series guns, the XDs is well finished for a utility gun. The controls are similarly placed with the takedown lever and slide release on the left side and an ambidextrous magazine release. The sights are really good with a driftable two-dot rear and a hi-vis front. The trigger is indistinguishable in pull from the larger XD pistols, which is to say it is very good. There is a fairly short initial travel and a distinct second stage that breaks consistently and cleanly.
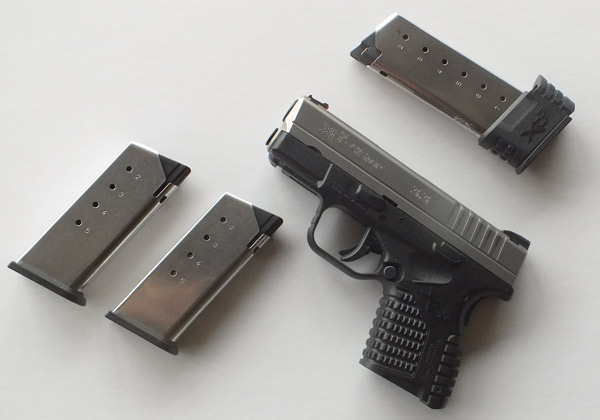
The standard magazine holds five rounds and there’s an available extended seven round magazine. While the seven round magazine is handy for range use, it increases the profile of the gun considerably. With one in the chamber, 6 rounds is reasonable in a concealed carry handgun. If you can’t do it with six, you should practice more.
Striker fired, with no manual safety, the XDs relies on a blade in the trigger and a grip safety to prevent accidental discharge. Carrying a round in the chamber is, in my opinion, a prerequisite for using a semi-auto for concealed carry and with a holster that protects the trigger, I’d feel perfectly safe carrying this gun with a round chambered.
At 21.5 ounces, the XDs is not a lightweight. With a loaded magazine, it approaches the empty weight of some service level pistols. While it occupies about the same profile as a J frame S&W, it weighs more empty and considerably more loaded.
What this pistol has going for it is that it’s a .45. It is thinner in profile than a small revolver and it carries a lot more punch. That punch also translates itself into recoil. In a recent range session where I fired 300 rounds with the XDs and a couple of other compact .45s, I managed to escape without having a sore hand the next day, but this is not a gun for the fainthearted.
The XDs comes with two five round magazines and there is an available seven round extended version. On the Range Operation of the XDs is both simple and convenient. The magazine is fairly easy to load, the slide operates well and may be easier to manipulate than some of the larger XD series guns with slides that taper towards the top. The controls are where they should be, making the gun easy to adapt to. With a good trigger and good sights, I expected it to perform well, and I wasn’t disappointed.
I don’t bench test carry guns because the short sight radius makes it difficult. My test is to determine reasonable accuracy for the purpose for which the gun is intended. At 10 yards, two hands, with a magazine change, I managed a 2.5 inch, 10-shot group that was centered in the target. Recoil recovery is slower than larger or less powerful guns, but it was reasonable and the good sights and trigger aided greatly. I fired this with the five-shot magazines because I see the seven shot magazine as too large for every day concealment.
Overall, this is a very good concealment gun for those who feel the need for serious power. It’s larger and considerably heavier than the gun I carry every day, but every aspect of concealed carry firearms choice is a tradeoff between effectiveness and concealability.
This gun is as powerful as any concealed carry gun needs to be. It’s also extremely reliable and accurate. It’s also quite safe to carry in normal carry situations. It’s not a gun for those who have problems dealing with recoil. Once loaded, it’s heavier than I’d want to carry every day, but you simply can’t argue with a gun this small with this kind of power and accuracy.
Springfield Armory XDs Caliber: .45 ACP Capacity: 5 + 1, and 7 + 1 with the extended magazine Magazines: Two aluminum five round furnished with the gun. Barrel: 3.3 inches Sights: Steel Dovetail rear, drift adjustable with white dots, front fiber optic. Frame: Polymer Slide: Forged Steel Length: 6.3” Height: 4.4” Weight: 21.5 oz. Options: Seven round extended magazine Suggested Retail Price: $689 Website: springfield-armory.com
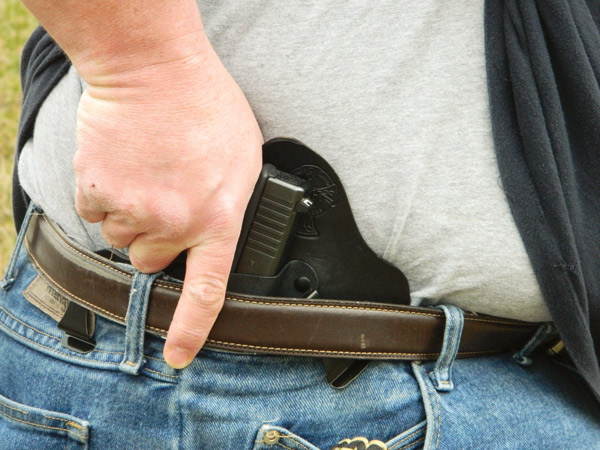
Mastering the mechanics of a proper draw can be one of your most important concealed carry skills. Choosing to carry a concealed handgun for self-defense is a good start to being prepared for an attack, but simply carrying a gun isn’t enough. You also have to know how to use that gun.
The basics of shooting and marksmanship are quite simple—grip, sights, trigger control and follow through—and can be easily learned. More advanced gun handling skills can be learned through research, or by attending one of the many firearm academies across the country.
While gun handling and accuracy skills are important, if you can’t get the gun out of the holster and into action quickly, you’ll be standing there with a lot of knowledge in your head and nothing in your hand. This makes the draw one of the most important components of proper self-defense. And you must be able to make the draw at any time and from any position.
Understanding Technique Now before developing your draw, you have to decide how you’re going to carry. Some methods of carry provide easier access, while others impart deeper cover. There is no single correct way to carry a gun and only you can decide the method that works best for your purposes. But regardless of how you carry, you must master the draw for the holster system, or systems, that you choose.
The standard draw consists of four simple motions—the grip, the pull, the rotate and the presentation—that must be conducted in sequence or the entire process disintegrates and problems arise. Everything in the draw begins with the grip.
When you reach for your handgun, you must instantly obtain a shooting grip, with the trigger finger aligned along the frame. If you don’t get a firm grip on your handgun before it exits the holster, the draw can be fumbled and the gun dropped, which won’t do any good and could very well cause a lot of harm. You then pull the gun straight out of the holster before rotating it toward the target—from here, you can fire if the attacker has gotten too close to fully extend the gun. Finally, you present the gun toward the target, allowing the support hand to come up into a two-hand shooting grip as the sights line up.
Developing the Proper Draw Now the problem with the standard draw is that it is based on carrying a gun in a strong-side holster, and there are as many different ways to carry a gun as there are types of handguns to carry. Fortunately, the draw is basically the same in all cases, with some minor variations.
Developing a proper draw takes time and practice, especially if you carry in multiple ways, as you must always be aware of where your gun is located and the best way to get that gun into action. You must develop the muscle memory for each and every way you carry. This is one of the reasons that many experts recommend carrying the same gun in the same way all the time. It doesn’t matter how good a shot you are if your gun is sitting in your holster.
The choice of carry method can also determine whether you can practice drawing at your local range. While some ranges do not allow draw training at all, others limit it to those methods like strong-side, pocket and ankle where the shooter is not sweeping the muzzle across adjacent areas. Unless you have your own range or shooting area, it’s very difficult to obtain live-fire training with cross draw, shoulder and small-of-back set ups. Availability of training locations should be included when considering how to carry a concealed handgun.
Few American holidays have a closer relationship to a particular firearm than Thanksgiving. Next to turkeys, Pilgrims and Indians the tried-and-true blunderbuss is one of the celebration’s most recognizable symbols. But the unmistakable gun was more than just a tool used to put meat on the table. The blunderbuss — Dutch for “thunder pipe” — was also a merciless weapon favored by pirates, cavalries and colonial militias. Check out the following videos to brush up on some of the finer points of the blunderbuss and, of course, watch a few people drop the hammer on the gun.
NEXT PAGE The National Firearms Museum gives a short history of the blunderbuss, with a Spanish Miquelet as its example.
Win1911 Ammunition, specifically tailored for one of the world’s most iconic pistols.
Of the many firearms designs emanating from John Browning few have become as ubiquitous and storied as the Model 1911.
The single-action semi-automatic pistol became one of the most popular handguns of the past century, having earned its stripes on some of the world’s most brutal battlegrounds. Since then, it has gone on to be the choice of every type of handgun enthusiast — from those looking for a personal-defense piece, to plain old plinkers. The 1911’s acclaim has even led nearly every major manufacturer to produce their version of the pistol — a claim few designs can make.
Now, a company aims to give its take on the handgun or at least its ammunition. Winchester has just released Win1911 line, ammo the company has tailored specifically for use in the historic pistol.
Winchester is offering two new rounds in the line, both in .45 ACP — a flat nose full-metal jacket and a jacketed hollow point option. Both the FMJ and JHP rounds have nickel-plated jackets, a feature meant to facilitate cleaner feeding in a handgun known to sometimes have finicky ammo tastes. But it is not the components that are the intriguing aspects of the Win1911 line. It’s the rounds’ ballistics.
The FMJ and JHP have identical ballistic performance, both capped with 230 grain bullets and boasting the same muzzle velocity. The clone rounds are meant to give shooters seamless ballistics from practice to application, allowing them to chamber a self-defense round that performs in similar fashion to the round they’ll punch holes in paper with at the shooting range.
The idea behind the Win1911 line seems solid, but only time will tell if it becomes as iconic as the pistol itself.
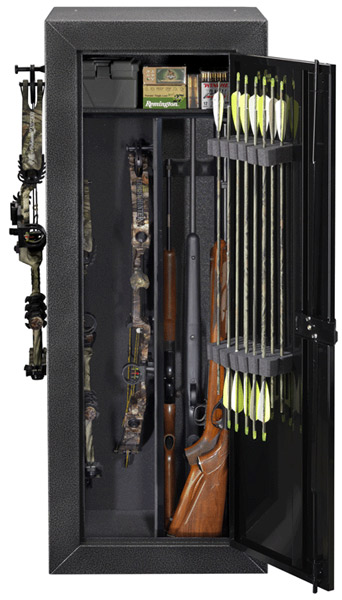
From gun safes to hard cases, here are three top-notch gun storage solutions certain to keep your most precious firearms in tip-top shape.
Cabinet for the Marksman-Archer
Some folks like to dabble in all of the shooting disciplines, including archery. Working off a 2006 study from the U.S. Fish & Wildlife Service that indicated 93% of all hunters hunt with firearms and 28% hunt with a bow, Stack-On came up with a security cabinet for hunters that houses both guns and bows.
The Buck Commander Gun & Bow Security Cabinet was designed to hold two compound bows and up to eight rifles or shotguns. The weapons are locked behind 3-point, key-coded system and the steel exterior has a Hammertone black and silver paint finish. Inside is a full-width, steel shelf for ammo or gear and on mounted on the door is a foam holder that holds 12 arrows. There is also hanging peg that attaches to the outside of the cabinet for hanging a bow—a handy feature for when your hands are too full.
“There is nothing else like it in the marketplace today,” said Shelley Nehrt, Director of Marketing for Stack-On Products. That is a true statement and the cabinet is perfect for the shooter that likes to send bullets, shot and arrows downrange. The specs: 21” wide, 18” deep, and 55” tall. Visit Stack-On.
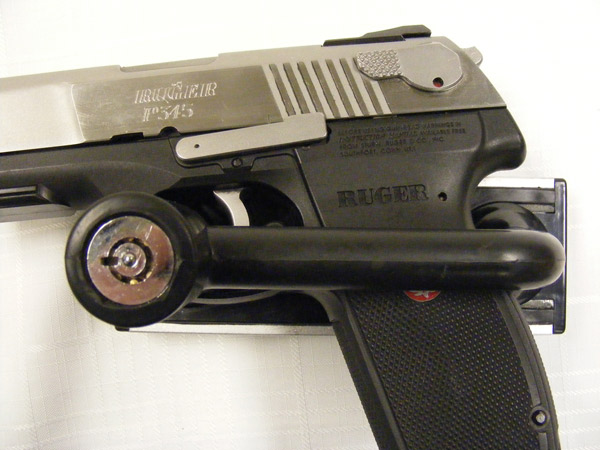
Put Your Guns in Lock-Up
Rather than locking a firearm inside of container to keep it safe, another option exists: lock the gun through a mechanical device and simply leave it out in the open (or hidden if so inclined). This is what the RAC does for firearms that are not in use. It has both a trigger lock and a tamper-resistant mounting system that can withstand 4,700 pounds of pressure.
What is interesting about the RAC is that it can be mounted on just about anything and anywhere. It can be bolted underneath the hood of a trunk so when you open the trunk, there is your gun. It can be mounted about anywhere in your home, garage, barn or work area. The only caveat is that whatever you mount the RAC onto; it should be just as strong since the surface material will probably break before the RAC will if a vandal were to try and smash it off a wall. But even if that happened, then the criminal will have a useless gun with a lock stuck on it. Hence, only a true idiot would attempt such a thing.
Mounting the RAC is about as hard has hanging a bookshelf. Mark where you want to put it with a pencil, drill the holes, and wrench in the lag bolts. There are some special instructions for removing a pin and they are easily understood.
The RAC secures about 97% of firearms with a trigger housing and has earned California compliance certification. It can fit both long guns and handguns and so they won’t get scratched, it is covered with a smooth rubber coating. A tubular key is used to access the gun and the manufacturer recommends storing only unloaded firearms. Two kinds are offered: a three-inch model that stores one firearm, and a five-inch model that can hold multiple firearms depending on their size and shape. MSRP: $75. For more information visit The RAC.
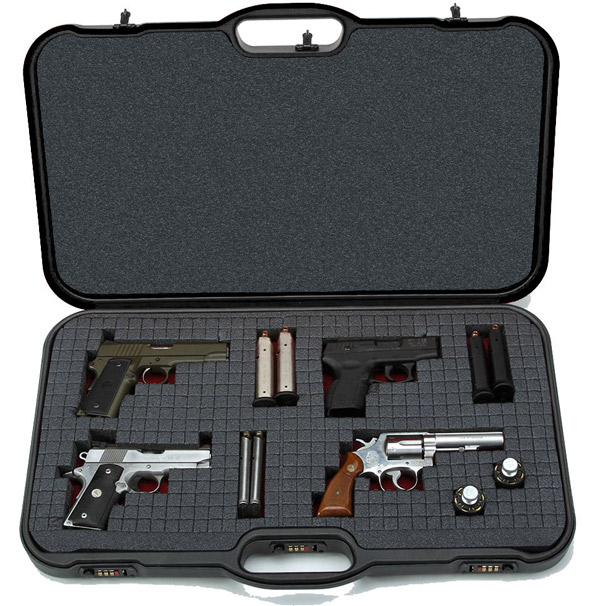
Mix-and-Match Gun Cases
Negrini has rolled out a new line of gun cases called Tactica Concealed Carry. On the outside, they look like a sleek and stylish case that could hold anything. On the inside are modular, transformable inner sections of dense die-cut PixelFoam. That means you can swap out this sections like Lego parts to fit whatever gun or accessory you need to make a tight, secure fit. The user removes the unused pixels in whatever way you want to fit your firearm and additional pixels can be ordered for further customizing or if you lose one.
The cases come in eight sizes ranging from a single handgun case to one that holds six. There are also cases for AR-15-type rifles. All sizes of the cases have extra room for magazines and accessories. The exterior of the cases are made of a double wall multi-layer ABS technical polymer that is lightweight and absorbs shock. The MSRP ranges from $119 to $369. Check out Negrini Cases.
Looking to go armed, but are stuck in the weeds as to what to arm yourself with? Here are 20 of the best concealed carry gun options that will keep you on the defensive.