It’s a striker-fired world any more. Shooters need not look further than Heckler & Koch for proof.
For the better part of its existence, the German manufacturer has made a name for itself as one of the world’s premier hammer-fired semi-automatic pistol makers. Legends such as the USP and P30 have graced many a service holsters and have become staples for concealed carry practitioners across the country. But even with its success in this niche of the firearms industry, H&K couldn’t resist the siren call to comeback to striker-fired pistols.
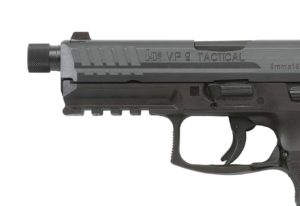
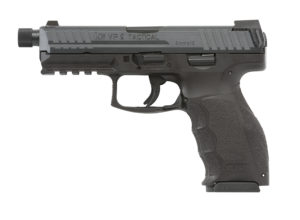
Similar to other H&K models, the VP now has a suppressor-ready iteration.
Jumping back into this style of firearm after nearly a quarter of a century away has proven a boon to the company and shooters. Heckler & Koch’s VP line — VP9 and VP40 — has stood out in the crowded striker-fire market, offering shooters the precision, reliability and quality the company is know for in a style of pistol that keeps growing in popularity.
And the company continues to roll with the success of the VP with three new additions to the line. Shooters now have the VP Tactical, VP FDE (Flat Dark Earth) and VP Grey to choose from, in addition to the two existing models.
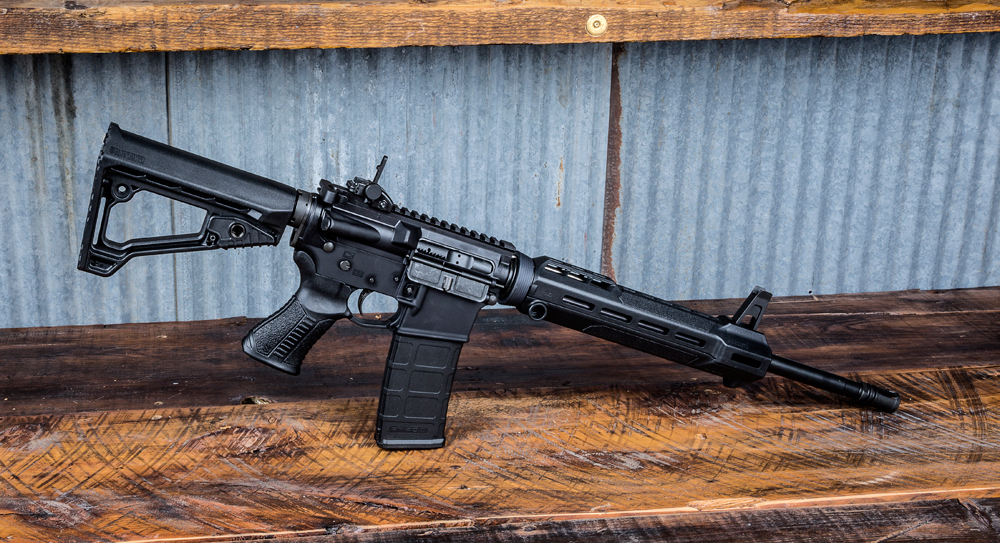
Of the new iterations, the VP Tactical offers the biggest jump in features, easy to discern with a quick glance at the pistol. As the barrel thread protector on the muzzle indicates, the Tactical addition is the first suppressor-ready VP. This is a logical move for Heckler & Koch, threaded barrels have grow in popularity with more and more shooters taking the plunge into suppressors. But it is also typical of the company, who has offered many of its models in a tactical edition.
Outside of being a bit longer, the new VP Tactical has all the features of the line.
The threaded barrel on the new VP9 and VP40 Tactical are a bit different than what the company has offered in the past when it comes to suppressor-ready firearms. The main break, they do not feature the O-ring assisted lockup, a proprietary feature that is meant to ensure better slide-to-barrel lockup and more accuracy.
The new model is also a bit different than the rest of the VP line, mainly in dimensions. At 4.7 inches, the VP Tactical boasts a slightly longer barrel, an obvious modification to make room for a suppressor. Overall, this makes for a slightly larger pistol than the standard VP, but not dramatically so; both the 9mm and .40 S&W are 7.95 inches in length, just a few tenths of inch longer that the standard model.
Shooters looking for something bit different now have the VP Grey and VP FDE to choose from.
From there, the VP Tactical becomes very familiar to those who know the line, outfitted with the exact same features as previous models. Some of these include cold-forged cannon-grade steel barrel , polygonal bore profile, Picatinny Rail, three changeable grip backstaps and six side panels, and 15-round capacity for the 9mm and 13 for the .40 S&W.
The VP FDE and Grey are also identical to the standard VP, not only in features but also dimensions. But each offers shooters a choice in frame color, an appealing proposition for those who want a bit more flare than matte black. At the moment, FDE is offered in 9mm and .40 S&W, while the Grey is only available in 9mm.
Presently, the MSRP for the VP Tactical is $899, and the MSRP for both the VP FDE and Grey is $719.
The Ruger American Rifle series has earned its place in shooters’ hearts. The short time the line has been around, it has grown to include nearly every popularly caliber and has been configured to meet nearly every shooter’s need. Best of all, Ruger has found the sweet spot between features, performance and price point. It’s an everyman’s rifle at an everyman’s price.
And Ruger is still finding new niches for the series to fill. The latest target the company has laid its crosshairs on is precision plinking with the introduction of the American Rimfire Target Model. The new iteration of the rimfire wing of the American family is available in three calibers — .17 HMR, .22 LR, .22 WMR— and comes with a load of features that should grab the attention of the precision minded.
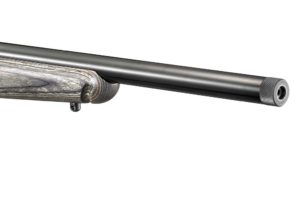
Chief among these is the bolt-action rifle’s .860-inch diameter target barrel. The bull barrel on the rifle should make it a tack tapper at the range, especially during those long shot strings, where inaccuracy from heat can come into play. The heavier barrel should also make recoil on these calibers non-existent, making the Target model all the more pleasurable to shoot.
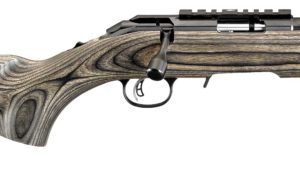
The threaded bull barrel and Alexander Henry forend aren’t just functional, but give the rifle a slick look
As is common in the American Rifle family, the barrel is threaded and comes with a factory installed knurled thread protector. This is a feature that is becoming more typical industry wide as more and more shooters employ suppressors. And like the rest of the line, the Rimfire Target employs Ruger’s Power Bedding system, blocks that free-floats the barrel, thus ensuring proper harmonics.
Another interesting addition to the American Rimfire Target model is its Alexander Henry forend. Typically seen on Ruger No. 1 rifles, the groove not only adds a dash of character to the black laminate stock, but also makes it more functional, steadying a shot made off of sticks or a bipod.
The rifles come outfitted with a one-piece Picatinny rail situated above the receiver for the quick addition of an optic. And it comes standard with the company’s Marksman Adjustable trigger, which allows shooters to tweak the pull weight between 3 and 5 pounds.
Picattiny Rail, adjustable trigger and over-sized bolt handle all come standard on the new Target model.
Giving the rifles a touch of the tactical is the over-sized bolt handle. But it’s more than just for looks, allowing for fast cycling, and thus, quick follow-up shots. As a nice touch, the bolt itself can be completely removed without pulling the trigger, making the rifle a bit safer.
The American Target Rimfire .22 LR comes with a 10/22 BX-1 10-round rotary magazine but accepts all 10/22 magazines across the board. The .17 HMR and .22 WMR both use the 9-round JMX-1 rotary magazine. The rifles have a tang safety for intuitive engagement and come with pre-mounted sling swivels. And like the rest of the American Rifles, the price is right on the Rimfire Target model, with all three calibers’ MSRPs at $499.
Bergara has made a name for itself in the gun world adhering to tenants of old-world craftsmanship. The Spanish barrel maker’s devotion to quality manufacturing and precision machining ensured a custom rifle had accuracy in addition to elegance.
Since expanding into full-scale rifle making in recent years, Bergara hasn’t jettisoned its dedication to precision. But at the same tick, the company hasn’t pigeonholed itself with traditional bolt-action rifle designs. Mixed in with its catalog of tried-and-true Monte Carlo-style stocks is the next generation of rifle.
The New Style
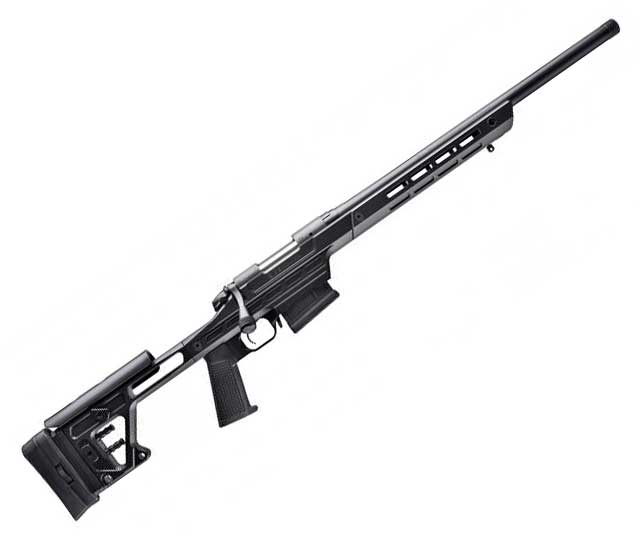
Bergara’s B-14 BMP Chassis Rifle features a fully adjustable butt stock that does not require tools to tweak.
The New B-14 BMP Rifle is a radical departure from Bergara’s old-style, but one that is most certain to set long-range and precision shooters’ collective hearts aflutter. The heart of Bergara’s latest addition to the B-14 line is the BMP (Bergara Match Precision) Chassis Rifle. The fully adjustable system is engineered to milk every ounce of precision out of each shot and add an entirely new dimension of versatility.
The B-14 BMP features an adjustable butt stock, allowing shooters to tailor the length of pull to their frame, as well as cant. It also is outfitted with an adjustable cheek piece, facilitating a more intuitive shouldering of the rifle. And the rifle can be adjusted on the fly with the tweaks not requiring any tools.
Versatility
The B-14 BMP has a number of aspects that make it more versatile. The butt stock can be removed for a standard AR-style buffer tube, and Bergara also offers a side-folding adapter, for those shooting to make the rifle more compact. The system also features a barrel nut engineered to facilitate quick and easy barrel changes, if the situation calls for it.
An extended barrel nut facilitates quick barrel changes on the B-14 BMP and a threaded barrel makes a suppressor a quick addition.
The chassis stock is crafted from aircraft-grade aluminum (7075-T6) and features QD attachment mounts and accessory mounting slots. The slots are compatible with Magpul M-LOK capable accessories.The magazine well accepts AICS-type magazines, and the front is designed to function as a support brace. And, the stock is topped off with an AR-style grip, to add an extra level of control over the rifle.
Barrel and Chambering
The 11-pound rifle is outfitted with Bergara’s B14 action and a Chrome-Moly button-rifled barrel. It has a threaded muzzle, making it suppressor ready and comes with a sub-MOA guarantee from 100 yards with the use of match-grade ammunition.
Presently, the B-14 BMP is offered in .308 Win., and 6.5 Creedmoor. The 30-caliber version has a 1:10 twist rate and a 20-inch barrel, while the Creedmoor has a 1:8 twist rate and a 24-inch barrel.
Bergara has released the B-14 BMP Chassis with an MSRP of $1,699.
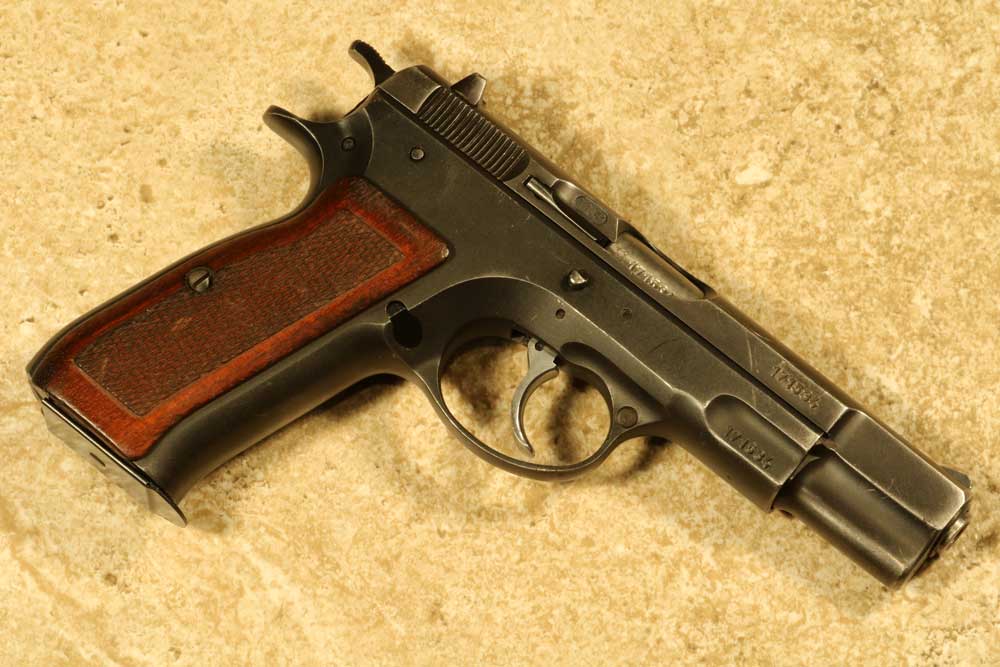
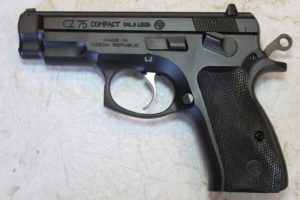
An original, blued Model 75, made in Czechoslovakia.Become an expert on one of the world’s most popular firearms companies and its guns with Gun Digest Book of CZ Firearms.
The CZ 75 is a masterpiece in firearms design. It is one of the original wonder-nines, a term coined in the late 1970s. A wonder-nine is a pistol that is 9mm (of course, hence the “nine”), double-stack magazine (read: high capacity of 12 or more rounds), double-action trigger, and of polymer, stainless, or alloy construction for ease of maintenance. Remember, at the time most police departments still carried .357 revolvers with a 6-round capacity. It was a big deal to have a gun that carried, at a minimum, twice that. And the semi-auto that Americans were most familiar with — the 1911 — you had to have a cocked hammer to fire the first round because it was single-action only. The ability to carry the weapon on safe with the hammer down, take the weapon off safe, and fire it without manually cocking the hammer was also a big deal.
Unfortunately, the CZ 75 didn’t catch on in the U.S. upon it’s release, as it did elsewhere. Not many Americans got to handle one because it was born on the wrong side of the Iron Curtain. Only a few got to hold it and shoot it, and most of them raved about it.
The pistol was designed in 1974 by CZ’s best weapon designers of the time, brothers Josef and František Koucký. Despite the Iron Curtain, it was actually designed with export to the West in mind, and it’s unfortunate that it was never exported to the U.S. It would have made a fine military side arm for someone, but of course that would never happen with any of the Warsaw Pact countries — Czechoslovakia included — because of the requirement to use the 9×18 Makarov. The CZ 75 was designed around the 9×19 Luger from the start, so it’s only hope for use as a service gun would have been with the west.
The CZ 75 slide is only moved back far enough to line up the disassembly lines.
The CZ 75 is CZ’s flagship handgun. The centerpiece of all other new handgun production. It’s iconic. It’s a legend. It’s reached a status that few other handguns have reached. That category includes the 1911, Walther P38, Beretta 92FS, Walther PP/PPK, with the newest handgun to be added to that list being the Glock. It would have been possible to include the CZ 75 in the Cold War chapter in this book, because that’s when it was made, and for a long time it had that “Iron Curtain” aura in the West, because it was unobtainable. However, it fit best in the current production guns, because, chiefly it is current production. But also because at the time it was built, as I said in the previous paragraph, the Czechs built it to Western standards, Western tastes, and it was really built for sale on the Western market.
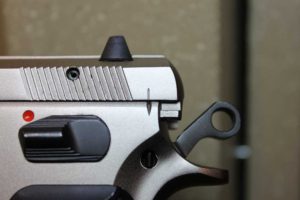
The 75 is an all-steel, locked-breech semi-automatic handgun. Two locking lugs are machined into the top of the barrel and, upon lock-up, fit into the matching recess in the slide. It uses the Browning design to unlock the barrel when the slide is pulled to the rear. It uses a selective double-action trigger, which means it can be carried cocked and locked (like the 1911) for a first-round single action pull, or it can be carried hammer down for a first round double action pull. The choice is yours.
The most notable feature of the CZ 75 is the slide rails fit inside of the lower frame assembly, and not the other way around. It’s generally the first thing people notice, and it does give it a bore axis much lower than any other hammer-fired handgun. This design was first seen in the SIG P210, designed in 1949, then the CZ 75. There are not many handguns that have been manufactured since then that incorporate this into their design — the Bren Ten is one that comes to mind — with exception of 19 different companies making clones and imitations.
The CZ 75 is most famous for the slide-inside-frame design.
I feel inclined to say something about those clones. There are some that are better than others, and I’ve even heard that some of the clones are pretty darn good. It’s unfortunate, though, that due to the communist system that the 75 was designed under, the design wasn’t patented. So, no one was paid for creating one of the most prolific handguns ever made — other than a communist worker’s salary — no one was compensated the design being used, and there are no royalties paid. Companies freely copied the design, and others poached design elements from the pistol and incorporated them into their own. It’s a shame, really, and for both the maker and the consumer. The consumer suffers, because since CZ had no control over the design, they also had no quality control over the products that were made by other companies. An example of this is Taurus, who makes a clone of the Beretta 92 FS. They have the license to do so, they paid for the license and rights to make it, and Beretta had control over the quality.
In general, I like the slide-inside-of-frame design of the 75, though it does have one drawback. When charging the slide to chamber a round, if you’re used to a large slab of slide to grasp, this only has a narrow bit of slide available for grasping, making it a little more difficult to rack the slide.
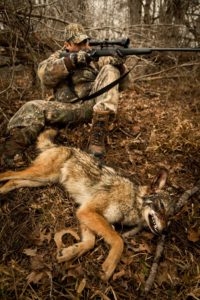
On a whitetail hunt at the JL Bar Ranch in Texas two years ago, I tagged out early and my guide asked if I was interested in spending the remaining mornings and evenings calling gray fox on the far side of the ranch. The cover was thick over there, he said, and since there were no deer hunters on that side of the property we wouldn’t blow anyone’s chances at a big buck. I should have been working—I had a deadline looming, I clearly remember—but I simply couldn’t pass on an opportunity to hunt predators in a new part of the country.
I was glad that I took him up on the offer. We hadn’t been set up for more than two minutes when the first gray appeared, almost literally, in our lap. That fox came so quickly and was so close that no one had a chance to shoot, but within 30 seconds another fox approached us at a trot from the opposite side. This time we were ready, and when the gray stopped at 40 yards and the .17 HMR barked, he went down hard, the first of several we took over the next few days.
Considering All the Options
A really outstanding predator hunt like the one I had at the JL Bar can be as exciting as just about any type of hunting. But despite the affordability and availability of predator hunting, there are certainly some important decisions that need to be made with regard to caliber. You need a gun that matches the style of hunting and the country, so a big, heavy-barreled rifle chambered in one of the hot .22s, which is a great choice for calling coyotes from a hilltop setup in Wyoming, isn’t the best option for a hunt that will require a lot of walking and quick, close shooting like our fox hunt in Texas. Conversely, the .17s that served so well in Texas won’t be very effective for those long-range setups in windy country where your closest shot might be a couple hundred yards.
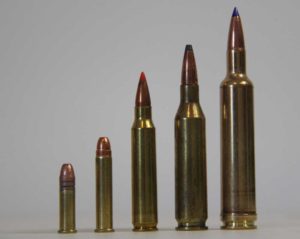
The 10 Best Predator Calibers of All Time
Some of the top predator cartridge choices, from left to right: .22 LR, .22 WMR, .223 Rem, .243 Win., .257 Wby Mag.
There’s a lot of diversity, then, on our 10-best list. These cartridges may not suit all hunters, but no matter what type of predator you are hunting, from weasels to wolves, there’s a round on this list that deserves top billing.
The .17 Remington was a fine moderate-range varmint and predator cartridge, but it never really was a commercial success. The .17 HMR, which was released by Hornady in 2002, however, was exactly what the .17 shooters were looking for. It could reach high (2,500 fps-plus) velocities and shot flat, but that little bullet didn’t destroy pelts, and it was an effective killer. There are lots of good, cheap loads, and Savage is now offering its affordable and deadly accurate A17 semi-auto rifle in this caliber. Recoil is barely noticeable, muzzle blast isn’t awful, and when ranges are moderate, this is an outstanding option for smaller predators. It’s also a great option for new hunters.
The .17 Winchester Super Magnum (WSM) is based, of all things, on a modified .26-caliber nail gun cartridge. But the parent cartridge’s thicker case walls allowed for higher pressures, so the .17 WSM can drive a 20-grain bullet at more than 3,000 feet per second. It pushes the .17 to new levels, but pelt damage is minimal and recoil is nil. At close to moderate ranges, it kills coyotes dead, and rifles from Savage and Ruger are affordable, available, and accurate. And while it hasn’t achieved the level of popularity of some of the other cartridges here, it has a loyal following, and those who use this cartridge are generally very satisfied with its performance.
The .204 Ruger is based on the .222 Remington Magnum, and it is capable of firing a 32-grain bullet at better than 4,000 feet per second, so it is a legitimate long-range predator cartridge that can topple even the largest coyotes at a quarter mile. Available bullets range in weight from 24 to 55 grains, but the most common options are between 32 and 40 grains. The .204 doesn’t produce the recoil of the hotter .22s, and it has proven to be extremely accurate. For that reason, it is certainly one of the very best all-around cartridges on this list for the predator hunter who plans to pursue small game like raccoons and gray fox yet wants a rifle that will work to longer ranges on ‘yotes. Best of all, ammo is cheap and rifles are widely available.
Bobcat pelts are valuable, so you don’t want to damage them with an explosive bullet. At close range, the .17s and .22 WMR will work, but these elusive cats are oftentimes hard to bring to the call so the flatter-shooting .22 centerfires are probably the most versatile option.
Although its applications are limited, the .22 Long Rifle is not a cartridge that should be overlooked by predator hunters who pursue small game at close range. For starters, .22 ammo is now once again widely available and cheap, and hundreds of rifles are available starting at rock-bottom prices. Is it the most versatile option here? Not by a long shot, but if you hunt smaller predators like raccoons over bait or by calling or simply want a gun that can keep small vermin under control, then the .22 is still a fine option. Not all .22 ammo is created equal, but there are some real standouts for those who prefer this caliber, cartridges like CCI’s Stinger, which pushes a 40-grain HP at 1,640 feet per second. If you sell your hides, there is no better option to preserve pelts and maximize profits.
The .22 WMR is a ‘tweener cartridge, a rimfire that pushes heavier (28- to 50-grain) bullets than most other loads in this class at around 2,200 feet per second. It shoots flatter than the .22 Long Rifle, has plenty of coyote-stopping power at moderate ranges, and doesn’t kick or bark like hotter loads. It pushes the limits of what a rimfire can accomplish in terms of predator rounds, but with ammo available as cheap as a quarter a shot, it’s affordable to shoot and there are a lot of great lightweight, accurate rifles available. With 40-grain hollow points, it drops game, and pelt damage is very minimal. If there’s one knock against this cartridge, it is that its popularity sometimes makes it hard to find factory ammo on store shelves.
The .220 Swift was one of the original hot .22 centerfires, having debuted in 1935 in the Winchester Model 54 rifle. It was based on the old 6mm Lee Navy cartridge, and original loadings pushed 40-grain bullets well past 4,000 feet per second. Like many other cartridges, the .220 Swift was ahead of its time; those blistering-fast early loads gave this cartridge the reputation as a barrel-burner, which was accurate, but modern metallurgy techniques and slightly reduced loads mean that case and barrel life with this cartridge is now on-par with other hot .22s. If you want to maximize the range of your .22-caliber rifle, this is an ideal round, perfect for dropping coyotes that hang up at a quarter mile or more. The two primary knocks are availability of rifles and ammo, and the need to be careful with shot placement and bullet selection if you want clean pelts, but the Swift is certainly an outstanding predator round.
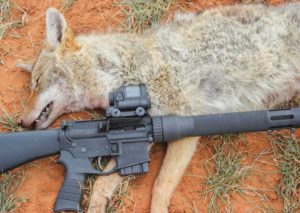
If you’re going to use multiple setups and walk a lot, you need a rifle that is light enough to carry all day yet accurate enough for long shots on coyotes that hang up. The centerfire .22s, particularly the popular .223 and .22-250, are ideal choices if you might need to shoot at 300 yards or more.
I’m lumping these two together because many hunters today use 5.56 ARs and feed them .223 Rem. ammo. No matter the platform, the .223/5.56 is probably the ultimate predator round in terms of versatility. There are tons of ammo offerings in a variety of bullet weights and plenty of choices when it comes to rifles. The .223 will do almost anything the hotter .22s will, and recoil is scant. I have used a Mossberg MMR rifle with 55-grain bullets on coyotes for several years now and that gun is deadly accurate, light enough for all-day carry and offers me the fastest follow-up possible. In truth, if I do my part, there’s no need for a follow-up, though, and there are so many bullet options available that you can achieve exactly the kind of performance you are looking for. The .223 has become to predator hunting what the .30-06 is to big game hunting. There are a lot of other choices, but there’s a reason this do-all round is on top of the pile in terms of popularity.
Based on a necked-down .250-3000 Savage, the .22-250 started life as a wildcat cartridge in the 1930s and was later adopted by Remington, which gave the cartridge both its name and the clout it needed to win over the masses. This round remains one of the most popular predator cartridges, and with good reason; bullets are widely available, it’s easy to reload, shoots flat, and it’s very, very accurate. Plus, this is a cartridge that serves dutifully in a variety of bolt-action rifle designs. It’s the perfect complement for a heavy-barreled, long-range rifle with a high-magnification scope, but it also works in lighter sporters that are great for multiple setups where you need to cover a lot of ground. It beats the .223 in terms of trajectory and velocity, and it is one of the absolute best do-all predator rounds for foxes, coyotes, and bobcats out to extended ranges. Recoil isn’t as mild as it is in some of the other .22s or .17s but is still quite manageable and a fair tradeoff given this level of performance.
The .243 Winchester has been around since 1955, and it debuted the same year as Remington’s .244. The .244 Remington (now 6mm Remington) was ballistically superior, but Winchester offered a 1:10 twist rate that allowed the gun to shoot heavier 100-grain bullets accurately, making the .243 more versatile. That versatility has made this cartridge what it is today—the perfect crossover cartridge for those who want to hunt coyotes and foxes one day and deer and antelope the next. It’s based on the .308 Winchester necked down, and it will drive a 70-grain bullet faster than 3,500 feet per second. There are a bunch of affordable ammo options and lots and lots of rifles in almost every configuration imaginable, and with lighter bullets at moderate velocities, it isn’t absolute overkill on smaller predators at long ranges.
The hot .22s, like the .22-250, are great for hunting coyotes. They offer plenty of range, plenty of knockdown power and produce little recoil and minimal pelt damage with the right bullets. Photo by Ben Gettinger.
I may have lost some of you with this one, I know. The .257 Weatherby Magnum is far and away more potent a round than is needed for a 200-yard shot on a coyote (Roy Weatherby actually killed a cape buffalo with this round just to prove that it could be done), but with a muzzle velocity near 3,900 feet per second with an 80-grain pill, this cartridge shoots very flat and hits very, very hard. Very few people that would choose this as their go-to coyote gun, but it works, though pelt damage will be more pronounced than with other cartridges listed here. The .257’s greatest virtue, however, is its outstanding versatility, for it will kill deer, antelope, sheep and even elk at long ranges, and it will also topple a coyote crossing an open pasture at a quarter mile. With an 80-grain Barnes TTSX bullet in Weatherby’s factory load you can sight your rifle in just under 2 inches high at 100 yards to hit dead-on at 300. At 400 yards, that bullet will be just 6.4 inches low, taking much of the guesswork out of long-range shooting. Weatherby’s Vanguard rifles are chambered in this round, and they are both accurate and affordable, and ammo isn’t nearly as expensive for this load as for some of Weatherby’s other offerings. Additionally, now that wolf hunting is legal in the Lower 48, there’s a whole new class of canine predator, and the Weatherby is up to the challenge.
If it is newer than M855 (the mid-1980s) and it is military, you can be sure it is 5.56 and should be treated accordingly.
A .223 Remington and 5.56×45 are not the same. The 5.56 has a longer leade, a longer distance between the bullet start and the onset of the rifling. Here’s why it matters.
Ammo companies know what they make, and they mark it accordingly. This is 5.56 ammo, and you should not be using it in a rifle with a .223 leade.
The rifle and cartridge designers did that deliberately to allow for a hotter load and higher velocities because the longer leade allows for more run-up to the engraving.
Some 5.56 chamber drawings show a larger diameter in the leade proper than is in a .223. This larger diameter is there less for pressure than function. In a really harsh environment, a scosh more room in the leade can keep a rifle running, where one with a tight leade (not a short leade, the two differ) would choke. The government is more interested in a rifle that keeps working, even if it means they have to accept a 3 MOA accuracy level, instead of a 2 MOA potential.
When you put 5.56×45 ammunition, meant to utilize a longer leade, into a chamber cut for the .223 with its shorter leade, you get a pressure spike. How much? To find out, I sent some 5.56 ammo off to a test lab. No big secret, the ammo was a batch of Federal XM-193, 55-grain FMJ brown box. I had them test it for pressure in two laboratory barrels — one chambered in 5.56, and the other in .223.
In the 5.56 test barrel, the XM-193 produced 48,000 PSI. A little on the low side, but since it delivered the expected velocity, why should Federal have loaded it any hotter? In the .223 barrel, the same ammo produced 62,000 PSI. That’s a big spike. Now, someone is going to say that it is no big deal. They’ll assert your AR can shrug off a diet of 62,000 PSI ammo, after all, it isn’t that much more than the 55,000 PSI the spec calls for, and hardly anything over the NATO pressure.
Remember my advice about people you can ignore? This is one example. A pressure increase of 29 percent is not “nothing.” And what if the original pressure had not been 48,000, but something more like what we’d expect, say 52,000? Then a straight 29 percent increase (and this is not usually a linear response) would make it 67,000 PSI. I have talked to other gunsmiths and AR-savvy people who have done the same thing and their experience of a 52,000 original round has been more along the lines of 72,000 PSI.
A 29 percent increase is pretty close to the increase in pressure that a proof round produces. How do you know if your barrel is .223 or 5.56? Measure it with a gauge produced by Ned Christiansen. If you have a .223 instead of the 5.56 you thought you had, ream it with a 5.56 reamer, also from Christensen.
The gauge has a short section that replicates the neck and leade of a 5.56 chamber drawing. Start by dropping the gauge into a recently cleaned chamber. If the leade has been cut to .223 dimensions, it wedges in place. However, if by turning the receiver upside down, the gauge falls out, you have a 5.56 leade.
This is the result of using the reamer from Ned Christensen. A clean, 5.56-length leade that will control pressure spikes in your rifle.
Use a felt-tip marker to darken the gauge to see exactly where it is binding. But while that can be fun, it does not correct a short leade.
And a reminder, this has nothing to do with headspace.
The reamer is designed so that it will cut the leade and only the leade. It is meant for carbon steel, stainless steel and chrome-plated bores. It will not cut a barrel treated via the Melonite process, and attempting that will only dull the reamer. You can spend all day using it in the appropriate barrels, and not change the headspace at all. The process goes like this. Having cleaned the chamber, apply a bit of lube to the cutting flutes of the reamer. Insert the reamer and turn clockwise as it bottoms out. You’ll feel it cutting. Once you feel that it is no longer cutting, keep on rotating it in the correct direction as you pull it out.
Do not rotate backward. Do not simply drop it in. Keep rotating clockwise as you lift it out.
Brush the chips off the reamer, and put it away. Swab the chamber, then push a patch down the bore to get all the chips and cutting oil out of the bore. Done.
Our Top Articles on AR-15 Builds and Performance
Buyer’s Guide to the Best AR-15 Rifles for Any Budget
With over 13 acres of floor space, 1,600 exhibitors and hundreds of new shooting, hunting and related items introduced, it’s no wonder gun enthusiasts are anticipating the opening bell of the SHOT Show. It’s the biggest trade show in the shooting and hunting industry and attracts tens of thousands of dealers, writers, buyers and others associated with the firearms business.
It’s not open to the general public, but you don’t have to wait. We’re giving you a sneak peak at some of the hot new products gun and ammo makers will be introducing this year.
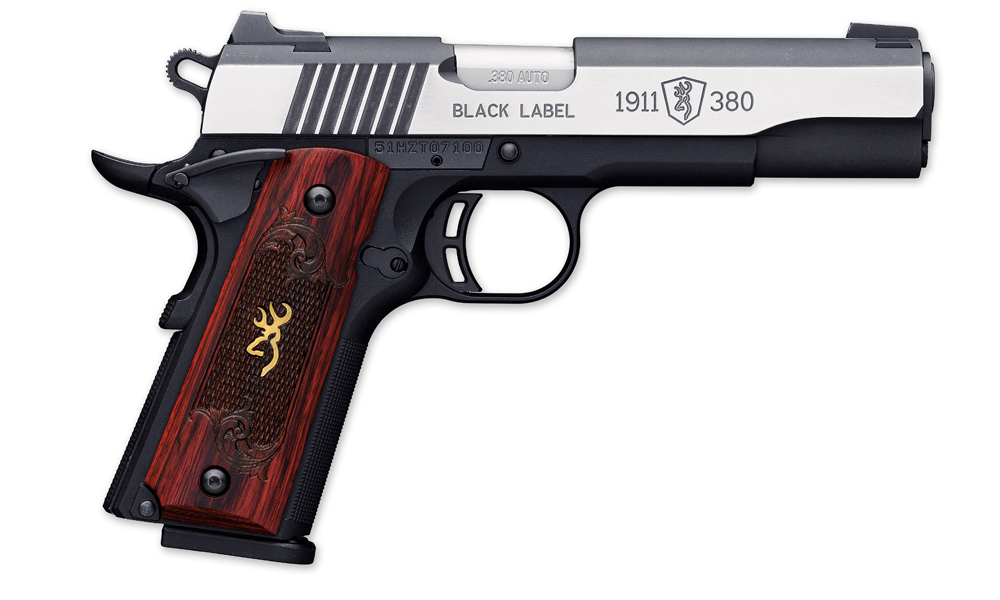
Browning Black Label 1911 Compact You don’t have to choose between beauty and function when you look for your next carry gun. Browning’s new compact Black Label 1911-380 Medallion Pro offers a handsome .380 Auto built on a 1911 platform for good looks and reliable performance on the range and unfailing confidence everywhere else. The barrel is 3 5/8 inches and the gun weighs about 16 ounces. It comes with two eight-round magazines and is available with three-dot or night sights. ($799.99; Browning.com)
Taurus Curve Viridian It may look unusual, but the Taurus Curve Viridian is one of the most functional and practical guns you’ll ever see. The .380 Auto comes with a built-in red laser and light, including a strobe mode. It has a 6+1 capacity and is built with polymer grips, a carbon steel slide and 2.7-inch barrel. The rounded edges allow for a fast draw and the simple features save fractions of seconds when they matter most. ($419; TaurusUSA.com)
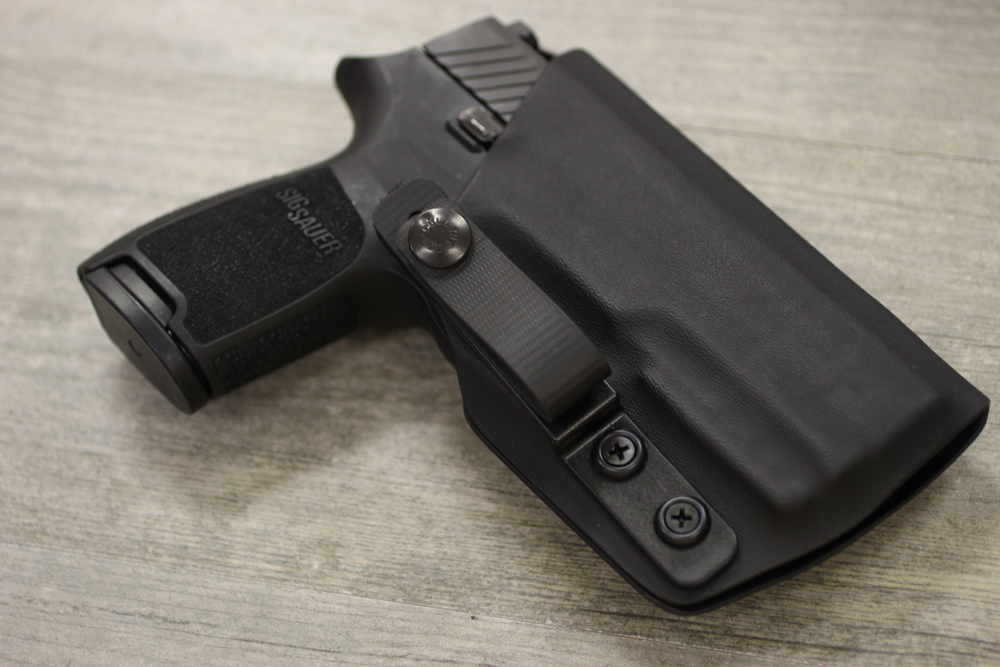
Clinger Trump Tuck Holster If you’re looking for a new holster for concealed carry, Clinger Holsters has a new product that offers a lot of flexibility, and of course, concealment. The new Trump Tuck Holster conceals handguns using only a single IWB Soft Loop with a Pull the Dot snap. This holster has a very small footprint and is completely adjustable. The cant can be adjusted from 0 to 30 degrees for either strong side or appendix carry, depending on the shooter’s preference. Or you can adjust it to a negative cant for cross-draw and small-of-back carry. The Trump Tuck is, of course, tuckable and is adjustable for ride height and belt size. (Pricing unavailable; ClingerHolsters.com)
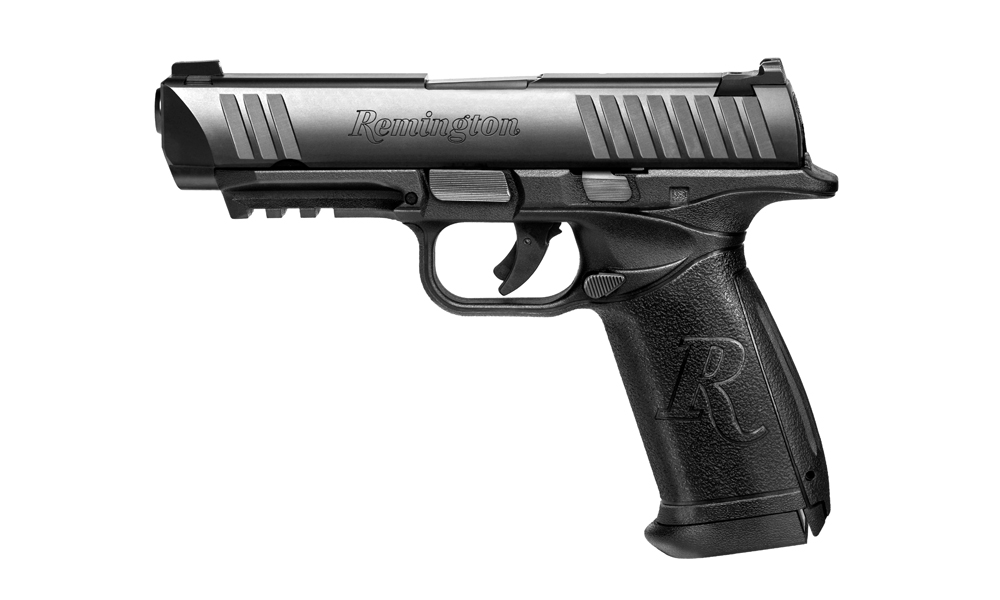
Remington RP9 Remington’s new striker-fired, polymer-framed RP9 is sure to turn some heads at this year’s SHOT Show. It’s a blunt show of practicality and functionality in a single package. The double-stack magazine holds a whopping 18 rounds of 9mm, but the grip is small enough to fit most shooters’ hands, thanks in part to three interchangeable back-straps. It also has a tactile loaded chamber indicator, an ambidextrous slide lock, a Picatinny front rail and a reversible magazine release. ($489; Remington.com)
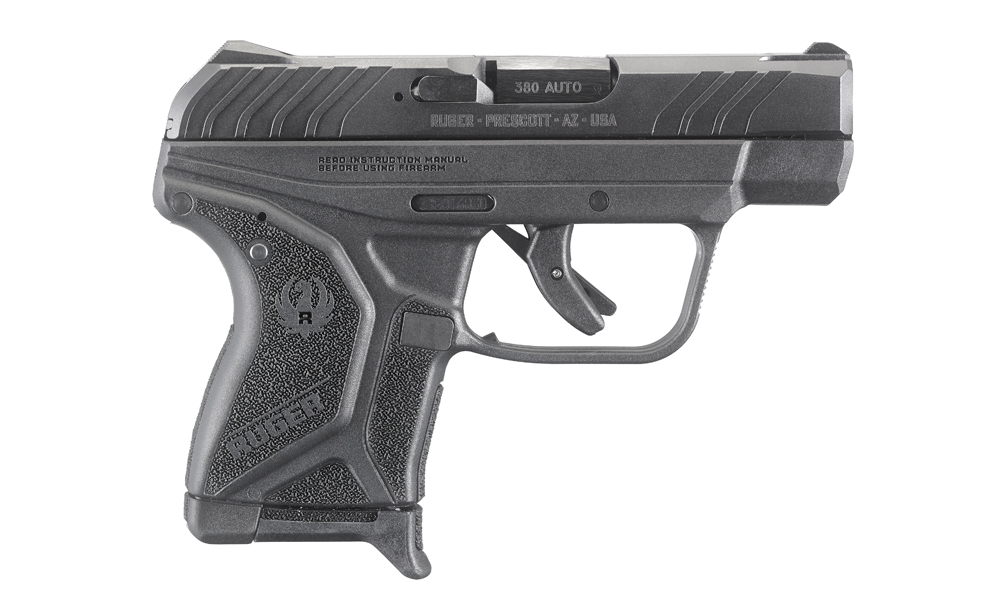
Ruger LCP II Ruger’s original LCP is one of the most popular carry pistols on the market, but the new LCP II just may be even more popular. The 6+1 round .380 Auto is a tad smaller than the original version, allowing you to carry anywhere, anytime without even noticing it’s there. It weighs just 10.6 ounces and is just over 5 inches long. The LCP II comes with a single-action trigger, a larger-framed textured grip and fixed front and rear sights. It comes with a pocket holster and a magazine. ($349; Ruger.com)
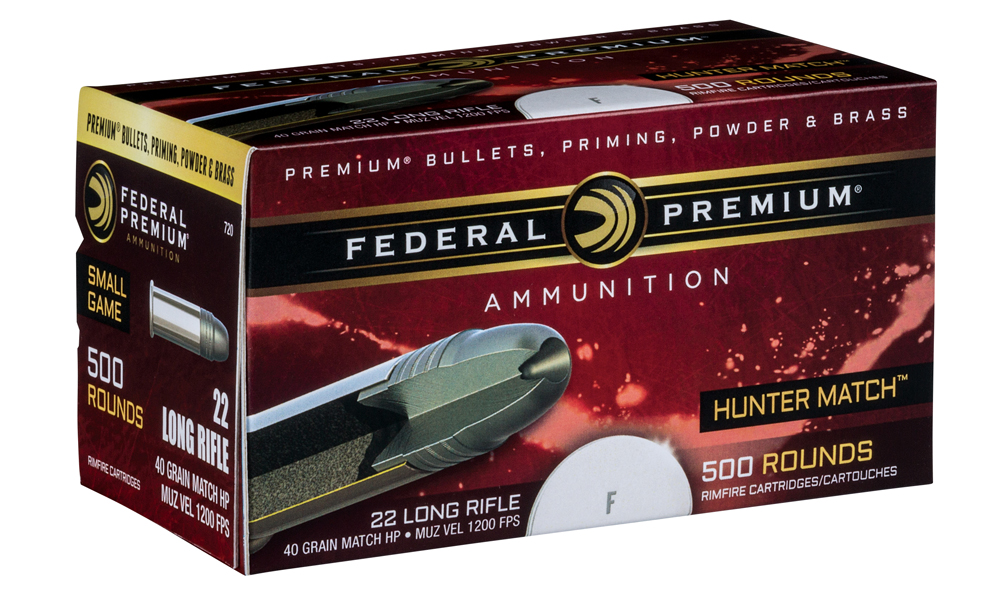
Federal Premium Hunter 22 LR There’s rimfire ammo and there’s Federal’s new Hunter Match rimfire ammo. It’s more than just your standard .22LR ammo. Built specifically for small game and varmint hunters who demand superior accuracy, reliability and maximum knockdown power, Hunter Match 22LR is perfect for a variety of applications. The hollow-point bullet is loaded for maximum velocity and the nickel-plated case provides reliable functioning in a variety of platforms. ($7.95; FederalPremium.com)
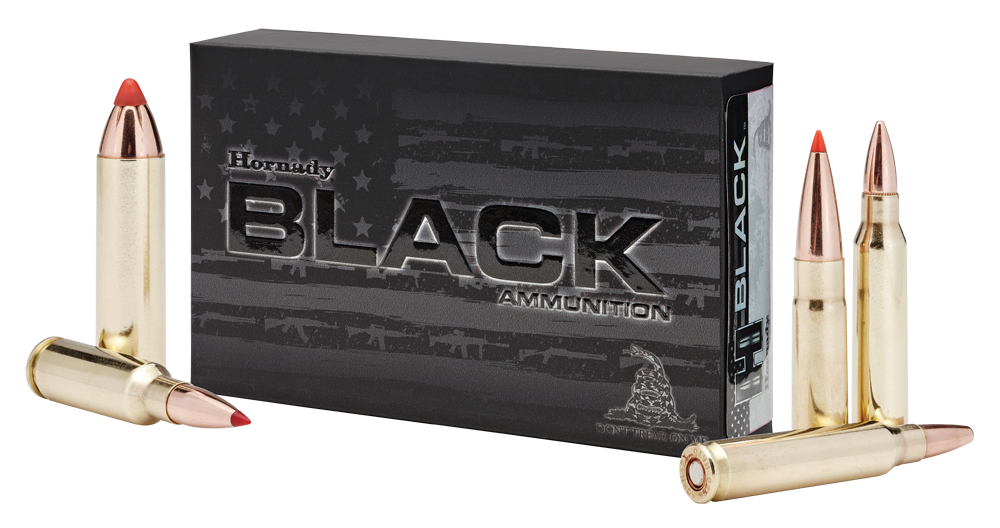
Hornady Black Ammunition Built specifically for modern sporting rifles, yet functional in all types of guns, Hornady’s Black is made with the same high-quality components as Hornady’s other ammunition. The cases feed and function smoothly in suppressed and unsuppressed direct impingement, gas operated and inertia driven auto-loaders, along with bolt-action and pump-action rifles. It’s available in 15 different calibers and bullet choices, plus 12-gauge buckshot. It’s suitable for target shooting, hunting and a variety of other uses. (Starts around $17; Hornady.com)
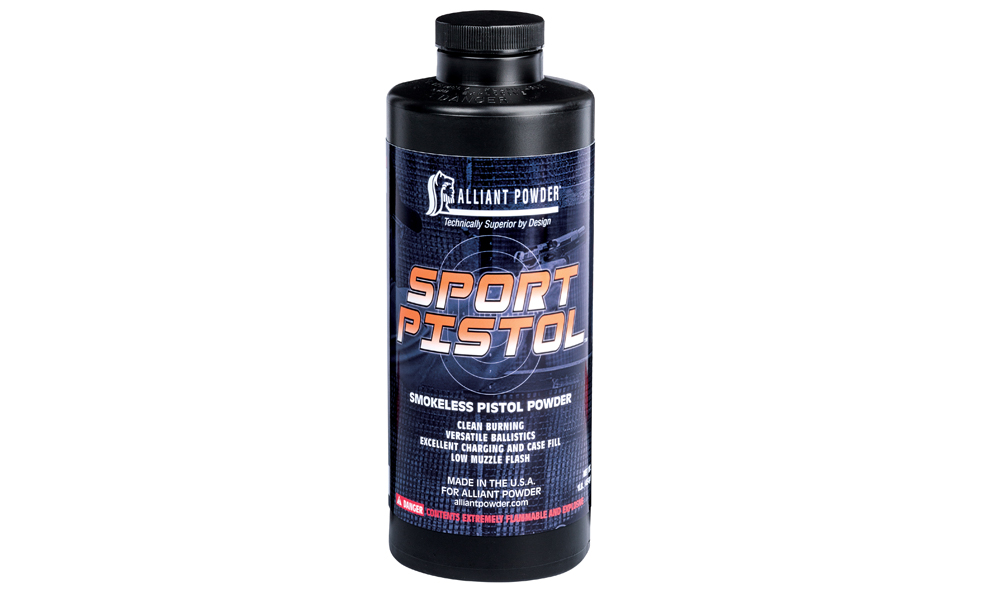
Alliant Powder Sport Pistol High-volume shooters can rest easy. Alliant’s new Sport Pistol powder isn’t just reliable and consistent; it’s clean burning, giving competitive shooters and backyard plinkers alike peace-of-mind. It’s designed for polymer-coated bullets, but it works with all kinds of bullets. It has low muzzle flash and provides versatile ballistics options for a variety of loads. Sport Pistol is a medium-fast burning powder. ($27.25; AlliantPowder.com)
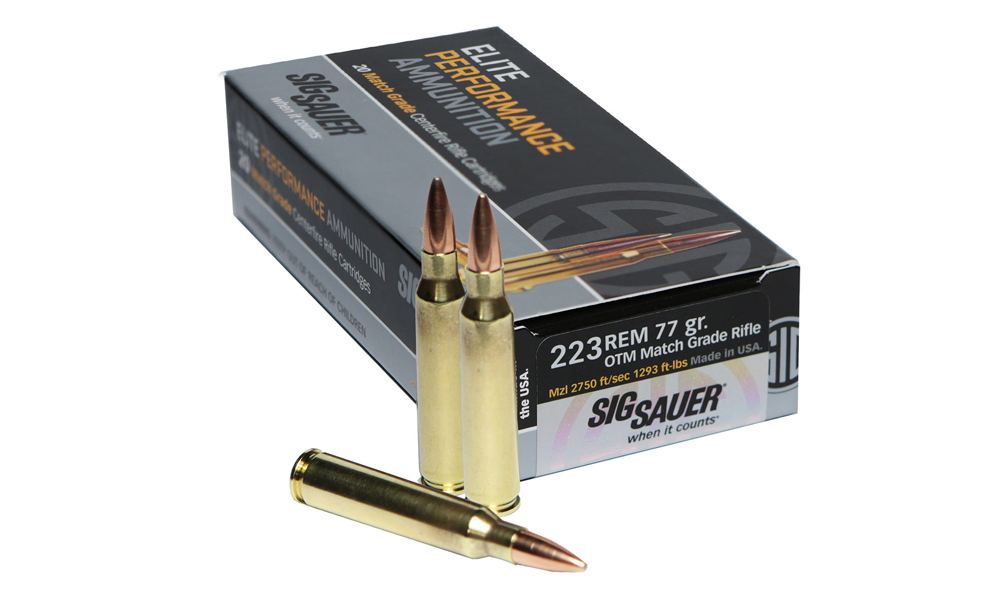
SIG Sauer Match Grade .223 Elite Performance Ammunition When it’s all about accuracy, reach for SIG’s Match Grade ammo. The .223 is loaded with a 77-grain Sierra MatchKing bullet for a muzzle velocity of 2,750 fps and a muzzle engery of 1,293 ft-lbs. It is designed for use in AR platforms, but it excels in bolt-action rifles, too. SIG uses premium primers and the highest-quality brass for reliable functioning under the most demanding conditions. ($24.95; SIGAmmo.com)
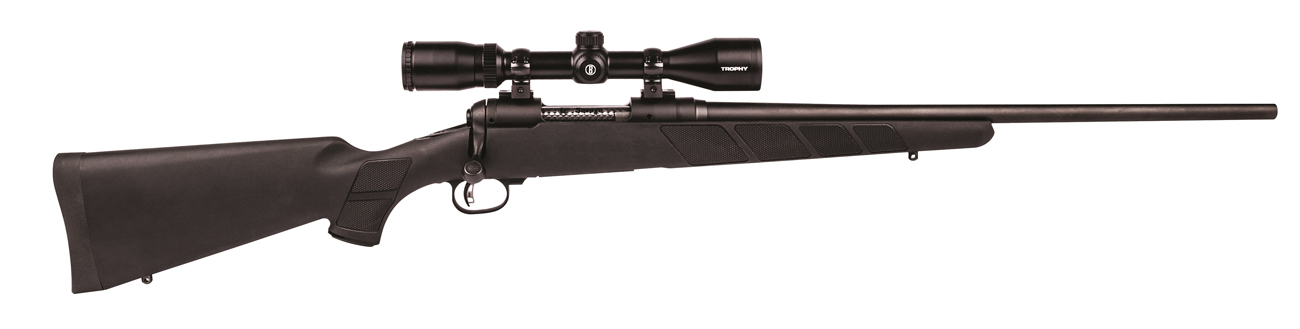
Savage Arms DOA Hunter You don’t need to pay an arm and a leg for a high-quality hunting rifle. Savage’s new DOA Hunter package does everything those high-dollar rifles do for a fraction of the cost. And it even includes a Bushnell Trophy scope. Available in 15 calibers, including 6.5 Creedmoor, .260 Rem, 6.5-284 Norma and various other popular calibers, it’s the perfect choice for budget-conscious big-game hunters everywhere. It comes with a detachable box magazine, a black synthetic stock and Weaver Grand Slam rings. ($684; SavageArms.com)
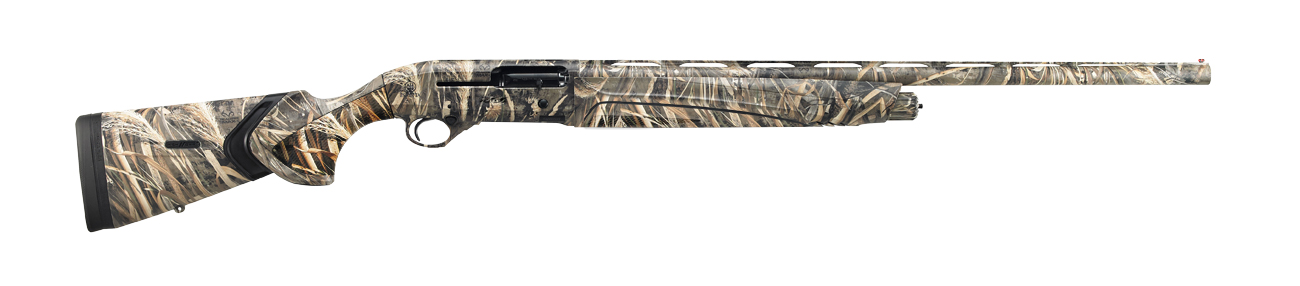
Beretta A400 Lite Synthetic Beretta is now making its great A400 Lite Syntetic shotgun available in 20 gauge and with a Realtree Max5 camo pattern. The excellent A400 Lite Synthetic utilizes a 3-inch chamber and comes with new features like S Grip surfaces on the stock and foreend, the Kick-Off Plus system, and a cross-tube piston for maximum capacity. For serious hunters, the new lightweight A400 Lite is the perfect option. (Beretta.com)
Sako A7 Big Game Roughtech 6.5 Creedmoor This new Big Game combines Sako’s world-renowned receivers and barrels with the durable Roughtech stock, giving the hunter a rugged and reliable tool that performs in all weather and terrain when that trophy of a lifetime presents itself. And Sako is now excited to introduce 6.5 Creedmoor to the list of available calibers. (Sako.fi)
Stevens 555 Enhanced Over-unders don’t have to break your bank account. Stevens’ 555 offers an affordable alternative that shoots just as well, feels just as good and is just as reliable as models that cost twice as much. It’s not only cheaper; at just 6 pounds, it’s also lighter than most other O/Us thanks to a light alloy receiver. It comes with a single trigger, a selective tang safety, automatic ejectors, chrome lined barrels and five choke tubes. Available in 12, 20 and 28 gauge, as well as .410. ($863; SavageArms.com)
Winchester SX4 Just when you thought Winchester’s popular autoloading shotgun couldn’t get any better, along comes the SX4. Building on the popular and tested SX3, the new SX4 includes more accessible operating controls, enhanced ergonomics, faster, more reliable cycling and an improved swing. The 12-gauge comes in four models, including a composite, field, waterfowl and field compact. The composite and waterfowl are available in 3 or 3 ½-inch versions. ($799.99; Winchester.com)
SIG Optics Whiskey 5 The farther the distance, the more room for error. SIG Optics’ Whiskey 5 removes some of the error with its anti-cant, LevelPlex technology. An integrated digital level accurate to +/-.5 degrees, it helps you stay on target in a variety of conditions. The TH100 turrets feature the LockDown Zero System. Six configurations range from 1-5×20 to 5-25×52 and four illuminated reticle options. Even better, scopes come with an unlimited lifetime guarantee. (Starts at $1,079.99; SIGOptics.com)
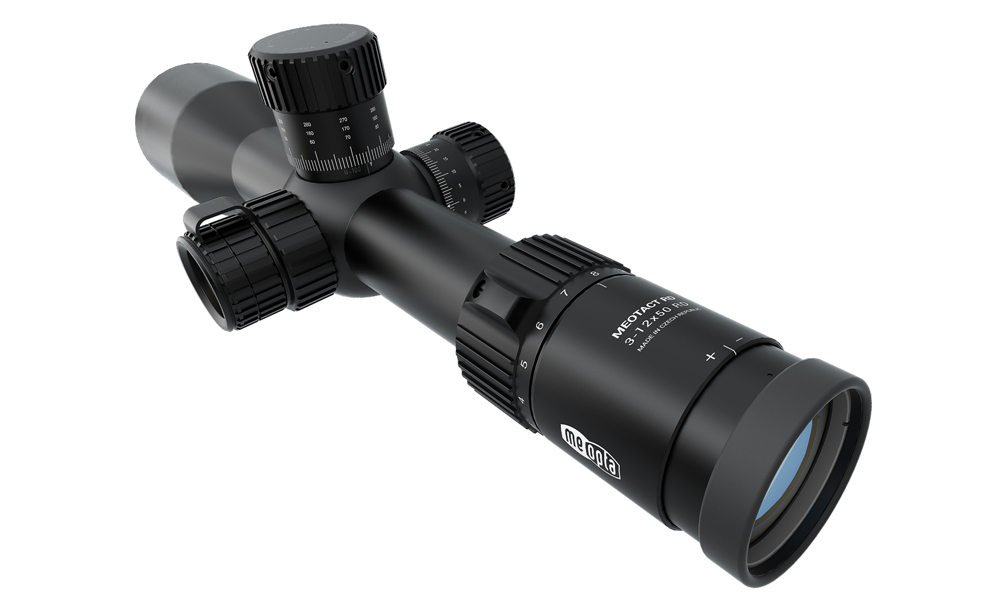
Meopta MeoTac 3-12×50 Designed specifically for AR platform rifles, Meopta’s brand new MeoTac 3-12×50 is made for medium-range shooting and is ideal for law enforcement, military and civilian tactical shooters. It features Meo-Lux, Meopta’s highest-quality lens coating. It allows 99.8 percent light transmission. The 34mm tube allows for 55 MOA windage and 100 MOA elevation adjustments with 1/3 MOA click adjustments. It comes with an illuminated MilDot 3 RD reticle, along with numerous other features. ($2,529.99; MeoptaSportsOptics.com)
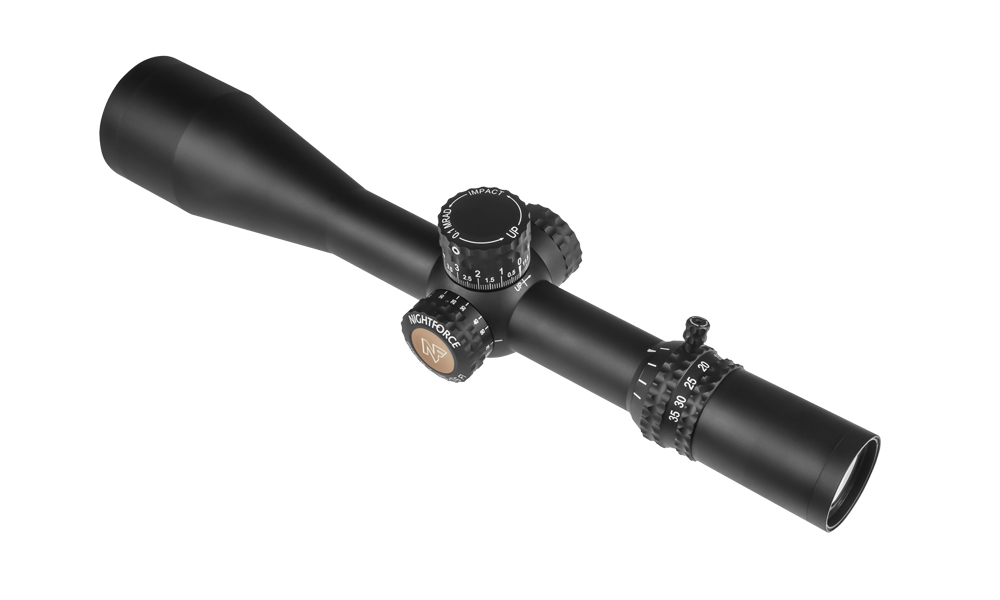
Nightforce ATACR 7-35×56 Long-range shooters who demand superior performance in a quality scope will find plenty to like with Nightforce’s newest scope. The ATACR 7-35×56 offers the highest-quality glass and other features that will help you make the shot every time. Built with a strong 34mm tube and a light-gathering 56mm objective, the ATACR also includes ZeroStop turrets, and a 100 MOA and 60 MOA elevation and windage adjustment, respectively. ($3,600; NightforceOptics.com)
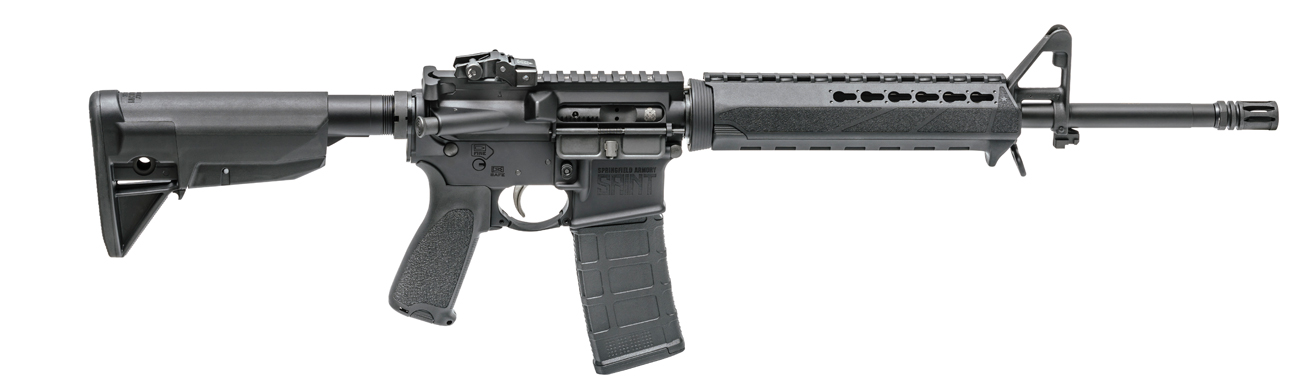
Springfield Armory SAINT Just when you thought AR rifles couldn’t get any better, Springfield Armory gives us the SAINT. Built with high-quality components, yet affordable, the SAINT combines reliability, accuracy and flexibility in a single 5.56 NATO rifle. It uses a direct-impingement gas system and comes with an SA nickel boron coated trigger, a 16-inch chrome moly vanadium barrel, low-profile flip-up sights, a keymod handguard, a six-position stock and a Bravo Company Mod 3 pistol grip. It weighs 6 pounds, 11 ounces. ($899; Springfield-Armory.com)
Tikka T3X TAC A1 Utilizing Sako’s famous Tikka T3x receiver and barrel, the TAC A1 is ready to meet the challenges of long-range tactical shooting. It is a compact, lightweight yet supremely durable package that offers consistent, dependable performance. The gun has an aluminum chassis stock system with a foldable rear stock that uses a quick-adjustable cheek piece and features adjustable length of pull. Mounting options include a full length Picatinny rail on the receiver and an AR-type forend for mounting NVD, LAD and other accessories. All in all, this rifle is loaded with great features. (Tikka.fi)
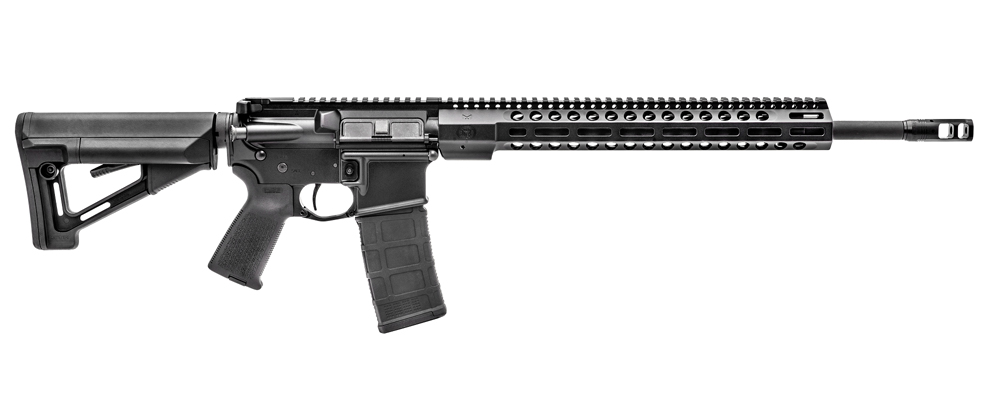
FN 15 DMR II One look at FN’s new DMR II 5.56 and you’ll see a high-quality gun built with the finest components. The cold-hammer forged, chrome-lined, 18-inch barrel is free-floating for maximum accuracy and the Timney match trigger offers a smooth, crisp, 3.5-pound pull. It comes with a Magpul adjustable stock, a Magpul MOE grip, a FN handguard with M-LOK technology and a SureFire ProComp 556 muzzle break. The DMR II weighs 7 pounds and includes a 30-round magazine. ($1,999; FNAmerica.com)
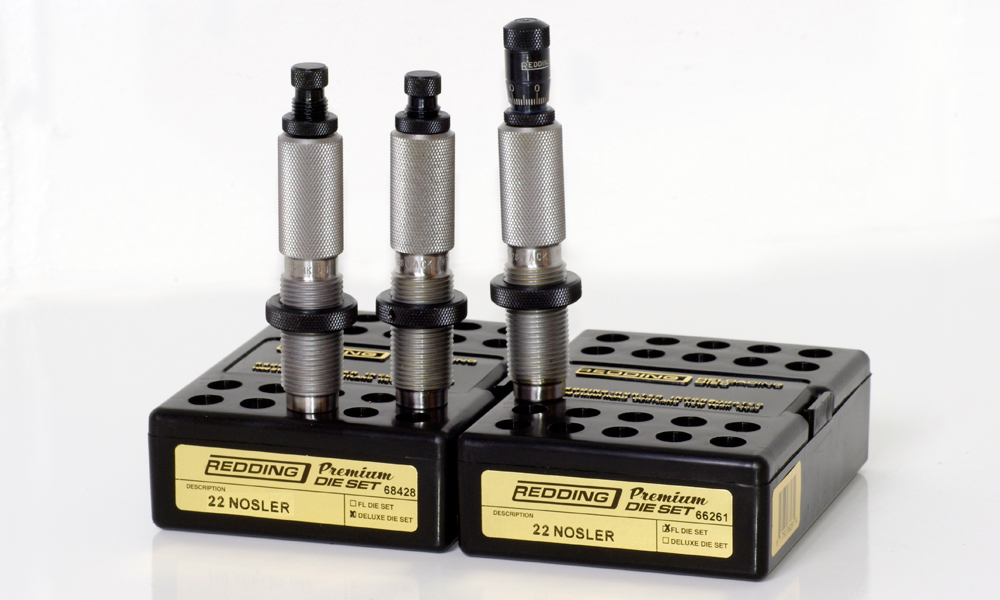
Redding 22 Nosler and 6.5 Creedmoor Reloading Die Sets Shooters who demand the most accurate ammo make their own. Now, Redding Reloading Equipment is giving shooters two new die sets in calibers that have grown in popularity. The 22 Nosler and 6.5 Creedmoor premium dies come with a carbide expander button and a micrometer adjusting seat stem and are packaged in a distinctive black and gold box. The bullet seat depth is adjustable to 1/.001” for maximum consistency. The three-die set includes a full-length sizing die, a seating die and a neck-sizing die. ($194.55 ; Redding-Reloading.com)
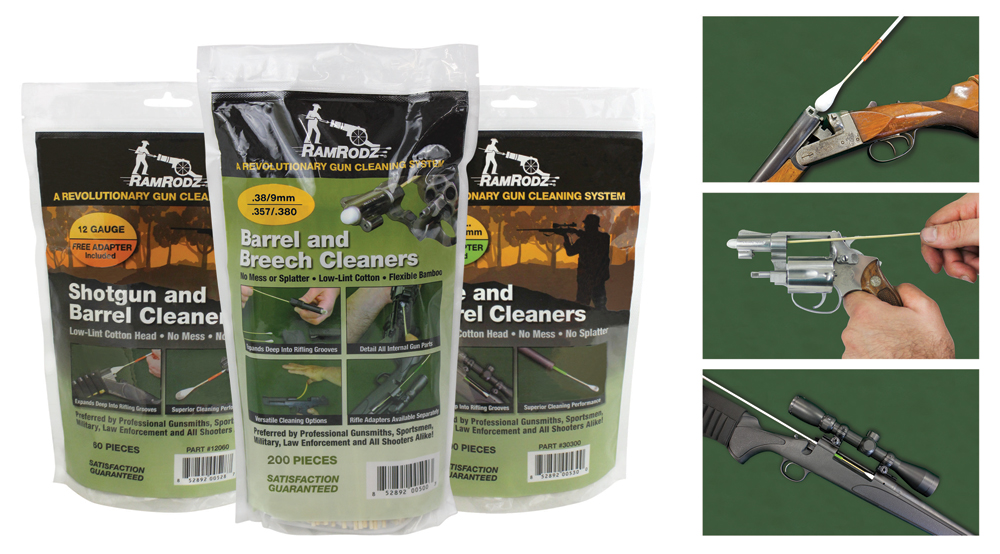
Ramrodz Cleaning Rods These little guys are great for cleaning your firearms. Specially engineered and caliber-specific, RamRodz cleaning swabs are available for pistols, rifles and shotguns. The swabs feature industrial-grade, low-lint cotton heads mounted on strong yet flexible bamboo handles. They expand deep into a firearm’s rifling grooves and also do a great job cleaning slides, receivers, chambers, magazine housings, breeches and more. These cleaning tools are disposable and biodegradable, offering excellent cleaning performance in a fraction of the time, and without the traditional mess of cotton patches. (Price varies; RamRodz.com)
Editor’s Note: This article is an excerpt from the January 2017 issue of Gun Digest the Magazine.
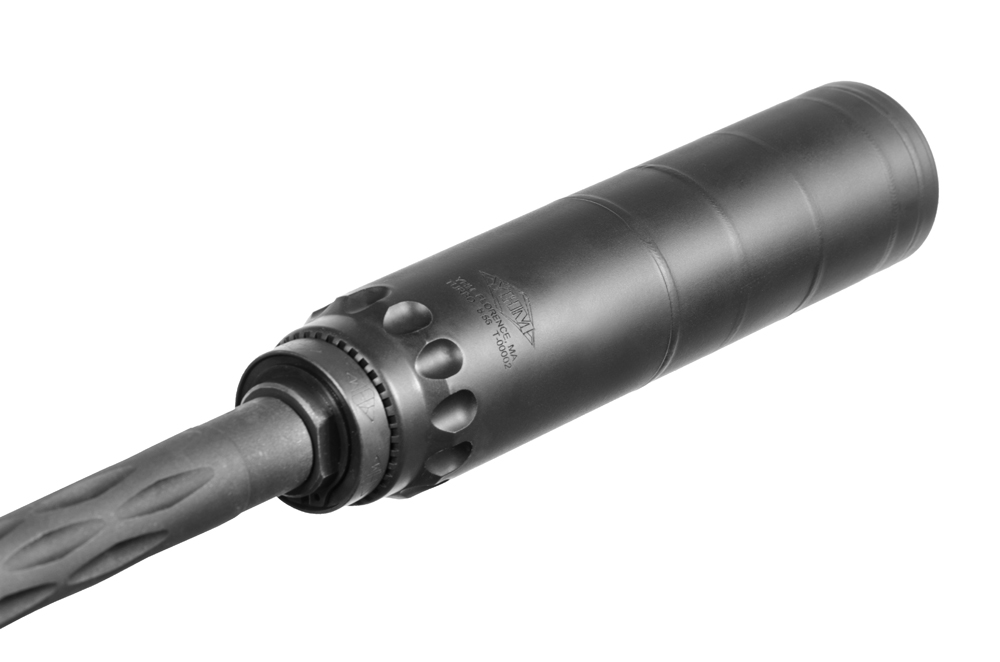
Yankee Hill Machine has brought out its new Turbo 5.56 suppressor, a high quality option at a relatively affordable price point.
The market for suppressors has been growing quite a bit in the past few years, especially with recent changes in legislation in many states to allow civilians to own suppressors, and in some cases, hunt with them. Manufacturers have begun offering a wide variety of options ranging from more affordable rimfire suppressors up to highly expensive big-bore cans.
Yankee Hill Machine (YHM) has announced a new 5.56 NATO suppressor built to be lightweight, quiet and durable, while remaining relatively affordable. Dubbed the Turbo, this new can is priced at a reasonable $489 and is intended to offer high-quality features at a price point that’s attractive to first-time buyers that may have been holding off on buying a suppressor due to the cost.
The new YHM Turbo 5.56 suppressor features a tubeless design with heat-treated 17-4 stainless steel and a heat-treated 718 Inconel blast baffle. Because of these design materials, the Turbo 5.56 can is rated for full-auto fire and can handle repeated abuse.
With a length of 6.5 inches, a diameter of 1.5625 inches and a weight of just 13.5 ounces, the new Turbo 5.56 suppressor is relatively low profile and doesn’t excessively weigh down the muzzle. And this new can is lightweight without sacrificing sound reduction. It has an average sound pressure level of 134 dB on a 14.5-inch AR shooting 55-grain projectiles, placing it within the hearing safe range of 140 dB or less.
The new Turbo is built according to YHM’s rigid quality standards to ensure it is a well-built, high-performance suppressor. It also ships with an included QD (quick-detach) brake for fast attachment and removal.
For more information on the new YHM Turbo 5.56 suppressor, visit the YHM website.
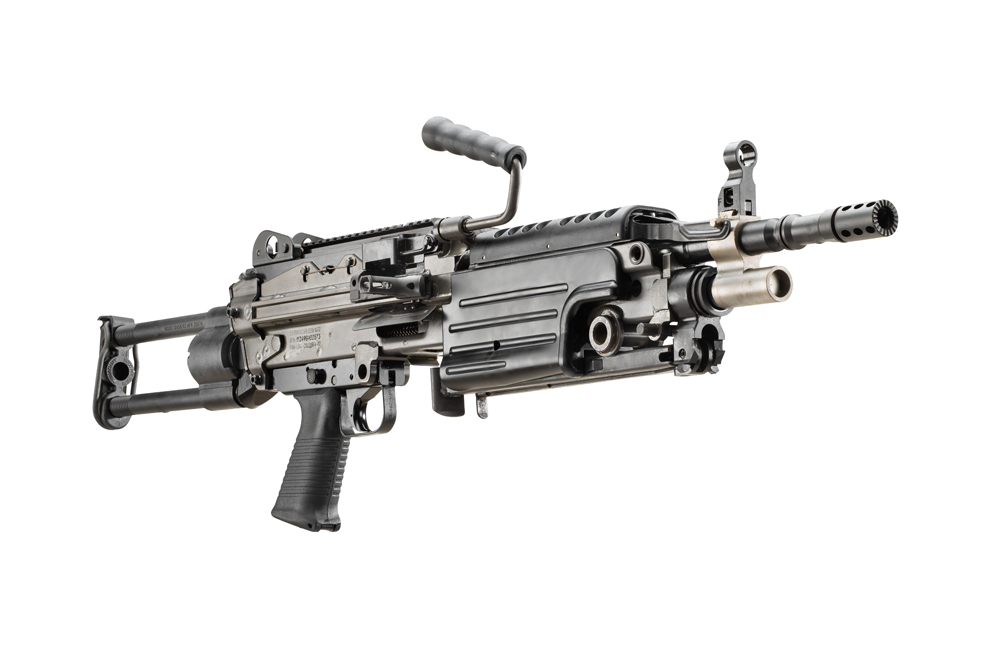
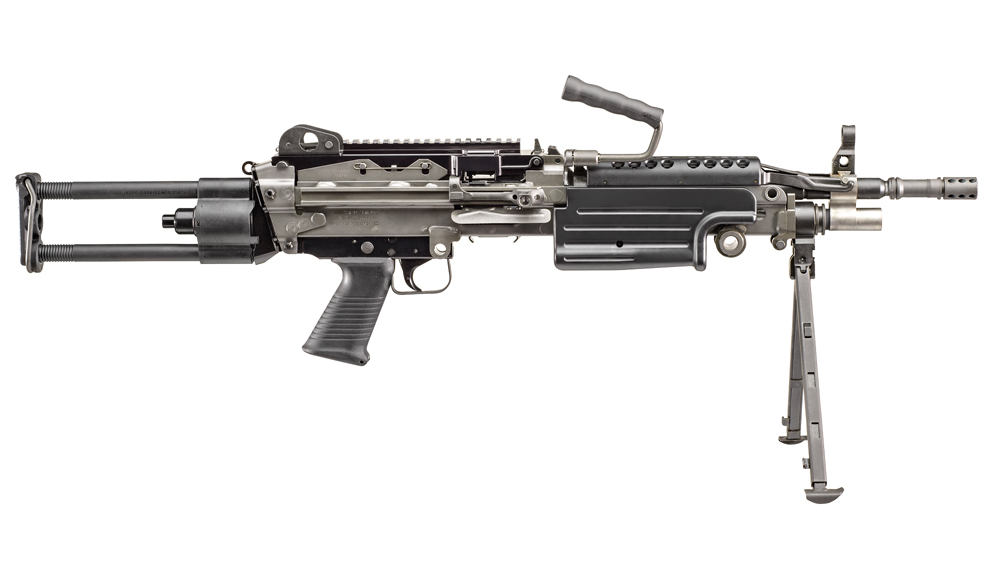
Last year around this time, FN brought out its new Military Collector Series of firearms. In that first launch, the manufacturer introduced three firearms: the FN 15 Military Collector M4, FN 15 Military Collector M16, and the FN M249S, a semi-automatic version of the company’s classic military M249 SAW.
This year, FN has announced it is expanding its Military Collector Series to include a fourth firearm, this one another M249S variant. The new M249S Para is a semi-auto replica of the M249 originally developed for and issued to airborne troops.
The two most notable changes between the original M249S introduced this past year and the new M249S Para are the iconic telescoping and rotating buttstock and the shorter 16.1-inch cold hammer-forged, machine gun-grade barrel. These changes result in a shorter overall length of 30.5 to 36 inches compared to the original’s 40.75-inch fixed overall length, and they shave off roughly a pound from the overall weight.
“The M249S Para is the fourth in our series of classic, semi-automatic FN military rifles and like the Standard, the Para is authentic to the last possible detail,” said John Keppeler, senior vice president of sales and marketing for FN America, LLC. “You’ll notice only two major differences between the semi- and full-auto versions – the barrel length and reconfigured internal components to change the rifle’s operation from open-bolt to closed-bolt. Authenticity was critical in this series and we changed as little as possible.”
In pursuit of this authenticity, the new FN M249S Para incorporates the classic M249 flip-up feed tray, an integrated steel bipod, and FN’s robust gas-piston system. The new gun does retain most of the features found on the previous M249S, and it can be converted back to the original model configuration in around 30 seconds.
The new M249S Para will be available in either black or in Flat Dark Earth (FDE). MSRP is currently listed at about $1,000 more than the original at $8,799 for the black version, and $9,199 for the FDE variant.
For more information, check out the full specs below, or visit the FN America website.
Specifications:
FN M249S Para Type: Semi-auto, closed bolt, gas piston Caliber: 5.56 NATO Barrel: 16.1 in., cold hammer-forged, machine gun-grade Twist Rate: 1:7 Overall Length: 30.5-36 in. Height: 9.5 in. Weight: 16 lbs. Trigger: 4-6.5 lbs. Receiver: Formed steel frame with claw extractor design, fixed and pivoting ejector Stock: Rotating, telescoping buttstock, non-slip buttplate, hydraulic recoil buffer system MSRP: $8,799 (black), $9,199 (FDE) Manufacturer: FN America
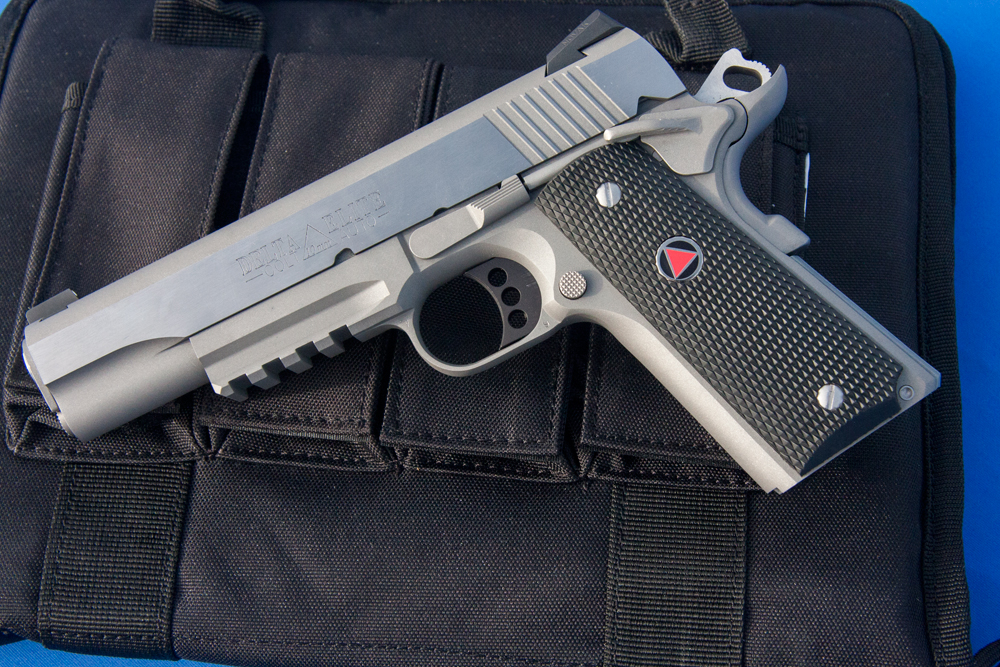
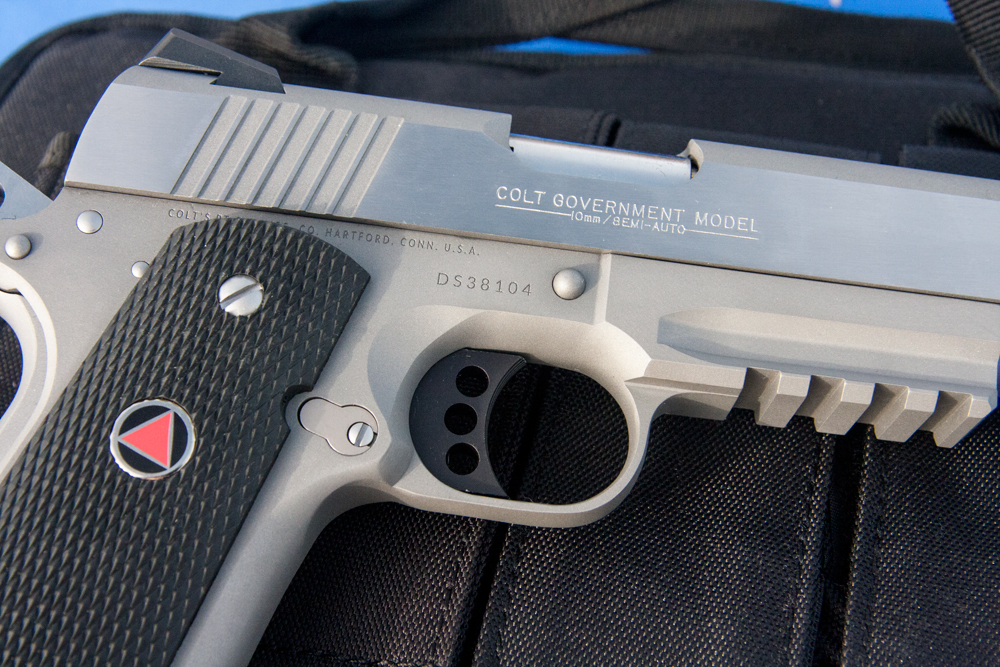
The original Colt Delta Elite came about just a few short years after the Bren Ten launched the 10mm Auto into existence. It was considered to be the first firearm chambered in 10mm produced by a major manufacturer, and many credit it with saving the 10mm from obscurity. Colt ceased production of the Delta Elite for some time, but several years back the company reintroduced it, and even more recently, it tinkered with the gun, creating a redesigned pistol.
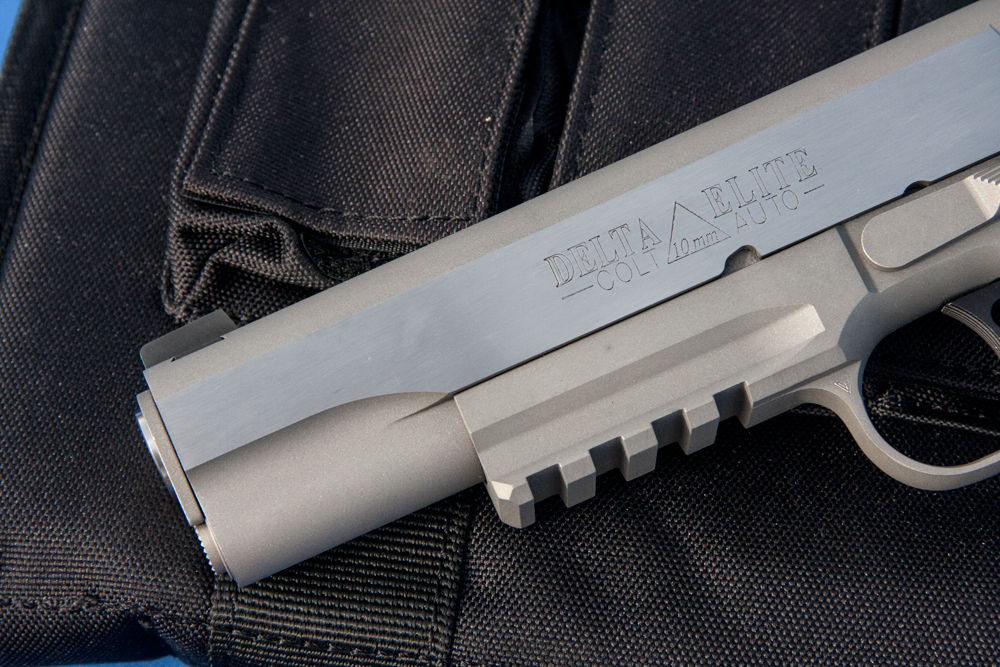
Now the American manufacturer is further improving on its Delta Elite by bringing out a version with an accessory rail. The new Colt Delta Elite Rail Gun offers serious stopping power for hunters or shooters in an accessory-ready platform.
The accessory rail is an obvious improvement to the Delta Elite and will be useful to many shooters.
“The Delta Elite started its life as tactical option for 1911 enthusiasts who required more stopping power than your traditional .45 ACP,” said Justin Baldini, Product Director for Colt. “In that world, an accessory rail makes a lot of sense. What we’ve seen, though, is that this is a great platform for hunting pig or other medium sized game. In those types of scenarios, proper illumination is critical, so I think hunters will really appreciate the ability to add on their favorite rail-mounted lighting.”
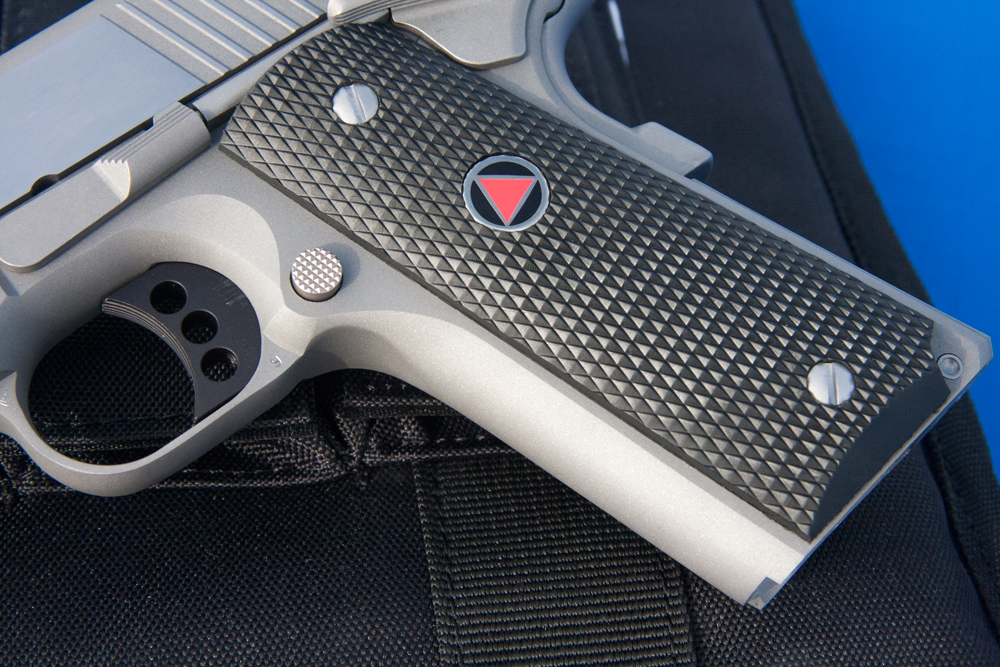
While attending Colt’s Media Day event at Gunsite this past November, I was able to get a first hand look at this new Delta Elite before it was released, and it definitely seems well suited to either of those applications. With an unloaded weight of 38 ounces and an overall length of 8.5 inches, the Delta Elite Rail Gun handles the 10mm’s substantial recoil quite well, and the gun comes with all the same great features built into Colt’s current Delta Elite. These include things like an upswept beavertail safety, an extended thumb safety that’s quick and easy to engage and disengage, and a classy and durable all-stainless steel construction with a brushed stainless finish.
The three-hole aluminum trigger on the new Delta Elite Rail Gun felt quite good.
As with most of Colt’s recently introduced pistols, this one comes with Novak’s excellent sights. The front is a Novak white dot, while the rear is Novak’s genuine Low Mount Carry. The great sights paired with an equally good three-hole aluminum trigger with a pull weight of between 4.5 and 6 pounds make for a pistol with great accuracy potential. Although I don’t generally shoot a lot of 10mm Auto pistols, I still managed to be fairly accurate with the gun, ringing the steel targets that Colt had setup downrange.
Colt did not have any accessories mounted on the new Delta Elite Rail Guns used at the event, but I can definitely see where the forward rail might be beneficial to tactical shooters or to hunters in the field. Of late, quite a few people have been using semi-auto pistols chambered in 10mm to go after pesky hogs due to their power and their quick follow-up potential, and an attachment, such as a laser sight or a light, could definitely be beneficial in those pursuits in states where permitted.
The Delta Elite Rail Gun’s lightly textured grip felt comfortable during repeated firing, and the classic Delta medallions are eye-catching.
The new Colt Delta Elite Rail Gun has a capacity of 8+1 rounds and ships with two magazines and a cable lock. It is available at an MSRP of $1,299.
For more information on the new Colt Delta Elite Rail gun, check out the full specifications below, or visit Colt’s website.
Specifications:
Colt Delta Elite Rail Gun Type: Semi-auto, single action Caliber: 10mm Auto Barrel: 5 in., polished, stainless steel Overall Length: 8.5 in. Height: 5.5 in. Width: 1.25 in. Weight: 38 oz. (unloaded) Frame: Stainless steel Slide: Stainless steel Finish: Brushed stainless Sights: Novak white dot front, Novak Low Mount Carry rear Trigger: 4.5 to 6 lbs., three-hole aluminum MSRP: $1,299 Manufacturer: Colt
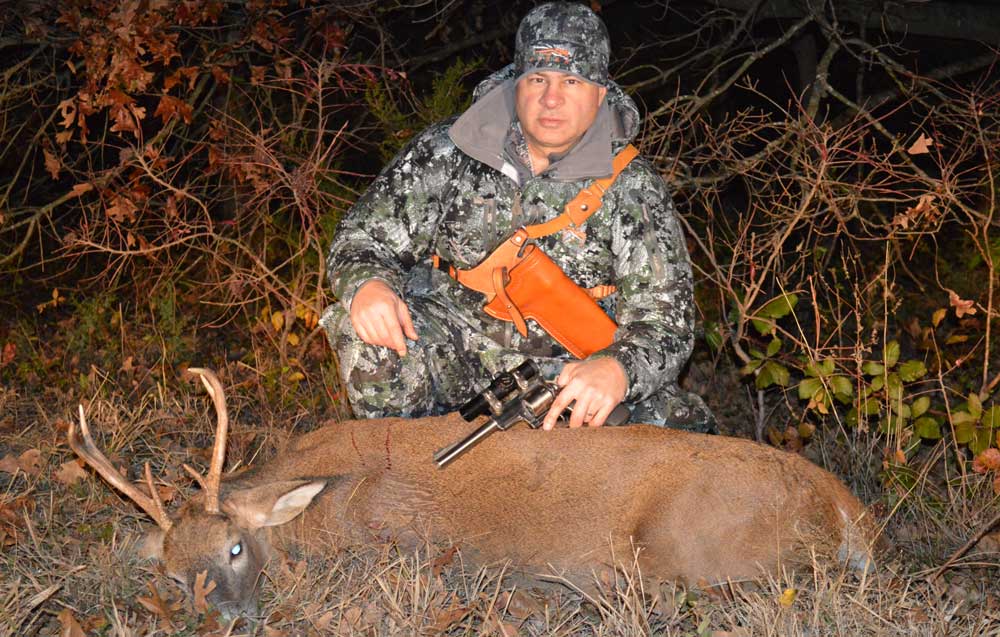
Before you head afield there is an important question that must be answered: Exactly which hunting revolver is right for you?Gun Digest Book of Hunting Revolvers opens the door to this fun and changing form of hunting.
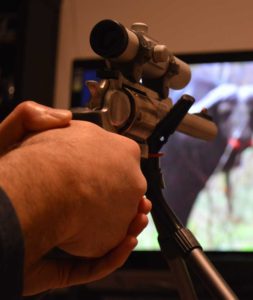
Finding a hunting revolver that suits you well is critical. Comfort goes a long way to building confidence. Should you choose a single- or double-action? .357 Mag. or .44 Mag? .454 Casull? Long barrel? Short barrel? Scope? Open sights? What configuration will fulfill your needs?
There are a number of questions you need to answer honestly to zero in on what will best serve your big-game hunting aspirations. If at all possible, you should try a number of different potential hunting revolvers. Recoil characteristics vary greatly between the different types and makes, and let’s face the facts, large-caliber revolvers deliver sizable recoil.
Double-action revolvers tend to concentrate recoil force straight back into the web of your hand, while single-actions tend to twist upward, sparing the shooter some of the unpleasantness. The two configurations are worlds apart in how they transfer recoil to the shooter.
I could go into the various single-action grip-frame profiles, but we don’t have room for that here. My personal favorite is Ruger’s take on the Bisley grip frame, as it is optimal for control in my hands because it has more of a double-action-like recoil dynamic. Freedom Arms’ Model 83 grip is another that I really like.
I would again recommend testing out a few of the different makes, models and calibers before you make this decision. If you don’t know anyone with a variety of revolvers to try, I would suggest joining any number of websites that are dedicated to revolvers and handgun hunting. You may find someone local who is willing to let you shoot some of their guns.
Everyone has different preferences, so there are no hard and fast rules when it comes to picking a platform. For me, single-action revolvers point more intuitively than double actions. They are almost an extension of the hand. Gunslingers of the Old West were undoubtedly well aware of this handling characteristic, relying on point-shooting for survival. On the other hand, we are not gunslingers but handgun hunters, and the double action may offer some advantages when quick follow-up shots are needed to dispatch a departing animal.
One of the best pieces of advice in finding the right hunting revolver is to test out as many as you can to discover what fits you.
This is as good as any time to briefly discuss calibers. While the .357 Magnum is not my first choice, it can be effective. Remember that shot placement is key, and a half-inch hole won’t make up for lousy marksmanship. Loaded with a quality bullet, I wouldn’t hesitate to use the .357 Mag. on deer. However, I still prefer erring on the larger side with regard to calibers. The .41 Magnum is a good starting point and compromise, though factory ammunition is somewhat scarce. The champion of all big-revolver rounds from an ammunition availability standpoint is the ubiquitous .44 Magnum. No other caliber can boast the sheer variety and quantity of available ammunition, and it is fully up to the task of taking any and every game animal that has ever walked the face of this earth.
One of my personal favorites is the .45 Colt — yeah, that old black-powder cartridge from the late 1800s. It can be loaded considerably hotter than its original configuration (limited to 14,000 psi). I’m not suggesting turning your .45 Colt into a .454 Casull, but revolvers like Ruger’s Blackhawk in .45 Colt are considerably stronger than a Colt Single Action Army or the many facsimiles available on the market and are able to safely handle considerably hotter loads than the 14,000-psi maximum imposed upon the smaller and more fragile revolvers. Adhere to published load data, and do not exceed the maximums recommended by the manufacturer, as there is no need to turn your favorite hunting revolver into a hand grenade.
There are quite a few big calibers that are fairly brutal to shoot, and I don’t recommend them to the neophyte. There are some, such as the .480 Ruger, that offer a fine compromise between power and recoil. However, you can load the big calibers down to “soft” levels and they still offer a sizable advantage over their smaller siblings. They don’t need to be pushed hard to be terminally effective. Keep this in mind when you are deciding on a caliber for a hunting revolver.
You need to be honest with yourself as far as your limitations. There is no shame in a low tolerance for recoil. These big-bore revolvers can be very difficult to shoot, as you generally have only 3 pounds to contain the considerable recoil generated by some cartridges. Take pride in being able to shoot your chosen hunting revolver well and effectively. Let someone else’s ego dictate their caliber choices. Confidence and competence will go a long way to filling the freezer with game meat. Confidence follows competence, and consistent competence is the offspring of practice.
Given the volume of aftermarket parts and upgrades now available, it’s no trouble making a custom AK.Get the most out of your Kalashnikov with the Gun Digest Guide to the Modern AK.
For many years now, fans of the AR rifle have been able to buy off-the-shelf parts to completely personalize and customize their guns. Today, AK owners have nearly as many options.
The fact is that the design of the AK, based as it was on the utilitarian needs of a ruthlessly efficient Soviet empire, is a little lacking in the area of consumer-friendly features and ergonomics. Fortunately, we live in a wonderfully chaotic free market and, combined with good old Yankee ingenuity, there are a growing number of aftermarket accessories that can turn the stock AK into a much more tactical weapon with improved functionality.
What follows is my own experience in selecting parts and building my own custom AK. For this project, I began with a made-in-the-USA AK rifle: The I.O. Inc. Sporter. This semi-automatic, gas-operated, long-stroke piston system rifle is chambered in the traditional 7.62x39mm, and the construction and design is based directly from Polish AKM blueprints with a stamped receiver.
The main improvement most shooters will make — often the first accessory they purchase — is a suitable optic, either a red dot holographic sight or one with magnification. However, the iron sights on the Sporter, like those found on most AK variants, are utilitarian. They are typical notch and post variety, with no top Picatinny rail as AR rifle owners have become accustomed. Many AKs, like my Sporter, include a left-side steel CNC-machined scope mount, but these are not ideal.
The first thing I installed was the Parabellum Armament AK-47/74 Adaptive Rail System (AKARS). This is a perfect solution for optics, providing a rock steady 5.5 inches of Picatinny rail as low as possible on top of the receiver cover. The AKARS actually comes in two parts: the Picatinny rail with integrated rear sight (which replaced the standard rear sight), and a new receiver cover with an attachment point for the front sight mounted rail section.
On top of this rail, I opted for the Aimpoint Micro T-1 red dot sight with a new 2 MOA dot instead of the standard 4 MOA. Made from high strength extruded aluminum and waterproof to 25 meters, this unit features a five-year battery and 12 brightness settings, including four for night vision. There is plenty of room left for a magnifier if so preferred.
Adding rails to your AK is one of the quickest modifications you can make and opens a wealth of customization options.
What I really like about the AKARS is, once the unit is assembled and locked down, there is never any need to remove it. To field strip and clean the gun, the entire top rail and receiver cover simply hinge up for access and snap back down to close. The unit retains zero for optics and, since it is low enough, allows for co-witnessing the iron sights for backup. The new rear sight provides a wider notch than the factory original, for faster target acquisition. It is not, however, elevation-adjustable, but this is hardly necessary at combat ranges of less than 300 yards.
Another area of complaint, at least for American shooters, is the AK’s short length of pull, which is fine if you wear a lot of body armor or heavy clothing in sub-zero temperatures. Command Arms Accessories (CAA) offers a lot of AK upgrades, not least of which is their AKTS aluminum buttstock tube. This sturdy unit accepts any commercial AR collapsible stock and gives the AK an adjustable length-of-pull from 12.5 inches to almost 16 inches.
The AKTS, available for milled-receiver AKs and with a recoil reducer, has length numbers on top so you can return the length-of-pull to your desired position without having to guess at it. It includes ambidextrous sling attachment points. I especially liked this unit because of its solid construction and sturdy feel.
I then added the BULS-Battlelink Utility Low Profile Stock from Mission First Tactical (MFT), a tough polyamide AR stock with a lot of well-designed features, including front and rear ambidextrous quick-detach sling swivels. This stock accepts MFT’s GPS attachment kit and adjustable cheek piece. The rear of the stock has a rubber non-slip buttpad and a water tight storage compartment for batteries, small cleaning kit, spare parts or other accessories.
The high quality of MFT’s stock accessories for the AK led me to install their extremely comfortable and ergonomic pistol grip. This is not to say that the standard AK grip is bad, but I prefer a wider one. The MFT Engage grip is not only wider but well-textured for a firmer hold in inclement conditions, with comfortable finger grooves and a sizable internal storage space.
For the ultimate in accessorizing the AK, a new handguard rail system is essential, and while there are many options in this regard, I stayed with MFT’s TEKKO Polymer AK47 Integrated Rail System. This two piece unit is lightweight and comfortable with sufficient rails at top, bottom and both sides for multiple accessories, including lights, lasers, vertical grips and bipods. The lower rail includes a cover that neatly hides it when not needed. Given the propensity of the usual AK handguard to heat up under fire, I opted for the MFT REACT Short Vertical Grip, which protects the hand, offers sufficient purchase and does not interfere with magazine changes. It includes its own waterproof storage space and matches perfectly with the rest of the MFT stock furniture.
The standard AK slanted muzzle brake was designed to vent escaping gas up and right to counter the effect of recoil in full-auto fire. In low light conditions, however, this does nothing to mitigate muzzle flash (which can be intense), so instead I installed an M16-style birdcage flash hider from TAPCO, which included a handy front sight elevation adjustment tool.
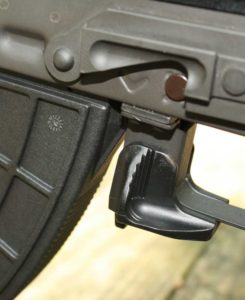
Options, such as paddles for the magazine release, abound and make the good old Kalashnikov more pleasant to shoot.
The paddle safety on the AK is already easy to use and ambidextrous, but I am used to being able to drop a magazine with my trigger finger alone. For that, CAA makes a very easy to install polymer unit that extends the magazine release and allows for ambidextrous operation with one finger. You still have to rock the magazine forward and out, but this makes it a lot faster.
Another source of complaints with the AK is in the safety, which is almost impossible to operate with the trigger finger unless you remove your hand from the pistol grip. Here, there are two excellent solutions: the first from US P.A.L.M, an enhanced drop-in AK safety with a lowered, extended trigger finger tab that makes flipping it on or off simple while keeping a firm grip. Another enhanced safety from Krebs Custom has an extended trigger finger tab and adds a cutout to allow you to lock the bolt open (something range officers will appreciate).
In keeping with the all-black polymer look of the rifle, I added the excellent 30-round waffle pattern polymer mags from US P.A.L.M. These are truly built tough, with an integral floor plate and vented self-cleaning, low-friction follower. The locking surfaces that engage the magazine release and receiver are of stainless steel, embedded into the polymer for maximum durability under any conditions.
Lastly, I added the Blue Force Gear Victory one-point sling with a quick-detach swivel. This adjustable, value-priced, black nylon sling features a quick-release option for fast removal.
On the range, the improvements to the I.O. Inc. Sporter AK proved their worth, making magazine changes and hits effortless and fast. The improved ergonomics aided greatly in the handling and feel of the rifle, as well as adding distinctly to its appeal. The Sporter is a high quality AK that can be had for less than an AR, but performs equally well, with good accuracy and no malfunctions.
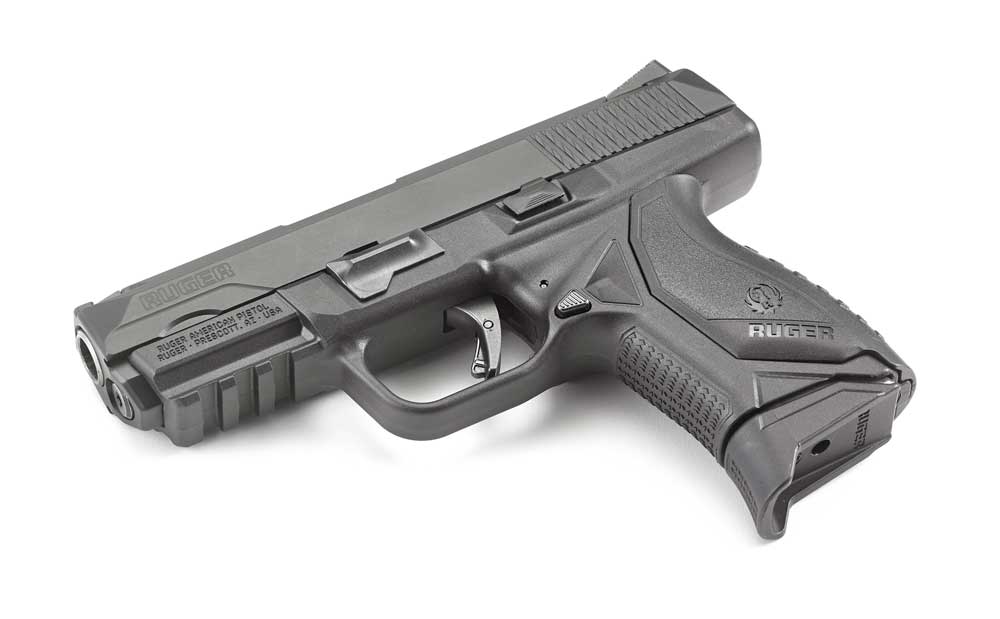
When Ruger unveiled the American Pistol a little over a year ago, it was a fairly sure bet it was a line destined for growth. The feature-rich polymer-framed, striker-fired semi-automatics had all the bells and whistles certain to turn heads and open wallets. And sure enough, Ruger’s newest family of handguns has multiplied like rabbits in a relatively short period of time.
In all, there are now 14 models of the American Pistol shooters can choose from. And the most recent addition is certain to catch the interest of enthusiasts who have a yen for an on-person self-defense piece in one of the most popular and potent calibers.
Ruger recently announced the release of the American Pistol Compact chambered in .45 APC. The handgun is the first compact of that caliber in the line — the rest are duty sized — and it has some features certain to appeal to the concealed carry crowd.
Chief among these is that the company has introduced its compact .45 without an external manual thumb safety. Instead, the 3.75-inch barreled model features an integrated trigger safety and internal automatic sear block system. This puts the new American Pistol in line with a majority of the existing striker-fired guns in the concealed carry market.
Shooters who desire a manual external safety, however, most likely won’t be left out in the cold. The 28.6-ounce pistol will likely follow suite with the rest of the line, with a thumb-safety model released sometime in the future.
The new American Pistol is outfitted with a number of the features that has made the family of handguns a success.
Like Ruger’s other polymer-framed pistols, the compact .45 has a low bore axis and barrel cam, both of which reduce felt recoil and muzzle flip. It is equipped with Novak LoMount Carry 3-Dot sights, which cut a lower profile and are rounded, reducing the risk of a snag upon a draw. And it has Ruger’s pre-tensioned striker system that facilitates a solid firing pin strike on the primer without requiring a heavier trigger pull.
The trigger itself has a short take-up and breaks smoothly, allowing for maximum accuracy shot to shot. And with a tactile positive reset, the pistol is certain to offer fast follow-up shots — should an occasion call for them.
The compact .45 has a 10+1 capacity with its grip extension magazine, but it also comes with a seven-round option, cutting the pistol’s profile down. The handgun is also rated to shoot +P ammunition, opening the door for a wider ammunition selection.
The pistol is right- and left-hand friendly with ambidextrous slide stop and magazine release. It has aggressive non-slip texturing on its grip and a modular backstrap system, adjusting to palm swell and trigger reach. And it has easy-to-manipulate cocking serrations at the aft of its stainless-steel slide, making it easy to rack, even with gloves. It also features a Picatinny rail beneath the barrel, allowing for the addition of an accessory.
Presently, the MSRP on the American Pistol Compact in .45 ACP is $579, which means by the time it reaches a local gun store, it should be in plenty of shooters’ price ranges.
For a healthy section of handgun shooters, Smith & Wesson‘s M&P line is the pinnacle of polymer pistol perfection. Messing with these gems of the striker-fired world would be akin to allowing the designated hitter, changing the recipe of Coke and releasing another version of Windows all wrapped up in one. Smith & Wesson, however, hasn’t left well enough alone with the iconic company’s first big release of 2017. But the new M&P M2.0 line of pistols shouldn’t be a bone of contention, even with the most ardent fans of the original models. The company has shot at engineering a more shootable, practical and rugged handgun. And building off a decade of experience manufacturing polymer pistols, it appears to have hit the bull’s eye on all accounts.
The M&P M2.0 line – available in 9mm, .40S&W and .45ACP – features improved grip ergonomics, including an optimized 18-degree angle, interchangeable palmswell grips and even more aggressive texturing. It’s outfitted with an extended stainless steel chassis, giving the platform more rigidity during firing, thus more accuracy. Its bore axis has been lowered, lessening the felt recoil and muzzle flip – making follow-up shots more accurate and faster. And it has one snappy trigger, breaking like glass and complete with an audible reset. This final point, the trigger, is what really caught Gun Digest Editor in Chief Eric Conn’s attention when he stepped to the firing line to put the full-sized M&P M2.0 through its paces in the above video. Priced competitively at $599 and with more compact models expected in the future, Smith & Wesson definitely appears to have moved the M&P line into the future, while staying true to its roots.
From Schofield Revolvers to M&P AR-15s, for more than 150 years Smith & Wesson has turned out some of the world’s most desirable firearms. Gun Digest is ready to arm shooters with the tools they need to know, appreciate and add more of the iconic guns to their collections. The newly updated Standard Catalog of Smith & Wesson 4th Edition is the industry’s most comprehensive guide to the well-respected manufacturer’s firearms. Get Your Copy Now
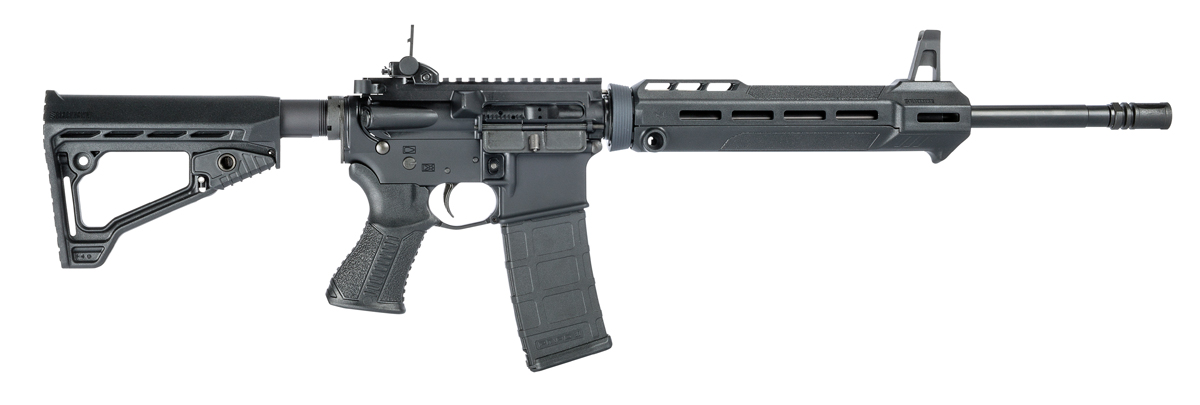
Savage Arms has announced it is planning to launch four new Modern Sporting Rifles (MSRs) in 2017.
Back in mid-December of 2016, Savage Arms shook up the firearms industry when it released a short teaser video giving shooters a brief first look at the new Modern Sporting Rifles (MSRs) the company was planning on launching for 2017. This represented a first for Savage, as the company has never been in the MSR game before, and people were (and are) understandably excited.
Now, with the 2017 SHOT Show less than two weeks away, the manufacturer has gone wide with the announcement, releasing more details and specifications on the new rifles.
First and foremost, the new line of Savage MSRs will consist of four rifles – two AR-15 platform rifles chambered in .223 Wylde and two AR-10 platform rifles chambered in either .308 Winchester or 6.5 Creedmoor. The manufacturer is planning to officially launch all of these at the SHOT Show this year.
The two AR-15s are the MSR 15 Patrol and the MSR 15 Recon. The Patrol model represents an entry-level AR that’s a step up from other ARs in this category, while the Recon is a further upgrade, coming with even more additional features.
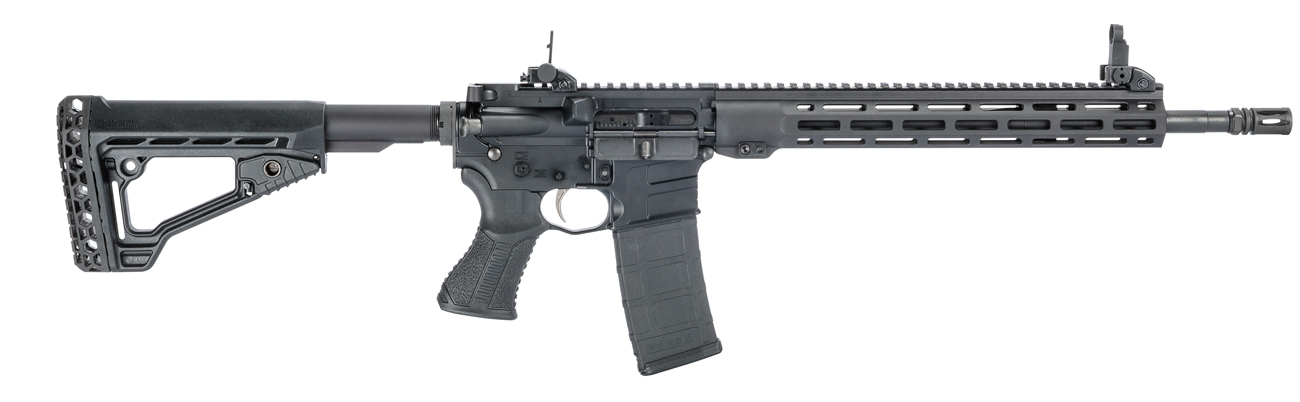
Savage MSR 10 Hunter.
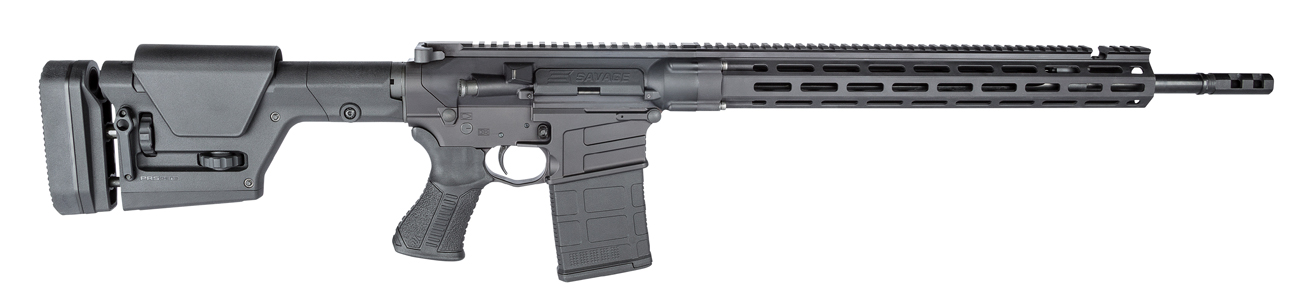
The two AR-10 models are the MSR 10 Hunter and the MSR 10 Long Range. The Hunter, as its name suggests, is built as a compact sporting platform that can serve well in big-game hunting, or simply as a quality .308 Win. or 6.5 Creedmoor AR for target shooting. The MSR 10 Long Range, on the other hand, represents the peak of Savage’s new MSR line, coming with a host of high performance features such as a fluted heavy barrel, a free-float M-LOK rail forend and – one of the more unique items – a non-reciprocating left-side charging handle, which should excite a lot of shooters.
[imagebrowser id=477]
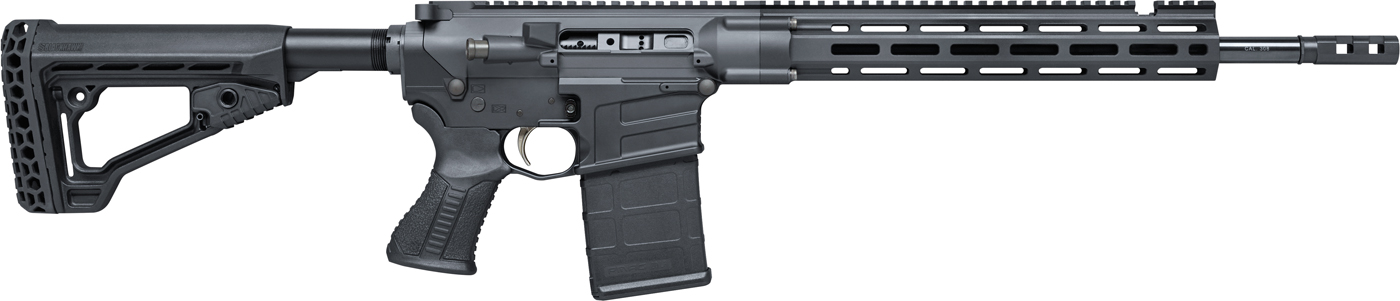
All of the new rifles incorporate 4140 steel barrels with a Melonite QPQ coating and 5R rifling, and their receivers are all forged from 7075-T6 aluminum. The receivers on the MSR 15 Patrol are standard forged, whereas those on the others are custom forged. Most of the new Savage Arms MSRs feature the new Blackhawk Knoxx Axiom AR pistol grip and Blackhawk adjustable Knoxx Axiom Carbine stock (with models above the Patrol getting the padded version). The exception to this is the MSR 10 Long Range, which features the Magpul PRS Gen3 stock instead.
All receivers on the new Savage MSRs are 7075-T6 aluminum. They are custom forged on all models except the Patrol.
The MSR 15 Patrol comes with a standard Mil-Spec trigger, whereas the rest of the line comes equipped with various Blackhawk AR Blaze triggers, with the Long Range models getting the enhanced AR Blaze Two-Stage trigger for improved accuracy. I haven’t personally experienced the Two-Stage trigger; however, I did get to shoot the standard AR Blaze SSD (Single Stage Duty) trigger during a Blackhawk event in Montana this past summer, and there is a noticeable improvement over Mil-Spec. The Blaze trigger is designed with a boron-rich surface that prevents wear, requires no lubrication and comes with a “duty” spring set to mirror the pull weight on Mil-Spec guns, as well as a “target” spring set.
Most of the new MSRs feature a free-floated hexagonal aluminum handguard with M-LOK attachment points. The Patrol has a Blackhawk mid-length forend.
The forend featured on the Patrol rifle is a Blackhawk mid-length handguard, while the other models sport a Savage aluminum hexagonal free-floated forend with M-LOK attachment points. The Patrol has a custom A-Frame gas block, and the Recon has a low-profile fixed gas block. The AR-10 models all feature an adjustable gas block. The MSR 15 models sport Blackhawk BUIS (the Patrol has a combination A-Frame gas block/front sight). The MSR 10 Hunter and Long Range have no sights, coming optic ready.
Pricing on these new MSRs from Savage Arms starts with an MSRP of $852 on the MSR 15 Patrol and go up to $2,284 on the MSR 10 Long Range. For more information on these new rifles, check out the full specifications below and visit the Savage Arms website. Also, be sure to check out the gallery above for some great first images of the new Savage MSRs.
Specifications:
Savage Arms MSR 15 Patrol Type: Semi-auto, direct-impingement gas Caliber: .223 Wylde (.223 Rem./5.56 NATO) Barrel: 16-1/8 in. 4140 steel, Melonite QPQ, 5R rifling Overall Length: 32.5-35.75 in. Weight: 6.5 lbs. Muzzle Device: A2 flash hider Gas Block: Custom A-Frame Trigger: Mil-Spec Receivers: Forged 7075-T6 aluminum Stock: Blackhawk Adjustable Knoxx Axiom Carbine Stock Grip: Blackhawk Knoxx Axiom AR pistol grip Charging Handle: Mil-Spec Handguard: Blackhawk mid-length Sights: Blackhawk BUIS/A-Frame gas block Capacity: 30 rounds Price: $852 Manufacturer: Savage Arms
Savage Arms MSR 15 Recon Type: Semi-auto, direct-impingement gas Caliber: .223 Wylde (.223 Rem./5.56 NATO) Barrel: 16-1/8 in. 4140 steel, Melonite QPQ, 5R rifling Overall Length: 33.5-36.75 in. Weight: 7.0 lbs. Muzzle Device: A2 flash hider Gas Block: Low-profile fixed Trigger: Blackhawk AR Blaze Receivers: Custom forged 7075-T6 aluminum Stock: Blackhawk Adjustable Knoxx Axiom Carbine Stock with pad Grip: Blackhawk Knoxx Axiom AR pistol grip Charging Handle: Mil-Spec Handguard: Savage aluminum hexagonal free-floated, with M-LOK Sights: Blackhawk BUIS Capacity: 30 rounds Price: $999 Manufacturer: Savage Arms
Savage Arms MSR 10 Hunter Type: Semi-auto, direct-impingement gas Caliber: .308 Winchester, 6.5 Creedmoor Barrel: 16-1/8 in. 4140 steel, fluted, Melonite QPQ, 5R rifling (18 in. in 6.5 Creedmoor) Overall Length: 35-39 in. (.308 Win.); 37-41 in. (6.5 Creedmoor) Weight: 7.8 lbs. (.308 Win.); 8 lbs. (6.5 Creedmoor) Muzzle Device: Savage muzzle brake Gas Block: Adjustable Trigger: Blackhawk AR Blaze Receivers: Custom forged 7075-T6 aluminum Stock: Blackhawk Adjustable Knoxx Axiom Carbine Stock with pad Grip: Blackhawk Knoxx Axiom AR pistol grip Charging Handle: Savage rear Handguard: Savage aluminum hexagonal free-floated, with M-LOK Sights: None Capacity: 20 rounds Price: $1,481 Manufacturer: Savage Arms
Savage Arms MSR 10 Long Range Type: Semi-auto, direct-impingement gas Caliber: .308 Winchester, 6.5 Creedmoor Barrel: 20 in. 4140 steel, fluted, Melonite QPQ, 5R rifling (22 in. in 6.5 Creedmoor) Overall Length: 41-5/8 in. (.308 Win.); 43-5/8 in. (6.5 Creedmoor), adjustable extended length Weight: 9.75 lbs. (.308 Win.); 10 lbs. (6.5 Creedmoor) Muzzle Device: Savage muzzle brake Gas Block: Adjustable Trigger: Blackhawk AR Blaze Two-Stage Receivers: Custom forged 7075-T6 aluminum Stock: Magpul PRS Gen3 Grip: Blackhawk Knoxx Axiom AR pistol grip Handguard: Savage aluminum hexagonal free-floated, with M-LOK Sights: None Capacity: 10 rounds Price: $2,284 Manufacturer: Savage Arms
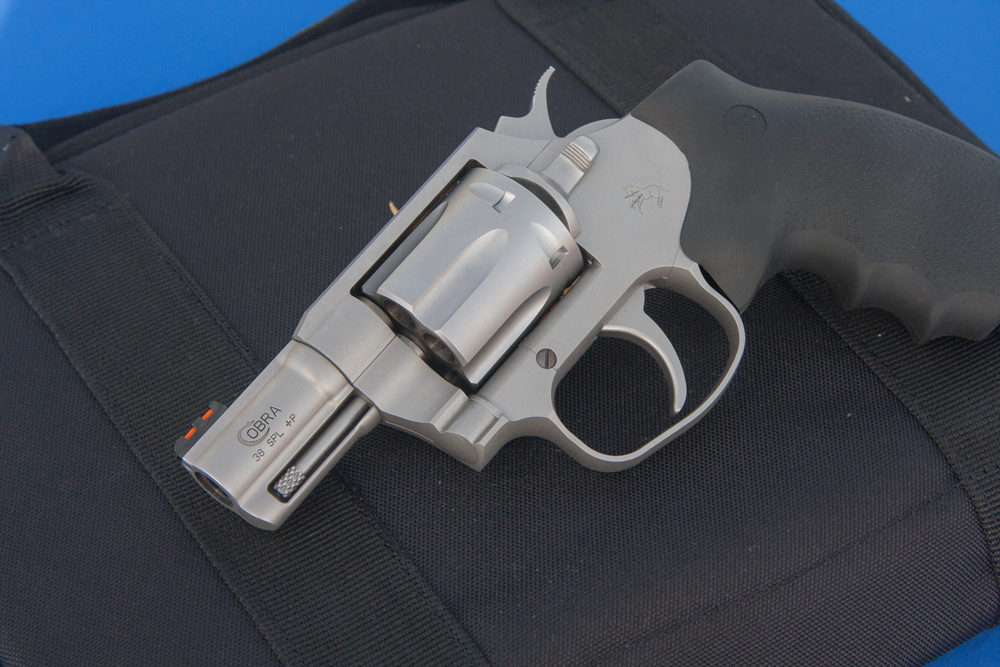
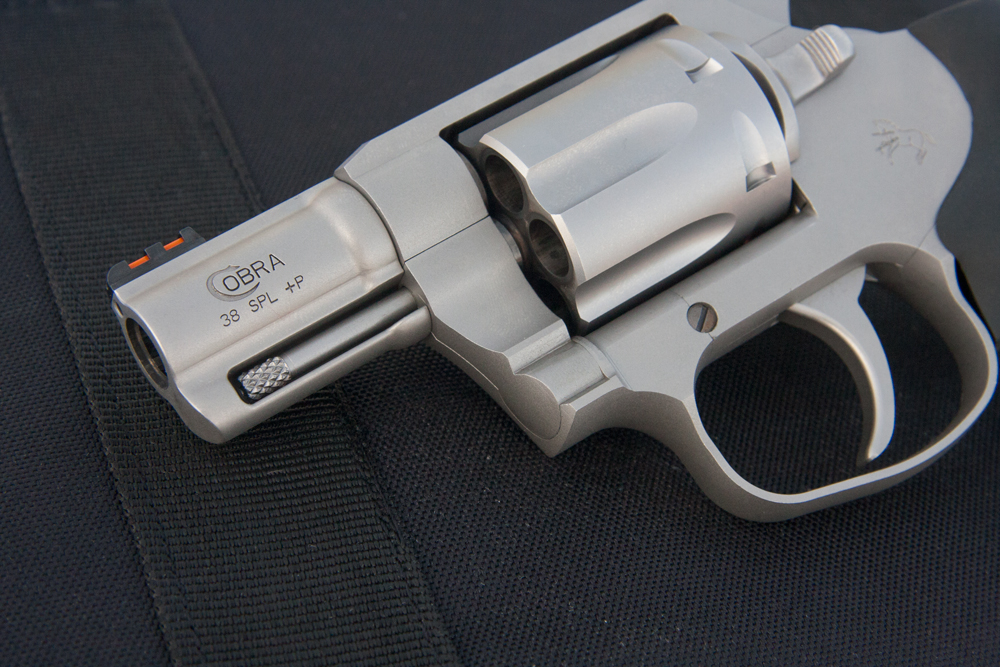
Fans of Colt’s earlier double-action revolvers should rejoice, as news of the American manufacturer’s jump back into the double-action revolver game has been breaking over the last couple days. It’s official folks; in what may be one of the more exciting new releases of the year, Colt is bringing out a new double-action revolver for 2017.
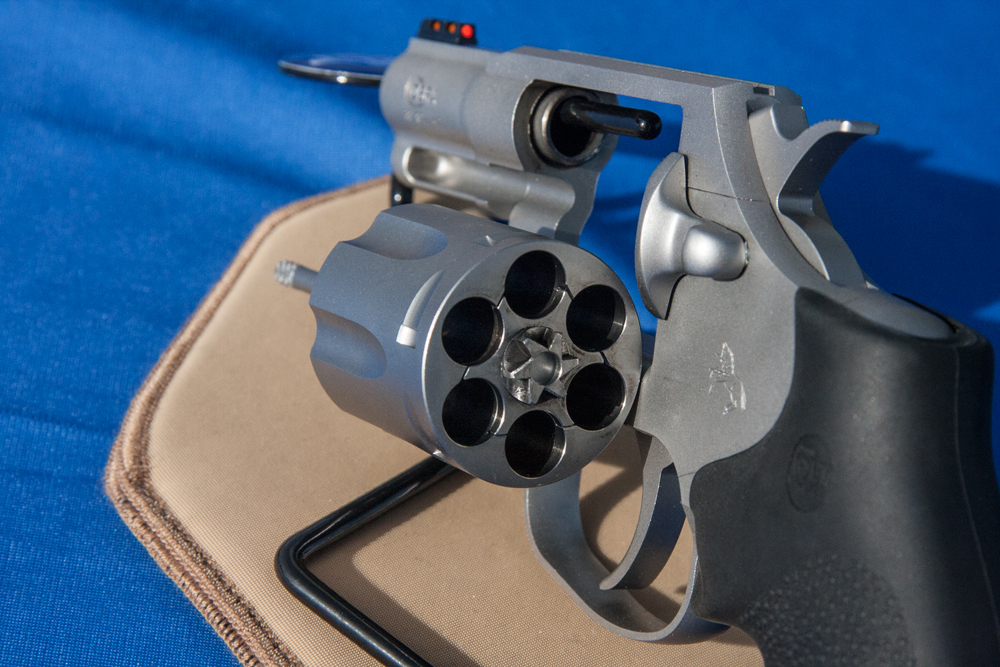
In a nod back to its well known and well respected “snake” line of revolvers, Colt is calling this new offering the Cobra. Chambered in .38 Special +P and sporting a 2-inch barrel, the new Colt Cobra is a six-shot revolver that looks perfectly situated to shine in the concealed carry market this year.
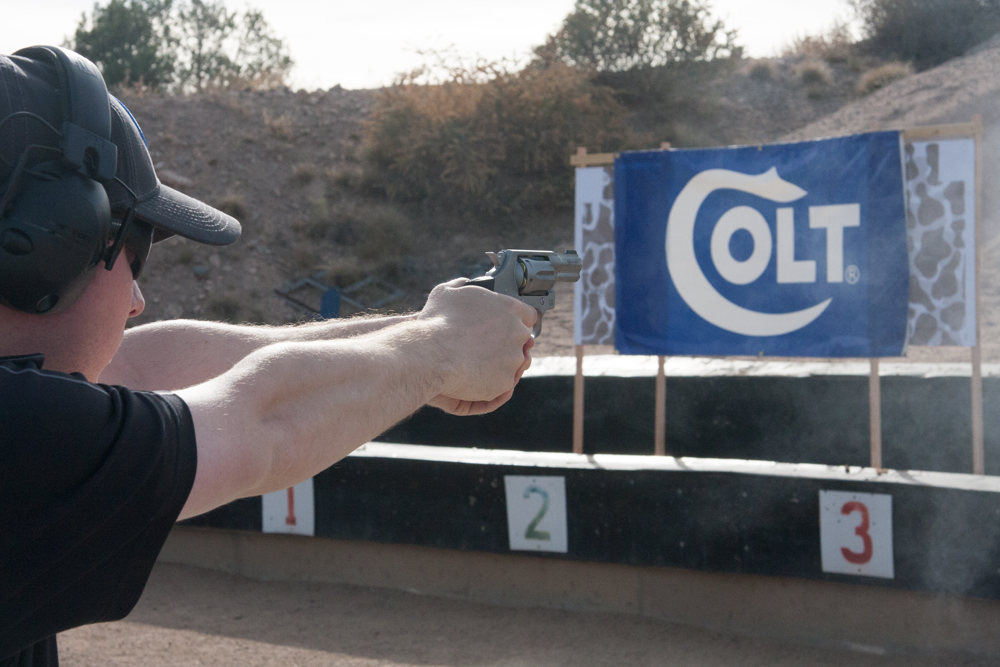
As someone who attended Colt’s Media Day event at Gunsite this past fall, I’ve been holding onto this exciting news for a couple months now. And while at the event, I was able to get a first hand look at, as well as some trigger time with, the new Colt Cobra.
Now, I’m admittedly not an expert when it comes revolvers. I don’t shoot them all that often, nor have I carried one concealed. However, I can still offer some general opinions on the new Cobra and how it felt to shoot, as well as some basic information on this new offering from Colt.
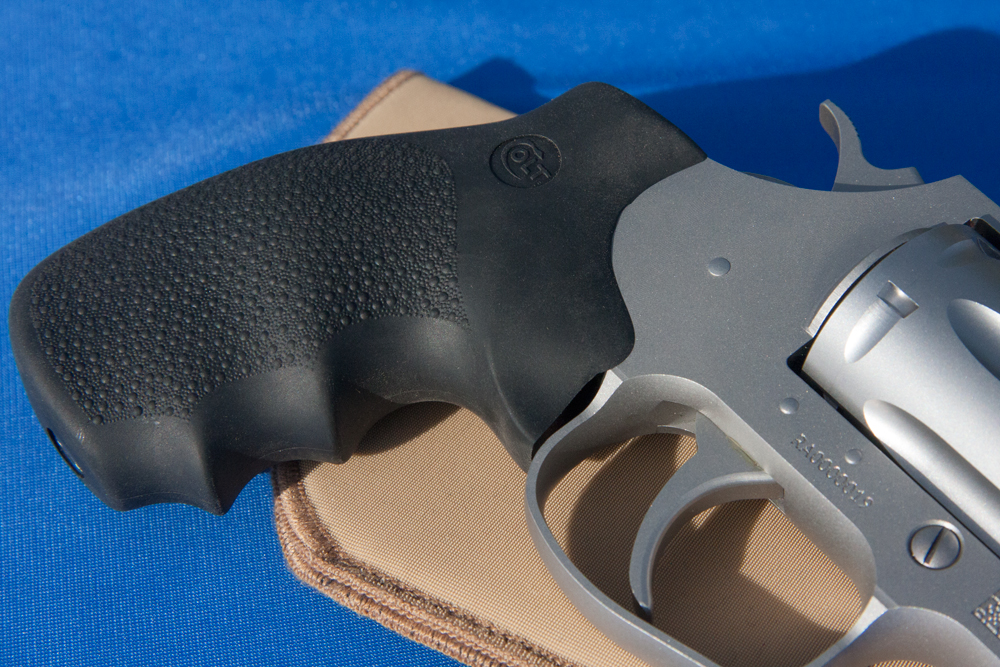
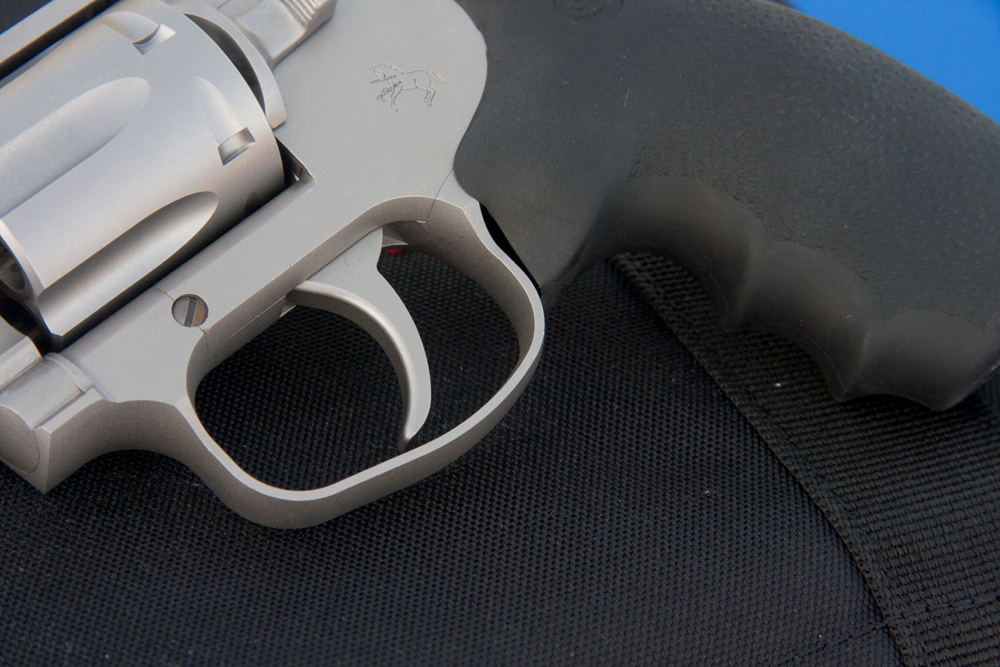
The new Colt Cobra features a hardy stainless steel frame that features a matte finish and a Hogue Overmolded grip. Hogue is well known in the industry for its quality revolver grips, and this one did not disappoint. The grip felt adequate and pleasant in my hand, and although recoil felt a little sharp from the 2-inch barrel, I never became uncomfortable while shooting the Cobra. The revolver seemed to point quite naturally in hand, and I never felt that I had to search for the trigger.
Speaking of the trigger, Colt has spent some considerable time improving the ergonomics of where the trigger is positioned and how the trigger guard is shaped, which definitely helps give it that natural feel in the hand. The trigger guard is enlarged and features somewhat of a bump at the bottom. This permits even gloved shooters, or shooters with larger hands, to have that same comfortable feel when shooting.
Colt did not have figures for trigger pull weight during the Media Day event or in the specifications provided, but it generally seemed pleasant in both single and double action. Obviously, the double-action pull was nowhere near as clean as the single-action pull, which felt silky smooth in comparison.
One of the additional new features Colt has brought out on the Cobra is what it refers to as its LL2 (Linear Leaf) Mainspring design. According to the company, this design change helps to ensure a consistently smooth trigger pull. Like I said earlier, I’m no revolver expert, but the trigger, particularly in single action, felt smoother than some of the other revolvers I’ve shot.
The front sight on the Cobra used at the Gunsite event was a red fiber optic, which offered plenty of visibility and felt quite familiar. The rear was a standard groove type sight built into the frame. This combination seemed to serve just fine, and I didn’t have too much trouble putting rounds on target.
In terms of dimensions, the Colt Cobra looks poised to strike out at the concealed carry market. With an overall length of 7.2 inches, a height of 4.9 inches, a width of 1.4 inches and an unloaded weight of 25 ounces, I’m sure it’ll be a popular option for those who prefer to carry revolvers. Capacity is six rounds, and given the .38 Special +P chambering, it should be able to pack some hot defensive loads.
The estimated MSRP that was provided to members of the media at the Media Day event for the new Colt Cobra is listed as $699. For those wondering about other potential double-action revolver models down the road, I would say to be patient. During the event at Gunsite the general attitude seemed to be that this was a first step in the category, with more introductions looming on the horizon.
For more information about the new Colt Cobra, check out the full specifications below and visit the Colt website.
Specifications:
Colt Cobra Type: Double-action revolver Caliber: .38 Special +P Barrel: 2 in. Overall Length: 7.2 in. Height: 4.9 in. Width: 1.4 in. Weight: 25 oz. (unloaded) Sights: Front fiber optic, rear groove/trench Grip: Hogue Overmolded Estimated MSRP: $699 Manufacturer: Colt
Looking to go armed, but are stuck in the weeds as to what to arm yourself with? Here are 20 of the best concealed carry gun options that will keep you on the defensive.