
A makeover for the made-over Enhanced Ruger Precision rifle.
When the Ruger Precision Rifle (RPR) debuted at the 2015 SHOT Show, it was hotter than MAGA hats after President Trump’s election night victory.
The RPR’s out-of-the-box accuracy, combined with a comparatively attractive price point, created instant demand. The marketing campaign certainly helped, with the company using a quote from its president, Mike Fifer, “Sixteen hundred yards. Enough said.”
Shooters soon found out the tagline was more than mere marketing hype. seemingly overnight social media was bombarded with videos of RPRs being shot accurately beyond 1,000 yards and even up to a mile. The rifles were so popular many writers (including this one) couldn’t get ahold of them for testing without waiting for several months. The RPR chassis rifle was somewhat unique at the time – a bolt action rifle with several black rifle components. In no time people were customizing the RPR – most commonly swapping out the handguard, adding a metal bolt shroud, and putting on some kind of muzzle brake.
As time passed, the popularity of the Ruger Precision Rifle continued to bloom. The platform is still gaining support, with nearly 16,000 members at the time of this writing on the dedicated Ruger Precision Rifle Facebook page. In 2016 the company took note of some of the modifications that were being done to the RPR and Ruger began offering the Enhanced RPR. Refinements included a billet aluminum bolt shroud, a new handguard, and a muzzle brake. Coincident with these upgrades Ruger also bumped the price by about $200 to $1,599 MSRP. While these were clearly welcome upgrades, there remained areas for improvement if one were so inclined. This article walks through some of the more common upgrades to the Enhanced RPR. As with all firearm modifications, ensure your rifle is completely unloaded before beginning your work (magazine removed, visually inspected empty chamber).
Stock
Perhaps the first thing noticed on the RPR is the stock. The design is very space-gun like, and it is adjustable for length of pull, cant, and cheek weld. Some shooters like the stock while others can’t pull it off their gun fast enough. Though it is a folding stock, it may be replaced by nearly every type of aftermarket stock designed for a black rifle. The folding component remains on the rifle, so that feature is retained after this customization. For this project the Magpul Precision Rifle Stock (PRS) Gen 3 was selected. The PRS has been a go-to stock for precision black rifle builds for many years. It is easily field-adjustable for length of pull (1.4 inches of adjustment) and cheek weld height (0.8 inches of adjustment) without the use of tools. It is also adjustable for butt stock pad height and cant. The Gen 3 PRS is compatible with both small and large frame black rifles, and it works on the RPR. Other enhancements to this latest generation of PRS include limited rotation QD sockets for sling attachment both fore and aft on the stock – the latter being part of a removable and reversible sling loop. Magpul also designed MLOK slots in the bottom of the stock to allow for attachment of an accessory. Finally, the Gen 3 PRS is almost 10% lighter at 27.8 ounces compared to the Gen 2 PRS.
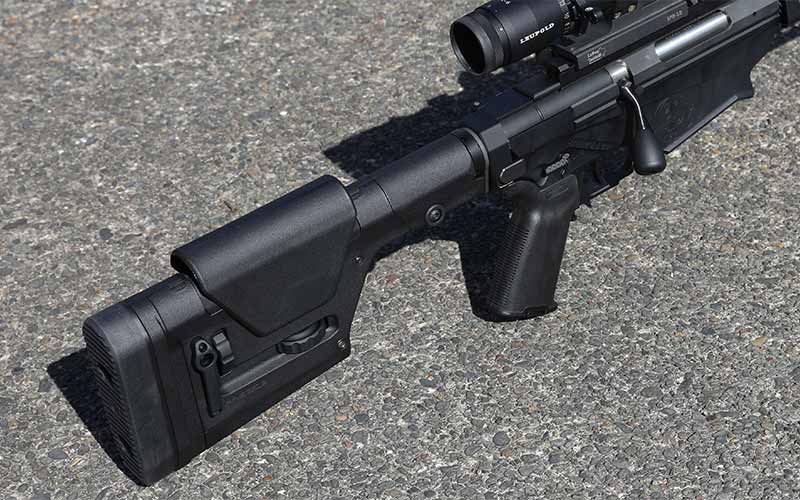
Swapping out the stock is as straightforward as on any black rifle. Simply loosen the nut near the action on the original stock to relieve the pressure of the clamp that holds the stock to the buffer tube. Next install the PRS by sliding it onto the buffer tube. Total time for this modification was less than 5 minutes.
Trigger
The stock trigger in the Enhanced RPR is very good, but it is not for everyone. Most people can use the stock trigger with good results, but the center blade safety feature bothers some shooters. For those who want to upgrade the RPR trigger the Timney drop in trigger is a great option.
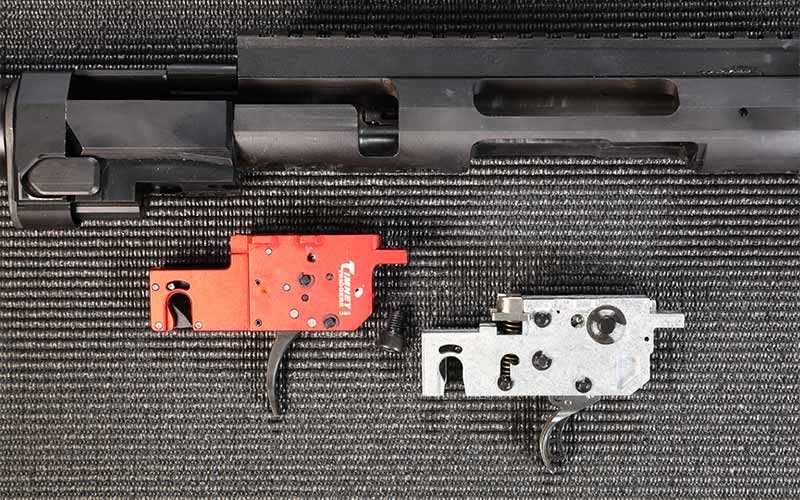
To trade out the stock trigger the clam shell action must be disassembled. This is a simple process, but it’s nerve racking to do the first time. Three hex head bolts must be removed – two on the side of the action and one at the rear of the action. The latter is concealed by the folding stock. Ruger made these bolts identical to each other, so you don’t need to keep track of which is which. A 3/16 hex wrench is required for this step. If the bolt has not yet been removed, now is a good time to do so. A single hex bolt holds the trigger assembly to the action. This is also a 3/16 hex head. On the side of the assembly a detent in a J-shaped slot must be moved to the top of the J. Next pull the silver tabs away from the action. Finally, tap the trigger assembly on the muzzle side with a nylon mallet and the whole thing pops out. The Timney trigger installs in the reverse manner. Slide the Timney assembly into position and install the retaining screw. The two stage Timney trigger may be adjusted for pull weight, but only the second stage may be adjusted once installed. Make any adjustments to the take up stage now. The trigger may be put on safe manually at this point by pushing on the bar on the side of the assembly. This opens the recess into which the safety selector will insert. Total time for this modification was 15 minutes.
Handguard
The new handguard on the Enhanced RPR is an excellent upgrade from the original. As compared to the original RPR handguard it is lighter in weight, and does not have a full length rail. Complaints were answered and the new version addresses many user concerns. However there are other options out there. For this project the Seekins Precision SP3R Rail System – Ruger Compatible was selected. Seekins products are works of art, combining form and function in a ways that delight shooters. Having used a SP3R Rail System on my 3-gun rifle for years I was very familiar with the features. The SP3R has a proprietary mounting nut and precision rail-to-nut fit that creates a very rigid free floating rail. The flat bottomed rail makes it easier to shoot off of many barriers used in action shooting competitions. MLOK or Keymod slots are available, and the Keymod version got the nod on this build.
Changing the handguard on the RPR is the exact same process as for a black rifle. Mounting screws are backed out and the original rail is removed. Next the mounting nut is removed. After replacing the barrel (below) the Seekins mounting was threaded all the way on and then backed off to roughly index the rail. The jam nut was tightened hand tight and then the SP3R Rail was indexed, which was achieved by taking a one piece scope mount and attaching it on both the upper and the SP3R. Finally the rail was removed and the jam nut tightened fully. The SP3R handguard attaches to the mounting nut with 12 screws. Total time for this procedure was 10 minutes.
Barrel
The barrels used by Ruger in the RPR produce very good results. Removing them is a challenge because they are “on there”, but an AR armor’s wrench and a good barrel vise will take care of business. There are plenty of YouTube videos covering this process if you wish to do it yourself. The key is to have a very good barrel vise. Some may wish to have this done by a reliable gunsmith. This is the route this writer chose, in part because the process requires head space gauges and I didn’t have the gauges for 6.5 Creedmoor at the time.
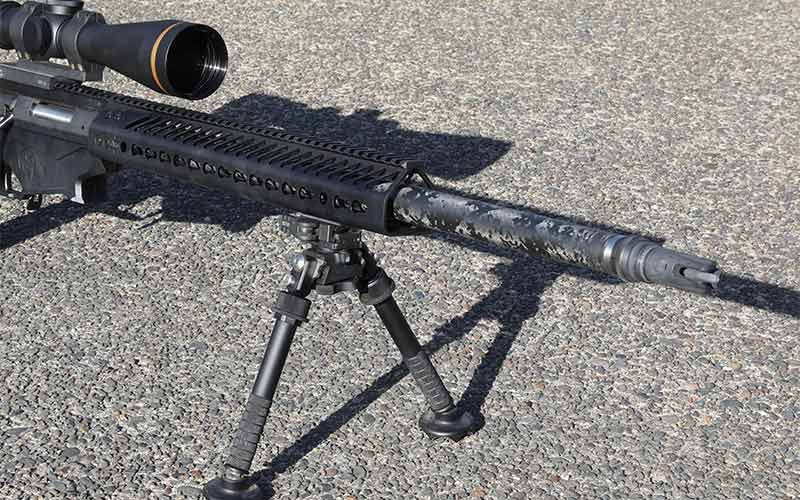
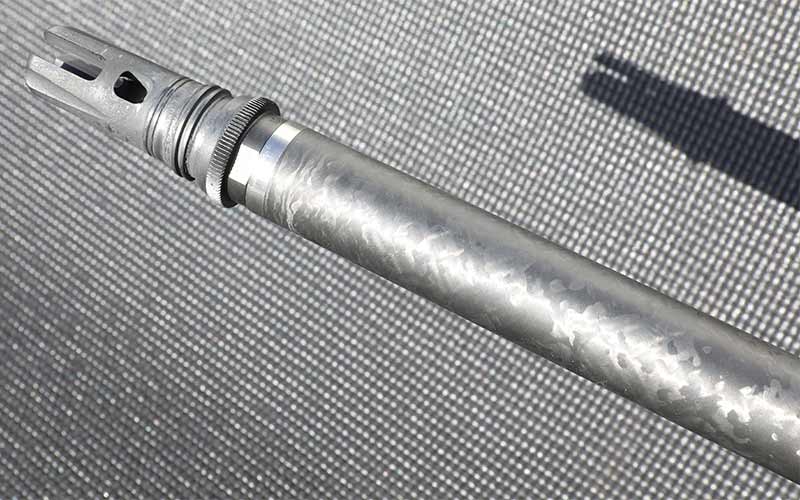
A carbon-fiber-wrapped match grade barrel from PROOF Research was selected for this project. These barrels are 50% lighter than stainless barrels of similar contour and they dissipate heat better as well. The advantage of the latter is PROOF barrels keep tight groups even after long shot strings. Beyond sustained accuracy these barrels just look great. I’m all for viewing my rifles as tools to be used, but I have to admit I smile every time I look at that PROOF barrel. The weight loss is significant, but it does not transform the RPR into a mountain gun.
Other Items
The stock grip is nothing special, and since I was using a Magpul stock I went with the Magpul MOE plus grip. This is a grip I use on several other rifles, so the familiarity added to the appeal. The stock safety for the RPR is a standard black rifle safety retained by a simple spring. For this project Seekins Precision ambidextrous safety was installed during the trigger swap out. This simple modification gives the shooter some flexibility when operating the rifle. Likewise, the stock muzzle device was changed for an AAC Brakeout 2.0 that allows an AAC SR-7 suppressor to be attached as necessary. The only trick with this upgrade is to note the stock muzzle brake has a jam nut that is hard to see. It allows the brake to be clocked to the appropriate position. The AAC Brakeout 2.0 does not require indexing.
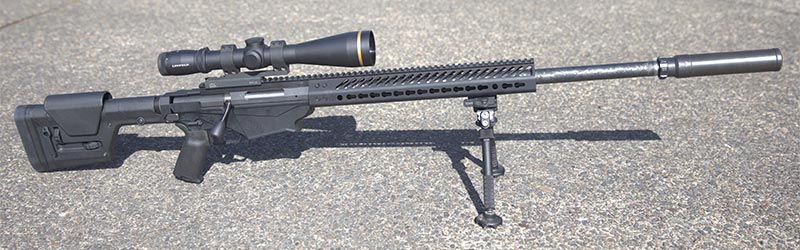
The Finished Ruger Precision Rifle
This rifle shoots better than I do I’m sure, but sub-MOA is relatively easy for me to achieve. I have been able to take the rifle out to 1100 yards using factory ammunition. Hornady ELD Match 140 grain ammunition has produced the best results to date. The ELD bullet tip developed by Hornady’s research team does not deform at high speeds and retains its high ballistic coefficient better than other ammunition.
For more on the Ruger Precision Rifle, please visit ruger.com.
More Precision Shooting
- Top 10 Sharpshooting 6.5 Creedmoor Rifles
- 8 Top Bolt Action Rifles for Hunting & More
- The 10 Best Long Range Cartridges
- Interested in Sniper Rifles? Start Here

Next Step: Get your FREE Printable Target Pack
Enhance your shooting precision with our 62 MOA Targets, perfect for rifles and handguns. Crafted in collaboration with Storm Tactical for accuracy and versatility.
Subscribe to the Gun Digest email newsletter and get your downloadable target pack sent straight to your inbox. Stay updated with the latest firearms info in the industry.


Are the 308 / 243 Win, 6.5 / 6 Creedmoor and 6.5 PRC all based on the same receiver ?
I’ve owned an RPR in 6.5 Creedmoor since it was priced st $1,000. That means I added my own bolt shroud and muzzle brake as wells a more vertical pistol grip. Now a Timney trigger will be the next upgrade and soon after that a stainless Bartlein 5R barrel.
*I like the RPR stock and original fore arm. My barrel put be one of the best RUGER made because I can regularly get 1/2 to 5/8 MOA with factory 140 gr. Hornady ELD-M rounds. And 3/4 MOA is beginning to happen so I may need a new barrel sooner than later.
Byt yeah, the RPR has a good reputation for being accurate and providing a lot of features for not a lot of money – relatively speaking, of course. ;o)