
If you make a mistake mounting your new suppressor, you might not get a second chance. Putting the right one on correctly, and putting the right one on a compatible rifle, will avoid a busted suppressor, perhaps a broken rifle, and maybe even injuries to you or bystanders.
- While not overly complex, properly mounting a suppressor is important to get right.
- Centering the suppressor with the rifle’s bore is key.
- If it’s not centered, shooters run the risk of damaging the baffles or caps.
- A Geissele alignment rod can be among the most important tool for this procedure.
- Once mounted, care must be taken to evaluate how flush the can sits on the muzzle.
Let’s start with two pieces of advice that I hope you take: buy a Geissele alignment rod in the caliber of your suppressor. That means a 5.56 or a 7.62 rod or both. And second: read the instructions. No, I’m not kidding, actually read them. They all come with instructions, and while we joke about deductions to our man-cards for reading them, do you really want to risk it?
I’m telling you this before we even begin the process of mounting your suppressor because, while the risk of misalignment might be small, the cost of it will be great if the odds go against you. The Geissele alignment rod will either be the best $60 you ever spent, or the biggest waste of $60 I’ve ever recommended. Either way, it is only $60, less than the cost of two weeks of over-priced coffee beverages on your way to work.
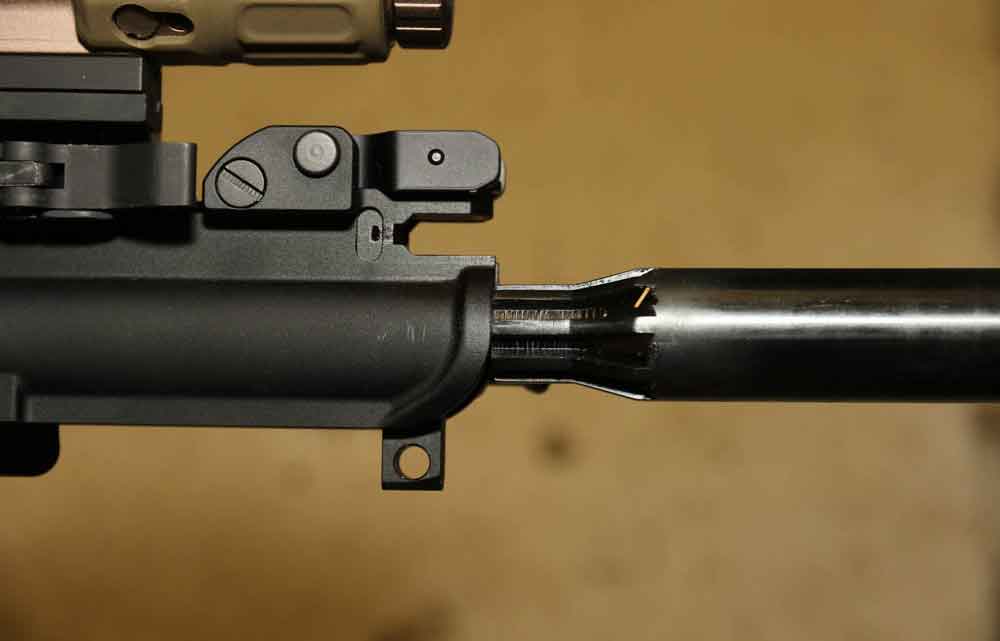
The use of the rod is simple; once you have your rifle and suppressor, hand-assemble all the parts (that means a muzzle device also, if you have a QD system) on the unloaded rifle. Do this with the rifle in a vise or other holding fixture, with the barrel horizontal. Then poke the rod down the bore. Let it rest flush with the front cap of the suppressor, and look at where the rod sits in the clearance hole of the front cap. Where it sits determines the future of your rifle/suppressor combination.
Geissele Alignment Rod: Pass Or Fail
Geissele rates the alignment by a set of pass-fail standards: centered, not centered but not touching, touching, not exiting, and one I call Epic Fail.
The instructions direct you to insert the rod into the barrel from the breech end and see how it fits as it passes out the bore. Some rifles won’t allow that, and it is just as easy to poke it in through the muzzle, so that’s the way I check.
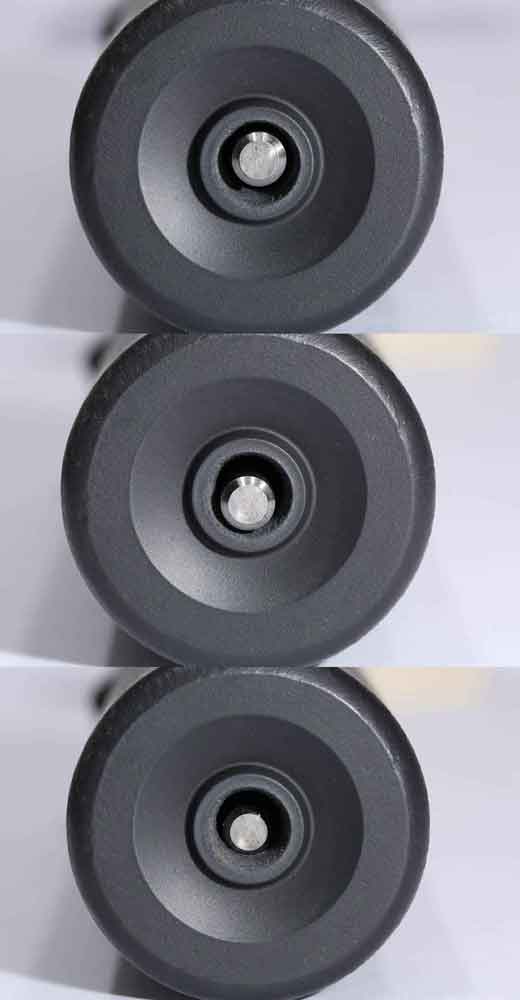
Centered
When centered, the rod sits perfectly centered in the exit hole of the suppressor. This is what you want, and you will not have any problems with this alignment provided you are using the correct ammunition for your rifle. As an example, even a centered alignment won’t help if you have a 1/12 twist and are firing heavy bullets in a .223/5.56 rifle. Those bullets will yaw, and baffle strikes will be a certainty.
Not Centered But Not Touching
Not centered but not touching means you have a less than perfect setup, but you will in all likelihood be just fine. I can’t guarantee that, because I don’t know how far “not centered” your rod is, and you may find that it works for you. Off a little, maybe barely noticeable? You’re probably just fine, and as good as perfectly centered. Really off-center, and almost touching the front cap hole, but not touching? Hmm, I think I’d fail that one.
Not Centered And Touching
Not centered and touching the front cap is not good, and you probably should not shoot this combination. There are guys who will, and have done so not knowing this is what their rifle/suppressor combo would gauge. I would not shoot such a combo.
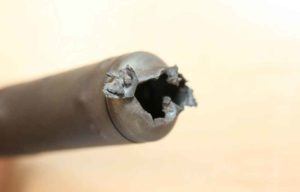
Not Exiting
This is where the rod stops on a baffle somewhere inside of the tube and won’t come out. This is obviously a bad arrangement, and you should not fire it. (Do I really have to tell you that? I hope not.)
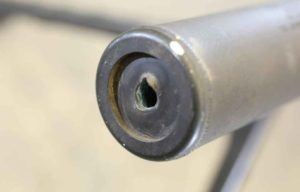
Epic Fail
I encountered this when I was measuring some AKs for suppressor mounting. The commies hadn’t ever considered the muzzle threads for more than a slant brake, and so the threads can be wildly off-center and not aligned. I had some combinations where, having poked the alignment gauge up into the suppressor, it bound in place so tightly that I was worried I’d bend it getting it back out. One suppressor was even visibly tilted on the barrel. I didn’t even bother trying to poke the alignment rod into that one.
This should be, as they say in police work, a clue.
What Does All This Mean?
It means that short of an epic fail, a visibly tilted suppressor on our muzzle, there is no way to eyeball the alignment of a suppressor. If you don’t have an alignment rod, then you are just guessing. And unlike the lottery, where guessing a set of numbers just risks losing the dollar you put on the counter, guessing wrong about the alignment of your suppressor on a given rifle risks losing you the cost of your suppressor, the tax you paid, and the time spent waiting for it. If someone ever asks, “Can I try your suppressor on my AK?” the answer should be an immediate and emphatic NO.
Suppressor Attachment Instructions
You’ve all probably worked with mechanical devices before. If you’ve overhauled an engine for your lawn mower, if you’ve changed oil, recharged the air conditioner compressor gas in your car, you know that there was a learning curve. You didn’t do it right the first time, and sometimes you had to go back and do it over again.
If you make a mistake mounting your suppressor, you may not get a second chance. Putting the right one on incorrectly, or putting the wrong one on an incompatible rifle, will lead to a busted suppressor, perhaps a broken rifle, and maybe even injuries to you or bystanders.
It will only take a few minutes, it may remind you of a step you had forgotten, and the manufacturer might have a slightly different approach to the process, required by their design, a process that you’d never think of.
Read the instructions. Pay attention. Benefit from the mistakes of others.
Mounting, Direct Thread
Let’s assume for the start that your rifle came with a threaded muzzle. In the case of an AR, this usually means there is a flash hider already there. So, remove the flash hider. If it is secured with a thread-locking compound, this may require some wrenching, maybe even an application of heat from a propane torch. Remove the flash hider and any/all washers that might have been used to time the flash hider.
It might be a good idea at this point to recommend you use another Geissele product, their reaction rod. This is a steel bar that engages the locking lug slots in your barrel extension. You use this to put the torque of wrenching off the flash hider into the barrel extension and reaction rod. Otherwise, the little pin in its slot in the upper receiver takes the gaff. Forcing off a flash hider, you can damage the slot and make your rifle less accurate.

You do not want the old washers, and you must not use them, either the old ones or new ones.
This is an important detail that will hold for all suppressor mounting applications: do not ever use the standard washers that come with, or are used with, flash hiders, muzzle brakes or other doodads on the muzzle. None of them.
If you ever do have need of some sort of shim or spacer to get a mount, device or other suppressor gizmo properly timed on the muzzle, you should only use whatever washers that manufacturer supplied. They will be guaranteed flat, something other washers cannot be.
With the flash hider off, clean the threads. You can brush them with a nylon bristle cleaning brush, you can use a wire brush, you can even get out a dental pick and pry the residues out of the threads. But get them clean. It would not be beyond reason, if you have one available, to use a tapping die to chase the threads and make sure they are clean.
While you’re at it, also pay attention to the bearing shoulder, the surface at the back of the threads, the one your suppressor is most-likely to stop against. Clean all the gunk off of that surface, also.
Hand-spin your suppressor onto the barrel (you’ve done all this after making sure the rifle is unloaded, haven’t you? Haven’t you?). Then insert your Geissele alignment rod. Look at the alignment, and don’t kid yourself. What is it, really?
Judgment Time
This part applies to all suppressor mounting systems and applications. So, when I later in the book say “check alignment,” I mean go through this whole process. It thought it would be just a bit pedantic, and perhaps even a bit insulting, to throw all of this next part into each and every section where I put “check alignment,” so it is here for all those times. Pay attention, the suppressor you bust may be your own. (And probably will be, when the owner insists you pay for its replacement.)
No Joy
If it is Fail, or Epic Fail, then you cannot use your suppressor on that rifle. You may only have the one rifle and the one suppressor. I feel for you, but having only one of each is not going to change the results or the future. If you mount that suppressor on that rifle, there will be an unpleasant surprise, and very soon.
Your choices are simple: buy another rifle, replace the barrel on this rifle, or have a gunsmith/machinist re-thread the barrel so it is correct and not too short. This last one won’t be much of an option if what you have is a carbine with a 16.1-inch barrel. There really won’t be much a gunsmith can do with it. A 20-inch rifle can be trimmed back an inch, re-threaded, and be a one-off rifle. But there aren’t many other options.
Careful Joy
If it is off-center but not touching, then you have to decide how much risk you are willing to take. A very slightly off-center but not touching situation is no big deal. But if it is off-center and not touching but almost touching, then the risk increases.
One thing you can try here is remove the suppressor, re-clean the threads and try again. Also, you can use a torque wrench or an open-end wrench and an educated arm to tighten the suppressor to its correct working torque. You might get lucky. You might find that there was some un-noticed bit of grit or left-behind Loctite that caused your suppressor to tilt slightly.
Also, you might find that the bearing shoulder has a slight high point, and when you tighten the suppressor it evens out, straightens up, and your suppressor now passes the test.
In a rare instance, there might be a left-behind tool mark on the bearing shoulder, and carefully stoning this flush removes the suppressor tilt.
Joy, Joy, Joy
Your suppressor tightens on with the alignment rod, centered. Then make sure it is torqued to the correct limit and plan for the next trip to the range.
Mounting, Muzzle Device
The process here involves more steps because you are assembling more gear. As before, remove the old gear and clean the threads. Take the muzzle device (your QD mount for your suppressor) and hand-spin it onto the barrel, making sure it fits and comes to a proper stop.
The muzzle device must come all the way back to the bearing shoulder and tighten down properly, unless (and this is important) the designer intended it to stop on the crown of the barrel and not the bearing shoulder. If yours stops short of the bearing shoulder, you have some problem-solving to do.
First, read the instructions again. Is it supposed to stop on the muzzle? Or the bearing shoulder? Is this the correct-caliber muzzle device?
If everything checks out, spin the device off and take a quick measurement of the length of the threaded portion of your muzzle. Then, phone the manufacturer. Explain the situation, and when they ask, you already know the length of the threaded portion of your barrel. It may well be in your situation that whoever threaded it didn’t know (or did it so long ago, no one knew) the standard length for suppressor mounting. Yours may be too long. You’ll have to take it to a gunsmith or machinist who can shorten it, and also check to see that it is correctly centered, before you move on.
Assuming the device threads on properly, attach the suppressor to the hand-tight muzzle device.
Fair warning here: when you attach the suppressor to the hand-tight muzzle device, they may stay attached when you go to remove the suppressor. If this happens, stop. Find a wrench to hold the muzzle device in place while you remove the suppressor, as you proceed to the next step.
With the muzzle device hand-tight and the suppressor correctly mounted on the muzzle device, use the alignment gauge to check clearance. Follow the process above of observing and correcting any problems.
If you have alignment problems, the solutions will be much the same as with the direct-thread mounting process, since you are threading the QD mount onto your barrel.
This article is an excerpt from The Suppressor Handbook by Patrick Sweeney.

Next Step: Get your FREE Printable Target Pack
Enhance your shooting precision with our 62 MOA Targets, perfect for rifles and handguns. Crafted in collaboration with Storm Tactical for accuracy and versatility.
Subscribe to the Gun Digest email newsletter and get your downloadable target pack sent straight to your inbox. Stay updated with the latest firearms info in the industry.


