Home Blog Page 386

Build an AR from Scratch – Part II

0
Using a hard surface as an anvil for the rivet head, one can then use a roll pin punch to expand the rivet tip to secure the sling swivel to the front sight gas block.

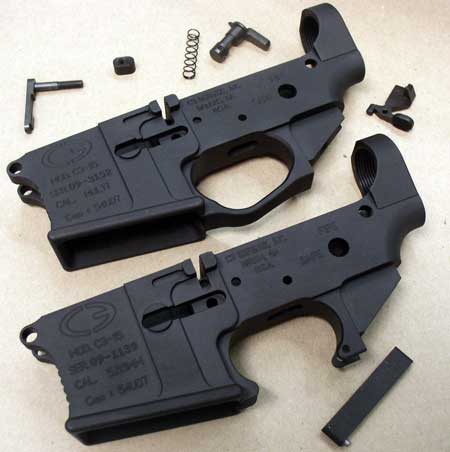
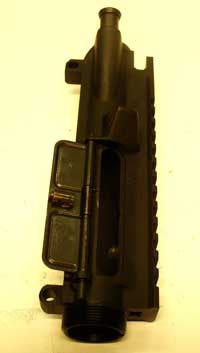
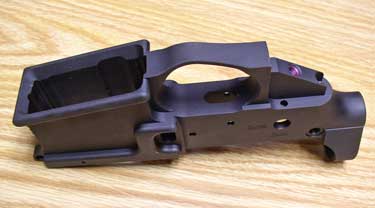
When last we spoke, the examination of the two lower receivers from C3 Defense (www.c3defenseinc.com) had concluded and we had initiated the construction of the upper receiver for the economy rifle, with all the remaining parts from Del-Ton, Inc. (www.del-ton.com).

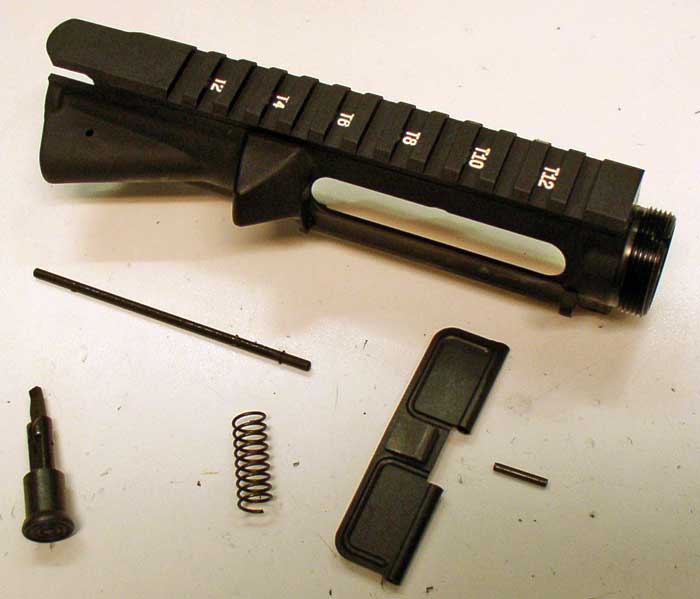
Having the completed upper in hand, we move on to installing the barrel. Make sure the upper receiver threads and the threads of the nut are completely clean and free of foreign objects, like burrs, dirt, grease, or blood.
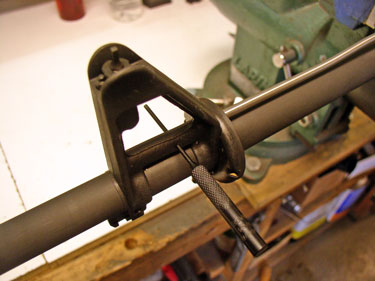
BARREL

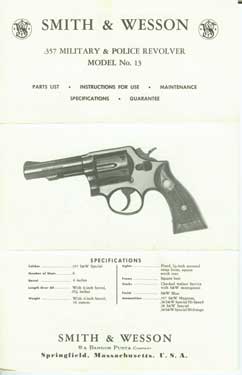
The most difficult chore here is to install the snap ring on the delta ring. While not absolutely required, snap ring pliers are very, very useful here. The barrel should have the serrated barrel nut already installed. Place the large angled aluminum delta ring around the rear of the barrel nut, with the small diameter facing forward.

The large weld spring can then be placed against the rear of the angled ring. The split snap ring is then placed on the nut and pushed home into the groove on the barrel nut. This compresses the weld spring, so that there is forward spring tension on the delta ring.

Then, simply insert the barrel into the upper receiver, making sure that the locator pin on the barrel extension makes its way into the notch on the top of the receiver. It should be a loose fit. If not, heat the receiver threads with a propane hand torch for about ten seconds and then it should slide right on.

Apply anti-seize in a liberal amount (liberal as in copious, not as in political) to the receiver threads and hand tighten the delta ring and nut to the receiver.

(Clockwise starting upper left) 1. Completing the delta ring assembly is much easier with a snap ring pliers. Use plenty of anti-seize to ensure the threads do not get galled and installation is smooth. 2. This nut is now “oomph” tight, at 30 foot pounds. It now just needs to be tightened until the next nut “scallop” is aligned with the gas tube hole in the upper receiver. 3. A firing pin makes a handy gauge for aligning the holes through the delta ring, spring and snap ring, nut, and receiver

Taketh up thy AR action wrench and matcheth thy wrench’s scallops to those of thy barrel nut. You will have to push the delta ring back in order to insert the wrench’s teeth fully into the nut’s teeth. Tighten. Use a torque wrench (if you have one) with your action wrench and tighten to about 30 foot pounds.

If you haven’t a torque wrench, give it a small “oomph.” Loosen and tighten again; then go further the necessary amount to align the next hole in the nut serration to the hole going through the upper receiver. It may be a little, it may be a lot. Generally, once it’s oomph tight, you can still go almost a full hole segment further if you have to. I should point out that 30 foot pounds is a lot lighter than you think. It’s effectively a minimum spec anyway.
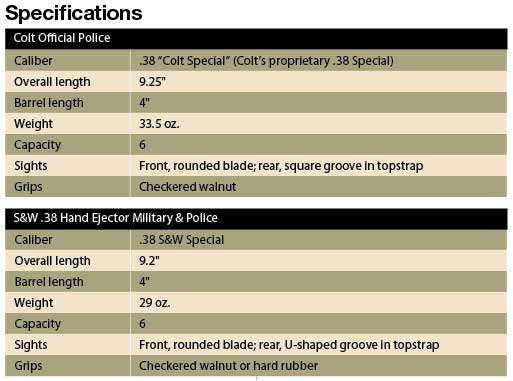
GAS TUBE

This is the trickiest part of the assembly of the upper. The end with the little knobby is the back end that goes into the receiver, and the end with the holes goes into the front sight gas block. With the upper in your vise, insert the back end through the barrel nut and into the upper receiver.

Adding the flash suppressor is simple. Place the crush washer with the wide end forward on the barrel threads and screw the device on. Use the large notch on the AR action wrench (DPMS model shown) to tighten. You have about one revolution worth in that crush washer, so don’t screw up.

You will have to rotate the tube so that the bend in it allows the front end to clear the front sight, though you may still have to flex it just a bit to do so (a small amount is okay). It should slide right in, and if it doesn’t, then take it back out and ensure that you can see all the way through the delta ring, weld spring, nut, and snap ring. All should be aligned so that the tube will pass through into the upper receiver.

HANDGUARD

Now all you do is install the two-piece handguard. Include your wife in the project by having her insert the handguard halves while you are pulling the delta ring back. It is a stout spring. Install the top half first (they are identical) making sure you have the front ears properly inserted into the front retaining ring, just behind the front sight tower, and around the gas tube.

Snap in the rear end, and then do the same for the bottom half. Push the delta ring forward to fully seat it on the handguard. You will probably feel a little play in the handguard, but very little, and this is correct. If you want to feel more manly, rejecting your wife’s assistance, get a handguard removal tool from Brownells.

CHARGING HANDLE, BOLT, AND CARRIER

The charging handle, if not assembled already, involves simply putting the spring in the hole in the left side of the “T”, inserting the latch and stuffing the little roll pin in to retain it. Starting the pin before inserting the spring and latch, and retaining the latch with a punch will make things easy. Just drive the pin in and the punch will fall out.

The firing pin should move freely within the bolt bore and in the pin hole in the cam. Ensure that it does so prior to assembling the bolt/carrier assembly. Push the bolt into the carrier with the extractor on the right side.

The cam pin should then be inserted through the carrier and into the bolt and rotated ninety degrees so that the short sides of the pin’s top are pointed to the sides of the carrier. The firing pin then goes down the middle of the assembly from the rear and is retained by the little cotter style pin, which is inserted into the large chamfered hole on the left side of the carrier. Test the fit of the bolt by pulling it all the way forward and standing the assembly upright on the bolt face. It should not collapse.

Use a punch to align the hole in the gas tube with the hole in the gas block. Then tap in the roll pin to retain the tube.

If it does, and a new one should not, the gas rings should be replaced. It should also not require more than light force to move it. Too much friction, and difficulty moving, will prevent proper cycling and may be indicative of poorly manufactured parts. I know that’s subjective, but there is a feel to it, and in this regard, with new parts, you are very unlikely to encounter a problem.

The firing pin should move freely without restraint. Hold the assembly with the bolt pointing straight up, and flick the back of the firing pin.

If it doesn’t bounce up and down freely, then you probably have a problem with the bolt’s cam pin hole/cam pin interface, meaning you will likely need a different bolt as the hole is not properly sized or crimped. The firing pin should also only protrude through the bolt face when the bolt is entirely pushed into the carrier.

CONCLUSION

That’s the upper assembly. We’ll finish next month with the construction of the lower receiver. This was the basic assembly of the run-of-the-mill rifle. Of course, the deer rifle was significantly different. Since that goes onto a more upperclassmen type of assembly, I won’t go into great detail.

That upper was a JP Enterprises CTR-02 upper that I received and promptly took apart to have another feature from another company added. We’ll discuss that in our next excursion.

Click here to read Part I


custom-ar

Gun Digest Guide to Customizing Your AR-15

Whether you’re in the brainstorming phase of planning the future of your AR-15 and what it will become, or you’re already applying the finishing touches to your custom AR-15 creation, Gun Digest Guide to Customizing Your AR-15 by Kevin Muramatsu will help you wade through and understand the wide variety of available options for almost every imaginable variation. Though the array of AR accessories and customization options seems to constantly grow, turn to this book for an examination of the customization landscape and helpful recommendations for which options would work best for the growing population of AR owners.

Retired Park Employees Irate Over Gun-Toting in National Parks

0

Retirees mad that law-abiding citizens can carry guns into national parks for self-defense.The law, which goes into effect in less than two weeks, will allow people to carry firearms in parks located in states that permit the carrying of concealed weapons.

Coburn’s controversial amendment was included on a bill to put new restrictions on credit card companies. Here’s a quote from Coburn from last May:

“It’s not about guns. It’s about states’ rights — being able to determine what’s best for them. And it’s about the Second Amendment. It’s not about bureaucrats telling Americans when their rights are going to be taken away.”

And here is the press release about the law taking effect:

TUCSON, AZ. February 9, 2010 — Assault rifles on Mather Point overlooking the Grand Canyon? Handguns on the Filene Center concert lawn at Wolf Trap in the Washington, D.C. suburbs? Shotguns at Lamar River Valley in the backcountry at Yellowstone National Park, the world’s first national park?

These are just some of the things that Americans can reasonably expect to see in national parks across the U.S. as of February 22, 2010, when a dangerous new gun law will go into effect in our nation’s national park areas. To mark this unfortunate development, the Coalition of National Park Service Retirees (CNPSR) is highlighting what visitors may soon experience in 11 representative national parks.

An amendment to the Credit Cardholders’ Bill of Rights Act of 2009, authored by Senator Tom Coburn (R-OK), and promoted by the NRA, passed by the Congress and signed into law by the President on May 22 of last year, permits park visitors to possess firearms in national park areas consistent with the laws of the state in which the area is located.

This is a significant departure from long-established, common-sense gun regulations that allowed visitors to possess guns in parks only if they were stowed out of reach and unloaded. Read more

Source: blog.newsok.com

Order the Gun Digest Book of Concealed Carry. Click Here. To learn more about concealed carry, check out the Gun Digest Book of Concealed Carry, by Massad Ayoob. Click Here.


Cop Implies Open Carry Advocates Should Be Shot

0
Cop implies open carry advocates should be shot
Click here to watch the video

Now East Palo Alto has become a reluctant testing ground for a battle of constitutional amendments: one police officer’s ‘freedom of speech’ versus a group’s ‘right to bear arms.’

Area resident Adnan Shahab is an “open carry” advocate who frequently goes out in public displaying an unloaded gun on his belt.

Such activity is legal in California with certain restrictions, such as staying clear of schools. Shahab said he was offended by Facebook remarks posted by East Palo Alto detective Rod Tuason. Tuason published a comment that said he agreed with a friend that open carry advocates should come to Oakland, Richmond and East Palo Alto and — in an apparent joke — said officers should shoot the advocates.

“So it’s a little shocking and disappointing to hear that a sworn officer is basically so cavalier with violating a person’s second amendment rights and basically putting a bullet in them for doing absolutely nothing wrong,” said Shahab. Read more

Source: ktvu.com

Gun Digest Book of Concealed Carry
Order the Gun Digest Book of Concealed Carry.
Click Here

The Gun Digest Book of Combat Handgunnery, 6th Edition
The Gun Digest Book of Combat Handgunnery, 6th Edition.
Learn More

Tactical Pistol Shooting, Your Guide to Tactics that Work, 2nd<br />             Edition
Tactical Pistol Shooting, Your Guide to Tactics that Work, 2nd Edition. Get Details

Police: Home Owner Shoots, Kills Alleged Robber

0

Armed Men Kick In Door Of Scott County Home

FOREST, Miss. — A homeowner shot andkilled a teenager who allegedly kicked in his door, police said.

Two men, one of whom was armed with a .38-caliber pistol,kicked in the door and rushed into the home, police said.

The homeownershot Derrick Thickland, 17, once in the leg and twice in the chest,
police said.

Thickland was allegedly armed with the gun, police said. Hewas pronounced dead at the scene, police said.

The second man,Luis Pedro, ran from the home and Forest police found him a few minutes
later hiding across the street, officials said.

Pedro admitted to policethat he and Thickland had gone to the home to commit armed robbery and
when they kicked in the door, they were met with gunfire, police said. Read more

Source: wapt.com

Jointhe Tactical Gear Concealed Carry Forum »

Tactical Gear Tip: Order the Gun Digest Book of Concealed Carry so you too
will be prepared when danger strikes. Learn More

Homeowner Shoots Intruder; OKC Police Arrest Suspects

0

Learn more about home defense. Click here.OKLAHOMA CITY – Three intruders fled from an Oklahoma City home this morning after being shot at by the home owner, police said.

The owner told police that he heard a noise at his front door around1:45 a.m. and opened the door. Three men armed with knives forced their way into the home in the 6400 block of South Phillips Avenue.

The intruders forced the residents into a back bedroom when thehomeowner shot one of the intruders. The intruders fled in a dark-colored SUV, police said.

Police said the homeowner said he recognized one of the suspects.Subsequently police arrested 30-year-old Eric Kutz as well as a 14-year-old male.

Police said Kutz was transported to an area hospital to receivetreatment for his injuries.

Jointhe Tactical Gear Concealed Carry Forum »

Tactical Gear Tip: Learn how to shoot back when you study the Gun Digest Book of Combat Handgunnery. Click Here to order.

70-Year-Old Winter Haven Man Shoots Would-be Thieves

0

Alarm alerts man to attempt to steal the batteries from his golf cart.

WINTER HAVEN, Florida – Two would-be thieves didn’t count on a motion alarm and a gun-toting 70-year-old Winter Haven man when they tried to steal the batteries from his golf cart, according to Polk County Sheriff’s Office reports.

Robert Rowley, of 28 Henry Drive in Winter Haven, awoke to the sound of a motion sensor alarm about 2:15 a.m. Monday.

When the alarm sounded, he grabbed his handgun and flashlight to investigate, sheriff’s reports said.

As he walked outside his home, he saw two men, who investigators said were trying to cut the cables to the battery packs on Rowley’s golf cart.

When he challenged them, one of the men began to walk in Rowley’s direction, he told investigators he tried to scare the men away by firing his gun.

Rowley fired three shots – once in the air, another at the ground and a third at the men’s truck as they
tried to quickly get away.

Deputies were later called to Winter Haven Hospital for two men who showed up with gun shot wounds, reports said. Read more

Source: theledger.com

Join the Tactical Gear Concealed Carry Forum »

Tactical Gear Tip: Order the Gun Digest Book of Concealed Carry so you too
will be prepared when danger strikes. Learn More

Modesto Woman Fires Shot at Suspected Burglar, Who Flees

0

A Modesto woman walked into her home this morning to find a suspected burglar and fired her gun at him before he fled the scene, authorities said.

Modesto police received a call at 11:21 a.m. of a possible burglary in process on Kingfield Drive, which is northeast of the intersection of East Orangeburg and Sunrise avenues.

“A female in her 40s came home to her residence and interrupted a burglary in process,” said Sgt. Rick Armendariz, a police spokesman. “She was able to arm herself and when she confronted the suspect, she feared for her safety.”

Source: modbee.com

Join the Tactical Gear Concealed Carry Forum »

Tactical Gear Tip: Order the Gun Digest Book of Concealed Carry so you too will be prepared when danger strikes. Learn More

Something to hold on to

1

My new Ring’s Blue Gun arrived the other day. It is the Glock 17/22 clone. Now I can do holster evaluations and practice my draw and sight picture. True, the Blue Gun is not the exact weight of a fully loaded Glock 22, but is its the exact size and the detail is actually quite impressive. It even accepts weapon lights and so far has worked in all the holsters my real Glock fits into. I now own 1911 and Glock 17/22 Blue Guns. Meaning I have the two most popular pistol styles as far as holster tests are concerned.

Perhaps now I can begin to brush up on my weapon retention/weapon take-away drills. There is no substitute for repetitions and Rings products are durable, dependable and ready for training. If you don’t have one, get one. Check them out at www.blueguns.com.

Gun Digest Feb. 15, 2010

0

Gun Digest is the source for firearms news, pricing and guns for sale. Readers benefit from in-depth editorial expert advice, show reviews and practical how-to instructions. Subscriptions are the First Amendment way to stand up for your Second Amendment rights. Click here to begin your subscription to Gun Digest.

Inside This Issue

Choosing the right load for cowboy action shooting just got easier, writes Dave Morelli.

Century International Arms’ CETME has a storied past and proves to be a solid shooter. Jerry Ahern takes a look.

Rifles: Harrington & Richardson

Shotguns: Lefever and Marlin

Handguns: Manhattan

NRA Update: Museum Pieces On Display

Precision Handloading: Final Factory Ammo Tests

Troubleshooting: The Savage Model 1912

Field Gun Review: The Handi-Rifle

Gunsmithing: Tale of Two ARs, Part III

Precision Marksmanship: Mounting Scopes the Right Way

Burris Eliminator Scope Combines Ranging and Compensation

0

Burris Eliminator scope integrates laser range finder and drop compensation.

Burris Company unveiled its new Eliminator LaserScope at the 2010 SHOT Show in Las Vegas recently. The new laser rangefinding riflescope integrates easily-programmable and customizeable automatic trajectory compensation with built-in rangefinding capability.

The 4X-12X-42mm Eliminator LaserScope features an integrated 800 yard rangefinder coupled with a very simple yet very accurate method of customizing the trajectory compensation capability to virtually any cartridge.


The Eliminator has 39 ballistic curves on board to select from and Burris provides a listing of nearly 600 factory loaded cartridges and the two digit ballistic curve number associated with each. A few clicks in the set up mode is all it takes to enter or change the ballistic curve to perfectly match your specific cartridge’s performance.

Burris Eliminator laserscopeBurris has marketed their original LaserScope for four years having now field-proven it’s reliability under severe recoil and tough field conditions. The new Eliminator takes this proven technology to a new level of technology and begins a new era for precision long range hunting. In combining these technologies, the Eliminator LaserScope provides the following benefits:

– Eliminates the need for a separate hand held rangefinder.
– Eliminates the lasering inaccuracies associated with an unsteady handheld laser.
– Eliminates sometimes crucial seconds switching between an handheld unit and the rifle during times game is moving closer or further away.
– Eliminates estimating distance.
– Eliminates estimating holdover.
– Eliminates loosing a black crosshair on a dark target by providing a 1/3 MOA illuminated dot that is highly visible under any light condition.
– Eliminates the lack of confidence in making a long range ethical shot.
– Eliminates missing or wounding shots.
– Eliminates missing out on a once in a lifetime trophy. The Eliminator LaserScope is affordable at well under $1,000, and is of a size and weight that is workable for everyday field use.

Burris Eliminator scope reticle
The Burris Eliminator scope reticle is calibrated for your cartridge and can be fine-tuned to match your gun/cartridge combination. It automatically adjusts for bullet drop.

Also, the Eliminator delivers the extremely vivid, bright, and crystal clear optics for which Burris is well-known. A single button to activate the laser is located about mid-section on the left side of the scope. In addition, Burris provides a remote activator that can be strapped either to rifle’s forearm or to the objective bell of the scope. The remote activator makes ranging while viewing through the scope more natural and steadier.

The unique mounting system allows the lowest possible mounting of the LaserScope to the rifle. The LaserScope by nature of it’s shape positions the shooter’s eye higher than with a conventional riflescope. The Burris mounting system allows the LaserScope to be mounted at it’s lowest possible mounting which compares to normal high rings on a conventional riflescope.

For more information contact Burris at 970-356-1670 or  www.burrisoptics.com

Build an AR from Scratch – Part I

0
The C3 Defense lowers, surrounded by some of the small parts that go into them. Note the enhanced model on top with the integral trigger guard. These are excellent, excellent receivers.

The gun-loving American is fortunate to live in these times. Even through the constant efforts of the statists, in the open or darkly concealed, we have at our fingertips the greatest assortment of firearms, and the greatest ability to possess them (Okay, not including early America), of any people that have ever lived. Also as Americans, we are innately susceptible to the “Flavor of the Month” complex. We love the newer and hopefully better.

Our market economy allows any itch to be scratched. If someone wants to hang some thing on his rifle, someone else will produce that thing to be hanged, and another the method for the hanging. Higher tech materials and production methodology multiply the effects even further. In practice, this makes an almost limitless selection of goodies available to the modern American gun owner.

This brings us to the subject of this particular excursion into gun goodness. The current flavor of the month (decade, really) is the AR-15. While this rifle has been discussed and touched upon in this column in more than one installment, the actual elaboration of the beginning to end construction of such a device has not been explored, and indeed is difficult to do, as there are so many steps to go through.

The proper alignment of the cover spring, with the short leg touching the port, and the long leg lying in a groove on the inside surface of the cover. It’s important that this step is completed before attempting to install the barrel.

Don’t confuse multiple steps with complexity, however, as this is easily the simplest repeating firearm to assemble, requiring very few specialty tools. The average homeowner or tinkerer has most of the tools required.

Post the recent elections, the sales of ARs and similar themed firearms skyrocketed. Indeed, beyond the purchase of complete rifles, many thousands of stripped lower receivers were obtained, often with customers buying several “for a rainy day.” Most were shoved in a safe, but others were destined to be built to conform to the owners’ mental architectural designs. Manufacturers rushed to fill the demand for these lowers, delaying production of other components in order to feed the buying frenzy.

So what do we do with those stripped lowers? This author decided to explore a pattern of extremes. Building an inexpensive (not “cheap,” however), affordable carbine, and building an expensive (“expensive”) deer rifle should sufficiently illustrate the wide range of possible outcomes.

WHAT RECEIVERS ARE THOSE?

I chose to order my stripped lowers from a new company on the scene, C3 Defense (www.c3defenseinc.com, 678-363-5899). When initially ordered, C3 offered only upper and lower receivers, but they have now expanded into full rifle production, concentrating on the personal defense and law enforcement markets. C3 Defense is one of the expanding numbers of manufacturers that are machining receivers from billets rather than forgings (the normal run of the mill Mil-spec method). These types of receivers are identified by a more linear, “slab sided” appearance, one characterized by straight lines rather than curves.

They do tend to be a bit heavier, but cosmetically and functionally have properties that forgings do not.

Both C3 lowers show these trends. Thicker sidewalls allow a more aggressive magazine well bevel, more structural reinforcing around the buttstock attachment area (weak point), mag well, bolt catch, mag catch, and trigger guard, a raised gripping surface on the front of the mag well, and a great looking appearance. The enhanced model also features a machined-in expanded trigger guard, large enough for thick-gloved fingers.

Both sport a helicoil in the pistol grip screw hole (these threads are easily cross threaded, but not now), and a nylon tipped screw to place tension on the rear lug of the upper receiver to keep the rattle down, and enhance accuracy. Made of 7075 aluminum, the anodizing was flawless and completely even. This doesn’t happen much. Most AR receivers have some little color or finish flaws, and one major manufacturer, a while back, had at least one production run that was actually purple.

Most impressive was the mag well. Some manufacturers finish cut the mag well by wire EDM, but most use a broach to form the corners of the well. Broaching has a tendency to bow out the sides a bit, leaving a mag well that is not perfectly “square” with the outer wall. The result is a tight mag well that pinches magazines from the sides. Wire cutting them makes a perfect cut, but is more expensive. These lowers were broach cut and showed no bowing, and from a gunsmith and armorer’s standpoint, this showed top quality control and attention to detail. Very pleasing to see.

The rifle parts kit came from Del-Ton (www.del-ton.com, 910-645-2172), a known source that has a reputation for very competitively priced, yet well-made products, and a very customer friendly customer service. They have a variety of basic choices, all of which can be heavily customized at your whim with easy to use, drop down menus. The kit that was ordered was a 16” heavy barrel carbine flattop kit. Why that one? It was available, that’s why.

The flared mag well is obvious here. Also note the helicoil in the pistol grip screw hole and the tension screw hole just aft of that. These are all cool, useful features not commonly found on a standard forged lower.

Everybody wants one of those silly looking M4 barrel kits. I didn’t care. I just wanted a kit. It includes everything needed to turn a stripped lower into a fully functioning rifle. This was used to build on the standard lower, the process of which is soon to be relayed. The enhanced lower will begin receiving next month a variety of my favorite parts from my favorite manufacturers, to produce the ultimate AR deer rifle.

I should point out that to illustrate in this article, Del-ton kindly sent me the kit in parts, but normally they sell rifle kits with the upper half already assembled. The following processes should be representative of any basic part or kit builds that the reader would likely attempt.

SO LET’S GET STARTED

You need the following tools:

•Bench vise with hard padded jaw covers
•AR-15 action wrench (pick one, they all work and you must have one)
•Carbine stock wrench (absolutely necessary, but cheap, like ten bucks cheap)
•Upper receiver vise block (not completely necessary, but very useful)
•Needle nose pliers
•Anti-seize
•Brownells or Wheeler screwdriver set (I have both and love them both)
•Punch set
•Roll pin punch set
•Roll pin starter punches are recommended as well
•Small hammer
•Fingers with a moderate amount of dexterity
•GO, NOGO, and Field headspace gauges (you can pay your gunsmith a small fee to test headspace, but they are nice to have)
•It also doesn’t hurt to have a few spares of the really small springs and detents. I won’t bother to tell which ones. You’ll figure it out.

A stripped upper needs these parts, the completely useless forward assist assembly with spring and pin, and ejection port cover with spring, pin, and clip. The handy white T-lettering helps you to remember where you mounted the scope, after you took it off to clean the rifle.

We’ll begin with assembling the stripped upper receiver. The first thing to do is to add the completely useless forward assist. This is used to fill the large hole on the right side of the upper that houses the completely useless forward assist, preventing lots of hot gases from coming out of that hole that should house the completely useless forward assist (like the arguments supporting evolution, this is called a tautology). It is retained by a simple roll pin. Put it in, then function test by inserting the bolt carrier in the upper and pushing the big button. The carrier should move slightly forward, thus displaying that even a completely useless device can still justify its own existence.

Next: the ejection port dust cover. Put the little E-clip in the slot on the cover pin first. After you drop it, pick it up and try again. Then insert the other end of the pin about one fifth of the way through the front loop on the receiver. Take the cover itself and put it in place and push the pin until it comes halfway through the gap in the middle. With the cover in the open position, place the spiral spring on the pin so that the long arm is on the inside of the open cover.

Then twist the short arm of the spring so that it will bear against the bottom edge of the ejection port, while simultaneously pushing the pin all the way through the spring, cover, and rear loop. From the installer’s perspective, the long leg will be pointing down, on top of the cover, and the short leg will be pointing up into the ejection port. Test it by closing the cover and inserting the bolt carrier. The carrier should cause the cover to spring open.

If the port won’t stay closed on its own, check that you put it on with the little springy detent on the top positioned to the inside when the cover is closed. If you put the thing on backwards, you deserve ridicule. Don’t show your face in public for at least 14 hours.

That’s all we have room for this month. We’ll continue the detailed examination of this build as it progresses next month. Till then, go out and buy another lower or two. The buying spike has all but flattened, and the manufacturers really need to keep selling stuff. Plus then, when the ban legislations actually start showing life, and you know they will eventually (probably in December of 2010 or 2012), you will already have something to build on. Or sell.

This article appeared in the November 23, 2009 issue of Gun Digest the Magazine.


custom-ar

Gun Digest Guide to Customizing Your AR-15

Whether you’re in the brainstorming phase of planning the future of your AR-15 and what it will become, or you’re already applying the finishing touches to your custom AR-15 creation, Gun Digest Guide to Customizing Your AR-15 by Kevin Muramatsu will help you wade through and understand the wide variety of available options for almost every imaginable variation. Though the array of AR accessories and customization options seems to constantly grow, turn to this book for an examination of the customization landscape and helpful recommendations for which options would work best for the growing population of AR owners.

Armed Teen Stops Intruder at Doggie Door

0

Intruder Tries to Break In Through Doggie Door: MyFoxPHOENIX.com

GLENDALE – A pregnant 17-year-old girl takes matters into her own hands when an intruder tries to break into her house.

Investigators say at first the burglar rang the door bell. When no one answered, he tried to break in by going through a doggie door.

What the burglar didn’t realize — a pregnant teen was there to meet him with a gun.

“He tried to put his hand inside and I guess she shot him in his hand,” says neighbor Liz Zamora. Read more


Source: myfoxphoenix.com


Recommended Gun Books for Self-Defense:

New! Concealed Carry Bundle – Save 50%!

The Gun Digest Book of Concealed Carry

The Gun Digest Book of Combat Handgunnery

Effective Handgun Defense, A Comprehensive Guide to Concealed Carry

Find more resources at
gundigeststore.com/tactical


The Nikon P-223 Expands AR Scope Offerings

0

AR 15 M16 Gas Piston Conversion Kit Primer Download

Thinking about buying an AR-15 Piston Kit or new-from-the-factory Piston AR? This FREE Download, courtesy of Gun Digest and Patrick Sweeney’s Gun Digest Book of the AR-15 Vol. 3is your starting point. Simply submit your e-mail below to continue to the FREE Download. You’ll Learn: How the AR-15 Direct Impingement System works; Advantages of the AR-15 Piston system; 7.62×39 Gas Piston AR 15s and more.

Click Here to Download

As an added bonus, we’ll send you the industry’s best e-mail newsletters from Gun Digest and Tactical Gear and the industry-leading companies’ special offers, straight to your inbox. This FREE service is another benefit of being a fan and reader of Gun Digest.


The new P-223 series of riflescopes broadens Nikon’s line of precision optics for AR rifles.
Designed with sighting speed and long-range accuracy in mind for both AR platform rifles and .223 cartridges, the P-223 is offered in 3-9×40 long range and 3×32 Carbine models. The P-223’s entire optical system is fully multicoated for extreme brightness and light transmission.

The 3-9×40 features the patented Nikon BDC 600 reticle and tactical-style turrets with Zero-Reset feature to simplify field adjustments. Developed specifically for the trajectory of the .223 Rem /5.56 NATO round with 55-grain polymer tip bullet, at 3240 FPS the BDC 600 reticle offers shooters unique open circle aiming points and hash marks from 100 to 600 yards. MSRP for the P-223 3-9×40 is $199.95.

The P-223 3×32 Carbine is an incredibly compact optic designed specifically for fast-handling, shorter barrel ARs. The all-new, fast-sighting BDC Carbine reticle was developed specifically for the 3×32 and .223 Remington cartridge to make engaging targets out to 600 yards a snap. MSRP for the P-223 3×32 Carbine is $149.95.

The P-223 is optimized for use with Nikon Spot OnTM Ballistic Match Technology. The Spot On program provides users with exact aiming points on the BDC reticle for any load or ammunition at a specified range. Spot On can be purchased for iPhone and Android or tried out for free at nikonhunting.com/spoton.

Also available is an all-new P-Series Mount. Developed to fit Picatinny rails found on most flattop AR rifles, this two-piece design allows proper height and positioning of either P-223 scope. The lightweight-but-strong alloy construction will hold up under the most brutal conditions.

The Nikon P-223 riflescopes include the following features:

Fully Multicoated Optical System
Provides up to 98% light transmission and maximum brightness from dawn to dusk.

100-yard Parallax Setting
Eliminates parallax for precise shooting.

Generous, Consistent Eye Relief
Keeps your brow safe-even with the heaviest recoiling cartridges, lightweight rifles, and severe shooting angles.

Precise, 1/4-MOA Hand-turn Tactical-Style Turrets
Positive click reticle adjustments get you zeroed in quicker and maintain your setting.

For more information: www.nikonhunting.com.


Resources for Tactical Operators

The Gun Digest Book of Tactical Gear

The Gun Digest Book of Tactical Weapons Assembly/Disassembly

Own the Night: Selection and Use of Tactical Lights and Lasers

Tactical Pistol Shooting: Your Guide to Tactics that Work, 2nd Ed.

West Virginia: Bill to Allow Concealed Carry Without License Introduced

0

Bill to remove permit requirement for concealed carry introduced in West Virginia.HB 4235 also partially strengthens preemption, cleans up confusing and contradictory hunting laws regulating handguns, restores firearm rights to individuals who have received a pardon, expungement, or certain forms of relief from disabilities for a disqualifying crime, and maintains optional concealed weapon licenses for West Virginians to be able to carry in other states via reciprocity.

Currently, only Alaska and Vermont recognize the right to carry without a license.

Alaska issues optional permits for reciprocity purposes in other states, as would HB 4235. Learn more

Source: West Virginia Citizens Defense League

Order the Gun Digest Book of Concealed Carry. Click Here. To learn more about concealed carry, check out the Gun Digest Book of Concealed Carry, by Massad Ayoob. Click Here.

Maryland Legislature to Redefine, Ban Assault Weapons

0

Maryland to ban "asault weapons."In a 2007 report released by the National Institute of Corrections (NIC), the crime rate in Maryland was approximately 8-percent higher than the national rate.

According to the study, Maryland’s property crime rate – which accounts for roughly 87.2-percent of the overall crimes committed – was 5-percent higher than the national average, and violent crime clocked in 27-percent higher.

In 2009, CQ Press released their annual Crime State Rankings, and Maryland was listed as the ninth most dangerous state in the union, finishing second in murders, second in robbery, sixth in auto theft and ninth in assault.

And Maryland has – according to the National Rifle Association – some of the toughest gun control laws in the country.

So to capitalize on that documented ‘success’ thanks to previous get-tough-on-guns legislation – and to remain indifferent to properly enforcing laws currently on the books – the Maryland General Assembly is once again seeking passage of an ‘assault weapons’ ban that does little more than regulate the people who actually abide by those laws.

SB 516, introduced this week by Senator Mike Lenett (D – Montgomery County) and numerous other members of the anti-gun sect in the Maryland Senate, would designate “specified firearms as assault weapons; prohibiting with specified exceptions a person from transporting an assault weapon into the State or possessing, selling, offering to sell, transferring, or receiving an assault weapon; requiring the Handgun Roster Board to compile and maintain a roster of prohibited assault weapons; etc.” Read more

Source: Maryland Statehouse Examiner

Gun Digest Book of the AR-15 Vol. IISpeaking of semi-autos, get yours in top shape while you still can. Order the Gun Digest Book of the AR-15, Volume II, by Patrick Sweeney. Click Here.

Most Popular Police Handguns 1900-1999

4

smithwesson-1-450.jpg

After the war, both Colt and Smith & Wesson resumed production of commercial-grade guns for the police and civilian market. As it had been before 1941, the O.P. proved a bigger seller – but the situation was about to change.

During the war years, Colt had concentrated on building 1911 pistols and other weaponry, letting their revolver line languish. S&W, on the other hand, had upgraded their manufacturing processes and had a large pool of trained workers. With the war’s end, Colt was stuck with outdated equipment and a shortage of skilled labor.

Additionally, Colt revolvers required more hand-fitting and detail work, which significantly increased their price compared to the competition. Lastly, while S&W embarked on a long-term R&D program to improve their revolvers, Colt’s management seemed content to live off their reputation and did little to improve equipment, efficiency, their labor force and, most significantly, the product. This recipe for disaster led to S&W’s capturing an ever-increasing share of the police and military market.

1948 saw the venerable M&P’s designation changed to the Model 10. Seven years later, S&W introduced a K-frame revolver chambered for the .357 Magnum cartridge: the Model 19 Combat Magnum. Police agencies seeking more powerful weapons bought them as fast as they could be produced. Colt attempted to play catchup by re-chambering the O.P. for the .357 cartridge and adding a heavy barrel, adjustable sights and larger grips. Known as the Colt 357 Magnum, sales were disappointing.

The popularity of S&W K-frame revolvers, however, continued to grow as such prestigious agencies as the New York State Police, FBI and Royal Canadian Mounted Police adopted them. S&W also sold large numbers of them to police and military forces in Europe, Latin America and Asia.

Instruction manual for a S&W .357 Magnum Model 13 revolver. This model, with a 3″ barrel, was adopted by the FBI. (Courtesy of Michael Jon Littman)
Instruction manual for a S&W
.357 Magnum Model 13 revolver. This model, with a 3″ barrel, was adopted by the FBI. (Courtesy of Michael Jon Littman)

The handwriting was now on the wall. Colt went through a series of new owners, none of whom seemed interested in innovation; the product line remained stagnant; and quality control took a hit while a series of labor disputes adversely affected production and the company’s reputation.

As is evident from a 1976 survey taken by the New York State Criminal Justice Services, by that time, the police market was S&W’s private preserve The sidearms used by the 45 state police agencies responding to the survey broke down as follows:

In an attempt to stay solvent, Colt began dropping models and 1969 found the O.P. missing from the catalog. The name was briefly revived with the Mark III Official Police revolver, but sales were so disappointing that production ceased after only three years. Many shooters and collectors found it disturbing that Colt’s product line, reputation and popularity had sunk to such low levels.

The S&W Model 10 continued to be the firm’s bread and butter product, although with the advent of the troublesome – and more violent – 1970s, .357 K-frame revolvers soon became their most popular law enforcement product. Beginning in the late 1980s, the 9mm (and later .40-caliber) semi-auto pistol became the police sidearm of choice, and today it is rare to see an American police officer with a holstered revolver at his side.

Opinions regarding this change of equipment are varied, with both sides making many good points in favor of their preferred weapon but such discussions – which always threaten to become heated – is beyond the scope of this article.

Which Is the Better-Shooting Revolver?

You knew we were going to get around to burning gunpowder sooner or later, didn’t you? Accordingly I obtained samples of each revolver: my brother Vincent provided a very nice M&P made around 1940 while my fellow collector of oddities, John Rasalov, was able to supply an O.P. Despite its being of 1930 vintage, the latter was in very good condition and as mechanically sound as the day it left the factory.

First, several observations as to each revolver’s strong and weak points: I found the S&W to be the better balanced of the two, making it a more naturally pointing revolver.

Double-action trigger pulls are a subjective matter and while some prefer the way the Colt’s stroke has a noticeable stage just before it breaks, I prefer the lighter, stage-free pull of the M&P.

The O.P. was graced with a superior set of sights: a wide, square notch at the rear and the blade of ample proportions up front. While having the same style of sights, the Smith’s were smaller and harder to align quickly. In addition, the tip of M&P’s hammer spur actually obscured the rear notch until the hammer was slightly cocked. For the life of me I cannot fathom this, and wish someone could explain the reason for it.

When it comes to grips it was a tie. Both were horrible! I do not understand why it took the firearms industry several centuries to figure out that the odds of hitting the target would be greatly improved by a set of hand-filling, ergonomically-correct grips?

In keeping with the proper historical spirit I decided to limit me test firing to the type of ammunition that was most widely used during the era during in which this pair or revolvers had seen service. Black Hills Ammunition kindly supplied a quantity of .38 Special cartridges loaded with the traditional 158-gr. LRN bullets.

While I served as cameraman, my brother Vincent fired a series of six-shot groups with each revolver from a rest at a distance of 15 yards. As can be seen in the photos, both shot to point of aim and produced some very nice six-shot groups. I then set up a pair of USPSA targets at seven yards, and Vince ran two dozen rounds through each revolver, firing them both one-handed and supported.

What can we deduce from this expenditure of ammunition? Inasmuch as my brother Vince did all the shooting, I will quote him: “I can make several observations,” he says. “First of all, both revolvers proved capable of excellent accuracy, whether fired from a rest or offhand. And while the Colt’s sights were of a more practical design, I shot slightly better with the S&W. Whether or not this was due to the fact that I have much more experience with S&W revolvers, I can’t really say. The grips on both revolvers were poorly designed and I believe something as simple as the addition of a grip adapter would improve handling to a significant degree. The Tyler-T Grip Adapter was first marketed in the 1930s and I can understand why! As regards recoil control, with its greater weight, I found I could shoot the O.P. faster but, considering the rather sedate ammunition we used, the difference was not all that great.”

Vince summed it all up by saying, “I have long been a fan of the fixed-sight, double-action revolver and the performance of this pair only serves to buttress my long-held belief that they are one of the most practical type of handguns ever invented. I contend that for over a century they were proved capable of performing any law enforcement task they were called upon to perform and – despite the present popularity of the semi-auto pistol – still are!”

I then pressed him to choose a “winner.” After a few moments of hesitation he said, “The M&P. But then I’m prejudiced.”

NOTE: I would like to thank Vincent Scarlata, John Rasalov, Charles Pate, Michael Jon Littman, Donna Wells, Jeff Hoffman and Clive Law for supplying materials used to prepare this report. And I’m indebted to Black Hills Ammunition (PO Box 3090, Rapid City, SD 57709. Tel. 800-568-6625) for their kind cooperation in furnishing ammunition.

This article is an excerpt from Gun Digest 2010

MUST READ ARTICLES