Witnesses to a defensive gun use can work for or against you, which only strengthens the case for giving the proper information to responding authorities.
In Part 1 and Part 2 of this concealed carry series, I explained the rationale behind giving responding police officers a very brief statement after a self-defense shooting, then waiting for your attorney before giving a formal statement. There may very well be others on the scene that can and will give responding officers an explanation of what they believe occurred.
If other witnesses hear and see the shooting, you may heave a sigh of relief and think, “I don’t have to risk telling the responding police anything, because others will tell the police what happened.”
This brings up two problems. The worst arises if the witnesses lie. Perhaps police interview witnesses who include the person you shot or his accomplices. They were committing a crime, most likely a violent felony, and if the one you shot dies, the others could be convicted of felony murder. Do you honestly think they are going to confess to the police that they were part of a robbery team? Not likely.
Instead, their lies will be long, loud and abundant, and at trial you must convince the jury that one, two or three other people who say that you just pulled your pistol and started blasting away are, in fact, lying.
The stories these witnesses tell will likely be the same, rehearsed many times, perhaps even with the aid of the prosecutor. Prosecutors don’t like to lose, and in fact, if they lose too many cases, they may also lose the prosecutor’s position. So, the prosecution will pull out all the stops to convict you, and if that means helping the witnesses communicate better with the jury, expect them to do so.
In the end, because you decided to follow the advice of lawyers, who defend real criminals, by remaining silent and demanding to talk to your attorney, you face a trial in which you desperately need to prove that the people the prosecution and their witnesses paint as poor suffering victims were actually committing a crime against you.
The witnesses extend well beyond those present at the scene. You can be sure the doctor that performed the surgery on the guy you shot will be at your trial to describe every excruciating detail of the injury you inflicted. If your assailant dies, the Medical Examiner or forensic pathologist will go to the witness stand to give the same testimony.
It can get even worse. Perhaps there were independent witnesses who saw what happened. “You’re saved!” your friends and family may cry. Not necessarily. What the witnesses saw or heard is not necessarily what actually happened. Witness dynamics is a fascinating subject in and of itself, and one you should study up on.
Witnesses’ observations and experiences will be filtered by many variables. Distance, lighting, ambient sound and even their own physical limitations in eyesight and hearing will come into play when they give their honest, independent account of what they saw or heard. And these simple physical limitations are nothing compared to the filter of social or political biases that also might be present.
An independent witness or two provides no guarantee that the truth will come out at trial. Those witnesses may be unavailable, may have moved away between the time of your arrest and trial or may for their own reasons make themselves inaccessible. It happens, especially if the witness might be related either through blood or social strata with the criminal suspects. In other words, when asked by the police what they saw, they told the truth, but by the time your trial gets underway, they are nowhere to be found. It happens all the time. Still, it can get even worse.
Evidence Overlooked
Because you never told the cops the dead guy attacked you first, they felt no driving concern to search out evidence at the shooting scene that might support that version of events. Lost is evidence, let’s say, of a knife or even another shiny object that could reasonably be mistaken for a knife that perhaps the assailant threw in the bushes after you shot him. Later, one of his buddies may sneak back and retrieve it before your attorney shows up bleary eyed at the jail to advise you while you tell the police what happened.
Do you think a jury will believe you when you say a guy threatened you with a knife when there is no knife to be found?
Wouldn’t it have been much better to tell the police succinctly that you were attacked, that the man lying on the ground placed your life in danger, and you were forced to shoot to save your life?
Or that others standing nearby saw what happened? And that after falling down, the assailant threw the knife in those bushes—just as you point to the clump of bushes 30 feet away? Maybe, just maybe, the police will consider the idea that you were justified in shooting, and they will investigate and document all the pertinent facts surrounding the incident. Wouldn’t that be nice?
Be sure to read Part 1 and Part 2, if you haven’t done so already.
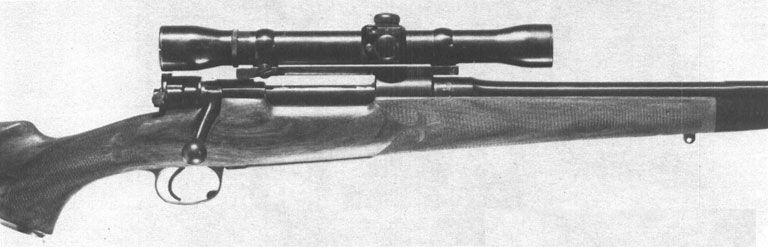
Mrs. O’Connor’s 7×57 Mauser, metalsmithing by Burgess, stock by Russ Leonard. Shown here with Buehler mount and Weaver K4, but it now carries a Leupold 3x.
“I think,” says the author, “I’ve seen more game killed with fewer shots from this modest little cartridge than any other.” Here’s the why and how, all of which may well explain the current spate of interest in the 7X57 as chronicled in the Gun Digest 1974 annual edition.
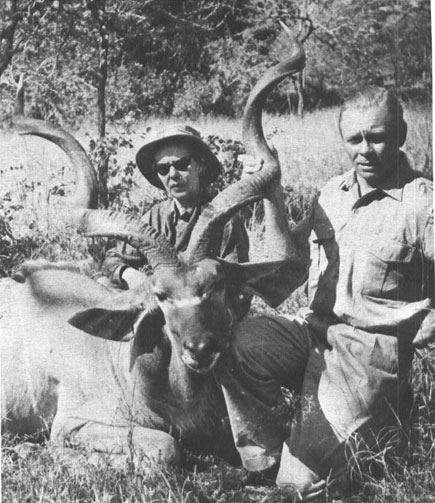
Eleanor O’Connor with a 53-inch greater kudu shot with the 7×57 in Mozambique in 1962. Her professional hunter is Harry Manners.
For almost 40 years I’ve been having an off-and-on romance with a sweet little cartridge known as the 7×57, the 7mm Mauser, and the 7mm Spanish Mauser. There is nothing spectacular about the 7×57. It does not have a big case. Even when the charge is tightly compressed it is possible to get only about 53 grains of 4350 or 4831 powders into the Western 7×57 case, which is roomier than Remington’s. This modest little cartridge does not have a belt. It isn’t a magnum. It doesn’t bellow like a 105mm howitzer and scramble the brains of the firer. It doesn’t shoot through three elk, one moose, two grizzlies and a forest ranger and then mow down a grove of jack pines on the far side. The hole in the barrel is so little that even a small, thin, underprivileged mouse would have difficulty in entering, and the cartridge itself isn’t as long as a maiden’s arm.
Yet I think I have seen more game killed with fewer shots from this modest little cartridge than with any other. The explanation for its deadly efficiency does not lie in blinding velocity, in big bullets, in a frightening number of foot pounds of energy. It lies in the light recoil, coupled with the excellent hunting accuracy of so many 7×57s. Those who use it are not afraid of it and, as a consequence, they tend to shoot it well—and to place their shots well. In case no one has told you, the most important factor in killing power is putting that bullet in the right spot.
The 7×57 is so-called because the bullet has the number of millimeters which add up to a diameter of .284″ and the barrels a bore diameter of .276″. The bullets have a slightly greater diameter than those of the 270 WCF, which measure .277″. The 7×57 case holds about 10 grains less powder, as you can stuff 62–63 grains of 4831 into a Western 270 case. The cartridge gets the “57” tacked onto its name because the case is 57mm long. The head size is the same as that of the 30-06 and the 270. It is simply the 8×57J Mauser case necked down to 7mm.
As I write this, late in 1972, the cartridge is 80 years old. Developed in 1892 at the Mauser Werke in Germany, it was adopted the next year by Spain as a military cartridge. We Americans first got acquainted with it in 1898 when, in Cuba, the Spanish used it to shoot small, neat holes in a considerable number of gringos in such ructions as the American charge up San Juan hill. The American army came out of the war with a profound admiration for the 7×57 and for the Model 1893 Mausers the cartridge was used in. American Ordnance developed the 1903 Springfield rifle, which is a modified Mauser, and the 30-03 and 30-06 cartridges, which are enlarged 7×57s.
Early History
This 42-inch sable antelope was a one-shot kill with the 7×57 in Angola.
Until recent years, the 7×57 was enormously popular as a military cartridge. It was adopted by Mexico, Brazil, Colombia, Chile, Honduras, Uruguay, and Serbia, as well as by Spain. It became popular as a sporting cartridge in England, on the Continent, and in Africa. W.D.M. Bell, the famous elephant hunter and excellent writer (Bell of Africa, Tales of an Elephant Hunter, Karamojo Safari), used it with the full metal-jacketed 172-gr. military bullets (solids) to bump off over 1,000 elephants. Most of these were big, tough bulls with good ivory. Bell never bothered much with cows.
Americans became acquainted with the 7×57 as a big game cartridge after the Spanish-American War, as many American soldiers brought rifles back with them and used them on deer, elk, moose, and bear. For a long time the only American factory cartridge available was one loaded with a 175-gr. soft point bullet at a muzzle velocity of 2,300 foot seconds. Later the velocity was stepped up to 2,490 fps. I do not know, but I suspect that this velocity was taken in a 30-inch barrel as, until recently anyway, it was the practice to take velocities in the barrel length for which the cartridge was developed. In the case of the 7mm, the early military rifles had 30-inch barrels.
The long 175-gr. bullets gave satisfactory penetration because of good sectional density, made a satisfactory wound channel because the bullets had plenty of lead and expanded easily. All in all, with that bullet, the 7mm was a good 175–225 yard cartridge for about any sort of game. Trajectory with the heavy bullet was about like that of the 30-06 with the 220-gr. bullet. Recoil was less. If you were smart enough to sight in to put the bullet 3 inches high at 100 yards, there was no necessity to hold high even at 200—and I’m sure I don’t need to tell my gentle readers that more game is killed at under 200 yards than over.
Along in the middle 1920s, the Western Cartridge Company shot the old 7mm full of testosterone and vitamins Z, P, and X, by bringing out a load that gave a 139-gr. open point bullet an alleged velocity of 3,000 fps. If that velocity were the McCoy (and I doubt that like hell) it was achieved in a 30-inch barrel. Remington likewise introduced a load with a 139-gr. bullet but said it was stepping along at 2,900. Prior to World War II, Winchester loaded a 150-gr. bullet at 2,750, a velocity probably taken in a 24-inch barrel. Currently Norma loads a 110-gr. bullet at 3,068, a 150 at 2,756, and a 175 at 2,490.
7×57 Actions
The 1893 and 1895 Mauser actions are on the soft side, cock on the closing motion of the bolt, and do not have the auxiliary locking lug at the root of the bolt handle. Pressures, consequently, should be kept down to around 45,000 pounds per square inch. Some of the actions made in Spain are particularly soft. Beginning around 1908, the Mauser Werke at Oberndorf, Germany, began turning out 7×57 sporters in various styles on a slightly shortened Model 98 type action. I have heard this action called the Model 1908 and also the Model 1912. It is, I believe, ⅜-inch shorter than the standard Model 98. Actions of similar, if not identical, lengths were used by Mexico, Czechoslovakia, and Yugoslavia. Just before and after World War I hock shops in the Southwest and Southern California always had for sale 7mm Mauser carbines that had probably come across the line with fugitive Mexican soldiers. These could be bought for a song and were widely used for hunting deer and desert sheep in the Southwest.
In Germany, .the Mauser Werke and various custom gunsmiths built 7×57s. In England, Rigby made them on Mauser actions, calling the cartridge the 275 Rigby. In the United States, Remington turned out 7×57 rifles on the Rider Rolling Block actions for various foreign governments, and also chambered Lee sporting rifles for the cartridge.
During the 1920s and 1930s, Griffin & Howe made many handsome sporters on Mauser and Springfield actions for the cartridge. The first caliber that W.A. Sukalle, the famous Arizona gunsmith and barrelmaker, tooled up for was the 7mm.
Remington chambered the Model 30 bolt action for the cartridge, and Winchester produced 7×57s in the Models 54 and 70. But what had been a mild boom for this fine little cartridge petered out. Both Winchester and Remington dropped the load with the 139-gr. bullet. They also discontinued the caliber in their line of bolt action rifles about the time WW II began.
Winchester chambered the Model 54 and the Model 70 for the 7 ×57. A Super Grade pre- ’64 Model 70 like this early one in 7 ×57 would bring a nice sum from a collector.
However, in the past 20 years or so in the United States, thousands of 7×57 military rifles have been sold, turned into sporters in one way or another, and used for hunting. The cartridge has always had its admirers and hundreds of expensive custom sporters have been built for it. In 1972 Ruger made a few thousand 7×57 rifles in the Model 77 (as well as a near number of 257 Roberts rifles) and all were spoken for before they could be produced. The cartridge is a long way from being dead yet. Besides the regular load with the 175-gr. bullet, Federal Cartridge now loads a 139-gr. bullet; Dominion, one of the same weight. Velocities are in the neighborhood of 2,800 fps. Pressures are O.K. for the older Mausers. With both of these loads pressure is kept down to around 45,000 psi, I am sure, because most of them will be used in older rifles of the Model 93 type. The cartridge makes new converts every day. People like it because of its light recoil, its good killing power, and its good accuracy — not that you can’t get bum 7mm barrels!
My First Little Seven
I got my first 7×57 rifle in 1934. I saw it at Bill Sukalle’s shop in Tucson. Bill had put a 7×57 barrel on a remodeled action from a World War I German Model 98 Mauser sniper’s rifle. It had been magnificently stocked in handsome French walnut by Adolph G. Minar of Fountain, Colorado, one of the finest classic stackers that ever lived. The stock had a German trap buttplate and a trap grip cap. It had as iron sights a Lyman 1-A peep on the cocking piece and a ramp front sight with gold bead. With iron sights, the rifle weighed slightly less than 7 pounds. However, it was equipped with a big German Gerard scope on claw mounts, which outfit added about two pounds. The scope was good optically, but because of the soft mount, it would not hold a constant point of impact. I traded the scope off. However, the rifle with iron sights was an astounding bargain at $75. That’s right-$75! I took off the Lyman 1-A and had a 4x Noske scope put on with the Noske mount. The outfit then weighed less than 8 pounds.
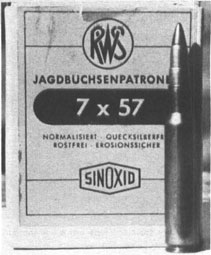
The 7×57 is loaded all over the world. Here is some of the good RWS (German) ammo.
I shot my first desert ram with that rifle, one of the best Rocky Mountain mule deer I have ever knocked off, and various other game — all with the Western factory 139-gr. open point bullet load. With one exception, everything I shot at with a 7×57 was a one-shot kill. That was a desert mule deer which I shot in one ham as he ran directly away and on which I used two cartridges. Then about 1952, I caught up. Hunting on Idaho’s Snake River with another 7×57, I picked out a nice fat doe and took a crack at her. Down the hill she rolled — and also a forkhorn buck that had been standing behind her.
Sadly enough, I traded off that lovely little Sukalle-Minar 7×57, along about 1940, for an equally handsome 2-R Lovell on a Sharps-Borchardt action. Like the 7×57, it had been barreled by Sukalle and stocked by Minar. The O’Connors felt civilization crowding in on them, moved away from Tucson to Lewiston, Idaho in 1948. Not long after I had Tom Burgess, a crack metal man (who was then in Spokane, but who’s now located in Kalispell, Montana), remodel a Czech VZ33 action and fit a 22-inch 7×57 barrel. The late Russ Leonard made the stock. Before long, my wife latched onto it. I had the stock shortened and a recoil pad installed. This 7×57 has been her favorite rifle ever since. I have no idea how many North American animals she has collected with it, but I believe I can name the species — mule deer, Rocky Mountain goat, black bear, caribou, elk, Stone sheep, Dall sheep, Corsican mouflon in Texas, and pronghorn antelope. She has also used it on the mountain sheep called urial in Iran and has collected most of the African antelope — including such large ones as eland, greater kudu, roan, and sable — with it on safaris in Tanzania, Mozambique, Angola, Botswana, South West Africa and Rhodesia. When she went after tiger in India, and elephant and lion in Zambia, she felt she needed a very powerful rifle, so she acquired a 30-06. In Mozambique, our professional hunter was the famous Harry Manners. He looked askance at her little rifle, told her she was undergunned. Before the trip was over, he was calling her One-Shot Eleanor, because — with the exception of a greater kudu, a handsome antelope about the size of a spike bull elk — everything she shot at was taken with one bullet. This kudu jumped into the air as she fired, and I called it a heart shot. My wife hit it again as it ran and yet again when it stopped. It fell at the third shot, but it had one bullet through the heart. From its actions, I am convinced it was the first one.
In the summer of 1972 my wife, our son Bradford (who is the outdoor editor of The Seattle Times ) and I decided to make modest safaris in South West Africa and Rhodesia. Bradford took a Ruger Model 77 in 30-06 and a restocked Winchester Model 70 in 375 H&H. My wife and I did all of our shooting with two 7×57 rifles — her Mauser and my Model 70 Winchester.
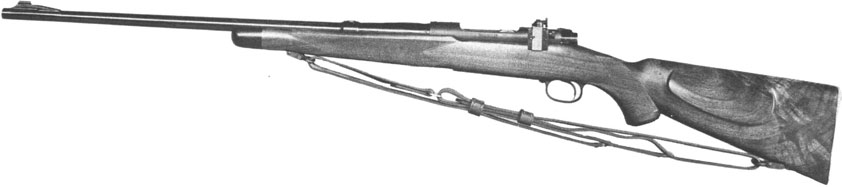
Last Model 70 in 7×57
About that Model 70 in 7×57 there is a tale. It was the last 7×57 ever turned out at the Winchester factory. When I felt myself coming down with another 7×57 in 1955,1 asked friends at Winchester if they could put a Model 70 in that caliber together for me. I was told this was possible as they still had exactly one (1) 7×57 barrel left. When the rifle came I sent it to Al Biesen, the Spokane, Washington, gunsmith and stockmaker. He turned down the barrel, shortened it to 22-inches, put a release button for the hinged floorplate in the trigger guard, checkered the bolt knob, made a stock of good French walnut, mounted a Weaver K4 scope on a two-piece Redfield mount. Complete with scope, this rifle weighs 7¾ pounds and will keep good bullets into less than an inch. Partly because of the light recoil, I shoot this rifle quite well. I would be hard put to imagine a much better mountain rifle. For the record, the serial number of this little dream is 361582. Prince Abdorreza Pahlavi of Iran has the next to the last Model 70 in 7×57 turned out at Winchester. He has used it extensively in Asia, Africa, Europe and North America. Likewise put together on special order, its number is 222222!
When my wife and I arrived in South West Africa in the summer of 1972, the professional hunters there told us we were undergunned — an opinion I had heard before. There, and in Rhodesia, we shot greater kudu, sable (in size midway between mule deer and elk), mountain zebra, gemsbok, and various other antelope. Most of the animals were anchored with the first shot.
I used the 140-gr. Nosler bullet in front of 45 grains of 4320. Velocity in my Model 70 with 22-inch barrel is 2,825. This is the velocity I get in the same rifle with the Dominion 139-gr. bullet load. The Federal load, with the 139-gr. bullet, produces somewhat less velocity.
For years my wife has used various 160-gr. bullets pushed by 52 grains of 4831. Velocity in the 22-inch barrel of her rifle is 2,660. As far as I can tell, this load shoots just as flat as the 180-gr. bullet in the 30-06 and kills just as well.
In South West Africa the only animal she did not kill with one shot was an enormous kudu bull with 60-inch horns. The bull was about 300 yards away and moving. She shot twice, paunched it, broke a hip. He went about 100 yards and fell. A good bull sable she shot in Rhodesia was quartering away. The 160-gr. Nosler bullet angled through and came to rest under the hide behind the right shoulder. It ran about 150 yards. Only one lung had been hit.
Tough African Antelope
I have heard many a fanciful tale about the incredible toughness of African antelope. After much prayer and meditation and ten African safaris I cannot for the life of me see that African game is any tougher than North American game. I have used as “light” rifles on safari the following calibers: 300 Weatherby, 30-06, 270, 7mm Remington Magnum, 338 Winchester Magnum and the 7×57. I have also used on heavier animals a 416 Rigby, a 450/400 Jeffery double rifle, a 450 Watts (the predecessor of the 458 Winchester) and various 375 magnums.
As far as I can tell the little 7×57 kills African antelope from the largest to the smallest just as well as any of the cartridges I have used. I have, for instance, shot greater kudu with a 300 Weatherby, a 30-06, a 375, a 7mm Remington Magnum, a 270 and a 7×57. All kill well if the bullet is well placed, but the hunter who paunches his animal or breaks a leg is generally in trouble with any of them.
Just before writing this I read a piece by a writer who dotes on the magnums more than I do. He uses the 7×57 as a dreadful example of the non-magnum. He says that “200 yards is close to the practical killing limit of the 7×57.”-He adds that this is because the energy has then fallen off to about 1,400 ft. pounds.
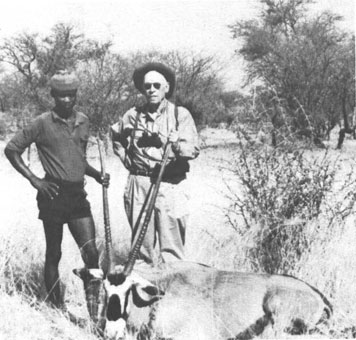
Jack O’ Connor and friend with a 38½″ gemsbok, the kill made in Southwest Africa in 1972, Jack’s rifle a 7×57.
Well, I’ve got news for the lad. Two hundred yards is not only the practical killing range of the 7×57, but also the practical killing range of the 30-06, the 7mm Magnum, the 300 Weatherby Magnum, and what have you. The reason for this is that very few hunters can lay the bullets into the vital area of a game animal at any greater distance, even under the most favorable conditions. In fact, I’d bet a sugar cookie that most hunters could kill stuff farther away with the 7×57 than they could with the 7mm Magnum. It would not kick them so hard. They wouldn’t be afraid of it, and they would shoot it better. I have some more news: game is not killed by foot pounds of energy. In fact, the energy has little to do with killing power. Animals are killed by putting in the right place a bullet that penetrates deep enough and opens up adequately.
Some of the most spectacular kills I have ever seen have been made with the 7×57. A very large mule deer, standing on a frosty hillside at about 8,000 feet above sea level in northern Arizona, was hit behind the shoulder and went over like a paper deer in a puff of wind. He was literally killed in his tracks. A greater kudu bull in South West Africa was hit through the upper leg bone and heart at about 150 yards. He fell as if he had been electrocuted. A Hartmann mountain zebra, that may have weighed 700 on the hoof, went down as if poleaxed when hit through the shoulder blade at about 275–300 yards. A sable in Rhodesia was hit too far back when trotting at about 250. It ran about 50 yards and stopped. I held slightly high (6–9 inches probably) and squeezed one off. The bull sable hit the deck.
I haven’t made any very long shots with the 7×57, but I try to avoid long shots with any rifle. Most game is killed at 200 yards or less, but many of these kills get stretched out when they are processed through a typewriter.
I have never used a 7×57 to kill a bear of any sort — black, blue, brown, or grizzly. However, I saw the Storm & Strife knock off a nice black with one shot. I have never shot an elk with the 7×57, but I have seen her lay two good bulls low, each with one 7mm bullet, not to mention zebra, greater kudu, sable, roan, eland, four different kinds of sheep, and what-not.
Many very fine hunters have sworn by the 7×57.1 have mentioned W.D.M. Bell. That hunter of man-eating tigers, the late Capt. Jim Corbett, used a 7×57 (which he called a 275 Rigby) and a 450/400 Jeffery on these 400–500 pound cats. Prince Abdorreza Pahlavi has shot all sorts of Asiatic sheep and goats, all species of North American sheep, and most African antelope, with the Little Seven. One of the greatest sheep hunters who ever lived, the late Charlie Ren, used to shoot antelope and desert sheep with the 7×57 and the 300 Savage. He considered the 30-06 and the 270 too noisy, too violent, and too destructive, of meat. If a dude had ever shown up with a magnum I think old Charlie would have busted a gasket.
Shooting the 7×57
This 32½-inch Mozambique waterbuck rolled over with one shot from the 7×57.
The 7×57 is a sweet little number to shoot. Recoil is about one-third less than that of the 270, about half that of the 7mm Remington Magnum. This is going to be a hard one for a lot of people to swallow: I have shot about the same amount of game with the 7×57 and the 7mm Magnum, and if, with the same shot placement, the magnum kills any better than the 7×57, I have been unable to see it.
The handloader will rejoice to learn that the 7×57 owner has his pick among a great variety of .284″ bullets. Speer alone makes bullets weighing 115, 130, 145, 160 and 175 grains. Nosler has three weights — 140, 160 and 175. Hornady can supply bullets in weights of 120, 139, 154 and 175 grains. The last can be had in either round nose or spire point styles. Anyone with a yen to shoot an elephant can usually scrounge up some old 175-gr. military “solids.”
Such lighter weight bullets as the 120-gr. Hornady and the 130-gr. Speer, which can be pushed along at velocities ranging from 2,900 to above 3,000, should be excellent for ante lope and open country deer. I have shot around 35–40 head of game ranging in size from Thompson gazelles (30 pounds) to greater kudu (600 pounds) and mountain zebra (700 pounds) with 140–145 grain bullets. No complaint. My wife has always stuck with one bullet weight — 160 grains. In her rifle this bullet leaves the muzzle at 2,660. She sights in for 200. The bullet drops 9 inches at 300. At 400, it would probably drop about two feet, but she doesn’t believe in shooting at things that far away. She says doing so is silly. I’m inclined to agree with her.
Gun Safety in the Home by Massad Ayoob is your guide to replacing your child’s natural curiosity and ignorance with a basic understanding and respect for firearms, wherever, and in whatever situations they may encounter them. Not only will you find gun safety information from the experienced author, but you will also benefit from valuable advice from many other experts who Massad Ayoob resources. Learn more
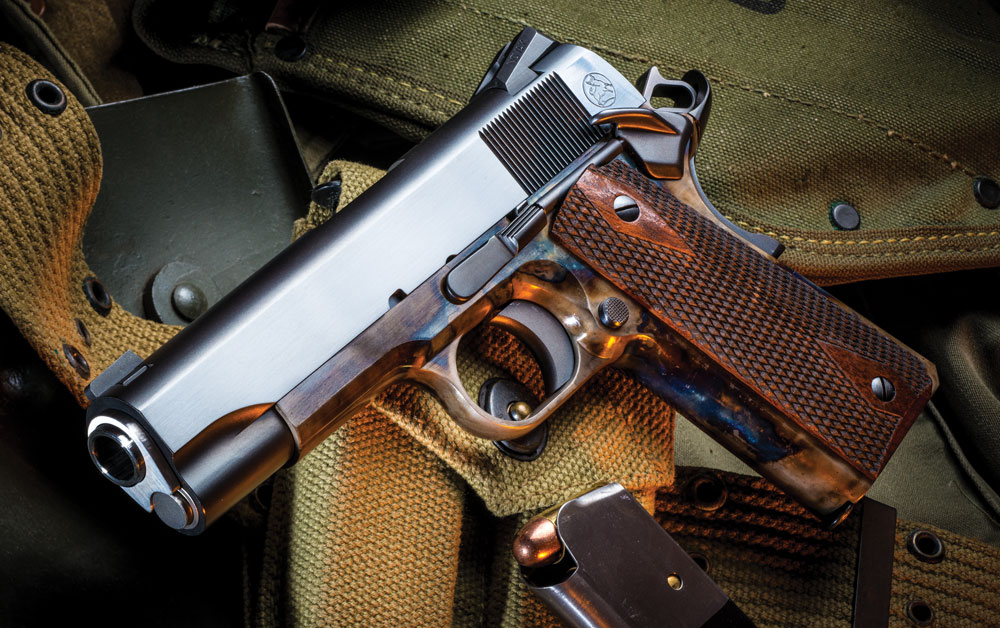
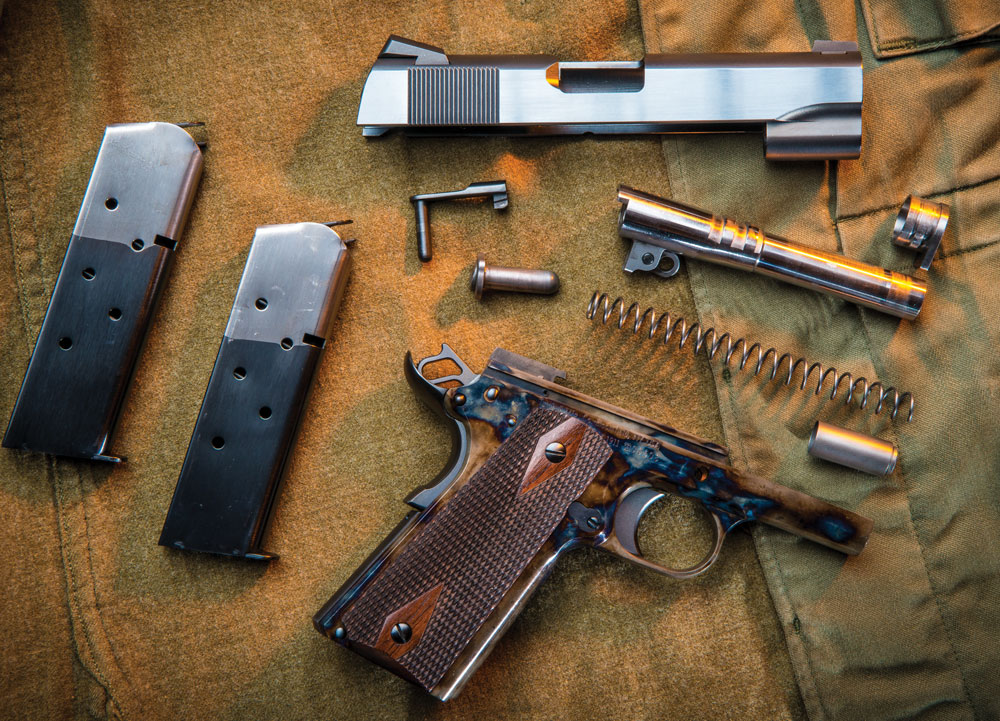
Turnbull 1911 Heritage Edition Commander. Photo by Alex Landeen
The Turnbull 1911 Heritage Edition Commander is a masterpiece that weds restoration-grade artisanship with new gun production.
Photo by Alex Landeen
For decades, Doug Turnbull has built a lasting reputation as the premiere gun restoration master. His New York-based company, Turnbull Restoration & Manufacturing Co., has turned thousands of worn and tattered relics into gallery-worthy works of art, many christened with the color case-hardening, exquisite engraving and charcoal bluing that’s become synonymous with the company name. He didn’t invent these techniques—he just perfected them.
Turnbull’s newest introduction, the Model 1911 Heritage Edition Commander, demonstrates what can be accomplished when the mindset of the restoration process is applied to the production of a new firearm. The Commander, which will be featured at the 2016 SHOT Show, is a follow up to the original Heritage full-size 1911, introduced in 2014. As Turnbull himself said, it’s all about attention to detail.
“The idea with the [Model 1911] Heritage Edition was to take the heritage of the old guns, with the historical finishes, the color case-hardening and the charcoal bluing, and bring that into new manufacturing,” Turnbull said. “The result is a work of art.” Gallery worthy it is, but range weary it is not.
“That’s probably one of the things we hear most, ‘That gun is too pretty to shoot,’” Turnbull said. “But we always tell people, ‘These guns are works of art, yes, but they’re meant to be shot. Shoot it. Enjoy it. They’re meant to be used.’ Once people do shoot the gun, they’re impressed. It’s not just for looks.”
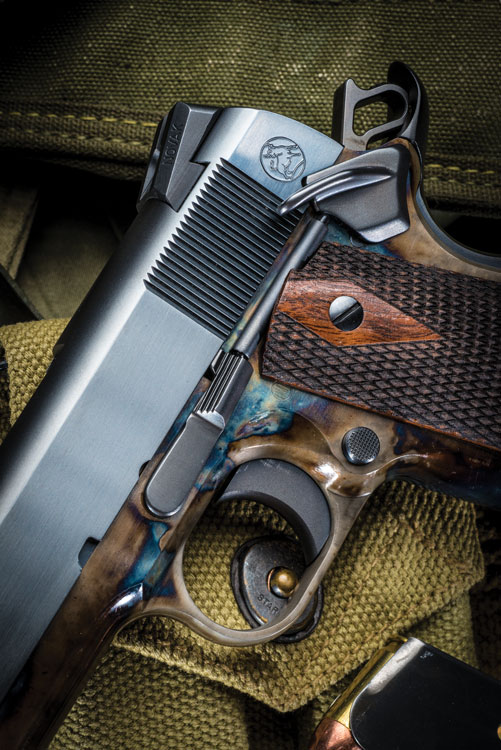
The Heritage Commander ships with twin two-tone magazines and features American black walnut double diamond checkered grips. By Alex Landeen
Built for Looks, Built to Last
As good as it looks—and yes, it looks damn fine—the Heritage Edition Commander is, as Turnbull said, made to shoot. The gun features a forged frame and slide and is CNC machined to meet the strictest specifications and tolerances. All parts are fit by hand, tested, hand polished and feature roll marking, charcoal bluing and color case-hardening. With an expert engraver on staff, Turnbull also offers customized engraving for those so desiring.
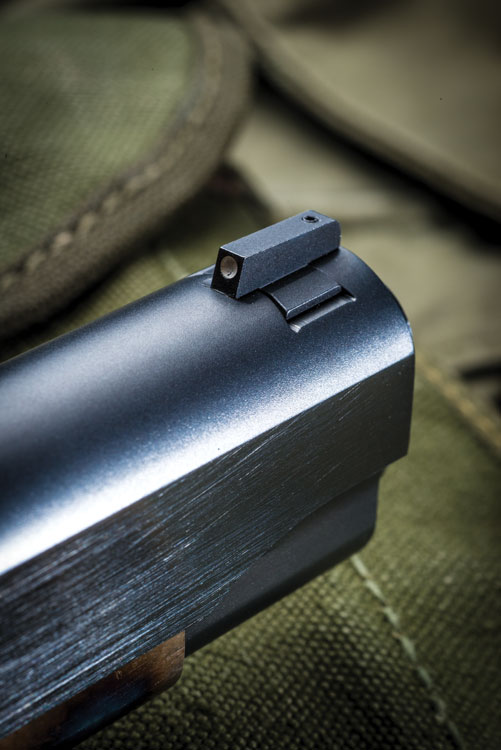
The Heritage Commander features Novak sights. By Alex Landeen
The Commander also features Novak dovetail-style, white three-dot sights and double diamond American black walnut checkered grips. The solid one-piece trigger is set between 4 and 5 pounds and, as range testing verified, makes for a highly accurate and enjoyable handgun to shoot.
In hand, the Heritage Commander has the smooth, ergonomic feel of a custom gun, matching the elegant look of a masterpiece. The thumb safety is easily engaged or disengaged without the need for multiple fingers and a hernia-grade effort, and the slide functions like an already broken-in gun. Disassembly is a cinch thanks to the hand-fit parts. The gun ships with a nice Turnbull case and a pair of two-tone magazines.
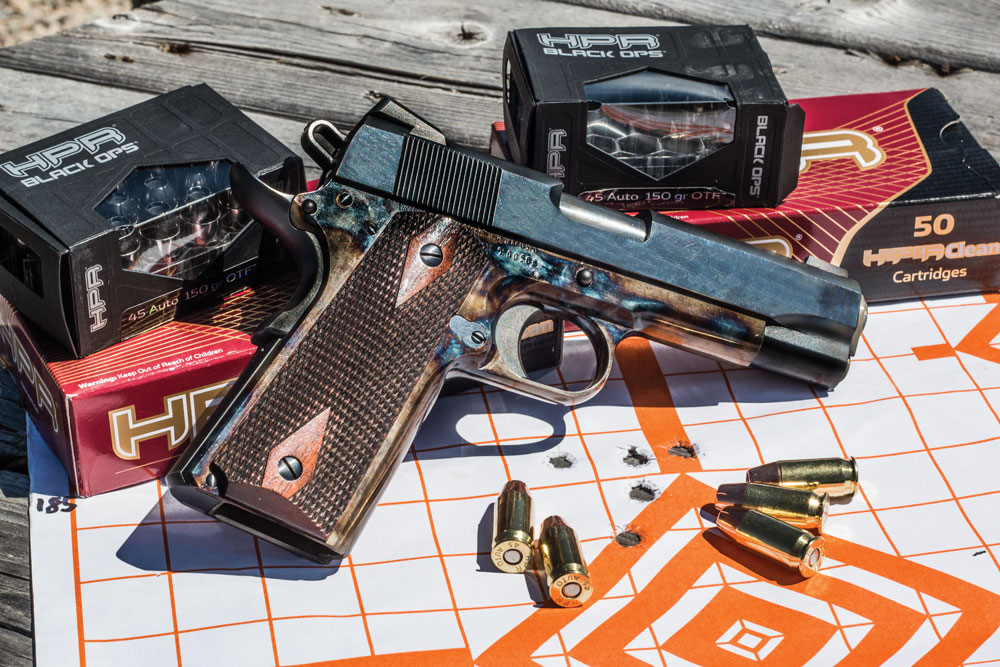
At the range, the Commander was tested with three different loads from HPR: the 230-grain jacketed hollow point (JHP), 185-grain JHP, and the 150-grain Black Ops open tip frangible (OTF). Testing was conducted at 25 yards from sandbags.
Group averages were taken from five-shot groups. There were no functionality issues with the handgun, which has a price tag of $2,850. The best overall test group was 1.74 inches from the 185-grain JHP, which also averaged 3.33-inch groups overall. The 230-grain JHP had a best group of 2.5 inches and an average of 3.17 inches. The lighter 150-grain OTF produced a best group of 3.28 inches and an average of 4.06 inches.
Photo By Alex Landeen
Parting Shots
The first handgun I fell in love with as a kid was my dad’s Colt Combat Commander that he’d bought off an old retired sheriff. Since then, I’ve had a thing for the 1911. Turnbull’s Heritage Edition Commander is the epitome of everything good about the 1911. It’s elegantly designed, artistically crafted and functionally flawless. It’s as accurate as it is beautiful, and it embraces the rich tradition of the old while putting forth something breathtakingly new. Simply put, it’s the kind of gun you can’t stop staring at…and can’t stop shooting.
This article appeared in the Fall 2015 issue of Gun Digest the Magazine.
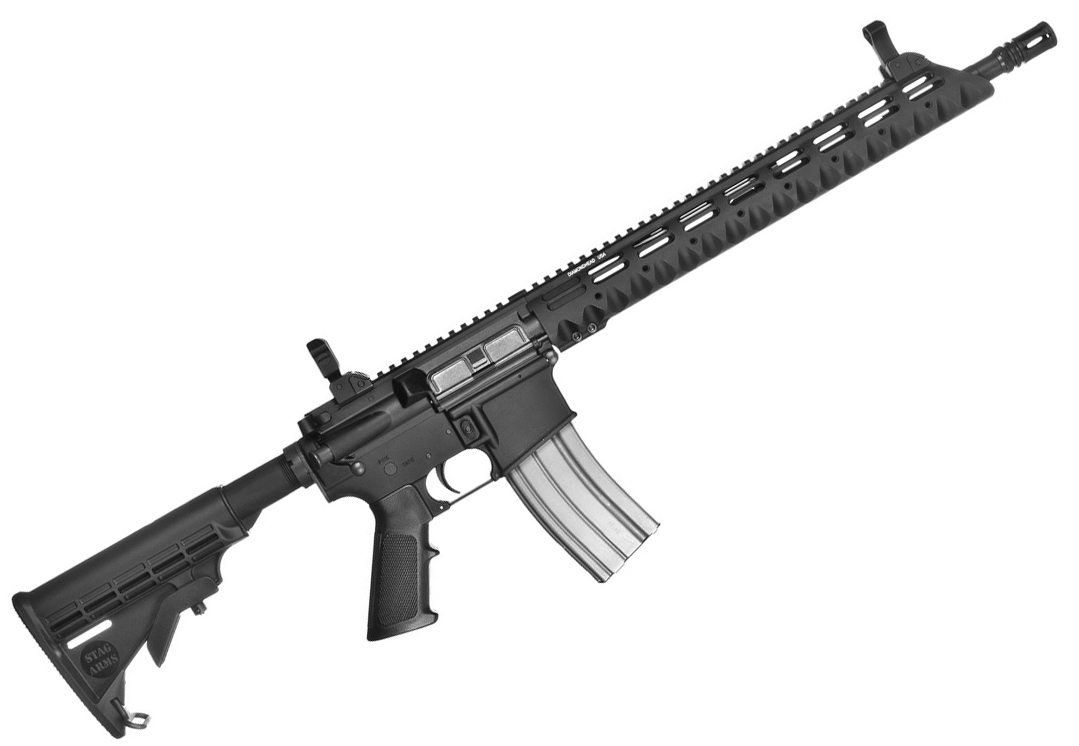
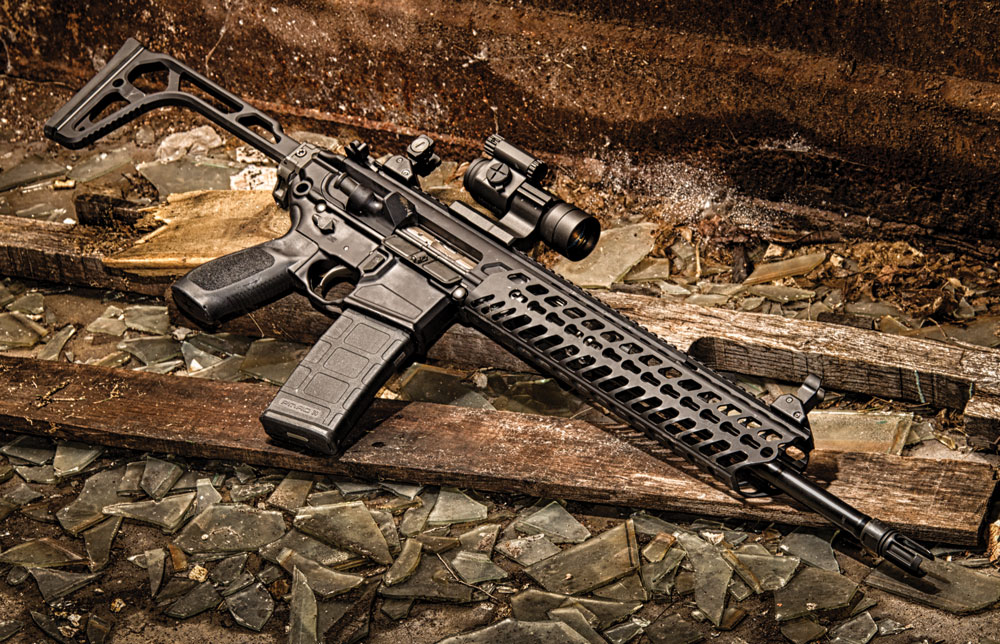
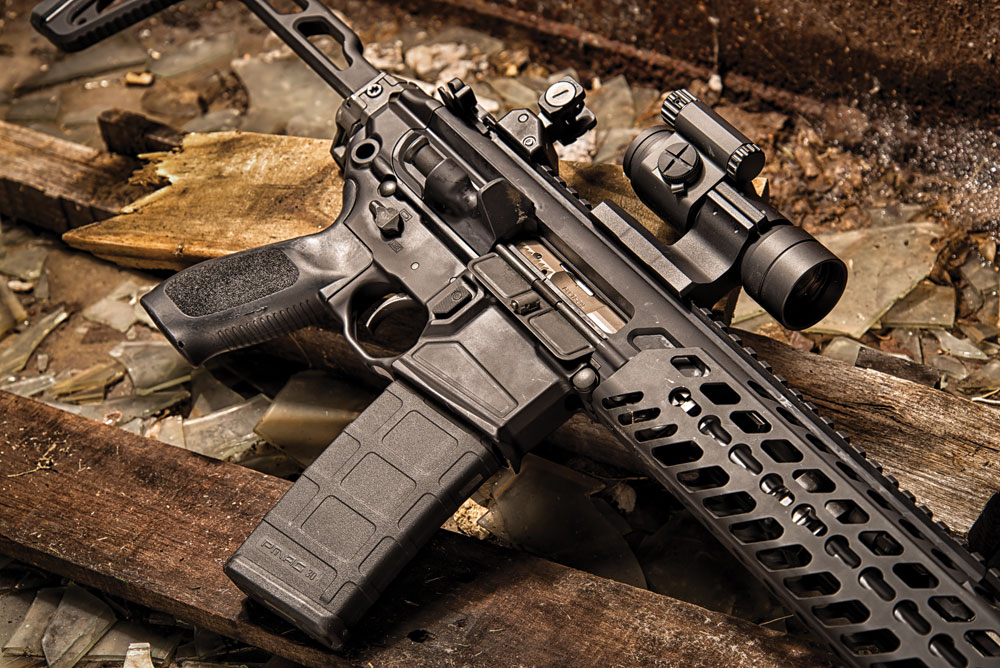
The Model 3T, one of six Stag models now available in .300 Blackout. Photo Stag
Aside from 5.56/.223, AR-15 calibers come and go. But as times goes on, one particular round appears to be building some staying power.
The .300 Blackout has become more and more commonplace in gun makers’ catalogs. And recently, the eminently suppressible round got a big boost from one company, who has blacked out a good selection of its lineup.
Stag Arms recently announced it’s offering its 16-inch-barreled ARs chambered in the relatively new round. In all, this will include the Connecticut company’s Model 1, 2, 2T, 3, 3T and 3T-M series of rifles.
Choosing one of the carbines in the .30-caliber round won’t blow apart your pocket book; it only costs an additional $50 over the asking price of each model. Presently, that means the prices of the .300 Blackout range from $1,015-$1,205.
Each of the models have a number of different features, especially when it comes to the handguard they are outfitted with. But they also include a number of characteristics that are common to all the new .300 Blackouts.
Along these lines, the most notable is all the chrome-lined 4140 steel barrels have a 1/7-inch twist rate. This faster twist helps the barrels stabilize the large 220-grain bullets often found in subsonic .300 Blackout rounds. All of the barrels also have 5/8×24 muzzle threads, making them compatible with most rifle suppressors available today.
This is the second move Stag has made toward the .300 Blackout, with the company offering complete upper receivers earlier this year.
Weatherby’s new hot shot, the 6.5-300 Weatherby Magnum.
Busy days in Paso Robles Calif. Well, at least for one of the town’s most famous residents.
In addition to Weatherby redesigning its flagship rifle — the Mark V — the manufacturer also released a new round in recent weeks. This is big news, in one respect, due to how long it’s been since the company expanded its ammunition catalog. For the record, it’s been around two decades.
There is, however, much more to the freshly unveiled 6.5-300 Weatherby Magnum than just its place in the company’s history. There is also a little issue of where the cartridge sits in regards to other red-hot rifle ammunition.
In short, it is perched at the top. In fact, the new round — built on a necked-down .300 Weatherby Magnum cartridge — is the fastest commercial 6.5mm round on the market.
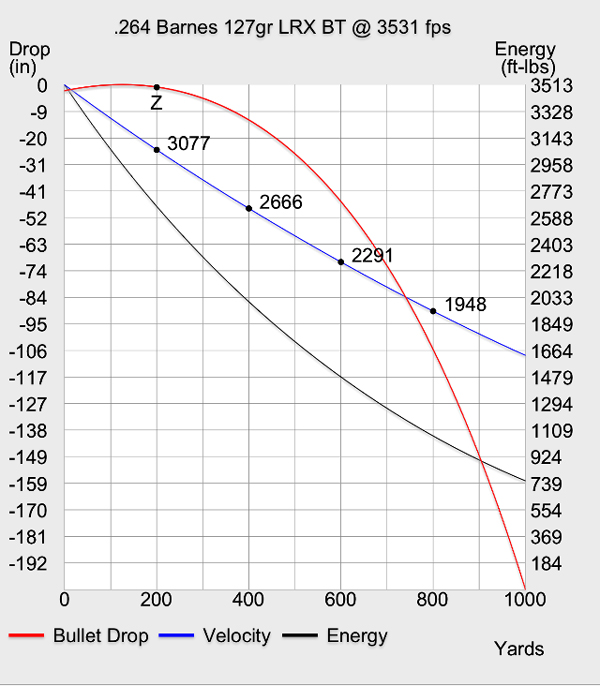
How fast, you might ask? Well, the company is introducing three cartridges, each with a muzzle velocity well north of 3,300 fps:
127-grain Barnes LRX — 3,531 fps
130-grain Swift Scirocco — 3,475 fps
140-grain Swift A-Frame — 3,395 fps
To give some perspective, the 127-grain round has a maximum point blank range (MPBR) of 0-305 yards on a 5-inch target with the rifle scoped in at 200 yards. And the bullet has more velocity at this particular MPBR than the .260 Remington produces at the muzzle.
This ballistic chart, created on the Ballistics App, shows the velocity and energy potentials of 6.5-300 Weatherby Magnum with it’s hottest commercial round.
Weatherby offering a sizzling 6.5mm cartridge is of little surprise, given many companies have recently turned their attention to the ballistically gifted caliber.
But, in all actuality, this isn’t the California company’s first rodeo with a 6.5-300. The company’s founder and iconic wildcatter Roy Weatherby produced at least two rifles for the round, but never took the next step to making it a commercial endeavor.
Obviously, the blistering round has the potential to eat barrels more quickly than most ammunition. But that’s not the only point that could potentially leave interested parties howling. Presently, Weatherby has a fairly steep price on the 6.5-300’s ammunition — $95 for a box of 20 or $4.75 per round.
Weatherby is chambering three of its rifles for the round — Accumark (MSRP $2,300), Accumark RC ($2,700) and Mark V Ultra Lightweight ($2,300).
The Weatherby Mark V has received its first redesign since its introduction in 1958.
The Weatherby Mark V has gone though its first redesign since the rifle was introduced in 1958.
While Weatherby produces a wide line of firearms and ammunition, there is one product that tends to reign supreme — the Mark V.
Since its introduction in 1958, the rifle has been the apple of both hunters’ and marksmen’s eyes. Of course, it’s the firearm’s high functionality — along with Weatherby’s peppy cartridges — that have won it accolades.
With a design that has won renown for more than half a century, it seems like there’s little to improve on the Mark V. But don’t tell that to the designers and engineers at Weatherby, who recently endeavored to make the rifle a bit more perfect.
Firearms purists need not panic, however. Weatherby has not gone the way of New Coke with the Mark V. Instead, it’s refined a few of the rifle’s curves and manufacturing processes; and it’s tacked on one new feature that is certain to enhance the overall function of the gun.
To that final point, Weatherby has developed and added a new adjustable trigger for the line of rifles. The company doesn’t list the top end of the LXX trigger’s pull weight, but lists the basement at a curt 2.5 pounds.
And the ability to dial the pull weight isn’t the only refinement with Weatherby precision grinding the contact surfaces for a smooth pull. The company also widened the trigger itself to create more contact surface with the finger, thus giving shooters more control over the shot.
The most noticeable refinements on the new Mark V, though, are those made to the stock. The rifle has a slimmer, more graspable forend, which gives the gun a more streamlined appearance. Its grip has also had material removed to reduce its diameter and has a slight right-hand palm swell. These stock modifications make the rifle lighter, no matter what version of the Mark V.
A couple of other notes on the new the Weatherby Mark V, it has a hand-lapped barrel, and the company guarantees it of sub-MOA accuracy. The line of Mark Vs start at $1,700 (the Weathermark) and have MSRPs that go up from there.
Not a lot of revolvers make what I consider great nightstand or full-blown, apocalyptic-scenario sidearms. Those that do are double-actions in .357 Magnum caliber, with 4- to 6-inch barrels. Much as I love the bigger .44 and .41 magnums, they are just too hard for the average shooter to shoot well and shoot quickly. Good medium-size, steel-frame revolvers in .357 Magnum are powerful, easy enough to shoot even with full-house loads, accurate, and reliable. Here are a few of the best.
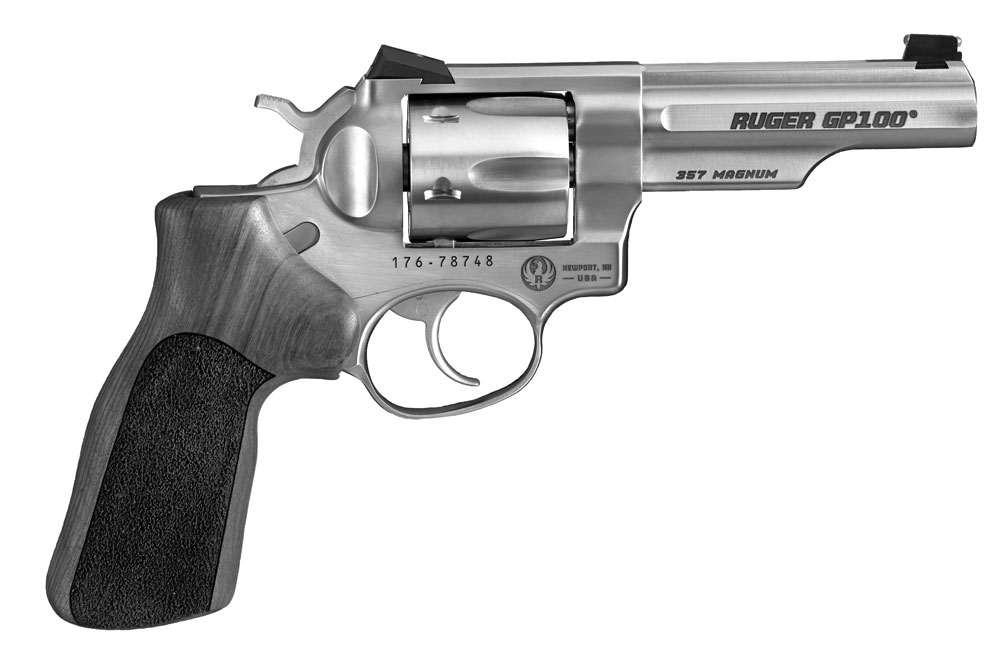
Ruger GP100
Overbuilt for pure durability, the GP100 will take as many full-pressure magnum loads as you care to feed it without issue. One of the heavier mid-size double-action revolvers, it’s easy to shoot because that weight tames recoil. Triggers can be heavy and sometimes a bit rough—if you purchase one and the trigger doesn’t smooth up within 500 rounds or so, you may want to consider having a professional trigger job done.
Capacity is six rounds, and weight is a hefty 40 ounces. Like most revolvers, GP100s don’t have a light rail, so pair it with a good tactical flashlight. Though suggested retail for the blued model is nearly $700, and the stainless model tops $750, street price is usually much lower. It’s a lot of gun for the money.
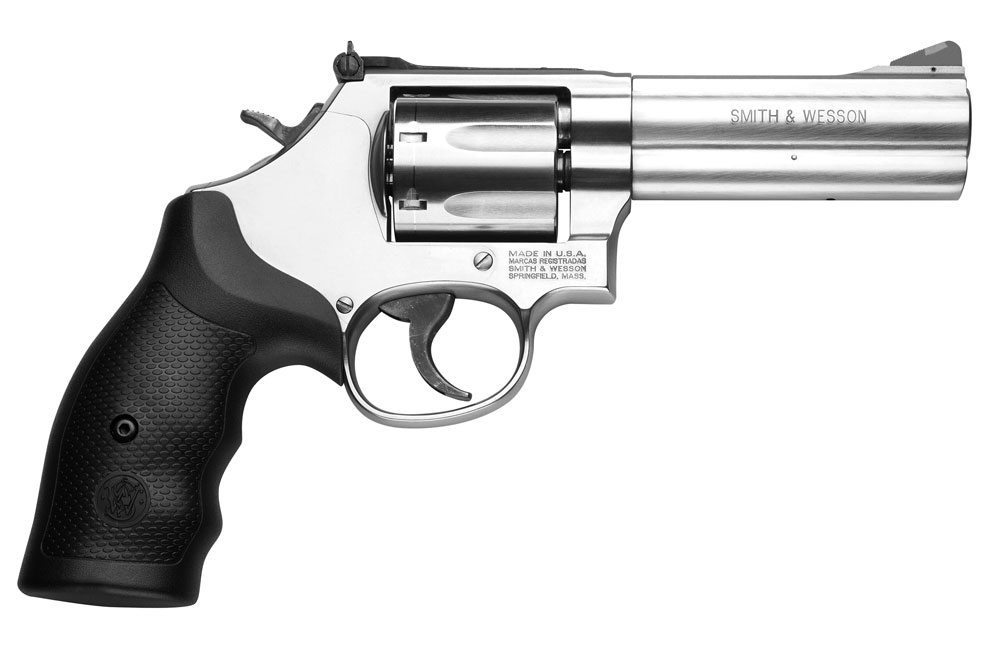
Smith & Wesson Model 686 Plus
There are those who would disagree, but I consider the S&W 686 Plus to be arguably the single most versatile, ergonomic .357 Magnum revolver available. The dead-reliable actions are smooth, trigger pull is crisp and clean, and they are typically very accurate. Add to that the “plus” feature—an additional round in the cylinder, making it a seven-shooter—and you’ve got a fantastic all-around double-action revolver.
All 686 models are constructed of stainless steel, and are robust and durable enough to pound nails with and then go outshoot your buddies at the local bowling pin revolver match. Weight of the 4-inch model is just over 38 ounces. Paired with a good tactical flashlight, it will serve yeoman’s duty on your nightstand. They aren’t cheap: suggested retail price is $849. The only double-action revolver that could possibly be better is its suped-up, combat-configured sibling, the S&W M&P R8.
Smith & Wesson Model M&P R8
This is a state-of-the-art fighting revolver, and much as I love the slightly smaller L-framed model 686, the N-frame, eight-shot double-action M&P R8 is a better personal-protection gun. The “R8” designation indicates characteristics vital to its superiority: a light rail machined into the barrel shroud, and eight-round capacity.
Designed from the ground up for duty carry and combat, the eight-shot cylinder is cut for moon clips (which allow shooters to reload very quickly), but functions just fine with loose rounds too, courtesy of the rimmed design of the .357 cartridge. Built on a scandium alloy frame with a stainless cylinder, the M&P R8 is light—only 36 ounces— and is completely finished in matte-black.
I once ran a series of rather challenging tests on an M&P R8, and it performed impressively in every department. One of the most memorable was the series of 100-yard groups I fired with a handgun scope mounted; they measured between 3.5 and 5.0 inches with a variety of ammo—very good accuracy indeed.
Pushing the high $1,200s, it’s not cheap, but it will be accurate, smooth, and tough. Get a handful of moon clips for it, learn to use them, pair it with a good light such as SureFire’s X400, and you’ll have one of the most unstoppable nightstand and SHTF guns anywhere.
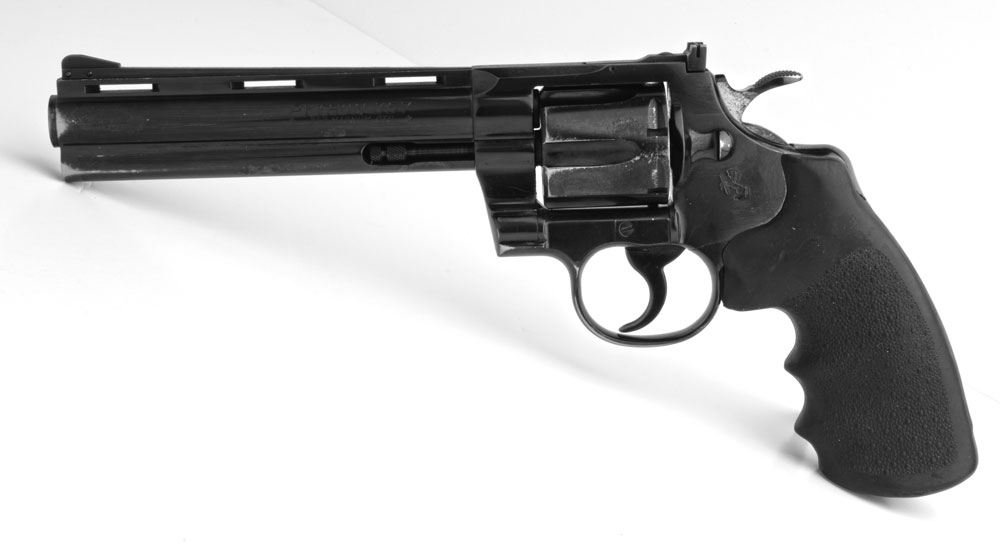
Colt Python
Known for extraordinary shootability and ultra-smooth actions, the Colt Python is a fighting revolver with history and panache. Built like a Swiss watch, Pythons are a pure joy to shoot, and typically prove both reliable and accurate.
The Python has two Achilles’ heels. The first is the flat mainspring, which gives it its legendary smooth action but is more prone to breakage than the coil springs in competing designs. The second is an unfortunate byproduct of time: Pythons haven’t been made for many years; most are coveted and protected to the point where they are not shot much any more, and as a result, gunsmiths adept at tuning, timing, and repairing them are becoming few in number.
If you drive a classic convertible, carry a pocket watch, and smoke a pipe, your only real choice (aside from a vintage Colt 1911 semi-auto) is a Colt Python. They cost, but they bring refinement and charisma to the defensive revolver world.
Part 1 covered the best semi-auto choices for the nightstand.
Professional hunter Ron Spomer displays the craftsmanship, function, accuracy, beauty and massive firepower of a .416 Rigby Mauser dangerous game rifle built in 1938.
Introduced by John Rigby of London, the .416 Rigby is a good example of a sound design that refuses to die. Until quite recently, fewer than 10,000 rifles in this caliber had been made. However, most of the older rifles in that chambering are still in use. In 1992, Ruger added this cartridge to its rifle product line. Ruger thus increased the total number of guns in this chambering by 10 percent in one year. The company continues to produce it. In 1989, Federal Cartridge Co. added the .416 Rigby to its Premium product line. In so doing, Federal became the first major American manufacturer to offer this classic African cartridge. By their actions, both Ruger and Federal took away much of the momentum from the new .416 Remington Magnum cartridge. Their efforts in reintroducing the .416 Rigby have been successful, and sales remain brisk. This only goes to show that not all new product success stories use totally new products.
General Comments:
The .416 Rigby is today a great favorite of African game wardens and professional hunters alike. It is an excellent choice for the hunter who wishes to take only one rifle to Africa. Federal ballistics are identical to previous British loads, so the point of impact with express sights will be the same. Breech pressures of the .416 are only about 40,000 CUP, in order to avoid sticky extraction exhibited by high pressures on very hot days. This is strictly good sense, based on many years of African experience. Remington has chosen to load the .416 Remington Magnum to pressure levels of 50,000 CUP, which makes one wonder if extraction at very high temperatures has been adequately tested, and handloaders should resist the urge to improve the .416 Rigby ballistics for this reason.
Cartridge Notes provided by Cartridges of the World, 14th Edition.
Pairing a modular design with top-class reliability, the new SIG Sauer MCX is ready for anything.
Formally introduced ahead of the 2015 SHOT Show in Las Vegas, the MCX was built to be a compact and lightweight, close-quarters battle (CQB) suppressed rifle optimized for the .300 AAC Blackout cartridge. Additional requirements for the platform included a modular design with a quick-change barrel system for easy interchangeability of calibers and barrel lengths, traditional AR-style controls for ease of use, the ability to utilize a folding stock, and a gas system that provided unparalleled reliability. In early 2015, SIG commercially released the MCX and made it available in three variations—a semi-auto rifle, a short-barreled rifle (SBR) and a pistol configuration.
With a weight hovering around 6 pounds for all three variants and an overall length of 35.75 inches for the rifle (28.75 inches and 26.625 inches for the SBR and pistol versions, respectively), the engineers at SIG excelled in the “compact” and “lightweight” categories. What’s more impressive, however, is that the company was able to meet all the other design goals as well.
Naturally, reaching these objectives doesn’t happen overnight. The MCX is the result of a rigorous development process on the part of SIG engineers.
“It was at least a 3- to 3½-year development that we’ve been working on the gun full time,” SIG Sauer rifle manager John Brasseur said. “We had probably about a year’s worth of tossing around what the spec was and nailing that down—exactly what would satisfy the customer and what they were looking for. Then it was 3 to 3½ years non-stop—conducting an engineering analysis and making a prototype, testing it and verifying it and going back and forth.”
Multiple Calibers, Multiple Configurations
Able to transition between three calibers and hundreds of unique configurations, the MCX can take on any task. Photo by Jeff Jones
One of the most impressive features of the MCX is its modularity. In addition to the .300 BLK it is primarily designed for, the MCX can easily configure to chamber and fire 5.56 NATO/.223 Rem. and the Soviet 7.62x39mm. The MCX features a lightweight aluminum KeyMod handguard that removes easily to reveal a simple, quick-change barrel system that consists of two bolts holding the barrel in place. One of the bolts helps push the barrel into the receiver, while the other tightens for a sure fit. Alternating between .300 BLK and 5.56 NATO/.223 Rem. is as easy as swapping out barrels and the included operating rods; transitioning to 7.62x39mm adds a simple bolt face change to the process.
The op rods are designed to adjust the positioning of the gas block to ensure reliable performance with the given cartridge. The 5.56 NATO and 7.62x39mm op rods create a piston system that has a length similar to a carbine-length gas system in standard ARs, while the .300 BLK op rod produces a length similar to a pistol-length gas system, which is necessary for subsonic loads. Barrel twists are 1:6 inches for the .300 BLK, 1:7 for the 5.56 NATO, and 1:9.5 for the 7.62x39mm.
The MCX rifle reviewed for the magazine came with a long KeyMod handguard, but this can be replaced with a shorter variant, or a suppressor-width option if the user chooses. The short KeyMod handguard comes standard on SBR and pistol variants, while the suppressor-width option places the silencer inside as opposed to forward of the handguard. A carbon fiber choice is also listed on SIG Sauer’s website.
Because of its design requirement to utilize a folding stock, SIG’s engineers had to remove the buffer tube found on traditional ARs. To accomplish this, they developed a unique recoil assembly that places the recoil springs above the bolt carrier group (BCG). While this system offers other benefits, such as an altered recoil impulse and increased durability, it also removes the restriction of using a buffer-tube-style stock. SIG is offering several different options, but the rifle reviewed for the magazine came equipped with the company’s low profile, skeletonized SAS folding stock, which is standard on the rifle version of the MCX.
A 16-inch or 9-inch barrel is available on factory models, with the rifle version utilizing the 16-inch barrel and the SBR and pistol variants featuring the 9-inch barrel. However, Brasseur said SIG will also likely offer 6¾-, 11- and 14-inch barrels as aftermarket options. There are also two different color options, black and Flat Dark Earth (FDE).
“I think we went through one day and we did all the different variations that we could do,” Brasser said. “Just with the MCX we were over 250, I think, by the time we got done.”
With the exception of the absent buffer tube, the MCX lower is basically identical to a standard Mil-Spec lower, which means users can replace SIG’s proprietary pistol grip or the Mil-Spec trigger as their preference dictates. Because it uses a Mil-Spec lower, shooters can also transfer their MCX upper to any standard AR lower and convert it to an MCX with the help of a SIG MCX Stock Kit.
The MCX’s innovative and reliable auto-regulating gas-piston system sets it apart from other rifles. Photo by Jeff Jones
The MCX is certainly remarkable, but modularity means nothing if the firearm isn’t reliable across the different configurations. One of the biggest challenges for SIG’s engineers during the development of the MCX was creating a gas system that could not only handle .300 BLK, 5.56 NATO and 7.62x39mm, but also perform when firing super and subsonic loads from a variety of different barrel lengths, and with or without a suppressor.
“Those variations in barrel length and caliber create huge issues for gas systems and consistency with different ammos—never mind when you go suppressed and unsuppressed,” Brasseur said. “Creating a gas system that was robust and would function with all ammos with and without a silencer, in multiple barrel lengths, was a feat in itself.”
To produce such a system, the engineers at SIG used various high-level modeling systems to essentially “map out” the pressures going down and also out of the barrel, as well as the energy needed to reliably cycle each round.
“We would do pressure testing on high-impulse rounds and low-impulse rounds and get different pressure curves for the different ammunition down the barrel,” Brasseur said. “And then [we] were able to take that map and apply that to the gas system and see dynamically what was happening and if it would function the gun.”
The result of all this testing and development is the gas-operated, short-stroke piston system that makes the MCX so unique, and so reliable with any load. Of course, there are other factors that contribute to long-term reliability and durability. On a rifle such as the MCX, which was required to have an upper receiver that could fire up to 50,000 rounds before failure, it is important for parts to last. The best way to ensure this is to use robust parts that can handle lots of abuse. For this reason, SIG used a replaceable steel cam-path insert instead of the traditional aluminum one to avoid excessive wear. The charging handle latches move over steel pins as opposed to aluminum pins, and the interchangeable feed ramp insert is also made of steel. In addition, all of these parts—along with the forward assist—are replaceable for easy repair.
Barrels for the SIG Sauer MCX are hammer forged and receive a nitride treatment for increased barrel life. The MCX also utilizes a fully locked and closed rotating bolt system with a bolt and carrier that have a Nickel Boron coating for enhanced durability.
Range Tested
The MCX offers capable accuracy for a combat-inspired .300 BLK. Photo by Drew Warden
The MCX was tested with four different loads. Two of these were supersonic loads; two were subsonic. Accuracy testing was conducted at 100 yards from a bench using a Caldwell Matrix rest. Accuracy was measured on four different five-shot groups for each load, and velocity was measured with a Competition Electronics ProChrono chronograph from Brownells. For short-range target shooting, an Aimpoint ACO and MCX factory-installed, flip-up iron sights were used. For accuracy testing, a Nightforce Competition 15-55x52mm scope was utilized.
Of the loads tested, the SIG Sauer 125-grain Elite Performance supersonic load produced the best accuracy, with an average group of 1.59 inches and a best group of 1.01 inches. The Hornady 110-grain V-MAX supersonic load yielded the best single group overall at 1 inch. Average velocity with the supersonic Elite Performance was 2,189 fps with a standard deviation of 17 fps and an extreme spread of 39 fps. The V-MAX was the fastest, producing an average velocity of 2,369 fps with a standard deviation of 19 fps and an extreme spread of 48 fps.
Parting Shots
The SIG Sauer MCX is without question one of the most adaptable and customizable firearms currently available. It promises shooters the ability to easily transition between three different popular cartridges using supersonic or subsonic loads—with or without a suppressor—and it has an innovative and reliable gas-piston system that makes all of these things possible.
The MCX is primed for user-customization, with ample optics options available courtesy of 17¾ inches of available rail space up top, a KeyMod handguard for accessories, and several unique folding and expanding stock options from SIG. The MCX is a modular, multi-caliber weapon platform that users can transform into whatever they need it to be, and at a price of $1,866, it is also reasonably attainable for many shooters.
SIG SAUER MCX Type: Gas-piston, semi-automatic Caliber: .300 AAC Blackout, 5.56 NATO/.223 Rem., 7.62x39mm Barrel: 16 in., 1:6-in. twist (1:7-in. for 5.56 NATO; 1:9.5-in. for 7.62x39mm) Weight: 6 pounds (5.75 pounds for SBR and Pistol Variants) Handguard: Aluminum KeyMod Stock: SIG SAS folding stock Grip: SIG Sauer proprietary grip Trigger: Mil-Spec AR trigger MSRP: $1,866 Manufacturer: SIG Sauer; SigEvolution.com
This article appeared in the Fall 2015 issue of Gun Digest the Magazine.
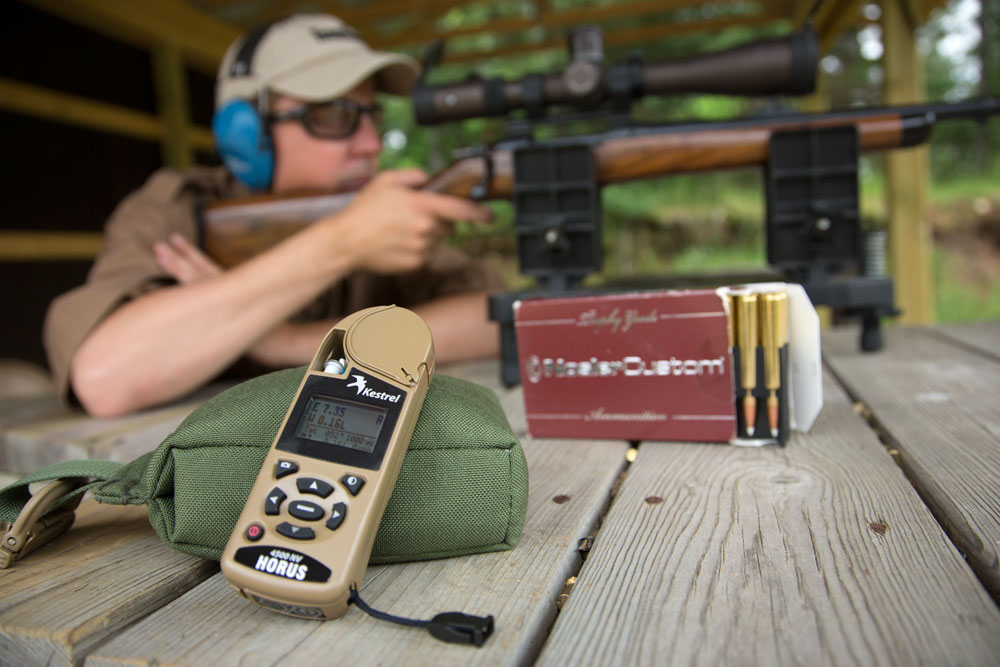
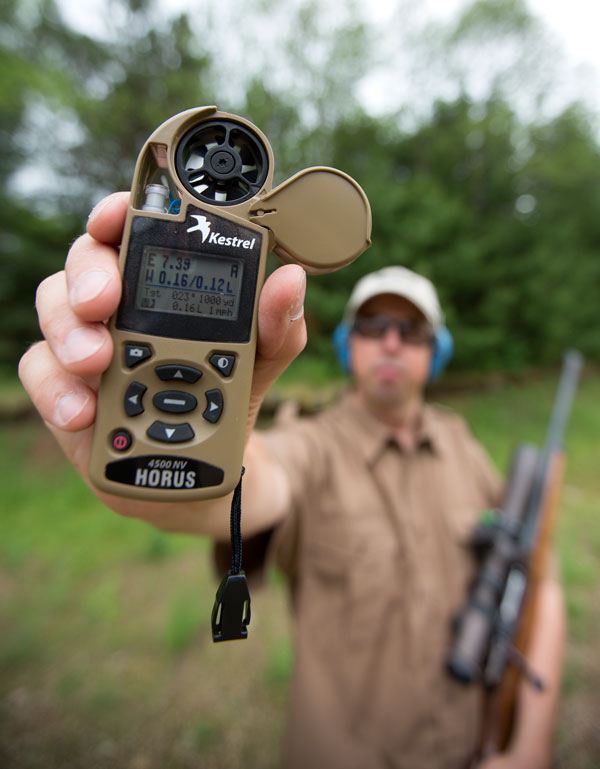
The Kestrel 4500 NV takes the guesswork out of shooting so you can concentrate on making the shot at extended distances.
The Kestrel 4500 NV from Nielsen-Kellerman is a do-it-all weather meter with full on board ballistics that takes the guesswork out of shooting, allowing you to dial in precisely to make truly long-range shots.
I’m on the bench, range to target is known. Peering through the scope, little wavy thermal lines rise up from the earth, dancing like gypsies in a carnival caravan. Forty-five degrees, I think to myself, noting the thermals’ angle to earth. I see there is moderate leaf action on the trees and I estimate the wind: 10-15 miles per hour full crosswind value. Click, click. Send it.
And it’s a miss.
Wind estimation is both a science and an art and it can be a tough nut to crack. Super bullets can help buck the wind but they will only get you so far. “No matter how well your bullet resists wind,” writes Wayne van Zwoll in Mastering the Art of Long-Range Shooting, “hitting at distance depends on your ability to predict drift.”
One way to predict drift is by good ol’ fashioned wind estimation techniques in the field. Another way is to use a calculator. And the gold standard of calculators, the one you must have if you want to ratchet up your long-distance shooting game, is the Kestrel 4500 NV weather meter with built-in ballistics (Horus Vision or Applied Ballistics) software.
Nothing compares when trying to place a tiny super-sonic missile on a pie plate ten football fields away. Indeed, that’s a challenging enough feat if you know all the variables, let alone if you’re just guessing.
Features
The Kestrel 4500 NV is a handheld mobile weather station. The unit I tested was the Horus Vision ATRAG model, which provides what can only be described as a staggering amount of ballistic calculation in a tiny package.
Among other things, you can set up and save any number of guns and cartridge combinations. When setting up a new gun, parameters include Muzzle Velocity (MV); Drag Curves or DC (G1, G7); Ballistic Coefficient (BC); Bullet Weight (BW); Bullet Diameter (BD); Bullet Length (BL); Zero Range or ZR (109 yards, 100 meters is default); Bore Height or BH (middle of bore to middle of scope); Rifle Twist (RT); Rifle Twist Direction (RTd); Elevation Unit or eUnit (mil, true moa, shooter moa, click value) and Calibrate muzzle velocity (CMV), a truing feature based on actual observed field data. You can also input inclination and declination—to compensate for angle shooting up or down.
Unless you’re a caveman, you’ll get the hang of the Kestrel’s menu fairly quickly, though admittedly there are a ton of things packed into this device. Speaking of Horus Vision vs. Applied Ballistics, you can order the Kestrel configured with either. Space doesn’t permit a full discussion here of the differences but both programs are completely capable. Stay tuned for further reports on the software differences.
Real-Time Wind Correction
The Kestrel reads wind in real time. Instead of trying to estimate wind by reading the trees or inputting a general or average wind value into a unit based on a meteorologist’s report, the Kestrel measures and updates the firing solution values in real time. The unit displays minimum and maximum wind values while calculations happen behind the scenes—saving time and effort in the field so you can concentrate on the fundamentals of the shot itself.
I was really impressed by the “W>,” or Wind function, which gives you firing solutions based on the cardinal direction—that is, the angle to the wind—you’re shooting. This calculates crosswind, while automatically updating the firing solutions for any angle off of the locked-in direction. To use, just hold in the direction of the wind and “lock it” by using the camera button on the front.
Coriolis Effect
Coriolis, or the effect of Earth’s spin during the time your bullet is in flight, is calculated from the Latitude setting in the Environment menu. Latitude is something you have to enter as the Kestrel cannot measure this. Needless to say, the Kestrel makes adjustment for Coriolis so easy even I can do it.
Range Card
The built-in range card feature is a powerful application in and of itself. You can set the range increments—50 yards is default—and it will spit out your dope, including moving target solutions. The Range Card also delineates transonic and subsonic muzzle velocity at various ranges. It’s amazing how much you can learn about how your loads perform in the real world from this tiny yet very powerful device.
The Range Card even depicts data and holdover solutions for moving targets with target direction (to compensate for wind angles) and target speed. In fact, you can designate individual targets and switch them on or off as you engage them. It includes a slew of variables you can input; just make sure you select “Active” to switch the Kestrel into that specific target mode. And turn off when you go back to general firing solutions.
Dope Aplenty
The Kestrel’s sensors pick up environmental conditions like altitude above sea level, relative humidity, barometric pressure, absolute or station pressure (SP), air temperature and of course real-time wind.
The most confusing aspect of the device relates to pressure and altitude.”Essentially, it does not matter what you set on the weather side for reference alt and reference baro,” said Joe Racosky, Support Engineer with Nielsen-Kellerman. “The ballistics side will always be using the correct number. Ballistic solutions want station pressure, not barometric pressure. Station pressure is the pressure felt at that spot (station) without adjusting it for altitude. This is the same pressure that the bullet feels when fired. So if the user is curious as to what their station pressure is, they can leave the REF ALT to zero. And if the user is curious as to what their current altitude is, they can enter the local barometric pressure as their REF BARO.
“But this has no effect on anything on the ballistics side. And another confusing point for users is that density altitude does not depend on the altitude measurement. DA is from temperature, humidity and station pressure—which it will always use no matter what,” he explained.
Basically, the Kestrel gives you environmental readings if you want or need to know them, but the ballistic solver always reads actual Station Pressure and Density Altitude—automatically generating correct ballistic solutions. So it’s really very simple: Don’t do anything; just trust the Kestrel and you’re on the money.
Ballistic Truing
Tip: If you already use a separate handheld ballistics calculator, check out the Kestrel 1000 windmeter. For less than $75 it’s well worth knowing the exact wind value.
Even if you don’t have a chronograph you can still sync your Kestrel to your gun and load for spot-on use by using the Kestrel’s ballistic truing option. You input all the variables you do know, shoot at the range and measure actual bullet drop. Then simply input your range results to “true” the unit’s data to your gun. This will not only give you the calculated muzzle velocity but will precisely tailor the Kestrel to your actual ballistic situation—what your gun really does in the real world.
Value
Now, you can hold a device in your hand that will not only read the weather and environmental conditions where you are, but also update a ballistics engine finely tuned to your bullet’s performance: giving you information you can use to hit distant targets that are barely visible to the naked eye.
The Kestrel 4500 NV is a steal when you consider everything you’re getting. After having used it, I can’t imagine shooting at really extended ranges without one. It’s like several units in one all working seamlessly together. To my mind, that means fewer gadgets to carry, making me more efficient and allowing me to do my part behind the rifle. The unit grabs the atmospherics, and updates the firing solutions for you. What more do you need?
Conclusion
I’m on the bench again, and the little Kestrel’s impellor is whirring and buzzing in the wind. 7.5 … 9.7 … 11.2 … 8.4. Calculate. A firing solution is on screen. I grab the scope’s windage turret. Click, click. Squeeze the trigger. I look through the wavering mirage, this time not to estimate the wind, but to examine the target. A little black hole is seen, dead center mass. They say knowledge is power. I say knowledge is hitting your target. And that’s no guess.
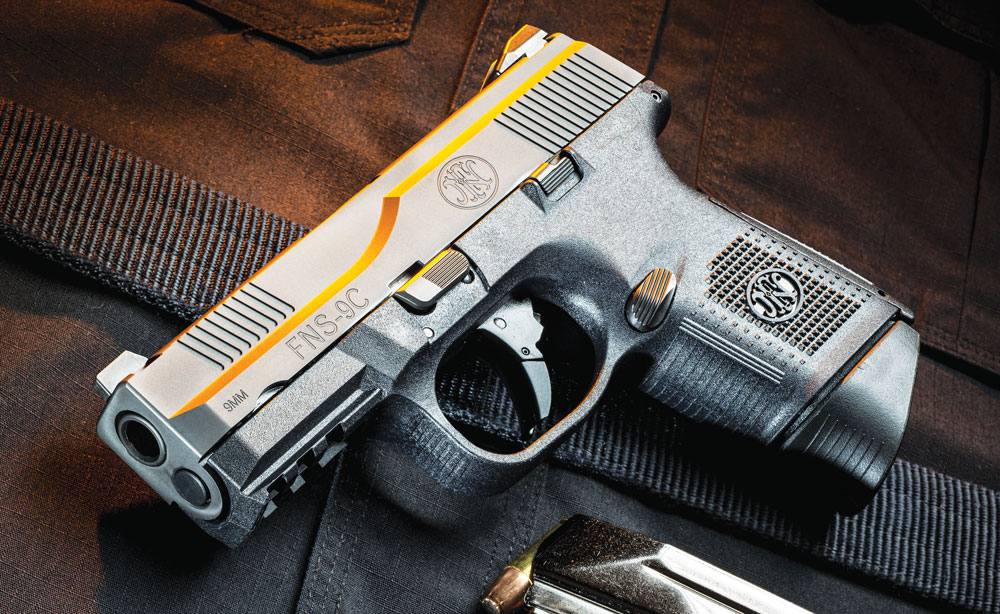
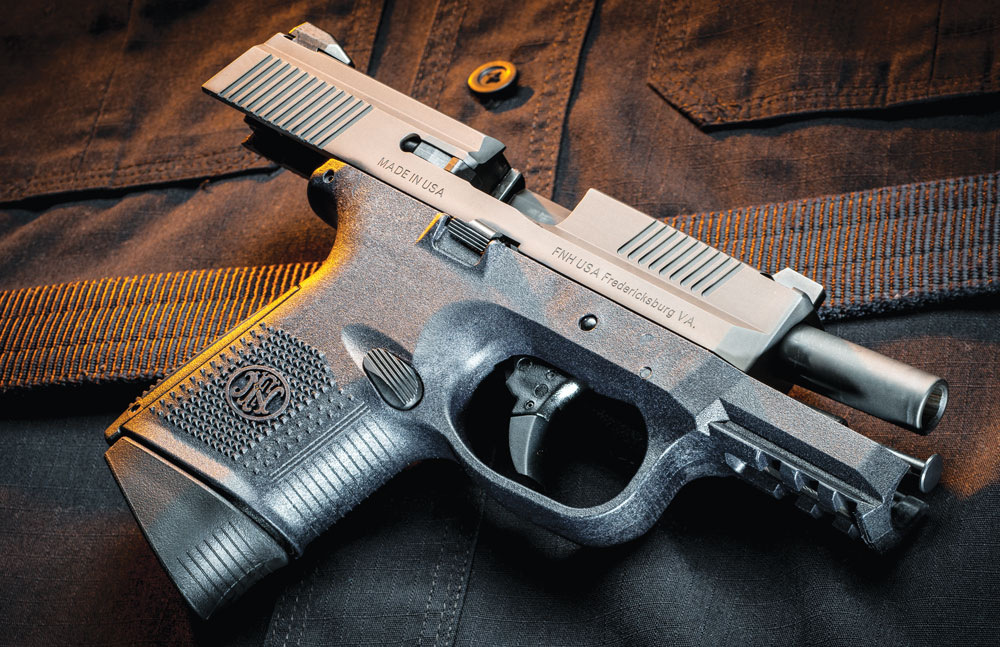
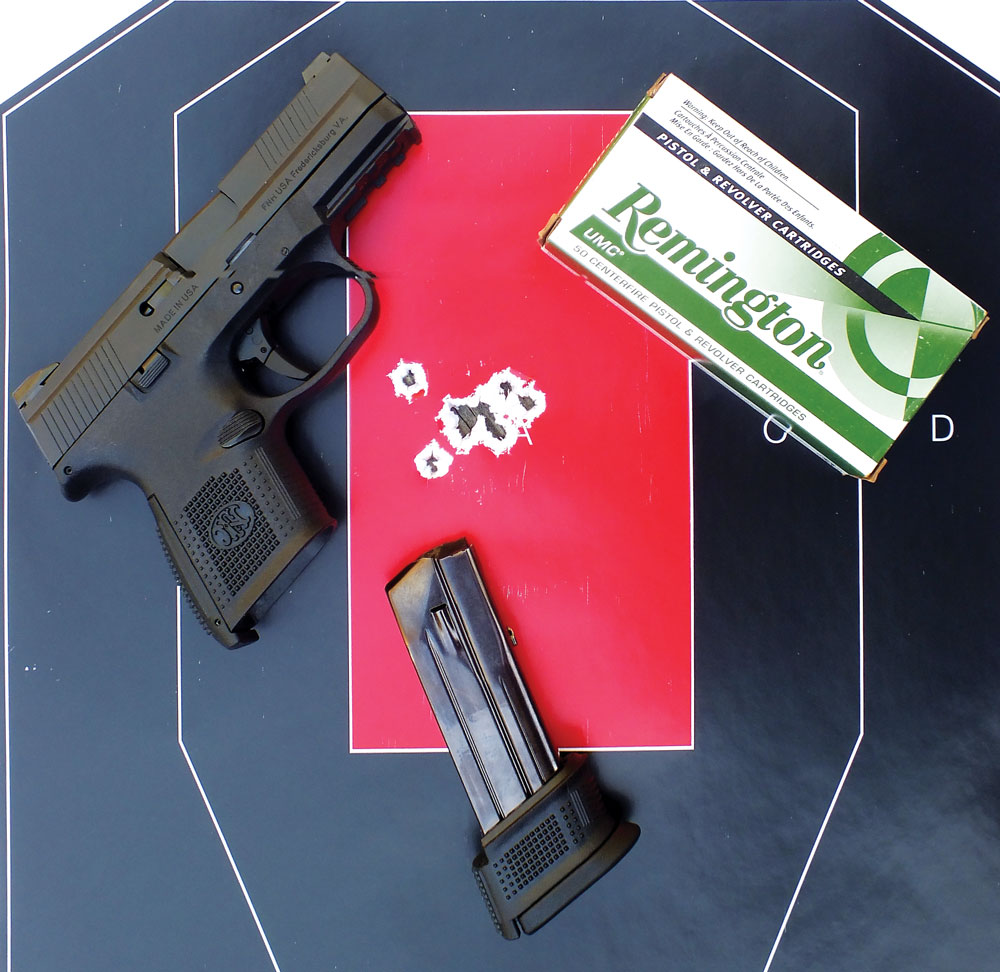
FNH makes a splash in the carry market with its new striker-fired FNS-9 Compact.
In 2011, FNH entered the modern striker-fired pistol market. The FNS fit the mold of the current standard with a polymer frame, two-stage, striker-fired trigger that’s hinged like the Smith & Wesson M&P line. As do most of the duty-style, striker-fired guns, the FNS uses a double stack magazine with a capacity of 17+1 in 9mm and 14+1 in .40 S&W. My friend Chris Cerino, of “Top Shot” fame, used one for a while in 3-Gun matches, and his wife, Michelle Cerino, still does. I recently had a chance to shoot the long slide version with a 5.5-inch barrel and was impressed with how flat shooting it was.
What makes a great duty pistol or competition pistol, however, doesn’t necessarily make a great defensive carry gun—an important fact since the hottest segment of the current firearms market is concealed carry. Carry guns need concealability and comfort in addition to accuracy and reliability. The new compact version utilizes a shorter 3.6-inch barrel and shorter grip frame. It weighs 23.4 ounces. At its thickest point, the ambidextrous slide release is 1.3 inches wide and has a total length of 6.7 inches, making the FNS Compact small and light enough for daily carry.
The shorter grip frame accommodates a 12-round magazine in the 9mm version tested. The .40 S&W version has a capacity of 10+1 with the standard compact magazine. My test gun came in a hard plastic case with three magazines. One is a compact, flat-bottom magazine that provides maximum concealment. The other features an extended base that allows all four fingers on the grip, and the third is a full sized 17-round magazine with an extender sleeve.
The magazine release is ambidextrous, and I found the left side location a bit harder to manipulate than normal. It’s an oval shaped button that’s almost flush; I had to push hard for a magazine drop. I had others try it, and they observed the same. For some reason, I found the right side release easier to access with my right index finger. That’s not a method I normally use, but it was easy with the FNS Compact. Making the release unobtrusive is a good idea for concealment, so I suppose it’s a tradeoff. There are two backstraps to allow for better hand fit. The grip area is covered with little pyramids that provide good grip surface without being obtrusive.
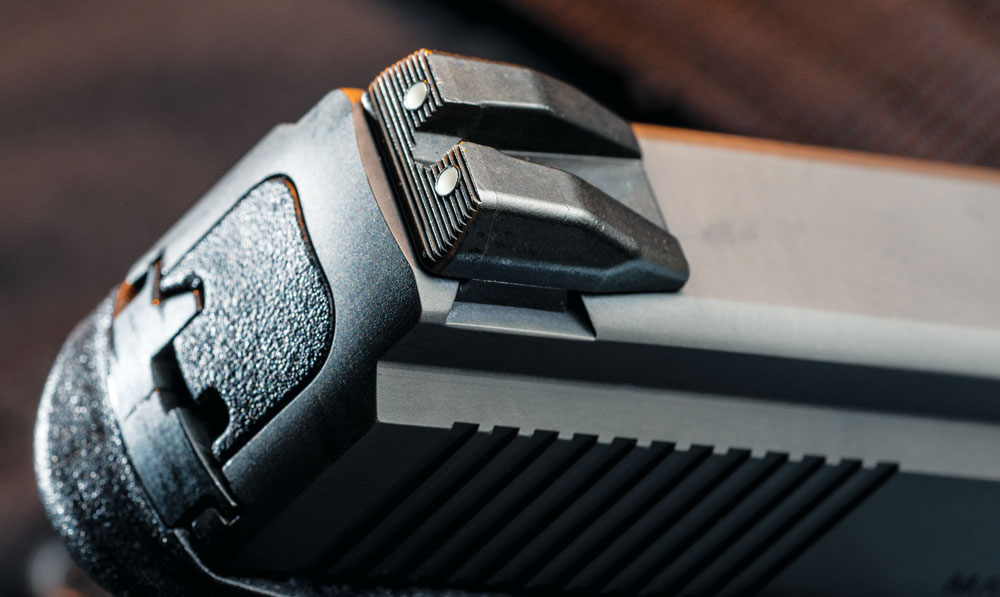
The sights are a three-dot system with both front and rear sights in dovetails, allowing for drift adjustment of the rear for windage. There’s a front rail for lights and lasers and a bit of textured surface on the front of the trigger guard. There are front and rear slide serrations, and the slide is easy to grip and operate. The extractor serves as a tactile and visual loaded chamber indicator.
Every operational feature of the FNS is ambidextrous except the takedown lever, which has no bearing on normal operation. Take down is simple: Remove the magazine and check for clear, lock the slide to the rear, rotate the takedown lever down, release the slide and depress the trigger. The double recoil springs are contained in the guide and easy to remove and replace. It’s one of the easier striker-fired guns to field strip.
Shooting the FNS compact at 10 yards, unsupported, deliberate fire, I managed to put 8 of 10 shots into well under an inch. I called one shot left, and there was another left shot I didn’t call that opened the group up to 1.56 inches, center to center. This is certainly adequate accuracy for a carry gun. I particularly liked the sights, which were bold with a large white front sight dot that almost filled the notch in the two-dot rear. I felt they would be fast and allow precision when needed.
The trigger was on par with other striker-fired compacts, predictable and capable without being too light. My test gun broke at just over 6 pounds—a reasonable pull for a defensive gun. The current belief is that match triggers don’t belong on defensive guns because defensive situations don’t generally require fine motor skills to perform well.
The first stage of the trigger had a bit of a squeaky feel, but the break was positive with only a bit of backlash. Reset was short and positive. Running the plates at 10 yards was easy, with recoil being remarkably comfortable and flat. Magazine changes were fast and easy once I acclimated myself to the magazine release. The slide release is a bit hard to manipulate because it’s rounded at the top and hard to depress.
There are so many excellent guns currently available for the concealed carry citizen. With so many good guns available, the choice comes down to more minor features that the user might prefer. Of course, brand loyalty can also make a difference.
There are major players in the game, but there’s no doubt the FNS-9 Compact is as good as any gun in the category. It has reliability, accuracy and concealability. Whether you choose the mild-mannered 9mm or the more potent .40, the FNS Compact is a great defense pistol choice for the concealed carry citizen.
FNS-9 Compact Caliber: 9mm Luger Capacity: 12 + 1 and 17 + 1 as tested in 9mm Magazines: 3 magazines, one for concealment, one with a finger extension, and one full-sized with an extension sleeve. Barrel: 3.6 in. Sights: Drift adjustable, three dot Frame: Polymer with interchangeable backstrap Slide: Steel Length: 6.7 in. Height: 4.58 in. Weight: 23.4 oz. Options: Standard or manual safety MSRP: $599.00 Website: fnhusa.com
This article appeared in the July 31, 2015 Concealed Carry issue of Gun Digest the Magazine.
Rex Gore — Black Wing Shooting Center, Delaware, Ohio. The youth shooting market continues to grow at Black Wing Shooting Center, noted CEO Rex Gore, thanks to youth shooting camps held at the facility that run all summer, as well as more families becoming involved in shooting.
“As far as product, demand for youth-sized shotguns are focused on the few companies that manufacturer reduced-length guns,” Gore said. “The Remington 870s and 1100s, the Mossberg 500 and the Franchi AL all offer youth options. On the higher end, since Beretta has exited this market, we have done well with the Fabarms XLR/Syren shotgun, even though it is a $2,500-plus firearm.”
Youth rifle purchases are centered on the numerous Ruger 10/22 options. Ruger’s new American rifle in .22 LR and .22 Mag. sells well here, also.
“Shooting accessories focus mainly on clothing and gun cases/shooting bags,” he added. “We sell several of the manufacturers’ logoed cases and bags to go with their purchase. Logoed shooting vests, caps and t-shirts are very popular, also.”
Editor’s Note: This brief originally appeared in the Fall 2015 issue of Gun Digest the Magazine.
Whether you’ve engaged in clay shooting before or are considering trying it out for the first time, Gun Digest Shooter’s Guide to Shotgun Games by Nick Sisley provides a comprehensive look at clay target games. Not only receive the how-to instruction you need to get started with (or get better at) clay breaking, but also explore the best shotguns available for clay shooting, as well as reloading tips and more. Discover the truth about shooting a moving target, and become a better clay shooter! Get Your Copy Now
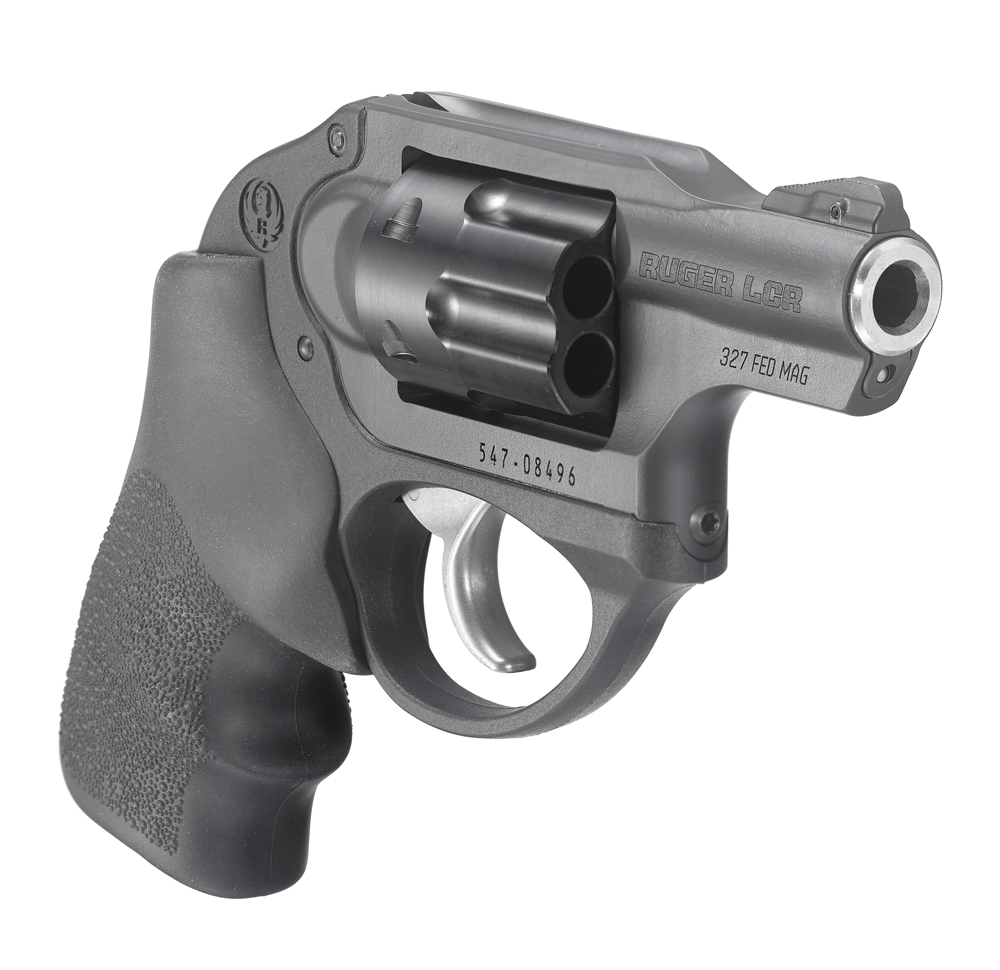
Ruger is now offering its LCR in the light, yet potent .327 Federal Magnum.
The .327 Federal Magnum has found new life in the past year.
Ruger has invested in the light, yet snappy round, releasing two revolvers chambered for the cartridge. And while the Single Seven and SP101 were both intriguing offerings, each one’s release was met with a similar refrain: “Nice, but when are they going to make one for concealed carry.”
Well, for these particular shooters, the wait is over.
The New Hampshire/Arizona manufacture has added yet another .327 Magnum to its lineup, in model literally tailored for clandestine carry—the LCR. And there appears to be plenty to like about Ruger marrying its polymer- and stainless steel-framed pistol to the cartridge it helped develop.
One of the features that is almost certain to turn heads, particularly with LCR fence sitters, is the revolver’s capacity. The .327 holds six rounds, more than any other in the line, save the .22 models. For the most part, a larger capacity in a smaller firearm was one of the main aims behind the development of the magnum cartridge.
The .327 Magnum has plenty of selling points in and of itself. Among these is it’s potent, yet manageable to shoot. The round achieves velocities similar to a .357 Magnum; it actually outperforms the larger cartridge in snubbed-nosed revolvers, such as the LCR. Of course, there’s a rub to the small magnum’s performance: It’s with a smaller projectile.
Presently, the majority of .327 Federal Magnum ammunition is topped with 85- to 130-grain bullets. And while availability is typically not a problem, there isn’t a ton of different rounds to choose from. However, shooters need not fear about fodder for a LCR in this caliber. It’s fully capable of shooting .327 H&R Magnum, .32 S&W Short and .32 S&W Long rounds as well.
Like the rest of the LCRs, the new .327 has the dimensions to make it a slick deep-cover or backup gun. The double-action-only revolver is only 1.3 inches wide and tips the scales at 17 ounces, making it more than convenient for pocket carry. It has a 1.875-inch barrel and comes outfitted with a Hogue Tamer Monogrip, a feature that should make recoil even more manageable. It also has a pinned, replaceable ramp front sight and integral U-notch rear.
Presently, Ruger’s MSRP on the new .327 Federal Magnum LCR is $619.
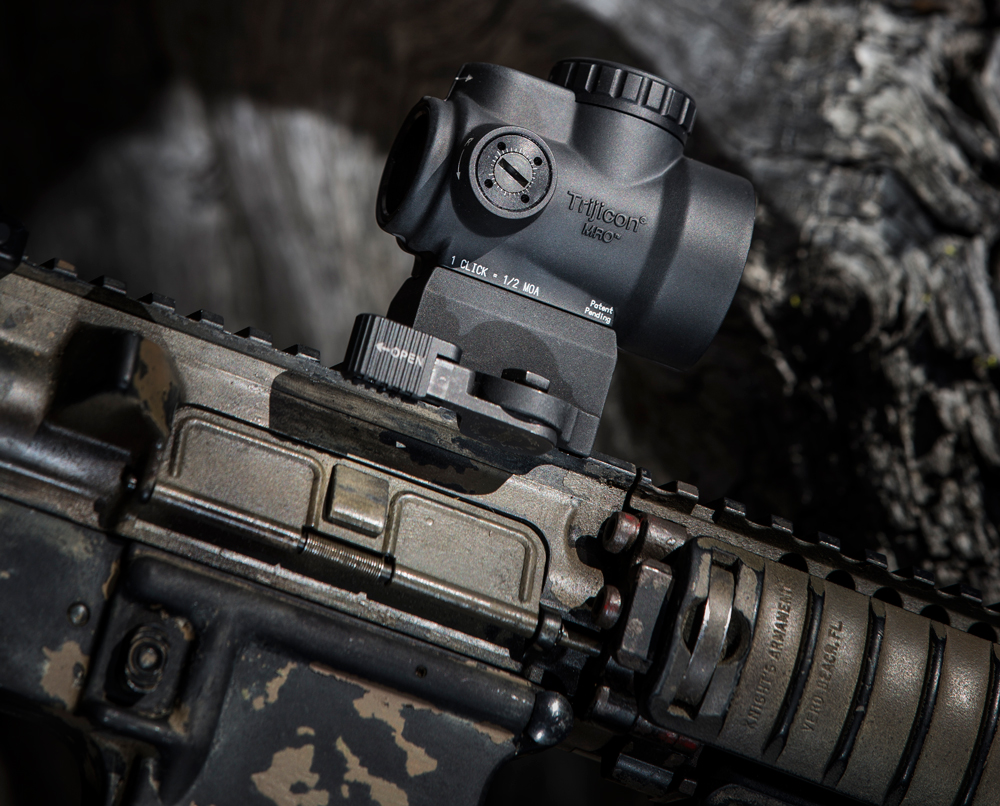
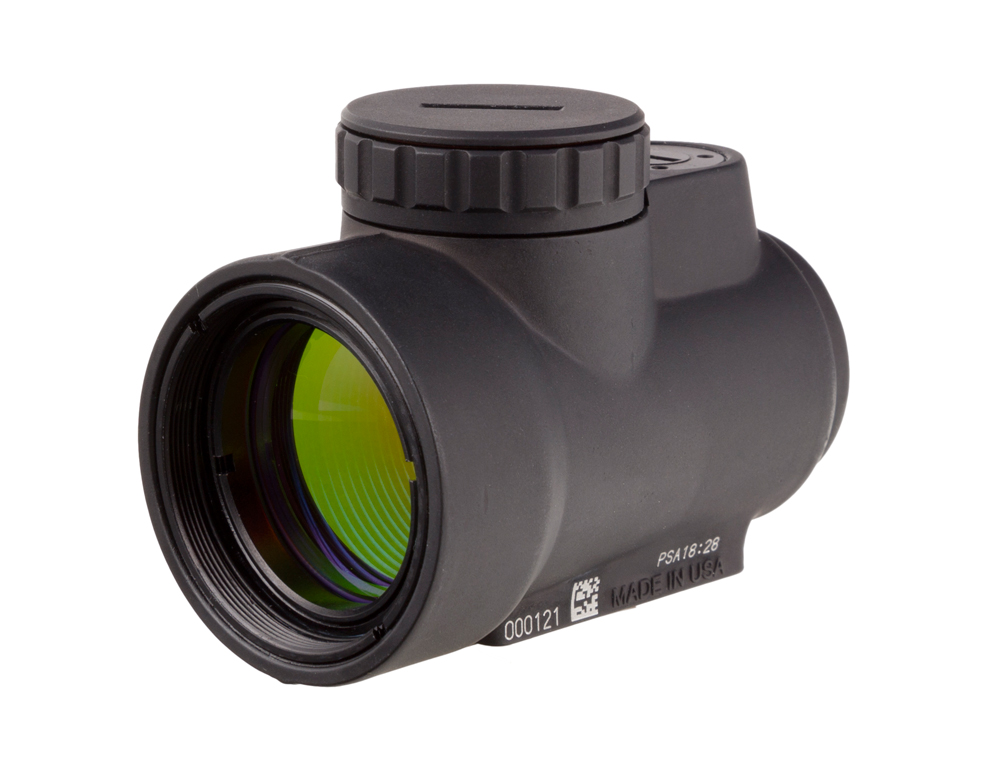
The Trijicon MRO offers a flexible, accurate and petite aiming solution.
When it comes to aiming solutions, Trijicon has always been at the cutting edge. And the Michigan company shows no signs of slowing up its innovations anytime soon.
Recently, the manufacturer expanded its catalog with an optic meant to add little to a firearm’s overall bulk, while offering lightning-fast target acquisition. But its petite design isn’t the only advantage Trijicon is offering with its Miniature Rifle Optic. The red-dot sight has also been refined to offer a clearer sight picture, thus creating a more accurate optic.
The MRO is engineered to eliminate the tube-effect with a shortened body and larger objective lens. Overall, the optic measures in at 2.6 inches and has a 25mm objective lens. These features also add some flexibility to the unit, given it can be mounted anywhere on a firearm without causing tunnel vision.
While the Trijicon MRO is an ideal option for close quarters shooting, the 1X optic also has potential to help shooters reach out. In part, this is facilitated through the sight’s 2 MOA red dot. The dot is large enough to draw a clear bead, but not so huge as to blot out a distant target. It also has eight brightness settings, helping it adapt to nearly any lighting conditions.
At around 2 inches in length and weighing around 4 ounces, the Trijicon MRO adds little bulk to a firearm.
The 4.1-ounce unit is also designed to be fine tuned with one click equaling ½ MOA at 100 yards. The optic has a total of 70 MOA total travel, both in windage and drop, allowing it to be zeroed in almost any configuration.
The MRO looks to be ready to tackle long stints in the field with the optic sipping energy. Trijicon lists five years of continuous use on a single 2032 battery.
The unit is also rated to handle the most extreme conditions. It can operate in temperatures from -60F to +160F. It is waterproof to 100 feet, and its 7075-T6 aluminum body is also chemical- and corrosion-resistant. And it is able to endure the roughest treatment without losing its zero or sustaining damage.
Presently, the Trijicon MRO has an MSRP of $579 without a mount and $629 with one.
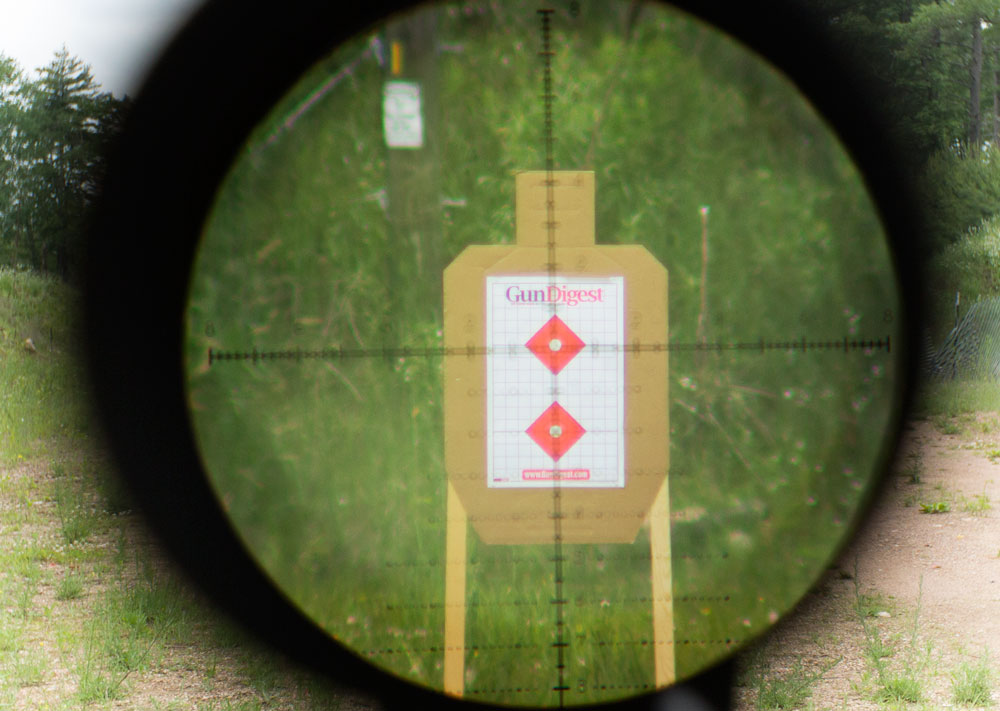
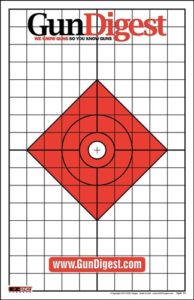
EZ2C targets combine lots of white space and a clean design for an easy-to-see paper shooting target that makes range sessions more productive.
This grid-style target is ideal for rifle sight-in and group shooting.
Years ago, when I was trying to scratch a living as a freelance gun writer, I learned the value of a good target. With gun test assignments in hand I needed something which would allow me to do a high volume of shooting—that is, were affordable—and also clearly showed groups.
Of course, there were the fancy paint-splatterin’ types with black pasted over a mysterious fluorescent goo; these were slicker than snot but cut into the frozen burrito fund a freelancer lived on.
Necessity being the mother of invention, some diligent research turned up the EZ2C concern, which was online order only. They made paper targets that were highly visible, came in high quantity pads and featured a price tag that didn’t cut deeply into the wallet.
Reactive targets, steel plates, poppers, fresh fruit and water jugs are jolly good fun, but the best paper shooting targets are ones that allow you to see where your rounds are landing.
That’s why Gun Digest has partnered with EZ2C targets. Like the name suggests, they’re easy as pie to see and handy as the dickens for long-range rifle work.
The center of these targets is all white, surrounded by a bright red that tends to draw your eye to the middle and gives you white space around which you can more precisely reference your crosshairs if shooting with a scope. Despite having excellent vision, I found my groups actually improved just from using these targets.
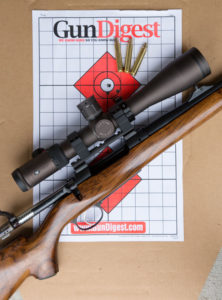
The author liked this clean style for close-range handgunning. Click here to order.
Even at really long range, my 600 meter tests proved how nice it was having an all-white background upon which to center the crosshairs for shooting center mass groups.
Open sight shooting with rifle, slug gun or muzzleloader is also better, for referencing the sights is so much easier when contrasted against the light background.
We’ve come up with five styles of target that will cover nearly all your shooting needs. To zero your rifle or shoot groups I like either of the diamond-shaped designs featuring grid backgrounds, which are a slick reference for scope adjustments.
For handgunning, the clean background targets with round circles give you an uncluttered view; I like stapling these onto IDPA-style cardboard targets and then pouring on the lead. The style with two vertical circles can be used for switching between center mass and high shots and fits well with many handgun drills.
If you’re unsure of what style you need, get one of each of the five. Most likely, you’ll end up using all of them. Give them a try—you’ll see why.
These high-visibility fluorescent red and white paper targets from EZ2C are preferred by the Gun Digest editors because they allow us to see exactly where our rounds are landing. You’ll love them, too. Load up here
Looking to go armed, but are stuck in the weeds as to what to arm yourself with? Here are 20 of the best concealed carry gun options that will keep you on the defensive.