
Inspired by the great Remington Rolling Block design, the author decided to build a buffalo gun for hunting and shooting cowboy action single-shot long-range events. He chose a No. 5 carbine in 7mm and went to work.
After I fitted the barrel, I wanted to shape and taper it for looks and to reduce the weight.
After setting up the mill, I used a facing tool to remove a great deal of material — about 1 pound of metal was shaved off — and to give the barrel a more streamlined shape. I still had to draw-file and sand the barrel, but I liked the resulting look much more than when it had a slight taper from the box. It also took off some of the front weight.
 I cut off about 4 inches — giving me a 30-inch barrel — and dialed it up in the lathe to face and crown the muzzle. A flat face was machined and it was crowned with a deep 45-degree taper. Brownell’s sells crowning tools that can be used without a lathe, but the lathe was handy, so I used it for the crowning job. Whichever method you use, the crowning job is critical for accuracy. The face of the rifle must be perfectly perpendicular to the bore so the bullet exits the pipe evenly. The crown recesses this edge to protect it from damage.
Proof Testing
With the barrel chambered and installed, I wanted to proof-test my work. Headspace depends on the base of the case sitting against the rolling block and how tight the block fits against the hammer surface. This is the base of the action’s strength. I was happy with the way everything fit, but I still wanted to proof it, so I put the old stock on the rifle.
My proof-tester is simple: I use a spare tire as a base and strap the action to it with ratchet tie-downs. Then, I point the muzzle into a safe backstop and fire the action from a distance with a string. I had to load some new cases because the cartridges I had for my Sharps were not full-sized, and apparently, its chamber is a bit larger than the new chamber in my Rolling Block.
I loaded four of my pet smokeless loads and carefully measured the cases for a comparison after firing. The proof-test went well, and the cases measured out, showing no signs of headspace problems or excessive pressure.
Stock Work
It was time to stock the rifle. TreeBone Carving has some of the prettiest wood I’ve seen for rolling blocks. I told George Peterson, owner of TreeBone, I was trying to duplicate a Rolling Block Sporting Rifle but also wanted to shoot cowboy long-range events and possibly hunt with it. He recommended a walnut stock with a shotgun-shaped butt.
 I could inlet the original buttplate or put a plain metal buttplate on the rifle to be historically correct. I ended up putting a rubber recoil pad on the rifle to protect it (and me) and will probably have to make a hard, more authentic buttplate for shooting cowboy events.
Brownell’s carries TreeBone’s walnut version of that stock, so I figured I could always fit a prettier piece of wood on the gun later. I didn’t really want a high-gloss finish.
TreeBone stocks require about 90 percent fitting to the action, and almost anybody with some tools should be able to do the job. Rolling block actions differ a bit in stock fit, and this one was more difficult. I have a Danish action with a flat-angled fit, in which the action meets the gripped part of the stock. The Remington No. 5 has two angles that must be negotiated.
The stock slipped up almost to home position before I did anything. My most important tools were a triangle file, flat file with one blank edge, fordum or dremel tool, and a variety of sandpaper matched to a sanding block. You can’t see some surfaces when fitting the stock, and candle soot helped me find where the high spots had to be relieved. I put soot on the action and filed a bit off where the stock rubbed it. With a lot of fitting and filing, the stock will eventually slide up tight and right. After it’s in place, you can drill the receiver tang-screw hole in the right spot.
The forearm grip comes cut to fit an octagonal barrel. It was very close to the barrel I shaped but needed some minor fitting. The forearm was not drilled for an attaching screw, and I had to position and drill it. A brass escutcheon was then bedded in the stock where I planned to put the screw — and a hole was threaded into the barrel.
It’s critical that you make the threaded hole in the exact spot, or it won’t fit correctly. I used a drill press to create the hole. Be careful not to go too deep; there’s enough meat in the barrel, but it’s very easy to make it too thin. You can set up a drill press or mill to stop at the correct depth.
Find the center of the barrel flat more precisely by using the calibrated table on a mill. After I found the hole and drilled, I used a bottom tap to tap the hole to the correct thread right in the mill vise. The bottom tap allowed me to cut as many threads as possible into the shallow hole.
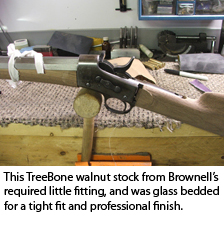
After the hole was completed and the forearm screwed to the barrel, I wanted to strengthen the stock on both pieces by glass-bedding it where it fit to the metal. The glass fills voids in the wood from carving and provides a stronger, tighter fit. The finished fit of a glass-bedded stock gives a rifle a professional look. Acraglas with a bit of coloring for the finished stock shade was the ticket.
I knew I would shoot the rifle before I did the finish bluing, and I didn’t want to stain the stock with dirt, sweat and cleaning solvents, so I put a couple coats of Tru-Oil on it for protection. That also gave me an idea of what shade to tint the Acraglas. I also fit the stock with the recoil pad so it would protect the butt and my shoulder in pre-finish shooting sessions. The rifle was really starting to take shape, and I liked the look of the stock.
Sighting Up
A set of sights was the only thing I still needed. Most cowboy long-range rifle side matches are 500 yards or closer. Still, I needed some drop compensation for longer work.
I studied sporting rifles in Remington Rolling Block Firearms by Konrad F. Schreier Jr.. This book features vintage Remington rifle ads, including options. The rear sight common to the guns was the Rough and Ready sight on the rear, which was an open-notched sight with a flip-up peep that can be adjusted 1.5 to 2 inches for elevation.
A blade front sight was common in the day, and Remington also made a Beech sight, which was a blade with a flip-up hooded post that could be used with the peep rear.
 Montana Vintage Arms makes many quality sights, but its Rough and Ready replica seemed to be the right choice. I complimented it with the company’s version of the Beech front sight.
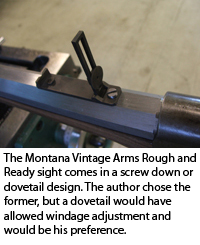
The front sight comes with a dovetail fit, and the Rough and Ready can be dovetailed or screwed in place. I used the screw-down model for my rifle, but if I had it to do again, I’d go with the dovetail model because it gives you some windage adjustment on the rear sight. The front sight is dovetailed, so I adjusted my windage there. Montana Vintage Arms also makes high-quality long-range Soule sights and old-time scope sights it calls MVA scopes.
You can easily cut dovetails on a mill with a dovetail cutter. I measured the dovetail on the combination Beech front sight, and then took a couple of passes with the mill to cut the slot slightly smaller than the base.
The fit was finished by hand with a file, and it was perfectly tight. I have fitted dovetails without a mill by cutting the slot in the barrel with a hacksaw. Then, I’ve roughed the slot out with a file and finish-fitted it with a triangular file to create the dovetail. It takes longer, but if done carefully, it’s just as precise
With the sights on, it was time to put the gun together and see how it shot. The rifle still needed to be final polished and blued, and the stock had to be sanded and stained, but I figured a range session would tell me if I chambered and muzzled it correctly. If figured it would be better to redo metal work before the final finish.
 The first session was a rough sight-in affair using a proven smokeless load. I discovered that the bullet I had cast was long enough to touch the rifling, as evidenced by marks on the lead when I took a live round out of the chamber. At 100 yards, the gun required just a small sight adjustment to make fist-sized rocks disappear. It was time to develop a pet load for the rifle and put it on paper. It had a good start.
For the second session, I loaded some of the LaserCast 500-grain bullets with a semi-wadcutter nose. I loaded them to the same length as the cast round-nose bullet, but the taper nose of the wadcutter was narrower and did not quite touch the rifling. The bullets showed promise in the rifle. The combo was tried on the 200-yard gong after a cowboy practice match.
After figuring the adjustment for the drop, hitting the gong consistently was just a matter of pulling the trigger. I’m really looking forward to developing a load, because the gun is accurate enough to make it work.
Finishing Touches
 I planned on finishing the rifle so it looked like something from the rolling block’s heyday. I went with a plain walnut stock, which would have been standard on hunting guns. Some engraved custom guns had nice wood on them, but those were more common at uppity gun clubs or target matches. The original stock on my gun had a very dark stain, which seems common for firearms from that time.
I sanded the Tru-Oil off of the stock and darkened the wood with Mini Wax Dark Walnut Stain. Tru-Oil is a great finish, and I use it often. However, it would not darken the wood as much as I wanted. After the first coat of Mini Wax, I saw many scratches and tool marks I couldn’t see when the wood was plain sanded. It took several coats and some sanding to get all the scratches out, and the multiple coatings filled the wood grain with the stain and protectants.
The Mini Wax retained the dull look I was seeking, and some light work with steel wool gave me the finish I wanted. Taking the time to apply several coats alternated with fine sanding did the job.
I really had a dilemma with finishing the metal. Many of the original rolling blocks came with a case-colored hardening on the receiver. I could send the action to a shop for that finish. However, I had recently seen a rifle with a shiny blue receiver and a less shiny finish on the barrel, and I liked how that looked. A dull blue finish and glare-free barrel would be practical for hunting and sighting, but the shiny finish really stuck in my mind.
Finishing metal is easy and can be done with emery cloth and steel wool. I view polishing as gradually putting finer scratches in the metal until they have a mirror finish. I started with 80-grit sandpaper to remove tool marks on the barrel and some bad pits on the receiver.
Actually, I removed three really bad pits with a file and then formed the metal back with sandpaper. I was careful not to change the lines of the receiver or wear any writing. The only factory writing on this action was on the tang, which had no huge pits, so I got away with some minor polishing there. It’s easy to round off corners that should remain sharp to keep the original look of the receiver. I then went to 120- , 220- and 320-grit paper.
I took the flats of the barrel down to a 400-grit polish so it blued out shiny, but less so than the receiver. It also will produce less glare on the top flat when sighting. I used a polishing wheel and compound on the receiver to get a very shiny finish that will blue out like a deluxe finish on a custom gun. It’s easy to vaporize a number, letter or lines on the gun with even the finest polishing compounds, so take care.
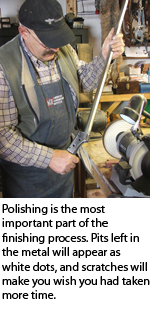
Polishing is the most important part of the finishing process. Pits left in the metal will appear as white dots, and scratches will make you wish you had taken more time.
The screws on my gun were boogered up a bit, so I carefully filed and sanded the damaged areas and polished them to the same gloss finish as the receiver. I also sanded and blued the rolling block and hammer.
I use hot blue for everything but touch-up efforts. Brownell’s and DuLite Corp. salts provide good results. Hot bluing is a book in itself, but it’s the most durable bluing finish I’ve used.
Worth the Effort
 When building your own firearm from an antique — whether sporterizing an old military Mauser or rebuilding a buffalo gun — you take pride in shooting an animal or winning a competition with the finished product.
With the availability of tools and products to make the job easier, anyone can complete a project like this. Even if you farm out some of the work to a pro, there will still be part of you in every hunting trip or shooting expedition with your project gun.

Next Step: Get your FREE Printable Target Pack
Enhance your shooting precision with our 62 MOA Targets, perfect for rifles and handguns. Crafted in collaboration with Storm Tactical for accuracy and versatility.
Subscribe to the Gun Digest email newsletter and get your downloadable target pack sent straight to your inbox. Stay updated with the latest firearms info in the industry.


[…] I’ll do that, and shape the barrel, fit the stock and sights, and decide on a final finish. Click Here for Part 2 of this article to see the results of the great rolling block project. — Dave […]