The case will address the application of the Second Amendment to the states through either the Due Process clause or the Privileges or Immunities clause of the Fourteenth Amendment. The case has major implications for the legality of restrictive gun laws not only in Chicago, but also in other cities across the United States.
Full support by the Wisconsin Assembly and other states will only strengthen the stance of the Second Amendment’s true meaning in the eyes of the court. Read more
Brady’s comment came at a debate among the seven GOP candidates for governor.
Each candidate was asked why he was qualified to oversee the Illinois National Guard and public safety. Most promise to modernize the Guard and hire professionals with experience in military and security work.
Brady says another way to improve safety is to let people carry concealed guns. He says that would help in the case of a shooting like the one last year at Northern Illinois University or Thursday in Texas. Read more
The homeowner was talking on the phone to another family member about 10 a.m. when he thought he heard something at the back door, police said.
“The suspects had already broken down the back door,” said Flint Police Lt. TP Johnson.
Johnson said two people had broken into the home. The homeowner was able to get a gun away from one of the intruders, which the homeowner used to shoot one of the intruders, who died, Johnson said.
The homeowner was not injured and is cooperating with police, Johnson said. Read more
When taking a rifle to its full accuracy, lug lapping should be a last resort. The concept is simple, but the results are hard to predict.
Bearing surface contact varies from rifle to rifle, and the percentage of contact doesn’t always correlate with accuracy. Here’s a basic primer on lapping the lugs.
We have been talking about trying to get to that maximum accuracy potential of our rifles and invariably when techniques are discussed that are supposed to help us get there someone brings up lapping the bolt lugs.
Taking a rifle from the box to its full accuracy potential is a process of many individual steps that cannot be rushed. Often someone throws out a term or procedure like “Lap the lugs!” or “Bed the action!” as if this is the magic voodoo to cure all the accuracy ills.
Well, welcome to reality, boys and girls; many times what some people consider as required for good accuracy is completely unnecessary and may actually harm your rifle, to say nothing of ruining your accuracy. Every rifle is an individual unto itself and what works for one might not work for another.
Lug lapping, in my experience, is the one procedure that is best left as the very last resort, and then it may be best to leave it out completely. Improper lug-lapping can ruin a bolt-action rifle. The concept is simple and logical. To promote the best circumstances for accuracy, the rifle bolt when in battery under a loaded round should be solidly and evenly held in the action, true with the central axis of the bore and holding the cartridge case at minimum headspace.
Several factors are involved here; the face of the bolt must be square with the long axis of the bolt (some say the firing pin axis, but if the bolt was drilled true, they should be one in the same), the chamber must be cut aligned with the bore, the barrel and receiver must be mated properly, etc.
If any one of these things is botched then you can lap the lugs until they disappear, it won’t matter a bit. Lapping is the act of using some type of abrasive compound on the bearing surfaces of the bolt lugs to cut away metal to try to get the bearing surface of the lug in as close to full contact as possible with the mating surface in the receiver. Lapping can be done on precision machinery, but for the most part shooters use the compound/work-the-action method to cut the bearing surfaces.
Here is where we start getting into trouble; how much contact is “enough?” We have seen rifles that shot wonderfully with about 50% contact on the lugs, guns that shot “ho-hum” with 90% contact and several guns that were brought in ruined from too much lapping.
Modern rifle bolts such as those from Remington, Winchester and Savage with modern steels will lap differently than those from old Mausers, where the heat treating is different. What is important to remember is that changing one thing in the precision dimensions of a rifle may have unexpected effects on other dimensions. Proper chamber fit and headspace must also be considered if we are going to muck about with bolt fit in the receiver.
When we build a custom rifle “from the ground up” we try to get the action right first, then chamber, thread and fit a barrel. Lapping the bolt lugs for maximum contact is one of the operations we perform when we are getting the bolt and action ready, along with truing the action surfaces, squaring the bolt face, smoothing the bolt ways, squaring off the receiver face (all of which must be done before the lugs are lapped) and on Mausers, grinding the rear tang for a lower profile.
The lapping is done with a special jig and spud and once we get above 80% contact we stop. So far it seems to be working; one Ruger old model 77 action we barreled in 6.5-284 Norma that received our standard action treatment produces five-shot groups at 300 yards with handloads that measure .775” center to center.
I am convinced that lug lapping alone in this instance had almost nothing to do with this superb level of accuracy, rather the combination of materials we used and all of the treatments and procedures together we followed in the building culminated in a very accurate finished product.
I have been asked many times to give the proper technique for lapping bolt lugs and I’m sorry, but I will not publish such information, for the simple reason that this procedure can so quickly ruin a rifle. There are several write-ups on the Internet and the various forums found there and some of the lapping kits sold through gunsmithing firms such as Brownells provide this information, but I will not.
As I have said, I believe that lug lapping is the “last resort” in working a rifle for accuracy and may or may not deliver the results one is looking for. If your rifle is not shooting to suit you it would be my guess that lapping the lugs would be pretty far down the list of possible fixes for the problem.
After all, take a look at any model 788 Remington, with its nine rear-locking lugs. I’ve never heard of anyone trying to lap those lugs and the 788 is one of the most accurate rifle designs ever made.
All too often we look for the “magic bullet” to make our rifles shoot better, looking for the easy solution instead of the smart solution. Sometimes we need to accept reality and realize that it might not be the gun that needs help. Give it some thought.
When we reached Krasnodar in the afternoon, a city of some 150,000, we were met by the forestry people and took off in a couple of Pobeda cars to the hunting lodge, some 200 kilometers away. We arrived there too late for any hunting, but we were set down to an excellent dinner, a lot better than we’d had on the train. After much good talk and almost as much drinking (Jim again proved his prowess), we hit the hay – we’d be going hunting early in the morning.
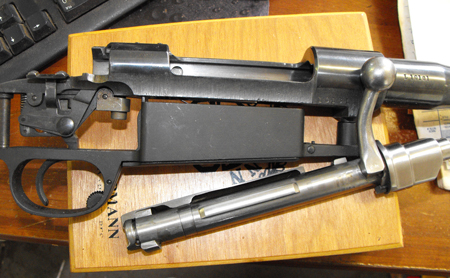
The weather had improved markedly, this far south – we awoke to a sunny sky, the temperature a cool 40 degrees F. or so, and little wind. Our guides and beaters were assembling as we stepped outside, and we had our first look at the guns we’d be using on the stags. These were 18-inch barreled 3-shot autoloading carbines, the magazine/guard hinged at the front to drop down for loading.
Loading was a little tricky, even for the guides on occasion – the cartridges had to be forced into the magazine lips from directly above – which was awkward – or fed through the receiver from the top and on into the rear of the magazine. The Medved carbine is gas-operated, the slender actuating rod free-floating and lying above the barrel.
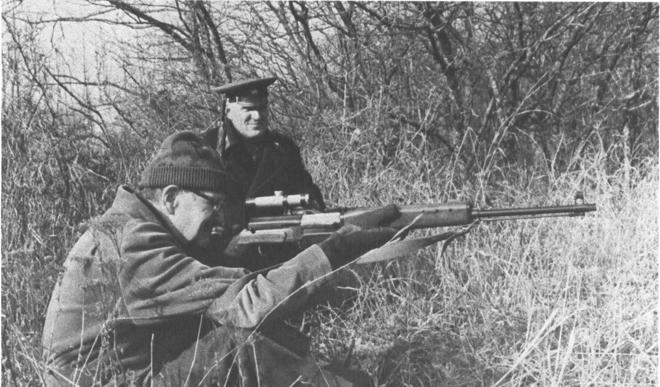
Amber takes practice aim with the Medved 9.3 carbine, his be-capped and uniformed forester looking on.
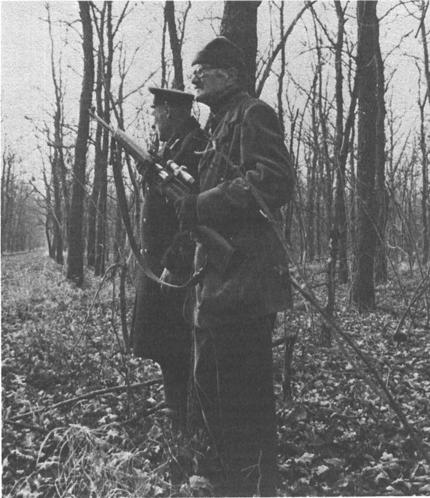
The drive has started. My forester/guide and I can hear the distant shouts and calls of the beaters.
The cartridges, we were told, were 9mm, and that’s all anyone there knew about them; muzzle velocity, bullet weight, trajectory figures were unknown. Subsequent checking showed this load to be, in fact, a 9.3mm, a Russian round derived from the Finnish 9.3×53 Rimmed, with power about like the 35 Remington.
Even in bright sunlight a sheet of flame a foot long was easily visible at the muzzle whenever these Medved carbines were fired! Though I had indicated early on that I’d need a scope, one had to be sent for, which didn’t take long, happily – the long train ride had lost us a day or more of hunting time, as would the return trip to Moscow, a 29-hour stretch.
The straight-tube scope, which appeared to be about 2x, had a very narrow field of view. The reticle was, of course, the beloved European type – a sharply-pointed broad post with a thick bar coming in from either side.
A target was set up about 70 yards away, and each of us – as required in European hunting everywhere – managed to connect adequately with it.
Russian Red Deer The Red Forest, a vast acreage of hardwoods and deciduous trees, was entirely leafless, affording us no cover. Most boles were only about 8 inches in diameter, and when the stags did appear they had scented or seen us well before.
Nearly all shots had to be made by aiming up or down the numerous cart tracks. Fortunately there was no shortage of deer – we must have seen hundreds, many of them great stags, but often too far away for the fire-belching 9.3mm loads. In our day-and-a-half of hunting five excellent deer were killed by us foreigners, plus another by our escort, Andrei Stepoura, and two or three more by the head forester and his son.
We could have shot others, of course – hunting is a commercial operation in much of Russia, and we were told that the 1978 quota for the Red Forest area would necessitate the shooting of a few dozen more stags and cows. Some 45 deer were taken during the regular season. Two of our stags came close to making the Gold Medal class (in the CIC European system) but all were noble beasts, both in body size and racks. Dewey Thorns was the first to score, then came Barlow and Carmichel; your aging scribe came last, and about at the last.
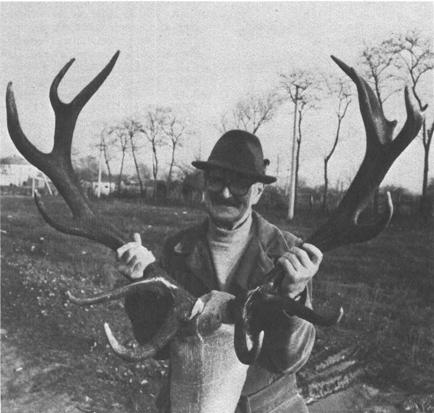
John Amber with his red deer. The trophy is both large and heavy. It lacks symmetry in the crown area, but scores well in any league.
No question, the stag hunting was excellent indeed in the Red Forest in spite of non-ideal conditions. Had there been thick cover, as would have prevailed in September or early October – when we were supposed to have hunted – I’m sure we’d have done even better.
Fearing red tape and border-crossing problems, not to mention the chore of lugging four rifles around Europe, we didn’t bring our favorites into Russia. We wished we had, though, and as we learned, there’d have been no trouble.
The 9.3mm round is about a 150-yard load, and I gazed at my guide in wonder the first morning as we spotted several stags walking in single file some 350 meters away (the guide’s guess, not mine) on the far side of a great open meadow.
“Shoot,” he told me as I didn’t even bother to raise the carbine, so I shot – a guide’s command in Europe is just about that. I held a good couple of feet over the deer’s shoulder, but I missed. I probably dropped that bullet about as much under the deer’s belly as I’d held over.
All too soon the stag party was over – the company and the food had been excellent, and Carmichel was learning to curse in Russian. That was fair enough; he’d taught the Tula engineer a rough phrase or two in English.
If you enjoyed the quality of this article, you can’t miss your chance to get the new Gun Digest 1944-2009 3-DVD Set — containing 65 years of Gun Digest books in digital format.
This new 3-DVD set includes all of the previous 63 editions of the Gun Digest annual, from 1944 to 2009. Nearly all of these editions are out of print and are very rare and difficult to find.
Insight Tech-Gear, the world’s leading provider of tactical lasers, illuminators and thermal imaging equipment, introduces their newest X-Treme Series tactical rail-mounted LED light, the WX150 (Weapons X-Treme 150 Lumen).
Its stunning 150 lumen high-output LED, along with its precision focused reflector, provides exceptional brightness with a tightly focused uniform beam. The WX150 has a truly ambidextrous toggle switch for intuitive activation in even the most crucial, stressful moments.
Double tapping the toggle switch in any direction initiates a strobe effect that debilitates an unsuspecting target, giving you the advantage of potentially life-saving seconds. With its adjustable rail interface that fits all standard rails, the WX150 is the most versatile weapon mounted light currently available.
Insight Tech-Gear’s WX150 is available at your favorite dealer. For more information on Insight Tech-Gear or the new WX150, please call toll free 877-744-4802 or log on to www.InsightTechGear.com.
The Common Council urged lawmakers to adopt legislation that would require felons to stay 1,000 feet from gun stores, shooting ranges and gun shows, and that would declare “straw buying” of guns to be a felony and failure to report stolen guns a crime.
Those measures came partly in response to concerns about firearms sold at Badger Guns of West Milwaukee. For years, Badger and its predecessor, Badger Outdoors, have been leading suppliers of guns used in crimes, including the weapons that wounded all six Milwaukee police officers shot in the past two years.
The Journal Sentinel has highlighted those issues in a series of stories.
Because felons are prohibited from buying guns, they sometimes use associates with clean records to purchase firearms for them, a practice known as straw buying. That’s a misdemeanor under state law and a felony under federal law.
Since 2007, 21 of 27 federal straw-buying cases in the Milwaukee area involved guns bought at Badger Guns or Badger Outdoors. Straw buying was proved or suspected to be a factor for all of the guns used in the six most recent police shootings. A Milwaukee police investigation found continuing indications of straw buying at Badger, with felons freely entering the store and even using the firing range to practice shooting.
In some cases, Milwaukee Police Chief Edward Flynn says, straw buyers claim their guns have been stolen, which is why Flynn, Mayor Tom Barrett and their allies want to require that stolen guns be reported to police.
Badger owner Adam Allan has said he tries to prevent straw buying and that his store’s proximity to Milwaukee is the reason for its prominence in crime gun statistics. But a nearby store in West Allis has sold far fewer crime guns and has not been involved in as many straw-buying cases.
Concealed carry debate
Flynn and Milwaukee County District Attorney John Chisholm recently split with Barrett by recommending the package of gun crime legislation include legalization of carrying concealed weapons, with tough penalties for anyone carrying a concealed gun without a permit.
Wisconsin and Illinois are the only states that prohibit concealed carry.
But the package backed by the council does not include that measure and instead calls for elevating second and subsequent concealed-carry offenses from misdemeanors to felonies. Read more
Some will now portray this as a loss, because a Republican previously held that seat, and Scozzafava was nominally in the gun rights camp. But her actions in the final days of the campaign show she was no more to be trusted than, say Kirsten Gillibrand.
Let’s take a look at victorious NRA-endorsed governor-elect Bob McDonnell in Virginia:
A reader and blogger sent McDonnell and R. Creigh Deeds the Gun Rights Political Questionnaire and they both ignored it. McDonnell also refused to sign the Virginia Gun Owners Coalition Pro-Gun Pledge.
McDonnell claims to now be against one-gun-a-month laws, but when it was up for enactment, he voted for it.
And then we have the New Jersey gubernatorial race, where Chris Christie ousted anti-gun Jon Corzine.
I wouldn’t dance too hard, especially after reading Christie’s old campaign mailer calling for a ban on semiautomatic firearms, deceptively portrayed as “automatic”. But that didn’t stop the Fudds from telling us they’ve done their “homework,” and portraying him as the sportsman’s pal. Just in case you thought either Anthony P. Mauro, Sr., or the New Jersey Outdoor Alliance have any relevance whatsoever to freedom…Read more
On Saturday, police say a man broke into the home of an 81-year-old woman.
The woman had a handgun and managed to fire several shots, scaring the man away.The burglar got away with some cash and other items, but the woman was not hurt.
Investigators believe this incident may be connected to a series of sexual assaults on elderly women across four Central Texas counties, including Bell County. Read more
Order the Gun Digest Book of Combat Handgunnery, Click here.
Two employees of the Phone Store at 2111 Center Point Road were closing up for the night about 8 p.m. when a man came from behind a trash bin and pointed a gun at the female employee as she was getting in her car, saying “Give up your money; you might as well give it up.”
When the male employee tried to take cover, the gunman opened fire. The male employee returned fire, firing eight shots at the robber who took off running, said Jefferson County sheriff’s spokesman Lt. Randy Christian.
The female employee got in her car and tried unsuccessfully to chase the gunman. Read more
Order the Gun Digest Book of Combat Handgunnery, Click here.
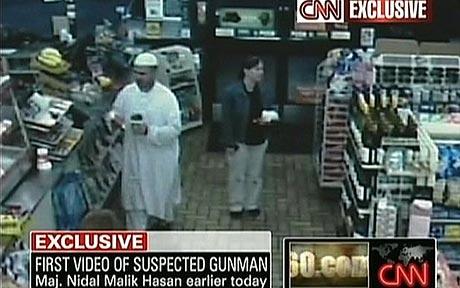
Lt. Gen. Bob Cone said Friday that Fort Hood police Sgt. Kimberly Munley and her partner responded within three minutes of reported gunfire Thursday afternoon. Cone said Munley shot the gunman four times despite being shot herself.
Officials said Munley was in stable condition.
Cone said, “It was an amazing and an aggressive performance by this police officer.” Read more
Gun Digest is the source for firearms news, pricing and guns for sale. Readers benefit from in-depth editorial expert advice, show reviews and practical how-to instructions. Subscriptions are the First Amendment way to stand up for your Second Amendment rights. Click here to begin your subscription to Gun Digest.
Inside This Issue
• The Remington Model 673 Guide Rifle was too funky to last, but Dan Shideler writes this neat little rifle was one tough cookie.
• Editor Kevin Michalowski sifts through misinformation in his “Editor’s Shot” column. Click here to read it.
• Rifles: Knight
• Shotguns: Ithaca Gun Co.
• Handguns: Goudry – H. J. S.
• Tactical Gear: Cool Tools
• Troubleshooting the Wilkinson Terry Carbine
• Towsley on Target: Tri-Gun Challenge
• NRA Update: Collector rifle available
• Book Review: Big Fat Book of the .45 ACP
• Performance Handloading: Researching a load change
The bill (H.R. 3962) is 1,990 pages long and weighs over 20 pounds. And even though a search of the bill will not reveal the word “gun” or “firearm,” that doesn’t mean the bill is neutral in regard to your Second Amendment rights.
For starters, this bill will — like all the ObamaCare versions before it — most likely result in all of your gun-related health data being dumped into a government database that was created in the stimulus bill. This includes any firearms-related information your doctor has gleaned… or any determination of PTSD, or something similar, that can preclude you from owning firearms.
The bill will also create special “wellness” programs in section 112 which would allow the government to offer lower premiums to employers who bribe their employees to live healthier lifestyles — and nothing within the bill would prohibit rabidly anti-gun HHS Secretary Sebelius from decreeing that “no guns” is somehow healthier.
The bill purports to cut Medicare by $500 billion — in a move which will result in massive rationing for seniors, while ultimately adding hundreds of billions of dollars to the deficit.
The bill will mandate that you purchase expensive government-approved policies and will (according to some studies) triple your insurance premiums through taxes and government requirements.
Of course, this all means that you will have less money to spend on pursuing your real passions — like providing for your family and purchasing guns and ammunition!
ACTION: Write your Representative. Tell him or her to oppose this bill. Don’t be discouraged by reports in the liberal media which have tried to tell us — since January — that this battle is hopeless. We can win, and, with your help, we will win.
The Pelosi health care bill, sponsored by Rep. Dingell, has now been made public.
For starters, this bill will — like all the ObamaCare versions before it — most likely result in all gun-related health data being dumped into the government database that was created in the stimulus bill. This includes any firearms-related information that doctors have gleaned… or any determination of PTSD, or something similar, that can preclude a person from owning firearms.
The bill will also create special “wellness” programs in section 112 which would allow the government to offer lower premiums to employers who bribe their employees to live healthier lifestyles — and nothing within the bill would prohibit rabidly anti-gun HHS Secretary Sebelius from decreeing that “no guns” is somehow healthier.
The bill will, according to some studies, triple insurance premiums through taxes and government requirements — while mandating that Americans purchase expensive government-approved policies.
But, perhaps most instructively, there is this: Barack Obama, Nancy Pelosi, and Harry Reid promised to produce a $900 billion bill which would not add “one dime” to the deficit.
This bill will cost $1.3 trillion and will increase the deficit by AT LEAST $150 billion.
The only way Pelosi or the Congressional Budget Office can continue to pretend to the contrary is to take $247 billion in bill costs and slip them through in separate legislation.
In short, this process is fraudulent.
I have many issues with this legislation. And so I urge you to oppose this legislation and keep the government from inserting itself even more into my everyday life.
Learn how to shoot back: Order the new Personal Defense for Women book. Click here to buy now.
Police say the woman broke up with the 29 year old man, who had a history of domestic violence, nearly 4 years ago.
Last week, the ex-boyfriend reportedly broke in to the woman’s home on the 700 block of West Louise Drive, and waited in ambush until she arrived home that night. At this point, the ex-boyfriend is said to have emerged from the bedroom closet and attacked the woman.
The woman reported grabbed her self defense gun and fired, fatally wounding the home invading ex-boyfriend and saving herself from the violent attack. Police say that neither of the home’s children, ages 9 and 15, were harmed.
As a matter of biology and perhaps cultural norms, men tend to be physically stronger than women. The result is that cowardly abusive men can and do use their superior physical strength to harm their victims.
However firearms are the great equalizer, and when a woman is armed, she is in the best position possible to defend herself. A few examples illustrate this point: This armed woman used her gun to stop violent ex who broke into her home and cornered her in her bedroom. This armed woman was able to defend herself against a rapist who came back to rape her for a second time in a week.
This 85 year old armed woman held a young burglar at gunpoint and made him call the police on himself. This armed woman stopped an attacker who tried to ambush her. This armed pregnant woman used a shotgun to scare away two home invaders. This armed female school teacher used a gun to save herself from a convicted felon who broke into her home, while this armed woman saved herself and her family from a pair of armed, kidnappers.
The suspect was arrested after he turned up overnight at Paradise Valley Hospital with a graze wound, San Diego police Sgt. David Jennings said.
He and another suspect, who got away empty handed, banged on the woman’s door in the 6400 block of College Grove Drive around 10:20 p.m. Sunday, the sergeant said.
The woman said the men were yelling at her to let them in as she stood on a balcony. When she refused, they began kicking the door, prompting her to get a shotgun, according to Jennings.
Order the Gun Digest Book of Combat Handgunnery, Click here.
Several people were inside the Northglen Drive home when an armed man burst through the door, 10TV’s Kurt Ludlow reported. The incident happened around 7 p.m.
Franklin County Sheriff’s Deputies said one of the victims inside retrieved a handgun and fired it, shooting one of the robbers at least twice, deputies said.
Emergency crews arrived to find Ezekiel D. Feagin, 21, dead on the living room floor.
Deputies arrested a second man believed to be involved in the robbery, who was hiding in the bathroom. Read more
Looking to go armed, but are stuck in the weeds as to what to arm yourself with? Here are 20 of the best concealed carry gun options that will keep you on the defensive.
 The case will address the application of the Second Amendment to the states through either the Due Process clause or the Privileges or Immunities clause of the Fourteenth Amendment. The case has major implications for the legality of restrictive gun laws not only in Chicago, but also in other cities across the United States.
 Brady’s comment came at a debate among the seven GOP candidates for governor.