
The Remington 870 pump action has been used as a standard police model for decades. But as good as this gun is, it can always be improved by the application of aftermarket parts and the ingenuity of a custom gunsmith.
Setting up a Remington 870 shotgun for defense is easier than you may think. Keep in mind that this gun can also be used in 3-Gun competition in the Heavy Metal Division, where the only firearms allowed are 12-gauge pump shotguns, .308 rifles and .45 ACP handguns.
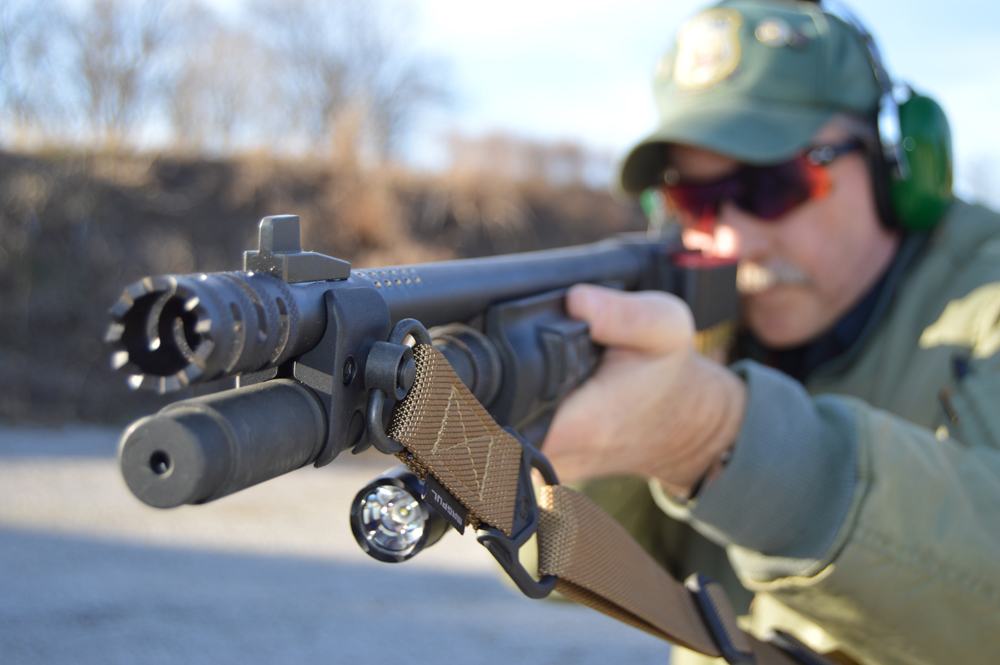
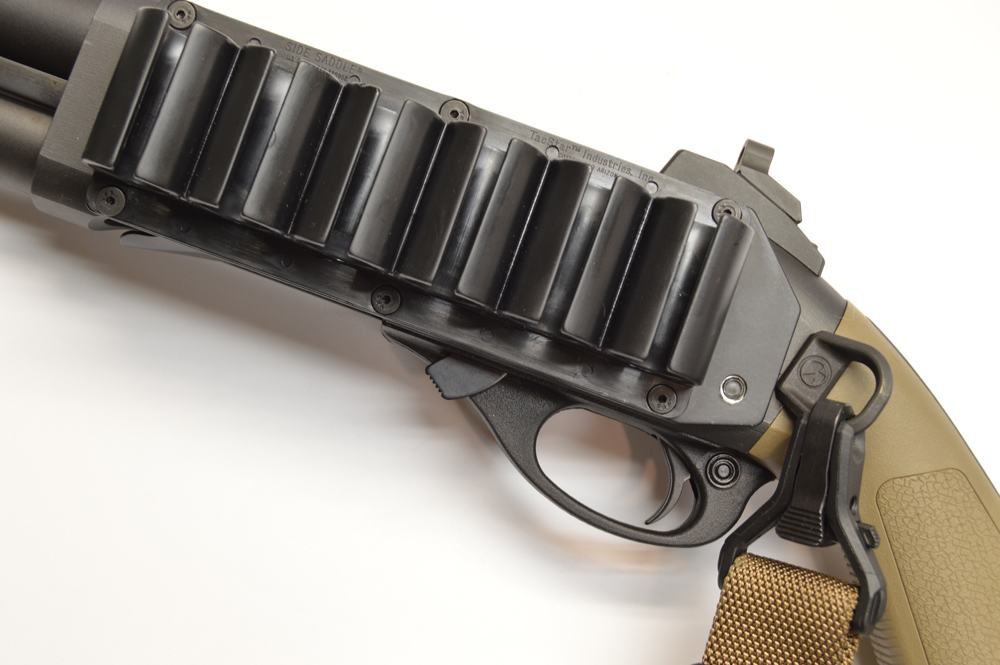
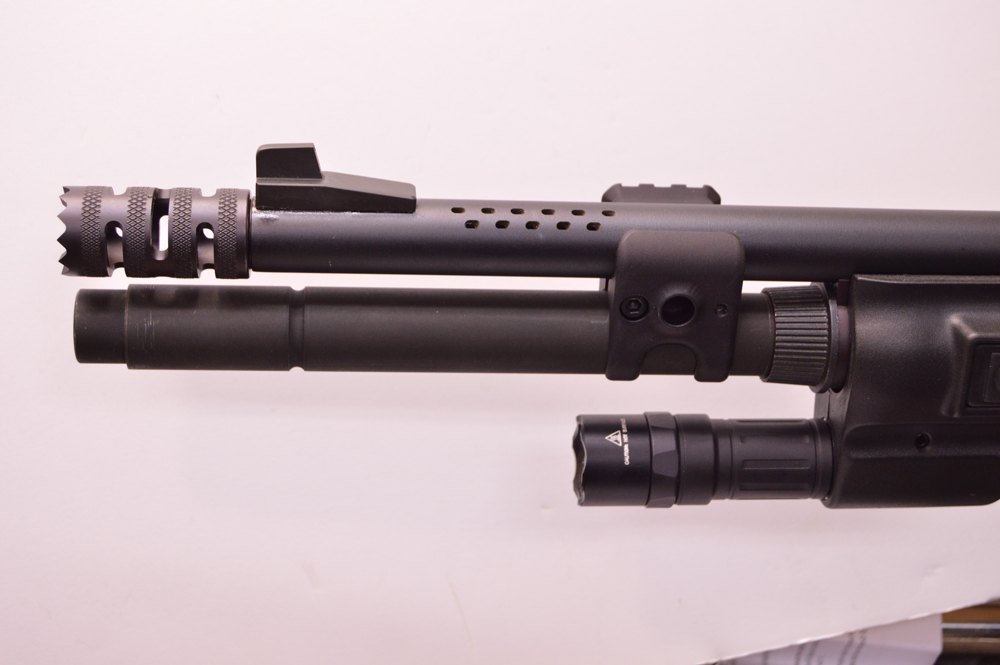
For the project shotgun, I selected the Scattergun Technologies ghost ring sights with tritium inserts, a sidesaddle shell carrier, Timney sear, Vang systems oversized safety button, Magpul buttstock with spacer system and raised cheekpiece and a Surefire 6V tactical forend light. I also selected a Trulock tactical breacher combination muzzle brake and stand-off, an extended magazine tube, Kick-Eez recoil pad and opted to Mag-na-port the barrel and add a Blackhawk! sling.
Since the rear sight on this gun has to be precisely located, I sent the gun off to Accurate Plating to have them drill and tap the rear sight holes on their milling machine. This could be performed on a drill press, but it can get a little tricky, especially with a small bench drill press.
Upgrading The Trigger Group
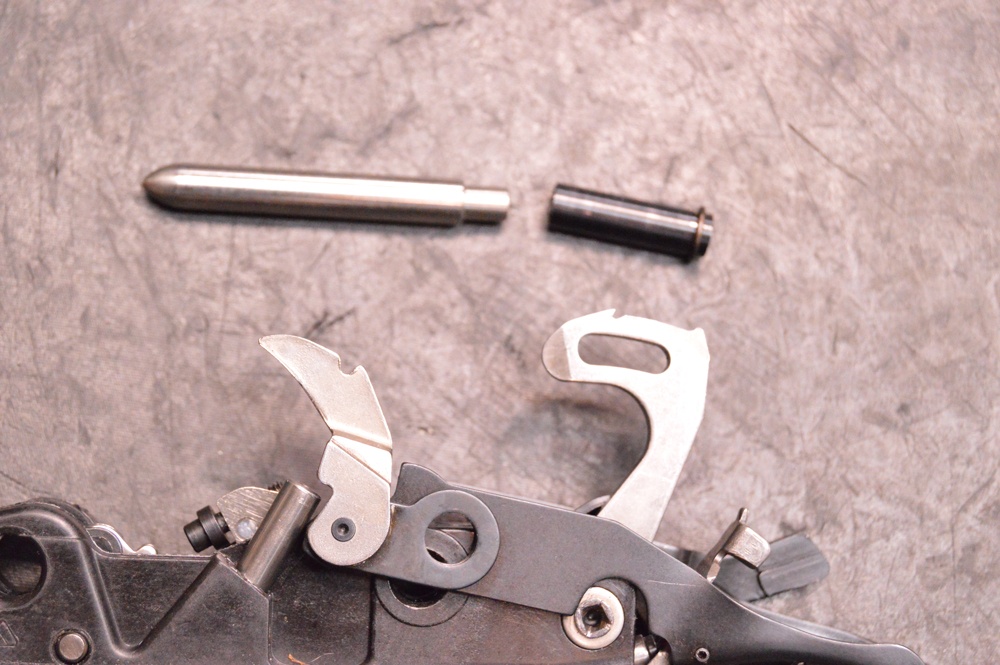
Once the receiver came back, I turned to the trigger group. I wanted to install the excellent Timney sear unit, which comes with three sear springs to set the trigger pull to the weight desired. I chose the mid-weight spring for a trigger pull of about 3 pounds.
To install the trigger, drive out the two trigger group retaining pins, and lift out the trigger group. Compress and lift out the sear spring, and remove the shell lifter by disengaging the c-clip and pushing out the lifter retaining pin.
Be careful to retain the carrier dog and spring. Then drive out the sear retaining pin.
Replace the sear with the Timney unit, and press in the sear retaining pin. Then, using the Silver Bullet, press in the large carrier retaining pin, and replace the c-clip.
Replacing the safety is a simple matter of pushing out the retaining pin and safety, inserting the new safety and replacing the retaining pin. Be careful not to lose the spring and detent. Note that the Timney sear has a set screw that allows for small adjustment in the trigger pull weight once installed.
Barrel and Front Sight Modifications
To modify the barrel, I opted to lengthen the forcing cone, and install a Rem Choke system so I could install the breacher muzzle brake. I first installed the Scattergun Technologies front sight, which is accomplished by mixing the included epoxy, degreasing the front sight and front sight base on the barrel after removing the front sight bead.
Apply the epoxy, wipe off the excess, and secure with a rubber band. Let it set overnight and you’re done.
Next ream the choke for the choke tube, and lengthen the forcing cone. Lengthening the forcing cone is a very common modification among shotgun competitors to reduce recoil.
Factory forcing cones have a fairly sharp angle from the chamber to the bore, which makes the shot column slam into the forcing cone when the gun is fired. The shot column slows down when it hits this sharp angle, increasing recoil force against the shooter.
Lengthening the forcing cone allows the shot column to transition from the chamber to the bore gradually. This operation can be performed by hand with a spiral flute forcing cone reamer and a tap handle, with a little cutting oil. The job should only take about 30 minutes. Flush out the chips and oil and you’re done.
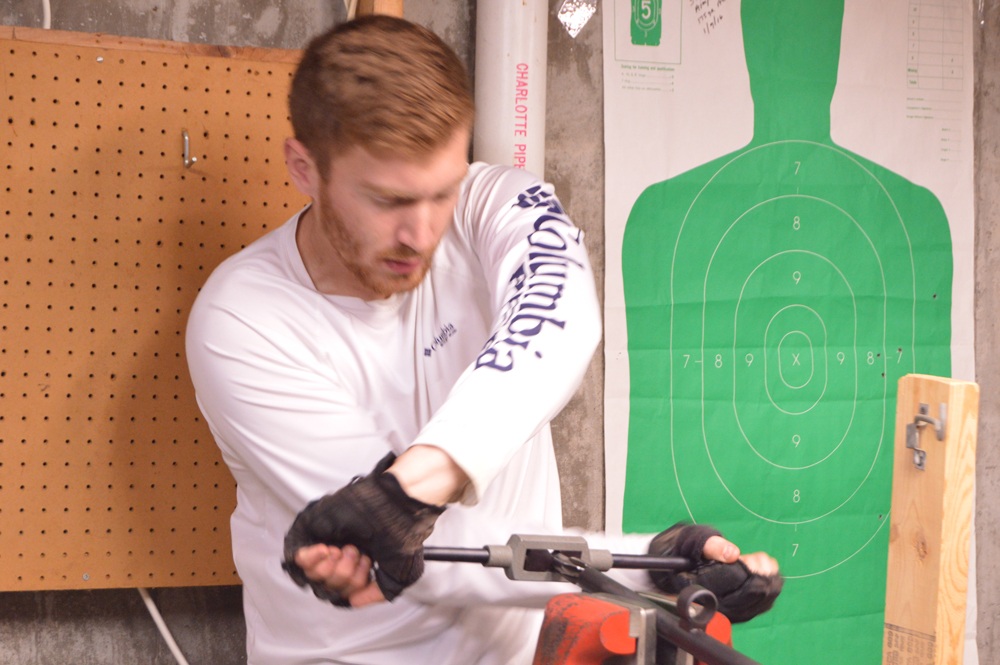
Installing the Rem Choke is a little more difficult. This operation should really be done with a lathe or a floor-mounted drill press. Since this book is about projects for the home hobbyist, I reamed the choke by hand and it took about 13 hours, whereas if I would have reamed it on a lathe, it should only take about an hour.
Ream the barrel until the rear shoulder of the reamer butts up against the face of the barrel. There are calculations that need to be performed in older barrels or barrels of questionable thickness prior to any choke reaming. Be absolutely certain the barrel has sufficient wall thickness before you do any type of choke work.
When performing an installation of screw-in choke tubes on shotguns, and machining the barrel to accept screw-in chokes, measure the outside diameter (O.D.) with a micrometer to determine if there will be sufficient wall thickness after machining. Measure the O.D. of the barrel and the O.D. of the tap for the particular gauge.
Subtract the O.D. of the tap from that of the barrel, divide by 2, and this will give the wall thickness after machining, providing the O.D. of the barrel is concentric with the inside diameter (I.D.). A sample calculation appears below.
- Barrel O.D. (12 Gauge)
- Tap O.D. (12 Gauge) Win-Choke™
- .850-.814=.036 / 2 = .018 Wall Thickness – Anything thinner than .015 wall thickness is not a candidate for screw-in chokes.
Since this is a new Remington 870 shotgun barrel, I knew it was of sufficient thickness for screw-in Rem chokes, but always measure just to be sure before proceeding. Without sufficient wall thickness the end of the barrel could blow out when the gun is fired, causing injury or death.
Before you start to ream the barrel, install the pilot onto the reamer. There are different sizes of pilots, so pick the one that gives the best fit.
Ream the muzzle until the rear shoulder of the reamer just touches the face of the barrel, then — using the same pilot — tap the threads for the breacher. The reamer has two steps, so make sure you understand that the shoulder of the reamer is the rear, or second shoulder, and ream all the way to the rear of the reamer.
Carefully follow the instructions provided by the reamer manufacturer. If performed incorrectly, the barrel muzzle can burst on the first shot due to the choke serving as an obstruction in the bore.
Again, if you are unsure of how to do this, take your gun to a qualified gunsmith and have them install your choke tube.
The breacher, also known as a stand-off, allows you to breach doors — you can press the end of the breacher against the door lock or door hinge, or both, and blow them off using a special breaching round. Fun stuff. The teeth keep the breacher from slipping off the door, and the cutouts serve as a muzzle brake to safely vent the gas sideways.
One caveat with the use of the breacher: Right now, the shotgun has an extended magazine tube that reaches almost to the end of the muzzle. This will make it a little difficult to effectively use the breacher the way it’s supposed to be used.
Since this gun is my house gun, I can leave it like that since I won’t be blowing off locks and hinges in my house anytime soon, and I want the extra rounds that the longer magazine extension provides, but if it were a dedicated breaching shotgun, I would install the shorter, two-shot magazine extension to make sure there was clearance for the breacher to make contact with door hinges without the magazine tube also hitting the door.
Stock And Forend Customizations
After installing the front sight and breacher, turn your attention to the buttstock and forend. There is a special tool to remove the forend retaining ring. Once that’s removed, you can install the Surefire tactical light onto the forend hanger and screw the ring nut down.
Put a small amount of blue Loctite to make sure the forend retaining ring doesn’t loosen up with firing. A steady diet of slugs and buckshot through the gun will generate a significant amount of recoil, and the Loctite will keep the retaining ring in place, but will also allow it to be removed later if needed.
In order to install the extended magazine tube, remove the stop pressed into the tube by the factory. This stop limits the number of shells that can be loaded into the tube.
Brownells sells two tools that can remove this detent: a dent raiser, and a magazine tube swage that both work great. I used the swage to remove the limiter in my firearm. Be sure that the limiter is completely removed, and that by using the swage, it doesn’t raise material on the outside of the tube and cause the forend to bind when cycling the action.
Usually, the swage will raise a small amount of material on the outside of the magazine tube; always check for this. I had to file the outside of the tube, and used my Foredom with a 120-grit sanding drum on the inside of the tube to eliminate the stop completely from both the outside and inside of the magazine tube.
Once removed, install the shell follower, and check to see if it binds around the area of the magazine limiter you just removed. Consider using the fluorescent shell followers that have bright visibility, telling you if the gun is empty.
Next up is installing the buttstock and fitting the Kick-Eez recoil pad. Remove the old recoil pad, which will expose the buttstock mounting bolt. Remove the buttstock, and install the Magpul sling attachment, then the Magpul buttstock.
This model has a separate raised cheekpiece that can be added. It’s an important detail because the Scattergun ghost ring sight forces the head a little higher, and the cheekpiece comes in handy to get a good cheek weld when firing the gun, especially with harder kicking rounds.
The buttstock also has a spacer system to adjust the length of pull. Since I’m taller than six foot, with fairly long arms, I installed a couple of the spacers.
The Kick-Eez pad is ground and fitted as covered in the rifle section of the book. Once mounted, the buttstock installation is complete.
Install the bolt assembly and forend back into the gun, along with the barrel. Reinstall the trigger group, and with the cross bolts provided, install the sidesaddle shell carrier onto the side of the receiver.
Install the extended magazine spring into the magazine tube, and screw on the extended mag tube. I used a clamp by Blackhawk Industries that secures the extended tube to the barrel, and also provides a sling mounting point on one side, and a Picatinny rail on the other. I opted to install a two-point Blackhawk sling. Cycle the gun with dummy rounds about a dozen times, and then it’s time to go to the range.
Testing The Customized Remington 870
The combination of muzzle brake, Mag-na-porting, long forcing cones and the Kick-Eez recoil pad makes for the softest-recoiling 870 shotgun I’ve ever shot. My son and I shot the gun with a variety of loads, from #7 1/2 birdshot, to #4 buckshot, to 00 buckshot and Federal slugs in 3-inch shells.
All of them were easy to shoot, and the combination of the light, crisp trigger, Scattergun Tech ghost ring sights, and the Magpul stock made for a quick-pointing, fast shooting gun.
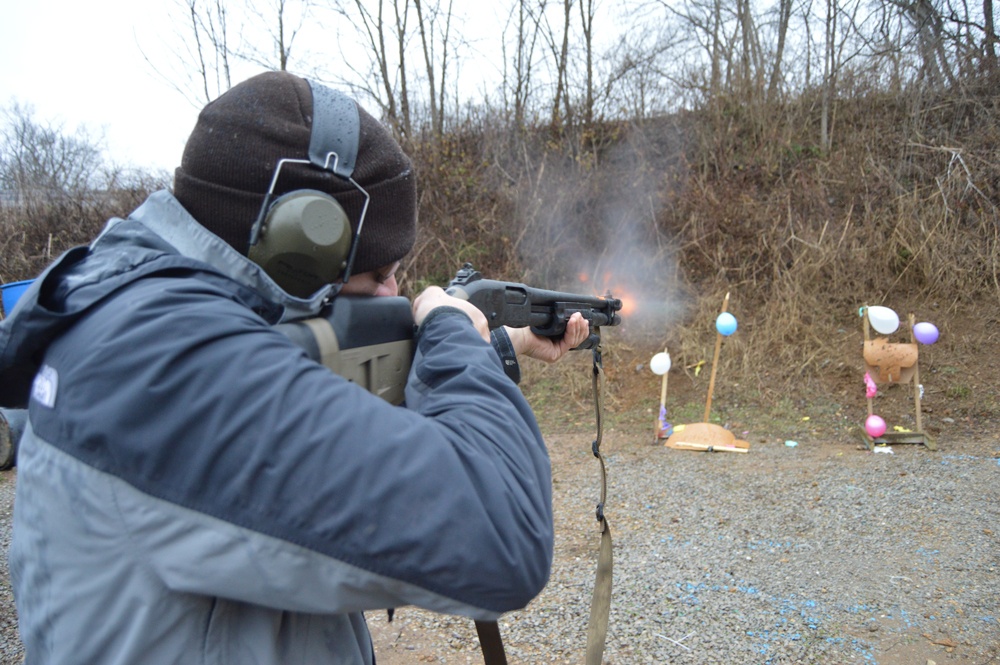
I waited for dusk to see if I could see some flame escaping from the barrel ports and the muzzle brake of the upgraded Model 870. I was not disappointed. The Mag-na-porting and the muzzle brake work to redirect the gas, softening and controlling recoil.
The Surefire light was very effective in lighting up targets at dusk. The light has a momentary pressure switch and a permanent on-off switch as well. This shotgun is now ready for tactical, home defense or 3-Gun competition.
The article is an excerpt from Custom Gunsmithing for Self-Defense Firearms available at GunDigestStore.com.

Next Step: Get your FREE Printable Target Pack
Enhance your shooting precision with our 62 MOA Targets, perfect for rifles and handguns. Crafted in collaboration with Storm Tactical for accuracy and versatility.
Subscribe to the Gun Digest email newsletter and get your downloadable target pack sent straight to your inbox. Stay updated with the latest firearms info in the industry.


Very nice list of upgrades but I think that breacher choke is something you add just for looks 🙂
This is all a total waste of money. The 870 model chosen is fine as is. All it needs is the extended magazine tube and a clamp-on M7 bayonet lug with sling swivels. There is nothing like a fixed bayonet at close range to put the fear of God in most bad guys.
I would find that these improvements make the shotgun unsuitable for self defense. I use a stock 870 police for self defense, better to not be portrayed as an evil gunner with a whole lot of killing modifications. If I had to defend myself for shooting someone I would have a hard time with this shotgun as it is set up.
It seems that even selecting anything other than ball ammo makes one an “Evil gunner.” Oh, wait–just having a gun does that.
Use what you need to defend yourself. It will make a difference in your physical defense. It won’t make any difference in court. Either you live where the facts are clear–you shot in self defense–or you live in a state where they’re going to roast you anyway. If the latter, try to move away.
Though personally I see no need for a “breacher” on a shotgun I’m using in the house or car.
The breacher standoff also makes a Great DNA collector as well as it’s muzzle brake/recoil reducing properties.
And how do these modifications make the 870 more appropriate for self defense? Self defense happens at very close range. If you need all these enhancements to come out on top of an encounter then the person you are protecting against is probably for enough away to allow other means of defense. I would build this out for fun and recreation and then use it in self defense if needed. But, I would not try to sell a judge and jury on the original intent for the build out.
A Fun Build: House/Camp REMINGTON 870:
https://s859.photobucket.com/user/SR25MK4/Firearms/Remington%20870%20Build/story