Last time around we talked about eye dominance and the importance it place on accurate shooting. Now we are getting into the building blocks of putting your rounds on target. If you need to draw your concealed carry pistol that means the fight is on. This is not target shooting. When the weapon comes out of the holster you need to be ready to fight, which means you need good balance and the ability to move. A fight is a dynamic thing, if you stand still, you will get killed. So let’s take a look at the proper shooting stance as outlined in the book Tactical Pistol Shooting by Erik Lawrence.
Stance
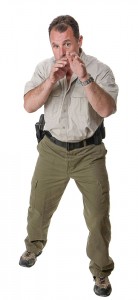
This fundamental of shooting is always important; it is the foundation for your shooting platform. For combat-type shooting, the stance should be solid, yet potently ready for movement. This stance looks like a fist-fighter’s stance. This stance should be very similar to your shooting stance for tactical carbines and shotguns and with the empty-hand martial arts. The less you have to change for different weapon systems, the more natural it will be. Make this stance a habit.
Feet
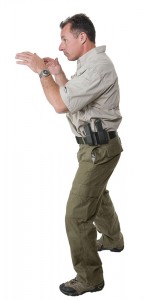
The feet should be shoulder-width apart. The non-firing foot is slightly forward of the firing foot (usually 3 to 6 inches) and is pointed to the target to be engaged. Your firing foot should be firmly planted and at up to a 45-degree angle outboard to provide you with balance.
Weight distribution between the non-firing foot and firing foot should be 60/40 and focused on your toes (essential in recoil management). Refer to Figures 5-2a and 5-2b. Your weight should be centered over the balls of your feet. This position also allows for quick lateral or forward movement.
Natural point of aim is very important for beginning shooters, as it is where the body naturally points and is a good starting place so you are not correcting for other mistakes. You can find your natural point of aim by acquiring your stance oriented at the desired target, closing your eyes, presenting your hands toward the target as if holding a pistol, and then opening your eyes. At what are you oriented? If it is not the center of the desired target, move your firing-side foot slightly forward or backward to bring your natural aim point to the desired area. Repeat until your hands are oriented to the center of the desired target.
Knees
Your knees should be slightly bent and your upper torso leaning forward. When you assume this position, you absorb the recoil through your body, which will allow you to speed up engagements.
Elbows
Your elbows should touch the side of your body. Stand with your head and shoulders square to the target and your head erect.
Your stance must be comfortable, so make sure you attain it every time you start your practice. It is quick to move from, you present the strongest part of your body armor, if used, and you are facing the known threat so you can analyze your courses of actions with the most amount of information available.
Grip
This section will teach a right-handed shooter who is right-eye dominant. You left-handers know the drill. If you are cross-eyed dominant you will still be using the same grip, just raising the pistol in front of your dominant eye.
With your unloaded weapon pointed in a safe direction and the index finger off the trigger and outside the trigger guard, use the non-firing hand to place the pistol in the web of the shooting hand. Make a fist around the handle of the pistol. Your grip should allow you to place your trigger finger so that you have maximum control. Your trigger finger should be straight and lie along the side of the frame or the outside of the trigger guard. Refer to Figure 5-4.
Be sure to fit the “V” of your hand, formed by the thumb and the index finger of the shooting hand, as high as possible on the backstrap of the frame. This placement is to help manage recoil more efficiently. Your grip holding the pistol should align the backstrap of the pistol with the wrist and forearm.
Your non-firing hand should now fill in the exposed grip panel from the back to the front to make a fist over your firing hand fingers. The thumb of your non-firing hand should be under the thumb of the firing hand, which is pushing down. The index finger of the non-firing hand should be indexed under the trigger guard, pushing up. Refer to Figure 5-5.
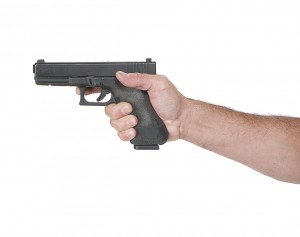
Try to apply most of the tension to hold the pistol with your non-firing hand, which allows you to relax your firing hand and obtain greater control with your trigger finger. My rule is a 70/30 ratio of non-firing hand to firing hand tension. Others think that equal pressure (50/50) is more easily learned and works well for some.
Use 100 percent of the grip panels; you can use skateboard tape to maximize friction. Pinch the heels of your hands together to get a complete grip. If you have extremely white knuckles or start trembling immediately, you are gripping too hard. You must find your happy medium, for this balance allows for sustained shooting if the need arises. You will find the more you lock your wrists using the top tendon, the more control you have with recoil management.
The arms form two sides of a triangle, your back the third, with your arms taking equal pressure in your position. The elbows are just under a full lock (keep it comfortable) to assist in allowing the recoil to go through the arms into your chest to help manage recoil. You may have to modify this grip and your elbows slightly as everyone has different hands, physical dimensions, and different pistols have various grips. Your grip must be consistent and comfortable. This isosceles of the arms is more natural to maintain under extremes than some forms of the Weaver technique. Train to use your natural instincts, not to counter them.
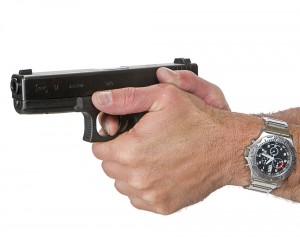
NOTE: Your grip will change as you become more proficient, and you should always check your grip before drifting any sights. Pistols come from the factory bench sighted in, and you should make your hand fit your pistol, not your pistol fit your hand. If you do this step correctly, you will be able to shoot quite well with any factory, out-of-the-box pistol. Try different pistols to learn which one fits you the best; there are many different grip angles out there, so check them out first.
These tips come directly from Tactical Pistol Shooting, the excellent book by Erik Lawrence available online at the Gun Digest Store. On Friday will talk about sight picture for the pistol shooter. Tactical pistol Shooting offers everything from shooting fundamentals like those shown here to dealing with extreme situations like shooting while wounded and speed reloading behind cover. This is a must-read for anyone with a CCW permit or who carries a pistol for work or self-defense.
To get your very own copy of Tactical Pistol Shooting at a great price, click here!

Free Download: Beginner's Guide to Handguns
Recommended Glock Resources:

![Best Concealed Carry Guns In 2025 [Field Tested] Wilson Combat EDC X9S 1](https://gundigest.com/wp-content/uploads/Wilson-Combat-EDC-X9S-1-324x160.jpg)


![Best 9mm Carbine: Affordable PCCs [Tested] Ruger Carbine Shooting](https://gundigest.com/wp-content/uploads/Ruger-Carbine-Shooting-100x70.jpg)
![Best AR-15: Top Options Available Today [Field Tested] Harrington and Richardson PSA XM177E2 feature](https://gundigest.com/wp-content/uploads/Harrington-and-Richardson-PSA-XM177E2-feature-100x70.jpg)
