
Tips and tricks for using and adjusting open sights.
What are the advantages of open sights:
- Precise in medium to close range.
- Fast target acquisition.
- Many offer easy adjustment for zero.
- Lighter rifle.
Back when my eyes were crisp, I could shoot the ear off a squirrel with open sights. In the ‘70s, riflescopes were just starting to be trusted and they failed about as frequently as they didn’t. At that time, only one hunter frequenting our deer camp had a rifle with an optical sight — most of the other hunters thought he was weird. (He was weird, but for other reasons.) Open sights have now fallen out of favor because most shooters don’t know how to use them, or just as importantly, they don’t know how to adjust them.
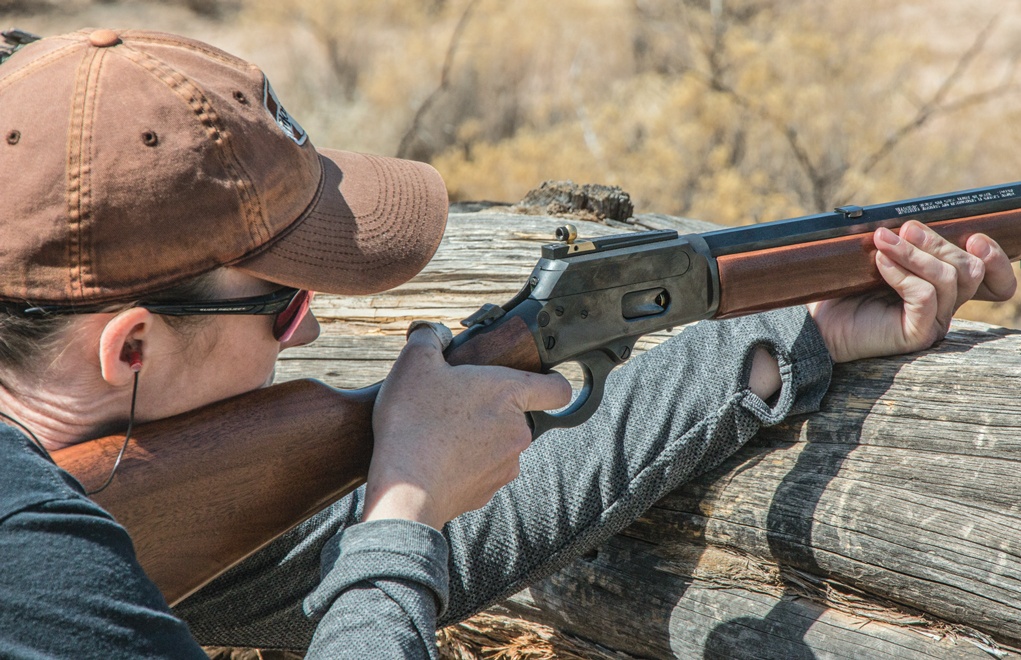
The key to using open sights is to focus on the front one, trust the sight picture, and like with any other sight, follow through. With but little practice you can trust open sights more than you trusted your high school girlfriend. In fact, you might be surprised how well you can actually shoot with them.
Not too long ago I was testing Ruger’s new Single Seven Bisley from Lipsey’s. I managed seven out of seven hits on an 8-inch plate, at 50 yards, while shooting off-hand. Similarly, during a recent lever-gun class at Gunsite Academy, I took a Marlin .45-70 Govt. from the Remington Custom Shop and hit a 12-inch target five out of five times at 200 yards. Granted, these feats pale in comparison to what others can do — or I used to be able to do — with open sights, but they stand as evidence that they’re not as antiquated as some might think.
Open Sight Application
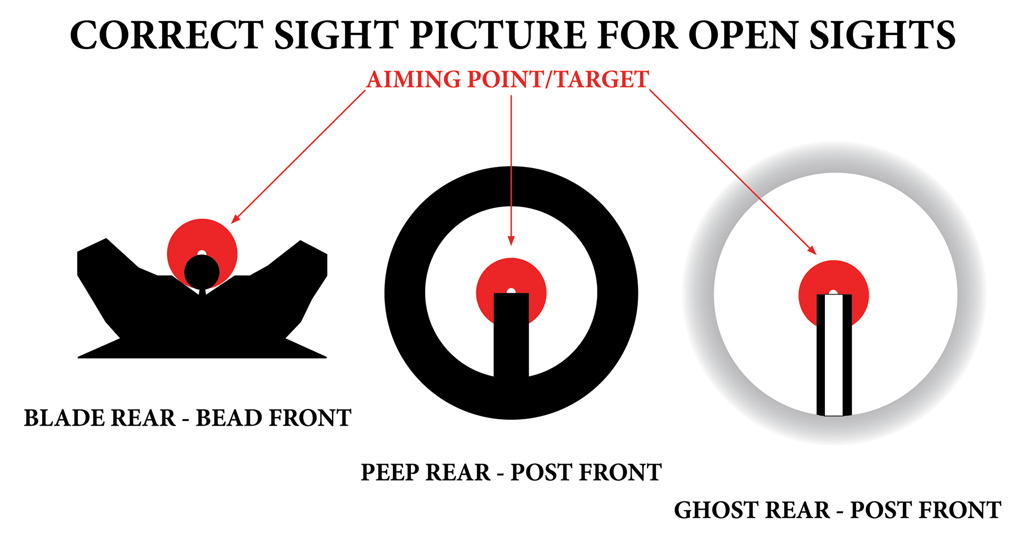
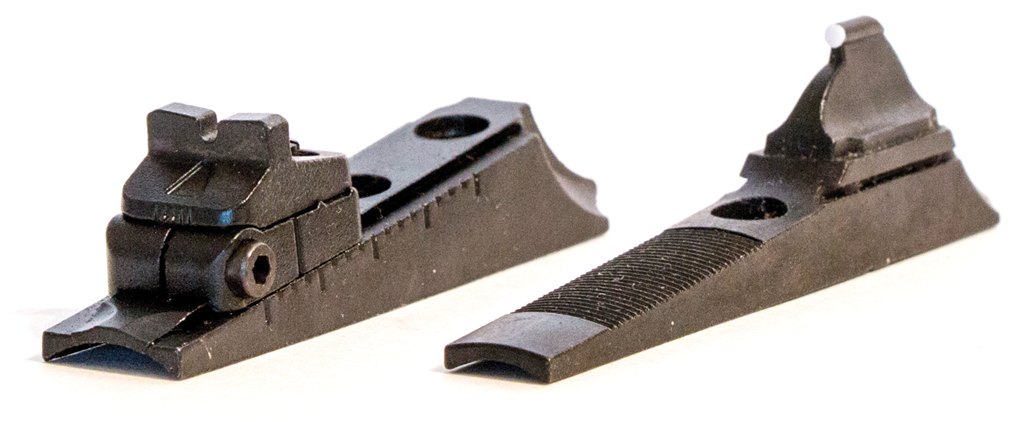
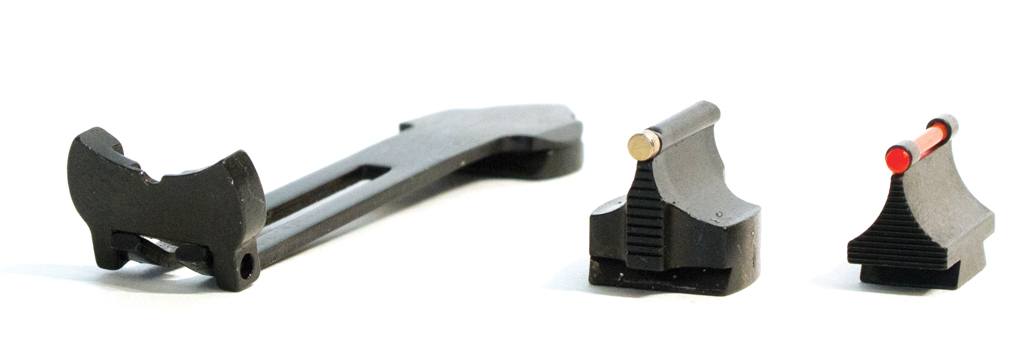
Part of the trick with open sights is to make sure you’re using the correct sight picture, and some folks — particularly those raised on optics — don’t know what a proper sight picture is. Excluding target-styled sights, with open rifle sights there are two basic versions. The most common is the blade rear and bead front, the other is the peep or ghost-ring rear and post front. Sometimes a bead front is used in conjunction with a peep or ghost ring, but a post generally provides a better sight picture for the most precision.
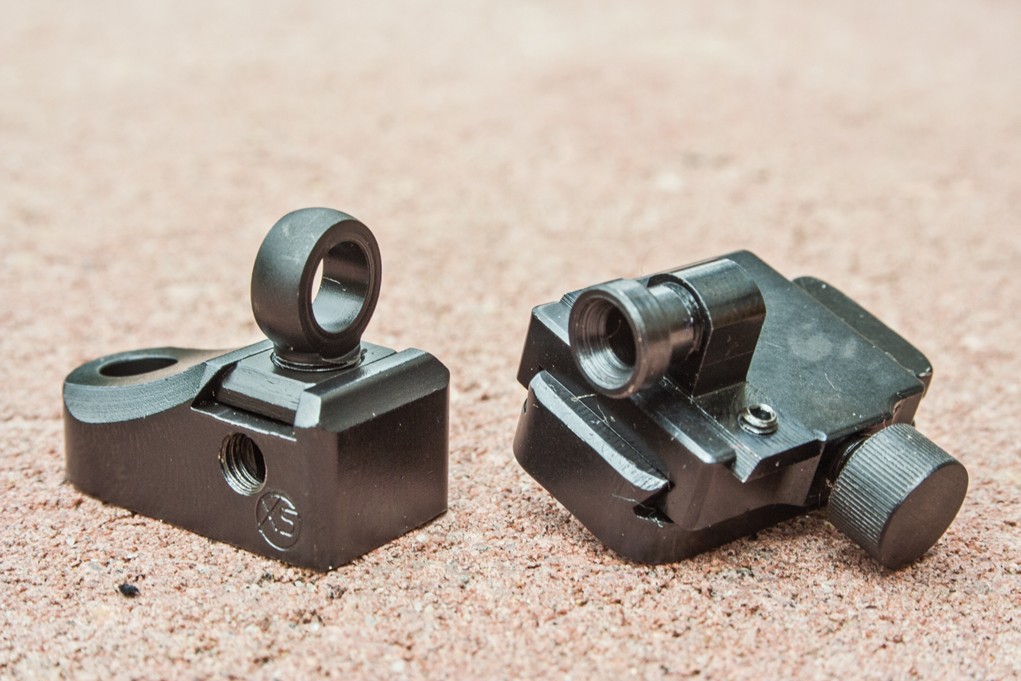
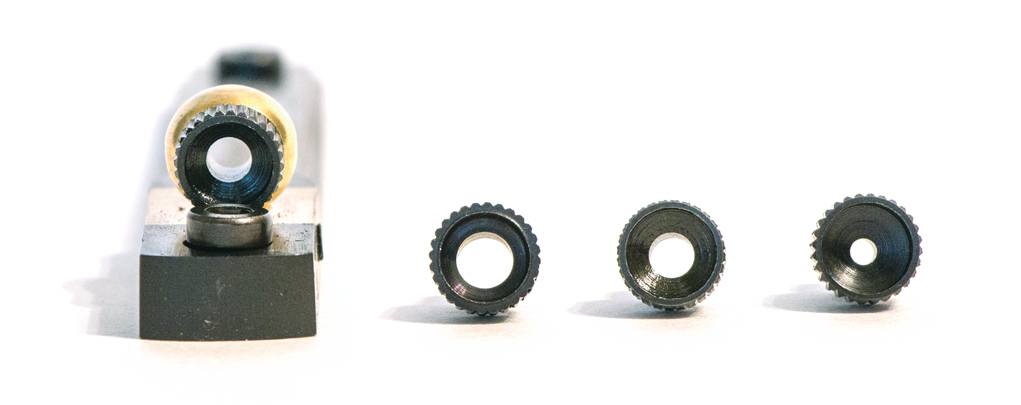
Most factory rifles that come with open sights have the traditional blade rear and bead front. XS Sights makes a wide variety of ghost ring sights for many rifles. They’re of excellent quality and offer full adjustment of the rear sight. They also come standard with a white-striped front post, which is the best front sight for the ghost ring. Skinner Sights also makes a wide selection of ghost-ring sights, but with optional screw-in apertures that can make them more of a peep sight. Skinner also has a wide variety of front sights, including fiber-optic versions.
A tremendous advantage of peep or ghost-ring sights that’s often overlooked is the sight radius — actually it’s not a radius, it’s a separation. For example, with a barrel-mounted blade sight on a lever-action rifle with a 20-inch barrel, sight separation can be as short as 16 inches. Install a receiver-mounted peep or ghost-ring sight and the distance between the sights can increase to about 25 inches.
This matters because with a 16-inch sight radius, if you have 1/10-inch deviation in sight picture, it will change point of impact as much as a foot at 50 yards. With the longer sight radius, that same sight 1/10-inch deviation in sight picture would only alter your point of impact by about half as much. That’s a big difference.
With the blade rear and bead front, you position the bead in the notch in the rear sight, with an even amount of space — or no space — on the bottom and three sides, and focus on the front sight — not the target. With the peep or ghost-ring rear and post front, you focus on the top of the front blade and let your eye naturally center that focus point in the circle of the peep or ghost ring. Again, your focus is always on the front sight, not the target.
Calculating Corrections
Some folks get all flustered when they try to adjust open sights because they confuse themselves with the correction needed. So, here’s your rule of thumb for open-sight adjustment: Move the rear sight in the direction you want the bullet to move on the target, and move the front sight in the opposite direction you want the bullet to move on the target.
For example, let’s say you shoot a three-shot group at 50 yards with your open-sighted Marlin 336, and the center of that group is 4 inches to the right of center, and 2 inches high. This means you need to move the rear sight to the left for the windage correction. For the elevation correction you can raise or get a taller front sight, or adjust the rear sight down.
Simple enough, right? The other confusion that complicates the adjustment of open sights is how far to move them to achieve the correction you want. Unlike optical sights, most practical non-target open sights don’t come with a click adjustment feature. This means you will have to do some math.
Some manufacturers will give you an indication of the adjustment you can expect with one turn of a sight screw, and they’re generally very close. However, the problem is, manufactures don’t know the length of the rifle’s barrel that you might install their sights on. This is critical because the sight radius — separation — determines how much each movement of the front or rear sight will affect the point of impact at a specific distance.
One way to sort all this out is to use the Sight Correction Calculator at Brownells.com (Google is your friend.) This handy-dandy online calculator will tell you exactly how much correction you need. All you have to do is input the amount of error on the target, the sight radius and the distance to target — all in inches — and push the “calculate” button. The result will tell you how much of an inch of correction you need. Since almost all of us have a smartphone, you can even do this at the range.
If you’re living in the dark ages or just feel like math is something you do on paper instead of on the internet, you can work out the correction (C) yourself. Just multiply the amount of error (E) in inches, by the sight radius (SR) in inches, and then divide the product by the distance (D) to the target in inches. Regardless, you get the same number — a fraction of an inch — as the answer. The formula looks like this:
(E x SR ) / D = C
In the previous example mentioned, where we needed a 4-inch adjustment to the left, the calculation would look like this:
(4×16) / 1800 = C or 64 / 1800 = 0.036
In other words, you would need to move the rear sight 0.036 of an inch to the left to obtain a proper zero.
Making Corrections
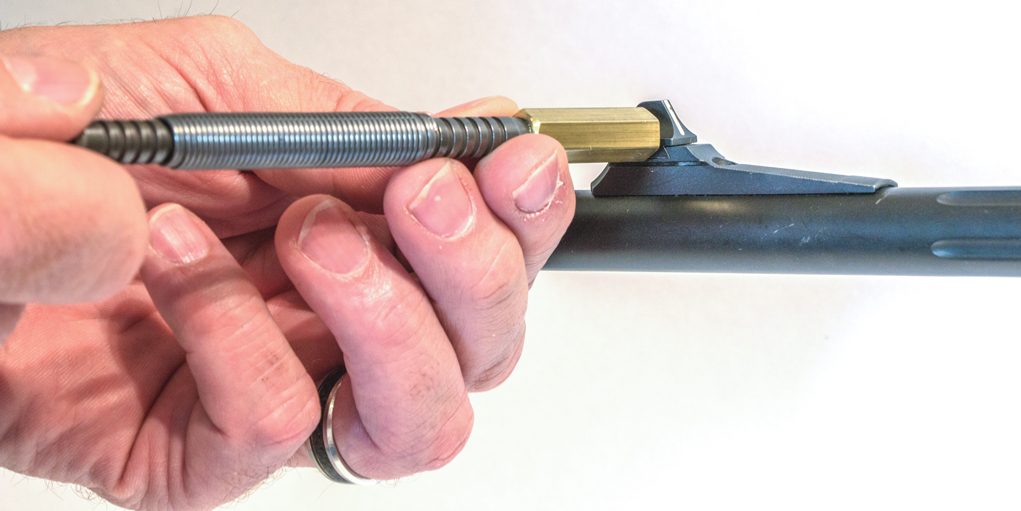
The next place shooters screw up is when they’re making corrections. Most open sights on rifles fit into a dovetail cut into the rifle’s barrel. The front and rear sights are driven or pushed into the dovetail and held in place by friction. You can move — drift — or replace these sights by tapping them lightly with a small hammer and a nylon or brass punch. Don’t use a steel punch! You’ll mar the sight and your firearm. In most cases, this drifting occurs rather easily. In some cases, it must be accompanied by some hard pounding and even cussing. It’s always wise to put the rifle/barrel in a vice first.
Andy Larsson of Skinner Sights showed me one of the coolest gun tools that’s specifically made for adjusting open sights. It’s called the Wyoming Sight Drifter — it’s spring-loaded and sells for $32. You place the brass end against the sight and pull and release the spring-loaded plunger. It impacts the brass push, and very much like the Newton’s Cradle balls you find on office desks, it drives the force from the impact through to the sight. This tool will eliminate time, scarred guns and a good deal of profanity from your sight adjustment sessions. Skinner Sights has them in stock.
Open Sights And Old Eyes
An optical sight does not make your rifle deliver more precision … it only helps you see better. Yes, because you see better, you can often shoot more accurately, and this is why young eyes often perform better with open sights. As you get older — around age 40 — presbyopia sets in. Presbyopia is a condition that comes with age and limits your ability to focus on objects up close. With minor cases of presbyopia, peep and ghost ring sights help you better focus on the front sight. However, when you get to the point you need reading glasses with a +2 magnification, you’re going to have to seek the help of an optometrist.
That’s what I did. I explained to my eye doctor what I wanted to see, and what needed to be in focus. He altered my prescription and ordered me a pair of Oakley shooting glasses. It didn’t take my eyes back to when they were only 20 years old, but I think I might once again be able to shoot the ear off a squirrel, or at least, the cents off a nickel … even with open sights!
Editor’s Note: This article originally appeared in the June issue of Gun Digest the Magazine.
More optics and sights info:
- How To Upgrade Your Muzzleloader’s Open Sights
- Adjust Iron Sights On Fixed-Sight Pistols And Revolvers
- Red Dot, Green Dot Or Iron Sights?
- Hunting Revolvers: Are Red-Dot Sights the Answer?

Next Step: Get your FREE Printable Target Pack
Enhance your shooting precision with our 62 MOA Targets, perfect for rifles and handguns. Crafted in collaboration with Storm Tactical for accuracy and versatility.
Subscribe to the Gun Digest email newsletter and get your downloadable target pack sent straight to your inbox. Stay updated with the latest firearms info in the industry.


j,bush I have a similar setup on my 1895 Cowboy but I have a Marble’s Deluxe tang sight (windage and elevation adjustable) a Lyman flipper on the barrel and a Lyman globe on the front. The globe lets me change the posts….for long range SASS (cowboy action) competition and for long range hunting I love the hair fine crosshair front; it is precise and won’t cover up a target. If the targets are round, the sight comes with circular front inserts as well.
Wish we could post pice here
You are referring to a rear peep or ghost ring sight as “open sights”. While they do not have an optic, neither is an open sight. They would be better described as “iron sights”. True open sights would be of the notch variety rather than the closed ring of a peep sight or ghost ring. Just a clarification of terms. Your article has plenty of great information.
I took a buffalo head on at 210 yards with a winchester single shot 45-70 using a lyman tang sight. I had the rifle zeroed for 100 yards using a flip up marbles sight on the barrell and the tang sight set for 200 yards. Using Hornady leverevolution ammunition I figured I was good for about 250-300 yards considering tha baseball like trajectory of the cartridge. I was age 70 at the time, the sun was setting and the bull was backed tp to grey scrub oak. My dayglow front sight saved the day and my shot cut his horn at the skull and traveled down the side of the spine exiting at the rump. We had to move in for a final shot and I switched to the marbles sight to make a clean kill. Solid article and I think most people can do well upto 200 yards with open sights but anything beyond 200 becomes increasingly difficult to define a target in the field. My front sight totally obliterated my buffalo and I had to get a solid sight picture and slide up the target until just the tip of the bulls head showed over the center of the front sight and shoot. This sort of thing takes a lot of practice. A properly zerod optical sight takes a lot less skill.