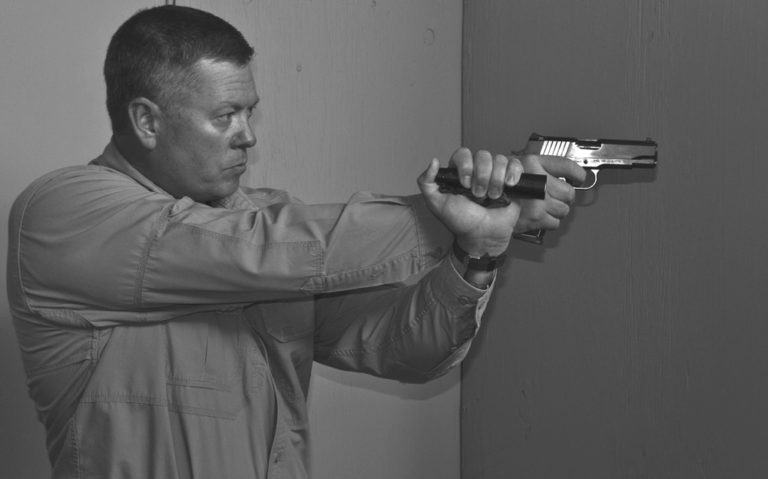
In his new book, Handgun Training for Personal Protection, firearms trainer Richard Mann admits that acquiring a good tactical light was one of the first investments he made after becoming a police officer.
It's easy to see why. Good flashlights are a game changer for concealed carry or armed duty and should be a part of your everyday carry kit (EDC). Today's tactical lights are powerful enough to provide total illumination of an area, your target and your handgun's sights. They can virtually blind an attacker momentarily, providing a split-second advantage.
But what is the best flashlight technique to use while deploying your handgun for self-defense? That depends on the situation. Here are Richard Mann's 4 techniques to know and practice.
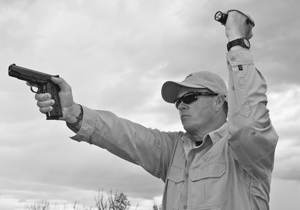
The FBI Technique
Thinking bad guys might shoot at your light because they think that’s where you are, the FBI developed this technique to protect its agents from incoming bullets directed at the light. With the FBI technique, you hold the flashlight away from your body, out to the side and up in your non-shooting hand as you search for and engage targets. This is a tactically sound method for searching, but once you start shooting, your muzzle blast will give away the center of your location. This sort of negates the need to hold the flashlight away from your body and negatively impacts your ability to shoot accurately because you are shooting with one hand. Also, by having an arm extended away from your body, you unbalance your shooting platform.
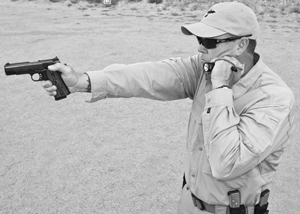
Neck Index
The neck index technique lets you transition from looking to shooting. Let’s say you are using the FBI technique to search and see a threat. You can pull the light to the neck index method as you start weapon presentation. If you need to shoot fast, you can shoot with one hand while using the neck index technique. If time allows, you can transition to one of the two-handed flashlight techniques. With the light indexed at your neck, it’s similar to your support hand being at the center of your body as it’s supposed to be during normal weapon presentation. Pull your non-shooting hand, which holds the flashlight, up to your chin with the bright end orientated toward the threat. If you have hard-to-see sights on your handgun, this method will help illuminate the sights. But, it will also illuminate some of you. Regardless, it lets you get a lot of lumens directed toward the bad guy fast.
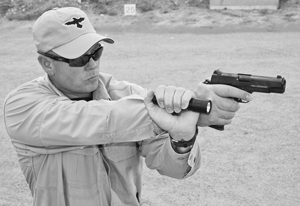
The Harries Technique
With the Harries technique, you lock your wrists or the backsides of your hands together. To employ, slip your non-shooting hand, which is holding the flashlight, under your shooting arm and then lower the elbow of your non-shooting hand by rotating your non-shooting arm at the shoulder. This applies pressure against the backside of your shooting hand and makes for a relatively stable shooting platform. The downside is assuming the position in a hurry. It takes some time to prefect this position without muzzling your support hand as you present the weapon. Ideally, you should fully present the weapon to the target with your strong hand. Then slip your support hand with the flashlight under your shooting arm. You could start by assuming the neck index position with the flashlight illuminating the threat. After the handgun has been pointed towards the threat, then transition to the Harries Technique.
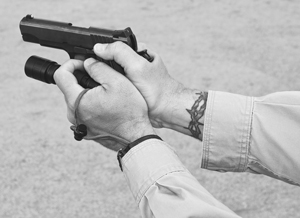
Surefire Technique
To perform the Surefire technique, you’ll need a small-bodied flashlight with an activation button on the end of the tailpiece and, ideally, a rubber grommet positioned just a few inches forward from the end of the light. Hold the flashlight like a syringe, between the index and the middle finger of your shooting hand with the activation switch placed against your palm. Grip the handgun as when using a normal two-handed grip, but only using the bottom two fingers of your non-shooting hand as part of that grip. Your index finger, middle finger, and thumb are used to hold and orientate the light. To activate the light, squeeze it like a syringe pushing the activation button with your palm. The trick is learning to orientate the light with the handgun. Most commonly, shooters tend to point the light toward the ground. This is not all that bad. Generally there will be enough light reflected off the ground or ambient light from the beam to light up the target.

Next Step: Get your FREE Printable Target Pack
Enhance your shooting precision with our 62 MOA Targets, perfect for rifles and handguns. Crafted in collaboration with Storm Tactical for accuracy and versatility.
Subscribe to the Gun Digest email newsletter and get your downloadable target pack sent straight to your inbox. Stay updated with the latest firearms info in the industry.

![Best Concealed Carry Guns In 2025 [Field Tested] Wilson Combat EDC X9S 1](https://gundigest.com/wp-content/uploads/Wilson-Combat-EDC-X9S-1-324x160.jpg)


![Best 9mm Carbine: Affordable PCCs [Tested] Ruger Carbine Shooting](https://gundigest.com/wp-content/uploads/Ruger-Carbine-Shooting-100x70.jpg)
![Best AR-15: Top Options Available Today [Field Tested] Harrington and Richardson PSA XM177E2 feature](https://gundigest.com/wp-content/uploads/Harrington-and-Richardson-PSA-XM177E2-feature-100x70.jpg)

My wife and I recently attended Practical Pistol III at the Whittington Center in New Mexico. Most of the training was low light or no light engagements. As is usual for training with Jon Weiler of Professional Marksmen, off we went way outside our comfort zone. On the other hand, to date, every time I have been in the position to put a hand on a weapon in the interest of self defense, it has been at night. In my opinion, becoming familiar with low light or no light engagements is a needed skill. By this article, there appears to be some controversy on the best way of accomplishing adequate engagement. After having done so, I would agree that it is difficult, unwieldy, hard to adequately identify the target, even harder to hit the target, and ignoring flashlight use during home training is probably foolish for all of us that concealed carry. Nice short article, but something that needs to be more thoroughly addressed.