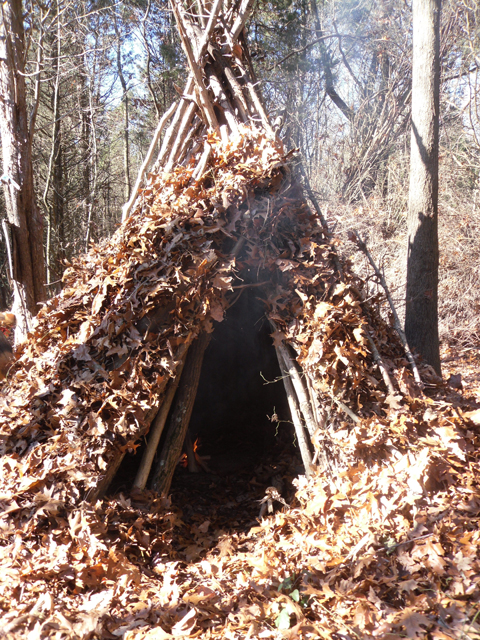
Learn how to make a wikiup survival shelter using forest debris, such as leaves and branches, to keep warm in an outdoors emergency.

A wikiup is essentially a “teepee” style shelter made with forest debris. There are other less time-consuming primitive shelters that you can make in a pinch. However, in a longer term survival scenario in colder weather, the wikiup is king for an important reason: it allows the use of a fire inside the shelter.
Note that no tools are need to make this survival shelter. This makes it ideal for a scenario where you may have been separated from your survival gear.
Wikiup Step 1: Prep the Space
Start by clearing the forest floor where the wikiup will be built. Don't throw those sticks and leaves too far, as they will be used later.
Wikiup Step 2: Make a Tripod
You then need to find three main support poles. These need to be strong, as they will be bearing a lot of weight by the end of this build.
You may choose to secure these poles together with a tripod lashing, although it is not necessary. I like to use poles with a “Y” shape on one end so that they can be locked together and spread apart at the bottoms to make the basic tripod for the survival shelter.
Wikiup Step 3: Add More Poles
Once the tripod is in place, continue to place straight poles around the circumference of the shelter. Place the poles as close to one another as you feel necessary, but don't worry about closing all the gaps. They'll be filled in soon enough.
Wikiup Step 4: Add Insulation
By this point your shelter will start to look like a home. However, the real work is about to begin.
The next objective is to get insulation/shingles installed. For that you will be using forest debris.
This is no different than putting shingles on a house. Start at the bottom and work your way up. The same is true with any primitive shelter. This allows the survival shelter to properly shred rain. If you get this wrong you may not get another chance to correct it.
Continue to piles leaves, pine needles and any other debris in the area to the wikiup. The more insulation added, the more dead air space that can be trapped and ultimately the warmer the inside of the shelter will become.
Sleeping in the Wikiup
Once a sufficient amount of insulation and rain protection is installed, it's time to think about the sleeping options for this shelter.
For me, provided that I don't have any modern gear, I would opt for a post bed. It's as simple as it gets. You first place a pole to one side of the wikiup (making sure to give yourself enough room to lay comfortably), and then you fill the cavity with the driest debris you can find.
The pole you place on the edge of the bed with help keep the leaves in places as you add to your bed, and also keep them away from the fire at night. I recommend adding as much debris as you can, then laying down on top of them repeatedly to condense everything into a thick mattress. This will keep you off the cold ground.
The last step is to gather firewood and bust out that bow drill kit, or ferro rod if you were prepared, and smoke the creepy crawlies out of the shelter before laying down for the night.
I have spent a lot of time over the years staying in wikiups and they are extremely comfortable, even on the coldest winter nights.

Next Step: Get your FREE Printable Target Pack
Enhance your shooting precision with our 62 MOA Targets, perfect for rifles and handguns. Crafted in collaboration with Storm Tactical for accuracy and versatility.
Subscribe to the Gun Digest email newsletter and get your downloadable target pack sent straight to your inbox. Stay updated with the latest firearms info in the industry.

![Best Concealed Carry Guns In 2025 [Field Tested] Wilson Combat EDC X9S 1](https://gundigest.com/wp-content/uploads/Wilson-Combat-EDC-X9S-1-324x160.jpg)


![Best 9mm Carbine: Affordable PCCs [Tested] Ruger Carbine Shooting](https://gundigest.com/wp-content/uploads/Ruger-Carbine-Shooting-100x70.jpg)
![Best AR-15: Top Options Available Today [Field Tested] Harrington and Richardson PSA XM177E2 feature](https://gundigest.com/wp-content/uploads/Harrington-and-Richardson-PSA-XM177E2-feature-100x70.jpg)
