
Iron sights on handguns remain a durable and cost-effective option. Check out these tips to adjust the iron sights on your fixed-sight pistol or revolver.
Sights come in three types; fixed, adjustable and optical. Fixed and adjustable sights are referred to generically as “iron” sights. Despite their name, fixed sights can still be adjusted, though they require filing or welding, and drifting with a hammer and copper punch, to adjust. Adjustable sights can be moved with just a small screwdriver, and you can easily make incremental changes. A lot of shooters wonder why, if the fixed sights are so hard to adjust, they should use them. The answer is this: Fixed sights are cheaper and more durable.
Adjust Iron Sights On A Fixed-Sight Revolver
There are two directions to adjust on a sight: Vertical and horizontal. Do not make vertical (up-down) adjustments until you have the revolver hitting on the centerline horizontally (left-right adjustments).
Adjusting the horizontal is done by turning the barrel fractionally in or out of the frame. When you turn the barrel slightly tighter into the frame, you will move the bullet strike to the right. When you slightly unscrew the barrel, you will be moving the bullet strike to the left.
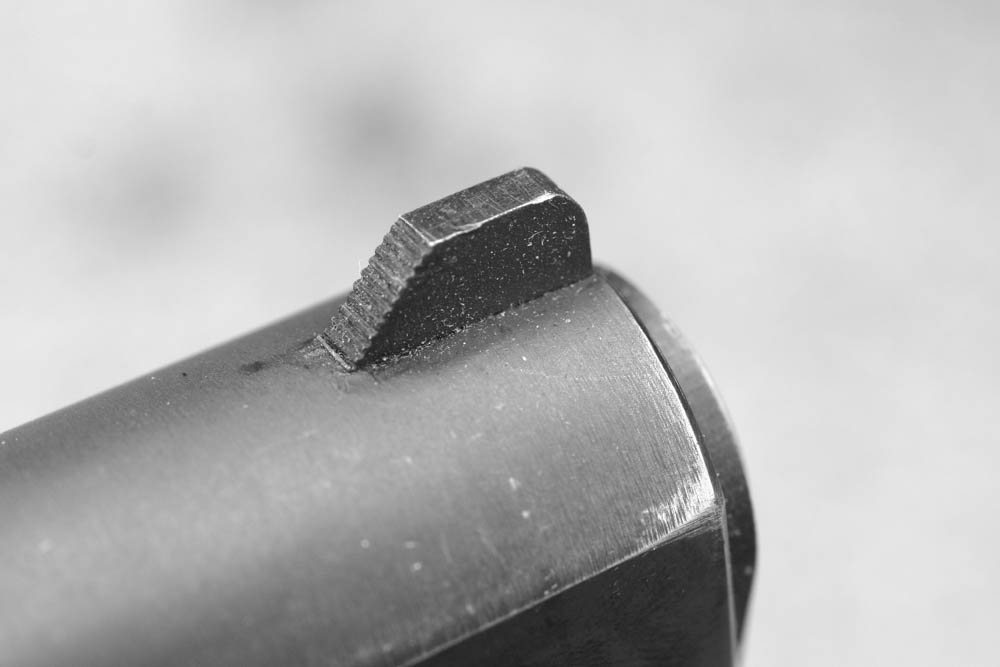
Before you start, examine the top of the barrel where it joins the frame. You need to record exactly how the two fit together before you make any adjustment. If the barrel is a smooth round cylinder, take a permanent marking pen and draw a straight line from the barrel to frame. With a barrel that has a rib or grooves on the top, make a drawing of just where the rib or lines match up with the frame.
Take the cylinder out of the frame. Clamp the barrel vertically in a padded vise, or in barrel blocks in the vise. Secure a frame wrench firmly around the frame. Depending on which adjustment you need, right or left, use a wrench to tighten or loosen the barrel slightly.
The amount you will adjust the barrel is extremely small. Make your first adjustment so the mark you are using as an index on the barrel/frame alignment is moved no more than .010 inch. Take the revolver to the range and test fire it. Your group will be moved by the adjustment you have made. Use the difference between the unadjusted and adjusted groups to determine how much additional adjustment may be needed, or what fraction of the correction you need to undo.
For example, your bullets had been striking 6 inches to the right, and you loosened the barrel .010 inch. Now the bullets are only 2 inches to the right. A .010-inch adjustment corrected 2/3 of the error (4 of the 6 total inches). To correct the remaining 1/3, or 2 inches, you need to make another adjustment of .005 inch, or half the adjustment you already made. Setting up a simple proportion will help you calculate the adjustment with any set of numbers.
Vertical adjustment can be made only by filing the front sight to raise the bullets’ impact, or welding more steel to the sight to lower the impact.
Except when you change barrels, you will rarely have to adjust the horizontal impact. You may have to “tweak” the new barrel back and forth a couple of times until the sights are dead-on. Filing the front sight for vertical adjustment is common only on single-action Colt or Colt clone revolvers. On these, the barrel is often made with the front sight too tall. You file it to the correct height after adjusting horizontal impact. I have never had to adjust a Smith & Wesson barrel for vertical impact.
Adjust Iron Sights On A Fixed-Sight Semi-Auto Pistol
To make horizontal adjustments on most pistols, you move the rear sight. Use a brass or copper punch and a hammer, or an adjustment fixture. To move the bullet impact to the right, move the rear sight to the right. Move the sight to the left to move the bullet to the left. Many modern pistols will have a front sight that is installed in the slide by means of a dovetail. Just like the rear, the front sight is pressed into the dovetail and left centered on the slide.
If you have a pistol that strikes right or left of your aiming point, look first at the front sight as a check. Measure it. Is it centered? If it is, then you can proceed to make your corrections on the rear. If it is not, plot the front sight offset, and how it affects your problem. If you find that you have a pistol that hits to the right, and curiously enough your front sight is left of center, perhaps the front is more of your problem than the rear? Center the front sight, test-shoot again, and see what happens.
Unlike barrel turning, you can calculate the exact amount you have to move your pistol sight without trekking back and forth to the range. The ratio of the sight radius to the correction needed is the same as the ratio of the distance to the target and correction on the target. This is the same formula in Chapter 3, using a mill to adjust your sights. The sight correction divided by the sight radius equals the target error divided by the target distance.
For vertical adjustment, file the front sight to move the bullet impact up. Install a taller front sight to move the bullet impact down.
Glock makes vertical adjustment very easy by offering their rear sights in a range of heights. If you find that your Glock is off vertically, check the side of your rear sight and find the line or lines cast into the plastic. The lines indicate the height of the sight. When you write to Glock for a replacement, state which model Glock you have, how far off your pistol is at what distance, and what your current sight says on the side. If you plan to own several Glocks, you can order one sight of each height, and then swap them around as needed.
This article is an excerpt from Gunsmithing Pistols & Revolvers 4th Edition.

Next Step: Get your FREE Printable Target Pack
Enhance your shooting precision with our 62 MOA Targets, perfect for rifles and handguns. Crafted in collaboration with Storm Tactical for accuracy and versatility.
Subscribe to the Gun Digest email newsletter and get your downloadable target pack sent straight to your inbox. Stay updated with the latest firearms info in the industry.


