
Inspired by the great Remington Rolling Block design, the author decided to build a buffalo gun for hunting and shooting cowboy single-shot long-range events.
Founded in 1816 by Eliphalet Remington, Remington Arms Co. is the oldest arms manufacturing company in America. Before that, most arms were produced by small gunmaking operations.Remington might have marked the beginning of the industrial revolution in the gun business, I guess. It’s interesting that one of the company’s most popular products pulled it from almost certain ruin near the end of the Civil War.
Leonard Geiger brought the idea of the rolling block rifle to Remington Arms Co., which agreed to manufacture it. First, the idea had to be developed into the production stage by Remington designer Joseph Rider.
The initial gun was a split-breech carbine that saw little duty toward the end of the war. The design needed improvements, and it was eventually turned into the rolling-block action we know and love today.
The design came along at the right time, as arms manufacturers typically experience tough times when wars end. The rolling block was acknowledged as the best arm of its time, and its acceptance overseas brought Remington back into the black. Even today, the action is a popular single-shot for hunters and target shooters.
In its 70 years of production, the rolling block had so many versions it would take a book to decipher them. (For a great text, check out “The Military Remington Rolling Block Rifle” by George Layman.)
Although many sporting versions were produced, the rolling block was primarily a military weapon. Sustained fire with the rolling block was full auto compared to other options of the time, and the action was sturdy and reliable for military use.
Modern Applications
Inspired by the great design, I decided to build a buffalo gun with a rolling-block action for shooting cowboy single-shot long-range events.
Layman’s book helped me distinguish what type of action I started with. I had shot many Sharps-type rifles but wanted a different gun of the time. Plus, it seemed pretty cool to start with an action that was 100 years old.
The actions are still available at pawn shops and estate sales. www.gunbroker.com usually has a good selection of rolling-block actions, rifles and miscellaneous parts on auction. That’s where I got my last one. Gun Digest Classifieds also features these rifles.
The first actions were built of steel in the late 1860s. They were used with black-powder cartridges, most of which are obsolete. These actions were called No. 1s. The sporting rolling-block rifles were produced in .50-70 caliber.
Some were involved in skirmishes with American Indians, in which men held off attackers that outnumbered them five to one. As rifles were produced for overseas markets, they were chambered in calibers such as .43 Spanish, 43 Egyptian and metric calibers from Danish contracts in 11.7 x 51. Rifles usually have markings to identify where they saw service.
In the late 1890s and early 1900s, when smokeless powder started to rule ammunition, better steels were developed and used to produce these actions.
They were stronger and withstood the pressures developed by new propellants and cartridges. The rifles were chambered for 7 mm Mauser, .303, .30-40 and other cartridges produced for new-fangled repeating rifles.
These were No. 5 actions, and although the rifles differed in many details — such as the type of sights or length — the action was essentially the same as the No. 1, except it was made with the stronger “smokeless” steel. The parts are interchangeable.
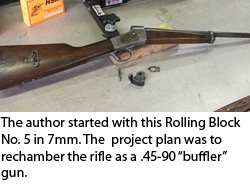 The rolling block came in various other models, but the one I found for my project was a No. 5 in 7 mm. It was a carbine and made circa 1902 to 1905. The rifle was functional, but as I disassembled it to start the project, my desire to shoot it waned. The action was in excellent shape, however, and would be an great base for my project. I began the search for the parts I’d need to rechamber it into a .45-90 “buffler” gun.
The question of caliber was my first decision. I wanted to build a sporting-type rifle, so the .50-70 might have been a period-correct caliber. It was a No. 5 action made of stronger steel, so I could shoot smokeless or black powder.
However, I wanted it in a more common buffalo caliber. I also wanted something for which it was easy to find loading components for making cartridges.
The .45-70 fit that description and is certainly a period-correct caliber. I went with the .45 Sharps, which is more commonly known today as the .45-90. My spaghetti Sharps is a .45-90, and I figured I could easily get parts right at my loading bench.
I have found most of the time it’s better to shoot the .45-90 instead of the .45-70 when you’re using black powder. The extra black powder that fits in the .45-90 case will increase the velocity a bit.
The most accurate smokeless loads in either rifle travel at about the same speed. Some of the new big-case powders will make the pill travel faster, but slowing them from 1,600 to 1,300 feet per second yields better results.
The .45-70 can be loaded faster, but that’s only recommended in the Ruger No. 1 action. I’ve never used that rifle and don’t have information about accuracy when pushing the .45-70 that far. The .45-90 will stay in the safe pressure zone at higher velocities, but accuracy suffers.
Getting Down to Business
 After I decided on the caliber, I could start rounding up stuff. I needed a barrel, sights, a stock, a forearm and a .45-90 chambering reamer.
I went to the Brownell’s catalog and found about everything I needed. It carries Green Mountain black-powder cartridge barrel blanks in an octagonal stock. The barrel would have to be sized, threaded, chambered and crowned to the desired length.
It was plenty oversized enough for anything I wanted to do. I could have made it half-octagonal, half-round, or swamped it down to reduce the weight. I liked the full octagonal barrel but ended up tapering it down from breech to muzzle to decrease the weight. I also ended up shortening it to 30 inches before crowning it. The Green Mountain barrel blank was a .458 bore with a 1-in-18 twist.
When I pulled the 7 mm barrel off of the No.5, I saw something new. The barrel threads were square. I knew such threads existed, but I’ve never had to cut them. I had to grind a tool to cut square threads, which turned out to be an easy project. I counted how many threads were inside an inch: 12 tpi.
Next, I measured between and across the threads, and they were around .041 inch. I say “around” because they varied a bit, but only by a few thousandths. I then ground a square tool to those dimensions out of high-speed steel. I gave it a trial run on a piece of aluminum and made a plug that had a Class 3 fit to the receiver. A Class 3 fit has very little wobble.
The machining to fit a barrel blank requires access to a lathe. I have seen barrels on the Internet that were already machined and chambered. If you keep an eye open, you might find barrel that suits your needs.
Some companies offer barreling and chambering with their products, or most local gunsmiths can do that. If you have machining skills but need coaching, Brownell’s tech support guys are always there to help. I’ve found them to be extremely knowledgeable and will point do-it-yourself folks in the right direction.
I turned the barrel stub down to the right diameter and found that the round stub was a bit short for the rolling-block action.
It wasn’t a problem to use the lathe and lengthen the stub and round out some of the octagonal barrel. I like putting my own shoulder on the barrel so everything in the chambering and threading process is on the same plane. I used the old barrel to get it close enough for a hand fit.
 When I was ready for threading, I kept the stripped receiver nearby, as the threads were getting close. This is the only way to get a precise fit, and it takes some time to try the threads, take off a few more thousandths and try again until it screws down tight. After the fit is good, you can adjust the receiver to the right position by taking off a few thousandths at the shoulder until it stops level. The breech face will also have to be trimmed to be flush with the back of the receiver to headspace correctly.
After the receiver fit to the barrel, it needed to be chambered. Brownell’s carries a good selection of Dave Manson reamers, which I like. When picking out a reamer for the .45-90, you can choose between lead bullets and copper jackets.
I knew I was going to shoot buffalo matches in cowboy games and would have to use lead bullets. I also planned on doing some elk hunting with the finished rifle and have been happy with the performance of lead bullets in such situations. Those big, slow bullets do not destroy meat from velocity shock; you can eat right up to the hole.
The .458 bore was big enough that I didn’t have to drill out the hole before starting the reamer. You could use a roughing reamer to get closer and then finalize things with a finish reamer.
You won’t finish this part of the job in a few minutes. The process is slow, and you have to remove the reamer often to clear off chips. You’ll also need lots of good-quality cutting oil. I kept the blank in the lathe, lined up the reamer with the tail stock and turned it by hand with a wrench. That kept the reamer lined up precisely with the bore, which is paramount for accuracy.
I was careful not to turn the reamer backward or counter-clockwise, because the chips binding against the cutting edges will dull the reamer.
After the chamber was reamed to the desired length, I fired up the lathe and slightly chamfered the edges to knock off the sharpness and keep bullets from snagging when loading. Then, I polished the chamber to a high finish with 600-grit emery and steel wool. I wrapped the abrasive on a properly sized wooden dowel and inserted it into the chamber when spinning it in the lathe. You can also polish it in a vise, spinning the abrasive with a drill motor.
With the barrel chambered, I had to form the breech face to fit the rolling block part of the action and cut the extractor slot. The First No. 1 actions had a straight-eject extractor on the bottom of the chamber.
Later, however, they were redesigned with a rotary extractor. My No. 5 was fitted with the rotary, and I only had to duplicate the position using the old barrel as a guide. I bought a new extractor and it was easy to fit to the rim of the .45-90. Having the old barrel made positioning the cut easy.
While doing the metal work, I tried to decide how to stock the gun and what type of sights I would use.
I wanted to duplicate a sporting rifle and really didn’t want verneer sights because I also planned to hunt with the gun. Montana Vintage Arms makes a period-correct Rough and Ready rear sight that combines an open sight and flip-up peep for distance shooting. For the front sight, I chose the company’s Beech-type combination, which has a blade for open sighting and a flip-up hooded pin for the peep rear sight.
I figured the gunstock would depend on my needs. I would shoot cowboy long-range events and hunt with the gun.
If I just shot competitions with it, the gun would remain in pristine condition. However, hunting would nick a custom-finished stock.
Brownell’s carries a Treebark Carving plain walnut stock for the rolling block action. It is 90 percent fitted and would be correct and practical for the rifle. It has a flat butt and can be fitted with a recoil pad or inletted to a period buttplate. Treebark Carving also offers various woods to fit any level of look.
What’s Next?
After the receiver is barreled and chambered, I usually proof-test guns before I proceed. In the second part of this article, I’ll do that, and shape the barrel, fit the stock and sights, and decide on a final finish. Click Here for Part 2 of this article to see the results of the great rolling block project.

Next Step: Get your FREE Printable Target Pack
Enhance your shooting precision with our 62 MOA Targets, perfect for rifles and handguns. Crafted in collaboration with Storm Tactical for accuracy and versatility.
Subscribe to the Gun Digest email newsletter and get your downloadable target pack sent straight to your inbox. Stay updated with the latest firearms info in the industry.


The false information is numerous. Lost me when I read “I went with the .45 Sharps, which is more commonly known today as the .45-90.” 45-90 was never called 45 Sharps. Matter of fact there was a 45 Sharps commonly called the 45-2 1/10th aka 45-70.