
To troubleshoot an AR gas system, the first step is figuring out if the gas system is to blame.
How to tell your system is straight:
- Shooters tend to blame the gas system for issues such as a failure to extract.
- It is wise to eliminate other possible causes before turning to the gas system.
- Most stoppages are due to magazine problems, a good place to start.
- Firing a single round from a magazine is a good diagnostic.
- If the bolt locks, you’re likely not under-gassed.
- To determine the power of your gas system you can observe the direction of ejection.
- Brass that ejects forward gets more gas than brass that ejects rearward.
Editor’s Note: This is the second article of four-part series dealing with direct impingement operated ARs and troubleshooting the gas system. To read the first article on the DI system, please go here.
The most complicated aspect of diagnosing a gas system issue is determining if the gas system is to blame. Typically, a shooter will experience a stoppage, such as a failure to extract or feed, and begin to wonder if it’s the gas system. Here’s a free piece of advice: Exercise a moment of patience and some basic deduction before blaming the gas system.

By this I mean first eliminate as many other possible causes as you can. There are a few tests that can be used to determine if your AR is over- or under-gassed, but the tests should be conducted before and after removing all the non–gas system possibilities. Luckily, these tests are quick and simple to conduct.
1. The Single-Round Magazine Test
This test involves nothing more than loading one round into a new or serviceable magazine. Most AR stoppages are due to magazine problems, so start with one that works. Load the magazine into the rifle and fire the round. What does this tell you? The key piece of evidence is whether the bolt locks to the rear after the round fires.
If the bolt locks to the rear, you’re likely not under-gassed. In other words, the direct impingement system has adequate pressure to press the bolt carriage group far enough to the rear to engage the bolt stop/release on an empty magazine. If the bolt does not lock to the rear, it might be your gas system. It also might be a broken bolt stop/release or weak ammo. The next test will help narrow it down.
2. The Angle Of Ejection Test
This test allows you to determine the amount of power your gas system is exerting into the direct impingement system by observing the direction the spent brass flies upon firing. This test is best accomplished on a bench beside a table or with extra bench space to the right of the rifle (on the ejection port side).
Imagine the deflector (the triangular profusion of metal just behind the dust cover or opening for the bolt group) is the center of a clock. Mark this position and make sure the AR is placed here for every shot. Perpendicular to the line of the bore (direction of the barrel), directly to the right of the deflector, imagine that’s 3 o’clock.
Each time you fire a round, the AR should be oriented directly down range, and the deflector is in the same place. You can even use a marking device such as blue painter’s tape to mark the 3 o’clock position, as well as the 1 o’clock and 5 o’clock positions for reference. The brass will be moving quickly, so the marking tape will make the visual tracking easier.
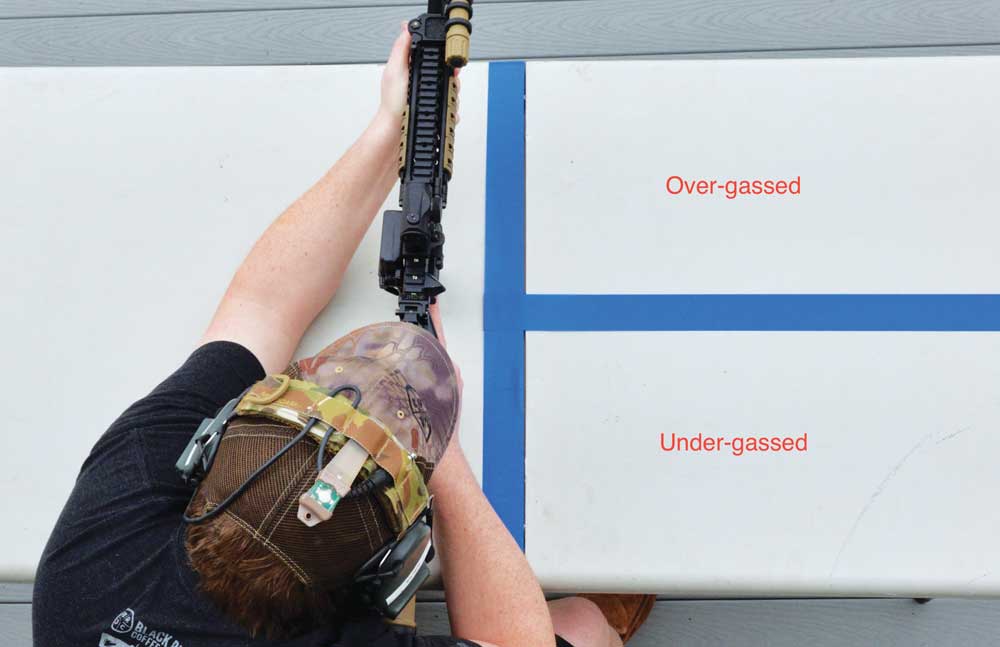
With the AR pointed directly down range and the deflector in the center, fire a single round and watch the path of the brass’ flight. It might help to have a buddy stand to your left and do the spotting. Where does the brass fly? In general, this test measures the strength with which the spent casing hits the deflector — said another way, how much force the gas system is putting into the action.
Presuming all other elements in the system are otherwise functioning properly, brass that flies through the upper half of the arc, between 3 and 1 o’clock, is getting more gas than brass that flies through the lower half of the arc (between 3 and 5 o’clock). Keep in mind, this is a relative measure of the combination of your specific rifle, its level of cleanliness, its age and your choice of ammo.
Editor’s Note: The article originally appeared in the May 2018 issue of Gun Digest the Magazine.

Next Step: Get your FREE Printable Target Pack
Enhance your shooting precision with our 62 MOA Targets, perfect for rifles and handguns. Crafted in collaboration with Storm Tactical for accuracy and versatility.
Subscribe to the Gun Digest email newsletter and get your downloadable target pack sent straight to your inbox. Stay updated with the latest firearms info in the industry.


