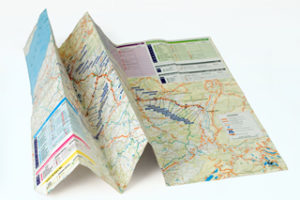
A “threat map” details the hazards in your area. It helps choose evacuation routes and a rendezvous point.
The explosion at a fertilizer plant in Texas this week killed several people and injured many more. It brought to mind the “threat map” disaster expert Paul Purcell details in his book, Disaster Prep 101. (Look for a full review of the book soon.)
A threat map is something you create at home. It details potentially hazardous sites, like a fertilizer plant, should a disaster strike. Using readily available maps at places like Google Maps and Mapquest, the idea is to best assess where not to travel during an evacuation.
The following lists are from Disaster Prep 101. This is just a brief overview. The book contains a lot more detail on these subjects.
Maps to Gather to Create Your Threat Map
Street maps
Aerial photos of your workplace, children’s schools and your home
A city map
A county map
A state map
A national atlas
Start Making Your Threat Map
On each of the maps, mark the following things:
Potential targets of terrorist attacks
Prevailing wind directions – You’ll need this determine where to go if toxic chemicals are in the air. In the case of the fertilizer plant explosion, it would be a good idea to stay upwind.
From rolling blackouts to hurricanes, floods to tornadoes, power can go out at a moment’s notice. If the grid fails, the PowerPot will keep you charging! The PowerPot thermoelectric generator converts any heat source directly into power that charges your USB handheld devices. Get Yours Now
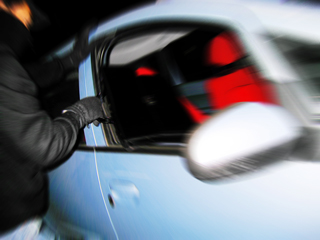
Because she was mentally PREPARED and SKILLED, the author’s mother walked away from what could have been a carjacking. Now that she is more AWARE of the threat, she adjusted her strategy and became better prepared should it happen again. (Image via sxc.hu)
My mom nearly became the victim of a carjacking this week.
After parking her vehicle on a city street, a man rushed up to the rear passenger door. He opened it and got in.
Her immediate reaction was to yell, “No” and “Get out” as loud and as mean as she could muster. It did the trick. The stranger left the vehicle and ran off.
Fortunately, she walked away from the incident with a story, not an injury and a police report. What this man’s intentions were will never be known. It’s better that way.
After talking with her about what happened, it became clear how this is the perfect example of the preparedness mindset. “Prepared, Skilled, Aware” is more than just a catchy tagline at Living Ready. It’s a way to be ready before, during and after an event.
Prepared for a Carjacking: She Had a Plan
Waiting until an event happens is the wrong time to develop a plan. There’s barely time to think. My mom’s incident didn’t last more than a few seconds.
So don’t think. Go into autopilot and execute the plan. In this case, my mom already knew what to do: Use her voice to bring as much attention to herself as possible.
Perhaps the menacing way she said “No” and “Get out” suggested she wasn’t going to tolerate this person’s presence. But my money is on this guy weighing the odds of getting away with a crime. The incident happened in a city with a lot of foot traffic. The odds were good someone would notice the confrontation.
This plan might seem overly simple. But consider how natural it is to freeze up. To allow terror to gel a person’s better judgement.
That didn’t happen because my mom was mentally prepared. She’s safe now. However simple, the plan worked.
On the next page: SKILLED and AWARE
Skilled for a Carjacking: an Appropriate Response
It’s one thing to have a plan. It’s another to execute it properly. In this case, her plan was to draw attention to herself. The way she executed it was with her voice.
In the time since the incident, some suggested that a firearm would’ve helped. I disagree.
Yes, using one would’ve drawn attention to herself. But any concealed carry advocate knows that this level of escalation needs an equivalent threat in order to be legal.
In this case, it’s not known whether the man had a weapon. His intentions weren’t explicit. He didn’t physically attack her.
To the layperson, that doesn’t matter. A stranger entering a vehicle is enough justification. But to a prosecutor considering a homicide case, these details make all the difference.
There are times and places for using lethal force. This wasn’t one of them.
Aware of Carjackings: Changing Settings on the Vehicle
The incident made my mom more aware of a security risk in her vehicle. After putting the vehicle into park, the doors automatically unlock. That’s what happened just as the man entered the vehicle.
Perhaps this stranger knew about these settings, saw an opportunity and went for it. It’s hard to say, but this could have been the case.
Changing the lock setting wasn’t hard. For those who frequent cities, it’s not the worst idea to do the same.
Conclusion: Never a Better Time to be Prepared, Skilled and Aware
It’s worth mentioning again how fast that entire incident happened. A few seconds. No time to think.
That’s why it’s so important to have a plan, know how to use it and to be able to analyze it after the fact. Prepared, skilled, aware. Before, during, after.
Things could have turned out much differently for my mom. Thankfully, they didn’t. I hope this story inspires you to follow her lead and be proactive about your preparedness.
Do you have a true carjacking story or other self-defense lessons? Post them in the comments below.
Recommended Book: Personal Defense for Women
This incident reminded me of the rich resource that is Personal Defense for Women: Practical Advice for Self-Protection by Gila Hayes. It’s an excellent source of information for women interested in concealed carry, self-defense or how to be better aware of threats.
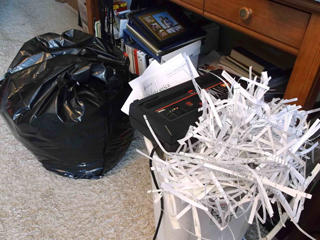
Cleaning up old documents may not be on par with having 20 cords of seasoned hardwood or a bug-out bag ready to go. But good organization is simply smart.
Spring Cleaning Tips: Get Organized
Spring cleaning doesn’t necessarily mean getting the yard tidy, taking care of winter’s buildup in the house or working in the garage or shed to toss out accumulated junk.
Proper filing of necessary home documents and shredding or burning old ones sounds dull. But it’s a smart task that in today’s time of identity theft could prove to be a helpful chore. Cleaning up your home office or corner nook where papers have accumulated is worth the time, as is getting into the habit of properly discarding old documents.
Spring Cleaning Tips: Destroy Documents
I took some time during a recent cleaning day around the house to shred a pile of documents. These included, to my amazement, some that were seven and eight years old. Many of the accounts were closed or had been transferred to newer ones, with new records and account numbers, but I was dismayed at my laziness in letting all these accumulate.
If you have a way to burn old documents, that would be my first recommendation. A fireplace, a patio chiminea, maybe a burn pile in your yard, and once they’re up in smoke they’re gone. If not, a stout paper shredder is a good idea to have and use. I’ve had one for more than a dozen years (and will be putting it to use more frequently).
Buy a shredder applicable to your needs. If you don’t need one with a bunch of bells and whistles, don’t buy one. Shop around. Look online for positive reviews, like in Consumer Reports. Study the models for durability and what kind of ability they have – paper, card stock paper, etc., and purchase locally at an office supply or retail store, or buy online.
Spring Cleaning Tips: Paperwork to Keep
With documents, some of them you need to keep and many can be discarded. Those to keep may include tax records or annual filings, pay stubs from the last couple of years for tax purposes and insurance statements if you’re filing a claim or are involved in a legal matter.
Home purchase or lease records, of course, as well as vehicle or other major purchases or leases. I’ve kept records about paying my speeding tickets (I’ve had a few) for at least three or four years, just in case something came up and I needed to prove I’d paid them. Everyone will have different ideas about what to keep and what can be tossed.
If you have a tax or financial advisor, check with them for their advice about keeping old records. They should be able to offer some advice about what kind of and how long to keep documents.
With our documents, I look for contract numbers, account numbers, bar codes, old bills that may have account or banking information — anything with a number or personal info. If I believe it has something that someone could somehow use to create problems for me, it goes through the shredder.
Spring Cleaning Tips: Preventing Identity Thieves
As for the necessary items — home mortgage, car purchases, land or other major purchases or leases, financial records — consider purchasing a safe or lockable filing cabinet. Make sure your spouse knows how to get to those records.
If you have a safety deposit box at the bank, consider making photocopies or digital copies to store there (or somewhere else you deem safe). I know some folks also will make videos of their home, inside and out, to have a record in case of fire or robbery. It’s easy to remember some of the big or sentimental things but all of the little things – books, other valuables, outdoors gear, cameras, etc. – all add up when you’re filing an insurance claim.
I’d rather have the peace of mind knowing the necessary documents we have are secure and anything else isn’t easily available for some slimebag who might try to fiddle with our finances.
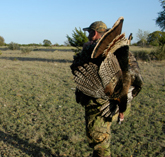
How to clean a wild turkey. These are good skills to know even if the only turkeys you see are in a grocery store.
Many hunters prefer to fillet the breast meat and legs off their turkey, and why not? It’s clean, easy and saves freezer space.
First, remove the turkey’s beard, and then slice off its legs where the scaly skin meets feathers.
Using a sharp knife, slice into the gobbler’s skin at the point of its breast. Then, with your fingers, pull the skin away from the sides, top and bottom of the breast, exposing the meat.
Next, grab the turkey’s breast sponge, on the top edge of the breast meat, and use your knife to peel it off. Also, pull out the turkey’s crop while removing the sponge.
When the crop and breast sponge are out of the way, begin filleting the breast. Make an incision along the center of one side of the breast plate, and then gently cut the meat off the bone.
When you reach the upper portion of the breast meat, follow the wishbone with your knife up to the wing joint. Slice through the tendon that attaches the small, underlying “tender” portion of the breast, and then finish cutting off the breast.
After the breast is free, trim off excess fat or connective tissue. Then, remove the other side of the breast using the same process.
How to Clean a Wild Turkey: The Legs
Many hunters don’t take the legs from their turkeys, but that’s a mistake. The thighs and drumsticks provide great meat for stew, soup or gravy. To remove the legs, pull the skin down past the drumstick, and then pull the leg free, as if you are taking off a turtleneck.
Then, firmly grasp the top portion of the thigh between your thumb and forefinger, and quickly push the thigh bone upward, separating it from the body. Use your knife to cut through the tissue connecting the thigh to the torso.
How to Clean a Wild Turkey: Removing the Skin
Many folks like to save the entire bird but don’t want to pluck it. Skinning provides an easy option.
First, remove the beard and lower legs, and then cut off the wings, starting at the second wing joint from the body. You can also remove the tail if desired.
Then, gut the bird. Make an incision just below the gobbler’s breast bone. Work your hand into the bird’s chest cavity, grasp the viscera just above the heart, and pull out the innards.
Cut around the bird’s anal area and remove the intestines and other guts. Slip your fingers between the lungs and ribs, and gently pull out the lungs to the side, away from the spine. You might have to use a toothpick or paper toweling to further clean out the lung tissue.
Then, slice off the bird’s head close to the torso. Grab the skin atop the breast and slowly peel it off, working from top to bottom.
As you work the skin off the bird, make sure to remove the breast sponge and crop. You might have to use a knife to cut around the ends of the wings and drumsticks.
When you’ve removed the skin, thoroughly wash the bird inside and out, and remove excess skin, feathers and breast sponge tissue.
How to Clean a Wild Turkey: Plucking Feathers
This can be a chore, but if you like roasted turkey, it’s worth it. If you don’t pluck a turkey immediately after killing it, the skin tightens, and you’ll rip much of it off with the feathers.
However, you can remedy this by dunking the bird in a vat of scalding-hot water.
You can remove the wings, viscera and lower legs of the bird before or after plucking, but it’s probably easier to do so before.
If you want to save the beard, be sure to cut it off before dunking the bird.
After the water is ready, submerge the bird for a couple of minutes. Then, pluck it immediately.
Grab the feathers near their bases, and rip them upward. Take special care to remove all the small feathers under the wingbone and along the lower legs.
When the bird is clean, wash it thoroughly, cook it, and enjoy.
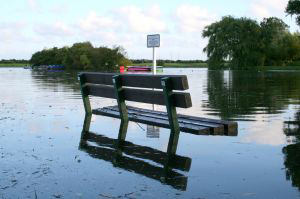
The National Flood Insurance Program issued the FAQ below about flood insurance myths. If it’s something you’ve wondered about, this should answer many questions.
One thing it does address is the recent retooling of the National Flood Insurance Program. Following the passage of the Flood Insurance Reform Act of 2012, the National Flood Insurance Program will lose many subsidies that kept rates low.
Rates will also rise for areas more frequently hit by storms and flooding. The artificially low rates in these areas will be adjusted to reflect actual risk.
Implementation of the increases are being staggered throughout 2013. The additional costs to policyholders could be in the thousands.
Is flood insurance still a viable option? In an interview that will appear in a future edition of Living Ready magazine, disaster planning expert Paul Purcell said the decision must be made on a personal, case-by-case basis. There isn’t a set “yes” or “no” answer.
Hopefully, the following FAQ from the National Flood Insurance Program will help homeowners make a decision.
~Ben
Why You Shouldn’t Count on Flood Disaster Assistance
Before most forms of federal disaster assistance can be offered, the President must declare a major disaster.
The most common form of federal disaster assistance is a loan, which must be paid back with interest.
The average Individuals and Households Program award for Presidential disaster declarations related to flooding in 2008 was less than $4,000.
To qualify for federal home repair assistance, your home must have relatively minor damage that can be repaired quickly.
You do not qualify for federal rental assistance unless your home has been heavily damaged or destroyed.
The Costs of Having Flood Insurance vs. Not
The duration of a Small Business Administration (SBA) disaster home loan can extend to 30 years.
The monthly payment on a $50,000 disaster home loan at 4 percent interest is $303 for 20 years.
The average premium for federally backed flood insurance through the National Flood Insurance Program (NFIP) is $550 a year.
The cost of a Preferred Risk Policy starts as low as $119 a year.
What are the Odds of Needing to Use Flood Insurance?
Floods are the most common, and most costly, natural disaster.
In the past several years, about 60 percent of all declared disasters involved flooding.
Because more roads, buildings, and parking lots are being constructed where forests and meadows once stood, floods are becoming more severe throughout the U.S.
In areas with the greatest risk of flooding, Special Flood Hazard Areas (SFHAs), a building has a 26 percent chance of being flooded during a 30-year mortgage.
On average, 25 to 30 percent of all flood insurance claims paid by the NFIP are for property outside of SFHAs.
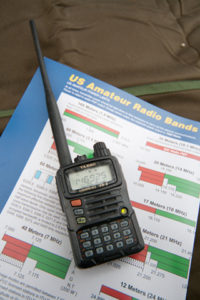
Tragedy brings cell phone outages during Boston Marathon incident, but ham radio just keeps on working.
Runners weren’t the only thing stopped at the 2013 Boston Marathon following the bombing — cell phone operation screeched to a halt as well.
The untold story of the marathon is how nearly 240 volunteer amateur radio operators handled communications for the event. A ham radio network or “net” was established to pass traffic (on-air information or data) between operators stationed at checkpoints throughout the course and the net control operator.
Radio operators keep the event going by communicating injuries, equipment breakdowns, needed supplies, even race updates on leaders and slowpokes.
Panic Causes Cell Phone Outages
mall 5-watt HT radios like this Yaesu dual-band transceiver cover UHF and VHF amateur bands and allow licensed amateur radio operators to communicate locally, statewide and nationally. When cell phone outages hit, these radios keep working.
But when two bombs were detonated at the Boston event, the race was halted. Soon the cell phone networks became overloaded and quit working.
“Many runners don’t carry cell phones, and they were desperately trying to use anyone’s phone, including mine, to call their loved ones at the finish line,” wrote ham radio operator Tim Carter, W3ATB. “Everyone was getting a busy signal. That could have happened because the cell networks were overloaded, or because officials turned off the cell towers.
“The bottom line is there were several hundred people who were able to continue to communicate during the disaster. Police, fire and others like me who had radios were still talking,” Carter said.
Following the bombing, some media outlets reported officials shut down the network to prevent the bombers from using cell signals to detonate additional devices.
The cell phone industry itself admits cellular networks are not designed to — and, in fact, cannot — handle simultaneous usage by all customers. Overloading the system during times of disaster is a safe bet.
Ham radio used at events such as this typically operate VHF 2-meter (144-148 Mhz) or UHF 70 cm (420-450 Mhz) FM. Operators employ either vehicle-mounted mobile radio stations or use handheld “HT” Handie-Talkies that relay signals between the operator and repeater stations (repeaters are high-power, high elevation stations that magnify weak signals to increase coverage area).
“Perhaps this will be the wakeup call to convince you to get your amateur radio license and discover what hundreds of thousands of us already know,” wrote Carter. “We know how to stay connected in disasters and other situations where traditional communications systems suddenly don’t work.”
Click here to read more about ham radios during the Boston Marathon at ARRL (American Radio Relay League).
A bug-out location, also known as a BOL, is the go-to place during an emergency. Whether it’s short- or long-term notice, “bugging out” involves getting the heck out of Dodge until it’s safe to return. That’s why a BOL is important to identify ahead of time.
For many, a cabin or property in a rural area is a popular choice. It’s not always an option, since such a bug-out location requires private investment or knowing someone with property.
If you’re able to set up your own bug-out location at a cabin, the photos above contain tips to help increase efficiency and sufficiency. The snow had just finished melting a few days prior, so pardon the mess. But the points are clear. This bug-out location can run itself until it’s clear to head back home.
One quick note: Electricity is still being provided via a local utility. That could change in the future. But for now, the cabin can sustain itself with its own heat and water. Preparedness is a marathon, not a sprint.
Tell Living Ready About Your Bug-Out Location
Have any bug-out location tips of your own? Post them in the comments section below.
[slideshow_deploy id=’217134′] Editor’s Note: With severe weather season in full swing, it’s a good idea to minimize storm debris risks around the exterior of your home. One way is to remove dead or sick trees that could fall onto structures or other valuables. The following tree removal tips were submitted by Davey.com.
9 Ways to Tell It’s Time for Tree Removal or trimming
Watch for open cavities in a tree’s trunk. These can create weak spots in the entire structure.
Dead wood – Dead trees and large, dead branches can fall at any time.
Cracks – Deep splits through the bark extend into the wood of the tree. Internal or external cavities.
Decay – In advanced stages, soft wood or cavities where wood is missing can create hazardous conditions.
Weak branch unions – Two or more branches grow too closely together, with bark growing between them. This bark does not hold the branches together.
Heavy canopies – Excessively thick branches and foliage catch more wind during stormy weather. This increases the risk of branch breakage and uprooting.
Cankers – Caused by fungi, cankers occur on the stems or branches of trees (bark is sunken or missing). Stems or branches are prone to breaking off near cankers.
Root problems – Without a strong root system, trees are more likely to be uprooted or blown over in stormy weather. Look out for nearby construction that may sever large roots or compact the soil too much to allow for healthy root growth.
Poor tree architecture -This is characterized by excessive leaning of the tree, or branches growing out of proportion with the rest of the tree crown. Odd growth patterns may indicate general weakness or structural imbalance.
Tips for Tree Removal and Pruning
Regular tree maintenance can mean a world of difference when it comes to tree strength during a storm.
Strong branches = stronger tree
Although defective trees are dangerous, not all of them need to be removed immediately, and some defects can be treated to prolong the life of the tree.
Proper pruning thins the tree canopy, allowing wind to blow through it instead of against it as though it were a sail. Pruning also removes potentially hazardous dead or weak branches.
Not all tree risks are visible or obvious. If you’re especially concerned about a tree, a certified arborist can evaluate soil conditions, wind exposure, defects, overall health and other factors to determine a tree’s hazard potential.
From rolling blackouts to hurricanes, floods to tornadoes, power can go out at a moment’s notice. If the grid fails, the PowerPot will keep you charging! The PowerPot thermoelectric generator converts any heat source directly into power that charges your USB handheld devices. Get Yours Now
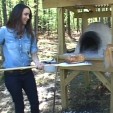
This is the earthen oven Stacy Harris used to bake the bread.
In an earlier post, Stacy Harris showed you how to make an earthen oven in your backyard. Now she takes you step-by-step through the bread-making process using that same earthen oven.
Harris appears in the video above starting around the 7:40 mark. The bread comes out of the oven in the last few minutes. The episode aired on Venture Outdoors, which broadcasts in Alabama.
The advantage of earthen ovens is how they hold their heat. This characteristic is what makes them extremely efficient. It also makes them ideal for baking.
The only downsides are the time earthen ovens take to dry. As Harris mentions in the video, it took two months for the one she made to dry. The other disadvantage is that they’re stationary. This may not matter depending on the situation, but it’s something to keep in mind.
Your Turn: Ever Used an Earthen Oven?
Have you baked in an earthen oven before? Share your experiences and tips in the comments below.
From rolling blackouts to hurricanes, floods to tornadoes, power can go out at a moment’s notice. If the grid fails, the PowerPot will keep you charging! The PowerPot thermoelectric generator converts any heat source directly into power that charges your USB handheld devices. Get Yours Now
[slideshow_deploy id=’217114′] Vincent Zandri is a globe-hopping journalist, author and Living Ready contributor who recently took a trip into the Amazon wilderness of Peru. It put to practice the safe travel tips he outlines in his article in the Summer 2013 issue of Living Ready magazine and the in-depth travel preparedness Online Course he presented.
Travel Tips: No Watches? No Clocks? No Problem
We talk a lot at Living Ready about what to do when essential services go away. But as Zandri pointed out, there are plenty of people in the world who wouldn’t know what they’re missing anyway. And they seem perfectly happy.
From Zandri’s notes to Living Ready:
“The people here don’t have clocks. They don’t have watches, they don’t have smartphones, and they don’t have internet (as far as I can tell). They don’t have any kind of device that chimes, rings, chirps, vibrates, or belts out the opening bars to some Lady Gaga song stuffed into their pockets.
“They don’t need to be reminded of the time. Like one of my travel partners tells me, ‘In Russia, we have a saying: those who are happy do not need to know what time it is.’ Such is the case when it comes to the Peruvian people who occupy Llachon.”
That perspective is shared by many throughout the world. In addition to being a travel tip for making a mental adjustment, it’s food for thought when making preparedness plans in the United States. No matter how bad it gets, chances are good you’ll be OK. All it takes is shifting a comfort zone.
Travel tips: An Injury Overseas? Yeah, That’s a Problem
In his Online Course, Zandri talks extensively about being prepared for health emergencies while traveling. But being prepared doesn’t mean fate won’t strike.
Zandri sent Living Ready these thoughts after returning from the trip.
“I went straight to the surgeon from the airport only to learn that I snapped a tendon in my right foot during the many hikes through Peru’s mountainous jungle. I need an operation that will lay me up for two months.”
That’s two months in an American hospital. Sometimes, it’s better to wait to get medical attention – if you can bear it. Bad treatment can be worse than no treatment at all.
For domestic preparedness, this brings to mind triage skills. Learn what’s important to treat now, in a little while or not at all. That prioritization will make better use of limited resources. Living Ready will have an Online Course soon on simple ways to apply medical techniques in survival situations.
Travel Tips: Know your animals
An important preparedness detail that Zandri emphasized in his Online Course is to research the area. That includes weather, laws, people and animals.
He found out that last one the hard way. A piranha but his finger. Seeing as how writing is how he makes his living, this would’ve been an especially dire situation had the wound
Zandri reflected on his animal encounters:
“A piranha bit my finger as I pulled it in with fishing line and hook. The bite stung and drew blood. It also caused the guides to laugh out loud while shaking their heads, saying, ‘Who’s the silly gringo in the Indiana Jones hat?’
“A family of howling monkeys growled at me while protecting their new baby. A tarantula blocked my path on a narrow trail as me and my guide tried to get back to the lodge in the dark of night.”
However, because he was prepared, none of this turned out to be life-threatening.
From rolling blackouts to hurricanes, floods to tornadoes, power can go out at a moment’s notice. If the grid fails, the PowerPot will keep you charging! The PowerPot thermoelectric generator converts any heat source directly into power that charges your USB handheld devices. Get Yours Now
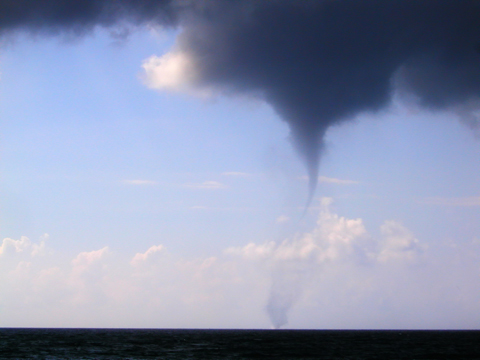
Tornado preparedness is a front-and-center issue not just for the central parts of North America known as Tornado Alley. Considering the tough economic times and limited response services, it’s in the everyone’s best interests that tornado preparedness is taken seriously.
Use these tornado survival tips to stay one step ahead of the storm.
Tornado Survival Tips: Get this App Right Now
As the skies grew dark this past weekend, my smart phone buzzed in time with a few lightning strikes in the distance. The free Red Cross app had alerted me our county was under a tornado watch.
This heads up changed our plans to travel later in the day. Instead, I worked with some neighbors to remove a dead tree next to our house. We’d been putting that to-do item off for some time. But priorities changed in an instant with that alert.
Click here to get the free tornado app from the Red Cross. You can set up alerts by ZIP code. It’s one of the best tornado survival tips for today’s digital world.
Tornado Survival Tips: Getting Ready
The following tornado survival tips about preparations are from Pat McHugh:
Plan how members of your immediate family will stay in contact if you are separated. Identify two meeting places: the first should be near your home if realistic, and the second place be away from your neighborhood in case you cannot return home.
Pick a friend or relative who lives out of the area for household members to call to say they are OK. Pick a safe place to meet if you are separated.
Make sure everyone in your household knows how and when to shut off water, gas, and electricity at the main switches. Consult with your local utilities if you have questions.
Reduce the economic impact that could be caused by any tornado on your property and your household’s health and financial well-being. Review property insurance policies before disaster strikes. Make sure policies are current and be certain they meet your needs.
It is advisable to keep a small amount of cash or traveler’s checks at home in a safe place where you can quickly gain access to it in case.
Consider ways to help neighbors who may need special assistance, such as the elderly or the disabled.
Make arrangements for pets. Pets are not allowed in public shelters. Service animals for those who depend on them are allowed.
Do emergency planning for people with special needs. If you, or a member of your family have a disability or special need, you may have to take additional steps to protect yourself and your household in an emergency. If you know of friends or neighbors with special needs, help them with these extra precautions.
Hearing impaired may need to make special arrangements to receive a warning.
Mobility impaired may need assistance in getting to a shelter.
Households with a single working parent may need help from others both in planning for disasters and during an emergency.
Non-English speaking people may need assistance planning for and responding to emergencies. Community and cultural groups may be able to help keep these populations informed.
People without vehicles may need to make arrangements for transportation.
People with special dietary needs should have an adequate emergency food supply.
Tornado Survival Tips: Riding Out the Storm
The Federal Emergency Management Agency (FEMA) offers tornado survival tips on what to do during a storm. Here’s a summary of this important advice.
In a Structure – Get to a safe room, as identified ahead of time at home or as directed by the operators of some other building. The idea is to get away from windows, glass and things that could fall. Put as much sturdy material between yourself and the outside.
In a Mobile Home – Grab your bug-out bag and head to the nearest emergency shelter.
In a Vehicle – Don’t drive to an overpass or bridge. Don’t try to outrun the tornado. Buckle up and head to a ditch or another low point in the terrain if getting to a shelter isn’t possible. Once parked, get down onto the floor of the vehicle. Flying debris can shatter the windows and cause injury.
Outside – Take shelter in a low point in the geography. Avoid areas that could produce flying debris.
Tornado Survival Tips: Don’t Open the Windows
A common myth about tornadoes is that opening a window will relieve pressure against the outside of a building, such as a home. That’s like swapping a bear on the outside for a bear on the inside.
Strong winds could lift the roof of the structure once it gains entry. It’s better to leave windows shut.
One final point. What do all home videos of tornadoes have in common? None of them use common sense. Get away from windows and into shelter. Flying debris doesn’t give much warning before it comes through the glass.
This squirrel recipe from Stacy Harris for Brunswick stew makes for a delicious meal no matter the time of year.
As explained in a previous post on squirrel hunting, it’s time to rethink these ubiquitous rodents. They’re numerous, they have a mild taste and they’re on pace with the cockroach to thrive in almost any environment.
Still, there’s plenty of stigma about eating squirrels. Forget about that noise. One bite of this stew from Stacy Harris and you’ll be convinced. It won’t take the SHTF for you to start eating squirrels.
Ingredients: Brunswick Stew Recipe
3-4 squirrels (about 12 oz.) dressed and cut into ½ inch cubes 1 cup flour 2 tablespoons kosher salt, divided 1 teaspoon freshly ground pepper, divided ½ cup olive oil 1 cup celery, diced 1 cup onion, diced 1 cup bell pepper, diced 1 cup carrots, diced 4 garlic cloves, minced 1 cup corn 1 pint homemade canned tomatoes or 1 14 oz. can of tomatoes 1/2 cup turnips, diced 1 cup Yukon gold potatoes, diced 2 teaspoons rosemary 1 teaspoon thyme 2 bay leaves 1 1/2 cups dry white wine 1 cup okra cut into 1/2–inch pieces 3 cups chicken stock Lemon juice
Instructions: Brunswick Stew Recipe
In a large bowl, mix flour, 1 tablespoon salt, and ½ teaspoon pepper. Place squirrel in bowl with flour mixture and coat thoroughly.
In a large Dutch oven, heat olive oil until almost smoking. Sauté squirrel in batches. Remove squirrel and set aside.
Add celery, onions, bell pepper, carrots and garlic to the pot. Add more olive oil for sautéing if needed. Cook until vegetables are translucent over medium heat. Add remaining tablespoon of salt and 1/2 teaspoon pepper.
Add corn, tomatoes, turnips, Yukon gold potatoes, rosemary, thyme, bay leaves, wine, okra, chicken stock and squirrel meat to the pot. Bring mixture to a boil then lower to simmer for about 35 minutes. Add extra water if necessary. Squeeze the juice of one lemon over stew. Serve with cornbread.
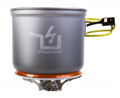
Editor’s note: You’ll be hearing more from the instructors at P.R.E.P., who submitted this gear review of the EcoZoom Versa, on LivingReadyOnline.com. Be sure to check out the full EcoZoom Versa review here.
[slideshow_deploy id=’217085′]
The folks at EcoZoom asked us if we were interested in trying out their Versa stove and writing an unflinching review of our findings. That takes nerve and you better be ready to take a punch if your product is lacking in any way. Of course we said yes, always happy to discover a worthy survival solution or to thin the herd of junk products where needed.
We first saw their stoves at a survival expo out in Colorado a couple years ago and were intrigued. Rocket stoves come in various designs and many people have tried to create their own version. Some even make them from debris lying around. There are usually a couple of problems with rocket stoves. They are either made in pieces from debris and not easy to transport, or they are made of some kind of structural steel/concrete and could double as a ship anchor. Some designs are even dangerously hot to the exterior touch due to lack of insulation, which is a fire hazard in itself. One thing is for sure though; they work great if you can get your muddy hands on a good one.
We found that there actually is a solid solution to this problem. In the Versa model we found that EcoZoom has created a good combination of strength, weight, portability and safety. Here’s what we found as we put the stove through some paces.
EcoZoom Versa Review: Pros
Much easier than making a full campfire
Much easier to contain/extinguish than a campfire
Can be moved while hot, unlike a typical fire
Has convenient handles for transport
Stable footprint, just find and clear a small level spot anywhere
Works well in windy conditions
Potentially works well in rainy conditions due to the fire being shielded
Multi-fuel (biomass, charcoal or anything that burns)
As opposed to a typical charcoal fire, you can adjust the temperature and not have to carry charcoal with you unless you want to. The stove does come standard with a nice heavy-duty cast iron charcoal grate that allows you to get every last bit of heat from briquettes before they fall through to the lower ash chamber.
Great instructions using pictures that are easy to understand
Their charity program will send a stove to a needful family for every unit they sell through their Z+ Program
EcoZoom Versa Review: Cons
The well insulated structure and refractory brick makes it a heavy piece of equipment, so it’s not a convenient trail stove. This stout little rocket is best suited as an off-grid cooking option in case of disaster, or a base camp stove, but you won’t be throwing this in a backpack anytime soon. For hiking, I’ll rely on either a bush craft stove or a portable cooking system.
EcoZoom Versa Review: The Verdict
In the end, we love this thing and consider it to be one of those things you will only need to buy once and keep using for many years to come. Its amazing ability to be useful in almost any environment, using almost any combustible solid material is a big plus for us as we are hard on equipment and go to some rough places.
Check out more survival gear reviews and instruction from P.R.E.P. at ReadyGoPrep.com.
Jim Cobb is a Living Ready contributor, book author and the operator of SurvivalWeekly.com. He came up with this unique video as a way to demonstrate the importance of disaster readiness plans.
While it is a neat sleight-of-hand card trick, the video drives home an important point. Having a plan is critical in keeping your family together when disaster strikes.
This video from Jim Cobb explains how to make a fire straw. It’s a useful technique to learn because it offers a waterproof method of transport for tinder. It can also cut down on the amount of space tinder takes in a small tin.
For example, the photo at left is of a quick survival tin Living Ready staff made for a hiking trip. The tinder, cotton balls, takes up a significant amount of space. Turning these cotton balls into fire straws is one way to maximize efficiency inside that tiny tin.
How to Make Fire Straws: What You’ll Need
To get started making fire straws, you’ll only need a few simple items:
Several wide straws, such as the ones seen at fast food restaurants
Scissors
A small candle
Pliers
Cotton balls
A metal or wood skewer
Cut the straws to length to match the container they will be stored inside. Stuff the straws with cotton using the skewer. Melt the ends of the straws using the candle. Use the pliers to crimp the ends so they form a seal. Give the straws a minute to cool.
Now you have a waterproof, portable and efficient source of tinder. When it’s time to use one, cut the fire straw open lengthwise and remove as much tinder as needed.
Learn More from Jim Cobb
Cobb is an all-around preparedness expert with a lot to offer. Be sure to check out his Online Course, How to Barter for Survival, for tips on navigating the barter economies that spring up after disasters. His 30-minute presentation, available as a video and as audio, also covers the items and skills to stock up on now for bartering later.
Here’s a look at five defensive ammo and two practice loads for concealed carry handguns. After extensive testing and lots of range time with them all, I’d be confident carrying any of them.
Few things are argued about as vehemently as defensive handgun cartridges. Next on the debate list is probably what ammo to use in them. Options are endless, but in reality the choice is not all that complicated—so long as you understand you need two different loads and accept a few things as fact.
First, you need a carry load intended to maximize your chances at stopping a bad guy quickly. Second, you need a practice load so that you can maintain and improve your shooting skills. After that, you must accept the brutal truth that there is no magic bullet. Likewise, you must realize that shot placement and your ability to manipulate and run your gun will have a larger impact on your survival than which loads you choose.
With carry ammo, the primary consideration is reliability. Carry loads should be 100-percent reliable, and you should ascertain and continually monitor this. The only way to establish reliability is to select a load and try it. If you can push 50 to 100 rounds through your handgun without a stoppage, you should feel reasonably confident in that load’s compatibility with your handgun. Once each year when you rotate out old carry loads for new, continue with your reliability evaluation. You do rotate out carry ammo annually, don’t you?
With practice ammo, reliability is important, but a stoppage here and there is not disqualifying. After all, it gives you an opportunity to apply and practice immediate action, something you may have to do in a fight. The two primary concerns with practice ammo are that it’s affordable and shoots to the same point of impact as your carry loads.
As for terminal performance, or the ability of a bullet to stop a bad guy, most carry loads using conventional bullets perform very similarly. Avoid the latest hybrid bullets claiming instant incapacitation and ultra-high velocities. Not only do they go against the accepted model of balancing expansion and penetration, they are largely unproven. Additionally, don’t get caught up in the notion you need the hardest hitting +P load out there. With more power comes more recoil, and if you cannot manage your handgun, you will not make the desired hits.
More from Richard Mann:
Handgun Training for Personal Protection Handgun Training for Personal Protection teaches you the skills necessary for optimal handgun performance. With an all new approach, this book outlines the different handgun accessories & personal protection equipment needed to survive. Different lights and lasers for handguns are thoroughly explained in this must-have book. Get it here
Looking to go armed, but are stuck in the weeds as to what to arm yourself with? Here are 20 of the best concealed carry gun options that will keep you on the defensive.