Today’s lesson begins with a short recap. In the last two installments of this column we have been building an inexpensive go-to rifle and a not so inexpensive hunting rifle.
The lower receivers were supplied by C3 Defense (www.c3defenseinc.com), while the remainder of the go-to rifle was a 16” carbine kit from Del-Ton. The other stuff for the hunting rifle will be detailed in a later paragraph.
The next step was to assemble the lower receiver of the Del-Ton/C3 rifle to complete the carbine. The steps below are not necessarily the most comprehensive, but rather are an attempt to make the steps easier from my own extensive AR construction experience, in an order absolutely guaranteed to prove the most convenient and happy-happy for you.
This also assumes that the reader who attempts this type of build is also more intelligent than the average arboreal primate.
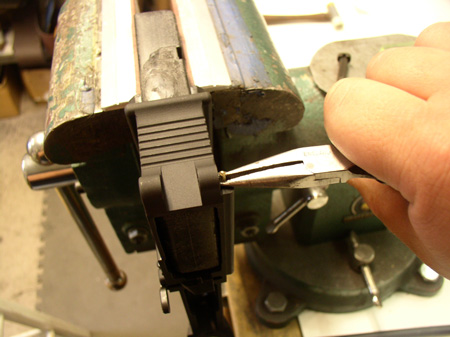
To begin, pins such as the trigger guard pin are easier to insert if you push or pinch them in, rather than tapping. The trigger guard ears are easily broken from pounding, so if you have a bench vise with hard flat jaws, the pin can be easily and cleanly fully inserted by slowly closing the vise jaws on a pin that has been finger pushed or “tap started” in the hole.
This should be the first step. Our second step is to screw in the magazine catch. The tip here is to grab your firing pin and use the back end of it to push in the mag button from the right side (with spring inserted first, of course), and screw the latch itself until the tip of the screw becomes flush or just below flush to the outside surface of the button.
The firing pin will allow you to push the mag button all the way in, allowing the latch to screw in the necessary amount while still clearing the left side of the receiver. Unless you are a lefty it is this author’s recommendation to stay away from the ambidextrous magazine catches. Norgon makes a truly wonderful model but it tends to be pricey, and is not worth it for a righty.
However, if you are a lefty, it is almost a necessity, and according to the mutant dominance-challenged lefties that I have talked to, it is the finest accessory available. The third step is to install the bolt catch. Use a roll pin starter punch of the appropriate size and tap the latch retaining roll pin in (standard forged receivers from the front; however, most billet machined lowers like these from C3 Defense, almost always require installation from the rear) until its leading edge is flush with the inside of the slot within which the catch rotates.
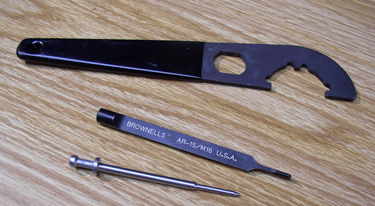
Then insert the spring, detent, and latch, and tap the pin in, while holding the catch in with your third hand. Finish the pin insertion with Brownell’s bolt catch pin punch. This is a handy punch that is flattened on one side to allow left side receiver clearance and simplifies bolt catch installation nicely. It’s long enough to use from the front or the back and is a mere sixteen bucks.
Its purpose is mainly cosmetic, so you don’t scratch up the side of your receiver with a normal knurled punch.

PINS
Pivot and takedown pins next. If you haven’t got a lower receiver vise block, get one, or use a crappy magazine. Brownells has the former, everyone has the latter. Stick the vise block in the mag well.
Place the receiver in the vise so that the front of the receiver is pointed at the sky. Drop the pivot pin spring in the hole on the right front of the receiver and use needle nose pliers to grasp the detent, pushing it in part way until the pliers prevent any further insertion. Then take the pivot pin with your other hand and push with the side of the nose of the pin straight down while pulling the pliers off.
This pin should push the detent right down flush and then you can just shove the pivot pin into its loops. There is a tool out there somewhere that is supposed to make this task easy but this is one instance where the “nice to have tool” is just not worth the money.
This is merely a simple test of your dexterity, and you should pass as long as you don’t have any kind of the shakes. If you have the shakes then by all means buy the pivot pin installation tool. But since its existence so offends me, you can just go out and find it yourself. The rear takedown pin installation is integral with the installation of the stock.
Some billet receivers out there have a retaining screw for the takedown pin detent spring, but most times the spring is retained by the buttstock. In this case, using an M-4 style stock, the receiver end plate (as Colt calls it, I call it a stock/receiver plate) holds the spring in and the castle nut tightens the plate to the rear of the receiver.
Insert the pin halfway with the slot to the rear and stick the detent in the small hole in the back of the receiver, followed by the spring. Place the buffer detent and spring into the large hole just in front of the receiver threads at the back of the receiver. Screw the castle nut on, notches to rear, then slide the retaining plate onto the buffer tube and apply blue loctite to the threads.
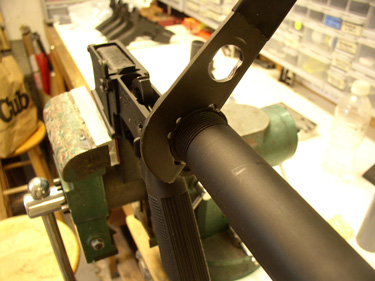
Then screw the extension tube in until the lip on the front of the mouth of the tube retains the buffer detent in the hole. Most combination action wrenches don’t have the right stuff for this castle nut, but the M-4 stock wrench (a cheap 10 bucks usually) is made to order for tightening this nut.
Brownells has a new model of this wrench that engages all four of the notches, and while more expensive, I expect has a significantly longer life expectancy. The front of the castle nut has three little indents in it. Take a punch and stake the rear edge of the plate into one of these indents. One should be enough.
This and the blue loctite should suffice to keep the stock nut tight. One thing to note is that there are two types of collapsible stock extension tubes, commercial and mil-spec.
The mil-spec tube is about thirty thousandths of an inch smaller in diameter. Mil-spec stock pieces will not fit on the commercial tubes, and the commercial stock pieces are so loose on a mil-spec tube that even a moron might think that something is amiss from the persistent high volume rattle.
Fortunately, most, if not all, stocks out there are made in both sizes. This particular tube was of commercial diameter. I’m going to end this installment here. The conclusion, including the fire control installation and the details of the hunter build will be relayed in next month’s column. Till then, have a nice life.
This article appeared in the February 15, 2010 issue of Gun Digest the Magazine. Click here to load up on a subscription.
AR-15 Ready Kit
The AR-15 Ready Kit offers huge savings in this value pack format as opposed to purchasing these components individually – it’s no more expensive than a case of .223 ammo, but will compliment your tactical rifle kit for a lifetime.


![Best Concealed Carry Guns In 2025 [Field Tested] Wilson Combat EDC X9S 1](https://gundigest.com/wp-content/uploads/Wilson-Combat-EDC-X9S-1-324x160.jpg)


![Best 9mm Carbine: Affordable PCCs [Tested] Ruger Carbine Shooting](https://gundigest.com/wp-content/uploads/Ruger-Carbine-Shooting-100x70.jpg)
![Best AR-15: Top Options Available Today [Field Tested] Harrington and Richardson PSA XM177E2 feature](https://gundigest.com/wp-content/uploads/Harrington-and-Richardson-PSA-XM177E2-feature-100x70.jpg)
