
Never heard of the 1/3 Second Zero technique to zero in a rifle? Read on: It will improve your hit success forever.
The ins and outs of the 1/3 Second Zero:
- The 1/3 Second Zero is similar to Point Blank Range but is based on bullet flight time.
- The method works because all bullets drop at the same rate over a given time.
- This method also gives shooters a zero that perfectly matches their rifle/ammunition.
- Determining a 1/3 Second Zero requires a chronograph, the bullet’s ballistic coefficient and a ballistic calculator.
- 1/3 second corresponds with the maximum effective range for the zero.
Properly zeroing a big game rifle is critical to making shots in the field. There are a variety of zeroing methods, but the Point Blank Zero (PBZ) might be the most practical. As the great gun writer Jim Carmichel once pointed out, “In some shooting circles, ‘point blank’ means up close and very personal … but in the lingua franca of ballistics, the point-blank range of a cartridge is the maximum distance out to which the bullet will hit a target of a specific size.”
Let’s see if I can simplify the PBZ concept. With PBZ, you sight your rifle in so the bullet will never rise or fall more than half the diameter of your target out to a certain distance. That distance is determined by the velocity and ballistic coefficient of your bullet, fired from your rifle.
For example, if you were shooting baseballs with a .223 Remington, theoretically the ballistics would allow you to hold dead on and hit the 3-inch target out to about 240 yards. In other words, from the muzzle to that distance, the bullet would never be more than 1.5 inches above or below your line of sight. To make this work, you’d have to zero your rifle at about 205 yards. That’s how PBZ works.
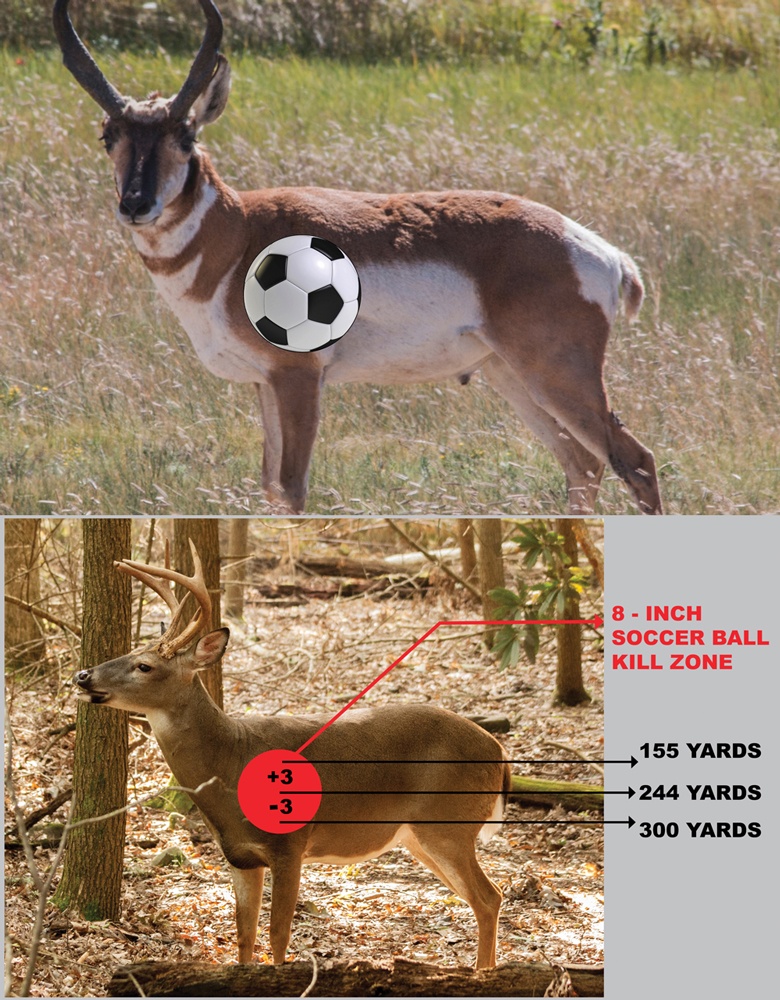
With big game hunting, our target is a bit larger, about the size of a soccer ball. However, you want to allow some wiggle room for shooter error, so working with a maximum target size of 6 inches makes more sense. After spending about a week with a calculator and a lot more time than that at the range, I came up with a zero method for big game rifles I call the 1⁄3 Second Zero. It’s similar to PBZ but is based on bullet flight time, and it works with any rifle cartridge.
Watching The Time
By using time as a parameter, the 1⁄3 Second Zero works because over a given time, all bullets drop the same distance. In fact, in 1⁄3 of a second a bullet — all bullets — will drop about 20 inches. We never see these 20 inches of drop in the field or on the range because we zero our rifles to offset it.
With the 1⁄3 Second Zero, you have a zero that perfectly matches your rifle/ammunition combination, establishes a maximum effective range, and takes the guesswork out of the shot. You simply zero your rifle so your bullet will never be more than 3 inches above or below the line of sight, out to any distance that is no more than 1⁄3 of a second away. The key is in establishing how far 1⁄3 of a second is, because it’s different with every rifle and every load.
1. The first step is to chronograph your hunting ammunition. Fire five shots over a chronograph to establish an average velocity.
2. Next, you’ll need the ballistic coefficient of your bullet.
3. And finally, you’ll need a ballistics calculator. Any program providing time of flight will work. Enter the data for your load and don’t forget to include the height of the riflescope above the bore because it’s a critical element of trajectory calculation. Look at the program like you look at your tax guy; you provide the numbers and he — the program — gives you the good or bad news.
Once you have the data, find the distance corresponding with a flight time of 0.333 or 1⁄3 of a second. This will be your maximum effective range (MER) and you’ll be able to zero your rifle so the bullet will never be more than 3 inches above or below the line of sight out to this distance.
Out to this distance, you’ll also not have to worry about drift in winds of less than 10 mph, and you’ll not have to wonder if your bullet will expand. All big game bullets will deliver reliable expansion out to any distance they can reach in 1⁄3 of a second or less. Finally, at only 1⁄3 of a second away, a small step taken by the animal at exactly the time you pull the trigger is unlikely to move its kill zone out of the path of your bullet.
Calculating Your 1⁄3 Second Zero
The trick is establishing at what distance your rifle should be zeroed, or maybe more easily accomplished, how high you should zero your rifle at 100 yards. There are a couple gun writer-driven myths with regard to establishing a PBZ. One is that you should zero your rifle at 25 yards. Another is that your rifle should be zeroed so the bullet strikes 2 inches high at 100 yards. While neither method is ideal, both can get you close. As a South African professional hunter friend likes to say, “The big thing is,” we’re not playing with horseshoes or hand grenades, so close is not good enough.
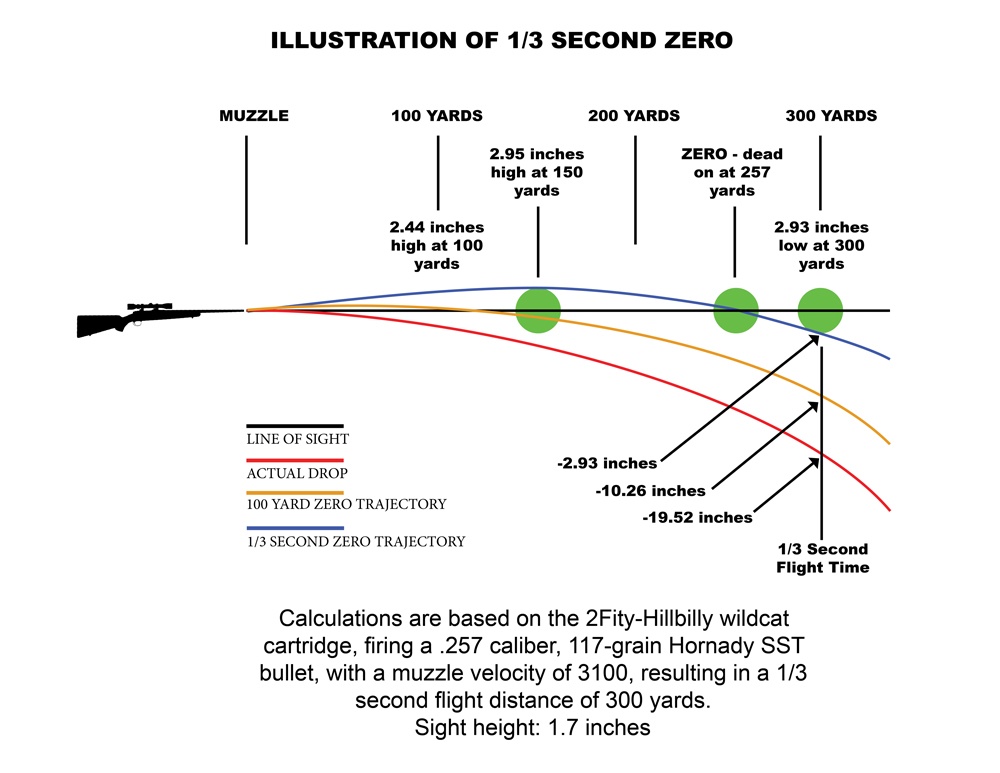
For example, my wildcat 2Fity-Hillbilly cartridge — a 6.5 Creedmoor necked down to .257 caliber — has a 1⁄3 second flight time, or MER, of 300 yards. If I zero the rifle at 25 yards, my bullet will be almost 5 inches high at 175 yards. That’s well outside my 3-inch, above or below the line of sight, allowance. If I zero the rifle 2 inches high at 100 yards, I’m 4 inches low at 300 yards — again, this is outside my target window. But, if I apply the 1⁄3 Second Zero where the rifle is essentially sighted in 3 inches low at my MER — I can hold dead on out to that range and always hit a soccer ball.
The simplest way to sort out the 1⁄3 Second Zero is to sight your riflescope in so the bullet strikes 3 inches low at your MER. This can be tricky because your group size and shape at that distance makes confirmation iffy. So, monkey with your ballistics calculator until you see the bullet’s trajectory never rises or falls more than 3 inches above the line of sight out to your MER. This can take some time, but it will save ammunition.
For starters, divide your MER by 10 and enter that as a zero distance. With my 2Fity-Hillbilly cartridge, I would start with a zero distance of 30 yards. This puts the bullet 3.2 inches above the line of sight at 155 yards and 2.44 inches below the line of sight at 300 yards. It’s close, but not ideal.
By adjusting my sight-in distance to 31 yards, my bullet is 2.95 inches above the line of sight at 150 yards and 2.93 inches below at 300 yards. This is about as close as you can get. But, sighting a rifle in at such a close range never really seems to work out. Fortunately, the trajectory data provided by the ballistics program tells me I need to sight in my riflescope so the bullet will strike 2.44 inches high at 100 yards or dead on at 257 yards. Now, I can go to the range, sight my rifle in as indicated, and confirm on targets all the way out to my MER. You might need to tweak your zero slightly due to atmospheric conditions and the personality of your rifle.
Tweaking Your Game Plan
Pragmatically, it makes sense to utilize the 1⁄3 Second Zero and to never shoot at an animal beyond your MER. I know there are a select few hunters who have the tools and skills to shoot much farther, and I’ve got no issue with that. However, the 1⁄3 Second Zero can be beneficial to them, too. While you’re hunting, it’s a good idea to be ready for an animal that might present you with a fleeting opportunity. If that happens, it will more than likely be at a range within the distance your bullet can cover in 1⁄3 of a second.
For long-range hunters, I suggest they set the target turret to their dead-on 1⁄3 Second Zero distance. (With my 2Fity-Hillbilly, that distance is 257 yards.) That way, if an opportunity comes inside their MER, they simply hold dead on and pull the trigger, with no ranging, dialing or holding over or under. It’s just point and shoot, and you’ll hit that soccer-ball-sized kill zone.
The 1⁄3 Second Zero is the solution to a complicated problem. The postulate it proves is that if you sight your rifle — any rifle — in so the bullet strikes 3 inches low at the distance it can travel in 1⁄3 of a second, you can hold dead on a soccer ball out to that distance and get a hit. For a hunter, that’s a big deal and it’s why the 1⁄3 Second Zero is the best approach to sighting in a big game rifle.
This article originally appeared in the December 2017 issue of Gun Digest the Magazine.

Next Step: Get your FREE Printable Target Pack
Enhance your shooting precision with our 62 MOA Targets, perfect for rifles and handguns. Crafted in collaboration with Storm Tactical for accuracy and versatility.
Subscribe to the Gun Digest email newsletter and get your downloadable target pack sent straight to your inbox. Stay updated with the latest firearms info in the industry.


Richard what is the ballistics calculator? That you are using for this article.