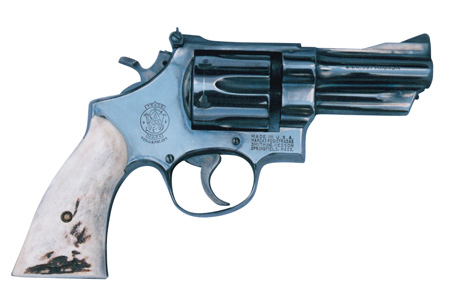
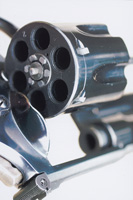
In 1935, Smith & Wesson and Winchester announced a new revolver and a new cartridge simultaneously. Both would bear the same name. The cartridge would go on to become one of the most popular in the history of handgunning. The revolver would also be a milestone. More than 20 years later, it would get a mundane new name: “Model 27.” But until then, it would be known simply as the “Smith & Wesson .357 Magnum.”
To many purists, this model would forever be the Smith & Wesson .357 Magnum.

From its beginning, the revolver we now call the Model 27 (if only to distinguish it from its long list of descendants and stable-mates in the same caliber) was welcomed and then almost universally endorsed by gun experts. The ones of its time, and the ones that followed.
The great Elmer Keith, of course, cheered its creation: he was a part of that, as we shall see in a bit. Charles Askins, Jr., carried one with a 4-inch barrel for a good part of his career on the United States Border Patrol. “This is the most sturdy revolver in the world,” Askins wrote. “As a service weapon it is tops! A very great deal of care goes into the production of each weapon; they are in fact custom made.”
The most enthusiastic ambassador of the new gun and cartridge was a member of S&W’s ruling family, Douglas Wesson, who had worked on the .357 Magnum project. Wrote Keith, “Major Wesson hunted big game and killed elk, antelope, moose and one grizzly with his 8-3/8 inch .357 Magnum.”
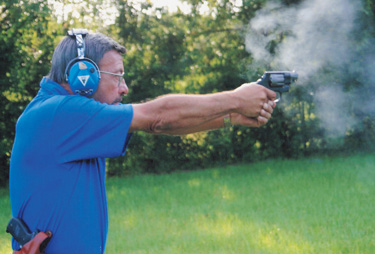
Later experts shared the appreciation. One was Henry M. Stebbins, who in 1961 noted that shooters were only then becoming adjusted to its power level. “When it came out in 1935 it was terrific enough to frighten some of us a bit by its noise and recoil,” he admitted. “Since then it has done much to educate us as to the amount of such ruction that we can stand and still do effective shooting…what used to seem a ferocious gun is accepted in handgun society today, with almost everyone agreeing that it has its points.”
But more experts than those who wrote for gun magazines learned to appreciate the big Smith .357. George S. Patton bought one before he went overseas in WWII, embellishing it with his trademark ivory stocks bearing his inlaid initials. When he gave away one of his matched Colt Single Action Army revolvers to a Hollywood star, he augmented the remaining .45 with the Magnum, which he called his “killing gun.” Patton’s weapon had a 3-1/2-inch barrel. So, legend has it, did the very first .357 Magnum to leave the factory, which was presented to FBI director J. Edgar Hoover, though some who study the history of S&W insist it had an 8-3/4-inch barrel.
Many agents bought identical revolvers for themselves, with the 3-1/2-inch barrel, or the 4-inch that Askins preferred. Among those with the 4-inch .357s was Walter Walsh, the legendary FBI agent, fast draw ace, and pistol champion. One day in Maine in 1937, Walsh shot it out with the notorious Brady gang. Armed with a Colt .45 automatic in one hand and his Smith & Wesson .357 Magnum in the other – and with a .45 slug through his own chest, collapsing a lung – Walsh used the .357 to kill gang leader Al Brady. Ed McGivern, the famed six-gun wizard of the period, often used one in his demonstrations, and repeatedly shot man-size targets with it at distances out to 600 yards.
Meanwhile, S&W’s archrival Colt quickly chambered three of their classic revolvers for the .357 Magnum cartridge: the Single Action Army, the massive New Service, and the “targetized” version of the latter revolver, the Shooting Master. Smith & Wesson, however, was inextricably associated with the new cartridge and dominated sales in that caliber for twenty years. None of those Colt .357s resumed production after WWII. In 1954 and ’55, for the first time, a wide choice of new models became available to those interested in the caliber.
Colt introduced their deluxe Python, even pricier than the S&W, in ’55. A year or so before, Colt had brought out their “357,” on the same theme as their service Trooper .38 whose name this adjustable sight Magnum would soon share. It was a slightly smaller, more “holster-friendly” gun, and much less expensive. In 1955, Bill Ruger brought out a highly improved single action on the Peacemaker theme, also budget priced: the Blackhawk .357. S&W countered in those years with a one-two punch.
One blow was the Highway Patrolman. This was the regular large frame .357 Magnum with choice of 4- or 6-inch barrel, but with no checkering (except on the hammer) or other frills, and with a gray sand-blasted finish. It competed directly with the Colt Trooper for market and price point. The other punch was the smallest .357 Magnum yet, the Combat Magnum inspired by Border Patrolman Bill Jordan. This K-frame gun was, by Jordan’s own admission, designed to be “carried mostly with .357 ammo and shot mostly with .38 Special.”
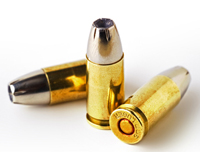
Approximately a decade later, Super Vel introduced expanding bullet hollow point ammunition commercially, quickly followed by the larger ammo makers. This allowed the .357 Magnum’s potential power to be harnessed for anti-personnel work, creating a shorter, wider wound channel that did massive damage inside the narrow confines of an erect biped’s torso.
It allowed the .357 to get past the widely held stigma that it was not suitable for defense or police use, since it would blast through a human body and kill whatever innocent bystander might be on the other side. Suddenly, long after its introduction, the .357 Magnum cartridge was becoming truly popular in American law enforcement. When Remington introduced a 125-grain hollow point at 1400 foot-seconds velocity and Federal countered with one at 1450 foot-seconds, word quickly got around of the awesome wounds it inflicted, only about 10 inches deep but enormously wide, and the .357’s popularity increased in police circles.
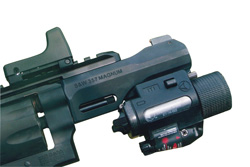
The police guns, by then, were .38-frame Combat Magnums and .41-framed guns like the Colts, Ruger’s Security-Six and then GP100, and S&W’s own L-frame, which was an intermediate size between the Combat Magnum and the original 1935 Magnum. Large for its purpose by late 20th century standards, the N-frame .357 Smith was discontinued, first in its economy Highway Patrolman variation, and finally, in 1994, in its original form.
By then, it had made a host of friends among discriminating shooters of yet another generation. Such late 20th century experts as Skeeter Skelton, John Taffin, Frank James, Walt Rauch and Chuck Taylor all had good things to say about the original S&W .357. Jerry Miculek, the top dog of modern speed revolver shooters, blasted his way to fame initially with the 8-3/8-inch barrel Model 27, because no smaller frame would handle the violent 200-grain handloads he developed to set speed records in bowling pin matches. Upon its discontinuation, the big Smith, now known as the Model 27 series, became an instant “cult favorite” among revolver enthusiasts, and prices of existing samples soared.
Click here to Read Part II
This article is an excerpt from the new book Massad Ayoob’s Greatest Handguns of the World. To learn more, Click Here.