At GunDigest, we independently review products. However, we may earn a commission when you purchase through links on our site. Learn More
Tooling Up For Reloading
This Series Brought to You by These Trusted Sponsors
 |


One way to enter the water, as it were, is to get acquainted with other reloaders and see what they use and don’t use, and quiz them on the whys and wherefors of their equipment. Ask a friend if you can try his equipment. This way you can get a feel for the tools, how they work, and begin to come to some decisions regarding what you might like and what you find difficult or unnecessary.
The reloading bench is the foundation of your work area. There is no standardized design, and it may well serve a dual purpose as a kitchen counter on which reloading tools are temporarily mounted. If you must use a temporary surface of this type, your reloading press and sizer/lubricator should be permanently mounted on a solid 2×6 or heavier plank that can be securely attached to the counter top with C-clamps. The counter must have a solid top since the levering force exerted on the bullet sizer and the loading press can pull the counter top loose.
If you have the space, a solid desk or workbench arrangement is best. General requirements are that it have enough weight or be attached to the floor so that it will not rock back and forth in use. It should be solid enough that the top will not pry loose under the stress of cartridge and bullet sizing. Whether or not it is to be a thing of beauty depends on how much of the public will view it, in a dining room or corner of an apartment, or if it will stay in a garage or basement area. If ammunition and powder are to be stored in the same area, the bench should in a spot that is climate controlled. It should have at least one large drawer and be close to shelving or cabinets where bullets, primers, powder, cases, loading manuals, etc., can be located within easy reach. The top should be smooth and free of cracks, holes and splinters.
While you can build a bench of your own design out of whatever scrap lumber you have at hand, an easier way is to use plans from the National Reloading Manufacturers Association. (That organization is now inactive, but you can go to Chapter 18 where your editor revisits those plans, and actually gives you the complete plans right in this book.) If you’re handy with tools, you can buy all the components from your local lumber yard or building materials store for around $100 and assemble it yourself.
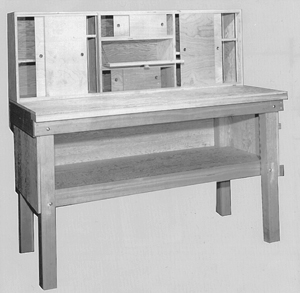 A basic reloading bench should be sturdy and have plenty of storage space. The individual design is up to the maker. This bench was built from plans formerly available from the National Reloading Manufacturers Association, which is now inactive. |

The NRMA bench is heavy, solid and able to support all manner of tools and presses, The plans have been around for more than 20 years, and thousands of reloaders have built them. The plans call for heavy dimension lumber and plywood, so build it where you will use it.
Once you have your bench, the next step is to choose the basic reloading tool, the heart of your operation–the press. Before parting with any money, it is best to start with the maximum amount of experience and knowledge. This returns to the above-mentioned issues of speed, economy and precision. Your first question should be: Am I going to load for pistol, rifle or both? Shotshell reloading requires it’s own special loading equipment and will be dealt with later. If the answer is to reload both handgun and rifle cartridges, then you will want to buy a press that is intended for rifle cartridges that will do handgun ammunition as well.
Economy Versus Speed
The most basic type of bench-mounted loading press is the O-frame or C-frame press, so called because the frames are shaped like these letters. Both are rugged and simple. They are also referred to as single-stage presses since they mount a single loading die in the top. Each operation–decapping and sizing, neck expanding and bullet seating–requires that the die be unscrewed and the next die screwed in place for each operation. Most reloaders perform each operation in batches, so you don’t spend all your time changing dies. The manufacturers promise a production rate of about 100 finished rounds per hour.
Similar to these are the arbor presses, which mount a single die in the bottom. Arbor presses require a special straight-line type of die that is not compatible with the top-mounted variety used in standard presses. The price range and speed are about the same. Arbor presses are small and compact, and have the advantage of being on a flat base and not requiring permanent bench mounting. This makes them handy to take to the range where ammunition can be fabricated while you shoot. In addition to instant gratification, this portability saves time and material put into long runs of test ammunition.
More expensive and faster are the turret and H-frame machines that allow a full three-die set to be mounted along with a powder measure. All dies are in place and the cartridge is moved from one station to the next, or the turret is rotated to bring the next die into position. Production is estimated at 200 rounds per hour, but the price is higher.
Near the top end, short of buying an ammunition factory, are the progressive loaders. These are semi-automated machines with feed tubes and hoppers that are filled with cases, bullets, primers and powder. Once the various feeding devices are filled, the operator simply pulls a handle and manually feeds one component, usually bullets or cases, inserting them into a slot on a revolving plate, and the machine does the rest, moving the case from station to station. The finished rounds come popping out at the end of a full plate rotation cycle and are collected in a convenient bin. Production rates are from about 500 rounds per hour to 1200. Plan to do a lot of shooting if you invest in one of these. You should also plan to have plenty of space since a progressive stands better than 2 feet high and weighs up to 50 pounds.
Speed Versus Precision
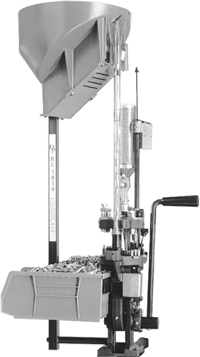 The Dillon RL 1050 will load 1000 to 1200 rounds per hour. A progressive loader of this sort represents a sizable investment and is definitely not for beginners. |

All of the presses mentioned will produce high quality, precision ammunition, or at least as precise as you make it, since quality control is up to the operator. Careful adjustment, precise measurement, and inspecting every step in production are your job, and if you do it well, the results will show in the finished product.
Progressive loaders are designed more for speed than precision. In the case of handgun ammunition where benchrest accuracy is not expected, they are the best investment for a shooter who really burns a lot of ammunition.
These are also purchased by clubs, police departments and professional reloaders who sell their ammunition. While progressives churn out tremendous quantities of ammunition, they generally require a fairly complicated set-up period, and if there is a change of caliber of ammunition, this can mean a different set of feed tubes and plates as well as dies. Because they are complicated, progressives require more tinkering and cleaning to keep them running smoothly. Automation of the process means you depend on the machine to do it right every time. That doesn’t always happen.
Precision Versus Economy
As mentioned above, precision and economy lie mainly with the single-die and turret/H-frame (multi-station) machines. Progressives only pay when there is a demand for high-volume production of one caliber at a time. The price differential between the single-stage and turret/multi-station machines is close enough that it is probably worth the extra money to invest in the latter if you are going to do more than a very modest amount of reloading. They have the advantage of holding a full die set and a powder measure.
This means the dies are seated and adjusted once, for the most part, unless you are reloading a number of calibers. The production edge will be noticed as the amount of ammunition you make increases. For a shooter reloading a single caliber––mainly for hunting––someone who does not do a lot of practice and may assemble no more than 200 to 2000 rounds a year––the best buy would be the simple, reliable O- or C-frame machine. It will do the job.
Reloading Dies
 Reloading dies come in two basic formats–a two-die set for rifle cartridges and a three-die set for pistol and cast-bullet rifle loading. |

Once a press is purchased, it must be equipped with one set of dies for each different cartridge you reload. For handgun ammunition, the first die decaps the cartridge and resizes it to unfired dimensions, the second expands the case mouth, and the third seats the bullet. Rifle dies do not expand the case mouth since this is not necessary for hard, jacketed bullets. Cast bullets, however, require this expansion to keep them from being accidentally cut by a sharp case mouth.
Dies come in grades from plain to fancy. Basic die sets of steel will last for many years and many thousands of rounds of ammunition. Using tungsten carbide or titanium nitride dies requires little or no lubrication of the cases, which speeds the loading process a bit, and they last longer than steel. Forster, Redding and Jones offer micrometer-adjustable bullet seating dies, while Harrell’s Precision makes a variable base for reforming benchrest cases to near chamber dimensions.
Specialty dies of this sort cost more and are worth the price if you are into competition target shooting. There are special neck-sizing dies for use with bottleneck cases that will only be fired in one particular rifle, thus there is no need to put cases through the wear and tear of full-length resizing. There are custom dies for obsolete calibers and loading cartridges as large as 20mm. Nearly anything your heart desires will cheerfully be made up by the 4-D Custom Die Co. of Mount Vernon, Ohio.
Primer Seaters and Shellholders
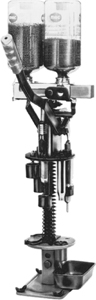
 The primer seater, as shown on this RCBS Rock Chucker, is usually included as part of the press, but if you get used equipment, be sure all parts are there. |

Primer seaters generally fit in the front bottom of the reloading press, and you will need one for large diameter primers and another for small primers. It’s probably a good idea to buy both since a pair is generally quite inexpensive. Case or shellholders are needed to hold the case as it inserted into the die. One size does not fit all, but Lee and Lyman offer sets that cover most popular rifle and pistol cartridges.
A real headache is getting the primer crimp out of a military case. A number of die makers offer a useful die to remove this crimp with a stroke of the loading press handle. There is also a chamfering tool to do this, but some prefer a swager die.
Sizer/Lubricators
The second large bench tool you will need is a sizer/lubricator if you are planning on shooting your own cast bullets. In addition to applying lubricant in the grooves of the bullet, the sizer rounds them out to a dimension determined by the sizing die. By the use of various dies, you can control bullet diameters to .001-inch.
Small Bench Tools
These are either mounted on the bench or on the press, or are freestanding on the bench.
Powder scales are absolutely essential when working up loads, as well as for checking those that are measured with a hand dipper or metered by a powder measure. Basic balance scales will do an accurate job, but the speed advantage goes to the electronic models.
Powder measures are not an absolute necessity, but are invaluable when it comes time to get into production loading. They can be mounted on a loading press or a stand. The precision of the adjustment is not all that different. More expensive models adjust faster and a little more precisely, keep their accuracy more consistently, hold more powder and so on. The accuracy of powder-measure metering is mainly dependent on the consistency of the operator as he pulls and returns the handle.
Case trimmers are essential for keeping cartridge length consistent. Cases stretch on firing and in reloading dies, and must be trimmed back every so often.
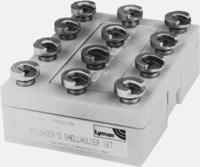 Shellholders must be purchased to fit the cartridge you are reloading. Some accept more than one cartridge, and they can be had in sets. |

Hand-cranked models do the job, with a selection of collets and pilots available to handle most common calibers. Collets hold the case head, and pilots guide the case mouth straight against the cutter. Motorized models do the job more quickly.
Hand Tools
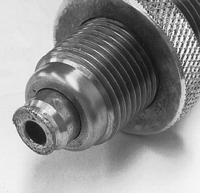 Problems such as crimped-in primers and stuck cases, like this one with the head torn off, require special tools such as a stuck-case removal kit. |
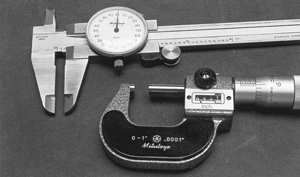 A micrometer and/or precision caliper capable of accurate measurement to .001-inch are necessary tools. Investing in good-quality equipment is worthwhile in the long run. |


Case deburring or chamfering tools come with a bench mount and, in the case of the Forster case trimmer, can be purchased as an add-on feature. They are also made in hand-held versions. These are necessary to take burrs off the outside of a case mouth that has been trimmed and to chamfer (bevel) the inside of the case mouth, removing burrs that will otherwise scratch and gall jacketed bullets.
A primer pocket cleaner can be simply a flat-blade screwdriver, inserted into the primer pocket and turned several times to get the fouling out. However, all the major (and some minor) tool makers have them, and they’re not expensive. The two basic types are the scraper and brush styles, and both do good work.
Getting the primer ash deposit out of the pocket is necessary or the fresh primer will not seat properly. The ash build-up will either result in a high primer or one that may give poor ignition, as the firing pin blow is cushioned and the vent blocked by ash. A steel straightedge ruler will check that your primers are seated deeply enough.
Lyman, Redding, RCBS and others offer case-care kits containing primer pocket cleaners and an assortment of case brushes to remove interior fouling, a good investment if you are loading blackpowder or Pyrodex ammunition. If you want to automate things a bit, Lyman and RCBS have a number of options to do so.
Loading blocks are the best way to keep from double-charging your cases.
They come in molded plastic from several manufacturers and cost very little. You can make your own by drilling holes in a flat piece of 1-inch plank and gluing on a flat bottom. A loading block is the best way to inspect your cases after they have been charged with powder, before you seat a bullet. Double charging is very easy to do, especially when using a powder measure. If you shoot one of these loads, your gun will never forgive you.
Powder funnels cost little, and their use is only way to avoid spilling powder when you are working up loads by weighing each one. A charge drawn from a powder measure and dumped into the pan of your scale for checking is the way to maintain accuracy in your measure. If everything is working as it should, the charge in the pan is then funneled into the case. Forster offers a funnel with a long drop tube for loading nearly compressed charges.
Micrometer/calipers are the best means of making all sorts of precision measurements, like case length, inside and outside diameters, case neck wall thickness, checks for bullet roundness and diameter, case swelling, etc.
Bullet pullers are there for the same reason they put erasers on pencils. Everybody, sooner or later, puts together some loads that won’t fly for one reason or another and need to be taken apart. The two basic types are the one that screws into the die hole on your press and the kinetic type, which looks like a hammer. The press-mounted type is easy to use, but can mar the bullets, making them unshootable.
The kinetic model features a hollow plastic head into which the cartridge is fitted. A wad of cotton or tissue can be used to cushion the bottom of the chamber where the bullet is caught. With this addition, even very soft lead-alloy bullets may be retrieved undamaged. These are very efficient and handy tools.
