At GunDigest, we independently review products. However, we may earn a commission when you purchase through links on our site. Learn More
Secrets To Mounting A Precision Scope On A Long-Range Rifle


It takes more than Loctite and torque to robustly mount a precision scope. Find out the secrets to getting the most out of your long-range optic.
What Are The Tips For Mounting A Precision Scope:
Over the past three decades, I’ve had to extract every bit of accuracy potential from both my recreational and duty rifles. Coached by my precision-driven father on the handloading bench during my teenage years, I developed this same obsession at an early age.
This passion has continued for me as a long-range hunter and a marksmanship, tactics and sniper instructor, as well as when developing and running my agency’s first Designated Marksman Observer (DMO) team in 2014. Throughout it all, attaining quarter-minute-of-angle (MOA) accuracy from any rifle system has been an objective.
Today, the interest in long-range accuracy among the shooting community has never been greater. The exponential increase in the amount of precision rifle platforms over the past decade has been overwhelming for long-range shooting enthusiasts, with a plethora of rifle and optic options now available in a wide range of both new precision-oriented calibers and the time-tested classics.
For any precision rifle to perform at peak potential, all three components within the system (rifle, scope and ammunition) must be of high quality with extremely narrow tolerances to provide repeatable quarter-minute accuracy or better.
For the focus of this article, let’s assume we’re working with a vetted precision rifle from a reliable manufacturer; a quality scope that’s robust and proven to be reliable under even the heaviest recoil stresses from modern, big-bore, long-range calibers (.338 Lapua, .300 PRC, .300 RUM, etc.); and, of course, quality match-grade ammunition with bullets capable of remaining stable and hitting consistently past 2,000 yards.
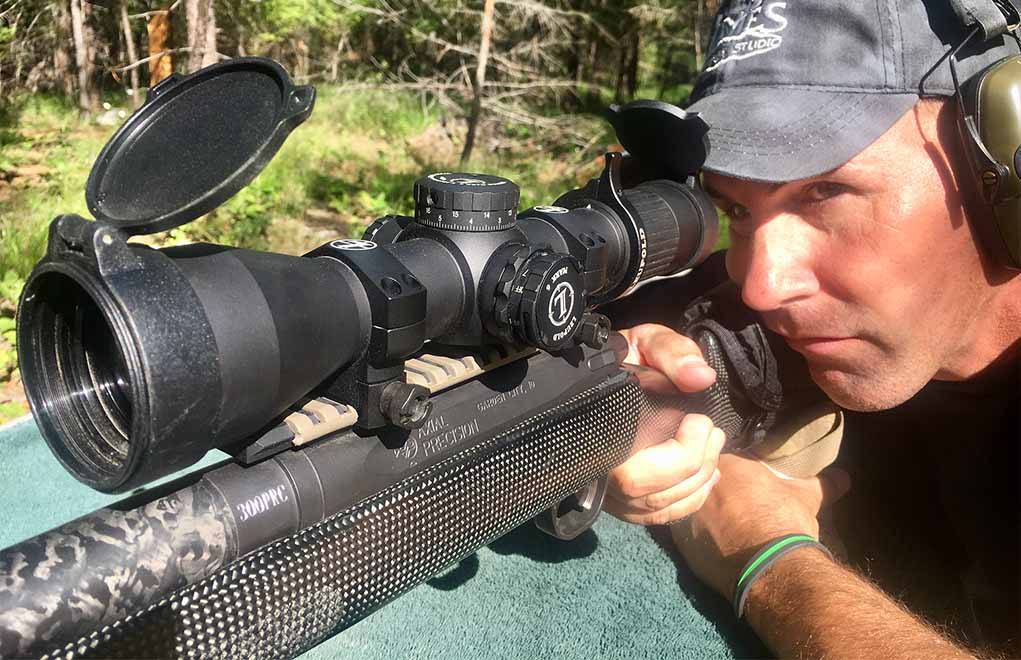
With those base-level equipment requirements covered, let’s focus on techniques for securely mounting and setting up that tier one optic on your precision rifle system.
Building The Perfect Bond
For decades, I’ve carefully mounted my single and two-piece bases to all my rifles the way I was taught by my gun-building and precision handloading mentors. This two-step process includes mounting the base(s) to the rifle’s receiver by mating a completely clean and degreased base set to a clean and degreased receiver before carefully anchoring the two together.
To ensure the base screws would not vibrate loose during barrel whip and harmonics when being fired, I routinely anchor the two base(s) and receiver together using a very small amount of medium Loctite in a few of the threads in the lower third of the base screws. This is done to make sure the thread-locking compound will be effective below the contact point and into the rifle’s receiver for maximum contact. It is critical to only use medium Loctite during this process so you can remove your base screws without problems if you need to in the future.
While this process has proved effective overall for my rifles, I have occasionally witnessed other shooters having sudden zero shifts with their tack-drivers using this common base-mounting process. Even with Loctite added appropriately, those base screws can, and do, stretch over time. Repeated harmonic vibration (especially in the larger-caliber, magnum-class, long-range cartridges) whipping through your rifle with each shot can loosen your base screws and cause significant zero shift.

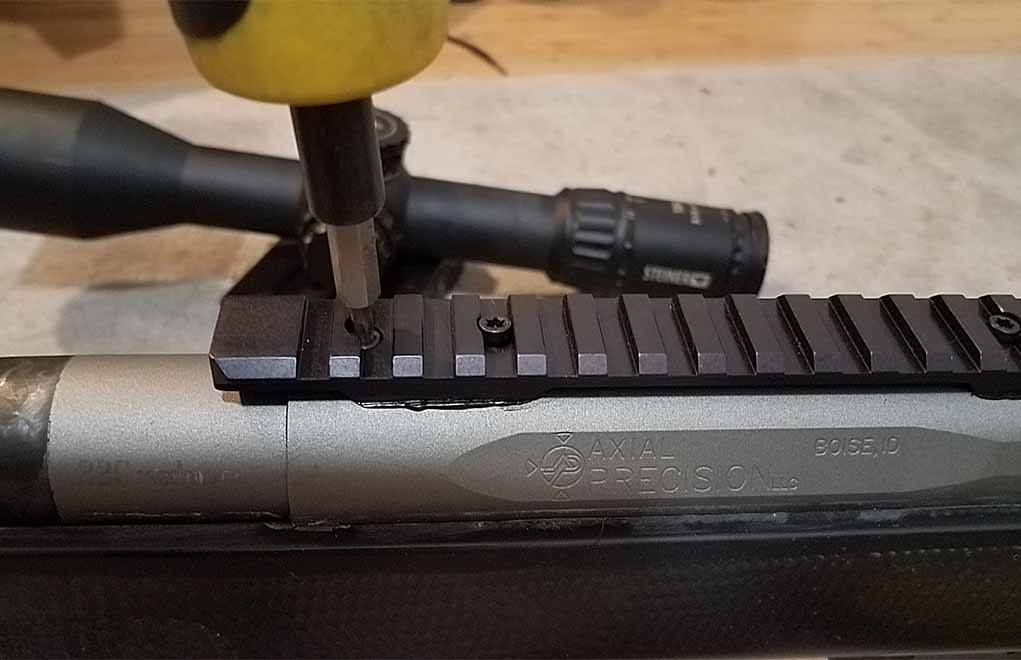
An even more precise and secure process of mounting your scope to your precision rifle is direct bedding. My friend, Marc LeQuieu, over at Axial Precision, introduced me to this process earlier this year, and I’ve found it to be a straightforward, rock-solid and reliable way to eliminate inconsistent accuracy problems generated at your scope base.
As with all other components that comprise your precision rifle system, only use bases manufactured to very high tolerances. Regardless of whether you’re using a two-piece base, a single-piece, hunting-style base or a robust, one-piece tactical Picatinny rail base, the technique remains the same. I prefer a single-piece Picatinny base, because its inherent strength over a two-piece base eliminates more variables for inconstancy over the long run.
Using single-piece bases on your precision rifles also allows you to easily move an optic and scope ring set among a variety of rifles. The process for mounting a Picatinny rail is also much simpler, given its one-piece design. Granted, the overall weight of your precision rifle platform will increase a bit with a one-piece base, but the numerous advantages outweigh the weight gain—a small price to pay to guarantee the maximum strength, stability and consistency possible in your long-range optics kit.
Bedding the Scope Base(s)
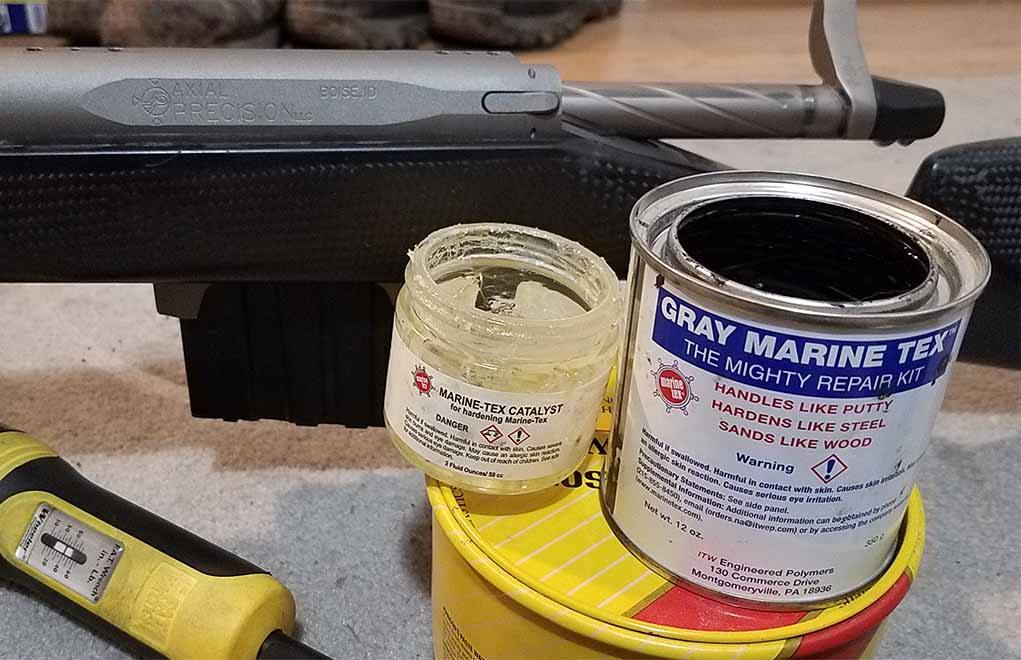
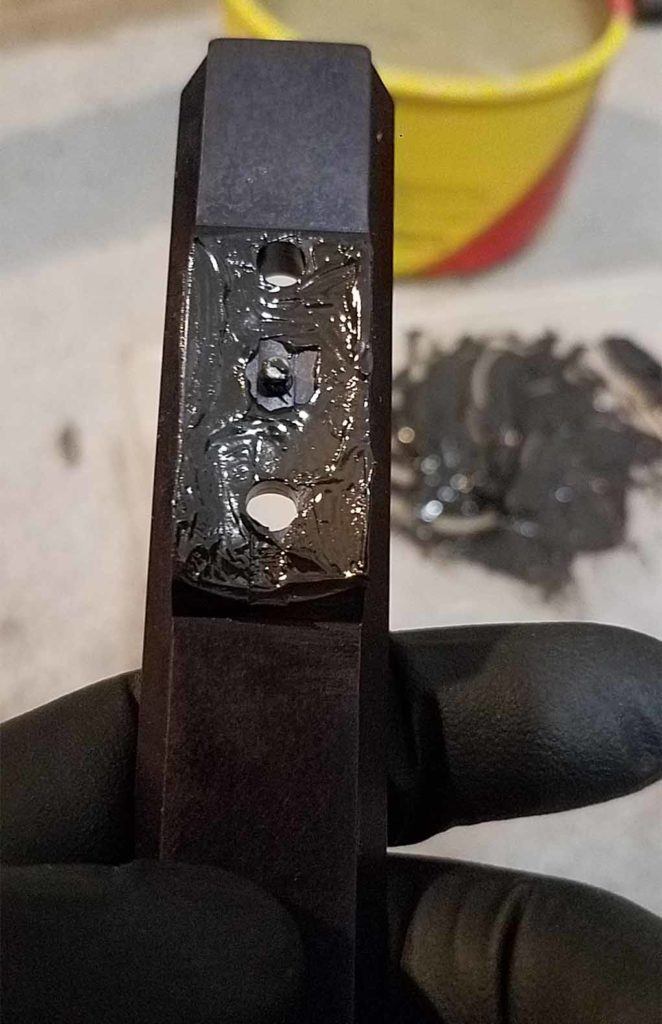
Bedding the base rail to the top of the receiver with a light layer of Marine Tex bedding compound (the same compound used by Axial Precision and other tier I precision rifle builders to bed their stocks to their receivers) is the best option. A 1/16-inch-thick layer of compound spread evenly along the entire bottom surface of the base rail allows the rail to mate perfectly to the contours of the receiver. It will also eliminate any gaps created by machining errors or profile variations in either the top of the receiver itself or the bottom of the rail.

To prepare the surface of the receiver before beginning the bedding process, use either Johnson’s floor wax or a commercially available release agent to ensure the rail does not become permanently attached to the rifle. Prepare the base rail screws for release by waxing them as well. The Marine Tex compound acts as a cushion between the receiver and rail surfaces when it is still pliable before you tighten the base screws just to the point at which the bedding compound begins to squeeze out between the rail and receiver. This bedding process allows for a perfect mating of the rail and action.
At this point, begin torquing your rail screws down to 22 inch-pounds before removing the excess bedding material that has seeped out around base screw contact areas. Do so in a systematic, back-and-forth method to make sure there is incremental and uniform torque pressure on all anchoring points along the rail. This will guarantee that the bedded rail is now rigid and extremely secure.
Bedding the Scope Rings
We use the same process to bed scope rings as we do when bedding the base rail to the rifle receiver—regardless of what ring set you use for your long-range optic kit.
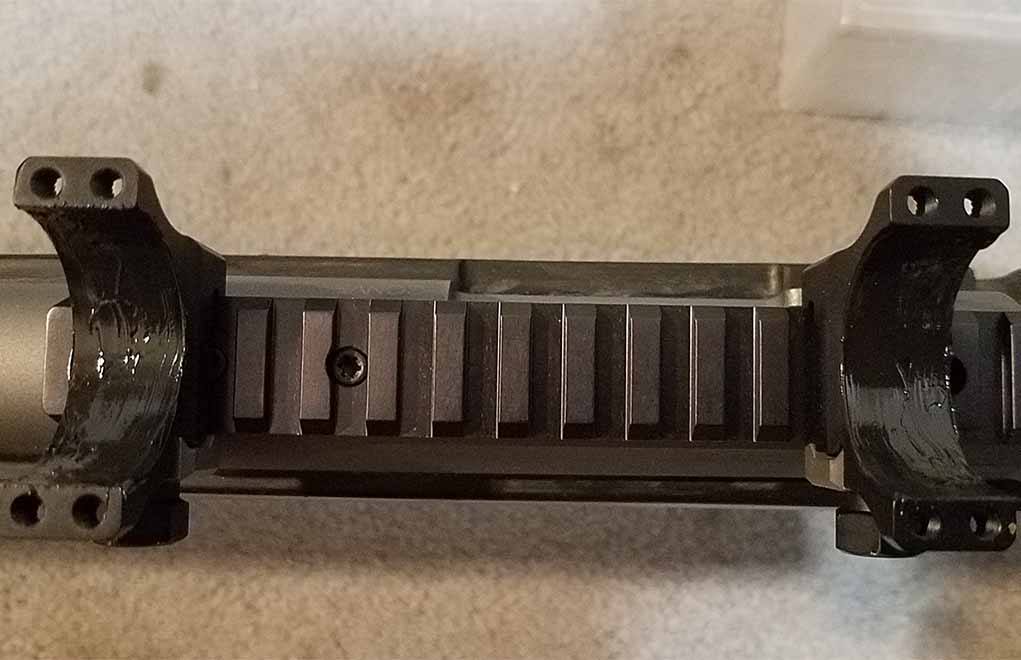
Traditionally, I’ve carefully and tediously hand-lapped my scope rings until attaining as close to 100 percent contact between the bearing surface of the entire scope tube and the complete surface area of each scope ring. This process works effectively but is a bit messy … and very time-consuming.
An easier and faster method is bedding your scope rings to your scope just as you do when bedding the scope base to your precision rifle’s receiver. Start by using the same bedding compound on the inside surfaces of the ring set. Just as when bedding your scope base, a 1/16-inch layer of Marine Tex on the entire inner circumference of the top and bottom ring halves will suffice. Use the same release agent on the scope’s main tube to ensure the rings do not become permanently bonded to the scope.
The objective is to create a complete match between the scope rings and optic with 100 percent contact between the inner circumferences of both rings and the scope tube itself. Be careful not to put too much bedding compound on these parts during the process, because more than a 1/16-inch layer of bedding compound in the right places can get messy.
More Long-Range Shooting Info:
- Buying the Perfect Precision Scope
- Ballistics Basics: Initial Bullet Speed
- The Effects Of Air Temperature On Bullet Flight
- Mils vs. MOA: Which Is The Best Long-Range Language?
Just as on your one-piece base, tighten the screws down only enough to see the compound start to squeeze out from between the rings and main tube of your scope. Once you’ve reached this level of contact pressure on all your ring screws, wipe off and remove the excess bedding compound from the edge of your rings; continue to systematically tighten them down in small increments until you reach an ideal torque level of 18 to 22 inch/pounds. Do not tighten past 22 inch/pounds! Also make sure each ring screw is torqued to the same pressure before completion.
While this process takes some time, it is a straightforward end-user method to avoid micro shifts in your precision rifle’s zero that can be completed without paying a gunsmith to do so.
Torquing Base and Ring Screws
As we’ve touched on earlier, all base and ring screws must be torqued to proper levels in an incremental and systematic method to ensure maximum strength and consistency.
For example, if you’re working with a single-piece Picatinny rail scope base that has four base screw holes mated to your rifle receiver’s tapped scope base threaded holes, start all four screws into their slots only to the point of the threads catching in the rifle’s receiver. Using a systematic approach, torque the far-forward (closest to the rifle’s muzzle) base screw down only one full turn before moving to the far-rear (closest to the back of the rifle’s receiver) base screw and doing the same. Go to the next base screw behind the far-forward one and anchor it with just one turn to set the screw into the receiver’s threads. Then, continue to the next rearward screw and do the same.
Repeat this back-and-forth process systematically on all four base screws until you feel resistance and free spin on all four has stopped. Once there, continue working systematically back and forth between the four screws until all the excess bedding compound has seeped out between the two bearing surfaces and you’ve reached the desired amount of torque on each screw (18 to 22 inch-pounds).
Systematically Torquing Scope Ring Screws
For ring screws, the same method applies. What’s different in this case is that you will have many more screws to deal with on each ring set (usually at least four screws for each scope ring on quality optics). Not to worry: Just follow the same process as described for the base screws. For systematic torquing on multiple ring screws, remember to do so in a repeatable pattern.
For instance, when dealing with two scope rings that have four screws each, start with getting all eight screws started into their threads before proceeding to the next step. Now, using a repeatable crisscross pattern (similar to tightening lug nuts during a tire-and-wheel replacement) for all eight screws on both scope rings, torque in short increments until you feel resistance from each. Continue incremental torquing on each of the eight screws until all the excess bedding compound has seeped out from under the bearing surface of the scope ring. Once all screws are torqued to this pressure, continue the crisscross torque pattern in short increments again until all screws are at the same torque level of 18 inch/pounds.
For Picatinny rail-compatible scope rings that use a typical ½-inch locking nut at the base of each scope ring, use the back-and-forth and incremental torque pressure on each ring nut until you reach the prescribed torque level (65 inch-pounds for steel rings and manufacturer specifications for aluminum rings).
Scope Alignment
For long-range shooting consistency and success, proper scope alignment is critical.
We’ve all been frustrated while trying to twist our scope’s tube carefully left or right to find that level sight picture through our eyepiece during the scope mounting process. Using the vertical and horizontal crosshairs in the scope’s reticle as a reference, we find a sight picture that looks level and then start to systematically torque down our scope ring screws to the prescribed 18 inch/pounds. When shouldering the rifle and looking through the scope again, the crosshair now looks out of alignment—canting left or right of where we felt it was ideal just minutes before. We go through the process again, sometimes repeatedly for hours, without reaching a satisfying scope image.
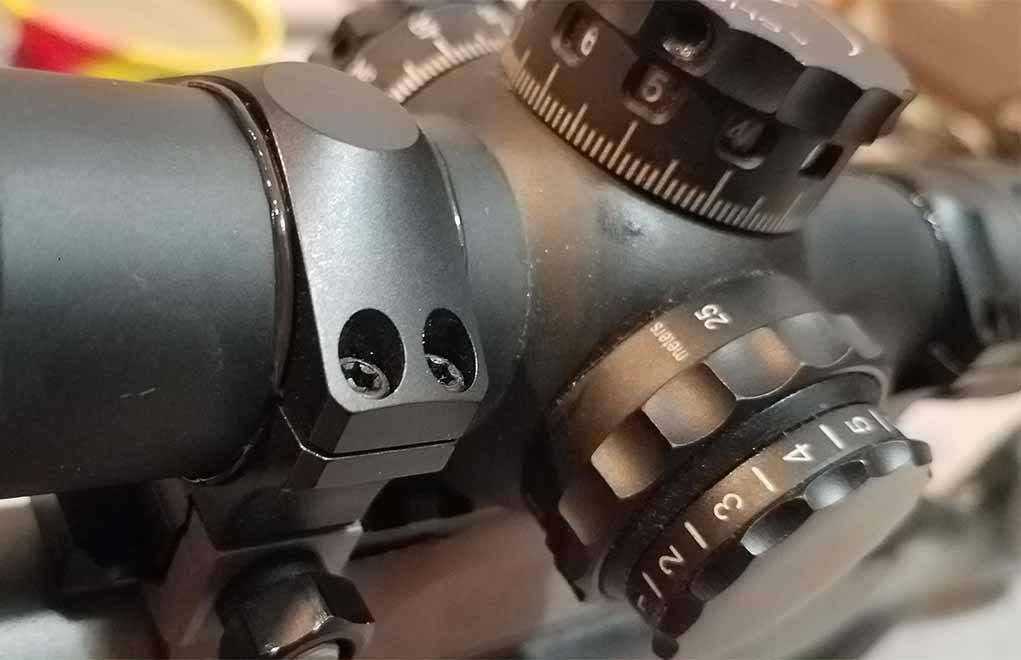
In the past, I’ve used scope-leveling kits with two magnetic bubble levels (one for your scope and one for your rifle’s receiver) with mixed results. However, a much easier scope alignment method works well to remedy this frustration: Having a rear scope ring that utilizes a small bubble level mounted at the top of the ring ensures you’re level with the target when taking a long-range shot. This eliminates any cant error effect on your shot’s point of impact for an accurate hit.
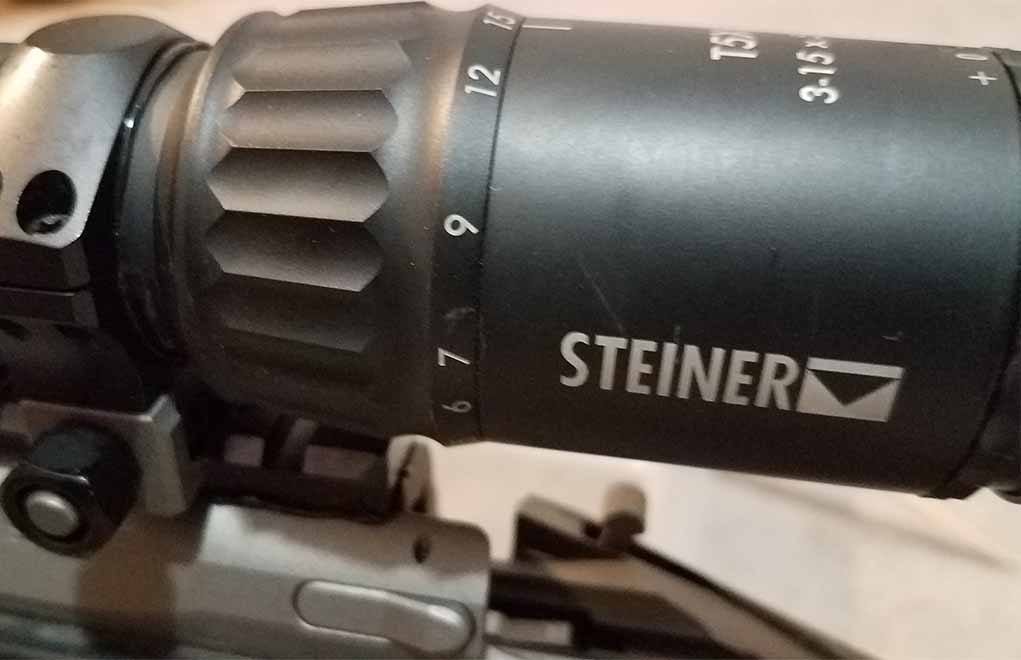
Steiner makes an excellent set of steel rings with this embedded bubble level feature that is both durable and streamlined. By making sure your bubble is centered in its tube and is level with the horizontal crosshair of your scope’s reticle, you’ll attain proper scope alignment—regardless of shooting position or individual body mechanics—when mounting the rifle. While effective, this method is also a lot easier and less time-consuming than all the others I’ve tried through trial and error over the years.
Well Worth the Time and Effort
The techniques outlined here comprise the starting point to achieving the best possible results with your precision rifle—well before you fire your first shot. While these procedures require a time investment and attention to detail, the results are well worth it.
A sudden zero shift and inconsistent group placement caused by a poorly mounted optic is not only frustrating, it also engenders doubt and a lack of confidence in your precision rifle system—a nightmare for all of us long-range enthusiasts. With so many environmental variables already in play that affect accurate shot placement at longer ranges that we can’t control, preparing your precision rifle system properly right out of the box will eliminate the variables that you can control.
This saves time, frustration and, just as importantly, it keeps the shooting process fun—as it should be when you make that rewarding first hit on steel at a mile.
Editor’s Note: This article originally appeared in the 2019 Long-Range Shooting issue of Gun Digest the Magazine.
Next Step: Get your FREE Printable Target Pack


Enhance your shooting precision with our 62 MOA Targets, perfect for rifles and handguns. Crafted in collaboration with Storm Tactical for accuracy and versatility.
Subscribe to the Gun Digest email newsletter and get your downloadable target pack sent straight to your inbox. Stay updated with the latest firearms info in the industry.
