At GunDigest, we independently review products. However, we may earn a commission when you purchase through links on our site. Learn More
Mathsplaining The CCW Red Dot
Thinking about mounting an optic on your carry pistol? Here’s how to get the most out of the CCW red dot.
Mini red dot sights (MRDS) on a pistol slide aren’t a new concept, but it’s only been the past few years that we’ve seen mass adoption of the magic floating dot. If you understand how to get the most out of the dot it can be a huge advantage, but some bad advice can turn that advantage into a disadvantage quickly. We won’t dive into any MRDS topics that have been beaten to death, talking you through some of the math that I have found useful is far more interesting.
The gun industry doesn’t make it any easier with the breakneck pace of introducing new products, some good and others bad. Don’t be dissuaded though; there’s a lot to be learned from doing something wrong as long as you can be humble enough to find the lesson in failure.


The more you learn, the less likely failure is. Regardless of your skill level, a deeper understanding of the math that makes the dot so great is bound to translate to a better result on the range…maybe.
What Even Is MOA?
In the plainest terms, minute of angle or MOA is an angular measurement that equates to 1.047 inches per 100 yards; or more accurately, one MOA is 1/60 of a degree (that’s 0.01666666666 degrees) with a total of 21,600 MOA in a 360-degree circle. Unfortunately, the common misunderstanding that MOA means “about 1 inch at 100 yards” does a piss-poor job of conveying that it isn’t a linear measurement, but rather a conical one.
With the understanding that MOA is angular, we can establish that its value in inches will either grow or shrink based on distance. It’s important to remember that MOA is always a cone-shaped measurement, even though it’s often used as a two-dimensional measurement.
As a two-dimensional measurement, MOA is often used to describe windage and elevation adjustments, which will come in handy when we talk about zeroing your pistol. When you think of the two-dimensional MOA like a pie, picture a disappointingly skinny slice of pie with the crust pointing away from you.

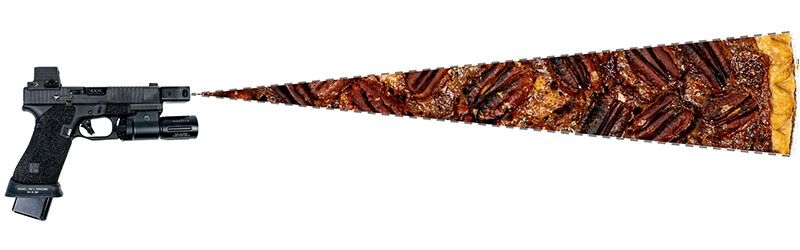
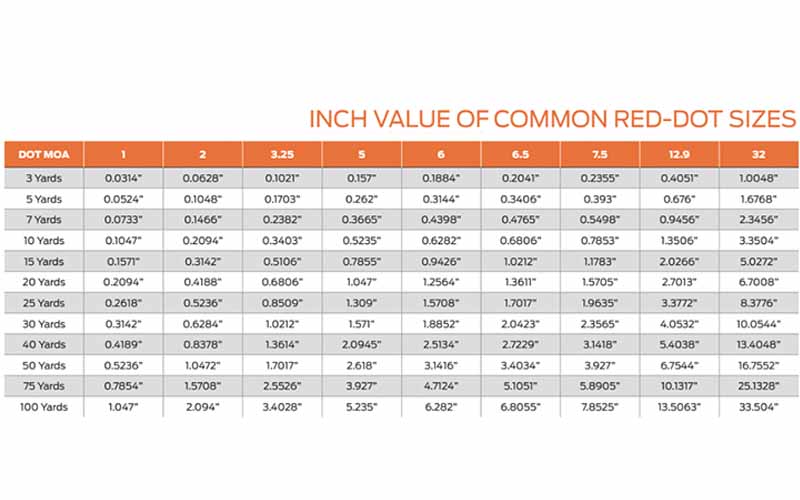
The crust on that 1 MOA piece of pie at the generally accepted “typical gunfight distance” of 7 yards equals 0.0733-inch crust. At 15 yards, your 1 MOA slice of pie equals 0.1571 inch of crust, and at 25 yards, it equals a mere 0.2618 inch of pie crust. Now take those same measurements and apply them to a birthday hat’s open end. That MOA birthday hat can be used to measure the reticle’s size, target size, group size and even the bullet hole size.
Right now, you’re wondering what the hell a birthday hat and pie have to do with guns? Nothing. Birthday hats are fun, and pie is delicious.
Zeroing Your CCW Red Dot With Pie
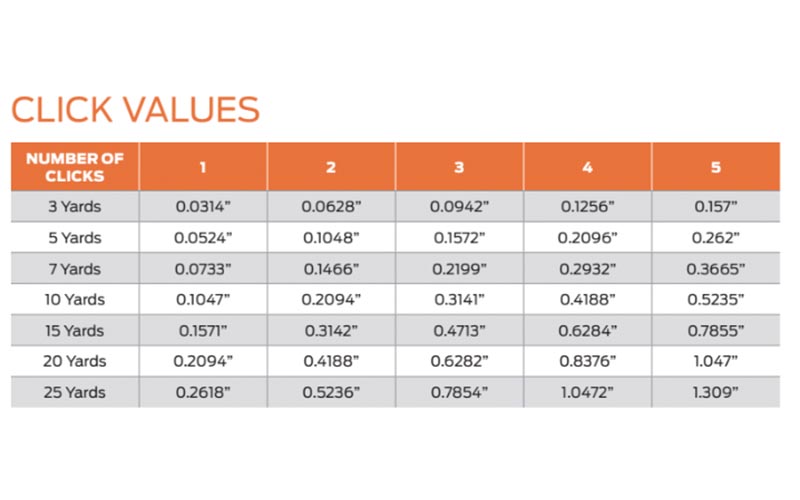
So, we have established that MOA is an angular measurement, how does that impact the value of adjustment clicks at a known distance? Since nearly every MRDS on the market uses a 1 MOA per click value, we know that translates to 1.047 inches of movement at 100 yards per click. Moving the target to the 10-yard line means that the 1 MOA click is now worth 0.1047 inch.
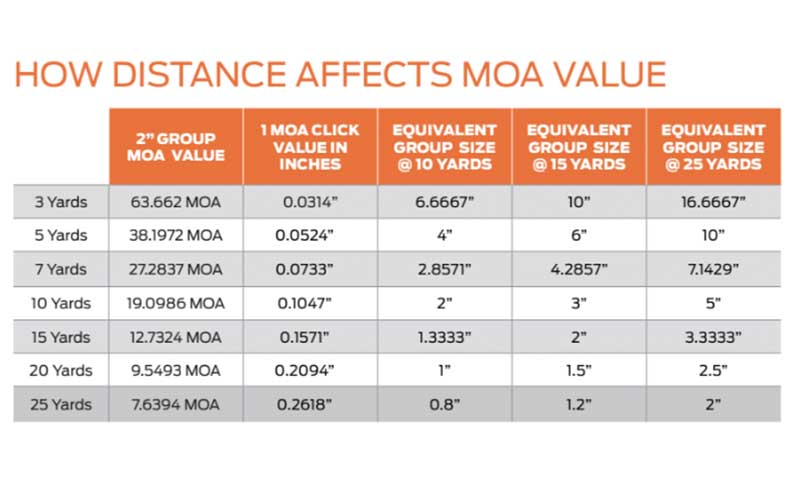
You might think that having super fine adjustments is a benefit, and if that were all that changed with distance, you’d be right. The reality is everything’s MOA value changes with distance. Say you shoot a nice tight 1-inch group at 10 yards, why is zeroing off that 1-inch ragged hole less useful than a 2.5-inch group at 25 yards? You get the same amount of clicks within each 9.5493 MOA group, why would the 25-yard group be better suited?

Simply put, the 2.5-inch group has more dispersion, which will help you identify the true point of impact which might not be in the middle of the group depending on how you pulled some of the shots. Another benefit to that 25-yard group is that the diameter of the bullet hole has less of an impact on the perceived size of the group.
Eyeballing the distance from the group to the desired point of aim is going to be a hell of a lot easier when you have to guesstimate to the nearest 0.2618 inch than it is to guess to the nearest 0.1047 inch. As you increase distance, the cone of fire widens just like the click values since everything we’re doing is dependent on the angular deviation of the muzzle from the center of the target when the shot goes bang.
If you haven’t eaten your pie yet, put it in your range bag, use Google to find a printable NRA B8 repair center if you don’t have some and let’s go zero your red dot pistol.
What The Zero Process Looks Like
There isn’t just one “right” way to zero a CCW red dot, but there sure as heck are some wrong ways. The biggest mistake you could make when zeroing your dot is to shoot it without using a bag or rest to support the gun. I don’t use a rest until the target is at 25 yards, when you add in the rest is dependent on the shooter’s skill.
Choose wisely, young Padawan: If you tough it out and refuse the rest, you may end up zeroing to accommodate your shooting deficiencies rather than getting the point of aim as close to the point of impact as possible. You don’t want to zero to your shooting deficiencies like a flinch right? If you think you’re always shooting point of aim but your zero accounts for a flinch, how are you supposed to get better?

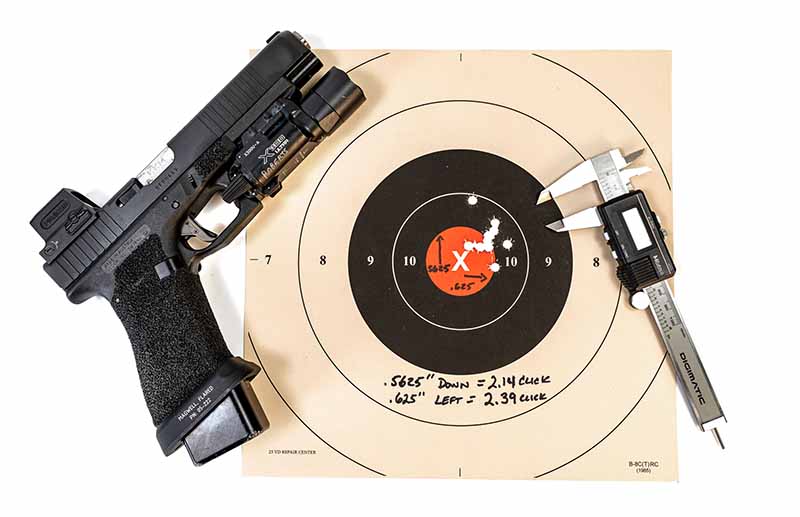
Start at 5 to 10 yards, based on your skill, and shoot five rounds holding the dot on the center of the target. Make sure to dim the red dot till it’s barely visible—we’ll get into why in a moment. After shooting you five-round string, bring the target back and use the click value chart in this article and a measuring device to determine the correct adjustment. Send the target back to the same yard marker and fire three to five rounds to confirm you’re on target.
Replace your target with a fresh one and send it to the 15- yard or 25-yard line, depending on your shooting skill and available distance. This time you’ll be shooting from a rest so either use your range bag or find a rest to shoot from and send five rounds while supporting the pistol. Retrieve the target and again use the click value chart and a measuring device to apply the correct amount of clicks. Send the target back downrange after marking your hits and confirm.
If you happen to be at the limit of your skill or have limited out the available distance on your range, now is when you will confirm the zero without the rest. Again, send a fresh target to the 25-yard line or as far as your range allows and shoot a string of 10 rounds (slow fire, take breaks as needed) to see where those bullets impact. Use your best judgment when deciding if you think adjustment is needed, remember now your movements are impacting where the bullets impact.
Your Dot Shouldn’t Look Like A Red Dwarf Star
Curious why you should dim your red dot when zeroing? As you increase brightness on your red dot, the dot will begin to blow or spread into a perceptibly larger dot through a process called diffraction. When you view a light source significantly brighter than the ambient light, the light bends as it’s entering your eye, creating a starburst effect. If the starburst was perfectly uniform, it would just make the dot appear larger without any negative effects.
Unfortunately, the possibility of it appearing perfectly uniform is almost impossible thanks to very tiny imperfections in your cornea. If you pay attention to the shape of your red dot as you increase brightness, you’ll notice one side grow more as you press the brightness button. That uneven blooming effect will cost you the ability to make precise shots at distance, like when zeroing the gun.
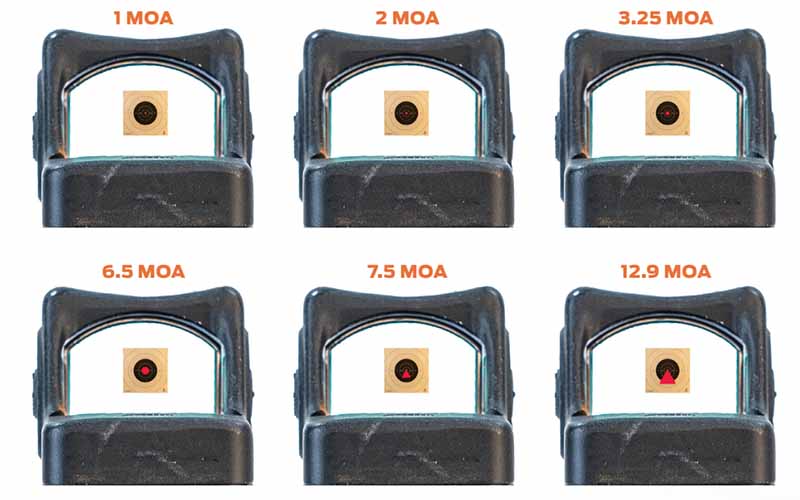
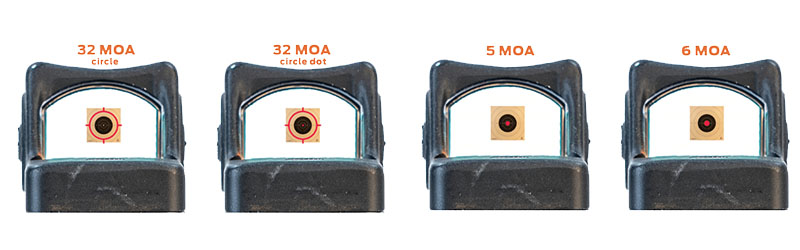
Now if you’re shooting for speed up close, crank that dot up and get your John Wick on. Diffraction affects smaller dots more than larger dots, so if you like a larger or brighter dot but want to retain the ability to place precise shots, you might want to choose a CCW red dot with a 5 MOA or larger reticle.
No Blinky Dots
While refresh rate of a red dot isn’t directly related to today’s math lesson, it’ll impact your ability to place accurate shots. Refresh rate is a result of how LEDs are dimmed for the human eye through a process called pulse width modulation.
As the dot’s brightness decreases, the length of the on-off-on cycle increases, giving a dimming effect that generally happens faster than you can see. Depending on how your red dot is made, you may be able to see the gaps between pulses. That can cost you the ability to call your shots during the string…or even impact your ability to place a shot accurately because the pulse width is too long.
If you can see the dot pulsing during recoil, you may want to consider another brand or model of MRDS. Without the ability to call your shots, figuring out why two shots hit the target low left is going to be hard as hell. With a properly functioning MRDS, you can watch the red streak and identify where that red streak came from and determine what shots you sent into Shanksville.
Looking At Pistols From A New Angle
Now that you see (hopefully) the value in this pocket protector-level pistol nerd stuff, remember that angular measurements are the cornerstone of accurate shooting with both pistols and rifles.
The precision rifle guys don’t have a monopoly on MOA…or pie.
Editor’s Note: This article originally appeared in the CCW 2022 special issue of Gun Digest the Magazine.
More On CCW Red Dot Sights:
- The Red Dot Sight Advantage
- First Look: Leupold DeltaPoint Micro Red Dot
- Red Dot Optics And MOA
- Best Concealed Carry Optics: Red Dot, Green Dot Or Iron Sights?
Next Step: Get your FREE Printable Target Pack


Enhance your shooting precision with our 62 MOA Targets, perfect for rifles and handguns. Crafted in collaboration with Storm Tactical for accuracy and versatility.
Subscribe to the Gun Digest email newsletter and get your downloadable target pack sent straight to your inbox. Stay updated with the latest firearms info in the industry.
