I am an avid USPSA shooter. I was turned off by the technology race and began shooting and ended up spending alot of money building Limited pistols!
In recent years, such mundane matters as putting my daughter through college and graduate school, needing a new car and – groan! – buying a house, have put a severe crimp in my “fun funds.” Because of this I began looking for a less expensive means of pursuing my favorite sport. Enter Production Division … USPSA created Production Division for those persons who wanted to compete with basically factory, stock (read, “inexpensive”) pistols.
Besides restricting magazine capacity to 10 rounds, there are strict limitations as to what modifications can be made to the pistol (e.g.: internal polishing and detailing of parts, changing the sights,etc.) and the rules mandated that only pistols using DA/SA, DAO or Safe Action type triggers were permitted. Unlike Open, Limited and Limited Ten divisions, Production did away with the Major/Minor power factor (P.F.) controversy for ammunition by specifying that only Minor P.F. was needed to compete.
This had the result of making the readily available, and inexpensive, 9mm Parabellum cartridge the overwhelming choice among Production shooters. Over the past few years I have used several different pistols in Production division and, while all have proven suitable for the sport, most lacked that “something” that I considered necessary for competition.
Last year I obtained a 9mm Smith & Wesson M&P pistol which, until recently, spent most of its time as my “night stand” gun. The M&P is Smith’s newest addition to their extensive line of semi-auto pistols and is possibly the best one they have produced so far.
Since its introduction, the M&P has been examined extensively in gun magazines and I don’t feel it is necessary to repeat the technical nitty-gritty here. Suffice it to say that the M&P is a polymer framed pistol that uses integral steel rails to strengthen the frame and provide rigidity that improves accuracy and functional reliability. It features a double-action-only (DAO) type trigger, multiple internal safety devices, accepts high-capacity magazines and features an ergonomically-shaped grip with interchangeable inserts (S&W calls them “palm swells”) that allow the shooter to fit the pistol to their particular hand size.
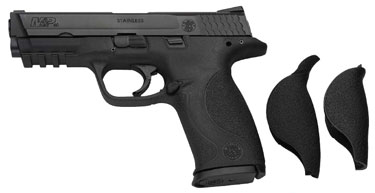
It is available in 9mm Para, 357 SIG, 40 S&W and 45 ACP, in both standard and compact versions. I found my M&P a very shootable pistol and, as these things tend to happen, began ruminating upon the idea of using it in competition. With this in mind, I approached my good friend, fellow action pistol shooter, and part time gunsmith, Lin Webb. Lin has built several competition pistols for me and when I asked him if he could work his magic on the M&P he responded rather guardedly “Well…I haven’t done a trigger job on one of them before and, as far as I know, neither has anyone else. I guess someone has to be the first? Leave it with me.”
I did. After some time had passed, Lin called and told me “I think I’ve figured out how to smooth out the trigger and get the let-off a bit lighter.” The following month, a rather cryptic e-mail arrived from my erstwhile ‘smithin forming me that “….I believe it will work. I’m almost done.”
A few weeks later a follow-up message arrived “Yup, it works. I’ve taken first place Production with it in two matches so far. You’re not going to believe the trigger!”
Smoothing Out the M&P Trigger
Needless to say, my anxiety level was steadily rising and I could not wait to get my hands on my M&P. I asked Lin if he would tell the readers in his own words how he accomplished this. No one has ever been able to accuse him of being the taciturn type, so he elaborated thus:
1 Make sure the pistol is unloaded and remove any and all ammo from the same area as the pistol you are working on.
1.1 Make dad-gum sure the gun is unloaded, with no ammo in the same area you are working in.
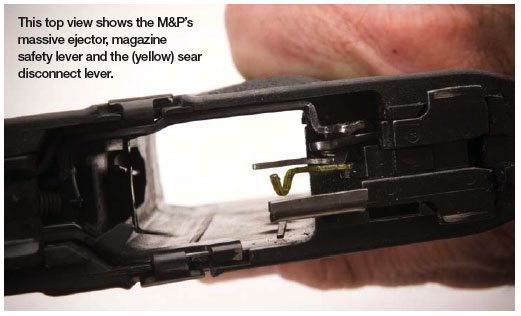
2 The M&P, like any other semi-auto on the market today, has’ way too much take-up and overtravel as it comes from the factory. Remove the slide, and pull the trigger to the rear and note where the trigger bar engages the sear. If your pistol has the magazine safety, you must hold the mag safety lever up to see this function, so you may as well insert an empty magazine so you’ll only need two hands instead of three.
If your gun does not have the mag safety lever, you must pull the sear deactivation lever back up in order to see the trigger bar move in its normal operating position. Just be sure to return the deactivation lever to the ‘down’ position before reassembly.
3 Once you’ve got it in your head where and how the trigger bar contacts the sear, proceed to remove the sear housing block. Use the correct size pin punch or roll pin punch and remove the pin from the frame. Be sure to support the frame from the bottom so the pin can clear the frame as it is driven out.
The pin can be removed from either direction. Then lift the sear housing out of the frame. You can use the same punch you used to remove the pin to pry the sear housing block out of the frame. When you get the sear housing about half-way up, pull the trigger to the rear to take tension off the trigger bar. Continue to lift upon the sear housing, and then it will slide right off the rear of the trigger bar. On older model M&Ps, the ejector will practically fall off the side of the sear housing. This is OK, but on newer models, it will be staked on pretty tightly, so don’t bother to remove it.
4 Locate the sear pin, and push it out. It will come out easily and from either direction. Be sure to keep the sear housing in the upright position as you remove the pin, and then remove the sear itself. Again, be sure to keep the housing upright so the sear spring and plunger stay in place because if they fall out, they are a pain to get back in. Use a small piece of leather or wood to clamp the sear in a small vise. Make sure the contact point with the trigger bar is facing up. Using a small fine cut mill file, start cutting the rounded portion of the sear where the trigger bar makes contact. Cut SLOWLY at a 45-degree angle, and remove about 20 percent of this contact point. Finish with a fine cut stone to polish the surface, and then finish by slightly rounding the edges for a smooth “compound” type finish. Then polish the trigger bar where it contacts the sear to a fine mirror-like finish. Remember to go slowly, and don’t remove any metal from the trigger bar, just polish only. You might want to put the gun back together at this point to test it out to see where you are.
Just this little bit of work will greatly improve the pull.
 5 For a further reduced trigger pull weight, remove the sear again and look at the rear of the sear. You’ll see a hump where the sear engages the striker and pulls it to the rear during trigger pull. Polish the rear of the sear with a polishing wheel, and also the top flat portion of the sear where the tang of the striker rides across during re-set. Be sure to keep the two surfaces at right angles to each other. In other words, don’t round off this edge. Keep it at 90 degrees to eachother. Polishing with an aggressive jeweler’s polishing compound works quite well.
You can also use a Dremel polishing wheel to speed this process, but go slowly. This will remove metal faster than you think.You can remove the striker now and polish the tang of the striker where it makes contact with the sear. Polish only here, DO NOT remove any metal. To remove the striker, push down on the striker sleeve, just like brand “G” and push the end cap off, while holding your thumb over the striker to keep it from flying into the next room, and remove the striker.
6 To remove the “crunchiness” from the trigger pull, now is the time to do this while the striker is removed. Wrap the slide in several wraps of cloth or use a large piece of leather, and clamp it in a vise with just the rear sight area clear of the vise jaws. Loosen the set screw in the rear sight.
Using a brass drift punch, tap the rear sight out from left to right. Don’t be afraid to whack it, as some rear sights are tough to remove. Nylon punches give too much, and steel punches will mar the sight. Use a brass punch with nice square edges. If yours is not, straighten it up with a file first. When the sight is almost out, look for the firing pin safety block spring cap and spring underneath the rear sight. Hold your finger over this cap as you continue to tap the sight out.
Hold onto to the cap to keep it from flying into the next county. Remember, the striker must be OUT of the gun to be able to do this. Remove the firing pin safety block from the frame.
7 Using a 3/32” pin punch, place the firing pin safety block on the end of the punch. Hold the firing pin block at a 45-degree angle to a 3M polishing wheel and polish the head of the safety block but do not remove any metal from these two areas of the trigger bar. Clean the hole where the firing pin block goes and lube it with a good quality gun lube. Put the firing pin block back in, along with the small spring.
Start the rear sight into the dovetail from right to left. Place the spring cap on top of the spring and press it into place. While holding it there, tap the rear sight back over this assembly to hold it in place. Don’t let go until the rear sight has almost covered the cap or it will fly out. NOTE: This procedure is very tricky, but go slow and you can do it. Some rear sights are easier to get out and back in than others on the same model gun, so don’t be afraid to whack the hell out of it with a brass punch to get it to move. Brass marks can be easily removed with 0000 steel wool.
 8 There is one last thing you can do for the ultimate M&P trigger job. Obtain a Glock trigger return spring and replace the stock M&P trigger spring with this spring. Be sure to place the open end of the spring on the trigger bar in the UP position. The end that goes on the trigger pin must be slightly enlarged to fit over the M&P trigger pin, but it can be done.
Use a pin punch of the proper size as a guide to align the pin hole and spring as you tap the trigger pin back in. If you have done everything as I have described it, you will have a much improved trigger pull over the stock configuration. If you shoot a lot of USPSA or IDPA matches, your scores will definitely improve. There are several M&P trigger jobs described on the Internet now, and they are very much like I have described it here, however, you must have some familiarity with the M&P to perform these modifications correctly.
It isn’t as easy as some would have you believe. I have found out that the 45-caliber M&P differs slightly from the 9mm, 40S&W, and the 357 SIG calibers. The firing pin is different, the angles on the trigger and sear are different, and pretty much everything as far as a trigger job goes is different, so take your time on the 45s. Again, go slow, and don’t remove too much. If you don’t feel comfortable doing it yourself, then you will be way ahead of the game to send your gun out to some of the shops that advertise M&P trigger jobs on the Internet.
Since working on Paul’s pistol, I’ve done about two dozen M&P trigger jobs without any failure, and no safety parts violations, but they were T&E guns and they were not returned to the general shooting public. Most all of these guns broke the trigger pull gauge at around 3 pounds, and were smooth as silk.
If you feel like it, and have the confidence, give it a try. You might want to purchase a spare sear, safety block, and trigger bar from Smith & Wesson just in case you mess something up. That way you can put stock parts back in and get the gun back up and shooting again.
Getting the Pistol Back
 As I make no pretense whatsoever to being technically minded, I will have to take what Lin said at face value. But I can tell you this: once I finally retrieved my M&P from Mr. Webb’s clutches, and got a chance to try it, I was most impressed. The trigger take-up was so light and smooth as to be almost unnoticeable; the let-off was a crisp 2.5 pounds while reset distance was less than a half-inch. During rapid fire drills it almost felt as if I was shooting a single-action pistol.
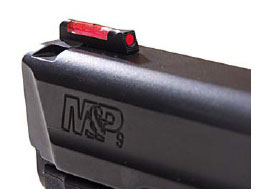
In fact, after getting my M&P back, the only changes I made to it were to install a HiViz fiber optic front sight and use a marker pen to blacken out the white dots on the rear sight. Aside from the trigger return spring and front sight replacement it remains a 100-percent stock pistol and thus abides by USPSA rules to the letter!
Being the M&P has fixed sights I experimented with various brands of factory and handloaded ammo and eventually settled on Cor-Bon’s 9mm 147-grain Performance Match ammunition for serious competition shooting. I have used this ammo in several pistols over the years and it has proven to be the most accurate 9mm load I have ever shot.
My handload consists of a Berry’s 147-grain plated bullet over 3.6 grains of TiteGroup. Both provide 100-percent functioning, shoot close enough to point out to 25 yards to keep me happy, produce low levels of recoil and make Minor P.F. with a bit to spare.
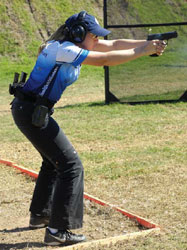
I also experimented with a number of holsters and mag pouches and settled on a Comp-Tac Belt Holster and Belt feed magazine pouches. The former holds the M&P at just the right height and angle for a fast acquisition and smooth draw while the latter rig holds four spare magazines in a staggered row allowing a fast, secure grip on each to ensure fast and smooth reloads. Unfortunately, I did not have an opportunity to practice very much with my M&P before the next match but, despite the trepidation I felt at competing with a pistol I had little experience with, I finished 2nd Place overall in Limited Division and 1st Place in B Class.
And while I like to think that my personal skill had a little something to do with it, a good measure of the credit must go to Lin’s excellent trigger job and the accuracy, reliability and ergonomics that were built into the M&P at the factory. The M&P has served as my regular Production pistol for several months now and my positive opinion of it continues to grow. As Humphrey Bogart said at the end of his classic film Casablanca,“….I think this is the beginning of a beautiful friendship.”
This article is an excerpt from Gun Digest 2009.

Next Step: Get your FREE Printable Target Pack
Enhance your shooting precision with our 62 MOA Targets, perfect for rifles and handguns. Crafted in collaboration with Storm Tactical for accuracy and versatility.
Subscribe to the Gun Digest email newsletter and get your downloadable target pack sent straight to your inbox. Stay updated with the latest firearms info in the industry.


